installation sheet harrier - whitecroft lighting...harrier whitecroft lighting limited warning! the...
TRANSCRIPT

SPECIFICATION:Lamp type: LED
Output: 1100lm / 2000lm nominal.
Colour: 4000°K - Ra80 (830/840)
Materials:
Body: RAL 9003 White painted mild steel
Reflector: RAL 9003 White painted/Specular Aluminium
Diffuser: Polycarbonate (OPAL)
Control gear: Fixed output / Dali
Emergency: Integral 3hr / COMEPS
Supply: 240v 50Hz AC
Ambient Temperature: 0-25°C
Terminal block type: Push-wire (non-EM) / piano-key (EM)
Ingress protection: IP20
Whitecroft Lighting LimitedBurlington Street, Ashton-under-Lyne, Lancashire OL7 0AX
Telephone +44 (0)870 5 087 087 Facsimile: +44 (0)870 5 084 210
Registered No. 3848973 England Registered Office: As above
GENERAL INFORMATIONA qualified electrician, in accordance with IEE wiring regulations should carry out connection
to mains wiring.Observe ESD precautions during installation.This unit must be EARTHED.Ensure that the rated voltage and frequency requirements are compatible with the available
mains supply.Cleaning of reflectors and lenses should be carried out using clean, soft and lint free cloths
and anti-static cleaning fluidDo not carry out high voltage insulation test, i.e. 500/1000v this may damage internal
components.
FURTHER INFORMATIONTECHNICAL SUPPORT
Telephone: 0161 331 5700E-mail: [email protected]
http://www.whitecroftlighting.com/
1.
2.3.4.
5.
6.
Installation sheet
Harrier
PK/HRINSTALLEAF June 2016 - Rev B
HARRIERWhitecroft Lighting Limited
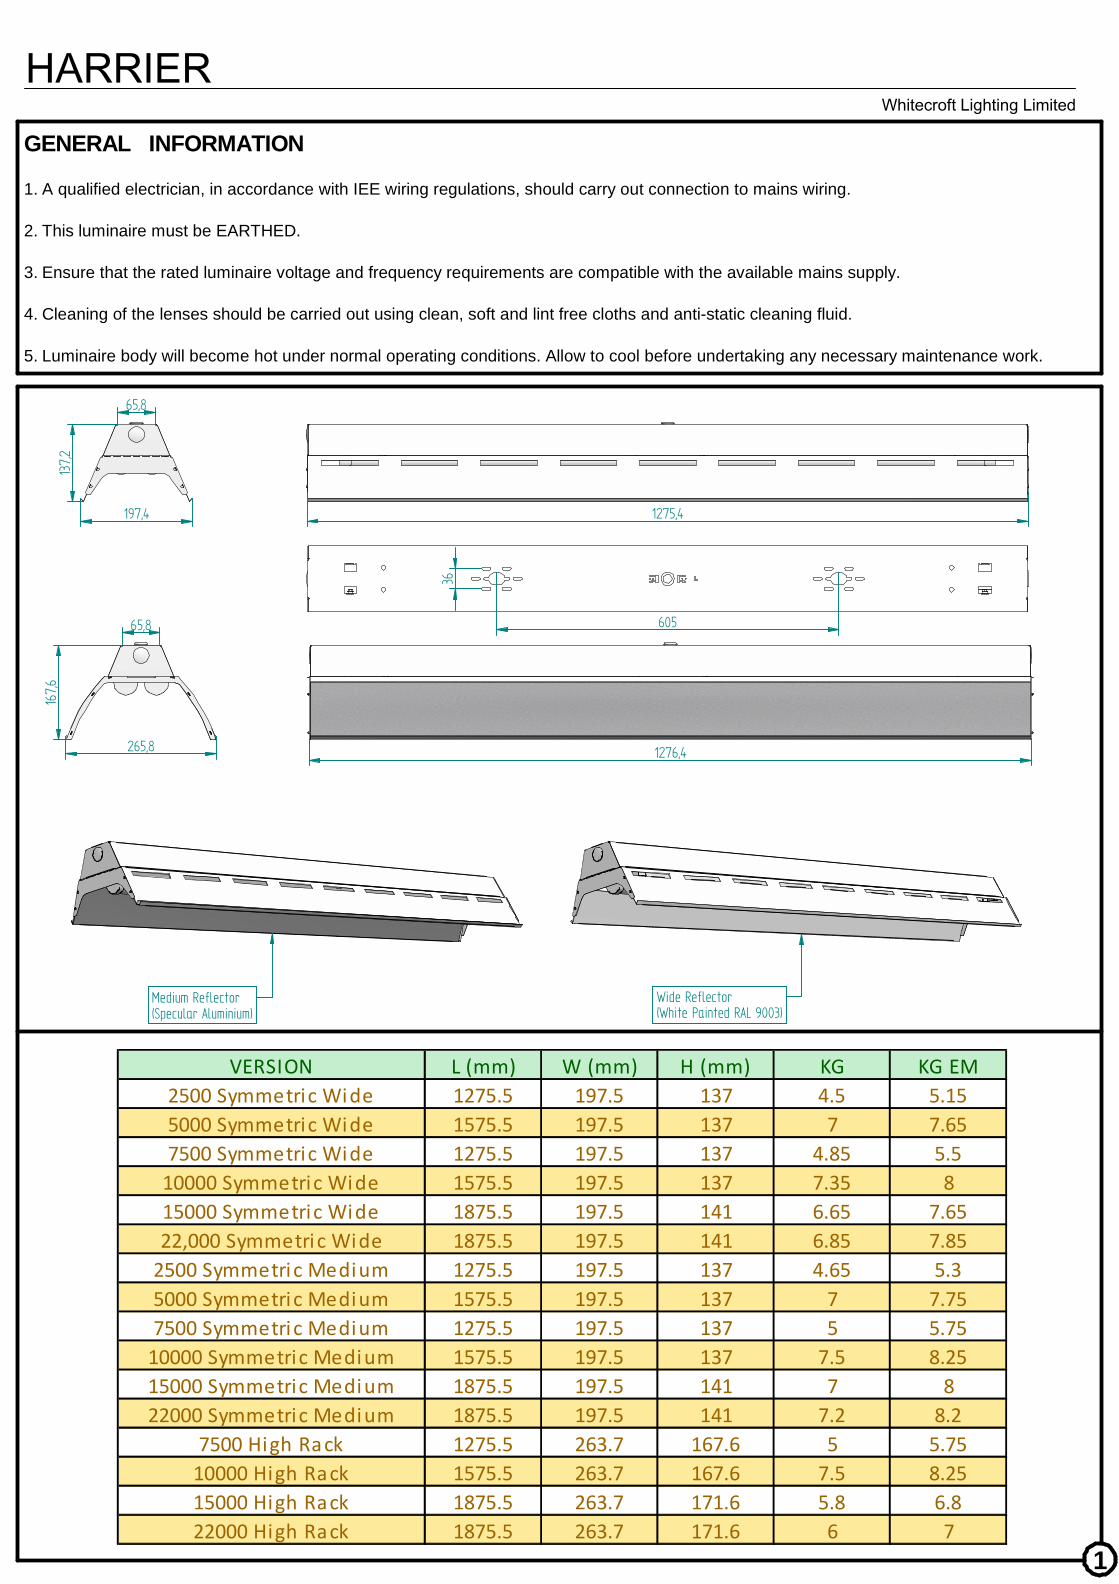
GENERAL INFORMATION
A qualified electrician, in accordance with IEE wiring regulations, should carry out connection to mains wiring.
This luminaire must be EARTHED.
Ensure that the rated luminaire voltage and frequency requirements are compatible with the available mains supply.
Cleaning of the lenses should be carried out using clean, soft and lint free cloths and anti-static cleaning fluid.
Luminaire body will become hot under normal operating conditions. Allow to cool before undertaking any necessary maintenance work.
1.
2.
3.
4.
5.
137,
2
197,4
65,8
1275,4
605
36
1276,4
167,
6
265,8
65,8
VERSION L (mm) W (mm) H (mm) KG KG EM
2500 Symmetric Wide 1275.5 197.5 137 4.5 5.15
5000 Symmetric Wide 1575.5 197.5 137 7 7.65
7500 Symmetric Wide 1275.5 197.5 137 4.85 5.5
10000 Symmetric Wide 1575.5 197.5 137 7.35 8
15000 Symmetric Wide 1875.5 197.5 141 6.65 7.65
22,000 Symmetric Wide 1875.5 197.5 141 6.85 7.85
2500 Symmetric Medium 1275.5 197.5 137 4.65 5.3
5000 Symmetric Medium 1575.5 197.5 137 7 7.75
7500 Symmetric Medium 1275.5 197.5 137 5 5.75
10000 Symmetric Medium 1575.5 197.5 137 7.5 8.25
15000 Symmetric Medium 1875.5 197.5 141 7 8
22000 Symmetric Medium 1875.5 197.5 141 7.2 8.2
7500 High Rack 1275.5 263.7 167.6 5 5.75
10000 High Rack 1575.5 263.7 167.6 7.5 8.25
15000 High Rack 1875.5 263.7 171.6 5.8 6.8
22000 High Rack 1875.5 263.7 171.6 6 7
Medium Reflector(Specular Aluminium)
Wide Reflector(White Painted RAL 9003)
1

HARRIERWhitecroft Lighting Limited
WARNING!
The LEDs in this luminaire
operate at HIGH VOLTAGE.
Ensure that the luminaire is
isolated.
4.Reattach reflector body to top body spine via the safety cords to allow easy wiring for the product.
Wiring details are shown below.
4
GENERAL WIRING INFORMATION
5.Connect all electrical connections to the
terminal blocks.
6.If the luminaire is an emergency variant,
connect the battery leads and mark the
installation date. NB Battery connection must
be undertaken before installation of luminaire if
surface or trunking mounted.
+-
5
6
1
2
PRE INSTALLATION
Remove the luminaire from packaging and inspect the
contents for damage.
Ensure that the supporting ceiling structure is of
adequate strength to support the weight of the
luminaire. (See table for weights).
•
•
INSTALLATION INSTRUCTIONS
Separate the top body spine from the main reflector
body. Make sure to detach the safety cords and earth
lead.
Attach top body spine to appropriate trunking/surface.
Use suitable fixings at the centres indicated above. (Not
Supplied).
3.To further aid installation allow main reflector to slot
into place using the keyhole punch details.
1.
2.
Safety Cord
Earth Lead
4 X M5 Screws
3
Keyhole Slot
Cable Entry Locations
Max Capacity of Block= 2.5mm
N E L
N E L DALI
N E L1L2 DALI
N E L1L2
N E L1L2 DALI EM DALI
N- NEUTRAL
E- EARTH
L/L1- SWITCHED LIVE
L2- PERMANENT LIVE
DALI EM- DALI EMERGENCY
STANDARD VARIANTS
STANDARD DALI
VARIANTS
EMERGENCY VARIANTS
EMERGENCY DALI
VARIANTS/EMERGENCY
COMEPS
EMERGENCY COMEPS
DALI VARIANTS
2

HARRIERWhitecroft Lighting Limited
SAFETY WIRES AND EARTH
LEAD MAY GET CAUGHT
BETWEEN THE TWO BODIES
WHEN REASSEMBLED.
MAKE SURE THEY ARE
TUCKED INSIDE THE
LUMINAIRE.
9
8
7
7. Slot the main reflector back onto the top
body spine, using the M5 screws already in
place with the keyhole slot features in the
main relfector.
8. Safety wires and earth lead may get caught
between the two bodies when reassembled.
Make sure they are tucked inside the
luminaire.
9. Secure the reflector in place with the 4 M5
screws.
FOR LUMINAIRES WITH
CONTROL OPTIONS USE THE
SEPERATLY PROVIDED
LITERATURE FOR SET UP
INSTRUCTIONS.
3

HARRIERWhitecroft Lighting Limited
GRIPPLE
WIRE SUSPENSION KIT OPTION
PART REF - AERSK1
FIT WIRE SUSPENSION TOGGLESINTO SLOTS INDICATED
LOOP SUSPENSION CABLE AROUNDSUITABLE MOUNTING POINT
ADJUST SUSPENSION HEIGHTVIA GRIPPLE CLUTCH
4
1005 mm
WIRE SUSPENSION KIT OPTION - 5m (supplied separate)
1. Loop the suspension cable around a suitable load bearing structure at the approximate centres indicated. Fit the gripple clutch &
suspension toggle ‘Y’splitter to the cable and adjust to the desired height making reference to the separate suspension kit instructions.
2. Support the weight of the luminaire from below and then offer the ‘Y’ splitter toggles through the slots indicated on the back of the
luminaire at each end.
3. Check luminaire height and level if necessary via the adjustable clutch mechanisms (Nb support the luminaire weight when adjusting).
Trim off any excess cable only when happy with the luminaire suspension height.