installation procedures for the ultra sl wall system on
TRANSCRIPT

Installation Procedures for Ultra SL Wall System on Block WallUsing Styrofoam™ Brand Ultra SL
Installation Information
2
General InformationStyrofoam™ Brand Ultra SL Insulation* offers an excellent option for meeting today’s energy code requirements for block wall or concrete/CMU backup construction. LiquidArmor™ Flashing and Sealant* is used on the insulation joints and building transitions. It is an innovative liquid flashing alternative to conventional tape. It is designed to provide commercial buildings advanced moisture and air sealing protection.
Together, these two products form the basis of the Ultra Air Barrier Wall System, offering the best of both worlds: a high R-value wall (R-5.6 per inch) of continuous insulation with exceptional air, vapor and water barrier capabilities.
With fewer steps than standard construction methods, the Ultra Air Barrier Wall System can save contractors time and money.
About Styrofoam™ Brand Ultra SL InsulationStyrofoam™ Brand Ultra SL uses patented carbon black materials in the foam for greater thermal performance over other extruded polystyrene foam insulations. This enhanced formulation helps the extruded polystyrene foam to absorb infrared radiation, slowing transmission through the foam and lowering heat flow. The special 4’ x 8’ boards with shiplap edges offer continuous insulation and are quick and easy to install. They also offer high moisture resistance and durability.
About LiquidArmor™ Flashing and SealantThe elastomeric flashing forms a tight, durable, seamless barrier along the rough openings of windows and doors while helping to significantly reduce labor time compared to tape alternatives. The fluid applied joint treatment option which installs quickly, and easily conforms to complex geometries.
LiquidArmor™ Flashing and Sealant comes in two grades. LiquidArmor™ CM can be quickly sprayed or brushed on and LiquidArmor™ LT is a durable, low-temperature liquid flashing solution.
Materials ChecklistMake sure to use an appropriate application method for LiquidArmor™ Flashing and Sealant such as a commercial grade sprayer, roller or 3-inch chip brush.
• Styrofoam™ Brand Ultra SL Insulation • LiquidArmor™ Flashing and Sealant • Great Stuff Pro™ Gaps & Cracks Polyurethane
Foam Sealant** • Great Stuff Pro™ Series Foam Dispensing Gun • Great Stuff Pro™ Foam Cleaner • Spray Adhesive, such as 3M High-Strength 90
• Pos-I-Tie ThermalClip Fasteners
• Hammer/Drill Bits
• Rodenhouse Fasteners
• Screw Gun with Pos-I-Tie Sleeve
• Table/Skill Saw for Cutting Insulation
• Smoothing Tool
• Chalk Line
• Tape Measure
• Safety Gloves
• Safety Glasses
• A wet mil gauge
SYSTEM OVERVIEW
*Styrofoam™ Brand Ultra SL and LiquidArmor™ are former products of The Dow Chemical Company.** Consult label and Safety Data Sheet carefully before use.

3
Symbol KeyThe Ultra Air Barrier Wall System combines exceptional thermal performance with air and moisture barrier capabilities — in one system. The following symbols are used throughout the installation instructions to highlight a particular benefit.
Installation Over Block Walls (Diagram)
Air Barrier Water BarrierThermal
Great Stuff Pro™ Gaps & CracksPolyurethane Foam Sealant*
Pos-I-Tie ThermalClip
Brick Facade
LiquidArmor™ Flashing & Sealant
Block Wall
Rodenhouse Fastener
Styrofoam™ Brand Ultra SL Insulation

4
INSTALLATION
Safety, Storage and Conditions of Use • Install at an ambient temperature of 25°F or higher and a
substrate temperature of 25°F or higher for best results.
• Do not install Styrofoam™ Brand Ultra SL Insulation while it is raining.
• Do not leave Styrofoam™ Brand Ultra SL exposed to direct sunlight for more than 90 days. Consult a DuPont representative if exposure is expected to be more than 90 days. Prolonged exposure to ultraviolet radiation may cause the surface of Styrofoam™ Brand Ultra SL to become faded and dusty.
• The surface degradation will have no measurable effect on the insulating value of the plastic foam unless the deterioration is allowed to continue until actual foam thickness is lost. Since the dust would impair the performance of adhesives and finishes, dusty surfaces should be brushed off before these products are applied. A light-colored, opaque
protective covering should be used if excessive solar exposure is expected. When stored outdoors, keep insulation boards tarped or covered to protect from weather and weighted down to prevent boards from being blown around by the wind.
• Store Styrofoam™ Brand Ultra SL above standing water.
Wall PreparationMaking sure the wall surface is properly prepared is a key step to a successful installation of the Ultra Air Barrier Wall System. To allow the system to function at maximum effectiveness, first make sure that:
• The wall surface is clean and free of any dirt and debris
• The temperature and moisture levels fall within acceptable parameters; review the “Safety, Storage and Conditions of Use” section for recommended conditions.
• Styrofoam™ Brand Ultra SL boards are clean and dry
All boards are installed vertically (4’ x 8’ orientation). Boards can be installed horizontally, if preferred. However, vertical installation is recommended for speed and ease of install.
Cut the first board in half to a 2’ x 8’ dimension (this allows for staggering of joints later)
Apply a 1” bead of Great Stuff Pro™ Gaps & Cracks Polyurethane Foam Sealant at the foundation with a PRO™ Series Foam Dispensing Gun. Locate this horizontal bead of foam so that the bottom edge of each insulation board will seat and create a seal between the bottom face of the foam and the foundation. This step is critical to creating an air seal and is to be performed ONLY on the bottom first course of installation.
1
2
General Recommendations

5
Starting at the edge of the wall, install a 2’ x 8’ board on top of the block vertically (with flat side next to the edge of the wall).
3
Attach with Rodenhouse fastener to the block wall (this fastener holds the board in place).
4
General Recommendations
6
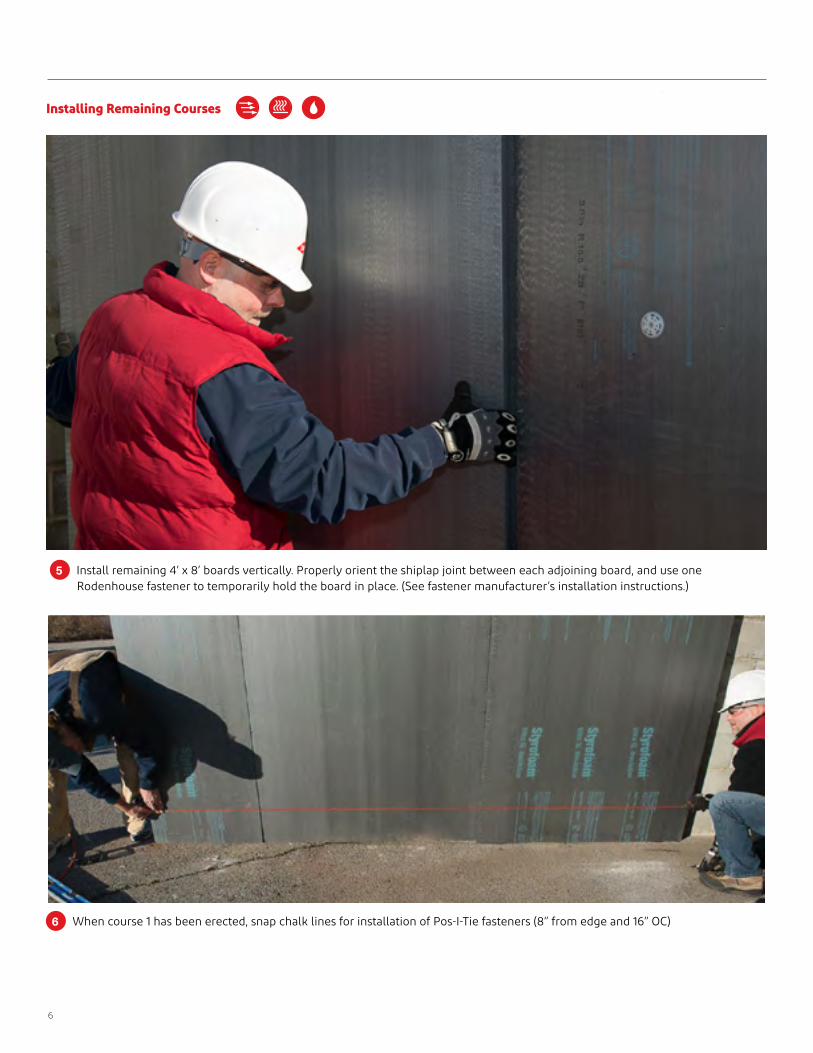
5 Install remaining 4’ x 8’ boards vertically. Properly orient the shiplap joint between each adjoining board, and use one Rodenhouse fastener to temporarily hold the board in place. (See fastener manufacturer’s installation instructions.)
6 When course 1 has been erected, snap chalk lines for installation of Pos-I-Tie fasteners (8” from edge and 16” OC)
Installing Remaining Courses

7
8” from edge
16” from edge
7 Drill pilot holes for location of each fastener. Remember to install LiquidArmor™ Flashing and Sealant at joint seal before installing fasteners. The flashing helps to create an air- and water-tight seal at the seam locations. Note: It is critical that you drill the pilot hole deep enough and that the bit is 1/4” to 1/2” larger in diameter than the screw.
8 Screw in Pos-I-Tie fasteners with screw gun. Note: If installing base flashing, use Rodenhouse fasteners in place of Pos-I-Tie fasteners for the first row from the bottom. This will allow for a flush mount of the installed base flashing and termination bar.
Installing Remaining Courses

8
Install Pos-I-Tie ThermalClip over each Pos-I-Tie fastener.
• Insert tab up through hole at the bottom, and make sure to press the fastener at both sides until you hear it snap. Installation video can be seen at: http://www.youtube.com/watch?v=6RwAE_meSdQ
• Snap-on design locks the Pos-I-Tie ThermalClip to the barrel loop, creating a thermal break between the wire tie and the Pos-I-Tie Barrel Screw
• Pos-I-Tie ThermalClip also creates a dissimilar metals break, allowing the use of Stainless Steel Ties or Stone Anchors with the Original Pos-I-Tie
Note: The edge of the insulation board should not be more than 8” away from the Pos-I-Tie anchor. If the edge of the board is greater than 8” away from the anchor, then fasteners need to be installed between the anchor and the board edge.
Now that the Styrofoam™ Brand Ultra SL Insulation has been installed on the walls and the Pos-I-Tie ThermalClip is in place, the next step is to install the base flashing
10 Snap line at desired length for top edge of base flashing where it will be installed.
Note: System design may or may not require a termination bar, depending on architect’s specification.
11 Install double-sided butyl flashing tape across top back edge of base flashing.
12 Press flashing at chalk line and press firmly on tape to adhere (double-sided tape adheres back side of flashing to insulation board).
13 Install termination bar at top edge of flashing. Attach with block fasteners. Install LiquidArmor™ Flashing & Sealant as a counter flashing over termination bar.
Installing Remaining Courses
Installing Base Flashing
9

9
Install LiquidArmor™ over all vertical and horizontal seams. Note: Remember to install LiquidArmor™ at joint seals before installing anchors/wall ties. The flashing helps to create an air- and water-tight seal at these locations
LiquidArmor™ LT Flashing and SealantFlash board joints, penetrations and/ or fenestration openings as detailed by the project drawings by applying LiquidArmor™ LT Flashing and Sealant from either a sausage gun or directly from a pail onto the substrate. Trowel LiquidArmor™ LT to 30 ±5 wet mils. Tip: LiquidArmor™ LT has an average tooling time of 30 minutes.
LiquidArmor™ CM Flashing and Sealant LiquidArmor™ CM Flashing and Sealant is commonly spray applied. Follow the usage instructions according to the sprayer. As you first begin, it is helpful to first spray a pass or two of material on scrap piece of foam board or OBS to dial an appropriate sprayer pressure and check for good flow through the spray tip. Tip: A popular technique to attain 50 ±5 wet mils with LiquidArmor™ CM is to apply the product in two passes. This is not required, though, and the target application thickness can be attained in one pass.
Application guidelines for LiquidArmor™ Flashing and Sealant Foam Board Joints: Apply 3 inches +/- 1 inch over board joint, making sure that a minimum of 1 inch of LiquidArmor™ Flashing and Sealant covers each side of the joint and completely cover fasteners and washers.
Penetrations & Counterflashing: Apply LiquidArmor™ a minimum of 2 inches onto the insulation face at penetrations and a minimum of 2 inches onto the penetration substrate or primary flashing substrate.
Allow Time to Cure LiquidArmor™ CM Flashing and Sealant to cure 1-4 hours. LiquidArmor™ LT Flashing and Sealant is a moisture cure product and will skin over in 30-45 minutes. This time can be extended to ~60 minutes at colder temperatures. LiquidArmor™ LT only needs to cure for 15 minutes before rain exposure
LiquidArmor™ LT and LiquidArmor™ CM can span gaps up to ¼”. Seal any gaps ¼”or greater with Great Stuff Pro™ Gaps & Cracks, Great Stuff Pro™ Window & Door or foam backer rod. If either Great Stuff Pro™ Gaps & Crack or Great Stuff Pro™
Window & Door is used, be sure it is fully cured before applying LiquidArmor™ Flashing & Sealant.
15 Install wire ties on Pos-I-Tie fasteners.
Installing Joint Flashing
Installing Around PenetrationsTo install Styrofoam™ Brand Ultra SL Insulation around penetrations such as ducts, electrical boxes and pipes:
16 Cut opening in board approximately ½” to 1” larger than the measured penetration.
17 Slide board over the penetration. Fill the void between the penetration and the board with Great Stuff Pro™ Gaps & Cracks Polyurethane Foam Sealant.
14
You now have created the baseline for excellent air/vapor and water barrier properties by using Great Stuff Pro™ Gaps & Cracks Polyurethane Foam Sealant at the base of the first course of insulation and by properly installing the base flashing. The last critical step is to install LiquidArmor™ Flashing & Sealant at all horizontal and vertical joints to complete the system.

10
Installing Around Windows and Doors
Window Jamb1. Attach wood nailer to block as shown in illustration.
2. Apply Great Stuff Pro™ Gaps & Cracks Polyurethane Foam Sealant to the interface between the wood nailer, block and Styrofoam™ Brand Ultra SL Insulation.
3. Install window per window-manufacturer installation instructions.
4. Seal window as necessary, depending on window design.
5. LiquidArmor™ Flashing and Sealant as necessary at terminations.
Note: Illustrations and details shown are for window applications, but can be utilized for doors or other through-wall openings.
D
B
CE
A F
Window Header1. Install solid fire-rated 2X continuous wood blocking (no joints),
and attach to the steel angle on the front side and the block at the back side. (A)
2. Install window per window-manufacturer installation instructions.
3. Install loose-laid structural steel angle. (C)
4. Install preformed metal drip edge (E) with required separation between drip edge and steel angle.
5. Install flashing (D) with termination bar at top.
6. Install cavity drainage net as needed. (B)
7. Install weeps as required.
8. Install closure angle (F) to match window material and finish (e.g., aluminum clad, vinyl clad).
11
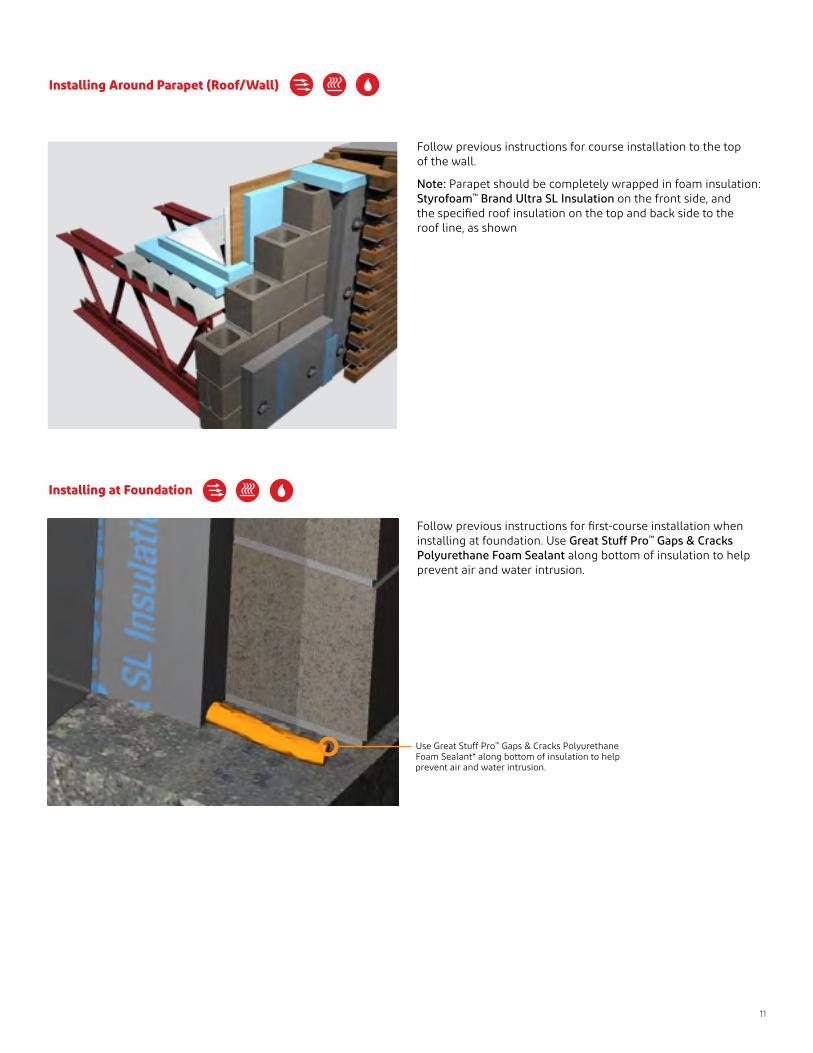
Installing Around Parapet (Roof/Wall)
Follow previous instructions for course installation to the top of the wall.
Note: Parapet should be completely wrapped in foam insulation: Styrofoam™ Brand Ultra SL Insulation on the front side, and the specified roof insulation on the top and back side to the roof line, as shown
Use Great Stuff Pro™ Gaps & Cracks Polyurethane Foam Sealant* along bottom of insulation to help prevent air and water intrusion.
Installing at Foundation
Follow previous instructions for first-course installation when installing at foundation. Use Great Stuff Pro™ Gaps & Cracks Polyurethane Foam Sealant along bottom of insulation to help prevent air and water intrusion.
For more information visit us at Styrofoam.com or call 1-866-583-2583
NOTICE: No freedom from any patent owned by DuPont or others is to be inferred. Because use conditions and applicable laws may differ from one location to another and may change with time, Customer is responsible for determining whether products and the information in this document are appropriate for Customer’s use and for ensuring that Customer’s workplace and disposal practices are in compliance with applicable laws and other government enactments. The product shown in this literature may not be available for sale and/or available in all geographies where DuPont is represented. The claims made may not have been approved for use in all countries or regions. DuPont assumes no obligation or liability for the information in this document. References to “DuPont” or the “Company” mean the DuPont legal entity selling the products to Customer unless otherwise expressly noted. NO EXPRESS WARRANTIES ARE GIVEN EXCEPT FOR ANY APPLICABLE WRITTEN WARRANTIES SPECIFICALLY PROVIDED BY DUPONT. ALL IMPLIED WARRANTIES INCLUDING THOSE OF MERCHANTABILITY AND FITNESS FOR A PARTICULAR PURPOSE ARE EXPRESSLY EXCLUDED. The buyer assumes all risks as to the use of the material. Buyer’s exclusive remedy or any claim (including without limitations, negligence, strict liability, or tort) shall be limited to the refund of the purchase price of the material. Failure to strictly adhere to any recommended procedures shall release DuPont Specialty Products USA, LLC or its affiliates, of all liability with respect to the materials or the use thereof. The information herein is not intended for use by non-professional designers, applicators or other persons who do not purchase or utilize this product in the normal course of their business.
CAUTION: This product is combustible. Protect from high heat sources. A protective barrier or thermal barrier may be required as specified in the appropriate building code. For more information, consult (Material) Safety Data Sheet ((M)SDS), call DuPont at 1-866-583-2583 or contact your local building inspector. In an emergency, call 1-989-636-4400 in the U.S. or 1-519-339-3711 in Canada.
WARNING: Rigid foam insulation does not constitute a working walkable surface or qualify as a fall protection product.
FROTH-PAK™ Spray Polyurethane Foam contains isocyanate, hydrofluorocarbon blowing agent and polyol. Read the instructions and Material Safety Data Sheets carefully before use. Wear protective clothing (including long sleeves), gloves, goggles or safety glasses, and proper respiratory protection.
Do not breathe vapor or mist. Use only with adequate ventilation. It is recommended that applicators and those working in the spray area wear respiratory protection. Increased ventilation significantly reduces the potential for isocyanate exposure; however, supplied air or an approved air-purifying respirator equipped with an organic vapor sorbent and a particulate filter may still be required to maintain exposure levels below ACGIH, OSHA,
WEEL or other applicable limits. For situations where the atmospheric levels may exceed the level for which an air-purifying respirator is effective, use a positive-pressure, air-supplying respirator (air line or self-contained breathing apparatus). Spraying large amounts of foam indoors may require the use of a positive-pressure, air-supplying respirator. Contents under pressure.
Great Stuff Pro,™ ENERFOAM™ and ENERBOND™ sealant and adhesive products contain isocyanate and a flammable blowing agent. Read the label and MSDS carefully before use. Eliminate all sources of ignition before use. Wear long sleeves, gloves, and safety glasses or goggles. Provide adequate ventilation or wear proper respiratory protection. Contents under pressure.
Building and/or construction practices unrelated to building materials could greatly affect moisture and the potential for mold formation. No material supplier including DuPont can give assurance that mold will not develop in any specific system.
When air sealing buildings, ensure that combustion appliances, such as furnaces, water heaters, wood burning stoves, gas stoves and gas dryers, are properly vented to the outside. Building and/or construction practices unrelated to building materials could greatly affect moisture and the potential for mold formation. No material supplier including DuPont can give assurance that mold will not develop in any specific system.
DuPont™, the DuPont Oval Logo, and all trademarks and service marks denoted with ™, SM or ® are owned by affiliates of DuPont de Nemours, Inc. unless otherwise noted. © 2019 DuPont. 43-D100145-enNA-0619 CDP