installation instructions sentrysuite - carefusion...page 6/22 9huvlrq r installation instructions...
TRANSCRIPT
Installation Instructions SentrySuite®
V-781300-213Version 01.00for SentrySuite® Software ≥ 2.13English

Page 2/22 Version 01.00 • 2014-07-28
Installation Instructions SentrySuite
This manual has been composed with the assistance of Adobe® Creative Suite® programs Adobe InDesign®, Adobe Photoshop®, Adobe Illustrator® and Adobe Acrobat®. The complete pages have been produced with Adobe InDesign® CS4 for PC and are also available as PDF files. Adobe Acrobat Reader is required in order to open these PDF files.
Trademarks
Microsoft, Windows and Server are either registered trademarks or trademarks of Microsoft Corporation in the United States and/or other countries.
Dell, Optiplex and Latitude are either registered trademarks or trademarks of Dell Computer Corporation in the United States and/or other countries.
Core is a trademark of Intel Corporation in the U.S. and/or other countries.
Adobe, Creative Suite, InDesign, Photoshop, Illustrator and Acrobat are registered trademarks of Adobe Systems Incorporated in the USA and/or other countries.
Copyright
All rights, also those in translations, are reserved. Written permission of CareFusion shall be obtained for the reproduction of the manual or an excerpt thereof by any means which includes printing, photostatic duplication, microfilms or any other process.
Note
This document contains copyright information. All rights are reserved. It is not allowed to copy, duplicate or translate this manual in any other language without having the prior written ap-proval of CareFusion. CareFusion reserves the right to alter the information included in this document without notice.
Alterations and Revisions
In case of a new edition the manual is completely revised. Modification sheets, if necessary, will be issued with additional information. The version number on the front page will only change if a new edition is published. Minor corrections which do not have any influence on the functionality of the product might be included in a reprint without changing the version num-ber.
For many product improvements it is not necessary to modify the manual. On the other hand, corrections in the manual can be made without changing the product. Therefore, the version number of the product often differs from the version number of the manual.
Subject to technical alterations. Copyright © 2014 by CareFusion Germany 234 GmbH, Hoechberg
Please contact:
CareFusion Germany 234 GmbH
Leibnizstrasse 7
97204 Hoechberg, Germany
Tel. +49 931 4972-0
Fax +49 931 4972-423
Email: [email protected]

Page 3/22Version 01.00 • 2014-07-28
Installation Instructions SentrySuite
Table of Contents
Symbols for Notes on Safety in Instructions for Use and Installation Instructions ............................................................................................. 4
System Requirements ................................................................................................ 5
Installation of the SentrySuite® Software ................................................................... 7
How to install the SentrySuite® Software .............................................................. 7
Initial Configuration ........................................................................................... 13
Start SentrySuite® ............................................................................................. 19
Important Email Addresses and Phone Numbers ...................................................... 21
Page 4/22 Version 01.00 • 2014-07-28
Installation Instructions SentrySuite
Symbols for Notes on Safety in Instructions for Use and Installation Instructions
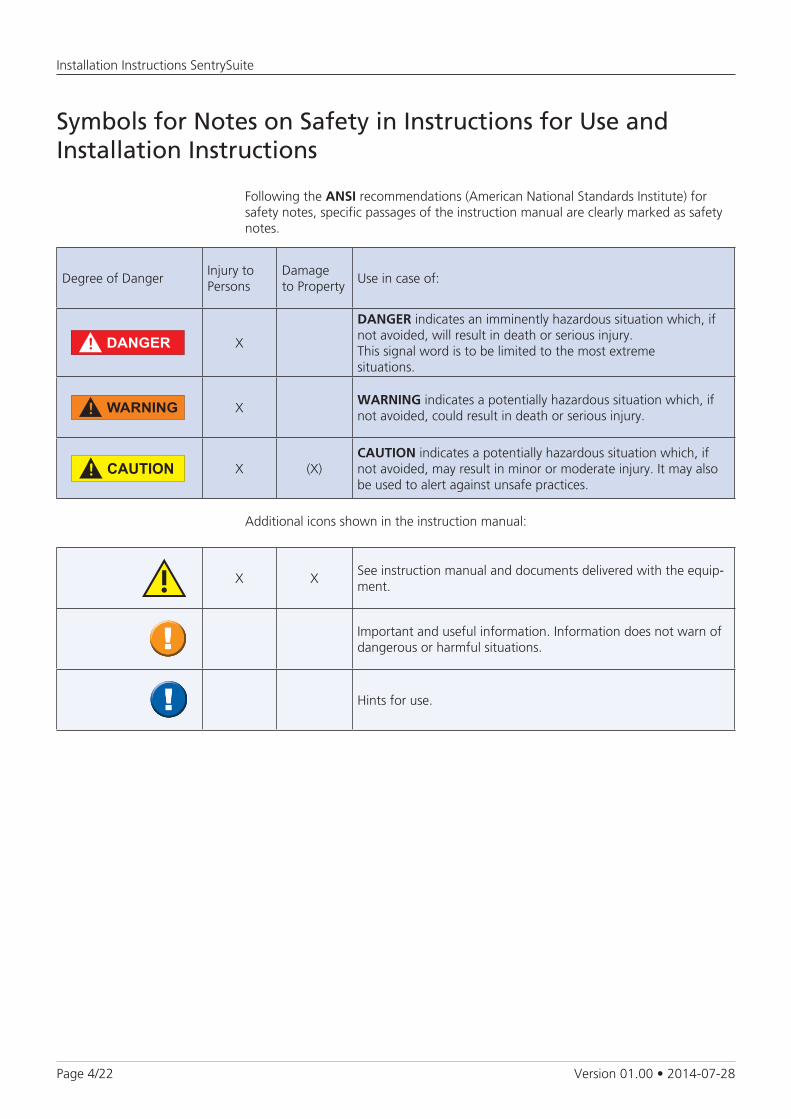
Following the ANSI recommendations (American National Standards Institute) for safety notes, specific passages of the instruction manual are clearly marked as safety notes.
Additional icons shown in the instruction manual:
X X
See instruction manual and documents delivered with the equip-ment.
Important and useful information. Information does not warn of dangerous or harmful situations.
Hints for use.
Degree of DangerInjury to Persons
Damage to Property
Use in case of:
X
DANGER indicates an imminently hazardous situation which, if not avoided, will result in death or serious injury. This signal word is to be limited to the most extreme situations.
XWARNING indicates a potentially hazardous situation which, if not avoided, could result in death or serious injury.
X (X)CAUTION indicates a potentially hazardous situation which, if not avoided, may result in minor or moderate injury. It may also be used to alert against unsafe practices.

Page 5/22Version 01.00 • 2014-07-28
Installation Instructions SentrySuite
System Requirements
Certain prerequisites have to be fulfilled to ensure proper functioning of the SentrySuite software*. Accessory equipment connected to the analog and digital interfaces must be certified according to the respective IEC standards (e.g. IEC 60950 for data processing equipment and IEC 60601-1 for medical electronic equipment). Additional equipment connected to medical electrical equipment must comply with the respective EN (IEC) or ISO standards (e.g. EN 60950 for data processing equipment). Furthermore all configurations shall comply with the requirements for medical electrical systems ((section 16 of the 3rd ed. of EN 60601-1). Anybody connecting additional equipment to medical electrical equipment configures a medical system and is therefore responsible that the system complies with the requirements for medical electrical systems. Attention is drawn to the fact that local laws take priority over the above mentioned requirements. If in doubt, consult your local representative or the CareFusion Global Customer Support.
Please check the system requirements prior to installation.
Minimum requirements:- PC or Notebook with Dual CoreTM with a minimum of 2.0 GHz clock speed- 3 GB RAM main memory for 32 bit; 4 GB RAM main memory for 64 bit- 100 GB hard disk- DVD-ROM drive- Graphics card and monitor with a resolution of 1280 x 900 pixels, True Color (24/32
bit)- Network interface card with 100 Mbits/s or minimum 150 Mbits/s with WLAN (if
networking is desired)
Recommended requirements:- PC or Notebook with QuadCore processor with min. 2.8 GHz clock speed- Minimum 4 GB RAM main memory for 32 bit; minimum 8 GB RAM main memory
for 64 bit- 320 GB SSD-hard disk- DVD-RW drive- Graphics card with a resolution of at least 1280 x 1024 pixels, True Color (24/32 Bit)- Monitor with a resolution of at least 1280 x 1024 pixels- Network interface card with 1000 Mbits/s or minimum 150 Mbits/s with WLAN (if
networking is desired)
Necessary interfaces:- 1 free USB 2.0 interface for each Vyntus PNEUMO, Vyntus IOS, Vyntus APS, Vyntus
SPIRO, Vyntus CPX, MasterScope Body, CardioSoft ECG, Tango M2- 1 free serial interface RS 232 or 1 free USB 2.0 interface for each MasterScreen
Pneumo/IOS/APS pro, Bicycle ergometer, treadmill- 1 free PS/2 interface or 1 free USB 2.0 interface (for MasterScreen Pneumo,
unheated)- 1 free PCIe interface for MasterScreen PFT/MasterScreen Body/Diffusion
Additional requirements:- User interface Microsoft® Windows® 7 Professional, 32 bit with Service Pack 1 or
Microsoft® Windows® 7 Professional/Ultimate/Enterprise, 64 bit with Service Pack 1- Keyboard, mouse or trackball, printer
Page 6/22 Version 01.00 • 2014-07-28
Installation Instructions SentrySuite
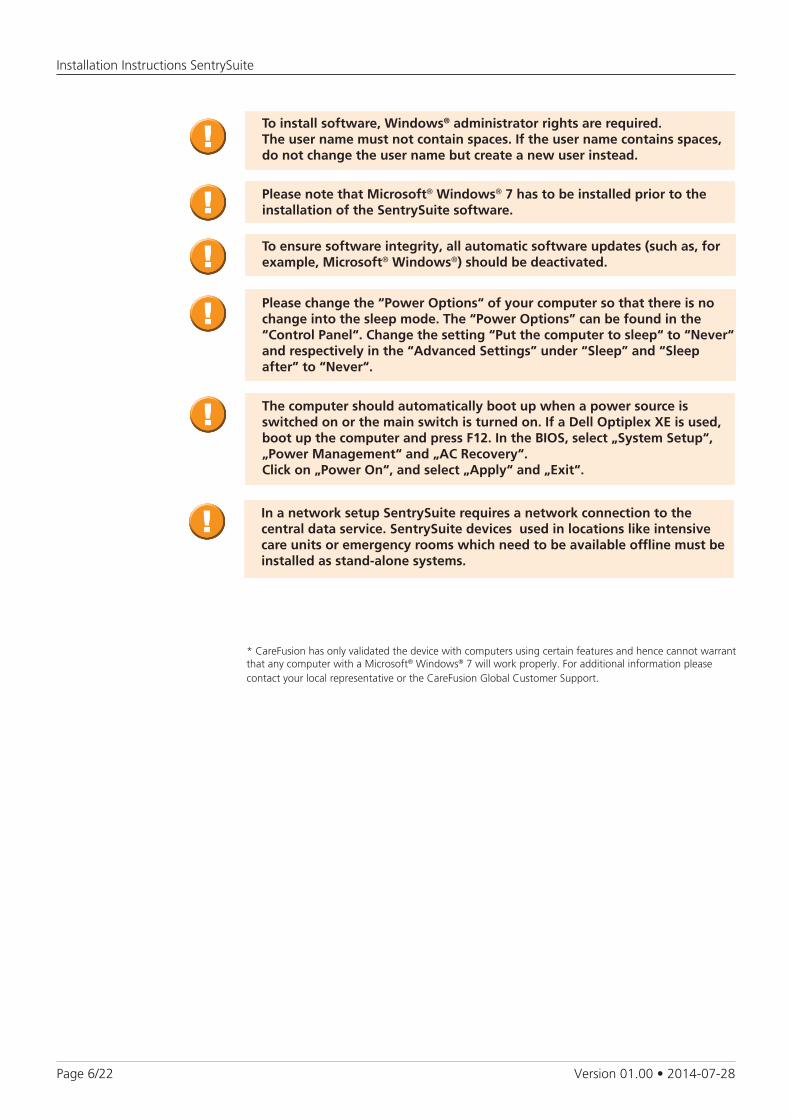
The computer should automatically boot up when a power source is switched on or the main switch is turned on. If a Dell Optiplex XE is used, boot up the computer and press F12. In the BIOS, select „System Setup“, „Power Management“ and „AC Recovery“. Click on „Power On“, and select „Apply“ and „Exit“.
To install software, Windows® administrator rights are required.The user name must not contain spaces. If the user name contains spaces, do not change the user name but create a new user instead.
Please note that Microsoft® Windows® 7 has to be installed prior to the installation of the SentrySuite software.
To ensure software integrity, all automatic software updates (such as, for example, Microsoft® Windows®) should be deactivated.
Please change the “Power Options“ of your computer so that there is no change into the sleep mode. The “Power Options” can be found in the “Control Panel“. Change the setting “Put the computer to sleep“ to “Never“ and respectively in the “Advanced Settings” under “Sleep” and “Sleep after” to “Never“.
* CareFusion has only validated the device with computers using certain features and hence cannot warrant that any computer with a Microsoft® Windows® 7 will work properly. For additional information please contact your local representative or the CareFusion Global Customer Support.
In a network setup SentrySuite requires a network connection to the central data service. SentrySuite devices used in locations like intensive care units or emergency rooms which need to be available offline must be installed as stand-alone systems.

Page 7/22Version 01.00 • 2014-07-28
Installation Instructions SentrySuite
Installation of the SentrySuite® Software
The system requirements listed on the previous page must be met. In addition, the SentrySuite license code and the SentrySuite validation code are required.
How to install the SentrySuite® Software
If the USB-RS232 adapter is used (e.g. with the MasterScreen Pneumo, MasterScreen IOS, APS SA), connect the adapter to a free USB port. Windows® will automatically try to install the appropriate driver.
Insert the USB-RS232 adapter software CD and follow the on-screen instructions. (The CD is included in the delivery package of the USB-RS232 adapter.)
If an EASI-PCIe card is used which is integrated in the PC, and required for Master-Screen PFT for example, the card driver must be installed prior to the installation of the SentrySuite software. See Installation Instructions “MasterScreen“.
The SentrySuite software is provided on one Installation DVD.
Insert the SentrySuite Software DVD into the DVD drive.
Start the installation process by double-clicking the Setup.exe program.
Procedure:
1. Select the “Windows Explorer“ icon on the Windows® desktop and click on “Computer“.
2. Click the DVD drive in the respective window and start the“Setup.exe“ program.
To install the SentrySuite software, follow the instructions as they appear on the screen. They will guide you through the installation process.
Prior to installing the software, the measuring system has to be connected to the PC or notebook. The measuring system must be switched on.
At a report or view station (without measuring system) the USB dongle has to be connected to a free USB port.

Page 8/22 Version 01.00 • 2014-07-28
Installation Instructions SentrySuite
The following screen will be displayed automatically:
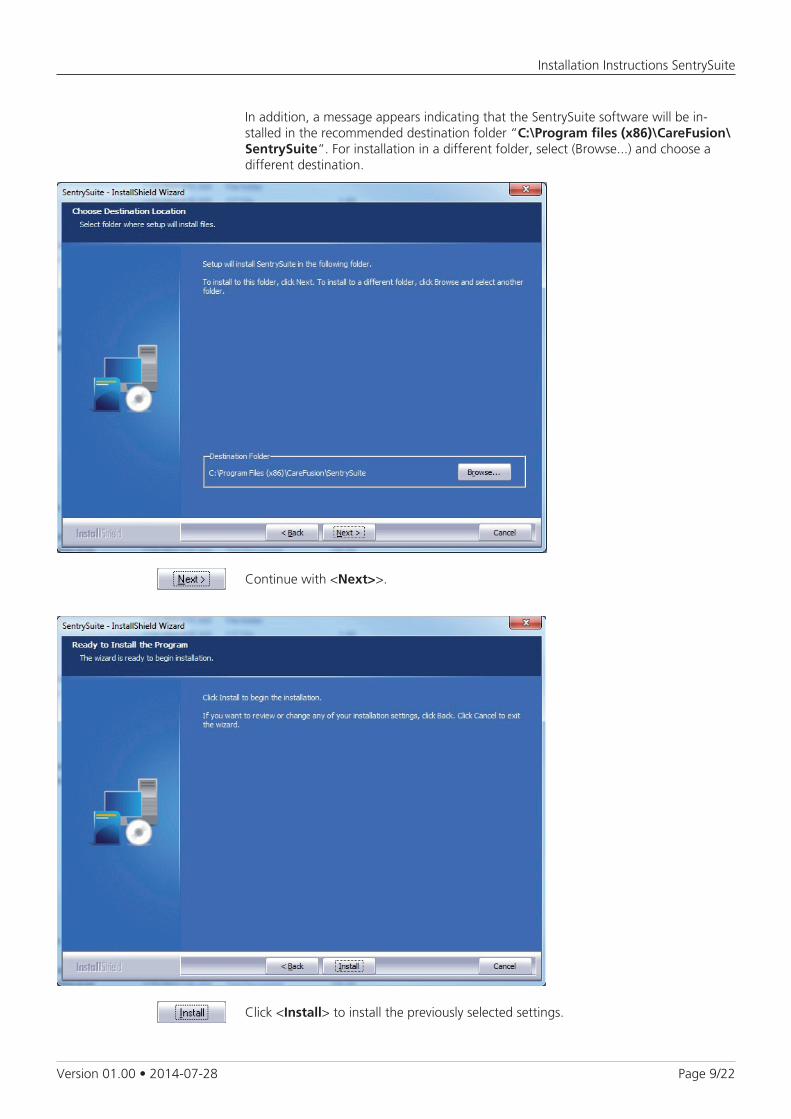
Continue with <Next>>.
In the following screen, the license code must be entered.
In this installation instruction, type “A) Standalone System (Local System)” is described. The installation of type B (Client) and type C (Backend) is described in the Service Manual.
Continue with <Next>>.
Page 9/22Version 01.00 • 2014-07-28
Installation Instructions SentrySuite
Continue with <Next>>.
In addition, a message appears indicating that the SentrySuite software will be in-stalled in the recommended destination folder “C:\Program files (x86)\CareFusion\SentrySuite“. For installation in a different folder, select (Browse...) and choose a different destination.
Click <Install> to install the previously selected settings.

Page 10/22 Version 01.00 • 2014-07-28
Installation Instructions SentrySuite
Screen display during installation:
Screen display during installation:

Page 11/22Version 01.00 • 2014-07-28
Installation Instructions SentrySuite
Now, the computer has to be restarted.
Please DO NOT CHANGE the settings.
Click <Finish> to shut down and restart the PC.
After the restart the Windows® desktop is shown.
Several windows pop up during the installation process. It is not necessary for the user to interact here.
Depending on the type of PC and the existing system configuration it may be necessary to restart the PC several times and after that to also restart the SentrySuite installation procedure.
Page 12/22 Version 01.00 • 2014-07-28
Installation Instructions SentrySuite
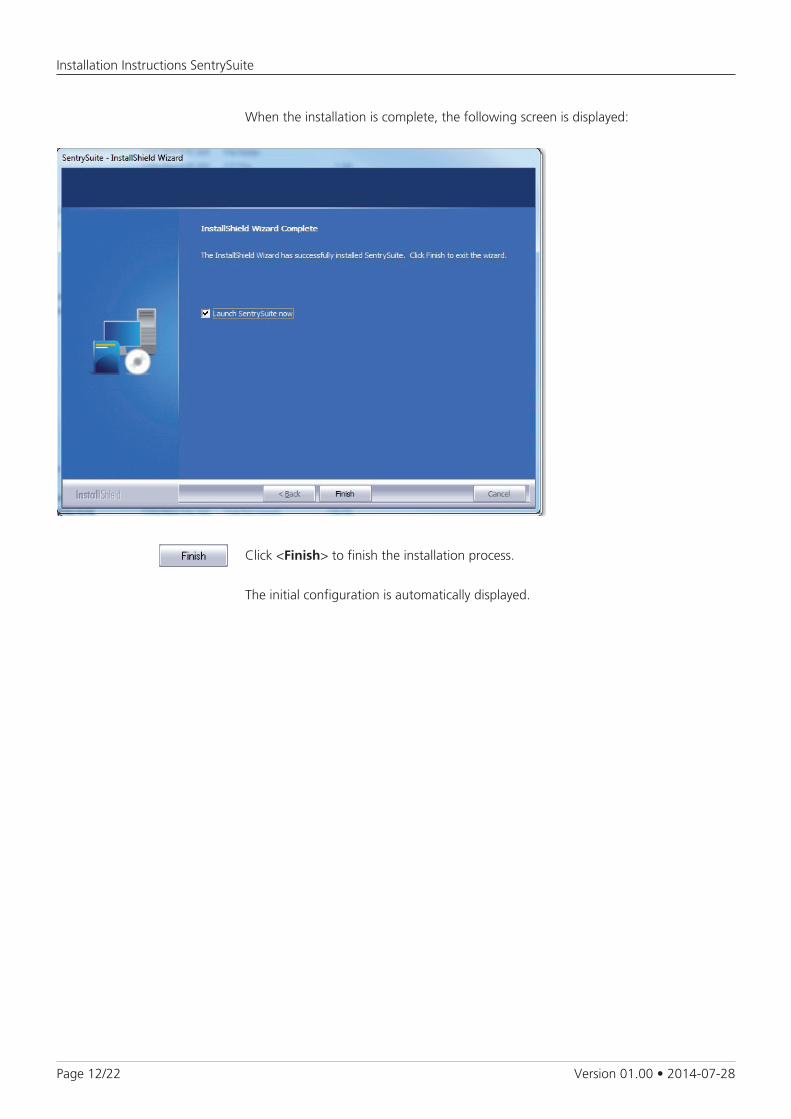
Click <Finish> to finish the installation process.
The initial configuration is automatically displayed.
When the installation is complete, the following screen is displayed:
Page 13/22Version 01.00 • 2014-07-28
Installation Instructions SentrySuite
Initial Configuration
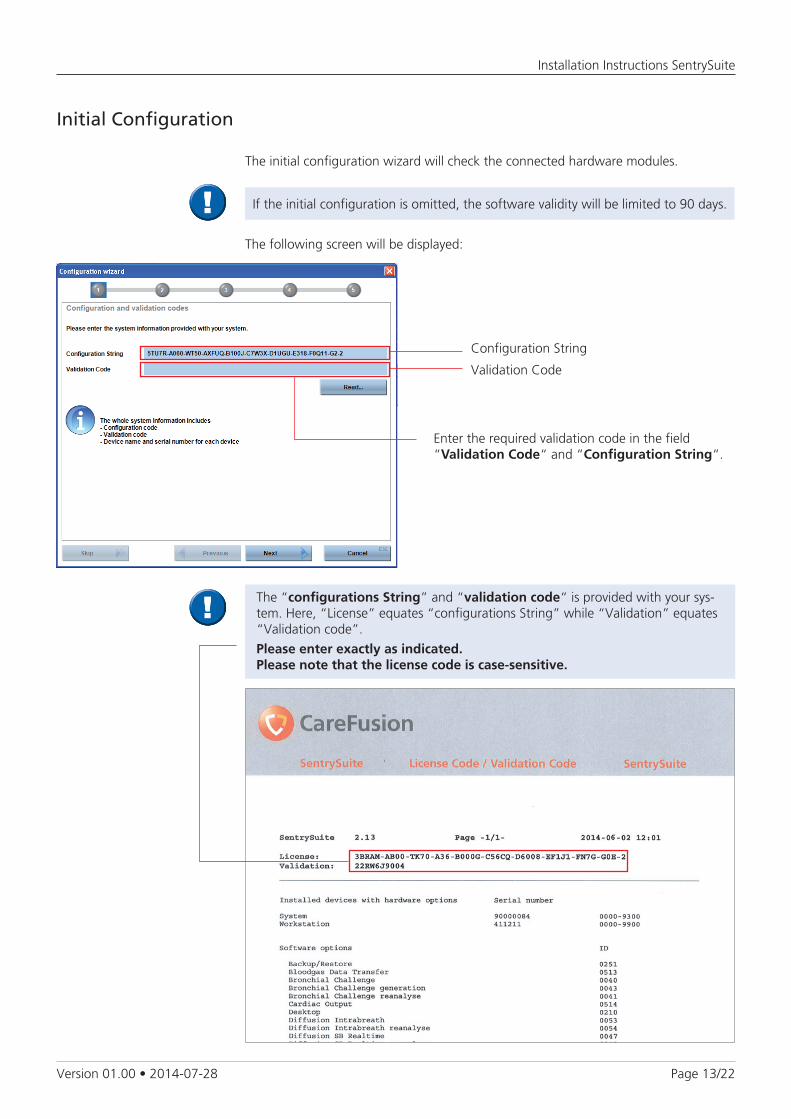
If the initial configuration is omitted, the software validity will be limited to 90 days.
The initial configuration wizard will check the connected hardware modules.
Validation Code
The following screen will be displayed:
The “configurations String” and “validation code“ is provided with your sys-tem. Here, “License” equates “configurations String” while “Validation” equates “Validation code”.
Please enter exactly as indicated. Please note that the license code is case-sensitive.
Configuration String
Enter the required validation code in the field “Validation Code“ and “Configuration String“.

Page 14/22 Version 01.00 • 2014-07-28
Installation Instructions SentrySuite
Now, the following features will be checked in a step-by-step process:
- Interfaces
- Serial numbers of the devices
- Corresponding hardware
Confirm every step by clicking <Next >>.
Continue with <Next >>.
Continue with <Next >>.

Page 15/22Version 01.00 • 2014-07-28
Installation Instructions SentrySuite
In the following windows the system serial numbers are requested. There are at least two different serial numbers which can be found in the delivered license/validation code sheet.
- System serial number. In our example “90000056“
- Serial number of the device, e.g. MasterScreen Pneumo. In our example “511123“
A window appears for entering the system serial number:
The system serial number can be found in the delivered documents.

Page 16/22 Version 01.00 • 2014-07-28
Installation Instructions SentrySuite
Once the window for entering the MasterScreen serial number appears, it should not be necessary to enter this number. The software should read it automatically.
Click <Next>>.
Screen display after the serial number was entered:

Page 17/22Version 01.00 • 2014-07-28
Installation Instructions SentrySuite
If the serial number is not displayed automatically, it has to be entered manually via the keyboard.
The following prompt is displayed:
“Device found and tested successfully!“
Continue with <Next >>.

Page 18/22 Version 01.00 • 2014-07-28
Installation Instructions SentrySuite
At the end of the initial configuration a validation summary will be displayed.
Continue with (Next >).
Now, the initial configuration is complete and SentrySuite Desktop is started automati-cally if the system does not use a network database. See chapter “Start SentrySuite“.

Page 19/22Version 01.00 • 2014-07-28
Installation Instructions SentrySuite
After the program has been started, a self-test is automatically performed verify-ing that all hardware modules connected to the system are functioning correctly.
The following appears on the screen:
Start SentrySuite®
The system now verifies that all hardware modules connected to the unit are func-tioning correctly. For the MasterScreen Pneumo for example, the connection to the digital handle (DH) is checked.
Time System MasterScreen System Vyntus
05 minutes MasterScreen Pneumo, MasterScreen IOS, APS
Vyntus Spiro, Vyntus Pneumo, Vyntus IOS, Vyntus APS
15 minutes MasterScreen Body, MasterScreen Body/Diff, MasterScope Body
Vyntus CPX
45 minutes MasterScreen PFT, MasterScreen Diffusion (RT), MasterScreen Body/Diffusion (RT)
Page 20/22 Version 01.00 • 2014-07-28
Installation Instructions SentrySuite
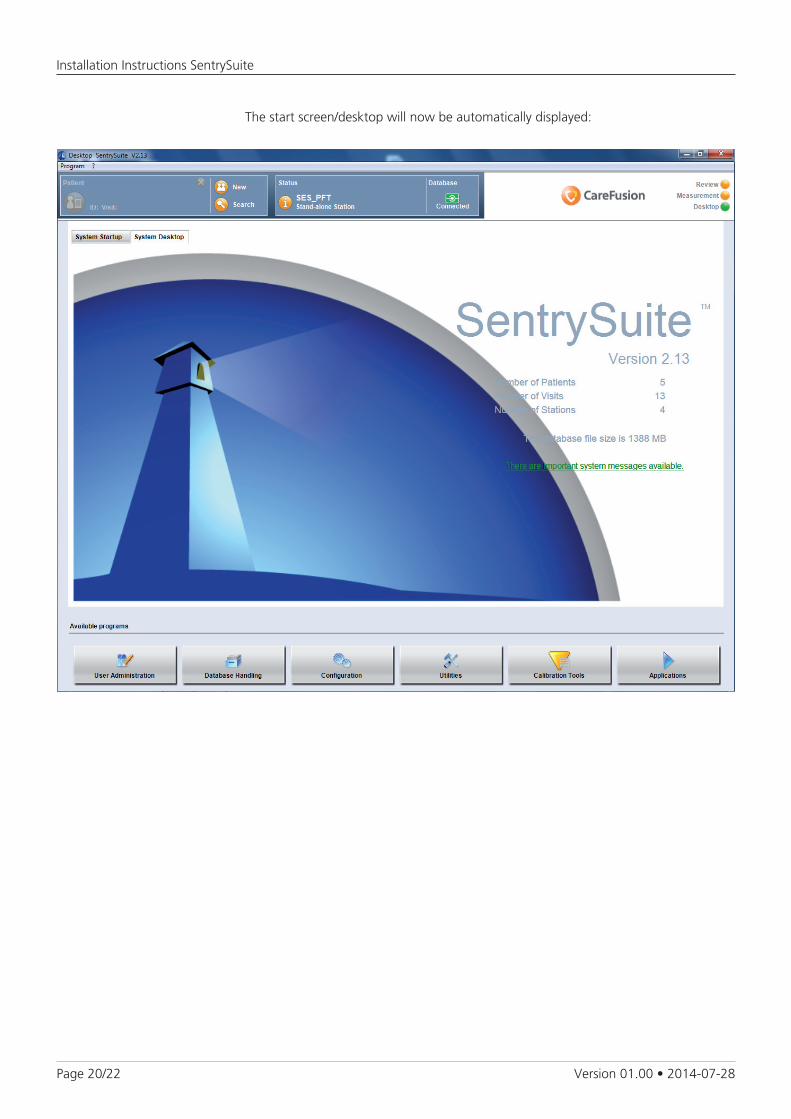
The start screen/desktop will now be automatically displayed:

Page 21/22Version 01.00 • 2014-07-28
Installation Instructions SentrySuite
Important Email Addresses and Phone Numbers
Europe - Hoechberg, Germany
Global Customer Support:(Hotline Respiratory Diagnostics):
[email protected] +49 931 4972-127
Administration:
[email protected] +49 931 4972-867
Clinical Integration Services:
[email protected] +49 931 4972-672
Accessories/Consumables: +49 931 4972-365
CareFusion Germany 234 GmbHLeibnizstrasse 797204 HoechbergGermany+49 931 4972-0 tel+49 931 4972-423 faxwww.carefusion.com
North America - Yorba Linda, CA Technical Support: 800 231 2466
[email protected] 714 283 2228
Customer Service (Order Management): 800 231 2466 ext.8500

carefusion.com
CareFusion Germany 234 GmbHLeibnizstrasse 797204 Hoechberg+49 931 4972-0 tel+49 931 4972-423 fax
© 2014 CareFusion Corporation or one of its subsidiaries.All rights reserved.SentrySuite, Vyntus, and MicroGard are trademarks or registered trademarks of CareFusion Corporation or one of its subsidiaries. All trademarks are property of their respective owners.
Distribution & Service:
CareFusion Yorba Linda22745 Savi Ranch ParkwayYorba Linda, CA 92887+1 714 283 2228 tel +1 714 283 8493 fax