installation guide - el jefe - threat analysis€¢ cuckoo: cuckoo sandbox v1.0 for automated...
TRANSCRIPT

INSTALLATION GUIDEEl Jefe 2.1
Document version: June 2014
Immunity Inc. 1130 Washington Ave. 8th Floor Miami Beach, FL 33139 (p) 786-220-0600 (f) 786-513-8100 (web) www.immunityinc.com

Contents 1 Goal of this Document...............................................................................................................3 2 Introduction................................................................................................................................3 3 Installation..................................................................................................................................4
3.1 El Jefe 2.1 Installation on Ubuntu 13.04 LTS.....................................................................4 3.2 El Jefe 2.1 Installation on Red Hat Enterprise 7.................................................................6 3.3 Cuckoo Installation.............................................................................................................7
4 Configuring the Virtual Machine................................................................................................8 5 Network Setup............................................................................................................................9
5.1 Configuration of Networking............................................................................................11 6 Agent Installation.....................................................................................................................12 7 Final Configuration..................................................................................................................13 8 Optional Settings (recommended)............................................................................................15 9 Starting El Jefe.........................................................................................................................15
Immunity Inc. 1130 Washington Ave. 8th Floor Miami Beach, FL 33139 (p) 786-220-0600 (f) 786-513-8100 (web) www.immunityinc.com

1 Goal of this DocumentThis document enables you to realize the glory of a full installation of El Jefe 2.1 on various operating systems. You will need to be familiar with administering Linux in order to properly use this document. Should you require any troubleshooting at anytime during the El Jefe installation please email us at [email protected].
2 IntroductionThe first step is to download the last version of El Jefe from Immunity's website: https://eljefe.immunityinc.com/eljefe/. The file comes in a tar/gzip format. You should also take the time now to verify the SHA-1 hash with the release email, which is likely archived in many places from being sent to our company mailing list, DailyDave. If you're not subscribed to DailyDave, then you should take the time to subscribe now.Inside the downloaded package you will find the following components:
• Client: El Jefe client's source code• Cuckoo: Cuckoo Sandbox v1.0 for automated malware analysis.• Dependencies : All dependencies needed for the client's installer development.• Docs: El Jefe documentation.• Installer: All files needed to create an executable installer for the El Jefe client.• Webapp: El Jefe server's source code.
Immunity Inc. 1130 Washington Ave. 8th Floor Miami Beach, FL 33139 (p) 786-220-0600 (f) 786-513-8100 (web) www.immunityinc.com
Illustration 1: El Jefe root's folders.

3 Installation
3.1 El Jefe 2.1 Installation on Ubuntu 13.04 LTS
El Jefe comes with its own shellscript installer inside the webapp folder (webbapp/install_ubuntu.sh) for Ubuntu. The script was created and tested on Ubuntu 13.04 LTS (we highly recommend you to use that version). Run the script to install the El Jefe server. Root privileges are required. The script will install all the dependencies needed for El Jefe 2.1 and configure El Jefe 's database.
A list of dependencies installed by the El Jefe installation script include the following:
• build-essential• python-dev• python-pip• python-psycopg2
Immunity Inc. 1130 Washington Ave. 8th Floor Miami Beach, FL 33139 (p) 786-220-0600 (f) 786-513-8100 (web) www.immunityinc.com
Illustration 2: Running the installation script

• postgresql • mongodb• django • django-taggit• django-bootstrap3 • requests • numpy • pymongo
Before finishing the installation you must insert the username and password needed for the first login to El Jefe's WebUI. You will want to use a strong password here as some of the information may be considered sensitive and El Jefe also has the ability to download executables from the remote machines.
Immunity Inc. 1130 Washington Ave. 8th Floor Miami Beach, FL 33139 (p) 786-220-0600 (f) 786-513-8100 (web) www.immunityinc.com
Illustration 3: Installation script will request to create an account

3.2 El Jefe 2.1 Installation on Red Hat Enterprise 7
Aside from the Ubuntu Installer, El Jefe comes with a second installer shellscript for Red Hat Enterprise 7 in the webapp folder webbapp/install_rhel.sh. Run the script to install the El Jefe server. Root privileges are required.
The script will require a username and password for the El Jefe's WebUI login.
Immunity Inc. 1130 Washington Ave. 8th Floor Miami Beach, FL 33139 (p) 786-220-0600 (f) 786-513-8100 (web) www.immunityinc.com
Illustration 4: Installation Complete
Illustration 5: Installing El Jefe using RHEL shellscript

3.3 Cuckoo Installation
Cuckoo is an open source sandbox that automates malware analysis. Version 2.1 of El Jefe includes Cuckoo to help analysts by providing further in-depth information about potentially harmful processes. The installation of Cuckoo is optional, but we think you will find it quite useful once completed. Keep in mind that Cuckoo cannot be installed from WITHIN a virtual machine, unlike El Jefe itself.
The reason Cuckoo is so useful is that El Jefe will download a suspicious binary from any event upon the analyst's request. Then El Jefe will task Cuckoo with running that binary in a virtual machine. Cuckoo will then produce a complete report with the results and these results are then made available through the El Jefe WebUI.
The Cuckoo Sandbox is already inside El Jefe version 2.1 package release so there is no need for extra downloads (Check out the cuckoo folder for more information).
Cuckoo supports VirtualBox, KVM and VMWare for virtualization. We are using VMWare Workstation 9.0 in this guide as our virtualization software, but it should be rather trivial to install it in others. You can follow the guidelines in the following URL for assistance with other virtualization software (http://docs.cuckoosandbox.org/en/latest/installation/guest/).
Immunity Inc. 1130 Washington Ave. 8th Floor Miami Beach, FL 33139 (p) 786-220-0600 (f) 786-513-8100 (web) www.immunityinc.com
Illustration 6: Installation Complete

4 Configuring the Virtual MachineIt is time to setup the virtual machine where we are going to run and analyze our binaries. First, we will need to create a new virtual machine. The preferred operating system by Cuckoo is Windows XP, but other Windows versions are also supported. We are using Windows 7 x64 in this guide.
We need to install Python and Python Imaging Library (PIL) (http://www.pythonware.com/products/pil/). If you are using Windows x64 you need to install a 32 bits Python version to support PIL.
Immunity Inc. 1130 Washington Ave. 8th Floor Miami Beach, FL 33139 (p) 786-220-0600 (f) 786-513-8100 (web) www.immunityinc.com
Illustration 7: Installing Python and PIL on the guest virtual machine
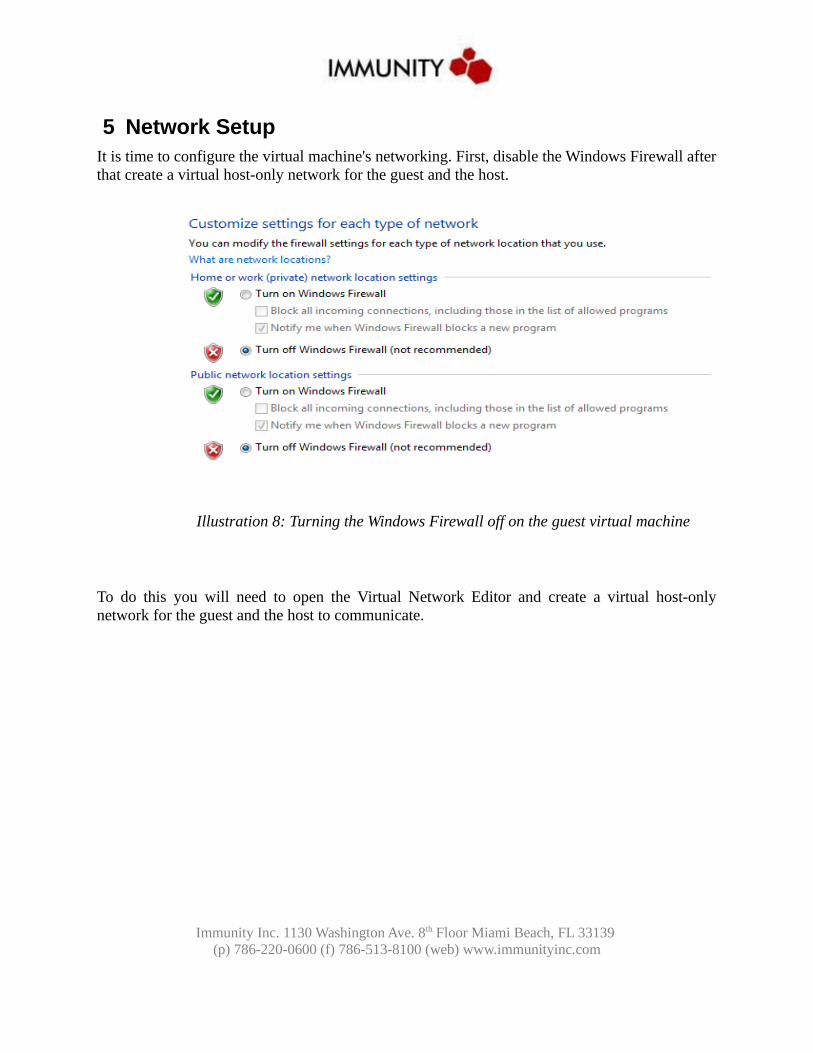
5 Network SetupIt is time to configure the virtual machine's networking. First, disable the Windows Firewall after that create a virtual host-only network for the guest and the host.
To do this you will need to open the Virtual Network Editor and create a virtual host-only network for the guest and the host to communicate.
Immunity Inc. 1130 Washington Ave. 8th Floor Miami Beach, FL 33139 (p) 786-220-0600 (f) 786-513-8100 (web) www.immunityinc.com
Illustration 8: Turning the Windows Firewall off on the guest virtual machine

We are using the 172.16.41.0 network which makes the guest configuration as follows:
IP Address: 172.16.41.159Netmask: 255.255.255.0Gateway: 172.16.41.1
Cuckoo supports DNS resolution so you can choose 172.16.41.1 as your DNS server. In our experience, we get better analysis results by using a public DNS server (for example the Google DNS: 8.8.8.8 and 8.8.4.4).
The host configuration (for the vmnet adapter) is as follows:
IP Address: 172.16.41.1Netmask: 255.255.255.0
Immunity Inc. 1130 Washington Ave. 8th Floor Miami Beach, FL 33139 (p) 786-220-0600 (f) 786-513-8100 (web) www.immunityinc.com
Illustration 9: Configuring Virtual Network Editor

5.1 Configuration of Networking
The next step is to configure packet forwarding on the host machine to give the guest machine Internet access. We can do this with the following commands (replacing eth0 with your outgoing interface and vboxnet0 with your virtual interface):
$ iptables -A FORWARD -o eth0 -i vmnet1 -s 172.16.41.0/24 -m conntrack --ctstate NEW -j ACCEPT$ iptables -A FORWARD -m conntrack --ctstate ESTABLISHED,RELATED -j ACCEPT$ iptables -A POSTROUTING -t nat -j MASQUERADE$ sysctl -w net.ipv4.ip_forward=1
This concludes the networking setup.
Immunity Inc. 1130 Washington Ave. 8th Floor Miami Beach, FL 33139 (p) 786-220-0600 (f) 786-513-8100 (web) www.immunityinc.com
Illustration 10: Setting-up the network on the guest virtual machine
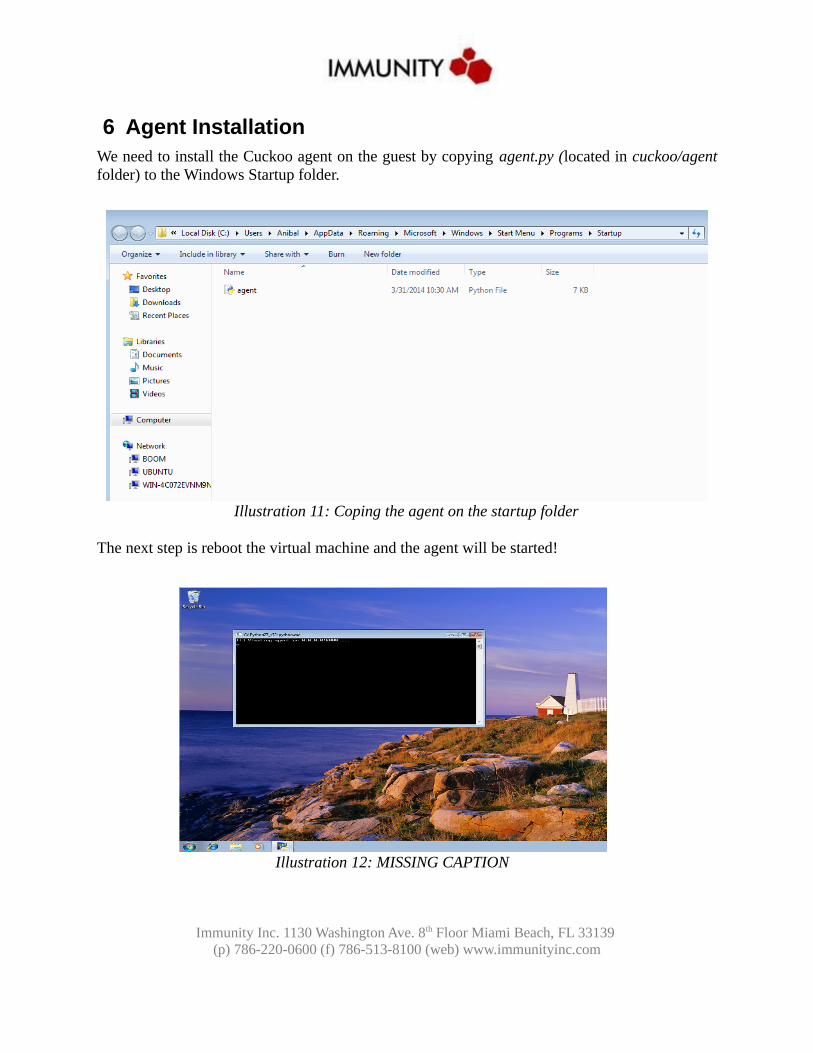
6 Agent InstallationWe need to install the Cuckoo agent on the guest by copying agent.py (located in cuckoo/agent folder) to the Windows Startup folder.
The next step is reboot the virtual machine and the agent will be started!
Immunity Inc. 1130 Washington Ave. 8th Floor Miami Beach, FL 33139 (p) 786-220-0600 (f) 786-513-8100 (web) www.immunityinc.com
Illustration 11: Coping the agent on the startup folder
Illustration 12: MISSING CAPTION

Now it is time to make a snapshot. Before executing a malware binary the snapshot is reverted and then the binary is executed and analyzed.
Summary:vm path = $HOME/vmware/W7x64/W7x64.vmxvm snapshot = Snapshot_Win7x64_1vm IP = 172.16.41.159
7 Final ConfigurationIf you opted to install Cuckoo, you will need to configure the files in Cuckoo which is running on our El Jefe server. First, modify the cuckoo/conf/auxiliary.conf and change the interface to the one that you will use to communicate with the guest virtual machine.
Immunity Inc. 1130 Washington Ave. 8th Floor Miami Beach, FL 33139 (p) 786-220-0600 (f) 786-513-8100 (web) www.immunityinc.com
Illustration 13: Taking a snapshot of the guest virtual machine
Illustration 14: Configure the interface to be used

Next, modify cuckoo/conf/cuckoo.conf to set the result server IP address on the [resultserver] section (in our case it is the El Jefe Server (172.16.41.1)).
Finally, modify cuckoo/conf/vmware.conf. If you are planning to use just one virtual machine then you will just need to modify everything inside [cuckoo1]. Otherwise, you will have to create an additional section for each extra virtual machine used. Inside these sections you will have to set the virtual machine path, snapshot name and IP address of the machine (in our example it is 172.16.41.159).
We are done setting Cuckoo for El Jefe!
Immunity Inc. 1130 Washington Ave. 8th Floor Miami Beach, FL 33139 (p) 786-220-0600 (f) 786-513-8100 (web) www.immunityinc.com
Illustration 15: Set up the result server IP
Illustration 16: Setting-up the last configuration details

8 Optional Settings (recommended)When Cuckoo is analyzing submitted files there are some extra modules and libraries that will improve the analysis which will provide the analyst with a better report. These modules are optional but their installation is highly recommended.
Run setcap to give tcpdump root privileges without needing to have Cuckoo run as root.
$ sudo setcap cap_net_raw,cap_net_admin=eip /usr/sbin/tcpdump
9 Starting El JefeNow you are ready to start up El Jefe. We recommend running these commands inside a screen session.
First, run the web interface. Inside webapp/ you must type :
$ python manage.py runserver
The next step is start the XML Server. You must set the IP address of El Jefe Server in webapp/xmlserver/settings.py
Immunity Inc. 1130 Washington Ave. 8th Floor Miami Beach, FL 33139 (p) 786-220-0600 (f) 786-513-8100 (web) www.immunityinc.com
Illustration 17: Running the WebUI
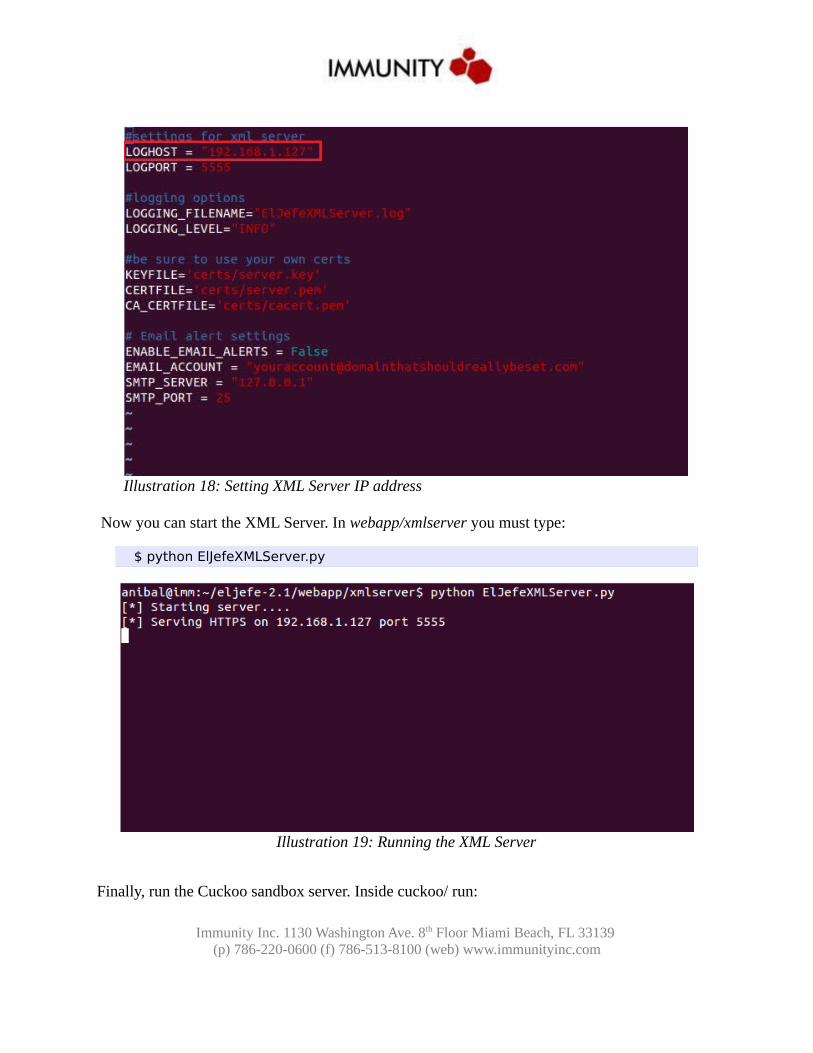
Now you can start the XML Server. In webapp/xmlserver you must type:
$ python ElJefeXMLServer.py
Finally, run the Cuckoo sandbox server. Inside cuckoo/ run:
Immunity Inc. 1130 Washington Ave. 8th Floor Miami Beach, FL 33139 (p) 786-220-0600 (f) 786-513-8100 (web) www.immunityinc.com
Illustration 19: Running the XML Server
Illustration 18: Setting XML Server IP address

$ python cuckoo.py
You should now be able to log into El Jefe using the username and password created during the installation by going to http://ElJefeIP:8000/.
Now that you are logged in it is now time to catch some threats. Enjoy the ride!
Immunity Inc. 1130 Washington Ave. 8th Floor Miami Beach, FL 33139 (p) 786-220-0600 (f) 786-513-8100 (web) www.immunityinc.com
llustration 20: Running Cuckoo
Illustration 21: Log-in into El Jefe UI