installation guide - amazon s3€¦ · this installation guide is written with the understanding...
TRANSCRIPT
Installation Guide
P L U M B I N G

Plumbing Installation Guide published by
MrPEX® Systems 2613 87th Court W. Northfield, MN 55057
800-716-3406 mrpexsystems.com [email protected]
©2015 MrPEX® Systems All rights reserved
Printed November 2015 in the United States of America
MrPEX® Systems has used reasonable efforts in collecting, preparing, and providing quality information and material in this guide. However, system enhancements may result in modification of features of specifications without notice.
MrPEX® Systems is not liable for installation practices that deviate from this guide or are not acceptable practices within the mechanical trades.

1-800-716-3406 1
TABLE OF CONTENTS2 INTRODUCTION TO MrPEX®
3 BEFORE YOU BEGIN
5 CHOOSING YOUR DESIGN & LAYOUT
9 MRPEX PEXa PLUMBING ADVANTAGES
10 HOW TO MAKE A FITTING
11 PRESS TOOL CALIBRATION
12 INSTALLATION GUIDELINES
13 INSTALLATION LIMITATIONS
14 FIXTURE SIZING CHART
15 LISTINGS & APPROVALS
16 PRESSURE DROP CHARTS
18 INSTALLATION DIAGRAMS
25 USING FIRESTOP
25 REPAIRING A KINK
27 LIMITED WARRANTY

In
tro
du
ctIo
n to
Mr
PEX®
MRPEXSYSTEMS.COM2
INTRODUCTION TO MrPEX®ABOUT MrPEX® SYSTEMSMrPEX® Systems is one of the leading North American system suppliers of residential and commercial radiant heating/cooling, snowmelt systems, and PEX-a domestic hot and cold water systems. With a very knowledgeable and experienced team, our company is on the fast track for growth in the USA and Canadian market. Our core product, the MrPEX® PEXa Tubing, is considerably more flexible and kink-resistant than any other PEX Tubing on the market today, plus comes with an extensive 30 year warranty!
Combined with our highly technical knowledge and dedication to customer service, it's no wonder MrPEX® Systems is one of the fastest growing PEX system suppliers in North America.
WHY MrPEX®?MrPEX® Systems provides all components you need for a superior system, whether radiant heating/cooling, snowmelt, or PEX-a plumbing system. This includes tubing, fittings, manifolds, controls and accessories that are matched for high performance and reliability over many years of service. When used together, these components provide trouble free installation and long-term reliability. The MrPEX® tubing and fittings meet current national standards of performance and dimensional tolerances. The system package and product offering is growing continually with an emphasis on taking advantage of sustainable energy sources whenever possible.
WHO IS MrPEX®?MrPEX®—Tomas Lenman—started at Wirsbo Bruks AB in Sweden as a development engineer in 1971, developing the very first PEX process ever invented. He developed many Standard Specifications for PEX Tubing in Europe and Australia. MrPEX® wrote the ASTM F 876/877 for PEX Tubing during 1982–84. In 1982 he co-authored the book “Water and Pipes”. He founded and managed Wirsbo Company (USA) 1984 -1992 and continued consulting for this group until 1996. He authored the CSA B137.5 standard for PEX Tubing in 1989. MrPEX® managed the successful
start-up of Roth Industries PEX Tubing Division 1997–2001 after which he started his own radiant floor heating company: MrPEX® Systems using PEX-a Tubing with exclusive distribution in North America for LK PEX AB in Sweden.
The unique production process is invented by Mr. Lennart Aagren of Sweden, previously manager of Uponor Innovation AB for many years, and his second innovation of a PEX Tubing manufacturing process. No one has more knowledge and experience with PEX Tubing and Radiant Floor Heating Systems than MrPEX®.
no one has more knowledge and experience with PEX tubing and related Systems than MrPEX®.
This Plumbing Install Guide is designed as a point of reference for plumbers and code enforcement officials. Local codes and municipalities will
supersede this handbook. It is the installing plumbing contractor’s responsibility to install in accordance with local plumbing codes and practices.
MrPEX® Systems does not authorize or allow any unlicensed plumber to use our products, and will not be held responsible for any
improperly installed systems and/or property damage.
MrPEX Potable PEXa tubing will carry a transferable warranty of 30years. All MrPEX Lead Free Brass and PPSU Fittings carry a 5 year
warranty. All other parts and pieces installed in an existing system will carry a 2 year warranty.
B
Efo
rE
You
BEg
In
1-800-716-3406 3
BEFORE YOU BEGINABOUT THIS GUIDEThe purpose of this guide is to assist the plumbing professional by providing specific information regarding the MrPEX® plumbing System. This installation guide is written with the understanding that a licensed plumber will be designing and installing all MrPEX System components and will help plan and perform a successful installation. This guide is derived from MrPEX® Systems information and a combination of sections from industry documents, codes and standards
READ THIS PRIOR TO STARTING THE INSTALLATIONThis guide constitutes the Manufacturer's Recommendations for the design and installation of MrPEX® plumbing systems, or the purpose of clarity in communicating concepts, this manual is conceptual in nature, and may, therefore, omit certain components that are not necessary in communicating the concept at issue, but may be necessary or essential in the actual installation. The designer must rely on his knowledge of plumbing systems, and the local administrative requirements to determine the suitability of any particular material or method described herein.
STORAGE AND HANDLINGMrPEX® tubing coils are is delivered in cardboard boxes, and straight lengths are delivered in plastic bags. Check boxes at delivery for any possible freight damage and report immediately. Store tubing indoors in original packaging, safe from, moisture, tampering and UV exposure.
MRPEX® POTABLE PEX TUBING INFO Ű Expansion: The tubing has an expansion coefficient of 1.1” per 10°F per 100 feet.
Ű Bending: The tubing can be exposed to a bending radius approximately 4 times the actual outside diameter without kinking.
Ű Uncoiling: The tubing coil has an inside diameter exceeding 15 inches, so that memory-effect of its coiling is minimal. Un-roll the tubing from its coil without twisting the tubing, this will make the installation easier. Use a MrPEX® tube uncoiler to aid the installation.
Ű Markings and Ratings: The tubing is marked with MrPEX®, size, SDR, pressure rating 100 psi at 180°F, ASTM standard reference, independent third party certifiers’ mark, production date, and running ft. length—every three feet. The running ft. markings start from 0 at the inside of each coil so that the installer will always know how much tubing is left in each coil.
Ű Cutting: The tubing needs to be cut using an appropriate tubing cutter, leaving a square clean cut, free from burrs.
Ű MrPEX POTABLE PEX-a is currently offered in ½”, ¾”, and 1” in size. All sizes are available in straight lengths of 20’ or coiled lengths of 100’ through 300'. All sizes and lengths are offered in your choice of Red, Blue or White.

B
Efor
E You
BEg
In
MRPEXSYSTEMS.COM4
DIAMETER COLOR LENGTH TYPE
1/2" Red, Blue, White 100' Coil1/2" Red, Blue, White 300' Coil1/2" Red, Blue, White 500' Coil1/2" Red, Blue, White 20' Straight3/4" Red, Blue, White 100' Coil3/4" Red, Blue, White 300' Coil3/4" Red, Blue, White 20' Straight1" Red, Blue, White 100' Coil1" Red, Blue, White 300' Coil1" Red, Blue, White 20' Straight
With all the system components that are offered, you have the freedom to choose what kind of potable plumbing system is going to be installed. All systems offer pro’s and con’s, we are here to let you decide which one is best for your application.

c
ho
oS
Ing
Yo
ur
dES
Ign
& L
aYo
ut
1-800-716-3406 5
CHOOSING YOUR DESIGN & LAYOUTBRANCH AND TEE METHOD
This system incorporates one set of main hot and cold lines with all the fixtures branching off of the main lines with flow through tee’s until the last fixture is reduced off the end of the line.
Pros: Saves on tubing. No need to carry different multiport tee’s or manifolds to job.
Cons: Pressures will vary downstream during the use of upstream fixtures. Hot water will take longer to get to furthest point.
Dishw
ashe
rRe
frigerator
c
ho
oS
Ing
You
r d
ESIg
n &
LaYou
t
MRPEXSYSTEMS.COM6
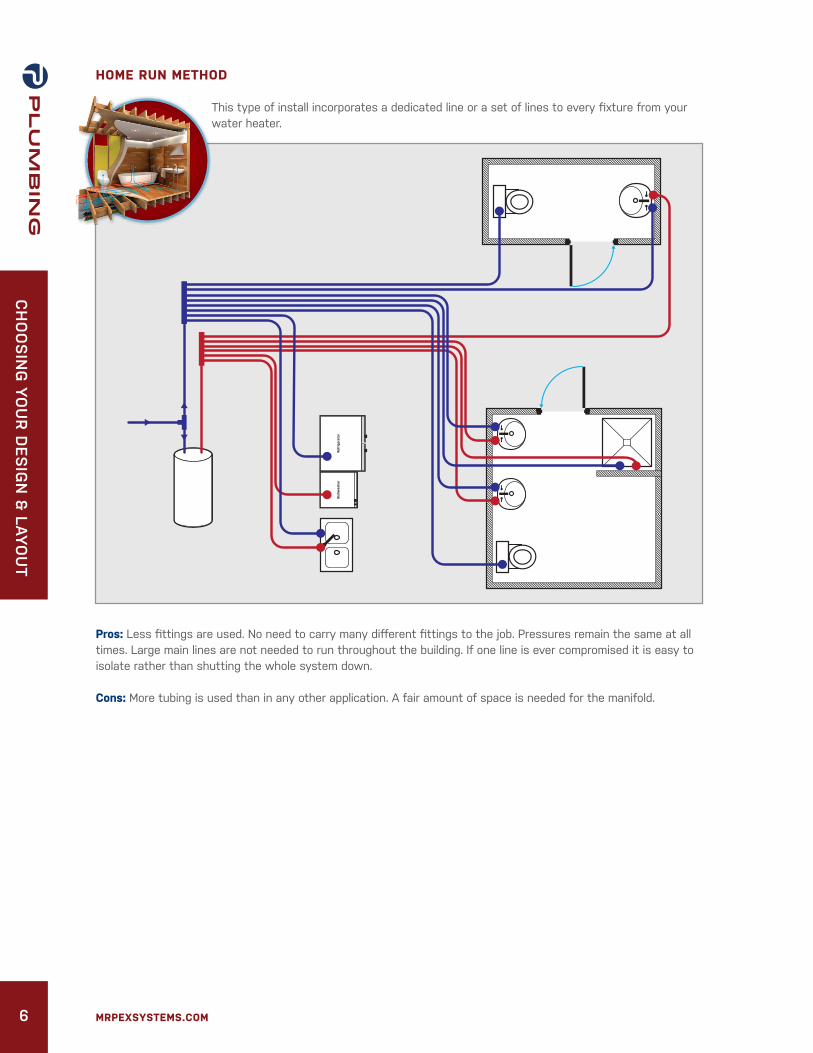
HOME RUN METHOD
This type of install incorporates a dedicated line or a set of lines to every fixture from your water heater.
Pros: Less fittings are used. No need to carry many different fittings to the job. Pressures remain the same at all times. Large main lines are not needed to run throughout the building. If one line is ever compromised it is easy to isolate rather than shutting the whole system down.
Cons: More tubing is used than in any other application. A fair amount of space is needed for the manifold.
Dishw
ashe
rRe
frigerator
c
ho
oS
Ing
Yo
ur
dES
Ign
& L
aYo
ut
1-800-716-3406 7
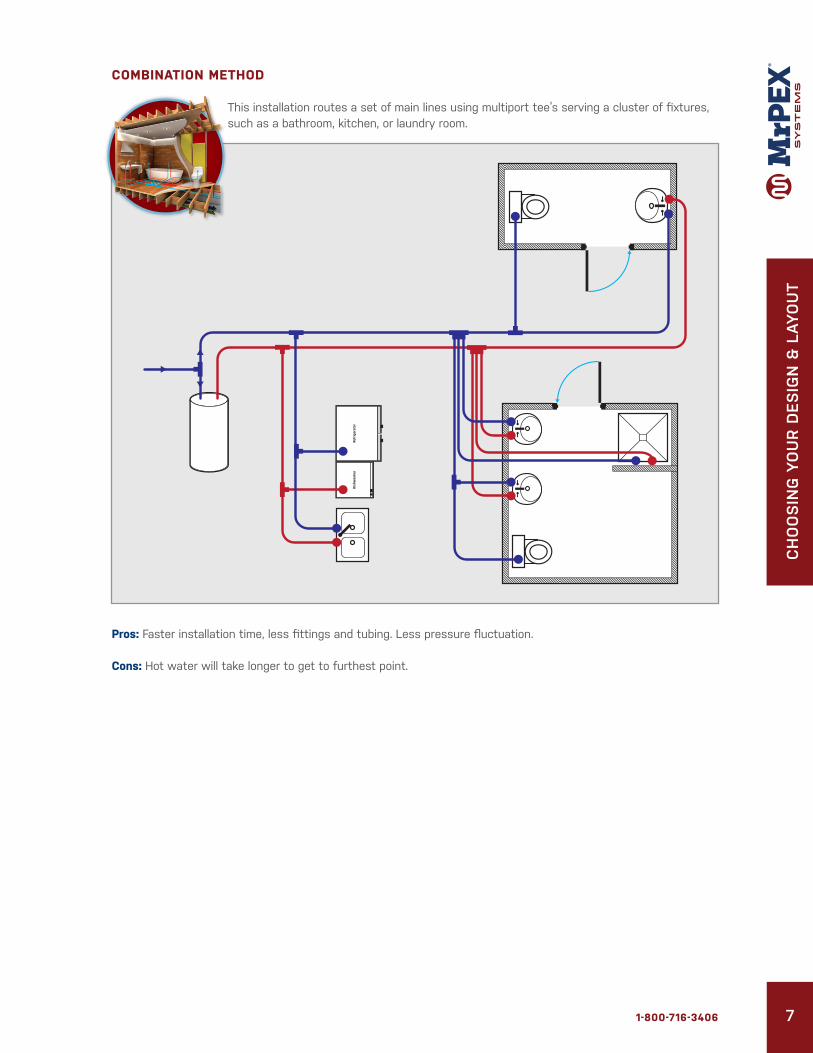
COMBINATION METHOD
This installation routes a set of main lines using multiport tee’s serving a cluster of fixtures, such as a bathroom, kitchen, or laundry room.
Pros: Faster installation time, less fittings and tubing. Less pressure fluctuation.
Cons: Hot water will take longer to get to furthest point.
Dishw
ashe
rRe
frigerator

c
ho
oS
Ing
You
r d
ESIg
n &
LaYou
t
MRPEXSYSTEMS.COM8
COMBINATION METHOD WITH RECIRCULATION PUMPThis installation routes a set of main lines using multiport tee’s serving a cluster of fixtures, such as a bathroom, kitchen, or laundry room. But hot side also continues back to the water heater allowing for a re-circ pump to deliver hot water quicker to the fixtures.
Pros: Faster installation time, less fittings and tubing. Saves on water usage. No waiting for hot water at fixture.
Cons: Installation of added hot return line.
MrPEX PEXa plumbing connections, are made using an insert fitting along with a press sleeve. This fitting meets ASTM F1807 for Lead free brass and the ASTM F2159 for PPSU plastic standards. This connection has many features such as reliability, strength, installs in seconds and is inexpensive. A tool is used to make this connection, one tool for each size is needed. MrPEX® does offer a ½” and ¾” combo press tool as well as ½”-1”tools.
Dishw
ashe
rRe
frigerator

M
rPE
X P
EXa
PLu
MB
Ing
ad
van
tag
ES
1-800-716-3406 9
MRPEX PEXa PLUMBING ADVANTAGES Ű Flexibility – having the freedom to route around obstacles rather than using elbows.
Ű Long term durability – standard operating temperatures do not cause MrPEX® to turn brittle, melt or freeze.
Ű Color coded – Red, Blue and White Pex provided for easy identification.
Ű Quiet – PEX greatly reduces water hammering and also reduces Velocity noise.
Ű Price – PEX prices are more stable and less susceptible to market fluctuation as compared to copper. You can quote jobs that are months away and not worry about your cost being different at time of sale.
Ű Corrosion free – MrPEX will not corrode over time because it has no ferrous metals to deteriorate.
Ű No scaling – PEX is smooth on the inside and does not foster buildup of calcium, minerals or other impurities.
Ű Free of toxins – No solder/flux is used for joining PEX pipes, therefore exposure to harmful and toxic chemicals is greatly reduced.
Ű High pressure tolerance – MrPEX will withstand pressures of 100psi at 180° F.
Ű Fast install time – joints take seconds rather than minutes to connect. The ability to route around an obstacle rather than using elbows, plus having the freedom to run longer than 20’ without any fittings.
Ű Light weight – 100’ of PEX is 22lbs lighter than 100’ of ½” type M copper.
Ű Worry free kinking – On the rare occasion PEX does get kinked, MrPEX pipes can be repaired. See page 26 for instructions.
Ű Warranty – MrPEX provides a 30year warranty on our PEX. (see warranty section)
Let’s face it, would you rather drink out of a copper or plastic cup?

h
ow
to M
akE a
fIttIng
MRPEXSYSTEMS.COM10
HOW TO MAKE A FITTINGCORRECT WRONG
Cut PEX tubing square using a PEX cutter.
Place Stainless Steel Sleeve on the end of the tubing, making sure it is fully seated. Tubing must be seen in witness hole completely.
Insert fitting into the tubing all the way to the shoulder.
Position the tool jaws on the stainless steel sleeve, making sure it is centered.
Close tool all the way.
Once fitting is made, check with GO / NO GO gauge. Follow the tool adjustment instructions to calibrate the tool if necessary.
Pr
ESS
to
oL
ca
LIB
rat
Ion
1-800-716-3406 11
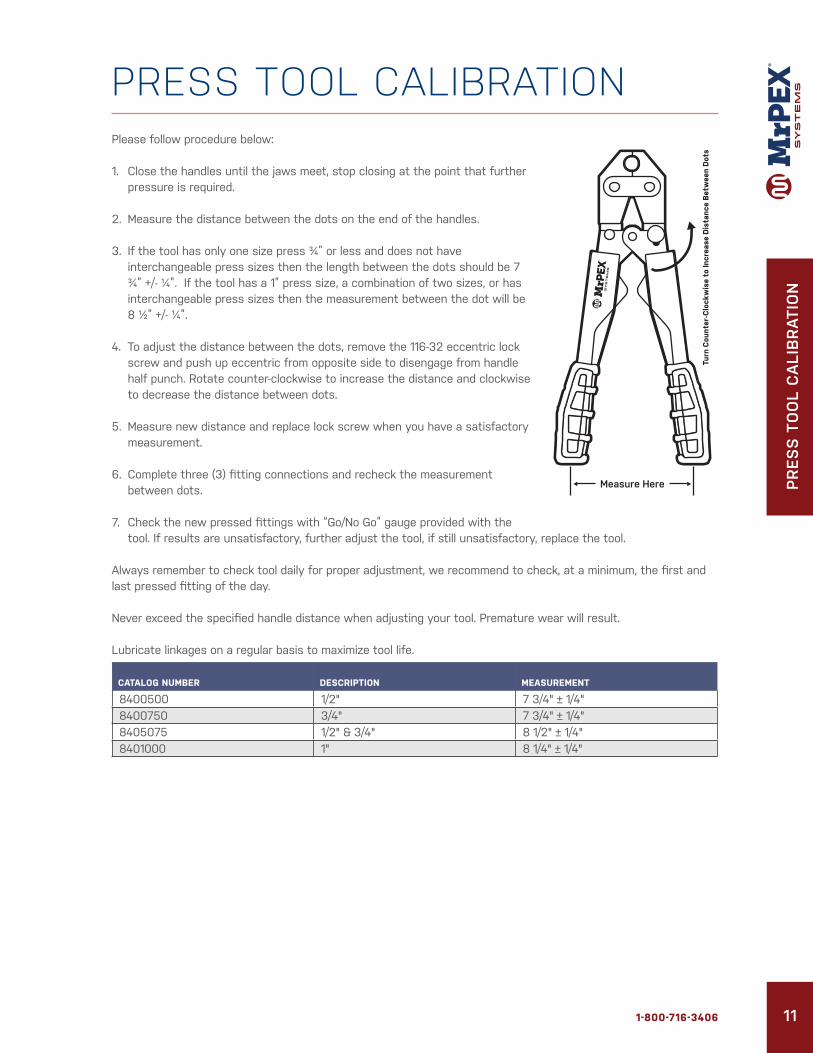
PRESS TOOL CALIBRATIONPlease follow procedure below:
1. Close the handles until the jaws meet, stop closing at the point that further pressure is required.
2. Measure the distance between the dots on the end of the handles.
3. If the tool has only one size press ¾” or less and does not have interchangeable press sizes then the length between the dots should be 7 ¾” +/- ¼”. If the tool has a 1” press size, a combination of two sizes, or has interchangeable press sizes then the measurement between the dot will be 8 ½” +/- ¼”.
4. To adjust the distance between the dots, remove the 116-32 eccentric lock screw and push up eccentric from opposite side to disengage from handle half punch. Rotate counter-clockwise to increase the distance and clockwise to decrease the distance between dots.
5. Measure new distance and replace lock screw when you have a satisfactory measurement.
6. Complete three (3) fitting connections and recheck the measurement between dots.
7. Check the new pressed fittings with “Go/No Go” gauge provided with the tool. If results are unsatisfactory, further adjust the tool, if still unsatisfactory, replace the tool.
Always remember to check tool daily for proper adjustment, we recommend to check, at a minimum, the first and last pressed fitting of the day.
Never exceed the specified handle distance when adjusting your tool. Premature wear will result.
Lubricate linkages on a regular basis to maximize tool life.
CATALOG NUMBER DESCRIPTION MEASUREMENT
8400500 1/2" 7 3/4" ± 1/4"8400750 3/4" 7 3/4" ± 1/4"8405075 1/2" & 3/4" 8 1/2" ± 1/4"8401000 1" 8 1/4" ± 1/4"

In
Sta
LLatIon
gu
IdELIn
ES
MRPEXSYSTEMS.COM12
INSTALLATION GUIDELINES Ű Support horizontal PEX tubing runs every 32”
Ű Support vertical PEX tubing runs every 48”
Ű All drilled penetrations shall be ¼” larger diameter than pipe
Ű For mason walls and metal studs use suitable grommets/sleeve that will protect the PEX from rubbing or wearing on the wall.
Ű Use closed cell pipe insulation or similar suitable material for PEX that will be in poured concrete penetrations
Ű Use a UL listed fire stop that is approved for PEX and by your local code official when penetrating a fire rated wall, floor or ceiling.
Ű Use a bend support or a copper stub out when exiting a wall with a 90° bend
Ű 100 ‘of PEX will expand 1.1” for every 10°F of temperature rise. When installing a longer run than 20’ horizontally or vertically, the use of an expansion loop is required. See example on page 24.
Ű MrPEX recommends that cold water PEX runs be insulated in heated or humid areas, although it is not required, this will help prevent sweating.
Ű MrPEX recommends that PEX runs be insulated when directly buried in the ground, although it is not required, this will discourage freezing and/or heat loss in the tubing.
Ű Minimum bend radius is 4 times the pipe diameter
Ű Use approved metal stud guards to protect tubing that is closer than 2” from surface where nails or screws may be used
Ű Maintain a minimum distance of 12” away from any recessed light fixtures. See Installation Diagram section.
Ű Maintain a minimum distance of 6” away from any gas burning appliance venting. See Installation Diagram section.
Ű All connections to atmospheric vented appliances must be made with an 18” length of copper or approved flex connector prior to connecting with PEX. See Installation Diagram section.
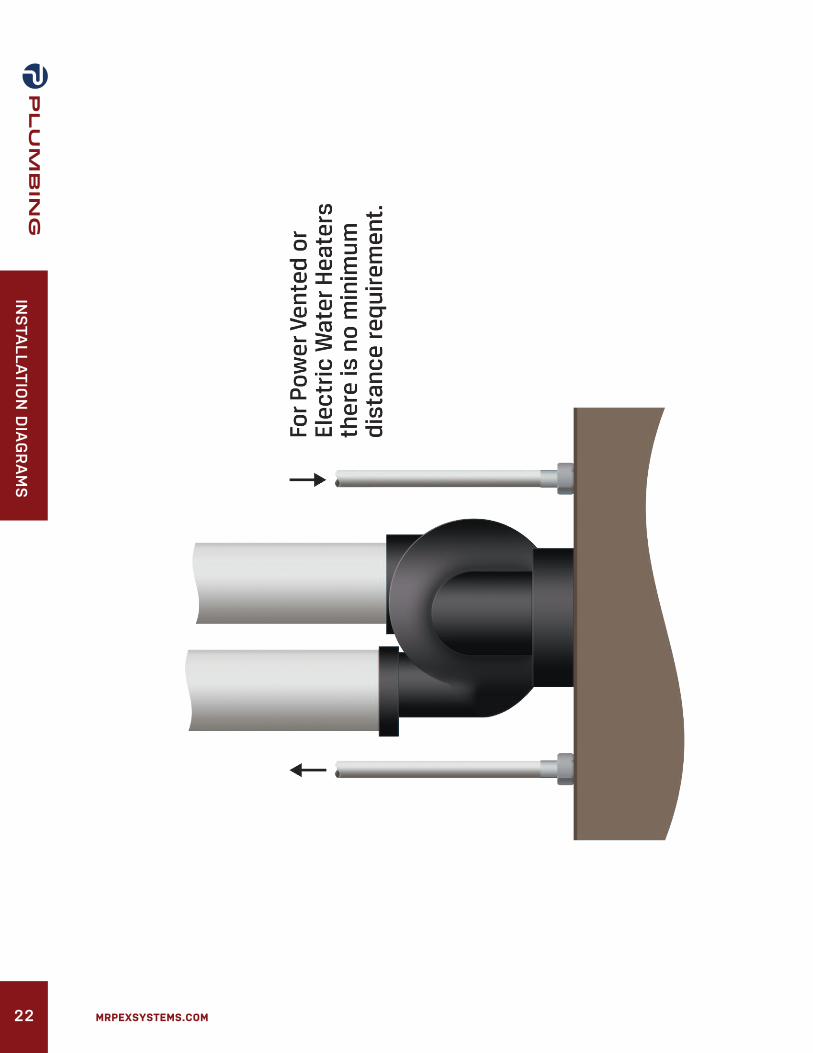
Ű PEX can be connected directly to power vented and direct vented gas burning appliances, also electric or tank less water heaters. See Installation Diagram section.
Ű A kink can be fixed using warm air at temperatures above 270°F, but not to exceed 330°F, heating evenly until the tubing is transparent, allow cool off. See page 26 for instructions
In
Sta
LLat
Ion
LIM
Itat
Ion
S
1-800-716-3406 13
INSTALLATION LIMITATIONS Ű Do not allow PEX tubing to freeze with water inside, especially in concrete as this will cause the concrete to
crack and could potentially shorten the life of the PEX.
Ű Do not solder within 18” of PEX that is connected to copper
Ű Do not expose to open flame
Ű Do not use any flammable gases (liquid or fluid) in PEX tubing
Ű Do not use any cleaning agents on PEX tubing other than soapy water
Ű Do not use as an electrical ground
Ű Do not install in contaminated soils
Ű Do not exceed pressure and/or temperature limits listed on the PEX tubing
Ű Do not use glue on PEX
Ű Do not use PEX if it has been compromised in any way, remove section and splice in a new piece with couplings

fIX
tur
E SIzIn
g c
ha
rt
MRPEXSYSTEMS.COM14
FIXTURE SIZING CHARTFIXTURE MINIMUM
TUBE
SIZING
SUPPLY CONTROL OCCUPANCY WATER SUPPLY FIXTURE UNITS
(WSFU)
COLD HOT TOTAL
Bathtub with 1/2" fill 1/2" Faucet Private 1 1 1.4Bathtub with 1/2" fill 1/2" Faucet Public 3 3 4Bathtub with 3/4" fill 3/4" Faucet Private 2 2 3Bathtub with 3/4" fill 3/4" Faucet Public 5 5 10Bidet 1/2" Faucet Private 1.5 1.5 2Diswashing Machine 1/2" Automatic Private 1.4 1.4Drinking Fountain 3/8" Valve Public 0.25 0.25Kitchen Sink 1/2" Faucet Private 1 1 1.4Kitchen Sink 3/4" Faucet Public 3 3 4Laundry Tray 1/2" Faucet Private 1 1 1.4Lavatory 1/2" Faucet Public 1.5 1.5 2Lavatory 3/8" Faucet Private 0.5 0.5 0.7Service Sink 1/2" Faucet Public 2.25 2.25 3Shower Head 1/2" Mixing Valve Private 1 1 1.4Shower Head 3/4" Mixing Valve Public 3 3 4Urinal with 1" Flush 1" Valve Public 10 10Urinal with 3/4" Flush 3/4" Valve Public 5 5Urinal 1/2" Flush Tank Public 3 3Wash Machine 8 lb 1/2" Automatic Private 1 1 1.4Wash Machine 8 lb 1/2" Automatic Public 2.25 2.25 3Wash Machine 15 lb 3/4" Automatic Public 3 3 4Water Closet 1/2" Flush Valve Private 6 6Water Closet 1/2" Flush Tank Private 2.2 2.2Water Closet 3/4" Flush Valve Public 10 10Water Closet 1/2" Flush Tank Public 5 5
Use the chart above to determine size of distribution pipe. Chart above has been compiled from multiple sources, therefore all WSFU may not match local building codes, verify with local codes/official in your area to gather exact chart.

LI
StI
ng
S &
aPP
ro
vaLS
1-800-716-3406 15
LISTINGS & APPROVALSProduct LIStIng StandardS
MrPEX Potable PEX‐a Tubing
cNSFus‐pw ICC‐ES IAPMO UPC PPI TR‐4 CSA POTABLE NSF‐fs ICC‐PMG
ASTM F876/F877/F2023 /F1807/F2159/F1960/F2080/F2098 ASTM E84 CSA B137.5 NSF/ANSI‐14 NSF/ANSI‐61 NSF/ANSI‐61 Annex G ULC S102.2 AWWA C904
MrPEX Stainless Steel Press Sleeves cNSFus‐pwASTM F877 CSA
MrPEX PPSU FittingsIAPMO UPC cNSFus‐pw
ASTM F2159/F877 CSA B137.5 NSF/ANSI‐14 NSF/ANSI‐61 NSF/ANSI‐61 Annex G
MrPEX Lead Free Brass Fittings
IAPMO UPC cNSFus‐pw CSA
ASTM F1807 CSA B137.5
MrPEX Lead Free Brass Ball Valves
IAPMO UPC NSF/ANSI 61 Annex G CSA
ASTM F1807 CSA B137.5
MrPEX PPSU Manifolds
IAPMO UPC NSF 61 CSA CSA B137.5
MrPEX Copper Manifolds CSA IAPMO UPC NSF ASTM F1807

Pr
ESS
ur
E dr
oP c
ha
rtS
MRPEXSYSTEMS.COM16
PRESSURE DROP CHARTS
10
5
1
0.5
0.1
0.01 0.1 0.5 10.05 2 3
GPM
Pressure Drop in PSI/10 ft of PEX
0.8 ft/s
0.9 ft/s
1 ft/s
2 ft/s
3 ft/s
5 ft/s
8 ft/s
Pex Tubing Pressure Drop at 60° F (16° C)

Pr
ESS
ur
E d
ro
P c
ha
rtS
1-800-716-3406 17
10
5
1
0.5
0.1
0.01 0.1 0.5 10.05 2 3
GPM
Pressure Drop in PSI/10 ft of PEX
Pex Tubing Pressure Drop at 120° F (49° C)
5 ft/s
8 ft/s
3 ft/s
2 ft/s
1 ft/s
0.9 ft/s
0.8 ft/s

In
Sta
LLatIon
dIa
gr
aM
S
MRPEXSYSTEMS.COM18
INSTALLATION DIAGRAMS
Use
the
met
al
drop
ear
ben
d su
ppor
t 71
4050
1.

In
Sta
LLat
Ion
dIa
gr
aM
S
1-800-716-3406 19

In
Sta
LLatIon
dIa
gr
aM
S
MRPEXSYSTEMS.COM20
Use
cop
per
drop
ear
stu
b ou
t el
bow
par
t 41
0900
3

In
Sta
LLat
Ion
dIa
gr
aM
S
1-800-716-3406 21
In
Sta
LLatIon
dIa
gr
aM
S
MRPEXSYSTEMS.COM22

In
Sta
LLat
Ion
dIa
gr
aM
S
1-800-716-3406 23

In
Sta
LLatIon
dIa
gr
aM
S
MRPEXSYSTEMS.COM24

u
SIn
g f
IrES
toP
1-800-716-3406 25
USING FIRESTOP Firestop is an essential part of any plumbing application where tubing needs to penetrate a fire rated wall, floor or ceiling assembly. Follow local building codes when selecting a product, make sure that the product is rated for PEX as well as the intended application. Firestop manufacturer’s test their products with PEX tubing in many different applications, and can refer you to the correct product to use based on the application.
Also keep in mind that each test assembly is approved with a certain type of caulk. Not all caulks are approved for all penetrations. Be sure to seal the penetration in accordance with the appropriate test assembly, using the type of firestop material recommended by the firestop manufacturer. For larger penetrations other types of firestop caulk may be required. For more information check with the firestop manufacturer.
REPAIRING A KINK Although MrPEX® Tubing is the most flexible and kink-resistant tubing on the market, it may still happen that a kink could occur. PEX-a (peroxide cross-linked PEX) has the very important property of being extremely crack-resistant, so that the kink will not result in a crack. This property results in a couple of “extra” options to repair kinks:
If the kink is not very accentuated, just rounding the tubing carefully with a pair of smooth pliers is acceptable. However, if the kink is in a place where there has to be a bend, there could be a risk that the kink re-develops. If so, measures have to be taken in order to prevent this from happening. One option is to apply a bend support in such a way that the kink gets firm support.
A kink will disappear if the kinked section of the tubing is heated to a temperature above the material’s crystalline melting point, 270°F. This temperature can be reached with a thermostat controlled hot air gun. It is quite important that the hot air reaching the tubing surface does not exceed 330°F. Please check with a thermometer. First, relieve the tension on the kink by straightening the tubing. Carefully heat the tubing while continuously turning the hot air gun, allowing all sides of the kinked tubing section receive the same heat. The tubing wall will turn transparent in 2–4 minutes. When turning transparent, the kink will disappear. Stop heating and let the tubing cool down to room temperature, untouched, before continuing the installation. Applying cool water will speed up the cooling. The Tubing wall will turn opaque again. The very thin barrier layers may be slightly damaged during this process, but the core of the PEX Tubing will be fine. Local damage to the barrier layers will not affect the integrity of the installation. You may notice a very slight expansion of the heated section. That is because of the slight dimensional calibration performed during manufacturing will disappear, and that is okay. Never use a torch to heat the tubing! Overheating the tubing can lead to thermal degradation, which means that the life expectancy is compromised.
The third method to repair a kink is the “conventional repair method”. See following page 26 for instruction on specific coupling style used.

r
EPaIr
Ing
a kIn
k
MRPEXSYSTEMS.COM26
PEX PrESS f1807 BraSS and f2159 PPSu rEPaIr couPLIng Note: This coupling method is considered a manufactured fitting and is approved by MrPEX® to be used to repair the MrPEX® PEX Tubing.
Making the repair:STEP 1 Start by making a square cut at the end of the tube using a suitable tubing cutter.
STEP 2 After cutting the tubing, slide the stainless steel press sleeve onto the tubing, making sure it seats all the way at the bottom. Tubing should be visible in the witness hole at the bottom of the press sleeve.
STEP 3 Push the tubing and sleeve onto the fitting until it stops.
STEP 4 Using either a manual or battery press tool, complete the fitting. Making sure that the press jaw is up against the shoulder of the fitting. Make sure to perform a pressure test prior to covering or burying the coupling.
STEP 5 Wrap coupling with suitable material such as foam insulation if coupling is to be buried to making sure the fitting is not in direct contact with the ground or concrete.

LI
MIt
Ed w
ar
ra
ntY
1-800-716-3406 27
LIMITED WARRANTYLIMItEd warrantY-EffctIvE JuLY 1, 2015
VALID FOR MRPEX® POTABLE PEX-A TUBING, FITTINGS AND OTHER SELECT PLUMBING PRODUCTS
LIMITED WARRANTY:MrPEX® Systems warrants to its “clients” that the MrPEX® POTABLE PEX-a Tubing and Plumbing Components, used for Plumbing applications, sold hereunder shall be free from defects in material and workmanship and that the components will conform to specifications stated in MrPEX® Publications. This Limited Warranty shall expire thirty (30) years for the MrPEX® POTABLE PEX-a tubing, five (5) years for Lead Free Brass F1807 PEX Press Fittings, PPSU F2159 PEX Press Fittings and two (2) years for all other components, from date of shipment by MrPEX® Systems unless otherwise specified in writing. MrPEX® Systems further warrants that products listed are compatible with Each other, but at the same time we disclaim warranty for claims related to compatibility with non-MrPEX® products. Components sold under this Limited Warranty must (1) be selected, designed, and installed according to the instructions in MrPEX® Publications using appropriate trade workmanship and according to the local building code(s), (2) remain in their originally installed location, (3) are connected to appropriate water and power supplies, (4) show no evidence of tampering, mishandling, neglect, accidental damage, modification or repair without the approval of MrPEX® Systems or damage done to the product by anyone other than MrPEX® Systems authorized personnel.
MrPEX® Systems’ sole obligation hereunder shall be, at its option, to issue credit, repair or replace any component or part thereof which is proved to be other than as warranted. No allowance shall be made to clients for transportation or labor charges unless such charges are authorized in writing in advance by MrPEX® Systems. Any repairs without the express written consent of MrPEX® Systems, shall render this Limited Warranty invalid. Warranty claims must be received by MrPEX® Systems within the applicable warranty period and within thirty (30) days from the time when the cause for the claim occurred or was discovered. Upon receipt of prompt notice of a warranty claim, MrPEX® Systems shall have ten (10) business days in which to determine whether it acknowledges responsibility for any asserted defects in material or workmanship and the appropriate action to be taken. This Limited Warranty and any claims arising from breach of warranty, or any other claim arising hereunder, shall be governed and construed under the laws of the State of Minnesota. No other persons than MrPEX® employees have any express or implied authority to bind MrPEX® to any agreement or warranty of any kind without the express written consent of MrPEX® Systems.
Disclaimer of Warranties:MrPEX® Systems disclaims any warranty not provided herein including the implied warranty of merchantability and implied warranty of fitness for a particular purpose. It is expressly understood that MrPEX® Systems is not responsible for any consequential or other damages that may arise from using MrPEX® System components. Damage resulting from water freezing in the tubing does not constitute a defect in material or workmanship, and shall not be covered by this warranty. MrPEX® tubing may not be stored in direct sunlight for any period longer than three weeks or this limited warranty becomes invalid. MrPEX® Systems disclaims any statutory or implied warranty of habitability. MrPEX® Systems further disclaims any responsibility for losses, expenses, inconveniences, special, indirect, secondary, incidental or consequential damages arising from ownership or use of the articles sold hereunder. There are no warranties which extend beyond the face hereof.

LIM
ItEd w
ar
ra
ntY
MRPEXSYSTEMS.COM28
notES

LI
MIt
Ed w
ar
ra
ntY
1-800-716-3406 29
notES

Corporate Office 2613 87th court w.northfield, Mn 55057800-716-3406 [email protected]
Order Departmentorder by fax: 952-423-6114order by Phone: 800-716-3406 order by Email:[email protected]
Sales & Service5300 alpine dr. nwramsey, Mn [email protected]
mrpexsystems.com
#L411