installation and configuration guide - home | netiq · 4 netiq sentinel unix agent installation and...
TRANSCRIPT

Installation and Configuration Guide
NetIQ® Sentinel UNIX Agent
March 2014
Legal Notice
THIS DOCUMENT AND THE SOFTWARE DESCRIBED IN THIS DOCUMENT ARE FURNISHED UNDER AND ARE SUBJECT TO THE TERMS OF A LICENSE AGREEMENT OR A NON-DISCLOSURE AGREEMENT. EXCEPT AS EXPRESSLY SET FORTH IN SUCH LICENSE AGREEMENT OR NON-DISCLOSURE AGREEMENT, NETIQ CORPORATION PROVIDES THIS DOCUMENT AND THE SOFTWARE DESCRIBED IN THIS DOCUMENT "AS IS" WITHOUT WARRANTY OF ANY KIND, EITHER EXPRESS OR IMPLIED, INCLUDING, BUT NOT LIMITED TO, THE IMPLIED WARRANTIES OF MERCHANTABILITY OR FITNESS FOR A PARTICULAR PURPOSE. SOME STATES DO NOT ALLOW DISCLAIMERS OF EXPRESS OR IMPLIED WARRANTIES IN CERTAIN TRANSACTIONS; THEREFORE, THIS STATEMENT MAY NOT APPLY TO YOU.
For purposes of clarity, any module, adapter or other similar material ("Module") is licensed under the terms and conditions of the End User License Agreement for the applicable version of the NetIQ product or software to which it relates or interoperates with, and by accessing, copying or using a Module you agree to be bound by such terms. If you do not agree to the terms of the End User License Agreement you are not authorized to use, access or copy a Module and you must destroy all copies of the Module and contact NetIQ for further instructions.
This document and the software described in this document may not be lent, sold, or given away without the prior written permission of NetIQ Corporation, except as otherwise permitted by law. Except as expressly set forth in such license agreement or non-disclosure agreement, no part of this document or the software described in this document may be reproduced, stored in a retrieval system, or transmitted in any form or by any means, electronic, mechanical, or otherwise, without the prior written consent of NetIQ Corporation. Some companies, names, and data in this document are used for illustration purposes and may not represent real companies, individuals, or data.
This document could include technical inaccuracies or typographical errors. Changes are periodically made to the information herein. These changes may be incorporated in new editions of this document. NetIQ Corporation may make improvements in or changes to the software described in this document at any time.
U.S. Government Restricted Rights: If the software and documentation are being acquired by or on behalf of the U.S. Government or by a U.S. Government prime contractor or subcontractor (at any tier), in accordance with 48 C.F.R. 227.7202-4 (for Department of Defense (DOD) acquisitions) and 48 C.F.R. 2.101 and 12.212 (for non-DOD acquisitions), the government’s rights in the software and documentation, including its rights to use, modify, reproduce, release, perform, display or disclose the software or documentation, will be subject in all respects to the commercial license rights and restrictions provided in the license agreement.
© 2014 NetIQ Corporation and its affiliates. All Rights Reserved.
For information about NetIQ trademarks, see https://www.netiq.com/company/legal/.

Contents
About this Book and the Library 5About NetIQ Corporation 7
1 Introduction 9
1.1 Overview of Features . . . . . . . . . . . . . . . . . . . . . . . . . . . . . . . . . . . . . . . . . . . . . . . . . . . . . . . . . . . . . . 91.2 UNIX Agent Processes . . . . . . . . . . . . . . . . . . . . . . . . . . . . . . . . . . . . . . . . . . . . . . . . . . . . . . . . . . . 10
2 Installing the UNIX Agent and UNIX Agent Manager 11
2.1 System Requirements . . . . . . . . . . . . . . . . . . . . . . . . . . . . . . . . . . . . . . . . . . . . . . . . . . . . . . . . . . . . 122.2 Installing UNIX Agent Manager . . . . . . . . . . . . . . . . . . . . . . . . . . . . . . . . . . . . . . . . . . . . . . . . . . . . . 13
2.2.1 Installing UNIX Agent Manager on a Microsoft Windows Computer . . . . . . . . . . . . . . . . . . 132.2.2 Installing UNIX Agent Manager on a Linux Computer . . . . . . . . . . . . . . . . . . . . . . . . . . . . . 13
2.3 Installing the Agent. . . . . . . . . . . . . . . . . . . . . . . . . . . . . . . . . . . . . . . . . . . . . . . . . . . . . . . . . . . . . . . 142.3.1 Deploying the UNIX Agent Using UNIX Agent Manager . . . . . . . . . . . . . . . . . . . . . . . . . . 142.3.2 Installing the Agent on the Local Computer. . . . . . . . . . . . . . . . . . . . . . . . . . . . . . . . . . . . . 152.3.3 Silently Installing on the Agent Computer . . . . . . . . . . . . . . . . . . . . . . . . . . . . . . . . . . . . . . 16
2.4 Configuring Your Auditing System for AuditObject_singleton Groups . . . . . . . . . . . . . . . . . . . . . . . . 172.4.1 Configuration for the AIXObject_singleton Group . . . . . . . . . . . . . . . . . . . . . . . . . . . . . . . . 182.4.2 Configuration for the HPAuditObject__singleton Group . . . . . . . . . . . . . . . . . . . . . . . . . . . 182.4.3 Configuration for the LinuxObject_singleton Group. . . . . . . . . . . . . . . . . . . . . . . . . . . . . . . 182.4.4 Configuration for the SolarisAuditObject__singleton Group . . . . . . . . . . . . . . . . . . . . . . . . 192.4.5 Configuration for the OracleAuditObject__singleton Group. . . . . . . . . . . . . . . . . . . . . . . . 20
2.5 Configuring the Agent for Use with Oracle. . . . . . . . . . . . . . . . . . . . . . . . . . . . . . . . . . . . . . . . . . . . . 202.6 Applying Patches . . . . . . . . . . . . . . . . . . . . . . . . . . . . . . . . . . . . . . . . . . . . . . . . . . . . . . . . . . . . . . . . 212.7 Uninstalling UNIX Agents and UNIX Agent Manager. . . . . . . . . . . . . . . . . . . . . . . . . . . . . . . . . . . . . 21
2.7.1 Uninstalling the UNIX Agent . . . . . . . . . . . . . . . . . . . . . . . . . . . . . . . . . . . . . . . . . . . . . . . . 212.7.2 Uninstalling UNIX Agent Manager . . . . . . . . . . . . . . . . . . . . . . . . . . . . . . . . . . . . . . . . . . . . 21
3 Working with the UNIX Agent and UNIX Agent Manager 23
3.1 Deploying Rule Sets. . . . . . . . . . . . . . . . . . . . . . . . . . . . . . . . . . . . . . . . . . . . . . . . . . . . . . . . . . . . . . 233.2 Enabling Process Accounting . . . . . . . . . . . . . . . . . . . . . . . . . . . . . . . . . . . . . . . . . . . . . . . . . . . . . . 23
3.2.1 Enabling Process Accounting on AIX Computers . . . . . . . . . . . . . . . . . . . . . . . . . . . . . . . . 243.2.2 Enabling Process Accounting on HP-UX Computers . . . . . . . . . . . . . . . . . . . . . . . . . . . . . 243.2.3 Enabling Process Accounting on Red Hat Linux . . . . . . . . . . . . . . . . . . . . . . . . . . . . . . . . . 243.2.4 Enabling Process Accounting on Solaris Computers . . . . . . . . . . . . . . . . . . . . . . . . . . . . . 243.2.5 Restricting Access to Rule Sets. . . . . . . . . . . . . . . . . . . . . . . . . . . . . . . . . . . . . . . . . . . . . . 25
3.3 Managing Users in UNIX Agent Manager . . . . . . . . . . . . . . . . . . . . . . . . . . . . . . . . . . . . . . . . . . . . . 263.3.1 Using LDAP or Microsoft Active Directory Credentials . . . . . . . . . . . . . . . . . . . . . . . . . . . . 263.3.2 SSL Communication with the LDAP or Active Directory Server . . . . . . . . . . . . . . . . . . . . . 27
3.4 Understanding FIPS Communication. . . . . . . . . . . . . . . . . . . . . . . . . . . . . . . . . . . . . . . . . . . . . . . . . 273.5 Restart Methods for the UNIX Agent . . . . . . . . . . . . . . . . . . . . . . . . . . . . . . . . . . . . . . . . . . . . . . . . . 27
4 Understanding Security Rules 29
4.1 Understanding UNIX Agent Rules . . . . . . . . . . . . . . . . . . . . . . . . . . . . . . . . . . . . . . . . . . . . . . . . . . . 294.2 Understanding Rule Sets . . . . . . . . . . . . . . . . . . . . . . . . . . . . . . . . . . . . . . . . . . . . . . . . . . . . . . . . . . 29
4.2.1 Selecting a Rule Set to Edit . . . . . . . . . . . . . . . . . . . . . . . . . . . . . . . . . . . . . . . . . . . . . . . . . 30
Contents 3
4.2.2 Viewing Rule Sets and Editing Rule Set Properties . . . . . . . . . . . . . . . . . . . . . . . . . . . . . . 304.2.3 Activating Rule Sets. . . . . . . . . . . . . . . . . . . . . . . . . . . . . . . . . . . . . . . . . . . . . . . . . . . . . . . 31
4.3 Deciding How to Create UNIX Rules and Rule Sets . . . . . . . . . . . . . . . . . . . . . . . . . . . . . . . . . . . . . 314.4 Using the Rule Wizard to Create Rules . . . . . . . . . . . . . . . . . . . . . . . . . . . . . . . . . . . . . . . . . . . . . . . 314.5 Understanding Event Sources . . . . . . . . . . . . . . . . . . . . . . . . . . . . . . . . . . . . . . . . . . . . . . . . . . . . . . 324.6 Understanding Rule Groups. . . . . . . . . . . . . . . . . . . . . . . . . . . . . . . . . . . . . . . . . . . . . . . . . . . . . . . . 334.7 Understanding Rules and Actions . . . . . . . . . . . . . . . . . . . . . . . . . . . . . . . . . . . . . . . . . . . . . . . . . . . 33
4.7.1 Viewing and Editing Rule Properties and Actions . . . . . . . . . . . . . . . . . . . . . . . . . . . . . . . . 344.7.2 Creating New Rules and Actions . . . . . . . . . . . . . . . . . . . . . . . . . . . . . . . . . . . . . . . . . . . . . 35
4.8 Understanding Initialization Code . . . . . . . . . . . . . . . . . . . . . . . . . . . . . . . . . . . . . . . . . . . . . . . . . . . 354.9 Understanding Conditionals and Comparisons . . . . . . . . . . . . . . . . . . . . . . . . . . . . . . . . . . . . . . . . . 354.10 Understanding Time Conditions. . . . . . . . . . . . . . . . . . . . . . . . . . . . . . . . . . . . . . . . . . . . . . . . . . . . . 36
4.10.1 Viewing and Editing Time Conditions . . . . . . . . . . . . . . . . . . . . . . . . . . . . . . . . . . . . . . . . . 364.10.2 Adding New Time Conditions . . . . . . . . . . . . . . . . . . . . . . . . . . . . . . . . . . . . . . . . . . . . . . . 364.10.3 Deleting Time Conditions. . . . . . . . . . . . . . . . . . . . . . . . . . . . . . . . . . . . . . . . . . . . . . . . . . . 36
4.11 Understanding Main Code . . . . . . . . . . . . . . . . . . . . . . . . . . . . . . . . . . . . . . . . . . . . . . . . . . . . . . . . . 374.11.1 Viewing and Editing Main Code. . . . . . . . . . . . . . . . . . . . . . . . . . . . . . . . . . . . . . . . . . . . . . 374.11.2 Adding New Main Code . . . . . . . . . . . . . . . . . . . . . . . . . . . . . . . . . . . . . . . . . . . . . . . . . . . . 374.11.3 Deleting Main Code . . . . . . . . . . . . . . . . . . . . . . . . . . . . . . . . . . . . . . . . . . . . . . . . . . . . . . . 37
4.12 Customizing the Rules Management User Interface . . . . . . . . . . . . . . . . . . . . . . . . . . . . . . . . . . . . . 384.12.1 Deciding Whether to Use Tabbed Layouts . . . . . . . . . . . . . . . . . . . . . . . . . . . . . . . . . . . . . 384.12.2 Deciding Whether to Use Parameter Aliases . . . . . . . . . . . . . . . . . . . . . . . . . . . . . . . . . . . 38
4 NetIQ Sentinel UNIX Agent Installation and Configuration Guide

About this Book and the Library
This book provides conceptual and installation information about the components that provide UNIX and Linux agent support for UNIX and Linux computers running the NetIQ Sentinel product.
Intended AudienceThis book provides information for individuals responsible for installing and managing the Sentinel UNIX agent.
Other Information in the LibraryIn addition to the documentation for the core Sentinel product, the following books contain information for environments running the UNIX agent:
Sentinel Agent Manager Installation Guide Provides detailed planning and installation information about Sentinel Agent Manager, which passes information from the UNIX agent to Sentinel.
Sentinel Agent Manager User Guide Provides conceptual information about Sentinel Agent Manager. This book also provides an overview of the user interfaces and step-by-step guidance for many administration tasks.
Sentinel Agent Manager Migration Guide Provides step-by-step guidance for migrating from NetIQ Security Manager agents and Central Computers to a Sentinel environment.
About this Book and the Library 5

6 NetIQ Sentinel UNIX Agent Installation and Configuration Guide

About NetIQ Corporation
NetIQ, an Attachmate business, is a global leader in systems and security management. With more than 12,000 customers in over 60 countries, NetIQ solutions maximize technology investments and enable IT process improvements to achieve measurable cost savings. The company’s portfolio includes award-winning management products for IT Process Automation, Systems Management, Security Management, Configuration Audit and Control, Enterprise Administration, and Unified Communications Management. For more information, please visit www.netiq.com.
Contacting Sales SupportFor questions about products, pricing, and capabilities, please contact your local partner. If you cannot contact your partner, please contact our Sales Support team.
Contacting Technical SupportFor specific product issues, please contact our Technical Support team.
Contacting Documentation SupportOur goal is to provide documentation that meets your needs. If you have suggestions for improvements, please e-mail [email protected]. We value your input and look forward to hearing from you.
Worldwide: www.netiq.com/about_netiq/officelocations.asp
United States and Canada: 888-323-6768
Email: [email protected]
Web Site: www.netiq.com
Worldwide: www.netiq.com/Support/contactinfo.asp
North and South America: 1-713-418-5555
Europe, Middle East, and Africa: +353 (0) 91-782 677
Email: [email protected]
Web Site: www.netiq.com/support
About NetIQ Corporation 7
Contacting the Online User CommunityQmunity, the NetIQ online community, is a collaborative network connecting you to your peers and NetIQ experts. By providing more immediate information, useful links to helpful resources, and access to NetIQ experts, Qmunity helps ensure you are mastering the knowledge you need to realize the full potential of IT investments upon which you rely. For more information, please visit http://community.netiq.com.
8 NetIQ Sentinel UNIX Agent Installation and Configuration Guide
1 1Introduction
The NetIQ Sentinel UNIX Agent (UNIX agent) allows you to use an agent to monitor your UNIX and Linux computers. After you install the applicable components of the UNIX agent that you need in your environment, use the Sentinel Agent Manager Connector to pass information from the UNIX agent to Sentinel.
NetIQ offers several UNIX agent options that enable UNIX and Linux operating system support for the following NetIQ products:
NetIQ AppManager NetIQ Change Guardian NetIQ Secure Configuration Manager NetIQ Sentinel
The NetIQ UNIX Agents include the following components:
NetIQ UNIX Agent Manager: A user interface that you can use to manage all your UNIX agents components across your enterprise. UNIX Agent Manager runs on Windows and Linux operating systems. You can store information about your agent computers in one UNIX Agent Manager server, then access the information through one or numerous UNIX Agent Manager consoles.
The AppManager UNIX Agent: A component of the NetIQ UNIX Agent that enables support for AppManager and provides the managed objects for UNIX and Linux AppManager modules.
The NetIQ Security Agent for UNIX: A component of the NetIQ UNIX Agent that enables support for Change Guardian, Secure Configuration Manager, and Sentinel.
Common components: Components that are shared by the AppManager UNIX Agent and the Security Agent for UNIX.
1.1 Overview of FeaturesSecuring and monitoring the performance of your UNIX and Linux environment can be expensive and time-consuming, especially when you and your staff face tight budgets and escalating security threats. Consider the following issues most enterprise performance and security managers face:
Deficits in staff knowledge concerning UNIX and Linux security and system expertise Managing various operating systems including Red Hat, AIX, HP-UX, Solaris, and SUSE Linux Controlling access to privileged commands and sensitive resources Lacking intrusion detection and response systems to handle both real and potential security
breaches
The NetIQ Security Agent for UNIX (UNIX agent) helps you effectively address these challenges, enabling Sentinel to monitor the security of your UNIX and Linux environment.
Introduction 9
1.2 UNIX Agent ProcessesThe two key processes used by the UNIX agent are:
VigilEntAgent: The process that the UNIX agent uses for communication. detectd: The process that performs the monitoring tasks and data retrieval for Sentinel. The
specific behavior of this process is directed by the content of the detect.xml file.
10 NetIQ Sentinel UNIX Agent Installation and Configuration Guide

2 2Installing the UNIX Agent and UNIX Agent Manager
This chapter provides information about installing and uninstalling the UNIX agent on computers you want to monitor and UNIX Agent Manager. This chapter also provides an overview of starting and stopping the UNIX agent.
This chapter assumes you have Sentinel Server and the Sentinel Agent Manager installed.
This chapter does not provide information about upgrading from NetIQ Security Manager to Sentinel. For information about upgrading, see Upgrading From NetIQ Security Manager 6.5 to Sentinel 7.0 on www.netiq.com/documentation. In addition to the procedures in that document, you must also perform the following actions after you upgrade:
Remove the agent from UNIX Agent Manager, and add it back with the new version number. Remove the Security Manager Rules from Rules Manager.. Reconfigure the event destination server. Reconfigure the Sentinel server port.
To install UNIX agent, complete the following checklist:
Ensure you have the necessary environment. For more information, see Section 2.1, “System Requirements,” on page 12.
Install UNIX Agent Manager. For more information, see Section 2.2, “Installing UNIX Agent Manager,” on page 13.
Install the agent on the computer you want to manage.
For information about how to install, or deploy, to one or more computers from the console, see Section 2.3.1, “Deploying the UNIX Agent Using UNIX Agent Manager,” on page 14.
For information about how to install on a local computer, see Section 2.3.2, “Installing the Agent on the Local Computer,” on page 15.
For information about how to install using an answer file, see Section 2.3.3, “Silently Installing on the Agent Computer,” on page 16.
Install any agent hotfixes applicable to your environment. For information about how to install patches to the console and the UNIX agent, see Section 2.6, “Applying Patches,” on page 21.
Use UNIX Agent Manager to deploy the Sentinel rules on the agent computer. For information about how to deploy rules, see Section 3.1, “Deploying Rule Sets,” on page 23.
Begin monitoring your UNIX and Linux computers.
Installing the UNIX Agent and UNIX Agent Manager 11

2.1 System RequirementsThe UNIX agent, when used with Sentinel, has the following system requirements.
Item Requirement
NetIQ Sentinel 7.1
Operating system on agent computers One of the following:
CentOS
HP-UX
IBM AIX
Oracle Linux
Oracle Solaris
Red Hat Enterprise Linux
SUSE Linux Enterprise Server
Operating system on UNIX Agent Manager computers
One of the following:
Red Hat Enterprise Linux
SUSE Linux Enterprise Server
Windows 7 (32-bit and 64-bit)
Windows 8
Windows Server 2008 R2
Windows Server 2008 (32-bit and 64-bit)
Windows Server 2012
Memory on agent computers 512 MB
Memory on UNIX Agent Manager UNIX agents require the following:
128 MB minimum RAM
512 MB swap file (virtual memory)
Hard disk space on agent computers 350 MB plus 400 Bytes per inode used by local file systems
Hard disk space on UNIX Agent Manager computers
1.2 GB
Default port assignments UNIX agent uses the following default ports:
2620: The UNIX agent communicates with UNIX Agent Manager.
1590: The UNIX agent communicates with Sentinel.
You can use the Configure option in UNIX Agent Manager to change the port assignments.
12 NetIQ Sentinel UNIX Agent Installation and Configuration Guide
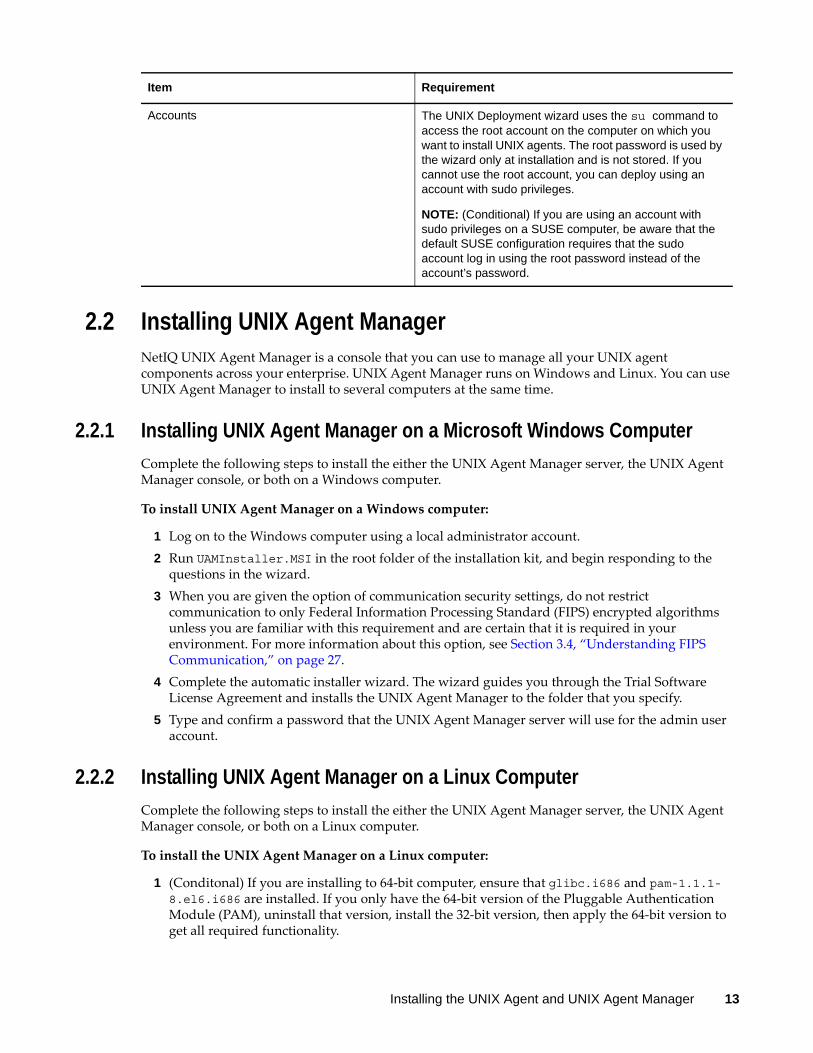
2.2 Installing UNIX Agent ManagerNetIQ UNIX Agent Manager is a console that you can use to manage all your UNIX agent components across your enterprise. UNIX Agent Manager runs on Windows and Linux. You can use UNIX Agent Manager to install to several computers at the same time.
2.2.1 Installing UNIX Agent Manager on a Microsoft Windows Computer
Complete the following steps to install the either the UNIX Agent Manager server, the UNIX Agent Manager console, or both on a Windows computer.
To install UNIX Agent Manager on a Windows computer:
1 Log on to the Windows computer using a local administrator account.2 Run UAMInstaller.MSI in the root folder of the installation kit, and begin responding to the
questions in the wizard.3 When you are given the option of communication security settings, do not restrict
communication to only Federal Information Processing Standard (FIPS) encrypted algorithms unless you are familiar with this requirement and are certain that it is required in your environment. For more information about this option, see Section 3.4, “Understanding FIPS Communication,” on page 27.
4 Complete the automatic installer wizard. The wizard guides you through the Trial Software License Agreement and installs the UNIX Agent Manager to the folder that you specify.
5 Type and confirm a password that the UNIX Agent Manager server will use for the admin user account.
2.2.2 Installing UNIX Agent Manager on a Linux Computer
Complete the following steps to install the either the UNIX Agent Manager server, the UNIX Agent Manager console, or both on a Linux computer.
To install the UNIX Agent Manager on a Linux computer:
1 (Conditonal) If you are installing to 64-bit computer, ensure that glibc.i686 and pam-1.1.1-8.el6.i686 are installed. If you only have the 64-bit version of the Pluggable Authentication Module (PAM), uninstall that version, install the 32-bit version, then apply the 64-bit version to get all required functionality.
Accounts The UNIX Deployment wizard uses the su command to access the root account on the computer on which you want to install UNIX agents. The root password is used by the wizard only at installation and is not stored. If you cannot use the root account, you can deploy using an account with sudo privileges.
NOTE: (Conditional) If you are using an account with sudo privileges on a SUSE computer, be aware that the default SUSE configuration requires that the sudo account log in using the root password instead of the account’s password.
Item Requirement
Installing the UNIX Agent and UNIX Agent Manager 13

2 Change directories to where you copied the installation package for UNIX Agent Manager. In the installation package, change directories to where the installation files are located.
3 Extract the appropriate .tar.gz file for your platform.4 In the new UAM folder, start the installation by running ./installserver.sh install. 5 Type and confirm a password that the UNIX Agent Manager server will use for the admin user
account.6 Start the UNIX Agent Manager console by running the run.sh script.
2.3 Installing the AgentYou can install the agent locally on the computer you will monitor, by deploying from UNIX Agent Manager, or without user interaction by using an answer file.
If you are upgrading the agent, you can choose to create a custom configuration file that contains one or more configuration parameters instead of entering each parameter manually. For any configuration parameter in the file, the UNIX agent upgrade program uses that parameter instead of using the fields in the upgrade screen. You set the parameters in the file using the same format as the silent installation file. For more information about the silent installation file parameters, see Section 2.3.3, “Silently Installing on the Agent Computer,” on page 16.
2.3.1 Deploying the UNIX Agent Using UNIX Agent Manager
Remote deployment provides a convenient and uniform method for installing one or more UNIX agents. You can use the Deployment wizard provided in the UNIX Agent Manager for remote deployment, unless one of the following conditions exists:
Your site standards prohibit your access to root passwords. Your site standards require a specific software distribution mechanism. Your site standards prohibit software distribution mechanisms.
For information about installing UNIX Agent Manager, see Section 2.2, “Installing UNIX Agent Manager,” on page 13.
To remotely deploy UNIX agent components:
1 (Conditonal) If you are installing to 64-bit Linux computer, ensure that glibc.i686 and pam-1.1.1-8.el6.i686 are installed. If you only have the 64-bit version of the Pluggable Authentication Module (PAM), uninstall that version, install the 32-bit version, then apply the 64-bit version to get all required functionality.
2 In the File menu of UNIX Agent Manager, select Remote Deployment.3 Click the Add Host button and fill in the fields as prompted.4 When you are given the option of communication security settings, do not restrict
communication to only Federal Information Processing Standard (FIPS) encrypted algorithms unless you are familiar with this requirement and are certain it is required in your environment. For more information about this option, see Section 3.4, “Understanding FIPS Communication,” on page 27.
5 When you are given the option to specify the restart method, NetIQ recommends that you accept the default, rclink. For more information about restart methods, see Section 3.5, “Restart Methods for the UNIX Agent,” on page 27.
6 Proceed through the wizard to complete installation.
14 NetIQ Sentinel UNIX Agent Installation and Configuration Guide

After you install the agent, use UNIX Agent Manager to deploy the Sentinel rules on the agent computer. For information about how to deploy rules, see Section 4.2.3, “Activating Rule Sets,” on page 31.
If you are monitoring Oracle databases or Apache Web Servers, provide any required configuration under the Configure > Sentinel Options menu. For more configuration information for Oracle or Apache, see the Sentinel collector documentation for your application.
2.3.2 Installing the Agent on the Local Computer
The following procedure guides you through logging on to an agent computer and locally installing all required components on the agent computer. If you are upgrading and have used UNIX Agent Manager, make sure to export your host list.
To install an agent on the local computer:
1 Log on to an agent computer using an account with super user privileges.2 Change directories to the product installation package, and then enter the following command
to start the install script:
/bin/sh ./install.sh
3 Proceed through the prompts. 4 When you are given the option to configure the agent for use with other products, select the
option only if you run NetIQ AppManager, NetIQ Change Guardian, or NetIQ Secure Configuration Manager to monitor the computer. If you will not use those products, type n instead of accepting the default response of y for those questions.
5 When you are given the option to specify the restart method, NetIQ recommends that you accept the default, rclink. For more information about restart methods, see Section 3.5, “Restart Methods for the UNIX Agent,” on page 27.
6 When the installation completes, register the computer as an agent computer in UNIX Agent Manager and activate the agent the Sentinel rules on the agent computer. For information about how to deploy rules, see Section 4.2.3, “Activating Rule Sets,” on page 31.
7 (Conditional) If you are monitoring Oracle databases, provide the configuration information for the computer by clicking Configure > Sentinel Options > Configure Oracle Endpoints.
8 Use UNIX Agent Manager to deploy the Sentinel rules on the agent computer. For information about how to deploy rules, see Section 4.2.3, “Activating Rule Sets,” on page 31.
When you finish the installation process, the UNIX agent starts the daemons.
Installing the UNIX Agent and UNIX Agent Manager 15

2.3.3 Silently Installing on the Agent Computer
Performing a silent installation allows you to install the UNIX agent without interactively running the installation script. Instead, silent installation uses an installation file that records the information required for completing the installation. Each line in the file is a name=value pair that provides the required information, for example, HOME=/usr/netiq.
If you use the deployment wizard to perform a local installation on one computer, the wizard offers you an opportunity to create a silent installation file based on your choices. A sample installation file, SampleSilentInstallation.cfg, is located on your UNIX agent download package. The following parameters are available for silent installation for the UNIX agent working with Sentinel:
Parameter Description
FRESH_INSTALL Specifies whether you want to install or upgrade the agent. If you upgrade, some entries in the silent install file are not required. Valid entries are 1 (install) and 0 (upgrade). The default is 1.
CREATE_TARGET_DIR Specifies whether you want the install program to create the target installation directory if it does not already exist. Valid entries are y and n. The default is y.
CONTINUE_WITHOUT_PATCHES Specifies whether the install program stops or continues when the operating system is not a supported version. Valid entries are y and n. The default is n.
IQCONNECT_PORTSpecifies the port that the UNIX agent uses to listen for communications from UNIX Agent Manager. The default is 2620.
IQ_STARTUPSpecifies restart method for the uagent process. For information about the options, see Section 3.5, “Restart Methods for the UNIX Agent,” on page 27. Valid entries are rclink and inittab. The default is rclink.
USE_FIPS_COMMON Specifies whether the UNIX agent communicates with UNIX Agent Manager using only FIPS certified encryption algorithms. For more information about this option, see Section 3.4, “Understanding FIPS Communication,” on page 27. The default is 0.
INSTALL_SENTINEL Specifies whether the UNIX agent works with Sentinel. Valid entries are y and n.
SENTINEL_ADDR= Specifies the IP address of the primary Sentinel Agent Manager Server SSL.
SENTINEL_PORT Specifies the port that the UNIX agent will use to communicate with the Central Computer. The default is 1590.
SENTINEL_FAILOVER1_ADDR= Specifies the IP address of the failover Central Computer that the agent will attempt to contact if the primary Central Computer does not respond.
SENTINEL_FAILOVER1_PORT= Specifies the port that the UNIX agent will use to communicate with the first failover Central Computer. The default is 1590.
16 NetIQ Sentinel UNIX Agent Installation and Configuration Guide

Once you have created the installation file, you can run the silent installation from the command line. For example:
./install.sh <Target_Directory> -s <SilentConfigurationFile>.cfg
Where <Target_Directory> is the directory you want to install to and <SilentConfigurationFile> is the file name you used to specify the installation options. You can also use the default configuration file, SampleSilentInstallation.cfg. The installation filename must be specified as an absolute path. By default, SampleSilentInstallation.cfg is located in the UNIX agent install directory.
The script extracts information from the installation file and installs the agent according to the values you specify.
After you install the agent, use UNIX Agent Manager to deploy the Sentinel rules on the agent computer. For information about how to deploy rules, see Section 4.2.3, “Activating Rule Sets,” on page 31.
If you are monitoring Oracle databases, provide the configuration information for the computer by clicking Configure > Sentinel Options > Configure Oracle Endpoints.
2.4 Configuring Your Auditing System for AuditObject_singleton GroupsIf you use an AuditObject_singleton group, ensure that your operating system audit system is configured to report the required information.
SENTINEL_FAILOVER2_ADDR= Specifies the IP address of the failover Central Computer that the agent will attempt to contact if the first failover computer Central Computer does not respond.
SENTINEL_FAILOVER2_PORT= Specifies the port that the UNIX agent will use to communicate with the second failover Central Computer. The default is 1590.
SENTINEL_PRIMARY_RETRY Specifies how many seconds you want the UNIX agent to wait before attempting to reconnect to a primary computer that does not respond.
SENTINEL_SNMP_TRAPS Specifies the port that the UNIX agent will monitor for SNMP notifications.
SENTINEL_LOW_DISK Specifies the minimum disk space in bytes that are required to run the UNIX agent. If the disk space falls below this limit, then the agent will stop monitoring.
SENTINEL_STARTUPSpecifies restart method for the UNIX agent. For information about the options, see Section 3.5, “Restart Methods for the UNIX Agent,” on page 27. Valid entries are rclink and inittab. The default is rclink.
Parameter Description
Installing the UNIX Agent and UNIX Agent Manager 17

2.4.1 Configuration for the AIXObject_singleton Group
To monitor AIX, you must process audit events. Ensure that the auditing subsystem is configured and activated. Additionally, ensure that stream mode is enable in /etc/security/audit/config and /etc/security/audit/streamcmds contains the following line:
/usr/sbin/auditstream | /usr/sbin/auditpr -t 0 -r -v -helRtcrpPTh >> /audit/stream.out&
In the classes area of /etc/security/audit/config create a class for the following events:
PASSWORD_Change,GROUP_User,GROUP_Adms,GROUP_Change,GROUP_Create,GROUP_Remove,FILE_Mode,FILE_Fchmod,FILE_Fchown,USER_Change,USER_Remove,USER_Create,USER_SU,USER_Exit,USER_Logout,AUD_It
Also create a class for the following file-specific events:
S_ENVIRON_WRITE,S_GROUP_WRITE,S_LIMITS_WRITE,S_LOGIN_WRITE,S_PASSWD_WRITE,S_USER_WRITE,AUD_OBJECTS_WR,AUD_CONFIG_WR,AUD_EVENTS_WR,AUD_STREAMCMDS_WR,AUD_BINCMDS_WR
In the users area of /etc/security/audit/config add an entry for every user on the system that enables auditing of the two newly create event classes. For example:
users:
user1 = netiq,objs
user2 = netiq,objs
Ensure that /etc/security/audit/objects contains entries for the following events:
S_ENVIRON_WRITE,S_GROUP_WRITE,S_LIMITS_WRITE,S_LOGIN_WRITE,S_PASSWD_WRITE,S_USER_WRITE,AUD_OBJECTS_WR,AUD_CONFIG_WR,AUD_EVENTS_WR,AUD_STREAMCMDS_WR,AUD_BINCMDS_WR
To enable your changes, restart the audit subsystem by running as root the following commands: audit shutdown; audit start
2.4.2 Configuration for the HPAuditObject__singleton Group
To monitor HP, you must process the HP-UX audit trail events. Ensure that AUDEVENT_ARGS1 in /etc/rc.config.d/auditing is set to:
-P -F -s open -s creat -s mkdir -s mknod -s link -s symlink -s chmod -s fchmod -s lchmod -s rename -s truncate -s truncate64 -s ftruncate -s ftruncate64 -s chown -s lchown -s fchown -s rmdir -s unlink -s fork -s vfork -s exit -s setuid -s setgid -s setregid -s setresgid -s setresuid -s adjtime -s clock_settime -s settimeofday -s stime -s execv -s execve
2.4.3 Configuration for the LinuxObject_singleton Group
To monitor Linux, you must process the Linux audit trail events. Ensure that the following audit rules are added to /etc/audit/audit.rules:
On i686:
-a exit,always -F arch=b32 -S open -S openat -S close -S dup -S dup2 -S creat -S mkdir -S mkdirat -S mknod -S mknodat -S link -S linkat -S symlink -S symlinkat -S chmod -S fchmod -S rename -S renameat -S truncate -S ftruncate -S chown -S lchown -S lchown32 -S fchown -S fchown32 -S rmdir -S unlink -S unlinkat -S clone -S fork -
18 NetIQ Sentinel UNIX Agent Installation and Configuration Guide
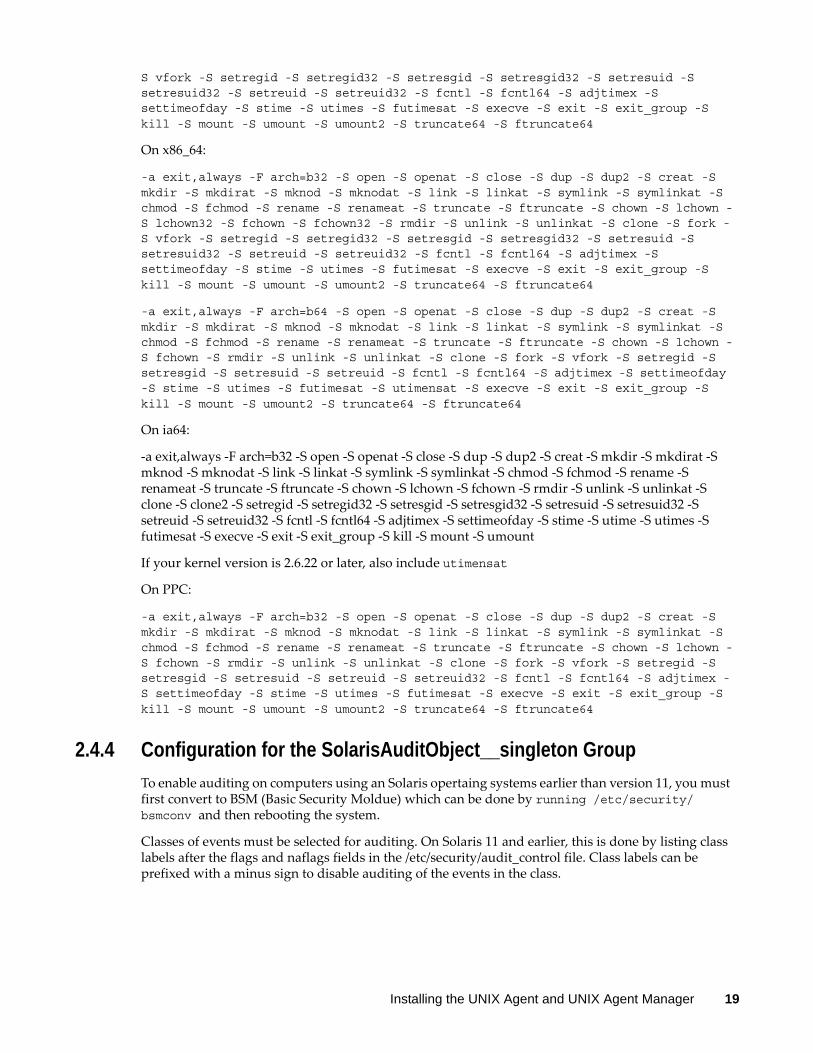
S vfork -S setregid -S setregid32 -S setresgid -S setresgid32 -S setresuid -S setresuid32 -S setreuid -S setreuid32 -S fcntl -S fcntl64 -S adjtimex -S settimeofday -S stime -S utimes -S futimesat -S execve -S exit -S exit_group -S kill -S mount -S umount -S umount2 -S truncate64 -S ftruncate64
On x86_64:
-a exit,always -F arch=b32 -S open -S openat -S close -S dup -S dup2 -S creat -S mkdir -S mkdirat -S mknod -S mknodat -S link -S linkat -S symlink -S symlinkat -S chmod -S fchmod -S rename -S renameat -S truncate -S ftruncate -S chown -S lchown -S lchown32 -S fchown -S fchown32 -S rmdir -S unlink -S unlinkat -S clone -S fork -S vfork -S setregid -S setregid32 -S setresgid -S setresgid32 -S setresuid -S setresuid32 -S setreuid -S setreuid32 -S fcntl -S fcntl64 -S adjtimex -S settimeofday -S stime -S utimes -S futimesat -S execve -S exit -S exit_group -S kill -S mount -S umount -S umount2 -S truncate64 -S ftruncate64
-a exit,always -F arch=b64 -S open -S openat -S close -S dup -S dup2 -S creat -S mkdir -S mkdirat -S mknod -S mknodat -S link -S linkat -S symlink -S symlinkat -S chmod -S fchmod -S rename -S renameat -S truncate -S ftruncate -S chown -S lchown -S fchown -S rmdir -S unlink -S unlinkat -S clone -S fork -S vfork -S setregid -S setresgid -S setresuid -S setreuid -S fcntl -S fcntl64 -S adjtimex -S settimeofday -S stime -S utimes -S futimesat -S utimensat -S execve -S exit -S exit_group -S kill -S mount -S umount2 -S truncate64 -S ftruncate64
On ia64:
-a exit,always -F arch=b32 -S open -S openat -S close -S dup -S dup2 -S creat -S mkdir -S mkdirat -S mknod -S mknodat -S link -S linkat -S symlink -S symlinkat -S chmod -S fchmod -S rename -S renameat -S truncate -S ftruncate -S chown -S lchown -S fchown -S rmdir -S unlink -S unlinkat -S clone -S clone2 -S setregid -S setregid32 -S setresgid -S setresgid32 -S setresuid -S setresuid32 -S setreuid -S setreuid32 -S fcntl -S fcntl64 -S adjtimex -S settimeofday -S stime -S utime -S utimes -S futimesat -S execve -S exit -S exit_group -S kill -S mount -S umount
If your kernel version is 2.6.22 or later, also include utimensat
On PPC:
-a exit,always -F arch=b32 -S open -S openat -S close -S dup -S dup2 -S creat -S mkdir -S mkdirat -S mknod -S mknodat -S link -S linkat -S symlink -S symlinkat -S chmod -S fchmod -S rename -S renameat -S truncate -S ftruncate -S chown -S lchown -S fchown -S rmdir -S unlink -S unlinkat -S clone -S fork -S vfork -S setregid -S setresgid -S setresuid -S setreuid -S setreuid32 -S fcntl -S fcntl64 -S adjtimex -S settimeofday -S stime -S utimes -S futimesat -S execve -S exit -S exit_group -S kill -S mount -S umount -S umount2 -S truncate64 -S ftruncate64
2.4.4 Configuration for the SolarisAuditObject__singleton Group
To enable auditing on computers using an Solaris opertaing systems earlier than version 11, you must first convert to BSM (Basic Security Moldue) which can be done by running /etc/security/bsmconv and then rebooting the system.
Classes of events must be selected for auditing. On Solaris 11 and earlier, this is done by listing class labels after the flags and naflags fields in the /etc/security/audit_control file. Class labels can be prefixed with a minus sign to disable auditing of the events in the class.
Installing the UNIX Agent and UNIX Agent Manager 19

2.4.5 Configuration for the OracleAuditObject__singleton Group
This rule group contains rules that process Oracle audit events. To monitor Oracle, also register the endpoint in UNIX Agent Manager. For more information, see Section 2.5, “Configuring the Agent for Use with Oracle,” on page 20
Ensure the following have auditing turned on:
AUDIT USER BY ACCESS; AUDIT ROLE BY ACCESS; AUDIT CONNECT BY ACCESS; AUDIT UPDATE ON SYS.AUD$ BY ACCESS; AUDIT INSERT TABLE BY ACCESS WHENEVER NOT SUCCESSFUL; AUDIT SYSTEM GRANT BY ACCESS; AUDIT ALTER ANY TABLE BY ACCESS; AUDIT DROP ANY PROCEDURE BY ACCESS; AUDIT CREATE ANY CLUSTER, CREATE ANY DIRECTORY, CREATE ANY INDEX, CREATE ANY LIBRARY, CREATE ANY PROCEDURE, CREATE ANY SEQUENCE, CREATE ANY SNAPSHOT, CREATE ANY SYNONYM, CREATE ANY TABLE, CREATE ANY TRIGGER, CREATE ANY TYPE, CREATE ANY VIEW, CREATE CLUSTER, CREATE DATABASE LINK, CREATE LIBRARY, CREATE PROCEDURE, CREATE PROFILE, CREATE PUBLIC DATABASE LINK, CREATE PUBLIC SYNONYM, CREATE ROLLBACK SEGMENT, CREATE SEQUENCE, CREATE SNAPSHOT, CREATE SYNONYM, CREATE TABLE, CREATE TRIGGER, CREATE TYPE, CREATE VIEW BY ACCESS;AUDIT DROP ANY CLUSTER, DROP ANY DIRECTORY, DROP ANY INDEX, DROP ANY LIBRARY, DROP ANY PROCEDURE, DROP ANY SEQUENCE, DROP ANY SNAPSHOT, DROP ANY SYNONYM, DROP ANY TABLE, DROP ANY TRIGGER,DROP ANY TYPE, DROP ANY VIEW, DROP PROFILE, DROP PUBLIC DATABASE LINK, DROP PUBLIC SYNONYM, DROP ROLLBACK SEGMENT, DROP TABLESPACE, DROP USER BY ACCESS;
2.5 Configuring the Agent for Use with OracleIf you use Sentinel to monitor Oracle on UNIX or Linux, you must use UNIX Agent Manager to register the Oracle database and specify an account with access to read the table and views.
NOTE: You only need to register the Oracle database and endpoint if you are not also running Secure Configuration Manager on your UNIX Agent Manager computer.
To register the Oracle database and specify an account with permission to read the table and views:
1. Start UNIX Agent Manager using an account that has permission to read the Oracle database (tables and views) that you want to monitor.
2. On the Configure menu, click Sentinel Options.3. Select the host with the Oracle database you want to monitor.4. Click Manage Oracle Endpoints > Add.5. Complete the fields on the window.6. Click Register Endpoints.7. Activate the Oracle rule set. For more information about activating rule sets, see Section 3.1,
“Deploying Rule Sets,” on page 23.
20 NetIQ Sentinel UNIX Agent Installation and Configuration Guide

2.6 Applying PatchesNetIQ provides patches to the UNIX agent in a zipped file known as a p-ball.
Patches to UNIX Agent Manager are applied to the UNIX Agent Manager server, which automatically applies any required changes to the consoles using that server. To update UNIX Agent Manager on Windows, click Update UAM on the Start menu. To update UNIX Agent Manager on Linux, run the update.sh command.
To apply a patch to the agent computer using the UNIX Agent Manager:
1 Click Patch > Patch Manager.2 Click Load Patch to add the patch you want to apply to the list of available patches.3 Select the computers where you want to apply the patch.4 Select the patch or patches that you want to apply.5 Click Start Install. The time necessary to update your agents depends on the number of agents
to update, distance from the UNIX Agent Manager server, network connectivity, and bandwidth, among other factors. This process can take up to 20 minutes per agent.
6 Click Back to close the Patch Manager.
2.7 Uninstalling UNIX Agents and UNIX Agent ManagerYou can uninstall the UNIX agent components manually or using UNIX Agent Manager.
2.7.1 Uninstalling the UNIX Agent
You can use UNIX Agent Manager to uninstall agents from remote computers, or you can uninstall them locally. When you uninstall the agent, you can choose to uninstall all components, or only one the are for specific products.
NOTE: You do not need to uninstall agents with a lower version number before upgrading agents. Use this procedure only if you want to completely remove agents from remote computers.
To uninstall the agent locally, change to the installation directory, then run the following command:
./uninstall.sh
You can also uninstall using the console. This option allows you to uninstall from many computers at once. To uninstall an agent in UNIX Agent Manager, select the computers where you want to uninstall the agent, click Manage Hosts > Uninstall Agent.
2.7.2 Uninstalling UNIX Agent Manager
To uninstall the UNIX Agent Manager on Windows computers, use the Add/Remove Programs Control Panel to remove the UNIX Agent Manager program.
To uninstall the UNIX Agent Manager on a Linux computer, change directories to the UNIX Agent Manager installation directory and run installserver.sh -remove. When you have completed the uninstall program, you can remove the UAM directory by running rm -rf UAM.
Installing the UNIX Agent and UNIX Agent Manager 21
22 NetIQ Sentinel UNIX Agent Installation and Configuration Guide

3 3Working with the UNIX Agent and UNIX Agent Manager
This chapter describes features of the UNIX agent and UNIX Agent Manager beyond installation. This chapter also presents internal product concepts, such as communication between the components and restart options.
UNIX Agent Manager provides some features that this guide does not describe. The console provides these features for products other than Sentinel.
3.1 Deploying Rule SetsComplete the following steps to activate the rule set delivered with the latest version of UNIX Agent Manager on your agent computers. These rules configure the event detection and alerting daemon to send events to Sentinel.
To deploy rule sets to agent computers:
1 Start the UNIX Agent Manager.2 Click Rules Manager.3 Make any changes you want to make to the default rule set displayed in the Rule Manager,
customize the rule set as needed until the rule set is correctly configured for your environment.4 After you made changes to the rule set, save a copy by clicking File > Save/Save All and
completing the Save window.5 In the Available Hosts list, select the agent computers where you want to deploy the rule set.6 Click File > To Select Hosts.7 Click Select to deploy the rule set. The detectd process, which is a watchdog process, begins
processing and initializing the new rule set immediately. However, it may take up to 30 seconds for the new rule set to take effect.
8 Click Hosts > Scan All Hosts.9 Verify that the rule set is active on the agent computers. The Sentinel column shows green cells
for all agents with an active rule set.
3.2 Enabling Process AccountingYou can enhance security event reporting in Sentinel by enabling process accounting. However, enabling process accounting substantially increases the activity on the monitored computer and also changes the base computer configuration, which may not be acceptable for your environment. Enabling process accounting are optional tasks. Do not enable these modules if syslog reports the events you want to monitor.
Working with the UNIX Agent and UNIX Agent Manager 23

3.2.1 Enabling Process Accounting on AIX Computers
To enable process accounting on AIX computers, enter the following command at the prompt:
/usr/sbin/acct/accton /var/adm/pact
You can also enter the following line in an rc script to automatically restart process accounting:
/usr/bin/su – adm –c /usr/sbin/acct/startup
3.2.2 Enabling Process Accounting on HP-UX Computers
To enable process accounting, enter the following command at the prompt:
/usr/sbin/acct/startup
You can also enter the following line in the /etc/rc.config.d/acct script to automatically restart process accounting:
START_ACCT=1
3.2.3 Enabling Process Accounting on Red Hat Linux
To configure process accounting on Red Hat Linux computers:
1 Install the psacct package located in the Linux installation kit. This package is not installed by default unless you installed all available packages. For more information about installing the psacct package, see the Red Hat Linux documentation.
2 Modify your system init script to automatically start process accounting by adding the following lines:
# Turn process accounting on. if [ -x /sbin/accton ]then /sbin/accton /var/log/pacct echo "Process accounting turned on."fi
3 Create an accounting record file named pacct by entering the following command:
touch /var/log/pacct
By default, the process accounting software prints out all commands executed to the file /var/log/pacct.
4 Modify the permissions to the pacct file by entering the following commands:
chown root /var/log/pacctchmod 644 /var/log/pacct
3.2.4 Enabling Process Accounting on Solaris Computers
To start process accounting, enter the following command at the prompt:
/usr/lib/acct/accton /var/adm/pacct
You can also enter the following commands to automatically restart process accounting:
ln /etc/init.d/acct /etc/rc2.d/S22acctln /etc/init.d/acct /etc/rc0.d/K22acct
24 NetIQ Sentinel UNIX Agent Installation and Configuration Guide

3.2.5 Restricting Access to Rule Sets
The UNIX agent provides variables that allow you to customize the access to rule sets. The variables and associated parameters are specified, by default, in the vsaunix.cfg configuration file. Some environments might benefit from limiting access to the rule sets to improve security or performance. The following table describe the variables.
Variable Description
DETECTD_OPS This commands allows you to define opcodes or opgroups allowed to access the rule sets. Separated the opcodes or opcode groups with a space. If you want to include an opcode group, but deny access to one of the opcodes in that group, prepend the opcode with a hyphen (-).
Example: DETECTD_OPS="sleep time unpack sort :browse"
DETECTD_SAFE_MODULES This command allows you to define which Perl modules _loadModule() loads. Separate the modules with a space. You can use wildcards to replace a single character or a set of characters.
Example: DETECTD_SAFE_MODULES="NONE"
DETECTD_TOUCH_ALLOW This command allows you to define which log files _touchLogfile() creates. Separate the file names with a space. You can use wildcards to replace a single character or a set of characters.
Example: DETECTD_TOUCH_ALLOW="/var/adm/pacct /var/account/pacct"
DETECTD_TRUNC_ALLOW This command allows you to define which log files _truncateLogfile() creates. Separate the file names with a space. You can use wildcards to replace a single character or a set of characters.
Example: DETECTD_TRUNC_ALLOW="/audit/stream.out"
DETECTD_CMD_PATH This command allows you to define the directories for command actions. Separate the file names with either a comma or a space.
Example: DETECTD_CMD_PATH="../local/script"
DETECTD_LOG_DIR This command allows you to define the directory for log actions.
Example: DETECTD_LOG_DIR="../local/log"
Working with the UNIX Agent and UNIX Agent Manager 25

3.3 Managing Users in UNIX Agent ManagerUNIX Agent Manager allows administrators to control user access to features and computers. To log into any UNIX Agent Manager server, an administrator on that server must create the user account in the UNIX Agent Manager Administrator Console, which is part of the UNIX Agent Manager console.
You can grant different permissions to each user account that allows access to only the features required by that user’s role. Permission sets allow you to simplify this process. Permission sets define product, computer, and feature access. Once you create a permission set, you can assign it to multiple user accounts with the same role.
For example, you can create a permission set that grants access to all Change Guardian functionality separate from Secure Configuration Manager functionality. You can then assign this permission set to all computers running Change Guardian. When you grant a new Change Guardian user access to a console, simply assign the user to the Change Guardian permission set to grant them access to the applicable features and computers.
To assign permissions, log into a UNIX Agent Manager console as an administrator and click Access Control > Admin Console. From there, add the users that need access to that UNIX Agent Manager server, then assign the appropriate permissions.
3.3.1 Using LDAP or Microsoft Active Directory Credentials
UNIX Agent Manager can access the information you have already set up in your LDAP or Microsoft Active Directory server to allow users to log into the UNIX Agent Manager server. This functionality is not available if you restricted UNIX Agent Manager to only use Federal Information Processing Standard (FIPS) encrypted algorithms.
To configure UNIX Agent Manager server to use LDAP or Active Directory credentials:
1. Ensure you have the following information: The domain and computer address, such as ldap://houston.itservice.production:389, of the
LDAP or Active Directory server The location of the user entries in the structure of the LDAP or Active Directory server The attribute that identifies the login name for each user An account that UNIX Agent Manager server can use to access the LDAP or Active
Directory server2. Log into a UNIX Agent Manager console as an administrator, and open the Manage Server
window. 3. Click the LDAP tab, then the Add button. 4. Enter the name of the domain that contains the LDAP or AD server. Users must also enter this
domain name when they log into UNIX Agent Manager. 5. Select the domain and provide the information as requested on the window using the following
guidelines: In Server Address, enter LDAP or Active Directory server computer name and port. For
example, ldap://houston.itservice.production:389 In User’s Parent DN, enter the path to the node that contains the usernames you want to
use. For example, ou=AMAdmins,dc=netiq,dn=com
26 NetIQ Sentinel UNIX Agent Installation and Configuration Guide

In Username Attribute, enter the attribute you want UNIX Agent Manager to use to identify the user. This attribute will be used as a consistent identifier even if the user name changes. The default and only attribute supported by UNIX Agent Manager 7.2 is uid
(Conditional) If you use simple authentication for specific users, in Username, enter the path to the user name. For example, ou=Operator,dc=netiq,dn=com
6. Click Save.
3.3.2 SSL Communication with the LDAP or Active Directory Server
The UNIX Agent Manager server can communicate with the LDAP or Active Directory server using Secure Sockets Layer (SSL). If you choose to have UNIX Agent Manager server communicate with the server using SSL, you must obtain and manage the required certificates. UNIX Agent Manager requires certificates that are base-64 encoded and use the .cer extension.
For example, to get a certificate from an OpenLDAP server, run the following command from the /etc/openldap/certs directory on the computer that is running the slapd daemon:
certutil –L –a –n “OpenLDAP Server” –d `pwd` > servername.pem
The command creates a servername.pem file that you can import into UNIX Agent Manager using the Manage Server window where you identify your LDAP server.
Ensure you close and restart the UNIX Agent Manager after you import the certificate.
3.4 Understanding FIPS CommunicationUse this feature only if you are sure that your environment requires this restriction.
Sentinel supports Federal Information Processing Standard (FIPS) 140-2 communication among the product components. You can configure the UNIX agent and UNIX Agent Manager to restrict all communication to FIPS certified encryption algorithms. Be aware that when you configure UNIX Agent Manager to use only these communication algorithms, UNIX Agent Manager cannot fully communicate with any UNIX agent that does not also use these algorithms. A component that is using FIPS algorithms might be able to send information to a component that is not using those algorithms, but cannot receive information. Also, if you configure UNIX Agent Manager to use these algorithms, you cannot deploy a UNIX agent to a remote computer.
3.5 Restart Methods for the UNIX AgentNetIQ recommends that you accept the default, rclink. However, the following start methods are available.
Option Description
rclink Starts the agent daemons immediately after the deployment process and adds a startup script to the /etc/rc.d directory. This startup script starts the agent daemons after each reboot when the master rc script runs. This is the default method, and should be used in nearly all environments.
inittab Starts the agent daemons immediately after the deployment process and adds an entry to the /etc/inittab file. This inittab file entry starts the agent daemons at the default run level after each reboot.
Working with the UNIX Agent and UNIX Agent Manager 27

inetd Configures the (x)inetd daemon to start the agent daemons when needed and then stop and unload the agent daemons.
Option Description
28 NetIQ Sentinel UNIX Agent Installation and Configuration Guide
4 4Understanding Security Rules
The following section provides an overview of UNIX agent rules and how to implement them using the UNIX Agent Manager. You can access Rules Manager in UNIX Agent Manager by clicking File > Rules Manager.
4.1 Understanding UNIX Agent RulesYou can protect your information assets and ensure uniform security by applying UNIX agent rule sets. By working in conjunction with the event detection and alerting daemon, rule sets offer real-time event detection, alerting, and response. The default rule set provides a wealth of UNIX knowledge and an excellent starting point from which to build custom rule sets.
UNIX Agent Manager provides a Rule wizard that guides you through creating rules to monitor and react to a number of common conditions, including the following:
Terminating daemons Running specific sensitive commands Running sensitive commands in a context other than root Creating, modifying, or deleting of specific files
You can deploy the rule sets that you create to any or all of the UNIX computers in your enterprise.
4.2 Understanding Rule SetsRule sets are collections of rules you want to enforce on a specific UNIX agent computer or a group of UNIX agent computers. You can create rule sets that are specific to the location, job, or sensitivity of a particular UNIX or Linux computer, or you can easily create a rule set to apply to all your Apache web servers or Oracle database servers. You can enforce unique rule sets on each UNIX agent or deploy a uniform rule set to multiple computers.
Rule set data is normally in a UNIX Agent Manager server, and can be accessed by any UNIX Agent Manager console that is connected to that server. However, you can export the data to a file that can be imported into another server. When you import a rule set, you have the opportunity to change the name of that rule set.
Understanding Security Rules 29
4.2.1 Selecting a Rule Set to Edit
Before you start working with a rule set, determine what rule set you want to modify. Consider the following scenarios:
Consider reviewing and editing the default rule set provided with the UNIX Agent Manager if this is an initial implementation of rule sets in your organization. The UNIX Agent Manager displays the default rule set when you open Rules Manager and click Create Rule Set If you modify the default rule set, save the new rule set with a unique name.
Open a saved rule set if you have already begun to edit a rule set. You might also need to open a saved rule set if you have template rule sets based on the job-related use of the agent computer. For more information, see Section 4.2, “Understanding Rule Sets,” on page 29
4.2.2 Viewing Rule Sets and Editing Rule Set Properties
When you open a rule set, the UNIX Agent Manager provides both a tree pane and a list pane. The tree pane provides an easy way to navigate through specific event source and rule group information, while the list pane changes to provide detailed information about your tree selection.
At the second level of the tree, you can find the event sources and rule groups of the rule set. The following list provides a short description of the contents of this secondary tree level and references for more information:
Event sources provide the data on which to trigger your rules. For more information, see Section 4.5, “Understanding Event Sources,” on page 32.
Rule groups provide editable properties at the group level, and contain individual rules. For more information, see Section 4.6, “Understanding Rule Groups,” on page 33.
Expanding a rule group allows you to view and edit the rules associated with its common event source. For more information, see Section 4.7, “Understanding Rules and Actions,” on page 33
UNIX Agent Manager displays disabled rules and event sources in a darker color.
Editing Properties
The content pane allows you to view the configuration of any selected tree element. But, you cannot edit the properties in the content pane.
To edit the properties of an element:
1 Right-click the element in the tree pane. You cannot modify the properties of action elements and conditional elements from the tree pane. For more information, see Section 4.7, “Understanding Rules and Actions,” on page 33, Section 4.9, “Understanding Conditionals and Comparisons,” on page 35, and Section 4.10, “Understanding Time Conditions,” on page 36.
2 Select Edit on the menu.3 On the Edit window, modify the appropriate properties.4 Click OK to save the modifications and close the window.
30 NetIQ Sentinel UNIX Agent Installation and Configuration Guide

4.2.3 Activating Rule Sets
Deploying a rule set to an agent computer replaces the previous rule set. The event detection and alerting daemon begins processing and initializing the new rule set immediately. However, it may take up to 30 seconds for the new rule set to take effect. Modifications to items in the filesystem rule group may cause the event detection and alerting daemon may take longer to initialize, due to the time it takes to create initial snapshots of the filesystem objects.
To deploy rule sets to agent computers:
1 Start the UNIX Agent Manager.2 Click File > Rules Manager.3 Click Manage Rule Sets > Create Rule Set, then enter a name for rule set.4 (Conditional) If you want to make changes to the default rule set displayed in the Rules
Manager, customize the rule set as needed until the rule set is correctly configured for your environment.
5 Close the Rule Editor.6 Click Back to return to the main Rules Management window.7 In the Available Hosts list, select the agent computers where you want to use the rule set.8 Click To Selected Hosts to deploy the rule set. The detectd process begins processing and
initializing the new rule set immediately. However, it may take up to 30 seconds for the new rule set to take effect.
9 Click Hosts > Scan All Hosts.10 Verify that the rule set is active on the agent computers. The Sentinel column shows green cells
for all agents with an active rule set.
4.3 Deciding How to Create UNIX Rules and Rule SetsUNIX Agent Manager provides both wizard-driven rule creation and the ability to create custom rules not covered by the wizard.
Use the wizard if you want to monitor one or more of the following:
Rules that trigger when a certain daemon terminates Rules that trigger when a log file decreases in size Rules that trigger when certain commands are run Rules that trigger when certain commands are run by users other than root Rules that trigger when certain files are changed or created
To start the wizard, click the Edit Rule Set button on the left area of the Rules Manager screen, then click Wizard > Rules Wizard.
4.4 Using the Rule Wizard to Create RulesThe Rule wizard helps you quickly create the following types of rules:
Rules that trigger when a certain daemon terminates Rules that trigger when a log file decreases in size
Understanding Security Rules 31
Rules that trigger when certain commands are run Rules that trigger when certain commands are run by users other than root Rules that trigger when certain files are changed or created
To use the Rule Wizard to create rules:
1 Click Wizard > Rule Wizard to start the Rule wizard.2 On the select rule type window, select the appropriate rule type, and then click Next. For more
information, see the description of rule type or Section 4.7, “Understanding Rules and Actions,” on page 33.
3 On the Rule Description window, provide a name for the rule, and then click Next.4 On the Rule Name window, provide a descriptive name for the rule, and then click Next.5 If you are using the Log_file_shrunk or modified_file rule, select either Names or Paths, and then
click Next. Selecting Name causes the event detection and alerting daemon to monitor all files with a certain name. Selecting Paths causes the event detection and alerting daemon to monitor a specific file.
6 On the Name of File window, specify the name of the object you want to monitor and click Next. The name depends on the rule type selected, which might be a daemon executable, a command, a file name, or a fully-qualified path. For example, if you selected Paths while creating a modified_file rule, specify the full path, including the file name you want to monitor.
7 Provide the appropriate information for the action you want the rule to trigger in response to an event, and then click Next. All fields are optional. You do not need to select an action to create a rule. For more information, see Section 4.7, “Understanding Rules and Actions,” on page 33
8 Review the information provided about the rule group associated with your rule, and then click Next.
9 Complete the Rule wizard. The Rule wizard displays only the windows relevant to the event source you associated with the new rule. If the new rule is in a rule group that uses configurable event sources, the remaining windows offer you the ability to modify the configurable parameters. Read the descriptions provided and, if necessary, modify parameters. If you are unsure, retain the current value.
10 When you have completed the Rule wizard, click Finish.
4.5 Understanding Event SourcesEvent sources extract a particular type or class of events from one of the following providers:
Operating system Daemon Server Application
Typically, event sources extract the required information by parsing and filtering log entries. Once extracted, the log entry is considered an event. All events must be composed of output parameters that can be evaluated by the event detection and alerting daemon.
32 NetIQ Sentinel UNIX Agent Installation and Configuration Guide
When an event source detects an event and assigns output parameter values, the event detection and alerting daemon uses the values to trigger the appropriate rule response in the associated rule group. For example, you can configure a rule in an agent computer rule set that alerts you when an FTP event associated with a particular user account is detected. To successfully trigger your FTP rule, you must have an event source that can do the following:
Monitor the wtmp log file, the log in which FTP events are reported Parse the log entries Generate output about each event
UNIX Agent Manager provides a wtmp event source with the default rule set. This event source scans the wtmp log and generates output about each entry in the log. The wtmp event source extracts a number of properties, including the event type and user login name, and provides them to the event detection and alerting daemon. Specifically, the event type and user login are defined as the $id and $user output parameters. If the value of an output parameter matches criteria you configure in a rule, the actions you specify in the rule properties trigger.
You can use a single event source for multiple rule groups, but consider configuring each event source to monitor unique log files. Configuring multiple rule groups to use identical event sources and setting configuration parameters to the same values, is undesirable. You duplicate the monitoring, parsing, and output parameter generation between instances of the event source. You specify the event source of a rule group by editing the properties of its corresponding rule group.
To add an event source to a rule set, right-click Rule Set in the Edit Rules window.
4.6 Understanding Rule GroupsRule groups contain one or more rules sharing common event sources, schedules, and other properties. Clicking a rule group in the tree area displays the group properties in the content area. Rule group properties consist of the following information:
Delay Event source name Event source parameters for the rules contained in the rule group Name and description of the rule group Nice value or process priority
Increasing the allowable delay and nice value lowers the impact on the resources of the agent computer.
To create a new rule group, right-click Rule Set in the Edit Rules window.
4.7 Understanding Rules and ActionsRules contain all of the information the event detection and alerting daemon needs to evaluate event source output parameters and trigger actions. Expanding a rule group displays the rules contained in the rule group. Rules that appear in the same group have common event sources and schedules, if applicable.
A rule is defined and governed by one or more of the following properties:
Actions.
Understanding Security Rules 33

Initialization code. For more information, see Section 4.8, “Understanding Initialization Code,” on page 35.
Main code. For more information, see Section 4.11, “Understanding Main Code,” on page 37. Conditionals -- And and Or objects. For more information, see Section 4.9, “Understanding
Conditionals and Comparisons,” on page 35. Comparisons. For more information, see Section 4.9, “Understanding Conditionals and
Comparisons,” on page 35. Time conditions. For more information, see Section 4.10, “Understanding Time Conditions,” on
page 36. Templates contain information for the Rule wizard. Template nodes do not require user
maintenance.
The UNIX Agent Manager displays these properties as child objects of the rule in the tree. The following figure illustrates the tree arrangement of the default telnet rule.
Actions are the responses available for a detected event. The following definitions provide more information about your options:
E-mail Specifies the name, e-mail address, and message content you want sent when the rule triggers. Populate these fields with the appropriate information. Separate multiple e-mail addresses with a comma (,). You must have sendmail configured correctly on the agent computer to send e-mail.
SNMP Message Specifies the SNMP message you want sent when the rule triggers. Select the appropriate notification for this field.
Log Specifies the name of the log file and the message written in the log file when the rule triggers. Provide the appropriate information in these fields.
Command Specifies a Bourne shell command to execute on the agent computer when the rule triggers. Provide an appropriate command in this field.
Sentinel Event Specifies the NetIQ classification attribute used to classify events for Sentinel.
4.7.1 Viewing and Editing Rule Properties and Actions
Clicking a rule displays the properties, configuration, actions, conditions, and advanced settings of the rule in the content pane. The rule attributes tab identifies and describes the rule; the configuration tab displays the rule configuration; the actions tab specifies the actions to perform when the rule triggers; the conditions tab displays the conditions that must be met for the rule to trigger; and the advanced tab displays the rule debug level.
Expanding an action node displays a sub-node that is labeled with the action that will occur if the rule triggers. For example, an element that is labeled Alert: $user logged in at $time describes the alert message that displays when the rule triggers.
To edit rule properties, right-click the rule in the Edit Rules window.
NOTE: Use only Bourne shell commands when specifying Command rule properties.
34 NetIQ Sentinel UNIX Agent Installation and Configuration Guide

4.7.2 Creating New Rules and Actions
Creating new rules can be a time consuming task. Before creating new rules, ensure you have investigated the following statements are true:
You cannot use the Rules wizard. You cannot find an existing rule to modify.
To create new rules and actions in a rule group:
1 Right-click a rule group that is associated with the event source that you want to use, and then click Add Rule.
2 On the Add Rule window, configure the appropriate rule group properties and actions, then click OK.
NOTE: Use only Bourne shell commands in the Command attribute.
4.8 Understanding Initialization CodeInitialization code, written in Perl, runs when the rule set is activated. Your rule requires initialization code if it relies on parameters or tables not previously configured. If the rule configures itself through querying the operating system or daemons, the rule requires initialization code. Rule containing initialization code display Init Code as a child element in the tree pane.
To view, add, or edit existing initialization code, right-click the rule you want to modify.
4.9 Understanding Conditionals and ComparisonsYou declare conditionals and comparisons to ensure you trigger actions only when necessary. Conditionals and comparisons help you filter event source output parameters. Consider the following example from the telnet rule:
$message =~ /telnet/
$source =~ /telnet/
Because you can find these entries in an Or child element of the telnet login rule, you know the rule triggers when any one of the comparisons is true. When the syslog event source generates a $message or a $source parameter equivalent to telnet, the event detection and alerting daemon searches the output parameters and triggers the defined actions.
To trigger an action when both comparisons are met, you create And comparisons. And comparisons trigger rule actions when both comparisons evaluate as true.
The hierarchy of the tree graphically represents the order in which conditional and comparison expressions are evaluated. While the tree displays one conditional or comparison under the rule element, the And or Or may have numerous child elements. Rules that do not have conditional or comparison statements must have main code to trigger. For more information, see Section 4.11, “Understanding Main Code,” on page 37.
Rules that contain a comparison not as a child element of an And or Or comparison is not a conditional. These comparisons trigger actions when the event detection and alerting daemon evaluates the statement as true.
Understanding Security Rules 35
To edit comparisons or conditionals, right-click the rule you want to modify. To associate comparisons with a conditional, R=right-click the conditional, and then click Add Comparison. Comparisons are labeled with the output parameter name, equation, and value describing the comparison. For example, $message =~ /telnet/.
NOTE: When defining the Value property, enclose regular expressions with slashes (/) to indicate that the value is a regular expression. For example, /telnet/ designates telnet is a regular expression.
4.10 Understanding Time ConditionsTime conditions allow you to specify when you want a rule activated and ready to trigger. A time condition specifies the days and hours during the week when you want to activate the rule. For example, if your information security policy does not allow FTP sessions after hours, you can attach a time condition to the FTP rule that alerts you only when FTP sessions initiate after hours.
4.10.1 Viewing and Editing Time Conditions
To view time conditions, expand the rule containing the time condition, and then click Time Condition. The UNIX Agent Manager displays when the associated rule is active.
If you want to change the schedule of a rule governed by a time condition, complete the following procedure.
To edit existing time conditions:
1 Right-click the time condition that you want to edit, and then click Edit.2 Select the days and hours on which you want to activate the rule. You can use the Ctrl and
Shift keys to select multiple days and times. 3 Click OK.
4.10.2 Adding New Time Conditions
The following procedure guides you through adding a time condition to a rule. You can designate one time condition per rule. Time conditions ensure rules only run when necessary.
To add a new time condition:
1 Right-click the rule that you want to modify, and then click Add Time Condition.2 Select the days and hours on which you want to activate the rule. You can use the Ctrl and
Shift keys to select multiple days and times. 3 Click OK.
4.10.3 Deleting Time Conditions
You can remove time conditions and have a rule active all the time. Complete the following procedure to delete a time condition.
To delete time conditions:
1 Right-click the time condition node you want to delete, and then click Delete.2 On the Delete window, click Yes.
36 NetIQ Sentinel UNIX Agent Installation and Configuration Guide

4.11 Understanding Main CodeMain code is Perl code you can add to a rule if the filtering provided by the conditionals and comparisons is inadequate or needs augmenting to detect more complex patterns. Main code must contain a call to the subroutine _take_actions(). The code you write can be selective about the circumstances under which the subroutine is called. It is not necessary for the code to call _take_actions() every time it is evaluated. Rule that contain main code display the Code element in the rule.
4.11.1 Viewing and Editing Main Code
To view main code, expand the rule containing the main code you want to view, and then click Code.
The UNIX Agent Manager also allows you to edit existing main code. Before editing code that functions correctly, ensure you make a back up of the rule set. Complete the following procedure to edit your main code.
To edit existing main code:
1 Expand the appropriate rule, and then right-click Code.2 Click Edit.3 On the Edit Code window, modify the Perl code.4 Click OK.
After editing main code, you can save the modified rule set on the UNIX Agent Manager computer and activate the modified rule set on remote agent computers. For more information, see Section 4.2.3, “Activating Rule Sets,” on page 31.
4.11.2 Adding New Main Code
The UNIX Agent Manager allows you to add main code to a rule. Before adding main code, ensure you have a thorough knowledge of Perl and a complete understanding of what you want the code to accomplish. You can create one set of main code per rule.
To add main code:
1 Right-click the rule to which you want to add main code, and then click Add Main Code.2 On the Edit Code window, add your Perl code.3 Click OK.
After adding new main code, you can save the modified rule set on the UNIX Agent Manager computer and activate the modified rule set on remote agent computers. For more information, see Section 4.2.3, “Activating Rule Sets,” on page 31.
4.11.3 Deleting Main Code
Before deleting main code, ensure you no longer need the code to make the rule work. Complete the following procedure to delete main code.
To delete main code:
1 Right-click the main code you want to delete, and then click Delete. 2 On the Delete window, click Yes.
Understanding Security Rules 37
4.12 Customizing the Rules Management User InterfaceThe UNIX Agent Manager provides a number of options that allow you to adjust the appearance and usability rules management. The following sections provide overviews of the features you can select from the Customize menu.
4.12.1 Deciding Whether to Use Tabbed Layouts
Tabbed layouts allow you to select how you want to view configuration information in the content area. The following figure illustrates the default tabbed layout of the filesystem event source. The tabbed layout provides easy to read information grouped into specific categories. You navigate to other configuration categories by clicking the corresponding tab.
The following figure shows the same event source displayed without the category grouped tabs. The non-tabbed layout option shows all the configuration information in one pane. This option is convenient if you have a large monitor and want to see all the information about an element. The pane borders are adjustable so that you can show more or less of each section. To adjust the pane border, click the border and drag it up or down.
4.12.2 Deciding Whether to Use Parameter Aliases
The UNIX Agent Manager uses parameter aliases to make parameters generated by event sources or rules easier to understand. The UNIX Agent Manager provides parameter aliases to make the configuration of alerts easier. Aliases are more descriptive than the actual parameter names.
For example, if parameter aliases are turned off, an alert message in the configuration area may look like the following:
Linux user, $user, logged in via ftp at $time, from $host at @addr_linux.
However, with parameter aliases turned on, the same alert message is easier to understand:
Linux user, (User name), logged in via ftp at (Hour:Minute:Second) from (Remote host name) at (Linux remote host Internet address).
Aliases are enclosed in parenthesis to visually sets them apart from the surrounding text.
When you configure rules using the descriptive aliases instead of the parameter name, the UNIX Agent Manager Rules Manager automatically substitutes the appropriate parameter. You can view the parameters, their associated aliases, and a description of their functions in the event source configuration area Output tab.
38 NetIQ Sentinel UNIX Agent Installation and Configuration Guide