inspiration why am i doing this project?
TRANSCRIPT
Alexander Sobolev, 04/21/08
Integrated Project ThesisUniversity of MichiganSchool of Art & Design
Project Title: Triolin
Through the medium of instrument making, I have created a tool that will facilitate a rich sensory experience that engages multiple musicians with one object. Using both traditional and contemporary woodworking techniques I have built a fully functioning three sided fiddle, that I affectionately call the Triolin. The project was developed out of communications research I was performing, and informed by a semiotic study of the violin’s physical form and history. The instrument is intended to be played by three violinists simultaneously, as an experiment in physical communication, but for the purposes of this thesis will only be displayed as an independent art object. To provide a deeper understanding of my work I am going to discuss the things that drew me to, and into, this project; my love of music, my communications research, violin semiotics, how this research relates to my process and design, and the possible post graduate future of these endeavors.
INSPIRATION why am I doing this project?
Why am I doing this project? Often, at the end of a late night and just before I lay my head down onto my pillow, I will ask myself this question. Trying to get a good nights rest, in the military style cot in my studio, I dream of possible answers. The short answer is that I love music! Combined with a strong interests in cultural theory, semiotics, building things, and design. I was first lured to the idea of making objects which were typically used by single individuals, and adapting them to a group setting, that forces multiple people to interact with each other while using the one object. After spending some time conceptualizing the violin, among other ideas, surfaced as a viable subject for the experiment. Yet, there were obvious challenges in following through with this choice. The primary problem was that I was a percussionist, a percussionist with hardly any experience, playing, designing, or building string or melodic instruments. In my eyes these challenges were great opportunities to learn new things, and experiment with new ideas. Fourteen years ago, when I was in elementary school, I started playing the classical percussion (i.e. snare drum, tympani, crash symbols, etc...). But, in High School I discovered completely different worlds of percussion while playing in the marching, jazz, and symphony band ensembles. During this period I also
1
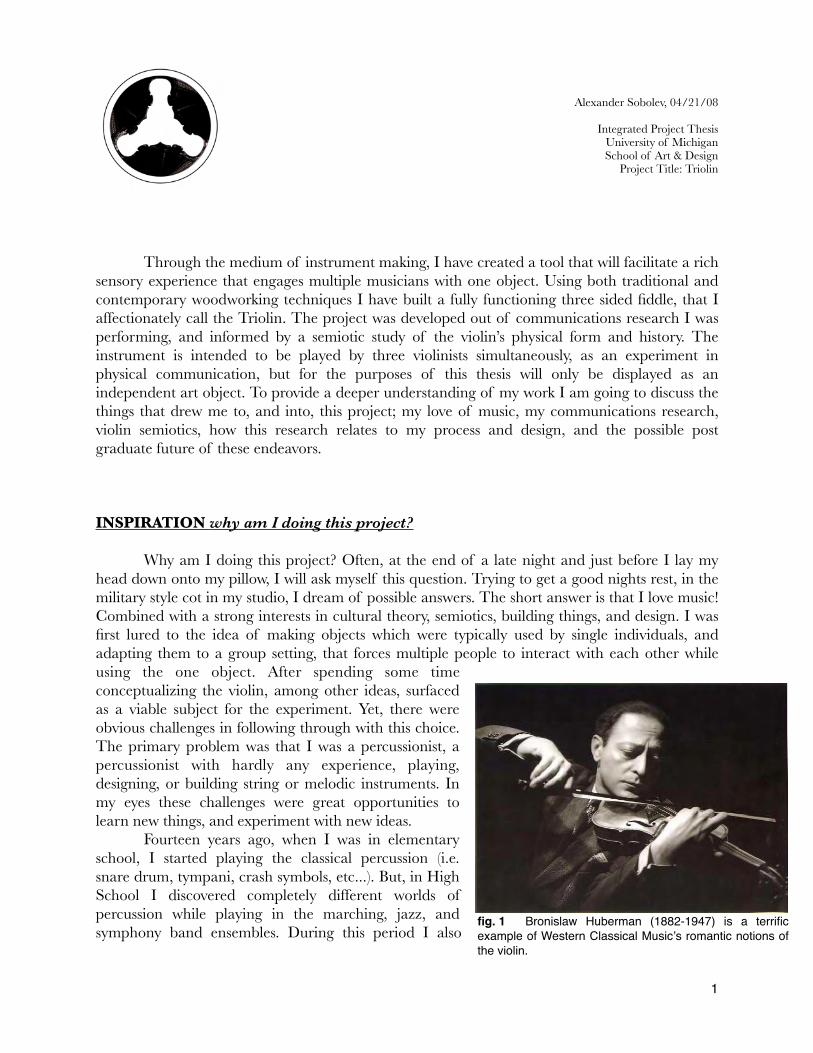
fig. 1 Bronislaw Huberman (1882-1947) is a terrific example of Western Classical Musicʼs romantic notions of the violin.

started working in the drums and percussion department of a local music store. There I got exposed to Latin, Indian music, and some of my favorite, and best, drummers in the world. Later, I learned how the slave trade brought musical styles, instruments, and rhythmic patterns from Africa over to the Americas. (Martin, B) Many instruments got reinvented because the slaves were not allowed to practice their own religious rituals, or play their traditional instruments. The loophole these courageous Africans took advantage of attributed new meaning to these instruments and music, that will forever be remembered somewhere in the social ethos. To site one example of such an instrument; the banjo was originally two-thirds of a gourd, with a skin membrane over the opening. When it moved to the united states it was only a slave instrument. Gradually the instrument was modernized and infiltrated American White culture through its use in minstrel shows in the first half of the 19th century. Banjos then became an important cultural part of the Appalachia's. Today, banjos are almost unanimous with the “Hill Billy” and Southern White cultures and music. Yet, it is a black instrument. This appropriation, by whites, of an African artifact is a symbol of Americas history. I found that similar stories were true of the violin, and they were important to the memetic cloth that these histories are woven into. I was also interested in drumming because it was an incredibly physical activity. At the time, it was the most physical activity I got. But there was something missing, no matter what type of music I played there were very few situations where I would get to interact with another musician physically. To be responsible for one another’s physical success. To Interact with them in the same way that dancers interact with each other. This was the problem that sparked the idea of creating object that would force people to interact with each other. This is the idea that lead me to the Triolin.
2
fig. 4 Middle Eastern violin traditions. Some Eastern societies have adopted the violin, but maintain their own instrument orientation.
fig. 3 The violin in the Indian tradition, like all other instruments, is cross legged and on the floor. Yet, they adopt a more relaxed western hand position, with the add support of the knee on the scroll.
fig. 2 The Sarangi, a traditional Indian bowed string instrument, accompanied by a harmonium.
SEMIOTICS what is the violin really telling us?
Early on in my research into violin construction I began stumbling upon nuggets of violin history, chronicling the violins evolution. Western explorers discovered that Eastern musicians had developed haired bows to play their string instruments with (fig. 2). Therefore the violin was an adaptation of a finger picked lute that used technology brought from the East (Heron-Allen, E.). The West brought the violin over and forced it upon the East, when they started to colonize parts of it (fig. 3, 4). The Violin came full circle starting in the East as an idea, growing and becoming standardized in the West, finally coming back to settle the East. As was true of African rhythms, and the banjo, the violin’s story is reviled through the subtle ways that the object is used in each culture and subculture.
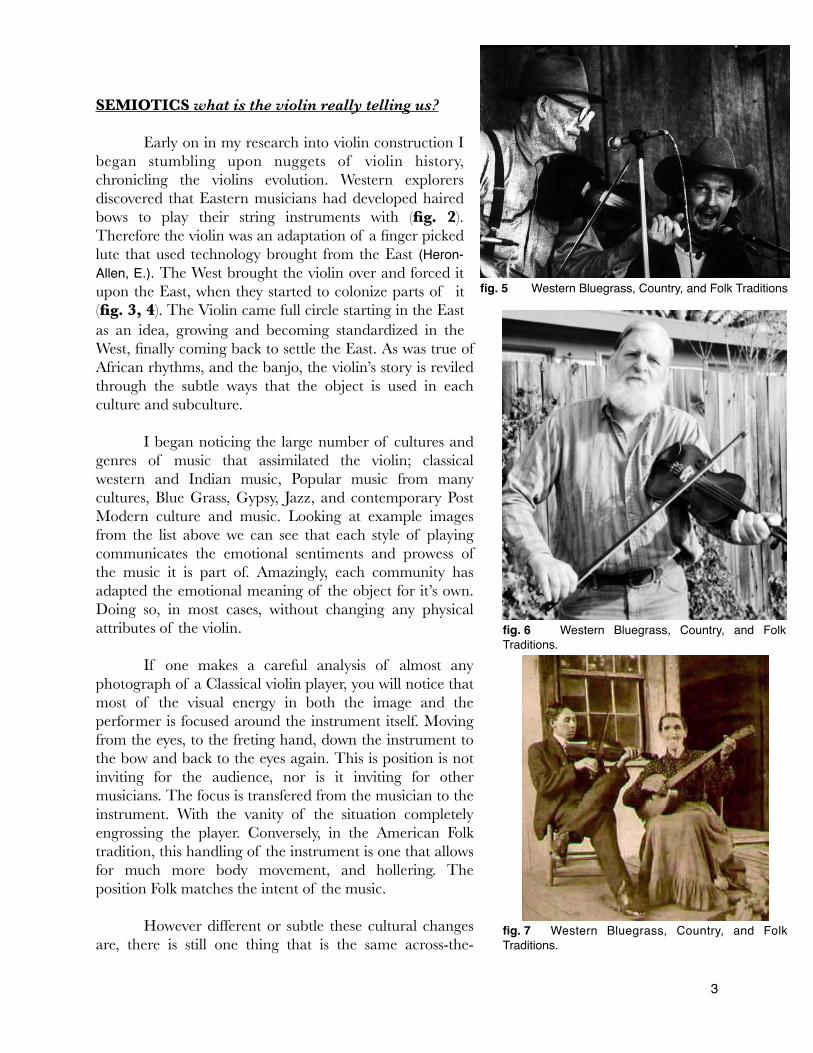
I began noticing the large number of cultures and genres of music that assimilated the violin; classical western and Indian music, Popular music from many cultures, Blue Grass, Gypsy, Jazz, and contemporary Post Modern culture and music. Looking at example images from the list above we can see that each style of playing communicates the emotional sentiments and prowess of the music it is part of. Amazingly, each community has adapted the emotional meaning of the object for it’s own. Doing so, in most cases, without changing any physical attributes of the violin.
If one makes a careful analysis of almost any photograph of a Classical violin player, you will notice that most of the visual energy in both the image and the performer is focused around the instrument itself. Moving from the eyes, to the freting hand, down the instrument to the bow and back to the eyes again. This is position is not inviting for the audience, nor is it inviting for other musicians. The focus is transfered from the musician to the instrument. With the vanity of the situation completely engrossing the player. Conversely, in the American Folk tradition, this handling of the instrument is one that allows for much more body movement, and hollering. The position Folk matches the intent of the music.
However different or subtle these cultural changes are, there is still one thing that is the same across-the-
3
fig. 7 Western Bluegrass, Country, and Folk Traditions.
fig. 6 Western Bluegrass, Country, and Folk Traditions.
fig. 5 Western Bluegrass, Country, and Folk Traditions

board; only one person can play the instrument at a time! When I noticed that most musical instruments do not invite other musicians to play with you on the same object, I realized that there could never be any kind of direct responsibility between musicians. Although they could hear each other play, regardless of how close they are, the cannot feel each other play. I wanted to make a remedy for this.
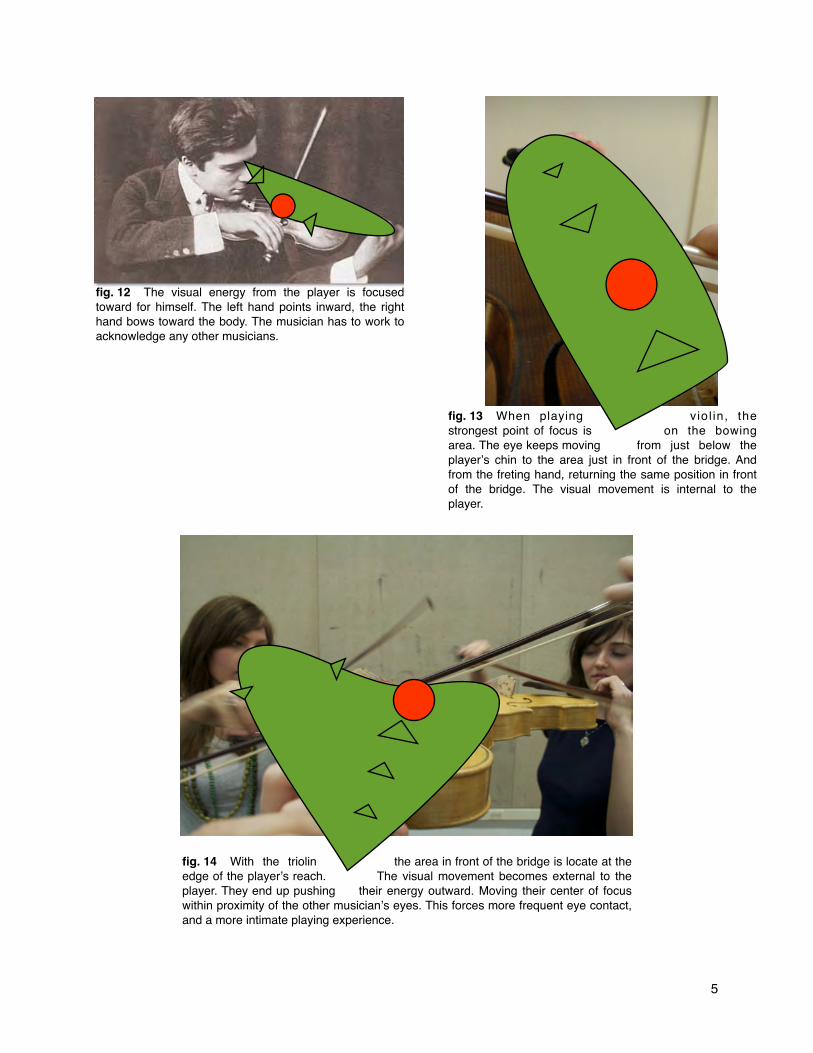
At first I wanted people to have contact with the same object, but then I wanted to change the eye lines, so that they were more likely to connect. Figures 12 & 13 show how the violin is, by design, susceptible to a certain amount of egotism. The musician’s left hand is directly in their field of vision, moving inward with increasing pitch. In combination with the movements of the right hand, playing involves a hugging motion towards yourself. The Western Classical culture is the extreme, where everything about the violin and the way it is played is centered towards the object. This physical dialog gives a little bit in the other styles, nevertheless, to some extent it is present. I wanted to revers this trend with my instrument.
In the triolin, the position of the players changes the eye lines completely (fig. 14). Forcing the focal point, their left hand, to be close to the other players’ eyes. Each musician has their space but it is constantly connected to the other players. This in combination with the shared physical s p a c e c r e a t e s playing experience unlike anything else a fi d d l e r c a n experience.
4
fig. 9 The electric violin is the next incarnation of the instrument. Yet it still holds onto much of the same physical, semiotic, language of a traditional violin.
fig. 8 The violin as a Western Pop music figure.
fig. 10 The electric violin taking on the aesthetic, siting position on the ground, of eastern culture.
fig. 11 M o r e e v i d e n c e o f t h e individual focused history of the violin.
5
fig. 14 With the triolin the area in front of the bridge is locate at the edge of the playerʼs reach. The visual movement becomes external to the player. They end up pushing their energy outward. Moving their center of focus within proximity of the other musicianʼs eyes. This forces more frequent eye contact, and a more intimate playing experience.
fig. 12 The visual energy from the player is focused toward for himself. The left hand points inward, the right hand bows toward the body. The musician has to work to acknowledge any other musicians.
fig. 13 When playing viol in, the strongest point of focus is on the bowing area. The eye keeps moving from just below the playerʼs chin to the area just in front of the bridge. And from the freting hand, returning the same position in front of the bridge. The visual movement is internal to the player.

PROCESS what am I doing?
In the end I will have put hundreds of hours of work into the construction and assembly of 270 odd parts. The result of which is an instrument that no one has ever seen before, that carries 500 years of history and brings up quest ions about community, relationships, ownership, and harmony. After the research phase was completed the real design and craftsmanship began.
When designing, I discovered that the more I strayed from the traditional violin aesthetic, the more emotional weight I lost. There are interesting design problems to tackle when designing a three player instrument from scratch, but the memes and connotations the traditional approach brought were to valuable to lose. Because my instrument would already push the musicians well out of their comfort zones, I wanted to maintain as much emotional foundation as possible for them to stand on. I created a series of sketches that sought to find the most appropriate way to reconfigure the violin for three players. I chose an arrangement that worked metaphorically, aesthetically, and one I felt I could learn the most from.
Since I had no previous experience, it was important for me to get a foundation in traditional musical instrument building practices. I wanted to know what it felt like to be a violin maker before the invention of power tools. I wanted to build the entire instrument by hand! I invested some money and bought some essential tools for instrument making: a set of palm gauges, a few full size gauges, a set of Japanese carpentry chisels, a Japanese dovetail saw, a Japanese backsaw, some finger plains, a bench plain, steal scrapers, and a peg reamer. Then I had to purchase more tools that would allow me to take care of the tools! This was mostly in the form of Japanese water stones, used to sharpen the steel blades. I also had to build a few of my own tools to complete the project (e.g. numerous jigs, hot iron, small doglegged chisel). Caring for my own tools was meditative because it reminded me that I
6
fig. 16 I felt that this reconfiguration of the violin with be most rewarding for me to make. It is structurally one of the more stable designs. Metaphorically it worked because the three instruments are sharing a resonating chamber, in much the same way as the musicians are sharing one instrument. It wasn't too different in structure from a regular violin, which would allow me to learn many of the traditional skills involved with making the object. It also changed the subtle body positions of the players to be more open towards each other, and forces the musicians into an almost uncomfortable amount of eye contact.
fig. 15 An exploded view of a violin. Vibrations travel from the strings, through the bridge, into the top plate. The top plate stirs the sound post which transfers it to the bottom plate. Through this transfer, every part of the instruments vibrates in unison to amplify the sound.

was building a tool as well as a work of art. The triolin is an object that is used to create music, just like my tools were used to create it. Once I got got a handle on how to take care of and use my tools, I began to work.
During the fall semester, I was a little nervous of my abilities, and hesitated jumping into constructing the body. I learned to use and take care of my tools, then carved two scrolls (fig. 17, 18). In January, I built one of the top plates entirely by hand. The general steps of building a violin plate are as follows:
• Select wood (spruce (fig. 19) for the top, maple (fig. 2) for the bottom).
• Acclimatize wood to the environment it will be worked in.
• Make a stencil of half of the plate pattern, choose stable area of the grain and trace around the stencil.
• Roughly saw around the pattern (the board will be twice as thick as necessary). (fig. 21)
• Split the blank in half.• Plane the bottom surface of both halves flat.• Clamp them back to back in a vise, and
plane the centerline to create mating butt joint.
• Glue the planed joint. (fig. 22)• Plane the bottom again, just to make sure
that the entire surface is square.• Using the stencil on the center line trace a
more accurate profile. Cut it out as close as possible using a coping saw.*
• Then, with a saw, remove as much unnecessary wood as possible.*
• The carving starts here. With a #5 gouge carve out the shape of the top surface.*
• Make two markings, one 4 mm in from the edge and the other 2.5 mm in from that, all the way around the piece.*
• Using a very sharp knife and a doglegged chisel, remove the material between the two markings, until it is a 2.5 mm deep groove. (fig. 20)
• Prepare ebony and maple veneer, by cutting down appropriate lengths from a larger sheet, to be inlayed into the groove.
• Soak the strips of veneer.
7
fig. 19 The rough cut Sitka Spruce that will eventually become the top plates and the internal blocks. If you look closely you can see several halved violin profiles, and the coping saw used to cut them out.
fig. 17 Two scroll patterns adhered to a block of curly maple wood. After sawing the necks free from the block, the scrolls are carefully carved by hand.
fig. 18 Cutting out the neck.

• Glue (fig. 21) the sandwiched stack (ebony, maple, ebony) of veneer into the slot. Put strong pressure onto the sandwich, to make sure it goes deep into the slot (fig. 22). While the strips are in the slot cut the ends to length with a very sharp knife. Be careful to create a crisp corner that the next piece can mate to. (fig. 23)
• Using finger planes, trim the access veneer that is sticking out of the slot. (fig. 24)
• Refine the shape of the plate surface with finger planes. (fig. 25)
• Finish the surface using steel scrapers• Flip the piece over, carve out the belly with
the #5 gouge.*• Move to the finger planes, but use a caliper
to check the thickness of the piece. It should be 4 mm at the edges, narrowing to 2.8 mm in the center. This is critical to the way the plate will resonate. If the plate is too thick it will not resonate. If it is uneven in thickness it will be dissonant, too thin and it will be too fragile.
• Refine the surface and fine tune using the scrapers.
• Make markings for the “F” hole locations. (fig. 26)
• Drill holes at the end of the “F” holes. (fig. 27)
• Use a coping saw to saw from one hole to anther. (fig. 28)
• Expand the saw path with a sharp knife, until it is the appropriate shape. Be very careful to cut with the grain as there are many changes because of the complex shape. (fig. 29)
• Cut out two notches from each “F” hole. (fig. 30)
After going through this process entirely by hand and quickly realized that with my experience, if I wanted to finish on time, I could not build the entire instrument this way. During that time a new opportunity opened up to me when the School of Art & Design bought a 4 axis CNC mill. I was immediately invigorated to learn about the most advanced manufacturing techniques available to me. I put physical
8
fig. 20 This is a large curly maple board with a gorgeous figure. Pencil line mark how each halved violin section will cut out.
fig. 21 Freeing a halved violin plate from the maple board.
fig. 22 Clamping the freshly glues butt joint between two maple violin halves.

9
fig. 25 I am removing all traces of the glue tabs, and shaping the surface into its final contours. The curly maple grain alternates very violently. Which makes it very difficult to use any kind of cutting tool accurately.
fig. 24 Carefully cleaning access material out of the corners of the plate.
fig. 23 A view of the purfling in the corner. It was very difficult to get precise matching in the corners.
fig. 22 Pressing the purfling into place. If it does not fit all the way down, then there is a chance that it will get torn later in the carving process.
fig. 21 Applying glue to a strip of maple, that will be placed between two pieces of ebony.
fig. 20 A piece of steel was bent and sharpened into a doglegged chisel, used to clean out the groove that the purfling will fit into.

work aside and invested a significant amount of time learning how to use 3 Dimensional modeling software. I was surprised by how easily the physical skills I learned transferred over to the digital media. It was incredibly rewarding to see the 3D model I made come to life on the CNC mill. It was also a surprise to realize how much more physicality and perspective a real object gives you when compared to a representation on a screen. I knew then that the project would have to move in and out of the digital realm.
Using digital tools did not change the process too much, (it only removed the steps marked with an asterisk) but it did increase the accuracy of my plate by many fold. It took nearly 16 hours to cut both sides of each plate.
10
fig. 26 The plate is reasonable tuned and the “F” holes are drawn on for reference. The tabs at the back of the plate are left on to provide a clamping area.
fig. 27 The ends of the “F” holes are drilled out on a drill press.
fig. 29 The Holes are expander to their final shape and size with a knife or a skew chisel.
fig. 28 The “F” holes are shaped by sawing out a connection between the two drilled holes.
fig. 30 The final shape of the “F” hole, including notches.

Many times faster then I could do it by hand, and I had those 16 hours to work on other things. There is a good chance that all the time I saved using the mill, was spent learning how to, or improving my 3D models. My digital process for the plates went as follows:•Convert analog violin plans into digital vector drawings using Adobe Illustrator. (fig. 31)•Create scale plans for plate outlines, rib contours, and jig templates. (fig. 32)•Use Illustrator violin files to create 3D versions of all Triolin parts in Rhinoceros NURBS Modeler. (fig. 33 - 35)•Mill first round of digital to physical prototypes. (fig. 36)•Refine digital models for prototyping, mill them out again.
•R e -refine digital
11
fig. 35 A digital model of how the finished ribs and blocks interact with the jig. The measurements from this model were used to construct the top and bottom plates.
fig. 33 3 Dimensional model of the jig used to bend and support the ribs and corner blocks.
fig. 34 Digital model of three-sided violin plate. One-third of this model would later be used to produce the first wood prototype on the CNC Mill.
fig. 31Scale outline of a violin, with center line, made in Adobe Illustrator.
fig. 32 From left to right; jig for a violin, contour that the ribs have to adhere to, out of perimeter of the top and bottom plates. The holes in the jig are used to house dowels to aid in the clamping process. And the rectangular spaces are used to hold the corner blocks throughout the process.

models for final physical production in spruce and maple. (fig. 37 - 43)•Clean up physical plates and jump back into the physical process of tuning the plates.•After which, because I am making a three sided violin, glue the three top plates together (fig. 44, 45), and the three bottom plates together. (fig. 46, 47)•Clean up joints, and blend the plates into
each other. (fig. 48)
12
fig. 38 The underside of the bottom plate. It is much simpler because it is prepared for another digital process.
fig. 37 A digital model of the back plate cut. The horizontal tabs are there to facilitate the other side of the plate to be cut. There are two registration markers to make sure that the piece will be lined up once it is flipped over. The whole part is submerged in a block to save time during the cutting process.
fig. 36 The first prototype of the top plate, cut out of seven layer birch plywood. The contrast of layers of plywood made it easy to see the curvature of the model, and suggested areas which needed to be adjusted.
fig. 39 A spruce top plate just off the mill. After the first pass the piece is flipped over, the vertical bars are used as a parallel glueing surface. In order for the piece to be shaped, the bars will have to be removed.
fig. 40 The backside of the top plate. The thickness of the entire piece is 5 mm, it will worked by hand down 2.8 mm in some areas. The plate is tuned during this process, revealing its pitch, tone and resonance. There is and area around the edge that is saved as a glueing surface for the blocks and ribs.

13
fig. 46 Here I am applying hide glue to the end of the bottom plat.
fig. 43 The volume of saw dust from the mill is at least 5 times the volume of the original piece. A strong shop vacuum is need to free the plate from its former self.
fig. 42 The belly of a top plate being worked on by the mill.
fig. 41 A spruce blank set up in the milling machine. After the top side of the piece is cut, it will be flipped over for the other side to be cut.
fig. 45 The three top plate are glued and clamped together.
fig. 44 Clamping the top plates together. Notice that the pice on right does not have clamping tabs. This is because that section was made entirely by hand while the other two were digitally assisted.
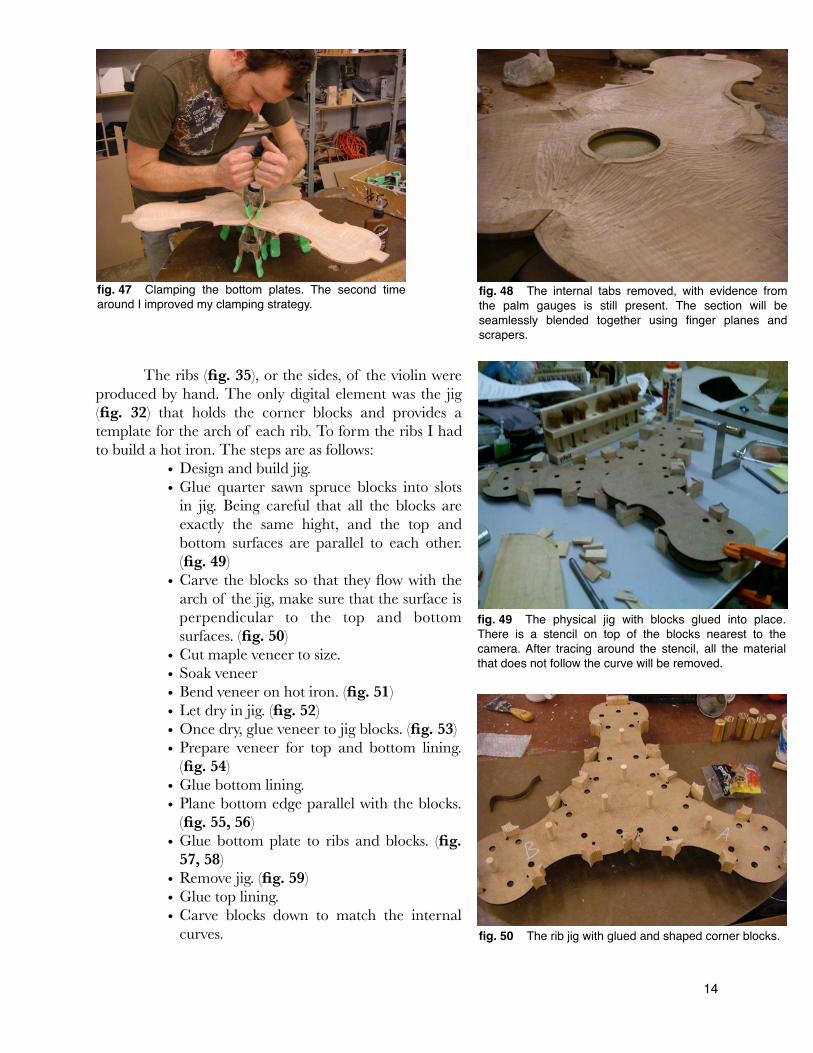
The ribs (fig. 35), or the sides, of the violin were produced by hand. The only digital element was the jig (fig. 32) that holds the corner blocks and provides a template for the arch of each rib. To form the ribs I had to build a hot iron. The steps are as follows:
• Design and build jig.• Glue quarter sawn spruce blocks into slots
in jig. Being careful that all the blocks are exactly the same hight, and the top and bottom surfaces are parallel to each other. (fig. 49)
• Carve the blocks so that they flow with the arch of the jig, make sure that the surface is perpendicular to the top and bottom surfaces. (fig. 50)
• Cut maple veneer to size.• Soak veneer• Bend veneer on hot iron. (fig. 51)• Let dry in jig. (fig. 52)• Once dry, glue veneer to jig blocks. (fig. 53)• Prepare veneer for top and bottom lining.
(fig. 54)• Glue bottom lining.• Plane bottom edge parallel with the blocks.
(fig. 55, 56)• Glue bottom plate to ribs and blocks. (fig.
57, 58)• Remove jig. (fig. 59)• Glue top lining.• Carve blocks down to match the internal
curves.
14
fig. 47 Clamping the bottom plates. The second time around I improved my clamping strategy.
fig. 48 The internal tabs removed, with evidence from the palm gauges is still present. The section will be seamlessly blended together using finger planes and scrapers.
fig. 49 The physical jig with blocks glued into place. There is a stencil on top of the blocks nearest to the camera. After tracing around the stencil, all the material that does not follow the curve will be removed.
fig. 50 The rib jig with glued and shaped corner blocks.

• Construct center block.• Glue center block to bottom plate. (fig. 60)• Glue top plates onto ribs and blocks. (fig.
61, 62)
At this point the body is entirely finished, and the only things left is to attach the three necks, clean up any glue residue, and prepare the surface for varnishing. These steps were also challenging, but they did not jeopardize the success of the project as much as the preceding process. When the instrument was varnished, set up, and the strings were tuned; there was an immediate resonance in the air (fig. 63). The responses the object has received at the show, and from players has been wonderful (fig. 64, 65).
15
fig. 52 One rib clamped overnight for drying.fig. 51 A group of bent ribs before they are glued on the jig.
fig. 53 Several ribs glued and clamped. I could not glue all of them at once because there was extra material that had to be removed from each piece before the next could be put in place.
fig. 54 Cutting the lining out of a larger sheet of veneer. The whole job was done using a sharp pocket knife, and aluminium ruler.
fig. 55 Cleaning the edges of the ribs to be parallel with the corner blocks. It was good to have a very sharp plane, because certain areas had me cutting against the grain.

16
fig. 56 The completed ribs and blocks.
fig. 57 Glueing the bottom plate to the ribs. It took a lot of clamps to distribute even pressure along the entire edge. Luckily hide glue has a longer working time than regular wood glues, which afforded me the time to make things perfect.
fig. 58 More clamping.
fig. 59 The bottom and ribs with the jig removed.
fig. 60 The center block. This piece is very important because it distributes much of the pressure created by the tension of the strings. It is made from three sequenced blocks of spruce, which have a conical hole reamed out to fit the tail pin. The whole assembly is wrapped in a single
fig. 61 The top plate (with base bar) the bottom plate, and ribs (with a few sections of lining being clamped in place with clothes pins). This photograph show these part just before final assembly.
Future where is this going?
After working on this project for two semesters I am happy to find that I am not tired of instrument making! The responses from people have also provided much inspiration for me to keep going with this work. A musical score has been composed for the instrument, I want to compose one other piece, and have plans to record both this summer. Using the internet, I want to gain some publicity for the project. It is to be hoped that this will lead to more people wanting to play the instrument and compose for it. I look forward to the time I have to spend with this object, and to the ideas that will be born from this project.
17
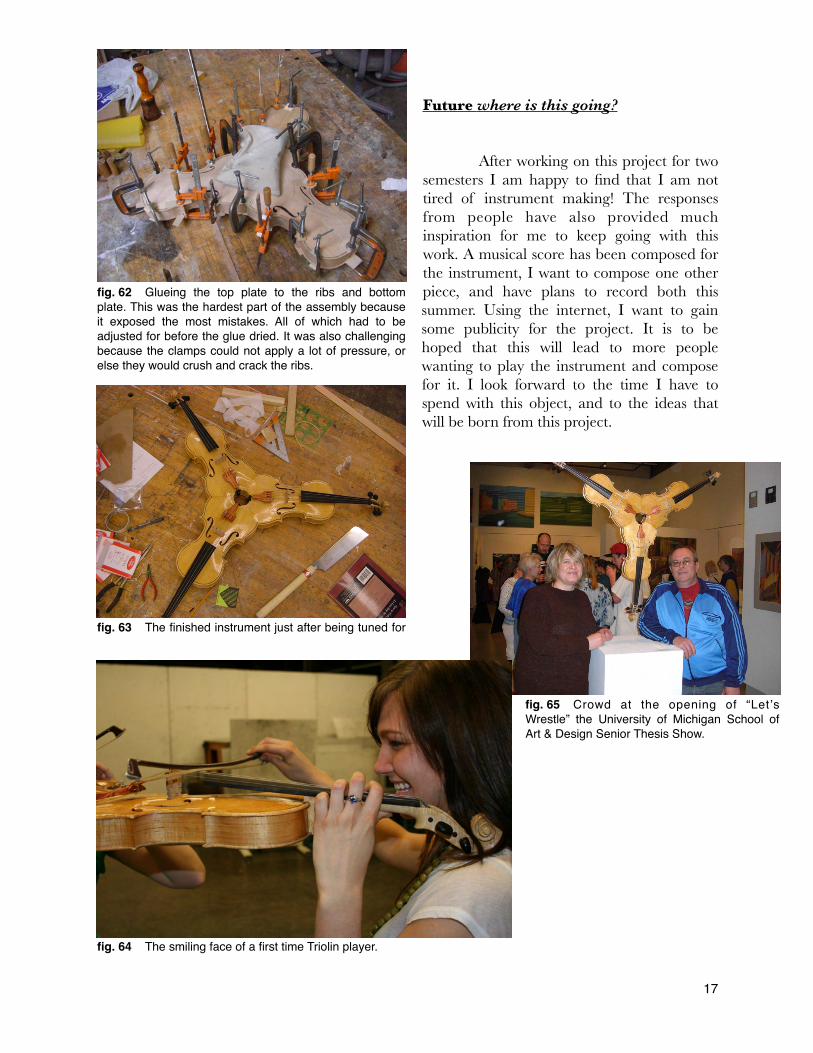
fig. 63 The finished instrument just after being tuned for
fig. 62 Glueing the top plate to the ribs and bottom plate. This was the hardest part of the assembly because it exposed the most mistakes. All of which had to be adjusted for before the glue dried. It was also challenging because the clamps could not apply a lot of pressure, or else they would crush and crack the ribs.
fig. 64 The smiling face of a first time Triolin player.
fig. 65 Crowd at the opening of “Letʼs Wrestle” the University of Michigan School of Art & Design Senior Thesis Show.

References and Sources
Historical References:Martin, B., Riddim: Claves of African Origin (Columbus, Music in Motion Films Ltd, 2006) ISBN 978-0-9673098-4-2
Heron-Allen, E., Violin Making: A Historical and Practical Guide (Mineola, Dover Publications, 2005) ISBN 0-486-44356-6
Violin Building References used:
Ossman, B., Violin Making: A guide for the Amateur (East Petersburg, Fox Chapel Publishing Co. Inc.,2000) ISBN 1-56523-091-4
Barker, J., Violin-Making: A practical Guide (Ramsbury, The Crowood Press Ltd, 2004) ISBN 1-86126-436-4
Strobel, H., Violin Maker’s Notebook (Aumsville, Henry Strobel, Violin Maker & Publisher, 2003) ISBN 0-9620673-3-4
Strobel, H., Art & Method of the Violin Maker: Principles & Practices (Aumsville, Henry Strobel, Violin Maker & Publisher, 2006) IBSN 0-9620673-5-0
Strobel, H., Useful Measurements for Violin Makers: A reference for Shop Use (Aumsville, Henry Strobel, Violin Maker & Publisher, 2006) IBSN 0-9620673-2-6
Strobel, H., Violin Making: Step by Step (Aumsville, Henry Strobel, Violin Maker & Publisher, 2005) ISBN 0-962073-6-9
Article about experimental violins:http://www.iht.com/articles/2007/10/12/arts/design15.php
18