inspiration 9.0 for mac & windows
TRANSCRIPT

Center for Adaptive Technology
Southern Connecticut State University • Engleman Hall, Room ENB17 501 Crescent Street• New Haven, CT 06515
Tel: (203) 392-5799 • Fax: (203) 392-5796 • E-mail: [email protected]
Inspiration 9.0 for Mac & Windows
Vendor: Inspiration Software, Inc., www.inspiration.com and www.inspiration.com/Inspiration Price: $69 for Single Version, and $39.95 for Upgrade Version Equipment required: On both platforms, an Internet browser or connection is required to use internet features. *Also, QuickTime is a recommended feature. Optional features or attachments: An interactive electronic whiteboard, and/or microphone. Macintosh: PowerPC G4 700 MHz or higher, OS X 10.3 or higher, 512 MB RAM, 250 MB available hard drive space, CD-ROM drive, Internet connection and Quicktime recommended. Windows: Pentium III 450 MHz or higher, Windows 98, 20000, ME, XP (including Tablet PC Edition), Vista, or Windows 7; 256 MB RAM, 250 MB available hard drive; CD-ROM drive, Internet connection and QuickTime recommended. What it does: Inspiration is a visual learning and organization mapping tool that will help its user when it comes time for thinking and writing. By using Inspiration’s web-like diagrams, its users can brainstorm and gather their ideas and plug them right into the already made templates or make their very own diagram. With Inspiration’s helpful visuals and organizers, the user will be able to create and map a diagram or outline that will help the user with future assignments including: Writing assignments, diagrams, outlines, reports and papers, and now with Inspiration 9 a presentation mode in which you can create a slide show or a presentation of your work.

2
Before you begin Start the Inspiration 9.0 program from either the desktop or the Start Menu. The main screen will pop up and it is up to you where you would like to go next, but for now let us begin with the basic Diagram option.
Creating a Diagram Using Rapid Fire The Rapid Fire command lets you quickly add subtopics to a diagram that you wish to work on.
1. The Main Idea symbol should show up when you click on the Diagram
option on the main page. Click in the bubble and replace “Main Idea” with the phrase “Civil Rights Movement.”
2. In the same box, you will then hit the “Rapid Fire Button”, which is located at the top left hand corner of the page.
3. From here, you will enter new topics related to your subject. In our case, we have related topics, ideas, or people to our main focus which is the “Civil Rights Movement”.

3
Every time you wish to add a new topic, idea, or person all you have to do is hit the Rapid Fire option, type in what you wish, then hit the enter key and a new bubble with that topic will be connected to the main idea.
4. Click on your Civil Rights Movement bubble and click on the Rapid Fire option.
5. Type “Martin Luther King, Jr.” and hit enter. 6. Now type “Rosa Parks” and hit enter. You will now have two topic ideas
branching off of your main topic, “Civil Rights Movement”.
You can make as many branches and sub-branches as needed.
7. Click on the “Martin Luther King, Jr.” bubble. Now click on the Rapid Fire option.
8. Type “I have a dream” and hit enter. You will now have an idea bubble stemming off of the “Martin Luther King, Jr.” idea bubble.
You can continue to add ideas to any part of your diagram using Rapid Fire.
Creating a Diagram Using the Create Button

4
The Create button lets you create and link topics and subtopics to one another in any direction that you choose.
1. Let’s get started. If you just opened the program click on Diagram option on the Main Menu. If you are already in the program go to the top left hand corner of the program click File, New, and a save option might show up (click save if you wish save, or don’t save if you wish not to save).
2. A Main Idea Bubble will once again show up. In this main bubble, type in your main topic in which you will later branch subtopic bubbles off of. For this exercise, our main topic will be, “Adaptive Technology”.
3. At any time if you wish to add another Topic Bubble you can by taking the mouse and clicking where you want your bubble to be and then hitting the Create icon on the upper left hand side of the program.
Creating links using the Link icon
If you wish to connect two bubbles together you would simply click on the bubble you wish to connect and then click the Link button on the top tool bar. You can create as many bubbles as you want which apply to the topic/subtopic you are working on. For our exercise we will create and link many subtopics to our main topic, “Adaptive Technology”.
1. Type “Adaptive Technology” into the main idea bubble. 2. Click out of the main idea bubble. Click on the Oval in the Symbols box
and a new idea bubble will appear. Type the words “Computer Software” into the new bubble.

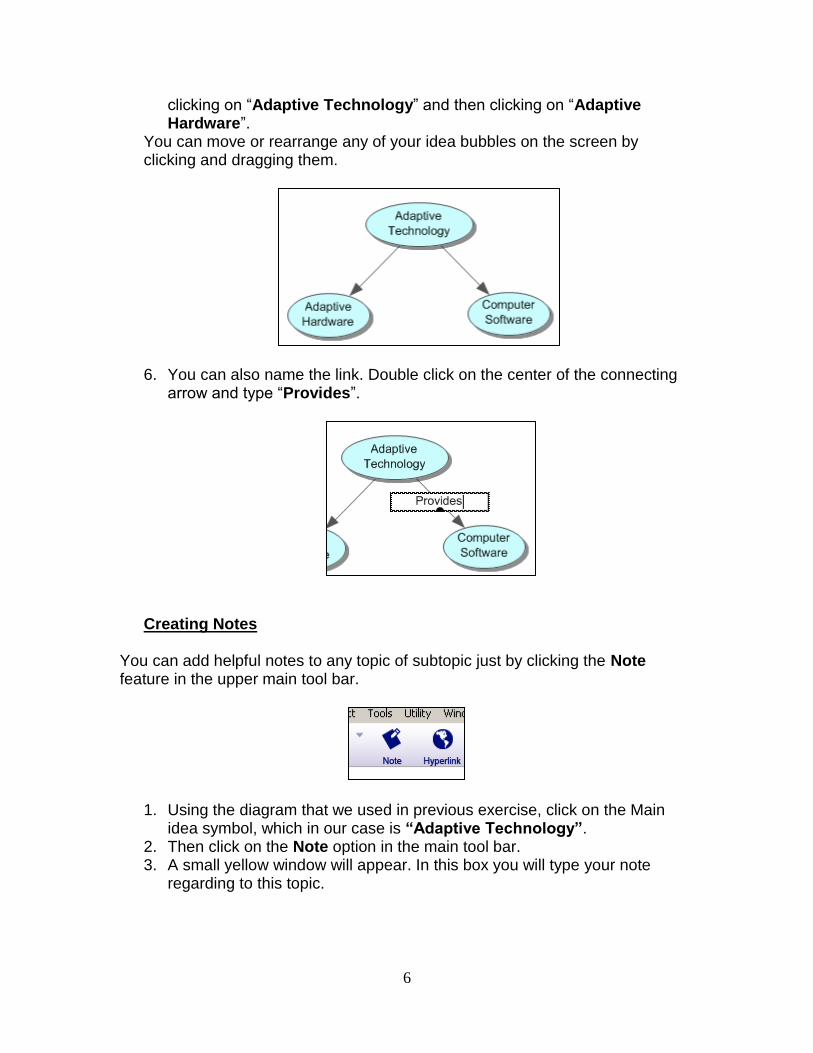
5
3. Click the Link icon on the top toolbar and it will become highlighted green. Click on the “Adaptive Technology” bubble and then click on the “Computer Software” bubble. They are now linked with an arrow from your main idea (“Adaptive Technology”) to your supporting idea (“Computer Software”).
4. To add another supporting idea, click out of all idea bubbles, click on the oval icon again in the Symbols box, and then type in “Adaptive Hardware”.
5. Link this idea bubble to “Adaptive Technology” by clicking out of the “Adaptive Hardware” bubble, clicking on the Link button on the top toolbar,
6
clicking on “Adaptive Technology” and then clicking on “Adaptive Hardware”.
You can move or rearrange any of your idea bubbles on the screen by clicking and dragging them.
6. You can also name the link. Double click on the center of the connecting
arrow and type “Provides”.
Creating Notes
You can add helpful notes to any topic of subtopic just by clicking the Note feature in the upper main tool bar.
1. Using the diagram that we used in previous exercise, click on the Main idea symbol, which in our case is “Adaptive Technology”.
2. Then click on the Note option in the main tool bar. 3. A small yellow window will appear. In this box you will type your note
regarding to this topic.

7
4. If you wish to close out of this box at any time, you just click the (x) button on the upper left hand corner of the yellow note box.
5. Also, you can click the bottom right-hand corner in the note box and click and drag the corner to make the note bigger or smaller.
6. You will notice above that there is a blue arrow option next to the “Adaptive Technology” idea bubble, by clicking that option you will hide the subtopic(s) (in our case Computer Software and Adaptive Hardware).
7. Above that symbol is the Hide Note(s) option. By clicking it you will hide your yellow note(s).
Changing the Shape, Color, and Appearance of Symbols and Lines
1. Using the diagram that you used in the previous exercise, move the arrow over to the “Symbols” tool pallet. *When hovering over each symbol, a magnified view will pop up showing you what the symbol with look like.

8
2. Click the “Main Idea” Bubble (“Adaptive Technology”), and then click on the “Star” symbol in the pallet. Your “main idea” bubble will now become a star. *You can change any of your bubbles to any shape you want just by clicking on a different shape in the “Symbols” pallet. 3. When it comes time that you want to change the color of your bubble or diagram look at the “Font” tool bar at the bottom of the program and you will notice the “color effects” option.
7. By clicking on the bubble/diagram of your choice and then clicking the color options in the “Font” tool bar you will be able to change the color and line color or your bubble or in our case star. Your options for colors are: Change the line color, fill color of the diagram, and revert back to the old color.
8. To change the size of your bubbles, click on the mountain symbols over the Font Name area on the bottom toolbar.

9
9. To change the font, click on the dropdown menu (automatically assigned to Arial) and choose any desired font. To change the size of your font, click on the font dropdown menu (automatically set to size 12) and choose any desired size.
10. You can make your font Bold, Italic, or Underlined by clicking on the symbols next to the font size menu on the bottom toolbar.
11. To change the font color, click on the A symbol next to the underline symbol on the bottom toolbar. Choose any desired color.
12. You can change the style of the links between bubbles by clicking on the symbol next to the A on the bottom toolbar. You can make them Straight, Right Angle, Single Curve, or a Double Curve.
13. You can remove the arrows from the links by clicking on the arrow icon on the bottom toolbar.
10
14. The icon next to the arrow button is the link thickness button. You can make the linking line thinner or thicker.
Using the Word Guide
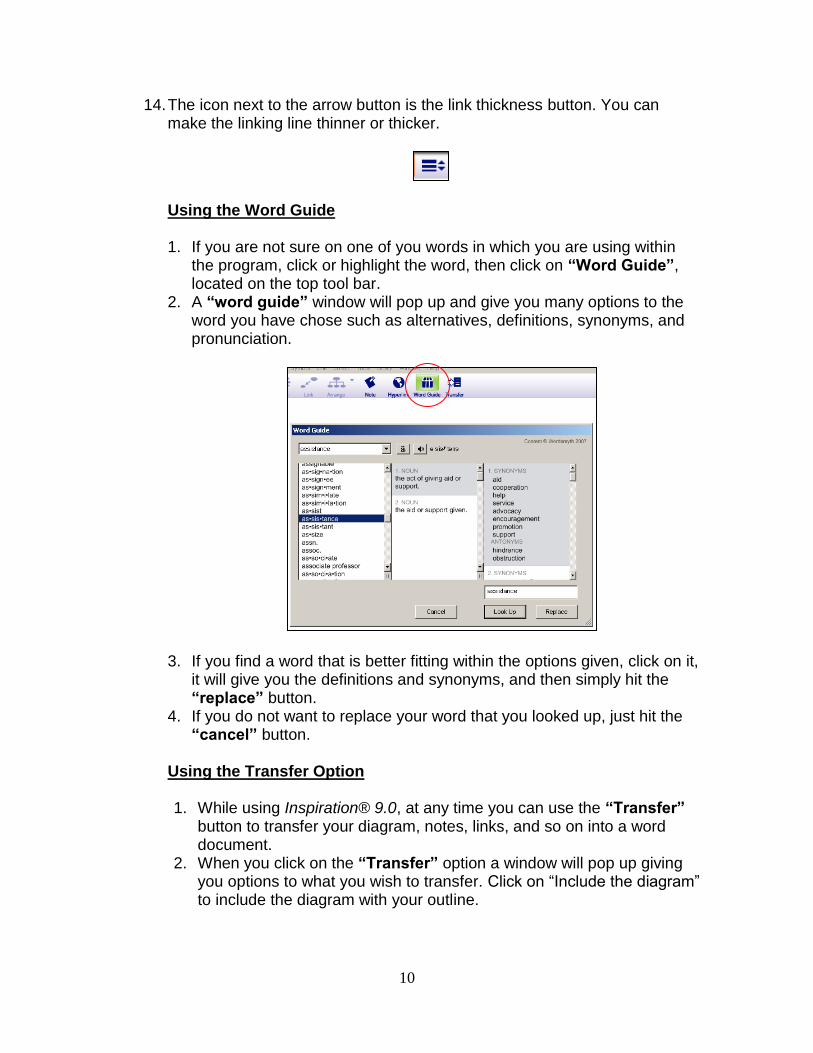
1. If you are not sure on one of you words in which you are using within
the program, click or highlight the word, then click on “Word Guide”, located on the top tool bar.
2. A “word guide” window will pop up and give you many options to the word you have chose such as alternatives, definitions, synonyms, and pronunciation.
3. If you find a word that is better fitting within the options given, click on it, it will give you the definitions and synonyms, and then simply hit the “replace” button.
4. If you do not want to replace your word that you looked up, just hit the “cancel” button.
Using the Transfer Option 1. While using Inspiration® 9.0, at any time you can use the “Transfer”
button to transfer your diagram, notes, links, and so on into a word document.
2. When you click on the “Transfer” option a window will pop up giving you options to what you wish to transfer. Click on “Include the diagram” to include the diagram with your outline.

11
3. When you choose what you wish to transfer, click on the “OK” option. From here it will tell you to “save” your Inspiration file. Save the file to wherever you would like, and the program will ask you how you would like to open this file: Microsoft® Word or OpenOffice.org Writer.
4. If you clicked on “Microsoft Word” option, it will open up in Word, where you will have the option of printing it.
Using the Hyperlink Option
1. Using this option you will be able to add “links” to your diagram or outline.
2. By clicking on the “Hyperlink” option, a window will pop up asking you what type of link you would like to enter.
3. By leaving the option on “Web Page”, you will be able to create a name for your link by typing it in the “Hyperlink Text” space, and then add your link to the “Link to” space.
4. By clicking “OK” you will now have an active link within your diagram or outline.
Using the Presentation Option
1. In Inspiration® 9.0 there is a new feature that allows you to build and
create a presentation and incorporate your outline or diagram within it. 2. The presentation feature is located at the top right hand corner of the
program screen. 3. By clicking the “Presentation” button a new window will pop up
showing you the variety of layouts available for you to use in your presentation.
12
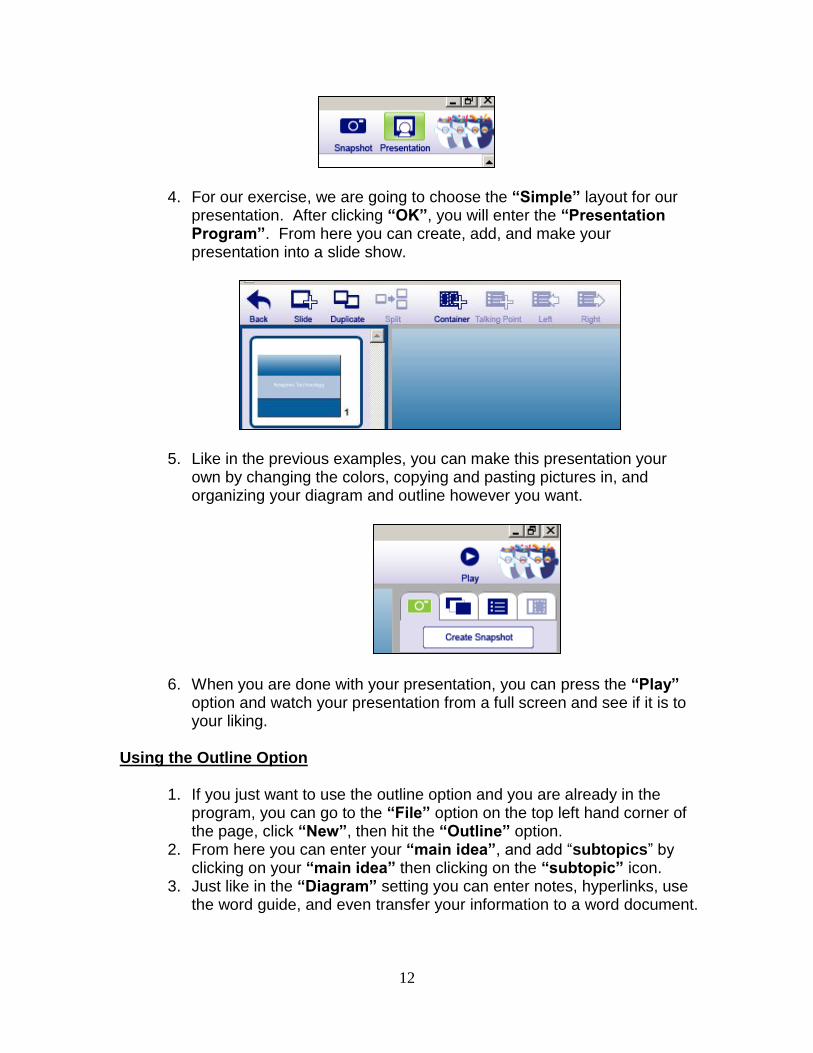
4. For our exercise, we are going to choose the “Simple” layout for our presentation. After clicking “OK”, you will enter the “Presentation Program”. From here you can create, add, and make your presentation into a slide show.
5. Like in the previous examples, you can make this presentation your
own by changing the colors, copying and pasting pictures in, and organizing your diagram and outline however you want.
6. When you are done with your presentation, you can press the “Play” option and watch your presentation from a full screen and see if it is to your liking.
Using the Outline Option
1. If you just want to use the outline option and you are already in the
program, you can go to the “File” option on the top left hand corner of the page, click “New”, then hit the “Outline” option.
2. From here you can enter your “main idea”, and add “subtopics” by clicking on your “main idea” then clicking on the “subtopic” icon.
3. Just like in the “Diagram” setting you can enter notes, hyperlinks, use the word guide, and even transfer your information to a word document.
13
Using Templates One of the great tools that Inspiration® offers is pre-made templates that are suitable for many subjects.
1. If you are already in the program you can go to File, New, and then click
on the “Template” option on the main screen. If you have just started the program, just click on the “Template” option on the main opening page.
2. From here a new window pops up giving you different subject areas in which you can click and open up pre-made templates.
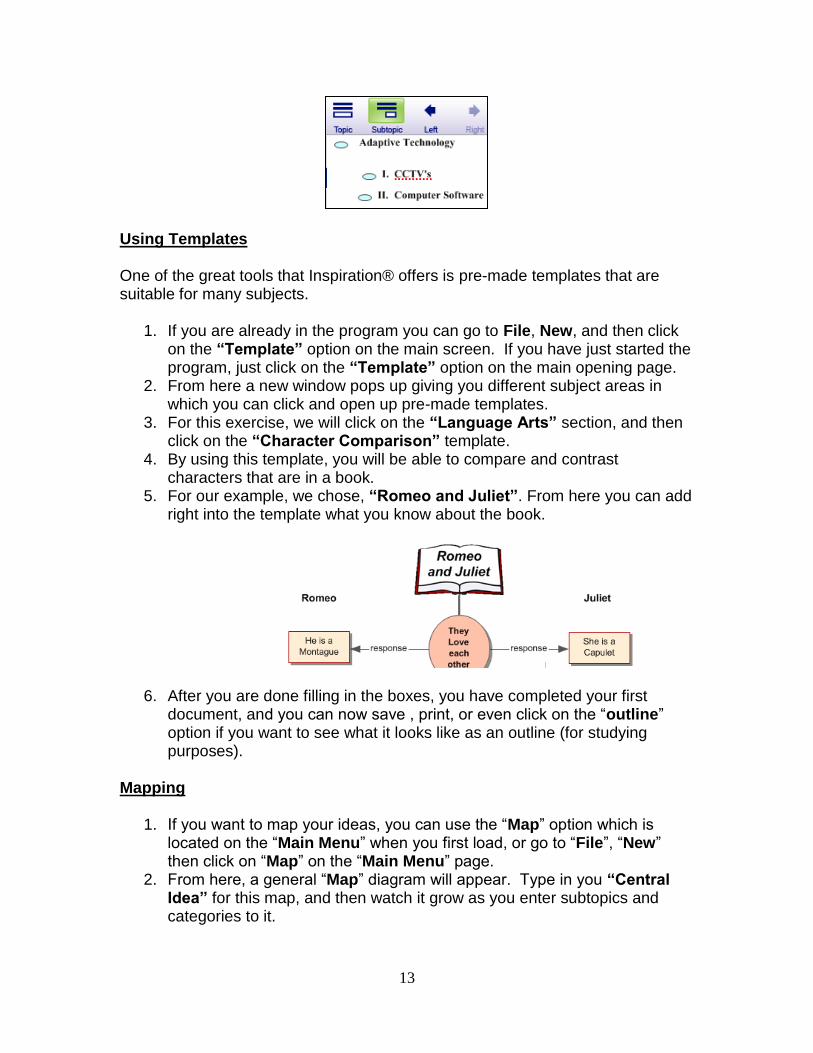
3. For this exercise, we will click on the “Language Arts” section, and then click on the “Character Comparison” template.
4. By using this template, you will be able to compare and contrast characters that are in a book.
5. For our example, we chose, “Romeo and Juliet”. From here you can add right into the template what you know about the book.
6. After you are done filling in the boxes, you have completed your first document, and you can now save , print, or even click on the “outline” option if you want to see what it looks like as an outline (for studying purposes).
Mapping
1. If you want to map your ideas, you can use the “Map” option which is located on the “Main Menu” when you first load, or go to “File”, “New” then click on “Map” on the “Main Menu” page.
2. From here, a general “Map” diagram will appear. Type in you “Central Idea” for this map, and then watch it grow as you enter subtopics and categories to it.

14
3. For our “Central Idea” we chose, “Colleges near New Haven, CT”. We created subtopics, which are the colleges, and if you wish to get into further detail you can add on to those branches as well.
4. By clicking on the “+” symbols you can then add more branches to your map, and if you wish to delete some branches, right click on them and click “delete branch”.
5. Just like in all the other sections of Inspiration® you can transfer, use the word guide, turn this map into an outline, insert hyperlinks, make a presentation, use the note option, and use rapid fire.

15
Index
Topic Page
About Inspiration 9.0……………………................................................................. 1
System Requirements……………………………………………………………… 1
Before You Begin…………………………………………………………………. 2
Creating a Diagram Using Rapid Fire……………………………………………... 2
Creating a Diagram Using the Create Button……………………………………… 3
Creating Links Using the Link Icon……………………………………………….. 4
Creating Notes……………………………………………………………………... 6
Changing the Shape, Color, and Appearance of Symbols and Lines……………… 7
Using the Word Guide……………………………………………………………... 10
Using the Transfer Option…………………………………………………………. 10
Using the Hyperlink Option……………………………………………………….. 11
Using the Presentation Option……………………………………………………... 11
Using the Outline Option…………………………………………………………... 12
Using Templates…………………………………………………………………… 13
Mapping…………………………………………………………………………… 13