ins-f006 (rev. a 12/23/19) installation instructions (page 1)
TRANSCRIPT
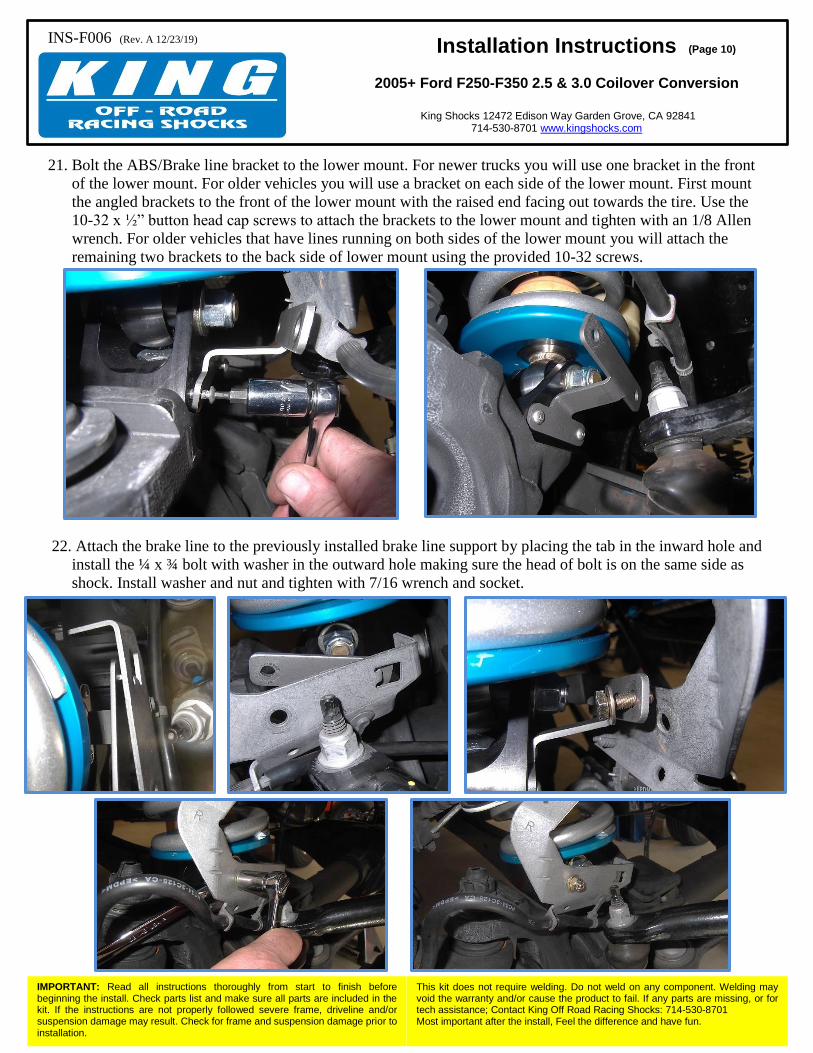
INS-F006 (Rev. A 12/23/19)
IMPORTANT: Read all instructions thoroughly from start to finish before beginning the install. Check parts list and make sure all parts are included in the kit. If the instructions are not properly followed severe frame, driveline and/or suspension damage may result. Check for frame and suspension damage prior to installation.
This kit does not require welding. Do not weld on any component. Welding may void the warranty and/or cause the product to fail. If any parts are missing, or for tech assistance; Contact King Off Road Racing Shocks: 714-530-8701 Most important after the install, Feel the difference and have fun.
Installation Instructions (Page 1)
2005+ Ford F250-F350 2.5 & 3.0 Coilover Conversion
King Shocks 12472 Edison Way Garden Grove, CA 92841
714-530-8701 www.kingshocks.com
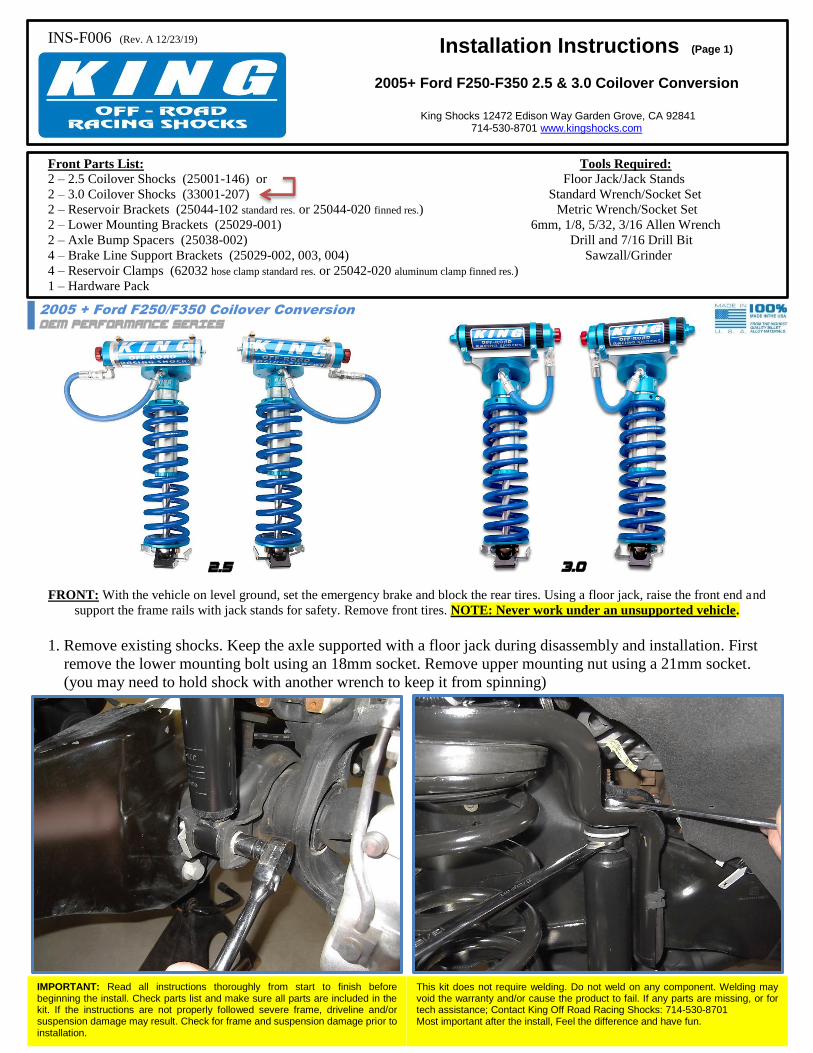
Front Parts List: Tools Required: 2 – 2.5 Coilover Shocks (25001-146) or Floor Jack/Jack Stands
2 – 3.0 Coilover Shocks (33001-207) Standard Wrench/Socket Set
2 – Reservoir Brackets (25044-102 standard res. or 25044-020 finned res.) Metric Wrench/Socket Set
2 – Lower Mounting Brackets (25029-001) 6mm, 1/8, 5/32, 3/16 Allen Wrench
2 – Axle Bump Spacers (25038-002) Drill and 7/16 Drill Bit
4 – Brake Line Support Brackets (25029-002, 003, 004) Sawzall/Grinder
4 – Reservoir Clamps (62032 hose clamp standard res. or 25042-020 aluminum clamp finned res.)
1 – Hardware Pack
FRONT: With the vehicle on level ground, set the emergency brake and block the rear tires. Using a floor jack, raise the front end and
support the frame rails with jack stands for safety. Remove front tires. NOTE: Never work under an unsupported vehicle.
1. Remove existing shocks. Keep the axle supported with a floor jack during disassembly and installation. First
remove the lower mounting bolt using an 18mm socket. Remove upper mounting nut using a 21mm socket.
(you may need to hold shock with another wrench to keep it from spinning)
OEM PERFORMANCE SERIES
2005 + Ford F250/F350 Coilover Conversion
2.5 3.0
INS-F006 (Rev. A 12/23/19)
IMPORTANT: Read all instructions thoroughly from start to finish before beginning the install. Check parts list and make sure all parts are included in the kit. If the instructions are not properly followed severe frame, driveline and/or suspension damage may result. Check for frame and suspension damage prior to installation.
This kit does not require welding. Do not weld on any component. Welding may void the warranty and/or cause the product to fail. If any parts are missing, or for tech assistance; Contact King Off Road Racing Shocks: 714-530-8701 Most important after the install, Feel the difference and have fun.
Installation Instructions (Page 2)
2005+ Ford F250-F350 2.5 & 3.0 Coilover Conversion
King Shocks 12472 Edison Way Garden Grove, CA 92841
714-530-8701 www.kingshocks.com
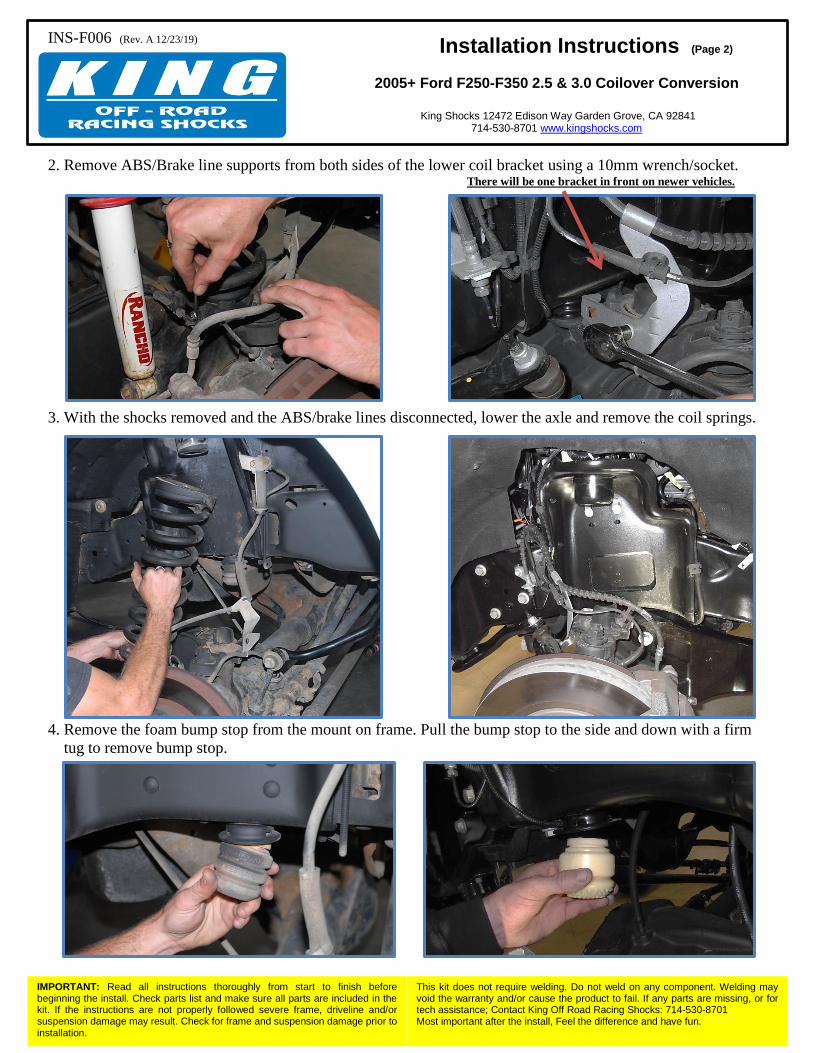
2. Remove ABS/Brake line supports from both sides of the lower coil bracket using a 10mm wrench/socket. There will be one bracket in front on newer vehicles.
3. With the shocks removed and the ABS/brake lines disconnected, lower the axle and remove the coil springs.
4. Remove the foam bump stop from the mount on frame. Pull the bump stop to the side and down with a firm
tug to remove bump stop.
INS-F006 (Rev. A 12/23/19)
IMPORTANT: Read all instructions thoroughly from start to finish before beginning the install. Check parts list and make sure all parts are included in the kit. If the instructions are not properly followed severe frame, driveline and/or suspension damage may result. Check for frame and suspension damage prior to installation.
This kit does not require welding. Do not weld on any component. Welding may void the warranty and/or cause the product to fail. If any parts are missing, or for tech assistance; Contact King Off Road Racing Shocks: 714-530-8701 Most important after the install, Feel the difference and have fun.
Installation Instructions (Page 3)
2005+ Ford F250-F350 2.5 & 3.0 Coilover Conversion
King Shocks 12472 Edison Way Garden Grove, CA 92841
714-530-8701 www.kingshocks.com
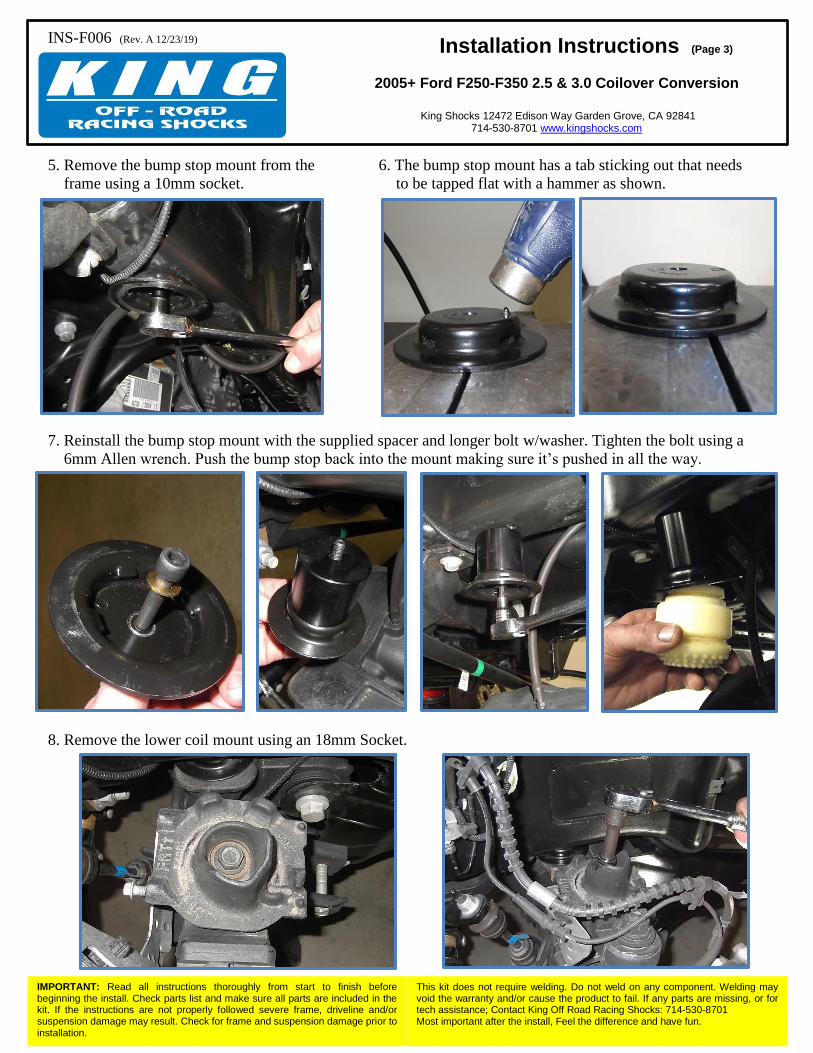
5. Remove the bump stop mount from the 6. The bump stop mount has a tab sticking out that needs
frame using a 10mm socket. to be tapped flat with a hammer as shown.
7. Reinstall the bump stop mount with the supplied spacer and longer bolt w/washer. Tighten the bolt using a
6mm Allen wrench. Push the bump stop back into the mount making sure it’s pushed in all the way.
8. Remove the lower coil mount using an 18mm Socket.
INS-F006 (Rev. A 12/23/19)
IMPORTANT: Read all instructions thoroughly from start to finish before beginning the install. Check parts list and make sure all parts are included in the kit. If the instructions are not properly followed severe frame, driveline and/or suspension damage may result. Check for frame and suspension damage prior to installation.
This kit does not require welding. Do not weld on any component. Welding may void the warranty and/or cause the product to fail. If any parts are missing, or for tech assistance; Contact King Off Road Racing Shocks: 714-530-8701 Most important after the install, Feel the difference and have fun.
Installation Instructions (Page 4)
2005+ Ford F250-F350 2.5 & 3.0 Coilover Conversion
King Shocks 12472 Edison Way Garden Grove, CA 92841
714-530-8701 www.kingshocks.com
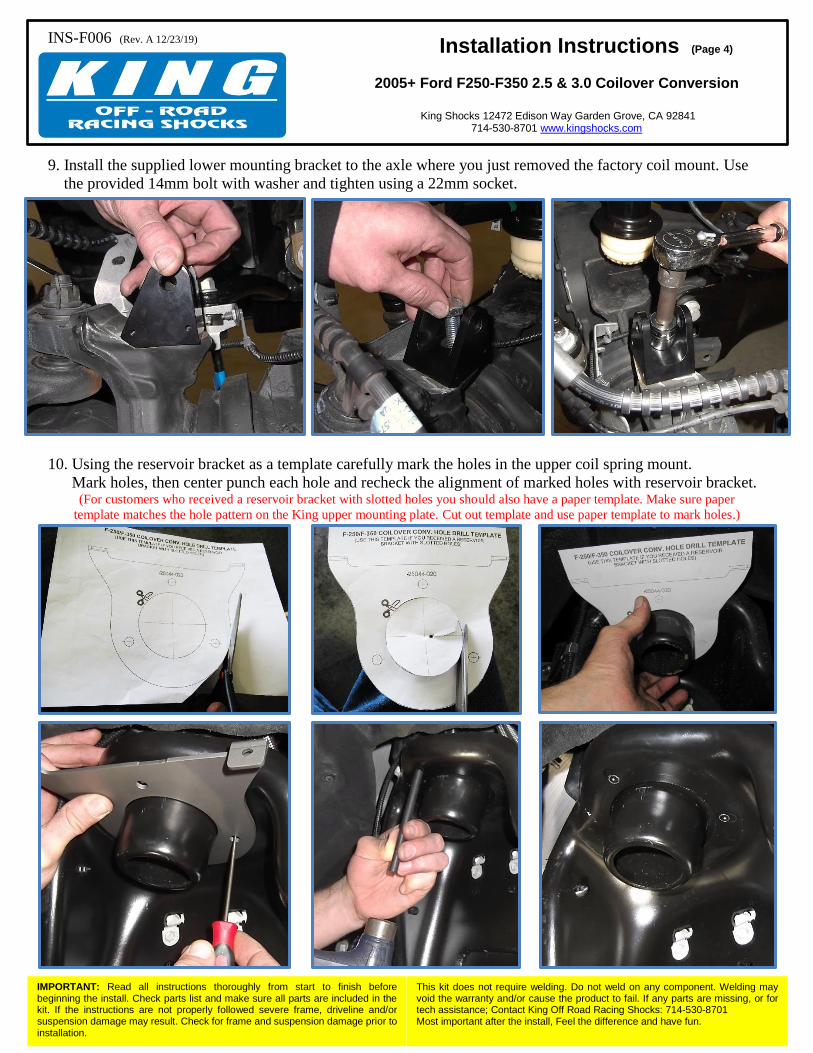
9. Install the supplied lower mounting bracket to the axle where you just removed the factory coil mount. Use
the provided 14mm bolt with washer and tighten using a 22mm socket.
10. Using the reservoir bracket as a template carefully mark the holes in the upper coil spring mount.
Mark holes, then center punch each hole and recheck the alignment of marked holes with reservoir bracket. (For customers who received a reservoir bracket with slotted holes you should also have a paper template. Make sure paper
template matches the hole pattern on the King upper mounting plate. Cut out template and use paper template to mark holes.)

INS-F006 (Rev. A 12/23/19)
IMPORTANT: Read all instructions thoroughly from start to finish before beginning the install. Check parts list and make sure all parts are included in the kit. If the instructions are not properly followed severe frame, driveline and/or suspension damage may result. Check for frame and suspension damage prior to installation.
This kit does not require welding. Do not weld on any component. Welding may void the warranty and/or cause the product to fail. If any parts are missing, or for tech assistance; Contact King Off Road Racing Shocks: 714-530-8701 Most important after the install, Feel the difference and have fun.
Installation Instructions (Page 5)
2005+ Ford F250-F350 2.5 & 3.0 Coilover Conversion
King Shocks 12472 Edison Way Garden Grove, CA 92841
714-530-8701 www.kingshocks.com
11. Use the center punch mark to drill a pilot hole starting with a smaller drill bit - 1/8 or 3/16. Double check
your pilot holes with your template to make sure the hole pattern is lining up. Now finish drilling out holes
using a 7/16” drill bit.
12. Cut the coil spring locating boss flush with the upper mount. Grind any protruding or sharp edges so the
surface is completely flat. Paint the bare metal prior to installing shocks to prevent rusting.
INS-F006 (Rev. A 12/23/19)
IMPORTANT: Read all instructions thoroughly from start to finish before beginning the install. Check parts list and make sure all parts are included in the kit. If the instructions are not properly followed severe frame, driveline and/or suspension damage may result. Check for frame and suspension damage prior to installation.
This kit does not require welding. Do not weld on any component. Welding may void the warranty and/or cause the product to fail. If any parts are missing, or for tech assistance; Contact King Off Road Racing Shocks: 714-530-8701 Most important after the install, Feel the difference and have fun.
Installation Instructions (Page 6)
2005+ Ford F250-F350 2.5 & 3.0 Coilover Conversion
King Shocks 12472 Edison Way Garden Grove, CA 92841
714-530-8701 www.kingshocks.com
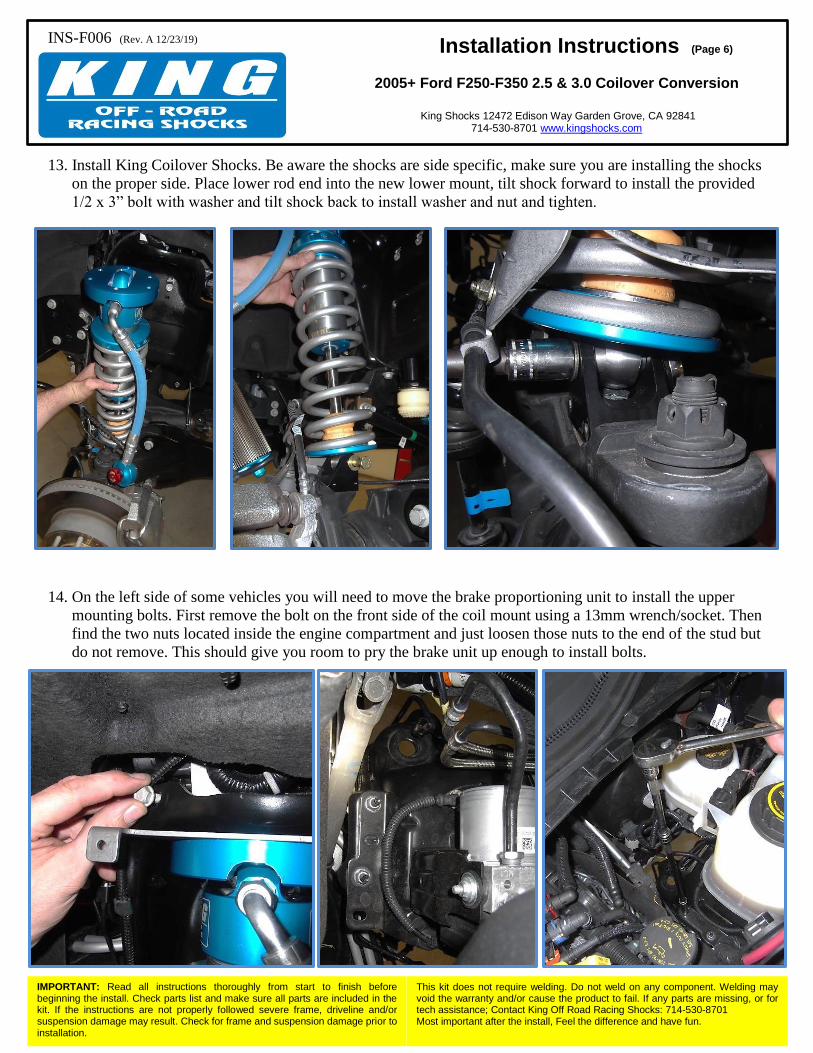
13. Install King Coilover Shocks. Be aware the shocks are side specific, make sure you are installing the shocks
on the proper side. Place lower rod end into the new lower mount, tilt shock forward to install the provided
1/2 x 3” bolt with washer and tilt shock back to install washer and nut and tighten.
14. On the left side of some vehicles you will need to move the brake proportioning unit to install the upper
mounting bolts. First remove the bolt on the front side of the coil mount using a 13mm wrench/socket. Then
find the two nuts located inside the engine compartment and just loosen those nuts to the end of the stud but
do not remove. This should give you room to pry the brake unit up enough to install bolts.
INS-F006 (Rev. A 12/23/19)
IMPORTANT: Read all instructions thoroughly from start to finish before beginning the install. Check parts list and make sure all parts are included in the kit. If the instructions are not properly followed severe frame, driveline and/or suspension damage may result. Check for frame and suspension damage prior to installation.
This kit does not require welding. Do not weld on any component. Welding may void the warranty and/or cause the product to fail. If any parts are missing, or for tech assistance; Contact King Off Road Racing Shocks: 714-530-8701 Most important after the install, Feel the difference and have fun.
Installation Instructions (Page 7)
2005+ Ford F250-F350 2.5 & 3.0 Coilover Conversion
King Shocks 12472 Edison Way Garden Grove, CA 92841
714-530-8701 www.kingshocks.com
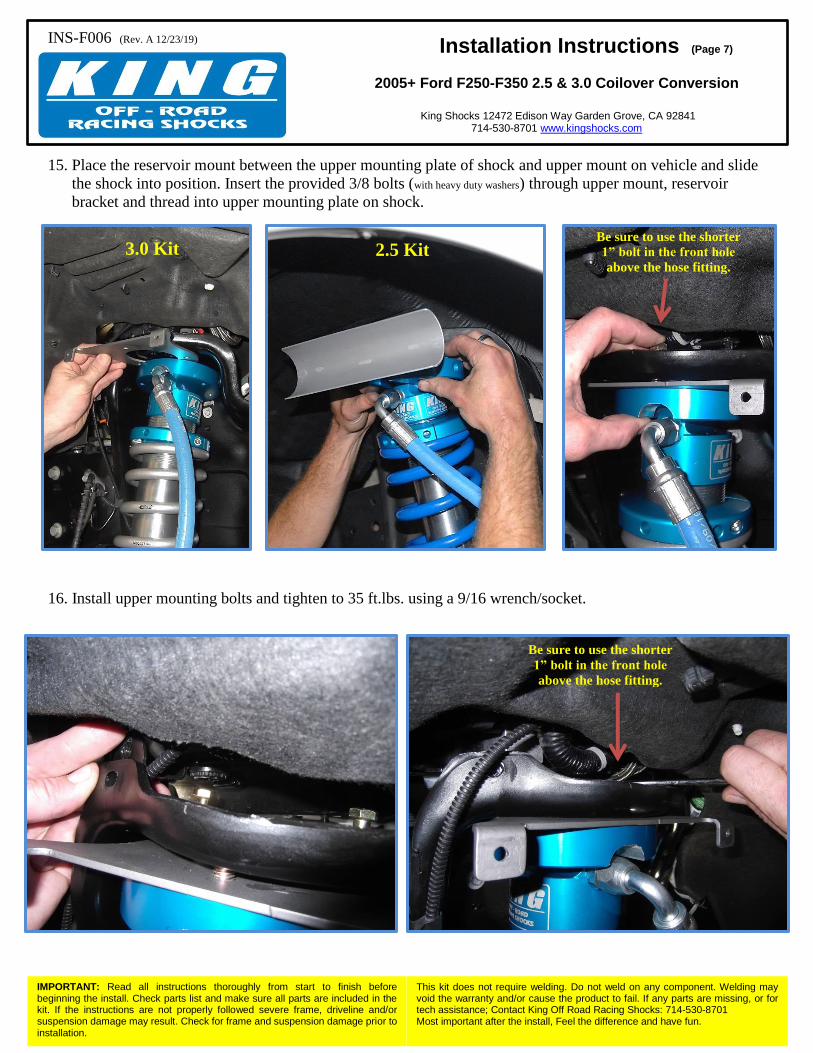
15. Place the reservoir mount between the upper mounting plate of shock and upper mount on vehicle and slide
the shock into position. Insert the provided 3/8 bolts (with heavy duty washers) through upper mount, reservoir
bracket and thread into upper mounting plate on shock.
16. Install upper mounting bolts and tighten to 35 ft.lbs. using a 9/16 wrench/socket.
Be sure to use the shorter
1” bolt in the front hole
above the hose fitting.
2.5 Kit 3.0 Kit
Be sure to use the shorter
1” bolt in the front hole
above the hose fitting.
INS-F006 (Rev. A 12/23/19)
IMPORTANT: Read all instructions thoroughly from start to finish before beginning the install. Check parts list and make sure all parts are included in the kit. If the instructions are not properly followed severe frame, driveline and/or suspension damage may result. Check for frame and suspension damage prior to installation.
This kit does not require welding. Do not weld on any component. Welding may void the warranty and/or cause the product to fail. If any parts are missing, or for tech assistance; Contact King Off Road Racing Shocks: 714-530-8701 Most important after the install, Feel the difference and have fun.
Installation Instructions (Page 8)
2005+ Ford F250-F350 2.5 & 3.0 Coilover Conversion
King Shocks 12472 Edison Way Garden Grove, CA 92841
714-530-8701 www.kingshocks.com
17. Secure the brake unit. Replace the bolt on the front of coil mount and tighten the nuts in the engine
compartment. (IF APPLICABLE)
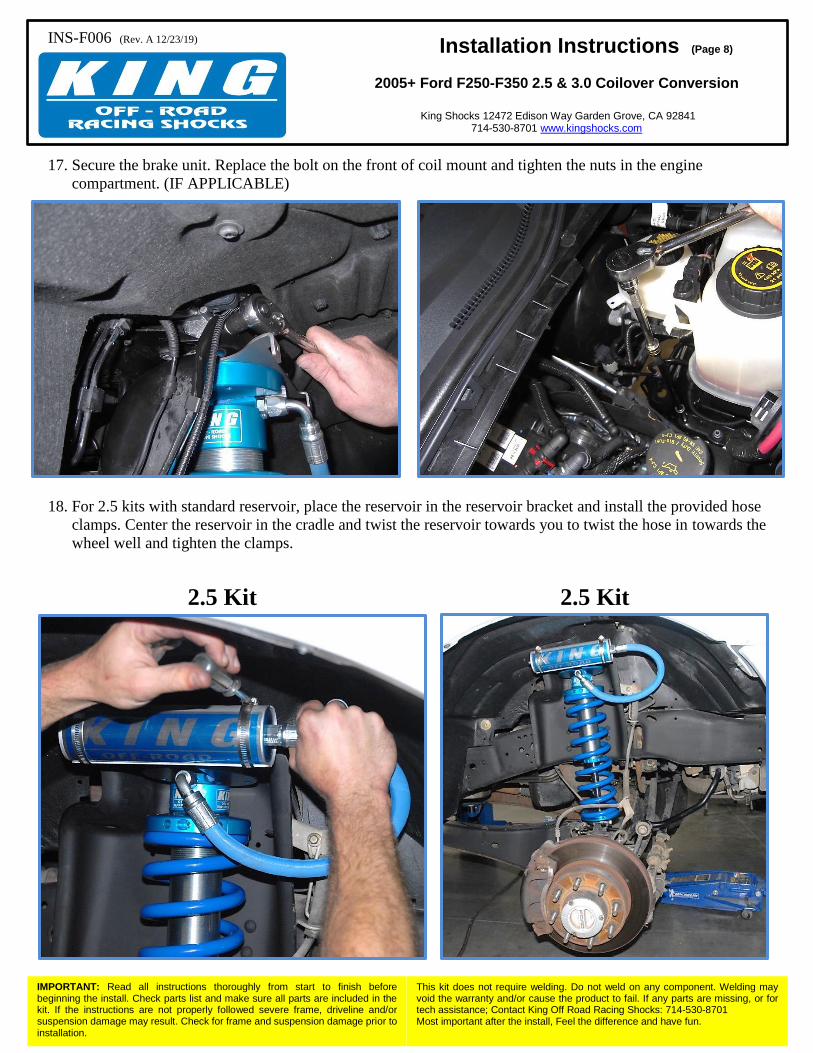
18. For 2.5 kits with standard reservoir, place the reservoir in the reservoir bracket and install the provided hose
clamps. Center the reservoir in the cradle and twist the reservoir towards you to twist the hose in towards the
wheel well and tighten the clamps.
2.5 Kit 2.5 Kit
INS-F006 (Rev. A 12/23/19)
IMPORTANT: Read all instructions thoroughly from start to finish before beginning the install. Check parts list and make sure all parts are included in the kit. If the instructions are not properly followed severe frame, driveline and/or suspension damage may result. Check for frame and suspension damage prior to installation.
This kit does not require welding. Do not weld on any component. Welding may void the warranty and/or cause the product to fail. If any parts are missing, or for tech assistance; Contact King Off Road Racing Shocks: 714-530-8701 Most important after the install, Feel the difference and have fun.
Installation Instructions (Page 9)
2005+ Ford F250-F350 2.5 & 3.0 Coilover Conversion
King Shocks 12472 Edison Way Garden Grove, CA 92841
714-530-8701 www.kingshocks.com
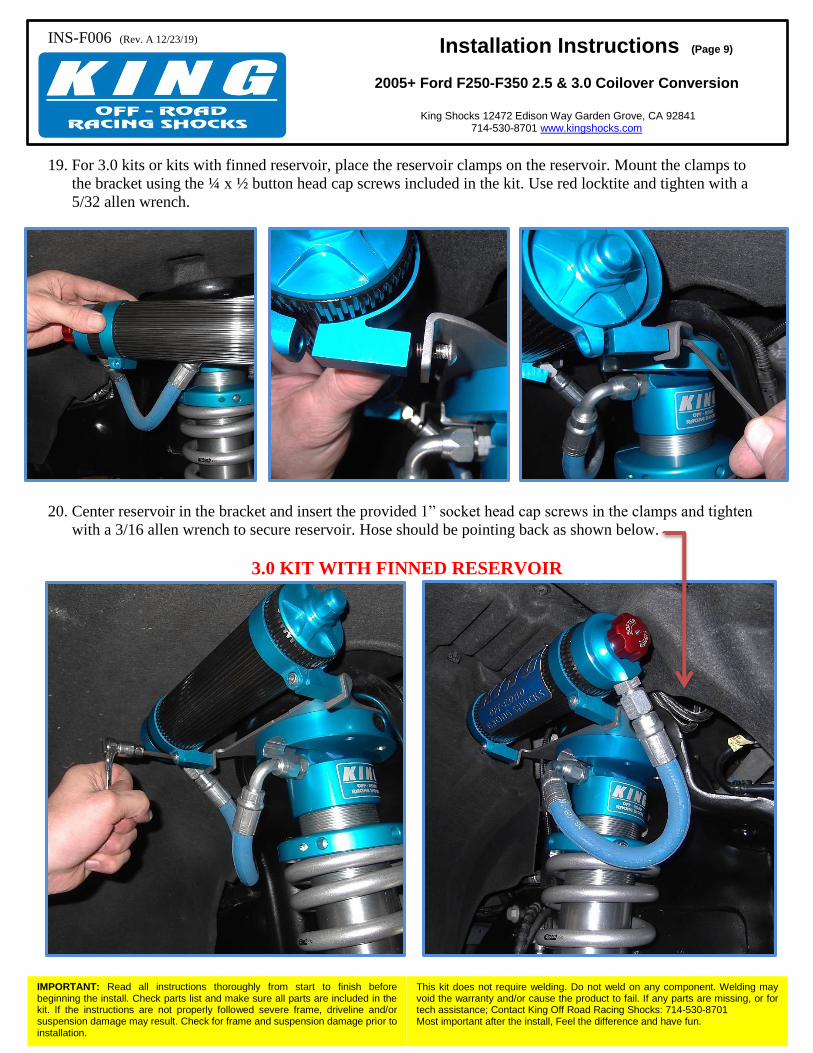
19. For 3.0 kits or kits with finned reservoir, place the reservoir clamps on the reservoir. Mount the clamps to
the bracket using the ¼ x ½ button head cap screws included in the kit. Use red locktite and tighten with a
5/32 allen wrench.
20. Center reservoir in the bracket and insert the provided 1” socket head cap screws in the clamps and tighten
with a 3/16 allen wrench to secure reservoir. Hose should be pointing back as shown below.
3.0 KIT WITH FINNED RESERVOIR
INS-F006 (Rev. A 12/23/19)
IMPORTANT: Read all instructions thoroughly from start to finish before beginning the install. Check parts list and make sure all parts are included in the kit. If the instructions are not properly followed severe frame, driveline and/or suspension damage may result. Check for frame and suspension damage prior to installation.
This kit does not require welding. Do not weld on any component. Welding may void the warranty and/or cause the product to fail. If any parts are missing, or for tech assistance; Contact King Off Road Racing Shocks: 714-530-8701 Most important after the install, Feel the difference and have fun.
Installation Instructions (Page 10)
2005+ Ford F250-F350 2.5 & 3.0 Coilover Conversion
King Shocks 12472 Edison Way Garden Grove, CA 92841
714-530-8701 www.kingshocks.com
21. Bolt the ABS/Brake line bracket to the lower mount. For newer trucks you will use one bracket in the front
of the lower mount. For older vehicles you will use a bracket on each side of the lower mount. First mount
the angled brackets to the front of the lower mount with the raised end facing out towards the tire. Use the
10-32 x ½” button head cap screws to attach the brackets to the lower mount and tighten with an 1/8 Allen
wrench. For older vehicles that have lines running on both sides of the lower mount you will attach the
remaining two brackets to the back side of lower mount using the provided 10-32 screws.
22. Attach the brake line to the previously installed brake line support by placing the tab in the inward hole and
install the ¼ x ¾ bolt with washer in the outward hole making sure the head of bolt is on the same side as
shock. Install washer and nut and tighten with 7/16 wrench and socket.

INS-F006 (Rev. A 12/23/19)
IMPORTANT: Read all instructions thoroughly from start to finish before beginning the install. Check parts list and make sure all parts are included in the kit. If the instructions are not properly followed severe frame, driveline and/or suspension damage may result. Check for frame and suspension damage prior to installation.
This kit does not require welding. Do not weld on any component. Welding may void the warranty and/or cause the product to fail. If any parts are missing, or for tech assistance; Contact King Off Road Racing Shocks: 714-530-8701 Most important after the install, Feel the difference and have fun.
Installation Instructions (Page 11)
2005+ Ford F250-F350 2.5 & 3.0 Coilover Conversion
King Shocks 12472 Edison Way Garden Grove, CA 92841
714-530-8701 www.kingshocks.com
23. For older vehicles with lines running on both sides of lower mount, use the remaining two brackets on the
rear of the lower mount. Attach brackets with provided hardware and attach ABS line to the new support
bracket using the provided ¼ x ¾ bolts.
Photos are for reference only. Brackets must be attached after shock is installed.
DOUBLE CHECK ALL HARDWARE: Make sure everything is installed correctly and all hardware is tight before reinstalling tires. Install tires, remove
jack stands and lower vehicle to the ground. Recheck all hardware and lug nuts after 100 miles and periodically
after that as part of routine maintenance.
Alignment is critical: A professional alignment must be performed before driving this vehicle at highway speeds. Do not attempt to
drive your vehicle after this install without having the alignment readjusted to factory specs!

INS-F006 (Rev. A 12/23/19)
IMPORTANT: Read all instructions thoroughly from start to finish before beginning the install. Check parts list and make sure all parts are included in the kit. If the instructions are not properly followed severe frame, driveline and/or suspension damage may result. Check for frame and suspension damage prior to installation.
This kit does not require welding. Do not weld on any component. Welding may void the warranty and/or cause the product to fail. If any parts are missing, or for tech assistance; Contact King Off Road Racing Shocks: 714-530-8701 Most important after the install, Feel the difference and have fun.
Installation Instructions (Page 12)
2005+ Ford F250-F350 2.5 & 3.0 Coilover Conversion
King Shocks 12472 Edison Way Garden Grove, CA 92841
714-530-8701 www.kingshocks.com
King Shocks
12472 Edison Way
Garden Grove, CA 92841 www.kingshocks.com
2.5 Kit finished install. Hose faces towards
front of vehicle.
3.0 Kit finished install. Hose faces
towards rear of vehicle.