inpatient nursing student - samaritan health services
TRANSCRIPT

1
Inpatient Nursing Student Begin Your Shift .................................................................................................................................................... 2-7
Log in to Hyperspace........................................................................................................................................... 2
Sign In and Assign Yourself to Patients ............................................................................................................ 3-4 My Lists vs Available Lists ................................................................................................................................... 5 Update Your Patient List Columns ...................................................................................................................... 6 Patient List Reports ............................................................................................................................................. 7
Open the Patient Chart ...................................................................................................................................... 8-10 Storyboard and Summary Reports ..................................................................................................................... 8 Chart Review and Result Review ................................................................................................................... 9-10
Work List ............................................................................................................................................................... 10 Collect a Specimen ....................................................................................................................................... 11-12
Document Vitals and an Assessments ............................................................................................................. 13-14
Document Vitals and an Assessment ........................................................................................................... 13-14
Assess Existing Lines, Drains, and Airways (LDAs) ....................................................................................... 14-15 Document Intake and Output and Review Reports ..................................................................................... 15-16 Add, Remove and Complete an LDA ............................................................................................................ 15-18 Document Intake/Output ............................................................................................................................ 18-19
Administer Medications ................................................................................................................................... 20-23
Administer Medication and Edit ................................................................................................................. 20-21 Administer a Mulit-Dose Package ..................................................................................................................... 21 Administer a Vaccination and Update Immunizations ..................................................................................... 22 Administer a Med with a Ranged Dose ....................................................................................................... 22-23 Administer a Med with a Partial Package ......................................................................................................... 23
Receive a patient................................................................................................................................................... 24
Find a new patient and Take Over Patient Assignments .................................................................................. 24
Navigators ........................................................................................................................................................ 25-26
Specimen Collection ......................................................................................................................................... 25
Signed and held Orders/Unreconiled Orders ................................................................................................... 25
Overview of the Admission and Discharge table of contents .......................................................................... 26 Extras ................................................................................................................................................................ 27-31
Start and Stop an IV Medicaiton .................................................................................................................. 27-28
Manage Lines using the LDA Avatar ............................................................................................................ 28-30
Manages Lines using Flowsheets ................................................................................................................. 30-31

2
Begin your shift 1. Log in to hyperspace. 2. Sign In and assign yourself to the patients you will be caring for this shift. 3. Get report and find out what's going on with your patients. 4. Plan for your shift.
Log in to Hyperspace User ID: Enter the TRN number on your tent card and press Tab. Password: Type Train and press Enter or click Log In. Department: GSR <spacebar> 3C The last department you logged into appears by default. You can search for a different department if
you're logging in somewhere else. Message of the Day: Press enter or click OK
3
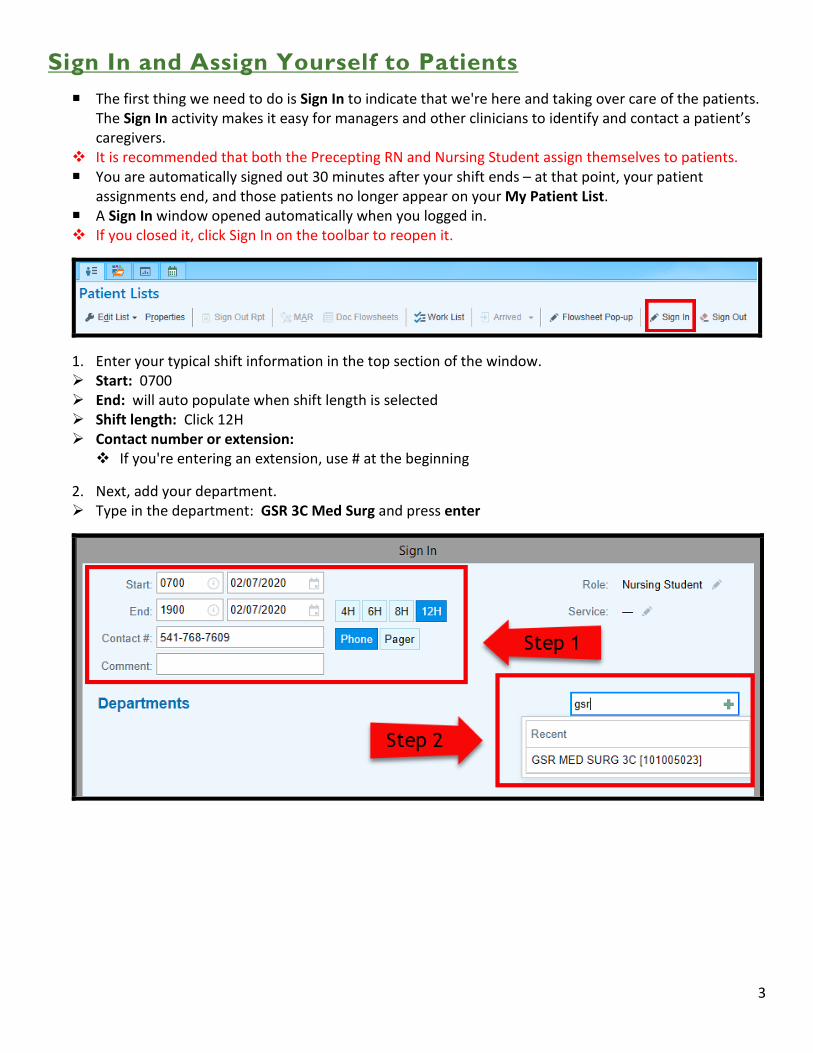
Sign In and Assign Yourself to Patients The first thing we need to do is Sign In to indicate that we're here and taking over care of the patients.
The Sign In activity makes it easy for managers and other clinicians to identify and contact a patient’s caregivers.
It is recommended that both the Precepting RN and Nursing Student assign themselves to patients. You are automatically signed out 30 minutes after your shift ends – at that point, your patient
assignments end, and those patients no longer appear on your My Patient List. A Sign In window opened automatically when you logged in. If you closed it, click Sign In on the toolbar to reopen it.
1. Enter your typical shift information in the top section of the window. Start: 0700 End: will auto populate when shift length is selected Shift length: Click 12H Contact number or extension: If you're entering an extension, use # at the beginning
2. Next, add your department. Type in the department: GSR 3C Med Surg and press enter

4
3. Find all the patients with the last name from your classroom tent card and click the box next to the patient’s name.
4. Click Sign In.
To find your patients easier, you can click the Patient column title to alphabetize your list
If you receive additional patients during your shift from new admits or transfers, click the Sign In activity again, place a check mark next to the patient to assign them to yourself, and click the Update Sign In at the bottom to complete. Your patient assignments are now updated.
If a patient is transferred out of your care, click the Sign In activity, uncheck the box next to the patient’s name to unassign yourself from the patient’s treatment team and click the Update Sign In button.
If you are ending your shift early, click the Sign Out activity on the toolbar. You will automatically be unassigned all patients that you assigned yourself to.

5
My Lists vs Available Lists The My List section contains lists of patients you are keeping track of. The My Patient List displays the
patients that you assigned yourself to at the beginning of your shift when you did the Sign In activity. The My Unit List contains departments that you have added from The Available Lists section.
The Available List section contains lists of patients that the system updates and maintains based on certain criteria, such as Recently Discharged. You can use the Recently Discharged system lists to find patients who were discharged within certain time periods (24HR, 3Day, 7Day). The available list will default to the site based on the department you are logged in as.

6
Update your Patient List columns You can add, rearrange, or remove columns in lists you create to make it easier to find the information
you use most often. Select your My Patient List and click Properties.
To add a new column to your list, select the column from the list of Available Columns and click Add Column.
To save time scrolling through a long list of available columns, use the Search field to look up columns by keyword, such as Code.
To remove a column you no longer want to appear in your list, select the column from the list of Selected Columns and click Remove. Note that some list templates have required columns, which you can't remove.
To rearrange the order of the columns in your list, select a column in the Selected Columns list and use the arrow buttons to move it up or down.
Click Accept to save your changes.
7
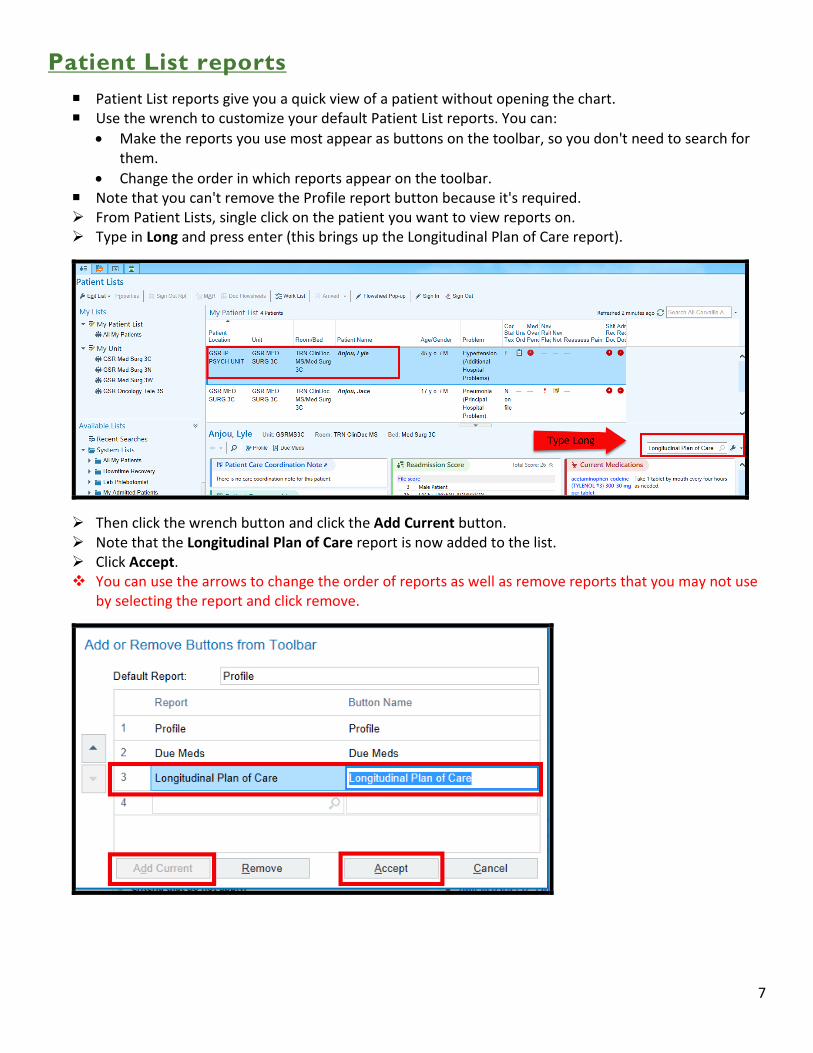
Patient List reports Patient List reports give you a quick view of a patient without opening the chart. Use the wrench to customize your default Patient List reports. You can:
• Make the reports you use most appear as buttons on the toolbar, so you don't need to search for them.
• Change the order in which reports appear on the toolbar. Note that you can't remove the Profile report button because it's required. From Patient Lists, single click on the patient you want to view reports on. Type in Long and press enter (this brings up the Longitudinal Plan of Care report).
Then click the wrench button and click the Add Current button. Note that the Longitudinal Plan of Care report is now added to the list. Click Accept. You can use the arrows to change the order of reports as well as remove reports that you may not use
by selecting the report and click remove.

8
Open the Patient Chart Storyboard
On the left side of the patient chart, Storyboard helps you review basic patient information from anywhere in chart.
Storyboard is interactive: You can hover to see additional information. You can click items to open the relevant activity.
Summary Reports When you open any patient's chart, the first activity you see is the Summary activity. Like the Patient List reports, Summary reports pull information from the rest of the chart and provide
a lot of patient information in one place.
The Index report is where you can:
View Orders to be Acknowledged. • In Epic, acknowledging an order means you've seen the order.
o If clarification is needed, call the provider. • Ancillary orders are acknowledged by both nurse and ancillary provider.
o For example, PT orders are acknowledged by the nurse and by the physical therapist. o This workflow ensures that both the nurse and ancillary provider are aware of the orders.
• You can acknowledge orders one at a time, or all at once. • Click the order name if you need more information. • Take a moment to review the orders.
Write a Sticky Note. .Sig is a SmartPhrase (a shortcut for your signature stamp).

9
View Active Orders and Reprint lab labels Glucose Monitoring Report
The Overview report gives you a high-level view of the current admission. Information is organized into sections, such as vitals, labs, and medications. Scroll through the Overview report, notice that some section headers have arrows next to them.
• This means they're links. Hover to discover where the links will take you.
The Event Log report is a helpful way to get caught up on the care the patient has received during their inpatient stay. Use the Event Log to view relevant events and documentation that have occurred during the admission and related visits. Hover over an event to see a preview, such as trending information for a lab result. Click an event to see more information, such as the full text of the note.
Just like Patient List reports, you can use the wrench to add reports or change the order that the reports appear.
Note that you can't remove the Index report because it's required.
Chart Review Quickly gather information about your patient from previous visits and admissions in the Chart Review
activity. • Chart Review sorts documentation in the patient's chart into different tabs based on set criteria.
o Encounters o Notes o Medications o Labs o Card Proc o Letters o Media

10
Results Review You can quickly find the most relevant lab results in Results Review by using default date ranges.
• After you set a default date range, you will see data from this date range any time you open Results Review for any of your patients.
• If you ever want to change the default date range, repeat these steps.
Open your Jace patient’s chart. Click on the Results Review Tab Select a date range. Click Set Default to save for future. Click Accept.
Work List Open your Carter patient’s chart and click the Work List tab. You can change the way tasks appear and filter the tasks using the options at the top of the Work List.
For example, you can: o Click the yellow Overdue button to see only the Overdue tasks. o If you're looking for tasks you completed already, use the Complete and Discontinued check boxes. o Select Labs in the Filters drop down menu to see only upcoming Labs on your Work List.
Applying filters and changing views doesn't complete tasks but can help you manage tasks. How do you complete tasks on the Work List?
o Complete the documentation in another activity. For example, if you administer a scheduled dose of a med from the MAR, the Work List task is automatically completed.
o From the Work List, click Document or Complete to either complete the documentation or mark the task as complete.

11
Collect a Specimen We'll print labels and document the collection of a UA from the chart, since we have it open. You will want to Scan the patient’s barcode to verify that you are working with the correct patient. Click Print Label.
In the specimen collection window, you can see the specimens that need to be collected. To remove any specimens you are not collecting from the list, click the X in the corner Click Print Labels. Labels will not print today in the training environment.
At this point, you'd go get the labels from the printer. Close the window to simulate logging out. Notice that the task button now says Collect instead of Print Label. Hint: You might need to exit the Work List and return to refresh the button name. Click Collect.

12
Notice that the Print Labels button now says Reprint Labels. You can reprint the labels if they printed incorrectly. If there are any specific instructions, they appear on the specimen card. Normally, we'd scan the specimen label at this point. Because this is a training environment, we don't have specimen labels. Also, sometimes barcodes are
smudged, or scanners aren't working. Here's how you'd proceed in those situations. Click the link called Scan the label or click to document the collection. Verify that the collection information is correct:
• Date and time • Collector • Collection unit • Specimen type
You must document this collection information, or the lab won't be able to process the specimen. Click Accept. Notice the task drops off the Work List after it's complete.

13
Documenting vitals and assessments You took vitals and performed a respiratory assessment on your Carter patient. Now you want to
document it. In this section you will learn to: • Document vital signs in flowsheets • Document a respiratory assessment using cascading rows • Assess and LDA (lines, wounds, drains, and airways) • Add an LDA using the LDA Avatar • Document Intake/Output
Overview of Flowsheets Open Flowsheets. As a Nursing Student you will need to enter a Cosigner. You will enter your Preceptor’s Name, but for
training today we will use IPRN.
o At the top, you see a list of tabs for different flowsheets (Vitals, Assessments, etc.) o On the left, there's a table of contents. Click a section to jump to it - helpful for long flowsheets o For example, click Height/Weight to move directly to the Height and Weight group. o In the center, you can see the rows and columns where you'll record documentation. Each column is a time.
o On the right, the flowsheet sidebar shows details about the row you have selected. Some rows have options you can choose from in the sidebar.
14
Document vitals Select the Vitals tab. There are two ways to add a new time column to Flowsheets.
• Add Col: Adds a column for the current time • Insert Col: Insert a column for a specified time
Select the Temperature cell for your new time column. Notice the details report on the right. It shows you the values that can be entered, as well as last filed
values. Enter the patient's temperature (39.9). Your documentation files automatically when you move to another screen, or you can click File to save
at any time.
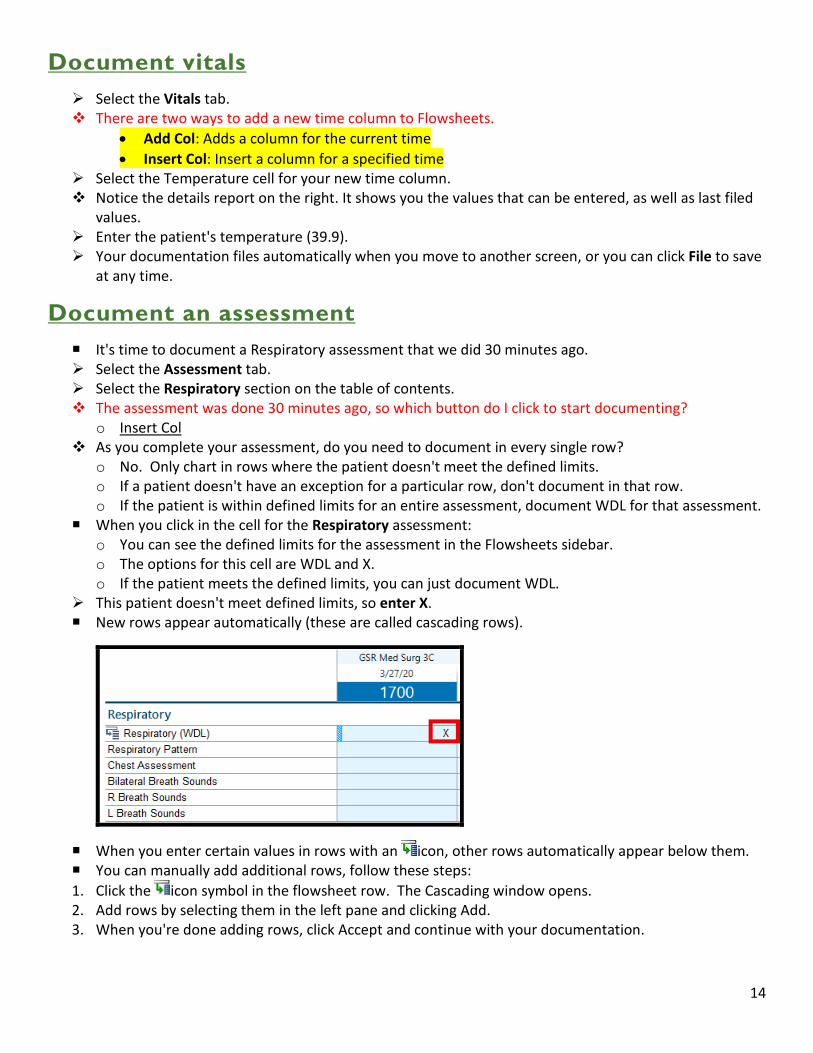
Document an assessment It's time to document a Respiratory assessment that we did 30 minutes ago. Select the Assessment tab. Select the Respiratory section on the table of contents. The assessment was done 30 minutes ago, so which button do I click to start documenting?
o Insert Col As you complete your assessment, do you need to document in every single row?
o No. Only chart in rows where the patient doesn't meet the defined limits. o If a patient doesn't have an exception for a particular row, don't document in that row. o If the patient is within defined limits for an entire assessment, document WDL for that assessment.
When you click in the cell for the Respiratory assessment: o You can see the defined limits for the assessment in the Flowsheets sidebar. o The options for this cell are WDL and X. o If the patient meets the defined limits, you can just document WDL.
This patient doesn't meet defined limits, so enter X. New rows appear automatically (these are called cascading rows).
When you enter certain values in rows with an icon, other rows automatically appear below them. You can manually add additional rows, follow these steps: 1. Click the icon symbol in the flowsheet row. The Cascading window opens. 2. Add rows by selecting them in the left pane and clicking Add. 3. When you're done adding rows, click Accept and continue with your documentation.

15
Assess existing lines, drains, and airways (LDAs) In Epic, the following areas of documentation are referred to as LDAs:
o Lines o Drains o Airways o Tubes o Wounds
You just assessed Carter’s Peripheral IV and it was clean, dry, and intact. Where do you document line assessments? In Flowsheets, open the IV Assessment tab. Notice the IV Properties row:
o Placement Date/time o Size o Orientation o Other information you can see if you hover over the link
Document your Assessment: o Site assessment o Line status o Dressing status
Different types of lines, drains, airways, tubes, and wounds appear on different tabs in Flowsheets. o If you can't find an LDA you're looking for, check a different tab.
Lines, including IVs and central lines, appear on the IV Assessment tab. Drains (including catheters) and feeding tubes appear on the Intake/Output tab. Airways and wounds appear on the Assessment tab.
Adding a Drain using the LDA Avator Now we need to add a new drain to our Carter patient. Go to the Flowsheets tab. Open the LDA Avatar.
Click Add and search for Foley.
16
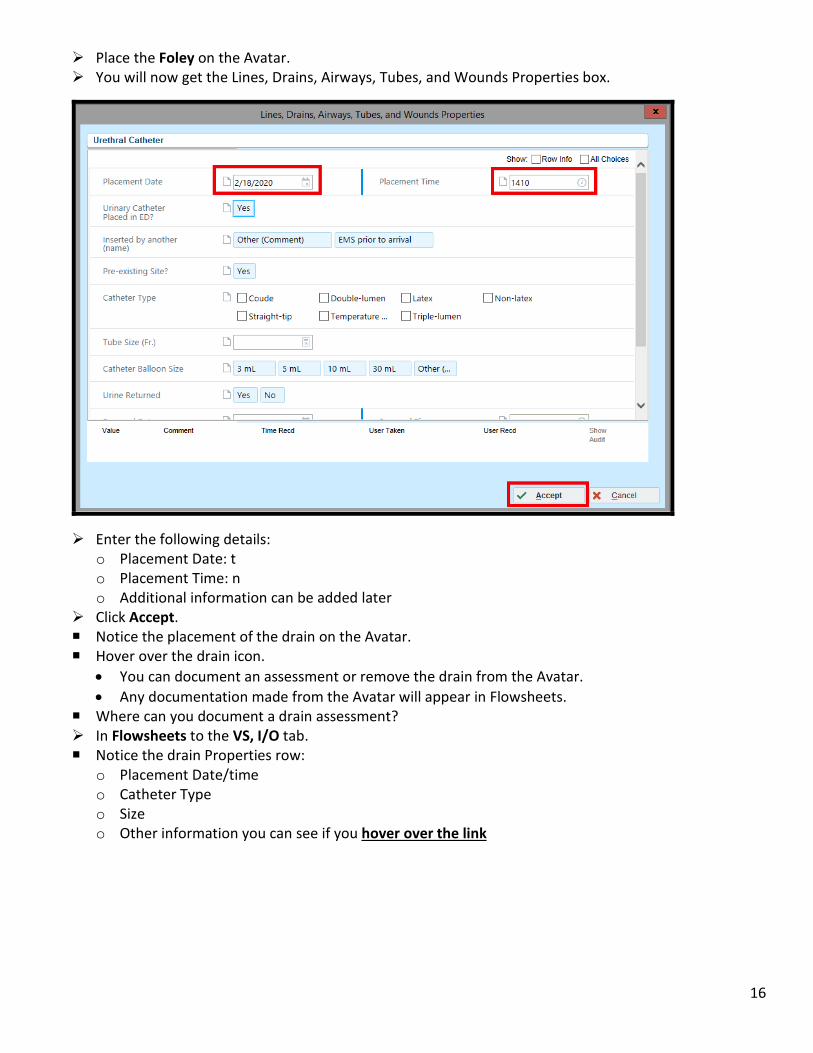
Place the Foley on the Avatar. You will now get the Lines, Drains, Airways, Tubes, and Wounds Properties box.
Enter the following details: o Placement Date: t o Placement Time: n o Additional information can be added later
Click Accept. Notice the placement of the drain on the Avatar. Hover over the drain icon.
• You can document an assessment or remove the drain from the Avatar. • Any documentation made from the Avatar will appear in Flowsheets.
Where can you document a drain assessment? In Flowsheets to the VS, I/O tab. Notice the drain Properties row:
o Placement Date/time o Catheter Type o Size o Other information you can see if you hover over the link
17
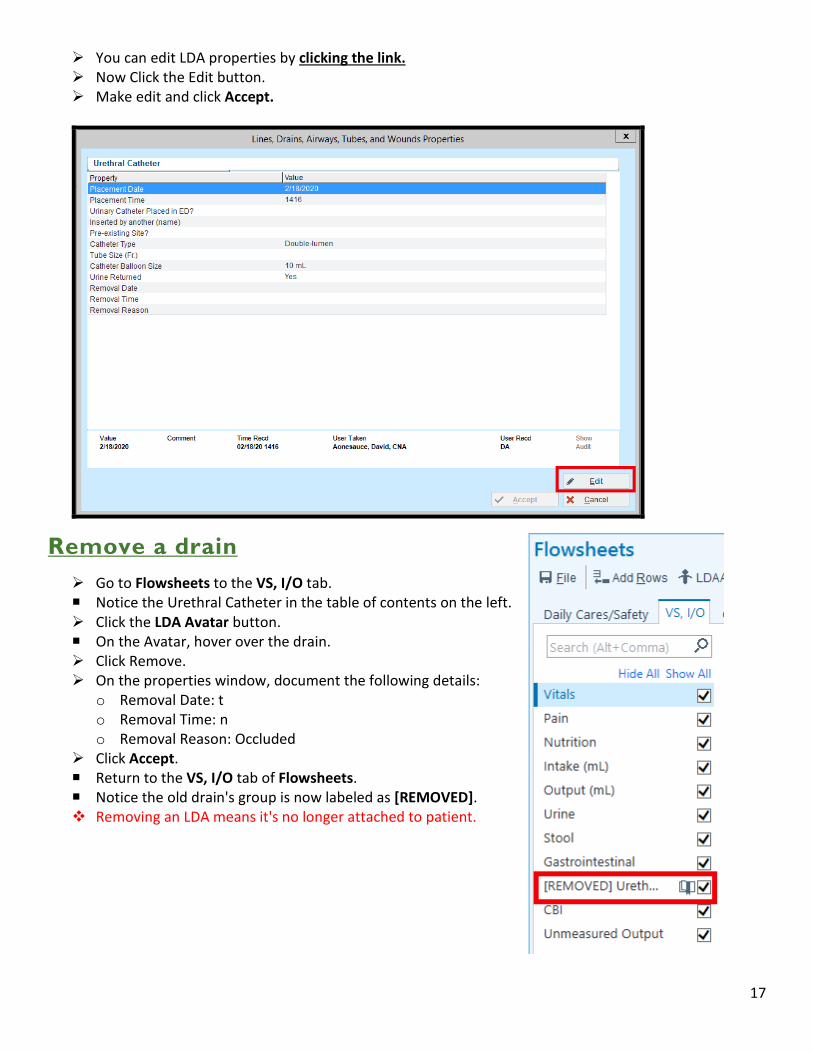
You can edit LDA properties by clicking the link. Now Click the Edit button. Make edit and click Accept.
Remove a drain Go to Flowsheets to the VS, I/O tab. Notice the Urethral Catheter in the table of contents on the left. Click the LDA Avatar button. On the Avatar, hover over the drain. Click Remove. On the properties window, document the following details:
o Removal Date: t o Removal Time: n o Removal Reason: Occluded
Click Accept. Return to the VS, I/O tab of Flowsheets. Notice the old drain's group is now labeled as [REMOVED]. Removing an LDA means it's no longer attached to patient.
18
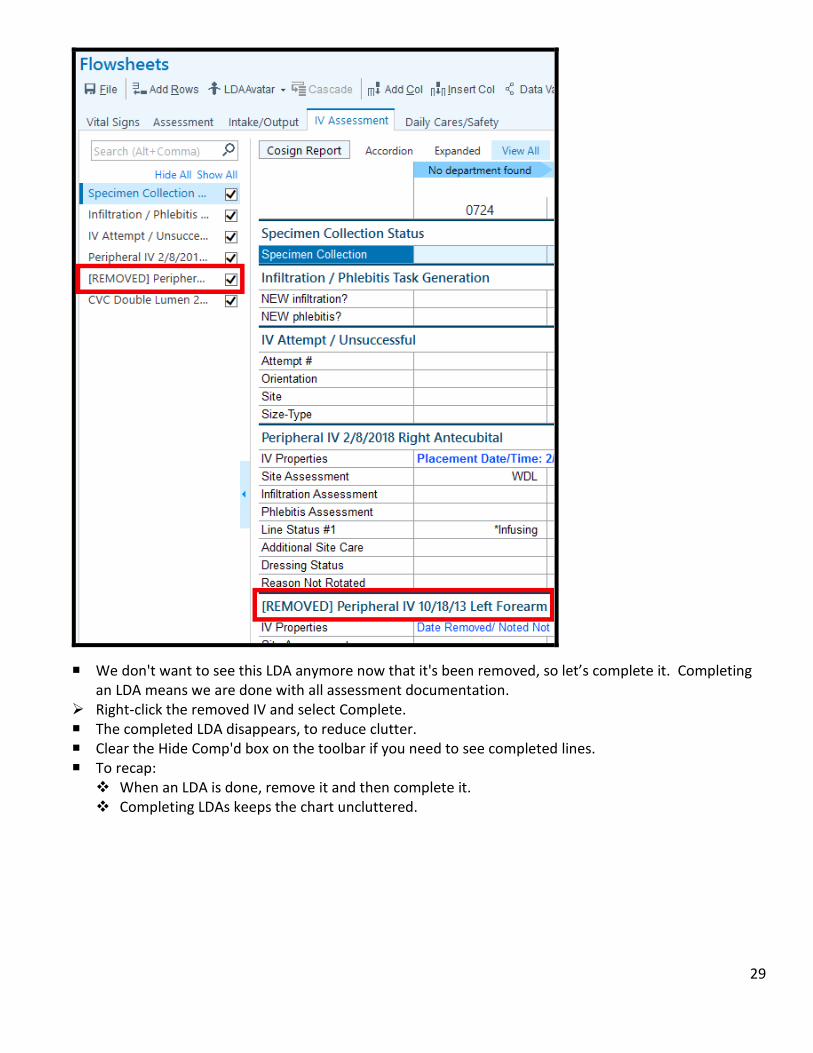
Complete a drain We don't want to see this LDA anymore now that it's been removed, so let’s complete it. Completing
an LDA means we are done with all assessment documentation. Right-click the removed drain and select Complete. The completed LDA disappears, to reduce clutter. Clear the Hide Comp'd box on the toolbar if you need to see completed lines. To recap: When an LDA is done, remove it and then complete it. Completing LDAs keeps the chart uncluttered.
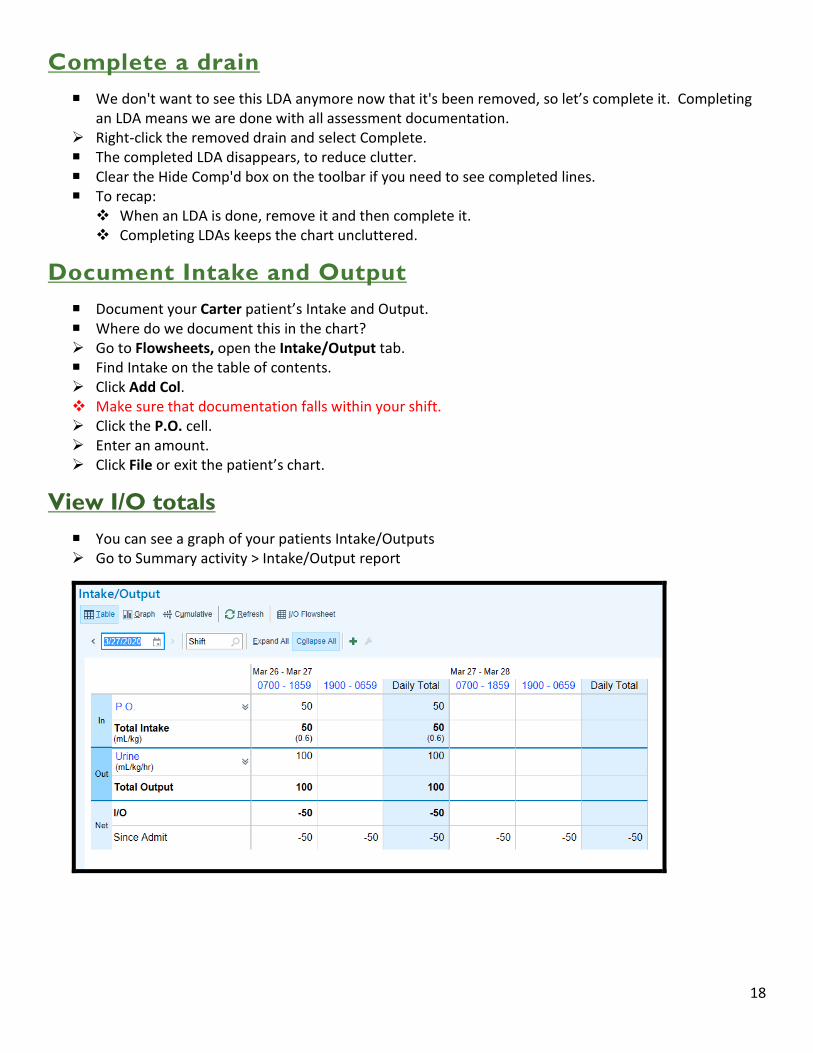
Document Intake and Output Document your Carter patient’s Intake and Output. Where do we document this in the chart? Go to Flowsheets, open the Intake/Output tab. Find Intake on the table of contents. Click Add Col. Make sure that documentation falls within your shift. Click the P.O. cell. Enter an amount. Click File or exit the patient’s chart.
View I/O totals You can see a graph of your patients Intake/Outputs Go to Summary activity > Intake/Output report

19
Document Volume in Flowsheets Document your Carter patient’s Intake and Output. Where do we document this in the chart? Go to Flowsheets, open the Intake/Output tab. Find the infusion group for IV med that was recently administered. Looking at the Dose or Rate row. You can see:
• when the med was started • when it stopped, because the dose or rate is zero
Click Add Col. Click the Volume cell. Enter Volume amount. Click File or exit the patient’s chart.
CRITICAL: Always check the pump and document the volume that actually infused. The volume on the infusion pump is the source of truth.
Epic is only as accurate as your documentation.

20
Administer medications
In Epic, to administer a med you: o Scan the patient's barcode. o Scan the med's barcode. o Verify and update the dose, rate, and other information on the admin form. o This is how we check the five rights: Patient, med, route, dose, time.
Overview of the MAR Go to the MAR. Each medication has a row, and there are columns corresponding to one-hour time blocks. Actions such as due times, administrations, and rate changes appear in the appropriate time block.
Use the arrows to the right and left of the time columns to move forward and backward in time.
Administer a Medication Scan a patient's wristband to start the administration from the Patient Lists. If a patient's wristband doesn't scan, open the MAR, choose the correct override reason (for not
scanning the patient), and get a new wristband printed as soon as possible. Not Scanned warnings are monitored to ensure compliance with hospital policy.
Scan your Molly patient's wristband on your tent card. Scan the Advil 600 mg tablet on your medication handout. In training we may not have access to scan
In the medication administration window, you can review order details and document administration details.
For some meds, related flowsheet documentation appears. An example is a Pain Assessment for pain medications. This will prompt a cosign from your precepting nurse.
Verify the following details: o The correct med action is being documented. o The correct date is noted. o The correct time is noted. o The correct route is noted. o The dose we are administering. o Document your Pain Assessment.
Click Accept. A Given action appears on MAR. Hover over the Given action. Other actions you might see: Hold, New Bag, Stopped, Not Given, others The system will check the dose you scanned against the dose ordered. If there's a mismatch, a
warning appears. If you're administering a partial package, select Partial Package as the override reason.

21
Edit an administration You just realized that you documented the medication at the wrong time. If necessary, you can update
a documented administration. Find your recent administration of Advil. Click the administration to see more information about it. Select the Edit administration check box. (It's at the bottom of the administration summary.) The fields in the administration window can now be edited. Update the time to be earlier than originally documented. Click Accept and notice the updated time of administration. If a message about updating flowsheet documentation appears, click Yes.
Administer a Multi-Dose Package Some medications, like inhalers or eye drops, are dispensed in multi-use packages. In that case, scan
the barcode on the package itself. You should already be in Molly’s MAR. If not Scan Molly’s wristband on your tent card. Scan the Ocean nasal spray on the medication handout.
• The administration form opens for sodium Chloride (OCEAN) 0.65% nasal spray. • Look at the Dose field. What appears there?
Since Ocean is always dispensed in a multi-dose, multi-use package, the system doesn't warn you. It assumes you are only going to give the ordered dose, so that's what appears in the Dose field: 2 sprays.
Click Accept.

22
Administer a Vaccination Vaccinations are dispensed and administered much like any other syringe medication. The main
difference is that you need to document a bit more information with a vaccination, and the patient's vaccination history needs to be updated.
You should already be in Molly’s MAR. If not, scan Molly’s wristband on your tent card. Scan the Pneumococcal Vaccine on the medication handout. Complete the Required fields (Red Stop Signs) and Click Accept.
The patient's immunization history also needs to be updated to reflect the vaccine you just
administered. Open the Immunizations activity found under the More activity tab.
You can Star Immunizations as a favorite for the tab to automatically show up in all patient charts. o Under the Administration History section, you see an immunization for Pneumococcal
Polysaccharide, given on today's date. o When you document giving a vaccination on the MAR, it automatically updates the patient's
immunization record! You don't actually need to do anything except mark the History as Reviewed. Close Molly's chart.
Administer a Med with a Ranged Dose Sometimes a medication might be ordered with a ranged dose. For tablets and capsules, you simply
scan each tablet you give, and the Dose field is updated automatically. Scan Molly’s wristband on your tent card. Scan the Hydrocodone-Acetaminophen 5mg-325mg tablet on the medication handout. Notice we get a Cosign prompt. We will be documenting a pain assessment. That data will show in
Flowsheets. This action requires your preceptor to cosign. o Note the order dose and the PRN comment on the left side of the screen. You could give either one
or two tablets. Molly reports significant pain, an 8 out of 10, so you want to give a second tab. Scan the Hydrocodone Acetaminophen barcode again. What happens? The dose increases to 2 tabs.

23
Try again. Scan the Hydrocodone-Acetaminophen barcode a third time. This time, you get an administration warning because you are trying to give more Norco than what
was ordered! You don't actually want to give Molly 3 tabs, so click Cancel.
o You return to the administration form for the Norco order. Let's document Molly's pain. Click 8 in the 0-10 scale pain screening row under the Associated
Flowsheet Rows section. Click Accept to file this administration and the associated flowsheet data.
Administering a Med with a Partial Package Many oral solids come in varying strengths. The system is smart enough to accept equivalent
combinations of pills when you scan them. Find the Prednisone (DELTASONE) tablet 7.5 mg order on the MAR. Pharmacy is saying this med
should be dispensed as 1.5 x 5 mg tablets.
Scan the Prednisone 5 mg tablet on the medications handout.
o Like you saw earlier with the ibuprofen, the administration window opens. The Dose field reflects the tablet you just scanned.
Now you plan to give half of another tablet, so scan the Prednisone 5 mg tablet again. o You get the overdose warning again. The system thinks you're trying to give 10 mg when the order
is for 7.5 mg. Since you only intend to give half of the second tab, click Partial Package.
o The warning goes away, and the Dose field in the administration window is now blank. You'll need to manually enter the dose you give.
Enter "7.5" in the Dose field and click Accept. o You return to the MAR. The green "Given" action appears for prednisone.

24
Receiving a Patient You are receiving a patient being transferred from another unit in the hospital. In this section you will learn how to:
• Complete the admission and take over patient assignments • Complete admission documentation • Release signed and held orders
Find patient in other units
Before your new patient arrives, you would like to review the chart. To find patients in other units, open Patient Lists. Remember the lists on the left:
• My Patients shows you the patients you're assigned to. • My Unit shows all patients in the unit I'm logged in to. • The system lists under Available Lists show you lists of patients on a certain unit or patients who
meet a certain criterion. For example, there is a list for all patients in the ICU. The fastest way to find a specific admitted patient is to search Patient Lists. Check out the search
field in the upper right of Patient Lists (not Chart Search). This field searches all admitted patients at the site you are logged into.
In the search field, enter the first and last name on your Carlos patient from your classroom tent card and press Enter.
When you find your Carlos patient, you can review the chart before he arrives on your unit.
Take over patient assignments Now that your Carlos patient has been transferred to your unit, you will take over as the nurse on the
treatment team. To update patient assignments mid-shift, you will click the Sign In activity again.

25
Navigators What are navigators used for?
• Navigators are a one-stop shop for documentation. You can complete many different types of documentation all on one screen. There are navigators for Admission, Transfer, and Discharge.
Open the Navigators activity to the Admission Navigator. • Working your Navigator from top to bottom will ensure that you have completed all of your
required documentation for your shift.
Specimen Collection Specimens can be either Lab collect, or Unit collect.
o If a specimen is Lab collect, a phlebotomist will come collect it. Nurses don't see tasks for these specimens on their Work List. o Unit collect specimens are collected by the nurse.
If you change the collection status for the patient, the change applies to specimens that you haven't printed labels for yet.
If you've already printed a label for a specimen, that specimen's collection status won't change. CRITICAL: Nurses are responsible for labeling the specimen—not with a patient label. Specimens
must be labeled in order to be received by the lab.
Handle signed and held orders Signed and held means:
• Physician from sending unit signed the orders before the patient was transferred. • Orders should not be active until patient arrives in receiving unit. • When the patient arrives in the receiving unit, the receiving nurse releases the orders to make
them active. Use your judgement in releasing orders that are clinically necessary for the patient. CRITICAL: The patient must be on the unit when you release orders. If you release the orders when
the patient's location is wrong, meds will be delivered to the incorrect units, labels will go to the wrong printer, etc.
26
Unreconciled Orders The physician is responsible for reconciling orders before the patient is transferred from another unit. A warning appears if reconciliation is not complete. Contact the physician if you see the warning, so they can complete order reconciliation.
If the physician does not reconcile a medication, it's put on MAR Hold. If the patient needs a med that's on MAR Hold, document the administration as you normally
would.
Overview of the Admission Table of Contents Open the Vital Signs section.
• The fields available here are the same as the Vitals flowsheet. When you document here, the values appear in Flowsheets and when you document in Flowsheets, the values appear here.
Click New Reading button. Reminder: as a Nursing Student you will need to enter a Cosigner. You will enter your Preceptor’s
Name, but for training today we will use IPRN. Enter a temperature Along the top, you can specify the date and time of the documentation. The current date and time
appear automatically, but you can update it if needed. Remember: The information you enter here appears in Flowsheets, so you want the date and time
to be accurate. In the upper right, you can see more details by selecting these check boxes (Row Info, Last Filed, Etc). Open the Allergies section.
o Add a new allergy. o Enter reactions, severity, reaction type, and date noted. o Click Mark as Reviewed. Indicates I've collected and reviewed this information.
Open the Home Meds section. • Your patient informs you of a medication that's not on the list. o Add the medication. o Indicate the med was last taken yesterday. o Click Mark as Reviewed.
Click down the table of contents to review each section of the Admission Navigator.
Overview of the Discharge Table of Contents The Discharge Navigator helps you get your patient ready for discharge. Click down the table of contents to review each section of the Discharge Navigator.
• Unresulted Labs • Running Infusions • LDA Removal • Add Med Details
27
Extras Administer IV Add, remove, and complete IV lines. Start and stop an IV medication. Document intake and output.
Start an IV med What is different about documenting IV meds, compared to other kinds of medications? Patient needs an intravenous line Document intake volumes Medication dosages might be adjusted based on the patient's response
When do you add a line to the patient's chart? Before or after administering the med? Before.
Steps for documenting IV meds in Epic: Scan the med. Link the med to the line. Document administration details as usual. Open the MAR. What will you do first to administer the medication? Scan the patient's wristband.
Scan the medication barcode. If you see a medication verification warning: In the training environment a pharmacist wasn't able
to verify this medication, so it shows as unverified. We'll bypass this warning now, but in real life you would wait to administer until it's verified, unless it's an emergency.
Link it to a line. This administration window is similar to the one we saw during the previous lesson. Do you see
anything that's different? There's linked line information on the left side. The action is New Bag instead of Given. There's an ordered infusion rate. The order will be infused over a specified amount of time. (Not all meds have this.)
Confirm the following details: o Action: New Bag o Date: o Time: o Dose: o Rate: o Linked line:
Click Accept to document starting the infusion. Notice the new actions listed on the MAR.

28
Stop an IV med Time has passed and the infusion is complete. We need to document that the medication has stopped. Document a Stopped action on the MAR for the medication. Confirm the following details in the med admin window:
• Action: Stopped • Date: • Time:
Click Accept and notice the Stopped action on the MAR.
Manage lines in the LDA Avatar
Stop an infusion Your Carlos patient is complaining of pain and swelling at the insertion site. First stop the infusion that's currently running. Go to the MAR. Click the current time and document a Stopped action for the medication. Confirm the following details in the med admin window:
o Action: Stopped o Date: today o Time: now
Click Accept. Notice the Stopped action on the MAR. Now we can remove the line.
Remove and complete an IV line Thinking back to when we documented assessments, where do you assess and manage IVs? Flowsheets
Open Flowsheets to the IV Assessment tab. Notice the IV groups for the current line(s). Click the LDA Avatar button. On the Avatar, hover over the old line.
• You can document an assessment or remove the line. Click Remove. On the properties window, document the following details:
o Removal Date: t o Removal Time: n o Removal Reason: Infiltrated
Click Accept. Return to the IV Assessment tab of Flowsheets. Notice the old line's group is now labeled as [REMOVED]. Removing an LDA means it's no longer attached to patient.
29
We don't want to see this LDA anymore now that it's been removed, so let’s complete it. Completing an LDA means we are done with all assessment documentation.
Right-click the removed IV and select Complete. The completed LDA disappears, to reduce clutter. Clear the Hide Comp'd box on the toolbar if you need to see completed lines. To recap: When an LDA is done, remove it and then complete it. Completing LDAs keeps the chart uncluttered.

30
Add an IV line Now we need to add a new line to the patient. Open the LDA Avatar. Click Add and search for the line type. Place the new line on the Avatar. On the window that appears, confirm you chose the correct location/orientation and document the
following: o Placement Date: t o Placement Time: n o Fill out additional details if desired
Click Accept. Notice the new IV on the Avatar.
Restart an infusion Now it's time to restart the infusion. Where do you think we go to do that? Go to the MAR. Click the current time and document the Restarted action. Link it to the new line. Confirm the following details in the med admin window:
o Action: Restarted o Date: today o Time: now
Click Accept. Notice the new action listed on the MAR. Go to Flowsheets, do you see the current rate listed?
Manage lines in Flowsheets
Stop an infusion Same as above example.
Remove and complete an IV line Open Flowsheets to the IV Assessment tab. Click the blue link in the Properties row for the old line. Click Edit. Enter the following details:
o Removal date: t o Removal time: n o Removal reason: Infiltrated
Click Accept.
Add an IV line Same as above example.

31
Restart an infusion We can also restart the medication from Flowsheets. Go to the IV Assessment tab. Click Add Col. Click the Rate row of the medication we want to restart.
Notice the syringe. Click the syringe.
Look Familiar? o Action: Restarted
Click Accept You are now in the MAR.

© 2019 Epic Systems Corporation. All rights reserved. PROPRIETARY INFORMATION - This item and its contents may not be accessed, used, modified, reproduced, performed, displayed, distributed or disclosed unless and only to the extent expressly authorized by an agreement with Epic. This item is a Commercial Item, as that term is defined at 48 C.F.R. Sec. 2.101. It contains trade secrets and commercial information that are confidential, privileged and exempt from disclosure under the Freedom of Information Act and prohibited from disclosure under the Trade Secrets Act. After Visit Summary, Analyst, App Orchard, ASAP, Beacon, Beaker, BedTime, Bones, Break-the-Glass, Caboodle, Cadence, Canto, Care Everywhere, Charge Router, Chronicles, Clarity, Cogito ergo sum, Cohort, Colleague, Community Connect, Cupid, Epic, EpicCare, EpicCare Link, Epicenter, Epic Earth, EpicLink, EpicWeb, Garden Plot, Good Better Best, Grand Central, Haiku, Happy Together, Healthy Planet, Hyperspace, Kaleidoscope, Kit, Limerick, Lucy, Lumens, MyChart, OpTime, OutReach, Patients Like Mine, Phoenix, Powered by Epic, Prelude, Radar, Radiant, Resolute, Revenue Guardian, Rover, Share Everywhere, SmartForms, Sonnet, Stork, System Pulse, Tapestry, Trove, Welcome, Willow, Wisdom, and With the Patient at Heart are registered trademarks, trademarks, or service marks of Epic Systems Corporation in the United States of America and/or other countries. Other company, product, and service names referenced herein may be trademarks or service marks of their respective owners. Patents Notice: www.epic.com/patents.