inmage scout 8.0.1 standard quick install...
TRANSCRIPT

InMage Scout 8.0.1 Standard Quick Install Guide Version 1.3

2
Table: Document History
Document Version
Document Date
Remarks
1.0 26th Feb 2015 Standard version
1.1 7th April 2015 Minor update
1.2 28th July 2016 Added download instruction from ARM portal. Updated Brief Deployments Steps section and Scout deployment sections. Added sizing guideline table.
1.3 13th Oct 2016 Update4: RHEL 7 UA installer is added to Scout 8.0.1 GA package

3
Contents 1 About this document ......................................................................................................................................... 4 2 Introduction to Scout ........................................................................................................................................ 5 3 Brief Deployment Steps ................................................................................................................................... 7 4 InMage Scout Package Contents and Operating systems applicable ...................................................... 7
4.1 Unified Agent ............................................................................................................................................ 7 4.2 CX Server (Configuration Server/Process Server) ................................................................................ 8 4.3 Scout vContinuum MT ............................................................................................................................. 8 4.4 RX Server .................................................................................................................................................... 8 4.5 Push Install Clients ................................................................................................................................... 9
5 Installation ........................................................................................................................................................ 10 5.1 Deploy Configuration Server ................................................................................................................ 10 5.2 Deploy Process Server ............................................................................................................................ 11 5.3 Deploy Windows Master Target ........................................................................................................... 12 5.4 Deploy Unified Agent (mobility service) – Windows ........................................................................ 13 5.5 Deploy Unified Agent(mobility service) - Linux ................................................................................ 14 5.6 Deploy ScoutCloud RX ........................................................................................................................... 14
6 Access To the Software UI and using the product ..................................................................................... 15 7 Sizing Guideline .............................................................................................................................................. 16
7.1 Process server VM size ........................................................................................................................... 16 7.2 Configuration Server VM Size ............................................................................................................... 16 7.3 Master Target Server VM Size ............................................................................................................... 17

4
1 About this document
The purpose of this document is to describe the procedures to install Scout 8.0.1 GA components. This
document also lists the software package contents and provides an overview of Scout Product
deployment. The package is downloadable from Microsoft Azure portal as below. It can be downloaded
from new Azure Resource Manager portal and from old Azure classic portal.
DOWNLOAD ARM portal
Sign in to the Azure Portal.
Click New > Management > Backup and Site Recovery (OMS). Alternatively, you can click
Browse > Recovery Services Vault > Add.
In Name specify a friendly name to identify the vault. If you have more than one subscription,
select one of them.
Create a new resource group or select an existing one. Specify an Azure region to complete
required fields.
If you want to quickly access the vault from the Dashboard click Pin to dashboard and then click
Create.
The new vault will appear on the Dashboard > All resources, and on the main Recovery Services
vaults blade.
In the Recovery Services vaults blade select your vault and click Settings.
In Settings > Getting Started click Site Recovery > Step 1: Prepare Infrastructure > Protection
goal.
In Protection goal select To recovery site, and select Yes, with VMware vSphere Hypervisor.
Then click OK.
In Scout setup, Download Scout software and registration key.
Classic Azure portal
Sign in to the Azure portal
Click on RECOVERY SERVICES.
Select “NEW” SITE RECOVERY VAULT
Click “QUICK CREATE”
Enter Name of your choice
Select a region
A Site Recovery Vault gets created in a few minutes, with the name provided above. On clicking the vault
name, a dialog gets displayed with a few options under Setup Recovery label. Select the option “Between
two VMware Sites” to see the download link for Scout Software. Download ASR Scout bits and
registration key.
The Scout Software bundle (InMage_Scout_Standard_8.0.1_GA.zip) contains the following executables,
InMage_CX_8.0.1.0_Windows_GA_26Feb2015_release.exe InMage_CX_TP_8.0.1.0_Windows_GA_26Feb2015_release.exe InMage_PI_8.0.1.0_Windows_GA_26Feb2015_release.exe InMage_Scout_vContinuum_MT_8.0.1.0_Windows_GA_26Feb2015_release.exe InMage_UA_8.0.1.0_Windows_GA_26Feb2015_release.exe InMage_UA_8.0.1.0_OL5-32_GA_26Feb2015_release.tar.gz

5
InMage_UA_8.0.1.0_OL5-64_GA_26Feb2015_release.tar.gz InMage_UA_8.0.1.0_OL6-32_GA_26Feb2015_release.tar.gz InMage_UA_8.0.1.0_OL6-64_GA_26Feb2015_release.tar.gz InMage_UA_8.0.1.0_RHEL5-32_GA_26Feb2015_release.tar.gz InMage_UA_8.0.1.0_RHEL5-64_GA_26Feb2015_release.tar.gz InMage_UA_8.0.1.0_RHEL6-32_GA_26Feb2015_release.tar.gz InMage_UA_8.0.1.0_RHEL6-64_GA_26Feb2015_release.tar.gz InMage_UA_8.0.1.0_RHEL7-64_GA_06Oct2016_release.tar.gz InMage_UA_8.0.1.0_SLES10-32_GA_26Feb2015_release.tar.gz InMage_UA_8.0.1.0_SLES10-64_GA_26Feb2015_release.tar.gz InMage_UA_8.0.1.0_SLES10-SP1-32_GA_26Feb2015_release.tar.gz InMage_UA_8.0.1.0_SLES10-SP1-64_GA_26Feb2015_release.tar.gz InMage_UA_8.0.1.0_SLES10-SP2-32_GA_26Feb2015_release.tar.gz InMage_UA_8.0.1.0_SLES10-SP2-64_GA_26Feb2015_release.tar.gz InMage_UA_8.0.1.0_SLES10-SP3-32_GA_26Feb2015_release.tar.gz InMage_UA_8.0.1.0_SLES10-SP3-64_GA_26Feb2015_release.tar.gz InMage_UA_8.0.1.0_SLES10-SP4-32_GA_26Feb2015_release.tar.gz InMage_UA_8.0.1.0_SLES10-SP4-64_GA_26Feb2015_release.tar.gz InMage_UA_8.0.1.0_SLES11-32_GA_26Feb2015_release.tar.gz InMage_UA_8.0.1.0_SLES11-64_GA_26Feb2015_release.tar.gz InMage_UA_8.0.1.0_SLES11-SP1-32_GA_26Feb2015_release.tar.gz InMage_UA_8.0.1.0_SLES11-SP1-64_GA_26Feb2015_release.tar.gz InMage_UA_8.0.1.0_SLES11-SP2-32_GA_26Feb2015_release.tar.gz InMage_UA_8.0.1.0_SLES11-SP2-64_GA_26Feb2015_release.tar.gz InMage_UA_8.0.1.0_SLES11-SP3-32_GA_26Feb2015_release.tar.gz InMage_UA_8.0.1.0_SLES11-SP3-64_GA_26Feb2015_release.tar.gz InMage_ScoutCloud_RX_8.0.1.0_RHEL6-64_GA_02Mar2015.tar.gz
A datacenter that hosts the servers that need replication is referred as Primary site
A co-location/hosted/managed cloud is referred as Secondary site.
You can download the latest updates from here.
2 Introduction to Scout
Scout Software is a continuous data protection product which allows users to have full instance
asynchronous replication (Physical or Virtual Machines) over LAN or WAN for local and remote
recovery with near zero data loss (RPO).
The software is used for DR by enterprises and for deployment in DR as a Service (DRaaS) offering by
Managed Service Providers (MSP).

6
ScoutCloud RX server (RX)
The ScoutCloud RX server helps in consolidating administration from one single interface rather than
depending on individual Configuration server(CS) UI to monitor individual CS servers. It is a multi-
tenant portal intended for use by Managed Service Providers (MSP) and end-customers. You will be able
to monitor individual accounts and multiple accounts with their respective customers and their assigned
CS server(s) from one interface. It simplifies monitoring and saves time. RX needs to be registered to
Azure.
This is the first server that MSP needs to deploy before installing CS server(s). CS servers need to be
registered with RX. If you are not Managed service provider, you don’t need to install RX, you can start
with configuration server.
Configuration Server (CS)
CS server presents Scout UI. If you are enterprise customer this is the first software needs to install. All
other Scout software installers (PS, Source UA, MT) prompt user to enter the CS IP address and they get
registered to the CS. This UI is used for management of replication. The CS server need to be registered
either with RX (in case of MSP) or with Azure to start using it. RX IP address is required to register with
RX.
Unified Agent (UA)
Scout software has block-level replication software that captures data in real time, called the Unified
Agent (UA) and it needs to be installed on all the virtual or physical machines in the primary site. CS IP
address is required during this installation.
Process Server (PS)
A dedicated Windows 2012 virtual or physical machine, also in the primary site, called Process Server
(PS) is installed with CX software. The PS receives, compresses, encrypts and bandwidth optimizes the
data captured by UA’s on all Primary servers and transfers it to a VMware virtual machine called Master
Target (MT). CS IP address is required during this installation.
Master Target (MT)
MT server acts as a Recovery Vault that continuously receives, updates and retains the replica VM’s. The
MT virtual machine can reside at primary site for local recovery or in a co-location datacenter for remote
recovery (or public or managed cloud). The MT virtual machine has to be running on VMware with the
compute and storage capacity provisioned to retain replica VMs and data changes for retention period
desired. These replica VMs are kept ready to boot-up in the event of a local or site wide disaster at the
Primary Site.
Windows MT server presents a UI on a wizard called vContinuum. It is used for configuring and
initiating replications for a Physical or Virtual Machine on Primary site to a VMWare based Secondary
Sites. The vContinuum wizard is to be used for Physical to VMare (P2V) and VMware to VMware (V2V)
replication and recovery. CS IP address is required during this installation.

7
3 Brief Deployment Steps
For Managed Service Providers (MSP), a multi-tenant orchestration and management portal software
InMage_ScoutCloud_RX is to be deployed first. A VMware virtual machine running RHEL 6.4 64 bit
needs to be provisioned in the managed/hosting datacenters for ScoutCloud_RX.
a) Create the ScoutCloud (RX) VM at the Secondary Site (for MSPs only) by following the steps
here.
b) All other Scout components listed below for enterprise customers are required to be done for
each MSP customer.
For enterprises, the following are the high level actions required to protect a Primary site server to a
Secondary site,
a) A minimum of two Windows 2012R2 VMware virtual machines have to be provisioned on
secondary site. One VM for Configuration Server and second for Master Target. If your source is
Linux, then one additional VM for Linux Master Target is to be deploy on the secondary site.
a. Create a Configuration Server (CS) VM, at the Secondary Site and install the CS software
by following the steps here and choose the CS option.
b. Create a Windows Master Target (MT) VM, at the Secondary Site and install the MT
software by following the steps here.
c. Create Linux Master Target(MT) VM at the Secondary Site and install the MT software by
following the steps here.
b) On Primary site minimum one Windows 2012R2 server is required for Process Server. It can be
either physical or VM. Install Process Server software by following the steps here.
c) InMage_UA_8.0.1.0_Windows_GA_XXX must be installed on all Primary site Windows instances
by following the steps here.
d) InMage_UA_8.0.1_<Linux>_GA_XXX must be installed on all Primary site Linux instances by
following the steps here.
4 InMage Scout Package Contents and Operating systems
applicable
The installable package nomenclature of Scout 8.0.1 GA is self-explanatory; it provides the details of
operating system in the name of the package itself apart from the product type. For Windows, the file is a
setup program with the extension “.exe”. For non-Windows platforms, the file is a compressed tar ball
with the extension “.tar.gz”.
4.1 Unified Agent
Operating System File Name Windows 2008 32/64-bit Windows 2008R2 64-bit Windows 2012 64-bit Windows 2012 R2 64-bit
InMage_UA_8.0.1.0_Windows_GA_26Feb2015_release.exe
RHEL 5.x/CentOS 5.x 32 bit InMage_UA_8.0.1.0_RHEL5-32_GA_26Feb2015_release.tar.gz
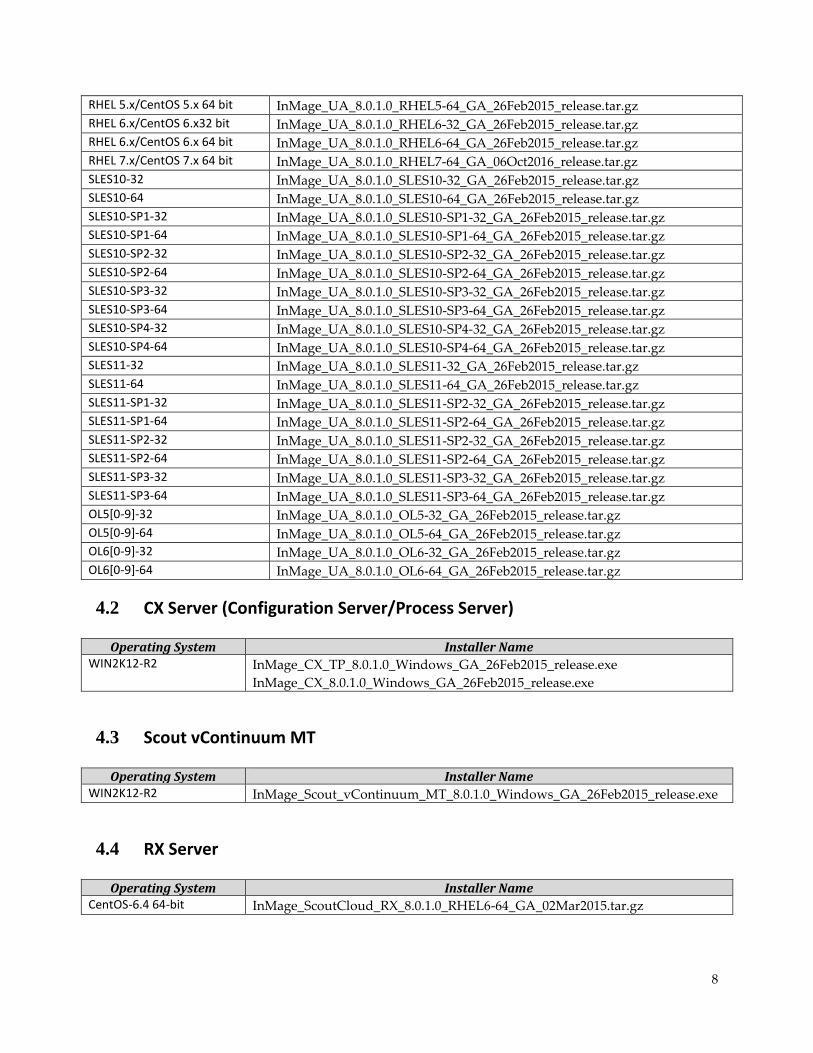
8
RHEL 5.x/CentOS 5.x 64 bit InMage_UA_8.0.1.0_RHEL5-64_GA_26Feb2015_release.tar.gz
RHEL 6.x/CentOS 6.x32 bit InMage_UA_8.0.1.0_RHEL6-32_GA_26Feb2015_release.tar.gz
RHEL 6.x/CentOS 6.x 64 bit InMage_UA_8.0.1.0_RHEL6-64_GA_26Feb2015_release.tar.gz
RHEL 7.x/CentOS 7.x 64 bit InMage_UA_8.0.1.0_RHEL7-64_GA_06Oct2016_release.tar.gz
SLES10-32 InMage_UA_8.0.1.0_SLES10-32_GA_26Feb2015_release.tar.gz
SLES10-64 InMage_UA_8.0.1.0_SLES10-64_GA_26Feb2015_release.tar.gz
SLES10-SP1-32 InMage_UA_8.0.1.0_SLES10-SP1-32_GA_26Feb2015_release.tar.gz
SLES10-SP1-64 InMage_UA_8.0.1.0_SLES10-SP1-64_GA_26Feb2015_release.tar.gz
SLES10-SP2-32 InMage_UA_8.0.1.0_SLES10-SP2-32_GA_26Feb2015_release.tar.gz
SLES10-SP2-64 InMage_UA_8.0.1.0_SLES10-SP2-64_GA_26Feb2015_release.tar.gz
SLES10-SP3-32 InMage_UA_8.0.1.0_SLES10-SP3-32_GA_26Feb2015_release.tar.gz
SLES10-SP3-64 InMage_UA_8.0.1.0_SLES10-SP3-64_GA_26Feb2015_release.tar.gz
SLES10-SP4-32 InMage_UA_8.0.1.0_SLES10-SP4-32_GA_26Feb2015_release.tar.gz
SLES10-SP4-64 InMage_UA_8.0.1.0_SLES10-SP4-64_GA_26Feb2015_release.tar.gz
SLES11-32 InMage_UA_8.0.1.0_SLES11-32_GA_26Feb2015_release.tar.gz
SLES11-64 InMage_UA_8.0.1.0_SLES11-64_GA_26Feb2015_release.tar.gz
SLES11-SP1-32 InMage_UA_8.0.1.0_SLES11-SP2-32_GA_26Feb2015_release.tar.gz
SLES11-SP1-64 InMage_UA_8.0.1.0_SLES11-SP2-64_GA_26Feb2015_release.tar.gz
SLES11-SP2-32 InMage_UA_8.0.1.0_SLES11-SP2-32_GA_26Feb2015_release.tar.gz
SLES11-SP2-64 InMage_UA_8.0.1.0_SLES11-SP2-64_GA_26Feb2015_release.tar.gz
SLES11-SP3-32 InMage_UA_8.0.1.0_SLES11-SP3-32_GA_26Feb2015_release.tar.gz
SLES11-SP3-64 InMage_UA_8.0.1.0_SLES11-SP3-64_GA_26Feb2015_release.tar.gz
OL5[0-9]-32 InMage_UA_8.0.1.0_OL5-32_GA_26Feb2015_release.tar.gz
OL5[0-9]-64 InMage_UA_8.0.1.0_OL5-64_GA_26Feb2015_release.tar.gz
OL6[0-9]-32 InMage_UA_8.0.1.0_OL6-32_GA_26Feb2015_release.tar.gz
OL6[0-9]-64 InMage_UA_8.0.1.0_OL6-64_GA_26Feb2015_release.tar.gz
4.2 CX Server (Configuration Server/Process Server)
Operating System Installer Name WIN2K12-R2
InMage_CX_TP_8.0.1.0_Windows_GA_26Feb2015_release.exe
InMage_CX_8.0.1.0_Windows_GA_26Feb2015_release.exe
4.3 Scout vContinuum MT
Operating System Installer Name WIN2K12-R2 InMage_Scout_vContinuum_MT_8.0.1.0_Windows_GA_26Feb2015_release.exe
4.4 RX Server
Operating System Installer Name CentOS-6.4 64-bit InMage_ScoutCloud_RX_8.0.1.0_RHEL6-64_GA_02Mar2015.tar.gz

9
4.5 Push Install Clients
Operating System Installer Name RHEL-5.x/CentOS-5.x 32-bit RHEL5-32_pushinstallclient.tar.gz
RHEL-5.x/CentOS-5.x 64-bit RHEL5-64_pushinstallclient.tar.gz
RHEL-6.x/CentOS-6.x 32-bit RHEL6-32_pushinstallclient.tar.gz
RHEL-6.x/CentOS-6.x 64-bit RHEL6-64_pushinstallclient.tar.gz
RHEL-7.x/CentOS-7.x 64-bit RHEL7-64_pushinstallclient.tar.gz
SLES10-32 bit SLES10-32_pushinstallclient.tar.gz
SLES10-64 bit SLES10-64_pushinstallclient.tar.gz
SLES10-SP1-32 bit SLES10-SP1-32_pushinstallclient.tar.gz
SLES10-SP1-64 bit SLES10-SP1-64_pushinstallclient.tar.gz
SLES10-SP2-32 bit SLES10-SP2-32_pushinstallclient.tar.gz
SLES10-SP2-64 bit SLES10-SP2-64_pushinstallclient.tar.gz
SLES10-SP3-32 bit SLES10-SP3-32_pushinstallclient.tar.gz
SLES10-SP3-64 bit SLES10-SP3-64_pushinstallclient.tar.gz
SLES10-SP4-32 bit SLES10-SP4-32_pushinstallclient.tar.gz
SLES10-SP4-64 bit SLES10-SP4-64_pushinstallclient.tar.gz
SLES11-32 bit SLES11-32_pushinstallclient.tar.gz
SLES11-64 bit SLES11-64_pushinstallclient.tar.gz
SLES11-SP1-32 bit SLES11-SP1-32_pushinstallclient.tar.gz
SLES11-SP1-64 bit SLES11-SP1-64_pushinstallclient.tar.gz
SLES11-SP2-32 bit SLES11-SP2-32_pushinstallclient.tar.gz
SLES11-SP2-64 bit SLES11-SP2-64_pushinstallclient.tar.gz
SLES11-SP3-32 bit SLES11-SP3-32_pushinstallclient.tar.gz
SLES11-SP3-64 bit SLES11-SP3-64_pushinstallclient.tar.gz
OL5U[0-10]-32 bit OL5-32_pushinstallclient.tar.gz
OL5U[0-10]-64 bit OL5-64_pushinstallclient.tar.gz
OL6U[0-5]-32 bit OL6-32_pushinstallclient.tar.gz
OL6U[0-5]-64 bit OL6-64_pushinstallclient.tar.gz
To facilitate centralized unified agent installation on Windows/Linux instances, Scout is packaged with
“pushinstallclients”. The windows version is built-in with Scout CX software and files for Linux are part
of the software package, this need to be uploaded to the Scout CX using the UI. For more information,
please refer to ASR Scout user guide section on “Install Agent Through CX UI”. Refer to ASR Scout
compatibility matrix for support configurations.

10
5 Installation
5.1 Deploy Configuration Server
5.1.1 Create a VM
Create a Windows 2012R2 VM to deploy Configuration server on target site. Follow sizing
guideline to prepare a configuration server.
5.1.2 Install Configuration Server
Install Configuration Server binary and latest CX update on the server. Follow the below quick
installation steps to install configuration server or refer to section 3.5.1 Install CX on Windows in
ASR Scout user guide for detailed installation steps.
a. Copy InMage_CX_TP_8.0.1.0_Windows_GA_26Feb2015_release.exe and
InMage_CX_8.0.1.0_Windows_GA_26Feb2015_release.exe into configuration server VM in
the same folder.
b. Double click on the CX executable
(InMage_CX_8.0.1.0_Windows_GA_26Feb2015_release.exe)
c. Windows CX installer automatically launch CX_TP, if both CX_TP and CX installers are kept
in the same directory.
d. Click on ‘Next’ button on the “Welcome” page of installation wizard.
e. Click on ’Install’ button on the “Ready to Install” page to proceed ahead with the
installation.
f. Click on ‘Finish’ button on the page which will be displayed at the end of installation. This
will complete CX_TP installation.
g. Click on ‘Next’ button on the “Welcome” page of installation wizard.
h. In the next page MySQL, Cygwin and RRD Tool download links are displayed. Please
download them to some directory and click on ‘Next’ button.
i. Select ‘New Installation’ radio button and click on ‘Next’ button.
j. In the “Mail Server Configuration” page please enter the Mail Server IP, Mail Sender Address
and Mail receiver and click on ‘Next’ button.
k. In the “Server Mode” page, select Configuration Server radio button and click on ‘Next’
button.
Configuration Server
Process Server
Both Configuration and Process Servers
l. In “Communication Mode” page, select Both Http and Https radio button and click on ‘Next’
button.
Http
Https
Both Http and Https

11
m. In next page, provide the RRD zip, Cygwin and MySQL installer paths which were
downloaded earlier and click on ‘Next’ button. It installs RRD Tool and invokes Cygwin and
MySQL installer one after another.
n. In “MySQL Server Details” page, enter the MySQL Root password and MySQL Database
User Password and click on ‘Next’ button.
Note: Please uncheck "Launch MySQL Instance Configuration Wizard" in the final step of
MySQL installation.
o. In “Role of CX Server” page, select Primary radio button and click on ‘Next’ button.
Primary
Standby
p. In “NIC Selection for Configuration Server” page, enter NIC configuration details and
Http/Https port numbers and click on ‘Next’ button.
q. In “Push Server Details” page, enter Domain name\User name and password and click on
‘Next’ button.
r. In “Select Destination Location” page, select destination folder and click on ‘Next’ button.
s. In “Ready to Install” page, click on ‘Install’ button to proceed ahead with installation.
t. Click on ‘Finish’ button on the page which will be displayed at the end of installation.
u. Download and install latest CX update.
v. Register the configuration server to your ASR vault or RX.
Refer to section 4.3 Register Configuration Server to an Azure Site Recovery vault in ASR Scout
user guide to register configuration server.
5.2 Deploy Process Server
5.2.1 Create a VM
Create a Windows 2012 R2 VM to deploy Process Server on primary site. Follow sizing guideline
to prepare a process server You may need to prepare multiple process server depending upon
number of VMs that you want to replicate and data change rate per day.
5.2.2 Install Process Server
Install Process Server binary and latest CX update on the process server. Follow the below quick
installation steps to install process server or refer to section 3.5.2 Install Process Server on Windows
in ASR Scout user guide for detailed installation steps.
a. Copy InMage_CX_TP_8.0.1.0_Windows_GA_26Feb2015_release.exe and
InMage_CX_8.0.1.0_Windows_GA_26Feb2015_release.exe into configuration server VM in
the same folder.
b. Double click on the CX executable
(InMage_CX_8.0.1.0_Windows_GA_26Feb2015_release.exe)

12
c. Windows CX installer automatically launch CX_TP, if both CX_TP and CX installers are kept
in the same directory.
d. Click on ‘Next’ button on the “Welcome” page of installation wizard.
e. Click on ’Install’ button on the “Ready to Install” page to proceed ahead with the
installation.
f. Click on ‘Finish’ button on the page which will be displayed at the end of installation. This
will complete CX_TP installation.
g. Click on ‘Next’ button on the “Welcome” page of installation wizard.
h. In the next page MySQL, Cygwin and RRD Tool download links are displayed. Please
download Cygwin and RRF to some directory and click on ‘Next’ button. MySQL is not
required for Process Server.
i. Select ‘New Installation’ radio button and click on ‘Next’ button.
j. In the “Mail Server Configuration” page please enter the Mail Server IP, Mail Sender Address
and Mail receiver and click on ‘Next’ button.
k. In the “Server Mode” page, select Process Server radio button and click on ‘Next’ button.
Configuration Server
Process Server
Both Configuration and Process Servers
l. In “Communication Mode” page, select Https radio button and click on ‘Next’ button.
Http
Https
m. In next page, provide the RRD zip, Cygwin installer paths which were downloaded earlier
and click on ‘Next’ button. It installs RRD Tool and invokes Cygwin installer one after
another.
n. In “NIC Selection for Process Server” page select IP for process server and click on ‘Next’
button
o. In the ‘Configuration Serer Details’ page, enter configuration server IP and Https port
numbers and click on ‘Next’ button.
p. In “Push Server Details” page, enter Domain name\User name and password and click on
‘Next’ button.
q. In “Select Destination Location” page, select destination folder and click on ‘Next’ button.
r. In “Ready to Install” page, click on ‘Install’ button to proceed ahead with installation.
s. Click on ‘Finish’ button on the page which will be displayed at the end of installation.
t. Download and install latest CX update.
5.3 Deploy Windows Master Target
5.3.1 Create a VM
Create a Windows 2012R2 VM to deploy Master Target components. You may need to prepare
multiple Master Target depending upon number of VMs that you want to replicate. Follow sizing
guideline to prepare a Master Target. Maximum 57 disks can be attached to a Master Target
(excluding retention, OS and cache disks). It is recommended to deploy a new Master target after
protecting around 28 disks. Scout needs same number of additional disks for DR-Drill operation. The
DR-Drill operation will fail if the required number of SCSI ports are not available to attach the disks.

13
5.3.2 Add Retention and cache disks to Master Target
a. Create two new disks and attach to Master Target for retention. Following the Master Target sizing
guideline for the retention and cache disk size.
5.3.3 Install Windows Master Target
a. Copy InMage_UA_8.0.1.0_Windows_GA_26Feb2015_release.exe to Master Target VM
b. Double-click on the Scout vContinuum MT executable.
(InMage_Scout_vContinuum_MT_8.0.1.0_Windows_GA_26Feb2015_release.exe)
c. Click on ‘Next’ button on the “Welcome” page of installation wizard.
d. Download VMware vSphereCLI 5.5 to some directory and click on ‘Next’ button.
e. In the next page, provide vSphereCLI installer path which was downloaded earlier and click on
‘Next’ button. It invokes vSphereCLI installer.
f. In the next page, provide CX IP, Port Number. Select ‘Use Https’ checkbox for secure
communication.
g. Note: Select HTTPs here only if Https is selected in section 5.2 g) during CS server install.
h. In “Ready to Install” page, click on ‘Install’ button to proceed ahead with installation.
i. Click on ‘Finish’ button on the page which will be displayed at the end of installation.
j. Download and install latest Master Target and vContinuum updates.
5.4 Deploy Unified Agent (mobility service) – Windows
a. Copy InMage_UA_8.0.1.0_Windows_GA_26Feb2015_release.exe on source server. b. Double-click on the Unified Agent setup executable.
c. (InMage_UA_8.0.1.0_Windows_GA_26Feb2015_release.exe)
d. In the “Agent Configuration” page, select “Both File Replication and Volume Replication Agent”
radio button and click on ‘Next’ button.
e. In “Role of the Agent” page, select Scout Agent role radio button and click on ‘Next’ button.
f. Scout Agent
g. Master Target
h. Select the installation directory in the next page.
i. In “Ready to Install” page, click on ‘Install’ button to proceed ahead with installation.
j. At the end of the installation, agent configuration UI pop in, provide CX IP, Port Number. Select
‘Use Https’ checkbox for secure communication.
k. Note: Select HTTPs here only if Https is selected in section 5.2 g) during CS server install.
l. Installer shows reboot page at the end of installation, if reboot is required.
m. Download and install latest Unified Agent update.

14
5.5 Deploy Unified Agent(mobility service) - Linux
a. Copy appropriate agent installers and extract it.
b. Ex: tar –xvzf InMage_UA_8.0.1.0_RHEL6-64_GA_26Feb2015_release.tar.gz
c. If you are going install agent on ‘Master Target’ server, invoke ./PostInstallConfiguration.sh
script. Reboot the server after successful execution of the script. Continue with the rest of the
steps after reboot. Please note that this script has to be executed only once on a particular server.
If you had already invoked this script as part of OS installation process, please skip this step.
d. Invoke ./install to proceed ahead with installation.
e. Select one of the below listed options.
f. File Replication Agent
g. Volume Replication Agent
h. Both
i. Provide installation path. If you want to go with default installation path press ‘Enter’.
j. Select the role of the agent. Agent role can be Scout Agent/Master Target.
k. Select Scout Agent for installation on servers that need to be protected. Select Master Target for
installation on a VMware VM that acts as the protection target.
l. Enter CX IP and Port in ‘Global’ menu in ‘Host Config Interface’ wizard. In same menu select
choose ‘Yes’ if you want to use https as communication mode. Select ‘quit’ to proceed further
with installation.
Note: Select HTTPs here only if Https is selected during CS server install.
m. Download and install latest Unifies Agent update.
n. If this is your Linux Master Target, add two new disks, one for retention and other for cache.
5.6 Deploy ScoutCloud RX
Install ScoutCloud RX Server binary and latest RX update on the server. Follow the below quick
installation steps to install RX or refer to chapter 3 Install/Uninstall/Upgrade RX Server in ASR Scout RX
user guide for detailed installation steps.
a. Copy RX installer to the RHEL 6.4 or CentOS 6.4 system and extract it. Refer to section 3.1 Install
Operating Systems in ASR Scout RX user guide for detailed information.
b. tar –xvzf InMage_ScoutCloud_RX_8.0.1.0_RHEL6-64_GA_02Mar2015.tar.gz
c. Change directory to Scout-RX-RHEL6-64.
d. Invoke ./PostInstallConfiguration.sh script. Reboot the server after successful execution of the
script.
e. Continue with the rest of the steps after reboot. Please note that this script has to be executed only
once on a particular server. If you had already invoked this script, skip this step.
f. Invoke ./install.sh to proceed ahead with installation.
g. Provide installation path. If you want to go with default installation path press ‘Enter’.
h. Provide MySQL root password.
i. Provide database user (svsystems) password.
j. If system has multiple NICs, user will be asked to choose one for RX communication.
k. Choose communication protocol. https is the default communication protocol.
l. Provide port number to procced with the installation.
m. Download and install latest RX update.

15
n. Register the RX to your ASR vault. Refer to section 4.2 Register RX to an Azure Site Recovery vault in ASR Scout RX user guide to register RX server.
6 Access To the Software UI and using the product
To access the UI for the Scout Software,
a) Launch internet explorer
b) Http://<CS IP>:<port> or Https://<CS IP>:<port>
c) Enter the username and password
a. Username : admin
b. Password: password
d) Refer to the in InMage_Scout_User_Guide.pdf for detail information.
a. P2V and V2V information: Chapter 7. Overview of InMage vContinuum
b. How to Prepare Master Target on Linux: Chapter 3.5.7. Prepare Master Target on Linux.
c. Sizing information for MT: Chapter 7.4.Preparing for the Solution
e) Please reach out to [email protected] if assistance is required.

16
7 Sizing Guideline
7.1 Process server VM size
7.2 Configuration Server VM Size
Number of
Replication Pairs CPU Memory
Boot Volume
Capacity NIC Details
<=300 8 vCPUs @ 2.50GHz 8GB 100 GB Usable File
system 1 GigE vNIC
>300 Recommend to deploy new CS server
Data Change Rate
CPU Memory
Boot Volume Capacity + Cache Directory
Disk Size Including Cache Directory Based
on Outage
Minimum Total Disk
Throughput Required
NIC Details
Less than or equal to 300 GB per day
4 vCPUs 8GB Minimum of 400 GB 15 to 20 MB/s
2 x 1 GigE vNIC
with static IP
Less than or equal to 700 GB per day
8 vCPUs 16GB Minimum of 790 GB 34.9 to 46.6
MB/s
2 x 1 GigE vNIC
with static IP
Less than or equal to 1 TB
8vCPUs 32GB Minimum of 790 GB 51.2 to 68.27
MB/s
2 x 1 GigE vNIC
with static IP
Greater than 1 TB
Recommend Multiple Process servers

17
7.3 Master Target Server VM Size
CPU Memory Boot Volume
Capacity Cache Retention
NIC
Details
8 vCPUs @ 2.50GHz 8 GB 50 GB Usable
File system Average 100 GB
Based on
number of
retention days
and data
change rate.*
1 GigE
vNIC
*For 300 GB data change per day and required retention for 2 days, total retention volume size should be
= 300*2 = 600 GB.