infoserver administrator
TRANSCRIPT
IBM InfoSphere Information ServerVersion 8 Release 5
Administration GuideRevised October 2011
SC18-9929-05
���


IBM InfoSphere Information ServerVersion 8 Release 5
Administration GuideRevised October 2011
SC18-9929-05
���
NoteBefore using this information and the product that it supports, read the information in “Notices and trademarks” on page267.
© Copyright IBM Corporation 2007, 2011.US Government Users Restricted Rights – Use, duplication or disclosure restricted by GSA ADP Schedule Contractwith IBM Corp.

Contents
Chapter 1. Administration overview . . . 1IBM InfoSphere DataStage administration . . . . 4IBM WebSphere Application Server administration . 5
Chapter 2. Opening the consoles . . . . 7Opening the IBM InfoSphere Information Serverconsole . . . . . . . . . . . . . . . . 7Opening the IBM InfoSphere Information Server webconsole . . . . . . . . . . . . . . . . 8
Determining the URL for the IBM InfoSphereInformation Server Web console . . . . . . . 8Configuring your Web browser to work with theIBM InfoSphere Information Server Web console . 9Navigating to the IBM InfoSphere InformationServer Web console . . . . . . . . . . . 11
Logging in to the IBM WebSphere ApplicationServer administrative console . . . . . . . . 11
Chapter 3. IBM InfoSphere InformationServer console overview . . . . . . . 13Main areas of the console. . . . . . . . . . 13
My Home workspace . . . . . . . . . . 13Workspace Navigator . . . . . . . . . . 15Project menu . . . . . . . . . . . . . 16Palettes . . . . . . . . . . . . . . . 17Project dashboard . . . . . . . . . . . 19Status bar . . . . . . . . . . . . . . 19Shortcuts . . . . . . . . . . . . . . 20Notes . . . . . . . . . . . . . . . 20
Basic task flow in the workspaces . . . . . . . 20Select a task menu from the WorkspaceNavigator . . . . . . . . . . . . . . 21Select the task that you want to perform fromthat menu . . . . . . . . . . . . . . 21Select objects and a task in the workspace . . . 22Work in a task pane . . . . . . . . . . 23
Reporting, scheduling, and logging in the console 24Reporting . . . . . . . . . . . . . . 24Scheduling . . . . . . . . . . . . . 24Logging . . . . . . . . . . . . . . 25
Online help . . . . . . . . . . . . . . 25
Chapter 4. Working with projects in theIBM InfoSphere Information Serverconsole . . . . . . . . . . . . . . 27Setting up a project in the IBM InfoSphereInformation Server console . . . . . . . . . 27
Creating a project . . . . . . . . . . . 27Modifying project properties. . . . . . . . 27Customizing the project dashboard . . . . . 28
Opening an existing project in the IBM InfoSphereInformation Server console . . . . . . . . . 28
Chapter 5. Customizing the consoles 29
Customizing the IBM InfoSphere Information Serverconsole . . . . . . . . . . . . . . . . 29
Customizing the My Home workspace . . . . 29Modifying user preferences . . . . . . . . 29Creating shortcuts . . . . . . . . . . . 29Working with palettes . . . . . . . . . . 30Creating notes . . . . . . . . . . . . 31Refreshing an object list . . . . . . . . . 31Changing your password . . . . . . . . . 31
Customizing the IBM InfoSphere Information ServerWeb console . . . . . . . . . . . . . . 32
Customizing the Home tab . . . . . . . . 32Changing your password . . . . . . . . . 32
Chapter 6. Managing security . . . . . 33Security setup . . . . . . . . . . . . . 33
User registry configuration . . . . . . . . 34User and group creation . . . . . . . . . 53Assigning user roles . . . . . . . . . . 61Engine security configuration . . . . . . . 74Configuring WebSphere Application Server fornon-root administration (Linux, UNIX) . . . . 84Starting IBM InfoSphere Information Server nodeagents as a non-root user . . . . . . . . . 91Audit logging configuration . . . . . . . . 93
Administrator account password changing . . . 106Changing an IBM InfoSphere Information Serveradministrator password . . . . . . . . . 106IBM WebSphere Application Serveradministrator password changing . . . . . 108Metadata repository database owner passwordchanging . . . . . . . . . . . . . . 111Changing the analysis database owner accountcredentials . . . . . . . . . . . . . 113Changing IBM DB2 passwords . . . . . . 114
Administration commands and tools . . . . . 114AppServerAdmin command . . . . . . . 114DirectoryAdmin tool . . . . . . . . . . 117
Chapter 7. Activating entitled IBMInfoSphere DataStage editions andfeature packs . . . . . . . . . . . 127Viewing a list of activated IBM InfoSphereDataStage editions and feature packs . . . . . 128Activating and deactivating IBM InfoSphereDataStage editions and feature packs . . . . . 129LicensingServiceAdmin command reference . . . 131
Chapter 8. Managing active sessions 135Viewing all active sessions . . . . . . . . . 135Setting session limits . . . . . . . . . . . 135Opening user details . . . . . . . . . . . 136Disconnecting all sessions . . . . . . . . . 136Disconnecting a session . . . . . . . . . . 136
© Copyright IBM Corp. 2007, 2011 iii
Chapter 9. Managing clusters andhigh availability configurations. . . . 139Active-passive configuration administration . . . 139
Administering an active-passive configurationbased on Tivoli System Automation forMultiplatforms . . . . . . . . . . . . 139
WebSphere Application Server clusteradministration . . . . . . . . . . . . . 139
WebSphere Application Server clusteradministration tools . . . . . . . . . . 139Propagating the plugin-cfg.xml file to thefront-end Web server . . . . . . . . . . 141Adding a new cluster member . . . . . . 143Adding a new managed node . . . . . . . 143Synchronizing nodes after changing the masterrepository configuration . . . . . . . . . 145Restarting application server processes . . . . 146Setting up HTTP session database persistence 147
IBM DB2 high availability configurationadministration . . . . . . . . . . . . . 148
Failover in an IBM DB2 HADR configuration 148Recovering from a failover in a DB2 clusteredconfiguration . . . . . . . . . . . . 150
Engine tier failover recovery . . . . . . . . 150Recovering from an engine tier failover. . . . 151
Chapter 10. Managing logs . . . . . 155Logging . . . . . . . . . . . . . . . 155Logging components . . . . . . . . . . . 155Logging configurations . . . . . . . . . . 155
Severity levels . . . . . . . . . . . . 156Views of logged events . . . . . . . . . . 156
Shared and private views . . . . . . . . 156Managing logging views in the console. . . . . 157
Creating a view of logged events in the console 157Viewing logged events . . . . . . . . . 157Editing a log view. . . . . . . . . . . 158Copying a log view . . . . . . . . . . 158Purging logged messages . . . . . . . . 158
Managing logging views in the IBM InfoSphereInformation Server Web console . . . . . . . 159
Creating a view of logged events in the IBMInfoSphere Information Server Web console . . 159Viewing log events in the IBM InfoSphereInformation Server Web console . . . . . . 160Editing a log view in the IBM InfoSphereInformation Server Web console . . . . . . 160Copying a log view in the IBM InfoSphereInformation Server Web console . . . . . . 161Purging logged messages in the IBM InfoSphereInformation Server Web console . . . . . . 161Managing logging by component. . . . . . 161
Chapter 11. Managing schedules . . . 165Criteria for schedule views . . . . . . . . . 165Shared and private views . . . . . . . . . 166Creating a schedule view . . . . . . . . . 166Creating a schedule view from a copy . . . . . 166Viewing the schedules that are captured by aschedule view . . . . . . . . . . . . . 167
Pausing all the schedules in a view . . . . . . 167Resuming all the schedules in a view . . . . . 167Purging the history for all the schedules in a view 168Working with the scheduled tasks in a view . . . 168
Stopping a scheduled task . . . . . . . . 168Purging the history of a scheduled task . . . 168Viewing a list of completed schedules . . . . 169Viewing a list of running schedules . . . . . 169Viewing a list of upcoming scheduled tasks . . 169
Chapter 12. Backing up and restoringIBM InfoSphere Information Server . . 171Backing up IBM InfoSphere Information Servercomponents . . . . . . . . . . . . . . 171
File system elements and databases that requirebacking up . . . . . . . . . . . . . 172
Restoring IBM InfoSphere Information Servercomponents . . . . . . . . . . . . . . 177
Chapter 13. Administering IBMInfoSphere Information Server andIBM WebSphere Application Serverservices. . . . . . . . . . . . . . 179Shutting down services (Windows) . . . . . . 180
Stopping IBM WebSphere Application Server(Windows) . . . . . . . . . . . . . 181
Shutting down services (Linux, UNIX) . . . . . 182Stopping IBM WebSphere Application Server(Linux, UNIX) . . . . . . . . . . . . 183
Starting services (Windows) . . . . . . . . 185Starting IBM WebSphere Application Server(Windows) . . . . . . . . . . . . . 186
Starting services (Linux, UNIX) . . . . . . . 187Starting IBM WebSphere Application Server(Linux, UNIX) . . . . . . . . . . . . 188
IBM WebSphere Application Server process statuschecking . . . . . . . . . . . . . . . 191
Checking the status of IBM WebSphereApplication Server (stand-alone installation) . . 192Checking the status of IBM WebSphereApplication Server startup (stand-aloneinstallation) . . . . . . . . . . . . . 192Checking the status of IBM WebSphereApplication Server startup (clusteredinstallation) . . . . . . . . . . . . . 193Checking the status of IBM WebSphereApplication Server cluster members . . . . . 194Checking the status of IBM WebSphereApplication Server node agents . . . . . . 195Checking the status of the IBM WebSphereApplication Server Deployment Manager . . . 195
IBM WebSphere Application Server system log files 195
Chapter 14. Managing assets by usingthe command line . . . . . . . . . 197Using the istool command line . . . . . . . 197
Location of the istool command line . . . . . 197Commands and common parameters for istool 198Command modes for istool . . . . . . . 202
iv Administration Guide
Asset interchange . . . . . . . . . . . . 203Common asset-interchange scenarios . . . . 205
InfoSphere Business Glossary assets . . . . . . 206Export command for glossary assets . . . . . 206Import command for glossary assets. . . . . 207
InfoSphere FastTrack assets . . . . . . . . . 208Asset IDs . . . . . . . . . . . . . . 209Export command for InfoSphere FastTrackassets . . . . . . . . . . . . . . . 210Import command for InfoSphere FastTrackassets . . . . . . . . . . . . . . . 211
InfoSphere Information Analyzer assets . . . . 214Export command for InfoSphere InformationAnalyzer assets. . . . . . . . . . . . 214Import command for InfoSphere InformationAnalyzer assets. . . . . . . . . . . . 215
InfoSphere DataStage and QualityStage assets . . 217Build package command . . . . . . . . 217Deploy package command . . . . . . . . 219Send package command . . . . . . . . . 221Export command for InfoSphere DataStage andQualityStage assets . . . . . . . . . . 222Import command for InfoSphere DataStage andQualityStage assets . . . . . . . . . . 227
Common metadata assets . . . . . . . . . 229
Importing and exporting common metadataassets by using the command line . . . . . 229Querying and deleting assets by using thecommand line . . . . . . . . . . . . 237Delete command for disconnected assets . . . 248
Reporting assets . . . . . . . . . . . . 249Export command for reporting assets . . . . 250Import command for reporting assets . . . . 252
Security assets . . . . . . . . . . . . . 254Export command for security assets . . . . . 255Import command for security assets . . . . . 257
Product accessibility . . . . . . . . 261
Accessing product documentation 263
Links to non-IBM Web sites . . . . . 265
Notices and trademarks . . . . . . . 267
Contacting IBM . . . . . . . . . . 271
Index . . . . . . . . . . . . . . . 273
Contents v

vi Administration Guide

Chapter 1. Administration overview
With IBM® InfoSphere® Information Server, you can administer security,entitlements, clusters and high availability configurations, logs, schedules, andservices, and back up data. Both the IBM InfoSphere Information Server consoleand the IBM InfoSphere Information Server Web console provide administrationcapabilities.
Security administration
As part of InfoSphere Information Server administration, you set up and managesuite security. Security administration includes the following tasks:v Configuring and administering the user registry
The user registry holds user account information, such as user names andpasswords, that can be accessed during authentication. You choose a userregistry for the suite to use. You can choose the internal InfoSphere InformationServer user registry, or an external local operating system or lightweightdirectory access protocol (LDAP) user registry. Depending on the registry youchoose and the topology of your installation, you might also have to mapcredentials from one user registry to another.
v Controlling accessYou create user accounts and groups. You assign roles to users and groups tospecify which features users can use and which projects a user can access. Userroles can be defined at several levels that build on one another.
v Auditing security-related eventsSecurity-related events include all activities that set or modify security-relatedsettings and all user authentications and application access attempts. Youconfigure which events to log and how much information to include. Youmonitor and analyze the log information to help prevent unauthorized access tosensitive data.
v Administering account passwordsYou periodically change administrator account passwords to comply with yoursecurity policies.
v Managing active user sessionsYou view current active sessions, and manage session limits. If necessary, youcan force one user or all users to disconnect.
Entitled IBM InfoSphere DataStage® edition and feature packadministration
As part of InfoSphere Information Server administrator, you control activation ofInfoSphere DataStage editions and feature packs to comply with your Proof ofEntitlement from IBM. Administration includes the following tasks:v Initial edition and feature pack activation
When you install InfoSphere DataStage, the InfoSphere Information Serverinstallation program prompts you to select the InfoSphere DataStage editionsand feature packs to install and activate. Select the items for which you have avalid Proof of Entitlement from IBM. The installation program activates thefeatures that are associated with the items that you select. Any other editions orfeature packs are deactivated and cannot be used.
© Copyright IBM Corp. 2007, 2011 1

v Maintaining the list of activated itemsIf you later acquire entitlements for an additional InfoSphere DataStage editionor feature pack, you must activate the item within InfoSphere InformationServer. If you no longer have entitlement for an item, you must deactivate it.When you deactivate the edition or feature pack, the features within the item areno longer available for use.
Clusters and high availability configuration and administration
If a portion of your installation is set up in a clustered or high availabilityconfiguration, you administer the cluster. Administration includes the followingtasks:v Administering an active-passive configuration administration
If one or more software tiers in your installation is set up in an active-passiveconfiguration, you monitor and manage the server pair. If a hardware ornetwork error causes a failover to the passive server, you recover projects andrestart any interrupted jobs. You can also force a failover to free the active serverfor maintenance or upgrade tasks.
v Administering an application server clusterIf the InfoSphere Information Server services tier is implemented in an IBMWebSphere® Application Server cluster, you administer and maintain the cluster.Tasks include adding cluster members, adding managed nodes, synchronizinginformation between nodes, and restarting processes.
v Administering an IBM DB2® high availability configurationIf the metadata repository tier is implemented in a DB2 cluster or highavailability disaster recovery (HADR) configuration, you monitor the cluster. If afailover occurs, you recover from a failover and restore service.
Log administration
You can manage logs across all of the InfoSphere Information Server productmodules. Logs are stored in the metadata repository. Log administration includesthe following tasks:v Configuring logging
You specify which logging categories and severity levels of logging events arestored in the metadata repository.
v Querying logsYou create log views in the IBM InfoSphere Information Server console and IBMInfoSphere Information Server Web console. You use the views to retrieve andquery the logged events that are stored in the metadata repository.
Scheduling administration
Many of the product modules use scheduling capabilities. For example, a reportrun and an analysis job in IBM InfoSphere Information Analyzer are scheduledtasks. Scheduling administration includes the following tasks:v Creating, updating, and managing schedules
Schedule management is done within the product module. For example, youcreate a schedule for a column analysis job to run weekly in an InfoSphereInformation Analyzer project in the console.
v Viewing schedules
2 Administration Guide

You can obtain a global view of all the scheduled activities for all productmodules. With this data, you can ensure that enough resources are available toprocess the schedules. You can monitor who schedules tasks and how often.
v Querying schedulesYou can query all the schedules that are defined across all product modules. Youcan check their status, history, and forecast. You can also do maintenance taskssuch as purging the scheduled execution history. You can stop or start existingschedules to prevent system overload.
Backup administration
To prevent the loss of data and to prepare for disaster recovery, you administerregular backups. Backup administration includes the following tasks:v Backing up InfoSphere Information Server components
You schedule and perform regular backups of all databases, profiles, libraries,and other data.
v Restoring componentsTo recover your data in the event of a hardware failure or other disaster, you canrestore the data that you have backed up.
Service administration
You administer InfoSphere Information Server services and WebSphere ApplicationServer services. Administration includes the following tasks:v Stopping and restarting services
Many maintenance and administration tasks require that you stop and restartvarious InfoSphere Information Server services or WebSphere Application Serverservices.
v Checking the status of servicesYou can determine the status of services for troubleshooting or othermaintenance tasks.
Asset administration
Assets include projects, templates, configuration specifications, parameter sets, andall other information that is produced within the InfoSphere Information Serverproduct modules. The assets are stored in the metadata repository. Administrationincludes the following tasks:v Importing and exporting assets
To move assets from one InfoSphere Information Server installation to another,you export the assets from one installation and import them into another. Forexample, if you have a development system, a test system, and a productionsystem, you move assets between the systems.
v Querying and deleting assetsYou can query certain assets and delete them as necessary.
Administration tools
To administer InfoSphere Information Server, you use the following software tools:v IBM InfoSphere Information Server console
The IBM InfoSphere Information Server console ("the console") is a richclient-based interface for activities such as profiling data and developing
Chapter 1. Overview 3
service-oriented applications. In the console, you can complete administrationtasks, reporting tasks, and the tasks that are associated with IBM InfoSphereInformation Analyzer and IBM InfoSphere Information Services Director.
v IBM InfoSphere Information Server Web consoleThe IBM InfoSphere Information Server Web console ("the Web console") is abrowser-based interface for administrative activities such as managing securityand creating views of scheduled tasks. In the Web console, you can performadministration tasks, reporting tasks, and the tasks that are associated with IBMInfoSphere Business Glossary and the Information Services catalog.
For certain tasks, you also use the WebSphere Application Server administrativeconsole.
To administer assets, you use the istool command line.
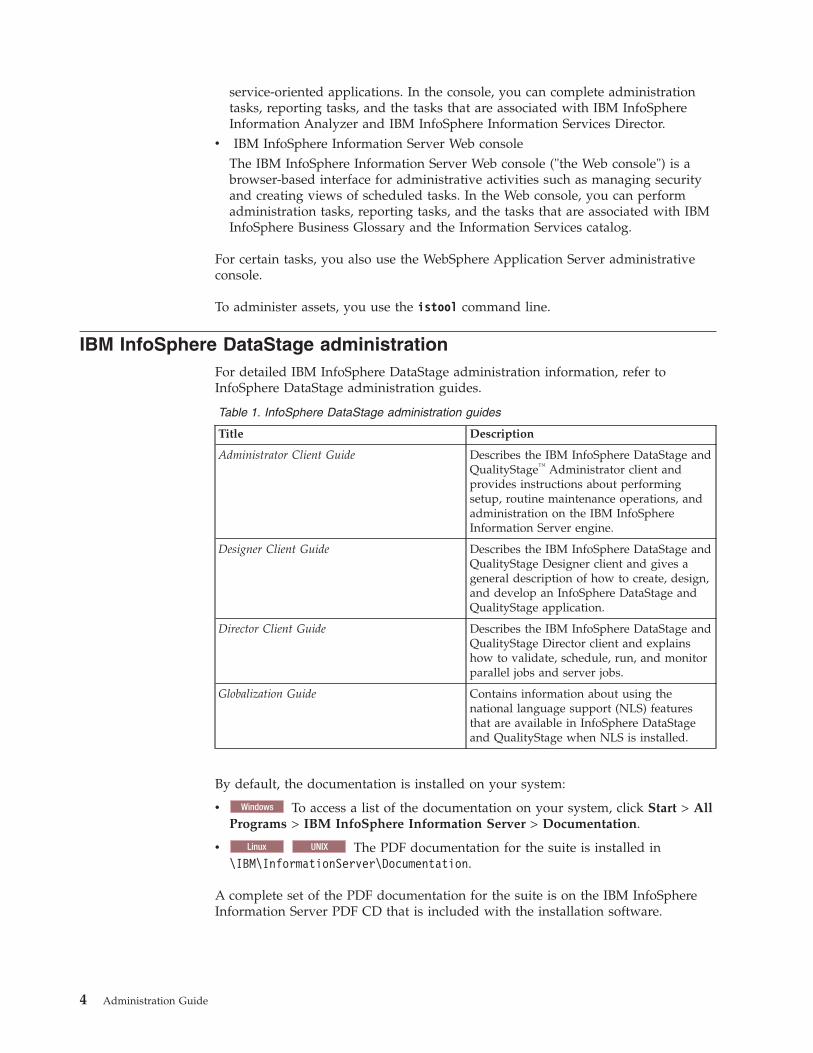
IBM InfoSphere DataStage administrationFor detailed IBM InfoSphere DataStage administration information, refer toInfoSphere DataStage administration guides.
Table 1. InfoSphere DataStage administration guides
Title Description
Administrator Client Guide Describes the IBM InfoSphere DataStage andQualityStage™ Administrator client andprovides instructions about performingsetup, routine maintenance operations, andadministration on the IBM InfoSphereInformation Server engine.
Designer Client Guide Describes the IBM InfoSphere DataStage andQualityStage Designer client and gives ageneral description of how to create, design,and develop an InfoSphere DataStage andQualityStage application.
Director Client Guide Describes the IBM InfoSphere DataStage andQualityStage Director client and explainshow to validate, schedule, run, and monitorparallel jobs and server jobs.
Globalization Guide Contains information about using thenational language support (NLS) featuresthat are available in InfoSphere DataStageand QualityStage when NLS is installed.
By default, the documentation is installed on your system:
v Windows To access a list of the documentation on your system, click Start > AllPrograms > IBM InfoSphere Information Server > Documentation.
v Linux UNIX The PDF documentation for the suite is installed in\IBM\InformationServer\Documentation.
A complete set of the PDF documentation for the suite is on the IBM InfoSphereInformation Server PDF CD that is included with the installation software.
4 Administration Guide

IBM WebSphere Application Server administrationWhile you can perform most administration tasks in the IBM InfoSphereInformation Server console or IBM InfoSphere Information Server Web console,you might need to change the user registry configuration, troubleshoot theapplication, tune the performance, and perform other configuration tasks directlyin IBM WebSphere Application Server.
You can find information about WebSphere Application Server at the followinglocations:v Version 6.1: publib.boulder.ibm.com/infocenter/wasinfo/v6r1/index.jspv Version 7.0: publib.boulder.ibm.com/infocenter/wasinfo/v7r0/index.jsp
For detailed WebSphere Application Server administration information, refer to thefollowing administration topics.
Table 2. WebSphere Application Server administration topics
Task Link
Configuring WebSphere Application Serveruser registries
Version 6.1: publib.boulder.ibm.com/infocenter/wasinfo/v6r1/topic/com.ibm.websphere.base.doc/info/aes/ae/tsec_useregistry.html
Version 7.0: publib.boulder.ibm.com/infocenter/wasinfo/v7r0/topic/com.ibm.websphere.base.doc/info/aes/ae/tsec_useregistry.html
WebSphere Application Server troubleshooting Version 6.1: publib.boulder.ibm.com/infocenter/wasinfo/v6r1/topic/com.ibm.websphere.base.doc/info/aes/ae/welc6toptroubleshooting.html
Version 7.0: publib.boulder.ibm.com/infocenter/wasinfo/v7r0/topic/com.ibm.websphere.base.doc/info/aes/ae/welc6toptroubleshooting.html
WebSphere Application Server log files Version 6.1: publib.boulder.ibm.com/infocenter/wasinfo/v6r1/topic/com.ibm.websphere.base.doc/info/aes/ae/ttrb_mglogs.html
Version 7.0: publib.boulder.ibm.com/infocenter/wasinfo/v7r0/topic/com.ibm.websphere.base.doc/info/aes/ae/ttrb_mglogs.html
Performance tuning Version 6.1: publib.boulder.ibm.com/infocenter/wasinfo/v6r1/topic/com.ibm.websphere.base.doc/info/aes/ae/tprf_tuneprf.html
Version 7.0: publib.boulder.ibm.com/infocenter/wasinfo/v7r0/topic/com.ibm.websphere.base.doc/info/aes/ae/tprf_tuneprf.html
Configuring bidirectional language support forIBM InfoSphere Business Glossary
See the topic about bidirectional languagesupport in the IBM InfoSphere BusinessGlossary Administrator's and Author's Guide
Chapter 1. Overview 5

6 Administration Guide

Chapter 2. Opening the consoles
To administer IBM InfoSphere Information Server, you can use the IBM InfoSphereInformation Server console, IBM InfoSphere Information Server Web console, andthe IBM WebSphere Application Server administrative console.
Opening the IBM InfoSphere Information Server consoleTo set up security, manage projects, analyze data, enable information services, orrun reports, use the IBM InfoSphere Information Server console. The console is arich-client-based interface.
About this task
Use the console for the following administrative activities:v Create and manage projects.v Set project-level security.v Analyze data with IBM InfoSphere Information Analyzer.v Enable information services with IBM InfoSphere Information Services Director.v Run reports.
Procedure1. From the Microsoft Windows start menu, select Start > All Programs > IBM
InfoSphere Information Server > IBM InfoSphere Information ServerConsole.
2. In the User Name field, type your user name.3. In the Password field, type your password.4. In the Server menu, type or select a host name and port. The host name and
port depend on whether WebSphere Application Server clustering is set up foryour services tier configuration and whether secure HTTP (HTTPS) is set up.
Table 3. Host and port values for different configurations
IBM WebSphereApplication Serverconfiguration Host value
Port value (HTTPprotocol)
Port value (HTTPSprotocol)
WebSphereApplication Serverclustering is set up
The host name or IPaddress of thefront-end dispatcher(either the Webserver or the loadbalancer). Do not usethe host name of aparticular clustermember.
HTTP port of thefront-end dispatcher(for example, 80). Donot use the portnumber of aparticular clustermember.
HTTPS secure port ofthe front-enddispatcher (forexample, 443). Do notuse the port numberof a particular clustermember.
Clustering is not setup
The host name or IPaddress of thecomputer whereWebSphereApplication Server isinstalled.
HTTP transport port(configured asWC_defaulthost inWebSphereApplication Server).Default: 9080
HTTPS transportsecure port(configured asWC_defaulthost_secure in WebSphereApplication Server).Default: 9443
© Copyright IBM Corp. 2007, 2011 7
5. Click Login.
Opening the IBM InfoSphere Information Server web consoleTo manage security, view scheduled tasks, work with reports, or perform tasks thatare related to IBM InfoSphere Business Glossary or the Information Servicescatalog, use the InfoSphere Information Server Web console.
Use the web console for the following administrative activities:v Managing security.v Creating views of scheduled tasks.v Reporting.v Tasks that are associated with IBM InfoSphere Business Glossary.v Tasks that are associated with the Information Services catalog.
To access the web console, determine the URL to use, configure your browser, andnavigate to the console window.
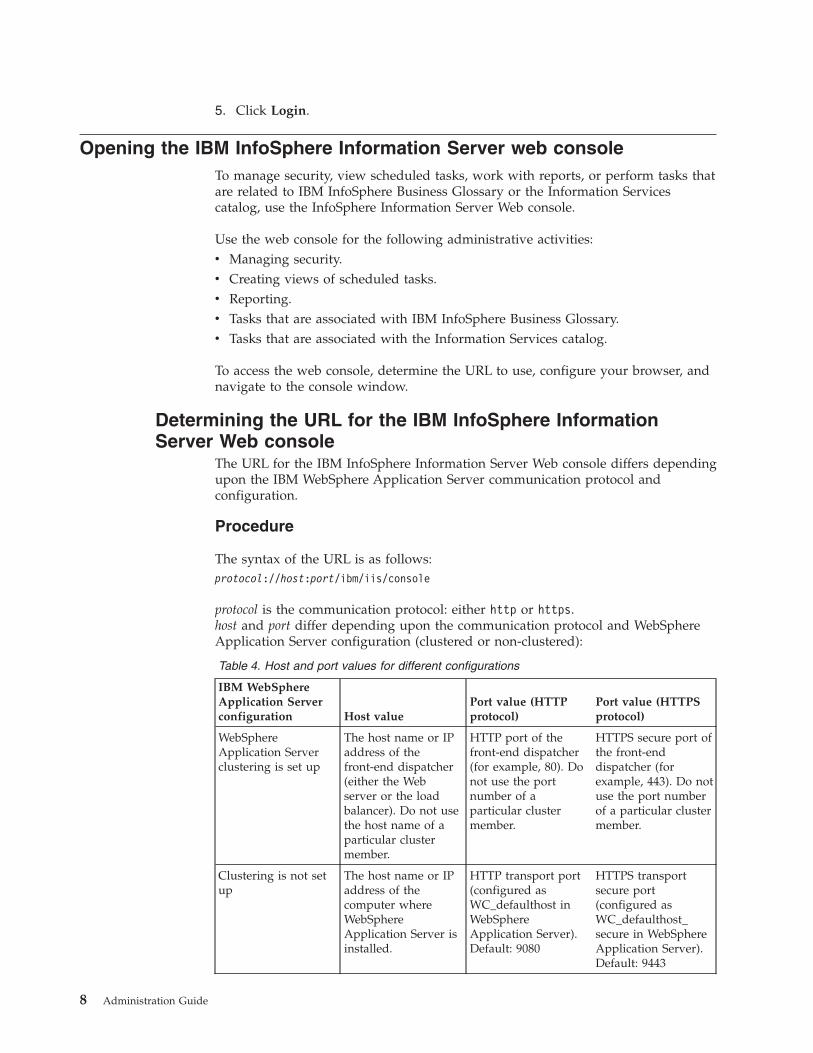
Determining the URL for the IBM InfoSphere InformationServer Web console
The URL for the IBM InfoSphere Information Server Web console differs dependingupon the IBM WebSphere Application Server communication protocol andconfiguration.
Procedure
The syntax of the URL is as follows:protocol://host:port/ibm/iis/console
protocol is the communication protocol: either http or https.host and port differ depending upon the communication protocol and WebSphereApplication Server configuration (clustered or non-clustered):
Table 4. Host and port values for different configurations
IBM WebSphereApplication Serverconfiguration Host value
Port value (HTTPprotocol)
Port value (HTTPSprotocol)
WebSphereApplication Serverclustering is set up
The host name or IPaddress of thefront-end dispatcher(either the Webserver or the loadbalancer). Do not usethe host name of aparticular clustermember.
HTTP port of thefront-end dispatcher(for example, 80). Donot use the portnumber of aparticular clustermember.
HTTPS secure port ofthe front-enddispatcher (forexample, 443). Do notuse the port numberof a particular clustermember.
Clustering is not setup
The host name or IPaddress of thecomputer whereWebSphereApplication Server isinstalled.
HTTP transport port(configured asWC_defaulthost inWebSphereApplication Server).Default: 9080
HTTPS transportsecure port(configured asWC_defaulthost_secure in WebSphereApplication Server).Default: 9443
8 Administration Guide

For example, in a configuration where clustering is not set up, the HTTPS URLmight be:https://myhost.example.com:9443/ibm/iis/console
Configuring your Web browser to work with the IBMInfoSphere Information Server Web console
The IBM InfoSphere Information Server Web console is supported with bothMicrosoft Internet Explorer and Mozilla Firefox. You must do these steps in yourpreferred Web browser before you use the IBM InfoSphere Information Server Webconsole.
Before you beginv Make sure that your browser is supported by InfoSphere Information Server. For
information about supported browsers, see the InfoSphere Information Serversystem requirements at www.ibm.com/software/data/integration/info_server/overview/requirements.html.
v Determine the URL to use to access the web console. See “Determining the URLfor the IBM InfoSphere Information Server Web console” on page 8. The hostname and port differ depending upon the IBM WebSphere Application Servercommunication protocol and configuration in use.
v If HTTPS is enabled, then the first time that you access the Web console, amessage about a security certificate is displayed if the certificate from the serveris not trusted. If you receive such a message, follow the browser prompts toaccept the certificate and proceed to the login page.
Configuring Microsoft Internet Explorer 6.0 and 7.0 to work withthe IBM InfoSphere Information Server Web consoleYou can enable Microsoft Internet Explorer to work with the IBM InfoSphereInformation Server Web console.
Procedure1. Enable JavaScript:
a. Click Tools > Internet Options. On the Security tab, click Custom Level.b. In the Settings window, select Scripting > Active Scripting > Enable.
2. Set the browser to accept cookies for the InfoSphere Information Server hostsite.a. Click Tools > Internet Options.b. On the Privacy tab, click Sites.c. In the Address of Web site field, enter the InfoSphere Information Server
host name.d. Click Allow.e. Click OK.
3. Enable pop-up windows for the URL of the IBM InfoSphere Information ServerWeb console:a. Click Tools > Pop-up Blocker > Pop-up Blocker Settings or turn off the
pop-up window blocker.b. If you selected the settings, type the URL and click Add.
Note: To enable pop-up windows for the site, you might also need to disableor configure pop-up blockers.
Chapter 2. Opening the consoles 9
4. Specify that the pages are refreshed every time you visit the site:a. Click Tools > Internet Options and on the General tab, click Settings. In
Microsoft Internet Explorer version 6, select Settings in the TemporaryInternet files section. In Microsoft Internet Explorer version 7, selectSettings in the Browsing history section.
b. Select Every time I visit to the webpage or Automatically and click OK.5. Optional: Disable the display of friendly HTTP error messages:
a. Click Tools > Internet Options.b. On the Advanced tab, clear Browsing > Show friendly HTTP error
messages.
Configuring Internet Explorer to work with the IBM InfoSphereInformation Server Web console on Microsoft Windows Server2003In Microsoft Windows Server 2003, you might need to add the InfoSphereInformation Server web console URL to the trusted sites zones in Internet Explorer.
About this task
If you are browsing to an IBM InfoSphere Information Server Web console byusing its host name, such as http://hostname:9080/ibm/iis/console, you must addthe URL (http://hostname) to the trusted site zones in Internet Explorer.
You do not have to add the URL to the trusted sites zones if your client computeris also your server and you are browsing to the server by using the URLhttp://localhost:9080/ibm/iis/console, or if you are using Mozilla Firefox.
Procedure1. In Microsoft Internet Explorer, choose Tools > Internet Options.2. In the Security tab, select the Trusted Sites zone.3. Click Sites.4. In the Trusted Sites window, enter the URL and click Add.
Configuring Mozilla Firefox to work with the IBM InfoSphereInformation Server Web consoleYou can configure Mozilla Firefox to work with the IBM InfoSphere InformationServer Web console.
Procedure1. Enable JavaScript:
a. Click Tools > Options, and on the Content tab, click Enable JavaScript.2. Set the browser to accept cookies for the InfoSphere Information Server host
site.a. Click Tools > Options.b. On the Privacy tab, click the Accept cookies from sites option or click
Exceptions and add the site to the allowed site list by entering the hostname and clicking Allow.
3. Enable pop-up windows for the URL of the web console:a. Click Tools > Options.b. Select the Contents tab and either clear the Block pop-up windows option
or click Exceptions and add the site to the allowed list by entering the hostname and clicking Allow.
10 Administration Guide

Viewing report results in a Web browserSet additional security options to ensure that report results open correctly inMicrosoft Internet Explorer.
Procedure1. In the Internet Explorer toolbar, click Tools > Internet Options.2. On the Security tab, click Internet.3. On the Security tab, click Custom Level.4. In the Security Settings dialog box, scroll to Automatic prompting for file
downloads under Downloads and select Enable.5. Click OK.6. Click OK.
Navigating to the IBM InfoSphere Information Server Webconsole
The IBM InfoSphere Information Server Web console ("the web console") is abrowser-based interface for administrative activities.
Before you beginv Make sure that your browser is supported by IBM InfoSphere Information
Server. For information about supported browsers, see the InfoSphereInformation Server system requirements at www.ibm.com/software/data/integration/info_server/overview/requirements.html.
v Determine the URL to use to access the web console. See “Determining the URLfor the IBM InfoSphere Information Server Web console” on page 8.
v Configure your browser as described in “Configuring your Web browser to workwith the IBM InfoSphere Information Server Web console” on page 9.
Procedure1. Open a web browser, and navigate to the console. The URL to use depends
upon the IBM WebSphere Application Server communication protocol andconfiguration in use. See “Determining the URL for the IBM InfoSphereInformation Server Web console” on page 8.
2. If HTTPS is enabled, then the first time that you access the web console, amessage about a security certificate is displayed if the certificate from theserver is not trusted. Follow the browser prompts to accept the certificate andproceed to the login page.
3. Type your user name and password.4. Click OK to open the Home tab.
Logging in to the IBM WebSphere Application Server administrativeconsole
Because IBM InfoSphere Information Server server-side processes run onWebSphere Application Server, you do certain administrative tasks by using theWebSphere Application Server administrative console.
Chapter 2. Opening the consoles 11
Before you begin
To perform various tasks in the WebSphere Application Server administrativeconsole, you must have sufficient authority. The authority level that you requirediffers from task to task.
Procedure1. Open a Web browser, and navigate to the WebSphere Application Server
administrative console. The URL is in the following form:https://hostname:port/ibm/console
Specify hostname and port in the following manner:v If WebSphere Application Server clustering is set up for your services tier
configuration, specify the host name (or IP address) and port of the computerthat hosts the Deployment Manager. The default port number is 9043.
v If clustering is not set up, specify the host name or IP address of thecomputer where WebSphere Application Server is installed. Specify the portnumber that is assigned to the WebSphere Application Server administrativeconsole. The default port number is 9043.
2. Log in to the WebSphere Application Server administrative console.
12 Administration Guide
Chapter 3. IBM InfoSphere Information Server consoleoverview
The IBM InfoSphere Information Server console is a rich-client-based interface foractivities such as creating and managing projects, setting project-level security,analyzing data with IBM InfoSphere Information Analyzer, enabling informationservices with IBM InfoSphere Information Services Director, and running reports.
From the IBM InfoSphere Information Server console, you can complete thefollowing tasks:v Create a projectv Set up project-level securityv Analyze information
– Columns– Primary keys and foreign keys– Across multiple data sources
v Enable information services– Connect to providers– Develop projects, applications, services, and operations– Deploy services
v Run reportsv Create views of scheduled tasks and logged messagesv Troubleshoot jobs
Main areas of the consoleThe IBM InfoSphere Information Server console provides workspaces that you useto investigate data, deploy applications and Web services, and monitor schedulesand logs.
In the following topics, both IBM InfoSphere Information Analyzer and IBMInfoSphere Information Services Director were installed. Some features might notbe available if you have only one product module installed.
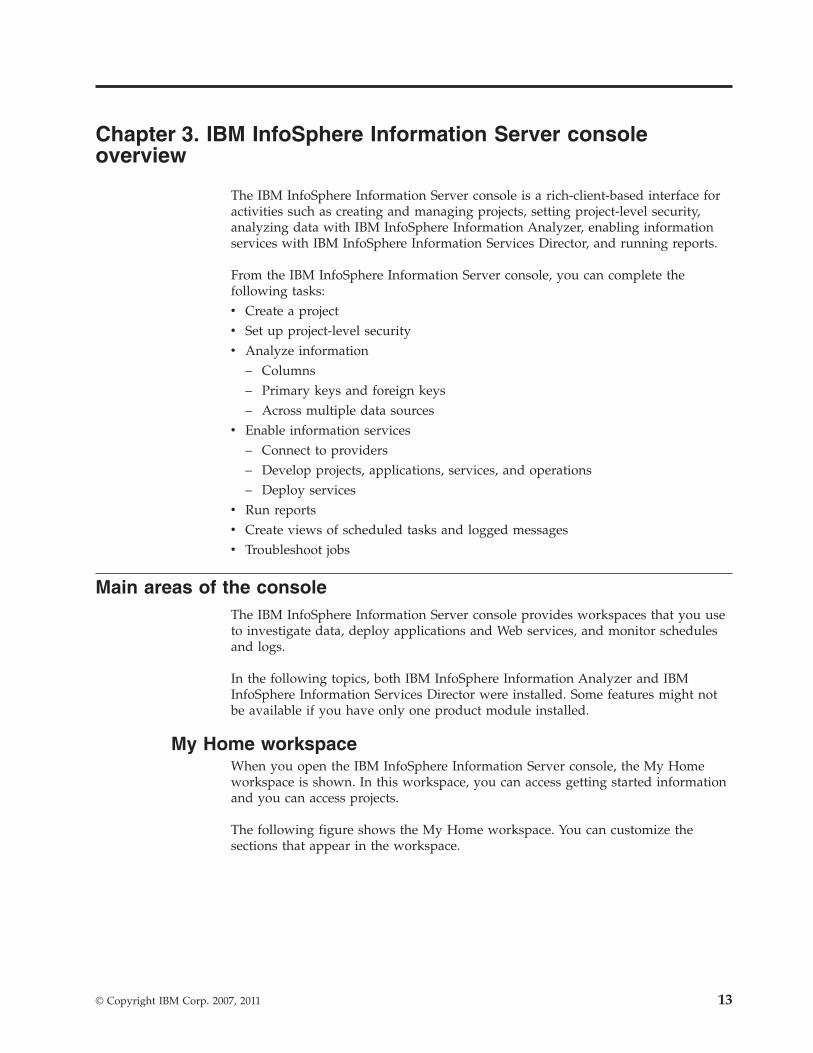
My Home workspaceWhen you open the IBM InfoSphere Information Server console, the My Homeworkspace is shown. In this workspace, you can access getting started informationand you can access projects.
The following figure shows the My Home workspace. You can customize thesections that appear in the workspace.
© Copyright IBM Corp. 2007, 2011 13
This workspace contains the following sections:
Getting Started pane
The Getting Started pane describes how to work in a product module, such as howto work in IBM InfoSphere Information Analyzer. The information that is displayedcorresponds to the product modules that you have installed.
Figure 1. The My Home workspace in the IBM InfoSphere Information Server console
14 Administration Guide

Many topics in the Getting Started pane have a link that opens the related task anda link that opens the information center for more information (the "Learn more"link).
Projects pane
In the Projects pane, you can select a project to open. Multiple users can contributeto and work on a project in the console. This pane shows a list of all of the projectsthat you have access to.
If you select an InfoSphere Information Analyzer project from the Projects pane,you can see the status of that project in the project details section.
Workspace NavigatorThe primary means of navigating through the workspaces is the WorkspaceNavigator. The Workspace Navigator is a series of menus that you use to movethrough workspaces.
The Workspace Navigator consists of five navigation menus. Each navigation menucontains links to workspaces that you use to complete tasks. The workspaces thatare available depend on the product module that you are working in. Somenavigation menus might be empty if a particular component has not been installed.
Each workspace corresponds to a navigation menu. For example, if you open theproject properties workspace, the Overview navigation menu is highlighted. You
Figure 2. The Getting Started pane
Figure 3. The Projects pane
Chapter 3. IBM InfoSphere Information Server console overview 15
can view all open workspaces that are associated with the current navigation menuthat is selected. You cannot view any open workspaces that are associated with anavigation menu that is not selected.
When you select a link and open a workspace, the number on the navigation menuindicates how many workspaces are open per menu. For example, if the dashboardworkspace and the project properties workspace are open, the number 2 isdisplayed on the Overview navigation menu.
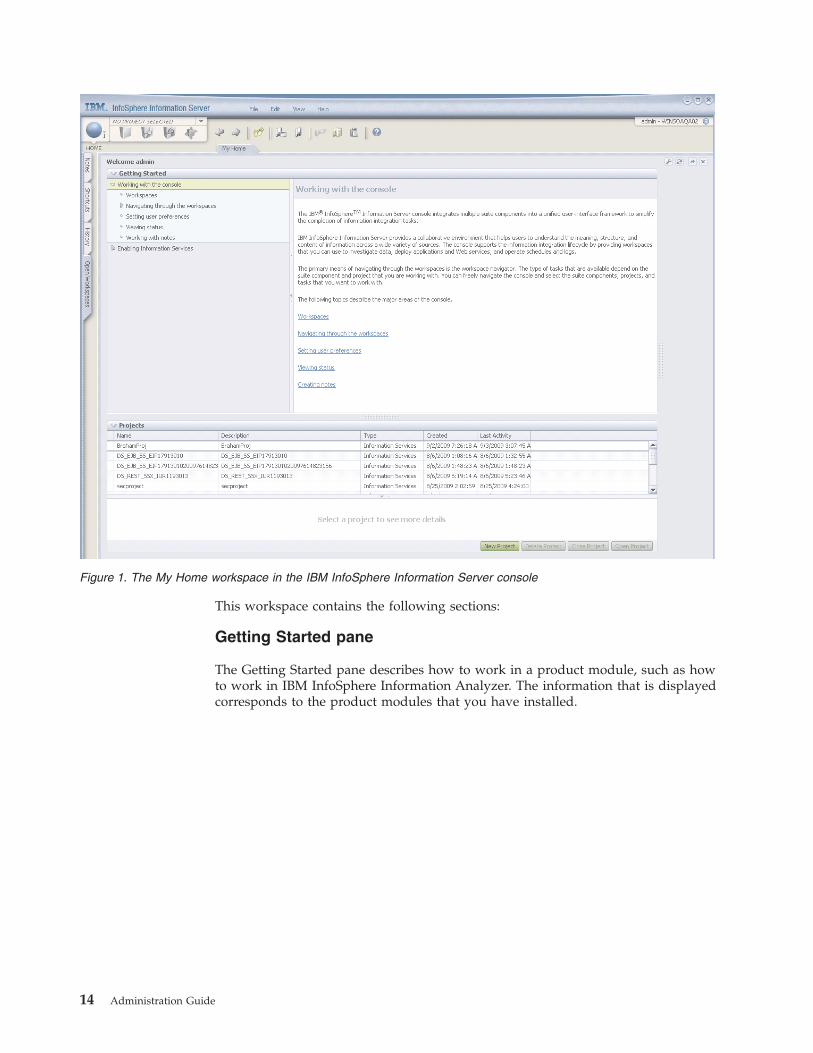
The types of tasks that are available depend on the product module and projectthat you are working with. The following list describes the type of tasks that areavailable in each of the menus.
Home navigation menuContains configuration and metadata tasks. For example, if you have IBMInfoSphere Information Services Director installed, you can set upconnections to available information providers in the Information ServicesConnection workspace.
Overview navigation menuContains the project dashboard and Project Properties workspace. Forexample, you specify project details in the Project Properties workspace.
Investigate navigation menuContains information discovery and data profiling tasks. For example, ifyou have IBM InfoSphere Information Analyzer installed, you can run acolumn analysis job in the Column Analysis workspace.
Develop navigation menuContains data transformation and information services enablement tasks.For example, if you have InfoSphere Information Services Directorinstalled, you design, create, and develop applications in the InformationServices Application workspace.
Operate navigation menuContains job scheduling tasks, logging tasks, and information servicesapplication tasks. For example, you create views of logged messages in theLog View workspace.
Project menuAbove the Workspace Navigator, you can access the project menu to open aproject, move between open projects, and create projects.
Figure 4. The Workspace Navigator on the IBM InfoSphere Information Server console toolbar
16 Administration Guide
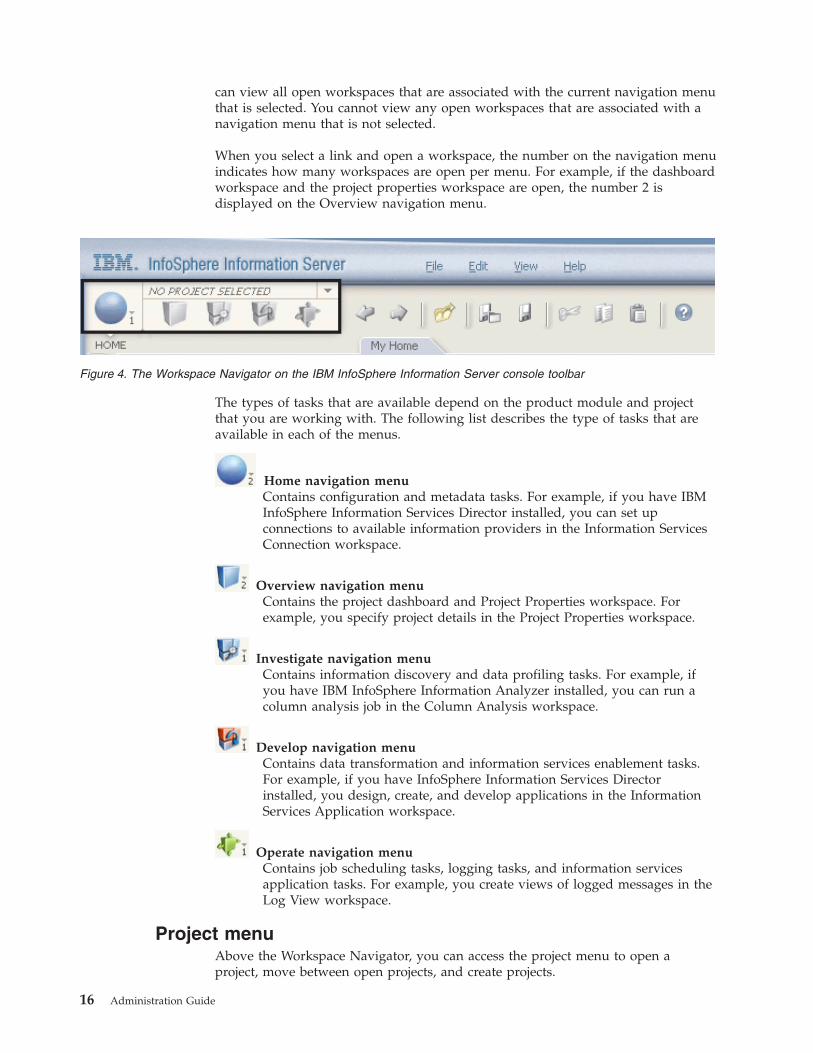
To open the project menu, click the drop-down menu.
You can perform configuration and administrative tasks, such as logging,scheduling, and reporting, outside of the context of a project in the console.
To perform product module tasks, such as information analysis or servicesenablement, you must first open a project. A project is a logical container for all ofthe tasks that can be performed in a product module.
PalettesYou can use the palettes to view a history of your activities and to openworkspaces, access shortcuts, and manage notes. You can dock, float, or anchor thepalettes. By default, the palettes are located on the left side of the console.
To open the palettes, click one of the tabs.
Figure 5. The Project menu above the Workspace Navigator
Chapter 3. IBM InfoSphere Information Server console overview 17
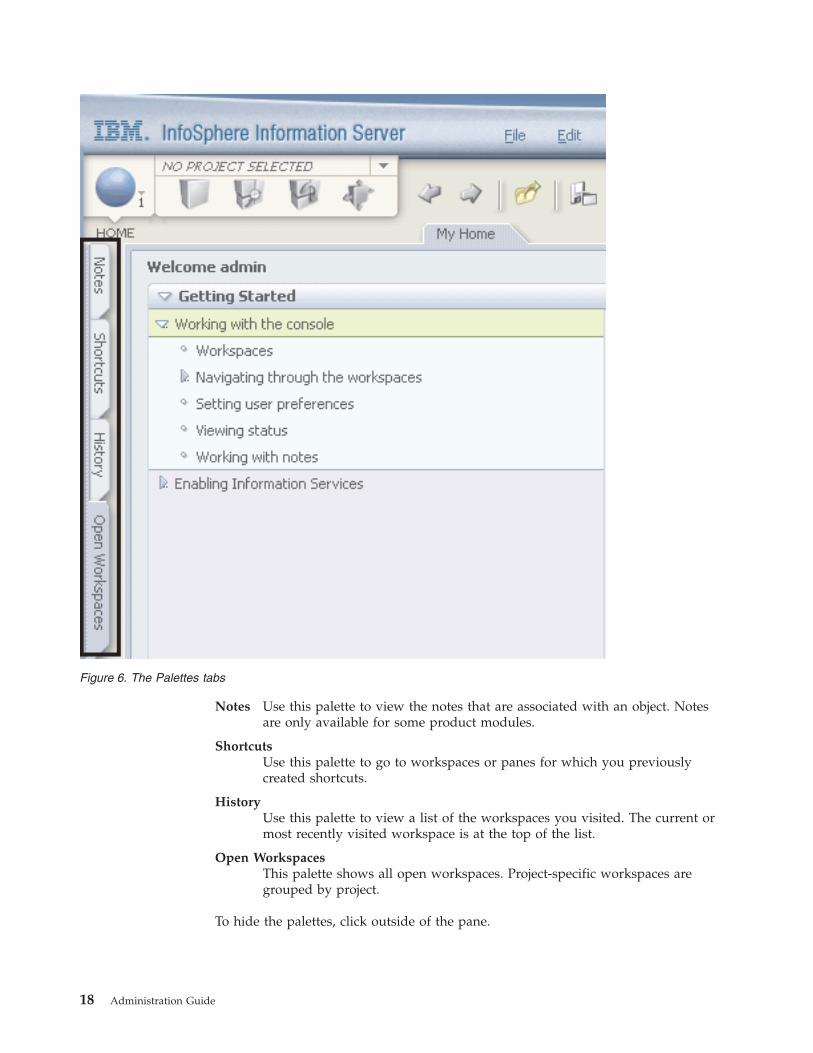
Notes Use this palette to view the notes that are associated with an object. Notesare only available for some product modules.
ShortcutsUse this palette to go to workspaces or panes for which you previouslycreated shortcuts.
HistoryUse this palette to view a list of the workspaces you visited. The current ormost recently visited workspace is at the top of the list.
Open WorkspacesThis palette shows all open workspaces. Project-specific workspaces aregrouped by project.
To hide the palettes, click outside of the pane.
Figure 6. The Palettes tabs
18 Administration Guide
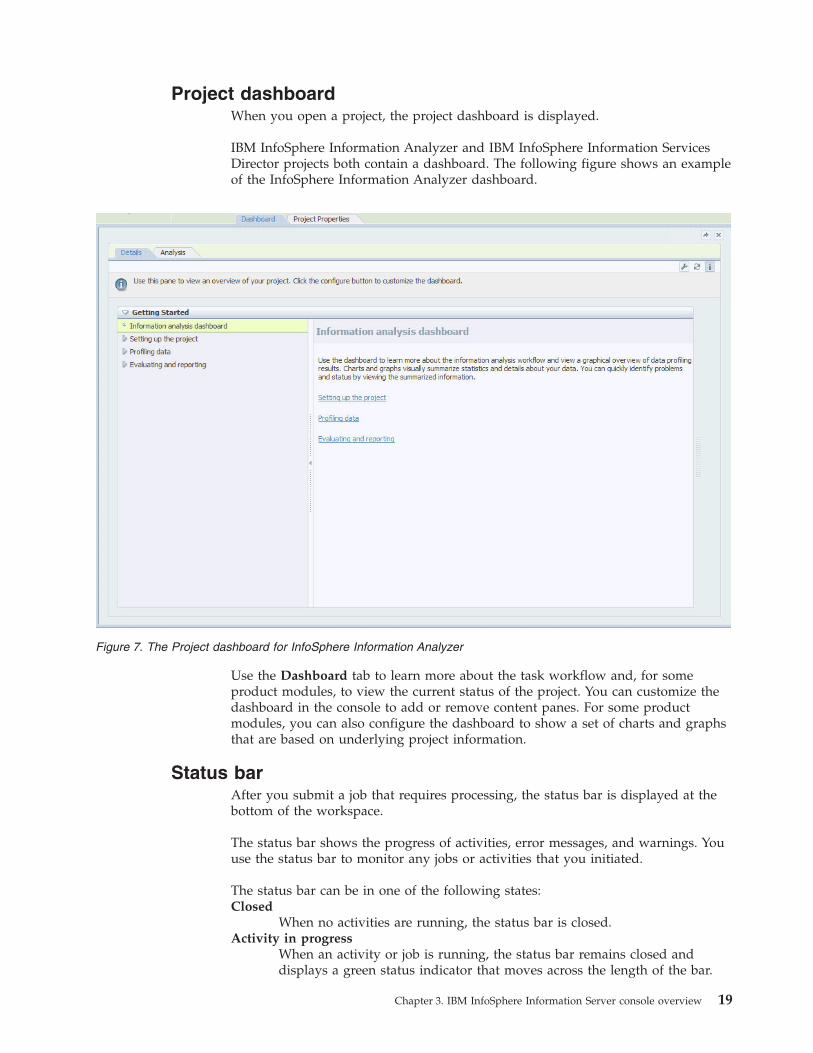
Project dashboardWhen you open a project, the project dashboard is displayed.
IBM InfoSphere Information Analyzer and IBM InfoSphere Information ServicesDirector projects both contain a dashboard. The following figure shows an exampleof the InfoSphere Information Analyzer dashboard.
Use the Dashboard tab to learn more about the task workflow and, for someproduct modules, to view the current status of the project. You can customize thedashboard in the console to add or remove content panes. For some productmodules, you can also configure the dashboard to show a set of charts and graphsthat are based on underlying project information.
Status barAfter you submit a job that requires processing, the status bar is displayed at thebottom of the workspace.
The status bar shows the progress of activities, error messages, and warnings. Youuse the status bar to monitor any jobs or activities that you initiated.
The status bar can be in one of the following states:Closed
When no activities are running, the status bar is closed.Activity in progress
When an activity or job is running, the status bar remains closed anddisplays a green status indicator that moves across the length of the bar.
Figure 7. The Project dashboard for InfoSphere Information Analyzer
Chapter 3. IBM InfoSphere Information Server console overview 19

NotificationWhen you initiate an activity or when an activity is completed, the statusbar opens briefly and shows details about the status of the activity. Whenan activity is running, you can view more information about the status ofthe activity by rolling your cursor over the status bar to open the statuspane. The status pane contains a larger progress bar, summary informationabout the activity, and a Details button. You can roll over the status bar atany time to view the status of the jobs or activities that you initiated.
DetailsTo view information about the status of an activity, click the Details buttonin the status pane. You can view details such as the time that the activitystarted running and whether there are any system warnings or errors. TheDetails state lists all the activities and jobs that you initiated.
ShortcutsTo quickly return to a task at a later time, you can create a shortcut.
To create a shortcut to the open task, click the Shortcut button .
After you create the shortcut, you can click the Shortcuts tab to return to the task.
NotesYou can use notes to comment on objects, provide information to other users, andidentify issues for further investigation. Notes are available depending on the suitecomponent that you are working in.
You can create or view notes by using the notes palette or clicking on a note icon.Note icons are located at the top of task panes.
Basic task flow in the workspacesEven though you perform different types of tasks in an IBM InfoSphereInformation Analyzer project and an IBM InfoSphere Information Services Directorproject, the basic task flow is the same.
The following topics describe the basic task flow in the workspaces. This exampleshows the task flow in the context of creating a column analysis job with
Figure 8. The Shortcuts tab
20 Administration Guide
InfoSphere Information Analyzer. The types of tasks and options that are availablewill vary between InfoSphere Information Analyzer projects and InfoSphereInformation Services Director projects.
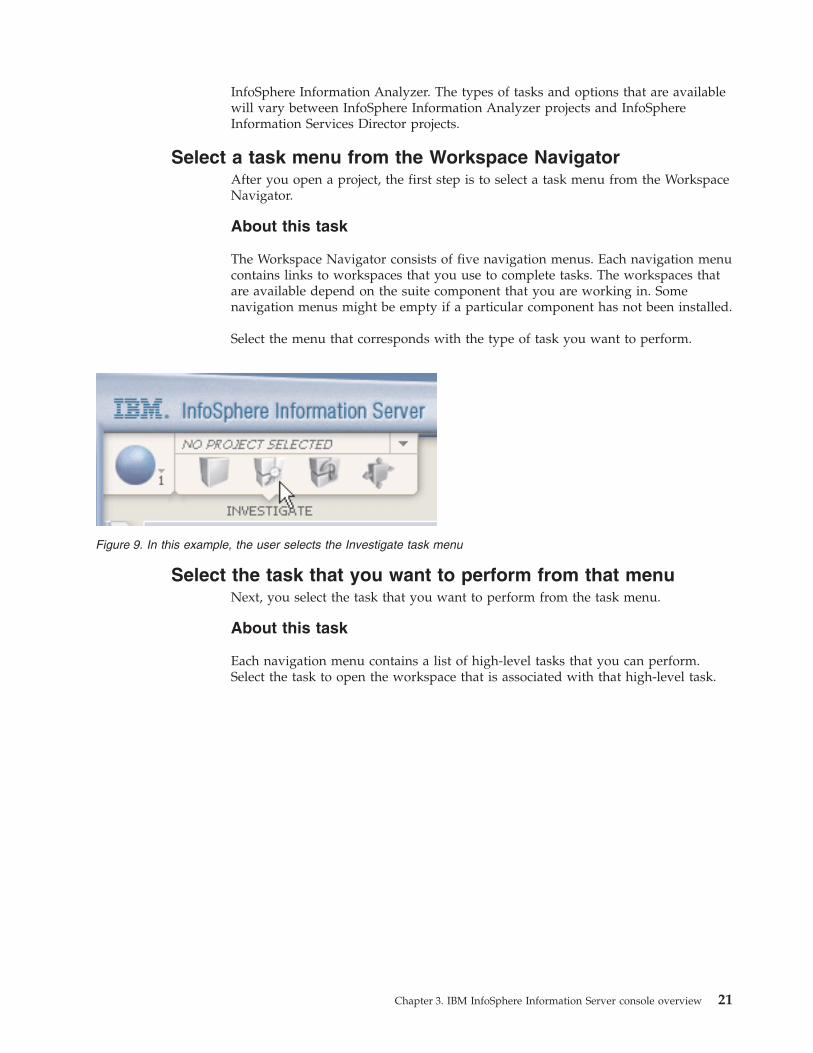
Select a task menu from the Workspace NavigatorAfter you open a project, the first step is to select a task menu from the WorkspaceNavigator.
About this task
The Workspace Navigator consists of five navigation menus. Each navigation menucontains links to workspaces that you use to complete tasks. The workspaces thatare available depend on the suite component that you are working in. Somenavigation menus might be empty if a particular component has not been installed.
Select the menu that corresponds with the type of task you want to perform.
Select the task that you want to perform from that menuNext, you select the task that you want to perform from the task menu.
About this task
Each navigation menu contains a list of high-level tasks that you can perform.Select the task to open the workspace that is associated with that high-level task.
Figure 9. In this example, the user selects the Investigate task menu
Chapter 3. IBM InfoSphere Information Server console overview 21

Select objects and a task in the workspaceIn the workspace, you select an item to work with from the objects lists and thenselect a task to perform from the Tasks list.
About this task
The object list contains the items that you perform the tasks on, such as datasources, applications and services, or log views. The object list can also containsstatus information, such as the completion of analysis or the creation date of a logview.
The Tasks list contains the tasks that you can perform on the selected objects.
Select an object to work with in the objects list, as shown in the following figure.
Figure 10. In this example, the user selects Column Analysis to open the Column Analysis workspace
Figure 11. Example of data sources selected in the Column Analysis workspace's object list
22 Administration Guide
And then, select the task that you want to perform from the Tasks list.
Tasks might be unavailable if you have not yet selected an object, or if there is aprerequisite task.
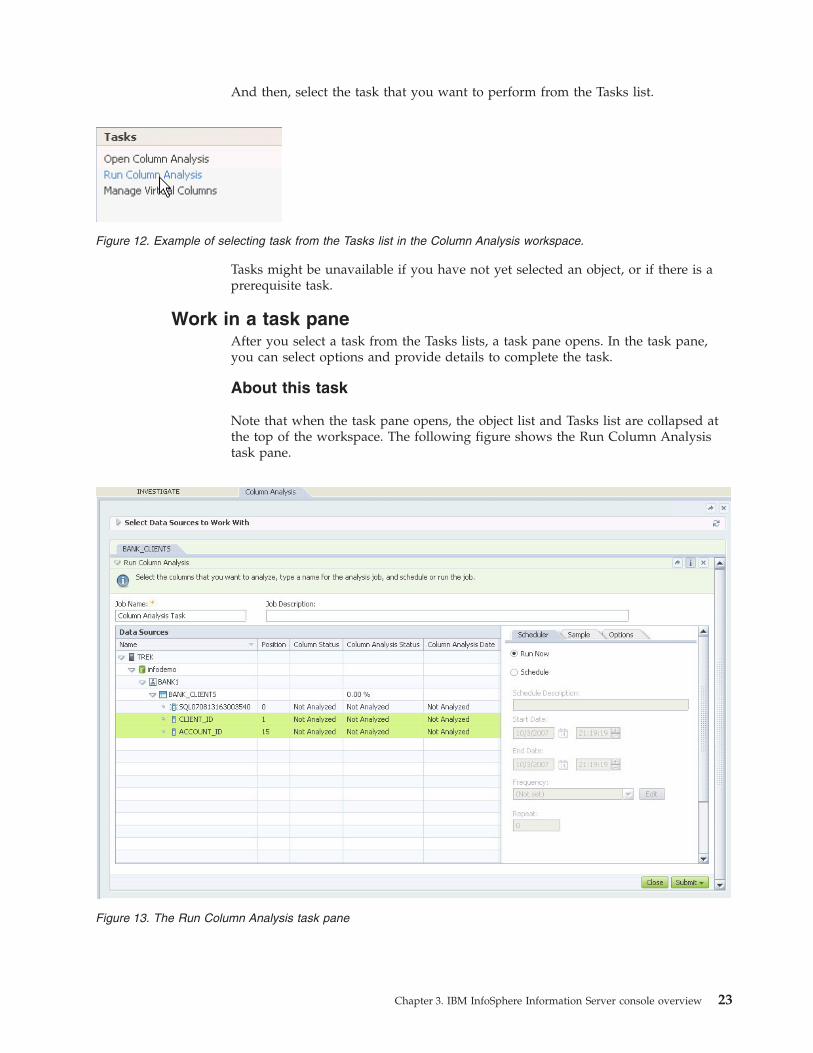
Work in a task paneAfter you select a task from the Tasks lists, a task pane opens. In the task pane,you can select options and provide details to complete the task.
About this task
Note that when the task pane opens, the object list and Tasks list are collapsed atthe top of the workspace. The following figure shows the Run Column Analysistask pane.
Figure 12. Example of selecting task from the Tasks list in the Column Analysis workspace.
Figure 13. The Run Column Analysis task pane
Chapter 3. IBM InfoSphere Information Server console overview 23
The content of each task pane differs. Many task panes require that you selectoptions and provide additional details. You can also schedule certain tasks to runat specified times or intervals. The asterisk (*) indicates a required field.
When you have completed the task, click Save or Submit.
After you submit a job that requires processing, the status bar is displayed at thebottom of the workspace.
Reporting, scheduling, and logging in the consoleThe IBM InfoSphere Information Server console also gives you access to commonadministrative tasks, such as reporting, scheduling, and logging.
ReportingYou can use the reports workspace to create, edit, or view a report. A report showsthe details of an activity that has been completed in the suite.
To create a report, you select a report template and then specify the project thatyou want to associate with the report. You then type parameters for the report andchoose the format that you want the report to be created in such as PDF, XML, orDHTML. The report templates that are available correspond to the components inthe suite.
To edit a report, you select the report that you want to modify and then create acopy of it. You make any changes in the copy.
Reports can be saved in the metadata repository and can be accessed by you or byother authorized users. You or other users can use the information in the reports tocomplete other tasks in the product modules.
You can also use the reports workspace to view saved reports that were generatedin the suite and to select certain reports as your favorites. To find a report, you canfilter the list of available reports by the names of the projects that they areassociated with or by the dates on which the reports were created. If you select areport as a favorite, the report is accessible in the report favorites pane in the MyHome workspace.
SchedulingYou create schedule views to query the schedules that you created elsewhere in thesuite.
You create a schedule to define when an activity will run in the suite componentthat you are working in. A schedule contains details about when the activity willrun, such as a specific time or day. Schedules can be configured to run at any timeor on any date that you specify. You can also configure schedules to run repeatedlyor at different intervals.
A schedule view shows information such as a list of available schedules in thesuite, a history of the scheduled tasks that have completed, and a forecast of the
Figure 14. Status bar showing the progress of the column analysis job
24 Administration Guide
schedules that will run at a specific time. You can create a query in multiple ways:by selecting the name of a schedule that you want to view, the user who createdthe schedule, the date on which the schedule will run, or the date on which theschedule was created or updated. You can also query schedules by the suitecomponent that they were created in. You can view only the schedules that youcreated. A suite administrator can view all schedules in the suite.
You can make a schedule view private to restrict users from accessing it. Scheduleviews that are marked as private are available only to the user who created them.If you want to make a schedule view available to all users, you can mark it asshared. A shared schedule view can only be edited by the user who created theschedule view or by the suite administrator.
LoggingYou can configure log views to manage the log messages that are generated whenactivities run in the suite.
You create log views to query log messages. Log messages show details about theactivities that run in the suite. After you create a log view, you use filters to restrictthe information in the log view. Only a suite administrator can delete logmessages. If you want to delete log messages, you select the log view that containsthe information that you want to remove.
You can restrict access to a log view by making the log view private. Private logviews are available only to the user who created the log view. If you want a logview to be available to all users, you can share the log view. Shared log views canbe edited only by the user who created the shared log view or by a suiteadministrator.
Online helpIf you need help when you are working on a task, press F1 to accesscontext-sensitive help, open the information center, or find specific informationabout the task in the instruction pane.
Context-sensitive help
When you need assistance while you work, press F1 to open context-sensitive help.For example, from the project properties workspace, press F1 to open the projectproperties documentation in the information center.
Information center
The information center is this Web-based help system and knowledge base, inwhich you can find conceptual and task-based information about the suite, theconsole, and the tasks that you can complete in the IBM InfoSphere InformationServer console. You can also access information about all the products that youhave installed.
Instruction panes
You can find information about the task in the instruction pane. An instructionpane button appears at the top of most panes and tabs. Most panes containinstructional text.
Chapter 3. IBM InfoSphere Information Server console overview 25
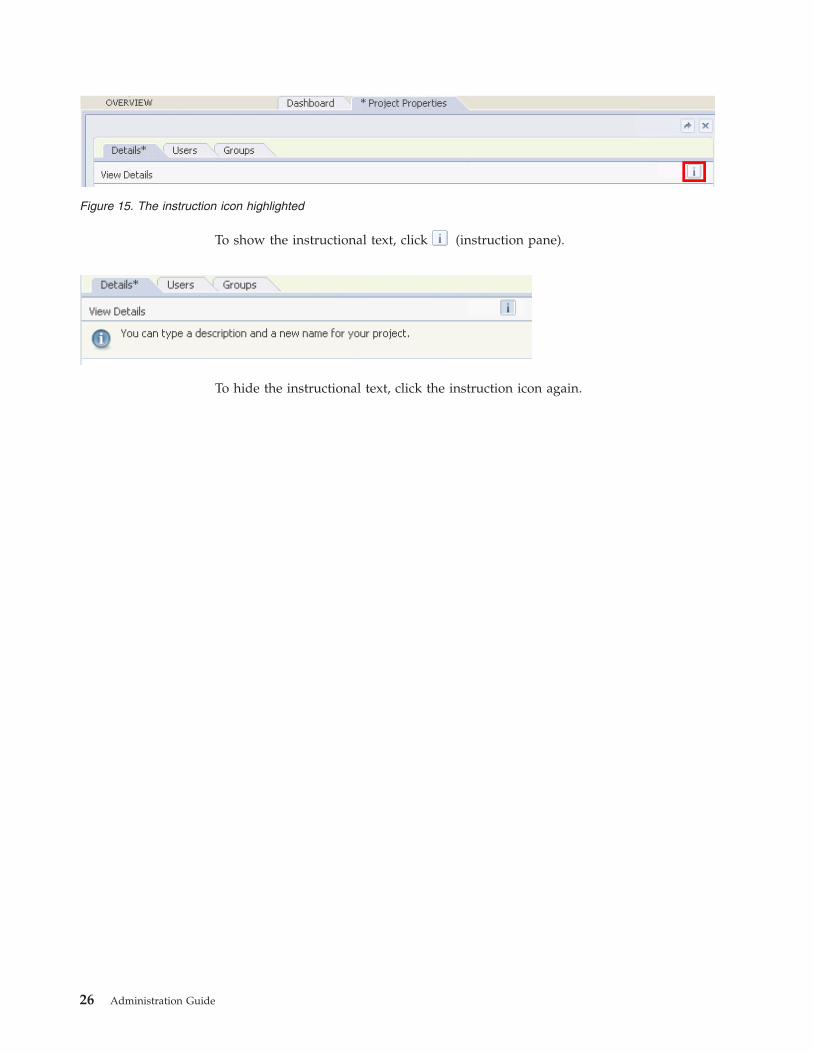
To show the instructional text, click (instruction pane).
To hide the instructional text, click the instruction icon again.
Figure 15. The instruction icon highlighted
26 Administration Guide
Chapter 4. Working with projects in the IBM InfoSphereInformation Server console
In the IBM InfoSphere Information Server console, a project is a logical containerfor all of the tasks that can be performed in a product module. Multiple users cancontribute to a project and view the status of a project over time.
Setting up a project in the IBM InfoSphere Information Server consoleTo set up a project, you first create a project and provide basic project details.
Creating a projectYou must first create a project. A project is a logical container for all of the tasksthat can be performed in a product module.
Before you begin
You must have permissions to create a project. If you do not, all project creationmenus and tasks are disabled.
Procedure1. On the File menu in the IBM InfoSphere Information Server console, select
New Project.2. In the New Project window, select the type of project that you want to create.
The Type field is displayed only if more than one product module is installed.3. Type a name for the project.4. Click OK to open the Project Properties workspace.
What to do nextv “Modifying project properties”v “Assigning users to a project and assigning roles” on page 71
Modifying project propertiesYou can view and modify the properties of your project.
Before you begin
You must have project administrator authority.
Procedure1. On the Overview navigator menu in the IBM InfoSphere Information Server
console, select Project Properties.2. Specify information about the project.3. Click Save All.
© Copyright IBM Corp. 2007, 2011 27

Customizing the project dashboardYou can customize the Dashboard workspace in the IBM InfoSphere InformationServer console to add or remove content panes. For some product modules, youcan also configure the dashboard to show a set of charts and graphs that are basedon underlying project information.
Procedure1. On the Overview navigator menu in the IBM InfoSphere Information Server
console, select Dashboard.
2. In the Dashboard workspace, click Configure3. Optional: Click Add to add content panes to the Content list. The available
content panes depend on the product modules that are installed.4. In the Configure Dashboard window, select the content pane that you want to
modify.5. For each content pane, you can modify the label of the pane and select whether
it is displayed on the workspace. Some content panes have additionalconfiguration properties.
6. Click OK to save your changes.
Opening an existing project in the IBM InfoSphere Information Serverconsole
You can open an existing project to perform tasks that are associated with theproject's product module, such as information analysis or information servicesenablement.
Before you begin
You or your administrator must create and set up a project.
Procedure1. In the Projects pane of the My Home workspace, select a project from the list.2. Click Open Project to open the Dashboard workspace.
28 Administration Guide
Chapter 5. Customizing the consoles
You can customize both the IBM InfoSphere Information Server console and theIBM InfoSphere Information Server Web console.
Customizing the IBM InfoSphere Information Server consoleThe IBM InfoSphere Information Server console integrates multiple productmodules into a unified user interface. To customize the IBM InfoSphereInformation Server console, you can set user preferences, create shortcuts, createnotes, and change your password.
Customizing the My Home workspaceYou can customize the My Home workspace to show or remove information in theGetting Started pane, project information, and favorite reports. You can also add orremove content panes for the product modules that are installed.
Procedure1. On the Home navigator menu, select My Home.
2. In the My Home workspace, click Configure
3. In the Configure My Home window, select the content pane that you want tomodify.
4. Optional: Click Add to add content panes to the Content list. The content panesthat are available depend on the product modules that are installed. Productmodule panes might have additional configurable details.
5. For each content pane, you can modify the label of the pane and specifywhether it is displayed on the My Home workspace.
6. Click OK to close the window.
Modifying user preferencesYou can modify user preferences for startup, to change the behavior of panes, andto customize the status bar.
Procedure1. Select Edit > Preferences.2. In the User Preferences window, select the type of preferences that you want to
modify.3. Modify the available options.4. Click OK to close the window and save your changes.
Creating shortcutsYou can create shortcuts to quickly access frequently used workspaces or tasks.
Procedure
1. On the workspace or task, click Add Shortcut .2. In the Add to Shortcuts window, type a name for the shortcut.
© Copyright IBM Corp. 2007, 2011 29
3. Optional: Click New Folder to create a folder to organize your shortcuts.4. Optional: Select a folder to add your shortcut to. You can also drag folders
around in the list to reorder them or to nest them.5. Click OK to save your changes.
What to do next
You can now access your shortcut on the Shortcuts palette.
Working with palettesPalettes are containers for IBM InfoSphere Information Server console shortcuts,workspace history, open workspaces, and notes. You can dock, float, and anchorthe palettes.
About this task
By default, the palettes are docked on the left side of the IBM InfoSphereInformation Server console. When docked, the palettes display as a set of verticaltabs.
Procedure
To open a palette, click the tab. You can click a workspace to hide the palettesagain.
What to do next
To pin the palette to stay open, click the pin image .
To reposition a palette, right-click the tab or the top bar of the palette.
Floating the palettesYou can float the palettes to move them as a separate pane in the IBM InfoSphereInformation Server console. You can float an individual palette or you can float thepalettes as a group.
Procedure
To float the palettes as a group, select the top bar of the palettes and drag it to anew location in the console. You can also select and drag an individual tab in thepalettes to just float that tab.
What to do next
Floated palettes can be docked by clicking Dock , or anchored by clicking
Anchor .
Anchoring the palettesYou can anchor the palettes to one side of the workspace. You can anchor anindividual palette or you can anchor the palettes in groups.
30 Administration Guide

Procedure
To anchor a palette, drag the palette to the opposite edge of the workspace.Anchored palettes can be stacked vertically or grouped together in one or moresets.
What to do next
Anchored palettes can be docked by clicking Dock , or floated by clicking
Float .
To switch the side of the window that the palettes are docked or anchored to,select the top bar of the docked palettes and drag it to the other side of theworkspace.
Creating notesIn some product modules, you can create notes to comment on an object, provideinformation to other users, and flag issues for further investigation.
Procedure
1. On the pane or table that you want to add the note, click Note .2. On the Notes palette, click New. New notes are saved when you create them.3. In the table, specify information for the note. Any changes you make to a note
are automatically saved.4. In the Notes palette, click Close.
What to do next
After you create the note, you and other users can access the note by clicking Note
.
Refreshing an object listYou can refresh an object list to view changes made by other users.
Procedure
To refresh an object list, click Refresh or right-click the header above theobject list.
Changing your passwordYou can change the password that you use to log in to the server. If IBMInfoSphere Information Server is configured to authenticate against an externaldirectory, passwords cannot be changed.
Procedure
To change your password, click File > Change Password.
Chapter 5. Customizing the consoles 31

Customizing the IBM InfoSphere Information Server Web consoleYou can access suite administration and reporting tasks, information aboutdeployed information services, and glossaries of information assets in the IBMInfoSphere Information Server console. To customize the IBM InfoSphereInformation Server console, you can customize the Home tab and change yourpassword.
Customizing the Home tabYou can customize the Home tab. For example, you can show a list of the latestreport results.
Procedure1. On the Home tab, select Customize My Home.2. In the Customize My Home dialog box, select the components that you want to
display on the left and right sides of the Home tab.3. Click Save to close the dialog box.
Changing your passwordYou can change the password that you use to log in to the IBM InfoSphereInformation Server Web console.
Procedure
To change your password, click Change Password in the top right corner of theWeb console window and type the required information.
32 Administration Guide

Chapter 6. Managing security
To set up security, you configure the user registry, control access levels, create orupdate users and groups, and configure audit logging. After security is set up, youcan change user names and passwords and perform other administrative tasks byusing IBM InfoSphere Information Server administration commands and tools.
If you enabled Secure Sockets Layer (SSL) for IBM WebSphere Application Server6.1 or 7.0, refer to the IBM InfoSphere Information Server Planning, Installation, andConfiguration Guide for information about administering SSL for InfoSphereInformation Server.
Security setupSetting up a secure environment in IBM InfoSphere Information Server involvesconfiguring the user registry, creating users, and assigning security roles to thoseusers.
In InfoSphere Information Server, to set up a secure environment you complete thefollowing tasks:1. Choose a user registry and configure it for InfoSphere Information Server.
A user registry contains valid user names and passwords. To log in toInfoSphere Information Server, a user must have a user name and password inthe user registry. The installation program configures InfoSphere InformationServer to use its internal user registry. As part of security setup, you canconfigure InfoSphere Information Server to use an external user registry such asa local operating system user registry or lightweight directory access protocol(LDAP) user registry.
2. Create users and groups.
Create users and groups in the user registry. If InfoSphere Information Server isconfigured to use the internal user registry, create users and groups by usingthe InfoSphere Information Server console or the InfoSphere Information ServerWeb console. If InfoSphere Information Server is configured to use an externaluser registry, use standard operating system utilities or user registry utilities tocreate users and groups.
3. Assign security roles to users and groups.
To configure which suite components a user or a group has access to and whatlevel of access that user or group has in the suite component, assign securityroles to the user or group.
4. Configure InfoSphere Information Server engine security.
The InfoSphere Information Server engine performs user authenticationseparately from other InfoSphere Information Server components. Dependingon your user registry configuration, you might have to map credentialsbetween the InfoSphere Information Server user registry and the local operatingsystem user registry on the computer where the engine is installed.
5. Assign project roles to users.
Some suite components require that you assign project-specific roles to users.
Optionally, you can also complete the following setup tasks:v Configure IBM WebSphere Application Server for non-root administration.
© Copyright IBM Corp. 2007, 2011 33
By default, WebSphere Application Server runs as root. However, it can also berun by using a non-root user ID. You can configure and set appropriate filesystem permissions for WebSphere Application Server to "run-as" a non-rootuser ID.
v Configure InfoSphere Information Server agents for non-root administration
By default, the InfoSphere Information Server agents (such as the ASB andlogging agents) run as root. However, they can also be run by using a non-rootuser ID. You can configure and set appropriate file system permissions for theagents to "run-as" a non-root user ID.
v Configure the Auditing service.
The Auditing service creates an audit trail of security-related events. The trailincludes all activities that set or modify security-related settings and all userauthentications and application logins. You can configure which audit events tolog and how much information to include based on your auditing requirements.
User registry configurationA user registry holds user account information, such as a user name and password,that is accessed during authentication. To log in to IBM InfoSphere InformationServer, a user must have a user name and password in the user registry.
During installation, the InfoSphere Information Server installation programconfigures InfoSphere Information Server to use an internal user registry. Theinternal user registry is located in the metadata repository. After you installInfoSphere Information Server, you can continue to use the internal user registry.Alternatively, you can set up InfoSphere Information Server to use a localoperating system user registry or a Lightweight Directory Access Protocol (LDAP)compliant user registry.
If you choose to change registries, complete the change immediately after theinstallation finishes. For best results, do not change user registries after the systemhas been in production. If you must change the user registry after the system hasbeen in production, consider migrating to a new installation to avoid securityissues and risks. Otherwise, there a mismatch might occur between the users of theold and new user registries.
Internal user registry overviewBy default, IBM InfoSphere Information Server stores user information in theinternal user registry in the metadata repository.
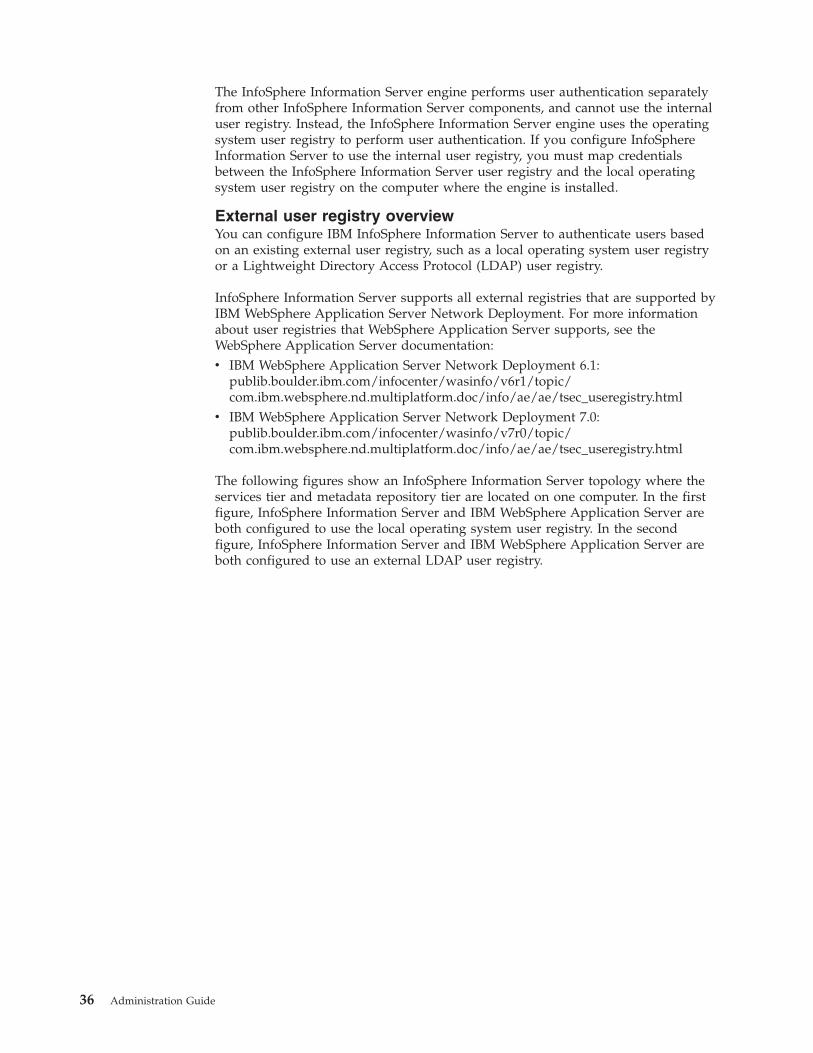
The following figure shows an InfoSphere Information Server topology where theservices tier and metadata repository tier are on one computer. InfoSphereInformation Server and IBM WebSphere Application Server are both configured touse the internal user registry provided by InfoSphere Information Server. Theinternal user registry is stored in the metadata repository.
34 Administration Guide
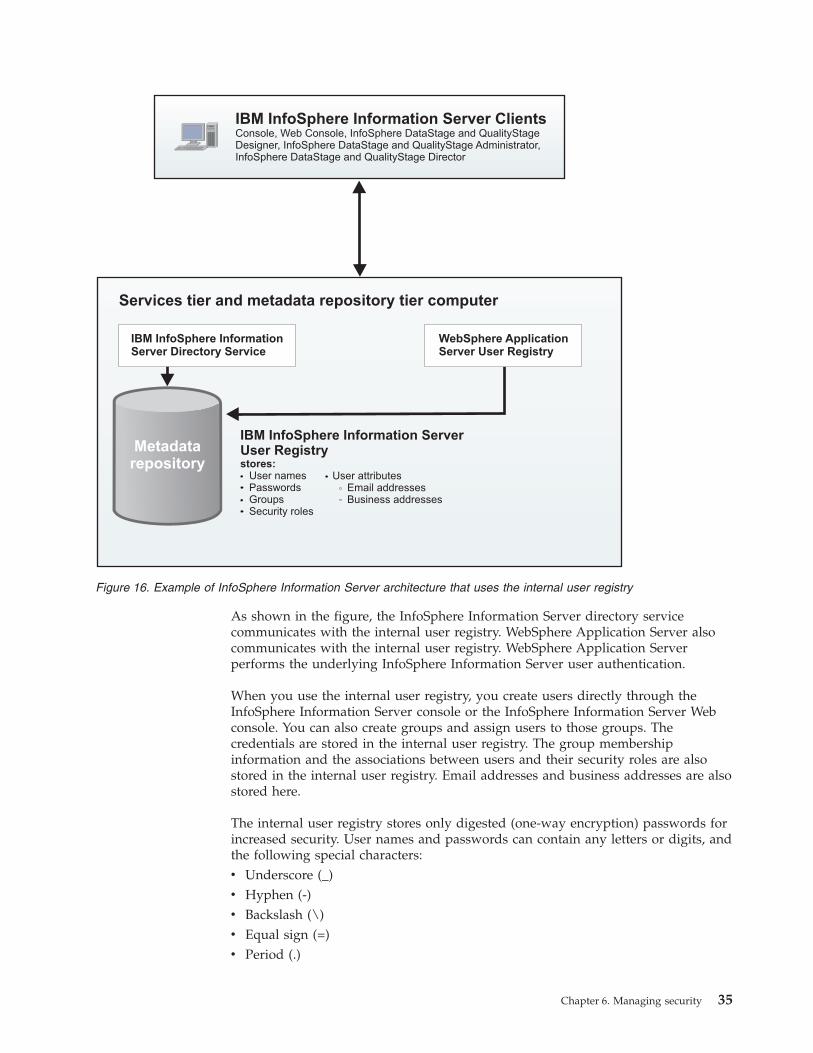
As shown in the figure, the InfoSphere Information Server directory servicecommunicates with the internal user registry. WebSphere Application Server alsocommunicates with the internal user registry. WebSphere Application Serverperforms the underlying InfoSphere Information Server user authentication.
When you use the internal user registry, you create users directly through theInfoSphere Information Server console or the InfoSphere Information Server Webconsole. You can also create groups and assign users to those groups. Thecredentials are stored in the internal user registry. The group membershipinformation and the associations between users and their security roles are alsostored in the internal user registry. Email addresses and business addresses are alsostored here.
The internal user registry stores only digested (one-way encryption) passwords forincreased security. User names and passwords can contain any letters or digits, andthe following special characters:v Underscore (_)v Hyphen (-)v Backslash (\)v Equal sign (=)v Period (.)
Services tier and metadata repository tier computer
IBM InfoSphere Information ServerUser Registrystores:
User namesPasswordsGroupsSecurity roles
WebSphere ApplicationServer User Registry
User attributesEmail addressesBusiness addresses
Metadatarepository
IBM InfoSphere Information Server ClientsConsole, Web Console, InfoSphere DataStage and QualityStageDesigner, Sphere DataStage and QualityStage Administrator,
Sphere DataStage and QualityStage DirectorInfo
Info
IBM InfoSphere InformationServer Directory Service
Figure 16. Example of InfoSphere Information Server architecture that uses the internal user registry
Chapter 6. Managing security 35
The InfoSphere Information Server engine performs user authentication separatelyfrom other InfoSphere Information Server components, and cannot use the internaluser registry. Instead, the InfoSphere Information Server engine uses the operatingsystem user registry to perform user authentication. If you configure InfoSphereInformation Server to use the internal user registry, you must map credentialsbetween the InfoSphere Information Server user registry and the local operatingsystem user registry on the computer where the engine is installed.
External user registry overviewYou can configure IBM InfoSphere Information Server to authenticate users basedon an existing external user registry, such as a local operating system user registryor a Lightweight Directory Access Protocol (LDAP) user registry.
InfoSphere Information Server supports all external registries that are supported byIBM WebSphere Application Server Network Deployment. For more informationabout user registries that WebSphere Application Server supports, see theWebSphere Application Server documentation:v IBM WebSphere Application Server Network Deployment 6.1:
publib.boulder.ibm.com/infocenter/wasinfo/v6r1/topic/com.ibm.websphere.nd.multiplatform.doc/info/ae/ae/tsec_useregistry.html
v IBM WebSphere Application Server Network Deployment 7.0:publib.boulder.ibm.com/infocenter/wasinfo/v7r0/topic/com.ibm.websphere.nd.multiplatform.doc/info/ae/ae/tsec_useregistry.html
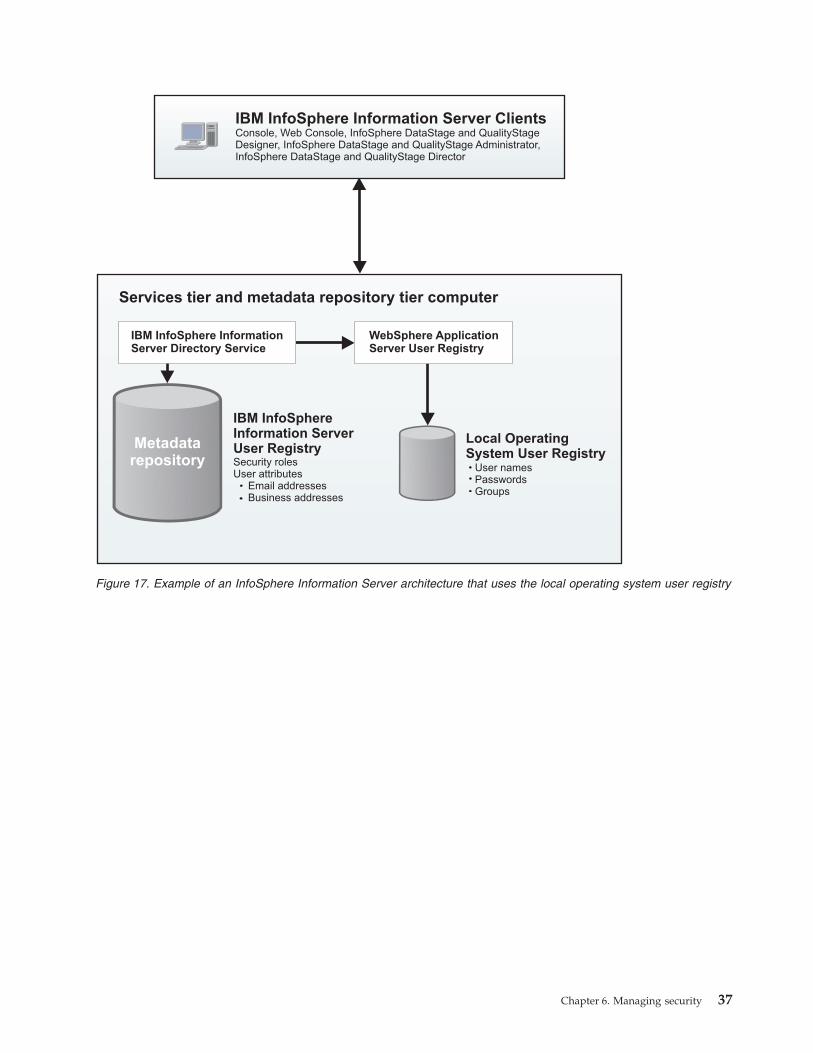
The following figures show an InfoSphere Information Server topology where theservices tier and metadata repository tier are located on one computer. In the firstfigure, InfoSphere Information Server and IBM WebSphere Application Server areboth configured to use the local operating system user registry. In the secondfigure, InfoSphere Information Server and IBM WebSphere Application Server areboth configured to use an external LDAP user registry.
36 Administration Guide
Services tier and metadata repository tier computer
Security rolesUser attributes
Email addressesBusiness addresses
Local OperatingSystem User Registry
IBM InfoSphere Information Server ClientsConsole, Web Console, InfoSphere DataStage and QualityStageDesigner, Sphere DataStage and QualityStage Administrator,
Sphere DataStage and QualityStage DirectorInfo
Info
WebSphere ApplicationServer User Registry
IBM InfoSphere InformationServer Directory Service
IBM InfoSphereInformation ServerUser Registry
User namesPasswordsGroups
Metadatarepository
Figure 17. Example of an InfoSphere Information Server architecture that uses the local operating system user registry
Chapter 6. Managing security 37

When you use an external user registry, WebSphere Application Servercommunicates with that user registry. The InfoSphere Information Server directoryservice communicates with the WebSphere Application Server user registry. It doesnot communicate with the external user registry directly. By going throughWebSphere Application Server to access the external user registry, InfoSphereInformation Server takes advantage of the capabilities in WebSphere ApplicationServer for handling various kinds of external user registries.
When you use an external user registry, you create users and groups through theadministration tools for that user registry. InfoSphere Information Server looks tothe external user registry for user names, passwords, group definitions, and groupmemberships. Password restrictions are imposed by the user registry.
If you are configuring WebSphere Application Server clustering for scalability orhigh-availability, you cannot configure InfoSphere Information Server to use thelocal operating system user registry. Instead, configure an LDAP user registry orthe internal user registry.
Even when you configure InfoSphere Information Server to use an external userregistry, certain user information is still maintained in the internal user registry.Specifically, the internal user registry always stores the security roles that areassigned to users and groups, as well as attributes that are not passed through byWebSphere Application Server, such as e-mail addresses and business addresses.The internal user registry is always available and working in the background.
Services tier and metadata repository tier computer
Security rolesUser attributes
Email addressesBusiness addresses
IBM InfoSphere Information Server ClientsConsole, Web Console, InfoSphere DataStage and QualityStageDesigner, Sphere DataStage and QualityStage Administrator,
Sphere DataStage and QualityStage DirectorInfo
Info
WebSphere ApplicationServer User Registry
IBM InfoSphere InformationServer Directory Service
IBM InfoSphere Information ServerUser Registry
External User RegistryLDAP
User namesPasswordsGroups
Metadatarepository
Figure 18. Example of an InfoSphere Information Server architecture that uses an external LDAP user registry
38 Administration Guide

User registry considerationsChoose your user registry configuration based on the scale of your installation andthe experience of your administrators.
The supported user registry configurations differ in the following areas:v Ease of installation and setup.v Ease of maintenance of users and groups, and the level of authentication
required.v The number of sets of credentials that you must maintain.v How the credentials are stored.v Feature support.v Engine security considerations. The IBM InfoSphere Information Server engine
performs user authentication separately from other InfoSphere InformationServer components. Depending on your topology and the user registry that youchoose, you might have to map credentials between the InfoSphere InformationServer user registry and the local operating system user registry on thecomputer where the engine is installed.
Internal user registry: Least complex, suitable for small-scale installationsConsider the following information when determining whether to use theinternal user registry:v The internal user registry is set up by the installation program.
InfoSphere Information Server is configured to use this user registry bydefault.
v To manage users and groups, you use the InfoSphere Information Serverconsole or Web console. With other user registry configurations, youmust have administrative access to the user registry.
v Because the internal user registry is separate from other user registries, itrequires that you maintain an independent set of credentials for eachInfoSphere Information Server user that are unrelated to any other userregistry that is maintained for other business applications.
v User credentials are stored in the InfoSphere Information Servermetadata repository database. User credential information is one-wayencrypted in the database.
v The internal user registry has no support for password policies, length,or expiration dates.
v The InfoSphere Information Server engine cannot use the internal userregistry for authentication. You must map credentials between theInfoSphere Information Server user registry and the local operatingsystem user registry on the computer where the engine is installed. If theuser names or passwords are changed in the local operating system userregistry, an administrator must update the mapping. The administratorcan use the InfoSphere Information Server console for this task.
v The mapped user credentials are also stored in the InfoSphereInformation Server metadata repository database. User credentialinformation is strongly encrypted in the database.
Local operating system user registry: Suitable for small and self-containedinstallations, if the internal user registry is unsuitable
Consider the following information when determining whether to use alocal operating system user registry:
Chapter 6. Managing security 39
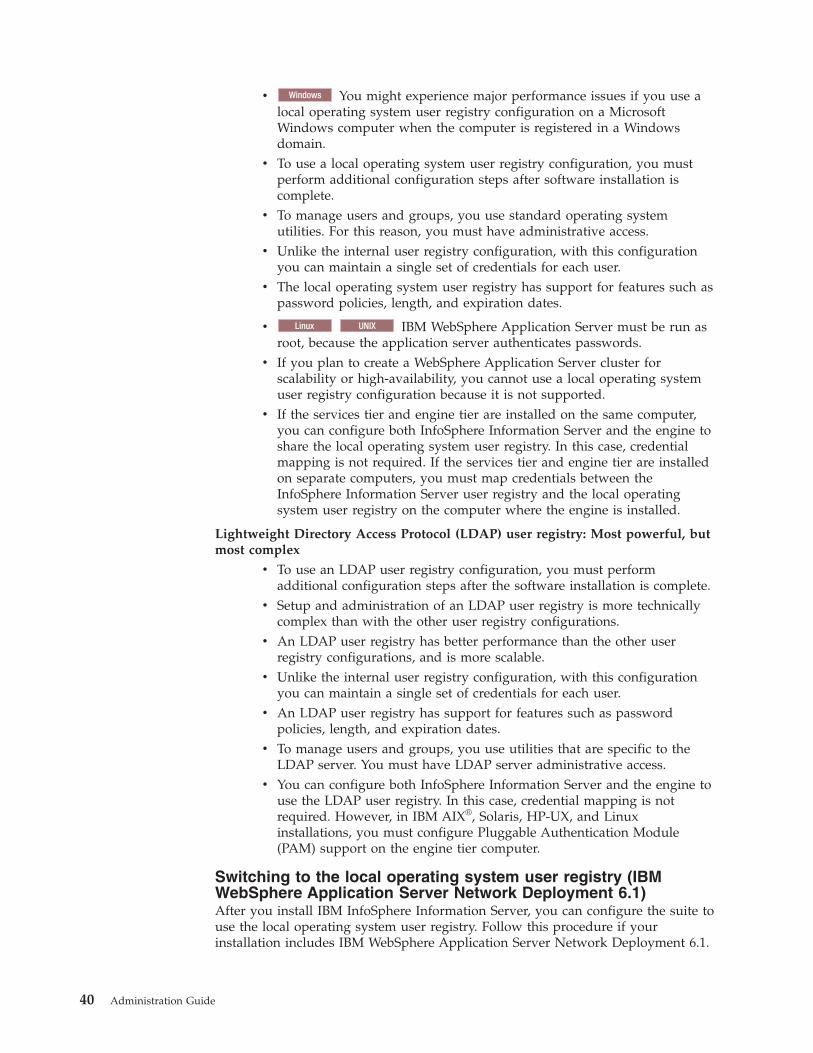
v Windows You might experience major performance issues if you use alocal operating system user registry configuration on a MicrosoftWindows computer when the computer is registered in a Windowsdomain.
v To use a local operating system user registry configuration, you mustperform additional configuration steps after software installation iscomplete.
v To manage users and groups, you use standard operating systemutilities. For this reason, you must have administrative access.
v Unlike the internal user registry configuration, with this configurationyou can maintain a single set of credentials for each user.
v The local operating system user registry has support for features such aspassword policies, length, and expiration dates.
v Linux UNIX IBM WebSphere Application Server must be run asroot, because the application server authenticates passwords.
v If you plan to create a WebSphere Application Server cluster forscalability or high-availability, you cannot use a local operating systemuser registry configuration because it is not supported.
v If the services tier and engine tier are installed on the same computer,you can configure both InfoSphere Information Server and the engine toshare the local operating system user registry. In this case, credentialmapping is not required. If the services tier and engine tier are installedon separate computers, you must map credentials between theInfoSphere Information Server user registry and the local operatingsystem user registry on the computer where the engine is installed.
Lightweight Directory Access Protocol (LDAP) user registry: Most powerful, butmost complex
v To use an LDAP user registry configuration, you must performadditional configuration steps after the software installation is complete.
v Setup and administration of an LDAP user registry is more technicallycomplex than with the other user registry configurations.
v An LDAP user registry has better performance than the other userregistry configurations, and is more scalable.
v Unlike the internal user registry configuration, with this configurationyou can maintain a single set of credentials for each user.
v An LDAP user registry has support for features such as passwordpolicies, length, and expiration dates.
v To manage users and groups, you use utilities that are specific to theLDAP server. You must have LDAP server administrative access.
v You can configure both InfoSphere Information Server and the engine touse the LDAP user registry. In this case, credential mapping is notrequired. However, in IBM AIX®, Solaris, HP-UX, and Linuxinstallations, you must configure Pluggable Authentication Module(PAM) support on the engine tier computer.
Switching to the local operating system user registry (IBMWebSphere Application Server Network Deployment 6.1)After you install IBM InfoSphere Information Server, you can configure the suite touse the local operating system user registry. Follow this procedure if yourinstallation includes IBM WebSphere Application Server Network Deployment 6.1.
40 Administration Guide
Before you begin
If you have implemented WebSphere Application Server clustering for yourinstallation, you cannot use the local operating system user registry.
WebSphere Application Server has a number of restrictions regarding localoperating system user registries. For example:
v Linux UNIX WebSphere Application Server processes must be run asroot.
v Linux UNIX The network information service (NIS) protocol is notsupported.
v Windows The use of domain accounts imposes access rights on users who runWebSphere Application Server processes.
See the WebSphere Application Server documentation for more information:v publib.boulder.ibm.com/infocenter/wasinfo/v6r1/index.jsp?topic=/
com.ibm.websphere.nd.doc/info/ae/ae/usec_localosreg.htmlv publib.boulder.ibm.com/infocenter/wasinfo/v6r1/topic/
com.ibm.websphere.nd.doc/info/ae/ae/tsec_localos.html
Procedure1. Create a user account on the local computer to use for the WebSphere
Application Server administration account. Alternatively, select an existingaccount. As part of the switch to the local operating system user registry, youdirect WebSphere Application Server to use this account for the administratorrole.
Note: This account can be the same as any of the following accounts:v The account that owns the WebSphere Application Server installation.v The account that runs the WebSphere Application Server processes.v A different account.
2. Log in to the WebSphere Application Server administrative console.3. In the console, click Security > Secure administration, applications, and
infrastructure.4. Ensure that the Use domain-qualified user names option is not selected.5. In the User account repository section, select Local operating system.6. Click Configure.7. In the Primary administrative user name field, type the name of the user
account that you created in step 1.8. Click Apply.9. Select Server identity that is stored in the repository.
10. In the Server user ID or administrative user on a Version 6.0.x node field,type the short name of the user account that you created in step 1.
11. In the Password field, type the password of the user account that you createdin step 1.
12. Click OK.13. In the User account repository section, select Local operating system, and
click Set as current. If an error occurs, the application server is unable toauthenticate with the local operating system by using the credentials that youprovided.
Chapter 6. Managing security 41

14. Click Apply.15. Log out of the console.16. Stop WebSphere Application Server.17. Log in to the services tier computer.18. From the command line, run the AppServerAdmin command. This command
propagates the WebSphere Application Server administrator user name andpassword to WebSphere Application Server.
Linux UNIX
/opt/IBM/InformationServer/ASBServer/bin/AppServerAdmin.sh -was-user was_admin_user_id -password was_admin_password
Windows
C:\IBM\InformationServer\ASBServer\bin\AppServerAdmin.bat -was-user was_admin_user_id -password was_admin_password
In the command, was_admin_user_id and was_admin_password must match thecredentials that you provided in the WebSphere Application Serveradministrative console.
19. If you are switching the user registry for a system that has been used forsome time by multiple users, clean up the users and groups that are related tothe security configuration. See “Switching the user registry configuration for asystem in use” on page 52.
20. Restart WebSphere Application Server.After WebSphere Application Server is restarted, during the InfoSphereInformation Server initialization, the WebSphere Application Server userregistry configuration is checked and the InfoSphere Information Server userregistry configuration is automatically adjusted if needed. The defaultWebSphere Application Server administrator user is also automaticallyconfigured as the initial new InfoSphere Information Server defaultadministrator user.
What to do next
After you change the user registry, you can open the InfoSphere InformationServer Web console and grant suite administrator access to additional users asneeded.
Switching to the local operating system user registry (IBMWebSphere Application Server Network Deployment 7.0)After you install IBM InfoSphere Information Server, you can configure the suite touse the local operating system user registry. Follow this procedure if yourinstallation includes IBM WebSphere Application Server Network Deployment 7.0.
Before you begin
If you have implemented WebSphere Application Server clustering for yourinstallation, use of the local operating system user registry is not supported.
WebSphere Application Server has a number of restrictions regarding localoperating system user registries on both UNIX and Microsoft Windows. Forexample:
v Linux UNIX WebSphere Application Server processes must be run asroot.
42 Administration Guide
v Linux UNIX The network information service (NIS) protocol is notsupported.
v Windows The use of domain accounts imposes access rights on users who runWebSphere Application Server processes.
See the WebSphere Application Server documentation for more information:v publib.boulder.ibm.com/infocenter/wasinfo/v7r0/index.jsp?topic=/
com.ibm.websphere.nd.doc/info/ae/ae/usec_localosreg.htmlv publib.boulder.ibm.com/infocenter/wasinfo/v7r0/topic/
com.ibm.websphere.nd.doc/info/ae/ae/tsec_localos.html
Procedure1. Create a user account on the local computer to use for the WebSphere
Application Server administration account. Alternatively, select an existingaccount. As part of the switch to the local operating system user registry, youdirect WebSphere Application Server to use this account for the administratorrole.
Note: This account can be the same as the account that owns the WebSphereApplication Server installation. Alternatively, the account can be the same asthe account that runs the WebSphere Application Server processes.Alternatively, it can be a different account.
2. Log in to the WebSphere Application Server administrative console.3. In the console, click Security > Global Security. The Global Security page
appears.4. Ensure that the Use domain-qualified user names option is not selected.5. In the User account repository section on the right side of the page, click the
Available realm definitions list and select Local operating system.6. Click Configure.7. In the Primary administrative user name field, type the name of the user
account that you created in step 1.8. Click Apply.9. Select Server identity that is stored in the repository.
10. In the Server user ID or administrator user on a Version 6.0.x node field,type the short name of the user account that you created in step 1.
11. In the Server user password field, type the password of the user account thatyou created in step 1.
12. Click OK.13. Click the Save link at the top of the page, and click the Save button.14. On the Global Security page, ensure that LTPA is selected for the Active
authentication mechanism setting.15. In the Available realm definitions list, select Local operating system, and
click Set as current. If an error occurs, the application server is unable toauthenticate with the local operating system by using the credentials that youprovided.
16. Click the Save link, and click the Save button.17. Stop WebSphere Application Server.18. Log in to the services tier computer.
Chapter 6. Managing security 43
19. From the command line, run the AppServerAdmin command. This commandpropagates the WebSphere Application Server administrator user name andpassword to WebSphere Application Server.
Linux UNIX
/opt/IBM/Information/server/ASBServer/bin/AppServerAdmin.sh -was-user was_admin_user_id -password was_admin_password
Windows
C:\IBM\InformationServer\ASBServer\bin\AppServerAdmin.bat -was-user was_admin_user_id -password was_admin_password
In the command, was_admin_user_id and was_admin_password must match thecredentials that you provided in the WebSphere Application Serveradministrative console.
20. If you are switching the user registry for a system that has been used for awhile by multiple users, clean up the users and groups that are related to thesecurity configuration. See “Switching the user registry configuration for asystem in use” on page 52.
21. Restart WebSphere Application Server.After WebSphere Application Server is restarted, during the InfoSphereInformation Server initialization, the WebSphere Application Server userregistry configuration is checked and the InfoSphere Information Server userregistry configuration is automatically adjusted if needed. The defaultWebSphere Application Server administrator user is also automaticallyconfigured as the initial new InfoSphere Information Server defaultadministrator user.
What to do next
After you change the user registry, you can open the InfoSphere InformationServer Web console and grant suite administrator access to additional users asneeded.
Switching to an LDAP user registryYou can authenticate users by using a Lightweight Directory Access Protocol(LDAP) user registry. You configure IBM InfoSphere Information Server to useLDAP authentication after installation finishes.
Before you beginv The InfoSphere Information Server engine performs user authentication
separately from other InfoSphere Information Server components. You canconfigure the engine to use the LDAP user registry that you set up. For IBMAIX, Solaris, HP-UX, and Linux platforms, you can optionally configurePluggable Authentication Module (PAM) support before you switch the userregistry. For more information, see “Configuring IBM InfoSphere InformationServer engine to use PAM (UNIX)” on page 47.
v In an IBM WebSphere Application Server stand-alone installation, WebSphereApplication Server must be running.
v In a clustered installation, the Deployment Manager and all node agents must berunning.
About this task
InfoSphere Information Server supports any LDAP-compliant user registry thatIBM WebSphere Application Server Network Deployment supports. For more
44 Administration Guide

information about supported LDAP servers, see the IBM WebSphere ApplicationServer Network Deployment system requirements:v IBM WebSphere Application Server Network Deployment 6.1:
www.ibm.com/support/docview.wss?rs=180&uid=swg27007642v IBM WebSphere Application Server Network Deployment 7.0:
www.ibm.com/support/docview.wss?rs=180&uid=swg27012369
Procedure1. Do the procedures in the WebSphere Application Server documentation for
configuring LDAP user registries.Procedures for configuring LDAP user registries within WebSphere ApplicationServer can be found in the WebSphere Application Server information center:v IBM WebSphere Application Server Network Deployment 6.1:
publib.boulder.ibm.com/infocenter/wasinfo/v6r1/topic/com.ibm.websphere.nd.doc/info/ae/ae/tsec_ldap.html
v IBM WebSphere Application Server Network Deployment 7.0:publib.boulder.ibm.com/infocenter/wasinfo/v7r0/topic/com.ibm.websphere.nd.doc/info/ae/ae/tsec_ldap.html
2. In a clustered installation, synchronize the configuration files on the nodes inthe cluster:a. In the System administration > Nodes.b. Select the check boxes beside all nodes.c. Click Synchronize.d. Log out of the console.
3. Stop WebSphere Application Server. In a clustered installation, stop theapplication servers and the node agents, and then stop the DeploymentManager.
Important: When stopping the WebSphere Application Server processes, usethe credentials of the WebSphere Application Server administrator from theprevious user registry.
4. Log in to the computer on which the AppServerAdmin tool is installed:v If you have implemented WebSphere Application Server clustering within
your installation, log in to the computer that hosts the WebSphereApplication Server Deployment Manager.
v If you have not implemented clustering, log in to the services tier computer.5. From the command line, run the AppServerAdmin command. This command
propagates the WebSphere Application Server administrator user name andpassword to WebSphere Application Server.
Linux UNIX
/opt/IBM/Information/server/ASBServer/bin/AppServerAdmin.sh -was-user was_admin_user_id -password was_admin_password
Windows
C:\IBM\InformationServer\ASBServer\bin\AppServerAdmin.bat -was-user was_admin_user_id -password was_admin_password
In the command, was_admin_user_id and was_admin_password must match thenew WebSphere Application Server administrator credentials that you providedin the WebSphere Application Server administrative console.
Chapter 6. Managing security 45
6. If you are switching the user registry for a system that has been used for awhile by multiple users, clean up the users and groups that are related to thesecurity configuration. See “Switching the user registry configuration for asystem in use” on page 52.
7. Restart WebSphere Application Server. In a clustered installation, start theDeployment Manager, and then the node agents and application servers.After WebSphere Application Server is restarted, during the InfoSphereInformation Server initialization, the WebSphere Application Server userregistry configuration is checked and the InfoSphere Information Server userregistry configuration is automatically adjusted if needed. The defaultWebSphere Application Server administrator user is also automaticallyconfigured as the initial new InfoSphere Information Server defaultadministrator user.
8. If one of the node agents was not running when you did the previous steps,the node agent cannot be restarted because the user registry configuration atthe Deployment Manager and node levels do not match. To fix this problem,run the WebSphere Application Server syncNode command to synchronize thenode with the Deployment manager. To run the syncNode command:a. Log in to the node.b. Run the syncNode command.
v Linux UNIX
/opt/IBM/WebSphere/AppServer/profiles/custom_profile/bin/syncNode.shdmgr_hostname dmgr_port -user was_admin_username -passwordwas_admin_password
v Windows
C:\IBM\WebSphere\AppServer\profiles\custom_profile\bin\syncNodedmgr_hostname dmgr_port -user was_admin_username -passwordwas_admin_password
In the command:v dmgr_hostname is the host name of the computer where the Deployment
Manager is running.v dmgr_port is the port number of the Deployment Manager (the default is
8879).v was_admin_username is the user name of the WebSphere Application
Server administrator.v was_admin_password is the administrator password.
c. Restart the node agent. See “Starting IBM WebSphere Application Server(Windows)” on page 186 or “Starting IBM WebSphere Application Server(Linux, UNIX)” on page 188.
What to do next
After you change the user registry, you can use theWebSphere Application Serveradministrator user name and password to log in to the InfoSphere InformationServer Web console. In the console, grant suite administrator access to additionalusers as needed. The WebSphere Application Server administrator is grantedInfoSphere Information Server administrator privileges by default.
LDAP distinguished name (DN) determination:
To configure IBM InfoSphere Information Server to use a lightweight directoryaccess protocol (LDAP) user registry, you might need the full LDAP distinguished
46 Administration Guide

name (DN) of the suite administrator. If you cannot get the LDAP DN from yourLDAP administrator, you can use these procedures to determine the LDAP DN.
Determining an LDAP distinguished name (DN) by using the IBM WebSphereApplication Server 6.1 Administrative Console:
You can determine a full LDAP distinguished name (DN) by using the WebSphereApplication Server 6.1 administrative console.
Procedure
1. Log in to the IBM WebSphere Application Server 6.1 administrative console.2. From the console, select Applications > Enterprise Applications.3. Click an application name.4. Under Detail properties, click Security role to user/group mapping.5. Select a role and click Look up users.6. In the Search String field, enter an '*' (asterisk) and click Search.
Determining an LDAP distinguished name (DN) by using the IBM WebSphereApplication Server 7.0 Administrative Console:
You can determine a full LDAP distinguished name (DN) by using the WebSphereApplication Server 7.0 administrative console.
Procedure
1. Log in to the IBM WebSphere Application Server 7.0 administrative console.2. From the console, select Applications > Application Types > WebSphere
enterprise applications.3. Click an application name.4. Under Detail properties, click Security role to user/group mapping.5. Select a role and click Map Users....6. In the Search String field, enter an '*' (asterisk) and click Search.
Determining an LDAP distinguished name (DN) by using Active Directory search(Windows):
If you have access to a Microsoft Windows computer that is registered with aWindows Active Directory domain, you can use the user search feature todetermine a Windows Active Directory distinguished name.
Procedure
1. On the computer, click Start > Run.2. In the window, type compmgmt.msc and press Enter.3. Expand Local Users and Groups.4. Open the Groups folder and double-click one of the groups.5. In the Properties window, click Add.6. In the Select Users window, click Advanced.7. In the Select Users window, search for the IBM WebSphere Application Server
user name. You must select the X500 name in the attributes to display the fulldistinguished name. The search returns the full distinguished name.
Configuring IBM InfoSphere Information Server engine to use PAM (UNIX):
Chapter 6. Managing security 47

Pluggable Authentication Module (PAM) is currently supported on IBM AIX,HP-UX, and Linux platforms.
Before you begin
To complete this task, you must have a working knowledge of PAM and theauthentication modules and strategies.
About this task
Perform this task on the computer that hosts the engine tier.
Important: Configuring PAM for the InfoSphere Information Server engine isoptional. You only need to do it if you want the engine to authenticate through anLDAP server that is configured in InfoSphere Information Server as the externaluser registry. With this configuration, you can use shared credentials and do notneed to map user credentials.
To configure PAM on IBM AIX, refer to the information at www.ibm.com/support/docview.wss?rs=14&uid=swg21398309. Use the following procedure toconfigure PAM on UNIX.
Procedure
1. Add to or create the PAM configuration file on your platform.2. Stop the InfoSphere Information Server engine by running the following
command:$DSHOME/bin/uv -admin -stop
3. Edit the uvconfig file in the DSHOME directory to change the setting of theAUTHENTICATION tunable to 1. The following example shows the AUTHENTICATIONtunable set to 1.# AUTHENTICATION - Specifies the method by which UNIX user# authentication is done. Currently, the following methods# are supported:## 0) Standard O/S Authentication (default)# 1) Pluggable Authentication Module (PAM)## This value should only be changed with a full understanding# of the implications, as improper setting of this value can# lead to the environment being unusable.AUTHENTICATION 1
4. Add the PAM service entry, dsepam, to the PAM configuration file. The nameand the location of the PAM configuration file are platform dependent.
5. Regenerate the InfoSphere Information Server engine configuration file byrunning the following command:$DSHOME/bin/uv -admin -regen
6. Restart the InfoSphere Information Server engine by running the followingcommand:$DSHOME/bin/uv -admin -start
What to do next
Now set up InfoSphere Information Server to use the Lightweight Directory AccessProtocol (LDAP) user registry.
48 Administration Guide

If you have configured PAM for the engine tier and InfoSphere Information Serveruses an LDAP user registry, you can share the user registry with the engine tier.For more information, see “Shared user registry overview” on page 75.
Examples of PAM configuration files (UNIX):
On a Linux system, you must create a file named dsepam in the /etc/pam.ddirectory. The following example shows the possible contents of the dsepam file ona 64-bit Linux system:#%PAM-1.0auth required /lib64/security/pam_stack.so service=system-authpassword required /lib64/security/pam_stack.so service=system-authaccount required /lib64/security/pam_stack.so service=system-auth
For IBM AIX, refer to the information at www.ibm.com/support/docview.wss?rs=14&uid=swg21398309 for an example PAM configuration file onAIX.
The following example is for SUSE Linux on System z® and on 64 bit platforms:#%PAM-1.0auth required pam_unix2.so nullok #set_secrpcpassword required pam_unix2.so nullok #set_secrpcaccount required pam_unix2.so nullok #set_secrpc
On a Solaris system, you must edit the existing pam.conf file in the /etc directoryand add an entry like the following example:dsepam auth required /usr/lib/security/pam_unix.so.1
Switching back to the internal user registryIf necessary, after configuring the IBM InfoSphere Information Server suite to usean external user registry, you can switch back to the internal user registry. Theinternal user registry is the user registry that was configured during the initialinstallation of InfoSphere Information Server.
Before you beginv In an IBM WebSphere® Application Server stand-alone installation, WebSphere
Application Server must be running.v In a clustered installation, the Deployment Manager and all node agents must be
running.v See the WebSphere Application Server documentation for more information:
– IBM WebSphere Application Server Network Deployment 6.1:publib.boulder.ibm.com/infocenter/wasinfo/v6r1/topic/com.ibm.websphere.nd.doc/info/ae/ae/tsec_tdaman.html
– IBM WebSphere Application Server Network Deployment 7.0:publib.boulder.ibm.com/infocenter/wasinfo/v7r0/topic/com.ibm.websphere.nd.doc/info/ae/ae/tsec_tdaman.html
Procedure
The internal user registry is an IBM WebSphere Application Server custom userregistry.1. Log in to the computer on which the DirectoryAdmin tool is installed:
v If you have implemented WebSphere Application Server clustering for yourinstallation, log in to the computer that hosts the WebSphere ApplicationServer Deployment Manager.
Chapter 6. Managing security 49
v If you have not implemented clustering, log in to the services tier computer.2. From the command line, run the following command to create the WebSphere
Application Server default administrator in the internal user registry:
Linux UNIX
/opt/IBM/InformationSesrver/ASBServer/bin/DirectoryAdmin.sh -user-userid was_admin_username -password was_admin_password -admin
Windows
C:\IBM\InformationServer\ASBServer\bin\DirectoryAdmin.bat -user-userid was_admin_username -password was_admin_password -admin
In the command, was_admin_user_id and was_admin_password are the username and password of the new WebSphere Application Server administrator.This account is the administrator from the newly configured internal userregistry.
3. Log in to the WebSphere Application Server administrative console.4. In the console, click Security > Secure administration, applications, and
infrastructure.In WebSphere Application Server 7.0, click Security > Global Security.
5. Ensure that the Use domain-qualified user names option is not selected.6. In the User account repository section, click the Available realm definitions
list and select Standalone custom registry.7. Click Configure.8. In the Primary administrative user name field, enter the administrator user
name that you specified in the command in step 2.9. Ensure that the custom registry class name is the following string:
com.ibm.is.isf.j2ee.impl.was.security.WASCustomUserRegistry
10. Click Apply.11. Select Server identity that is stored in the repository.12. In the Server user ID or administrative user on a Version 6.0.x node field,
type the short name of the user account that you created in step 2.13. In the Password field, type the password of the user account that you
specified in the command in 2.14. Click OK.15. In WebSphere Application Server 7.0: on the Global Security page, ensure that
LTPA is selected for the Active authentication mechanism setting.16. In the User account repository section, click the Available realm definitions
list and select Standalone custom registry.17. Click Set as current. If an error occurs, the application server is unable to
authenticate with the internal user registry by using the credentials that youprovided.
18. Click Apply and then click Save.19. Log out of the console.20. Stop WebSphere Application Server. In a clustered installation, stop the
application servers and the node agents, and then stop the DeploymentManager.
Important: When stopping the WebSphere Application Server processes, usethe credentials of the WebSphere Application Server administrator from theprevious user registry.
50 Administration Guide
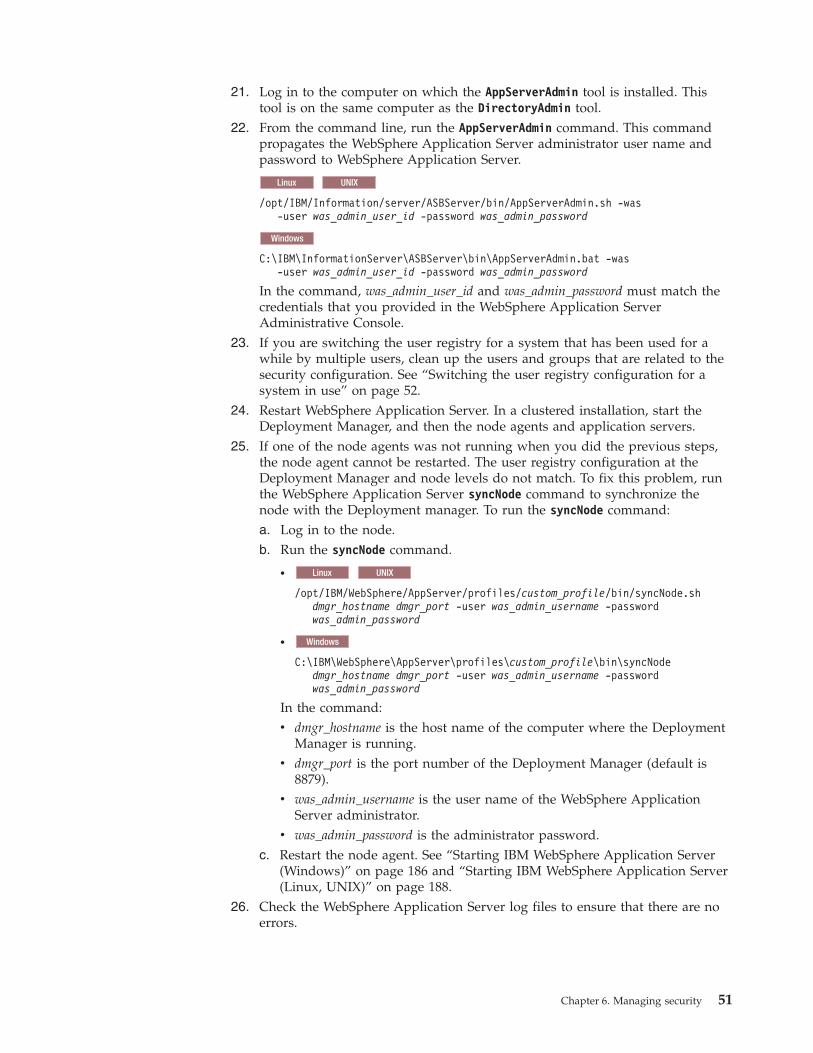
21. Log in to the computer on which the AppServerAdmin tool is installed. Thistool is on the same computer as the DirectoryAdmin tool.
22. From the command line, run the AppServerAdmin command. This commandpropagates the WebSphere Application Server administrator user name andpassword to WebSphere Application Server.
Linux UNIX
/opt/IBM/Information/server/ASBServer/bin/AppServerAdmin.sh -was-user was_admin_user_id -password was_admin_password
Windows
C:\IBM\InformationServer\ASBServer\bin\AppServerAdmin.bat -was-user was_admin_user_id -password was_admin_password
In the command, was_admin_user_id and was_admin_password must match thecredentials that you provided in the WebSphere Application ServerAdministrative Console.
23. If you are switching the user registry for a system that has been used for awhile by multiple users, clean up the users and groups that are related to thesecurity configuration. See “Switching the user registry configuration for asystem in use” on page 52.
24. Restart WebSphere Application Server. In a clustered installation, start theDeployment Manager, and then the node agents and application servers.
25. If one of the node agents was not running when you did the previous steps,the node agent cannot be restarted. The user registry configuration at theDeployment Manager and node levels do not match. To fix this problem, runthe WebSphere Application Server syncNode command to synchronize thenode with the Deployment manager. To run the syncNode command:a. Log in to the node.b. Run the syncNode command.
v Linux UNIX
/opt/IBM/WebSphere/AppServer/profiles/custom_profile/bin/syncNode.shdmgr_hostname dmgr_port -user was_admin_username -passwordwas_admin_password
v Windows
C:\IBM\WebSphere\AppServer\profiles\custom_profile\bin\syncNodedmgr_hostname dmgr_port -user was_admin_username -passwordwas_admin_password
In the command:v dmgr_hostname is the host name of the computer where the Deployment
Manager is running.v dmgr_port is the port number of the Deployment Manager (default is
8879).v was_admin_username is the user name of the WebSphere Application
Server administrator.v was_admin_password is the administrator password.
c. Restart the node agent. See “Starting IBM WebSphere Application Server(Windows)” on page 186 and “Starting IBM WebSphere Application Server(Linux, UNIX)” on page 188.
26. Check the WebSphere Application Server log files to ensure that there are noerrors.
Chapter 6. Managing security 51

What to do next
The administrator account is also automatically configured as the initial newInfoSphere Information Server default administrator.
After the user registry configuration change, you can open the InfoSphereInformation Server Web console, create new users, and grant them roles.
Switching the user registry configuration for a system in useIf you switch the user registry after the system has been used for a while bymultiple users, you must clean up the security repository as part of the userregistry change. If you switch the user registry immediately after installation, youdo not have to do this procedure.
About this task
If you must switch the user registry, do the registry switch immediately afterinstalling the software if possible, before you do any additional securityconfiguration tasks. If you must switch the user registry at a later time, do thisprocedure to clean up all previous security configuration settings. Settings includerole assignments, credential mappings, and access rights. These settings are deletedfrom the repository. You must configure the settings again manually for the newusers of the new registry.
If you must change the user registry after the system has been in production,consider instead migrating to a new installation to avoid any security issues andrisks. Otherwise, a mismatch might occur between the users of the old and newuser registries.
Procedure1. Perform the procedure to switch the user registry. Stop the procedure at the
point where you are directed back to this procedure. For user registry switchingprocedures, see “User registry configuration” on page 34.
2. Log in to the computer on which the DirectoryAdmin tool is installed:v If you have implemented WebSphere Application Server clustering within
your installation, log in to the computer that hosts the WebSphereApplication Server Deployment Manager.
v If you have not implemented clustering, log in to the services tier computer.3. From the command line, run the following command to clean up all of the
groups that are related to the security configuration:
Windows
C:\IBM\InformationServer\ASBServer\bin\DirectoryAdmin.bat -delete_groups
Linux UNIX
/opt/IBM/InformationServer/ASBServer/bin/DirectoryAdmin.sh -delete_groups
4. From the command line, run the following command to clean up all of theusers related to the security configuration:
Windows
C:\IBM\InformationServer\ASBServer\bin\DirectoryAdmin.bat -delete_users
Linux UNIX
/opt/IBM/InformationServer/ASBServer/bin/DirectoryAdmin.sh -delete_users
5. If you switch to the InfoSphere Information Server internal user registry, runthe following command from the command line again:
52 Administration Guide

Windows
C:\IBM\InformationServer\ASBServer\bin\DirectoryAdmin.bat -user-userid was_admin_username -password was_admin_password
Linux UNIX
/opt/IBM/InformationServer/ASBServer/bin/DirectoryAdmin.sh -user-userid was_admin_username -password was_admin_password
6. Complete the remainder of the user registry switching procedure.
User and group creationCreate users as the first level of security. You must create a user for each personwho will log in to IBM InfoSphere Information Server.
If the InfoSphere Information Server internal user registry is used, you can createusers and groups by using the InfoSphere Information Server console or theInfoSphere Information Server Web console. If you are using an external userregistry, such as the local operating system user registry or Lightweight DirectoryAccess Protocol (LDAP), you must create users and groups by using the userregistry administration tools. You cannot create users and groups in external userregistries by using the InfoSphere Information Server consoles.
Default and preconfigured usersIn addition to users that you create, several default or preconfigured users arecreated by you or for you during the installation process.
Accounts must be created for the administrator users for IBM InfoSphereInformation Server and IBM WebSphere Application Server. These users aretypically called "isadmin" and "wasadmin." You can choose to create them duringinstallation. The accounts must be created in the user registry that is used byWebSphere Application Server.
Table 5. Services tier users
Sample username Description
isadmin InfoSphere Information Server administrator
wasadmin WebSphere Application Server administrator and InfoSphere InformationServer administrator
Linux UNIX There must be at least one user account for the engine. Thisuser ID is typically called "dsadm." You can choose to create this account duringinstallation. It must be created in the user registry that is used by the engine. Thisuser registry can be the local operating system user registry. Alternatively, the userregistry can be an external user registry. This external user registry must beconfigured through Pluggable Authentication Modules (PAM). PAM must run onthe operating system of the computer that is hosting the engine.
Table 6. Engine tier users
Sample username Description
dsadm IBM InfoSphere DataStage administrator
Chapter 6. Managing security 53
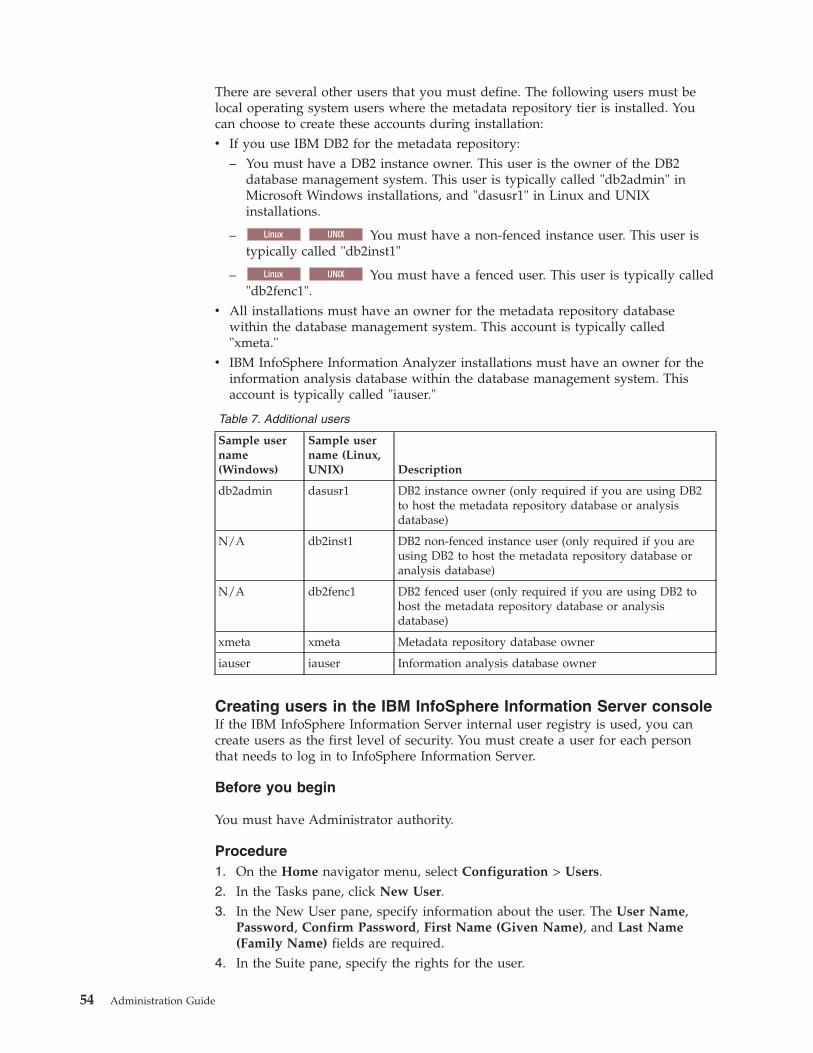
There are several other users that you must define. The following users must belocal operating system users where the metadata repository tier is installed. Youcan choose to create these accounts during installation:v If you use IBM DB2 for the metadata repository:
– You must have a DB2 instance owner. This user is the owner of the DB2database management system. This user is typically called "db2admin" inMicrosoft Windows installations, and "dasusr1" in Linux and UNIXinstallations.
– Linux UNIX You must have a non-fenced instance user. This user istypically called "db2inst1"
– Linux UNIX You must have a fenced user. This user is typically called"db2fenc1".
v All installations must have an owner for the metadata repository databasewithin the database management system. This account is typically called"xmeta."
v IBM InfoSphere Information Analyzer installations must have an owner for theinformation analysis database within the database management system. Thisaccount is typically called "iauser."
Table 7. Additional users
Sample username(Windows)
Sample username (Linux,UNIX) Description
db2admin dasusr1 DB2 instance owner (only required if you are using DB2to host the metadata repository database or analysisdatabase)
N/A db2inst1 DB2 non-fenced instance user (only required if you areusing DB2 to host the metadata repository database oranalysis database)
N/A db2fenc1 DB2 fenced user (only required if you are using DB2 tohost the metadata repository database or analysisdatabase)
xmeta xmeta Metadata repository database owner
iauser iauser Information analysis database owner
Creating users in the IBM InfoSphere Information Server consoleIf the IBM InfoSphere Information Server internal user registry is used, you cancreate users as the first level of security. You must create a user for each personthat needs to log in to InfoSphere Information Server.
Before you begin
You must have Administrator authority.
Procedure1. On the Home navigator menu, select Configuration > Users.2. In the Tasks pane, click New User.3. In the New User pane, specify information about the user. The User Name,
Password, Confirm Password, First Name (Given Name), and Last Name(Family Name) fields are required.
4. In the Suite pane, specify the rights for the user.
54 Administration Guide
5. In the Suite Component pane, select whether the user has any suite componentroles. You must add at least one suite component role for each suite componentthat you want the user to access. For example, if you are creating a user thatwill access IBM InfoSphere Information Analyzer, you must assign theInformation Analyzer Project Administrator, Data Administrator, or User role.
6. Optional: In the Groups pane, click Browse to add the user to a group.a. In the Add Groups window, select the group that you want to add the user
to.b. Click Add.c. Click OK to close the window.
7. Click Save > Save and Close.
What to do next
After you create users, you can add the users to new or existing projects.
Creating groups in the IBM InfoSphere Information ServerconsoleIf the IBM InfoSphere Information Server internal user registry is used, you cancreate user groups and assign security settings and roles to the groups. All usersthat belong to a group automatically inherit the security settings and roles that areassigned to the group.
Before you begin
You must have Administrator authority.
Procedure1. On the Home navigator menu, select Configuration > Groups.2. On the Groups workspace, click New Group on the Tasks pane.3. Specify information about the group. The ID and the Group Name fields are
required.4. In the Suite pane, specify the rights for the group.5. In the Suite Component pane, select whether the group has any suite
component roles. You must add at least one suite component role for each suitecomponent that you want the group of users to access. For example, if you arecreating a group that will access IBM InfoSphere Information Analyzer, youmust assign the Information Analyzer Project Administrator, DataAdministrator, or User role.
6. Optional: In the Users pane, click Browse to add users to the group.a. In the Add Users window, select the user that you want to add to the
group.b. Click Add.c. Click OK to close the window.
7. Click Save > Save and Close.
What to do next
After you create groups, you can add the groups to new or existing projects.
Chapter 6. Managing security 55
Adding users to a group in the IBM InfoSphere InformationServer consoleIf the IBM InfoSphere Information Server internal user registry is used, you canadd users to a group to quickly assign and reassign user roles.
Procedure1. On the Home navigator menu, select Configuration > Groups.2. In the Groups workspace, select a group.3. In the Task pane, click Open.4. In the Users pane, click Browse.5. In the Add Users window, select the users that you want to add to the group.6. Click Add.7. Click OK to save your choices and to close the Add Users window.8. Click Save > Save and Close to save the assignments.
Creating users in the IBM InfoSphere Information Server WebconsoleIf the IBM InfoSphere Information Server internal user registry is used, you cancreate users as the first level of security. You must create a user for each personthat needs to log in to InfoSphere Information Server.
Before you begin
You must have suite administrator authority.
Procedure1. In the IBM InfoSphere Information Server Web console, click the
Administration tab.2. In the Navigation pane, select Users and Groups > Users.3. In the Users pane, click New User.4. In the Create New User pane, provide information about the user.5. In the Roles pane, specify whether the user is an administrator and user of the
suite or a user of the suite.6. In the Suite Component pane, select whether the user has any suite component
roles. To log in to any of the product modules, a user must have the suite userrole. Also add at least one suite component role for each suite component thatyou want the user to access. For example, if you are creating a user that willaccess IBM InfoSphere Information Analyzer, you must assign the suite userrole, and also the Information Analyzer Project Administrator, DataAdministrator, or User role.
7. Click Save and Close to save the user information in the metadata repository.
Creating groups in the IBM InfoSphere Information Server WebconsoleIf the IBM InfoSphere Information Server internal user registry is used, you cancreate user groups and assign security settings and roles to the groups. All usersthat belong to a group automatically inherit the security settings and roles that areassigned to the group.
Before you begin
You must have suite administrator authority.
56 Administration Guide
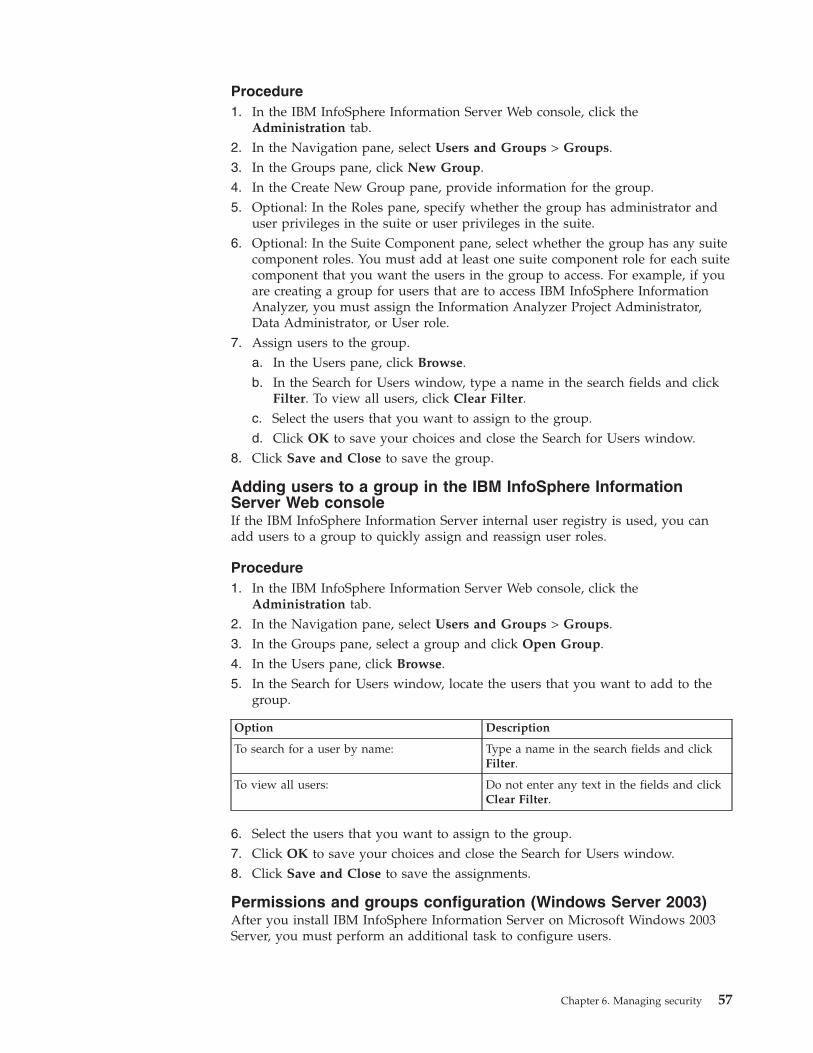
Procedure1. In the IBM InfoSphere Information Server Web console, click the
Administration tab.2. In the Navigation pane, select Users and Groups > Groups.3. In the Groups pane, click New Group.4. In the Create New Group pane, provide information for the group.5. Optional: In the Roles pane, specify whether the group has administrator and
user privileges in the suite or user privileges in the suite.6. Optional: In the Suite Component pane, select whether the group has any suite
component roles. You must add at least one suite component role for each suitecomponent that you want the users in the group to access. For example, if youare creating a group for users that are to access IBM InfoSphere InformationAnalyzer, you must assign the Information Analyzer Project Administrator,Data Administrator, or User role.
7. Assign users to the group.a. In the Users pane, click Browse.b. In the Search for Users window, type a name in the search fields and click
Filter. To view all users, click Clear Filter.c. Select the users that you want to assign to the group.d. Click OK to save your choices and close the Search for Users window.
8. Click Save and Close to save the group.
Adding users to a group in the IBM InfoSphere InformationServer Web consoleIf the IBM InfoSphere Information Server internal user registry is used, you canadd users to a group to quickly assign and reassign user roles.
Procedure1. In the IBM InfoSphere Information Server Web console, click the
Administration tab.2. In the Navigation pane, select Users and Groups > Groups.3. In the Groups pane, select a group and click Open Group.4. In the Users pane, click Browse.5. In the Search for Users window, locate the users that you want to add to the
group.
Option Description
To search for a user by name: Type a name in the search fields and clickFilter.
To view all users: Do not enter any text in the fields and clickClear Filter.
6. Select the users that you want to assign to the group.7. Click OK to save your choices and close the Search for Users window.8. Click Save and Close to save the assignments.
Permissions and groups configuration (Windows Server 2003)After you install IBM InfoSphere Information Server on Microsoft Windows 2003Server, you must perform an additional task to configure users.
Chapter 6. Managing security 57
About this task
Which task you use depends on whether Microsoft Windows Server 2003 isconfigured to be a domain controller.
The first time that a user of an InfoSphere Information Server client, such as theIBM InfoSphere DataStage client or the IBM InfoSphere Information Server console,successfully logs in to the InfoSphere Information Server services tier, the server isadded to the registered-servers.xml file. This file is located in theC:\IBM\InformationServer\ASBNode\eclipse\plugins\com.ibm.isf.client_8.5.0.0directory by default.
When logging in to the services tier for the first time, the operating system user onthe client must have write permission to the registered-servers.xml file on theclient so that in can be updated. If the user does not have the required permission,the login fails.
System administrators can limit access to specific InfoSphere Information Serverservices tiers from any client by removing the file system write permission to theregistered-servers.xml file. The administrator, or anyone who has writepermission, can log in ahead of time to each server that the client user will access.The administrator can then distribute the prepopulated registered-servers.xmlfile to the remaining clients in their network. To set or remove file system writepermission, see “Configuring write permission to the registered-servers.xml file”on page 61.
Configuring permissions and groups (Windows Server 2003):
You must complete these tasks to configure users and groups to access to IBMInfoSphere Information Server. This configuration is required only for the enginetier computer. This configuration is only applicable to the users of the operatingsystem where the engine tier components are installed.
Procedure
1. Log in to Microsoft Windows Server 2003 as an administrator.2. Configure users to log in.
a. Click Start > Control Panel > Administrative Tools > Local SecurityPolicy.
b. In the Local Security Settings window, expand Local Policies > User RightsAssignment to display the policies.
c. In the Local Security window click the Allow log on Locally policy, andclick Actions > Properties.
d. In the Allow log on Locally Properties window, click Add User or Group.e. In the Select Users or Groups window, click Locations, click the name of
your local computer, and click OK.f. In the Select Users or Groups window, click Advanced, and then click Find
Now.g. In the search results, click Authenticated Users, and then click OK three
times to save the results and to return to the Local Security window.h. Close the Local Security Policy window.
3. Create a group of users.a. Click Start > Control Panel > Administrative Tools > Computer
Management.
58 Administration Guide
b. In the Computer Management window, expand System Tools > Local Usersand Groups > Groups.
c. Click Action > New Group.d. In the New Group window, type the name for the group, click Create, and
click Close.4. Add users to the group.
a. From the Computer Management window, click Groups.b. Click the name of the group that you want to add users to.c. Click Action > Add to Group.d. In the User Properties window, click Add.e. In the Select Users or Groups window, click Location.f. Click the name of your local computer, and then click OK.g. In the Select Users window, click Advanced.h. In the window that opens, click Find Now.i. Click the names of users that you want to include in the group, and click
OK. At a minimum, include all authenticated users.j. Click OK three times to return to the Computer Management window.k. Close the Computer Management window.
5. Set permissions for the server folder.a. In Windows Explorer, locate the server folder. The default location is
c:\IBM\InformationServer\Server.b. Click File > Properties.c. In the Properties window, click the Security tab, and click Add.d. In the Select Users or Groups window, click Locations.e. Click the name of the local computer, and click OK.f. In the Select Users or Groups window, click Advanced.g. In the window that opens, click Find Now.h. Click the name of the group that you want to set permissions for.i. Click OK twice.j. In the Permissions list, locate Modify.k. Click Write in the Allow column for this item, and click OK.l. If you receive a message that asks you to confirm the changes, click Apply
changes to this folder, subfolders and files.
Configuring permissions and groups (Windows Server 2003 domain controller):
If Microsoft Windows Server 2003 is a domain controller, you must complete thesetasks to configure users and groups to access IBM InfoSphere Information Server.This configuration is required only for the engine tier computer and is onlyapplicable to the users of the operating system where the engine tier componentsare installed.
Procedure
Because you cannot add the built-in authenticated users group to a group that youcreate in steps 2 and 3 on page 60, you might prefer to skip steps 2 and 3 on page60 and use the authenticated users group directly.1. Log in to Microsoft Windows Server 2003 as an administrator.2. Configure the server to allow local users to log in.
Chapter 6. Managing security 59
a. Click Start > Control Panel > Administrative Tools > Domain SecurityPolicy.
b. In the Domain Security Policy window, expand Local Policies > UserRights Assignment to display the policies.
c. In the Domain Security window, click the Allow log on Locally policy, andclick Actions > Properties.
d. In the Allow log on Locally Properties window, click Add User or Group.e. Click Browse.f. In the Select Users, Computers, or Groups window, click Advanced and then
click Find Now.g. In the search results, click Authenticated Users, and then click OK three
times to return to the Domain Security Policy window.h. Close the Domain Security Policy window.
3. Create a group.a. Click Start > Control Panel > Administrative Tools > Active Directory and
Computers.b. In the Active Directory and Computers window, click Users in the current
domain.c. In the window that opens, click Action > New Group.d. In the New Group window, type the name for the group.e. Leave Group scope as Global and Group type as Security.f. Click OK
4. Add users to the group.a. In the Users in the current domain window, click the name of the group
that you want to add users to, and click OK. Authenticated users are notavailable.
b. Click Action > Properties.c. In the Properties window, click the Members tab, and then click Add.d. In the window that opens, click Advanced, and then click Find Now.e. Click the names of users that you want to add to the group, and then click
OK. Authenticated users are not available.f. Click OK two times to save your results and to return to the Active
Directory and Computers window.g. Close the Active Directory and Computers window.
5. Set permissions on the server folder.a. In Windows Explorer, locate the server folder. The default location is
c:\IBM\InformationServer\Server.b. Click File > Properties.c. In the Properties window, click the Security tab, and click Add.d. In the Select Users, Computers, or Groups window, click Locations.e. In the window that opens, click Advanced, and then click Find Now.f. Click the name of the group that you want to set permissions for.g. Click OK, and then click OK again.h. Click the name of the group that you want to set permissions for.i. In the Permissions list, locate Modify.j. Click Write in the Allow column for this item, and click OK.
60 Administration Guide

k. If you receive a message to confirm your changes, confirm by clickingApply changes to this folder, subfolders and files.
Configuring write permission to the registered-servers.xml file:
The first time that a given services tier is accessed from a given client system, theuser that is currently logged into the operating system must have write permissionto the registered-servers.xml file to allow the application to add the host nameand port of the client system to the file. Once the information is added, anysubsequent login by any user by any InfoSphere Information Server application onthe client system only requires read access to the file.
About this task
When an InfoSphere Information Server client application logs into a services tierfor the first time, the application adds the services tier host name and port to thelocal registered-servers.xml file. This file contains the list of services tiers to bedisplayed as choices for subsequent client logins.
Be default, administrators have write permission to the registered-servers.xmlfile. In addition, you can provide write permissions for specific users. To enablewrite permission for a specific user, follow this procedure.
Note: Write permission is only needed for the first user to log in to a new servicestier.
Procedure
1. In Microsoft Windows Explorer, locate the registered-servers.xml file. Bydefault, this file is located in the following directory: C:\IBM\InformationServer\ASBNode\eclipse\plugins\com.ibm.isf.client_8.5.0.0
2. Select the file.3. Select File > Properties.4. In the Properties window, click the Security tab.5. Click Add.6. In the Select Users or Groups window, click Locations.7. Select the name of your local computer and click OK.8. In the Select Users window, click Advanced.9. Click Find Now.
10. Select the name of the group or the user that you want to set permissions for.11. Click OK.12. Click OK.13. In the Permissions list, locate Write.14. Click Allow for this item, and then click OK.15. If you receive a message to confirm your changes, confirm by clicking Apply
changes to this folder, subfolders and files.
Assigning user rolesIBM InfoSphere Information Server supports role-based access control. User rolesdetermine which features users can use. For some suite components, user roles alsodetermine which projects a user can access.
Chapter 6. Managing security 61

User roles can be defined at several levels that build on one another. Users deriveauthority from the combination of their role in InfoSphere Information Server (theirsuite roles), their role in the suite component (for example, IBM InfoSphereInformation Analyzer or IBM InfoSphere FastTrack), and the permissions they haveto work in a given project (their project roles).
Suite
Suite-level roles are the basic roles that users need to access any part of InfoSphereInformation Server. Users who are not Suite Users cannot authenticate withInfoSphere Information Server. All InfoSphere Information Server users must havethe Suite User role. A suite user can also have the Suite Administrator role tocomplete administration tasks. Users with the Suite Administrator role must alsohave the Suite User role assigned to their user names.
The common metadata component roles are also suite-level roles. These roles havecertain authority over metadata in the metadata repository.
Component
Component-level roles provide access to the features of a specific product module.Users can be users or administrators of a product module. For example, you can bean InfoSphere Information Analyzer user and an IBM InfoSphere DataStageadministrator.
Project
Project-level roles are defined in the product module and by the product module.For example, in an information analysis project in the IBM InfoSphere InformationServer console, you can assign a user the Information Analyzer Data Steward rolefor that project.
Assigning user roles
Typically, an InfoSphere Information Server administrator assigns suite-level rolesand component-level roles. Both roles are assigned by using the IBM InfoSphereInformation Server console or IBM InfoSphere Information Server Web console.
After the security roles are configured, the administrator of each product modulefurther defines the project-level roles in the IBM InfoSphere Information Serverconsole or the IBM InfoSphere DataStage and QualityStage Administrator client. Toperform the actions of a particular project-level role, a user must also havesuite-level access and access to the product module that owns the project. Forexample, to be an InfoSphere DataStage developer, a user must be assigned theroles of suite user and component-level InfoSphere DataStage, as well as theInfoSphere DataStage developer project role.
Security role overviewIBM InfoSphere Information Server supports role-based access control. Users deriveauthority from the union of their roles in InfoSphere Information Server (the suiteroles), their roles in the suite component, such as IBM InfoSphere InformationAnalyzer (the suite component roles), and the projects that they work with (theproject roles).
Security configuration is performed by two levels of administrators:
62 Administration Guide
InfoSphere Information Server administratorsThese administrators are in charge of assigning the suite and suitecomponent roles to users. These roles determine which suite componentsthe user can access and whether the user has component administrator orcomponent user access in those suite components. InfoSphere InformationServer administrators can also configure credential mappings forInfoSphere Information Analyzer, IBM InfoSphere DataStage, and IBMInfoSphere QualityStage users. InfoSphere Information Serveradministrators must have, at least, the Suite Administrator and Suite Userrole assigned to their user names. During installation, a default InfoSphereInformation Server administrator is created to perform the initialinstallation tasks and configure the user registry. The default IBMWebSphere Application Server administrator is always automaticallyconfigured as an InfoSphere Information Server administrator when yourestart IBM WebSphere Application Server.
InfoSphere Information Server suite component administratorsThese administrators are in charge of assigning the component project rolesto the users that were configured by the InfoSphere Information Serveradministrator. These assignments are configured in the suite component.For example, the InfoSphere Information Server component administratorcan assign the Information Analyzer Business Analyst role to a user in theinformation analysis screens of the console. For InfoSphere DataStageprojects, these role assignments are configured in the InfoSphere DataStageAdministrator client. The InfoSphere DataStage and QualityStageadministrators can also use the IBM InfoSphere Information Server Webconsole to configure credential mappings.
Suite roles
Suite AdministratorProvides maximum InfoSphere Information Server administrationprivileges.
Suite UserIdentifies which users in the user registry have general access toInfoSphere Information Server and the suite components. A user must havethis role to authenticate with InfoSphere Information Server or any of thesuite components.
The common metadata roles are also suite roles. See “Common metadata roles” onpage 67.
The following figure shows the InfoSphere Information Server security roles.
Chapter 6. Managing security 63
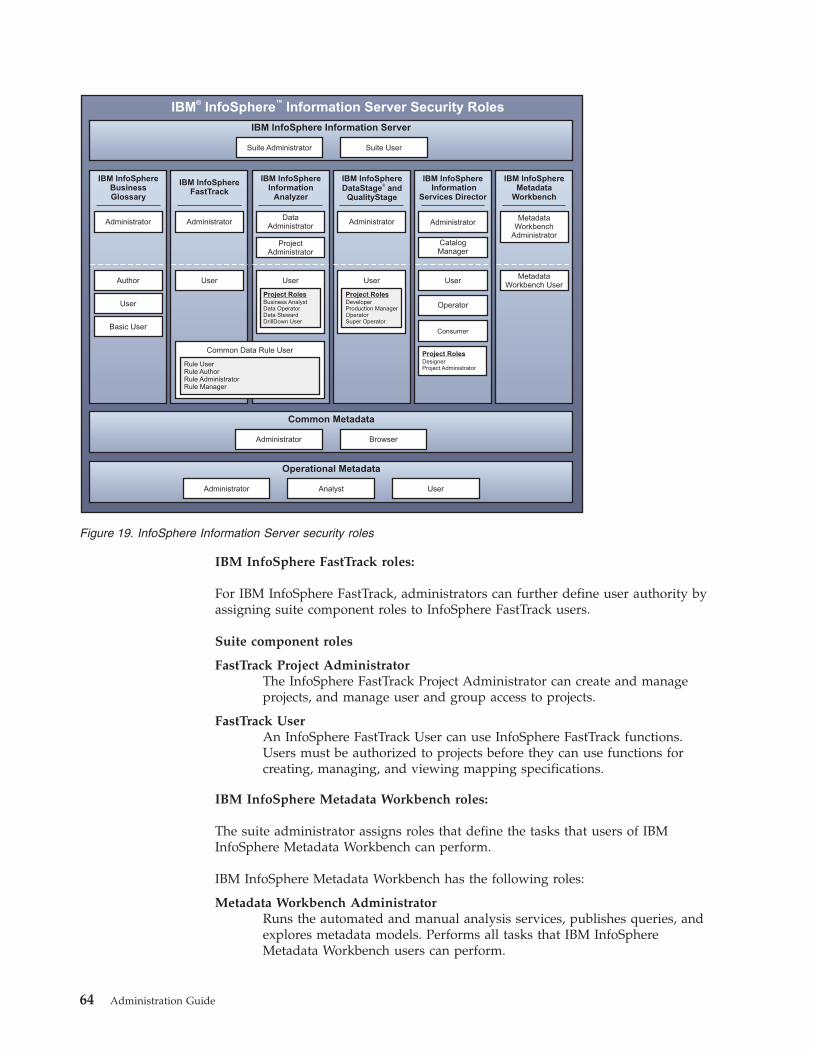
IBM InfoSphere FastTrack roles:
For IBM InfoSphere FastTrack, administrators can further define user authority byassigning suite component roles to InfoSphere FastTrack users.
Suite component roles
FastTrack Project AdministratorThe InfoSphere FastTrack Project Administrator can create and manageprojects, and manage user and group access to projects.
FastTrack UserAn InfoSphere FastTrack User can use InfoSphere FastTrack functions.Users must be authorized to projects before they can use functions forcreating, managing, and viewing mapping specifications.
IBM InfoSphere Metadata Workbench roles:
The suite administrator assigns roles that define the tasks that users of IBMInfoSphere Metadata Workbench can perform.
IBM InfoSphere Metadata Workbench has the following roles:
Metadata Workbench AdministratorRuns the automated and manual analysis services, publishes queries, andexplores metadata models. Performs all tasks that IBM InfoSphereMetadata Workbench users can perform.
Administrator Analyst User
Operational Metadata
IBM InfoSphere Information Server Security Roles™®
IBM InfoSphere Information Server
Suite Administrator Suite User
Administrator Browser
Common Metadata
IBM InfoSphereBusinessGlossary
Administrator
Author
User
IBM InfoSphereFastTrack
Administrator
User
IBM InfoSphereInformation
Analyzer
DataAdministrator
ProjectAdministrator
User
Project RolesBusiness AnalystData OperatorData StewardDrillDown User
IBM InfoSphereDataStage and
QualityStage
®
Administrator
User
Project RolesDeveloperProduction ManagerOperatorSuper Operator
Project Roles
IBM InfoSphereInformation
Services Director
Administrator
CatalogManager
User
Consumer
IBM InfoSphereMetadata
Workbench
MetadataWorkbench
Administrator
MetadataWorkbench User
Operator
Common Data Rule User
Rule UserRule AuthorRule AdministratorRule Manager
Basic User
DesignerProject Administrator
Figure 19. InfoSphere Information Server security roles
64 Administration Guide

The Metadata Workbench administrator must be familiar with theenterprise database metadata and data file metadata that is imported intothe repository. The administrator must also be familiar with the metadatathat is used in jobs.
Metadata Workbench UserFinds and explores information assets, runs analysis reports, and creates,saves, and runs queries.
IBM InfoSphere Business Glossary roles:
For IBM InfoSphere Business Glossary, administrators can further define userauthority by assigning suite component roles to InfoSphere Business Glossaryusers.
Suite component roles
Business Glossary AdministratorCan set up and administer the glossary so that other users can find andanalyze the information that they need. Can also create stewards fromusers and groups.
Business Glossary AuthorCan create and edit terms and categories, including assigning assets in themetadata repository to terms.
Business Glossary UserCan examine the terms and categories in the glossary, and the assets in themetadata repository.
Business Glossary Basic UserCan examine the terms and categories in the glossary, but cannot examinethe assets in the metadata repository.
IBM InfoSphere DataStage and IBM InfoSphere QualityStage roles:
For InfoSphere DataStage and InfoSphere QualityStage, administrators can furtherdefine user authority by assigning suite component and project roles to InfoSphereDataStage and InfoSphere QualityStage users.
You can assign suite component roles in the console or the Web console. Projectroles can be assigned only in the Permissions page of the IBM InfoSphereDataStage Administrator client.
Suite component roles
DataStage and QualityStage AdministratorCan perform the following tasks:v Assign project roles to InfoSphere DataStage suite users in the
InfoSphere DataStage Administrator clientv Use the Administrator client to create, delete, and configure projectsv Mark projects as protectedv Unprotect protected projectsv Issue server engine commandsv Use the Designer client to create and edit jobs and other objectsv Use the Director client to run and schedule jobsv View the entire job log messages
Chapter 6. Managing security 65
v Import objects into protected projects
With this role, the user cannot edit jobs or other objects in protectedprojects.
DataStage and QualityStage UserProvides access to InfoSphere DataStage and InfoSphere QualityStage.Additionally, this role is used to filter the lists of users and groups that areshown in the InfoSphere DataStage Administrator client. If an IBMInfoSphere Information Server user does not have this role, that usercannot access any of the InfoSphere DataStage or InfoSphere QualityStageproduct modules, even if that user has InfoSphere DataStage or InfoSphereQualityStage project roles assigned to the user name.
Project roles
DataStage DeveloperCan perform the following tasks:v Use the Designer client to create and edit jobs and other objectsv Use the Director client to run and schedule jobsv View entire job log messages
With this role, the user can also use the Administrator client to performlimited tasks including changing project NLS settings and changing projectproperties (not protect/unprotect).
With this role, the user cannot edit jobs or other objects in protectedprojects, create, delete, or configure projects (can perform limitedconfiguration tasks), mark existing projects as protected, unprotectprotected projects, assign project roles to InfoSphere DataStage suite usersin the Administrator client, or import objects into protected projects.
DataStage Production ManagerCan perform the following tasks:v Mark existing projects as protectedv Unprotect protected projectsv Use the Designer client to create and edit jobs and other objectsv Use the Director client to run and schedule jobsv View entire job log messagesv Import objects into protected projects
With this role, users can also use the InfoSphere DataStage Administratorclient to perform limited tasks including changing the project NLS settings,issuing server engine commands, and changing project properties.
With this role, users cannot edit jobs or other objects in protected projects.In addition, the role cannot create, delete, or configure projects (except forlimited configuration tasks), or assign project roles to InfoSphere DataStagesuite users in the Administrator client.
DataStage OperatorCan perform the following tasks:v Use the Director client to run and schedule jobsv View entire job log messages (unless set to read first line only by
InfoSphere DataStage Administrator)
66 Administration Guide
With this role, users can also use the Administrator client to performlimited tasks including changing project NLS settings and changing projectproperties (not protect/unprotect).
DataStage Super OperatorCan perform the following tasks:v Use the Director client to run and schedule jobsv View entire job log messagesv Use the Designer client to view jobs and view objects
This role can also use the Administrator client to perform limited tasksincluding changing project NLS settings and changing project properties(not protect/unprotect).
With this role, users cannot use the Designer client to create and edit jobsand other objects, edit jobs or other objects in protected projects, create,delete or configure projects, mark existing projects as protected, unprotectprotected projects, assign project roles to InfoSphere DataStage suite usersin the Administrator client, or import objects into protected projects.
For more information, see the IBM InfoSphere DataStage and QualityStageAdministrator Client Guide.
Operational metadata roles:
You can assign operational metadata component roles to a user.
Suite component roles
Operational Metadata AdministratorCan import operational metadata into the repository. You can assign thisrole to a suite user and edit the runimporter.cfg file to include the username and password of that user. When you run the runimporter file, ituses those credentials to allow the user to import operational metadatainto the repository.
Operational Metadata AnalystCan create and run reports on operational metadata in the Reporting tab ofthe Web console.
Operational Metadata UserCan view reports on operational metadata.
Common metadata roles:
You can assign common metadata component roles to a user.
Suite component roles
Common Metadata AdministratorCan browse assets and delete assets from the repository by using theRepository Manager.
Common Metadata UserCan browse and analyze metadata by using the Repository Manager.
Common data rule roles:
You can assign data rule roles to a user.
Chapter 6. Managing security 67
Suite component roles
Rule AdministratorSets up and administers who can access and run data rules and rule sets,so that other users can find and run data rules and rule sets for projects.
Rule AuthorProvides the ability to author data rule definitions and rule set definitions.
Rule ManagerManages the creation and organization of data rules and rule sets. This rolemanages who can create data rule definitions, rule set definitions, andmetrics, as well as who can run data rules, rule sets, and metrics.
Rule UserProvides the ability to run data rules and rule sets.
IBM InfoSphere Information Analyzer roles:
For IBM InfoSphere Information Analyzer, administrators can further define userauthority by assigning suite component and project roles to InfoSphere InformationAnalyzer users.
You can assign suite component roles in the IBM InfoSphere Information Serverconsole or the IBM InfoSphere Information Server Web console. Project roles can beassigned only in the Project Properties workspace of the console.
Suite component roles
Information Analyzer Data AdministratorCan import metadata, modify analysis settings, and add and modifysystem sources.
Information Analyzer Project AdministratorCan administer projects by creating, deleting, and modifying informationanalysis projects.
Information Analyzer UserCan log on to InfoSphere Information Analyzer, view the dashboard, andopen a project.
Project roles
Information Analyzer Business AnalystReviews analysis results. With this role, users can set baselines andcheckpoints for baseline analysis, publish analysis results, delete analysisresults, and view the results of analysis jobs.
Information Analyzer Data OperatorManages data analyses and logs. With this role, users can run or scheduleall analysis jobs.
Information Analyzer Data StewardProvides read-only views of analysis results. With this role, users can alsoview the results of all analysis jobs.
Information Analyzer DrillDown UserProvides the ability to drill down into source data if drill down security isenabled.
IBM InfoSphere Information Services Director roles:
68 Administration Guide
For IBM InfoSphere Information Services Director, administrators can furtherdefine user authority by assigning suite component roles and project roles toInfoSphere Information Services Director users.
Suite component roles
Information Services Director Catalog ManagerProvides full access to the Information Services Catalog tab including theability to manage and modify services categories, services, and customattributes. The InfoSphere Information Services Director Administrator isautomatically granted Information Services Catalog Manager authority.
Information Services Director AdministratorProvides access to all of the InfoSphere Information Services Directorfunctions.
Information Services Director ConsumerProvides ability to invoke secured services.
Information Services Director OperatorProvides access to the InfoSphere Information Services Director runtimefunctions. An operator can add and remove providers as well as configureruntime parameters of a deployed application, service and operation. Inaddition, an operator can deploy applications from the design time view.
Information Services Director UserProvides access to view a list of applications in the runtime environmentand view information on the Information Services Catalog tab. This usercan browse deployed applications, services, operations, and providers.
Project roles
Information Services Director DesignerWith the Information Services Director Designer role, users can access onlyprojects that it is authorized for at design time. At the project level atdesign time, the ISD Designer can:v View project details and the list of projectsv View the list of applicationsv Update applicationsv Export applicationsv Import services into an existing applicationv View, add, or remove services.
At run time, the Information Services Director Designer can view the list ofapplications.
Information Services Director Project AdministratorProvides access to create and delete applications, add and remove usersand groups to projects, and edit project properties.
Assigning security roles in the IBM InfoSphere InformationServer consoleTo create a secure project environment, you can define a security policy that isbased on user authentication and role identification. Users derive authority fromthe union of their individual and group roles.
Chapter 6. Managing security 69

About this task
In the IBM InfoSphere Information Server console, you can specify which rolesusers can perform in the suite. You can further define which suite components theusers have access to and what their roles are in those suite components.
Assigning security roles to a user in the IBM InfoSphere Information Serverconsole:
All users require authorization to access components and features of the IBMInfoSphere Information Server. You can assign one or more suite and suitecomponent roles to a user.
Before you begin
You must have suite administrator authority.
About this task
Changing the roles that are assigned to a user does not affect any currently activesessions for that user. The new role assignments will only be available the nexttime the user logs in. You can use session administration to disconnect the userand force the user to log in again.
Procedure
1. On the Home navigator menu, select Configuration > Users.2. In the Users workspace, select a user.3. In the Task pane, click Assign Roles.4. In the Roles pane, select a suite role to assign to the user.5. In the Suite Component pane, select one or more suite component roles to
assign to the user.6. Click Save > Save and Close to save the authorizations in the metadata
repository.
What to do next
Certain suite components, such as IBM InfoSphere DataStage and IBM InfoSphereInformation Analyzer, also require that you assign additional user roles in theclients or projects.
Assigning security roles to a group in the IBM InfoSphere Information Serverconsole:
You can assign one or more suite and suite component roles to a group of users.
Before you begin
You must have suite administrator authority.
About this task
Changing the roles that are assigned to a group does not affect any currently activesessions for the users in that group. The new role assignments will only beavailable the next time the users log in. You can use session administration todisconnect the users and force the users to log in again.
70 Administration Guide
Procedure
1. On the Home navigator menu, select Configuration > Groups.2. In the Groups workspace, select a group.3. In the Task pane, click Assign Roles.4. In the Roles pane, select a suite role to assign to the group.5. In the Suite Component pane, select one or more suite component roles to
assign to the group.6. Click Save > Save and Close to save the authorizations in the metadata
repository.
Viewing the roles that are assigned to a user or a group:
In the IBM InfoSphere Information Server console, you can view the suite andsuite component roles that are assigned to a user or group. If an administratorassigned project roles to the user or group, you can also view the project roles.
Before you begin
You must have suite administrator authority.
Procedure
1. On the Home navigator menu, select Configuration > Users, or selectConfiguration > Groups.
2. Select a user or group and click Open.3. In the Roles pane, view the list of assigned suite, suite component, or assigned
project roles. Project roles are assigned in the context of a project in IBMInfoSphere DataStage, or in the IBM InfoSphere Information Server console.
Assigning users to a project and assigning roles:
When you create a project, you can specify which users can access that project. Youcan also specify which actions users can perform in that project.
About this task
To add users to a project and assign roles, you use different tools. The tool you usedepends upon the product module in which you are working:v For IBM InfoSphere Information Analyzer and IBM InfoSphere Information
Services Director, use the IBM InfoSphere Information Server console asdescribed in this procedure.
v For IBM InfoSphere DataStage and IBM InfoSphere QualityStage, use the IBMInfoSphere DataStage and QualityStage Administrator. See the IBM InfoSphereDataStage and QualityStage Administrator Client Guide.
v For IBM InfoSphere FastTrack, use the IBM InfoSphere FastTrack console. See theIBM InfoSphere FastTrack Tutorial.
To add users to a project and assign roles for IBM InfoSphere Information Analyzerand IBM InfoSphere Information Services Director:
Procedure
1. In the IBM InfoSphere Information Server console, open the project that youwant to assign users and roles to.
Chapter 6. Managing security 71
2. On the Overview navigator menu in the IBM InfoSphere Information Serverconsole, select Project Properties.
3. On the Project Properties workspace, select the Users tab.4. In the Users pane, click Browse to add users to the project.5. On the Add Users window, select the users that you want to add to the project,
click Add, then click OK.6. On the Project Roles pane, select a project role to assign to the selected user. A
user can be assigned one or more roles in a project.7. Click Save All.
Assigning groups to a project and specifying roles:
When you create a project, you can specify which groups can access that project.You can also specify which actions they can perform in that project.
About this task
To assign groups to a project and select roles, you use different tools. The tool youuse depends on the product module in which you are working:v For IBM InfoSphere Information Analyzer and IBM InfoSphere Information
Services Director, use the IBM InfoSphere Information Server console asdescribed in this procedure.
v For IBM InfoSphere DataStage and IBM InfoSphere QualityStage, use the IBMInfoSphere DataStage and QualityStage Administrator. See the IBM InfoSphereDataStage and QualityStage Administrator Client Guide.
v For IBM InfoSphere FastTrack, use the IBM InfoSphere FastTrack console. See theIBM InfoSphere FastTrack Tutorial.
Procedure
To assign groups to a project and select roles for IBM InfoSphere InformationAnalyzer and IBM InfoSphere Information Services Director:1. In the IBM InfoSphere Information Server console, open the project that you
want to assign groups to.2. On the Overview navigator menu in the IBM InfoSphere Information Server
console, select Project Properties.3. On the Project Properties workspace, select the Groups tab.4. In the Groups pane, click Browse to add groups to the project.5. On the Add Groups window, select the groups that you want to add to the
project, click Add, then click OK.6. On the Project Roles pane, select a role to assign to the selected group. A group
can be assigned one or more roles in a project.7. Click Save All.
Assigning security roles in the IBM InfoSphere InformationServer Web consoleTo create a secure project environment, you define a security policy that is basedon user authentication and roles. Users derive authority from the union of theirindividual and group roles.
72 Administration Guide
About this task
In the IBM InfoSphere Information Server Web console, you can specify whichroles users can perform in the suite. You can further define which suitecomponents the users have access to and what their roles are in those suitecomponents.
Assigning security roles to a user in the IBM InfoSphere Information ServerWeb console:
All users require authorization to access components and features of IBMInfoSphere Information Server. You can assign one or more suite and suitecomponent roles to a user.
Before you begin
You must have suite administrator authority.
About this task
Changing the roles that are assigned to a user does not affect any currently activesessions for that user. The new role assignments will only be available the nexttime the user logs in. You can use session administration to disconnect the userand force the user to log in again.
Procedure
1. In the IBM InfoSphere Information Server Web console, click theAdministration tab.
2. In the Navigation pane, select Users and Groups > Users.3. In the Users pane, select a user and click Open User.
Note: You can assign roles to more than one user at a time by clicking AddRoles to Multiple Users.
4. In the Roles pane, select a suite role to assign to the user.5. In the Suite Component pane, select one or more suite component roles to
assign to the user.6. Click Save and Close to save the authorizations in the metadata repository.
What to do next
Certain suite components, such as IBM InfoSphere DataStage and IBM InfoSphereInformation Analyzer, also require that you assign additional user roles in theclients or projects.
Assigning security roles to a group in the IBM InfoSphere Information ServerWeb console:
You can assign one or more suite and suite component roles to a group of users.
Before you begin
You must have suite administrator authority.
Chapter 6. Managing security 73
About this task
Changing the roles that are assigned to a group does not affect any currently activesessions for the users in that group. The new role assignments will only beavailable the next time the users log in. You can use session administration todisconnect the users and force the users to log in again.
Procedure
1. In the IBM InfoSphere Information Server Web console, click theAdministration tab.
2. In the Navigation pane, select Users and Groups > Groups.3. In the Users pane, select a group and click Open Group.
Note: To assign roles to more than one group at a time, click Add Roles toMultiple Groups.
4. In the Roles pane, select a suite role to assign to the group.5. In the Suite Component pane, select one or more suite component roles to
assign to the group.6. Click Save and Close to save the authorizations in the metadata repository.
What to do next
Certain suite components, such as IBM InfoSphere DataStage and IBM InfoSphereInformation Analyzer, also require that you assign additional group roles in theclients or projects.
Viewing the roles that are assigned to a user or a group:
You can view the suite and suite component roles that are assigned to a user orgroup. If an administrator assigned project roles to the user or group, you can alsoview the project roles.
Before you begin
You must have suite administrator authority.
Procedure
1. In the IBM InfoSphere Information Server Web console, click theAdministration tab.
2. In the Navigation panev Select Users and Groups > Users.v Or, select Users and Groups > Groups.
3. Select a user or group.4. Click Open User or Open Group.5. In the Roles pane, view the list of assigned suites, suite component, or project
roles. Project roles are assigned in the context of a project in IBM InfoSphereDataStage or in the IBM InfoSphere Information Server console.
Engine security configurationThe IBM InfoSphere Information Server engine performs user authenticationseparately from other InfoSphere Information Server components. Depending uponyour user registry configuration, you might have to map credentials between the
74 Administration Guide

InfoSphere Information Server user registry and the local operating system userregistry on the computer where the engine is installed.
The InfoSphere Information Server engine requires valid user credentials for eachInfoSphere Information Server user that needs to access the engine. Usercredentials are stored in a user registry.
If the InfoSphere Information Server engine can share the user registry thatInfoSphere Information Server uses, the user credentials for both InfoSphereInformation Server and the engine can come from this user registry. If the userregistry cannot be shared, you must create a mapping between credentials in theuser registry that InfoSphere Information Server uses and valid user credentialsthat exist in the local operating system user registry on the computer where theengine is installed.
The services tier and the engine can share a local operating system user registry ifthey are installed on the same computer. If they are installed on separatecomputers, they can share an external user registry such as a LightweightDirectory Access Protocol (LDAP) or Windows Active Directory user registry. Theservices tier and the engine cannot share the InfoSphere Information Serverinternal user registry.
In an installation with more than one InfoSphere Information Server engine, youchoose the authentication method on a per InfoSphere Information Server enginebasis.
Credential mapping overviewIf IBM InfoSphere Information Server and the InfoSphere InformationServer engine do not share the user registry, you must create a mappingbetween credentials in the user registry that InfoSphere Information Serveruses and user credentials that exist in the local operating system userregistry on the engine tier computer.
After you have configured the shared user registry, use the IBM InfoSphereInformation Server Web console to indicate the new configuration toInfoSphere Information Server.
Do these tasks to map credentials.
After you share the user registry or define credential mappings, you mustgive your users access to IBM InfoSphere DataStage and IBM InfoSphereQualityStage.
Shared user registry overviewIf you configure IBM InfoSphere Information Server to use an external userregistry, you might be able to share the user registry between InfoSphereInformation Server and the InfoSphere Information Server engine.
Sharing the user registry allows IBM WebSphere Application Server, InfoSphereInformation Server, and the InfoSphere Information Server engine to access thesame user names, passwords, and group definitions. When the user registry isshared, authentication to the engine occurs silently by using the same credentials(user ID and password) that the user uses to authenticate with InfoSphereInformation Server. In this mode, no credential mapping is required.
You can share the user registry in any of the following scenarios:
Chapter 6. Managing security 75
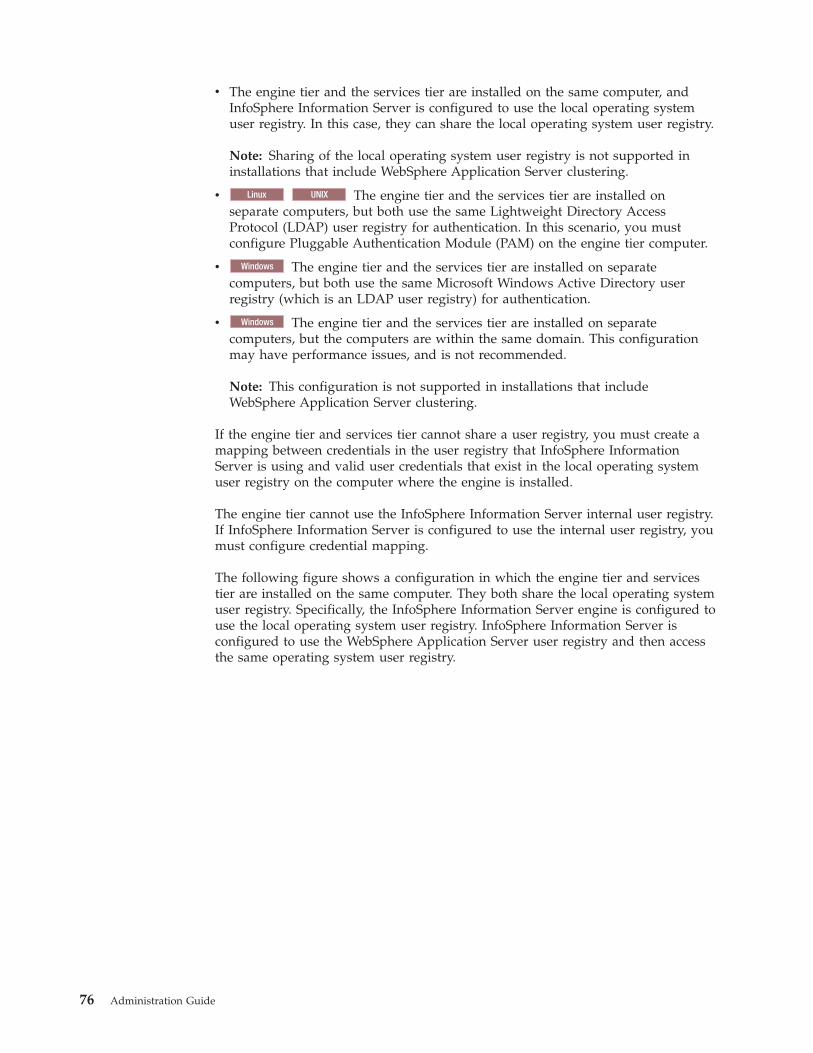
v The engine tier and the services tier are installed on the same computer, andInfoSphere Information Server is configured to use the local operating systemuser registry. In this case, they can share the local operating system user registry.
Note: Sharing of the local operating system user registry is not supported ininstallations that include WebSphere Application Server clustering.
v Linux UNIX The engine tier and the services tier are installed onseparate computers, but both use the same Lightweight Directory AccessProtocol (LDAP) user registry for authentication. In this scenario, you mustconfigure Pluggable Authentication Module (PAM) on the engine tier computer.
v Windows The engine tier and the services tier are installed on separatecomputers, but both use the same Microsoft Windows Active Directory userregistry (which is an LDAP user registry) for authentication.
v Windows The engine tier and the services tier are installed on separatecomputers, but the computers are within the same domain. This configurationmay have performance issues, and is not recommended.
Note: This configuration is not supported in installations that includeWebSphere Application Server clustering.
If the engine tier and services tier cannot share a user registry, you must create amapping between credentials in the user registry that InfoSphere InformationServer is using and valid user credentials that exist in the local operating systemuser registry on the computer where the engine is installed.
The engine tier cannot use the InfoSphere Information Server internal user registry.If InfoSphere Information Server is configured to use the internal user registry, youmust configure credential mapping.
The following figure shows a configuration in which the engine tier and servicestier are installed on the same computer. They both share the local operating systemuser registry. Specifically, the InfoSphere Information Server engine is configured touse the local operating system user registry. InfoSphere Information Server isconfigured to use the WebSphere Application Server user registry and then accessthe same operating system user registry.
76 Administration Guide

The following figure shows a configuration in which the engine tier and servicestier are installed on separate UNIX computers. They both share a common LDAPuser registry. Specifically, the InfoSphere Information Server engine is configured touse the LDAP user registry. InfoSphere Information Server is configured to use theWebSphere Application Server user registry and then access the LDAP userregistry. To provide the interface between the engine and the LDAP user registry,Pluggable Authentication Module (PAM) is configured on the engine tier computer.
Services tier, engine tier, and metadata repository tier computer
IBM InfoSphere Information Server ClientsConsole, Web Console, InfoSphere DataStage and QualityStageDesigner, Sphere DataStage and QualityStage Administrator,
Sphere DataStage and QualityStage DirectorInfo
Info
WebSphere ApplicationServer User Registry
IBM InfoSphere InformationServer Directory Service
Security rolesUser attributes
Email addressesBusiness addresses
IBM InfoSphereInformation ServerUser Registry
Local OperatingSystem User Registry
User namesPasswordsGroups
Metadatarepository
IBM InfoSphere InformationServer Engine
Figure 20. Example of architecture that uses a shared local operating system user registry
Chapter 6. Managing security 77

Windows After you share the user registry, you must still grant the engine tieroperating system users the required permissions. See Permissions and groupsconfiguration (Windows Server 2003).
Credential mapping overviewIf IBM InfoSphere Information Server and the InfoSphere Information Serverengine do not share the user registry, you must create a mapping betweencredentials in the user registry that InfoSphere Information Server uses and usercredentials that exist in the local operating system user registry on the engine tiercomputer.
You must use credential mapping in the following scenarios:v InfoSphere Information Server is configured to use the internal user registry. The
InfoSphere Information Server engine cannot use the internal user registry.
v Linux UNIX The services tier and engine tier are installed on separatecomputers. They do not share a user registry.
v Windows The services tier and engine tier are installed on separate computers.The computers are not in the same domain.
The credential mappings are stored with the internal user registry in the metadatarepository. The passwords are strongly encrypted for increased security.
You can create individual user mappings, so that each InfoSphere InformationServer user is associated with exactly one engine user. You also can create a defaultuser mapping, so that all InfoSphere Information Server users who do not haveindividual credential mappings can access the engine through a shared user name.
Services tier and metadata repository tier computer
Security rolesUser attributes
Email addressesBusiness addresses
IBM InfoSphere Information Server ClientsConsole, Web Console, InfoSphere DataStage and QualityStageDesigner, Sphere DataStage and QualityStage Administrator,
Sphere DataStage and QualityStage DirectorInfo
Info
WebSphere ApplicationServer User Registry
IBM InfoSphere InformationServer Directory Service
IBM InfoSphere Information ServerUser RegistryMetadata
repository
Engine tier computer
IBM InfoSphere InformationServer Engine
Pluggable AuthenticationModule (PAM)
External User RegistryLDAP
User namesPasswordsGroups
Figure 21. Example of architecture that uses a shared LDAP user registry
78 Administration Guide
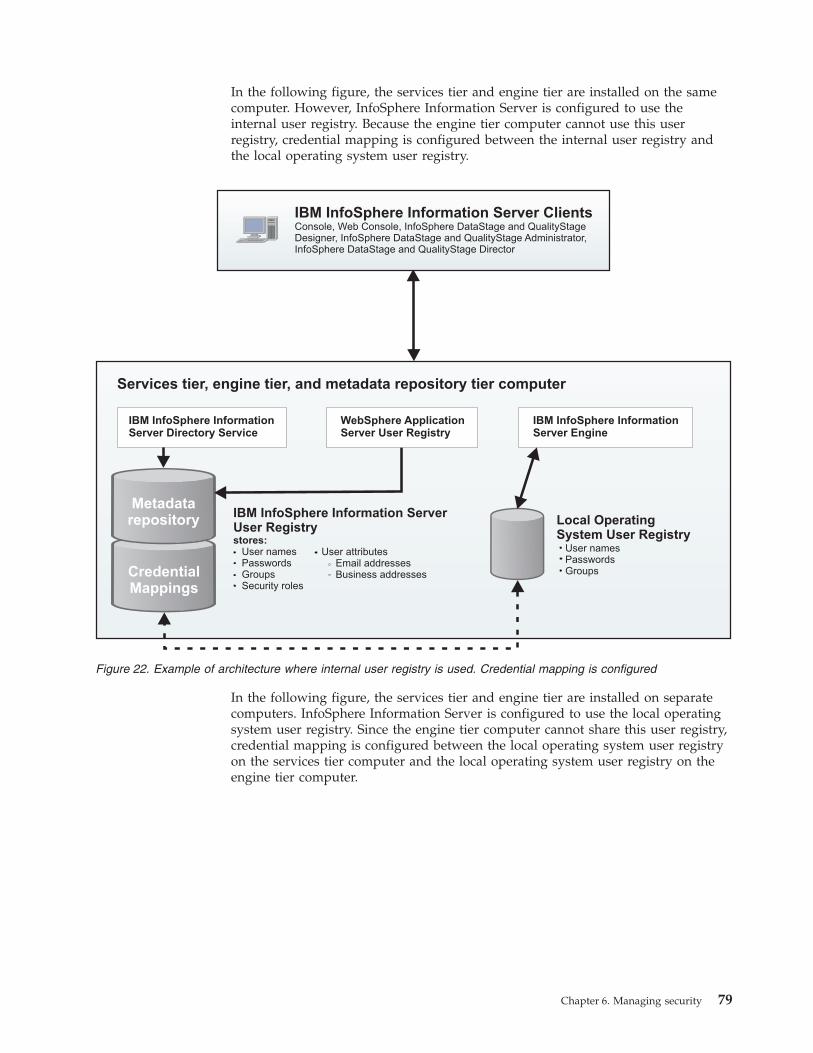
In the following figure, the services tier and engine tier are installed on the samecomputer. However, InfoSphere Information Server is configured to use theinternal user registry. Because the engine tier computer cannot use this userregistry, credential mapping is configured between the internal user registry andthe local operating system user registry.
In the following figure, the services tier and engine tier are installed on separatecomputers. InfoSphere Information Server is configured to use the local operatingsystem user registry. Since the engine tier computer cannot share this user registry,credential mapping is configured between the local operating system user registryon the services tier computer and the local operating system user registry on theengine tier computer.
Services tier, engine tier, and metadata repository tier computer
IBM InfoSphere Information ServerUser Registrystores:
User namesPasswordsGroupsSecurity roles
WebSphere ApplicationServer User Registry
User attributesEmail addressesBusiness addressesCredential
Mappings
IBM InfoSphere Information Server ClientsConsole, Web Console, InfoSphere DataStage and QualityStageDesigner, Sphere DataStage and QualityStage Administrator,
Sphere DataStage and QualityStage DirectorInfo
Info
IBM InfoSphere InformationServer Directory Service
Local OperatingSystem User Registry
User namesPasswordsGroups
IBM InfoSphere InformationServer Engine
Metadatarepository
Figure 22. Example of architecture where internal user registry is used. Credential mapping is configured
Chapter 6. Managing security 79
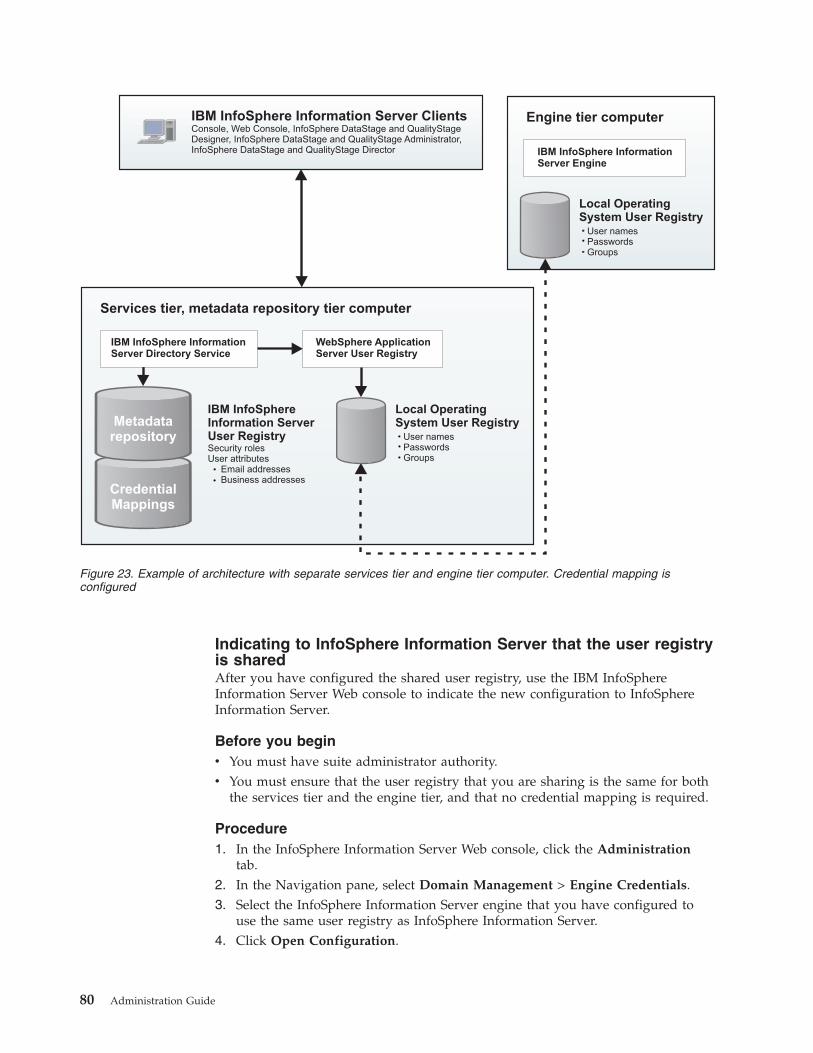
Indicating to InfoSphere Information Server that the user registryis sharedAfter you have configured the shared user registry, use the IBM InfoSphereInformation Server Web console to indicate the new configuration to InfoSphereInformation Server.
Before you beginv You must have suite administrator authority.v You must ensure that the user registry that you are sharing is the same for both
the services tier and the engine tier, and that no credential mapping is required.
Procedure1. In the InfoSphere Information Server Web console, click the Administration
tab.2. In the Navigation pane, select Domain Management > Engine Credentials.3. Select the InfoSphere Information Server engine that you have configured to
use the same user registry as InfoSphere Information Server.4. Click Open Configuration.
Services tier, metadata repository tier computer
IBM InfoSphere Information Server ClientsConsole, Web Console, InfoSphere DataStage and QualityStageDesigner, InfoSphere DataStage and QualityStage Administrator,InfoSphere DataStage and QualityStage Director
WebSphere ApplicationServer User Registry
IBM InfoSphere InformationServer Directory Service
Security rolesUser attributes
Email addressesBusiness addresses
IBM InfoSphereInformation ServerUser Registry
Engine tier computer
IBM InfoSphere InformationServer Engine
Local OperatingSystem User Registry
User namesPasswordsGroups
Local OperatingSystem User Registry
User namesPasswordsGroups
Metadatarepository
CredentialMappings
Figure 23. Example of architecture with separate services tier and engine tier computer. Credential mapping isconfigured
80 Administration Guide
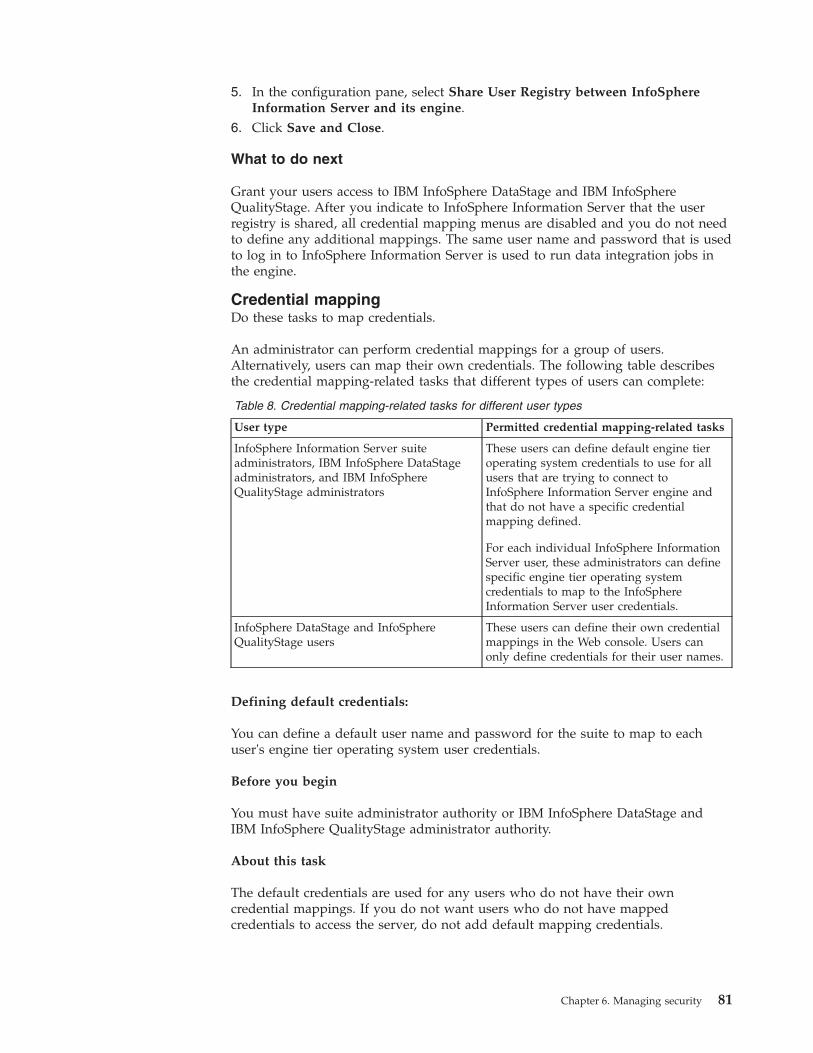
5. In the configuration pane, select Share User Registry between InfoSphereInformation Server and its engine.
6. Click Save and Close.
What to do next
Grant your users access to IBM InfoSphere DataStage and IBM InfoSphereQualityStage. After you indicate to InfoSphere Information Server that the userregistry is shared, all credential mapping menus are disabled and you do not needto define any additional mappings. The same user name and password that is usedto log in to InfoSphere Information Server is used to run data integration jobs inthe engine.
Credential mappingDo these tasks to map credentials.
An administrator can perform credential mappings for a group of users.Alternatively, users can map their own credentials. The following table describesthe credential mapping-related tasks that different types of users can complete:
Table 8. Credential mapping-related tasks for different user types
User type Permitted credential mapping-related tasks
InfoSphere Information Server suiteadministrators, IBM InfoSphere DataStageadministrators, and IBM InfoSphereQualityStage administrators
These users can define default engine tieroperating system credentials to use for allusers that are trying to connect toInfoSphere Information Server engine andthat do not have a specific credentialmapping defined.
For each individual InfoSphere InformationServer user, these administrators can definespecific engine tier operating systemcredentials to map to the InfoSphereInformation Server user credentials.
InfoSphere DataStage and InfoSphereQualityStage users
These users can define their own credentialmappings in the Web console. Users canonly define credentials for their user names.
Defining default credentials:
You can define a default user name and password for the suite to map to eachuser's engine tier operating system user credentials.
Before you begin
You must have suite administrator authority or IBM InfoSphere DataStage andIBM InfoSphere QualityStage administrator authority.
About this task
The default credentials are used for any users who do not have their owncredential mappings. If you do not want users who do not have mappedcredentials to access the server, do not add default mapping credentials.
Chapter 6. Managing security 81
Procedure
1. In the IBM InfoSphere Information Server Web console, click theAdministration tab.
2. In the Navigator pane, select Domain Management > Engine Credentials.3. Select the InfoSphere Information Server engine for which you want to specify
the default credentials.4. Click Open Configuration.5. In the User Name field, type the user name to be used by all InfoSphere
Information Server users for whom a specific mapping is not defined.6. In the Password field, type the corresponding password. The user name and
password that you provide must be a valid user name and password for theoperating system where the engine tier components are installed.
7. Confirm the password.8. Click Save and Close.
Configuring your credentials:
As a suite administrator or suite user, you can map the credentials for your ownuser account.
Procedure
1. In the IBM InfoSphere Information Server Web console, click theAdministration tab.
2. In the Navigation pane, select Domain Management > Engine Credentials.3. Select the InfoSphere Information Server engine that you want to configure.4. Click Open My Credentials.5. Type the user name and password that you want to use to connect to the IBM
InfoSphere Information Server engine. The user name and password that youprovide must be a valid user name and password for the operating systemwhere the engine tier components are installed.
6. Click Save and Close.
Mapping user credentials:
You can map one or more user credentials to engine tier operating system usercredentials.
About this task
If you use the IBM InfoSphere Information Server user registry, you must createcredential mappings before you can use IBM InfoSphere DataStage and IBMInfoSphere QualityStage clients. Create users and groups in the Web console beforeyou begin this task.
Suite users can configure their own credential mappings.
Procedure
1. Log in to the IBM InfoSphere Information Server Web console by usingAdministrator credentials.
2. On the Administration tab, expand the Domain Management section andclick Engine Credentials.
82 Administration Guide

3. Select the InfoSphere Information Server engine for which you want to mapuser credentials.
4. Click Open User Credentials.5. Click Browse to search for suite users.6. Optional: Specify additional search criteria, and click Filter to display a list of
users.7. From the search results, select the suite users that you want to map to the
engine tier operating system local credentials and click OK.8. On the Map User Credentials pane, select one or more users to map to the
credentials. If you want to map some suite users to one user and map othersuite users to a different user, select one subset of users and continue.
9. In the Assign User Credentials pane, specify the local operating system usercredentials. The user name and password that you provide must be a validuser name and password for the operating system where the engine tiercomponents are installed. If you want to preserve credential mappings thatusers have already configured, select the Apply Only to Users withoutCredentials check box.
10. Click Apply.11. To map credentials for additional suite users, do one of the following:
v Repeat steps 8 through 10 to map credentials for additional users displayedin the Map User Credentials pane.
v Repeat steps 5 through 10 to select from a new filtered list of users and mapcredentials for those users.
What to do next
After you map the credentials, any suite user or group that is assigned an IBMInfoSphere DataStage and QualityStage user or administrator security role can login to an InfoSphere DataStage and QualityStage client.
Granting access to IBM InfoSphere DataStage and QualityStageusersAfter you share the user registry or define credential mappings, you must giveyour users access to IBM InfoSphere DataStage and IBM InfoSphere QualityStage.
Procedure1. Ensure that the operating system user has the proper file access permissions to
InfoSphere DataStage, InfoSphere QualityStage, and the relevant files.2. Grant the required suite and suite component roles to the user in the Web
console.a. Using a role that has administrative privileges, log in to the IBM InfoSphere
Information Server Web console.b. Select the Administration tab.c. In the Navigation pane, select Users and Groups > Users.d. Select the user that you want to grant access to and click Open User.e. In the Roles pane, assign the following roles to the user.
Suite UserRequired for all users in order to log in to any of the suitecomponents.
Chapter 6. Managing security 83

DataStage and QualityStage UserRequired for any user in order log in to any of the InfoSphereDataStage and InfoSphere QualityStage product modules.
DataStage and QualityStage AdministratorOptional. Grants full access to all projects and the administrativecapability of InfoSphere DataStage and InfoSphere QualityStage.
3. If you did not grant the DataStage and QualityStage Administrator authority,you must use the IBM InfoSphere DataStage and QualityStage Administratorclient to grant project level roles to the user. If the user has only the DataStageand QualityStage user role and no specific project roles, that user cannot log into the InfoSphere DataStage clients.
Configuring WebSphere Application Server for non-rootadministration (Linux, UNIX)
By default, the IBM WebSphere Application Server runs as root. However, it canalso be run by using a non-root user ID. The following instructions describe thesteps required to configure and set appropriate file system permissions forWebSphere Application Server to run as a non-root user ID.
It might be necessary to rerun the post-installation steps (go to “Runningpost-installation commands to enable non-root administration (Linux, UNIX)” onpage 85) after installing any add-on components, fix packs, or patches to theservices tier because certain installations might change permissions.
Restrictions
v If you are using the local operating system as the user registry, WebSphereApplication Server must be run as root. WebSphere Application Server must berun as root in this case, because of system permissions that are required forcredential checking.
v WebSphere Application Server must be run as root when installing patches, fixpacks, and upgrades. When running the installation program or Update Installer,make sure to first restart WebSphere Application Server to run as root. Whenpreparing to run an installation process, if WebSphere Application Server isrunning as a non-root user, you might need to first stop WebSphere ApplicationServer while logged in as that non-root user. You can then log in as root, startWebSphere Application Server as root, and then start the installation program orUpdate Installer.
v The task of starting and stopping WebSphere Application Server must bedesignated to one non-root user only.The user who starts WebSphere Application Server must also be the user whostops WebSphere Application Server. Therefore, as preparation for anyinstallations, after WebSphere has already been configured for running as anon-root user and is started by that non-root user, you must first stopWebSphere Application Server while logged in as the configured non-root user.When WebSphere Application Server is stopped, log in as root and restartWebSphere Application Server before starting any InfoSphere Information Serverinstallations.
v Avoid assigning the dsadm user to manage WebSphere Application Server.Using the dsadm user to manage WebSphere Application Server might causeoverwrite issues for the InfoSphere Information Server environment settings. Thenon-root user selected for running WebSphere must not source dsenv.
84 Administration Guide
Setting up a new non-root user for WebSphere ApplicationServer (Linux, UNIX)If you have IBM InfoSphere Information Server installed, you can create a userwho can manage WebSphere Application Server processes. These steps need to becompleted only once.
Before you begin
Make sure to read the restrictions in “Configuring WebSphere Application Serverfor non-root administration (Linux, UNIX)” on page 84.
Important: Before you begin this task, back up your system so that the backup canbe used to restore the original state if necessary. See Chapter 12, “Backing up andrestoring IBM InfoSphere Information Server,” on page 171.
About this task
The general purpose in these instructions is to transfer the ownership of some ofthe files under WebSphere Application Server and InfoSphere Information Server tothe new non-root user, at which point the new user would be able to take over themanagement of the WebSphere Application Server process. This one-time setuptask describes the steps for creating the user. The post installation instructionsdescribe the steps that must be performed after every installation action.
These steps use wasadmin as the new non-root user. However, this is just anexample user name; you can use any user name that you want, or use an existinguser.
You must be a system administrator with root access.
Procedure1. Create the wasadmin user by running the command:
useradd -m -d /home/wasadmin wasadmin
Note: If you are using an existing user, replace instances of wasadmin withyour selected user name.
2. Set the umask of this user to 0022 by typing: umask 0022
What to do next
Proceed to the post-installation tasks for either a stand-alone environment orcluster environment to configure the settings in InfoSphere Information Server forthe non-root user: “(Stand-alone environment) Running post-installation commandsto enable non-root administration (Linux, UNIX)” on page 86 or “(Clusterenvironment) Running post-installation commands to enable non-rootadministration (Linux, UNIX)” on page 88
Running post-installation commands to enable non-rootadministration (Linux, UNIX)After installing IBM InfoSphere Information Server or adding components, patches,or fix packs, run these commands to enable non-root administration. The stepsdiffer depending upon whether IBM WebSphere Application Server is set up in aclustered configuration or stand-alone configuration.
Chapter 6. Managing security 85

(Stand-alone environment) Running post-installation commands to enablenon-root administration (Linux, UNIX):
You must run these tasks every time you install IBM InfoSphere Information Serverwhere IBM WebSphere Application Server is set up in a stand-alone configuration.You must also run these tasks after you install any new add-on components,patches, or fix packs in this configuration. If you are installing an InfoSphereInformation Server engine or client patch, the following instructions do not apply.
Before you begin
v If you have more than one patch or add-on InfoSphere Information Serverproduct to install, install all the patches and add-on products before you beginthese steps. When running the installation program or Update Installer, makesure to first restart IBM WebSphere Application Server to be running under root.If WebSphere Application Server was previously configured for non-rootadministration and is running under the non-root user, you might need to firststop WebSphere Application Server while logged in as the non-root user. Youcan then log in as root and start WebSphere Application Server under rootbefore starting the installation.
v Stop all InfoSphere Information Server processes, including WebSphereApplication Server, the server engine, JobMonApp, logging, and ASB agents. See“Shutting down services (Linux, UNIX)” on page 182.– The applications should be stopped while logged in as the user who started
the application.– If WebSphere Application Server is already running as a non-root user, you
must log in as that non-root user to stop WebSphere Application Server.– If the ASB agents are started as root, you must log in as root to stop the
agents.
About this task
v These steps apply to stand-alone (non-cluster) environments only. If you have acluster configuration, see “(Cluster environment) Running post-installationcommands to enable non-root administration (Linux, UNIX)” on page 88.
v The non-root user name, wasadmin, is an example that is used throughout thedocumentation. If you have a different non-root user name, make sure to usethat one instead and replace every instance of wasadmin in the commands thatyou run.
Procedure
1. Remove *.jar and *.lck files from the temporary directory by running thecommands:
Note: The operating system-defined temporary directory, tmp, is either /tmp or/var/tmp. Change the file path below accordingly.
Note: Alternatively, you can move these files to a backup directory. Third partyapplications might have dependencies on the .jar or .lck files in this temporarydirectory and you might want the option to restore them later.rm /tmp/*.jarrm /tmp/*.lck
2. If WB_vrdata or BG_vrdata exist in the temporary directory, run the followingcommands:
86 Administration Guide

Note: The OS-defined temporary directory, tmp, is either /tmp or /var/tmp.Change the file path below accordingly.rm –rf /tmp/WB__vrdatarm –rf /tmp/BG__vrdata
3. Either wasadmin must be a member of the group assigned to the Reportingworkspace directories and below with rwx permission, or you must setwasadmin as the owner of the Reporting workspace directories and below.
Note: If you relocated the Reporting workspace directory as described in thetechnote http://www.ibm.com/support/docview.wss?rs=14&uid=swg21317914,assign appropriate permissions to that directory instead.Run the commands to set the wasadmin user as the owner of the Reportingworkspace directories:cd /tmpchown -R wasadmin informationServer
Note: Where the temporary directory, tmp, is either /tmp or /var/tmp as definedby the operating system.
Note: If your system was configured to relocate the temporary directory usedby IBM InfoSphere Business Glossary or IBM InfoSphere Metadata Workbenchas described in the following technote, follow the instructions in the followingtechnote to assure that appropriate permissions are assigned to the WB__vrdataand BG__vrdata directories: http://www.ibm.com/support/docview.wss?rs=3291&uid=swg21413637.
4. Run the commands to set wasadmin as the owner of the InfoSphereInformation Server profile of WebSphere Application Server:cd WAS_installation_path/profileschown -R wasadmin InfoSphere
Note: Where WAS_installation_path is the path where WebSphere ApplicationServer is installed. The default installation path is /opt/IBM/WebSphere/AppServer. InfoSphere is the default name for the InfoSphere Information Serverprofile installed under WebSphere Application Server. If you installedInfoSphere Information Server to a profile name other than InfoSphere, use thatprofile name instead.
5. Start the WebSphere Application Server process as wasadmin and start allInfoSphere Information Server processes. See “Starting services (Linux, UNIX)”on page 187.
Important: When you restart InfoSphere Information Server processes,LoggingAgent and ASBAgent are started as root. To configure these agents asthe non-root user, you must complete the following procedure: “Starting IBMInfoSphere Information Server node agents as a non-root user” on page 91.If the agents are ever started by root and then are started by a non-root user,you must delete the process output files, such as *.out and *.err files that arelocated in the IS_installation_path/ASBNode and IS_installation_path/ASBNode/bin folders, to allow the new owners of the agent processes toregenerate those output files. This could have occurred during an installationprocess if the agents also had been configured to run under a non-root userand were restarted as root during the installation.
Chapter 6. Managing security 87

What to do next
Now, you can configure WebSphere Application Server to start as the non-root userduring a system restart. See “Configuring WebSphere Application Server to start asthe non-root user during a system restart (Linux, UNIX)” on page 90.
(Cluster environment) Running post-installation commands to enable non-rootadministration (Linux, UNIX):
You must run these tasks every time you install IBM InfoSphere Information Serverand after you install any new add-on components, patches, or fix packs. If you areinstalling an InfoSphere Information Server engine or client patch, the followinginstructions do not apply.
Before you begin
v If you have more than one patch or add-on InfoSphere Information Serverproduct to install, install all the patches and add-on products before you beginthese steps. When running the installation program or Update Installer, makesure to first restart all IBM WebSphere Application Server processes to berunning under root. If WebSphere Application Server was previously configuredfor non-root administration and is running under the non-root user, you mightneed to first stop all WebSphere Application Server processes while logged in asthe non-root user. You can then log in as root and start all WebSphereApplication Server processes under root before starting the installation.
v Stop all InfoSphere Information Server processes, including WebSphereApplication Server, the server engine, JobMonApp, logging, and ASB agents. See“Shutting down services (Linux, UNIX)” on page 182.– The applications should be stopped while logged in as the user who started
the application.– If WebSphere Application Server is already running as a non-root user, you
must log in as that non-root user to stop WebSphere Application Server.– If the ASB agents are started as root, you must log in as root to stop the
agents.
About this task
v These steps apply to cluster environments only. If you have a stand-alone(non-clustered) configuration, see “(Stand-alone environment) Runningpost-installation commands to enable non-root administration (Linux, UNIX)” onpage 86.
v The non-root user name, wasadmin, is an example that is used throughout thedocumentation. If you have a different non-root user name, make sure to usethat one instead and replace every instance of wasadmin in the commands thatyou run.
v This procedure must be repeated on all systems where IBM WebSphereApplication Server Network Deployment is installed. This includes the computerthat hosts the Deployment Manager and the computers that host the variousmanaged nodes.
Procedure
1. Remove *.jar and *.lck files from the temporary directory by running thecommands:
Note: The operating system-defined temporary directory, tmp, is either /tmp or/var/tmp. Change the file path below accordingly.
88 Administration Guide

Note: Alternatively, you can move these files to a backup directory. Third partyapplications might have dependencies on the .jar or .lck files in this temporarydirectory and you might want the option to restore them later.rm /tmp/*.jarrm /tmp/*.lck
2. If WB_vrdata or BG_vrdata exist in the temporary directory, run the followingcommands:
Note: The operating system-defined temporary directory, tmp, is either /tmp or/var/tmp. Change the file path below accordingly.rm –rf /tmp/WB__vrdatarm –rf /tmp/BG__vrdata
3. Either wasadmin must be a member of the group assigned to the Reportingworkspace directories and below with rwx permission, or you must setwasadmin as the owner of the Reporting workspace directories and below.
Note: If you relocated the Reporting workspace directory as described in thetechnote http://www.ibm.com/support/docview.wss?rs=14&uid=swg21317914,assign appropriate permissions to that directory instead.Run the commands to set the non-root user as the owner of the Reportingworkspace directories:cd /tmpchown -R wasadmin informationServer
Note: The tmp temporary directory is either /tmp or /var/tmp, as defined by theoperating system.
Note: If your system was configured to relocate the temporary directory usedby IBM InfoSphere Business Glossary or IBM InfoSphere Metadata Workbenchas described in the following technote, follow the instructions in the followingtechnote to assure that appropriate permissions are assigned to the WB__vrdataand BG__vrdata directories: http://www.ibm.com/support/docview.wss?rs=3291&uid=swg21413637.
4. Assign wasadmin ownership to all WebSphere Application Server profilesparticipating in the InfoSphere Information Server cluster.
Note: There are multiple WebSphere Application Server profiles potentially ondifferent machines.a. For each profile in the cluster, run the following command to change
ownership to the non-root user.cd WAS_installation_path/profileschown -R wasadmin Custom01
WAS_installation_path is the path where WebSphere Application Server isinstalled. The default installation path is /opt/IBM/WebSphere/AppServer.Custom01 is the default name for the InfoSphere Information Server profileinstalled under WebSphere Application Server. If you installed InfoSphereInformation Server to a profile name other than Custom01, use that profilename instead.Repeat this step on each custom profile. (A custom profile is a WebSphereApplication Server profile that hosts a managed node.)
b. Run the commands to assign ownership to the non-root user of theDeployment Manager profile. In this example, the profile is named Dmgr01,but you can specify a different name.
Chapter 6. Managing security 89

cd WAS_installation_path/profileschown -R wasadmin Dmgr01
WAS_installation_path is the path where WebSphere Application Server isinstalled. The default installation path is /opt/IBM/WebSphere/AppServer.Dmgr01 is the default profile name for the Deployment Manager profile.
5. Start all WebSphere Application Server processes as wasadmin user and startall InfoSphere Information Server processes. See “Starting services (Linux,UNIX)” on page 187.
Important: When you restart InfoSphere Information Server processes,LoggingAgent and ASBAgent are started as root. To configure these agents asthe non-root user, you must follow the procedure in “Starting IBM InfoSphereInformation Server node agents as a non-root user” on page 91.If the agents are ever launched by root and then are started by a non-root user,you must delete the process output files, such as *.out and *.err files that arelocated in the IS_installation_path/ASBNode and IS_installation_path/ASBNode/bin folders, to allow the new owners of the agent processes toregenerate those output files. The situation could have occurred during aninstallation process if the agents also had been configured to run under anon-root user and were restarted as root during the installation.
Configuring WebSphere Application Server to start as thenon-root user during a system restart (Linux, UNIX)You can configure IBM WebSphere Application Server to start as the non-root userwhen a system restart occurs. To set up WebSphere Application Server in thismanner, locate and change the content of the ISFServer files.
About this task
Do this task after you have done the post-configuration steps for the first time.After you do the following steps, it is unnecessary to repeat them after newinstallation activities.
Note: This task applies to stand-alone (non-clustered) installations only.
Procedure1. Find the ISFServer files that must be modified:
v For the HP-UX operating system, use the command:cd /sbinfind . -name *ISFServer*
v For all other operating systems, use the command:cd /etcfind . -name *ISFServer*
This might return multiple files with various prefixes in the name. Some filesmight be links to other files and could reflect the change you made in theoriginal file without needing to edit each file that was found. If you havemultiple instances of WebSphere Application Server installed, there might beunique files for each WebSphere Application Server instance. You only have tomodify the files that reference the instances of WebSphere Application Serverthat you have configured to start as non-root.
2. Identify the files to modify.3. Change and save the content of these files.
90 Administration Guide
Note: This step assumes that InfoSphere Information Server has been installedunder the default installation path, /opt/IBM/InformationServer. Your actualinstallation path might differ.Change the following content:#!/bin/sh# chkconfig: 2345 85 60# description: Information Services Framework server.IS_INIT_D=true;export IS_INIT_D"/opt/IBM/InformationServer/ASBServer/bin/MetadataServer.sh" "$@"
Change as follows:#!/bin/sh# chkconfig: 2345 85 60# description: Information Services Framework server.IS_INIT_D=true;export IS_INIT_D/usr/bin/su - wasadmin -c "/opt/IBM/InformationServer/ASBServer/bin/MetadataServer.sh $*"
Note: The location of your MetadataServer.sh file might be different andshould reflect the location of your IBM InfoSphere Information Serverinstallation directory.
Starting IBM InfoSphere Information Server node agents as anon-root user
The node agents (mainly the ASB and logging agents) can be started as the IBMInfoSphere DataStage administrator user. Do this procedure after you create aninstallation of InfoSphere Information Server. Repeat this procedure after you addadditional product modules or fix packs.
Before you begin
Before doing these steps, back up your system so that you can restore the originalstate if necessary. See Chapter 12, “Backing up and restoring IBM InfoSphereInformation Server,” on page 171.
About this task
Do these steps on all engine tier computers. You must be a system administratorwho has root access.
Instructions in this procedure use the default InfoSphere Information Serverinstallation locations. Your path varies if you installed InfoSphere InformationServer in a different location.
The following directory is the default InfoSphere Information Server installationlocation: /opt/IBM/InformationServer
Procedure1. If you added additional product modules or fix packs to an existing
InfoSphere Information Server installation, skip to step 6 on page 92. If youare modifying a fresh installation, continue with step 2.
2. Verify that the InfoSphere DataStage administrator account that originallyinstalled the engine tier exists. Verify that it belongs to the InfoSphereDataStage primary group. The InfoSphere DataStage administrator account istypically named dsadm. The InfoSphere DataStage primary group is typicallynamed dstage.
Chapter 6. Managing security 91

Note: If you did not install InfoSphere DataStage or IBM InfoSphereInformation Analyzer, you can choose any trusted user.
3. AIX Make sure that the stack_hard variable in the /etc/security/limitsfile is set to -1 for the user that was selected in step 2 on page 91.
4. Make sure that the user can write to the temporary directory.5. Configure the node agents to start as the non-root user when a computer
restarts. To do so, locate and change the content of the ISFAgents files on theengine tier computers.
Note: The location and file name are different for each operating system, butthe content of the file is the same.a. Find the ISFAgents file that must be modified.
v HP�UX Run this command: cd /sbin
v Linux Solaris UNIX Run this command: cd /etc
b. Run the command: find . -name "*ISFAgents*"
Note: This step might return multiple files with various prefixes in thename. Some files might link to other files and might reflect your change tothe original file. You do not have to edit the linked files. The main file istypically located in the rc.d/init.d/ISFAgents directory.
c. Change the content of the file. The file contains information such as theselines:#!/bin/sh# chkconfig: 2345 85 60# description: Information Services Framework server.IS_INIT_D=true;export IS_INIT_D"/opt/IBM/InformationServer/ASBNode/bin/NodeAgents.sh" "$@"
Change as follows:#!/bin/sh# chkconfig: 2345 85 60# description: Information Services Framework server.IS_INIT_D=true;export IS_INIT_D/usr/bin/su - dsadm -c "/opt/IBM/InformationServer/ASBNode/bin/NodeAgents.sh $*"
Note: If you did not install InfoSphere DataStage or InfoSphereInformation Analyzer, in place of dsadm in the file, specify the alternateuser that was selected in step 2 on page 91.
6. Log in as a system administrator with root access.7. Change to the /opt/IBM/InformationServer/ASBNode/bin directory.8. Run this command to stop the node agents:
./NodeAgents.sh stop
Note: If you use IBM InfoSphere Information Services Director, verify that allrelated jobs are stopped. Typically, stopping the node agents stops allInfoSphere Information Services Director jobs.
9. Remove any remaining *.out, *.err, and *.pid files from the/opt/IBM/InformationServer/ASBNode and /opt/IBM/InformationServer/ASBNode/bin directories.
10. If InfoSphere DataStage and InfoSphere Information Analyzer are notinstalled, change the ownership of the /opt/IBM/InformationServer/ASBNodedirectory to the trusted user that was selected in step 2 on page 91. To changethe ownership, run this command:chown -R user /opt/IBM/InformationServer/ASBNode
92 Administration Guide
where user is the trusted user.11. Log in as dsadm or as the user that you selected in step 2 on page 91.12. Change to the following directory:
/opt/IBM/InformationServer/ASBNode/bin
13. Run the following command to start the node agents:./NodeAgents.sh start
What to do next
To ensure that your system is configured correctly, run the following commands. Ifthe commands succeed, restart your system. Then run the commands again tomake sure that the startup scripts were correctly modified.v If the default ports for logging and ASB agents are 31531 and 31533, as specified
during the initial installation, run this command:netstat –a | grep 3153
If the agents are not running, you must stop and start the node agents again.v Run the following command to verify that the agents are up and running as the
specified user:ps –ef | grep Agent
Audit logging configurationThe Auditing service creates an audit trail of security-related events. These eventsinclude all security-related settings changes and user login and logout operations.You can configure which audit events to log and how much information to includebased on your auditing requirements.
The auditing configuration is controlled by a properties file. You can restrict accessto this properties file by using file system permission settings. This allows you torestrict the role of auditing configuration to select users or groups. Securityauditing trails assist in the detection of access to controlled information andapplication usage. Monitoring and analysis of the logged audit information canlead to improvements in the control of data access and the prevention of maliciousor careless unauthorized access to sensitive data or configuration settings. Themonitoring of application and individual user access, including systemadministration actions, provides an historic record of activity. This informationallows you to adjust user or group security roles to enable or prevent access toapplication features. This information can also assist in showing compliance withcorporate security policies.
The following events log audit records:v Creation and removal of users and groupsv Assignment or removal of a user from a groupv User password changes (does not log the password)v Changes to security roles assigned to users or groupsv Changes to user or group permissions on a project and the associated
project-level security roles that are assignedv Changes to mapped engine credentialsv User loginv User logoutv Session terminationv Session timeout
Chapter 6. Managing security 93
v Changes to audit logging configuration settings
See “Types of audit events” for more information about these events.
Configuration file
An auditing configuration file (ISauditing.properties) is installed in the classesdirectory of the IBM InfoSphere Information Server profile in IBM WebSphereApplication Server. The default location is WebSphere\AppServer\profiles\InfoSphere\classes. This file is where you configure which audit events arelogged and how much information to retain. You can keep the auditingconfiguration file in its default location or you can move it to another directory.You can set file system write permissions on the file or its folder to restrict whocan change the auditing configuration settings.
Refer to “Configuring the audit configuration file” on page 99 for moreinformation about the configuration file.
Audit log files
The default values in the auditing configuration file causes the audit log files to becreated in the logs directory of the InfoSphere Information Server profile in IBMWebSphere Application Server. The default location is Websphere\AppServer\profiles\InfoSphere\logs with the name ISauditLog_0.log. If the logs directorydoes not exist, the audit log file is created in the directory of the application serverwhere InfoSphere Information Server is installed.
Refer to “Audit logs” on page 102 for more information about the log files.
Types of audit eventsThe Auditing service provides groups of events that log audit records.
The following groups of audit events are logged:v User and group managementv User, group, and project security role assignmentsv Engine credential mappingv User session managementv Audit configuration
User and group management events:
User and group management consists of the following events: creation andremoval of users and groups, user group membership changes, and user credentialchanges.
User and group management events can be logged only if the User RegistryConfiguration is set to InfoSphere Information Server User Registry. These eventscannot be logged when the User Registry Configuration is set to ApplicationServer Registry such as when configured to use LDAP or the local operatingsystem for user authentication. Those configurations manage users and groupsthrough external tools so that IBM InfoSphere Information Server is not involvedin the management of these resources and is not aware when changes are made.
94 Administration Guide
The following event messages are logged with parameters that describe thesubjects that are changed or created. The (caller) indicated in each message is theuser ID of the caller to this event method:
ADD_USER (caller): UserID=”xxx”, LastName=”xxx”, FirstName=”xxx”Logged when a new user is created in the InfoSphere Information Serverconsole, Web console, or DirectoryCommand command line tool. Newusers created through the DirectoryAdmin command line tool on theserver do not log an audit event. However, these users cannot log in toInfoSphere Information Server until they are assigned at least the SuiteUserSecurity Role through the InfoSphere Information Server console or Webconsole. This security assignment is audited. The DirectoryAdmincommand line tool is available on the server side installation that hasrestricted access. This command cannot be executed on a client sideinstallation.
ADD_GROUP (caller): GroupID=”xxx”, GroupName=”xxx”Logged when a group is created in the InfoSphere Information Serverconsole, Web console, or DirectoryCommand command line tool.
DELETE_USERS (caller): UserIDs=”xxx, yyy”Logged when users are deleted through the InfoSphere Information Serverconsole or Web console. Deleting ALL USERS through the DirectoryAdmincommand line tool on the server does not log an audit event. This is not atypical action and is used only in a recovery type operation.
DELETE_GROUPS (caller): GroupIDs=”xxx, yyy”Logged when groups are deleted through the InfoSphere InformationServer console or Web console. Deleting ALL GROUPS through theDirectoryAdmin command line tool on the server does not log an auditevent. This is not a typical action and is used only in a recovery typeoperation.
ADD_USERS_TO_GROUPS (caller): UserIDs=”xxx, yyy”, GroupIDs=”xxx, yyy”Logged when users are added to groups in the InfoSphere InformationServer console, Web console, or DirectoryCommand command line tool.
DELETE_USERS_FROM_GROUPS (caller): UserIDs=”xxx, yyy”, GroupIDs=”xxx, yyy”Logged when users are removed from groups in the InfoSphereInformation Server console or Web console.
CHANGE_PASSWORD (caller): UserID=”xxx”Logged when the Change Password action is used in the InfoSphereInformation Server console or Web console to change the password of theuser who is currently logged in.
SET_CREDENTIAL (caller): UserID=”xxx”Logged when a password is changed for any user by an administrator inthe InfoSphere Information Server console or Web console. Changing auser's password through the DirectoryAdmin command line tool on theserver does not log an audit event.
REMOVE_CREDENTIAL (caller): UserIDs=”xxx, yyy”Logged when a password is cleared for one or more users.
User, group, and project security role assignment events:
The user, group, and project security role assignments consist of the followingevents: creation or deletion of a security role, assignment and removal of securityroles to users or groups, and assignment or removal of users or groups and rolesto a project.
Chapter 6. Managing security 95
The following event messages are logged with parameters that describe thesubjects that are changed or created. The (caller) indicated in each message is theuser ID of the caller to this event method:
ADD_ROLE (caller): RoleID=”xxx”Logged when a new security role is created. Because security roles areinternally created by IBM InfoSphere Information Server, these audit eventscan occur only during a maintenance release installation that includes newroles, if any.
DELETE_ROLES (caller): RoleIDs=”xxx, yyy”Logged when a security role is deleted. This audit event does not occurbecause there is no user interface to delete a security role.
ASSIGN_GROUP_ROLES (caller): GroupIDs=”xxx, yyy”, RoleIDs=”xxx, yyy”Logged when security roles are assigned to groups in the InfoSphereInformation Server console, Web console, or DirectoryCommand commandline tool.
ASSIGN_USER_ROLES (caller): UserIDs=”xxx, yyy”, RoleIDs=”xxx, yyy”Logged when security roles are assigned to users in the InfoSphereInformation Server console, Web console, or DirectoryCommand commandline tool.
REVOKE_GROUP_ROLES (caller): GroupIDs=”xxx, yyy”, RoleIDs=”xxx, yyy”Logged when security roles are deleted from groups in the InfoSphereInformation Server console or Web console.
REVOKE_USER_ROLES (caller): UserIDs=”xxx, yyy”, RoleIDs=”xxx, yyy”Logged when security roles are deleted from users in the InfoSphereInformation Server console or Web console.
ASSIGN_PROJECT_USER_ROLES (caller): Project=”xxx”, UserIDs=”xxx, yyy”,RoleIDs=”xxx, yyy”
Logged when users and associated project security roles are assigned toproject permissions in the IBM InfoSphere DataStage Administrator,InfoSphere Information Server console, or IBM InfoSphere FastTrack client.
ASSIGN_PROJECT_GROUP_ROLES (caller): Project=”xxx”, GroupIDs=”xxx, yyy”,RoleIDs=”xxx, yyy”
Logged when groups and associated project security roles are assigned toproject permissions in the InfoSphere DataStage Administrator, InfoSphereInformation Server console, or IBM InfoSphere FastTrack client.
REVOKE_PROJECT_USER_ROLES (caller): Project=”xxx”, UserIDs=”xxx, yyy”,RoleIDs=”xxx, yyy”
Logged when project security roles are changed for a user or when usersare removed from a project's permissions in the InfoSphere DataStageAdministrator, InfoSphere Information Server console, or IBM InfoSphereFastTrack client.
REVOKE_PROJECT_GROUP_ROLES (caller): Project=”xxx”, GroupIDs=”xxx, yyy”,RoleIDs=”xxx, yyy”
Logged when project security roles are changed for a group or whengroups are removed from a project's permissions in the InfoSphereDataStage Administrator, Information Server console, or IBM InfoSphereFastTrack client.
REVOKE_PROJECT_ALL_ROLES (caller): Project=”xxx”Logged when all security roles assigned to a project are removed.
Engine credential mapping events:
96 Administration Guide
The engine credential mapping consists of the following events: assignment andremoval of credentials to IBM InfoSphere DataStage suite users and assignment ofdefault credentials for an IBM InfoSphere Information Server engine whenmapping credentials using the Engine Credentials panel of the IBM InfoSphereInformation Server Web console.
The following event messages are logged with parameters that describe thesubjects that are changed or created. The (caller) indicated in each message is theuser ID of the caller to this event method:
ADD_DATASTAGE_CREDENTIAL (caller): UserIDs=”xxx, yyy”, DSServer=”xxx”,Username=”xxx”
Logged when a mapped credential is set for one or more suite users in theIBM InfoSphere Information Server Web console.
SET_DEFAULT_DATASTAGE_CREDENTIAL (caller): DSServers=”xxx, yyy”,Username=”xxx”
Logged when default engine credentials are set in the EngineConfiguration in the IBM InfoSphere Information Server Web console.
REMOVE_DATASTAGE_CREDENTIAL (caller): UserIDs=”xxx, yyy”, DSServer=”xxx”Logged when a mapped credential is cleared for one or more suite users inthe IBM InfoSphere Information Server Web console.
REMOVE_DEFAULT_DATASTAGE_CREDENTIAL (caller): DSServers=”xxx, yyy”Logged when default engine credentials are cleared in the EngineConfiguration in the IBM InfoSphere Information Server Web console.
DATASTAGE_CREDENTIAL_MAPPING_DISABLED (caller): DSServer=”xxx”Logged when Share User Registry is selected in the Engine Configurationin the IBM InfoSphere Information Server Web console. With this setting,InfoSphere DataStage users are authenticated to the operating system ofthe server engine using the same credentials they used to log in to theInfoSphere DataStage client application.
DATASTAGE_CREDENTIAL_MAPPING_ENABLED (caller): DSServer=”xxx”Logged when Share User Registry is cleared in the Engine Configurationin the IBM InfoSphere Information Server Web console. This restores theuse of the mapped credentials for InfoSphere Information Server engineauthentication.
User session management events:
User session management consists of the following events: user login and logout,direct session termination, and session expiration.
The following event messages are logged with parameters that describe thesubjects that are involved. The (caller) indicated in each message is the user ID ofthe caller to this event method:
LOGIN (caller): UserID=”xxx”, Client=”xxx”, Origin=”xxx”, SessionID=”xxx”Logged when a user logs in to an IBM InfoSphere Information Server clientapplication or command line tool or when an internal process logs in toInfoSphere Information Server to perform an operation. This action createsan InfoSphere Information Server session. UserID is the userid used toauthenticate with the server. In some cases, this userid value indicates aspecial trusted userid reserved for use by InfoSphere Information Server.This type of login is for performing some scheduled or system-initiatedoperation. Client indicates the type of application that initiated the login.Origin indicates the host name of the system from which the login
Chapter 6. Managing security 97
originated. SessionID is a unique alphanumeric value that unambiguouslyassociates this login session with a LOGOUT, SESSION_TERMINATED, orSESSION_EXPIRED audit event, or with log messages associated with thissession in other diagnostic logs. If this event is configured for LOGLEVEL=INFO, the system user login events are filtered out and not logged.These types of log ins are for InfoSphere Information Server internaloperations performed for various tasks. An example of a system user loginevent is a LOGIN event with a UserID=InformationServerSystemUser. Theseevents typically occur every 30 minutes as part of a scheduler activity butcan occur for other operations at other times.
LOGOUT (caller): UserID=”xxx”, Client=”xxx”, Origin=”xxx”, SessionID=”xxx”Logged when a user or process explicitly logs out of an active InfoSphereInformation Server session. This event might not occur when anapplication abnormally terminates, such as when the Web browser isclosed with an active InfoSphere Information Server Web console or whena session is terminated by an administrator or times out (in which case aSESSION_TERMINATED or SESSION_EXPIRED event is logged). UserID isthe authenticated userid that initially created this session. Client indicatesthe type of application that uses this session. Origin indicates the hostname of the system from which the login originated. SessionID is the samevalue that was logged with the corresponding LOGIN event to uniquelyidentify this session. If this event is configured for LOG LEVEL=INFO,then logouts from system user sessions are filtered out and not logged.These types of log outs are for InfoSphere Information Server internaloperations performed for various tasks.
SESSION_TERMINATED (caller): UserID=”xxx”, Client=”xxx”, Origin=”xxx”,SessionID=”xxx"
Logged when an InfoSphere Information Server session is disconnected byan administrator in the IBM InfoSphere Information Server Web console. IfDisconnect All is selected, or multiple sessions are selected, eachdisconnected session is logged as a separate audit event. Only activesessions that are terminated log an audit event. Sessions that have alreadyexpired are ignored because they have been previously logged with aSESSION_EXPIRED audit event. UserID is the authenticated userid thatinitially created this session. Client indicates the type of application thatuses this session. Origin indicates the host name of the system from whichthe login originated. SessionID is the same value that was logged with thecorresponding LOGIN event to uniquely identify this session.
SESSION_EXPIRED: SessionID=”xxx”Logged when an idle InfoSphere Information Server session times out andis terminated. The timeout is based on the Inactive Session Timeout valueconfigured in Global Session Properties of Session Management in theIBM InfoSphere Information Server Web console. SessionID is the samevalue that was logged with the corresponding LOGIN event to uniquelyidentify this session. Additional information about this session is notavailable at this time to be logged. To determine the actual clientapplication and userid associated with this session, find the correspondingLOGIN event with the same SessionID value.
Audit configuration events:
Auditing configuration consists of the following events: auditing properties filelocation, audit file configuration settings, and audit event settings.
98 Administration Guide

The following event messages are logged with parameters that describe the auditconfiguration settings used. These messages are logged when the applicationserver starts and the auditing service is initialized.
AUDITING_CONFIGURATION_FILE: Path=”xxx”Logged when IBM WebSphere Application Server starts and the AuditingService is initialized. Path indicates the location and name of the auditingconfiguration file that is used to initialize and configure auditing support.
AUDITING_CONFIGURATION_SETTINGS: Path=”xxx”, Name=”xxx”, MaxSize=”xxx”,Count=”xxx”, Format=”xxx”, Append=”xxx”
Logged when WebSphere Application Server starts and the AuditingService is initialized. Path indicates the location where audit log files arecreated. Name is the pattern configured for the log file name. MaxSize is themaximum size in bytes that each log file can grow to. Count is themaximum number of files created before recycling. Format is the format ofthe audit log file. Append indicates whether new records are appended or anew file is created when the Auditing service is initialized.
AUDITING_EVENT_SETTINGS: xxx=”yyy”, xxx=”yyy”Logged when WebSphere Application Server starts and the AuditingService is initialized. This event message includes a comma delimited listof all auditing event types and the current log level setting for each wherexxx is the event type and yyy is the log level. Typical log levels are ALL,INFO, or OFF. ALL indicates that all events of this type are always logged.OFF indicates that no events of this type will be logged. Any other valuewill filter which messages are logged for that event type. Each message isassigned a specific log level by IBM InfoSphere Information Server. OnlyINFO and FINE levels are currently assigned to messages. Messagesassigned at a lower level than INFO, which includes messages assigned alog level of FINE, are not logged if the event type is configured for INFO.The only event types that currently have FINE level log messages areLOGIN and LOGOUT events. Refer to “User session management events”on page 97 for more information about which messages are assigned whichlog levels.
Configuring the audit configuration fileUse the ISauditing.properties file to configure which audit events are logged andto configure the audit log file itself such as the location, name, maximum size, andnumber of cycled files to keep. By default, the file is located in the classes directoryof the IBM InfoSphere Information Server profile in IBM WebSphere ApplicationServer. The default location is WebSphere\AppServer\profiles\InfoSphere\classes.The file is read during the Auditing service initialization when the applicationserver starts up, so changes to the configuration settings take effect only after theapplication server restarts.
Audit configuration values
The ISauditing.properties file contains the following default settings. The defaultvalues are used if the properties file is missing, if a value from the properties file ismissing, or if an invalid value is configured.
auditing.enable = trueEnables or disables auditing. Setting this value to false disables all furtherlogging and ignores all other settings in the configuration file.
audit.file.path = logsLocation where to create the audit log file. The WebSphere ApplicationServer process owner must have write access to this directory. A relative
Chapter 6. Managing security 99
path is considered to be off the InfoSphere Information Server profiledirectory of WebSphere Application Server. Use the forward slash (/) asthe path separator.
audit.file.name = ISauditLog_%g.logAudit file name. A pattern consisting of a string that includes the followingspecial components that will be replaced at run time:v %g - Generation number to distinguish rotated logs. This is replaced by
a numeric value with 0 being the latest log file (the one currently beingwritten to) and then sequential values increasing with each additionallog file created as the file reaches the maximum size. The larger thenumber, the older the log file.
v %% - Translates to a single percent sign "%".
audit.file.size = 10000000Maximum size of each audit log file in bytes. If this value is equal to zero,there is no limit to the size of the log file. All audit records continue to belogged to the same file. Use 0 with caution. When a logged audit recordcauses the file size to exceed this configured size, the log file cycles, and anew log file is created.
audit.file.count = 5Maximum number of audit log files to rotate through. If this value isgreater than 1 and the %g generation parameter is not included in theaudit file name (audit.file.name), a numeric value preceded by a period isadded to the end of the file name. Existing audit files are renamed when anew file is created. The higher the generation number, the older the logfile. The count includes the 0 generation file. For example,
audit.file.count=5 allows the creation of file name ISauditLog_0.logthrough ISauditLog_4.log.
audit.file.format = SimpleFormat of the audit file. Possible values are Simple, XML, or both. Ifconfigured as both, the file name extension specified in audit.file.namewill be replaced with .xml for the XML log files or added to the end of thefile name if no extension is specified.
audit.file.append = trueAudit file append setting. Setting this value to false, forces the creation of anew 0 generation log file each time WebSphere Application Server restarts.Setting this value to true continues appending to the existing 0 generationfile until the maximum size is reached. If the audit.file.format = XML,set the value to false to prevent multiple XML file headers from beingwritten to the file.
The following list shows the valid audit event types and the log level setting foreach:
audit.event.ADD_USER = ALLaudit.event.ADD_GROUP = ALLaudit.event.DELETE_USERS = ALLaudit.event.DELETE_GROUPS = ALLaudit.event.ADD_USERS_TO_GROUPS = ALLaudit.event.DELETE_USERS_FROM_GROUPS = ALLaudit.event.CHANGE_PASSWORD = ALLaudit.event.SET_CREDENTIAL = ALLaudit.event.REMOVE_CREDENTIAL = ALLaudit.event.ADD_ROLE = ALL
100 Administration Guide

audit.event.DELETE_ROLES = ALLaudit.event.ASSIGN_GROUP_ROLES = ALLaudit.event.ASSIGN_USER_ROLES = ALLaudit.event.REVOKE_GROUP_ROLES = ALLaudit.event.REVOKE_USER_ROLES = ALLaudit.event.ASSIGN_PROJECT_USER_ROLES = ALLaudit.event.ASSIGN_PROJECT_GROUP_ROLES = ALLaudit.event.REVOKE_PROJECT_USER_ROLES = ALLaudit.event.REVOKE_PROJECT_GROUP_ROLES = ALLaudit.event.REVOKE_PROJECT_ALL_ROLES = ALLaudit.event.ADD_DATASTAGE_CREDENTIAL = ALLaudit.event.SET_DEFAULT_DATASTAGE_CREDENTIAL = ALLaudit.event.REMOVE_DATASTAGE_CREDENTIAL = ALLaudit.event.REMOVE_DEFAULT_DATASTAGE_CREDENTIAL = ALLaudit.event.DATASTAGE_CREDENTIAL_MAPPING_DISABLED = ALLaudit.event.DATASTAGE_CREDENTIAL_MAPPING_ENABLED = ALLaudit.event.LOGIN = ALLaudit.event.LOGOUT = ALLaudit.event.SESSION_TERMINATED = ALLaudit.event.SESSION_EXPIRED = ALLaudit.event.AUDITING_CONFIGURATION_FILE = ALLaudit.event.AUDITING_CONFIGURATION_SETTINGS = ALLaudit.event.AUDITING_EVENT_SETTINGS = ALL
Enables the audit events to be included in the logs. Set the desired loglevel for each audit event to ALL, INFO, or OFF.v ALL enables logging of all audit records produced by the system for the
configured event type. If an audit.event type is missing from theconfiguration file or is configured for an invalid log level, it defaults to alog level of ALL
v INFO filters which audit records get logged by ignoring requests to logall audit records defined with a log level lower than INFO. The onlyaudit records produced with a log level lower than INFO are LOGIN andLOGOUT event records for System User logins and logouts. These systemuser events are not initiated by a user but are from internal operationswithin InfoSphere Information Server. Setting audit.event.LOGIN=INFOsuppresses logging of the system user login events.
v OFF suppresses logging of all audit records produced by the system forthe configured event type.
Audit configuration securityThe Audit service creates an audit trail of security-related events. You can securethe audit configuration and logs to prevent unauthorized tampering.
Set the path where audit files are located in the ISauditing.propertiesconfiguration file. If configured as a relative path, the specified directory must existoff the IBM InfoSphere Information Server profile directory under IBM WebSphereApplication Server. If configured in another location, the full path must bespecified and you must ensure that the WebSphere Application Server processowner has file system write permission to that directory.
By default, the location of the ISauditing.properties configuration file is in theInfoSphere Information Server profile of WebSphere Application Server in theclasses directory. This is the same location as the isfconfig.properties file. A new
Chapter 6. Managing security 101

key is added to the isfconfig.properties file to indicate the location of theISauditing.properties file. This key and default value are: auditing.config.file= classes/ISauditing.properties.
To ensure additional secure access to the auditing configuration settings, you canrelocate the ISauditing.properties configuration file to another location andupdate the audit.config.file value in the isfconfig.properties file to specifythe full path and auditing property file name of the new location. A relative pathassumes a root of the InfoSphere Information Server Profile directory underWebSphere Application Server. Use the forward slash (/) for the path separator.The WebSphere Application Server process owner must have read access to the filewherever it is relocated. However, write access can be restricted to individuals whohave the authority to modify the auditing configuration. To detect any attempt tospoof the official configuration, the location of the audit configuration file used islogged as an audit event in the audit file at WebSphere Application Server startup.If someone with write access to the isfconfig.properties file changes the locationor name of the auditing configuration file, this information is logged.
The absence of the configured auditing properties file or a pointer to an invalid orpartial file defaults to logging events using the default audit configuration settings.A missing property key or an invalid value for a key results in the default valuebeing used for that property key. These precautions are in place to prevent anunauthorized circumvention of audit logging.
Auditing in a clustered environmentThere are information and auditing considerations that are specific to a clusteredIBM WebSphere Application Server configuration.
In a clustered configuration, a separate set of audit log files are created on eachmanaged node, each containing the specific events processed by that node. Youmust gather and collate these files to sort events by timestamp if you want asingle, chronological audit trail.
If a managed node in the cluster is configured with multiple application servers,each application server creates and manages its own audit log files. Because allapplication servers on a single managed node share the same auditingconfiguration settings, it is not possible to configure different file names orlocations for each application server. The first application server that is initializeduses (or creates) the 0 generation audit file by the configured log file name.Subsequent application servers initialized on that same managed node create a 0generation audit file by the same name, but with a period and a sequential numberappended to the end of the file name.
For clustered configurations that include multiple managed nodes, any changes tothe auditing configuration settings must be made to the ISauditing.properties filein the classes directory of each node's profile. If this properties file has beenrelocated or renamed, the appropriate changes must be made to theisfconfig.properties file on each managed node denoting the path and file nameof the custom auditing configuration file.
Audit logsThe audit log file can be created in simple text format or in XML format. The sizeof each audit record varies depending on the event, the string length, and thenumber of parameters associated with the audit event and the format selected.
102 Administration Guide
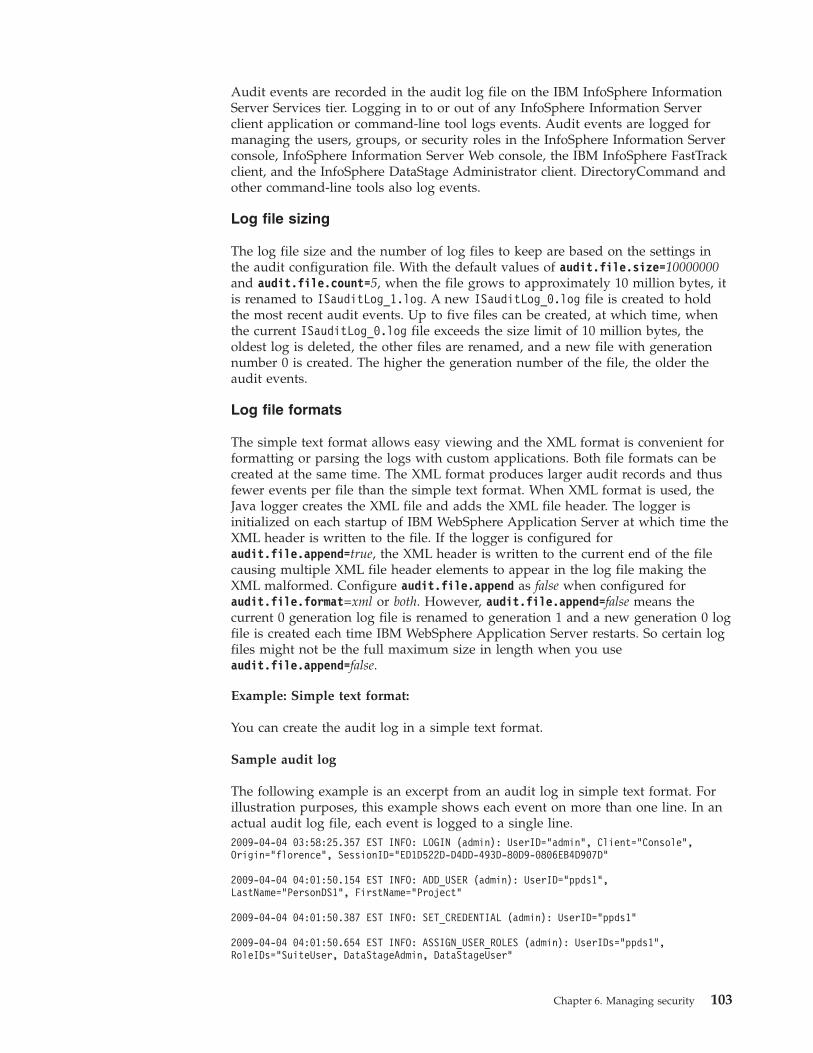
Audit events are recorded in the audit log file on the IBM InfoSphere InformationServer Services tier. Logging in to or out of any InfoSphere Information Serverclient application or command-line tool logs events. Audit events are logged formanaging the users, groups, or security roles in the InfoSphere Information Serverconsole, InfoSphere Information Server Web console, the IBM InfoSphere FastTrackclient, and the InfoSphere DataStage Administrator client. DirectoryCommand andother command-line tools also log events.
Log file sizing
The log file size and the number of log files to keep are based on the settings inthe audit configuration file. With the default values of audit.file.size=10000000and audit.file.count=5, when the file grows to approximately 10 million bytes, itis renamed to ISauditLog_1.log. A new ISauditLog_0.log file is created to holdthe most recent audit events. Up to five files can be created, at which time, whenthe current ISauditLog_0.log file exceeds the size limit of 10 million bytes, theoldest log is deleted, the other files are renamed, and a new file with generationnumber 0 is created. The higher the generation number of the file, the older theaudit events.
Log file formats
The simple text format allows easy viewing and the XML format is convenient forformatting or parsing the logs with custom applications. Both file formats can becreated at the same time. The XML format produces larger audit records and thusfewer events per file than the simple text format. When XML format is used, theJava logger creates the XML file and adds the XML file header. The logger isinitialized on each startup of IBM WebSphere Application Server at which time theXML header is written to the file. If the logger is configured foraudit.file.append=true, the XML header is written to the current end of the filecausing multiple XML file header elements to appear in the log file making theXML malformed. Configure audit.file.append as false when configured foraudit.file.format=xml or both. However, audit.file.append=false means thecurrent 0 generation log file is renamed to generation 1 and a new generation 0 logfile is created each time IBM WebSphere Application Server restarts. So certain logfiles might not be the full maximum size in length when you useaudit.file.append=false.
Example: Simple text format:
You can create the audit log in a simple text format.
Sample audit log
The following example is an excerpt from an audit log in simple text format. Forillustration purposes, this example shows each event on more than one line. In anactual audit log file, each event is logged to a single line.2009-04-04 03:58:25.357 EST INFO: LOGIN (admin): UserID="admin", Client="Console",Origin="florence", SessionID="ED1D522D-D4DD-493D-80D9-0806EB4D907D"
2009-04-04 04:01:50.154 EST INFO: ADD_USER (admin): UserID="ppds1",LastName="PersonDS1", FirstName="Project"
2009-04-04 04:01:50.387 EST INFO: SET_CREDENTIAL (admin): UserID="ppds1"
2009-04-04 04:01:50.654 EST INFO: ASSIGN_USER_ROLES (admin): UserIDs="ppds1",RoleIDs="SuiteUser, DataStageAdmin, DataStageUser"
Chapter 6. Managing security 103

2009-04-04 04:11:41.325 EST INFO: ADD_GROUP (admin): GroupID="regPeeps",GroupName="Regular People"
2009-04-04 04:11:42.895 EST INFO: ASSIGN_GROUP_ROLES (admin): GroupIDs="regPeeps",RoleIDs="SuiteUser"
2009-04-04 04:12:01.343 EST INFO: ASSIGN_GROUP_ROLES (admin): GroupIDs="regPeeps",RoleIDs="DataStageUser"
2009-04-04 04:12:12.784 EST INFO: LOGIN (admin): UserID="admin",Client="DataStage Administrator", Origin="florence",SessionID="FDBB462B-0381-4B14-80F9-82DDF060437A"
2009-04-04 04:12:45.336 EST INFO: REVOKE_PROJECT_GROUP_ROLES (admin):Project="FLORENCE/test", GroupIDs="regPeeps", RoleIDs="DataStageProductionManager,DataStageDeveloper, DataStageSuperOperator, DataStageOperator"
2009-04-04 04:12:45.779 EST INFO: ASSIGN_PROJECT_GROUP_ROLES (admin):Project="FLORENCE/test", GroupIDs="regPeeps", RoleIDs="DataStageOperator"
Example: XML format:
You can create the audit log in XML format.
Sample audit log
The following example is an excerpt from an audit log in an XML format:<?xml version="1.0" encoding="windows-1252" standalone="no"?><!DOCTYPE log SYSTEM "logger.dtd"><log><record><date>2009-05-21T00:00:00</date><millis>1242878400161</millis><sequence>323</sequence><logger>com.ibm.is.auditing</logger><level>FINE</level><thread>51</thread><message>LOGIN (InformationServerSystemUser): UserID="InformationServerSystemUser",Client="Server client", Origin="SwordIFS",SessionID="34BADF15-ABA5-4FA9-AA7D-68D26402C2D6"</message><key>info.audit.session.LOGIN</key><catalog>com.ascential.acs.auditing.server.impl.resources.StringData</catalog><param>InformationServerSystemUser</param><param>InformationServerSystemUser</param><param>Server client</param><param>SwordIFS</param><param>34BADF15-ABA5-4FA9-AA7D-68D26402C2D6</param></record><record><date>2009-05-21T00:00:04</date><millis>1242878404458</millis><sequence>324</sequence><logger>com.ibm.is.auditing</logger><level>FINE</level><thread>51</thread><message>LOGOUT (InformationServerSystemUser): UserID="InformationServerSystemUser",Client="Server client", Origin="SwordIFS",SessionID="34BADF15-ABA5-4FA9-AA7D-68D26402C2D6"</message><key>info.audit.session.LOGOUT</key><catalog>com.ascential.acs.auditing.server.impl.resources.StringData</catalog><param>InformationServerSystemUser</param><param>InformationServerSystemUser</param><param>Server client</param><param>SwordIFS</param><param>34BADF15-ABA5-4FA9-AA7D-68D26402C2D6</param></record>
104 Administration Guide
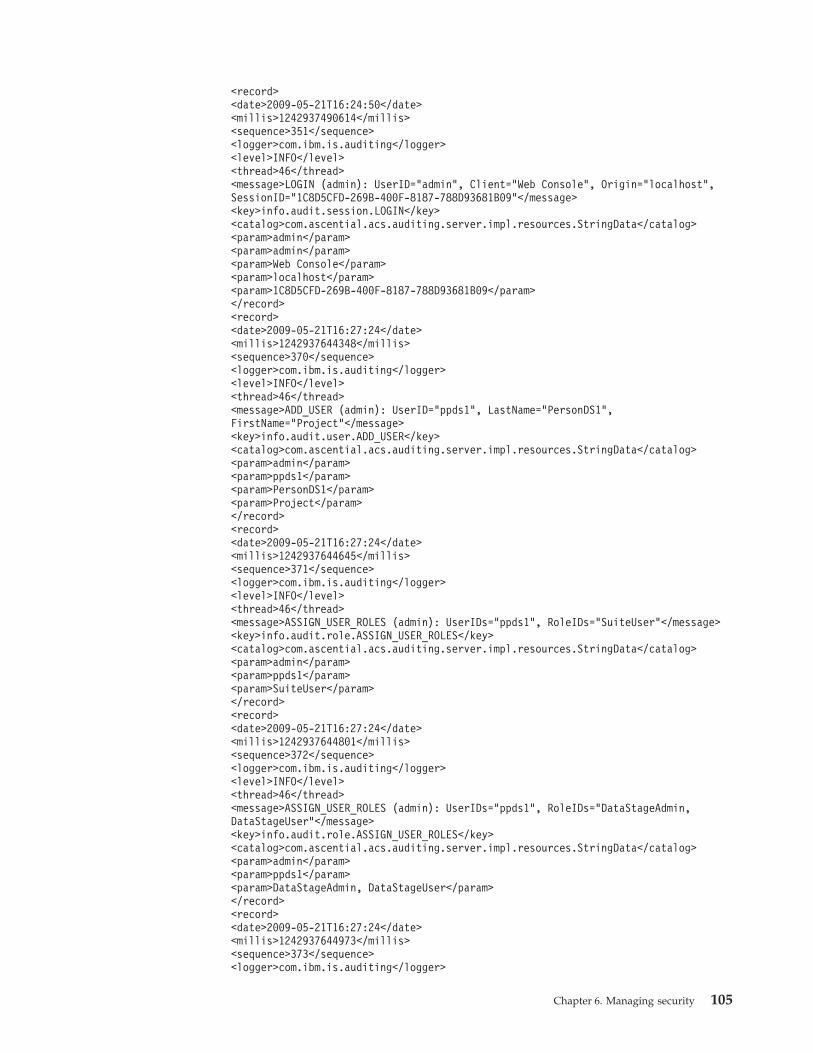
<record><date>2009-05-21T16:24:50</date><millis>1242937490614</millis><sequence>351</sequence><logger>com.ibm.is.auditing</logger><level>INFO</level><thread>46</thread><message>LOGIN (admin): UserID="admin", Client="Web Console", Origin="localhost",SessionID="1C8D5CFD-269B-400F-8187-788D93681B09"</message><key>info.audit.session.LOGIN</key><catalog>com.ascential.acs.auditing.server.impl.resources.StringData</catalog><param>admin</param><param>admin</param><param>Web Console</param><param>localhost</param><param>1C8D5CFD-269B-400F-8187-788D93681B09</param></record><record><date>2009-05-21T16:27:24</date><millis>1242937644348</millis><sequence>370</sequence><logger>com.ibm.is.auditing</logger><level>INFO</level><thread>46</thread><message>ADD_USER (admin): UserID="ppds1", LastName="PersonDS1",FirstName="Project"</message><key>info.audit.user.ADD_USER</key><catalog>com.ascential.acs.auditing.server.impl.resources.StringData</catalog><param>admin</param><param>ppds1</param><param>PersonDS1</param><param>Project</param></record><record><date>2009-05-21T16:27:24</date><millis>1242937644645</millis><sequence>371</sequence><logger>com.ibm.is.auditing</logger><level>INFO</level><thread>46</thread><message>ASSIGN_USER_ROLES (admin): UserIDs="ppds1", RoleIDs="SuiteUser"</message><key>info.audit.role.ASSIGN_USER_ROLES</key><catalog>com.ascential.acs.auditing.server.impl.resources.StringData</catalog><param>admin</param><param>ppds1</param><param>SuiteUser</param></record><record><date>2009-05-21T16:27:24</date><millis>1242937644801</millis><sequence>372</sequence><logger>com.ibm.is.auditing</logger><level>INFO</level><thread>46</thread><message>ASSIGN_USER_ROLES (admin): UserIDs="ppds1", RoleIDs="DataStageAdmin,DataStageUser"</message><key>info.audit.role.ASSIGN_USER_ROLES</key><catalog>com.ascential.acs.auditing.server.impl.resources.StringData</catalog><param>admin</param><param>ppds1</param><param>DataStageAdmin, DataStageUser</param></record><record><date>2009-05-21T16:27:24</date><millis>1242937644973</millis><sequence>373</sequence><logger>com.ibm.is.auditing</logger>
Chapter 6. Managing security 105

<level>INFO</level><thread>46</thread><message>SET_CREDENTIAL (admin): UserID="ppds1"</message><key>info.audit.user.SET_CREDENTIAL</key><catalog>com.ascential.acs.auditing.server.impl.resources.StringData</catalog><param>admin</param><param>ppds1</param></record><record><date>2009-05-21T16:27:53</date><millis>1242937673989</millis><sequence>375</sequence><logger>com.ibm.is.auditing</logger><level>INFO</level><thread>45</thread><message>LOGOUT (admin): UserID="admin", Client="Web Console", Origin="localhost",SessionID="1C8D5CFD-269B-400F-8187-788D93681B09"</message><key>info.audit.session.LOGOUT</key><catalog>com.ascential.acs.auditing.server.impl.resources.StringData</catalog><param>admin</param><param>admin</param><param>Web Console</param><param>localhost</param><param>1C8D5CFD-269B-400F-8187-788D93681B09</param></record></log>
Administrator account password changingAfter running the installation program, you can change the passwords foradministrator accounts that you created during installation.
You can change the following administrator account passwords:v An IBM InfoSphere Information Server administrator password.v An IBM WebSphere Application Server administrator password.v IBM InfoSphere Information Analyzer analysis database owner account
credentials.v IBM DB2 passwords.
Changing an IBM InfoSphere Information Server administratorpassword
You can change an InfoSphere Information Server administrator account passwordafter installation.
About this task
InfoSphere Information Server administrator accounts are the main administrationaccounts for InfoSphere Information Server.
You can create as many InfoSphere Information Server administrator accounts asyou need. Any users with the suite administrator role assigned to them areInfoSphere Information Server administrators. The IBM WebSphere ApplicationServer default administrator account also has this role.
106 Administration Guide
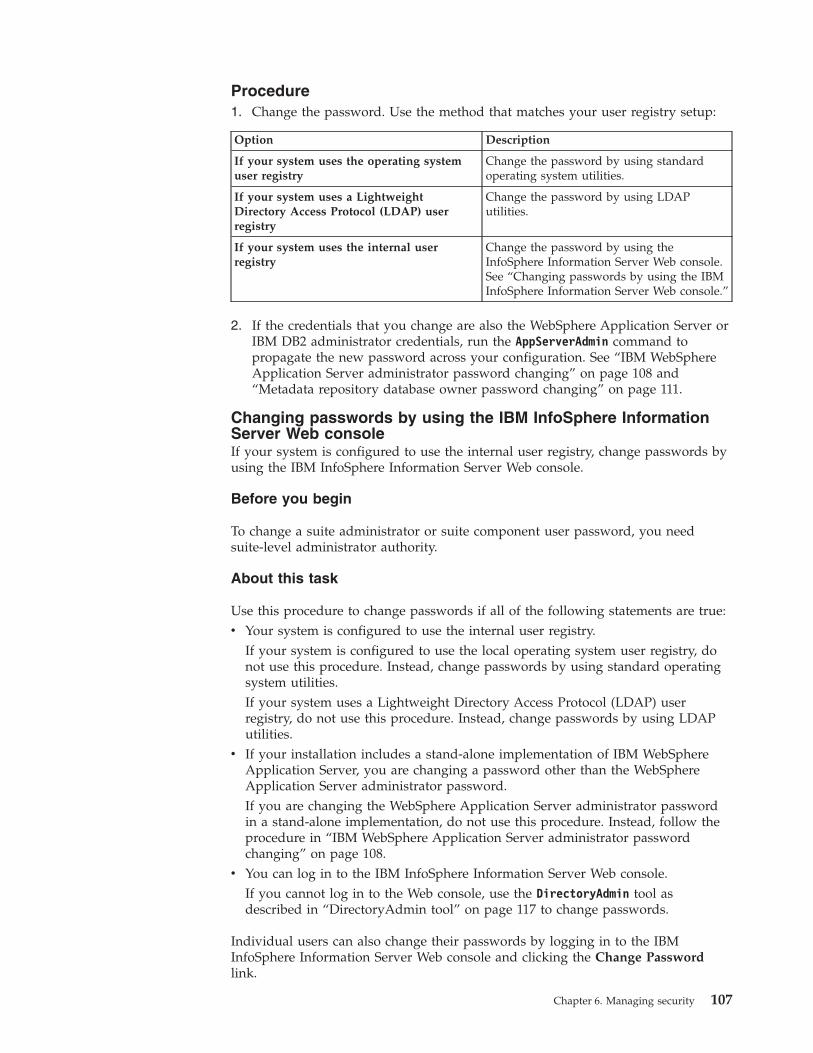
Procedure1. Change the password. Use the method that matches your user registry setup:
Option Description
If your system uses the operating systemuser registry
Change the password by using standardoperating system utilities.
If your system uses a LightweightDirectory Access Protocol (LDAP) userregistry
Change the password by using LDAPutilities.
If your system uses the internal userregistry
Change the password by using theInfoSphere Information Server Web console.See “Changing passwords by using the IBMInfoSphere Information Server Web console.”
2. If the credentials that you change are also the WebSphere Application Server orIBM DB2 administrator credentials, run the AppServerAdmin command topropagate the new password across your configuration. See “IBM WebSphereApplication Server administrator password changing” on page 108 and“Metadata repository database owner password changing” on page 111.
Changing passwords by using the IBM InfoSphere InformationServer Web consoleIf your system is configured to use the internal user registry, change passwords byusing the IBM InfoSphere Information Server Web console.
Before you begin
To change a suite administrator or suite component user password, you needsuite-level administrator authority.
About this task
Use this procedure to change passwords if all of the following statements are true:v Your system is configured to use the internal user registry.
If your system is configured to use the local operating system user registry, donot use this procedure. Instead, change passwords by using standard operatingsystem utilities.If your system uses a Lightweight Directory Access Protocol (LDAP) userregistry, do not use this procedure. Instead, change passwords by using LDAPutilities.
v If your installation includes a stand-alone implementation of IBM WebSphereApplication Server, you are changing a password other than the WebSphereApplication Server administrator password.If you are changing the WebSphere Application Server administrator passwordin a stand-alone implementation, do not use this procedure. Instead, follow theprocedure in “IBM WebSphere Application Server administrator passwordchanging” on page 108.
v You can log in to the IBM InfoSphere Information Server Web console.If you cannot log in to the Web console, use the DirectoryAdmin tool asdescribed in “DirectoryAdmin tool” on page 117 to change passwords.
Individual users can also change their passwords by logging in to the IBMInfoSphere Information Server Web console and clicking the Change Passwordlink.
Chapter 6. Managing security 107

Procedure1. Log in to the IBM InfoSphere Information Server Web console. Use an account
with administrator access.2. In the Web console, click the Administration tab.3. In the navigation pane, select Users and Groups > Users.4. In the Users pane, select the check box for the WebSphere Application Server
administrator.5. In the right pane, click Open User.6. In the Password field, type the new password.7. In the Confirm Password field, retype the new password.8. In the lower right corner of the page, click Save and Close.
IBM WebSphere Application Server administrator passwordchanging
The procedure for changing the WebSphere Application Server administratorpassword differs depending on whether WebSphere Application Server clusteringis implemented within your installation.
Changing the IBM WebSphere Application Server administratorpassword in a stand-alone installationYou can change the WebSphere Application Server administrator password afterinstallation. Follow this procedure if your implementation includes a stand-aloneinstallation of WebSphere Application Server.
Procedure1. Stop WebSphere Application Server. See “Stopping IBM WebSphere Application
Server (Windows)” on page 181 or “Stopping IBM WebSphere ApplicationServer (Linux, UNIX)” on page 183.
2. Log in to the services tier computer. Use an account with administratorcredentials.
Linux UNIX The account must have execution permission for the toolsin the ASBServer/bin directory within the InfoSphere Information Serverinstallation directory.
3. Change the password:v If your system is configured to use the internal user registry, change the
password by using the DirectoryAdmin command:
Windows
C:\IBM\InformationServer\ASBServer\bin\DirectoryAdmin.bat -user-userid wasadmin -password password
Linux UNIX
/opt/IBM/InformationServer/ASBServer/bin/DirectoryAdmin.sh -user-userid wasadmin -password password
In the command, wasadmin is the WebSphere Application Serveradministrator user name, and password as the new password.Do not use the IBM InfoSphere Information Server Web console to changethe WebSphere Application Server administrator password.
v If your system uses an operating system user registry, change the passwordby using standard operating system utilities.
v If your system uses a Lightweight Directory Access Protocol (LDAP) userregistry, change the password by using LDAP utilities.
108 Administration Guide

4. Run the AppServerAdmin command with the -was option to update thecredentials across your configuration.For example, to update your configuration with user name wasadmin1 andpassword mypassword, run the following command:
v Linux UNIX
/opt/IBM/InformationServer/ASBServer/bin/AppServerAdmin.sh -was-user wasadmin1 -password mypassword
v Windows
C:\IBM\InformationServer\ASBServer\bin\AppServerAdmin.bat -was-user wasadmin1 -password mypassword
This command updates the WebSphere Application Server user registryconfiguration. You do not have to use the WebSphere Application Serveradministrative console.
5. Restart WebSphere Application Server. See “Starting IBM WebSphereApplication Server (Linux, UNIX)” on page 188 or “Starting IBM WebSphereApplication Server (Windows)” on page 186.
6. When restarting WebSphere Application Server, regardless of the method thatyou use, the startup method returns before the application server is fullystarted. To verify that WebSphere Application Server has started, monitor thelog files. See “Checking the status of IBM WebSphere Application Serverstartup (stand-alone installation)” on page 192.
Changing the IBM WebSphere Application Server administratorpassword in a clustered installationYou can change the WebSphere Application Server administrator password afterinstallation. Follow this procedure if WebSphere Application Server clustering isimplemented for your installation.
Procedure1. Make sure that all node agents are running. See Checking the status of IBM
WebSphere Application Server node agents.2. Change the user password:
v If your system uses the internal user registry, change the password by usingthe IBM InfoSphere Information Server Web console. See “Changingpasswords by using the IBM InfoSphere Information Server Web console” onpage 107.
v If your system uses a Lightweight Directory Access Protocol (LDAP) userregistry, change the password by using LDAP utilities.
3. Log in to the computer that hosts the WebSphere Application ServerDeployment Manager.
v Linux UNIX Log in as root.
v Windows Use an account with administrator privileges.4. Make sure that all node agents are still running after the password change. See
“Checking the status of IBM WebSphere Application Server node agents” onpage 195.
5. Stop the Deployment Manager. See “Stopping the IBM WebSphere ApplicationServer Deployment Manager (Windows)” on page 182 or “Stopping the IBMWebSphere Application Server Deployment Manager (Linux, UNIX)” on page184. Do not stop the node agents.
Chapter 6. Managing security 109

6. On the computer that hosts the WebSphere Application Server DeploymentManager, run the AppServerAdmin command with the -was option to update thecredentials across your configuration.For example, to update your configuration with user name wasadmin1 andpassword mypassword, run the following command:
v Linux UNIX
/opt/IBM/InformationServer/ASBServer/bin/AppServerAdmin.sh -was-user wasadmin1 -password mypassword
To run this command, use an account that has execution permission for thetools in the ASBServer/bin directory.
v Windows
C:\IBM\InformationServer\ASBServer\bin\AppServerAdmin.bat -was-user wasadmin1 -password mypassword
This command updates the WebSphere Application Server user registryconfiguration. You do not have to use the WebSphere Application Serveradministrative console.
7. Restart the Deployment Manager. See “Starting the IBM WebSphere ApplicationServer Deployment Manager (Windows)” on page 187 or “Starting the IBMWebSphere Application Server Deployment Manager (Linux, UNIX)” on page190.You do not have to restart the node agents and application servers. They areautomatically synchronized with the Deployment Manager after it is running.The synchronization process takes a few seconds. After the synchronization iscomplete, you can safely stop or start node agents or application servers whennecessary.
8. If one of the node agents was not running when you changed the password instep 2 on page 109, the user cannot start that node agent because thepasswords no longer match at the Deployment manager and node level. To fixthis problem, run the WebSphere Application Server syncNode command tosynchronize the node with the Deployment manager. To run the syncNodecommand:a. Log into the node.b. Run the syncNode command.
v Linux UNIX
opt/IBM/WebSphere/AppServer/profiles/custom_profile/bin/syncNode.shdmgr_hostname dmgr_port -user was_admin_username -passwordwas_admin_password
v Windows
C:\IBM\WebSphere\AppServer\profiles\custom_profile\bin\syncNodedmgr_hostname dmgr_port -user was_admin_username -passwordwas_admin_password
In the command:v dmgr_hostname is the host name of the computer where the Deployment
Manager is running.v dmgr_port is the port number of the Deployment Manager (default is
8879).v was_admin_username is the user name of the WebSphere Application
Server administrator.v was_admin_password is the administrator password.
110 Administration Guide

c. Restart the node agent. See “Starting IBM WebSphere Application Server(Windows)” on page 186 and “Starting IBM WebSphere Application Server(Linux, UNIX)” on page 188.
9. When restarting WebSphere Application Server, regardless of the method thatyou use, the startup method returns before the application server is fullystarted. To verify that WebSphere Application Server has started, monitor thelog files. See “Checking the status of IBM WebSphere Application Serverstartup (clustered installation)” on page 193.
Metadata repository database owner password changingThe procedure for changing the metadata repository database owner passworddiffers depending upon whether IBM WebSphere Application Server clustering isimplemented within your installation.
Changing the metadata repository database owner password in astand-alone IBM WebSphere Application Server installationYou can change the metadata repository database owner account password afterinstallation. Follow this procedure if your implementation includes a stand-aloneinstallation of WebSphere Application Server.
About this task
Follow this procedure to change the metadata repository database ownerpassword. The metadata repository database owner user name cannot be changed.
Procedure1. Stop WebSphere Application Server. See “Stopping IBM WebSphere Application
Server (Windows)” on page 181 or “Stopping IBM WebSphere ApplicationServer (Linux, UNIX)” on page 183.
2. Change the metadata repository database owner account password on thecomputer:v If your database is implemented within IBM DB2, change the password by
using standard operating system utilities.v If your database is implemented within another database management
system, refer to the database management system documentation forinformation about changing the password.
3. Log in to the services tier computer. Use an account with administratorcredentials.
Linux UNIX The account must have execution permission for the toolsin the ASBServer/bin directory within the InfoSphere Information Serverinstallation directory.
4. Run the AppServerAdmin command with the -db option to update the passwordacross your configuration.For example, to update your configuration with password mypassword, run thefollowing command:
v Linux UNIX
/opt/IBM/InformationServer/ASBServer/bin/AppServerAdmin.sh -db -user xmeta1-password mypassword
v Windows
C:\IBM\InformationServer\ASBServer\bin\AppServerAdmin.bat -db -user xmeta1-password mypassword
Chapter 6. Managing security 111
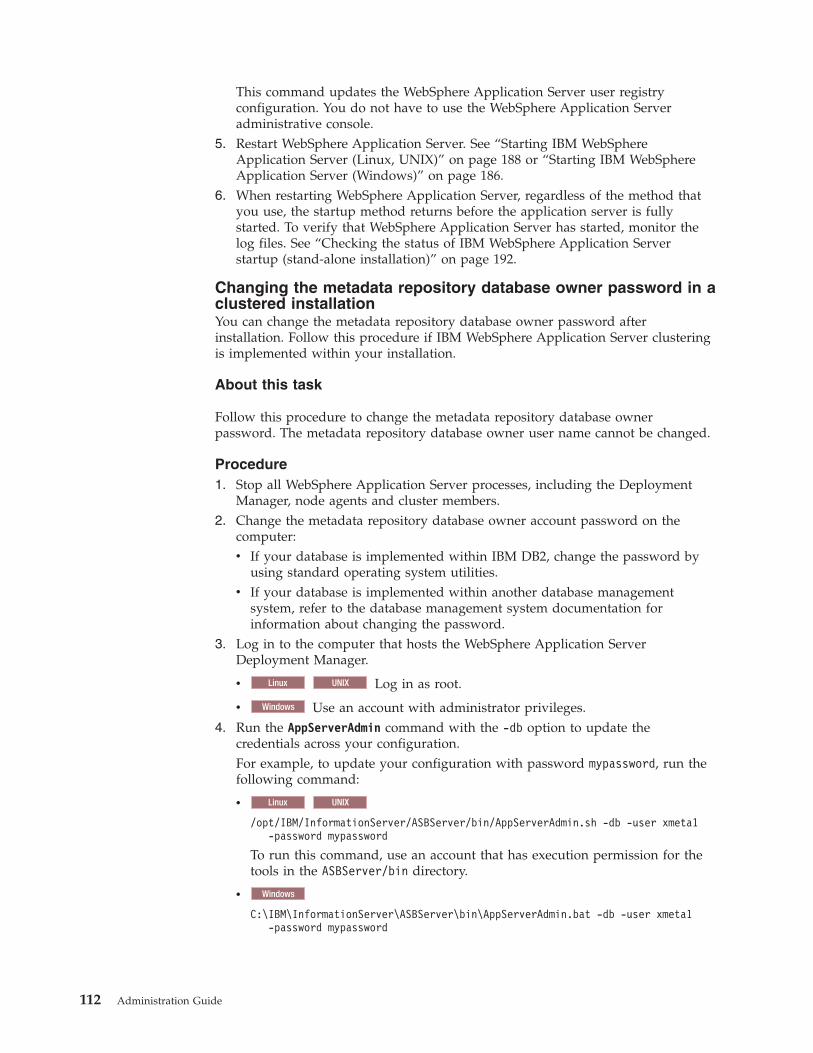
This command updates the WebSphere Application Server user registryconfiguration. You do not have to use the WebSphere Application Serveradministrative console.
5. Restart WebSphere Application Server. See “Starting IBM WebSphereApplication Server (Linux, UNIX)” on page 188 or “Starting IBM WebSphereApplication Server (Windows)” on page 186.
6. When restarting WebSphere Application Server, regardless of the method thatyou use, the startup method returns before the application server is fullystarted. To verify that WebSphere Application Server has started, monitor thelog files. See “Checking the status of IBM WebSphere Application Serverstartup (stand-alone installation)” on page 192.
Changing the metadata repository database owner password in aclustered installationYou can change the metadata repository database owner password afterinstallation. Follow this procedure if IBM WebSphere Application Server clusteringis implemented within your installation.
About this task
Follow this procedure to change the metadata repository database ownerpassword. The metadata repository database owner user name cannot be changed.
Procedure1. Stop all WebSphere Application Server processes, including the Deployment
Manager, node agents and cluster members.2. Change the metadata repository database owner account password on the
computer:v If your database is implemented within IBM DB2, change the password by
using standard operating system utilities.v If your database is implemented within another database management
system, refer to the database management system documentation forinformation about changing the password.
3. Log in to the computer that hosts the WebSphere Application ServerDeployment Manager.
v Linux UNIX Log in as root.
v Windows Use an account with administrator privileges.4. Run the AppServerAdmin command with the -db option to update the
credentials across your configuration.For example, to update your configuration with password mypassword, run thefollowing command:
v Linux UNIX
/opt/IBM/InformationServer/ASBServer/bin/AppServerAdmin.sh -db -user xmeta1-password mypassword
To run this command, use an account that has execution permission for thetools in the ASBServer/bin directory.
v Windows
C:\IBM\InformationServer\ASBServer\bin\AppServerAdmin.bat -db -user xmeta1-password mypassword
112 Administration Guide
This command updates the WebSphere Application Server user registryconfiguration. You do not have to use the WebSphere Application Serveradministrative console.
5. Restart the Deployment Manager. See “Starting the IBM WebSphere ApplicationServer Deployment Manager (Windows)” on page 187 or “Starting the IBMWebSphere Application Server Deployment Manager (Linux, UNIX)” on page190.Do not restart the node agents and cluster members yet.
6. On each managed node, run the WebSphere Application Server syncNodecommand to resynchronize the nodes with the Deployment Manager:
v Linux UNIX
opt/IBM/WebSphere/AppServer/profiles/custom_profile/bin/syncNode.shdmgr_hostname dmgr_port -user was_admin_username -passwordwas_admin_password
v Windows
C:\IBM\WebSphere\AppServer\profiles\custom_profile\bin\syncNodedmgr_hostname dmgr_port -user was_admin_username -passwordwas_admin_password
In the command:v dmgr_hostname is the host name of the computer where the Deployment
Manager is running.v dmgr_port is the port number of the Deployment Manager (default is 8879).v was_admin_username is the user name of the WebSphere Application Server
administrator.v was_admin_password is the administrator password.
7. Restart the node agents and cluster members. See “Starting IBM WebSphereApplication Server (Windows)” on page 186 or “Starting IBM WebSphereApplication Server (Linux, UNIX)” on page 188.
8. When restarting WebSphere Application Server, regardless of the method thatyou use, the startup method returns before the application server is fullystarted. To verify that WebSphere Application Server has started, monitor thelog files. See “Checking the status of IBM WebSphere Application Serverstartup (clustered installation)” on page 193.
Changing the analysis database owner account credentialsYou can change your IBM InfoSphere Information Analyzer analysis databaseowner account credentials after installation.
Before you begin
You must have InfoSphere Information Analyzer administrator authority.
About this task
The analysis database owner account has ownership authority over the analysisdatabase. By default, the user name of this account is iauser.
Follow this procedure to change the analysis database owner account credentials.
Procedure1. Change the analysis database owner credentials on the computer. If your
database is implemented within IBM DB2, change the credentials by using
Chapter 6. Managing security 113
standard operating system utilities. If your database is implemented withinanother database management system, refer to the database managementsystem documentation for information about changing the credentials.
2. Log in to the IBM InfoSphere Information Server console. Specify a user nameand password of an account with InfoSphere Information Analyzeradministrator authority.
3. From the Home navigator menu in the console, select Configuration >Analysis Settings. If these items do not appear in the Home menu, log out ofthe console and log in with an account with InfoSphere Information Analyzeradministrator authority.
4. Click the Analysis Database tab.5. Change the information in the fields.6. Click Save All.
Changing IBM DB2 passwordsYou can change the DB2 administrator account or other DB2 account passwordsafter installation.
About this task
The DB2 administrator account owns the DB2 database management system forIBM InfoSphere Information Server. DB2 runs under this account.
Linux UNIX An InfoSphere Information Server installation also requires anon-fenced instance user and a fenced user.
Procedure
To change a DB2 password, see the IBM DB2 documentation:v DB2 9.5: publib.boulder.ibm.com/infocenter/db2luw/v9r5/topic/
com.ibm.db2.luw.admin.sec.doc/doc/c0007253.htmlv DB2 9.7: publib.boulder.ibm.com/infocenter/db2luw/v9r7/topic/
com.ibm.db2.luw.admin.sec.doc/doc/c0007253.html
Administration commands and toolsUse the IBM InfoSphere Information Server administration commands and tools tocomplete security administration tasks, such as updating new credentials acrossyour configuration and searching for users in a configured user registry, and totroubleshoot your security configuration.
AppServerAdmin commandIf you change the default IBM WebSphere Application Server administrationcredentials or the repository credentials, use the AppServerAdmin command toupdate the new credentials across your configuration.
Location
Issue the command from the root_directory/InformationServer/ASBServer/bindirectory.
The AppServerAdmin command has two options: -was and -db.
114 Administration Guide
-was optionIf you change the default IBM WebSphere Application Server administratoruser name and password, this command updates the user name andpassword throughout the WebSphere Application Server configuration.
You can change the WebSphere Application Server default administratoruser name and password in the following cases:v If you change the WebSphere Application Server user registry
configuration in the WebSphere Application Server AdministrativeConsole and the server ID and password for the current user registry ischanged or a new user registry is configured.
v If the WebSphere Application Server default administrator is deletedfrom the configured user registry or if that user's password is changedor expired.
You must run the -was option each time the WebSphere Application Serverdefault administrator credentials are changed.
-db optionThe repository user credentials are used by WebSphere Application Serverto connect to the IBM InfoSphere Information Server metadata repository.The user account for the metadata repository is typically called "xmeta." Ifyou change the repository user password, this command updates thepassword throughout WebSphere Application Server and the InfoSphereInformation Server configuration.
You must run this command each time the repository user password ischanged.
You cannot change the user name of this account.
Syntax
The command syntax for the -was option:
Windows
AppServerAdmin.bat -was -user username -password password
Linux UNIX
AppServerAdmin.sh -was -user username -password password
The command syntax for the -db option:
Windows
AppServerAdmin.bat -db -user repository_userid -password repository_password
Linux UNIX
AppServerAdmin.sh -db -user repository_userid -password repository_password
Parameters
-wasUpdates the new user credentials throughout the WebSphere ApplicationServer configuration. WebSphere Application Server does not need to be upand running to run this command. If WebSphere Application Server is running,it must be restarted after this command is run.
Chapter 6. Managing security 115
-user The new WebSphere Application Server user name.
-passwordThe new password of the WebSphere Application Server user.
-dbUpdates the new user password throughout the WebSphere Application Serverconfiguration and the InfoSphere Information Server configuration. WebSphereApplication Server does not need to be up and running to run this command.If WebSphere Application Server is running, it must be restarted after you runthis command.
-user The repository user name.
Important: Do not change the user name by using this command.
-passwordThe new password of the repository user.
Changing the RunAs user of the ASB_managers.ear applicationAn administrative role other than the default primary IBM WebSphere ApplicationServer administrator role can be used to deploy and undeploy applications in IBMInfoSphere Information Services Director. You can use this option if you havesecurity concerns about propagating the primary WebSphere Application Serveradministrator credentials
About this task
As part of the procedure to switch to a Lightweight Directory Access Protocol(LDAP) registry, you must run the AppServerAdmin -was command to propagatethe primary WebSphere Application Server administrator user credentials to a fewplaces in WebSphere Application Server (for example, the RunAs user withinASB_managers.ear).
For more information about WebSphere Application Server administrative roles, goto the following documentation:v Administrative roles in 6.1v Administrative roles in 7.0
If you have concerns about IBM InfoSphere Information Server propagating theprimary WebSphere Application Server Administrator credentials, you can useother roles, such as the Deployer role, which has fewer permissions than theWebSphere Application Server Administrator role, to accomplish tasks as theRunAs user within ASB_managers.ear.
Procedure
To update the RunAs role of the ASB_managers.ear application with a user that hasDeployer administrative privileges:1. In the WebSphere administrative console, click Users and Groups >
Administrative user roles > Add...
2. Assign an existing user the WebSphere deployer role:v In 6.1: Type the user to be assigned this role and then select Deployer.v In 7.0: Select Deployer and search for the user to be assigned this role. Select
and add that user to the Mapped to role list.
Click OK and Save.
116 Administration Guide

3. Go to the User RunAs roles page in the administrative console:v In 6.1: Click Applications > Enterprise Applications > ASB_managers.ear >
User RunAs roles.v In 7.0: Click Applications > Application Type > WebSphere enterprise
applications > ASB_managers.ear > User RunAs roles.4. Update the RunAs role of the ASB_managers.ear application:
a. Remove the current RunAs user.b. Add the user that was configured in step 2 as the new RunAs user.
5. Restart WebSphere Application Server.
Results
You can use this configuration to deploy and undeploy applications in IBMInfoSphere Information Services Director.
DirectoryAdmin toolThe DirectoryAdmin tool provides a command-line interface that you can use tointeract with the metadata repository and complete a variety of IBM InfoSphereInformation Server user registry tasks. You should only use this tool and thesecommands for advanced configuration, such as configuring the InfoSphereInformation Server internal user registry or cleaning up the repository if you arechanging a registry configuration on a system that has been in production, or fortroubleshooting or recovery tasks.
The tool is available in the ASBServer\bin directory of your InfoSphereInformation Server directory, for example C:\IBM\InformationServer\ASBServer\bin.
Creating a user in the IBM InfoSphere Information Server userregistryUse the following command to create a user in the IBM InfoSphere InformationServer internal user registry. This command should only be used fortroubleshooting or recovery, or if it is specified in other procedures in thedocumentation.
IBM WebSphere Application Server does not need to be running to run thiscommand.
Syntax
Windows
DirectoryAdmin.bat -user -userid username -password password
Linux UNIX
DirectoryAdmin.sh -user -userid username -password password
Parameters
The following parameters are available for the DirectoryAdmin command.
-userThe command line option that specifies that this task is to work with users.
Chapter 6. Managing security 117
-userid usernameSpecifies the name of the user that you want to create.
-password passwordSpecifies the password of the user that you want to create.
Resetting the password of a userIf you use the IBM InfoSphere Information Server internal user registry, you canuse this command to set or reset the credentials of a user. This command shouldonly be used for troubleshooting or recovery, or if it is specified in otherprocedures in the documentation.
IBM WebSphere Application Server does not need to be running to run thiscommand.
Syntax
Windows
DirectoryAdmin.bat -user -userid username -password password
Linux UNIX
DirectoryAdmin.sh -user -userid username -password password
Parameters
The following options are available for the DirectoryAdmin command.
-userThe command line option that specifies that this task is to work with users.
-userid usernameSpecifies the name of the user whose password needs to be reset.
-password passwordSpecifies the user password that you want to set.
Assigning the IBM InfoSphere Information Server administratorrole to a userUse the following command to add the IBM InfoSphere Information Server SuiteAdministrator role to a user. Only use this command if you are fixing your userregistry configuration, or if it is specified in other procedures in thedocumentation.
IBM WebSphere Application Server does not have to be running to run thiscommand unless the -checkid option is also used.
Syntax
Windows
DirectoryAdmin.bat -user -userid username -admin [-checkid]
Linux UNIX
DirectoryAdmin.sh -user -userid username -admin [-checkid]
118 Administration Guide
Parameters
The following parameters are available for the DirectoryAdmin command.
-userThe command line option that specifies that this task is to work with users.
-userid usernameSpecifies the name of the user that you want to make a Suite Administrator.Note that the user ID syntax differs depending on the user registry that isconfigured in IBM WebSphere Application Server (local, operating system,LDAP, or custom).
Local OS on UNIXProvide the UNIX user ID, such as "isadmin."
Local OS on WindowsCOMPUTER_NAME\userid, such as MYSERVER\isadmin whereMYSERVER is the name of the Microsoft Windows computer. If theMicrosoft Windows computer is registered in a domain, the syntaxmight also be DOMAIN_NAME\userid. The name must be uppercase.
LDAP The full distinguished name (DN) must be provided in the proper case.For more information on retrieving the DN, refer to “LDAPdistinguished name (DN) determination” on page 46.
Note: To add users with long and composed user IDs, like LDAP fullyqualified names, surround the user IDs with double quotation marks whenusing the command.
-adminAssigns the InfoSphere Information Server Suite Administrator role to the user.
-checkid(Optional) Ensures that the given user ID exists before applying the SuiteAdministrator role to that user.
Checking to see if a user exists in the configured user registryUse this command to see if a user name exists in the configured user registry. Usethis command only for troubleshooting or recovery, or if it is specified in otherprocedures in the documentation.v IBM WebSphere Application Server must be running to run this command.
Syntax
Windows
DirectoryAdmin.bat -user -userid username -checkid [-admin]
Linux UNIX
DirectoryAdmin.sh -user -userid username -checkid [-admin]
Parameters
The following options are available for the DirectoryAdmin command.
-userThe command line option that specifies that this task is to work with users.
Chapter 6. Managing security 119

-userid usernameSpecifies the name of the user to search for. Note that the user ID syntaxdiffers depending on the user registry that is configured in IBM WebSphereApplication Server (local, OS, LDAP, or custom).
Local OS on UNIXProvide the UNIX user ID, such as "isadmin."
Local OS on WindowsCOMPUTER_NAME\userid, such as MYSERVER\isadmin whereMYSERVER is the name of the Microsoft Windows computer. If theMicrosoft Windows computer is registered in a domain, the syntaxmight also be DOMAIN_NAME\userid. The name must be uppercase.
LDAP The full distinguished name (DN) must be provided in the proper case.For more information on retrieving the DN, refer to “LDAPdistinguished name (DN) determination” on page 46.
Note: To include users with long and composed user IDs, like LDAP fullyqualified names, surround the user IDs with double quotation marks whenusing the command.
-checkidEnsures that the given user ID already exists in the configured directory beforecreating or updating the user in the security directory.
-admin(Optional) Assigns theIBM InfoSphere Information Server Suite Administratorrole to the user, if the user exists.
Configuring the IBM InfoSphere Information Server user registryto use the internal user registryUse this command to point the IBM InfoSphere Information Server user registry tothe internal user registry.
IBM WebSphere Application Server does not need to be running to run thiscommand. If IBM WebSphere Application Server is up and running, it must berestarted for these changes to take effect.
Use this command only for troubleshooting. If there are some errors in theauto-configuration mechanism during IBM WebSphere Application Server startup,you can use the DirectoryAdmin command to force the provider change. Thiscommand can be used as a recovery or resolution mechanism.
Syntax
Windows
DirectoryAdmin.bat -set_provider ISF
Linux UNIX
DirectoryAdmin.sh -set_provider ISF
Parameters
The following options are available for the DirectoryAdmin command.
-set_providerThe command line option that sets a provider to active.
120 Administration Guide
ISFIndicates that the tool should configure the InfoSphere Information Server userregistry to use the internal user registry.
Configuring the IBM InfoSphere Information Server user registryto use the application server registryUse this command to point the IBM InfoSphere Information Server user registry tothe application server registry.
The application server does not need to be running to run this command. If it isrunning, it must be restarted for these changes to take effect.
Use this command only for troubleshooting. If there are errors in theauto-configuration mechanism during application server startup, you can use theDirectoryAdmin command to force the provider change. This command can beused as a recovery or resolution mechanism.
Syntax
Windows
DirectoryAdmin.bat -set_provider J2EE
Linux UNIX
DirectoryAdmin.sh -set_provider J2EE
Parameters
The following options are available for the DirectoryAdmin command.
-set_providerThe command line option that sets a provider to active.
J2EEIndicates that the tool should configure the InfoSphere Information Server userregistry to use the IBM WebSphere Application Server user registry.
Deleting users from the IBM InfoSphere Information Server userregistryUse this command to delete users from the IBM InfoSphere Information Serveruser registry. This command deletes all the users in the InfoSphere InformationServer user registry. If you are using an external user registry, such as LDAP or alocal operating system user registry, this command deletes only the proxies of theusers that were created in the internal repository and their role assignments.
IBM WebSphere Application Server does not need to be running to run thiscommand. This command should only be used for troubleshooting or recovery.
You can use this command when changing the user registry configuration after thesystem has been in production. This command removes all security settings for allusers. You can then safely switch to a different user registry.
Attention: This command deletes all the users in the InfoSphere InformationServer user registry. From the IBM InfoSphere Information Server Web console, youcan delete users selectively.
Use this command only for troubleshooting.
Chapter 6. Managing security 121
Syntax
Windows
DirectoryAdmin.bat -delete_users
Linux UNIX
DirectoryAdmin.sh -delete_users
Parameters
The following options are available for the DirectoryAdmin command.
-delete_usersDeletes all the users in the IBM InfoSphere Information Server user registry.
Deleting groups from the IBM InfoSphere Information Server userregistryUse this command to delete groups from the IBM InfoSphere Information Serveruser registry. This command deletes all the groups in the InfoSphere InformationServer user registry. If you are using an external registry, such as LDAP or a localoperating system user registry, this command deletes only the proxies of thegroups that were created in the internal repository and their role assignments.
IBM WebSphere Application Server does not need to be running to run thiscommand. This command should only be used for troubleshooting or recovery.
You can use this command when changing the user registry configuration after thesystem has been in production. This command removes all security settings for allgroups which allows for a safe switch to a different registry.
Attention: This command deletes all the groups in the InfoSphere InformationServer user registry. From the IBM InfoSphere Information Server Web console, youcan delete groups selectively.
Use this command only for troubleshooting.
Syntax
Windows
DirectoryAdmin.bat -delete_groups
Linux UNIX
DirectoryAdmin.sh -delete_groups
Parameters
The following options are available for the DirectoryAdmin command.
-delete_groupsDeletes all the groups in the InfoSphere Information Server user registry.
Searching for users in the configured user registryUse this command to specify a user name criterion and return a list of users thatmeet that criterion in the configured user registry. This command should only beused for troubleshooting or recovery.
122 Administration Guide
IBM WebSphere Application Server must be running to run this command.
Syntax
Windows
DirectoryAdmin.bat -user -search -idp userid_pattern -max_count maxcount
Linux UNIX
DirectoryAdmin.sh -user -search -idp userid_pattern -max_count maxcount
Parameters
The following options are available for the DirectoryAdmin command.
-userThe command line option that specifies that this task is to work with users.
-searchSpecifies that the DirectoryAdmin command should perform a search.
-idpSpecifies the user name pattern to search for. The pattern must contain eitherthe full user name or, if the full user name is not used, a part of the user namewith a prepended or appended asterisk (*). For example, you might want touse DirectoryAdmin -user -search -idp a* -max_count 4 to search for allusers whose user names start with "a".
-max_countLimits the number of users that are returned as part of the search.
Searching for groups in the configured user registryUse this command to specify a group name criterion and return a list of groupsthat meet that criterion in the configured user registry. This command should onlybe used for troubleshooting or recovery.
IBM WebSphere Application Server must be running to run this command.
Syntax
Windows
DirectoryAdmin.bat -group -search -idp groupid_pattern -max_count maxcount
Linux UNIX
DirectoryAdmin.sh -group -search -idp groupid_pattern -max_count maxcount
Parameters
The following options are available for the DirectoryAdmin command.
-groupThe command line option that specifies that this task is to work with groups.
-searchSpecifies that the DirectoryAdmin command should perform a search.
-idpSpecifies the group ID pattern to search for. The pattern must contain eitherthe full group name or, if the full group name is not used, a part of the group
Chapter 6. Managing security 123
name with a prepended or appended asterisk (*). For example, you might wantto set -idp group* to return all groups that start with group, such as"groupname" or "grouplogin".
-max_countLimits the number of groups that are returned as part of the search.
Displaying user detailsUse this command to query for detailed information about a user, such as thesecurity roles that are assigned to the user name or the groups that the userbelongs to. This command should only be used for troubleshooting or recovery.
IBM WebSphere Application Server must be running to run this command.
Syntax
Windows
DirectoryAdmin.bat -user -userid username -display
Linux UNIX
DirectoryAdmin.sh -user -userid username -display
Parameters
The following options are available for the DirectoryAdmin command.
-userThe command line option that specifies that this task is to work with users.
-userid usernameSpecifies the name of the user to look up the details for. Note that the user IDsyntax differs depending on the user registry that is configured in IBMWebSphere Application Server (local, OS, LDAP, or custom).
Local OS on UNIXProvide the UNIX user ID, such as "isadmin."
Local OS on WindowsCOMPUTER_NAME\userid, such as MYSERVER\isadmin whereMYSERVER is the name of the Microsoft Windows computer. If theMicrosoft Windows computer is registered in a domain, the syntaxmight also be DOMAIN_NAME\userid. The name must be uppercase.
LDAP The full distinguished name (DN) must be provided in the proper case.For more information on retrieving the DN, refer to “LDAPdistinguished name (DN) determination” on page 46.
Note: To add users with long and composed user ids, like LDAP fullyqualified names, surround the user IDs with double quotation marks whenusing the tool.
-displayDisplays the detailed information associated with that user name.
Troubleshooting examples that use the DirectoryAdmin toolIf you run into the following problems while administering IBM InfoSphereInformation Server, you can use the DirectoryAdmin tool to help you determineand address the problem.
124 Administration Guide

Lost user password
This example is only applicable to internal user registry configuration. From thecommand line, enter the following command:DirectoryAdmin.bat -user -userid admin_user_id -password new_password
Note: If you have multiple InfoSphere Information Server Suite Administrators,you could instead ask one of these administrators to log in to the IBM InfoSphereInformation Server Web console and reset the lost user password in the IBMInfoSphere Information Server Web console.
User registry configuration is not working and you cannot log in to theIBM InfoSphere Information Server Web console
To reset the user registry configuration to use the IBM InfoSphere InformationServer internal user registry:1. From the command line, set the InfoSphere Information Server to use the
InfoSphere Information Server internal user registry by entering the followingcommand:DirectoryAdmin.bat -set_provider ISF
2. Create the default InfoSphere Information Server Suite administrator user byusing the following command:DirectoryAdmin.bat -user -userid default_isadmin_userid -password password-admin
3. Log in to the IBM WebSphere Application Server Administrator console and setthe IBM WebSphere Application Server user registry to the InfoSphereInformation Server internal user registry.
To reset the user registry configuration to use the IBM WebSphere ApplicationServer user registry:1. Ensure that the IBM WebSphere Application Server user registry is configured
to use the local operating system user registry or LDAP user registry of yourchoice.
2. From the command line, set InfoSphere Information Server to use the IBMWebSphere Application Server user registry by entering the followingcommand:DirectoryAdmin.bat -set_provider J2EE
3. Assign a user the necessary security roles to make that user the defaultInfoSphere Information Server Suite Administrator by entering the followingcommand:DirectoryAdmin.bat -user -userid default_isadmin -admin
The default InfoSphere Information Server administrator user syntax differsdepending on the user registry that is configured in IBM WebSphereApplication Server.
Local OS on UNIXProvide the UNIX user ID, such as "isadmin."
Local OS on WindowsCOMPUTER_NAME\userid, such as MYSERVER\isadmin whereMYSERVER is the name of the Microsoft Windows computer. If theMicrosoft Windows computer is registered in a domain, the syntaxmight also be DOMAIN_NAME\userid. The name must be uppercase.
LDAP The full distinguished name (DN) must be provided in the proper case.
Chapter 6. Managing security 125

For more information on retrieving the DN, refer to “LDAPdistinguished name (DN) determination” on page 46.
126 Administration Guide

Chapter 7. Activating entitled IBM InfoSphere DataStageeditions and feature packs
If your entitlement to IBM InfoSphere DataStage editions, trade-up, or featurepacks changes after you have installed IBM InfoSphere Information Server, youmust activate any newly entitled items before you can use them. If you no longerhave entitlements for items, you must deactivate them.
When you install IBM InfoSphere DataStage by using the InfoSphere InformationServer installation program, the program prompts you to select the InfoSphereDataStage editions and feature packs to install and activate. Each item in theselection list enables associated InfoSphere DataStage canvases and job features.Select the items for which you have a valid Proof of Entitlement from IBM. Theinstallation program activates the features that are associated with the items thatyou select. Any other editions or feature packs are deactivated and cannot be used.
If you later acquire entitlements for an additional InfoSphere DataStage edition orfeature pack, to use the features that are included in the item you must activate theitem within InfoSphere Information Server. If you no longer have entitlement foran item, you must deactivate it. When you deactivate the edition or feature pack,the features within the item are no longer available for use.
To activate or deactivate an edition or feature pack, run the LicensingServiceAdmincommand-line tool.
If you installed InfoSphere DataStage, the full product with all optional featureswas installed. However, the installation program activated only the features thatare associated with the edition and features that you selected at install time. If youacquire entitlements for additional InfoSphere DataStage features, enable them byusing the LicensingServiceAdmin tool. Also use the tool if you are entitled to anadditional edition or trade up to a different edition.
For example, a company is entitled to IBM InfoSphere DataStage Server, andenables this item. At a later time, they become entitled to the IBM InfoSphereDataStage from DataStage Server Trade Up. They use the LicensingServiceAdmintool to enable the full functionality of the InfoSphere DataStage product.
As another example, a company is entitled to InfoSphere DataStage, and enablesthis item. At a later time, they become entitled to the IBM InfoSphere DataStageBalanced Optimization feature pack and add the IBM InfoSphere DataStage MVSEdition. They enable these editions and features by using theLicensingServiceAdmin tool.
The following table lists the InfoSphere DataStage editions and feature packs thatthe InfoSphere Information Server installation program can install. The table alsolists the features that are included within each item.
© Copyright IBM Corp. 2007, 2011 127
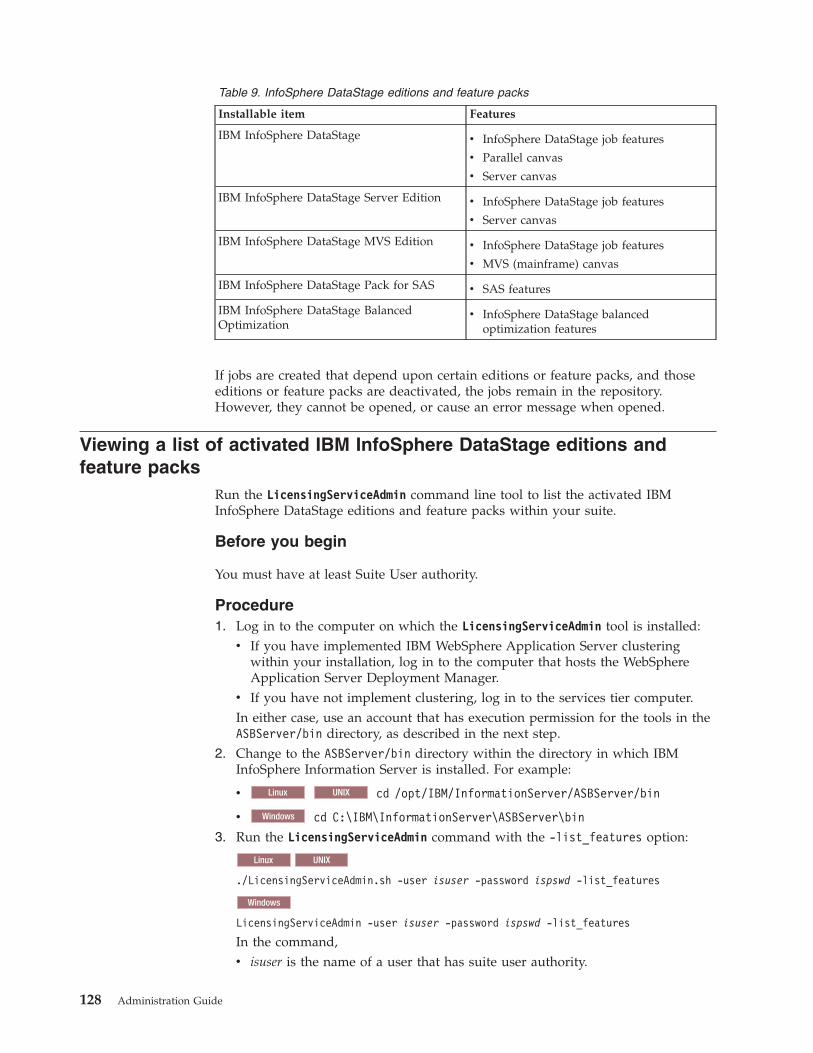
Table 9. InfoSphere DataStage editions and feature packs
Installable item Features
IBM InfoSphere DataStage v InfoSphere DataStage job features
v Parallel canvas
v Server canvas
IBM InfoSphere DataStage Server Edition v InfoSphere DataStage job features
v Server canvas
IBM InfoSphere DataStage MVS Edition v InfoSphere DataStage job features
v MVS (mainframe) canvas
IBM InfoSphere DataStage Pack for SAS v SAS features
IBM InfoSphere DataStage BalancedOptimization
v InfoSphere DataStage balancedoptimization features
If jobs are created that depend upon certain editions or feature packs, and thoseeditions or feature packs are deactivated, the jobs remain in the repository.However, they cannot be opened, or cause an error message when opened.
Viewing a list of activated IBM InfoSphere DataStage editions andfeature packs
Run the LicensingServiceAdmin command line tool to list the activated IBMInfoSphere DataStage editions and feature packs within your suite.
Before you begin
You must have at least Suite User authority.
Procedure1. Log in to the computer on which the LicensingServiceAdmin tool is installed:
v If you have implemented IBM WebSphere Application Server clusteringwithin your installation, log in to the computer that hosts the WebSphereApplication Server Deployment Manager.
v If you have not implement clustering, log in to the services tier computer.In either case, use an account that has execution permission for the tools in theASBServer/bin directory, as described in the next step.
2. Change to the ASBServer/bin directory within the directory in which IBMInfoSphere Information Server is installed. For example:
v Linux UNIX cd /opt/IBM/InformationServer/ASBServer/bin
v Windows cd C:\IBM\InformationServer\ASBServer\bin
3. Run the LicensingServiceAdmin command with the -list_features option:
Linux UNIX
./LicensingServiceAdmin.sh -user isuser -password ispswd -list_features
Windows
LicensingServiceAdmin -user isuser -password ispswd -list_features
In the command,v isuser is the name of a user that has suite user authority.
128 Administration Guide
v ispswd is the user password.
The command lists the features that are activated. Deactivated features are notlisted. For example:DS,DSServer,DSMVS,BalOpt,SAS,QSEnabled components:
IBM InfoSphere DataStageIBM InfoSphere DataStage ServerIBM InfoSphere DataStage MVS EditionIBM InfoSphere DataStage Balanced OptimizationIBM InfoSphere DataStage Pack for SASIBM InfoSphere QualityStageDataStage and QualityStage AdministratorDataStage and QualityStage DirectorDataStage and QualityStage Designer
Enabled features:job-type = DataStagejob-type = QualityStagelicensed-feature = BAL_OPTlicensed-feature = SAS_PACKcanvas = Parallelcanvas = Servercanvas = MVS
Since IBM InfoSphere QualityStage shares the InfoSphere DataStagecomponents and client applications, it is also listed as one of the activatedfeatures if InfoSphere QualityStage is installed. Even though it is listed as oneof the features, InfoSphere QualityStage cannot be activated or deactivated withthe LicensingServiceAdmin tool. To activate InfoSphere QualityStage, installInfoSphere QualityStage by using the installation program. To deactivateInfoSphere QualityStage, uninstall InfoSphere QualityStage by using thesoftware removal program.The list of enabled InfoSphere DataStage and InfoSphere QualityStage clientapplications is also shown. All three applications are enabled when InfoSphereQualityStage or any version of InfoSphere DataStage is installed. If IBMInfoSphere Information Analyzer is installed without InfoSphere DataStage orInfoSphere QualityStage, then only the InfoSphere DataStage and QualityStageAdministrator client is enabled.
Activating and deactivating IBM InfoSphere DataStage editions andfeature packs
Run the LicensingServiceAdmin command-line tool to change the InfoSphereDataStage features that were activated when the services tier was installed. Thetool can activate or deactivate InfoSphere DataStage editions and feature packswithin your suite if InfoSphere DataStage is installed.
Before you begin
You must have suite administrator authority.
About this task
To activate or deactivate InfoSphere DataStage editions and feature packs in thesuite, run the LicensingServiceAdmin command. Each time you run the command,specify all items that you want to activate. Any editions or feature packs that youdo not specify are deactivated by the command. The actual features enableddepend on the combination of editions and features that you specify. For thisreason, they must all be provided in a single command.
Chapter 7. Activating entitled IBM InfoSphere DataStage editions and feature packs 129

The tool cannot be used to activate InfoSphere DataStage features if InfoSphereDataStage is not installed. Also the tool cannot be used to deactivate all InfoSphereDataStage features. To remove all InfoSphere DataStage features, removeInfoSphere DataStage by using the IBM InfoSphere Information Server softwareremoval program.
Procedure1. Log in to the computer on which the LicensingServiceAdmin tool is installed:
v If you have implemented IBM WebSphere Application Server clusteringwithin your installation, log in to the computer that hosts the WebSphereApplication Server Deployment Manager.
v If you have not implemented clustering, log in to the services tier computer.In either case, use an account that has execution permission for the tools in theASBServer/bin directory, as described in the next step.
2. Change to the ASBServer/bin directory within the directory in whichInfoSphere Information Server is installed. For example:
v Linux UNIX cd /opt/IBM/InformationServer/ASBServer/bin
v Windows cd C:\IBM\InformationServer\ASBServer\bin
3. Run the LicensingServiceAdmin command with the -set_features option:
Linux UNIX
./LicensingServiceAdmin.sh -user isadmin -password ispswd -set_features codes
Windows
LicensingServiceAdmin -user isadmin -password ispwd -set_features codes
In the command,v isadmin is the name of a user that has suite administrator authority.v ispwd is the user password.v codes is a comma-separated list of codes that specify the editions and feature
packs to activate. The following table describes valid feature codes:
Table 10. Feature codes for LicensingServiceAdmin
Feature code Description
DS Activates IBM InfoSphere DataStage
DSServer Activates IBM InfoSphere DataStage Server
DSMVS Activates IBM InfoSphere DataStage MVSEdition
SAS Activates IBM InfoSphere DataStage Pack forSAS
BalOpt Activates IBM InfoSphere DataStageBalanced Optimization
Each time you run the command, specify the feature codes for all editionsand feature packs to activate. Include any editions and feature packs that arealready activated, that you want to remain activated. Any editions andfeature packs that you do not list in the command are deactivated.If you are entitled to both IBM InfoSphere DataStage Server and IBMInfoSphere DataStage from DataStage Server Trade Up, specify the DSfeature code only. Do not specify the DSServer feature code.Feature codes are not case sensitive. To include white space within thefeature code list, enclose the list in quotation marks.
130 Administration Guide
For example, to activate InfoSphere DataStage, InfoSphere DataStage BalancedOptimization, and the InfoSphere DataStage Pack for SAS, run the followingcommand.LicensingServiceAdmin -user isadmin -password ispwd -set_features DS,SAS,BalOpt
The command activates the features. In this example, the Mainframe canvas isnot enabled within the InfoSphere DataStage client applications. The commandthen lists the results:DS,SAS,BalOpt,QSEnabled components:
IBM InfoSphere DataStageIBM InfoSphere DataStage Pack for SASIBM InfoSphere DataStage Balanced OptimizationIBM InfoSphere QualityStageDataStage and QualityStage AdministratorDataStage and QualityStage DirectorDataStage and QualityStage Designer
Enabled features:job-type = DataStagejob-type = QualityStagelicensed-feature = BAL_OPTlicensed-feature = SAS_PACKcanvas = Parallelcanvas = Server
Since IBM InfoSphere QualityStage shares the InfoSphere DataStagecomponents and client applications, it is also listed as one of the activatedfeatures if InfoSphere QualityStage is installed. Even though it is listed as oneof the features, InfoSphere QualityStage cannot be activated or deactivated withthe LicensingServiceAdmin tool. To activate InfoSphere QualityStage, installInfoSphere QualityStage by using the installation program. To deactivateInfoSphere QualityStage, uninstall InfoSphere QualityStage by using thesoftware removal program.The list of enabled InfoSphere DataStage and InfoSphere QualityStage clientapplications is also shown. All three applications are enabled when InfoSphereQualityStage or any version of InfoSphere DataStage is installed. If IBMInfoSphere Information Analyzer is installed without InfoSphere DataStage orInfoSphere QualityStage, then only the InfoSphere DataStage and QualityStageAdministrator client is enabled.
LicensingServiceAdmin command referenceRun the LicensingServiceAdmin command to manage activation and deactivationof IBM InfoSphere DataStage editions and feature packs after InfoSphere DataStageis installed.
Purpose
If you are entitled to certain InfoSphere DataStage editions or feature packs afteryou run the IBM InfoSphere Information Server installation program, run thiscommand to activate the newly entitled items. If you no longer have entitlementsfor the items, run this command to deactivate them.
If you no longer have entitlement to any InfoSphere DataStage edition or feature,you must remove InfoSphere DataStage by using the InfoSphere InformationServer software removal program. You cannot use the tool to deactivate allInfoSphere DataStage editions and features.
Chapter 7. Activating entitled IBM InfoSphere DataStage editions and feature packs 131
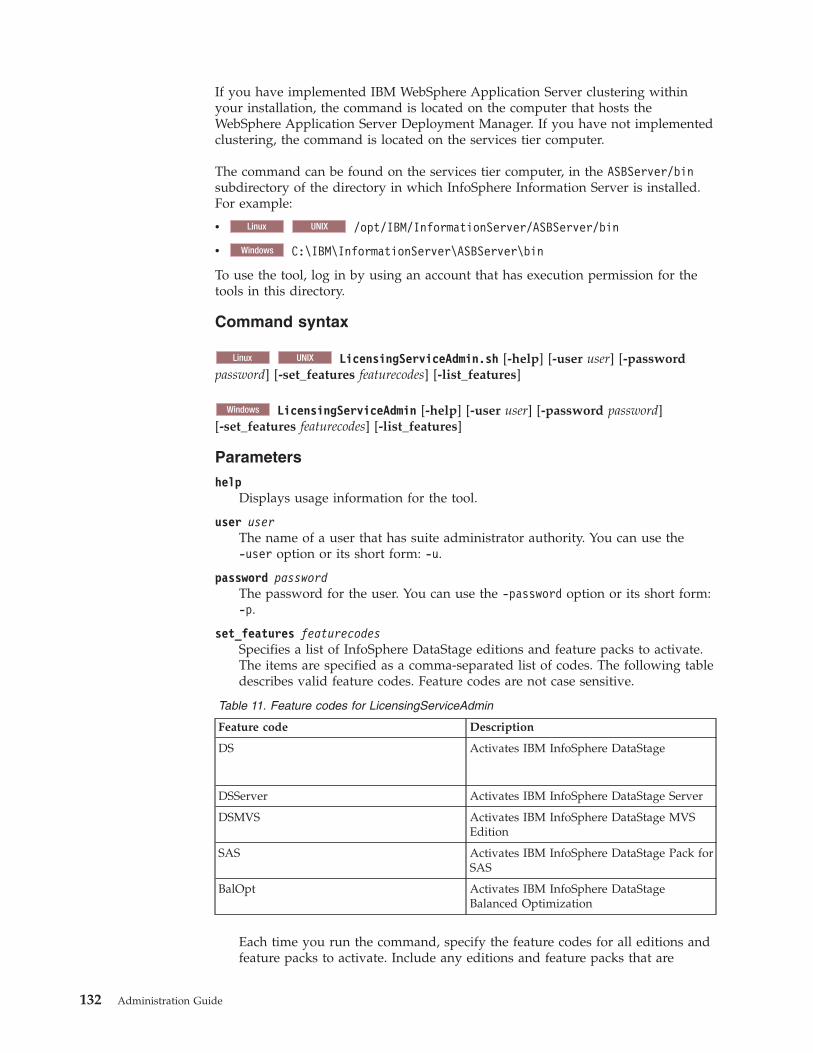
If you have implemented IBM WebSphere Application Server clustering withinyour installation, the command is located on the computer that hosts theWebSphere Application Server Deployment Manager. If you have not implementedclustering, the command is located on the services tier computer.
The command can be found on the services tier computer, in the ASBServer/binsubdirectory of the directory in which InfoSphere Information Server is installed.For example:
v Linux UNIX /opt/IBM/InformationServer/ASBServer/bin
v Windows C:\IBM\InformationServer\ASBServer\bin
To use the tool, log in by using an account that has execution permission for thetools in this directory.
Command syntax
Linux UNIX LicensingServiceAdmin.sh [-help] [-user user] [-passwordpassword] [-set_features featurecodes] [-list_features]
Windows LicensingServiceAdmin [-help] [-user user] [-password password][-set_features featurecodes] [-list_features]
Parameters
helpDisplays usage information for the tool.
user userThe name of a user that has suite administrator authority. You can use the-user option or its short form: -u.
password passwordThe password for the user. You can use the -password option or its short form:-p.
set_features featurecodesSpecifies a list of InfoSphere DataStage editions and feature packs to activate.The items are specified as a comma-separated list of codes. The following tabledescribes valid feature codes. Feature codes are not case sensitive.
Table 11. Feature codes for LicensingServiceAdmin
Feature code Description
DS Activates IBM InfoSphere DataStage
DSServer Activates IBM InfoSphere DataStage Server
DSMVS Activates IBM InfoSphere DataStage MVSEdition
SAS Activates IBM InfoSphere DataStage Pack forSAS
BalOpt Activates IBM InfoSphere DataStageBalanced Optimization
Each time you run the command, specify the feature codes for all editions andfeature packs to activate. Include any editions and feature packs that are
132 Administration Guide
already activated, that you want to remain activated. Any editions and featurepacks that you do not listed in the command are deactivated.
If you are entitled to both IBM InfoSphere DataStage Server and IBMInfoSphere DataStage from DataStage Server Trade Up, specify the DS featurecode but not the DSServer feature code.
You can use the -set_features option or its short form: -sf.
list_featuresCauses LicensingServiceAdmin to output a list of activated editions and featurepacks. If the -set_features option is also specified, the LicensingServiceAdmincommand activates the specified editions and feature packs and then outputsthe list. The list is output to stdout.
You can use the -list_features option or its short form: -lf.
The following command activates all editions and feature packs, and lists theactivated items on a Linux or UNIX computer:/opt/IBM/InformationServer/ASBServer/bin/LicensingServiceAdmin.sh
-u myadmin -p myadminpwd -lf -sf DS,DSMVS,BalOpt,SAS,DSServer
Chapter 7. Activating entitled IBM InfoSphere DataStage editions and feature packs 133

134 Administration Guide

Chapter 8. Managing active sessions
In the IBM InfoSphere Information Server Web console, you can view a list of allthe users that are currently connected to the server that you logged in to.
About this task
You can view the starting time of each session and the timestamp of the mostrecent action that each user performed. You can force active sessions to endimmediately, which is useful when preparing to stop the system.
Viewing all active sessionsIn the IBM InfoSphere Information Server Web console, you can view and managethe active user sessions.
Before you begin
You must have suite administrator authority.
About this task
A user session is an instance of a user with a connection to the IBM InfoSphereInformation Server. You might want to view all of the active sessions to determineif you need to set thresholds for the maximum amount of user sessions to allow, todisconnect one or more users, or to view details about the user who is connecting.
Procedure1. In the IBM InfoSphere Information Server Web console, click the
Administration tab.2. In the Navigation pane, select Session Management > Active Sessions. The
Active Sessions pane shows the users who are currently connected to theserver.
Setting session limitsYou can set the maximum number of active sessions on the server. You can alsospecify how long a session can remain inactive before it is automaticallydisconnected and how often the sessions are polled for inactivity.
Before you begin
You must have suite administrator authority.
Procedure1. In the IBM InfoSphere Information Server Web console, click the
Administration tab.2. In the Navigation pane, select Session Management > Active Sessions.3. In the Active Sessions pane, click Global Session Properties.4. Optional: Specify settings for inactive sessions and maximum number of
sessions.
© Copyright IBM Corp. 2007, 2011 135
5. Click Save and Close.
Opening user detailsTo view information about a current session that includes the user record, theduration of the session, and the security roles that are assigned to the user, you canopen the details of a user session.
Before you begin
You must have suite administrator authority.
Procedure1. In the IBM InfoSphere Information Server Web console, click the
Administration tab.2. In the Navigation pane, select Session Management > Active Sessions.3. In the Active Sessions pane, select a user session.4. Click Open. The Open User Details pane shows detailed information about the
user session.
Disconnecting all sessionsTo force all of the active sessions to end immediately, you can disconnect all of theuser sessions. You might want to disconnect all users to prepare for a systemshutdown.
Before you begin
You must have suite administrator authority.
Procedure1. In the IBM InfoSphere Information Server Web console, click the
Administration tab.2. In the Navigation pane, select Session Management > Active Sessions.3. In the Active Sessions pane, click Disconnect All.4. In the Disconnect All window, click Yes to immediately end all sessions.
Disconnecting a sessionYou can disconnect an individual user session.
Before you begin
You must have suite administrator authority.
Procedure1. In the IBM InfoSphere Information Server Web console, click the
Administration tab.2. In the Navigation pane, select Session Management > Active Sessions.3. In the Active Sessions pane, select a session. If multiple users signed in with
the same user account, only the selected session is disconnected.4. Click Disconnect.
136 Administration Guide

5. Click Yes to immediately end the session.
Chapter 8. Managing active sessions 137

138 Administration Guide

Chapter 9. Managing clusters and high availabilityconfigurations
If you have implemented clustering or other high availability configurations withinyour IBM InfoSphere Information Server installation, administer them by usingadministration tools.
Active-passive configuration administrationIf your engine tier (or all tiers) is set up in an active-passive configuration,administer the cluster by using the administration tools that are provided withyour high availability software.
For more information about active-passive configurations, see "Creating atwo-server active-passive high availability topology" in the IBM InfoSphereInformation Server Planning, Installation, and Configuration Guide.
Administering an active-passive configuration based on TivoliSystem Automation for Multiplatforms
For information about managing an active-passive configuration that is based onTivoli® System Automation for Multiplatforms, refer to the Tivoli documentation.
For documentation for Tivoli System Automation for Multiplatforms, see the TivoliSystem Automation for Multiplatforms documentation page atwww.ibm.com/developerworks/wikis/display/tivolidoccentral/Tivoli+System+Automation+for+Multiplatforms.
WebSphere Application Server cluster administrationAdminister and maintain your IBM WebSphere Application Server, Version 6.1 or7.0 clusters after you have installed or updated IBM InfoSphere Information Serverin a clustered environment. This documentation assumes that you understandWebSphere Application Server clustering.
Important: The IBM InfoSphere Information Server documentation assumes thatyou are already familiar with distributed computing, particularly with WebSphereApplication Server clustering. You must familiarize yourself with the IBMWebSphere Application Server Network Deployment documentation.
WebSphere Application Server cluster administration toolsYou use the following tools to install, configure, and administer IBM WebSphereApplication Server 6.1 and 7.0 clusters.
This information assumes that you have completed the required procedures forinstalling a highly available clustered configuration. For more information, refer tothe IBM InfoSphere Information Server Planning, Installation, and Configuration Guide.
WebSphere Application Server administrative consoleThe WebSphere Application Server administrative console is a Webinterface that provides configuration, operation, and administration
© Copyright IBM Corp. 2007, 2011 139
capabilities. You can use the administrative console to start and stop anapplication, deploy an application, configure resources, and implementsecurity configurations.
Use this tool to create a cluster and configure its members, nodes, andprocesses. If you are interested in using scripts to accomplish these tasks,see the IBM WebSphere Application Server Network Deploymentdocumentation:v For IBM WebSphere Application Server Network Deployment, Version
6.1: http://publib.boulder.ibm.com/infocenter/wasinfo/v6r1/index.jsp?topic=/com.ibm.websphere.nd.multiplatform.doc/info/ae/ae/welc6topscripting.html
v For IBM WebSphere Application Server Network Deployment, Version7.0: http://publib.boulder.ibm.com/infocenter/wasinfo/v7r0/index.jsp?topic=/com.ibm.websphere.nd.multiplatform.doc/info/ae/ae/welc6topscripting.html
WebSphere Application Server LaunchpadThe WebSphere Application Server Launchpad identifies components onthe WebSphere Application Server product media (disk or download) thatyou can install. It is the single point of reference for installing theWebSphere Application Server environment, an integrated platform thatcontains an application server, a Web server, a set of Web developmenttools, and additional supporting software and documentation.
Use this tool to install WebSphere Application Server and a front-end Webserver if you are creating a clustered WebSphere Application Serverconfiguration.
WebSphere Edge Components LaunchpadThe WebSphere Application Server Edge Components Launchpad containsa software load balancer. You can use this tool to front an IBM WebSphereApplication Server Network Deployment cluster instead of using the IBMHTTP Server.
For information about WebSphere Edge Components, Version 6.1, refer to:http://publib.boulder.ibm.com/infocenter/wasinfo/v6r1/index.jsp?topic=/com.ibm.websphere.edge.doc/welcome.html
For information about WebSphere Edge Components, Version 7.0, refer to:http://publib.boulder.ibm.com/infocenter/wasinfo/v7r0/index.jsp?topic=/com.ibm.websphere.edge.doc/welcome.html
Profile Management toolThe Profile Management tool performs the initial setup of WebSphereApplication Server cells and nodes. The Profile Management tool createsbatch jobs, scripts, and data files that you can use to do WebSphereApplication Server customization tasks.
Use this tool to create a deployment manager profile and a custom profile.
InfoSphere Information Server installation programThe InfoSphere Information Server installation program detects thedeployment manager process that is installed as a prerequisite on yourcomputer and prompts you for the information that it needs to run acluster installation.
Use this tool during the installation process to specify the WebSphereApplication Server directory location, deployment manager profile, and thehost name and port number of the front-end Web server or load balancer.
140 Administration Guide
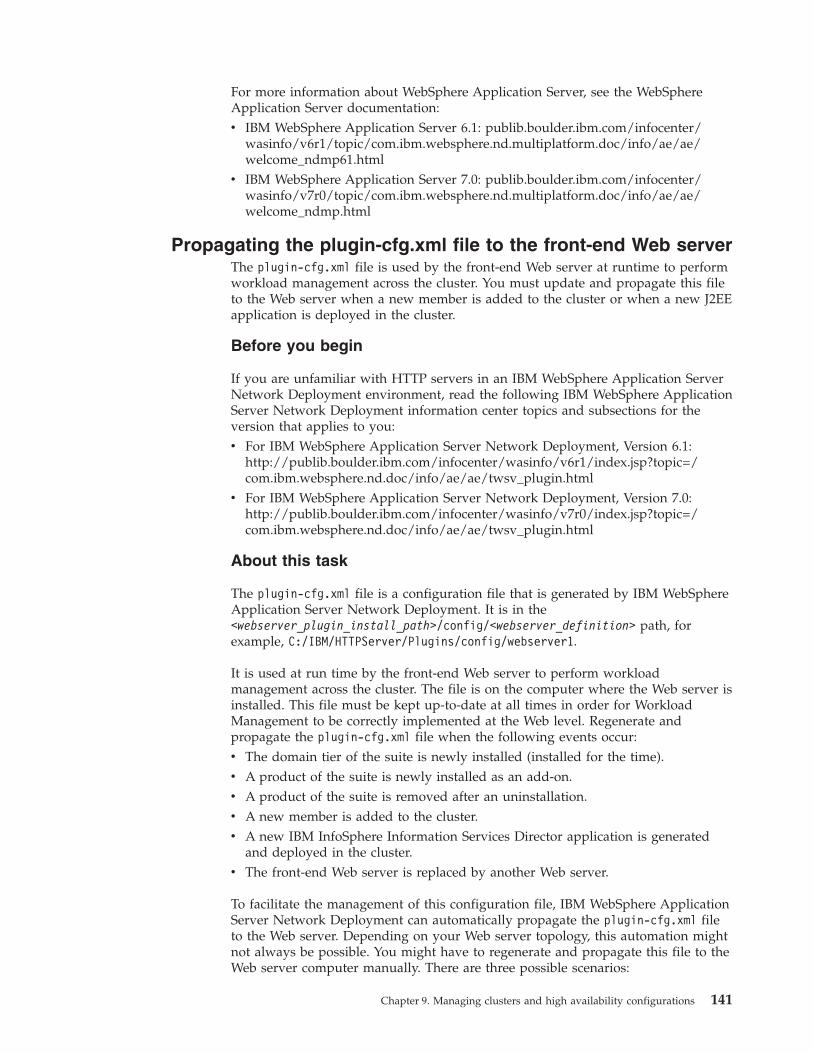
For more information about WebSphere Application Server, see the WebSphereApplication Server documentation:v IBM WebSphere Application Server 6.1: publib.boulder.ibm.com/infocenter/
wasinfo/v6r1/topic/com.ibm.websphere.nd.multiplatform.doc/info/ae/ae/welcome_ndmp61.html
v IBM WebSphere Application Server 7.0: publib.boulder.ibm.com/infocenter/wasinfo/v7r0/topic/com.ibm.websphere.nd.multiplatform.doc/info/ae/ae/welcome_ndmp.html
Propagating the plugin-cfg.xml file to the front-end Web serverThe plugin-cfg.xml file is used by the front-end Web server at runtime to performworkload management across the cluster. You must update and propagate this fileto the Web server when a new member is added to the cluster or when a new J2EEapplication is deployed in the cluster.
Before you begin
If you are unfamiliar with HTTP servers in an IBM WebSphere Application ServerNetwork Deployment environment, read the following IBM WebSphere ApplicationServer Network Deployment information center topics and subsections for theversion that applies to you:v For IBM WebSphere Application Server Network Deployment, Version 6.1:
http://publib.boulder.ibm.com/infocenter/wasinfo/v6r1/index.jsp?topic=/com.ibm.websphere.nd.doc/info/ae/ae/twsv_plugin.html
v For IBM WebSphere Application Server Network Deployment, Version 7.0:http://publib.boulder.ibm.com/infocenter/wasinfo/v7r0/index.jsp?topic=/com.ibm.websphere.nd.doc/info/ae/ae/twsv_plugin.html
About this task
The plugin-cfg.xml file is a configuration file that is generated by IBM WebSphereApplication Server Network Deployment. It is in the<webserver_plugin_install_path>/config/<webserver_definition> path, forexample, C:/IBM/HTTPServer/Plugins/config/webserver1.
It is used at run time by the front-end Web server to perform workloadmanagement across the cluster. The file is on the computer where the Web server isinstalled. This file must be kept up-to-date at all times in order for WorkloadManagement to be correctly implemented at the Web level. Regenerate andpropagate the plugin-cfg.xml file when the following events occur:v The domain tier of the suite is newly installed (installed for the time).v A product of the suite is newly installed as an add-on.v A product of the suite is removed after an uninstallation.v A new member is added to the cluster.v A new IBM InfoSphere Information Services Director application is generated
and deployed in the cluster.v The front-end Web server is replaced by another Web server.
To facilitate the management of this configuration file, IBM WebSphere ApplicationServer Network Deployment can automatically propagate the plugin-cfg.xml fileto the Web server. Depending on your Web server topology, this automation mightnot always be possible. You might have to regenerate and propagate this file to theWeb server computer manually. There are three possible scenarios:
Chapter 9. Managing clusters and high availability configurations 141

v Scenario 1: The Web server is installed in a managed node.In this case, the plugin-cfg.xml file is automatically regenerated and propagatedby the IBM WebSphere Application Server Network Deployment to the managednode hosting the Web server. It might take a few minutes for WebSphereApplication Server to regenerate and propagate the plugin file to the Web server.You do not need to propagate the plugin-cfg.xml file because this step iscompleted for you.
v Scenario 2: The Web server is installed in an unmanaged node (in other words,there is no node agent to manage the Web server definition).In this case, IBM WebSphere Application Server Network Deployment can notautomatically propagate the plugin-cfg.xml file to the Web server, so you needto manually propagate it.
v Scenario 3: The Web server is installed in an unmanaged node and is the IBMHTTP Server (IHS).In this special case, the plugin-cfg.xml file also is automatically propagated byIBM WebSphere Application Server Network Deployment to the unmanagednode that hosts IHS. This functionality is achieved because of the IHSadministration process that runs on the Web server computer, which can act as anode agent for the Web server.
Procedure
To manually propagate the plugin-cfg.xml file:
For the appropriate topology (either a remote distributed installation scenario or alocal distributed installation scenario), refer to the sections about regenerating theplugin-cfg.xml file and propagating the plugin-cfg.xml file in the followingtopics:v IBM WebSphere Application Server Network Deployment 6.1:
http://publib.boulder.ibm.com/infocenter/wasinfo/v6r1/index.jsp?topic=/com.ibm.websphere.nd.doc/info/ae/ae/tins_road_plugins.html
v IBM WebSphere Application Server Network Deployment 7.0:http://publib.boulder.ibm.com/infocenter/wasinfo/v7r0/index.jsp?topic=/com.ibm.websphere.nd.doc/info/ae/ae/tins_road_plugins.html
For more information about managed and unmanaged nodes in IBM WebSphereApplication Server Network Deployment, see the following resources:v The IBM Redbooks publication, WebSphere Application Server V6 Scalability and
Performance Handbook: http://www.redbooks.ibm.com/abstracts/sg246392.htmlv Information about Nodes in the IBM WebSphere Application Server Network
Deployment 6.1 information center: http://publib.boulder.ibm.com/infocenter/wasinfo/v6r1/index.jsp?topic=/com.ibm.websphere.nd.multiplatform.doc/info/ae/ae/cagt_node.html
v Information about Managed and unmanaged nodes in the IBM WebSphereApplication Server Network Deployment 7.0 information center:http://publib.boulder.ibm.com/infocenter/wasinfo/v7r0/index.jsp?topic=/com.ibm.websphere.nd.multiplatform.doc/info/ae/ae/cagt_node.html
v The IBM Redbooks publication tip, New Web Server Support in WebSphereApplication Server V6: http://www.redbooks.ibm.com/abstracts/tips0552.html
142 Administration Guide
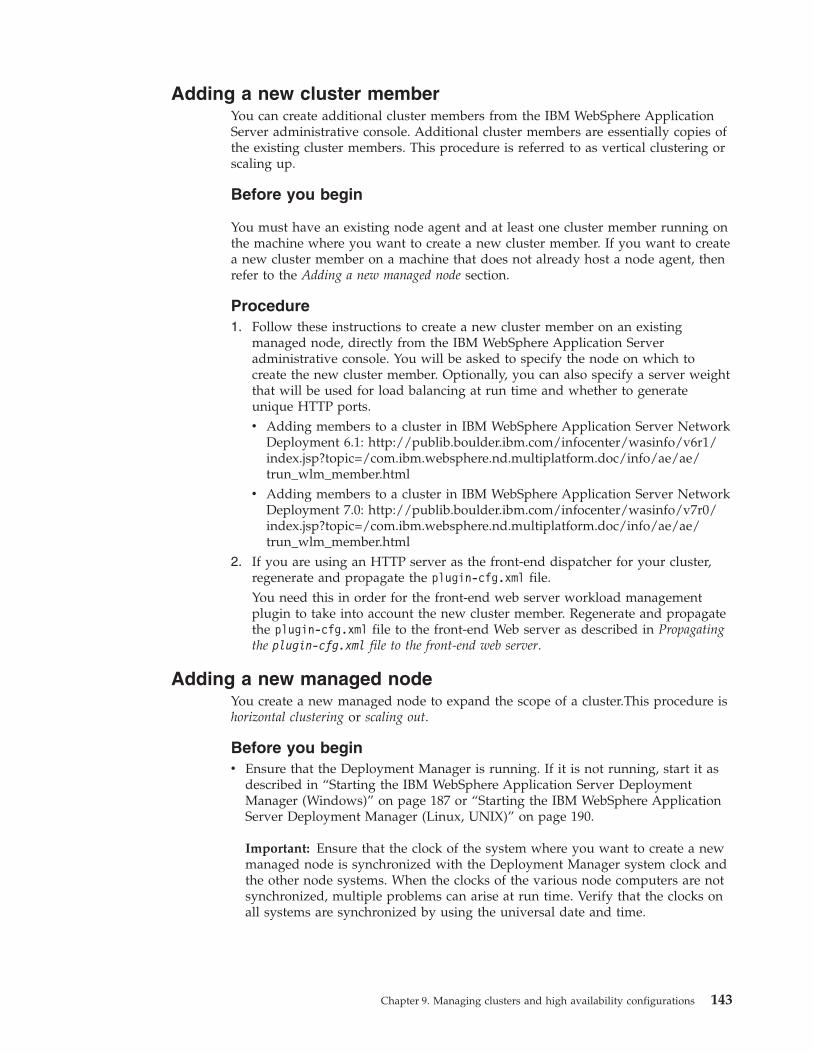
Adding a new cluster memberYou can create additional cluster members from the IBM WebSphere ApplicationServer administrative console. Additional cluster members are essentially copies ofthe existing cluster members. This procedure is referred to as vertical clustering orscaling up.
Before you begin
You must have an existing node agent and at least one cluster member running onthe machine where you want to create a new cluster member. If you want to createa new cluster member on a machine that does not already host a node agent, thenrefer to the Adding a new managed node section.
Procedure1. Follow these instructions to create a new cluster member on an existing
managed node, directly from the IBM WebSphere Application Serveradministrative console. You will be asked to specify the node on which tocreate the new cluster member. Optionally, you can also specify a server weightthat will be used for load balancing at run time and whether to generateunique HTTP ports.v Adding members to a cluster in IBM WebSphere Application Server Network
Deployment 6.1: http://publib.boulder.ibm.com/infocenter/wasinfo/v6r1/index.jsp?topic=/com.ibm.websphere.nd.multiplatform.doc/info/ae/ae/trun_wlm_member.html
v Adding members to a cluster in IBM WebSphere Application Server NetworkDeployment 7.0: http://publib.boulder.ibm.com/infocenter/wasinfo/v7r0/index.jsp?topic=/com.ibm.websphere.nd.multiplatform.doc/info/ae/ae/trun_wlm_member.html
2. If you are using an HTTP server as the front-end dispatcher for your cluster,regenerate and propagate the plugin-cfg.xml file.You need this in order for the front-end web server workload managementplugin to take into account the new cluster member. Regenerate and propagatethe plugin-cfg.xml file to the front-end Web server as described in Propagatingthe plugin-cfg.xml file to the front-end web server.
Adding a new managed nodeYou create a new managed node to expand the scope of a cluster.This procedure ishorizontal clustering or scaling out.
Before you beginv Ensure that the Deployment Manager is running. If it is not running, start it as
described in “Starting the IBM WebSphere Application Server DeploymentManager (Windows)” on page 187 or “Starting the IBM WebSphere ApplicationServer Deployment Manager (Linux, UNIX)” on page 190.
Important: Ensure that the clock of the system where you want to create a newmanaged node is synchronized with the Deployment Manager system clock andthe other node systems. When the clocks of the various node computers are notsynchronized, multiple problems can arise at run time. Verify that the clocks onall systems are synchronized by using the universal date and time.
Chapter 9. Managing clusters and high availability configurations 143

About this task
This procedure is the same procedure on IBM WebSphere Application ServerNetwork Deployment 6.1 and 7.0.
Procedure
1. Linux Configure file descriptor resources on the node as described in“Configuring file descriptor resources for IBM WebSphere Application Server(Linux)” on page 190.
2. AIX Unset the LDR_CNTRL variable on the node as described in“Configuring memory allocation for IBM WebSphere Application Server (AIX)”on page 191.
3. Create a custom profile on the node agent computer by using the ProfileManagement Tool. Follow the steps in the IBM InfoSphere Information ServerPlanning, Installation, and Configuration Guide.
Remember: When you create a custom profile, on the Federation page, specifya WebSphere Application Server administrator user name and password toconnect to the Deployment Manager.
Note: Do not select the Federate this node later check box.4. Create a cluster member (for example, "server3") on the node agent machine.
Follow the steps in the IBM InfoSphere Information Server Planning, Installation,and Configuration Guide.
Note: When selecting the node to create the cluster member, on the Createadditional cluster members page, make sure to select the new managed nodethat you created in the previous step.
5. Synchronize the new managed node. Run the syncNode WebSphere ApplicationServer command from the computer that hosts the managed node. You mustspecify the host name and port of the Deployment Manager and the WebSphereApplication Server administrator user name and password as input arguments.
Note: Do not start the node agents yet. The syncNode operation takes a coupleof minutes to complete.Refer to the IBM WebSphere Application Server Network Deploymentdocumentation for complete reference information about the syncNodecommand.v For 6.1: publib.boulder.ibm.com/infocenter/wasinfo/v6r1/topic/
com.ibm.websphere.nd.multiplatform.doc/info/ae/ae/rxml_syncnode.htmlv For 7.0: publib.boulder.ibm.com/infocenter/wasinfo/v7r0/topic/
com.ibm.websphere.nd.multiplatform.doc/info/ae/ae/rxml_syncnode.htmlThe following shows the syntax for the syncNode command, followed by anexample of the syncNode command log file found under the custom profiledirectory.syncNode dmgr_hostname dmgr_port -username was_admin_username-password was_admin_password
C:\IBM\WebSphereND61\AppServer\profiles\Custom01\bin>syncNode myDmgr01 8879-username wasadmin -password *******
ADMU0116I: Tool information is being logged in fileC:\IBM\WebSphereND61\AppServer\profiles\Custom01\logs\syncNode.log
ADMU0128I: Starting tool with the Custom01 profileADMU0401I: Begin syncNode operation for node myNode01 with Deployment
144 Administration Guide

Manager localhost: 8879ADMU0016I: Synchronizing configuration between node and cell.ADMU0402I: The configuration for node myNode01 has been synchronized
with Deployment Manager myDmgr01: 8879
When the synchronization is complete, verify that the custom profile containsboth newly created directories: the classes directory and theinformationServer directory. These two directories and the files they containare the result of the synchronization operation.
Note: If the synchronization fails, you can review the syncNode command logfile (syncNode.log) in the custom profile directory.
6. Start the new node agent on the node agent computer by using the startNodeWebSphere Application Server command.Refer to the IBM WebSphere Application Server Network Deploymentdocumentation for information about the startNode command.v For 6.1: http://publib.boulder.ibm.com/infocenter/wasinfo/v6r1/
index.jsp?topic=/com.ibm.websphere.nd.multiplatform.doc/info/ae/ae/rxml_startnode.html
v For 7.0: http://publib.boulder.ibm.com/infocenter/wasinfo/v7r0/index.jsp?topic=/com.ibm.websphere.nd.multiplatform.doc/info/ae/ae/rxml_startnode.html
7. Start the newly created cluster member from the WebSphere Application Serveradministrative console.
8. Propagate the plugin-cfg.xml to the front-end Web server WLM plug-in to takeinto account the new cluster member. See “Propagating the plugin-cfg.xml fileto the front-end Web server” on page 141.
Synchronizing nodes after changing the master repositoryconfiguration
When you change the master repository configuration, synchronize the nodes toensure that changes are propagated to all nodes in the cell. This procedure is thesame for IBM WebSphere Application Server Network Deployment Versions 6.1and 7.0.
About this task
WebSphere Application Server synchronizes nodes internally on a regular andautomatic basis. However, you can also synchronize the nodes whenever you needto, instead of waiting for WebSphere Application Server. For example, change themaster repository configuration when you add a new cluster member or change asecurity setting.
Important: Nodes need to be synchronized whenever there is a change to themaster repository configuration, including updates to the topology or cellconfigurations.
Procedure1. Log in to the WebSphere Application Server administrative console.2. Expand the System administration section and then click Nodes.3. Select the nodes that you want to synchronize (most likely all of them).4. Click Synchronize or Full Synchronize.
Chapter 9. Managing clusters and high availability configurations 145
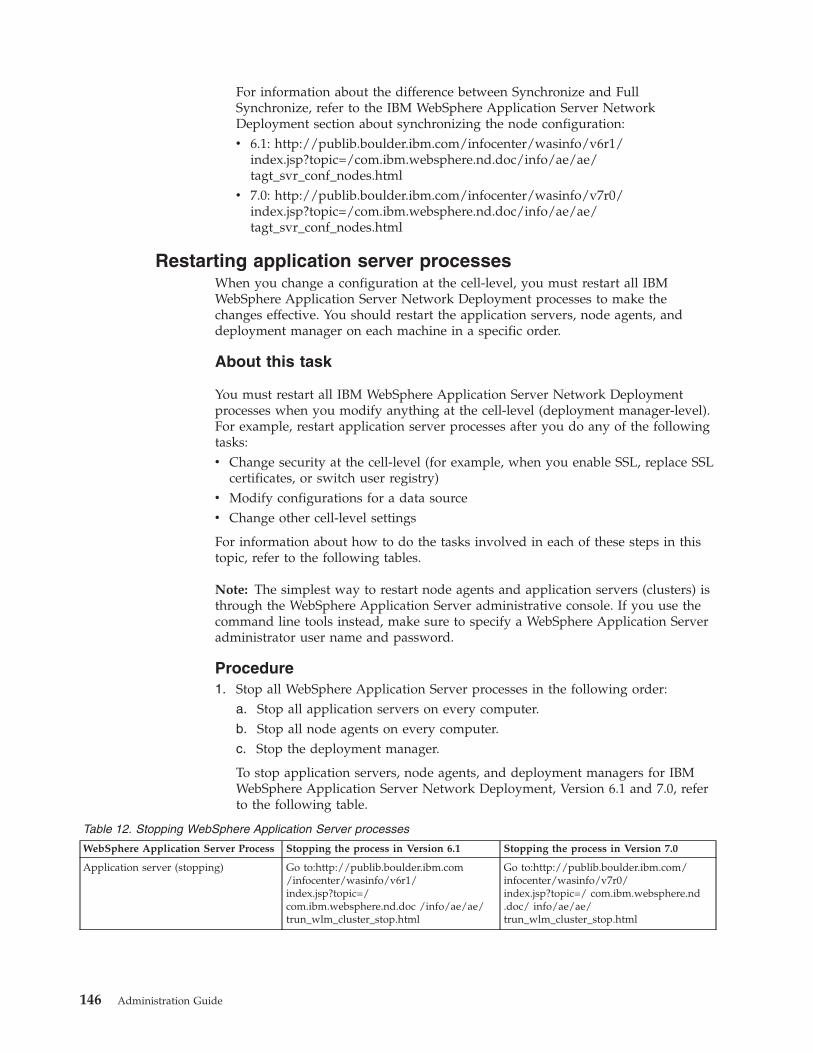
For information about the difference between Synchronize and FullSynchronize, refer to the IBM WebSphere Application Server NetworkDeployment section about synchronizing the node configuration:v 6.1: http://publib.boulder.ibm.com/infocenter/wasinfo/v6r1/
index.jsp?topic=/com.ibm.websphere.nd.doc/info/ae/ae/tagt_svr_conf_nodes.html
v 7.0: http://publib.boulder.ibm.com/infocenter/wasinfo/v7r0/index.jsp?topic=/com.ibm.websphere.nd.doc/info/ae/ae/tagt_svr_conf_nodes.html
Restarting application server processesWhen you change a configuration at the cell-level, you must restart all IBMWebSphere Application Server Network Deployment processes to make thechanges effective. You should restart the application servers, node agents, anddeployment manager on each machine in a specific order.
About this task
You must restart all IBM WebSphere Application Server Network Deploymentprocesses when you modify anything at the cell-level (deployment manager-level).For example, restart application server processes after you do any of the followingtasks:v Change security at the cell-level (for example, when you enable SSL, replace SSL
certificates, or switch user registry)v Modify configurations for a data sourcev Change other cell-level settings
For information about how to do the tasks involved in each of these steps in thistopic, refer to the following tables.
Note: The simplest way to restart node agents and application servers (clusters) isthrough the WebSphere Application Server administrative console. If you use thecommand line tools instead, make sure to specify a WebSphere Application Serveradministrator user name and password.
Procedure1. Stop all WebSphere Application Server processes in the following order:
a. Stop all application servers on every computer.b. Stop all node agents on every computer.c. Stop the deployment manager.
To stop application servers, node agents, and deployment managers for IBMWebSphere Application Server Network Deployment, Version 6.1 and 7.0, referto the following table.
Table 12. Stopping WebSphere Application Server processes
WebSphere Application Server Process Stopping the process in Version 6.1 Stopping the process in Version 7.0
Application server (stopping) Go to:http://publib.boulder.ibm.com/infocenter/wasinfo/v6r1/index.jsp?topic=/com.ibm.websphere.nd.doc /info/ae/ae/trun_wlm_cluster_stop.html
Go to:http://publib.boulder.ibm.com/infocenter/wasinfo/v7r0/index.jsp?topic=/ com.ibm.websphere.nd.doc/ info/ae/ae/trun_wlm_cluster_stop.html
146 Administration Guide

Table 12. Stopping WebSphere Application Server processes (continued)
WebSphere Application Server Process Stopping the process in Version 6.1 Stopping the process in Version 7.0
Node agent (stopping) Go to:http://publib.boulder.ibm.com/infocenter/wasinfo/v6r1/index.jsp?topic=/ com.ibm.websphere.nd.multiplatform.doc/ info/ae/ae/rxml_stopnode.html
Go to:http://publib.boulder.ibm.com/infocenter/wasinfo/v7r0/index.jsp?topic=/ com.ibm.websphere.nd.multiplatform.doc/ info/ae/ae/rxml_stopnode.html
Deployment manager (stopping) Go to:http://publib.boulder.ibm.com/infocenter/wasinfo/v6r1/index.jsp?topic=/ com.ibm.websphere.nd.multiplatform.doc/ info/ae/ae/rxml_stopmanager.html
Go to:http://publib.boulder.ibm.com/infocenter/wasinfo/v7r0/index.jsp?topic=/ com.ibm.websphere.nd.multiplatform.doc/ info/ae/ae/rxml_stopmanager.html
2. After you have stopped all WebSphere Application Server processes, you canproceed to restart them. Start all WebSphere Application Server processes in thefollowing order:a. Start the deployment manager.b. Start all node agents on every machine.c. Start all application servers on every machine.
Note: When you restart the application server, you restart the cluster.To start application servers, node agents, and deployment managers for IBMWebSphere Application Server Network Deployment, Version 7.0 and 7.0, referto the following table.
Table 13. Starting WebSphere Application Server processes
WebSphere Application Server Process Starting the process in Version 6.1 Starting the process in Version 7.0
Deployment manager (starting) Go to:http://publib.boulder.ibm.com/infocenter/wasinfo/v6r1/index.jsp?topic=/com.ibm.websphere.nd.multiplatform.doc/info/ae/ae/rxml_startmanager.html
Go to:http://publib.boulder.ibm.com/infocenter/wasinfo/v7r0/index.jsp?topic=/com.ibm.websphere.nd.multiplatform.doc/info/ae/ae/rxml_startmanager.html
Node agent (starting) Go to:http://publib.boulder.ibm.com/infocenter/wasinfo/v6r1/index.jsp?topic=/com.ibm.websphere.nd.multiplatform.doc/info/ae/ae/rxml_startnode.html
Go to:http://publib.boulder.ibm.com/infocenter/wasinfo/v7r0/index.jsp?topic=/com.ibm.websphere.nd.multiplatform.doc/info/ae/ae/rxml_startnode.html
Application server (starting) Go to:http://publib.boulder.ibm.com/infocenter/wasinfo/v6r1/index.jsp?topic=/ com.ibm.websphere.nd.doc/ info/ae/ae/trun_wlm_cluster_start.html
Go to:http://publib.boulder.ibm.com/infocenter/wasinfo/v7r0/index.jsp?topic=/ com.ibm.websphere.nd.doc/ info/ae/ae/trun_wlm_cluster_start.html
Note: For more information about node agents:v For 6.1: http://publib.boulder.ibm.com/infocenter/wasinfo/v6r1/
index.jsp?topic=/com.ibm.websphere.nd.doc/info/ae/ae/uagt_rnodeagent.html.
v For 7.0: http://publib.boulder.ibm.com/infocenter/wasinfo/v7r0/index.jsp?topic=/com.ibm.websphere.nd.doc/info/ae/ae/uagt_rnodeagent.html.
Setting up HTTP session database persistenceWhen you install IBM InfoSphere Information Server in a cluster environment,HTTP session management is configured to use memory-to-memory replication.
Chapter 9. Managing clusters and high availability configurations 147

If you want to use a database persistence approach, configure IBM WebSphereApplication Server Network Deployment as described in Section 6.8.5 of the IBMRedbooks publication, WebSphere Application Server V6 Scalability and PerformanceHandbook: http://www.redbooks.ibm.com/abstracts/sg246392.html. Refer to section6.8 for more information about the advantages and drawbacks of the twomechanisms.
To configure for database session persistence, use the instructions in the IBMWebSphere Application Server information center:v For WebSphere Application Server, Version 6.1: http://publib.boulder.ibm.com/
infocenter/wasinfo/v6r1/index.jsp?topic=/com.ibm.websphere.base.doc/info/aes/ae/tprs_cnfp.html
v For WebSphere Application Server, Version 7.0: http://publib.boulder.ibm.com/infocenter/wasinfo/v7r0/index.jsp?topic=/com.ibm.websphere.base.doc/info/aes/ae/tprs_cnfp.html
IBM DB2 high availability configuration administrationThese tasks outline how to administer an IBM InfoSphere Information Serverdatabase in an IBM DB2 cluster or high availability disaster recovery (HADR)configuration.
Use these procedures if your metadata repository or IBM InfoSphere InformationAnalyzer analysis database is set up in one of these configurations.
For detailed information about DB2 cluster or HADR administration, see thefollowing resources:v DB2 9.5: publib.boulder.ibm.com/infocenter/db2luw/v9r5/topic/
com.ibm.db2.luw.admin.ha.doc/doc/t0051382.htmlv DB2 9.7: publib.boulder.ibm.com/infocenter/db2luw/v9r7/topic/
com.ibm.db2.luw.admin.ha.doc/doc/t0051382.htmlv IBM Redbooks® publication: High Availability and Disaster Recovery Options for
DB2 on Linux, UNIX, and Windows available at www.redbooks.ibm.com/abstracts/SG247363.html
Failover in an IBM DB2 HADR configurationIf the primary database fails in a DB2 HADR configuration, IBM InfoSphereInformation Server can continue functioning by using the standby database.
To start using the standby database, the following things must occur:v The services tier (IBM WebSphere Application Server) must reconnect to the
standby server. The DB2 automatic client reroute (ACR) feature automaticallyreconnects the services tier to the standby server.
v The database administrator must run the TAKEOVER HADR command on thestandby database.
Attention: A failure might cause a loss of data.
If a user writes data to a database and a failure occurs during the data replicationto the backup server, the updates might be lost. In most cases, the user can redothe edit or import operation to restore the data after the switchover to the standbydatabase is complete.
148 Administration Guide

The likelihood and extent of transaction loss depends on the synchronization modein which HADR is configured. The following table lists synchronization modes anddata loss scenarios.
Table 14. HADR synchronization modes and data loss scenarios
HADR synchronization mode Data loss scenarios
SYNC Least risk of data loss.
NEARSYNC The standby database can lose transactions ifboth the primary and standby databases failat the same time.
ASYNC The standby database can lose transactionsin cases like these:
v The standby database does not receive allthe log records for the transactions beforethe takeover operation is performed.
v Both the primary and standby databasesfail at the same time.
If the primary database fails while in remote catchup pending state, transactionsthat the standby database has not processed are lost.
Note: Any log gap shown in the database snapshot represents the gap at the lasttime the primary and standby databases communicated. The primary databasemight have processed many transactions since that time.
Recovering from failover in a DB2 HADR scenarioIf your installation includes an IBM DB2 database that is configured with highavailability disaster recovery (HADR), the database administrator must completethe failover process manually.
About this task
If the primary HADR database fails, follow this procedure to restore service.
Attention: A failure might cause a loss of data.
Procedure1. If the DB2 fault monitor feature (db2fm) is enabled on the primary database
server, the database might automatically restart on the primary server. Directthe user to try the transaction again to see if the database is operational. If thedatabase is operational, no further action is required.
2. Deactivate the primary database or stop its instance, if possible. If the primarydatabase is still running, but cannot communicate with the standby database,running the takeover operation could result in two primary databases (a"split-brain" scenario).
3. Start the takeover operation by using one of the following administrationinterfaces:v The DB2 command-line processor (CLP).v The Manage High Availability Disaster Recovery window in the DB2 Control
Center.v The db2HADRTakeover application programming interface (API).
Chapter 9. Managing clusters and high availability configurations 149

Recovering from a failover in a DB2 clustered configurationIf your IBM InfoSphere Information Server databases are set up in an IBM DB2clustered configuration, failover is automatic.
If the primary node fails in such a configuration, the passive node connects to thedatabase file system, and continues. If you have automatic client reroute (ACR)configured, the services tier (IBM WebSphere Application Server) reconnects to thepassive node. No database administrator intervention is required.
Any transactions other than read-only transactions are stopped and rolled back.Users must resubmit the transactions.
Refer to the DB2 documentation for more detailed information.
Engine tier failover recoveryIf the engine tier (and possibly other tier software as well) is set up in anactive-passive configuration, hardware or network errors cause a failover to thepassive server. You can also force a failover to occur to free the active server formaintenance or upgrade tasks.
The high availability (HA) software that is installed on the servers manages thefault detection and failover process.
During a failover, the sequence of events differs depending on whether the failoveris due to a failure or is forced.
Failover due to a failure
When the active server hardware or network fails, the heartbeat mechanismbetween the nodes signals the passive server that the active server has failed. TheHA software restores service on the passive server by doing the following actions:v Ensures that the primary server is no longer running.v Assigns the IP address that is associated with the resource group to the new
server.v Mounts the floating mount point for the software on the new server.v Starts the engine tier software on the new server by calling the InfoSvrEngine
script with the start option.v If other tier software is installed on the server, the HA software starts it by
calling the InfoSvrServices script with the start option. This script starts theservices tier. It also starts the metadata repository tier if the tier is installed withthe engine tier.
Forced failover
When you force a failover, the HA software shuts down the software beforestarting it up on the other node. The HA software does the following steps:v If software is installed for tiers other than the engine tier, the HA software stops
it by calling the InfoSvrServices script with the stop option. This script stopsthe services tier. It also stops the metadata repository tier if the tier is installedwith the engine tier.
v Stops the engine tier software on the server by calling the InfoSvrEngine scriptwith the stop option.
150 Administration Guide
v Unmounts the floating mount point for the software.v Unmounts the data files mount point.v Unassigns the IP address associated with the resource group from the old server.v Reassigns the resource group IP address and mounts the floating mount point.v Starts the engine tier software on the new server by calling the InfoSvrEngine
script with the start option.v If other tier software is installed on the server, the HA software starts it by
calling the InfoSvrServices script with the start option. This script starts theservices tier. It also starts the metadata repository tier if the tier is installed withthe engine tier.
Recovery process
In a production system, if server engine services did not shut down normally, theDSHARestart tool starts automatically on the passive server. The tool checks andrepairs dynamic files that are associated with any jobs that were running on theprimary server when the failover occurred. The state of these jobs is set to crashedfor easy identification.
In a development system where users were creating, editing, or compiling projectswhen a failover occurred, the restart might leave projects in an inconsistent state.You can use the SyncProject tool to resolve any inconsistencies in these projects.
Recovering from an engine tier failoverWhen an engine tier failover occurs, follow this procedure to recover projects andrestart any interrupted jobs.
If IBM InfoSphere Information Server engine services did not shut down normally(for example, if a failover occurred due to a failure), the DSHARestart tool startsautomatically on the passive server. The tool checks and repairs dynamic files thatare associated with any jobs that were running on the primary server when thefailover occurred. The state of these jobs is set to crashed for easy identification.
The tool is intended to handle unattended failover events on a production system.No user interaction is required to ensure that running jobs can be restarted.
InfoSphere Information Server engine services do not start up fully until theDSHARestart tool has completed its tasks. While the tool is running, users cannotconnect and use the InfoSphere Information Server engine. This design ensuresthat jobs are not further corrupted during the recovery process.
While the DSHARestart tool runs, it records its actions in the HARestart.log file. Ifan issue arises during the recovery process, refer to this file for more information.This file is located in the following directory:
v Linux UNIX /opt/IBM/InformationServer/Server/DSEngine
v Windows C:\IBM\InformationServer\Server\DSEngine
After the DSHARestart tool has finished, recover projects by using the SyncProjecttool. Then restart any interrupted jobs. Replace the server and bring the new serveronline.
Chapter 9. Managing clusters and high availability configurations 151
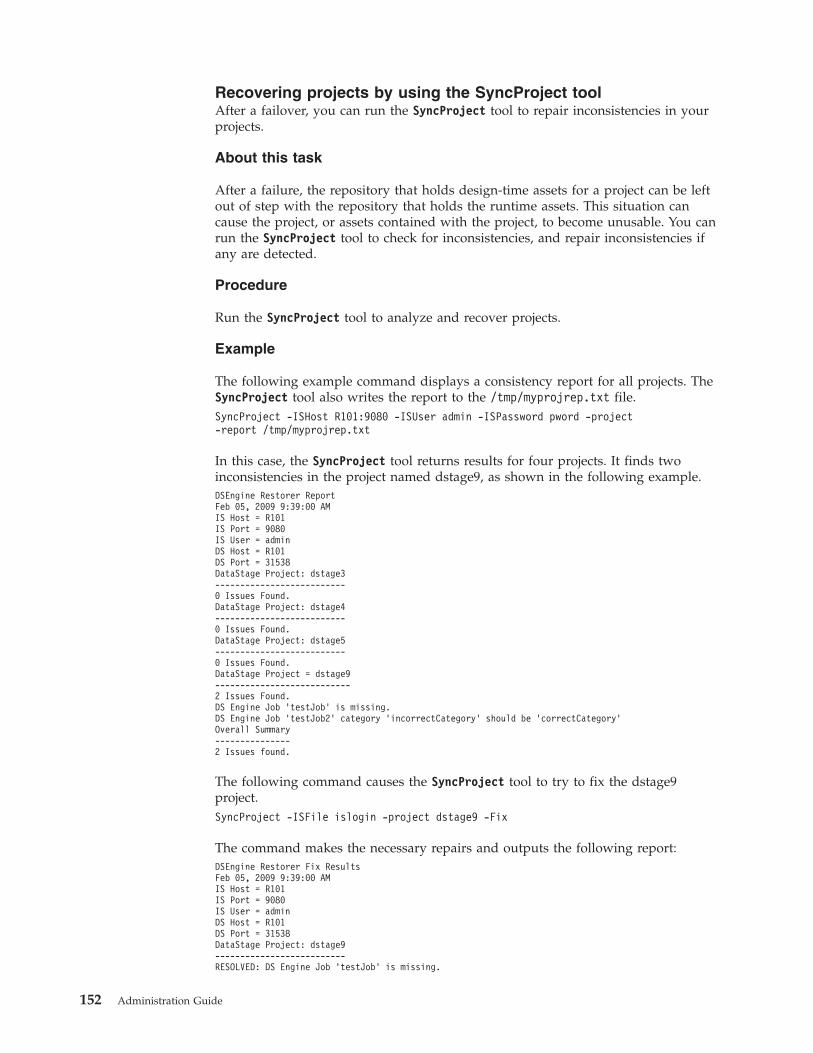
Recovering projects by using the SyncProject toolAfter a failover, you can run the SyncProject tool to repair inconsistencies in yourprojects.
About this task
After a failure, the repository that holds design-time assets for a project can be leftout of step with the repository that holds the runtime assets. This situation cancause the project, or assets contained with the project, to become unusable. You canrun the SyncProject tool to check for inconsistencies, and repair inconsistencies ifany are detected.
Procedure
Run the SyncProject tool to analyze and recover projects.
Example
The following example command displays a consistency report for all projects. TheSyncProject tool also writes the report to the /tmp/myprojrep.txt file.SyncProject -ISHost R101:9080 -ISUser admin -ISPassword pword -project-report /tmp/myprojrep.txt
In this case, the SyncProject tool returns results for four projects. It finds twoinconsistencies in the project named dstage9, as shown in the following example.DSEngine Restorer ReportFeb 05, 2009 9:39:00 AMIS Host = R101IS Port = 9080IS User = adminDS Host = R101DS Port = 31538DataStage Project: dstage3--------------------------0 Issues Found.DataStage Project: dstage4--------------------------0 Issues Found.DataStage Project: dstage5--------------------------0 Issues Found.DataStage Project = dstage9---------------------------2 Issues Found.DS Engine Job ’testJob’ is missing.DS Engine Job ’testJob2’ category ’incorrectCategory’ should be ’correctCategory’Overall Summary---------------2 Issues found.
The following command causes the SyncProject tool to try to fix the dstage9project.SyncProject -ISFile islogin -project dstage9 -Fix
The command makes the necessary repairs and outputs the following report:DSEngine Restorer Fix ResultsFeb 05, 2009 9:39:00 AMIS Host = R101IS Port = 9080IS User = adminDS Host = R101DS Port = 31538DataStage Project: dstage9--------------------------RESOLVED: DS Engine Job ’testJob’ is missing.
152 Administration Guide
RESOLVED: DS Engine Job ’testJob2’ category ’incorrectCategory’ should be ’correctCategory’.2 Issues resolved.0 Issues remaining.Overall Summary---------------2 Issues resolved.0 Issues remaining.
Identifying and restarting crashed jobsAfter the DSHARestart tool finishes, restart jobs by using the dsjob tool.
About this task
After the DSHARestart tool finishes, recovered job sequences are left in one of twostates:v Crashed/Restartable. You can run these job sequences from where they stopped,
or reset and run them.v Crashed. You must reset these jobs before you can run them.
Procedure
Use any of the following tools to identify jobs that are in a crashed/restartable orcrashed state.
The dsjob toolTo use the dsjob tool:1. Log in to the computer that hosts the engine tier. Use an account with
administrator or IBM InfoSphere DataStage user privileges.2. Change to the directory that contains the dsenv file. This directory is
specified in the $DSHOME environment variable. By default, thedirectory is /opt/IBM/InformationServer/Server/DSEngine.
3. Source the dsenv file:. dsenv
4. Run the dsjob tool. Specify the -status option with a value of 96.dsjob –ljobs –status 96 project
5. To restart checkpointed job sequences that are in the crashed/restartablestate, specify the -mode option with a value of RESTART, and specify thejob sequence.dsjob –run –mode RESTART project jobsequence
The IBM InfoSphere DataStage and QualityStage Director clientTo use the InfoSphere DataStage and QualityStage Director client, start theclient and view jobs. Look for jobs where the Status column reads Crashedor Crashed/Restartable.
The C or DSBasic Job Control API DSRunJob function.For information about the C or DSBasic Job Control API DSRunJob function,see the IBM InfoSphere DataStage documentation.
What to do next
After you identify and restart crashed jobs, investigate and resolve the cause of theprimary server failure.
Chapter 9. Managing clusters and high availability configurations 153

154 Administration Guide
Chapter 10. Managing logs
You can access logged events from a view, which filters the events based oncriteria that you set. You can also create multiple views, each of which shows adifferent set of events.
You can manage logs across all of the IBM InfoSphere Information Server suitecomponents. The console and the Web console provide a central place to view logsand resolve problems. Logs are stored in the metadata repository, and eachInfoSphere Information Server suite component defines relevant logging categories.
LoggingYou can configure log views to manage the log messages that are generated whenactivities run in the suite.
You create log views to query log messages. Log messages show details about theactivities that run in the suite. After you create a log view, you use filters to restrictthe information in the log view. Only a suite administrator can delete logmessages. If you want to delete log messages, you select the log view that containsthe information that you want to remove.
You can restrict access to a log view by making the log view private. Private logviews are available only to the user who created the log view. If you want a logview to be available to all users, you can share the log view. Shared log views canbe edited only by the user who created the shared log view or by a suiteadministrator.
Logging componentsA logging component is a named entity that represents a suite component in IBMInfoSphere Information Server or a shared service, such as reporting, that uses thelogging service.
A logging component defines one or more logging categories. Each loggingcategory is a group of logged messages that represent one functional aspect of thecomponent.
For example, the category ISF-REPORTING-ENGINE has one set of loggedmessages for the reporting engine, which is a functional aspect of the loggingcomponent called the Reporting Services.
Logging configurationsYou can use a logging configuration to set the criteria for logging events for a suitecomponent.
Both the configuration and the individual categories that belong to a configurationset severity level filters for saving events in the metadata repository. At runtime,the severity level for the configuration overrides the filters of the categories.
Each logging component can have multiple logging configurations. The activeconfiguration determines which events are saved in the metadata repository.
© Copyright IBM Corp. 2007, 2011 155

Severity levelsSeverity levels specify the threshold for saving events in the metadata repository.
In a configuration, you set the lowest threshold for inclusion, which also capturesall of the higher levels. For example, if you select the Warning level, warning, error,and fatal events are logged. The levels are ordered from the highest level (fatal) tothe lowest level (trace):v Fatalv Errorv Warnv Info (information only)v Debugv Trace
You can use the debug level and trace level to troubleshoot problems at runtimethat involve specific logging categories.
Each logging component can have multiple logging configurations. The activeconfiguration determines which events are saved in the metadata repository.
Views of logged eventsYou access logged events from a view. The view filters the events based on criteriathat you select.
You can create multiple views, each of which shows a different set of events.
You can filter messages by the following criteria:
Message stringsYou can filter messages by full or partial message text. Two wildcardcharacters are supported:v An asterisk (*) finds one or more characters.v A question mark (?) finds any single character at the current position.
CategoriesYou can filter messages by category name.
Severity levelYou can filter messages by severity level.
Time frameA view can capture activity in a date range or show the latest events. Youcan specify the number of events to include in the initial view and therefresh rate. The logging service automatically refreshes the view.
Shared and private viewsA view can be private or shared. A suite administrator or suite user who creates aprivate view has exclusive access to the view.
The following table describes the levels of access, based on the creator and type ofview.
156 Administration Guide
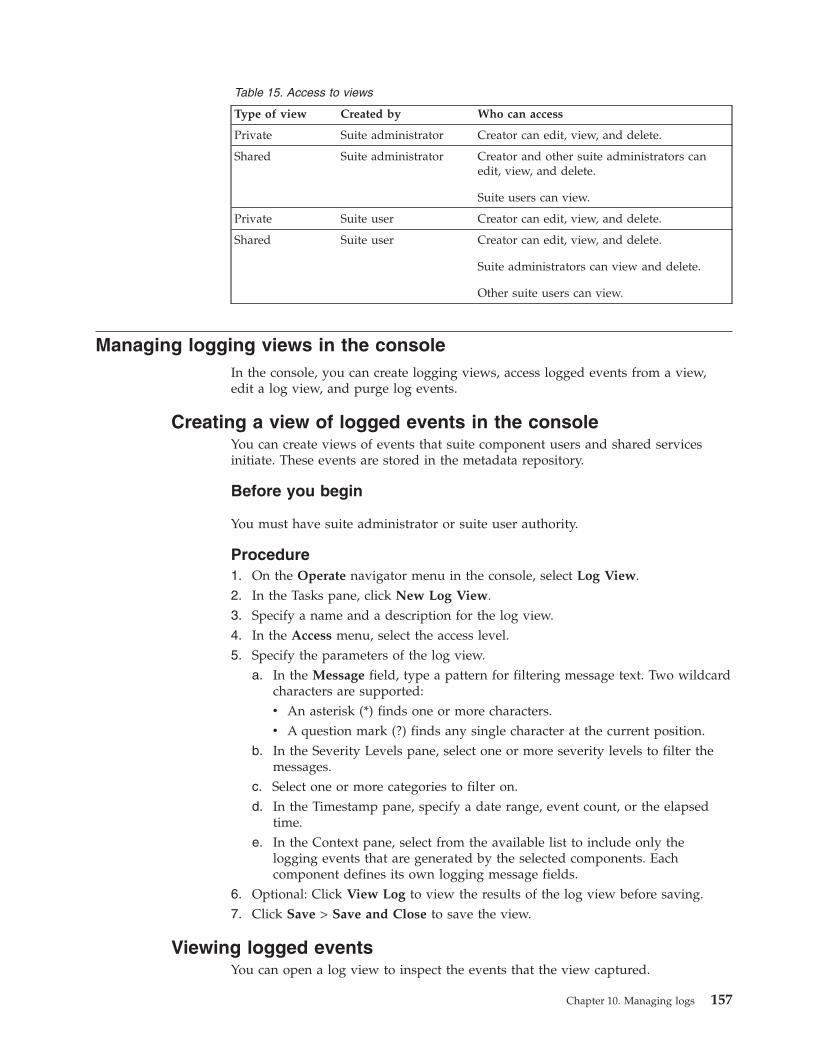
Table 15. Access to views
Type of view Created by Who can access
Private Suite administrator Creator can edit, view, and delete.
Shared Suite administrator Creator and other suite administrators canedit, view, and delete.
Suite users can view.
Private Suite user Creator can edit, view, and delete.
Shared Suite user Creator can edit, view, and delete.
Suite administrators can view and delete.
Other suite users can view.
Managing logging views in the consoleIn the console, you can create logging views, access logged events from a view,edit a log view, and purge log events.
Creating a view of logged events in the consoleYou can create views of events that suite component users and shared servicesinitiate. These events are stored in the metadata repository.
Before you begin
You must have suite administrator or suite user authority.
Procedure1. On the Operate navigator menu in the console, select Log View.2. In the Tasks pane, click New Log View.3. Specify a name and a description for the log view.4. In the Access menu, select the access level.5. Specify the parameters of the log view.
a. In the Message field, type a pattern for filtering message text. Two wildcardcharacters are supported:v An asterisk (*) finds one or more characters.v A question mark (?) finds any single character at the current position.
b. In the Severity Levels pane, select one or more severity levels to filter themessages.
c. Select one or more categories to filter on.d. In the Timestamp pane, specify a date range, event count, or the elapsed
time.e. In the Context pane, select from the available list to include only the
logging events that are generated by the selected components. Eachcomponent defines its own logging message fields.
6. Optional: Click View Log to view the results of the log view before saving.7. Click Save > Save and Close to save the view.
Viewing logged eventsYou can open a log view to inspect the events that the view captured.
Chapter 10. Managing logs 157
Procedure1. On the Operate navigator menu in the console, select Log View.2. In the Log View workspace, select the log view that you want to open.3. In the Tasks pane, click View Log.4. In the View Log pane, select an event to view the detailed log events. You can
view the details of the logging view by clicking Open Properties.
Editing a log viewYou can edit a view of logged events to modify which events are included in thelog view.
Procedure1. On the Operate navigator menu, select Log View.2. In the Log View workspace, select the log view that you want to edit.3. In the Tasks pane, click Open.4. In the Open pane, modify the criteria for the view.5. Optional: Click View Log to view the results of the modified log view before
saving.6. Click Save > Save and Close to save the view.
Copying a log viewTo create a new log view that is based on the configuration details of a previouslog view, you can create a copy of a log view.
Procedure1. On the Operate navigator menu, select Log View.2. In the Log View workspace, select the log view that you want to copy.3. In the Tasks pane, click Copy.4. Type a new name and a new description for the log view.5. Optional: Modify the filters of the view.6. Click Save > Save and Close to save the view.
Purging logged messagesThe logged messages that are in the metadata repository have no expiration. Youcan delete the logged messages for the events that a logging view captures. Thisaction is useful for managing large volumes of events.
Before you begin
You must have suite administrator authority.
Procedure1. On the Operate navigator menu, select Log View.2. In the Log View workspace, select one or more log views.3. In the Tasks pane, click Purge Log.4. In the confirmation window, click OK to confirm that you want to purge the
log events. The logged messages for the selected views are deleted from themetadata repository.
158 Administration Guide
Results
Logged messages are deleted in the background to allow you to continue to workon other tasks. When you delete a large number of logged messages, the events forlogged messages that have yet to be deleted might still be displayed after thescreen is refreshed. These events are no longer displayed after all the loggedmessages are deleted from the metadata repository.
Managing logging views in the IBM InfoSphere Information Server Webconsole
In the Administration tab of the IBM InfoSphere Information Server Web console,you can create logging views, access logged events from a view, edit a log view,purge log events, and delete logging views. You can also manage log views bylogging component.
Creating a view of logged events in the IBM InfoSphereInformation Server Web console
You can create views of events that suite component users and shared servicesinitiate. These events are stored in the metadata repository.
Before you begin
You must have suite administrator or suite user authority.
Procedure1. In the IBM InfoSphere Information Server Web console, click the
Administration tab.2. In the Navigation pane, select Log Management > Log Views.3. In the Log Views pane, click New.4. Specify a name and a description for the log view.5. In the Log View Access list, select the access level.6. Optional: In the Message field, type a pattern for filtering message text. Two
wildcard characters are supported:v An asterisk (*) finds one or more characters.v A question mark (?) finds any single character at the current position.
7. Optional: In the Severity Level group, select one or more severity levels tofilter the messages.
8. Optional: Filter on the logging category.a. In the Categories pane, click Browse.b. In the Browse Categories window, select one or more categories.c. Click OK to close the window.
9. Optional: In the Timestamp pane, specify a date range, event count, or theelapsed time.
Chapter 10. Managing logs 159
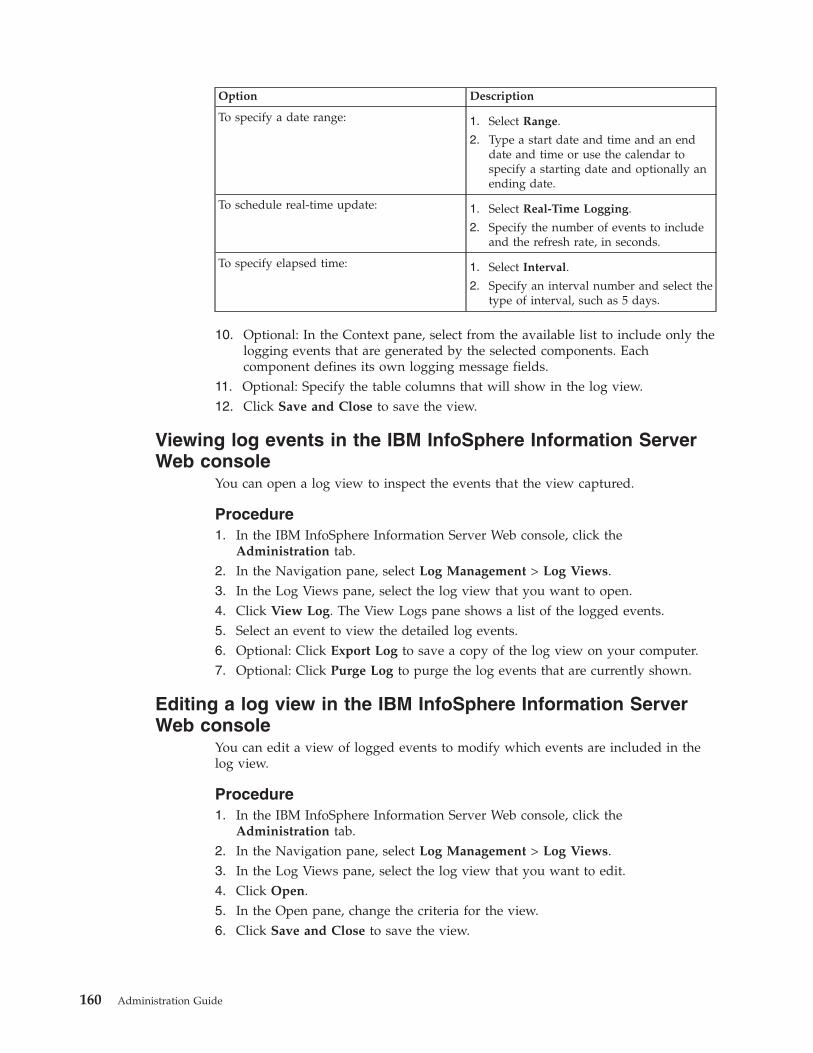
Option Description
To specify a date range: 1. Select Range.
2. Type a start date and time and an enddate and time or use the calendar tospecify a starting date and optionally anending date.
To schedule real-time update: 1. Select Real-Time Logging.
2. Specify the number of events to includeand the refresh rate, in seconds.
To specify elapsed time: 1. Select Interval.
2. Specify an interval number and select thetype of interval, such as 5 days.
10. Optional: In the Context pane, select from the available list to include only thelogging events that are generated by the selected components. Eachcomponent defines its own logging message fields.
11. Optional: Specify the table columns that will show in the log view.12. Click Save and Close to save the view.
Viewing log events in the IBM InfoSphere Information ServerWeb console
You can open a log view to inspect the events that the view captured.
Procedure1. In the IBM InfoSphere Information Server Web console, click the
Administration tab.2. In the Navigation pane, select Log Management > Log Views.3. In the Log Views pane, select the log view that you want to open.4. Click View Log. The View Logs pane shows a list of the logged events.5. Select an event to view the detailed log events.6. Optional: Click Export Log to save a copy of the log view on your computer.7. Optional: Click Purge Log to purge the log events that are currently shown.
Editing a log view in the IBM InfoSphere Information ServerWeb console
You can edit a view of logged events to modify which events are included in thelog view.
Procedure1. In the IBM InfoSphere Information Server Web console, click the
Administration tab.2. In the Navigation pane, select Log Management > Log Views.3. In the Log Views pane, select the log view that you want to edit.4. Click Open.5. In the Open pane, change the criteria for the view.6. Click Save and Close to save the view.
160 Administration Guide
Copying a log view in the IBM InfoSphere Information ServerWeb console
To create a log view that is based on the configuration details of a previous logview, you can create a copy of a log view.
Procedure1. In the IBM InfoSphere Information Server Web console, click the
Administration tab.2. In the Navigation pane, select Log Management > Log Views.3. In the Log Views pane, select the view that you want to copy.4. Click Copy.5. Type a new name and a new description for the log view.6. Optional: Modify the filters of the view.7. Click Save and Close to save the view.
Purging logged messages in the IBM InfoSphere InformationServer Web console
The logged messages that are in the metadata repository have no expiration. Youcan delete the logged messages for the events that a logging view captures. Thisaction is useful for managing large volumes of events.
Before you begin
You must have suite administrator authority.
Procedure1. In the IBM InfoSphere Information Server Web console, click the
Administration tab.2. In the Navigation pane, select Log Management > Log Views.3. In the Log Views pane, select one or more views.4. Click Purge Log.5. In the confirmation window, click Yes to confirm that you want to purge the
log events. The logged messages for the selected views are deleted from themetadata repository.
Results
Logged messages are deleted in the background to allow you continue to work onother tasks. When you delete a large number of logged messages, the events forlogged messages that have yet to be deleted might still display after the screen isrefreshed. These events are no longer displayed after all the logged messages aredeleted from the metadata repository.
Managing logging by componentFor each logging component in IBM InfoSphere Information Server, you canmanage logging by modifying the thresholds at which events are logged in themetadata repository, specifying that a logging configuration is active, specifyingthat a logging configuration is the default, or deleting a logging configuration.
Chapter 10. Managing logs 161
About this task
A logging component is a named entity that represents a suite component inInfoSphere Information Server or a shared service, such as the session ormonitoring service, that uses the logging service.
Creating a logging configurationYou can create a logging configuration to set the criteria for logging events in asuite component.
Before you begin
You must have suite administrator authority.
Procedure1. In the IBM InfoSphere Information Server Web console, click the
Administration tab.2. In the Navigation pane, select Log Management > Logging Components.3. In the Logging Components pane, select one of the logging components.4. Click Manage Configurations.5. Click New Logging Configuration.6. In the New pane, type a name for the configuration.7. Optional: In the Threshold menu, select a threshold level for writing logging
events to the metadata repository.8. Add logging categories to the configuration.
a. Click Browse.b. In the Browse Categories window, select the categories that you want to
include in the configuration.c. Click OK to close the window.
9. Modify the severity levels for the included categories.10. Click Save and Close to save the configuration in the metadata repository.
Results
The logging configuration displays the names of the logging categories specified inthe preceding task and the root logging category for the component that you areworking with. Always specify the root logging category in the loggingconfiguration.
Editing a logging configurationIf you want to change the logging categories and the filtering of the views, you canedit a logging configuration.
Before you begin
You must have suite administrator authority.
Procedure1. In the IBM InfoSphere Information Server Web console, click the
Administration tab.2. In the Navigation pane, select Log Management > Logging Components.3. In the Logging Components pane, select one of the logging components.
162 Administration Guide
4. Click Manage Configurations.5. Select a configuration.6. Click Open.7. Modify the details of the configuration.8. Click Save and Close to save the configuration.
Copying a logging configurationTo create a new logging configuration that is based on the configuration details ofanother logging configuration, you can create a copy of a logging configuration.
Before you begin
You must have suite administrator authority.
Procedure1. In the IBM InfoSphere Information Server Web console, click the
Administration tab.2. In the Navigation pane, select Log Management > Logging Components.3. In the Logging Components pane, select one of the logging components.4. Click Manage Configurations.5. Select a configuration.6. Click Copy.7. Optional: In the Copy pane, type a new name for the logging configuration.8. Modify the configuration details.9. Click Save and Close to save the configuration.
Setting a default logging configurationYou can set a default logging configuration. A default configuration is the activeconfiguration if no other configuration is activated.
Before you begin
You must have suite administrator authority.
Procedure1. In the IBM InfoSphere Information Server Web console, click the
Administration tab.2. In the Navigation pane, select Log Management > Logging Components.3. In the Logging Components pane, select one of the logging components.4. Click Manage Configurations.5. Select a configuration.6. Click Set as Default.
Activating a logging configurationYou activate a logging configuration to log events in the metadata repository thatuses that configuration.
Before you begin
You must have suite administrator authority.
Chapter 10. Managing logs 163
About this task
You can create multiple logging configurations for each suite component. Onlyactive logging configurations log events in the metadata repository.
Procedure1. In the IBM InfoSphere Information Server Web console, click the
Administration tab.2. In the Navigation pane, select Log Management > Logging Components.3. In the Logging Components pane, select one of the logging components.4. Click Manage Configurations.5. Select a configuration.6. Click Set as Active.
164 Administration Guide
Chapter 11. Managing schedules
In the IBM InfoSphere Information Server Web console, you can query all of theschedules that are defined across all of the suite components, check their status,history, and forecast, perform maintenance tasks such as purging the scheduleexecution history, and stop or start existing schedules to prevent system overload.
Many of the suite components use scheduling capabilities. For example, a reportrun and an analysis job in IBM InfoSphere Information Analyzer are scheduledtasks. Typically, you create, update, and manage these schedules in the suitecomponent. For example, you create a schedule for a column analysis job to runweekly in an InfoSphere Information Analyzer project in the IBM InfoSphereInformation Server console.
As a suite administrator, you might also want to have a global view of all of thescheduled activities that are created by each of the suite components to ensure thatenough resources are available to process these schedules and to monitor who isscheduling tasks and with what frequency.
Criteria for schedule viewsYou access schedules from a view, which filters the events based on criteria thatyou set.
To create views, you can filter messages by the following criteria:
Name You can filter tasks of a schedule by their names. Two wild cards aresupported:v An asterisk (*) finds one or more characters.v A question mark (?) finds any single character at the current position.
DescriptionYou can filter tasks of a schedule by their descriptions.
Schedule statusA schedule has three statuses: Complete, Started, and Paused.
Task Run statusEach task instance can have one of four statuses: Abnormally Ended,Finished, Canceled by User, or Running.
CreatorsYou can filter schedules by users.
Dates You can filter schedules by three sets of dates:v The dates on which schedules are created.v The dates on which any task executions of the schedule were started.v The updates, such as run start or completion, of any task executions for
the schedule.
OriginYou can filter tasks based on the application components that originatedthe tasks.
© Copyright IBM Corp. 2007, 2011 165

Shared and private viewsA view can be private or shared. A suite administrator or suite user who creates aprivate view has exclusive access to the view.
The following table describes the levels of access, based on the creator and type ofview.
Table 16. Access to views
Type of view Created by Who can access
Private Suite administrator Creator can edit, view, and delete.
Shared Suite administrator Creator and other suite administrators canedit, view, and delete.
Suite users can view.
Private Suite user Creator can edit, view, and delete.
Shared Suite user Creator can edit, view, and delete.
Suite administrators can view and delete.
Other suite users can view.
Creating a schedule viewYou create a schedule view to access and manage a list of schedules and scheduledtasks.
Before you begin
You must have suite administrator or suite user authority.
Procedure1. In the IBM InfoSphere Information Server Web console, click the
Administration tab.2. In the Navigation pane, select Schedule Monitoring > Views of Schedules.3. In the Views of Schedules pane, click New Scheduling View.4. Specify the name, description, and access level of the view.5. Optional: In the Filters pane, specify criteria for filtering schedules.6. Click Save and Close to save the schedule view.
What to do next
You can now view all of the schedules that are captured by this schedule view.
Creating a schedule view from a copyTo create a schedule view that is based on the configuration details of anotherschedule, you can create a copy of a schedule view.
Before you begin
You must have suite administrator or suite user authority.
166 Administration Guide

Procedure1. In the IBM InfoSphere Information Server Web console, click the
Administration tab.2. In the Navigation pane, select Schedule Monitoring > Views of Schedules.3. In the Views of Schedules pane, select a view.4. Click Copy.5. In the Copy pane, type a new name and description for the schedule view.6. Optional: Change the criteria of the view.7. Click Save and Close.
Viewing the schedules that are captured by a schedule viewYou can view the schedules that are captured by a schedule view. From this view,you can then manage the schedules and scheduled tasks.
Procedure1. In the IBM InfoSphere Information Server Web console, click the
Administration tab.2. In the Navigation pane, select Schedule Monitoring > Views of Schedules.3. In the Views of Schedules pane, select a view.4. Click View Schedules. A list of schedules that fit the criteria of the view opens.
Pausing all the schedules in a viewTo pause a set of schedules, you can pause all of the schedules that are capturedby a schedule view.
Procedure1. In the IBM InfoSphere Information Server Web console, click the
Administration tab.2. In the Navigation pane, select Schedule Monitoring > Views of Schedules.3. In the Views of Schedules pane, select a view.4. Click Pause. The schedules that are captured by the view are paused. All tasks
in them will not run until the schedules are resumed.
Resuming all the schedules in a viewAfter you pause all of the schedules in a schedule view, you can resume all of theschedules that are captured by the scheduled view.
Procedure
To reuse all of the schedules in a schedule view:1. In the IBM InfoSphere Information Server Web console, click the
Administration tab.2. In the Navigation pane, select Schedule Monitoring > Views of Schedules.3. In the Views of Schedules pane, select a view.4. Click Resume. The schedules that are captured by the view are resumed.
Chapter 11. Managing schedules 167
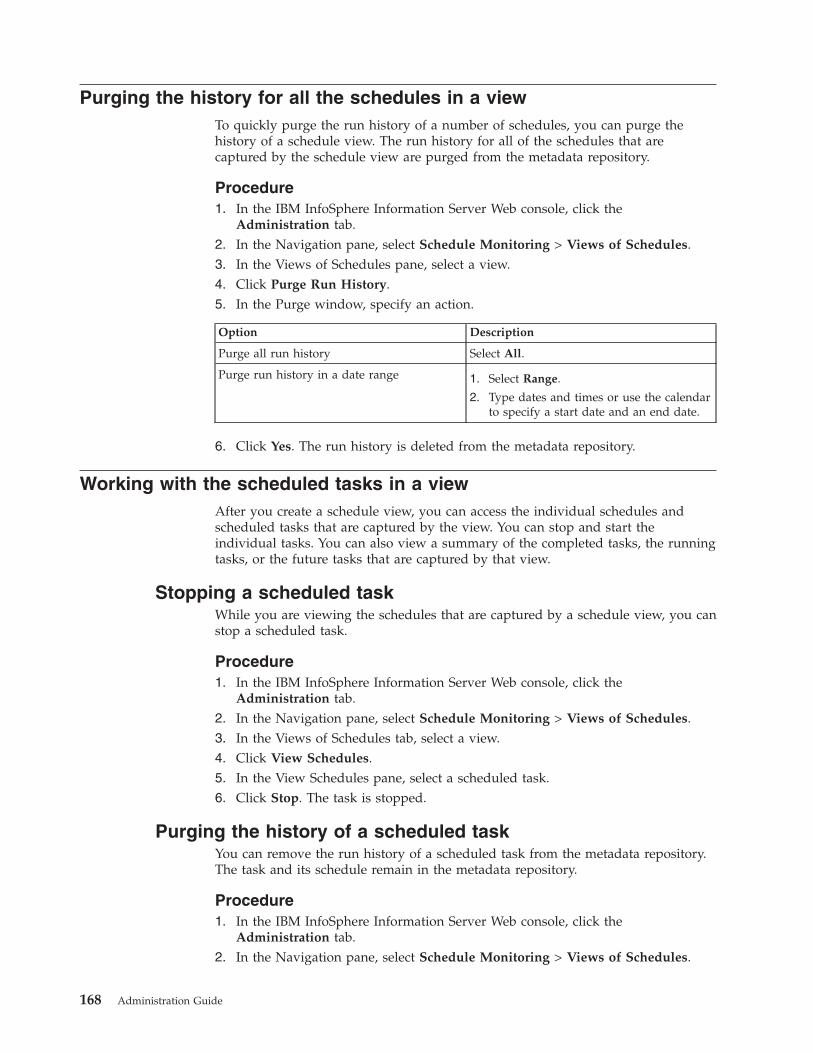
Purging the history for all the schedules in a viewTo quickly purge the run history of a number of schedules, you can purge thehistory of a schedule view. The run history for all of the schedules that arecaptured by the schedule view are purged from the metadata repository.
Procedure1. In the IBM InfoSphere Information Server Web console, click the
Administration tab.2. In the Navigation pane, select Schedule Monitoring > Views of Schedules.3. In the Views of Schedules pane, select a view.4. Click Purge Run History.5. In the Purge window, specify an action.
Option Description
Purge all run history Select All.
Purge run history in a date range 1. Select Range.
2. Type dates and times or use the calendarto specify a start date and an end date.
6. Click Yes. The run history is deleted from the metadata repository.
Working with the scheduled tasks in a viewAfter you create a schedule view, you can access the individual schedules andscheduled tasks that are captured by the view. You can stop and start theindividual tasks. You can also view a summary of the completed tasks, the runningtasks, or the future tasks that are captured by that view.
Stopping a scheduled taskWhile you are viewing the schedules that are captured by a schedule view, you canstop a scheduled task.
Procedure1. In the IBM InfoSphere Information Server Web console, click the
Administration tab.2. In the Navigation pane, select Schedule Monitoring > Views of Schedules.3. In the Views of Schedules tab, select a view.4. Click View Schedules.5. In the View Schedules pane, select a scheduled task.6. Click Stop. The task is stopped.
Purging the history of a scheduled taskYou can remove the run history of a scheduled task from the metadata repository.The task and its schedule remain in the metadata repository.
Procedure1. In the IBM InfoSphere Information Server Web console, click the
Administration tab.2. In the Navigation pane, select Schedule Monitoring > Views of Schedules.
168 Administration Guide

3. In the Views of Schedules pane, select a view.4. Click View Schedules.5. In the View Schedules pane, select a task.6. Click Purge. The run history of the scheduled task is deleted from the metadata
repository.
Viewing a list of completed schedulesIf you are viewing an ongoing scheduled task, you can view a summary of allinstances of this scheduled task that have completed.
Procedure1. In the View Schedules pane, select a schedule.2. Click View Complete.
Viewing a list of running schedulesFor a scheduled task, you can view which instances of the schedule are currentlyrunning.
Procedure1. In the View Schedules pane, select a schedule.2. Click View Running.
Viewing a list of upcoming scheduled tasksIf you are viewing an ongoing scheduled task, you can view the tasks that will runin the future.
Procedure1. In the View Schedules pane, select a schedule.2. Click View Forecast.
Chapter 11. Managing schedules 169

170 Administration Guide

Chapter 12. Backing up and restoring IBM InfoSphereInformation Server
To prevent the loss of data and to prepare for disaster recovery, you can back upand restore the databases, profiles, and directories that are associated with IBMInfoSphere Information Server.
About this task
The services tier, engine tier, and Metadata repository tier consist of a variety ofelements that require backup. The procedures documented here do not coverbacking up and restoring InfoSphere Information Server clients that are running onMicrosoft Windows computers. Backup and restore is typically not required forclient-only installations as only local, user-specific customizations are stored onclient computers. To recover a client-only installation, you can reinstall the clients.
The engine installation contains files and configuration data that are linked toelements stored in the metadata repository of InfoSphere Information Server. IBMInfoSphere DataStage and IBM InfoSphere QualityStage projects are stored in theengine installation directory or elsewhere on the same computer and are linked toelements stored in the metadata repository. There is also information stored in filesin the IBM WebSphere Application Server directory that is linked to elementsstored in the metadata repository. Finally, while the IBM InfoSphere InformationAnalyzer analysis databases and InfoSphere QualityStage Match Designerdatabases are separate from the metadata repository database, there arecross-database references between them.
Because of these interdependencies, to guarantee a successful backup, the metadatarepository, IBM InfoSphere DataStage and InfoSphere QualityStage projects, theInfoSphere QualityStage Match Designer database, InfoSphere InformationAnalyzer analysis databases, and all of the file system-based elements that changeafter installation must be backed up simultaneously and the backup must occurwhile all services and IBM WebSphere Application Server are shut down.
When you restore an installation, all of the same elements that were backed upneed to be restored simultaneously before starting IBM WebSphere ApplicationServer or InfoSphere Information Server services.
Backing up IBM InfoSphere Information Server componentsYou can back up the components of IBM InfoSphere Information Server to ensurethat you can recover your data in the event of hardware failure or other disaster.
About this task
Stopping services might cause unexpected errors if clients are connected. You candetermine if there are active connections and optionally terminated the connectionsin the IBM InfoSphere Information Server Web console. For more information, seeManaging active sessions.
Although clients might not be connected, the server might still be in use if IBMInfoSphere DataStage and IBM InfoSphere QualityStage jobs or IBM InfoSphere
© Copyright IBM Corp. 2007, 2011 171
Information Analyzer analysis jobs are currently running or might start runningbefore all server components can be stopped. You can use the IBM InfoSphereInformation Server Web console to determine if any jobs are running or arescheduled to run soon. For more information, see Managing schedules.
Procedure1. Disconnect all user sessions.2. Stop the InfoSphere Information Server services and IBM WebSphere
Application Server services. For more information, see Chapter 13,“Administering IBM InfoSphere Information Server and IBM WebSphereApplication Server services,” on page 179.
3. Back up the metadata repository by using database management tools. See thevendor documentation for your database. See the IBM DB2 Database for Linux,UNIX and Windows Information Center for the backup overview for DB2.
4. If InfoSphere Information Analyzer is installed, back up the analysis databaseused by InfoSphere Information Analyzer. See the vendor documentation foryour database. See the DB2 Database for Linux, UNIX, and, WindowsInformation Center for the backup overview for DB2.
5. Optional: If InfoSphere QualityStage is installed, you might want to back upthe results database used for the InfoSphere QualityStage Match Designeroutput. However, this is not required. Instead, if you want to continue to refineor develop match specifications after a restore, you can recreate the MatchDesigner database when you restore InfoSphere Information Servercomponents.
6. Back up all system elements that are listed in “File system elements anddatabases that require backing up.”
7. Back up external files or libraries that are used by InfoSphere DataStage andInfoSphere QualityStage jobs. External files are data sets, file sets, sequentialfiles, hashed files, and other similar files that are required to run InfoSphereInformation Server tasks, such as InfoSphere DataStage jobs. External librariescan be custom-written C++ functions that are called by the parallel engine.
8. Restart the InfoSphere Information Server services and WebSphere ApplicationServer services. For more information, see Chapter 13, “Administering IBMInfoSphere Information Server and IBM WebSphere Application Serverservices,” on page 179.
File system elements and databases that require backing upWhen you back up IBM InfoSphere Information Server, all file system-basedelements that change after installation and all databases must be backed upsimultaneously. The backup must occur while all services and IBM WebSphereApplication Server are shut down.
File system elements that change after installation
The following tables identify file system elements that change after installation.The paths in these tables assume that the product is installed in the defaultlocation. Your path will vary if you installed InfoSphere Information Server in adifferent location.
172 Administration Guide
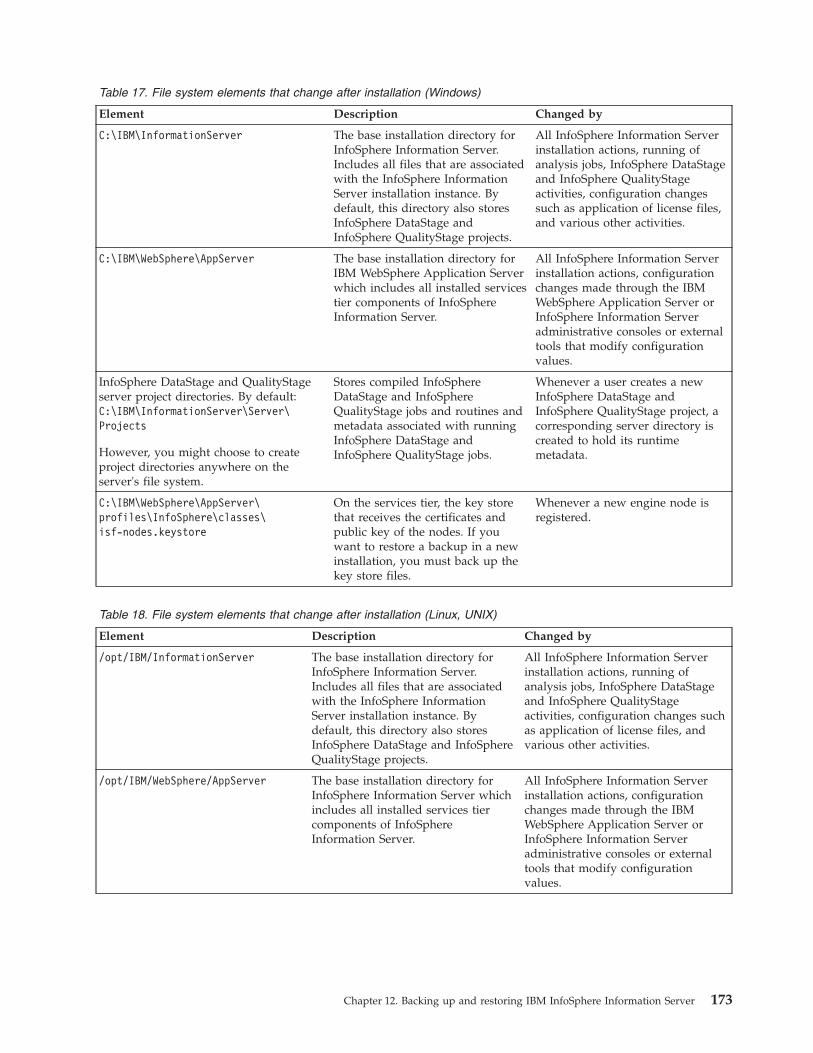
Table 17. File system elements that change after installation (Windows)
Element Description Changed by
C:\IBM\InformationServer The base installation directory forInfoSphere Information Server.Includes all files that are associatedwith the InfoSphere InformationServer installation instance. Bydefault, this directory also storesInfoSphere DataStage andInfoSphere QualityStage projects.
All InfoSphere Information Serverinstallation actions, running ofanalysis jobs, InfoSphere DataStageand InfoSphere QualityStageactivities, configuration changessuch as application of license files,and various other activities.
C:\IBM\WebSphere\AppServer The base installation directory forIBM WebSphere Application Serverwhich includes all installed servicestier components of InfoSphereInformation Server.
All InfoSphere Information Serverinstallation actions, configurationchanges made through the IBMWebSphere Application Server orInfoSphere Information Serveradministrative consoles or externaltools that modify configurationvalues.
InfoSphere DataStage and QualityStageserver project directories. By default:C:\IBM\InformationServer\Server\Projects
However, you might choose to createproject directories anywhere on theserver's file system.
Stores compiled InfoSphereDataStage and InfoSphereQualityStage jobs and routines andmetadata associated with runningInfoSphere DataStage andInfoSphere QualityStage jobs.
Whenever a user creates a newInfoSphere DataStage andInfoSphere QualityStage project, acorresponding server directory iscreated to hold its runtimemetadata.
C:\IBM\WebSphere\AppServer\profiles\InfoSphere\classes\isf-nodes.keystore
On the services tier, the key storethat receives the certificates andpublic key of the nodes. If youwant to restore a backup in a newinstallation, you must back up thekey store files.
Whenever a new engine node isregistered.
Table 18. File system elements that change after installation (Linux, UNIX)
Element Description Changed by
/opt/IBM/InformationServer The base installation directory forInfoSphere Information Server.Includes all files that are associatedwith the InfoSphere InformationServer installation instance. Bydefault, this directory also storesInfoSphere DataStage and InfoSphereQualityStage projects.
All InfoSphere Information Serverinstallation actions, running ofanalysis jobs, InfoSphere DataStageand InfoSphere QualityStageactivities, configuration changes suchas application of license files, andvarious other activities.
/opt/IBM/WebSphere/AppServer The base installation directory forInfoSphere Information Server whichincludes all installed services tiercomponents of InfoSphereInformation Server.
All InfoSphere Information Serverinstallation actions, configurationchanges made through the IBMWebSphere Application Server orInfoSphere Information Serveradministrative consoles or externaltools that modify configurationvalues.
Chapter 12. Backing up and restoring IBM InfoSphere Information Server 173
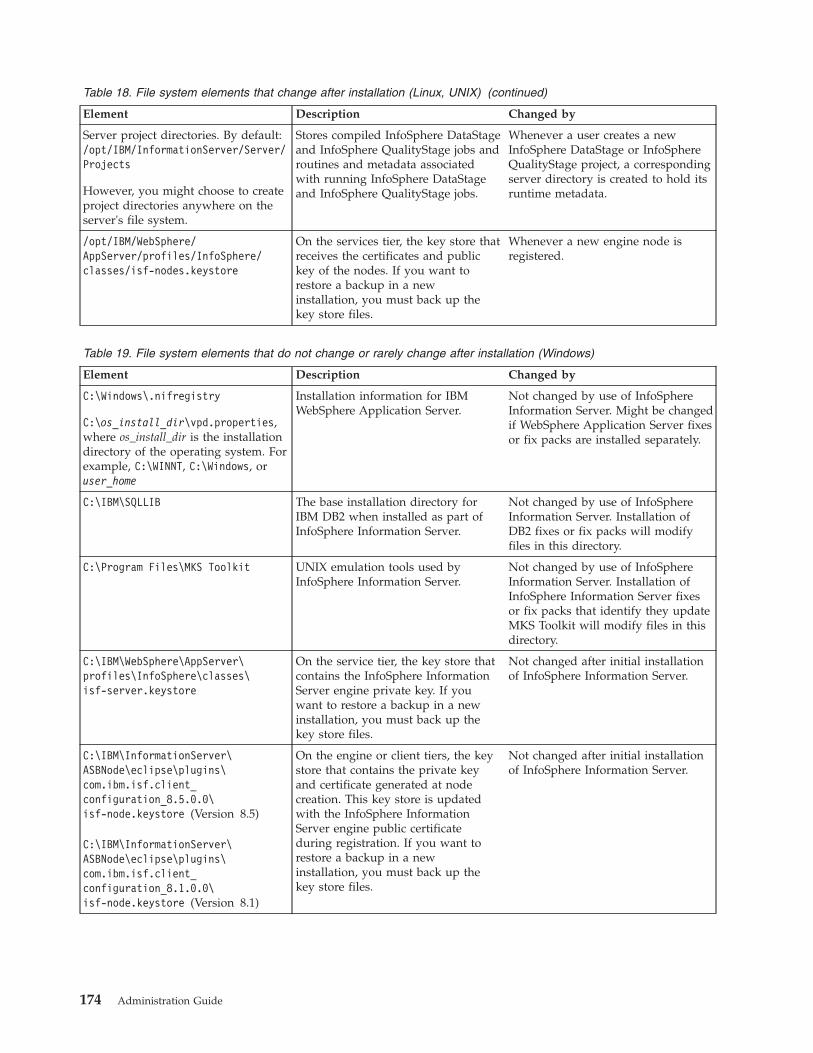
Table 18. File system elements that change after installation (Linux, UNIX) (continued)
Element Description Changed by
Server project directories. By default:/opt/IBM/InformationServer/Server/Projects
However, you might choose to createproject directories anywhere on theserver's file system.
Stores compiled InfoSphere DataStageand InfoSphere QualityStage jobs androutines and metadata associatedwith running InfoSphere DataStageand InfoSphere QualityStage jobs.
Whenever a user creates a newInfoSphere DataStage or InfoSphereQualityStage project, a correspondingserver directory is created to hold itsruntime metadata.
/opt/IBM/WebSphere/AppServer/profiles/InfoSphere/classes/isf-nodes.keystore
On the services tier, the key store thatreceives the certificates and publickey of the nodes. If you want torestore a backup in a newinstallation, you must back up thekey store files.
Whenever a new engine node isregistered.
Table 19. File system elements that do not change or rarely change after installation (Windows)
Element Description Changed by
C:\Windows\.nifregistry
C:\os_install_dir\vpd.properties,where os_install_dir is the installationdirectory of the operating system. Forexample, C:\WINNT, C:\Windows, oruser_home
Installation information for IBMWebSphere Application Server.
Not changed by use of InfoSphereInformation Server. Might be changedif WebSphere Application Server fixesor fix packs are installed separately.
C:\IBM\SQLLIB The base installation directory forIBM DB2 when installed as part ofInfoSphere Information Server.
Not changed by use of InfoSphereInformation Server. Installation ofDB2 fixes or fix packs will modifyfiles in this directory.
C:\Program Files\MKS Toolkit UNIX emulation tools used byInfoSphere Information Server.
Not changed by use of InfoSphereInformation Server. Installation ofInfoSphere Information Server fixesor fix packs that identify they updateMKS Toolkit will modify files in thisdirectory.
C:\IBM\WebSphere\AppServer\profiles\InfoSphere\classes\isf-server.keystore
On the service tier, the key store thatcontains the InfoSphere InformationServer engine private key. If youwant to restore a backup in a newinstallation, you must back up thekey store files.
Not changed after initial installationof InfoSphere Information Server.
C:\IBM\InformationServer\ASBNode\eclipse\plugins\com.ibm.isf.client_configuration_8.5.0.0\isf-node.keystore (Version 8.5)
C:\IBM\InformationServer\ASBNode\eclipse\plugins\com.ibm.isf.client_configuration_8.1.0.0\isf-node.keystore (Version 8.1)
On the engine or client tiers, the keystore that contains the private keyand certificate generated at nodecreation. This key store is updatedwith the InfoSphere InformationServer engine public certificateduring registration. If you want torestore a backup in a newinstallation, you must back up thekey store files.
Not changed after initial installationof InfoSphere Information Server.
174 Administration Guide
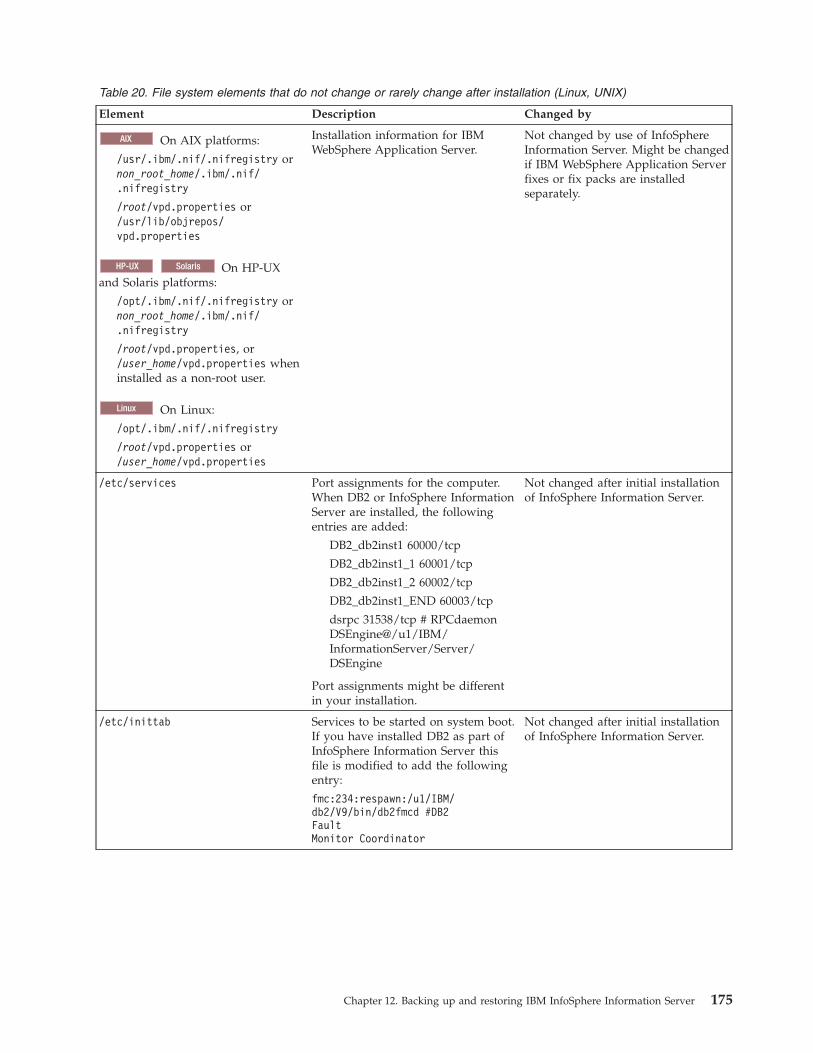
Table 20. File system elements that do not change or rarely change after installation (Linux, UNIX)
Element Description Changed by
AIX On AIX platforms:
/usr/.ibm/.nif/.nifregistry ornon_root_home/.ibm/.nif/.nifregistry
/root/vpd.properties or/usr/lib/objrepos/vpd.properties
HP�UX Solaris On HP-UXand Solaris platforms:
/opt/.ibm/.nif/.nifregistry ornon_root_home/.ibm/.nif/.nifregistry
/root/vpd.properties, or/user_home/vpd.properties wheninstalled as a non-root user.
Linux On Linux:
/opt/.ibm/.nif/.nifregistry
/root/vpd.properties or/user_home/vpd.properties
Installation information for IBMWebSphere Application Server.
Not changed by use of InfoSphereInformation Server. Might be changedif IBM WebSphere Application Serverfixes or fix packs are installedseparately.
/etc/services Port assignments for the computer.When DB2 or InfoSphere InformationServer are installed, the followingentries are added:
DB2_db2inst1 60000/tcp
DB2_db2inst1_1 60001/tcp
DB2_db2inst1_2 60002/tcp
DB2_db2inst1_END 60003/tcp
dsrpc 31538/tcp # RPCdaemonDSEngine@/u1/IBM/InformationServer/Server/DSEngine
Port assignments might be differentin your installation.
Not changed after initial installationof InfoSphere Information Server.
/etc/inittab Services to be started on system boot.If you have installed DB2 as part ofInfoSphere Information Server thisfile is modified to add the followingentry:
fmc:234:respawn:/u1/IBM/db2/V9/bin/db2fmcd #DB2FaultMonitor Coordinator
Not changed after initial installationof InfoSphere Information Server.
Chapter 12. Backing up and restoring IBM InfoSphere Information Server 175

Table 20. File system elements that do not change or rarely change after installation (Linux, UNIX) (continued)
Element Description Changed by
Start up and shutdown scripts.
You can determine the scripts to backup and restore by using thesecommands:
cd /etcfind . -name "SISFServer*"-print
find . -name "SISFAgents*"-print
find . -name "*"-print | xargs grep-i DSEngine
Scripts that are used to start and shutdown the services associated withInfoSphere Information Server. TheSISFAgents script and DSEnginescripts are present only when enginecomponents are installed. TheSISFServer script is present onlywhen the services tier is installed.
Not changed after initial installationof InfoSphere Information Server.
/opt/IBM/db2/V9 The base installation directory forDB2 when installed as part ofInfoSphere Information Server.
Not changed by use of InfoSphereInformation Server. Installation ofDB2 fixes or fix packs will modifyfiles in this directory.
/home/dasusr1 The home directory of the DB2Database Administrator account.Contains files required to run DB2.
Not changed by use of InfoSphereInformation Server. Installation ofDB2 fixes or fix packs might modifyfiles in this directory.
/home/db2inst1 The home directory of the DB2Database instance owner. Containsfiles required to run DB2.
Not changed by use of InfoSphereInformation Server. Installation ofDB2 fixes or fix packs might modifyfiles in this directory.
/opt/IBM/WebSphere/AppServer/profiles/InfoSphere/classes/isf-server.keystore
On the service tier, the key store thatcontains the InfoSphere InformationServer engine private key. If youwant to restore a backup in a newinstallation, you must back up thekey store files.
Not changed after initial installationof InfoSphere Information Server.
/opt/IBM/InformationServer/ASBNode/eclipse/plugins/com.ibm.isf.client_configuration_8.5.0.0/isf-node.keystore (Version 8.5)
/opt/IBM/InformationServer/ASBNode/eclipse/plugins/com.ibm.isf.client_configuration_8.1.0.0/isf-node.keystore (Version 8.1)
On the engine or client tiers, the keystore that contains the private keyand certificate generated at nodecreation. This key store is updatedwith the InfoSphere InformationServer engine public certificateduring registration. If you want torestore a backup in a newinstallation, you must back up thekey store files.
Not changed after initial installationof InfoSphere Information Server.
Databases that must be backed up
Table 21. Databases that must be backed up
Product module Databases Default database name
All Metadata repository xmeta
InfoSphere Information Analyzer Analysis results iadb
InfoSphere DataStage Match designer N/A
176 Administration Guide

Other elements that must be backed up
Windows On Windows installations, the registry stores a variety of values used byInfoSphere Information Server. Backing up and restoring the registry must be donein conjunction with a full system backup.
Restoring IBM InfoSphere Information Server componentsIf you backed up the files, directories, and databases that are associated with IBMInfoSphere Information Server, you can restore these components to recover yourdata in the event of hardware failure or other disaster.
About this task
When you restore an installation, all of the same elements that were backed upneed to be restored simultaneously before you start the InfoSphere InformationServer and IBM WebSphere Application Server services.
This task assumes that you are recovering InfoSphere Information Server on asystem where InfoSphere Information Server was previously installed and that agood backup was previously performed. It also assumes that the host name of thecomputer is identical to that of the computer on which the backup was performedand that all components are being restored in the exact same location that theyoriginally were in. If a different host name is used, the system will be inoperable.
Procedure1. Disconnect all user sessions. Users should not be allowed to log in to the
system at any point during the restore. Otherwise, it is possible that the restoremight fail or users might lose data which will be overwritten when themetadata repository is restored.
2. Stop the InfoSphere Information Server services and WebSphere ApplicationServer services. For more information, see Chapter 13, “Administering IBMInfoSphere Information Server and IBM WebSphere Application Serverservices,” on page 179.
3. Restore the metadata repository by using database management tools. See thevendor documentation for your database platform. Refer to the IBM DB2Database for Linux, UNIX and Windows Information Center for the restoreoverview for DB2.
4. If IBM InfoSphere Information Analyzer was installed, restore the analysisdatabase used by InfoSphere Information Analyzer. See the vendordocumentation for your database platform. Refer to the DB2 Database forLinux, UNIX and Windows Information Center for the restore overview forDB2.
5. If you use IBM InfoSphere QualityStage Match Designer and want to continueto refine or develop match specifications, recreate the Match Designer database.
6. Restore the file system elements that are listed in “File system elements anddatabases that require backing up” on page 172.
7. Restore external files or libraries that are used by IBM InfoSphere DataStageand InfoSphere QualityStage jobs.
8. Restart the InfoSphere Information Server services and WebSphere ApplicationServer services. For more information, see Chapter 13, “Administering IBMInfoSphere Information Server and IBM WebSphere Application Serverservices,” on page 179.
Chapter 12. Backing up and restoring IBM InfoSphere Information Server 177

178 Administration Guide
Chapter 13. Administering IBM InfoSphere Information Serverand IBM WebSphere Application Server services
Follow these procedures to administer IBM InfoSphere Information Server servicesand IBM WebSphere Application Server services. For example, check the status ofservices and stop and restart them when you back up or restore your system, or todo other maintenance tasks.
For further information about the WebSphere Application Server tools andprocesses mentioned in these procedures, see the WebSphere Application ServerInformation Center:v IBM WebSphere Application Server Network Deployment 6.1:
publib.boulder.ibm.com/infocenter/wasinfo/v6r1/index.jspv IBM WebSphere Application Server Network Deployment 7.0:
publib.boulder.ibm.com/infocenter/wasinfo/v7r0/index.jsp
For further information about various tools to use to manage a WebSphereApplication Server, see the following topics in the WebSphere Application Serverdocumentation:
WebSphere Application Server 6.1Starting the Deployment Manager by using the startManager tool:publib.boulder.ibm.com/infocenter/wasinfo/v6r1/index.jsp?topic=/com.ibm.websphere.nd.multiplatform.doc/info/ae/ae/rxml_startmanager.html
Stopping the Deployment Manager by using the stopManager tool:publib.boulder.ibm.com/infocenter/wasinfo/v6r1/index.jsp?topic=/com.ibm.websphere.nd.multiplatform.doc/info/ae/ae/rxml_stopmanager.html
Starting a node agent by using the startNode tool:publib.boulder.ibm.com/infocenter/wasinfo/v6r1/index.jsp?topic=/com.ibm.websphere.nd.multiplatform.doc/info/ae/ae/rxml_startnode.html
Stopping a node agent by using the stopNode tool:publib.boulder.ibm.com/infocenter/wasinfo/v6r1/index.jsp?topic=/com.ibm.websphere.nd.multiplatform.doc/info/ae/ae/rxml_stopnode.html
Starting cluster members: publib.boulder.ibm.com/infocenter/wasinfo/v6r1/index.jsp?topic=/com.ibm.websphere.nd.doc/info/ae/ae/trun_wlm_cluster_start.html
Stopping cluster members: publib.boulder.ibm.com/infocenter/wasinfo/v6r1/index.jsp?topic=/com.ibm.websphere.nd.doc/info/ae/ae/trun_wlm_cluster_stop.html
Starting stand-alone application servers and cluster members by using thestartServer tool: publib.boulder.ibm.com/infocenter/wasinfo/v6r1/index.jsp?topic=/com.ibm.websphere.nd.doc/info/ae/ae/rxml_startserver.html
WebSphere Application Server 7.0Starting the Deployment Manager by using the startManager tool:
© Copyright IBM Corp. 2007, 2011 179
publib.boulder.ibm.com/infocenter/wasinfo/v7r0/index.jsp?topic=/com.ibm.websphere.nd.multiplatform.doc/info/ae/ae/rxml_startmanager.html
Stopping the Deployment Manager by using the stopManager tool:publib.boulder.ibm.com/infocenter/wasinfo/v7r0/index.jsp?topic=/com.ibm.websphere.nd.multiplatform.doc/info/ae/ae/rxml_stopmanager.html
Starting a node agent by using the startNode tool:publib.boulder.ibm.com/infocenter/wasinfo/v7r0/index.jsp?topic=/com.ibm.websphere.nd.multiplatform.doc/info/ae/ae/rxml_startnode.html
Stopping a node agent by using the stopNode tool:publib.boulder.ibm.com/infocenter/wasinfo/v7r0/index.jsp?topic=/com.ibm.websphere.nd.multiplatform.doc/info/ae/ae/rxml_stopnode.html
Starting cluster members: publib.boulder.ibm.com/infocenter/wasinfo/v7r0/index.jsp?topic=/com.ibm.websphere.nd.doc/info/ae/ae/trun_wlm_cluster_start.html
Stopping cluster members: publib.boulder.ibm.com/infocenter/wasinfo/v7r0/index.jsp?topic=/com.ibm.websphere.nd.doc/info/ae/ae/trun_wlm_cluster_stop.html
Starting stand-alone application servers and cluster members by using thestartServer tool: publib.boulder.ibm.com/infocenter/wasinfo/v7r0/index.jsp?topic=/com.ibm.websphere.nd.doc/info/ae/ae/rxml_startserver.html
Shutting down services (Windows)Follow this procedure to shut down the IBM InfoSphere Information Serverservices and IBM WebSphere Application Server services in a Microsoft Windowsinstallation. Shut down services before you back up or restore your system, or doother maintenance tasks.
Before you begin
If your metadata repository tier is set up in a clustered configuration, make surethat the databases are shut down last, if you shut them down at all.
Note: To perform a cold backup, you must shut down the databases.
About this task
The paths shown in this task assume that WebSphere Application Server andInfoSphere Information Server are installed in the default locations. Your paths andprofile names are different if you installed these products in different locations.
Procedure1. Stop the following services: InfoSphere DataStage Engine Resource Service, IBM
InfoSphere DataStage Telnet Service, DSRPC Service, ASB Agent, and LoggingAgent. To stop the services:a. On each computer that hosts an engine tier, log in as a user that has local
administrator privileges.b. Use the Services Administrative Tool or the sc command-line tool to stop
the services. Stop the services in the order in which they appear in the table.
180 Administration Guide
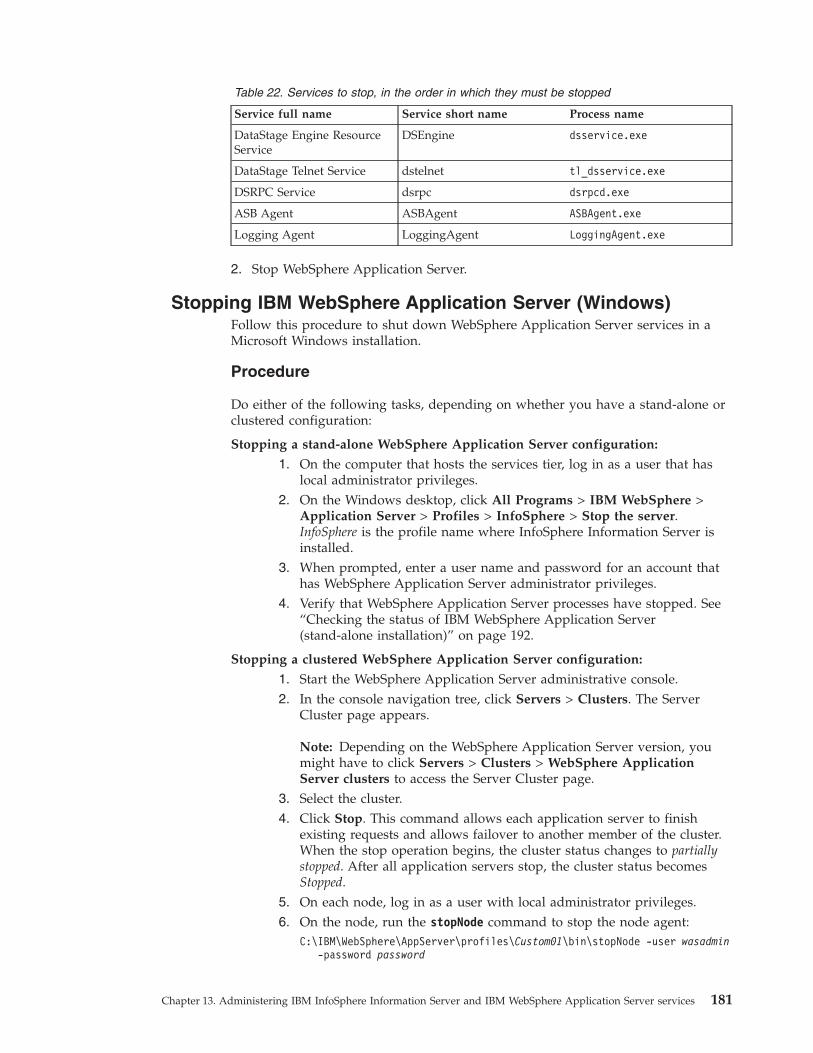
Table 22. Services to stop, in the order in which they must be stopped
Service full name Service short name Process name
DataStage Engine ResourceService
DSEngine dsservice.exe
DataStage Telnet Service dstelnet tl_dsservice.exe
DSRPC Service dsrpc dsrpcd.exe
ASB Agent ASBAgent ASBAgent.exe
Logging Agent LoggingAgent LoggingAgent.exe
2. Stop WebSphere Application Server.
Stopping IBM WebSphere Application Server (Windows)Follow this procedure to shut down WebSphere Application Server services in aMicrosoft Windows installation.
Procedure
Do either of the following tasks, depending on whether you have a stand-alone orclustered configuration:
Stopping a stand-alone WebSphere Application Server configuration:
1. On the computer that hosts the services tier, log in as a user that haslocal administrator privileges.
2. On the Windows desktop, click All Programs > IBM WebSphere >Application Server > Profiles > InfoSphere > Stop the server.InfoSphere is the profile name where InfoSphere Information Server isinstalled.
3. When prompted, enter a user name and password for an account thathas WebSphere Application Server administrator privileges.
4. Verify that WebSphere Application Server processes have stopped. See“Checking the status of IBM WebSphere Application Server(stand-alone installation)” on page 192.
Stopping a clustered WebSphere Application Server configuration:
1. Start the WebSphere Application Server administrative console.2. In the console navigation tree, click Servers > Clusters. The Server
Cluster page appears.
Note: Depending on the WebSphere Application Server version, youmight have to click Servers > Clusters > WebSphere ApplicationServer clusters to access the Server Cluster page.
3. Select the cluster.4. Click Stop. This command allows each application server to finish
existing requests and allows failover to another member of the cluster.When the stop operation begins, the cluster status changes to partiallystopped. After all application servers stop, the cluster status becomesStopped.
5. On each node, log in as a user with local administrator privileges.6. On the node, run the stopNode command to stop the node agent:
C:\IBM\WebSphere\AppServer\profiles\Custom01\bin\stopNode -user wasadmin-password password
Chapter 13. Administering IBM InfoSphere Information Server and IBM WebSphere Application Server services 181
In the command, Custom01 is the WebSphere Application Server customprofile that hosts a node of theIBM InfoSphere Information Servercluster. wasadmin and password are the WebSphere Application Serveradministrator user name and password.Control returns to the command line after the node agent shuts down.
Note: If the node agent runs as a Windows service, the stopNodecommand stops the associated Windows service and the node agent.
7. Verify that all cluster members and node agents are stopped. See“Checking the status of IBM WebSphere Application Server clustermembers” on page 194 and “Checking the status of IBM WebSphereApplication Server node agents” on page 195.
8. Stop the Network Deployment manager process. See “Stopping the IBMWebSphere Application Server Deployment Manager (Windows).”
Stopping the IBM WebSphere Application Server DeploymentManager (Windows)Follow this procedure to stop the IBM WebSphere Application Server NetworkDeployment Deployment Manager in a Microsoft Windows installation withWebSphere Application Server clustering.
Procedure1. On the node that hosts the Deployment Manager, log in as a user with local
administrator privileges.2. On the node, run the stopManager command to stop the Network Deployment
manager process:C:\IBM\WebSphere\AppServer\profiles\Dmgr01\bin\stopManager
-user wasadmin -password password
Dmgr01 is the WebSphere Application Server Deployment Manager profile.wasadmin and password are the WebSphere Application Server administratoruser name and password.
Note: If the Deployment Manager is running as a Windows service, thestopManager command stops the associated Windows service and also stops theDeployment Manager.
3. Verify that the Deployment Manager has stopped by using the WebSphereApplication Server serverStatus command-line tool.For more information, see the serverStatus documentation:v WebSphere Application Server 6.1: publib.boulder.ibm.com/infocenter/
wasinfo/v6r1/index.jsp?topic=/com.ibm.websphere.nd.doc/info/ae/ae/rxml_serverstatus.html
v WebSphere Application Server 7.0: publib.boulder.ibm.com/infocenter/wasinfo/v7r0/index.jsp?topic=/com.ibm.websphere.nd.doc/info/ae/ae/rxml_serverstatus.html
Shutting down services (Linux, UNIX)Follow this procedure to shut down the IBM InfoSphere Information Serverservices and IBM WebSphere Application Server services in a Linux or UNIXinstallation. Shut down services before you back up or restore your system, or doother maintenance tasks.
182 Administration Guide

Before you begin
If your metadata repository tier is set up in a clustered configuration, make surethat the databases are shut down last, if you shut them down at all.
Note: To perform a cold backup, you must shut down the databases.
About this task
The paths shown in this task assume that WebSphere Application Server andInfoSphere Information Server are installed in the default locations. Your paths andprofile names are different if you installed these products in different locations.
Procedure1. Stop the following services: Metadata Server services, ASB Agent, Logging
Agent, and DSRPC Server.a. Log in to each computer that hosts an engine tier. Use the following
credentials:v If you have configured the InfoSphere Information Server agents for
non-root administration, and the services were started and are currentlyrunning under this non-root user, use the credentials for the administratoruser that you previously configured.
v If you have not configured the agents in this manner, log in as root.b. Run the following command to source the dsenv file:
. /opt/IBM/InformationServer/Server/DSEngine/dsenv
c. Make sure that the /.dshome file contains the current engine location. UNIXsystems support multiple instances of InfoSphere DataStage.
d. Run the following commands to stop the InfoSphere DataStage services. Thebin/uv -admin -stop command stops the instance of InfoSphere DataStagethat is in the /.dshome file.cd /opt/IBM/InformationServer/Server/DSEnginebin/uv –admin –stop
e. Run the following commands to stop the agents:cd /opt/IBM/InformationServer/ASBNode/bin./NodeAgents.sh stop
f. Run the top command to verify that the processes have stopped.2. Stop WebSphere Application Server.
Stopping IBM WebSphere Application Server (Linux, UNIX)Follow this procedure to shut down WebSphere Application Server services in aLinux or UNIX installation.
Procedure
Do either of the following tasks, depending on whether you have a stand-alone orclustered configuration:
Stopping a stand-alone WebSphere Application Server configuration:
1. Log in to the computer that hosts the services tier. Use the followingcredentials:v If you have configured WebSphere Application Server for non-root
administration, use the credentials for the non-root user that isconfigured to administer WebSphere Application Server.
Chapter 13. Administering IBM InfoSphere Information Server and IBM WebSphere Application Server services 183

v If you have not configured WebSphere Application Server in thismanner, log in as root.
2. Run the following commands:cd /opt/IBM/InformationServer/ASBServer/bin./MetadataServer.sh stop
3. Verify that WebSphere Application Server processes have stopped. See“Checking the status of IBM WebSphere Application Server(stand-alone installation)” on page 192.
Stopping a clustered WebSphere Application Server configuration:
1. Log in to the node that hosts the Deployment Manager. Use theWebSphere Application Server administrator credentials.
2. In the console navigation tree, click Servers > Clusters to access theServer Cluster page.
Note: Depending on your WebSphere Application Server version, youmight have to click Servers > Clusters > WebSphere ApplicationServer clusters to access the Server Cluster page.
3. Select the cluster.4. Click Stop. This command allows each application server to finish
existing requests and allows failover to another member of the cluster.When the stop operation begins, the cluster status changes to partiallystopped. After all application servers stop, the cluster status becomesStopped.
5. On each node, log in by using WebSphere Application Serveradministrator credentials.
6. On the node, run the stopNode command to stop the node agent.Specify the correct profile:/opt/IBM/WebSphere/AppServer/profiles/Custom01/bin/stopNode.sh
-user wasadmin -password mypassword
Custom01 is the WebSphere Application Server custom profile that hostsa node of the IBM InfoSphere Information Server cluster. wasadmin isthe user name of the WebSphere Application Server administrator.password is the password.
7. Verify that all cluster members and node agents are stopped. See“Checking the status of IBM WebSphere Application Server clustermembers” on page 194 and “Checking the status of IBM WebSphereApplication Server node agents” on page 195.
8. Stop the Deployment Manager. See “Stopping the IBM WebSphereApplication Server Deployment Manager (Linux, UNIX).”
Stopping the IBM WebSphere Application Server DeploymentManager (Linux, UNIX)Follow this procedure to stop the WebSphere Application Server DeploymentManager in a Linux or UNIX installation with WebSphere Application Serverclustering.
Procedure1. Log in to the node that hosts the Deployment Manager by using WebSphere
Application Server administrator credentials.2. On the node, run the stopManager command to stop the Deployment Manager
process:
184 Administration Guide

/opt/IBM/WebSphere/AppServer/profiles/Dmgr01/bin/stopManager.sh -user wasadmin-password password
In the command, Dmgr01 is the WebSphere Application Server DeploymentManager profile. wasadmin is the user name of the WebSphere ApplicationServer administrator. password is the password.Control returns to the command line after the Deployment Manager processshuts down.
3. Verify that the Deployment Manager has stopped.To verify that the processes have stopped, run the WebSphere ApplicationServer serverStatus.sh command. For more information, see theserverStatus.sh documentation:v WebSphere Application Server 6.1: publib.boulder.ibm.com/infocenter/
wasinfo/v6r1/index.jsp?topic=/com.ibm.websphere.nd.doc/info/ae/ae/rxml_serverstatus.html
v WebSphere Application Server 7.0: publib.boulder.ibm.com/infocenter/wasinfo/v7r0/index.jsp?topic=/com.ibm.websphere.nd.doc/info/ae/ae/rxml_serverstatus.html
Starting services (Windows)Follow this procedure to start the IBM InfoSphere Information Server services andIBM WebSphere Application Server services in a Microsoft Windows installation.
Before you begin
Make sure that the database is operational before you do this procedure.
About this task
The paths in this task assume that WebSphere Application Server and InfoSphereInformation Server are installed in the default location. Your paths and profilenames are different if you installed these products in a different location.
Procedure1. Start WebSphere Application Server. See “Starting IBM WebSphere Application
Server (Windows)” on page 186.2. When WebSphere Application Server is fully started, log in to each computer
that hosts an engine tier.3. On each computer, start the following services: Logging Agent, ASB Agent,
DSRPC Service, IBM InfoSphere DataStage Telnet Service, and InfoSphereDataStage Engine Resource Service. You can use the Services AdministrativeTool or the sc command-line tool to start the services.Start these services in the order shown in the following table.
Table 23. Order in which services must be started
Service full name Service short name
Logging Agent LoggingAgent
ASB Agent ASBAgent
DSRPC Service dsrpc
InfoSphere DataStage Telnet Service dstelnet
Chapter 13. Administering IBM InfoSphere Information Server and IBM WebSphere Application Server services 185

Table 23. Order in which services must be started (continued)
Service full name Service short name
InfoSphere DataStage Engine ResourceService
DSEngine
Starting IBM WebSphere Application Server (Windows)Follow this procedure to start the IBM WebSphere Application Server services in aMicrosoft Windows installation.
Procedure
Do either of the following tasks, depending on whether you have a stand-alone orclustered configuration:
Starting a stand-alone WebSphere Application Server configuration:
1. On the computer that hosts the services tier, log in as a user with localadministrator privileges.
2. On the Windows desktop, click All Programs > IBM WebSphere >Application Server > Profiles > InfoSphere > Start the server.InfoSphere is the profile name where InfoSphere Information Server isinstalled.
3. Even though the status of a might show as Started within the IBMInfoSphere Information Server Web console, it might still not beavailable for use by InfoSphere Information Server until the InfoSphereInformation Server applications are fully initialized. To verify thatWebSphere Application Server has started, monitor the log files. See“Checking the status of IBM WebSphere Application Server startup(stand-alone installation)” on page 192.
Starting a clustered WebSphere Application Server configuration:
1. Start the Deployment Manager. See “Starting the IBM WebSphereApplication Server Deployment Manager (Windows)” on page 187.
2. On each node, run the startNode command to start the node agent:C:\IBM\WebSphere\AppServer\profiles\Custom01\bin\startNode
where Custom01 is the WebSphere Application Server custom profilethat hosts a node of the IBM InfoSphere Information Server cluster.
3. Start the WebSphere Application Server administrative console.4. In the console navigation tree, click Servers > Clusters to access the
Server Cluster page.
Note: Depending on the WebSphere Application Server version, youmight have to click Servers > Clusters > WebSphere ApplicationServer clusters to access the Server Cluster page.
5. Select the cluster.6. Click Start. This command starts the server process of each member of
the cluster by calling the node agent for each server to start theapplication servers. After all application servers are running, the stateof the cluster changes to running. If the call to a node agent for anapplication server fails, the application server does not start.
7. Even though the status returned by the serverStatus commandindicates STARTED, it might still not be available for use by InfoSphere
186 Administration Guide

Information Server until the InfoSphere Information Server applicationsare fully initialized. To verify that WebSphere Application Server hasstarted, monitor the log files. See “Checking the status of IBMWebSphere Application Server startup (clustered installation)” on page193.
Starting the IBM WebSphere Application Server DeploymentManager (Windows)Follow this procedure to start the IBM WebSphere Application Server DeploymentManager in a Microsoft Windows installation with WebSphere Application Serverclustering.
Procedure1. On the node that hosts the Deployment Manager, log in as a user with local
administrator privileges.2. On the node that hosts the Deployment Manager, run the startManager
command to start the Network Deployment manager process:C:\IBM\WebSphere\AppServer\profiles\Dmgr01\bin\startManager
where Dmgr01 is the WebSphere Application Server Deployment Managerprofile.If the Deployment Manager runs as a Windows service, the startManagercommand starts the associated Windows service and the Deployment Manager.
Starting services (Linux, UNIX)Follow this procedure to start the IBM InfoSphere Information Server services andIBM WebSphere Application Server services in a Linux or UNIX installation.
Before you begin
Make sure that the database is operational before you do this procedure.
The paths in this task assume that WebSphere Application Server and InfoSphereInformation Server are installed in the default location. Your paths are different ifyou installed these products in a different location.
Procedure1. Start WebSphere Application Server. See “Starting IBM WebSphere Application
Server (Linux, UNIX)” on page 188.2. On each computer, start the following services: ASB Agent, Logging Agent, and
DataStage Service.a. Wait until WebSphere Application Server is fully started.b. Log in to each computer that hosts an engine tier. Use the following
credentials:v If you configured the InfoSphere Information Server agents for non-root
administration, use the credentials for the administrator user that youselected.
v If you did not configure the agents in this manner, log in as root.c. Run the following command to source the dsenv file:
. /opt/IBM/InformationServer/Server/DSEngine/dsenv
Chapter 13. Administering IBM InfoSphere Information Server and IBM WebSphere Application Server services 187
d. Make sure that the /.dshome file contains the current engine location. UNIXsystems support multiple instances of InfoSphere DataStage. The bin/uv-admin -start command starts the instance of InfoSphere DataStage that isin the /.dshome file.
e. Run the following commands to start the InfoSphere DataStage services:cd /opt/IBM/InformationServer/Server/DSEngine./bin/uv –admin –start
f. Run the following commands to start the ASB Agent and the Logging Agent:cd /opt/IBM/InformationServer/ASBNode/bin./NodeAgents.sh start
Starting IBM WebSphere Application Server (Linux, UNIX)Follow this procedure to start the IBM WebSphere Application Server services in aLinux or UNIX installation.
Before you begin
For cluster environments:
v Linux If you did not configure file descriptor resources for WebSphereApplication Server before you installed IBM InfoSphere Information Server,make sure that WebSphere Application Server is stopped and configure yourmanaged nodes as described in “Configuring file descriptor resources for IBMWebSphere Application Server (Linux)” on page 190.
v AIX If you did not unset the LDR_CNTRL variable before you installedIBM InfoSphere Information Server, make sure that WebSphere ApplicationServer is stopped and configure your cluster computers as described in“Configuring memory allocation for IBM WebSphere Application Server (AIX)”on page 191.
For stand-alone environments, these settings are automatically configured by theMetadataServer script.
Procedure
Do either of the following tasks, depending upon whether you have a stand-aloneor clustered configuration:
Starting a stand-alone WebSphere Application Server configuration:
1. Log in to the computer that hosts the services tier. Use the followingcredentials:v If you configured WebSphere Application Server for non-root
administration, use the credentials for the non-root user that isconfigured to administer WebSphere Application Server.
v If you did not configure WebSphere Application Server in thismanner, log in as root.
2. Run the following commands:cd /opt/IBM/InformationServer/ASBServer/bin./MetadataServer.sh run
Note: The run argument echoes all output to the console.Alternatively, if you want to embed this script in another script, use theMetatdataServer.sh start command to launch the start process in thebackground:
188 Administration Guide
cd /opt/IBM/InformationServer/ASBServer/bin./MetadataServer.sh start
If you configured WebSphere Application Server for non-rootadministration, you can use this line in your script:/usr/bin/su - wasadmin -c "/opt/IBM/InformationServer/ASBServer/bin/
MetadataServer.sh start"
where wasadmin is the non-root user that is configured to administerWebSphere Application Server.
3. Even though the WebSphere Application Server status might show asStarted within the IBM InfoSphere Information Server Web console, itmight still not be available for use by InfoSphere Information Serveruntil the InfoSphere Information Server applications are fullyinitialized. To verify that WebSphere Application Server has started,monitor the log files. See “Checking the status of IBM WebSphereApplication Server startup (stand-alone installation)” on page 192.
Starting a cluster WebSphere Application Server configuration:
1. Start the Deployment Manager. See “Starting the IBM WebSphereApplication Server Deployment Manager (Linux, UNIX)” on page 190.
2. Log in to each node. Use the same credentials that you used to log into the Deployment Manager node.
3. On each node, run the startNode command to start the node agent:/opt/IBM/WebSphere/AppServer/profiles/Custom01/bin/startNode.sh
where Custom01 is the WebSphere Application Server custom profilethat hosts a node of the IBM InfoSphere Information Server cluster.Control returns to the command line when the node agent startup iscomplete.
4. Log in to the WebSphere Application Server administrative console.5. In the console navigation tree, click Servers > Clusters. The Server
Cluster page appears.
Note: Depending upon your WebSphere Application Server version,you might need to click Servers > Clusters > WebSphere ApplicationServer clusters to access the Server Cluster page.
6. Select the cluster.7. Click Start. This command starts the server process of each member of
the cluster. To do so, it calls the node agent for each server to start theapplication servers. After all application servers are running, the stateof the cluster changes to running. If the call to a node agent for anapplication server fails, the application server does not start.
8. Even though the status returned by the serverStatus commandindicates STARTED, it might still not be available for use by InfoSphereInformation Server until the InfoSphere Information Server applicationsare fully initialized. To verify that WebSphere Application Server hasstarted, monitor the log files. See “Checking the status of IBMWebSphere Application Server startup (clustered installation)” on page193.
Chapter 13. Administering IBM InfoSphere Information Server and IBM WebSphere Application Server services 189

Starting the IBM WebSphere Application Server DeploymentManager (Linux, UNIX)Follow this procedure to start the IBM WebSphere Application Server DeploymentManager in a Linux or UNIX installation with WebSphere Application Serverclustering.
Procedure1. Log in to the node that hosts the Deployment Manager. Use the following
credentials:v If you have configured WebSphere Application Server for non-root
administration, use the credentials for the non-root user that is configured toadminister WebSphere Application Server.
v If you have not configured WebSphere Application Server in this manner, login as root.
2. On the node, run the startManager command to start the Network Deploymentmanager process:/opt/IBM/WebSphere/AppServer/profiles/Dmgr01/bin/startManager.sh
where Dmgr01 is the WebSphere Application Server Deployment Managerprofile.
Configuring file descriptor resources for IBM WebSphereApplication Server (Linux)On Linux, the default setting for the maximum number of file descriptors allowedis not sufficient to run WebSphere Application Server. You must configure the filedescriptor resources for WebSphere Application Server to run correctly.
About this task
If your installation includes a stand-alone instance of WebSphere ApplicationServer, configure the file descriptor resources on the computer on whichWebSphere Application Server is installed. For cluster environments, you mustconfigure the file descriptor resources on each computer where WebSphereApplication Server is installed (Deployment Manager and managed nodes). Theresources can be permanently configured if appropriate for your environment.
Procedure1. Make sure all WebSphere Application Server processes are stopped. See
“Stopping IBM WebSphere Application Server (Linux, UNIX)” on page 183.2. Configure the computer to support a large number of file descriptors. Refer to
your system administrator if you are unsure about this process.The following example shows how to set the number of file descriptors to10240 if your login shell is /bin/bash. WebSphere Application Server requires avalue over 10000 to run properly.v To apply the settings to the entire system, add the following to the
/etc/profile file:ulimit -n 10240
v To set the soft and hard limits for all users, add the following to the/etc/security/limits.conf file:* soft nofile 10240* hard nofile 10240
If you do not want to permanently configure these values as shown in theexample, you can instead run the ulimit -n command just before you start a
190 Administration Guide
WebSphere Application Server process. All WebSphere Application Serverprocesses must be stopped before you run these commands.
3. Start all WebSphere Application Server processes. See “Starting IBM WebSphereApplication Server (Linux, UNIX)” on page 188.
4. In a cluster environment, repeat this procedure on all systems whereWebSphere Application Server is installed.
Configuring memory allocation for IBM WebSphere ApplicationServer (AIX)On AIX, the LDR_CNTRL environment variable controls the way AIX handles thememory space available to programs and the page sizes used in each segment. Toprovide sufficient memory allocation for WebSphere Application Server, you mustunset this environment variable for WebSphere Application Server to run correctly.
About this task
If your installation includes a stand-alone instance of WebSphere ApplicationServer, unset the LDR_CNTRL environment variable on the computer on whichWebSphere Application Server is installed. For cluster environments, you mustunset the LDR_CNTRL environment variable on each computer where WebSphereApplication Server is installed (Deployment Manager and managed nodes). Thechange can be permanently configured if appropriate for your environment.
Procedure
To unset the LDR_CNTRL environment variable:1. Make sure all WebSphere Application Server processes are stopped. See
“Stopping IBM WebSphere Application Server (Linux, UNIX)” on page 183.2. Configure the LDR_CNTRL environment variable. Refer to your system
administrator if you are unsure about this process.The following example shows how to unset the LDR_CNTRL environmentvariable if your login shell is /bin/bash.v To apply the setting to all users on the system, add the following line to the
/etc/profile file:unset LDR_CNTRL
v To apply the setting to a specific user, add the line to the ~/.profile file forthe user. The user to configure is typically root unless you reconfiguredWebSphere Application Server for non-root administration.
If you do not want to permanently configure the environment variable asshown in the example, you can run the unset LDR_CNTRL command just beforeyou start a WebSphere Application Server process. All WebSphere ApplicationServer processes must be stopped before you run these commands.
3. Start the WebSphere Application Server processes. See “Starting IBMWebSphere Application Server (Linux, UNIX)” on page 188.
4. In a clustered environment, repeat this procedure on all computers whereWebSphere Application Server is installed.
IBM WebSphere Application Server process status checkingFollow these procedures to check the status of a WebSphere Application Serverstand-alone installation, or of cluster members, node agents, and the DeploymentManager in a clustered installation.
Chapter 13. Administering IBM InfoSphere Information Server and IBM WebSphere Application Server services 191
Checking the status of IBM WebSphere Application Server(stand-alone installation)
In a WebSphere Application Server stand-alone installation, use the serverStatuscommand to check the status of the application server startup.
Procedure
For more information about the serverStatus command, see the WebSphereApplication Server documentation.v publib.boulder.ibm.com/infocenter/wasinfo/v6r1/index.jsp?topic=/
com.ibm.websphere.nd.doc/info/ae/ae/rxml_serverstatus.htmlv publib.boulder.ibm.com/infocenter/wasinfo/v7r0/index.jsp?topic=/
com.ibm.websphere.nd.doc/info/ae/ae/rxml_serverstatus.html
What to do next
When an application server is starting up, even when the status returned by theserverStatus command indicates that the application server is STARTED, it is notready for use by IBM InfoSphere Information Server until all InfoSphereInformation Server applications have completed initialization. See “Checking thestatus of IBM WebSphere Application Server startup (stand-alone installation)” formore information.
Checking the status of IBM WebSphere Application Serverstartup (stand-alone installation)
Whenever you restart WebSphere Application Server, make sure that theapplication server is fully started before you take any further action. Thisprocedure applies to a stand-alone installation of WebSphere Application Server.
About this task
Even though the status of an application server might show as STARTED, it mightstill not be available for use by IBM InfoSphere Information Server because theInfoSphere Information Server applications not yet fully initialized. The InfoSphereInformation Server applications typically complete initialization within two to fourminutes after the application server status first changes to STARTED.
If you started WebSphere Application Server by running startServer orMetadataServer.sh run, control returns when WebSphere Application Server hascompleted starting all applications but before InfoSphere Information Server hascompleted application initialization. Running serverStatus at this point shows astatus of STARTED. However, initialization is not yet complete.
If you started WebSphere Application Server by running MetadataServer.sh start,control returns immediately before WebSphere Application Server starts anyapplications. After a delay, running serverStatus will show a status of STARTING.After a few minutes, running serverStatus will show a status of STARTED. Thisstatus indicates that WebSphere Application Server has completed starting allapplications. However, it does not indicate that InfoSphere Information Server hascompleted application initialization.
192 Administration Guide
Procedure
Follow this procedure to determine if the InfoSphere Information Serverapplications have completed initialization.1. Log in to the services tier computer.2. Locate the SystemOut.log file. The file is located in the following directory:
WAS_install_path/profiles/profile/logs/serverx
In the directory path:v WAS_install_path is the location where WebSphere Application Server is
installed. The default installation path is:
– UNIX Linux /opt/IBM/WebSphere/AppServer
– Windows C:\IBM\WebSphere\AppServer
v profile is the profile name in which InfoSphere Information Server is running.The default profile name is InfoSphere.
v serverx is the name of the application server instance. The default servername is server1.
3. In the SystemOut.log file, in the timeframe in which the application server isbeing started, look for the following line. This line indicates that InfoSphereInformation Server is fully initialized and ready for operation:Initialization: EJB Initializations complete
The SystemOut.log file might contain log entries that span multiple applicationserver restarts. For this reason, the file might contain multiple lines that readEJB Initializations complete. Use the timestamps of the log entries todetermine if this message is associated with the application server startup thatyou want.
Checking the status of IBM WebSphere Application Serverstartup (clustered installation)
Whenever you start a cluster member, make sure the application server associatedwith that cluster member is fully started before you take any further action. Thisprocedure applies to a clustered installation of WebSphere Application Server.
About this task
Even though the status of a cluster member might show as Started within the IBMInfoSphere Information Server Web console, or the status returned by theserverStatus command indicates that the application server is STARTED, it mightstill not be available for use by InfoSphere Information Server until the InfoSphereInformation Server applications are fully initialized. The InfoSphere InformationServer applications typically complete initialization within two to four minutesafter the application server status first changes to Started.
Procedure
Follow this procedure to determine if the InfoSphere Information Serverapplications have completed initialization.1. Log in to each computer that hosts a cluster member.2. On the computer, locate the SystemOut.log file. The file can be found in the
following directory:WAS_install_path/profiles/profile/logs/serverx
In the directory path:
Chapter 13. Administering IBM InfoSphere Information Server and IBM WebSphere Application Server services 193
v WAS_install_path is the location where WebSphere Application Server isinstalled. The default installation path is:
– UNIX Linux /opt/IBM/WebSphere/AppServer
– Windows C:\IBM\WebSphere\AppServer
v profile is the profile name of the managed node in which InfoSphereInformation Server is running. The default profile name is Custom01.
v serverx is the name of the application server instance. The default value isserverx, where x is the number of one of the application server instances.
3. Check the SystemOut.log file in each server instance:a. In the SystemOut.log file, in the timeframe in which the application server
is being started, look for the following line. This line indicates thatInfoSphere Information Server is fully initialized and ready for operation:Initialization: EJB Initializations complete
The SystemOut.log file might contain log entries that span multipleapplication server restarts. For this reason, the file might contain multiplelines that read EJB Initializations complete. Use the timestamps of thelog entries to determine if this message is associated with the applicationserver startup that you want.
4. Repeat this procedure for each computer that hosts a cluster member.
What to do next
InfoSphere Information Server can be used as soon as one cluster member is fullyinitialized. However, for best performance, wait until all members of the cluster arefully initialized. Allowing all the members of the cluster to initialize fully alsomaximizes the number of members that can take over in case of a failover.
Checking the status of IBM WebSphere Application Servercluster members
In a WebSphere Application Server cluster installation, use the WebSphereApplication Server administrative console to check the status of cluster members.
Procedure1. Log in to the WebSphere Application Server administrative console.2. Access the cluster list in the console:
v WebSphere Application Server 6.1: in the navigation pane, expand Serversand click Clusters.
v WebSphere Application Server 7.0: in the navigation pane, expand Servers,expand Clusters, and click WebSphere application server clusters.
3. In the workspace, click the cluster name. The cluster page appears.4. Click Cluster members. The Cluster members page appears. Each cluster
member is listed on the page. The Status column indicates the status of eachcluster member.
What to do next
When an application server is starting up, even when the status of the clustermember in the WebSphere Application Server administrative console shows asStarted or when the status returned by the serverStatus command indicates thatthe application server is STARTED, it is not ready for use by IBM InfoSphereInformation Server until all InfoSphere Information Server applications have
194 Administration Guide
completed initialization. See Checking the status of IBM WebSphere ApplicationServer startup (clustered installation) for details on how to tell when InfoSphereInformation Server applications have completed initialization.
Checking the status of IBM WebSphere Application Servernode agents
In a WebSphere Application Server cluster installation, use the WebSphereApplication Server administrative console to check the status of node agents.
Procedure1. Log in to the WebSphere Application Server administrative console.2. In the navigation pane, expand System administration and click Node agents.
The Node agents page appears. Each node agent is listed on the page. TheStatus column indicates the status of each node agent.
Checking the status of the IBM WebSphere Application ServerDeployment Manager
In a WebSphere Application Server cluster installation, use the serverStatuscommand to check the status of the deployment manager.
Procedure
Run the serverStatus command. The command is located on the computer onwhich the Deployment Manager runs, in the following directory:WAS_install_path/profiles/profile/binIn the directory path:v WAS_install_path is the location where WebSphere Application Server is installed.
The default installation path is:
– UNIX Linux /opt/IBM/WebSphere/AppServer
– Windows C:\IBM\WebSphere\AppServer
v profile is the name of the Deployment Manager profile.
For more information about the serverStatus command, see the WebSphereApplication Server documentation.v publib.boulder.ibm.com/infocenter/wasinfo/v6r1/index.jsp?topic=/
com.ibm.websphere.nd.doc/info/ae/ae/rxml_serverstatus.htmlv publib.boulder.ibm.com/infocenter/wasinfo/v7r0/index.jsp?topic=/
com.ibm.websphere.nd.doc/info/ae/ae/rxml_serverstatus.html
IBM WebSphere Application Server system log filesThe WebSphere Application Server log files contain information that allows you tomonitor WebSphere Application Server startup and diagnose errors.
The log files that are most useful for diagnosing IBM InfoSphere InformationServer-related issues are:
SystemOut.logWebSphere Application Server messages to STDOUT are redirected to thisfile.
Chapter 13. Administering IBM InfoSphere Information Server and IBM WebSphere Application Server services 195
SystemErr.logWebSphere Application Server messages to STDERR are redirected to thisfile.
These files are located in the following directories on each node in your WebSphereApplication Server installation:
v Linux UNIX
path/profiles/profile/logs/server1
v Windows
path\profiles\profile\logs\server1
In the directory path:v path is the WebSphere Application Server installation path. By default, path is
one of the following paths:
– Linux UNIX
opt/IBM/WebSphere/AppServer
– Windows
C:\IBM\WebSphere\AppServer
v profile is the profile name where IBM InfoSphere Information Server is installed.For a stand-alone installation, the default value is InfoSphere. For a clusteredinstallation, the default value for a custom profile is Customxx.
v server1 is the name of the application server. For a stand-alone installation, thedefault value is server1. For cluster installations, there might be multipleapplication server directories under the custom profile. The typical value isserverx, where x is the number of the application server instance. For aDeployment Manager profile, the default value is dmgr. For a node agent underthe custom profile, the default value is nodeagent.
For more information about WebSphere Application Server log files, see theWebSphere Application Server documentation:v IBM WebSphere Application Server Network Deployment 6.1:
publib.boulder.ibm.com/infocenter/wasinfo/v6r1/topic/com.ibm.websphere.nd.doc/info/ae/ae/ttrb_mglogs.html
v IBM WebSphere Application Server Network Deployment 7.0:publib.boulder.ibm.com/infocenter/wasinfo/v7r0/topic/com.ibm.websphere.nd.doc/info/ae/ae/ttrb_mglogs.html
196 Administration Guide

Chapter 14. Managing assets by using the command line
You can use the command line to move assets between different metadatarepositories for environments such as development, test, and production. You canalso query and delete physical data resources and business intelligence assets byusing the command line.
Using the istool command lineYou can import and export many types of assets, and you can query anddelete common metadata.
Asset interchangeYou can move assets between the metadata repositories of differentinstallations of IBM InfoSphere Information Server. For example, you canmove assets from a development environment to a test, production, orsource control environment.
InfoSphere Business Glossary assetsYou can import and export categories and terms, links to assigned assetsand links to stewards.
InfoSphere FastTrack assetsYou can move project templates, projects, mapping specifications, mappingcomponents and their related assets.
InfoSphere Information Analyzer assetsYou can move projects, data classes, and the common metadata and reportsthat are associated with projects.
InfoSphere DataStage and QualityStage assetsYou can move jobs, table definitions, and related assets. You can also buildand deploy packages that were created in the IBM InfoSphere InformationServer Manager and send package files to client computers.
Common metadata assetsYou can import, export, query and delete physical data resources andbusiness intelligence assets.
Reporting assetsYou can move reports and report results that are created in the IBMInfoSphere Information Server console or Web console.
Security assetsYou can move users, groups, roles, and credentials for InfoSphereInformation Server.
Using the istool command lineYou can use the command line to import and export assets and to query and deletecommon metadata.
Location of the istool command lineThe istool command line is available on the client and engine tiers.
© Copyright IBM Corp. 2007, 2011 197

For Windows, the istool command framework is located in:installation_directory\Clients\istools\cli, where installation_directory is thedirectory where you installed IBM InfoSphere Information Server. For example,c:\IBM\InformationServer.
For UNIX or Linux, the istool command framework is located in:installation_directory/Clients/istools/cli, where installation_directory is thedirectory where you installed InfoSphere Information Server. For example,/opt/IBM/InformationServer.
The istool framework is installed on all client and engine tier computers. Theframework installation provides the ability to run commands and options for thefollowing tools and components:v IBM InfoSphere DataStage and QualityStagev Common metadata assetsv Reporting assetsv Security assets
Command options for each of the following tools are installed with the frameworkonly when the tool is installed:v IBM InfoSphere Information Analyzer – client and enginev IBM InfoSphere Metadata Workbench – engine onlyv IBM InfoSphere Business Glossary – client onlyv IBM InfoSphere FastTrack – client only
This means, for example, that to move InfoSphere DataStage and QualityStageassets, you can run the build package, deploy package, and send packagecommands, and the -datastage options from any computer on the client or enginetier. To move InfoSphere FastTrack assets, you must run the istool command linefrom the client computer where InfoSphere FastTrack is installed.
Commands and common parameters for istoolYou can use the istool commands to manage assets that are stored in the metadatarepository of IBM InfoSphere Information Server.
For Windows, the istool command framework is located in:installation_directory\Clients\istools\cli, where installation_directory is thedirectory where you installed InfoSphere Information Server. For example,c:\IBM\InformationServer.
For UNIX or Linux, the istool command framework is located in:installation_directory/Clients/istools/cli, where installation_directory is thedirectory where you installed InfoSphere Information Server. For example,/opt/IBM/InformationServer.
The basic syntax of the istool command is:istool command authentication_parameters [generic_parameters] [command_parameters]
The commands are given in the following table.
Table 24. istool commands
Command Description
istool export Export assets to a file.
198 Administration Guide
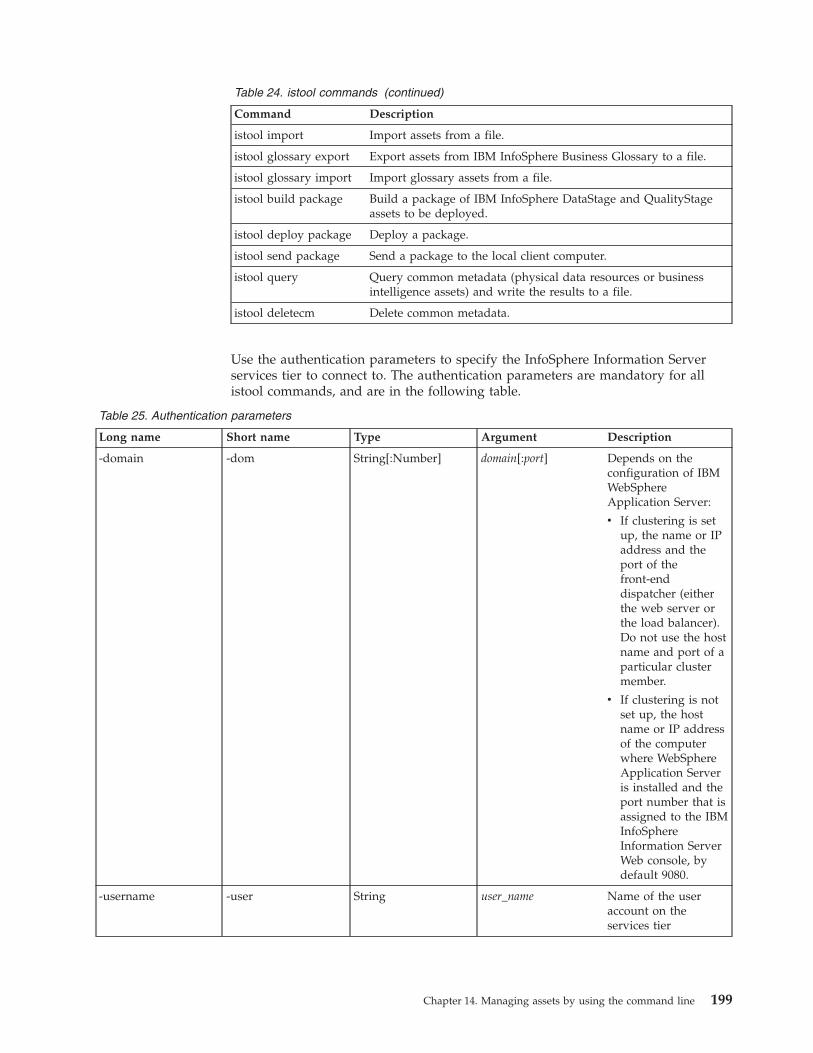
Table 24. istool commands (continued)
Command Description
istool import Import assets from a file.
istool glossary export Export assets from IBM InfoSphere Business Glossary to a file.
istool glossary import Import glossary assets from a file.
istool build package Build a package of IBM InfoSphere DataStage and QualityStageassets to be deployed.
istool deploy package Deploy a package.
istool send package Send a package to the local client computer.
istool query Query common metadata (physical data resources or businessintelligence assets) and write the results to a file.
istool deletecm Delete common metadata.
Use the authentication parameters to specify the InfoSphere Information Serverservices tier to connect to. The authentication parameters are mandatory for allistool commands, and are in the following table.
Table 25. Authentication parameters
Long name Short name Type Argument Description
-domain -dom String[:Number] domain[:port] Depends on theconfiguration of IBMWebSphereApplication Server:
v If clustering is setup, the name or IPaddress and theport of thefront-enddispatcher (eitherthe web server orthe load balancer).Do not use the hostname and port of aparticular clustermember.
v If clustering is notset up, the hostname or IP addressof the computerwhere WebSphereApplication Serveris installed and theport number that isassigned to the IBMInfoSphereInformation ServerWeb console, bydefault 9080.
-username -user String user_name Name of the useraccount on theservices tier
Chapter 14. Managing assets by using the command line 199

Table 25. Authentication parameters (continued)
Long name Short name Type Argument Description
-password -pass String password Password for theaccount that isspecified in the-username option.(Optional after thefirst login).
The generic parameters in the following table are optional parameters that can beused with all istool commands.
Table 26. Generic parameters
Option long name Option short name Description
-help -h Prints the list of command options. To view helpfor a specific command, enter istool command-help.
-verbose -v Prints detailed information throughout theoperation.
-silent -s Silences non-error command output.
-script Execute commands that are read directly from atext file. The file is read and executed as a seriesof command lines.
The following table lists parameters that are common to the istool import or exportcommands for most tools and asset types.
Table 27. Common parameters for the istool import and istool export commands
Long name Short name Type Argument Required Description Exceptions
-preview -pre Boolean N/A No Used withistool importand istoolexport.Previews theimport andexport taskswithoutexecuting thecommand.
Not supportedwith glossaryexport orglossaryimportcommands.
200 Administration Guide
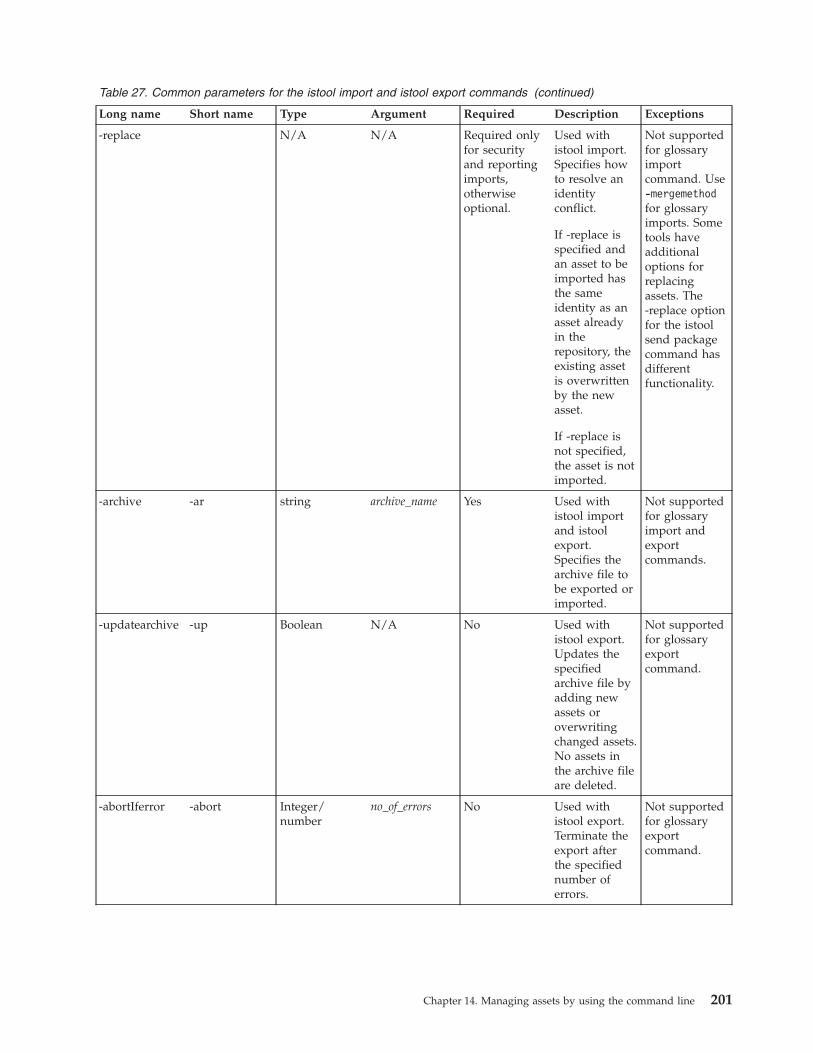
Table 27. Common parameters for the istool import and istool export commands (continued)
Long name Short name Type Argument Required Description Exceptions
-replace N/A N/A Required onlyfor securityand reportingimports,otherwiseoptional.
Used withistool import.Specifies howto resolve anidentityconflict.
If -replace isspecified andan asset to beimported hasthe sameidentity as anasset alreadyin therepository, theexisting assetis overwrittenby the newasset.
If -replace isnot specified,the asset is notimported.
Not supportedfor glossaryimportcommand. Use-mergemethodfor glossaryimports. Sometools haveadditionaloptions forreplacingassets. The-replace optionfor the istoolsend packagecommand hasdifferentfunctionality.
-archive -ar string archive_name Yes Used withistool importand istoolexport.Specifies thearchive file tobe exported orimported.
Not supportedfor glossaryimport andexportcommands.
-updatearchive -up Boolean N/A No Used withistool export.Updates thespecifiedarchive file byadding newassets oroverwritingchanged assets.No assets inthe archive fileare deleted.
Not supportedfor glossaryexportcommand.
-abortIferror -abort Integer/number
no_of_errors No Used withistool export.Terminate theexport afterthe specifiednumber oferrors.
Not supportedfor glossaryexportcommand.
Chapter 14. Managing assets by using the command line 201
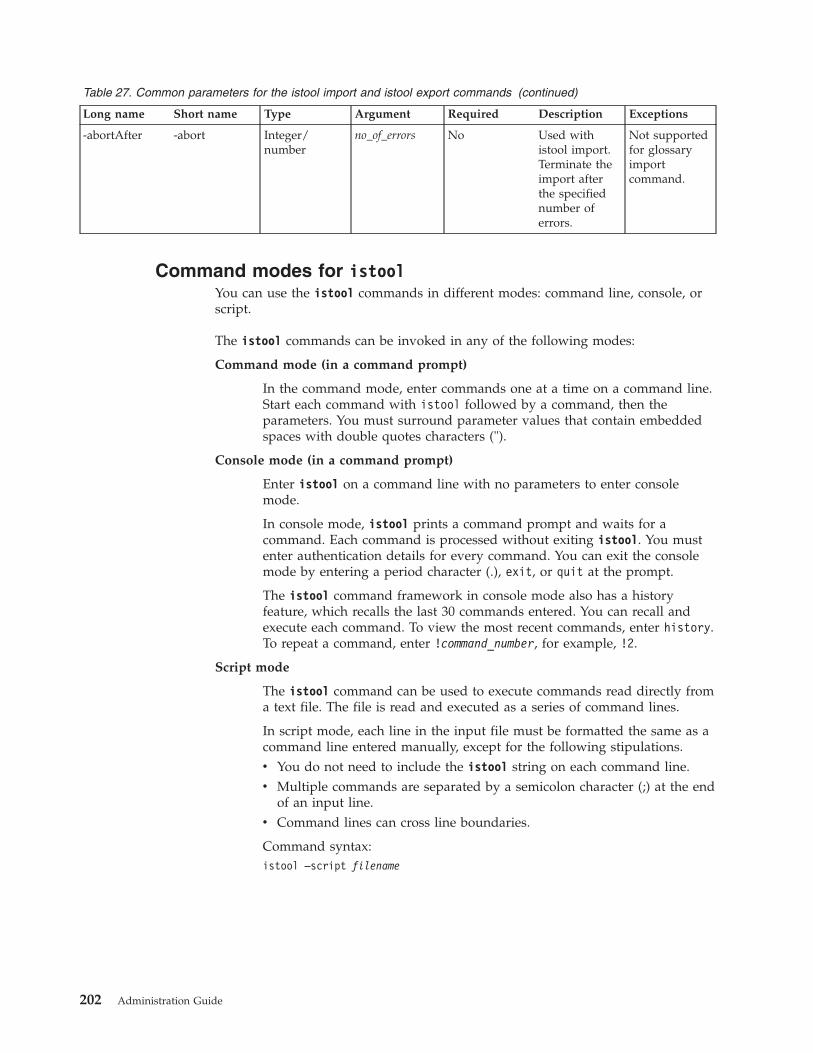
Table 27. Common parameters for the istool import and istool export commands (continued)
Long name Short name Type Argument Required Description Exceptions
-abortAfter -abort Integer/number
no_of_errors No Used withistool import.Terminate theimport afterthe specifiednumber oferrors.
Not supportedfor glossaryimportcommand.
Command modes for istoolYou can use the istool commands in different modes: command line, console, orscript.
The istool commands can be invoked in any of the following modes:
Command mode (in a command prompt)
In the command mode, enter commands one at a time on a command line.Start each command with istool followed by a command, then theparameters. You must surround parameter values that contain embeddedspaces with double quotes characters (").
Console mode (in a command prompt)
Enter istool on a command line with no parameters to enter consolemode.
In console mode, istool prints a command prompt and waits for acommand. Each command is processed without exiting istool. You mustenter authentication details for every command. You can exit the consolemode by entering a period character (.), exit, or quit at the prompt.
The istool command framework in console mode also has a historyfeature, which recalls the last 30 commands entered. You can recall andexecute each command. To view the most recent commands, enter history.To repeat a command, enter !command_number, for example, !2.
Script mode
The istool command can be used to execute commands read directly froma text file. The file is read and executed as a series of command lines.
In script mode, each line in the input file must be formatted the same as acommand line entered manually, except for the following stipulations.v You do not need to include the istool string on each command line.v Multiple commands are separated by a semicolon character (;) at the end
of an input line.v Command lines can cross line boundaries.
Command syntax:istool –script filename
202 Administration Guide
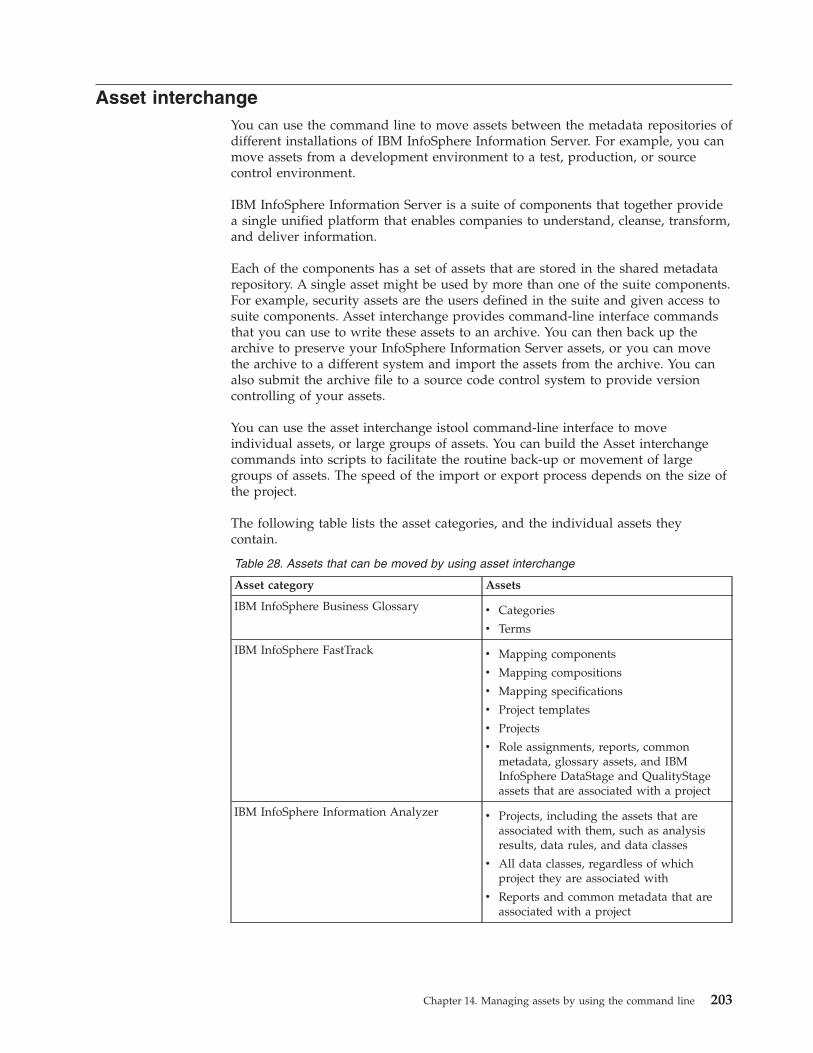
Asset interchangeYou can use the command line to move assets between the metadata repositories ofdifferent installations of IBM InfoSphere Information Server. For example, you canmove assets from a development environment to a test, production, or sourcecontrol environment.
IBM InfoSphere Information Server is a suite of components that together providea single unified platform that enables companies to understand, cleanse, transform,and deliver information.
Each of the components has a set of assets that are stored in the shared metadatarepository. A single asset might be used by more than one of the suite components.For example, security assets are the users defined in the suite and given access tosuite components. Asset interchange provides command-line interface commandsthat you can use to write these assets to an archive. You can then back up thearchive to preserve your InfoSphere Information Server assets, or you can movethe archive to a different system and import the assets from the archive. You canalso submit the archive file to a source code control system to provide versioncontrolling of your assets.
You can use the asset interchange istool command-line interface to moveindividual assets, or large groups of assets. You can build the Asset interchangecommands into scripts to facilitate the routine back-up or movement of largegroups of assets. The speed of the import or export process depends on the size ofthe project.
The following table lists the asset categories, and the individual assets theycontain.
Table 28. Assets that can be moved by using asset interchange
Asset category Assets
IBM InfoSphere Business Glossary v Categories
v Terms
IBM InfoSphere FastTrack v Mapping components
v Mapping compositions
v Mapping specifications
v Project templates
v Projects
v Role assignments, reports, commonmetadata, glossary assets, and IBMInfoSphere DataStage and QualityStageassets that are associated with a project
IBM InfoSphere Information Analyzer v Projects, including the assets that areassociated with them, such as analysisresults, data rules, and data classes
v All data classes, regardless of whichproject they are associated with
v Reports and common metadata that areassociated with a project
Chapter 14. Managing assets by using the command line 203
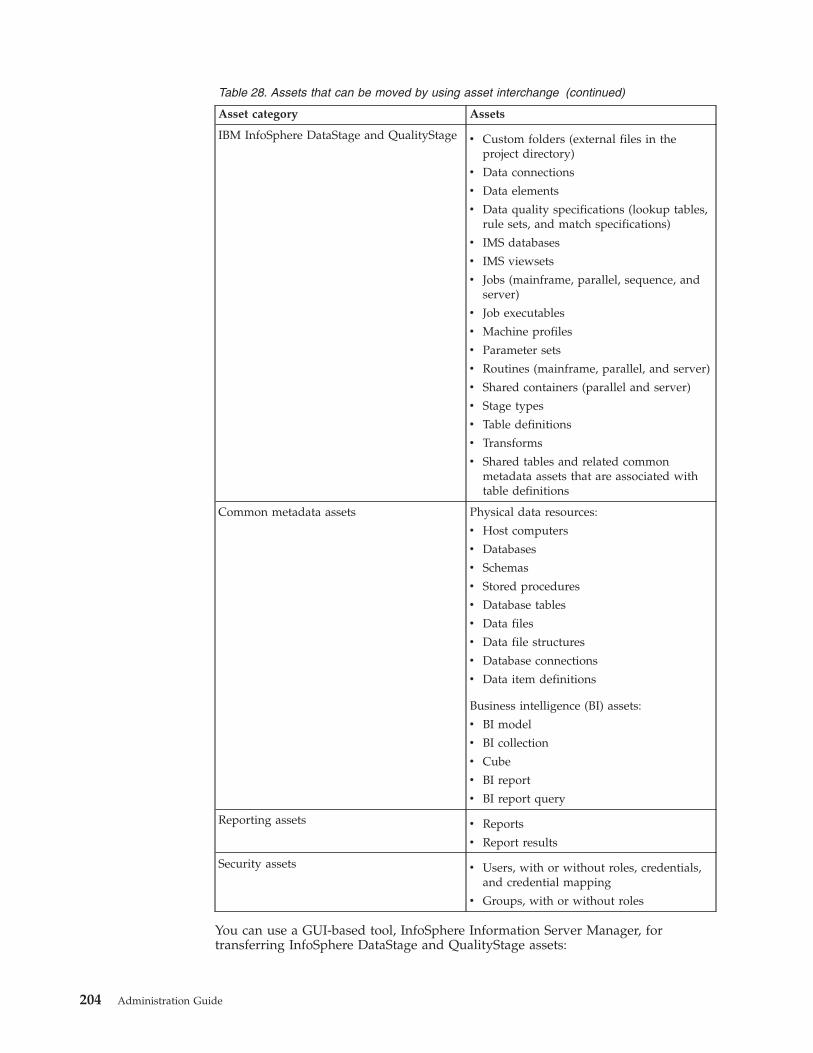
Table 28. Assets that can be moved by using asset interchange (continued)
Asset category Assets
IBM InfoSphere DataStage and QualityStage v Custom folders (external files in theproject directory)
v Data connections
v Data elements
v Data quality specifications (lookup tables,rule sets, and match specifications)
v IMS databases
v IMS viewsets
v Jobs (mainframe, parallel, sequence, andserver)
v Job executables
v Machine profiles
v Parameter sets
v Routines (mainframe, parallel, and server)
v Shared containers (parallel and server)
v Stage types
v Table definitions
v Transforms
v Shared tables and related commonmetadata assets that are associated withtable definitions
Common metadata assets Physical data resources:
v Host computers
v Databases
v Schemas
v Stored procedures
v Database tables
v Data files
v Data file structures
v Database connections
v Data item definitions
Business intelligence (BI) assets:
v BI model
v BI collection
v Cube
v BI report
v BI report query
Reporting assets v Reports
v Report results
Security assets v Users, with or without roles, credentials,and credential mapping
v Groups, with or without roles
You can use a GUI-based tool, InfoSphere Information Server Manager, fortransferring InfoSphere DataStage and QualityStage assets:
204 Administration Guide

v You can use InfoSphere Information Server Manager to build deploymentpackages of assets and move these packages between InfoSphere InformationServer systems, or submit the packages to a source code control system.
v You can use the InfoSphere Information Server Manager and the assetinterchange commands in conjunction with one another by browsing a tree ofInfoSphere DataStage and QualityStage assets in InfoSphere Information ServerManager, and selecting which assets to include in a package. You can thendefine a script of asset interchange commands that regularly rebuilds thespecified package and deploys the package to a target system or project,ensuring that the target has an up-to-date version of those assets.
Common asset-interchange scenariosYou can use asset interchange to address scenarios that occur commonly with IBMInfoSphere Information Server.
Moving projects from development to test
In a typical InfoSphere Information Server environment, there is a dedicateddevelopment system. This system is used to prototype and perform rudimentarytesting on your enterprise data solutions.
When initial development is complete, and your project is ready to test, you canuse asset interchange to deploy the entire system to the test system by using theasset interchange commands in a script. It is likely that there will be some iterationbetween the test and development machines:1. Faults are discovered on the test system.2. Fixes made on the development system.3. Results moved once more to the test system
You could define a script with the following commands:v One command to export the required assets from the development systemv A second command to import the exported assets to the test system.
You can rerun this script each time fixes are made on the development system.
Moving a subset of items
While you iterate between development and test systems, you might find that youwant to move just a subset of assets, rather than your entire project. In this case,you can use asset interchange commands directly on the command line andexplicitly specify one or more assets to move. For example, if one InfoSphereDataStage job needs changing, you can change the job on the development system.You can then re-export the job and reimport the job on the test system.
Moving projects from test to production
After the test cycles are complete, the assets can be deployed to the productionsystem, where the system processes real data. You can once again use the assetinterchange commands to export the assets to an archive, and to import them tothe production system.
Chapter 14. Managing assets by using the command line 205
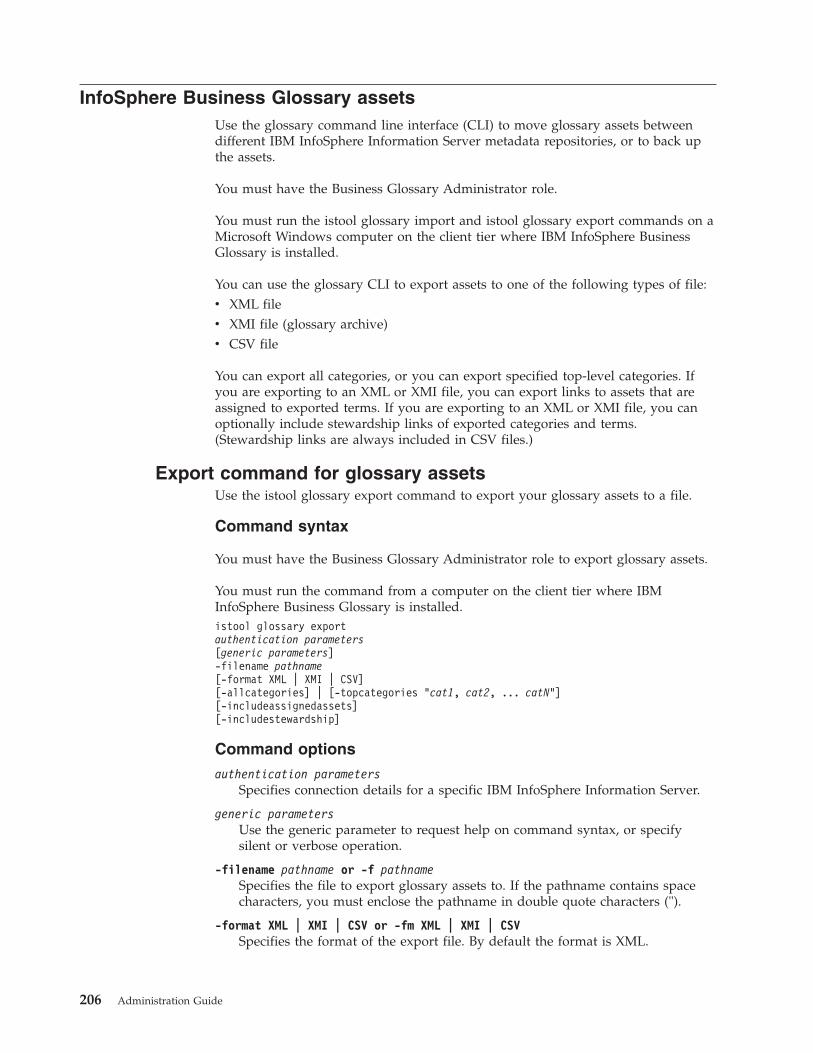
InfoSphere Business Glossary assetsUse the glossary command line interface (CLI) to move glossary assets betweendifferent IBM InfoSphere Information Server metadata repositories, or to back upthe assets.
You must have the Business Glossary Administrator role.
You must run the istool glossary import and istool glossary export commands on aMicrosoft Windows computer on the client tier where IBM InfoSphere BusinessGlossary is installed.
You can use the glossary CLI to export assets to one of the following types of file:v XML filev XMI file (glossary archive)v CSV file
You can export all categories, or you can export specified top-level categories. Ifyou are exporting to an XML or XMI file, you can export links to assets that areassigned to exported terms. If you are exporting to an XML or XMI file, you canoptionally include stewardship links of exported categories and terms.(Stewardship links are always included in CSV files.)
Export command for glossary assetsUse the istool glossary export command to export your glossary assets to a file.
Command syntax
You must have the Business Glossary Administrator role to export glossary assets.
You must run the command from a computer on the client tier where IBMInfoSphere Business Glossary is installed.istool glossary exportauthentication parameters[generic parameters]-filename pathname[-format XML | XMI | CSV][-allcategories] | [-topcategories "cat1, cat2, ... catN"][-includeassignedassets][-includestewardship]
Command options
authentication parametersSpecifies connection details for a specific IBM InfoSphere Information Server.
generic parametersUse the generic parameter to request help on command syntax, or specifysilent or verbose operation.
-filename pathname or -f pathnameSpecifies the file to export glossary assets to. If the pathname contains spacecharacters, you must enclose the pathname in double quote characters (").
-format XML | XMI | CSV or -fm XML | XMI | CSVSpecifies the format of the export file. By default the format is XML.
206 Administration Guide
-allcategories or -allSpecifies that all categories in the source glossary are exported to the specifiedfile.
-topcategories "cat1, cat2, ... catN" or -top "cat1, cat2, ... catN"Use this parameter to specify a comma-separated list of top-level categoriesthat are exported. Category names can contain spaces.
-includeassignedassets or -incasstSpecifies that links to assets assigned to exported terms are exported. Bydefault this option is false.
-includestewardship or -incstwdSpecifies that stewardship links of exported categories and terms are includedin the export. By default this option is false. (Export files in csv format alwayscontain stewardship links.)
Examples
The following command exports all the categories in the source glossary to the filenamed exp_all.xml. Because no format is explicitly specified, the categories areexported in XML format:istool glossary export –dom ABC:9080 –u xmetauser –p xmetapwd
-filename c:\exp_all.xml -allcategories
The following command exports the named categories in the source glossary to theglossary archive file named exp_sel.xmi.istool glossary export –dom ABC:9080 –u xmetauser –p xmetapwd
-filename c:\exp_sel.xmi -format XMI -topcategories "dept AB,dept XM, dept HR"
Import command for glossary assetsUse the istool glossary import command to import your glossary assets from a fileof previously archived assets.
Command syntax
You must have the Business Glossary Administrator role to import glossary assets.
You must run the command from a computer on the client tier where IBMInfoSphere Business Glossary is installed.istool glossary importauthentication parameters[generic parameters]-filename pathname[-format XML | XMI | CSV][-mergemethod overwrite | ignore | mergeignore | mergeoverwrite][-mappingfile pathname]
Command options
authentication parametersSpecifies connection details for a specific IBM InfoSphere Information Server.
generic parametersUse the generic parameters to request help on command syntax, or specifysilent or verbose operation.
Chapter 14. Managing assets by using the command line 207
-filename pathname or -f pathnameSpecifies the file to import glossary assets from. If the pathname contains spacecharacters, you must enclose the pathname in double quotation marks (").
-format XML | XMI | CSV or -fm XML | XMI | CSVSpecifies the format of the import file. By default the format is XML.
-mergemethod overwrite | ignore | mergeignore | mergeoverwrite or -mrgoverwrite | ignore | mergeignore | mergeoverwrite
Only applies when assets are imported from XML or XMI files. Specifies one ofthe following merge methods:
overwriteSpecify this option to overwrite assets that exist in the target repositorywith imported assets.
ignore This is the default option. Assets that exist in the target repository arenot overwritten.
mergeignoreSpecify this option to merge the asset and ignore imported attributesthat cannot be merged.
mergeoverwriteSpecify this option to merge the asset and overwrite existing attributesthat cannot be merged.
-mapping pathname or -map pathnameOnly applies when assets are imported from XMI files. Specifies a mapping fileto use to modify the imported assets. If the pathname contains spacecharacters, you must enclose the pathname in double quotation marks ("). Amapping file enables you to change attributes of exported glossary contentbefore you import it, so that it is suitable for your glossary.
Example
The following command imports all the glossary assets contained in the CSVformat file named bgexp.csv:istool glossary import –dom ABC:9080 –u xmetauser –p xmetapwd-filename c:\bgexp.csv -format CSV
The following command imports all the glossary assets contained in the XMLformat file named bg x imp.xml. If assets with the same name are encountered inthe target repository, they are overwritten with the imported assets:istool glossary import –dom ABC:9080 –u xmetauser –p xmetapwd-filename "c:\bg x imp.xml" -format XML -mergemethod overwrite
InfoSphere FastTrack assetsYou can use the command line to move assets from one IBM InfoSphereInformation Server metadata repository to another.
You can specify the mapping specifications, mapping components, projecttemplates, or projects to be moved by using the -fasttrack option of the istoolimport and istool export commands. This is useful in a case where you need totransfer data from a development environment to a test or productionenvironment.
208 Administration Guide

When you export project assets you can also include the related jobs, databasetables, and reports.
Asset IDsIdentify assets that you want to move using asset IDs.
An asset ID describes a project, folder, or a specific asset. An asset ID is a fullyqualified path that can be specified in one of the following formats:asset-id::=<project-name>.ftp|<project-template-name>.ftt |<project-name>/<mapping-specification-name>.spc<project-name>/<mapping-component-name>.cmp<project-name>/<mapping-composition-name>.cps
where
<project-name> is the name of a project.
<project-template-name>is the name of a FastTrack project template.
<mapping-specification-name> is the name of a mapping specification.
<mapping-component-name> is the name of a mapping component.
If there is a space in a name, the entire name must be surrounded with doublequotation marks (").
Using wildcard characters in the asset identifier
You can use the wildcard character in element names to specify multiple assets.
The asterisk wildcard character (*) represents 0 or more characters. The questionmark wildcard character (?) represents exactly 1 character. You cannot use thewildcard to specify the asset type.
For multipart names (such as mapping specification, mapping component, andmapping composition names), the separator character (/) is required, even if oneor more wildcard characters is used. For example, the following names are validuses of the wildcard:v Project*.ftp
All FastTrack projects whose name begins with the prefix "Project".v Project1/*Cust.spc
All mapping specifications that are contained in the project "Project1" where thename of the specification ends with the suffix "Cust".
v Project*/*Cust.cmpAll mapping components that are contained in any project where the name theproject begins with the prefix "Project" and where the name of the componentends with the suffix "Cust".
v */*.cpsAll mapping compositions that are contained in all projects.
The following names are invalid uses of the wildcard:v Project.*
The asset type cannot be a wildcard.v *.spc
Chapter 14. Managing assets by using the command line 209

The mapping specification must have a two-part name.
Export command for InfoSphere FastTrack assetsUse the istool export command to create an archive file that can be used totransfer some or all of your IBM InfoSphere FastTrack assets from one environmentto another.
You must have the FastTrack Administrator role.
You must run the command on a computer on the client tier where InfoSphereFastTrack is installed.
The result of the export command is an archive file, which contains all the assetsthat are being transferred.istool export -domain <domain>[:<port>]-username <username>-password <password>-archive <filename>[-preview]-fasttrack ’[<fasttrack-export-options>]’
where<fasttrack-export-options>::=[-includeGenerationHistory |-includeReports |-includeCommonMetadata |-includeDataStageAssets |-includeDependent-includeProjectRoleAssignments]*<asset-id-list>
Note: The two single quotation marks (') are required after the -fasttrack or -ftoption even if no export options are specified.
The <asset-id-list> is a list of asset identifiers that are specified in the formatdefined in the section "Asset IDs". The asset identifiers in this list are separated byblanks.
If you select a project, all of the contained mapping specifications, mappingcomponents, and mapping compositions are also selected and written to thearchive. If the project is defined based on a project template, the template isautomatically included.
For example:export -u admin -p admin100 -dom KILIMANJARO -ar ft_archive1.isx-fasttrack ’FTProject1.ftp -incCM’
Command options
The following list shows the export command options. These options are notrequired.
Table 29. Export command options
Long name Short name Description
-includeGenerationHistory -incGen Includes generation history.
210 Administration Guide

Table 29. Export command options (continued)
-includeReports -incRepIncludes related reports in theexported archive.
-includeCommonMetadata -incCMIncludes related common metadatain the exported archive.
-includeDataStageAssets -incDS
Includes related IBM InfoSphereDataStage and QualityStage assetsin the exported archive.
-includeProjectRoleAssignments -incRole
Includes InfoSphere FastTrack roleassignments in the exportedarchive.
-includeDependent -incDepIncludes all types of referencedassets in the exported archive.
Note: If you include related reports, common metadata, or InfoSphere DataStageand QualityStage assets in the archive file, you must specify each type of includedmetadata on the command line when you import the archive file, otherwise onlyInfoSphere FastTrack assets are imported.
Exit status
When exporting assets, if at least one item is successfully exported, an archive fileis created.
Exit status = 0The package was built successfully.
Values greater than 0An error occurred.
Import command for InfoSphere FastTrack assetsUse the istool import command to import an archive file that contains IBMInfoSphere FastTrack assets. This command is used when transferring assetsmetadata repository to another.
You must have the FastTrack Administrator role.
You must run the command on a computer on the client tier where InfoSphereFastTrack is installed.
If the archive contains related IBM InfoSphere DataStage and QualityStage assetsyou must have privileges to edit those assets. If the archive contains relatedcommon metadata, you must have the Common Metadata Administrator role. Ifthe archive contains related reports, you must be the owner of the reports or havethe Suite Administrator role.istool import -domain <domain>[:<port>]-username <username>-password <password>-archive <filename>[-preview|-replace]-fasttrack ’[<fasttrack-import-options>]’
where
Chapter 14. Managing assets by using the command line 211
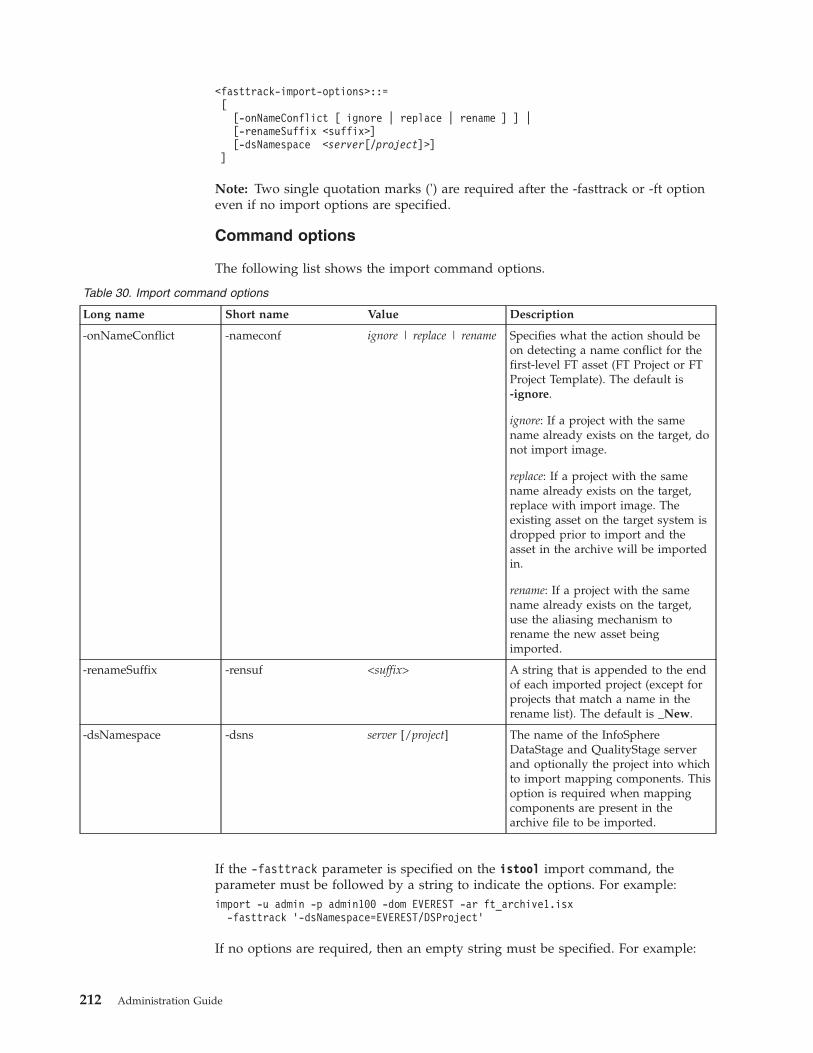
<fasttrack-import-options>::=[
[-onNameConflict [ ignore | replace | rename ] ] |[-renameSuffix <suffix>][-dsNamespace <server[/project]>]
]
Note: Two single quotation marks (') are required after the -fasttrack or -ft optioneven if no import options are specified.
Command options
The following list shows the import command options.
Table 30. Import command options
Long name Short name Value Description
-onNameConflict -nameconf ignore | replace | rename Specifies what the action should beon detecting a name conflict for thefirst-level FT asset (FT Project or FTProject Template). The default is-ignore.
ignore: If a project with the samename already exists on the target, donot import image.
replace: If a project with the samename already exists on the target,replace with import image. Theexisting asset on the target system isdropped prior to import and theasset in the archive will be importedin.
rename: If a project with the samename already exists on the target,use the aliasing mechanism torename the new asset beingimported.
-renameSuffix -rensuf <suffix> A string that is appended to the endof each imported project (except forprojects that match a name in therename list). The default is _New.
-dsNamespace -dsns server [/project] The name of the InfoSphereDataStage and QualityStage serverand optionally the project into whichto import mapping components. Thisoption is required when mappingcomponents are present in thearchive file to be imported.
If the -fasttrack parameter is specified on the istool import command, theparameter must be followed by a string to indicate the options. For example:import -u admin -p admin100 -dom EVEREST -ar ft_archive1.isx
-fasttrack ’-dsNamespace=EVEREST/DSProject’
If no options are required, then an empty string must be specified. For example:
212 Administration Guide

import -u admin -p admin100 -dom EVEREST -ar ft_archive1.isx-fasttrack ’’
Importing multiple types of assets
If the archive file includes multiple types of assets, you must specify each type ofincluded metadata on the command line when you import the archive file,otherwise only InfoSphere FastTrack assets are imported. For example, if thearchive was exported with the -includeDependent option, it could include relatedreports, common metadata, and InfoSphere DataStage and QualityStage assets.
For best import performance, run separate commands to import each type ofmetadata that was exported to the archive file. Run the commands in the followingorder:1. Import common metadata with the -cm option.2. Import InfoSphere DataStage and QualityStage assets with the -ds option.3. Import reports with the -rep and -replace options.4. Import InfoSphere FastTrack assets with the -fasttrack option.
Note: You must use the -replace option when you import report assets from anarchive. If you do not want to use the -replace option for other types of assets inthe archive, you must use a separate command to import the reports. If you importInfoSphere FastTrack assets without the -replace option and import their relatedreports with the -replace option, some of the reports might not be accurate for theunreplaced assets in the target environment. Check the reports and run them againin the new environment if necessary.
In the following example, the exported assets from the file ft_archive1.isx areimported in the correct order for best performance. The common metadata assets,InfoSphere DataStage and QualityStage assets, and InfoSphere FastTrack assets areimported without using the -replace option. The reporting assets are imported withthe required -replace option.import -u admin -p admin100 -dom EVEREST -ar ft_archive1.isx -cmimport -u admin -p admin100 -dom EVEREST -ar ft_archive1.isx
-ds ’<import-options>’import -u admin -p admin100 -dom EVEREST -ar ft_archive1.isx
-replace -rep ’<import options>’import -u admin -p admin100 -dom EVEREST -ar ft_archive1.isx
-fasttrack ’<import options>’
The import options for the InfoSphere FastTrack assets must include the-dsNamespace option, which specifies the server and project that the InfoSphereDataStage and QualityStage assets were imported to.
Exit status
The command returns the following exit values:
Exit status = 0The package was built successfully.
Values greater than 0An error occurred.
A summary report is printed upon completion.
Chapter 14. Managing assets by using the command line 213
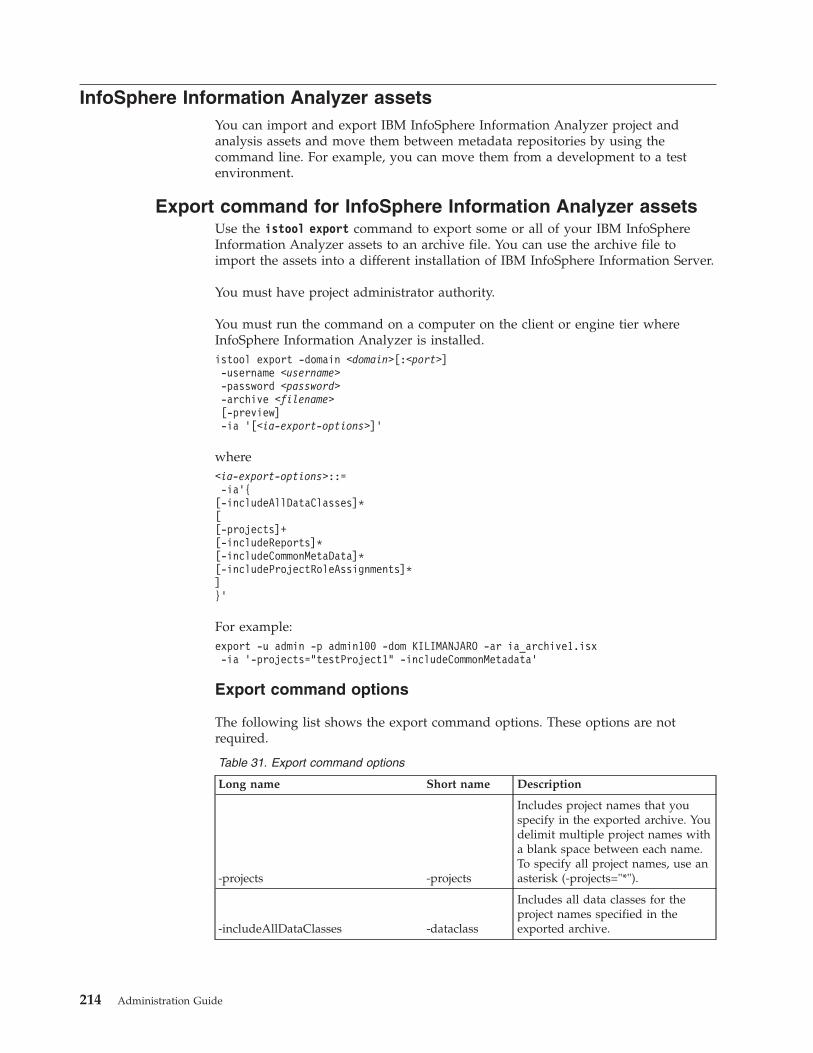
InfoSphere Information Analyzer assetsYou can import and export IBM InfoSphere Information Analyzer project andanalysis assets and move them between metadata repositories by using thecommand line. For example, you can move them from a development to a testenvironment.
Export command for InfoSphere Information Analyzer assetsUse the istool export command to export some or all of your IBM InfoSphereInformation Analyzer assets to an archive file. You can use the archive file toimport the assets into a different installation of IBM InfoSphere Information Server.
You must have project administrator authority.
You must run the command on a computer on the client or engine tier whereInfoSphere Information Analyzer is installed.istool export -domain <domain>[:<port>]-username <username>-password <password>-archive <filename>[-preview]-ia ’[<ia-export-options>]’
where<ia-export-options>::=-ia’{[-includeAllDataClasses]*[[-projects]+[-includeReports]*[-includeCommonMetaData]*[-includeProjectRoleAssignments]*]}’
For example:export -u admin -p admin100 -dom KILIMANJARO -ar ia_archive1.isx-ia ’-projects="testProject1" -includeCommonMetadata’
Export command options
The following list shows the export command options. These options are notrequired.
Table 31. Export command options
Long name Short name Description
-projects -projects
Includes project names that youspecify in the exported archive. Youdelimit multiple project names witha blank space between each name.To specify all project names, use anasterisk (-projects="*").
-includeAllDataClasses -dataclass
Includes all data classes for theproject names specified in theexported archive.
214 Administration Guide

Table 31. Export command options (continued)
-includeCommonMetadata -inccm
Includes all common metadata forthe project names specified in theexported archive.
-includeProjectRoleAssignments -incroles
Includes all project role assignmentsfor the project names specified inthe exported archive.
-includeReports -incrpt
Includes reports for the projectnames specified in the exportedarchive.
Note: If you include reports or common metadata assets in the archive file, youmust specify each type of included metadata on the command line when youimport the archive file, otherwise only InfoSphere Information Analyzer assets areimported.
Exit status
When exporting assets, if at least one item is successfully exported, an archive fileis created.
Exit status = 0The package was built successfully.
Values greater than 0An error occurred.
Note: Archive files of assets that are exported by using the istool command can beimported only by using the istool command line.
Import command for InfoSphere Information Analyzer assetsUse the istool import command to import an archive file of assets that wascreated by the istool export function.
You must have project administrator authority to import IBM InfoSphereInformation Analyzer assets. To import related common metadata, you must havethe Common Metadata Administrator role.
You must run the command on a computer on the client or engine tier whereInfoSphere Information Analyzer is installed.istool import -domain <domain>[:<port>]-username <username>-password <password>-archive <archive_name>[-preview | -replace]-ia’{[-onNameConflict < ignore | replace | rename >]+[-renameSuffix <is_New>]}’
Command options
The following list shows the command options for imports. These options are notrequired.
Chapter 14. Managing assets by using the command line 215
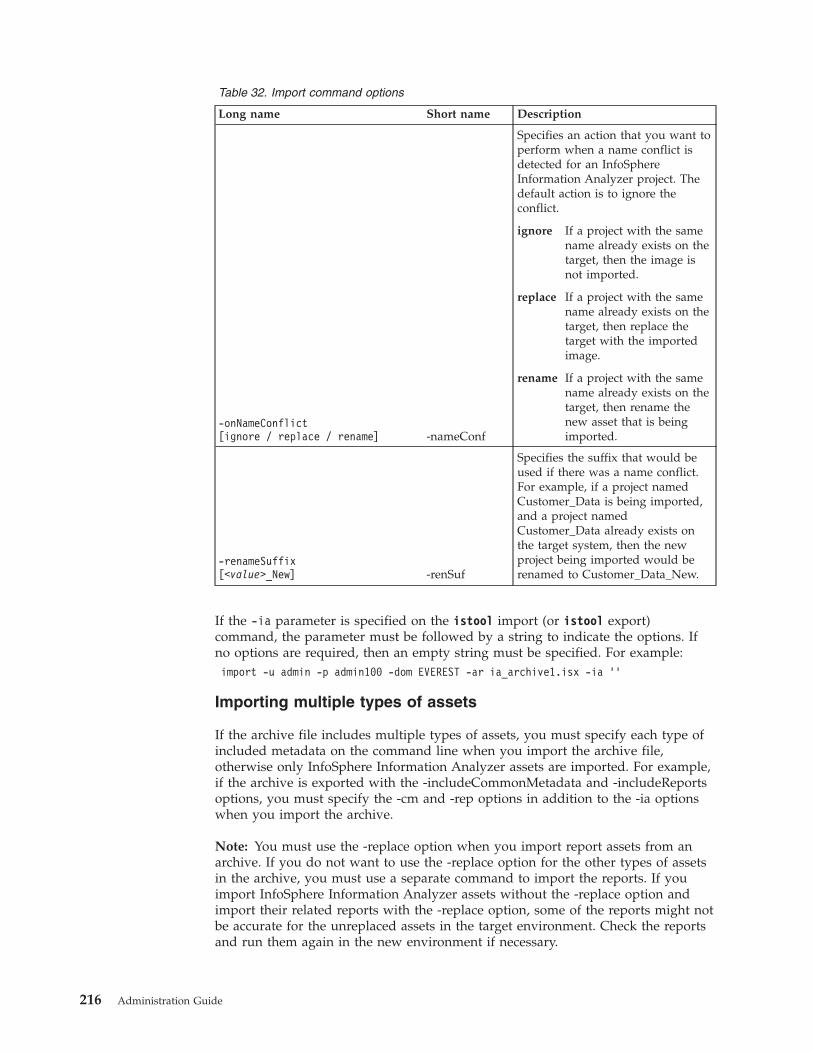
Table 32. Import command options
Long name Short name Description
-onNameConflict[ignore / replace / rename] -nameConf
Specifies an action that you want toperform when a name conflict isdetected for an InfoSphereInformation Analyzer project. Thedefault action is to ignore theconflict.
ignore If a project with the samename already exists on thetarget, then the image isnot imported.
replace If a project with the samename already exists on thetarget, then replace thetarget with the importedimage.
rename If a project with the samename already exists on thetarget, then rename thenew asset that is beingimported.
-renameSuffix[<value>_New] -renSuf
Specifies the suffix that would beused if there was a name conflict.For example, if a project namedCustomer_Data is being imported,and a project namedCustomer_Data already exists onthe target system, then the newproject being imported would berenamed to Customer_Data_New.
If the -ia parameter is specified on the istool import (or istool export)command, the parameter must be followed by a string to indicate the options. Ifno options are required, then an empty string must be specified. For example:import -u admin -p admin100 -dom EVEREST -ar ia_archive1.isx -ia ’’
Importing multiple types of assets
If the archive file includes multiple types of assets, you must specify each type ofincluded metadata on the command line when you import the archive file,otherwise only InfoSphere Information Analyzer assets are imported. For example,if the archive is exported with the -includeCommonMetadata and -includeReportsoptions, you must specify the -cm and -rep options in addition to the -ia optionswhen you import the archive.
Note: You must use the -replace option when you import report assets from anarchive. If you do not want to use the -replace option for the other types of assetsin the archive, you must use a separate command to import the reports. If youimport InfoSphere Information Analyzer assets without the -replace option andimport their related reports with the -replace option, some of the reports might notbe accurate for the unreplaced assets in the target environment. Check the reportsand run them again in the new environment if necessary.
216 Administration Guide
In the following example, the first command imports InfoSphere InformationAnalyzer assets and common metadata assets from the file ia_archive1.isx withoutusing the -replace option. The second command imports reporting assets from thesame archive file while using the required -replace option.import -u admin -p admin100 -dom EVEREST -ar ia_archive1.isx -ia ’’ -cm
’<import options>’
import -u admin -p admin100 -dom EVEREST -ar ia_archive1.isx -replace -rep’<import options>’
InfoSphere DataStage and QualityStage assetsThese assets are created in projects. They include jobs, table definitions, rule sets,and other project assets.
You can interchange IBM InfoSphere DataStage and QualityStage assets by usingtwo different methods:v You can use the graphic interface of IBM InfoSphere Information Server
Manager to define a package of assets. You can then build that package anddeploy that package to another project or services tier by using the buildpackage and deploy package commands. The package is an object that is held inthe InfoSphere Information Server metadata repository, and can be rebuilt ordeployed by users who have access to the repository. After you have defined apackage, you can rebuild and redeploy the package whenever any of the assetsthat it contains change. A history is maintained to help you track the package.
v You can export a list of named DataStage assets to an archive file by using theistool export command. You can then import the assets to another project ordomain by using the istool import command. If any of the objects contained inthe archive change, you can reexport them to a new archive or update theexisting archive file. The archive is created by, and belongs to, a particular user,and can be shared only by physically distributing the file.
The package and deploy method is suited to the product lifecycle scenario, whereyou are repeatedly moving assets between development, test, and productionsystems. The archive file method is suited to an asset sharing or asset backupscenario.
You can use InfoSphere Information Server Manager to identify the names of theassets that you want to export, and then capture those names for inclusion in istoolcommands.
Build package commandYou can use the istool command-line interface (CLI) to build packages of IBMInfoSphere DataStage and QualityStage assets that are defined in the IBMInfoSphere Information Server Manager.
Purpose
The istool build package command is used to build a package ready fordeployment. You must first define the package in the InfoSphere InformationServer Manager, including specifying the assets that it contains and the build anddeploy paths. In a clustering environment, set the build and deploy paths toshared directories that are accessible from every cluster node. The package thatyou specify resides in the metadata repository.
Chapter 14. Managing assets by using the command line 217
To build a package, you must have an InfoSphere DataStage and QualityStage rolethat grants you permission to edit the assets in the package
Command syntaxistool build packageauthentication options[generic options]-package package[ -label "buildlabel" ][ -comment "comment" ][ -overwrite ][ -preview ]
Command options
authentication optionsUse authentication options to connect to a specific installation of InfoSphereInformation Server.
generic optionsUse the generic options to request help on command syntax, or to specifysilent or verbose operation.
-package name or -pkg nameSpecifies the name of an existing deployment package definition in themetadata repository.
-comment "comment_text" or -c "comment_text"Adds a comment to the deployment package information.
-preview or -preSpecify this option to preview the build operation without building a package.
-label "label_text" or -l "label_text"Specifies a label for the build. You can use the label to version different buildsof your deployment package.
-overwrite or -oRebuilds an existing deployment package. This option removes all history fromthe package.
Exit status
A return value of 0 indicates successful completion, any other value indicatesfailure. The list of exit codes is shown in the command help. Enter istool buildpackage -help to see the list of possible exit codes for the build packagecommand.
Error handling
When building a deployment package, if at least one object is successfully built, adeployment package file is created. If one or more objects fails to build, thecommand completes with a non-zero exit code.
Example
The following example shows how to build two versions of a package.1. Define a package named DeployPackage1 by using the InfoSphere Information
Server Manager to include tabledef1.tbd.
218 Administration Guide
2. Build the package DeployPackage1, add the comment “my first package” to thebuild, and label the build "version 1.1":istool build package –domain myhost:9080-username user1 -password pass1 -package DeployPackage1-label "version 1.1" –comment "my first package"
3. Modify tabledef1.tbd in the Designer client. For example, add a row.4. Rebuild the same package, add the label "version 1.2", and add the comment
"table def changes":istool build package –domain myhost:9080-username user1 -password pass1 -package DeployPackage1-label "version 1.2" –comment "table def changes"
When you open DeployPackage1 in the InfoSphere Information Server Manager,the History tab shows two builds, version 1.1. and version 1.2. You can deployversion 1.1 or version 1.2 of tabledef1.tbd by using the deploy package commandand specifying the -label option.
Deploy package commandYou can use the istool command-line interface (CLI) to deploy packages of IBMInfoSphere DataStage and QualityStage assets that you have previously built.
Purpose
The istool deploy package command copies the contents of a package to a targetmetadata repository of IBM InfoSphere Information Server. You must first definethe package in the InfoSphere Information Server Manager, including specifyingthe assets that it contains and the build and deploy paths. In a clusteringenvironment, set the build and deploy paths to shared directories that areaccessible from every cluster node. The package is built by using the istool buildpackage command.
To deploy a package, you must have an InfoSphere DataStage and QualityStagerole that grants you permission to edit assets in the target project.
Command syntaxistool deploy packageauthentication options[generic options][-package package |-file deployfile | -localfile deployfile][-label "buildlabel"][-preview]
-datastage ’[-replace] server/project’
Command options
authentication optionsUse authentication options to connect to a specific installation of InfoSphereInformation Server.
generic optionsUse the generic options to request help on command syntax, or to specifysilent or verbose operation.
-package name or -pkg nameSpecifies the name of an existing deployment package definition in themetadata repository. The package must already be built. The -package, -file,and -localfile options are mutually exclusive.
Chapter 14. Managing assets by using the command line 219

-file name or -f nameSpecifies a deployment package file name in the target system. The specifiedfile name must be relative to the deploy directory in the target system. Use thisoption to deploy assets that were packaged on a different computer. You mustfirst transfer the package file from the source system build directory to thetarget system deploy directory. The -package, -file, and -localfile options aremutually exclusive.
-localfile name or -lf nameSpecifies the fully qualified name of a deployment package file on the local filesystem of the client. The -package, -file, and -localfile options are mutuallyexclusive.
-label "label_text" or -lab "label_text"Specifies the label for the build of the package to be deployed.
-preview or -preSpecify this option to preview the action of the command without changingthe repository.
-datastage 'server/project' or -ds 'server/project'Specifies that InfoSphere DataStage and QualityStage assets are to be deployedto the target server and project.
-replace or -replSpecifies that assets in the deployment package replace any existing assets inthe target project that have the same identity.
Exit status
A return value of 0 indicates successful completion, any other value indicatesfailure. The list of exit codes is shown in the command help. Enter istool deploypackage -help to see the list of possible exit codes for the deploy packagecommand.
Error handling
When you deploy a package, the operation continues until the entire deploymentpackage is processed. As many objects are imported as possible. If there is failurein deploying one or more objects to the project, a non-zero exit status is returned.
Examples
The following command deploys an existing package named localpackage to thetarget project named myProject. The target project is on the same computer. If thereare any assets with the same name in the target project, they are replaced withassets from the deployment package.istool deploy package –domain myserver:9080-username user1 -password pass1-package localpackage-datastage ’-replace sliver/myProject’
The following command deploys a package named remotePackage that wascreated on a different computer. The package file has already been copied to thedeploy directory on the target computer. The package is deployed from the file tothe project named OtherProject.
220 Administration Guide
istool deploy package –domain myserver:9080-username user1 -password pass1-file remotePackage.pkg-datastage ’slice/OtherProject’
Send package commandYou can use the istool command-line interface (CLI) to send package files to a localclient computer.
Purpose
The istool send package command sends a deployment package from the metadatarepository to a file on a local client computer. You can deploy a package from thelocal client computer by using the deploy package command with the -localfileoption.
You must first define the package in the InfoSphere Information Server Manager,including specifying the assets that it contains and the build and deploy paths. In aclustering environment, set the build and deploy paths to shared directories thatare accessible from every cluster node. The package is built by using the istoolbuild package command.
Command syntaxistool send packageauthentication options[generic options]-package package-file deployfile[-replace]
Command options
authentication optionsUse authentication options to connect to a specific installation of InfoSphereInformation Server.
generic optionsUse the generic options to request help on command syntax, or to specifysilent or verbose operation.
-package name or -pkg nameSpecifies the name of an existing deployment package definition in themetadata repository. The package must already be built.
-file name or -f nameSpecifies the fully qualified name of a file on the local file system of the clientcomputer to send the deployment package to.
-replaceReplaces the file if it exists on the computer.
Exit status
A return value of 0 indicates successful completion, any other value indicatesfailure. The list of exit codes is shown in the command help. Enter istool sendpackage -help to see the list of possible exit codes for the send package command.
Chapter 14. Managing assets by using the command line 221

Example
The following command sends the deployment package, package1, from thesystem named sliver to a file, package1.pkg in the folder "c:\package dir" in thelocal file system.istool send package –domain sliver:9080-username user1 -password pass1-package package1-file "c:\package dir\package1.pkg"-replace
Export command for InfoSphere DataStage and QualityStageassets
You can use the istool command line interface (CLI) to export assets to an archivefile. The default extension of the archive file is .isx.
Purpose
Use the DataStage command option with the istool export command to export IBMInfoSphere DataStage and QualityStage assets to an archive file on the local filesystem. You can then use the istool import command with the DataStage commandoption to restore the exported assets into a different IBM InfoSphere InformationServer metadata repository.
You must have an InfoSphere DataStage and QualityStage role that grants youpermission to edit the assets that you are exporting.
Command syntaxistool exportauthentication options[generic options]-archive "pathname" [-updatearchive][-preview ][-abortIfError=number_of_errors]-datastage ’ [ -base="server[:port]/project"][-includedependent][-nodesign][-includeexecutable]"dsServer[:port]/project/folder/name.type" ’
Command options
authentication optionsUse authentication options to connect to a specific installation of InfoSphereInformation Server.
generic optionsUse the generic options to request help on command syntax, or to specifysilent or verbose operation.
-archive "archive_pathname" or -ar "archive_pathname"Specifies the path name for the file that the assets are exported to.
-updatearchive or -upSpecifies that the archive file is updated if it exists (otherwise it is overwritten)
-preview or -preSpecify this option to preview the export operation without exporting theassets.
222 Administration Guide
-AbortIfError number_of_errors or -abort number_of_errorsSpecifies that the export stops if the specified number of errors occur
-datastage ' "server/project/folder/name.type" ' or -ds '"server/project/folder/name.type" '
Specifies that InfoSphere DataStage and QualityStage assets are to be exported.Specifies the assets that are to be added to the export file (see “Asset paths forInfoSphere DataStage and QualityStage assets” on page 224). You can copy andpaste asset names from the InfoSphere Information Server manager.
-nodesignExcludes design objects from the export. Use together with the-includeexecutable option to export only runtime executables.
-includedependent or -incdepIncludes dependent assets. For example, if you export a job named myjob thatuses the table definition named salesdata, then specifying the-includedependent causes the table definition to be automatically includedwhen the job is exported.
-includeexecutable or -incexeIncludes runtime executables. Some assets do not have executable components.If you use this option and an asset in the export does not have an executablecomponent, a warning is generated but the export does not fail as a result.
-base "dsServer[:port]/project/[folder]"You can optionally use the -base argument to specify a base path. This path isthen prefixed to all the asset path names that you specify. For example, if yourbase option specifies dsServer/project, then your asset path only specifiesfolder/name.type.
Note: If you specify -includedependent, the archive file can include commonmetadata assets. When you import the archive file, you must specify the -cmoption on the command line. Otherwise, the common metadata assets are notimported.
Exit status
A return value of 0 indicates successful completion, any other value indicatesfailure. The list of exit codes is shown in the command help. Enter istool export-help to see the list of possible exit codes for the export command.
Error handling
When you are exporting more than one object, a failure does not interrupt theoperation. If only one object is successfully exported, an archive file is still created.If no objects are exported, no archive file is created. The exit status reports an errorif one or more objects cannot be exported.
Examples
The following command exports the parallel job named ajob from the projectnamed proj on the computer named sliver. The job is located in the Mine subfolderof the Jobs folder. The command also exports all the server jobs in folder2 and itssubfolders in the project named anotherProj on the computer named serv2. In thisInfoSphere Information Server system, both sliver and serv2 belong to the samedomain (sliver:9080). All the assets are written to the archive file C:\arc.isx.
Chapter 14. Managing assets by using the command line 223
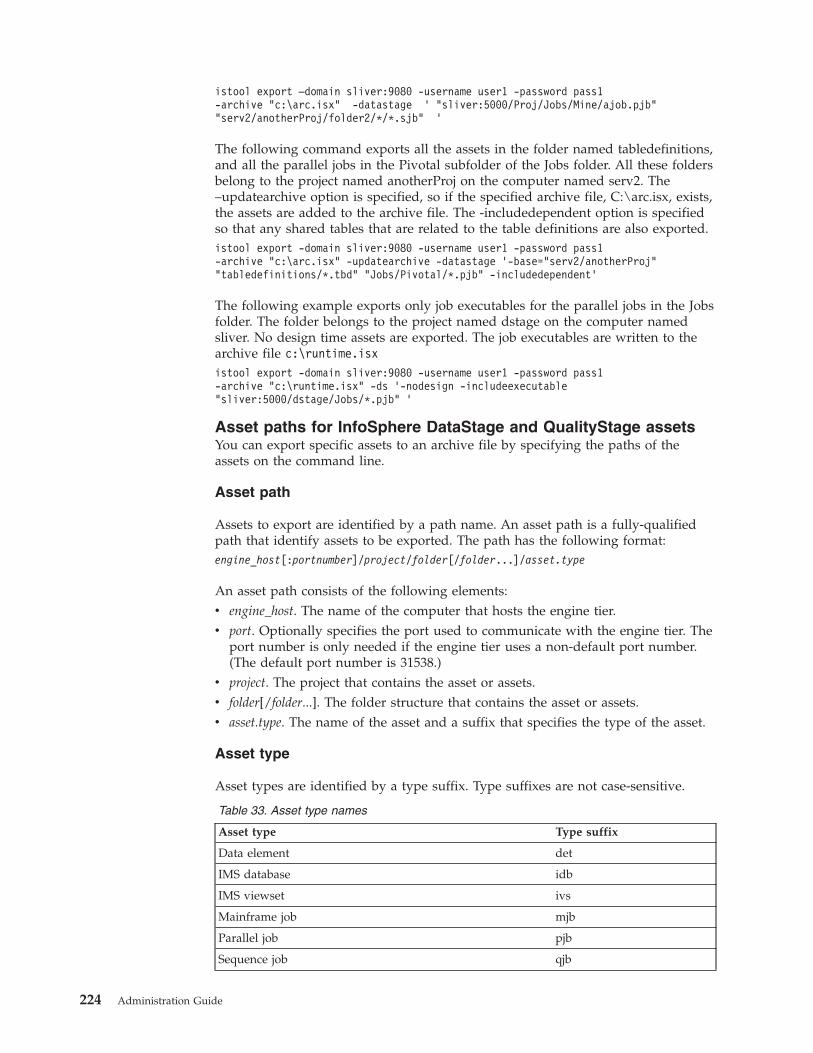
istool export –domain sliver:9080 -username user1 -password pass1-archive "c:\arc.isx" -datastage ’ "sliver:5000/Proj/Jobs/Mine/ajob.pjb""serv2/anotherProj/folder2/*/*.sjb" ’
The following command exports all the assets in the folder named tabledefinitions,and all the parallel jobs in the Pivotal subfolder of the Jobs folder. All these foldersbelong to the project named anotherProj on the computer named serv2. The–updatearchive option is specified, so if the specified archive file, C:\arc.isx, exists,the assets are added to the archive file. The -includedependent option is specifiedso that any shared tables that are related to the table definitions are also exported.istool export -domain sliver:9080 -username user1 -password pass1-archive "c:\arc.isx" -updatearchive -datastage ’-base="serv2/anotherProj""tabledefinitions/*.tbd" "Jobs/Pivotal/*.pjb" -includedependent’
The following example exports only job executables for the parallel jobs in the Jobsfolder. The folder belongs to the project named dstage on the computer namedsliver. No design time assets are exported. The job executables are written to thearchive file c:\runtime.isx
istool export -domain sliver:9080 -username user1 -password pass1-archive "c:\runtime.isx" -ds ’-nodesign -includeexecutable"sliver:5000/dstage/Jobs/*.pjb" ’
Asset paths for InfoSphere DataStage and QualityStage assetsYou can export specific assets to an archive file by specifying the paths of theassets on the command line.
Asset path
Assets to export are identified by a path name. An asset path is a fully-qualifiedpath that identify assets to be exported. The path has the following format:engine_host[:portnumber]/project/folder[/folder...]/asset.type
An asset path consists of the following elements:v engine_host. The name of the computer that hosts the engine tier.v port. Optionally specifies the port used to communicate with the engine tier. The
port number is only needed if the engine tier uses a non-default port number.(The default port number is 31538.)
v project. The project that contains the asset or assets.v folder[/folder...]. The folder structure that contains the asset or assets.v asset.type. The name of the asset and a suffix that specifies the type of the asset.
Asset type
Asset types are identified by a type suffix. Type suffixes are not case-sensitive.
Table 33. Asset type names
Asset type Type suffix
Data element det
IMS database idb
IMS viewset ivs
Mainframe job mjb
Parallel job pjb
Sequence job qjb
224 Administration Guide
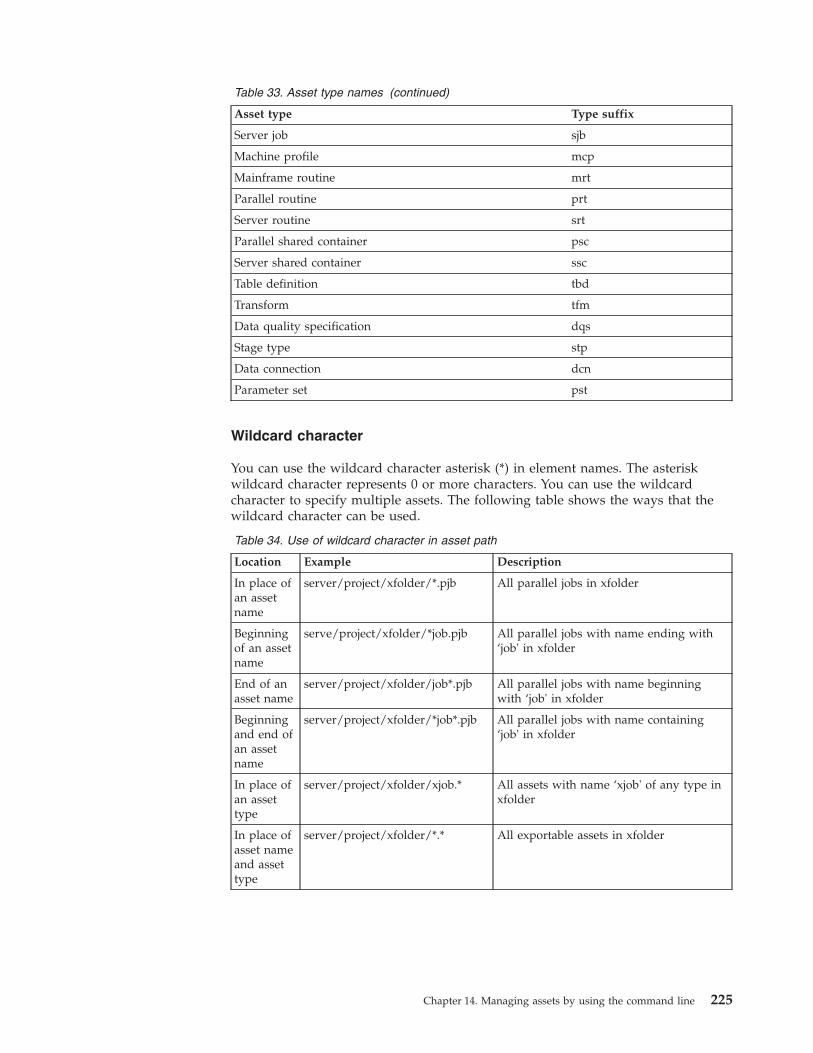
Table 33. Asset type names (continued)
Asset type Type suffix
Server job sjb
Machine profile mcp
Mainframe routine mrt
Parallel routine prt
Server routine srt
Parallel shared container psc
Server shared container ssc
Table definition tbd
Transform tfm
Data quality specification dqs
Stage type stp
Data connection dcn
Parameter set pst
Wildcard character
You can use the wildcard character asterisk (*) in element names. The asteriskwildcard character represents 0 or more characters. You can use the wildcardcharacter to specify multiple assets. The following table shows the ways that thewildcard character can be used.
Table 34. Use of wildcard character in asset path
Location Example Description
In place ofan assetname
server/project/xfolder/*.pjb All parallel jobs in xfolder
Beginningof an assetname
serve/project/xfolder/*job.pjb All parallel jobs with name ending with‘job' in xfolder
End of anasset name
server/project/xfolder/job*.pjb All parallel jobs with name beginningwith ‘job' in xfolder
Beginningand end ofan assetname
server/project/xfolder/*job*.pjb All parallel jobs with name containing‘job' in xfolder
In place ofan assettype
server/project/xfolder/xjob.* All assets with name ‘xjob' of any type inxfolder
In place ofasset nameand assettype
server/project/xfolder/*.* All exportable assets in xfolder
Chapter 14. Managing assets by using the command line 225
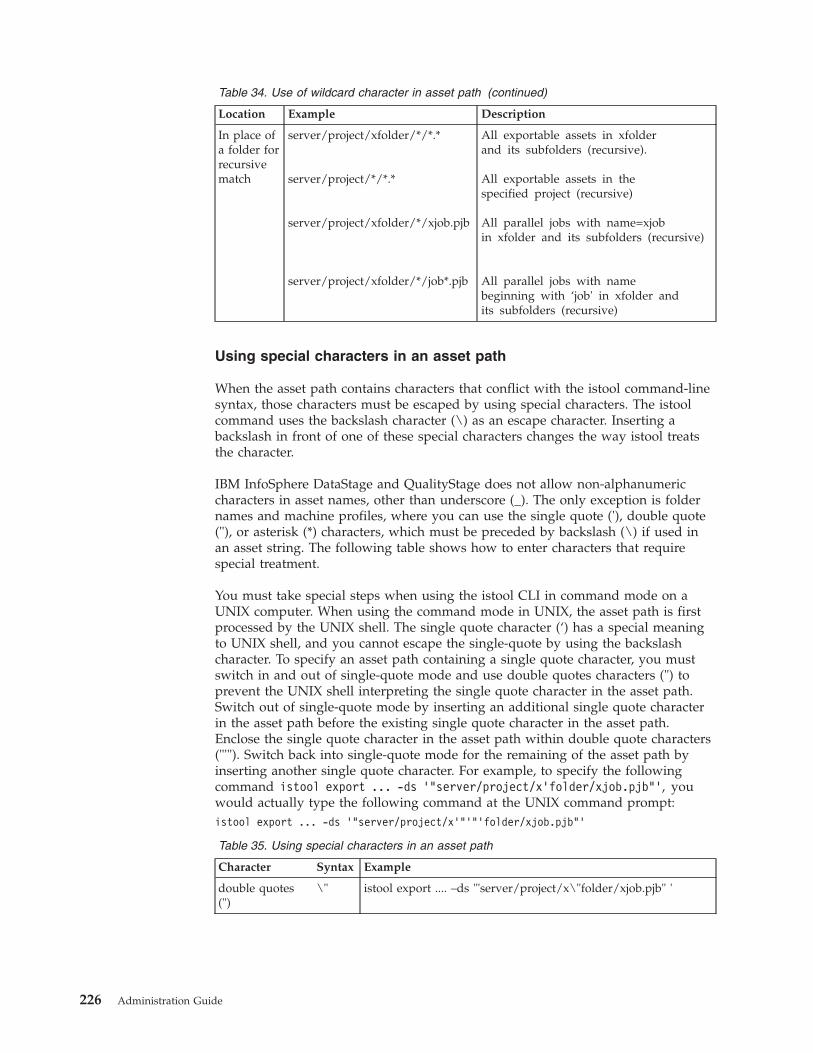
Table 34. Use of wildcard character in asset path (continued)
Location Example Description
In place ofa folder forrecursivematch
server/project/xfolder/*/*.*
server/project/*/*.*
server/project/xfolder/*/xjob.pjb
server/project/xfolder/*/job*.pjb
All exportable assets in xfolderand its subfolders (recursive).
All exportable assets in thespecified project (recursive)
All parallel jobs with name=xjobin xfolder and its subfolders (recursive)
All parallel jobs with namebeginning with ‘job' in xfolder andits subfolders (recursive)
Using special characters in an asset path
When the asset path contains characters that conflict with the istool command-linesyntax, those characters must be escaped by using special characters. The istoolcommand uses the backslash character (\) as an escape character. Inserting abackslash in front of one of these special characters changes the way istool treatsthe character.
IBM InfoSphere DataStage and QualityStage does not allow non-alphanumericcharacters in asset names, other than underscore (_). The only exception is foldernames and machine profiles, where you can use the single quote ('), double quote("), or asterisk (*) characters, which must be preceded by backslash (\) if used inan asset string. The following table shows how to enter characters that requirespecial treatment.
You must take special steps when using the istool CLI in command mode on aUNIX computer. When using the command mode in UNIX, the asset path is firstprocessed by the UNIX shell. The single quote character (‘) has a special meaningto UNIX shell, and you cannot escape the single-quote by using the backslashcharacter. To specify an asset path containing a single quote character, you mustswitch in and out of single-quote mode and use double quotes characters (") toprevent the UNIX shell interpreting the single quote character in the asset path.Switch out of single-quote mode by inserting an additional single quote characterin the asset path before the existing single quote character in the asset path.Enclose the single quote character in the asset path within double quote characters("'"). Switch back into single-quote mode for the remaining of the asset path byinserting another single quote character. For example, to specify the followingcommand istool export ... -ds '"server/project/x'folder/xjob.pjb"', youwould actually type the following command at the UNIX command prompt:istool export ... -ds ’"server/project/x’"’"’folder/xjob.pjb"’
Table 35. Using special characters in an asset path
Character Syntax Example
double quotes(")
\" istool export .... –ds '"server/project/x\"folder/xjob.pjb" '
226 Administration Guide
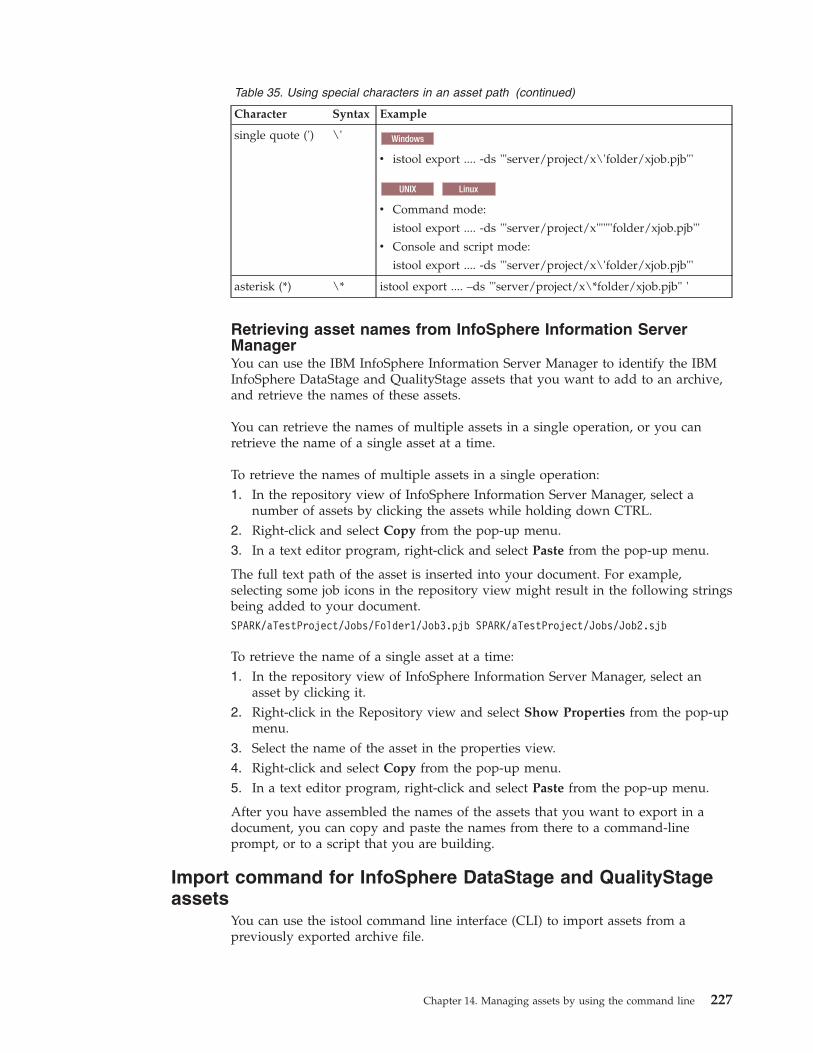
Table 35. Using special characters in an asset path (continued)
Character Syntax Example
single quote (') \' Windows
v istool export .... -ds '"server/project/x\'folder/xjob.pjb"'
UNIX Linux
v Command mode:
istool export .... -ds '"server/project/x'"'"'folder/xjob.pjb"'
v Console and script mode:
istool export .... -ds '"server/project/x\'folder/xjob.pjb"'
asterisk (*) \* istool export .... –ds '"server/project/x\*folder/xjob.pjb" '
Retrieving asset names from InfoSphere Information ServerManagerYou can use the IBM InfoSphere Information Server Manager to identify the IBMInfoSphere DataStage and QualityStage assets that you want to add to an archive,and retrieve the names of these assets.
You can retrieve the names of multiple assets in a single operation, or you canretrieve the name of a single asset at a time.
To retrieve the names of multiple assets in a single operation:1. In the repository view of InfoSphere Information Server Manager, select a
number of assets by clicking the assets while holding down CTRL.2. Right-click and select Copy from the pop-up menu.3. In a text editor program, right-click and select Paste from the pop-up menu.
The full text path of the asset is inserted into your document. For example,selecting some job icons in the repository view might result in the following stringsbeing added to your document.SPARK/aTestProject/Jobs/Folder1/Job3.pjb SPARK/aTestProject/Jobs/Job2.sjb
To retrieve the name of a single asset at a time:1. In the repository view of InfoSphere Information Server Manager, select an
asset by clicking it.2. Right-click in the Repository view and select Show Properties from the pop-up
menu.3. Select the name of the asset in the properties view.4. Right-click and select Copy from the pop-up menu.5. In a text editor program, right-click and select Paste from the pop-up menu.
After you have assembled the names of the assets that you want to export in adocument, you can copy and paste the names from there to a command-lineprompt, or to a script that you are building.
Import command for InfoSphere DataStage and QualityStageassets
You can use the istool command line interface (CLI) to import assets from apreviously exported archive file.
Chapter 14. Managing assets by using the command line 227

Purpose
Use the DataStage command option with the istool import command to importIBM InfoSphere DataStage and QualityStage assets from an archive file to themetadata repository of IBM InfoSphere Information Server. This command is thereverse of the export command.
To import InfoSphere DataStage and QualityStage assets you must have a role thatgrants you permission to edit assets in the target project. To include relatedcommon metadata assets in the import, you must have the Common MetadataAdministrator role.
Command syntaxistool importauthentication options[generic options]-archive pathname[-preview|-replace][-abortAfter=number_of_errors]-datastage ’[-nodesign]"Server/project" ’
Command options
authentication optionsAll asset interchange commands use authentication options to connect to aspecific installation of InfoSphere Information Server.
generic optionsThe generic parameters are available by all asset interchange commands. Usethe generic options to request help on command syntax, or to specify silent orverbose operation.
-archive "asset_pathname" or -ar "asset_pathname"Specifies the path name for the file that the assets are imported from.
-replaceSpecify this option to replace existing assets with imported assets of the sameidentity.
-preview or -preSpecify this option to preview the action of the command without changingthe repository.
-abortAfter number_of_errors or -abort number_of_errorsSpecifies that the import stops if more than the specified number of errorsoccur
-datastage ' "server/project' or -ds 'server/project" 'Specifies that InfoSphere DataStage and QualityStage assets are to be importedto the target server and project.
-nodesignSpecifies that job designs are not imported, only job executables
Importing multiple types of assets
If the archive file includes multiple types of assets, you must specify each type ofincluded metadata on the command line when you import the archive file.Otherwise, only InfoSphere DataStage and QualityStage assets are imported. Forexample, if the archive was exported with the -includedependent option, it couldinclude common metadata assets.
228 Administration Guide

For best import performance, import the common metadata assets first, and thenrun a command to import the InfoSphere DataStage and QualityStage assets.
The following commands import assets from the archive file arc.isx in the correctorder. The common metadata assets are imported first. The InfoSphere DataStageand QualityStage assets are then imported to the project aProj on the server slice.istool import –domain sliver.svl.ibm.com:9080-username user1 -password pass1-archive "c:\arc.isx" -cmistool import –domain sliver.svl.ibm.com:9080-username user1 -password pass1-archive "c:\arc.isx" -datastage ’ "slice/aProj" ’
Exit status
A return value of 0 indicates successful completion, any other value indicatesfailure. The list of exit codes is shown in the command help. Enter istool import-help to see the list of possible exit codes for the import command.
Error handling
When importing from an archive file that contains more than one object, a singlefailure does not interrupt the operation. The exit status reports an error if one ormore objects cannot be imported.
Examples
The following command previews an import of assets from the file arc.isx. Noassets are imported. Job designs are not included.istool import –domain sliver:9080-username user1 -password pass1-archive "c:\arc.isx" -pre -datastage ’ -nodesign "slice/aProj" ’
After the preview, the command is repeated without the -preview option to importthe assets to the project named aProj located on the computer named slice. TheInfoSphere Information Server engine on slice is associated with the computernamed sliver on the services tier.istool import –domain sliver.svl.ibm.com:9080-username user1 -password pass1-archive "c:\arc.isx" -datastage ’ -nodesign "slice/aProj" ’
Common metadata assetsCommon metadata includes physical data resources and business intelligenceassets that are stored in the metadata repository of IBM InfoSphere InformationServer. You can import, export, query and delete common metadata assets.
Importing and exporting common metadata assets by usingthe command line
Common metadata assets comprise the physical data resource metadata andbusiness intelligence metadata that is stored in the InfoSphere Information Serverrepository.
Physical data resources
Chapter 14. Managing assets by using the command line 229
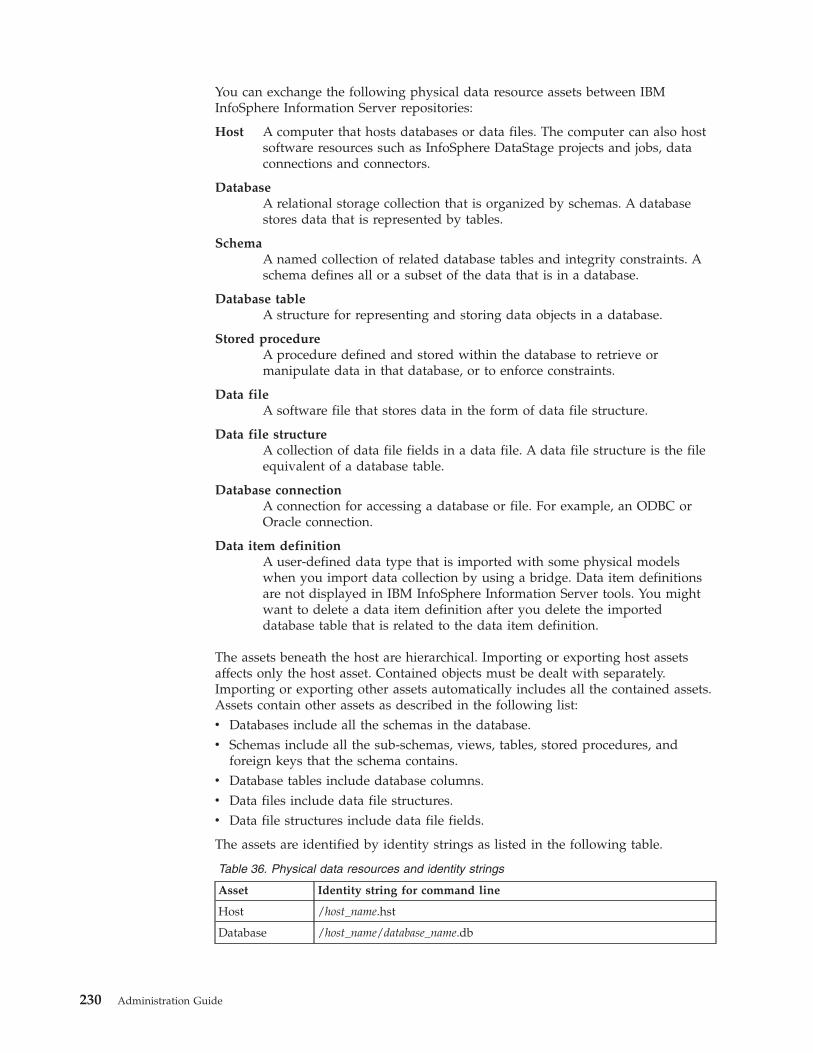
You can exchange the following physical data resource assets between IBMInfoSphere Information Server repositories:
Host A computer that hosts databases or data files. The computer can also hostsoftware resources such as InfoSphere DataStage projects and jobs, dataconnections and connectors.
DatabaseA relational storage collection that is organized by schemas. A databasestores data that is represented by tables.
SchemaA named collection of related database tables and integrity constraints. Aschema defines all or a subset of the data that is in a database.
Database tableA structure for representing and storing data objects in a database.
Stored procedureA procedure defined and stored within the database to retrieve ormanipulate data in that database, or to enforce constraints.
Data fileA software file that stores data in the form of data file structure.
Data file structureA collection of data file fields in a data file. A data file structure is the fileequivalent of a database table.
Database connectionA connection for accessing a database or file. For example, an ODBC orOracle connection.
Data item definitionA user-defined data type that is imported with some physical modelswhen you import data collection by using a bridge. Data item definitionsare not displayed in IBM InfoSphere Information Server tools. You mightwant to delete a data item definition after you delete the importeddatabase table that is related to the data item definition.
The assets beneath the host are hierarchical. Importing or exporting host assetsaffects only the host asset. Contained objects must be dealt with separately.Importing or exporting other assets automatically includes all the contained assets.Assets contain other assets as described in the following list:v Databases include all the schemas in the database.v Schemas include all the sub-schemas, views, tables, stored procedures, and
foreign keys that the schema contains.v Database tables include database columns.v Data files include data file structures.v Data file structures include data file fields.
The assets are identified by identity strings as listed in the following table.
Table 36. Physical data resources and identity strings
Asset Identity string for command line
Host /host_name.hst
Database /host_name/database_name.db
230 Administration Guide

Table 36. Physical data resources and identity strings (continued)
Asset Identity string for command line
Schema(DataSchema)
/host_name/database_name/schema_name.sch
Database table(DataCollection)
/host_name/database_name/schema_name/table_name.tbl /
Storedprocedure
/host_name/database_name/schema_name/stored_procedure_name.sp
Data file /host_name/datafile_path/datafile_name.fl
Data filestructure
host_name/datafile_path/datafile_name/dfstructure_name.dcl
Databaseconnection
/host_name/database_name/connection_name.dcn/host_name/datafile_path/datafile_name/connection_name.fcn
Data itemdefinition
/data_item_def_qualifier/data_item_def_name.did
If any asset names in the identity string contain space characters, the asset stringmust be enclosed in double quote characters (").
You can use the wildcard characters asterisk (*) and exclamation point (!) inidentity strings. The asterisk represents 0 or more characters, the exclamation pointrepresents exactly one character. For example,/host1/B!Dbase/schema1/t*.tbl
selects all the database tables whose names begin with t from the databasesB1Dbase, B3Dbase and BSDbase.
If a component of the identity string contains asterisks or exclamation points thatare not intended as wildcards but are part of the actual name, each such asterisk orexclamation point must be proceeded by two backward slash characters (\\). Forexample, if the host name is myhost and the database name is Data!base, then theidentity string is /myhost/Data\\!base.db.
If a component of the identity string contains a forward slash character (/) as partof the component name, then add an additional forward slash (/). For example, ifthe host name is myhost and the database name is data/base, then the identitystring is /myhost/data//base.db.
If a component of the indentity string contains a backward slash character (\) aspart of the component name, then add an additional backward slash (\). Forexample, if the host name is myhost and the and the database name is data\base,then the identity string is /myhost/data\\base.db.
Business intelligence assets
Business intelligence assets comprise the objects that have been imported into theInfoSphere Information Server metadata repository from business intelligence tools.
You can exchange the following physical data resource assets between IBMInfoSphere Information Server repositories:
BI modelA BI model is a grouping of BI data collection views that are relevant to aBI application.
Chapter 14. Managing assets by using the command line 231
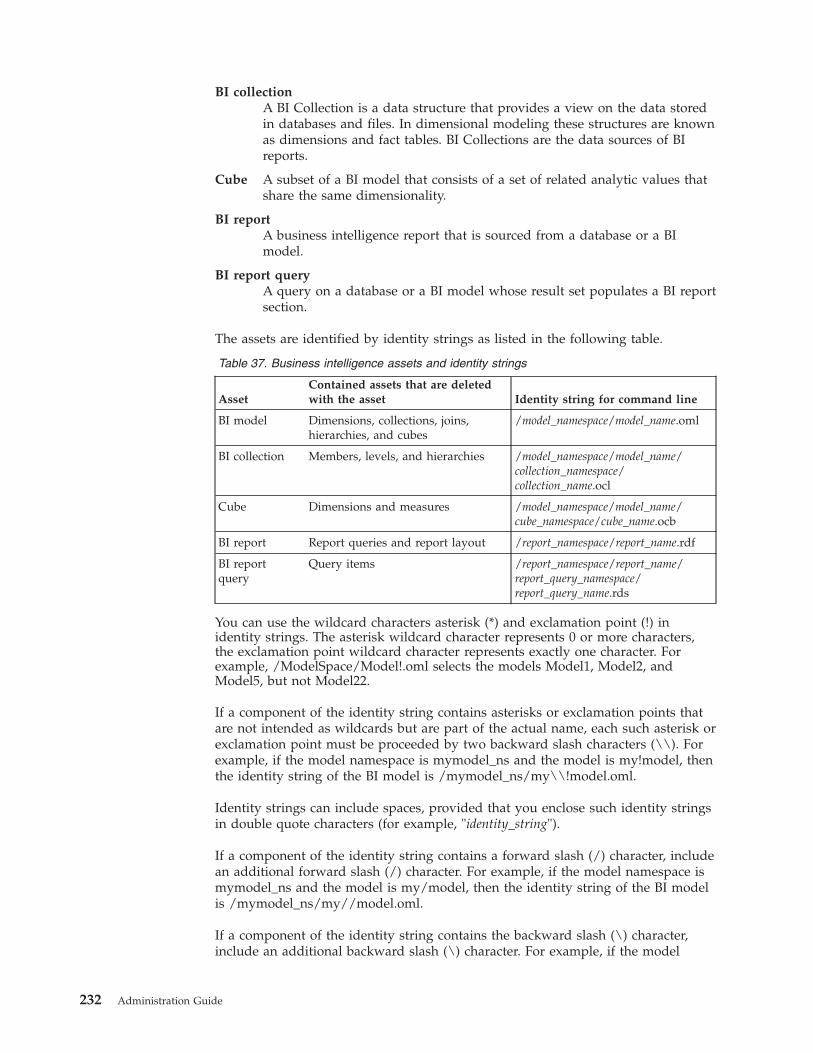
BI collectionA BI Collection is a data structure that provides a view on the data storedin databases and files. In dimensional modeling these structures are knownas dimensions and fact tables. BI Collections are the data sources of BIreports.
Cube A subset of a BI model that consists of a set of related analytic values thatshare the same dimensionality.
BI reportA business intelligence report that is sourced from a database or a BImodel.
BI report queryA query on a database or a BI model whose result set populates a BI reportsection.
The assets are identified by identity strings as listed in the following table.
Table 37. Business intelligence assets and identity strings
AssetContained assets that are deletedwith the asset Identity string for command line
BI model Dimensions, collections, joins,hierarchies, and cubes
/model_namespace/model_name.oml
BI collection Members, levels, and hierarchies /model_namespace/model_name/collection_namespace/collection_name.ocl
Cube Dimensions and measures /model_namespace/model_name/cube_namespace/cube_name.ocb
BI report Report queries and report layout /report_namespace/report_name.rdf
BI reportquery
Query items /report_namespace/report_name/report_query_namespace/report_query_name.rds
You can use the wildcard characters asterisk (*) and exclamation point (!) inidentity strings. The asterisk wildcard character represents 0 or more characters,the exclamation point wildcard character represents exactly one character. Forexample, /ModelSpace/Model!.oml selects the models Model1, Model2, andModel5, but not Model22.
If a component of the identity string contains asterisks or exclamation points thatare not intended as wildcards but are part of the actual name, each such asterisk orexclamation point must be proceeded by two backward slash characters (\\). Forexample, if the model namespace is mymodel_ns and the model is my!model, thenthe identity string of the BI model is /mymodel_ns/my\\!model.oml.
Identity strings can include spaces, provided that you enclose such identity stringsin double quote characters (for example, "identity_string").
If a component of the identity string contains a forward slash (/) character, includean additional forward slash (/) character. For example, if the model namespace ismymodel_ns and the model is my/model, then the identity string of the BI modelis /mymodel_ns/my//model.oml.
If a component of the identity string contains the backward slash (\) character,include an additional backward slash (\) character. For example, if the model
232 Administration Guide
namespace is mymodel_ns and the model is my\model, then the identity string ofthe BI model is /mymodel_ns/my\\model.oml.
Export command for common metadata assetsYou can use the istool command line interface (CLI) to export your data resourceassets, such as databases, schemas, and tables, and your business intelligenceassets, such as BI models and BI reports.
Purpose
Use the common metadata command parameter with the istool export command toexport the following physical data resource assets:v Hostsv Databasesv Schemasv Data filesv Database tablesv Stored proceduresv Data connectionsv Data item definitions
Use the common metadata command parameter with the istool export command toexport the following business intelligence assets:v BI modelv BI collectionv Cubev BI Reportv BI report query
The export creates an archive file, which by default has the suffix .isx.
You must have the Common Metadata Administrator role.
Command syntaxistool exportauthentication parameters[generic parameters]-archive "pathname" [-updatearchive][-AbortIfError number_of_errors][-preview]–commonmetadata ’[-base "path"] identity_string...
[-contactAssignmentOnly][-includeContactAssignment][-includeAnnotations][-includeDataConnection]
’
Parameters
exportThe export command specifies an export operation.
authenticationAll asset interchange commands use authentication parameters to connect to aspecific IBM InfoSphere Information Server.
Chapter 14. Managing assets by using the command line 233
generic parametersThe generic parameters are available to all asset interchange commands. Usethe generic parameters to request help on command syntax, or to specify silentor verbose operation.
-archive "path_name" or -ar "path_name"Specifies the path name for the file that the assets are exported to.
-updatearchive or -upUpdates the archive file if it exists (otherwise it is overwritten if it exists).
-AbortIfError number_of_errors or -abort number_of_errorsStops the export after the specified number of errors.
-preview or -prePreviews the export. The preview lists the assets that will be exported whenthe export runs.
-commonmetadata identity_string or -cm identity_stringSpecifies that common metadata assets are exported. Specifies the identitystring of each asset to export. The format for the identity_string is described in“Importing and exporting common metadata assets by using the commandline” on page 229. If you specify more than one identity string, the identitystrings and associated options must be enclosed in single quotation marks (').To be exported, an asset must have a name and a complete identity string.
-contactAssignmentOnly or -caonlyExports only the contact assignments that are associated with the specifiedassets or assets, not the assets themselves. A contact is a person or group thatis associated with a data resource, it is not an identity of a user in IBMInfoSphere Information Server installation. When imported to a target system,contact assignments are relinked to the assets that they are contacts for.
-includeContactAssignment or -inccaIncludes the contact information for the exported assets.
-includeAnnotations or -incannotIncludes the annotations for the exported assets.
-includeDataConnectionIncludes the data connections that are associated with the exported databasetables, data files, and stored procedures.
-base "path"Specifies a base path. This path is then prefixed to all the asset identity stringsthat you specify.
Exit status
A return value of 0 indicates successful completion; any other value indicatesfailure.
Examples
The following command exports all the tables and associated annotations in theschema named schema1 to the file myarchive.isx.istool export –dom ABC:9080 –username user1 –password pass1-archive "c:\myarchive.isx"–commonmetadata ’/host1/db1/schema1/*.tbl-includeAnnotations’
234 Administration Guide
The following command exports all the contact assignments associated to all thetables in the schema named schema1 to the file myarchive.isx.istool export –dom ABC:9080 –u user1 –p pass1-ar "c:\myarchive.isx"–cm ’/host1/db1/schema1/*.tbl-contactAssignmentOnly’
The following command exports the specified hosts to the file myarchive.isx.istool export –dom ABC:9080 –u user1 –p pass1-ar "c:\myarchive.isx"–cm ’/host1.hst /host2.hst’
The following command specifies a base path of /host1/db1/schema1 and usesthe base path when specifying tables to export to the file myarchive.isx:istool export –dom ABC:9080 –u user1 –p pass1-ar "c:\myarchive.isx"–cm ’-base "/host1/db1/schema1" tab1.tbltab2.tbl tab506.tbl ’
The following command exports the reports identified by the asset identity string'/report_namespace/*/report_query_namespace/*.rds':istool export –dom ABC:9080 –u user1 –p pass1-ar "c:\myarchive.isx"–cm ’/report_namespace/*/report_query_namespace/*.rds’
The following command uses the -base option to specify a base path for the assetidentity string that specifies the assets to export:istool export –dom ABC:9080 –u user1 –p pass1-ar "c:\myarchive.isx"-cm ’-base "/model_namespace/model_name/collection_namespace"collection_name01.ocl collection_name02.ocl’
Import command for common metadata assetsYou can use the istool command line interface (CLI) to import your data resourceassets, such as databases, schemas, and tables, and your business intelligenceassets, such as BI models and BI reports, from a previously exported archive file.
Purpose
Use the common metadata command parameter with the istool import commandto import the following physical data resource assets:v Hostsv Databasesv Schemasv Filesv Tablesv Stored proceduresv Data Connectionsv Data item definitions
Use the common metadata command parameter with the istool import commandto import the following business intelligence assets:v BI modelv BI collectionv Cube
Chapter 14. Managing assets by using the command line 235

v BI Reportv BI report query
If you specify the replace parameter, and a common metadata asset exists in thetarget metadata repository, then the imported asset is merged with the existingasset.
You must have the Common Metadata Administrator role.
Command syntaxistool importauthentication parameters[generic parameters][-AbortAfter number_of_errors]-archive "pathname"[-preview | -replace]–commonmetadata
Parameters
importThe import parameter specifies an import operation.
authenticationAll asset interchange commands use authentication parameters to connect to aspecific IBM InfoSphere Information Server.
generic parametersThe generic parameters are available to all asset interchange commands. Usethe generic parameter to request help on command syntax, or to specify silentor verbose operation.
-AbortAfter number_of_errors or -abort number_of_errorsSpecifies that the import stops if more than the specified number of errorsoccur.
-commonmetadata or -cmSpecifies that common metadata assets are imported.
-archive path_name or -ar path_nameSpecifies the path name of the file that the assets were previously exported to.
-preview or -prePreviews the import. The preview lists the assets that will be imported whenthe import runs.
-replaceReplaces existing common metadata assets with imported assets.
Exit status
A return value of 0 indicates successful completion, any other value indicatesfailure.
Example
The following command imports all the data resource assets from the filecustomer.isx:istool import –dom ABC:9080 –u user1 –p pass1-archive "c:\customer.isx" –commonmetadata
236 Administration Guide

The following command previews the assets in the file customer.isx:istool import –dom ABC:9080 –u user1 –p pass1 -pre-ar "c:\customer.isx" –cm
Merge and replace actions for common metadata assets:
If a common metadata asset with the same identity exists in the target metadatarepository, and the -replace option is specified in the import command, the newasset is merged with the existing asset. If the -replace option is not specified, theimport fails.
If the -replace option is selected, common metadata assets in the target metadatarepository are replaced by imported assets with the same identity. For some assetreferences, unions are performed. That is, if the imported assets have additionalreferences to the target asset, the references are added to the asset in the targetmetadata repository. The following references can be the subject of unions:v If the imported data contains contact assignments that are assigned to an object,
then the additional contact assignments are added to the object, and the existingcontact assignments in the metadata repository are preserved.
v If the imported data contains databases, data files, data connections, connectorsand jobs that are hosted by a host system, they are added to the host system,and the existing databases, data files, data connections, connectors and jobs inthe metadata repository are preserved.
v If the imported data contains data schemas that are contained in a database,then the data schemas are added to the database and the existing data schemasin the metadata repository are preserved.
v If the imported data contains data collections, stored procedures, andsub-schemas that are contained in a data schema, then the data collections,stored procedures, and sub-schemas are added to the data schema, and theexisting data collections, stored procedures, and sub-schemas in the metadatarepository are preserved.
v If the imported data contains data collections that are contained in a data file,then the data collections are added to the data file, and the existing datacollections in the metadata repository are preserved.
v If the imported data contains data connections that accesses a database or a datafile, then the data connections are added to the database or the data file, and theexisting data connections in the metadata repository are preserved.
v If the imported data contains data collections and stored procedures that areimported via a data connection, then the data collections and stored proceduresare added to the data connection, and the existing data collections and storedprocedures in the metadata repository are preserved.
v If the imported data contains data connections that are used by a connector, thenthe data connections are added to the connector, and the existing dataconnections in the metadata repository are preserved.
v If the imported data contains database tables that are referenced by foreign keys,then the foreign keys are added to the tables, and the existing foreign keys inthe metadata repository are preserved.
v If the imported data contains data fields that are referenced by key components,then the key components are added to the data fields, and the existing keycomponents in the metadata repository are preserved.
Querying and deleting assets by using the command lineYou can run queries to identify the assets that you want to delete.
Chapter 14. Managing assets by using the command line 237
You can delete physical data resources (PDR) and business intelligence (BI) assetsfrom the metadata repository of InfoSphere Information Server by using the istoolscommand line.
Physical data resources include database tables and data file structures, theircolumns or fields, and the assets that contain them, such as schemas, databases,and host computers. BI assets include BI models, BI reports, and the assets thatthey contain, such as levels, hierarchies, and joins.
In order to delete an asset, you must specify the identity string of the asset. Theidentity string includes the following elements:v Hierarchy of names of the assets that contain the asset to be deleted, separated
by forward slashes (/)v Name of the assetv For command-line operations only, the file extension for the asset, such as .tbl
For example, the identity string of a database table is /host_computer/database/schema/table.tbl. Therefore, the identity string of the Customer table in the Salesschema of the Production database on a computer named A341K is/A341K/Production/Sales/Customer.tbl.
When you want to delete multiple assets by using the command line, the mostefficient way is to run the query command and write the results to a file. You canthen specify the file as input to the deletecm command. The query results fileincludes the identity string and the repository ID (RID) of each asset that is listed.Both the identity string and the RID are required when you specify a file of assetsthat are to be deleted. Because you must run a query to obtain the RID, you mustuse a query to create the file.
If the query result contains an asset that does not have required attributes in theidentity string, such as database name, "Invalid Identity" is written to the output inplace of the identity string.
You can delete assets from the query results file, and add assets to it from otherqueries, as long as you include both the RID and the identity string of each asset.
When you have many PDR assets in the repository, it might be more efficient to dosuccessive queries. For example, you could first run a query to find all the schemasin the repository, and then run a second query on only those schemas that havedatabase tables that you want to delete.
If you are deleting a small number of assets, you might want to specify theidentity string of each asset on the command line instead of specifying a file. Youdo not specify the RID of the asset on the command line.
You can determine the identity string of an asset in the following ways:v Run a command-line query to find the asset.v In IBM InfoSphere Metadata Workbench, browse the hosts on the Browse tab to
find databases and data files. Search or query to find BI assets. When yourcursor hovers over the name of an asset in a list, the names of the containingassets are displayed.
v In InfoSphere Business Glossary, search for a type of PDR or BI asset. In theresulting list of assets, the Context column displays the elements of the identitystring.
238 Administration Guide

If the delete operation fails to delete one of the assets identified, then the entiredelete operation is rolled back.
Physical data resourcesPhysical data resources (PDR) comprise the database and data file metadata that isstored in the InfoSphere Information Server metadata repository.
You can delete the following PDR assets from the IBM InfoSphere InformationServer metadata repository.
Host A computer that hosts databases or data files. The computer can also hostsoftware resources such as InfoSphere DataStage projects and jobs, dataconnections and connectors. You cannot delete a host if it contains at leastone resource.
DatabaseA relational storage collection that is organized by schemas. A databasestores data that is represented by tables.
SchemaA named collection of related database tables and integrity constraints. Aschema defines all or a subset of the data that is in a database.
Database tableA structure for representing and storing data objects in a database.
Stored procedureA procedure defined and stored within the database to retrieve ormanipulate data in that database, or to enforce constraints.
Data fileA software file that stores data in the form of data file structure.
Data file structureA collection of data file fields in a data file. A data file structure is the fileequivalent of a database table.
ConnectorA software component that provides access from InfoSphere DataStage andQualityStage Administrator to an external source of data. You cannot deleteconnector assets.
Database connectionA connection for accessing a database or file. For example, an ODBC orOracle connection.
Data item definitionA user-defined data type that is imported with some physical modelswhen you import data collection by using a bridge. Data item definitionsare not displayed in IBM InfoSphere Information Server tools. You mightwant to delete a data item definition after you delete the importeddatabase table that is related to the data item definition.
Deleting an asset automatically deletes its contained assets. Objects contain otherobjects as described in the following list:v Hosts include databases and data files. Some hosts can also contain projects and
jobs from InfoSphere DataStage and QualityStage Administrator. You can onlydelete hosts only if they contain no Database, Data file, Data connection,Connector, and Job assets.
v Databases include all the schemas in the database.
Chapter 14. Managing assets by using the command line 239
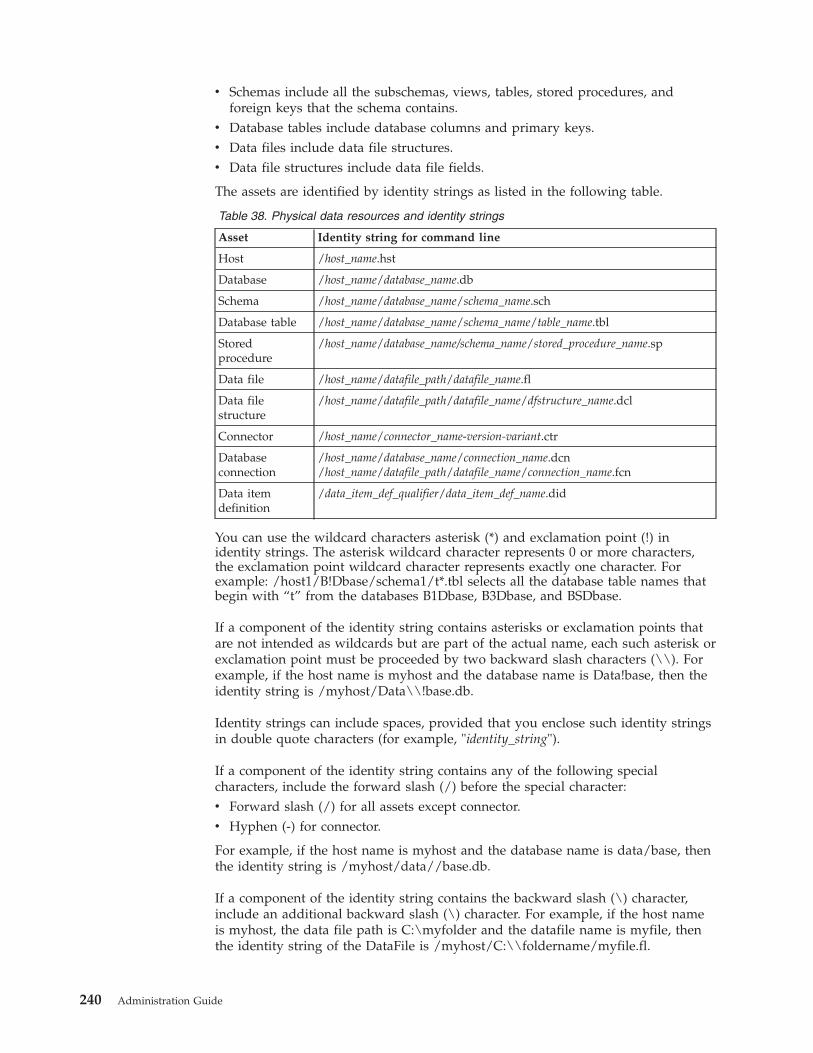
v Schemas include all the subschemas, views, tables, stored procedures, andforeign keys that the schema contains.
v Database tables include database columns and primary keys.v Data files include data file structures.v Data file structures include data file fields.
The assets are identified by identity strings as listed in the following table.
Table 38. Physical data resources and identity strings
Asset Identity string for command line
Host /host_name.hst
Database /host_name/database_name.db
Schema /host_name/database_name/schema_name.sch
Database table /host_name/database_name/schema_name/table_name.tbl
Storedprocedure
/host_name/database_name/schema_name/stored_procedure_name.sp
Data file /host_name/datafile_path/datafile_name.fl
Data filestructure
/host_name/datafile_path/datafile_name/dfstructure_name.dcl
Connector /host_name/connector_name-version-variant.ctr
Databaseconnection
/host_name/database_name/connection_name.dcn/host_name/datafile_path/datafile_name/connection_name.fcn
Data itemdefinition
/data_item_def_qualifier/data_item_def_name.did
You can use the wildcard characters asterisk (*) and exclamation point (!) inidentity strings. The asterisk wildcard character represents 0 or more characters,the exclamation point wildcard character represents exactly one character. Forexample: /host1/B!Dbase/schema1/t*.tbl selects all the database table names thatbegin with “t” from the databases B1Dbase, B3Dbase, and BSDbase.
If a component of the identity string contains asterisks or exclamation points thatare not intended as wildcards but are part of the actual name, each such asterisk orexclamation point must be proceeded by two backward slash characters (\\). Forexample, if the host name is myhost and the database name is Data!base, then theidentity string is /myhost/Data\\!base.db.
Identity strings can include spaces, provided that you enclose such identity stringsin double quote characters (for example, "identity_string").
If a component of the identity string contains any of the following specialcharacters, include the forward slash (/) before the special character:v Forward slash (/) for all assets except connector.v Hyphen (-) for connector.
For example, if the host name is myhost and the database name is data/base, thenthe identity string is /myhost/data//base.db.
If a component of the identity string contains the backward slash (\) character,include an additional backward slash (\) character. For example, if the host nameis myhost, the data file path is C:\myfolder and the datafile name is myfile, thenthe identity string of the DataFile is /myhost/C:\\foldername/myfile.fl.
240 Administration Guide
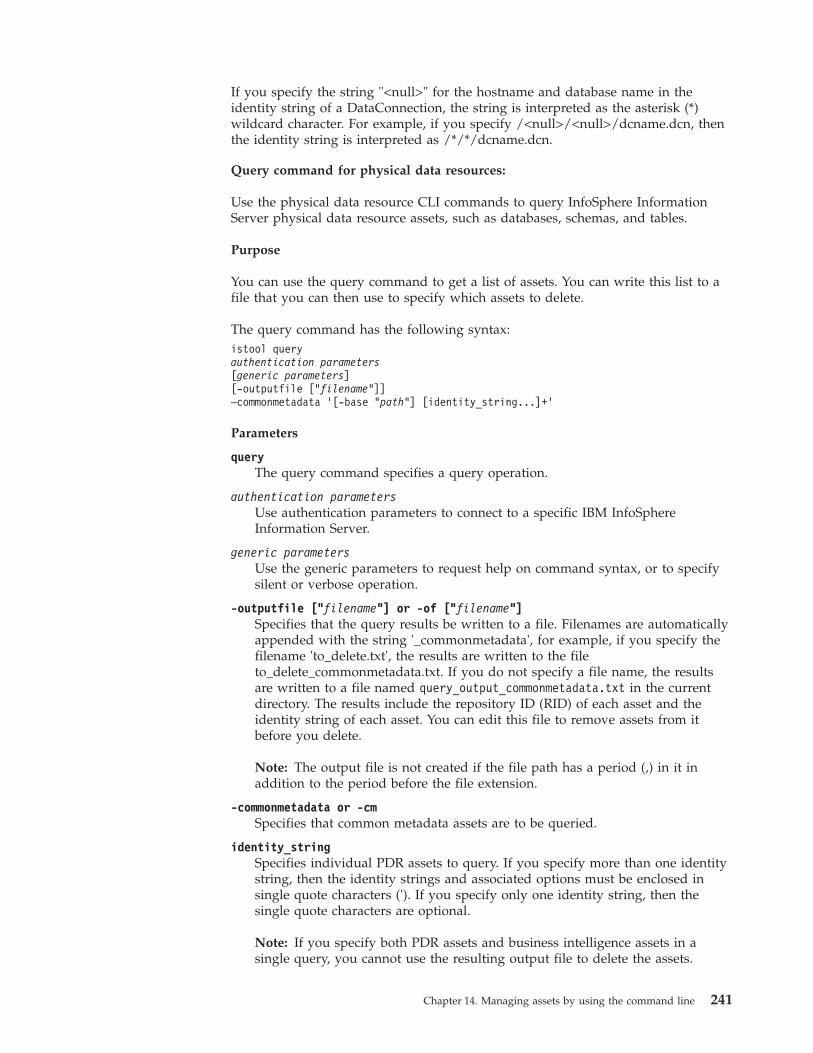
If you specify the string "<null>" for the hostname and database name in theidentity string of a DataConnection, the string is interpreted as the asterisk (*)wildcard character. For example, if you specify /<null>/<null>/dcname.dcn, thenthe identity string is interpreted as /*/*/dcname.dcn.
Query command for physical data resources:
Use the physical data resource CLI commands to query InfoSphere InformationServer physical data resource assets, such as databases, schemas, and tables.
Purpose
You can use the query command to get a list of assets. You can write this list to afile that you can then use to specify which assets to delete.
The query command has the following syntax:istool queryauthentication parameters[generic parameters][-outputfile ["filename"]]–commonmetadata ’[-base "path"] [identity_string...]+’
Parameters
queryThe query command specifies a query operation.
authentication parametersUse authentication parameters to connect to a specific IBM InfoSphereInformation Server.
generic parametersUse the generic parameters to request help on command syntax, or to specifysilent or verbose operation.
-outputfile ["filename"] or -of ["filename"]Specifies that the query results be written to a file. Filenames are automaticallyappended with the string '_commonmetadata', for example, if you specify thefilename 'to_delete.txt', the results are written to the fileto_delete_commonmetadata.txt. If you do not specify a file name, the resultsare written to a file named query_output_commonmetadata.txt in the currentdirectory. The results include the repository ID (RID) of each asset and theidentity string of each asset. You can edit this file to remove assets from itbefore you delete.
Note: The output file is not created if the file path has a period (,) in it inaddition to the period before the file extension.
-commonmetadata or -cmSpecifies that common metadata assets are to be queried.
identity_stringSpecifies individual PDR assets to query. If you specify more than one identitystring, then the identity strings and associated options must be enclosed insingle quote characters ('). If you specify only one identity string, then thesingle quote characters are optional.
Note: If you specify both PDR assets and business intelligence assets in asingle query, you cannot use the resulting output file to delete the assets.
Chapter 14. Managing assets by using the command line 241
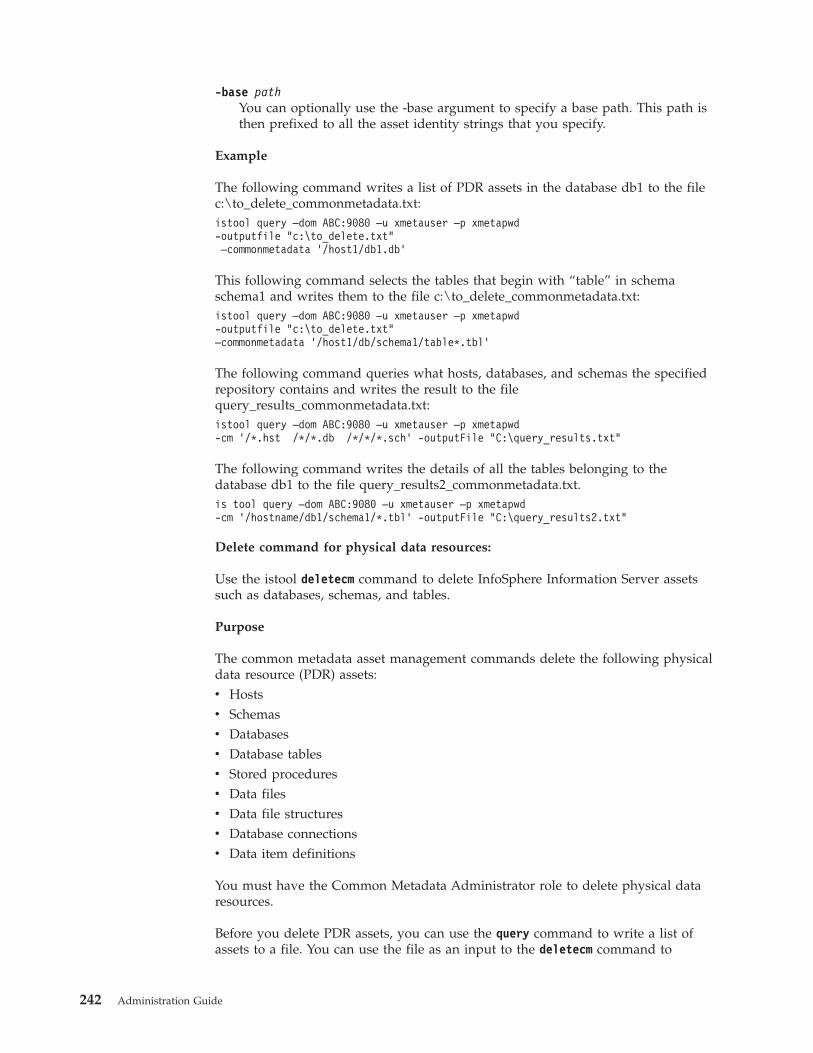
-base pathYou can optionally use the -base argument to specify a base path. This path isthen prefixed to all the asset identity strings that you specify.
Example
The following command writes a list of PDR assets in the database db1 to the filec:\to_delete_commonmetadata.txt:istool query –dom ABC:9080 –u xmetauser –p xmetapwd-outputfile "c:\to_delete.txt"–commonmetadata ’/host1/db1.db’
This following command selects the tables that begin with “table” in schemaschema1 and writes them to the file c:\to_delete_commonmetadata.txt:istool query –dom ABC:9080 –u xmetauser –p xmetapwd-outputfile "c:\to_delete.txt"–commonmetadata ’/host1/db/schema1/table*.tbl’
The following command queries what hosts, databases, and schemas the specifiedrepository contains and writes the result to the filequery_results_commonmetadata.txt:istool query –dom ABC:9080 –u xmetauser –p xmetapwd-cm ’/*.hst /*/*.db /*/*/*.sch’ -outputFile "C:\query_results.txt"
The following command writes the details of all the tables belonging to thedatabase db1 to the file query_results2_commonmetadata.txt.is tool query –dom ABC:9080 –u xmetauser –p xmetapwd-cm ’/hostname/db1/schema1/*.tbl’ -outputFile "C:\query_results2.txt"
Delete command for physical data resources:
Use the istool deletecm command to delete InfoSphere Information Server assetssuch as databases, schemas, and tables.
Purpose
The common metadata asset management commands delete the following physicaldata resource (PDR) assets:v Hostsv Schemasv Databasesv Database tablesv Stored proceduresv Data filesv Data file structuresv Database connectionsv Data item definitions
You must have the Common Metadata Administrator role to delete physical dataresources.
Before you delete PDR assets, you can use the query command to write a list ofassets to a file. You can use the file as an input to the deletecm command to
242 Administration Guide
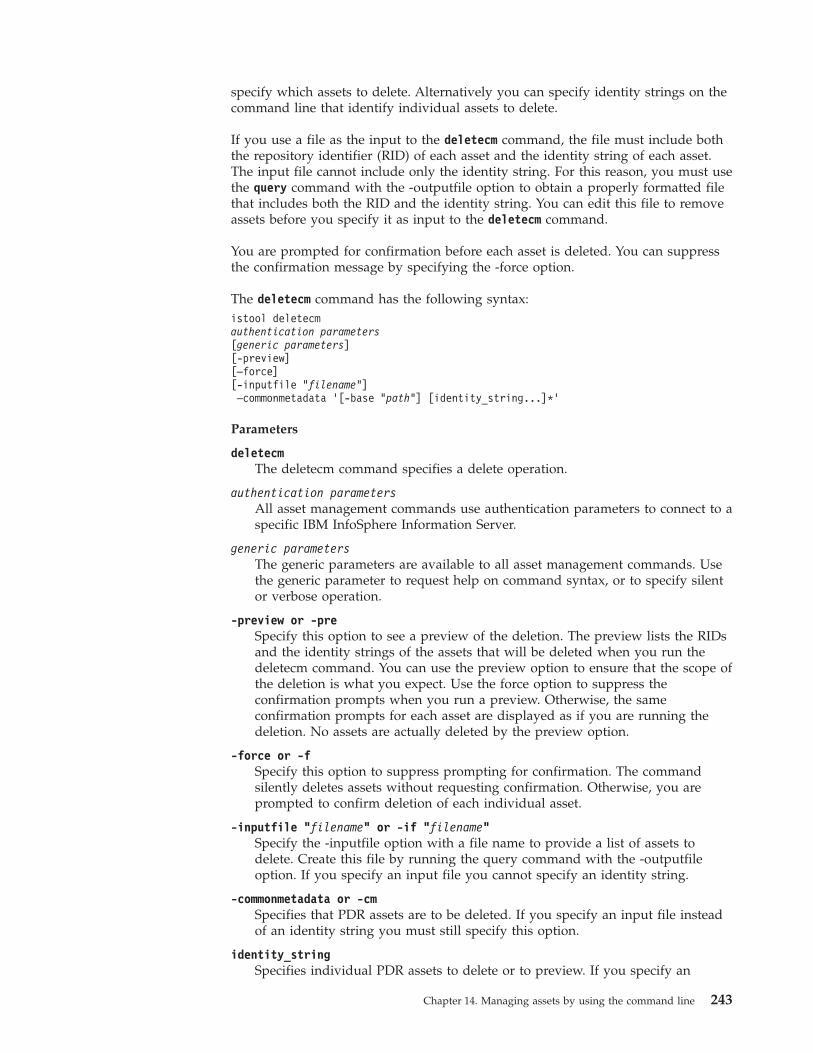
specify which assets to delete. Alternatively you can specify identity strings on thecommand line that identify individual assets to delete.
If you use a file as the input to the deletecm command, the file must include boththe repository identifier (RID) of each asset and the identity string of each asset.The input file cannot include only the identity string. For this reason, you must usethe query command with the -outputfile option to obtain a properly formatted filethat includes both the RID and the identity string. You can edit this file to removeassets before you specify it as input to the deletecm command.
You are prompted for confirmation before each asset is deleted. You can suppressthe confirmation message by specifying the -force option.
The deletecm command has the following syntax:istool deletecmauthentication parameters[generic parameters][-preview][–force][-inputfile "filename"]–commonmetadata ’[-base "path"] [identity_string...]*’
Parameters
deletecmThe deletecm command specifies a delete operation.
authentication parametersAll asset management commands use authentication parameters to connect to aspecific IBM InfoSphere Information Server.
generic parametersThe generic parameters are available to all asset management commands. Usethe generic parameter to request help on command syntax, or to specify silentor verbose operation.
-preview or -preSpecify this option to see a preview of the deletion. The preview lists the RIDsand the identity strings of the assets that will be deleted when you run thedeletecm command. You can use the preview option to ensure that the scope ofthe deletion is what you expect. Use the force option to suppress theconfirmation prompts when you run a preview. Otherwise, the sameconfirmation prompts for each asset are displayed as if you are running thedeletion. No assets are actually deleted by the preview option.
-force or -fSpecify this option to suppress prompting for confirmation. The commandsilently deletes assets without requesting confirmation. Otherwise, you areprompted to confirm deletion of each individual asset.
-inputfile "filename" or -if "filename"Specify the -inputfile option with a file name to provide a list of assets todelete. Create this file by running the query command with the -outputfileoption. If you specify an input file you cannot specify an identity string.
-commonmetadata or -cmSpecifies that PDR assets are to be deleted. If you specify an input file insteadof an identity string you must still specify this option.
identity_stringSpecifies individual PDR assets to delete or to preview. If you specify an
Chapter 14. Managing assets by using the command line 243

identity string, you cannot specify an input file. If you specify more than oneidentity string, then the identity strings and associated options must beenclosed in single quote characters ('). If you specify only one identity string,then the single quote characters are optional.
-base pathYou can optionally use the -base argument to specify a base path. This path isthen prefixed to all the asset identity strings that you specify.
Example
The following command deletes all the PDR assets listed in the filec:\to_delete_commonmetadata.txt :istool deletecm –dom ABC:9080 –u xmetauser –p xmetapwd-inputfile "c:\to_delete_commonmetadata.txt"–cm ’’
The following command deletes the table1 and table2 database tables in thedatabases db1 and db2:istool deletecm –dom ABC:9080 –u xmetauser –p xmetapwd–cm ’/myhost/db1/schema1/table1.tbl /myhost/db2/schema1/table2.tbl’
The following command deletes the table7 and table8 database tables in thedatabase db1:istool deletecm –dom ABC:9080 –u xmetauser –p xmetapwd–cm ’-base "/myhost/db1/schema1" table7.tbl table8.tbl’
The following command previews a deletion operation that deletes two tables:istool deletecm –dom ABC:9080 –u xmetauser –p xmetapwd -preview–cm ’/myhost/db1/schema1/table1.tbl /myhost/db2/schema1/table2.tbl’
The following command deletes the two tables that were previewed in theprevious command:istool deletecm –dom ABC:9080 –u xmetauser –p xmetapwd–cm ’/myhost/db1/schema1/table1.tbl /myhost/db2/schema1/table2.tbl’
Business intelligence assetsBusiness intelligence assets comprise the objects that have been imported into theInfoSphere Information Server metadata repository from business intelligence tools.
You can delete the following business intelligence (BI) assets from the metadatarepository:
BI modelA BI model is a grouping of BI data collection views that are relevant to aBI application.
BI collectionA BI Collection is a data structure that provides a view on the data storedin databases and files. In dimensional modeling these structures are knownas dimensions and fact tables. BI Collections are the data sources of BIreports.
Cube A subset of a BI model that consists of a set of related analytic values thatshare the same dimensionality.
BI reportA business intelligence report that is sourced from a database or a BImodel.
244 Administration Guide
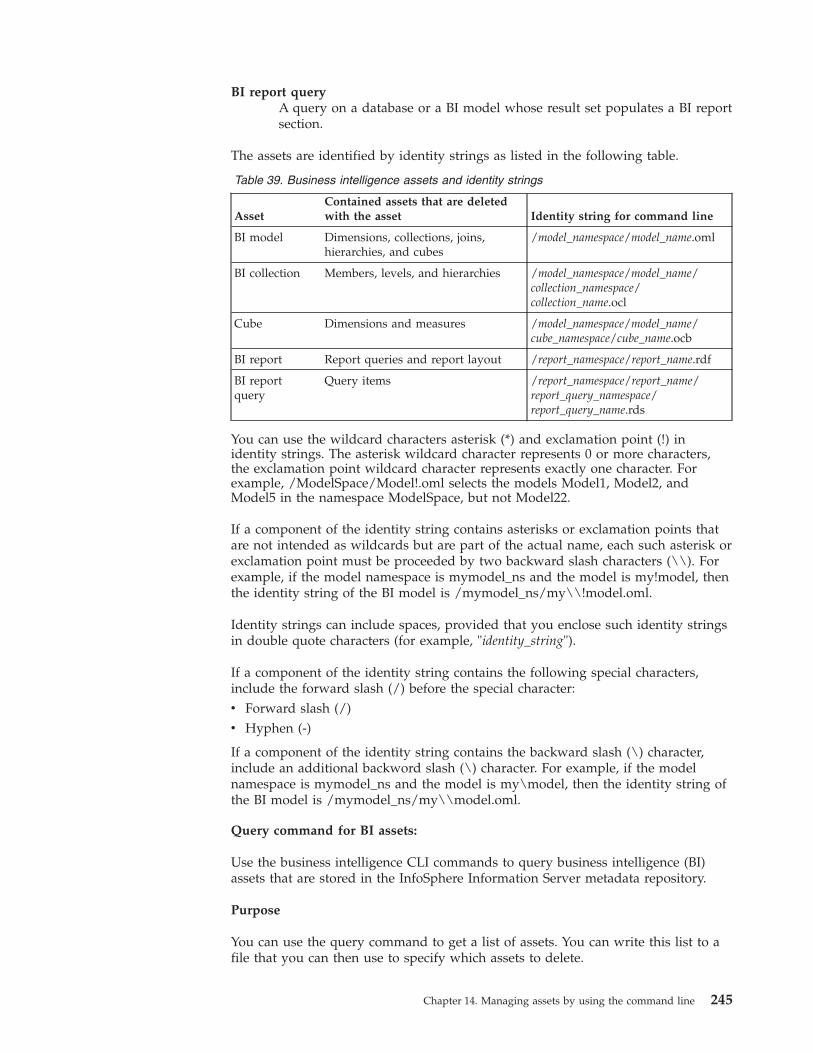
BI report queryA query on a database or a BI model whose result set populates a BI reportsection.
The assets are identified by identity strings as listed in the following table.
Table 39. Business intelligence assets and identity strings
AssetContained assets that are deletedwith the asset Identity string for command line
BI model Dimensions, collections, joins,hierarchies, and cubes
/model_namespace/model_name.oml
BI collection Members, levels, and hierarchies /model_namespace/model_name/collection_namespace/collection_name.ocl
Cube Dimensions and measures /model_namespace/model_name/cube_namespace/cube_name.ocb
BI report Report queries and report layout /report_namespace/report_name.rdf
BI reportquery
Query items /report_namespace/report_name/report_query_namespace/report_query_name.rds
You can use the wildcard characters asterisk (*) and exclamation point (!) inidentity strings. The asterisk wildcard character represents 0 or more characters,the exclamation point wildcard character represents exactly one character. Forexample, /ModelSpace/Model!.oml selects the models Model1, Model2, andModel5 in the namespace ModelSpace, but not Model22.
If a component of the identity string contains asterisks or exclamation points thatare not intended as wildcards but are part of the actual name, each such asterisk orexclamation point must be proceeded by two backward slash characters (\\). Forexample, if the model namespace is mymodel_ns and the model is my!model, thenthe identity string of the BI model is /mymodel_ns/my\\!model.oml.
Identity strings can include spaces, provided that you enclose such identity stringsin double quote characters (for example, "identity_string").
If a component of the identity string contains the following special characters,include the forward slash (/) before the special character:v Forward slash (/)v Hyphen (-)
If a component of the identity string contains the backward slash (\) character,include an additional backword slash (\) character. For example, if the modelnamespace is mymodel_ns and the model is my\model, then the identity string ofthe BI model is /mymodel_ns/my\\model.oml.
Query command for BI assets:
Use the business intelligence CLI commands to query business intelligence (BI)assets that are stored in the InfoSphere Information Server metadata repository.
Purpose
You can use the query command to get a list of assets. You can write this list to afile that you can then use to specify which assets to delete.
Chapter 14. Managing assets by using the command line 245
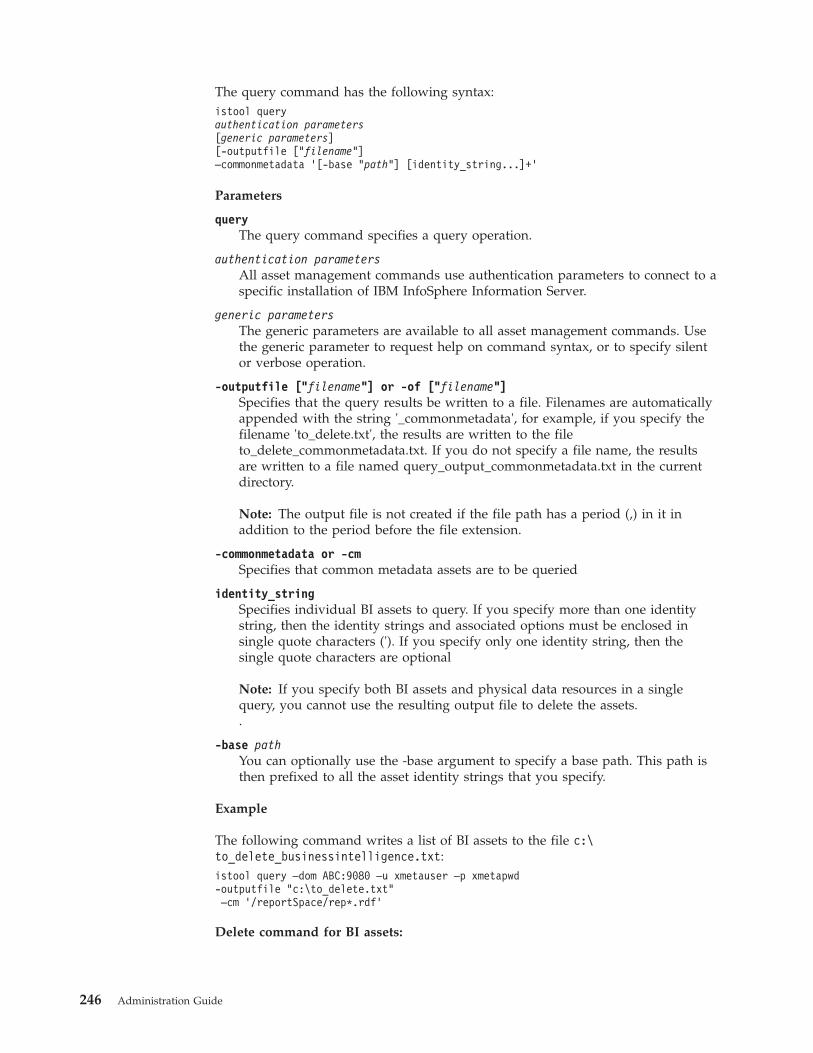
The query command has the following syntax:istool queryauthentication parameters[generic parameters][-outputfile ["filename"]–commonmetadata ’[-base "path"] [identity_string...]+’
Parameters
queryThe query command specifies a query operation.
authentication parametersAll asset management commands use authentication parameters to connect to aspecific installation of IBM InfoSphere Information Server.
generic parametersThe generic parameters are available to all asset management commands. Usethe generic parameter to request help on command syntax, or to specify silentor verbose operation.
-outputfile ["filename"] or -of ["filename"]Specifies that the query results be written to a file. Filenames are automaticallyappended with the string '_commonmetadata', for example, if you specify thefilename 'to_delete.txt', the results are written to the fileto_delete_commonmetadata.txt. If you do not specify a file name, the resultsare written to a file named query_output_commonmetadata.txt in the currentdirectory.
Note: The output file is not created if the file path has a period (,) in it inaddition to the period before the file extension.
-commonmetadata or -cmSpecifies that common metadata assets are to be queried
identity_stringSpecifies individual BI assets to query. If you specify more than one identitystring, then the identity strings and associated options must be enclosed insingle quote characters ('). If you specify only one identity string, then thesingle quote characters are optional
Note: If you specify both BI assets and physical data resources in a singlequery, you cannot use the resulting output file to delete the assets..
-base pathYou can optionally use the -base argument to specify a base path. This path isthen prefixed to all the asset identity strings that you specify.
Example
The following command writes a list of BI assets to the file c:\to_delete_businessintelligence.txt:istool query –dom ABC:9080 –u xmetauser –p xmetapwd-outputfile "c:\to_delete.txt"–cm ’/reportSpace/rep*.rdf’
Delete command for BI assets:
246 Administration Guide

Use the istool deletecm command to delete business intelligence (BI) assets fromthe InfoSphere Information Server repository.
Purpose
The business intelligence asset management commands delete the following assets:v BI modelsv BI collectionsv Cubesv BI reportsv BI report queries
You must have the Common Metadata Administrator role to delete BI assets.
Before you delete assets, you can use the query command to write a list of assets toa file. You can use the file as an input to the delete command to specify whichassets to delete. Alternatively, you can specify identity strings on the command linethat identify individual assets to delete.
If you use a file as the input to the delete command, the file must include boththe repository identifier (RID) of each asset and the identity string of each asset.The input file cannot include only the identity string. For this reason, you must usethe query command with the -outputfile parameter to obtain a properly formattedfile that includes both the RID and the identity string. You can edit this file toremove assets before you specify it as input to the delete command.
You are prompted for confirmation before each asset is deleted. You can suppressthe confirmation message by specifying the -force option.
The delete command has the following syntax:istool deletecmauthentication parameters[generic parameters][-preview][–force][-inputfile "filename"]–commonmetadata ’[-base "path"] [identity_string...]*’
Parameters
deletecmThe delete command specifies a delete operation.
authentication parametersAll asset interchange commands use authentication parameters to connect to aspecific IBM InfoSphere Information Server.
generic parametersThe generic parameters are available to all asset interchange commands. Usethe generic parameter to request help on command syntax, or specify silent orverbose operation.
-preview or -preSpecify this option to see a preview of the deletion. The preview lists the RIDsand the identity strings of the assets that will be deleted when you run thedeletecm command. You can use the preview option to ensure that the scope ofthe deletion is what you expect. Use the force option to suppress theconfirmation prompts when you run a preview. Otherwise, the same
Chapter 14. Managing assets by using the command line 247
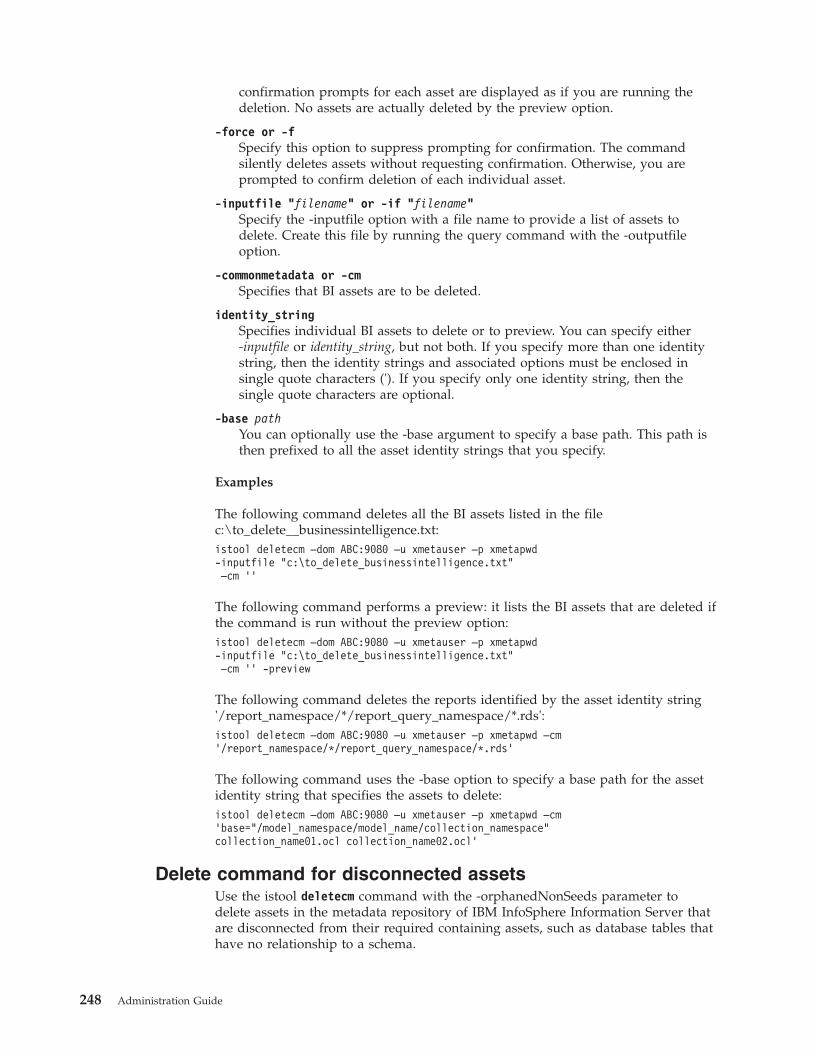
confirmation prompts for each asset are displayed as if you are running thedeletion. No assets are actually deleted by the preview option.
-force or -fSpecify this option to suppress prompting for confirmation. The commandsilently deletes assets without requesting confirmation. Otherwise, you areprompted to confirm deletion of each individual asset.
-inputfile "filename" or -if "filename"Specify the -inputfile option with a file name to provide a list of assets todelete. Create this file by running the query command with the -outputfileoption.
-commonmetadata or -cmSpecifies that BI assets are to be deleted.
identity_stringSpecifies individual BI assets to delete or to preview. You can specify either-inputfile or identity_string, but not both. If you specify more than one identitystring, then the identity strings and associated options must be enclosed insingle quote characters ('). If you specify only one identity string, then thesingle quote characters are optional.
-base pathYou can optionally use the -base argument to specify a base path. This path isthen prefixed to all the asset identity strings that you specify.
Examples
The following command deletes all the BI assets listed in the filec:\to_delete__businessintelligence.txt:istool deletecm –dom ABC:9080 –u xmetauser –p xmetapwd-inputfile "c:\to_delete_businessintelligence.txt"–cm ’’
The following command performs a preview: it lists the BI assets that are deleted ifthe command is run without the preview option:istool deletecm –dom ABC:9080 –u xmetauser –p xmetapwd-inputfile "c:\to_delete_businessintelligence.txt"–cm ’’ -preview
The following command deletes the reports identified by the asset identity string'/report_namespace/*/report_query_namespace/*.rds':istool deletecm –dom ABC:9080 –u xmetauser –p xmetapwd –cm’/report_namespace/*/report_query_namespace/*.rds’
The following command uses the -base option to specify a base path for the assetidentity string that specifies the assets to delete:istool deletecm –dom ABC:9080 –u xmetauser –p xmetapwd –cm’base="/model_namespace/model_name/collection_namespace"collection_name01.ocl collection_name02.ocl’
Delete command for disconnected assetsUse the istool deletecm command with the -orphanedNonSeeds parameter todelete assets in the metadata repository of IBM InfoSphere Information Server thatare disconnected from their required containing assets, such as database tables thathave no relationship to a schema.
248 Administration Guide
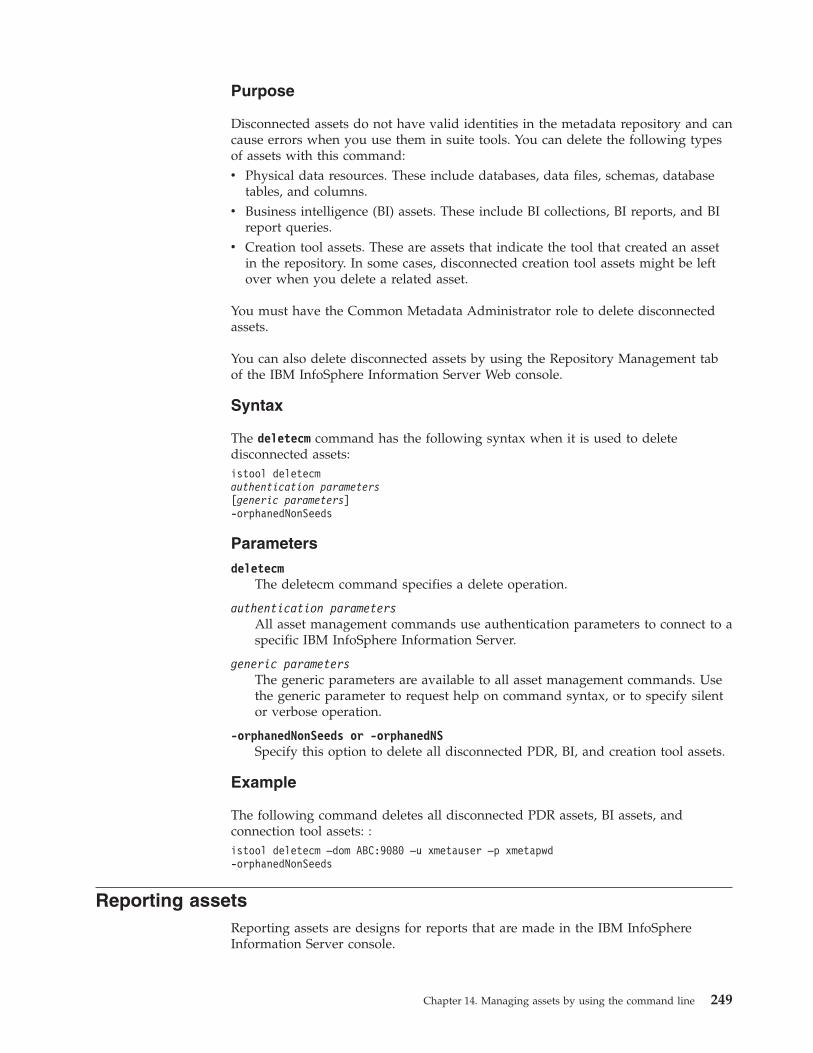
Purpose
Disconnected assets do not have valid identities in the metadata repository and cancause errors when you use them in suite tools. You can delete the following typesof assets with this command:v Physical data resources. These include databases, data files, schemas, database
tables, and columns.v Business intelligence (BI) assets. These include BI collections, BI reports, and BI
report queries.v Creation tool assets. These are assets that indicate the tool that created an asset
in the repository. In some cases, disconnected creation tool assets might be leftover when you delete a related asset.
You must have the Common Metadata Administrator role to delete disconnectedassets.
You can also delete disconnected assets by using the Repository Management tabof the IBM InfoSphere Information Server Web console.
Syntax
The deletecm command has the following syntax when it is used to deletedisconnected assets:istool deletecmauthentication parameters[generic parameters]-orphanedNonSeeds
Parameters
deletecmThe deletecm command specifies a delete operation.
authentication parametersAll asset management commands use authentication parameters to connect to aspecific IBM InfoSphere Information Server.
generic parametersThe generic parameters are available to all asset management commands. Usethe generic parameter to request help on command syntax, or to specify silentor verbose operation.
-orphanedNonSeeds or -orphanedNSSpecify this option to delete all disconnected PDR, BI, and creation tool assets.
Example
The following command deletes all disconnected PDR assets, BI assets, andconnection tool assets: :istool deletecm –dom ABC:9080 –u xmetauser –p xmetapwd-orphanedNonSeeds
Reporting assetsReporting assets are designs for reports that are made in the IBM InfoSphereInformation Server console.
Chapter 14. Managing assets by using the command line 249

You can interchange the designs for reports, and the results that were obtainedfrom running the reports. The reports and associated results are exported from thesource metadata repository to an archive file. The archive file has the suffix .isx.
You can specify the name of the report to export, or you can specify that thereports associated with a particular product are exported. The following productscan have reports associated with them:v InfoSphere Business Glossaryv InfoSphere DataStagev InfoSphere Information Analyzerv InfoSphere QualityStagev Administration reports for the suite.
You can include the report results for a specific named report, include the reportsresults for the last n runs of that report, or include all the results for the specifiedreports.
Export command for reporting assetsYou can use the istool command line interface (CLI) to export your IBM InfoSphereInformation Server reporting assets. These assets can include both report designsand report results.
Purpose
The reporting asset interchange commands export reports from your InfoSphereInformation Server installation. You can identify the reports to export by using thefollowing methods:v Export all the reports associated with a particular suite component. For example,
you can export all your IBM InfoSphere Business Glossary reports.v Export reports by name. You can specify wildcards as part of the report name.
You can also specify that the export includes the report results as well as thedesign details of a report.
To export a report or report results, you must have administration, read, andupdate permissions for that report. The creator of a report automatically hasadministration, read, and update permissions, and can grant permissions to otherusers or groups. A user with the Suite Administrator role can export any reports.
Command syntaxistool export[authentication][generic paramters]-archive "pathname" [-updatearchive][-AbortIfError number_of_errors]-report[’-reportName "report_name"
[-ownedByProduct "product_name"][-includeLastReportResults number |-includeAllReportResults |-includeReportResultName report_result_name]’
]|[’-ownedByProduct "product_name"
[-reportName "report_name"]
250 Administration Guide
[-includeLastReportResults number |-includeAllReportResults |-includeReportResultName report_result_name]’
]
Parameters
exportThe export command specifies an export operation.
authenticationAll asset interchange commands use authentication parameters to connect to aspecific installation of InfoSphere Information Server installation.
generic parametersThe generic parameters are available to all asset interchange commands. Usethe generic parameters to request help on command syntax, or to specify silentor verbose operation.
-archive "path_name" or -ar "path_name"Specifies the path name for the file that the assets are exported to.
-updatearchive or -upUpdates the archive file if it exists (otherwise it is overwritten if it exists).
-AbortIfError number_of_errors or -abort number_of_errorsStops the export if more than the specified number of errors occur.
-reportSpecifies that report assets are exported.
-reportName "report_name" or -repName "report_name"Exports reports by name. The argument report_name can include wildcardcharacters. For example, the parameter:-reportName "MyRep*"
exports the reports MyRep1, MyRep2, and MyRepTues. If you specify thisparameter together with the -ownedByProduct parameter, reports that specifyboth criteria are exported.
-ownedByProduct "product_name" or -prod "product_name"Exports the reports that are associated with the specified suite component. Ifyou specify this parameter together with the -reportName parameter, reportsthat satisfy both criteria are exported. Valid values for product_name are in thefollowing list:v "Administration"v "Business Glossary"v "DataStage"v "Information Analyzer"v "QualityStage"
-includeLastReportResults number or -incLastResult numberExports the specified number of report results along with the report designthat you specified by using the reportName or prod parameters. For example,the parameters:-reportName "MyRep1" -includeLastReportResults 20
export the report design for MyRep1 together with the 20 most recent resultsfor that report.
Chapter 14. Managing assets by using the command line 251

-includeAllReportResults or -incAllResultsExports all results along with the report design that you specified by using the-reportName or -prod parameters. For example, the parameters:-reportName "MyRep1" -includeAllReportResults
export the report design for MyRep1 together with all the results for thatreport.
-includeReportResultName "report_name" or -incResultName "report_name"Exports the most recent results for the report specified by report_name. You canuse wildcards in report_name to return results for a number of reports. Forexample, the parameter:-includeReportResultName "MyRep*"
exports the most recent results for the reports MyRep1, MyRep2, andMyRep15.
Exit status
A return value of 0 indicates successful completion; any other value indicatesfailure.
Examples
This following command exports all the InfoSphere QualityStage reports on theqakserv system to the archive, QSRAI_001.isx.istool export -domain qakserv:9080 -username user1 -password pass1-archive "c:/QSRAI_001.isx" -report ’-prod "QualityStage"’
The following command exports the report named FreqPat to the archiveQSRAI_001.isx.istool export -domain qakserv:9080 -username user1 -password pass1-archive "c:/QSRAI_002.isx" -report ’-reportName "FreqPat"’
The following command exports all InfoSphere DataStage reports with namesbeginning with MdB to the archive MDBds_001.isx, together with all the results forthose reports.istool export -domain qakserv:9080 -username user1 -password pass1-archive "c:/MDBds_001.isx" -report ’-prod ’"DataStage" -reportName "MdB*"-includeAllReportResults’
Import command for reporting assetsYou can use the istool command line interface (CLI) to import your reportingassets from a file containing previously exported assets. These assets can includeboth report designs and report results.
Purpose
Use the -report command parameter with the istool import command to importreports from an archive that contains previously exported assets.
To import a report or report results, you must have have the role of SuiteAdministrator, or have read permissions for the template that the report is basedon. After the import, you are the owner of that report and have administration,read, and write permissions.
252 Administration Guide
Command syntaxistool import[authentication][generic parameters][-AbortAfter number_of_errors]-report-archive pathname-preview | -replace
Parameters
importThe import command specifies an import operation.
authentication optionsAll asset interchange commands use authentication options to connect to aspecific installation of IBM InfoSphere Information Server
generic optionsThe generic options are available by all asset interchange commands. Use thegeneric options to request help on command syntax, or to specify silent orverbose operation.
-AbortAfter number_of_errors or -abort number_of_errorsSpecifies that the import stops if more than the specified number of errorsoccur.
-reportSpecifies that report assets are imported.
-archive "pathname" or -ar "pathname"Specifies he path name of the file that the assets were previously exported to.
-preview or -preSpecify this option to preview the action of the command without changingthe repository.
-replaceMerges imported assets with existing assets if they have the same identity. The-replace parameter must be specified for all reporting imports, regardless ofwhether there are existing assets in the metadata repository.
Example
The following command previews reporting assets that were previously exportedto the archive c:\MDBds_001.isx:istool import -domain qakserv:9080 -username user1 -password pass1-report -archive "c:\MDBds_001.isx" -preview
The following command imports reporting assets that were previously exported tothe archive c:\MDBds_001.isx:istool import -domain qakserv:9080 -username user1 -password pass1-report -archive "c:\MDBds_001.isx" -replace
Importing multiple types of assets
If the archive file to be imported includes multiple types of assets, you mustspecify each type of included metadata on the command line when you import thearchive file, otherwise only reporting assets are imported. For example, if thearchive includes InfoSphere Information Analyzer you must specify the -ia and -cm
Chapter 14. Managing assets by using the command line 253
and options in addition to the -rep options when you import the archive. You canuse separate import commands for each type of asset.
Note: You must use the -replace option when you import report assets from anarchive. If you do not want to use the -replace option for the other types of assetsin the archive, you must use a separate command to import the reports. If youimport assets without the -replace option and import their related reports with the-replace option, some of the reports might not be accurate for the unreplaced assetsin the target environment. Check the reports and run them again in the newenvironment if necessary.
In the following example, the first command imports InfoSphere InformationAnalyzer assets and common metadata assets from the file ia_archive1.isx withoutusing the -replace option. The second command imports reporting assets from thesame archive file while using the required -replace option.import -u admin -p admin100 -dom EVEREST -ar ia_archive1.isx -ia ’’
-cm ’<import options>’
import -u admin -p admin100 -dom EVEREST -ar ia_archive1.isx -replace-rep ’<import options>’
Exit status
A return value of 0 indicates successful completion; any other value indicatesfailure.
Merge and replace actions for reporting assetsIf a reporting asset with the same identity exists in the target repository, then thenew asset is merged with the existing asset.
A reporting asset has various attributes, and the merging process affects theattributes differently. A reporting asset has the following attributes:
Report designIf a matching Report exists in the target repository, the report isoverwritten provided that the user importing the asset has updatepermission on the target report. Otherwise the import of that asset fails.
Report access control listThe access control list for the target report is retained.
Report resultsReport results cannot change, and so a report result in an import file willnot overwrite the target report result.
FavoriteUsersIf the report exists on the target and has a FavoriteUsers list, the importedFavoriteUsers list is merged with the existing list. Any users that theimported list contains are added to the list of the target report.
Security assetsSecurity assets comprise the user IDs, user groups, user roles, and associatedcredentials that you define in your IBM InfoSphere Information Server.
The InfoSphere Information Server suite contains a number of components. In atypical system, several users are defined. Each of these users might have access to
254 Administration Guide
all the suite, or only to certain components within the suite. Each of these userscan have different roles that give them different rights in how they interact withsuite components and associated data.
Configuring the users, groups, and their roles is an important part of configuringthe suite. There can be several situations where you need to import or export theinformation from the suite. For example, when you back up your suite assets, youmight want to include the users and roles with these assets. When you develop onone system and test on a different system, then you might want to include theusers, groups, and roles with the other assets that you deploy. Similarly, when youdeploy your project to the final target production system, you might need to movethese assets to that system.
Export command for security assetsYou can use the istool command line interface (CLI) to export your IBM InfoSphereInformation Server security assets, such as users and roles.
Purpose
Use the -security parameter with the istool export command to export thefollowing assets:v Users and groups and their suite and product role assignments (including their
credentials when relevant).v Engine credential mappings.v Project roles are not exported by using the -security parameter. They are
exported by commands for the tools that create the project.
The export creates an archive file. By default the file has the suffix .isx.
You must have the Suite Administrator role to export security assets.
Command syntaxistool exportauthentication[generic options]-archive "pathname" [-updatearchive][-AbortIfError number_of_errors][-preview]-security
[’-securityUser-userident user_pattern...
[–includeUserGroupMemberships][–includeCredential][-includeCredentialMappings][-includeRoles]’]
|[’–securityGroup
-groupident group_pattern...[-includeGroupUserMemberships][-includeRoles]’]
Parameters
exportThe export command specifies an export operation.
Chapter 14. Managing assets by using the command line 255
authenticationAll asset interchange commands use authentication parameters to connect to aspecific InfoSphere Information Server installation.
generic parametersThe generic parameters are available to all asset interchange commands. Usethe generic parameters to request help on command syntax, or to specify silentor verbose operation.
-archive "path_name"or -ar "pathname"Specifies the path name (including file name) for the archive that the assets areexported to.
-updatearchive or -upUpdates an existing archive file (otherwise overwrites it).
-AbortIfError number_of_errors or -abort number_of_errorsStops the export if the specified number of errors occur.
-preview or -preShows a preview of the export. The preview lists the assets that are exportedwhen the export runs.
-security or -secThe -security command parameter specifies that security assets are exported.
'-securityUser subparameters' or -su 'subparameters'Specifies an export operation of security assets relating to users. The-securityUser parameter is mutually exclusive with the -securityGroupparameter. The -securityUser parameter has the following subparameters:
-userident user_pattern or -u user_patternSpecifies user assets to export. User_pattern is a search pattern forlocating users. You can use the asterisk (*) character to representmultiple characters, and the question mark (?) character to representsingle characters. The following strings are examples of valid searchpatterns:v dsadmin - selects the user dsadminv dsuser? - selects the users dsuser1, dsuser2, and dsuser3v ds* - selects the users dsadmin, dsuser1, dsuser2, and dsuser3v "dsadmin dsuser2" - selects the users dsadmin and dsuser2
-includeUserGroupMemberships or -incUsrGrpMemsExports user group relationships, including the referenced groups,along with user details.
-includeCredential or -incCredExports user credentials. Encrypted passwords are stored in the assetarchive. Passwords are stored in digested form (SHA-1). If theInfoSphere Information Server installation is using an externaldirectory, this parameter is ignored.
-includeCredentialMapping or -incMapExports DataStage credential mapping. Encrypted passwords are storedin the asset archive (passwords are stored in XOR encrypted form).
–includeRoles or -incRoleSpecifies that user role relationships are also exported.
'-securityGroup subparameters' or -sg 'subparameters'Specifies an export operation of security assets relating to groups. The
256 Administration Guide

-securityGroup parameter is mutually exclusive with the -securityUserparameter. The -securityGroup parameter has the following subparameters:
-groupident group_pattern or -grp group_patternSpecifies user group assets to export. Group_pattern is a search patternfor locating user groups. You can use the asterisk (*) character torepresent multiple characters, and the question mark (?) character torepresent single characters. The following strings are examples of validsearch patterns:v dsadmins - selects the group dsadminsv dsgroup? - selects the groups dsgroup1, dsgroup2, and dsgroup3v ds* - selects the groups dsadmins, dsgroup1, dsgroup2, and
dsgroup3v "dsadmins dsgroup1" - selects the groups dsadmins and dsgroup1
-includeGroupUserMemberships or -incGrpUsrMemsSpecifies that group user relationships, including the referenced users,are also exported.
-includeRoles or -incRoleSpecifies that group role relationships are also exported.
Exit status
A return value of 0 indicates successful completion; any other value indicatesfailure.
Examples
The following command exports DataStage users (whose user IDs begin with "ds"on this system), together with their credentials and credential mappings, to the filedsusers.isx.istool export -archive "c:\dsusers.isx"-domain mysys:9080 -username myid -password mypasswd-security ’-securityUser -userident ds* -includeCredentials-includeCredentialMappings’
The following command exports a group containing IA users, together with theirroles, to the file ia_export.isx.istool export -archive "c:\ia_export.isx"-domain mysys:9080 -username myid -password mypasswd-security ’-securityGroup -groupident iaUsergp -includeRoles’
Import command for security assetsYou can use the istool command line interface (CLI) to import IBM InfoSphereInformation Server security assets, such as users and groups.
Purpose
Use the -security command parameter with the istool import command to importuser, group, roles, and credential mappings from previously exported archive files.
If a security asset of the same name exists in the target metadata repository, thenthe imported asset is merged with the existing asset. If the imported asset hasentries for fields that are empty in the target asset, the imported settings are added
Chapter 14. Managing assets by using the command line 257

to the target asset. For example, if a user has additional roles defined in the importfile, those roles are added to the existing user in the target user definition.
You must have the Suite Administrator role to import security assets.
Command syntaxistool importauthentication[generic parameters][-AbortAfter number_of_errors]-security-archive pathname-preview | -replace
Parameters
importThe import command specifies an import operation.
authenticationAll asset interchange commands use authentication parameters to connect to aspecific InfoSphere Information Server installation.
generic parametersThe generic parameters are available to all asset interchange commands. Usethe generic parameters to request help on command syntax, or to specify silentor verbose operation.
-AbortAfter number_of_errors or -abort number_of_errorsStops the import if more than the specified number of errors occur.
-preview or -prePreviews the import. The preview lists the assets that will be imported whenthe import runs.
-security or -secSpecifies that security assets are imported.
-archive pathname or -ar pathnameSpecifies the pathname (including file name) for the archive that the assets areimported from.
-replaceMerges imported assets with existing assets if they have the same identity. The-replace parameter must be specified for all security imports, regardless ofwhether there are existing assets in the metadata repository.
Exit status
A return value of 0 indicates successful completion; any other value indicatesfailure.
Example
The following command previews the contents of the archive file/opt/IBM/InformationServer/exports/dsuserexport.isx:istool import -domain server1:9080 -username user1 -password pass1-archive "/opt/IBM/InformationServer/exports/dsuserexport.isx" -security -preview
The following command imports the users from the archive file/opt/IBM/InformationServer/exports/dsuserexport.isx:
258 Administration Guide

istool import -domain server1:9080 -username user1 -password pass1-archive "/opt/IBM/InformationServer/exports/dsuserexport.isx" -security -replace
Merge and replace actions for security assetsIf a security asset with the same identity exists in the target repository, then thenew asset is merged with the existing asset.
The merge rules depend on the type of the security asset:
User If a matching user exists in the target repository, the import implementsthe following merge rules:v All empty or null attributes of the existing user are replaced by the
attributes from the imported user.v A union is made of all group memberships between the existing user
and the imported user. That is, any group memberships of the importeduser that do not already exist for the target user are added to the targetuser.
v A union is made of all user roles between the existing user and theimported user. That is, any user roles of the imported user that do notalready exist for the target user are added to the target user.
v The user credentials of a target user are not overwritten by the usercredentials of the imported user.
v The credential mappings of a target user are not overwritten by thecredential mappings of the imported user. If the target user has nocredential mappings, then the import creates the credential mappings ofthe imported user.
Group If a matching user exists in the target repository, the import implementsthe following merge rules:v All empty or null attributes of the existing group are replaced by the
attributes from the imported group.v A union is made of all user memberships between the existing group
and the imported group. That is, any user memberships of the importedgroup that do not already exist for the target group are added to thetarget group.
v A union is made of all group roles between the existing user and theimported user. That is, any group roles of the imported group that donot already exist for the target group are added to the target group.
Chapter 14. Managing assets by using the command line 259

260 Administration Guide
Product accessibility
You can get information about the accessibility status of IBM products.
The IBM InfoSphere Information Server product modules and user interfaces arenot fully accessible. The installation program installs the following productmodules and components:v IBM InfoSphere Business Glossaryv IBM InfoSphere Business Glossary Anywherev IBM InfoSphere DataStagev IBM InfoSphere FastTrackv IBM InfoSphere Information Analyzerv IBM InfoSphere Information Services Directorv IBM InfoSphere Metadata Workbenchv IBM InfoSphere QualityStage
For information about the accessibility status of IBM products, see the IBM productaccessibility information at http://www.ibm.com/able/product_accessibility/index.html.
Accessible documentation
Accessible documentation for InfoSphere Information Server products is providedin an information center. The information center presents the documentation inXHTML 1.0 format, which is viewable in most Web browsers. XHTML allows youto set display preferences in your browser. It also allows you to use screen readersand other assistive technologies to access the documentation.
IBM and accessibility
See the IBM Human Ability and Accessibility Center for more information aboutthe commitment that IBM has to accessibility:
© Copyright IBM Corp. 2007, 2011 261

262 Administration Guide

Accessing product documentation
Documentation is provided in a variety of locations and formats, including in helpthat is opened directly from the product client interfaces, in a suite-wideinformation center, and in PDF file books.
The information center is installed as a common service with IBM InfoSphereInformation Server. The information center contains help for most of the productinterfaces, as well as complete documentation for all the product modules in thesuite. You can open the information center from the installed product or from aWeb browser.
Accessing the information center
You can use the following methods to open the installed information center.v Click the Help link in the upper right of the client interface.
Note: From IBM InfoSphere FastTrack and IBM InfoSphere Information ServerManager, the main Help item opens a local help system. Choose Help > OpenInfo Center to open the full suite information center.
v Press the F1 key. The F1 key typically opens the topic that describes the currentcontext of the client interface.
Note: The F1 key does not work in Web clients.v Use a Web browser to access the installed information center even when you are
not logged in to the product. Enter the following address in a Web browser:http://host_name:port_number/infocenter/topic/com.ibm.swg.im.iis.productization.iisinfsv.home.doc/ic-homepage.html. Thehost_name is the name of the services tier computer where the informationcenter is installed, and port_number is the port number for InfoSphereInformation Server. The default port number is 9080. For example, on aMicrosoft® Windows® Server computer named iisdocs2, the Web address is inthe following format: http://iisdocs2:9080/infocenter/topic/com.ibm.swg.im.iis.productization.iisinfsv.nav.doc/dochome/iisinfsrv_home.html.
A subset of the information center is also available on the IBM Web site andperiodically refreshed at http://publib.boulder.ibm.com/infocenter/iisinfsv/v8r5/index.jsp.
Obtaining PDF and hardcopy documentationv PDF file books are available through the InfoSphere Information Server software
installer and the distribution media. A subset of the PDF file books is alsoavailable online and periodically refreshed at www.ibm.com/support/docview.wss?rs=14&uid=swg27016910.
v You can also order IBM publications in hardcopy format online or through yourlocal IBM representative. To order publications online, go to the IBMPublications Center at http://www.ibm.com/e-business/linkweb/publications/servlet/pbi.wss.
© Copyright IBM Corp. 2007, 2011 263

Providing feedback about the documentation
You can send your comments about documentation in the following ways:v Online reader comment form: www.ibm.com/software/data/rcf/v E-mail: [email protected]
264 Administration Guide
Links to non-IBM Web sites
This information center may provide links or references to non-IBM Web sites andresources.
IBM makes no representations, warranties, or other commitments whatsoeverabout any non-IBM Web sites or third-party resources (including any Lenovo Website) that may be referenced, accessible from, or linked to any IBM site. A link to anon-IBM Web site does not mean that IBM endorses the content or use of suchWeb site or its owner. In addition, IBM is not a party to or responsible for anytransactions you may enter into with third parties, even if you learn of such parties(or use a link to such parties) from an IBM site. Accordingly, you acknowledge andagree that IBM is not responsible for the availability of such external sites orresources, and is not responsible or liable for any content, services, products orother materials on or available from those sites or resources.
When you access a non-IBM Web site, even one that may contain the IBM-logo,please understand that it is independent from IBM, and that IBM does not controlthe content on that Web site. It is up to you to take precautions to protect yourselffrom viruses, worms, trojan horses, and other potentially destructive programs,and to protect your information as you deem appropriate.
© Copyright IBM Corp. 2007, 2011 265

266 Administration Guide

Notices and trademarks
This information was developed for products and services offered in the U.S.A.
Notices
IBM may not offer the products, services, or features discussed in this document inother countries. Consult your local IBM representative for information on theproducts and services currently available in your area. Any reference to an IBMproduct, program, or service is not intended to state or imply that only that IBMproduct, program, or service may be used. Any functionally equivalent product,program, or service that does not infringe any IBM intellectual property right maybe used instead. However, it is the user's responsibility to evaluate and verify theoperation of any non-IBM product, program, or service.
IBM may have patents or pending patent applications covering subject matterdescribed in this document. The furnishing of this document does not grant youany license to these patents. You can send license inquiries, in writing, to:
IBM Director of LicensingIBM CorporationNorth Castle DriveArmonk, NY 10504-1785 U.S.A.
For license inquiries regarding double-byte character set (DBCS) information,contact the IBM Intellectual Property Department in your country or sendinquiries, in writing, to:
Intellectual Property LicensingLegal and Intellectual Property LawIBM Japan Ltd.1623-14, Shimotsuruma, Yamato-shiKanagawa 242-8502 Japan
The following paragraph does not apply to the United Kingdom or any othercountry where such provisions are inconsistent with local law:INTERNATIONAL BUSINESS MACHINES CORPORATION PROVIDES THISPUBLICATION "AS IS" WITHOUT WARRANTY OF ANY KIND, EITHEREXPRESS OR IMPLIED, INCLUDING, BUT NOT LIMITED TO, THE IMPLIEDWARRANTIES OF NON-INFRINGEMENT, MERCHANTABILITY OR FITNESSFOR A PARTICULAR PURPOSE. Some states do not allow disclaimer of express orimplied warranties in certain transactions, therefore, this statement may not applyto you.
This information could include technical inaccuracies or typographical errors.Changes are periodically made to the information herein; these changes will beincorporated in new editions of the publication. IBM may make improvementsand/or changes in the product(s) and/or the program(s) described in thispublication at any time without notice.
Any references in this information to non-IBM Web sites are provided forconvenience only and do not in any manner serve as an endorsement of those Web
© Copyright IBM Corp. 2007, 2011 267

sites. The materials at those Web sites are not part of the materials for this IBMproduct and use of those Web sites is at your own risk.
IBM may use or distribute any of the information you supply in any way itbelieves appropriate without incurring any obligation to you.
Licensees of this program who wish to have information about it for the purposeof enabling: (i) the exchange of information between independently createdprograms and other programs (including this one) and (ii) the mutual use of theinformation which has been exchanged, should contact:
IBM CorporationJ46A/G4555 Bailey AvenueSan Jose, CA 95141-1003 U.S.A.
Such information may be available, subject to appropriate terms and conditions,including in some cases, payment of a fee.
The licensed program described in this document and all licensed materialavailable for it are provided by IBM under terms of the IBM Customer Agreement,IBM International Program License Agreement or any equivalent agreementbetween us.
Any performance data contained herein was determined in a controlledenvironment. Therefore, the results obtained in other operating environments mayvary significantly. Some measurements may have been made on development-levelsystems and there is no guarantee that these measurements will be the same ongenerally available systems. Furthermore, some measurements may have beenestimated through extrapolation. Actual results may vary. Users of this documentshould verify the applicable data for their specific environment.
Information concerning non-IBM products was obtained from the suppliers ofthose products, their published announcements or other publicly available sources.IBM has not tested those products and cannot confirm the accuracy ofperformance, compatibility or any other claims related to non-IBM products.Questions on the capabilities of non-IBM products should be addressed to thesuppliers of those products.
All statements regarding IBM's future direction or intent are subject to change orwithdrawal without notice, and represent goals and objectives only.
This information is for planning purposes only. The information herein is subject tochange before the products described become available.
This information contains examples of data and reports used in daily businessoperations. To illustrate them as completely as possible, the examples include thenames of individuals, companies, brands, and products. All of these names arefictitious and any similarity to the names and addresses used by an actual businessenterprise is entirely coincidental.
COPYRIGHT LICENSE:
This information contains sample application programs in source language, whichillustrate programming techniques on various operating platforms. You may copy,modify, and distribute these sample programs in any form without payment to
268 Administration Guide

IBM, for the purposes of developing, using, marketing or distributing applicationprograms conforming to the application programming interface for the operatingplatform for which the sample programs are written. These examples have notbeen thoroughly tested under all conditions. IBM, therefore, cannot guarantee orimply reliability, serviceability, or function of these programs. The sampleprograms are provided "AS IS", without warranty of any kind. IBM shall not beliable for any damages arising out of your use of the sample programs.
Each copy or any portion of these sample programs or any derivative work, mustinclude a copyright notice as follows:
© (your company name) (year). Portions of this code are derived from IBM Corp.Sample Programs. © Copyright IBM Corp. _enter the year or years_. All rightsreserved.
If you are viewing this information softcopy, the photographs and colorillustrations may not appear.
Trademarks
IBM, the IBM logo, and ibm.com are trademarks of International BusinessMachines Corp., registered in many jurisdictions worldwide. Other product andservice names might be trademarks of IBM or other companies. A current list ofIBM trademarks is available on the Web at www.ibm.com/legal/copytrade.shtml.
The following terms are trademarks or registered trademarks of other companies:
Adobe is a registered trademark of Adobe Systems Incorporated in the UnitedStates, and/or other countries.
Linux is a registered trademark of Linus Torvalds in the United States, othercountries, or both.
Microsoft, Windows, Windows NT, and the Windows logo are trademarks ofMicrosoft Corporation in the United States, other countries, or both.
UNIX is a registered trademark of The Open Group in the United States and othercountries.
Java and all Java-based trademarks are trademarks of Sun Microsystems, Inc. in theUnited States, other countries, or both.
The United States Postal Service owns the following trademarks: CASS, CASSCertified, DPV, LACSLink, ZIP, ZIP + 4, ZIP Code, Post Office, Postal Service, USPSand United States Postal Service. IBM Corporation is a non-exclusive DPV andLACSLink licensee of the United States Postal Service.
Other company, product or service names may be trademarks or service marks ofothers.
Notices and trademarks 269

270 Administration Guide

Contacting IBM
You can contact IBM for customer support, software services, product information,and general information. You also can provide feedback to IBM about productsand documentation.
The following table lists resources for customer support, software services, training,and product and solutions information.
Table 40. IBM resources
Resource Description and location
IBM Support Portal You can customize support information bychoosing the products and the topics thatinterest you at www.ibm.com/support/entry/portal/Software/Information_Management/InfoSphere_Information_Server
Software services You can find information about software, IT,and business consulting services, on thesolutions site at www.ibm.com/businesssolutions/
My IBM You can manage links to IBM Web sites andinformation that meet your specific technicalsupport needs by creating an account on theMy IBM site at www.ibm.com/account/
Training and certification You can learn about technical training andeducation services designed for individuals,companies, and public organizations toacquire, maintain, and optimize their ITskills at http://www.ibm.com/software/sw-training/
IBM representatives You can contact an IBM representative tolearn about solutions atwww.ibm.com/connect/ibm/us/en/
Providing feedback
The following table describes how to provide feedback to IBM about products andproduct documentation.
Table 41. Providing feedback to IBM
Type of feedback Action
Product feedback You can provide general product feedbackthrough the Consumability Survey atwww.ibm.com/software/data/info/consumability-survey
© Copyright IBM Corp. 2007, 2011 271

Table 41. Providing feedback to IBM (continued)
Type of feedback Action
Documentation feedback To comment on the information center, clickthe Feedback link on the top right side ofany topic in the information center. You canalso send comments about PDF file books,the information center, or any otherdocumentation in the following ways:
v Online reader comment form:www.ibm.com/software/data/rcf/
v E-mail: [email protected]
272 Administration Guide

Index
Aactive sessions
disconnecting 136view 135
active-passive configurationadministration overview 139failover 150Tivoli System Automation for
Multiplatforms administrationresources 139
administrationcommands 114InfoSphere DataStage 4troubleshoot 114WebSphere Application Server 5
analysis databaseowner user name and password
changing 113AppServerAdmin 114AppServerAdmin -was command
changing administrativeprivileges 116
changing the RunAs user 116ASB agent
running as non-root user 91asset interchange 203
export command 214exporting 214import command 215importing 215scenarios 205
asset typesInfoSphere DataStage 224
assetsbusiness intelligence 244physical data resources 239
auditingaudit configuration events 99configuring 93, 94, 96, 97, 99, 101,
102, 103, 104credential mapping events 97events 94log files 93, 103, 104user and group management
events 94user session management events 97user, group and project security role
assignment events 96authentication
configuring PAM 48automatic client reroute (ACR) 150
Bbackup 171, 172BI collection 229, 233, 235, 244BI model 229, 233, 235, 244BI report 229, 233, 235, 244BI report query 229, 233, 235, 244business intelligence 244
business intelligence (continued)delete command 247query command 245
business intelligence assets 229, 233
CCLI
istool 203cluster members
adding to new computers 143clustering
auditing 102column analysis
viewing charts and graphs 28command line interface
istool 203command modes, istool 202command-line syntax 198
istool 198commands
AppServerAdmin 114assign administrator role 118check if a user exists 119configure to use application server
registry 121configure to use internal registry 120create a user 117delete groups 122delete users 121deploy package 219display user details 124istool 217istool export 222istool import 228reset credentials 118search for groups 123search for users 123send package 221troubleshoot 114user registry 117
common data rulessecurity roles 68
common metadata 229, 239delete 238, 242, 249query command 241security roles 67
common metadata assetsexporting 233importing 235
componentslogging 155
configurationauditing 93, 94, 96, 97, 99, 101, 102,
103, 104logging views 159schedule views 166
configuration filesexamples 49
configuring Microsoft InternetExplorer 9
configuring Mozilla Firefox 9console 13
areas 13dashboard 19history 17menus 15, 17My Home workspace 13notes 17object list 22open workspaces 17palettes 17project menu 17projects 17selecting a task 21shortcuts 17, 20status bar 19task flow 20task list 22task pane 23walkthrough 20workspaces 22
creatingproject 27
credential mapping 78configuring your own 82
credentialsserver default 81
cube 229, 233, 235, 244customer support 271customizing
Home tab 32
Ddashboard 19
customizing 28data file 229, 233, 235, 239data file structure 229, 233, 235, 239data item definition 229, 233, 235, 239database 229, 233, 235, 239database connection 229, 233, 235, 239database table 229, 233, 235, 239DB2
password changing 114DB2 cluster 148db2admin
changing metadata repositorydatabase owner password 111, 112
password changing 114Debug severity level 156delete 238, 242, 247, 249deploy package command 219Deployment Manager
starting 187, 190stopping 182, 184
directories 34, 36DirectoryAdmin
assign administrator role 118check if a user exists 119configure to use application server
registry 121
© Copyright IBM Corp. 2007, 2011 273

DirectoryAdmin (continued)configure to use internal registry 120create a user 117delete groups 122delete users 121display user details 124reset credentials 118search for groups 123search users 123troubleshoot 125
disconnecting users 136distinguished name (DN)
determining by using WebSphereApplication Server AdministrativeConsole 47
determining by using Windows ActiveDirectory search 47
dmgrshutting down 182, 184starting 187, 190status checking 195
Eengine
secure 75security 78user registry 75
engine tierfailover in active-passive
configuration 150recovering from failover 151
entitlementsactivating or deactivating 127activating or deactivating items 129LicensingServiceAdmin
command 131viewing activated items 128
eventslogging 155purging 158, 161snapshot 159
export 206export command, istool 222exporting InfoSphere FastTrack assets by
using the command line 210
Ffailover
DB2 clustered configuration 150defined 139engine tier 150high availability disaster recovery
(HADR) 148, 149recovering from 151
fatal severity level 156forecasts
scheduled tasks 169
Gglossary 206
export 206import 207
group roles 72
groups 55, 56assigning users to 56, 57
Hheartbeat 139high availability
administering active-passiveconfiguration 139
high availability disaster recovery(HADR) 148
failover overview 148failover recovery 149
history 17Home tab
customizing 32host 229, 233, 235, 239
Iiauser
changing user name andpassword 113
IBM InfoSphere DataStageactivating or deactivating editions and
feature packs 129activating or deactivating entitled
canvases and features 127viewing activated editions and feature
packs 128identity strings 229, 239, 244import 207import command for InfoSphere
FastTrack 211import command, istool 228inactivity limit 135information analysis
graphics 28InfoSphere Business Glossary
security 65InfoSphere DataStage
administering 4asset types 224security roles 65
InfoSphere FastTrackroles 68security 64
InfoSphere Information Analyzeranalysis database owner user name
and password changing 113roles 68security 68
InfoSphere Information Serveradd-on components, installing in a
cluster 141administration overview 1backup 171console 13data recovery 177non-root user, system restart 90prepare for data recovery 171restore 177setting up non-root user, WebSphere
Application Server 85
InfoSphere Information Serveradministrator
password changing 106InfoSphere Information Server console
components 13object list 22project dashboard 19shortcuts 20status bar 19task flow 20task list 22walkthrough 20workspaces 22
InfoSphere Information Server enginemapping credentials 82
InfoSphere Information ServerManager 227
InfoSphere Information Server Webconsole
changing passwords 107configuring browsers for 9determining URL for 8navigating to 11
InfoSphere Information Services Directorcluster deployment 141security 69
InfoSphere Metadata WorkbenchAdministrator role 64User role 64
internal user registrypros and cons 39switch back to 49
isadminpassword changing 106
istool 203, 206, 229, 250, 254command 217, 239, 244command line 197command modes 202command-line syntax 198export command 222import command 228interchanging
common metadata assets 233, 235reports 250, 252security assets 255, 257
location 198istool export command 214istool import command 215
JJavaScript
enabling in Microsoft InternetExplorer 9
enabling in Mozilla Firefox 9jobs
crashed 153restarting crashed 153
LLDAP
determining DN by using WebSphereApplication Server AdministrativeConsole 47
274 Administration Guide

LDAP (continued)determining DN by using Windows
Active Directory search 47switch to 44user registry pros and cons 39
LDR_CNTRL 191legal notices 267LicensingServiceAdmin
activating or deactivating editions andfeature packs 129
command reference 131introduction 127viewing activated editions and feature
packs 128local operating system
user registry 39, 41, 42log files
SystemOut.log 192, 193WebSphere Application Server 195
log viewcopying 158, 161creating 157, 159criteria 156log messages 25, 155modifying 158, 160
logged eventsaccessing 158, 160purging 158, 161views 157, 159
logged messagespurging 158, 161
logging agentrunning as non-root user 91
logging componentsoverview 155
logging configurationsactive 163copying 163default 163editing 162overview 155
logs 25, 155
Mmaximum active sessions 135merging
common metadata assets 237reporting assets 254security assets 259
metadata repositorychanging owner password 111, 112criteria for logging events 156deletecm command 247deleting assets 238, 242, 247, 249
MetadataServer scriptrunning 188
Microsoft Internet Explorer,configuring 9
modes, istool command 202Mozilla Firefox, configuring 9My Home workspace 13
Nnode agents
running as non-root user 91nodes
synchronizing 145non-IBM Web sites
links to 265non-root administration
WebSphere Application Server 84non-root user
running agents as 91notes 17
note icons 20
Oobject list 22open workspaces 17opening a project 28operational metadata
security roles 67
PPAM
configuring for InfoSphereInformation Server engine 48
example configuration files 49password changing
analysis database owner 113DB2 114InfoSphere Information Server
administrator 106InfoSphere Information Server Web
console 107metadata repository database
owner 111, 112Web console 32WebSphere Application Server
administrator 108, 109PDR assets 233, 235physical data resources 229, 239plugin-cfg.xml file
managing for WebSphere ApplicationServer clusters 141
pop-up windowsenabling in Microsoft Internet
Explorer 9enabling in Mozilla Firefox 9
private viewslogging 156, 166
product accessibilityaccessibility 261
projectadding groups 72adding users 71assigning group roles 72assigning user roles 71creating 27creating groups 55, 56creating users 54, 56details 27menu 17opening 28overview 27recovering 152
project (continued)security 54, 56setting up 27
Qquery command 241, 245
Rrecovering projects 152recovery 171, 172registries
overview 34user 34
reporting assets 250reports
creating 24exporting 250importing 252merging 252view 24workspace 24
restore 171, 172roles
common data rules 68Common metadata 67InfoSphere DataStage 65InfoSphere Metadata Workbench
Administrator 64Metadata Workbench User 64Operational metadata 67
rule user 68rwx permission
non-root user 86, 88
Sschedule views
copying 166creating 166criteria 165
scheduled tasksforecasts 169purging run histories 168stopping 168
schedulescompleted 169pausing 167purging run histories 168reactivating 167restarting 167running 169stopping 167viewing 167
schedulingjobs 24schedule requests 24
schema 229, 233, 235, 239security
assigning groups to a project 72assigning users to a project 71configuring PAM 48creating groups 55, 56creating users 54, 56engine 75
Index 275

security (continued)example PAM configuration files 49external directory 36internal user registry 34managing 33overview 33, 53roles 62set up 70setup 33user roles 62
security assets 254exporting 255importing 257merging 257
security configurationauditing 101switching user registry 52
security rolesInfoSphere Business Glossary 65InfoSphere FastTrack 64InfoSphere Information Analyzer 68InfoSphere Information Services
Director 69viewing assigned 71, 74
send package command 221serverStatus command 192, 195services
shutting down (Windows) 180sessions
active 135disconnecting 136setting limits 135
severity levelslogging criteria 156
shared viewslogging 156, 166
shortcuts 17, 20software services 271starting
WebSphere Application Server 186,188
status 19status bar 19status checking
WebSphere Application Server 192WebSphere Application Server cluster
members 194WebSphere Application Server cluster
node agents 195WebSphere Application Server
Deployment Manager 195stopping 181, 183stored procedure 229, 233, 235, 239suite component roles
assigning users 70, 73suite roles 62suite users
group assignments 56, 57support
customer 271switching registries 120, 121SyncProject 152SystemErr.log 195SystemOut.log 192, 193, 195
Ttask list 22Tivoli System Automation for
Multiplatformsadministering active-passive
configuration 139tools
WebSphere Application Serverclusters, administering 139
troubleshootingdelete groups 122delete users 121DirectoryAdmin tool 117display user details 124search for groups 123search for users 123
types, asset 224
Uulimit 190user directories 34user name changing
analysis database owner 113user registries 34
configure for local operatingsystem 41, 42
configuring 34credential mapping 78internal 34LDAP 44recommendations 39shared 75, 80switching back to internal 49switching for a system in use 52
user roles 71overview 62
users 54, 56assigning security roles 70, 73assigning suite component roles 70,
73default and preconfigured 53define default InfoSphere DataStage
and QualityStage 81disconnecting 136grant access to InfoSphere DataStage
and InfoSphere QualityStage 83group assignments 56, 57mapping credentials 82security and granting access 83
Vviews
creating 157, 159, 166logged events 156
Wwasadmin
changing administratorpassword 108, 109
Web consolechanging passwords 32
Web sitesnon-IBM 265
WebSphere Application Server 181, 183administering 5changing administrator
password 108, 109checking status of startup 192InfoSphere Information Server,
non-root administration 84starting 186, 188status checking 192
WebSphere Application Serveradministrative console
logging in 12WebSphere Application Server cluster
adding cluster members 143administering 139administration tools 139checking status of startup 193cluster member status checking 194cluster member, adding 141configurations, required 143, 188configuring AIX memory
allocation 191configuring Linux file descriptor
resources 190installing, tools for 139managed nodes, adding 143node agents status checking 195nodes, synchronizing 143, 145plugin-cfg.xml file 141restarting processes 146syncNode command 143workload management,
performing 141WebSphere Application Server
Deployment Managerstatus checking 195
WebSphere Application Server non-rootuser
InfoSphere Information Server,post-installation 86, 88
rwx permission, assigning 86, 88Windows Active Directory
determining DN by using search 47workspace
completing tasks 20workspace navigator 15, 21
276 Administration Guide


����
Printed in USA
SC18-9929-05

Spineinformation:
IBM
Info
Sphe
reIn
form
atio
nSe
rver
Vers
ion
8Re
leas
e5
Adm
inis
tratio
nGu
ide
��
�