income collection and receipt issuance system … · income collection and receipt issuance system...
TRANSCRIPT

Income Collection and Receipt Issuance System IRIS User Guide
Table of Contents
Table of Contents ................................................................................................................. 1
Introduction .......................................................................................................................... 2
Contact Us ............................................................................................................................ 3
Roles in IRIS ........................................................................................................................ 4
login to IRIS ......................................................................................................................... 5
Switch to my managed department/unit .............................................................................. 6
Make Sales Transaction ....................................................................................................... 7
Generate Receipt ................................................................................................................ 15
Import Sales Transaction by batch ..................................................................................... 16
Preparing your excel file for sales transaction import ............................................... 16
Search for sales transactions .............................................................................................. 18
Amend / Delete a TRANSACTION (Can be done by Administrator only) ...................... 19
Delete sales transactions (Can be done by administrator only) ................................. 20
Amend sales transaction records (Can be done by administrator only)..................... 21
To Print Receipt ......................................................................................................... 22
Customize your own favorite sales item list ...................................................................... 23
Maintain the Customer list in IRIS .................................................................................... 25
Maintain the Open Item List in IRIS ................................................................................. 26
Maintain the Receipt Remark list in IRIS .......................................................................... 27

Page 2
Introduction
This document describes the detailed operational procedures of using the Income Collection and
Receipt Issuance System (IRIS) to make sales transactions and issue receipts.
Another document “Collection and Receipt Issuance System (IRIS) Administrator Guide” focus on the
system setting, receipt issuance setting, register bank-in records, generate bank-in summary, RV and
other statistics reports, user account maintenance and account code management.
Different system roles might have different web pages to be operated. Therefore, corresponding screen
captures will guide you through every operation steps. Your system administrator has full rights to setup
the system environment that suit you most.
There are two interfaces with IRIS to perform different functions:
Interface for making sales transactions and related activities will go to:
https://iris.bur.cuhk.edu.hk/pos/
Interface for performing administrative tasks and related activities will go to:
https://iris.bur.cuhk.edu.hk/iris/

Page 3
Contact Us
You are welcome to contact us if you have enquiries about IRIS. You may contact Finance Office if
questions related to accounting policies, and if questions are related to system usages, please contact
ITSC.
Finance Office
Ms. Ivy Ho
Tel: 3943-7186
email: [email protected]
Ms. Maggie Chan
Tel: 3943-1939
email: [email protected]
Information Technology Services Centre
Ms. Sannie Tsui
Tel: 3943-8675
email: [email protected]

Page 4
Roles in IRIS
IRIS has two system roles User, and Administrator. User and Administrator can access one or more
than one department. Administrator is able to assign access rights for particular functions to a user role
of the Department.
Each Department must have at least one Administrator. If a department contains several sections or
divisions and wants to separately manage their groups of accounts, the department is required to submit
applications to create account for department’s section or division. Administrator can also apply for
managing more than one section/division. For details, please contact Finance Office for help
IRIS Admin Interface has six main pages including Welcome Page and Contact Us pages, BankIn, RV,
Report and Admin, for user to access. The rights of viewing these pages are assigned by the
Administrator. That means a User role user can view one or more of the pages in the IRIS Admin
interface, if he has been assigned the rights.
IRIS is developed an Audit Trail system to log down all transaction operations starting from login user
account, making sales transaction, printing receipt, updating transactions to finally the document
generation. Transactions can be traceable in case of dispute.

Page 5
login to IRIS
If you are already an IRIS user, do have your CWEM password ready; If you NEW to IRIS, contact your
department’s IRIS administrators to create account for you, then follow the steps below to login to the
system:
1. Enter either Staff ID or Computing ID in the space provided
2. Then enter your CWEM password, if you have forgotten your password, you may click the link to
ITSC and apply to reset the password
3. Press to access IRIS
4. If you cannot login to the system, please contact your Administrator or ITSC for help
Login

Page 6
Switch to my managed department/unit
After login to the system, you can select which department/unit that you are working with, just follow the
steps below to switch your working department/unit:
1. Go to My Profile page
2. Select department/unit to work on if you have access to more than one
3. You will be confirmed by a message “Profile changed”

Page 7
Make Sales Transaction
After you have successfully login to IRIS, you are directed to the Sales page which contains 3 parts for
you to record sales transactions and generate receipt.
The top part Sales items is for making sales transactions
The middle part is the detailed Sales information for recording payment method and customer
information
The bottom part is the Payment Method detail to record whether payment is by cash, credit
card, EPS, Cheque, internet payment or TT
Top part
Middle part
Bottom part

Page 8
1. In Sales Page, complete the top part by selecting Add Item which will bring you to the Add
Sales Item page.
2. To make a sale, select item from the drop down list on the left side Select Sales Item panel.
Then the item details will be shown on the right side Selected Item panel. Enter/edit the sales item
and press ADD. You can filter the specified account code by selecting in the drop down list, or
enter key words in the sales item field to search for wanted items. For receipt of self –financed
program tuition fee income, check the dates of “From” and “To” for the period of the receipt covers to
ensure accuracy of sales item selected. Select Add button on the right side to confirm.
Add Sales Item
Left side
panel
Right side
panel
Drop down list
Sales item details

Page 9
3. Repeat Point 2 to add more sale items. To remove unwanted items from selections, click or
Remove ALL items
4. To change sales item details, click to direct you to the Add Sales Item page

Page 10
5. select the record and edit unit price, quality, discount amount and actual received amount, confirm
by pressing button
6. Go the Middle part Sales Information to select payment method and input details of customer
and select ‘No’ if print receipt is not required. The default setting is ‘Yes’ in Print Receipt field.
Save

Page 11
7. At last complete the bottom part Payment Details. If payment is made by cash, specify the
cash payment from ATM, cash, Direct credit or E Banking, etc.
if payment is made by credit card, fill in the Trace Number (if any), Commission charged rate and
the transaction date and time:

Page 12
If payment is made by EPS, only Trace No. and transaction date and time to be filled up:

Page 13
If payment is made by cheque, fill in cheque no., select Bank Name from drop down list, or check
the box below if bank name not in list, transaction date and time
If bank name not in list, check the box and bank name will automatically be filled up with OTHERS,
you may specify the bank name:
Page 14
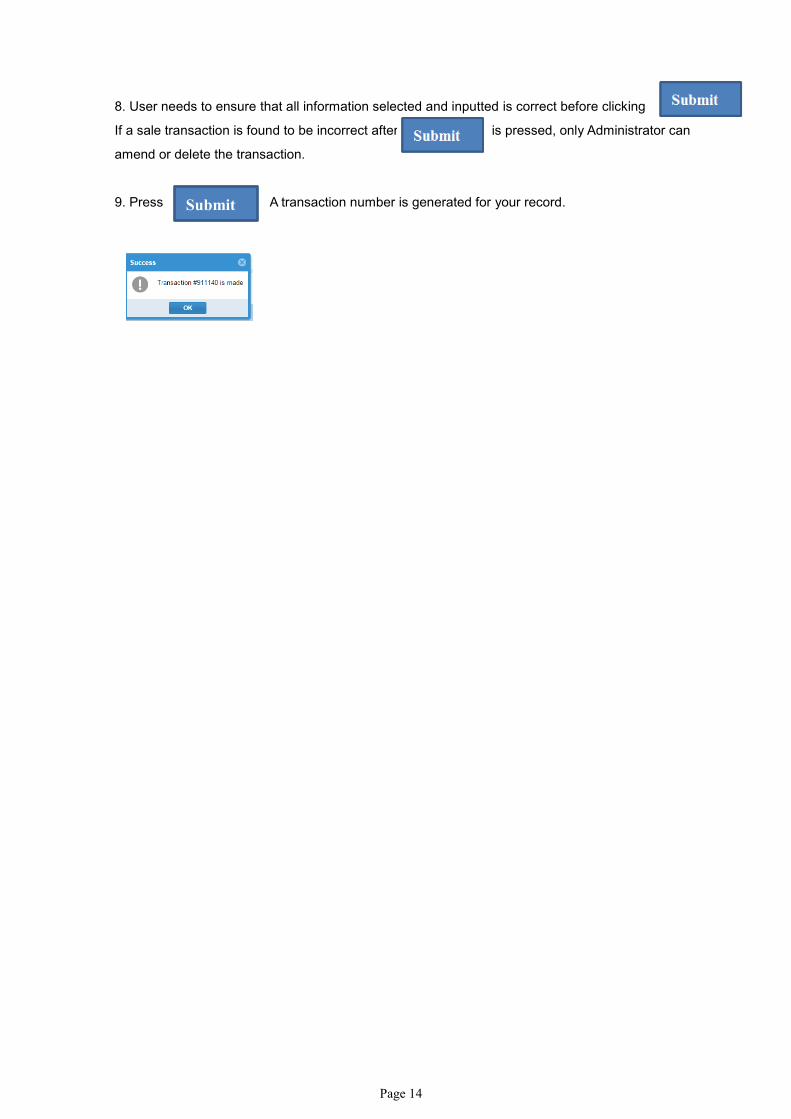
8. User needs to ensure that all information selected and inputted is correct before clicking
If a sale transaction is found to be incorrect after is pressed, only Administrator can
amend or delete the transaction.
9. Press A transaction number is generated for your record.
Submit

Page 15
Generate Receipt After press OK button to remove the transaction No. box, IRIS will print a receipt if the print receipt
checkbox is Yes. If the print receipt checkbox is changed to No, no receipt will be printed.
Receipt preview mode:
Print the receipt

Page 16
Import Sales Transaction by batch
You can prepare your own sales transaction list and import to IRIS. The import file will be prepared as
Excel format.
Preparing your excel file for sales transaction import
1. There are two excel file to be uploaded; Transaction File contains a list of transaction records
whereas the Breakdown File contains the detailed sales records in each transaction. Below is the
Transaction and breakdown files format:
2. To locate and upload the transaction and breakdown files

Page 17
3. Specify whether the transaction date is equal to the Bank-in-date for data verification (Yes or
No), press
4. Check your import history to avoid duplicated entries
Submit

Page 18
Search for sales transactions
IRIS provides a complete field list to locate the right sales transaction. All fields are available to pick the
selection and locate the record.
1. Go to the Transaction page, specifying either Ref. no / Receipt No. / Trace or Cheque No. to
search for the record. Or you can click on the Advance Search link to call out more options for
your searching criteria:
2. After specifying the search criteria, say Payment Type = ‘Cash’, press and the
result will be displayed in Transaction part
Search
Search results
1. select Cash in the drop
list of Payment type
2. Press Search

Page 19
Amend / Delete a TRANSACTION (Can be done by Administrator only)
1. follow the Search for sales transaction section above to locate the transaction that you
want to amend/delete. Check the record and double click
2. In Transaction page, you can
Double Click
Print Receipt Delete Transaction Amend Transaction

Page 20
Delete sales transactions (Can be done by administrator only)
Select the relevant sales transaction by referring to search for sales transactions sections of this user
guide. To delete a transaction, press , a Delete Transaction box pops up,
fill in the delete reason, press OK
Remarks: Any receipt printed for the sales transaction before deletion should be kept together with
the delete transaction report at department office for records and audit purposes.
You will be asked to give reason to delete the sales transaction:
And a message will acknowledge the transaction no. is deleted:
Delete Transaction
Type in reasons

Page 21
Amend sales transaction records (Can be done by administrator only)
Select the relevant sales transaction by referring to search for sales transactions sections of this user
guide. To amend a transaction record, press . you can
1. Add more sales items (follow Make Sales Transaction section to add more sales items)
2. Change the sales item details (follow Make Sales Transaction section to change sales item details)
3. Change the sales transaction information
4. Change details of payment
After the information is changed, press to confirm
You will be asked to give a reason for overriding the data, a new transaction no. will be generated.
Amend Transaction
1. Add more sales items
2. Change the sales item
details
3. Change the sales
transaction information
4. Change details of
payment
(cash/cheque/credit
card/EPS)
Override

Page 22
To Print Receipt
1. A preview screen of receipt pops up if print receipt checkbox was selected ‘Yes’ for the original
sales transaction.
Remarks: Administrator/user must collect back the receipt printed for the sales transaction done
before the amendment and kept it together with the void receipt report at department office for record
and for audit purpose.
Print Receipt

Page 23
Customize your own favorite sales item list
You can customize your own favorite sales item under My Favourite Item List page:
1. To add items into your favorite item list
a. press Add Item button
i. You can search for items by specifying account code
or key words in sales item fields
ii. Press Search button
iii. Press specific star to select one item
Key words

Page 24
b. press Add User Item button
i. Select User Name
ii. Press Search button
iii. Select any Star to select all items
2. To remove items from your favorite item list, click
3. To save your favorite item list
a. Press Save List button, then item list saved

Page 25
Maintain the Customer list in IRIS
You can maintain the Customer list under Customer Management page:
1. To add customer into customer list, press Add Template button, to remove items from existing item
list, click
2. Fill in the assigned Customer ID and the Customer Name, press Add button to confirm

Page 26
Maintain the Open Item List in IRIS
The Preset List stores the information of Open Item Description which are frequently used. You add, edit
or delete records in the preset list.
You can maintain the Open Item list under Open Item Management page, user can change the
description of a sales item only if your administrator check the Open Item box when create the sales
item created under CU Account page:
1. To add open item into open item list, press Add Template button, to remove items from existing item
list, click
2. Fill in the Open item description, press Add button to confirm

Page 27
Maintain the Receipt Remark list in IRIS
The Preset List stores the information of general remark description which are frequently used. You add,
edit or delete records in the preset list.
You can maintain the Receipt Remark list under Receipt Remark Management page:
1. To add receipt remark into Receipt Remark list, press Add Template button, to remove items from
existing item list, click
2. Fill in the Open item description, press Add button to confirm