improving methods of creation and aesthetics of
TRANSCRIPT

Improving Methods of Creation and Aesthetics of
Handcrafted Writing Instruments
Bachelors of Science in Mechanical Engineering
Summa Cum Laude – Fall 2017
Marshall Petrik
Committee Chair- Dr. Scott Banks (MAE), Faculty- Dr. Anil Rao (MAE), External Faculty- Dr. Mark Law (ECE)

1
Abstract— This research follows the improvements made in
the methods of creation and aesthetics of handcrafted writing
instruments over seven years of crafting. It was discovered the
optimum equipment to make pens are a mid-size wood lathe,
tabletop metal lathe, and carbide cutters for each. Pen
components and mechanisms progressed from making pens using
a single basic pen kit to using more than 50 different pen kits
with various styles to making custom components. Materials
started with woods, and progressed to acrylic, metal, and exotic
castings yielding truly unique aesthetics. Finishing techniques
were developed in conjunction with the various materials to
complement the natural beauty of the material. Safety was held
in high regard over the years with the implementation of dust
collecting equipment. Designs improved from simply matching
colors to eliciting emotional responses from the end users. These
improvements have led to the creation of world class handcrafted
writing instruments that stand at the forefront of the craft.
I. INTRODUCTION
HIS paper follows the improvements I have made to the
methods of creation and aesthetic results of my
handcrafted writing instruments over the seven years of
practice. I found out my grandfather made pens years before
during a visit in 2009. He gave me a pen that he crafted and
showed me the equipment he used to make them. I had always
enjoyed high end writing utensils and at this point it dawned
on me that the possibilities are only limited by your
imagination if you craft your own.
At that point I decided this was something I wanted to do
and began researching modern penmaking methods. After
reading many books and articles, and watching instructional
videos I purchased the equipment necessary and started
making my own pens in early 2010. From the start I began to
improve my methods and use a variety of materials to make
more aesthetically pleasing writing instruments.
In May 2010 I joined the International Association of
Penturners, a community of penmakers around the world who
share their works and advice. I was able to learn many new
techniques from other craftsmen at a rapid pace which lead to
immense improvement in my skills. Seeing the variety of pens
that others exhibited made me want to become one of the top
penmakers in the world by creating one of a kind designs
using materials that few if any had ever worked with.
By applying my engineering knowledge, researching cutting
edge techniques and materials, and trial and error I was able to
elevate my penmaking to a world class level. My works are
recognized by other craftsmen around the world. The areas in
which I have improved upon my craft are tooling, pen
mechanics and components, materials, finishes, safety, and
design.
II. TOOLING
The primary tool used to make pens is a lathe. This piece of
equipment spins a material at a high rate of speed while a
chisel or cutter removes material radially from the material. It
is used to make objects that are cylindrical in shape. I started
my penmaking with a mid-size wood lathe called a Turncrafter
pro shown in Fig. 1 below.
Fig. 1. Turncrafter Pro mid-size wood lathe. Fig. 1 from [1].
A wood lathe is the ideal tool for turning wood and acrylic
materials. It has a tool rest upon which chisels are placed and
guided by hand. These chisels come in a variety of shapes and
sizes to provide different cut geometry when interfacing with
the workpiece. This lathe has been my sole wood lathe for the
entirety of my penmaking career and is still serving me well. It
has plenty of power and enough speeds to accomplish every
task with ease, and has been very reliable.
Initially I invested in carbon steel chisels to use with this
wood lathe. These chisels are easy to sharpen and hold an
edge decently well. I used them exclusively for my first fifty
pens I produced. As I started to experiment with harder
materials, the edge on these tools would only last two or three
cuts before dulling and requiring me to stop to sharpen them. I
then upgraded my tools to M2 high speed steel.
These high speed steel tools have a much higher hardness
than the carbon steel tools I used before. This hardness allows
them to hold an edge longer and cut harder materials. The
better edge lead to higher dimensional accuracy in my pens as
they would cut the material with little input force allowing me
to cut small amounts of material when desired. They still had
to be sharpened, but much less frequently. These tools worked
very well until I started cutting composites that contained
metal or stone particles. At this point I upgraded to a tungsten
carbide chisel.
Improving Methods of Creation and Aesthetics of
Handcrafted Writing Instruments Petrik, Marshall
T

2
Tungsten carbide is a very hard ceramic that can cut
significantly harder materials than similar tools made of steel.
The chisel I selected utilizes a four sided radiused tungsten
carbide insert attached to the end of a carbon steel shaft.
Fig. 2. Square carbide insert wood lathe chisel. Fig. 2 from [2].
Since the carbide insert used at the tip of the tool has four
cutting edges, it can be indexed to a fresh edge when one side
gets dull. This allows the tool to cut a large amount of material
before needing to be sharpened. The slight radius on the cutter
is well suited to penmaking as it is possible to turn a smooth
curve on the pen without the corners of the cutter digging into
the workpiece.
This tool maintains an edge that is so sharp I have now been
able to skip my first two sandpaper steps while finishing the
pen. The finish left by the tool is about equal to the finish from
600 grit sandpaper. It has allowed me to pick any material I
desire with the knowledge that no matter what material I turn
on my wood lathe, this tool is able to cut it. This opened the
door to many of my most impressive pens that are made out of
exotic materials.
After attempting a pen made out of aluminum on my wood
lathe with my carbide tool I realized I needed new equipment
if I were to make any metal pens in the future. While the
carbide was able to cut the aluminum, I was unable to hold the
tool rigidly enough to provide a smooth cut. The chisel would
chatter across the workpiece, cutting little material and putting
a large amount of stress on my lathe. I then invested in an
Atlas tabletop metal lathe to start making pens out of metal.
Fig. 3. Atlas 6x18 metal lathe. Fig. 3 from [3].
The Atlas metal lathe has a carriage and cross slide that
move using gears and threaded rods. This creates a very rigid
platform upon which the tool rides. The user of a metal lathe
has very precise control of the motion of the tool in the X and
Y directions. It is this rigidity and control that allows the tool
to cut metal without the chattering that was experienced on the
wood lathe. Using carbide inserts on this metal lathe allowed
me to turn almost any metal I desired to make a pen from.
I perform all of my drilling operations on these lathes which
relieved the need for a drill press. I utilize some ancillary tools
to complete the penmaking process, but most of the work is
done on my two lathes. The combination of the Turncrafter
Pro wood lathe and the Atlas metal lathe using carbide cutters
allowed me to make pens out of any material I desired short of
stone. This equipment has allowed me to make world class
pens only limited by my imagination and design skills.
III. PEN MECHANICS AND COMPONENTS
Most pens consist of a standard assortment of components.
These components are a nib, clip, finial, actuation mechanism,
and refill. As with most people who embark on the penmaking
hobby, I started with a kit sold by many online retailers as the
Slimline kit.
The Slimline kit comes with every part necessary to make
the pen in one convenient package. It is a two barrel design
meaning two pieces of material are worked by the penmaker
and are separated by a center band. The kit has two brass tubes
that the craftsman glues his or her materials to that serve as the
skeleton of the pen. The finial, nib, and mechanism are press
fit into these brass tubes to form the pen after the materials are
worked. It utilized a unidirectional twist mechanism and a
ballpoint refill.
Fig. 4. Nine of my first fifty pens. All Slimline kits.
My first fifty pens primarily consisted of Slimline kits in
various finishes with various materials. It is a good kit to start
with as it leaves you with a lot of design freedom due to its
simple shape. I was able to hone my wood turning skills on
my lathe and learn how to make a pen aesthetically pleasing
and well proportioned. After doing a number of these pens I
yearned for more and started to purchase other kits with better
plating materials on the components and better mechanisms.
Each kit has a unique aesthetic and style to it. I kept trying
different kits to create the various aesthetics I had imagined
for each specific pen. After a few years I had used more than
50 different kits for my pens. These kits that came in a variety
of materials, finishes, and types taught me the difference
between high and low quality components. I learned which
kits met my quality standards and which did not. After a few
years, I started purchasing high end kits almost exclusively as
they more accurately reflected my skills as a craftsman.

3
The actuation mechanism is one of the most important parts
of any pen. The end user of the pen interacts with this every
time he or she intends to write with it. Initially many of my
pens were operated using a unidirectional twist mechanism.
Soon after I started using bidirectional twist mechanisms, click
mechanisms, and even bolt action mechanisms. Each
mechanism has its benefits and downsides, and is one of the
first things I will discuss with a customer when creating a
custom pen. The right mechanism for the pen comes down to
customer preference and the end user will be happy as long as
it is of high quality and reliability regardless of actuation type.
The most important part of the pen is the refill. It
determines the feel of the pen while writing as well as how the
user’s writing looks on the paper. All of my pens are made so
the user can access the refill to replace it when it runs out of
ink. This allows the user to use different colors and style of
refills in the same pen. That said, each pen is designed around
a standard refill type which cannot change, so the refill type is
one of the most important factors when designing the pen.
The first fifty pens I made primarily used a Cross type
ballpoint refill. This type of refill comes in various tip widths
and colors, but only has standard dyed oil based ink. This
limits the number of different writing experiences the user can
have with a pen that accepts this type of refill.
Fig. 5. Cross type refill used in my pens. Fig. 5 from [4].
My preferred ballpoint refill is the Parker type ballpoint
refill. I will only make a pen that utilizes the Cross type
ballpoint refill if a customer specifically requests it. The
Parker type refill comes in various widths and colors like the
Cross, but it also comes in different viscosities. This allows
the user to get a Parker type refill that writes like a rollerball
or one that writes like a gel pen. It makes the pens I make
much more versatile for the customer. Since some kits are
designed around the Cross type refill, I no longer make pens
using those kits.
Fig. 6. Parker type refill used in most of my pens. Fig. 6 from [5].
On many of my higher end pens I want to provide the best
writing experience possible. In order to do this I will use a kit
that incorporates either a Schmidt type ceramic tip rollerball
refill or a fountain pen nib with various inks. While ballpoint
inks are oil based to increase the viscosity of the ink, rollerball
and fountain pen ink is water based. This enables the ink to
flow much faster and smoother than the oil based inks. The
downside of these inks is since they are water based, they are
prone to evaporate. Any pen using a rollerball refill or any
fountain pen must have a cap that covers the tip of the refill or
nib.
Fig. 7. Schmidt type rollerball refill used in my pens. Fig. 7 from [6].
Despite all of the options offered in the commercially
available pen kits, there are still times when there isn’t a kit
that fits the design or characteristics I want in a pen. With the
addition of my metal lathe to my shop, I have started
designing and making my own pen parts. Often I will purchase
a mechanism and refill, then make all the other components
myself. The benefit of this is total freedom over the design and
overall aesthetic of the pen. Also I can utilize higher quality
mechanisms than the ones included in kits.
IV. MATERIALS
My first dozen or so pens were all made out of wood.
Working with wood is very easy for beginners who are just
learning how to work on a lathe. It cuts very predictably and is
forgiving in most cases. Many people enjoy the warmth of
writing with a wooden pen. I tried a few different woods, but
very early on I decided to try working with acrylics.
Acrylic is an interesting material to work with on a lathe. It
is a very dense plastic that comes in numerous colors and
designs. Many of the designs are very appealing and make
very nice looking pens. While wood forms chips when it is
cut, the acrylic materials form ribbons that can be upwards of
twenty feet long after a cut. This ribbon can wrap around the
workpiece and form a large mass of tangled plastic that has to
be separated from the workpiece after the lathe is shut off.
Fig. 8. Ribbons formed when cutting acrylics on a wood lathe.
Another difficulty of acrylic is the hardness. It requires
much sharper tools to cut than most woods. If the tool is not
sharp enough it can generate heat very quickly and even burn
the acrylic workpiece. This burning can render the workpiece
useless if it occurs near the final diameter of the pen. The
acrylics must be wet sanded to a very fine grit paper, polished
with polishing compounds, and sometimes buffed using
various buffing wheels to achieve a proper finish.
The third main category of materials is metals. My first
metal pens were made out of aluminum. Aluminum dissipates
cutting heat well and cuts very smoothly. After aluminum I
made a pen from stainless steel. This is much harder than the

4
aluminum and requires much sharper inserts to cut. It still
handles heat fairly well and is very durable in its finished
form. The most difficult metal I have worked with is titanium.
Only a handful of penmakers around the world have attempted
pens out of titanium due to its cost, low thermal conductivity,
and hardness. It does not dissipate heat well and requires very
hard and sharp tools to cut.
Fig. 9. Pen made out of Ti-6Al-4V titanium.
Almost all of the materials I work with can be placed into
one of those categories. The variety available in each category
is the surprising part. Within the wood category there are
hardwoods, soft woods, composite woods, veneers, burls, and
dyed woods. Acrylics have the greatest variety of all. Not only
do they come in virtually every color combination and design
imaginable, there are also acrylic composite materials. One of
these such materials is called Trustone and it consists of 85%
real stone particles combined with 15% acrylic to form a
material that looks and feels like stone, but can be worked
successfully on a wood lathe. Another technique done with
acrylics is casting objects and materials in clear acrylic resin.
It protects the material that is being cast without disrupting its
appearance.
I have always been interested in materials and have tried to
use as many different materials as possible to make my pens.
A pen that is good looking is a cool thing to have, but a good
looking pen with a compelling material that has a story behind
it can be priceless. I push the limits and am always open to
trying a new material even if I have to use it in a way in which
it has never before been used.
Some of the woods I have worked with are exotic woods
from all over the world. These include padauk, Indian
rosewood, African blackwood, bamboo, ironwood, ebony,
black ash burl, curly koa, and purpleheart. I have made pens
out of ancient kauri, a wood excavated from bogs in New
Zealand that carbon dates more than 50,000 years old. One of
my pens is an American flag pen made from dyed and laser
cut maple that you put together like a jigsaw puzzle.
Fig. 10. Pens made from various materials.
Some of the more impressive pens I have made are items
cast in clear acrylic resin. Some things I have cast in resin are
shredded money, abalone shell, carbon fiber, silver fiberglass
fiber, snakeskin, decals, circuit boards, pheasant feathers,
aluminum duct tape, and watch parts. These pens are some of
my most popular because they protect the material while
showing off its natural beauty.
Fig. 11. Pen made from watch parts overlaid on carbon fiber cast in resin.
My flagship pen has an Invicta watch face and other watch
parts overlaid on carbon fiber and cast in clear resin. I have
always enjoyed the pattern of carbon fiber and how
technologically advanced it is as a material. I use that as the
basis for the pen. I then bend each watch part to match the
curvature of the pen and adhere the parts to the carbon fiber.
This is then cast in resin and turned on the lathe. It is a time
intensive process, but shows the impressive results that can be
achieved with a little creativity. My fascination with materials
will always lead me to try new materials to push the limits of
my penmaking.

5
Fig. 12. Watch face bent and glued to carbon fiber with original Invicta watch.
V. FINISHES
The quality of the finish of any object plays a huge role in
the overall feel and value of the object. When creating a finely
crafted writing instrument, the finish is the key to a quality
product. The finish should complement the natural beauty of
the material the pen is made out of. When using a variety of
materials, you need to know a variety of finishes to make the
most of the material.
Starting off with wooden pens I mainly employed friction
polishes. These polishes seal the grains of the wood and bring
out the character in terms of color and grain lines. The finish
does not last very long when handled, so the wood will begin
to absorb the oils from the users hand. With some woods this
creates a patina of sorts and makes the wood soft to the touch.
Other woods don’t react well with the oils or may cause a
safety hazard. The friction polish is still a good finish that
leaves the wood in an almost natural state while adding some
protection.
Another wood finish I employ is a cyanoacrylate finish.
This finished is achieved by applying numerous thin layers of
cyanoacrylate glue, letting each dry before the next is applied.
This is then wet sanded and finished like an acrylic blank.
This completely seals the wood and is a very durable finish,
but has a plastic feel to it, so the user loses the warmth of the
wood in their hand. This finish is preferred for woods that
have loose grain patterns or wouldn’t react well to oils from
the user’s hand.
To add some interest to some wood pens I will burn lines
into the pen. This is achieved by cutting a small groove with
my parting tool on the lathe. I then wrap a piece of wire
around this groove and pull it tight. The friction of the wire
rubbing against the spinning wood burns the wood. This adds
black decorative lines to the pen in a short period of time.
Fig. 13. Burn lines near the center band of the pen.
Finishing acrylics consists of wet sanding and polishing.
Since they have a smooth surface, the smallest scratch is very
apparent when examining the final product. To counteract this
I wet sand with 600, 1200, 1500, and 2000 grit sandpaper.
This reduces any scratches in the surface to barely perceptible
swirl marks. These are then removed with plastic polishing
compounds. Some of the harder acrylics aren’t really affected
by the polishing compounds, so they must be buffed in
addition with red rouge and white diamond buffing
compounds.
One of the more interesting finishes I have done is
anodizing an aluminum pen. Aluminum being a soft metal is
prone to scratching. One way to stop this is to anodize, a form
of forced oxidation, the outer surface. During the process the
aluminum will absorb a die, so you can add color to the pen as
seen in the blue anodized aluminum pen in Fig. 13.
Fig. 14. Aluminum pen that I anodized blue.
The process of anodizing consists of submerging the
aluminum in a diluted sulfuric acid solution with lead
electrodes. DC current is run through the electrodes and the
aluminum part for over an hour, and then the aluminum part is
boiled to seal the pores in the metal. I was one of the first
penmakers in the United States to use this process and was the
first in the world to double anodize a pen. That consists of
anodizing a pen one color, masking parts of that anodized
layer, stripping the rest of the layer in citric acid, then re-
anodizing the pen another color. It is an interesting technique
that creates a very durable and appealing aluminum pen.
Another finish I employed is a hammered finish. This finish
consists of striking a metal pen with a ball peen hammer to
create an indentation. This process is continued until the strike
indentations begin to intersect one another. This creates an
interesting texture and pattern on a metal pen.
Fig. 15. Stainless steel pen with a hammered finish.
As I continue making pens I will continue to experiment
with new finishes. A good finish can take a lackluster design
and make it aesthetically appealing. Through lots of practice I
have found I have reached a point of being confident in my
ability to apply a near flawless finish to any pen I make.
6
VI. SAFETY
Safety has always been paramount to my success in my
penmaking endeavors. I approach each pen with a focus on
safety and ensure I do not take any action that could put me at
risk in any way. One hazard that I was unaware of when I first
started turning pens on my lathe is the toxicity of the fine
particles and dust released into the air while cutting or sanding
on the lathe. I read reports that showed some health detriments
of inhaling these particles. Ebony and cocobolo wood dust are
both particularly dangerous to inhale.
To eliminate this safety hazard I installed a dust collection
system to pull all of the dust out of the air and filter what is
released back into the environment. The dust collector I use is
2 HP and when used in conjunction with the 4 inch hose and
collection hood attached to my lathe, it vacuums almost every
chip and dust particle produced while using my lathe. When
turning particularly hazardous woods like ebony and cocobolo
I will wear a respirator along with using the dust collector. A
dust collector like the one I use is a necessity for anyone who
works on a wood lathe for any appreciable amount of time.
Fig. 16,17. Collection hood and 2 horsepower dust collector used in my shop.
Fig. 16 from [7]. Fig. 17 from [8].
VII. DESIGN
The thing that sets any given pen apart from other pens is
the design. A good design is the key to an appealing pen.
Initially my designing was limited to matching the color of the
blank to the plating of the kit. I made sure the kit plating
would complement the material used for the pen and not
detract from it. This level of design will only take a craftsman
so far. It yields products that are good enough, but not
groundbreaking in appeal.
When I started using a variety of kits to make my pens, it
opened me up to another level of design. At this point I could
figure out an overall theme or central idea to base the pen on.
The kit would complement the material not only in color tone,
but also in its geometric nature. An acrylic with smooth,
swooping curves would be paired up with a kit that has softer
edges than a crosscut wood with well-defined grain lines. This
level of design when executed correctly can lead to great
success as customers and end users are able to relate to the
theme of the pen.
The next level of design takes you out of the realm of what
is commercially available in terms of kits and materials to
custom made components and materials. At this point you can
design a pen that elicits a certain feeling. It is more than a
combination of two unrelated objects as is the case when you
match a kit to a material. In this case the two are designed
together and are intrinsically related.
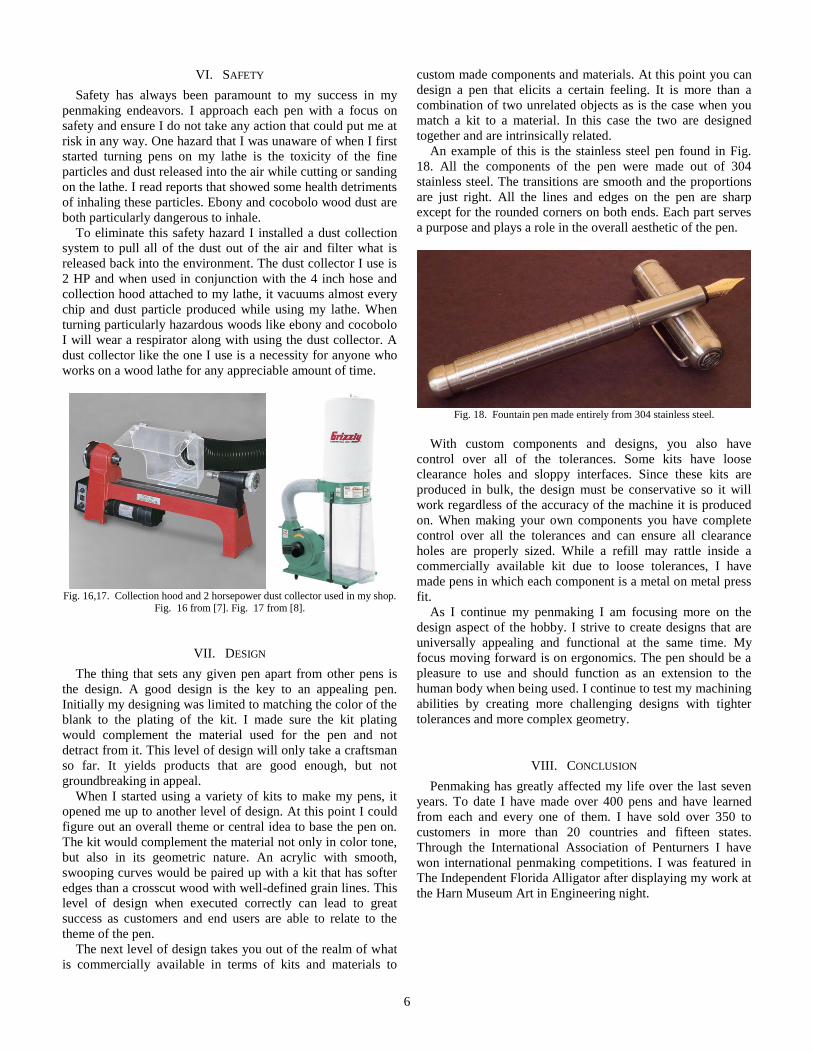
An example of this is the stainless steel pen found in Fig.
18. All the components of the pen were made out of 304
stainless steel. The transitions are smooth and the proportions
are just right. All the lines and edges on the pen are sharp
except for the rounded corners on both ends. Each part serves
a purpose and plays a role in the overall aesthetic of the pen.
Fig. 18. Fountain pen made entirely from 304 stainless steel.
With custom components and designs, you also have
control over all of the tolerances. Some kits have loose
clearance holes and sloppy interfaces. Since these kits are
produced in bulk, the design must be conservative so it will
work regardless of the accuracy of the machine it is produced
on. When making your own components you have complete
control over all the tolerances and can ensure all clearance
holes are properly sized. While a refill may rattle inside a
commercially available kit due to loose tolerances, I have
made pens in which each component is a metal on metal press
fit.
As I continue my penmaking I am focusing more on the
design aspect of the hobby. I strive to create designs that are
universally appealing and functional at the same time. My
focus moving forward is on ergonomics. The pen should be a
pleasure to use and should function as an extension to the
human body when being used. I continue to test my machining
abilities by creating more challenging designs with tighter
tolerances and more complex geometry.
VIII. CONCLUSION
Penmaking has greatly affected my life over the last seven
years. To date I have made over 400 pens and have learned
from each and every one of them. I have sold over 350 to
customers in more than 20 countries and fifteen states.
Through the International Association of Penturners I have
won international penmaking competitions. I was featured in
The Independent Florida Alligator after displaying my work at
the Harn Museum Art in Engineering night.

7
Fig. 19. Featured photo after Art in Engineering display. Fig. 19 from [9].
The penmaking has helped me win scholarships to school,
internships with reputable companies, and the UF Attributes of
a Gator Engineer Award for Creativity. It has also allowed me
to meet interesting people and form lasting relationships.
During a study abroad in South Africa I met a gentleman who
made pens and he remembered my name and my pens from
the International Association of Penturners.
All of these successes would not have been possible without
continuous improvement of my penmaking abilities and
equipment. Through lots of research and trial and error I have
reached the forefront of my craft and have made fine
handcrafted writing instruments that appeal to the masses.
Fig. 20. Assorted carbon fiber and watch part pens.
I improved my equipment to the point where I can turn any
material I desire. I started with basic pen kits, expanded to
using more than 50 commercially available kits, then started
making and implementing custom components to create my
desired appearance. I used and experimented with countless
materials and have found what materials help make a pen
attractive. I have learned various finishes to complement the
natural beauty of the material. I have held safety in high
regard and have implemented equipment to keep the hobby
safe. Finally I have improved my design skills to create pens
that are aesthetically pleasing and with which the end user
connects on an emotional level.
These are the improvements I have made thus far through
countless hours of research, study, and experimentation. It is a
never ending journey during which I will always improve my
skills. I strive to make better pens in the future than I have in
the past. This serves as a roadmap that outlines the progression
from just starting the hobby to being at the forefront of the
hobby worldwide. Moving into the future I will continue to
make fine pens that blend the fields of art and
engineering, represent the boundless possibilities of the
craft, and inspire others to bring their imagination to life.
REFERENCES
[1] Montello, Joe. “Turning Balsa Floats Tutorial.” Float Fishing
Connection, www.floatfishingconnection.com/tutorial_jm_balsafloattutorial.htm.
[2] “Easy Wood Tools Full Size Easy Rougher Replaceable Carbide Insert
Cutter Lathe Wood Turning Tool.” Lathe Turning Tools, Amazon.com, www.amazon.com/Easy-Wood-Tools-Replaceable-
1200/dp/B0039ZYQ4Y.
[3] “Tool bit angles for machining PVC?” MyLargeScale.com Community Forums, forums.mylargescale.com/30-tools/12455-tool-bit-angles-
machining-pvc.html.
[4] “Cross Ballpoint Pen Refill.” Tiger Pens, www.tigerpens.co.uk/cross-ballpoint-pen-refill.
[5] “Refills for Parker Ballpoint Pens.” Parker, www.parkerpen.com/en-
US/ball-point-refill. [6] “Schmidt® 5888 ceramic rollerball refill Black ink Medium point.”
Mitrax Trading, www.mitrax.com.au/store/product/schmidt-5888-
ceramic-rollerball-refill-black-ink-medium-point.html. [7] “Clear Lathe Dust Hood with Magnetic Mounting Clamp.” Penn State
Industries, www.pennstateind.com/store/DLHOODC2.html.
[8] “Grizzly G1028Z2 1-1/2 HP Dust Collector - Vacuum And Dust
Collector Accessories.” Vacuum And Dust Collector Accessories,
Amazon.com, www.amazon.com/Grizzly-G1028Z2-1-1-Dust-
Collector/dp/B0037VI2WM. [9] Writer, Alexandra Fernandez Alligator Staff. “A marriage of art and
science.” The Independent Florida Alligator, 8 Oct. 2015,
www.alligator.org/news/campus/article_6d5af0b6-6e40-11e5-a693-37be11939ac6.html.