important note - therammaninc.comtherammaninc.com/files/products/trm_front_disc_brake...with smaller...
TRANSCRIPT

7200 Winters Street Fort Worth, TX 76120
(817) 429-0105 Email: [email protected]
Website: www.therammanINC.com
TRM Introduction To Install Disc Brakes P a g e 1
CORRECT FACTORY DISC BRAKES OVERVIEW
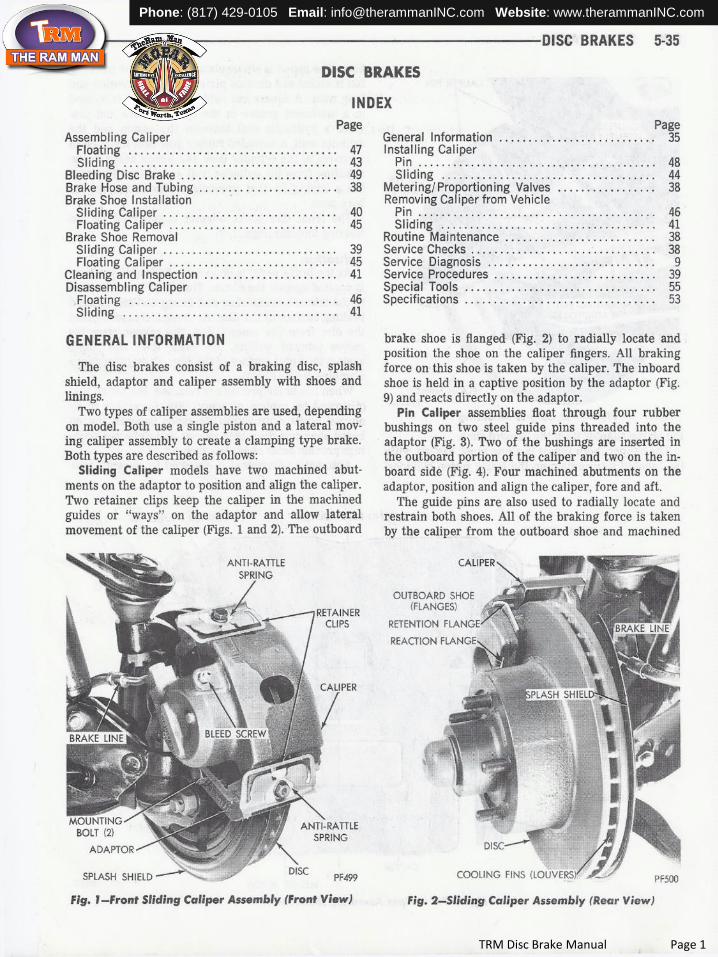
As written in the article, Disc-o-tech by Richard Ehrenburg, and countless tech articles in many magazines, the correct way to install factory disc brakes on all 62-76 A-Body’s, 62-74 B-Body’s and 70-74 E-Body’s, is to install 1976 Factory A-Body components. Since these parts are no longer available, we have reproduced them to solve this problem. Factory components always fit, always work, and installation is hassle free. The installers on assembly lines did not have much time, so installation had to be simple and hassle free! The 1973-1976 sliding caliper design fits under factory 14” wheels. These cars left the factory with 14” wheels!
IMPORTANT NOTE
YOU HAVE PURCHASED FACTORY 1976 A-BODY (DART, DUSTER) DISC BRAKE COMPONENTS. ALL WEARABLE PARTS MAY BE PURCHASED AT YOUR LOCAL PARTS HOUSE AS NEEDED DURING THE VEHICLE LIFETIME. THIS INCLUDES PADS (D84), BEARINGS (A2+A17) AND CORRECT ROTORS.
7200 Winters Street Fort Worth, TX 76120
(817) 429-0105 Email: [email protected]
Website: www.therammanINC.com
TRM Introduction To Install Disc Brakes P a g e 2
A-BODY SPECIAL NOTES
Up until the introduction of our upper ball joint crush sleeves, all A-Body disc swaps have required additional expense and hassle that B and E Body owners did not have to deal with. The original A-Body ball joint stem is a smaller diameter than all other Mopar units. Therefore, it does not mate with any other spindle than the original 1965-1972 units it came with. In past history, original 62-72 A-Body owners had only 2 choices:
1. Retrieve original 1973-1976 upper A-Arms, rebuild bush and install new ball joints ($300 to $400)
2. Purchase aftermarket fabricated upper A-Arms ($300 to $400) Because of our crush sleeve technology, clients are saved from this hassle and large expense. You may pursue those other avenues if you wish. A-Body kits are supplied with 2 additional parts, upper ball joint crush sleeves and lower factory A-Body 1976 ball joints to mate to new correct spindles.
ROTOR NOTES
The Ram Man has correct 4” Bolt Rotors for all A-Body disc brake spindles in both plain and drilled & slotted. This includes the original 1965-1972 Kelsey Hays System with smaller A6 inner bearings and the heavy duty 1973-1976 A17 large bearing spindle. We reproduced the correct larger, heavy duty A17 spindle years ago.
Installation Instructions: 1966-1972 A-Body Hints
1. Use original castle nuts to pull upper ball joint and sleeves down until tight in
steering knuckle upper hole. 2. Remove castle nut and replace with special ‘Top Lock’ flange nuts provided. You
may use Red Loctite also for added safety.
7200 Winters Street Fort Worth, TX 76120
(817) 429-0105 Email: [email protected]
Website: www.therammanINC.com
TRM Introduction To Install Disc Brakes P a g e 3
FRONT SWAY BAR SOLUTIONS
Some A-Bodies and B-Bodies were offered with performance handling packages that included a front sway bar as part of the performance package. This is why 1966-1972 A-Bodies and 1966-1969 B-Bodies used rear mount calipers from the factory. The 1976 A-Body’s calipers were designed for front mounting, as many Mopars were, starting in 1970. Swapping spindle sides right to left and left to right will position the calipers in the rear, but may lead to hose routing problems on some models and years. Binding, twisting and cork screw configuration have been seen over the years on some applications and some people have made custom hoses with round banjo caliper ends that allow more positioning options. We’ve been told some aftermarket companies offer them. Mopar solved this problem easily by making/designing a true rear mount sliding caliper. These are very rare, but available from The Ram Man also as a simple $65 upgrade; problem solved correctly and easily. Factory parts always fit, always work and save hassle, confusion and dissapointment.
7200 Winters Street Fort Worth, TX 76120
(817) 429-0105 Email: [email protected]
Website: www.therammanINC.com
TRM Introduction To Install Disc Brakes P a g e 4
DISC CONVERSION KIT UPGRADES FOR EXISTING CLIENTS
1. Timken® Bearings .............................................................. $45
2. 11” Drilled and Slotted Rotors.......................................... $145
3. 11.75” Big Rotor Sliding Caliper Brackets ......................... $125
4. 11.75” Drilled and Slotted Rotors ..................................... $175
5. 11.75” Drilled and Slotted Rotors Silver Zinced ................ $245
6. Adjustable TRM Proportioning Valve. Simple inline install
(easiest & fastest). ............................................................. $65
7. TA, AAR Factory Style Combo Proportioning Valve with Front
Metering Block / Hold Off Valve Unit and was the first
introduction of antilock braking (ABS), the best there is ... $95
8. Correct, complete factory style Power Brake Units, as factory
installed on assembly line ......................................... $300-450
9. Rear Disck Kits: Plain or Drilled & Slotted Rotors ...... $500-600
10. Larger Rotor 11.75” Pin Caliper Systems, a complete
performance upgrade, the finest system available ever offered
by Mopar (max effort) ............................................. $400 plus
11. Ceramic pads (max effort) for pin caliper systems………….$75
12. Black powder coated sliding calipers………………………………$65
(Allows use of 1978 Cordoba rotors from local parts store)
7200 Winters Street Fort Worth, TX 76120
(817) 429-0105 Email: [email protected]
Website: www.therammanINC.com
TRM Caliper & Rotor Performance Levels
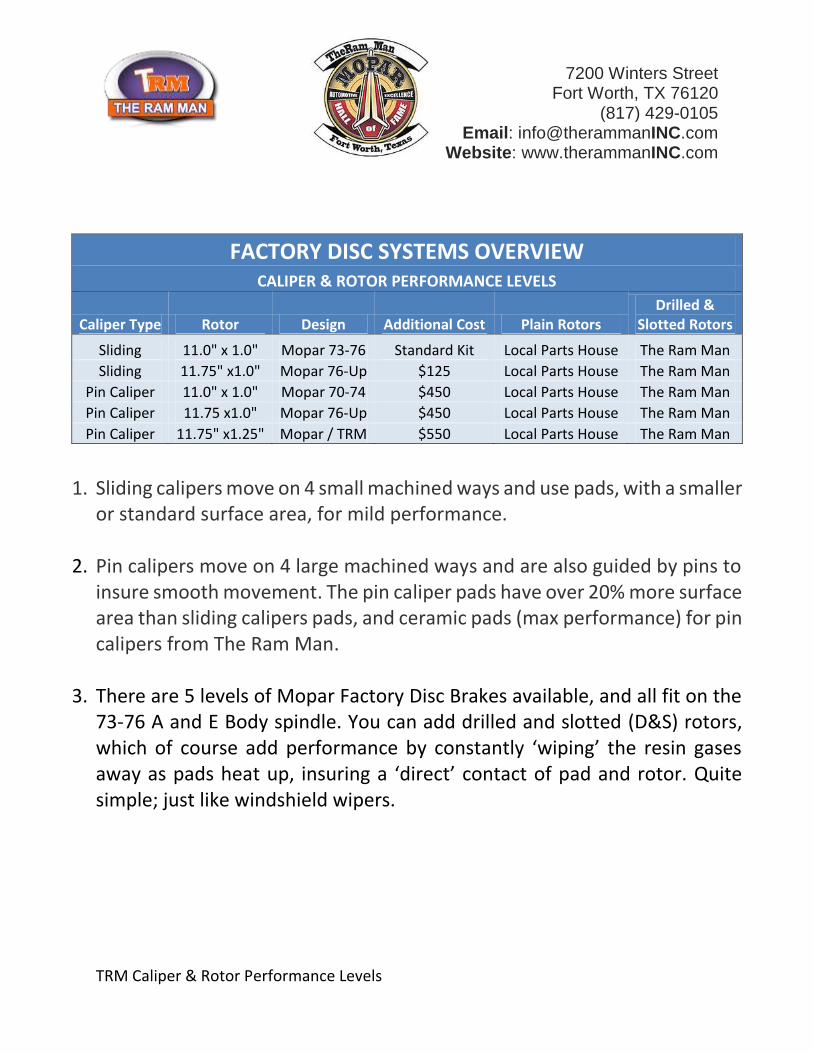
FACTORY DISC SYSTEMS OVERVIEW CALIPER & ROTOR PERFORMANCE LEVELS
Caliper Type Rotor Design Additional Cost Plain Rotors Drilled &
Slotted Rotors
Sliding 11.0" x 1.0" Mopar 73-76 Standard Kit Local Parts House The Ram Man
Sliding 11.75" x1.0" Mopar 76-Up $125 Local Parts House The Ram Man
Pin Caliper 11.0" x 1.0" Mopar 70-74 $450 Local Parts House The Ram Man
Pin Caliper 11.75 x1.0" Mopar 76-Up $450 Local Parts House The Ram Man
Pin Caliper 11.75" x1.25" Mopar / TRM $550 Local Parts House The Ram Man
1. Sliding calipers move on 4 small machined ways and use pads, with a smaller or standard surface area, for mild performance.
2. Pin calipers move on 4 large machined ways and are also guided by pins to insure smooth movement. The pin caliper pads have over 20% more surface area than sliding calipers pads, and ceramic pads (max performance) for pin calipers from The Ram Man.
3. There are 5 levels of Mopar Factory Disc Brakes available, and all fit on the
73-76 A and E Body spindle. You can add drilled and slotted (D&S) rotors, which of course add performance by constantly ‘wiping’ the resin gases away as pads heat up, insuring a ‘direct’ contact of pad and rotor. Quite simple; just like windshield wipers.
Phone: (817) 429-0105 Email: [email protected] Website: www.therammanINC.com
TRM Disc Brake Manual Page 1

TRM Disc Brake Manual Page 2
Phone: (817) 429-0105 Email: [email protected] Website: www.therammanINC.com
TRM Disc Brake Manual Page 3
Phone: (817) 429-0105 Email: [email protected] Website: www.therammanINC.com

TRM Disc Brake Manual Page 4
Phone: (817) 429-0105 Email: [email protected] Website: www.therammanINC.com
TRM Disc Brake Manual Page 5
Phone: (817) 429-0105 Email: [email protected] Website: www.therammanINC.com

TRM Disc Brake Manual Page 6
Phone: (817) 429-0105 Email: [email protected] Website: www.therammanINC.com
TRM Disc Brake Manual Page 7
Phone: (817) 429-0105 Email: [email protected] Website: www.therammanINC.com

66-72 Performance A-Body’s + 66-69 B-Body’sAll with factory front sway bar
FRONT
STANDARD FRONT MOUNTING CALIPERS
REAR CALIPER MOUNTING
TRM Disc Brake Manual Page 8
Phone: (817) 429-0105 Email: [email protected] Website: www.therammanINC.com

IMPORTANT NOTES:
TRM Disc Brake Special Instructions
Phone: (817) 429-0105
Email: [email protected]: www.therammanINC.com
Spindle SleevesFor converting 1.25” inner bearing to standard 1.375”
Rubber O-RingsA young engineer’s bad idea. Normally NOT used in real life
(Anti-Rattle)1. They break almost immediately2. Impossible to install them3. Prevents calipers from sliding as designed
See our Spindle Sleeve Tech online video tutorial at:https://vimeo.com/171179449
7200 Winters Street Fort Worth, TX 76120
(817) 429-0105 Email: [email protected]
Website: www.therammanINC.com
There are multiple videos on YouTube at theramman01 channel, showing Bleeding and Fluid Flow verification.
TRM Info - Hydraulic Info & Tips 20161229a P a g e 1
FANTASTIC TIPS AND IMPORTANT INFORMATION ON BRAKE SYSTEM HYDRAULICS
A major portion of all brake system problems and grief, can definitely be diagnosed with a simple procedure called, 2 person bleeding. Fluid flow issues, component failures and blocked brake lines, can all be identified easily, seeing is believing.
THE AWESOME ADVANTAGES OF THE OLD SCHOOL 2 PERSON BRAKE SYSTEM BLEEDING
1. A human gets to see and interpret the fluid flow at the bleeder fittings, no guessing. 2. This simple act indicates there are no flow restrictions and all components of the system
are working correctly. No (or poor) fluid flow definitely indicates problems.
ADVANTAGE OF BENCH BLEEDING THE MASTER CYLINDER
You get to see and interpret the fluid flow, indicating the true status of the master cylinder. This simple act answers all questions. Are both ports flowing? Is only one flowing? Does it leak out of the back?.....etc.
BENCH BLEEDING MASTER CYLINDER
1. Clamp master cylinder securely in a bench vise. 2. Twist/push pointed bleeder tube adaptors into the outlet ports of the master cylinder and
bend the tubes into the master cylinder reservoirs. Use the hose retainer. 3. Fill the reservoir with new brake fluid to approximately 1/4" from the top. Be sure the
ends of the tubes are covered by the brake fluid. 4. Using a bleeding tool or suitable blunt stroking tool, begin slowly depressing the master
cylinder piston using 3/4 to 1 inch strokes. Continue this procedure until you see a nice steady stream of fluid. While fluid is flowing on the compression stroke, you can lift the end of the clear tube out of the brake fluid, observe flow.
5. Remove master cylinder from vise and install on vehicle. 6. Now remove the bleeder tubes from the outlet ports and attach the vehicle’s brake lines. 7. The wheel cylinders and calipers must now be bled to remove any remaining air from the
system. Refer to the Service Manual or bleeding sequence guide for the proper bleeding procedure.
TUR
N O
VER
FO
R M
OR
E N
OTE
S
7200 Winters Street Fort Worth, TX 76120
(817) 429-0105 Email: [email protected]
Website: www.therammanINC.com
There are multiple videos on YouTube at theramman01 channel, showing Bleeding and Fluid Flow verification.
TRM Info - Hydraulic Info & Tips 20161229a P a g e 2
TESTING MASTER CYLINDER
Be sure that the master cylinder compensates at both ports. This can be done by applying the pedal lightly with the engine running (power brakes) and observing for a geyser of fluid squirting up in the reservoirs. This may only occur in the front chamber and so to determine if the rear compensating port is open, it will be necessary to pump up the brakes rapidly and then hold the pedal down. Have an observer watch the fluid in the rear reservoir while the pedal is raised. A disturbance in the fluid indicates that the compensating port is open.
IMPORTANT NOTE
There is no warranty for any client that chooses to use Dot 5 Brake fluid. When Dot 5 and Dot 3 mix on any level (even microscopic), a chemical reaction happens that causes the seals, gaskets and cups to swell and drag, increasing resistance. This can cause slow apply and slow or no release. It is the single worst thing you can do to an old car, using original rubber cups and seals. God Bless America, Wayne
TUR
N O
VER
FO
R M
OR
E N
OTE
S

7200 Winters Street Fort Worth, TX 76120
(817) 429-0105 Email: [email protected]
Website: www.therammanINC.com
THE RAM MAN INSTALLATION DISCLAIMER
PLEASE READ!
We assume owners have service manuals for their vehicles. Reprints are available on the internet for approximately $30 to $40.
We also assume owners are competent (having mechanical sense and experience), or have the good common sense to seek qualified help when needed.
THE RAM MAN IS NOT RESPONSIBLE FOR IMPROPER INSTALLATIONS OR ANY DAMAGE THAT COULD POSSIBLY RESULT FROM AN IMPROPER INSTALLATION.
IF YOU ARE NOT QUALIFIED TO INSTALL OUR PRODUCTS PROPERLY, PLEASE HAVE YOUR INSTALLATION PERFORMED BY A QUALIFIED MECHANIC.