immediate dental implant placement: technique, part 2 · continuing education immediate dental...
TRANSCRIPT

Continuing Education
Immediate Dental ImplantPlacement: Technique, Part 2
Authored by John Cavallaro, DDS, and Gary Greenstein, DDS, MS
Course Number: 170
Upon successful completion of this CE activity 2 CE credit hours may be awarded
A Peer-Reviewed CE Activity by
Opinions expressed by CE authors are their own and may not reflect those of Dentistry Today. Mention of
specific product names does not infer endorsement by Dentistry Today. Information contained in CE articles and
courses is not a substitute for sound clinical judgment and accepted standards of care. Participants are urged to
contact their state dental boards for continuing education requirements.
Dentistry Today, Inc, is an ADA CERP Recognized Provider. ADA CERP isa service of the American Dental Association to assist dental professionalsin indentifying quality providers of continuing dental education. ADA CERPdoes not approve or endorse individual courses or instructors, nor does itimply acceptance of credit hours by boards of dentistry. Concerns orcomplaints about a CE provider may be directed to the provider or to ADA CERP at ada.org/goto/cerp.
Approved PACE Program ProviderFAGD/MAGD Credit Approval doesnot imply acceptance by a state orprovincial board of dentistry orAGD endorsement. June 1, 2012 toMay 31, 2015 AGD PACE approvalnumber: 309062

LEARNING OBJECTIVESAfter participating in this CE activity, the individual will learn: • Indications and contraindications for immediate implantplacement.
• Technique variations that are employed when placingimmediate implants in different areas of the mouth.
ABOUT THE AUTHORSDr. Cavallaro is a clinical associateprofessor of prosthodontics at the Collegeof Dental Medicine, Columbia University,NY, He maintains a private practice insurgical implantology and prosthodonticsin Brooklyn, NY. He can be reached via
e-mail at the ad dress [email protected].
Disclosure: Dr. Cavallaro reports no disclosures.
Dr. Greenstein is a professor in thedepart ment of periodontology at theCollege of Dental Med icine, ColumbiaUniversity, New York, NY. He maintains aprivate practice in surgical implantologyand periodontics in Freehold, NJ. He can
be reached at [email protected].
Disclosure: Dr. Greenstein reports no disclosures.
INTRODUCTIONImmediate dental implant placement, whereby the implantis inserted directly after a tooth is extracted, has gainedwidespread acceptance based on a high survival rate.1,2
However, placement of immediate implants in differentregions of the mouth and under diverse conditions can bechallenging. Part one of this 2-part article addressedimportant clinical issues relevant to immediate implants.Part 2 provides practical clinical information for positioning
immediate implants in different sections of the mouth, witha focus on Type 1 extraction sockets.
POSITIONING IMMEDIATE IMPLANTS BY REGIONSOF THE MOUTHJumping Distance The jumping distance is a term that refers to the gap between animmediately placed implant and the bone’s ability to bridge thegap.3 Usually, if the gap is less than 2.0 mm, it will fill with bonewithout bone grafting.4,5-7 Others suggest that an even greaterdistance can heal without any osseous augmentation.8,9
Maxillary Anterior Teeth—An osteotomy is created onthe palatal aspect of the socket (Figures 1a to 1e). It isadvisable to take a side cutting (Lindemann) drill and createa ledge in the palatal bone two thirds the distance from thecrest of bone to the apex. This ledge is used as a purchasepoint to place twist drills. It may be useful to enter the boneat an angle with a twist drill and then straighten it up as theosteotomy is created. Ideally, the implant will be positionedso that incisal edges of the mandibular teeth are aiming atthe cingulum of the future anterior restoration. Maxillaryteeth protrude at about 110°; thus it is necessary to drill theosteotomy in a manner that positions the implant to restorethe desired tooth position and contour. It is advisable tokeep the implant slightly lingual in the socket and it shouldnot touch the buccal plate of bone. The horizontal biologicinfluence of the implant should be respected to avoidinducing buccal alveolar bone loss.10 As previouslyindicated, implants should be placed one mm subcrestallyas viewed from the labial osseous crest. In addition, toavoid an implant being pushed buccally upon insertion, it isa good idea to reshape (remove) a small amount of palatalbone at the crest prior to implant placement.
Maxillary Bicuspids—In the first bicuspid site, if thefurcation bone interferes with selecting an ideal osteotomylocation, it should be removed. If the furcation bone is thick,then the osteotomy can be initiated there. Usually, the buccalsocket of a 2-rooted bicuspid is not a good location for animplant. It is too far to the buccal, and often there is a labialconcavity of the alveolus. Thus, this location should beavoided because it will provide poor esthetics, and drillingan osteotomy in this site can result in labial plateperforation. The osteotomy should be drilled relatively
Continuing Education
1
Immediate Dental ImplantPlacement: Technique, Part 2Effective Date: 2/1/2014 Expiration Date: 2/1/2017
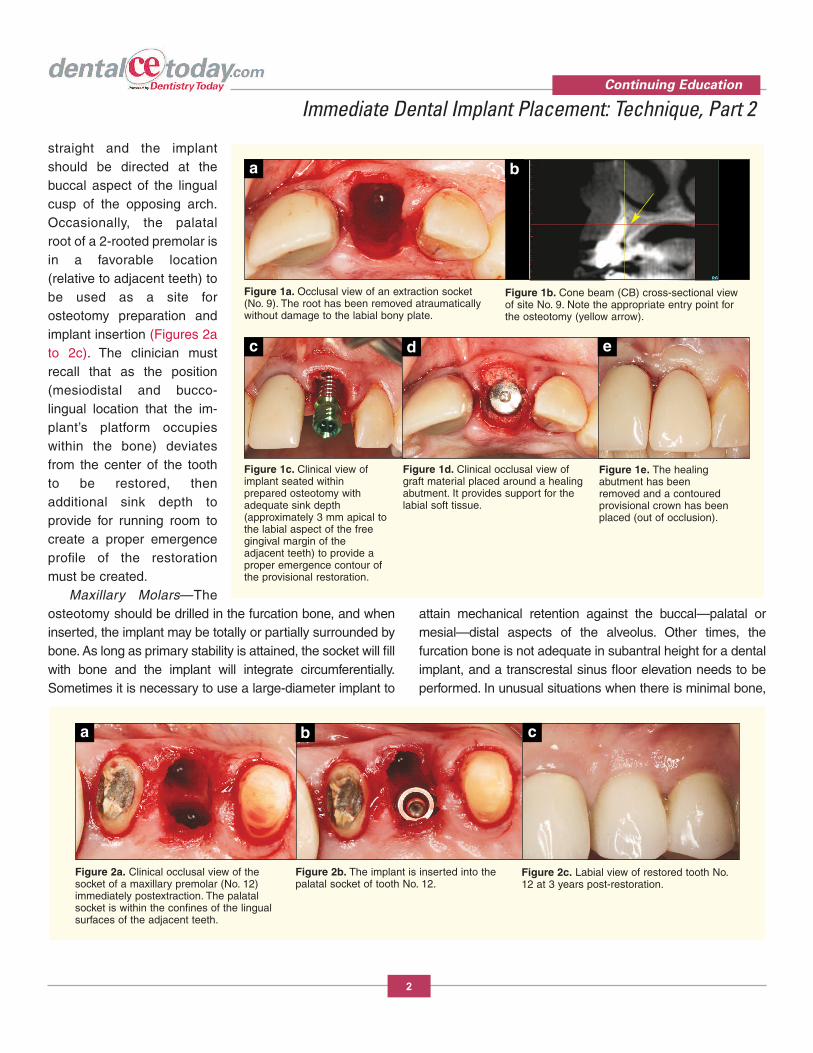
straight and the implantshould be directed at thebuccal aspect of the lingualcusp of the opposing arch.Occasionally, the palatalroot of a 2-rooted premolar isin a favorable location(relative to adjacent teeth) tobe used as a site forosteotomy preparation andimplant insertion (Figures 2ato 2c). The clinician mustrecall that as the position(mesiodistal and bucco-lingual location that the im -plant’s platform occupieswithin the bone) deviatesfrom the center of the toothto be restored, thenadditional sink depth toprovide for running room tocreate a proper emergenceprofile of the restorationmust be created.
Maxillary Molars—Theosteotomy should be drilled in the furcation bone, and wheninserted, the implant may be totally or partially surrounded bybone. As long as primary stability is attained, the socket will fillwith bone and the implant will integrate circumferentially.Sometimes it is necessary to use a large-diameter implant to
attain mechanical retention against the buccal—palatal ormesial—distal aspects of the alveolus. Other times, thefurcation bone is not adequate in subantral height for a dentalimplant, and a transcrestal sinus floor elevation needs to beperformed. In unusual situations when there is minimal bone,
Continuing Education
2
Immediate Dental Implant Placement: Technique, Part 2
Figure 1a. Occlusal view of an extraction socket(No. 9). The root has been removed atraumaticallywithout damage to the labial bony plate.
a
Figure 1b. Cone beam (CB) cross-sectional viewof site No. 9. Note the appropriate entry point forthe osteotomy (yellow arrow).
b
Figure 1c. Clinical view ofimplant seated within prepared osteotomy with adequate sink depth(approximately 3 mm apical tothe labial aspect of the free gingival margin of the adjacent teeth) to provide aproper emergence contour ofthe provisional restoration.
c
Figure 1d. Clinical occlusal view ofgraft material placed around a healingabutment. It provides support for thelabial soft tissue.
d
Figure 1e. The healing abutment has beenremoved and a contouredprovisional crown has beenplaced (out of occlusion).
e
Figure 2a. Clinical occlusal view of thesocket of a maxillary premolar (No. 12)immediately postextraction. The palatalsocket is within the confines of the lingualsurfaces of the adjacent teeth.
a
Figure 2b. The implant is inserted into thepalatal socket of tooth No. 12.
b
Figure 2c. Labial view of restored tooth No.12 at 3 years post-restoration.
c

but the palatal root alveolus is adequate in height to retain animplant, it can be used. How ever, caution must be exercisednot to perforate through the alveolus. If the palatal root is used,tilt the im plant to the center of the osteotomy. Furthermore, ifthe palatal root is too far lingual, it should not be employedbecause it will create poor positioning of the implant and resultin an unsatisfactory prosthesis. Keep in mind that the alveolarbone in a healthy situation is 2 mm apical to the cemento-enamel junction (CEJ). Therefore, it is probable that thefurcation bone is apical to the buccal and lingual osseouscrest. This usually does not present a problem be cause thebuccal and palatal walls resorb to a small degree. However, ifthe walls are very thin, they may resorb several millimeters. Ifthe furcation bone is many millimeters apical to the buccal andlingual crests of bone, the implant platform can be placedseveral millimeters supracrestally with respect to the level ofthe furcation bone.
Mandibular Incisors—The osteotomy can be drilledstraight down the alveolus and the implant should tilt towardthe cingulum of the maxillary opposing tooth. Alternately,the cingula of the adjacent teeth can provide a visual cue,or surgical guides can be employed. Note that due to theshape of the mandible in the incisor area, despite loss ofbone around the roots of teeth, the mandibular boneactually becomes thicker toward the buccal as drillingproceeds apically (Figures 3a to 3d).
Mandibular Bicuspids—The length of immediateimplants needs to be carefully assessed due to the locationof the mental foramen. It is coronal to the apex of the firstand second bicuspids, respectively, 38% and 25% of thetime. Therefore, it cannot be assumed that an implant can beplaced that is as long as a bicuspid root.11
Mandibular Molars—After a man dibular molar isextracted, an im plant can be placed in the furcation bone.Usually, the bone is not thick enough to encompass theimplant circumferentially. Often only the buccal and lingualaspect of the furcation bone stabilizes the implant.Alternately, the implant can also be placed into the mesialor distal alveolus, but the implant should be directed to thecenter of the edentate area and aimed at the buccal aspectof the lingual maxillary cusp. Similar to maxillary molarimplants, when the implant is placed into the furcationbone, it may be several millimeters apical to the buccal andlingual osseous crest. The gaps around the implant can beallowed to fill with a clot or the areas can be bone grafted.When furcation bone is not available to provide primarystability, there are im plants that are referred to as “rescueimplants” that are very wide and can be used in the man -dibular alveolus (Figure 4). These implants achieve primarystability by engaging the buccal and lingual plates of bone. Asalways, implant placement must be restoratively appropriate,or a de layed protocol should be used.
Continuing Education
3
Immediate Dental Implant Placement: Technique, Part 2
Figure 3a. CB crosssection of plannedimmediate implant inthe mandibular lateralincisor position. Notethat the abutmenttool depicts thetrajectory of theimplant passingthrough the cingulumarea of the existingtooth.
Figure 3b. Clinical view of 2implants placed into the freshextraction sockets of Nos. 23 and26. They are inserted slightly to the lingual of center buccolingually, butwithin the confines of the cingula ofthe adjacent teeth.
Figure 3c. Definitive PFM restoration Nos. 23to 26.
Figure 3d. Periapical radiographs ofthe definitive prosthesis (Nos. 23 to 26)supported by immediately placed,immediately restored implants at 5years after completion (nonocclusallyloaded immediate provisionalization).Note excellent bone levels.
da b c

ISSUES RELEVANT TO IMPLANT PLACEMENT Bone GraftingVarious graft materials including autogenous bone, de min -eralized freeze dried bone, and hydroxyapatite have beenused in gaps around immediately placed dental implants withand without barriers, and have achieved defect resolution.12 Atpresent there is no one graft material that appears to besuperior to all others. If a biomaterial is placed in the gap, somecollagen material (eg, CollaCote [Zimmer Dental]) can beplaced on top of the material to inhibit exfoliation of the materialbefore a fibrin clot forms.
As indicated, gaps < 2 mm heal spontaneously without graftmaterial. Deproteinated bovine bone mineral (DBBM) is themost commonly used bio filler in recent studies, and it wasemployed alone and in conjunction with resorbable andnonresorbable barriers.2 However, a possible explanation for thehigh use of DBBM is that in Europe, human allograft material isnot allowed to be used in humans. Additionally, a biomaterialmay be placed to preserve soft-tissue contour even if itprovides no enhancement to osseointegration of the implant.
Prior Position of Roots May Be Poor Guide for ImplantPlacement If possible, implants should be placed in their ideal locations toenhance prosthetic reconstructions. Pertinent ly, if roots ofextracted teeth are not in the best position for a futureprosthesis, the root socket should not be used as a guide tocreate oste otomies. If using the socket as a guide will create anonoptimally positioned implant, either start a new osteotomyor use a side cutting drill to extend the root socket to the correctposition for implant placement.
Technique for Placing Implants When DilaceratedRoots Are PresentIf dilacerated roots are present, it is difficult to initiate anosteotomy along a sloping bony wall. Instead, take a pilot drilland approach the socket in the appropriate place (often justprior to the dilacerations) at a 90° angle. Enter the bone andthen create a purchase point for subsequent drills.
Immediate Placement if There Is a High Smile-LineIn the esthetic zone, if there is a high smile-line, immediateplacement should only be attempted if the following criteria
are present: periodontal health, no recession, thick biotype,keratinized gingiva, and an intact buccal bony plate of bone.The most critical facet is the buccal plate of bone. The CEJ isnormally 2 mm apical to the gingival margin. If the bone is 3or 4 mm from the gingival margin, it increases the risk ofpotential recession. Immediate placement when there is adefective bony plate runs the possible complication ofrecession that may expose implant threads.
Concerns About Recession Extrusion of Teeth—If a tooth needs to be removed andreplaced with an immediate implant, consideration needs tobe given to the amount of soft-tissue recession and bone lossthat occurred. In this regard, a hopeless tooth may not be auseless tooth. It can be used via orthodontic extrusion to helpcorrect soft- and hard-tissue deformities. Orthodonticextrusion can coronally advance the tissue approximately onemm per month.13,14 If there is 3 mm or more of recession,consider orthodontic extrusion.
Biotype—Lee et al15 concluded that a thin biotypepredisposes individuals to recession and loss of papillae. Inthis regard, Kan et al16 reported that a thin biotype (probe isvisible when placed in the sulcus) in the esthetic zonedemonstrates 0.7 mm more recession post-healing than athick biotype (probe not visible when placed in the sulcus)after implant placement. In the esthetic zone, if the biotype isthin, place the implant more palatally and a little more apically.
Recession at Implant Site—If it is noticed that the buccalgingiva is several millimeters more apical than the gingivalmargin of adjacent teeth, there are several techniques thatcan be used to augment the gingiva at the time of immediateimplant placement: (1) place a short healing abutment on theimplant and advance the flap to cover the abutment, and (2)place a cover screw in the implant and cover it with a
Continuing Education
4
Immediate Dental Implant Placement: Technique, Part 2
Figure 4. Wide bodydental implant immediately placed intothe socket of amandibular first molar(No. 30). The implantengages the buccal andlingual cortical platesand achieves primarystability even thoughthere are remaininggaps mesially anddistally.

connective tissue graft or other soft-tissue biomaterial andadvance a flap over it. If a clinician is in doubt abut thepotential effectiveness of these procedures in a givensituation, then a delayed protocol should be selected.
Provisionalization for Immediately Placed DentalImplantsIt is recommended that an insertion torque of 30 to 40 Ncmbe attained when placing an implant if an abutment and aprovisional crown are to be inserted.17 The provisionalprosthesis should not be in occlusion for single toothreplacements. If multiple im plants are placed or theprosthesis turns the corner of the arch, or if it is a full archprovisional, then occlusion can be restored. If a permanentabutment is inserted, it may not have to be subsequentlyremoved (avoids disrupting the junctional epithelium), andthis may help de crease recession.18,19
CONCLUDING REMARKS Placement of immediate implants is a predictableprocedure, and attention to detail is essential to ensuresuccess. The Table20-30 lists guidelines to enhancesuccessful placement of immediate implants in Type Isockets. Management of atypical situations outlined in thispaper should en hance results and help avoid estheticproblems.
Often, sockets, adjacent or opposing teeth can provideadequate visual cues for implant placement. How ever,surgical guides can be used to facilitate precise placementof im plants.31 This is particularly true if multiple implantsare placed or deviations from optimal anatomy areapparent. In this regard, contemporary implantplanning/anatomy software can greatly simplify thesesurgical interventions.32-34
Continuing Education
5
Immediate Dental Implant Placement: Technique, Part 2
Table. Conclusions and Guidelines for Treating the Buccal Gap After Immediate Implant Placement20-30
1. Avoid elevating a labial flap when placing implants in the esthetic zone, thus decreasing the risk of recession.20-23 Raise a lingual flap if additional access for visualization is needed.
2. Gaps < 2 mm wide will usually heal spontaneously without placing a biomaterial.24 If a biomaterial is inserted in the gap which is less than 2 mm, the data indicate that there will be crestal bone loss, but the horizontal width (contour) will be maintained better.25-27 In the esthetic zone, it may be advantageous tograft the buccal gap; at a minimum it will help support the soft tissue.
3. It has been suggested that it is better to leave the gap uncovered, thereby retarding the connective tissue andepithelium from interfering with initial population of the site with bone progenitor cells.28
4. The implant should be inserted 2 mm from the buccal plate to circumvent encroaching on the buccalbony plate, thereby contributing to resorption.29
5. Insert implants one mm below the crest of bone to account for crestal bone loss.25,30
6. Biomaterials can be inserted without a barrier, thus avoiding flap elevation. But, if there is a bone dehiscence, it may be useful to place a barrier, and this would necessitate elevating a flap in order toachieve wound closure.
7. With a flapless approach, it was suggested that overfill of the gap with deproteinated bone helps support thesoft tissue and reduces recession when it is done in conjunction with an abutment and temporary crown.28 Thisstatement is based upon a recently completed study.
REFERENCES1. Lang NP, Pun L, Lau KY, et al. A systematic review on
survival and success rates of implants placedimmediately into fresh extraction sockets after at least1 year. Clin Oral Implants Res. 2012;23(suppl 5):39-66.
2. Ortega-Martínez J, Pérez-Pascual T, Mareque-BuenoS, et al. Immediate implants following tooth extraction.A systematic review. Med Oral Patol Oral Cir Bucal.2012;17:e251-e261.
3. Botticelli D, Berglundh T, Buser D, et al. The jumpingdistance revisited: an experimental study in the dog.Clin Oral Implants Res. 2003;14:35-42.
4. Paolantonio M, Dolci M, Scarano A, et al. Im mediateimplantation in fresh extraction sockets. A controlledclinical and histological study in man. J Periodontol.2001;72:1560-1571.
5. Caneva M, Salata LA, de Souza SS, et al. Hard tissueformation adjacent to implants of various size andconfiguration immediately placed into extractionsockets: an experimental study in dogs. Clin OralImplants Res. 2010;21:885-890.
6. Covani U, Cornelini R, Barone A. Bucco-lingual boneremodeling around implants placed into immediateextraction sockets: a case series. J Periodontol.2003;74:268-273.
7. Botticelli D, Berglundh T, Persson LG, et al. Boneregeneration at implants with turned or rough surfacesin self-contained defects. An experimental study in thedog. J Clin Periodontol. 2005;32:448-455.
8. Botticelli D, Berglundh T, Lindhe J. Hard-tissuealterations following immediate implant placement inextraction sites. J Clin Periodontol. 2004;31:820-828.
9. Tarnow DP, Chu SJ. Human histologic verification ofosseointegration of an immediate implant placed into afresh extraction socket with excessive gap distancewithout primary flap closure, graft, or membrane: acase report. Int J Perio dontics Restorative Dent.2011;31:515-521.
10. Rodríguez-Ciurana X, Vela-Nebot X, Segalà-Torres M,et al. The effect of interimplant distance on the heightof the interimplant bone crest when using platform-switched implants. Int J Perio dontics Restorative Dent.2009;29:141-151.
11. Fishel D, Buchner A, Hershkowith A, et al.Roentgenologic study of the mental foramen. OralSurg Oral Med Oral Pathol. 1976;41:682-686.
12. Chen ST, Wilson TG Jr, Hämmerle CH. Immediate orearly placement of implants following tooth extraction:review of biologic basis, clinical procedures, andoutcomes. Int J Oral Maxillofac Implants.2004;19(suppl):12-25.
13. Salama MA, Salama H, Garber DA. Guidelines foraesthetic restorative options and implant siteenhancement: the utilization of orthodontic extrusion.Pract Proced Aesthet Dent. 2002;14(pt 2):125-130.
14. Buskin R, Castellon P, Hochstedler JL. Ortho donticextrusion and orthodontic extraction in preprosthetictreatment using implant therapy. Pract PeriodonticsAesthet Dent. 2000;12:213-219.
15. Lee A, Fu JH, Wang HL. Soft tissue biotype affectsimplant success. Implant Dent. 2011;20:e38-e47.
16. Kan JY, Rungcharassaeng K, Lozada JL, et al. Facialgingival tissue stability following immediate placementand provisionalization of maxillary anterior singleimplants: a 2- to 8-year follow-up. Int J Oral MaxillofacImplants. 2011;26:179-187.
17. Chung S, McCullagh A, Irinakis T. Immediate loadingin the maxillary arch: evidence-based guidelines toimprove success rates: a review. J Oral Implantol.2011;37:610-621.
18. Abrahamsson I, Berglundh T, Lindhe J. The mucosalbarrier following abutment dis/reconnection. Anexperimental study in dogs. J Clin Periodontol.1997;24:568-572.
19. Abrahamsson I, Zitzmann NU, Berglundh T, et al. Themucosal attachment to titanium implants with differentsurface characteristics: an experimental study in dogs.J Clin Periodontol. 2002;29:448-455.
20. Brownfield LA, Weltman RL. Ridge preservation withor without an osteoinductive allograft: a clinical,radiographic, micro-computed tomography, andhistologic study evaluating dimensional changes andnew bone formation of the alveolar ridge. JPeriodontol. 2012;83:581-589.
21. Job S, Bhat V, Naidu EM. In vivo evaluation of crestalbone heights following implant placement with‘flapless’ and ‘with-flap’ techniques in sites ofimmediately loaded implants. Indian J Dent Res.2008;19:320-325.
22. Fickl S, Zuhr O, Wachtel H, et al. Tissue alterationsafter tooth extraction with and without surgical trauma:a volumetric study in the beagle dog. J ClinPeriodontol. 2008;35:356-363.
Continuing Education
6
Immediate Dental Implant Placement: Technique, Part 2
23. Barros RRM, Novaes AB Jr, Papalexiou V. Buccalbone remodeling after immediate implantation with aflap or flapless approach: a pilot study in dogs.Titanium. 2009;1:45-51.
24. Chen ST, Buser D. Clinical and esthetic outcomes ofimplants placed in postextraction sites. Int J OralMaxillofac Implants. 2009;24(suppl):186-217.
25. Chen ST, Darby IB, Reynolds EC. A prospectiveclinical study of non-submerged immediate im plants:clinical outcomes and esthetic results. Clin OralImplants Res. 2007;18:552-562.
26. Araújo MG, Wennström JL, Lindhe J. Modeling of thebuccal and lingual bone walls of fresh extraction sitesfollowing implant installation. Clin Oral Implants Res.2006;17:606-614.
27. Caneva M, Botticelli D, Pantani F, et al. De proteinizedbovine bone mineral in marginal defects at implantsinstalled immediately into extraction sockets: anexperimental study in dogs. Clin Oral Implants Res.2012;23:106-112.
28. Tarnow D. Immediate vs. delayed socket placement: whatwe know, what we think we know and what we don’tknow. Lecture presented at: American Academy ofPeriodontology; November 14, 2011; Miami Beach, FL.
29. Evian CI, Waasdorp JA. Evaluating extraction socketsin the esthetic zone for immediate implant placement.Compend Contin Educ Dent. 2011;32:e58-e65.
30. Araújo MG, Lindhe J. Dimensional ridge alterationsfollowing tooth extraction. An experimental study in thedog. J Clin Periodontol. 2005;32:212-218.
31. Greenstein G, Cavallaro J. The relationship betweenbiologic concepts and fabrication of surgical guides fordental implant placement. Compend Contin EducDent. 2007;28:196-203.
32. Giordano M, Ausiello P, Martorelli M, et al. Reliabilityof computer designed surgical guides in six implantrehabilitations with two years follow-up. Dent Mater.2012;28:e168-e177.
33. Abboud M, Wahl G, Guirado JL, et al. Application andsuccess of two stereolithographic surgical guide systemsfor implant placement with immediate loading. Int J OralMaxillofac Implants. 2012;27:634-643.
34. Platzer S, Bertha G, Heschl A, et al. Three-dimensional accuracy of guided implant placement:indirect assessment of clinical outcomes. Clin ImplantDent Relat Res. 2013;15:724-734.
Continuing Education
7
Immediate Dental Implant Placement: Technique, Part 2

POST EXAMINATION INFORMATION
To receive continuing education credit for participation inthis educational activity you must complete the programpost examination and receive a score of 70% or better.
Traditional Completion Option:You may fax or mail your answers with payment to DentistryToday (see Traditional Completion Information on followingpage). All information requested must be provided in orderto process the program for credit. Be sure to complete your“Payment,” “Personal Certification Information,” “Answers,”and “Evaluation” forms. Your exam will be graded within 72hours of receipt. Upon successful completion of the post-exam (70% or higher), a letter of completion will be mailedto the address provided.
Online Completion Option:Use this page to review the questions and mark youranswers. Return to dentalcetoday.com and sign in. If youhave not previously purchased the program, select it fromthe “Online Courses” listing and complete the onlinepurchase process. Once purchased the program will beadded to your User History page where a Take Exam linkwill be provided directly across from the program title.Select the Take Exam link, complete all the programquestions and Submit your answers. An immediate gradereport will be provided. Upon receiving a passing grade,complete the online evaluation form. Upon submitting the form, your Letter of Completion will be providedimmediately for printing.
General Program Information:Online users may log in to dentalcetoday.com any time inthe future to access previously purchased programs andview or print letters of completion and results.
POST EXAMINATION QUESTIONS
1. If the jumping distance is _____, usually it will fillwith bone without bone grafting.
a. < 2 mm.
b. 2 to 3 mm.
c. 3 to 4 mm.
d. 4 to 5 mm.
2. The buccal socket of a 2-rooted maxillary bicuspid isusually not a good location for an implant. It is toofar to the buccal.
a. The first statement is true, the second is false.
b. The first statement is false, the second is true.
c. Both statements are true.
d. Both statements are false.
3. With respect to maxillary molars, alveolar bone in ahealthy situation is:
a. At the level of the cemento-enamel junction (CEJ).
b. 2 mm apical to the CEJ.
c. 4 mm apical to the CEJ.
d. 6 mm apical to the CEJ.
4. With respect to mandibular bicuspids, the mentalforamen is coronal to the apex of the first bicuspid:
a. 25% of the time.
b. 30% of the time.
c. 38% of the time.
d. 45% of the time.
5. To account for crestal bone loss, implants should beinserted:
a. Level with the crest of bone.
b. One mm below the crest of bone.
c. 2 mm below the crest of bone.
d. 3 mm below the crest of bone.
6. After a mandibular molar is extracted, an implant canbe placed in the furcation bone. Usually the bone hasadequate thickness to encompass the implantcircumferentially.
a. The first statement is true, the second is false.
b. The first statement is false, the second is true.
c. Both statements are true.
d. Both statements are false.
Continuing Education
8
Immediate Dental Implant Placement: Technique, Part 2

7. To avoid inducing recession in the maxillary estheticzone, it is preferable to do the following:
a. Avoid raising a buccal flap.
b. Extrude teeth.
c. Place bone grafts to a crestal level.
d. Remove abutments and replace several times.
8. Orthodontic extrusion of a tooth can coronallyadvance the tissue approximately____:
a. One mm a week.
b. One mm a month.
c. 2 mm a month.
d. 3 mm a month.
9. In the esthetic zone, if the biotype is thin, place theimmediate implant:
a. More buccally and more apically.
b. More palatally and less apically.
c. More bucally and a little less apically.
d. More palatally and a little more apically.
10. It is recommended that an insertion torque of _____be attained when placing an implant if an abutmentand provisional crown are to be inserted.
a. 20 to 30 Ncm.
b. 30 to 40 Ncm.
c. 40 to 45 Ncm.
d. 45 to 50 Ncm.
Continuing Education
9
Immediate Dental Implant Placement: Technique, Part 2

PROGRAM COMPLETION INFORMATION
If you wish to purchase and complete this activitytraditionally (mail or fax) rather than online, you mustprovide the information requested below. Please be sure toselect your answers carefully and complete the evaluationinformation. To receive credit you must answer at least 7 ofthe 10 questions correctly.
Complete online at: dentalcetoday.com
TRADITIONAL COMPLETION INFORMATION:Mail or fax this completed form with payment to:
Dentistry TodayDepartment of Continuing Education100 Passaic AvenueFairfield, NJ 07004
Fax: 973-882-3622
PAYMENT & CREDIT INFORMATION:
Examination Fee: $40.00 Credit Hours: 2.0
Note: There is a $10 surcharge to process a check drawn on any bank other than a US bank. Should you have additionalquestions, please contact us at (973) 882-4700.
o I have enclosed a check or money order.
o I am using a credit card.
My Credit Card information is provided below.
o American Express o Visa o MC o Discover
Please provide the following (please print clearly):
Exact Name on Credit Card
Credit Card # Expiration Date
Signature
PROGRAM EVAUATION FORMPlease complete the following activity evaluation questions.
Rating Scale: Excellent = 5 and Poor = 0
Course objectives were achieved.
Content was useful and benefited your clinical practice.
Review questions were clear and relevant to the editorial.
Illustrations and photographs were clear and relevant.
Written presentation was informative and concise.
How much time did you spend reading the activity and completing the test?
What aspect of this course was most helpful and why?
What topics interest you for future Dentistry Today CE courses?
Continuing Education
Immediate Dental Implant Placement: Technique, Part 2
ANSWER FORM: COURSE #: 170Please check the correct box for each question below.
1. o a o b o c o d 6. o a o b o c o d
2. o a o b o c o d 7. o a o b o c o d
3. o a o b o c o d 8. o a o b o c o d
4. o a o b o c o d 9. o a o b o c o d
5. o a o b o c o d 10. o a o b o c o d
PERSONAL CERTIFICATION INFORMATION:
Last Name (PLEASE PRINT CLEARLY OR TYPE)
First Name
Profession / Credentials License Number
Street Address
Suite or Apartment Number
City State Zip Code
Daytime Telephone Number With Area Code
Fax Number With Area Code
E-mail Address
/
Dentistry Today, Inc, is an ADA CERP RecognizedProvider. ADA CERP is a service of the AmericanDental Association to assist dental professionals inindentifying quality providers of continuing dentaleducation. ADA CERP does not approve or endorseindividual courses or instructors, nor does it implyacceptance of credit hours by boards of dentistry.Concerns or complaints about a CE provider may bedirected to the provider or to ADA CERP atada.org/goto/cerp.
Approved PACE Program ProviderFAGD/MAGD Credit Approval doesnot imply acceptance by a state orprovincial board of dentistry or AGDendorsement. June 1, 2012 to May 31, 2015 AGD PACE approvalnumber: 309062
10