im-hp9000-r5-mar15 new logo - trans instruments · 4.1.4 now the instrument is performing a...
TRANSCRIPT

Operations Manual
WalkLAB pH–mV/ORP-
temperature meter
HP9000
16,1,16,1,2,15,2,15,14,3,14,3,4,13,4,13,12,5,12,5,6,11,6,11,10,7,10,7,8,9,8,9
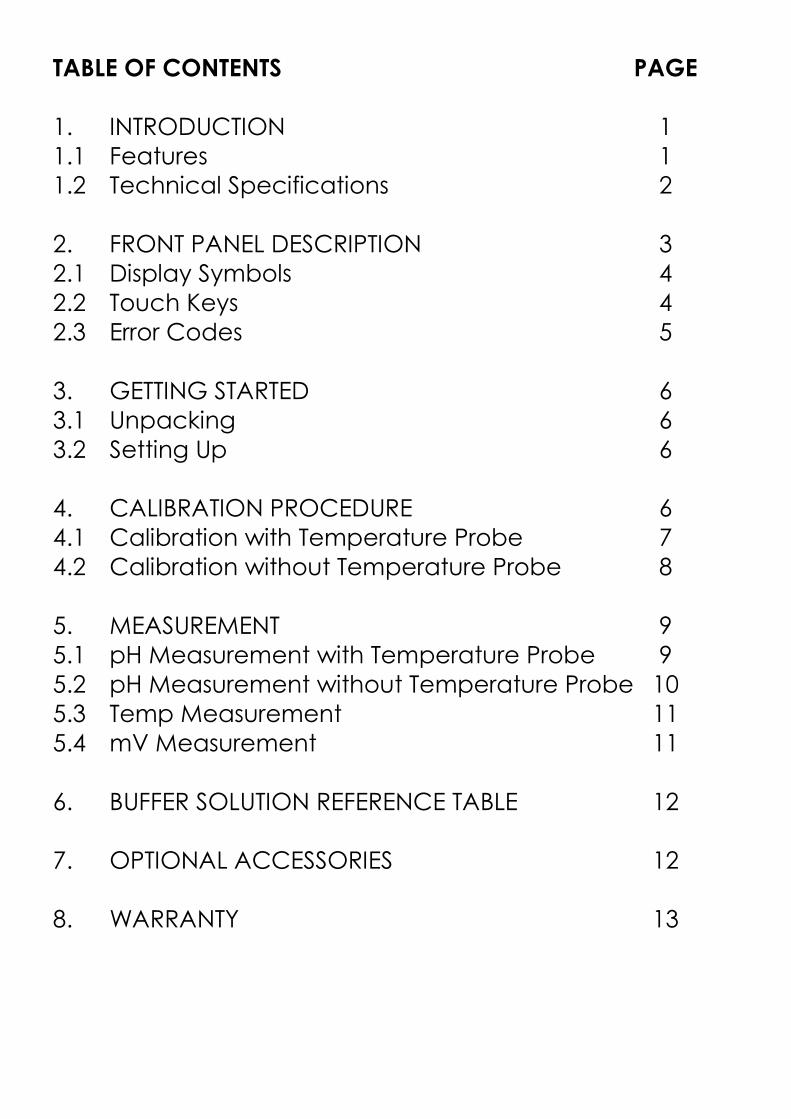
TABLE OF CONTENTS PAGE
1. INTRODUCTION 1
1.1 Features 1
1.2 Technical Specifications 2
2. FRONT PANEL DESCRIPTION 3
2.1 Display Symbols 4
2.2 Touch Keys 4
2.3 Error Codes 5
3. GETTING STARTED 6
3.1 Unpacking 6
3.2 Setting Up 6
4. CALIBRATION PROCEDURE 6
4.1 Calibration with Temperature Probe 7
4.2 Calibration without Temperature Probe 8
5. MEASUREMENT 9
5.1 pH Measurement with Temperature Probe 9
5.2 pH Measurement without Temperature Probe 10
5.3 Temp Measurement 11
5.4 mV Measurement 11
6. BUFFER SOLUTION REFERENCE TABLE 12
7. OPTIONAL ACCESSORIES 12
8. WARRANTY 13
1. INTRODUCTION
Your HP9000 pH Meter utilizes an advanced embedded
Microprocessor chip as the heart and brain of the
Instrument. It incorporates Analog/Digital Converter,
Computing, and Display into one micro-chip. This
increases the reliability and greatly reduces the power
consumption.
1.1 Features
Low Power Consumption
Unit requires very low power in “OFF” and ‘AUTOLOCK”
mode.
Ease of use
Automatically lock reading when a stable reading is
established. Feature can be disabled to allow continuous
reading display.
Automatic shut-off
Meter automatically shuts off after 5 minutes after last key
command. Feature can be disabled while reading in
continuous read mode.
One-touch calibration
The meter’s one-touch auto-calibration procedure uses
only one button to activate the mode. The unit will prompt
and confirm offset and slope point calibration.
1

1.2 Technical Specifications
Range Resolution Accuracy
PH 0.00 to 14.00 0.01pH ±0.01pH
mV -999 to +999 1mV ±1mV
Temp 0° to 99.9 °C 0. 1°C 0. 5°C
Automatic Temperature : 0° to 99.9 °C
Compensation
Buffer Recognition : pH 7, pH 4 or pH 10
Buffer Temperature Range : 0° to 60° C
Electrode Slope Recognition : ±20% at pH 4
or pH 10 @25° C
Electrode Offset : ±60 mV at pH 7 @25° C
Recognition
Power Source : 9 Volt Alkaline Battery
Battery Life : 250 Hrs Continuous
Reading
Size : 163 x 83 x 32 mm
Weight : Approx. 350g
2
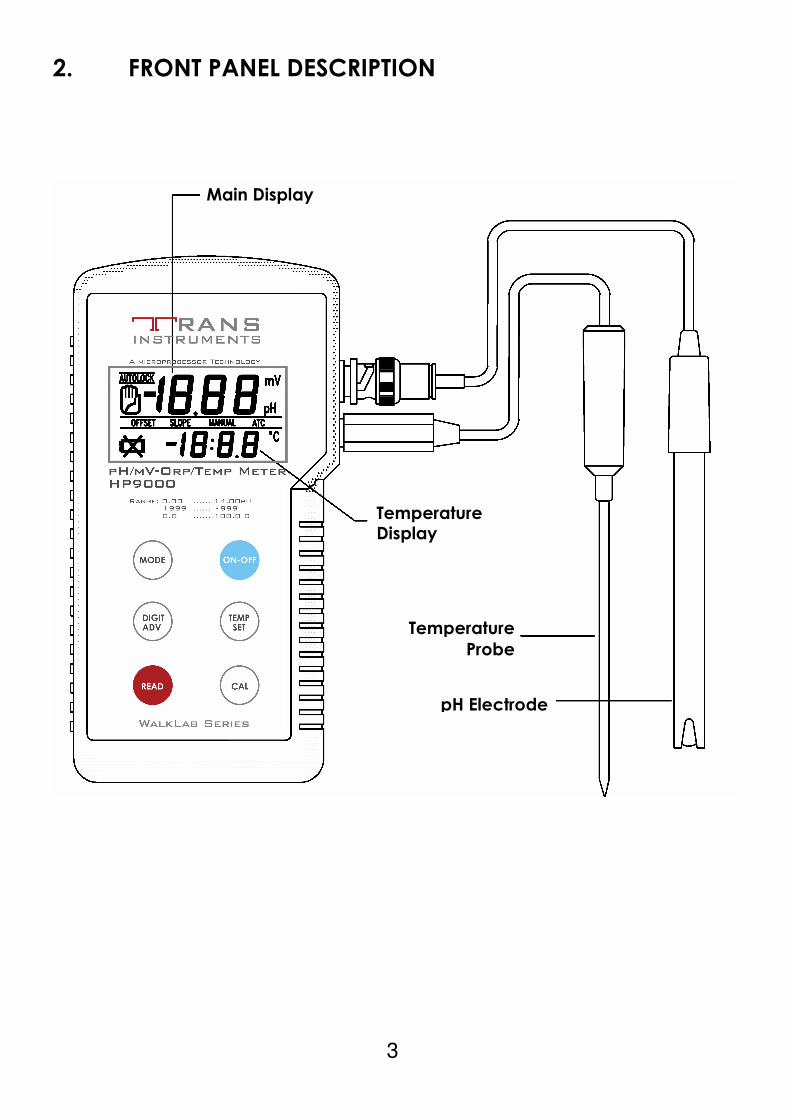
2. FRONT PANEL DESCRIPTION
3
Main Display
Temperature Display
Temperature
Probe
pH Electrode

2.1 DISPLAY SYMBOL
- Wait indicator
AUTOLOCK - Stabilized reading indicator
MANUAL - Manual temperature compensation mode
indicator
ATC - Automatic temperature compensation
mode indicator
OFFSET - Calibration mode offset point indicator
SLOPE - Calibration mode slope point indicator
- Low Battery indicator
2.2 TOUCH KEYS
ON / OFF
The ON/OFF key turns the instrument on and off. When switch
ON, display will show the present reading in AUTOLOCK mode.
MODE
The MODE key selects reading from pH to mV display. During
calibration, MODE selection will be temporarily disabled.
READ / AUTO
The READ/AUTO key activates input of pH or mV reading and
will auto-lock when reading is stable. To enable continuous
reading, press and hold this key for 3 seconds. To return to
AUTOLOCK reading, press the key once. (Note: in continuous
reading mode, automatic shut-off is disabled).
4
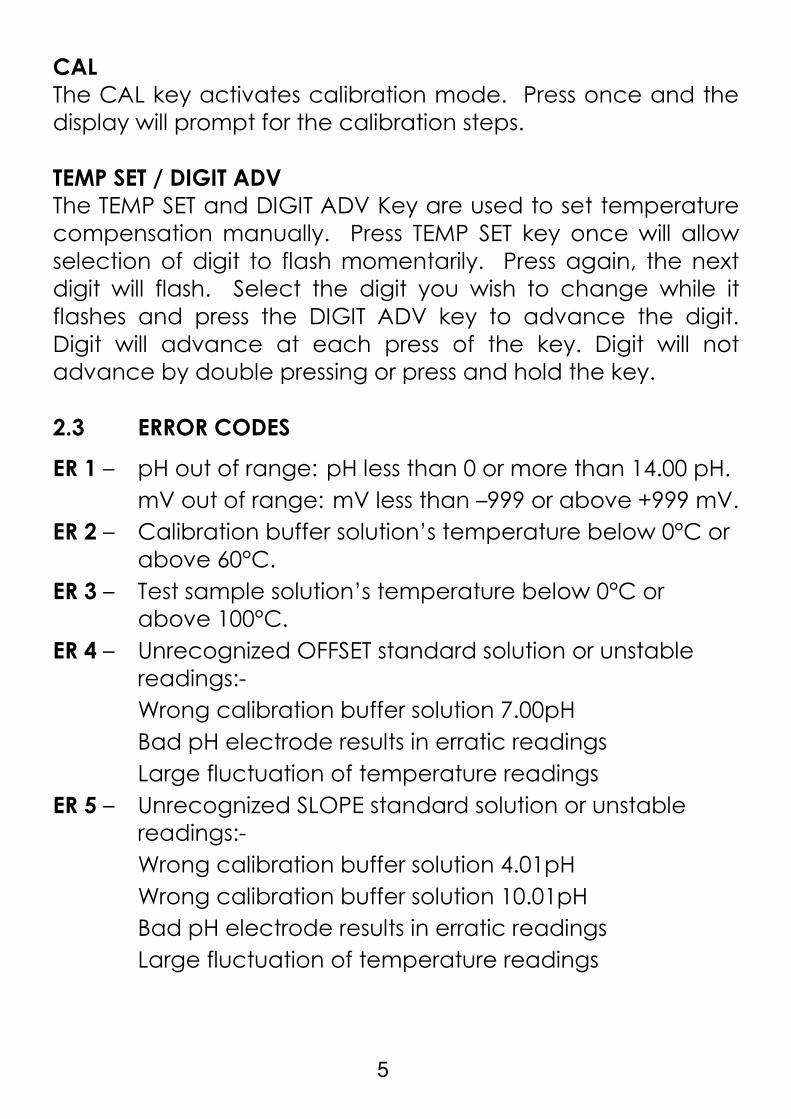
CAL
The CAL key activates calibration mode. Press once and the
display will prompt for the calibration steps.
TEMP SET / DIGIT ADV
The TEMP SET and DIGIT ADV Key are used to set temperature
compensation manually. Press TEMP SET key once will allow
selection of digit to flash momentarily. Press again, the next
digit will flash. Select the digit you wish to change while it
flashes and press the DIGIT ADV key to advance the digit.
Digit will advance at each press of the key. Digit will not
advance by double pressing or press and hold the key.
2.3 ERROR CODES
ER 1 – pH out of range: pH less than 0 or more than 14.00 pH.
mV out of range: mV less than –999 or above +999 mV.
ER 2 – Calibration buffer solution’s temperature below 0°C or
above 60°C.
ER 3 – Test sample solution’s temperature below 0°C or
above 100°C.
ER 4 – Unrecognized OFFSET standard solution or unstable
readings:-
Wrong calibration buffer solution 7.00pH
Bad pH electrode results in erratic readings
Large fluctuation of temperature readings
ER 5 – Unrecognized SLOPE standard solution or unstable
readings:-
Wrong calibration buffer solution 4.01pH
Wrong calibration buffer solution 10.01pH
Bad pH electrode results in erratic readings
Large fluctuation of temperature readings
5

3. GETTING STARTED
3.1 Unpacking
Your instrument is shipped with a pH electrode, a temperature
probe, buffer solution pH 7.00 , buffer solution pH 4.01 and this
manual. Check the items carefully and contact the place of
purchase immediately if anything is missing or damaged.
3.2 Setting Up
3.2.1 Pull the latch of battery cover located at bottom rear
of instrument and pull out the battery. Unwrap the
battery, attach the battery clip onto it and put it back
into the battery compactment. Finally close the
battery cover.
3.2.2 Plug the temperature probe and pH electrode into
their respective connectors on the side of the
instrument.
3.2.3 Next, you must calibrate the instrument. Follow the
calibration procedure in step 4. Always switch on the
instrument for about 10 minutes to allow the internal
circuitry to stablize before taking any calibration or
measurement
4. CALIBRATION PROCEDURE
To keep measurement accurate and precise, it is best to
calibrate the instrument each time before a series of
measurements. Use standard buffer solution with temperature
coefficient as in Buffer Solution Reference Table (Page 16).
Prepare one distilled or de-ionized water for rinsing and two
sets of buffer solution, one for rinsing and the other for
calibration. This will prevent carry-over of solution during
calibration.
6

4.1 Calibration with Temperature Probe
4.1.1 Rinse the pH electrode and temperature probe in
distilled water and switch on the instrument. OFFSET
and SLOPE indicator will alternate if no calibration is
registered in the memory.
4.1.2 Press the CAL key. The OFFSET indicator will flash
momentarily.
4.1.3 Rinse the pH electrode and temperature probe in pH
7.00 rinsing solution and dip into pH 7.00 calibration
solution. Once the instrument detected the correct
offset buffer, the OFFSET indicator will stop flashing and
the offset reading will be displayed.
4.1.4 Now the instrument is performing a multiple data
sampling. It will take a little longer time for an accurate
calibration point.
4.1.5 When OFFSET point is established, the instrument will
beep and the SLOPE indicator will flash.
4.1.6 Rinse the pH electrode and temperature probe in
distilled water and then pH 4.01 or 10.01 rinsing solution.
Dip the pH electrode and temperature probe in pH
4.01 or 10.01 calibration solution.
4.1.7 The SLOPE indicator will stop flashing when the
instrument detects the correct slope buffer and will
display the buffer reading.
4.1.8 When the SLOPE point is established, the instrument will
beep and AUTOLOCK indicator appears. Calibration is
completed.
4.1.9 For every successive calibration, the instrument will
retain the last calibration data until the next calibration.
7

4.2 Calibration without Temperature Probe
4.2.1 Remove the temperature probe connected to the
instrument. The temperature display will show a default
reading of 25.0°C.
4.2.2 Set the instrument to display the temperature of the
buffer 7.00 by pressing the TEMP SET key once. The
temperature digit will flash momentarily. Press the key
again, the next digit will flash. Select the digit you wish
to change while it flashes and press the DIGIT ADV key
to advance the digit. Digit will advance at each press
of the key. Digit will not advance by double pressing.
4.2.3 After setting the temperature, rinse the pH electrode in
distilled water. Dip the pH electrode into the pH 7.00
rinsing solution and then into the pH 7.00 calibration
solution and press the CAL key. The OFFSET indicator will
flash momentarily. Once the instrument detected the
correct offset buffer, the OFFSET indicator will stop
flashing and offset value will be displayed.
4.2.4 Now the instrument is performing a multiple data
sampling. It will take a little longer time for an accurate
calibration point.
4.2.5 When OFFSET point is established, the instrument will
beep and the SLOPE indicator will flash.
4.2.6 Repeat step 4.2.2 to set the temperature of the slope
buffer if required.
4.2.7 Rinse the pH electrode in distilled water and then pH
4.01 or 10.01 rinsing solution. Dip the pH electrode in pH
4.01 or 10.01 calibration solution.
4.2.8 The SLOPE indicator will stop flashing when the
instrument detects the correct slope buffer and will
display the buffer reading.
8
4.2.9 When the SLOPE point is established, the instrument will
beep and the ‘AUTOLOCK’ indicator appears.
Calibration is completed.
4.2.10 For every successive calibration, the instrument will
retain the last calibration data until the next calibration.
TERMINATION DURING CALIBRATION
If you wish to abort a calibration or if you have accidentally
activated the CAL key, press the READ/AUTO key to abort the
calibration and return to read mode.
5. MEASUREMENT
For an accurate measurement, prepare containers filled with
distilled water and two test sample solutions – one for rinsing
and the other for testing. This will prevent carry-over of solution
during testing.
5.1 pH Measurement with Temperature Probe
5.1.1 Rinse the pH electrode and temperature probe in
distilled water and switch on the instrument.
5.1.2 Rinse the pH electrode and temperature probe in the
first test sample solution and then dip in another test
sample solution and press READ/AUTO key.
5.1.2 The Wait indicator will flash momentarily until reading is
stabilized. The instrument will beep and the
‘AUTOLOCK’ indicator appears. Reading is established.
5.1.3 To disable the AUTOLOCK feature and enable
continuous reading, press and hold the READ/AUTO key
for 3 seconds. To resume to the AUTOLOCK mode, press
the READ/AUTO key once.
9

5.1.4 If reading is erratic or unstable, instrument will not be
able to AUTOLOCK the reading. This can be the result
of a worn-off or bad pH electrode.
5.2 pH Measurement without Temperature probe
5.2.1 Remove the temperature probe connected to the
instrument. The temperature display will show a default
reading of 25.0°C.
5.2.2 To set a known temperature reading, press the TEMP SET
key once. The temperature digit will flash momentarily.
Press again, the next digit will flash. Select the digit you
wish to change while it flashes and press DIGIT ADV key
to advance the digit. Digit will advance at each press of
the key. Digit will not advance by double pressing.
5.2.3 After setting the temperature, dip the pH electrode into
the rinsing solution and then into the test solution and
press the READ/AUTO key.
5.2.4 The Wait indicator will flash momentarily until reading is
stabilized, the instrument will then beep and
‘AUTOLOCK’ indicator appears. Reading is established.
5.2.5 To enable continuous reading, press and hold the
READ/AUTO key for 3 seconds. To resume to AUTOLOCK
mode, press the READ/AUTO key once.
10

5.3 Temperature Measurement
5.3.1 The instrument can be used to measure temperature
independently with the temperature probe.
5.3.2 When measuring temperature independently, remove
the pH electrode connected to the instrument.
5.3.3 Press the READ/AUTO key for 3 seconds to activate
continuous reading mode. Error code may appear on
pH display but will not affect the temperature reading.
5.3.4 Allow some time for the temperature reading to stabilize
before taking the measurement value.
5.4 mV Measurement
The instrument mV measuring function allows ORP, ion-
selective mV and others mV measurements.
5.4.1 Replace the pH electrode with the measuring
electrode.
5.4.2 Rinse the measuring electrode in distilled water and
switch on the instrument.
5.4.3 Rinse the measuring electrode in test sample solution
and then in another test sample solution and press the
READ/AUTO key.
5.4.4 The Wait indicator will flash momentarily until reading is
stabilized. The instrument will beep and the ‘AUTOLOCK’
indicator appears. Reading is established.
5.4.5 To disable the AUTOLOCK feature and allow continuous
reading, press and hold the READ/AUTO key for 3
seconds until a beep sound is heard. To resume to
AUTOLOCK mode, press the READ/AUTO key once.
5.4.6 If reading is erratic or unstable, the instrument will not be
able to AUTOLOCK the reading. This can be the result of
a worn-off or bad electrode.
11

6. BUFFER SOLUTION REFERENCE TABLE
While using standard buffer solutions for calibration, use only
Buffer solution with the following temperature coefficient for
accurate calibration:-
Temperature
(°C)
Buffer 7
(pH)
Buffer 4
(pH)
Buffer 10
(pH)
0 7.11 4.00 10.32
5 7.08 4.00 10.25
10 7.06 4.00 10.18
15 7.03 4.00 10.12
20 7.01 4.00 10.06
25 7.00 4.01 10.01
30 6.98 4.02 9.97
35 6.98 4.02 9.93
40 6.97 4.03 9.89
45 6.97 4.04 9.86
50 6.97 4.06 9.83
55 6.97 4.07 9.80
60 6.98 4.10 9.78
7. OPTIONAL ACCESSORIES
Description Order Code
pH Electrode - PE-03
ORP Electrode - ORP106
Temperature probe - TP-200
Buffer Solution pH 7.00 - 7010
Buffer Solution pH 4.01 - 4010
Buffer Solution pH 10.01 - 1010
12

8. WARRANTY
Trans Instruments (S) Pte. Ltd. warranties this product for a
period of 12 months for main unit and 3 months for pH
electrode from the date of purchase against all defects in
material and workmanship. This warranty does not apply
to the abuse and misuse of the instrument. If repairs or
adjustments are required, please return the defective
instrument freight prepaid. Instrument within warranty will
be repaired at no charge. Make sure that the instrument is
properly packed and insured against possible damage or
loss in shipment. Purchase invoice MUST accompany
returned product or else warranty is considered void.
Authorization must be obtained from Trans Instruments (S)
Pte. Ltd., or your Local Sales Representative prior to the
return.
www.transinstruments.com
13
(Singapore) Pte Ltd email: [email protected] Website: www.transinstrumnets.com
ISO9001 Certified Firm
Rev-5 July2014
PRINTED IN SINGAPORE
Quality checked in Singapore
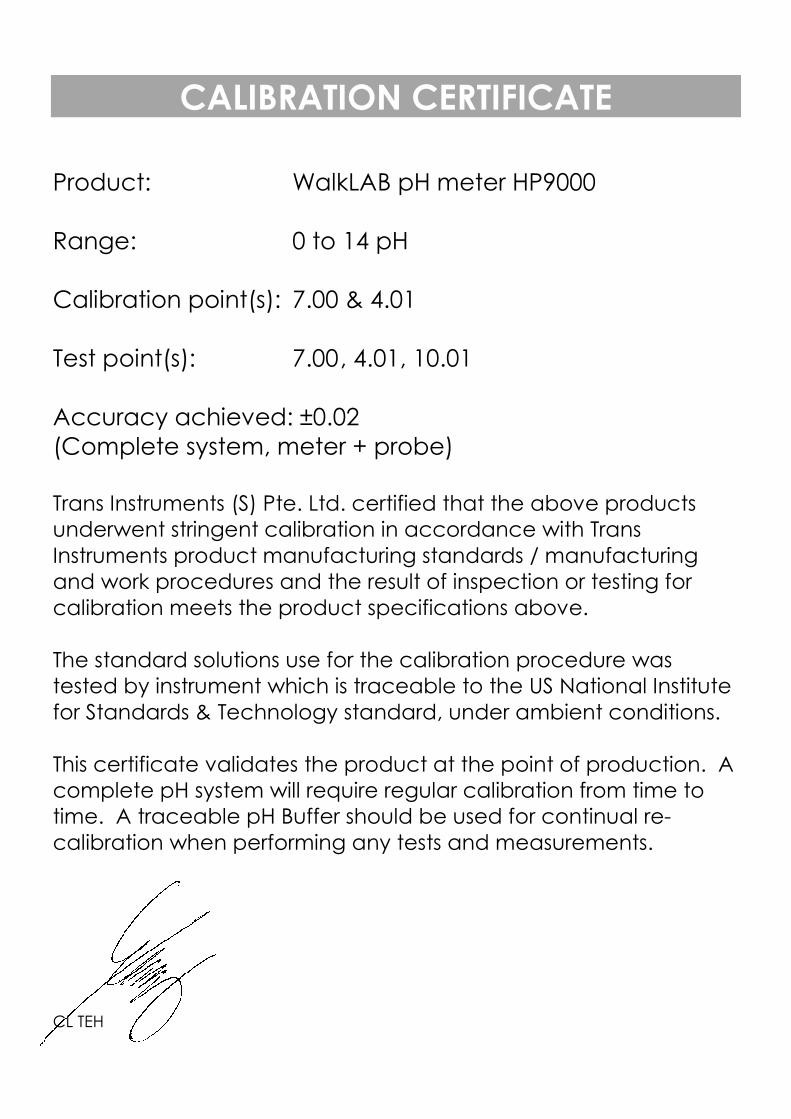
CALIBRATION CERTIFICATE
Product: WalkLAB pH meter HP9000
Range: 0 to 14 pH
Calibration point(s): 7.00 & 4.01
Test point(s): 7.00 , 4.01, 10.01
Accuracy achieved: ±0.02
(Complete system, meter + probe)
Trans Instruments (S) Pte. Ltd. certified that the above products
underwent stringent calibration in accordance with Trans
Instruments product manufacturing standards / manufacturing
and work procedures and the result of inspection or testing for
calibration meets the product specifications above.
The standard solutions use for the calibration procedure was
tested by instrument which is traceable to the US National Institute
for Standards & Technology standard, under ambient conditions.
This certificate validates the product at the point of production. A
complete pH system will require regular calibration from time to
time. A traceable pH Buffer should be used for continual re-
calibration when performing any tests and measurements.
CL TEH