ibm proventia network mail security system · ibm proventia network mail security system...
TRANSCRIPT

IBM Proventia® Network Mail Security System
Administrator GuideVersion 1.6
IBM Internet Security Systems

© Copyright IBM Corporation 2006, 2008.IBM Global ServicesRoute 100Somers, NY 10589U.S.A.
Produced in the United States of America.
All Rights Reserved.
IBM and the IBM logo are trademarks or registered trademarks of International Business Machines Corporation in the United States, other countries, or both. ADDME, Ahead of the threat, BlackICE, Internet Scanner, Proventia, RealSecure, SecurePartner, SecurityFusion, SiteProtector, System Scanner, Virtual Patch, X-Force and X-Press Update are trademarks or registered trademarks of Internet Security Systems, Inc. in the United States, other countries, or both. Internet Security Systems, Inc. is a wholly-owned subsidiary of International Business Machines Corporation.
Microsoft, Windows, and Windows NT are trademarks of Microsoft Corporation in the United States, other countries, or both.
Other company, product and service names may be trademarks or service marks of others.
References in this publication to IBM products or services do not imply that IBM intends to make them available in all countries in which IBM operates.
Disclaimer: The information contained in this document may change without notice, and may have been altered or changed if you have received it from a source other than IBM Internet Security Systems (IBM ISS). Use of this information constitutes acceptance for use in an “AS IS” condition, without warranties of any kind, and any use of this information is at the user’s own risk. IBM Internet Security Systems disclaims all warranties, either expressed or implied, including the warranties of merchantability and fitness for a particular purpose. In no event shall IBM ISS be liable for any damages whatsoever, including direct, indirect, incidental, consequential or special damages, arising from the use or dissemination hereof, even if IBM Internet Security Systems has been advised of the possibility of such damages. Some states do not allow the exclusion or limitation of liability for consequential or incidental damages, so the foregoing limitation may not apply.
Reference herein to any specific commercial products, process, or service by trade name, trademark, manufacturer, or otherwise, does not necessarily constitute or imply its endorsement, recommendation, or favoring by IBM Internet Security Systems. The views and opinions of authors expressed herein do not necessarily state or reflect those of IBM Internet Security Systems, and shall not be used for advertising or product endorsement purposes.
Links and addresses to Internet resources are inspected thoroughly prior to release, but the ever-changing nature of the Internet prevents IBM Internet Security Systems, Inc. from guaranteeing the content or existence of the resource. When possible, the reference contains alternate sites or keywords that could be used to acquire the information by other methods. If you find a broken or inappropriate link, please send an email with the topic name, link, and its behavior to [email protected].
September 25, 2008

Contents
PrefaceOverview . . . . . . . . . . . . . . . . . . . . . . . . . . . . . . . . . . . . . . . . . . . . . . . . . . . . . . . . . . . . . . . . . . 7How to Use the Appliance Documentation . . . . . . . . . . . . . . . . . . . . . . . . . . . . . . . . . . . . . . . . . . . . 8Getting Technical Support . . . . . . . . . . . . . . . . . . . . . . . . . . . . . . . . . . . . . . . . . . . . . . . . . . . . . . . 9
Part I: Network SetupChapter 1: Getting Started
Overview . . . . . . . . . . . . . . . . . . . . . . . . . . . . . . . . . . . . . . . . . . . . . . . . . . . . . . . . . . . . . . . . . 13How the Appliance Works. . . . . . . . . . . . . . . . . . . . . . . . . . . . . . . . . . . . . . . . . . . . . . . . . . . . . . 14License Keys. . . . . . . . . . . . . . . . . . . . . . . . . . . . . . . . . . . . . . . . . . . . . . . . . . . . . . . . . . . . . . . 17Backing Up Configuration Settings . . . . . . . . . . . . . . . . . . . . . . . . . . . . . . . . . . . . . . . . . . . . . . . . 19Opening Ports on the Firewall . . . . . . . . . . . . . . . . . . . . . . . . . . . . . . . . . . . . . . . . . . . . . . . . . . . 20Appliance Passwords . . . . . . . . . . . . . . . . . . . . . . . . . . . . . . . . . . . . . . . . . . . . . . . . . . . . . . . . . 22Date and Time Settings . . . . . . . . . . . . . . . . . . . . . . . . . . . . . . . . . . . . . . . . . . . . . . . . . . . . . . . 23Routing Modes . . . . . . . . . . . . . . . . . . . . . . . . . . . . . . . . . . . . . . . . . . . . . . . . . . . . . . . . . . . . . 24Network Interface Settings . . . . . . . . . . . . . . . . . . . . . . . . . . . . . . . . . . . . . . . . . . . . . . . . . . . . . 25Deleting Self-Signed SSL Certificates in Firefox 3.x . . . . . . . . . . . . . . . . . . . . . . . . . . . . . . . . . . . . . 27
Chapter 2: SMTP SettingsOverview . . . . . . . . . . . . . . . . . . . . . . . . . . . . . . . . . . . . . . . . . . . . . . . . . . . . . . . . . . . . . . . . . 31About SMTP Mail Routing . . . . . . . . . . . . . . . . . . . . . . . . . . . . . . . . . . . . . . . . . . . . . . . . . . . . . . 32Using Transport Layer Security (TLS) Certificates to Establish Secure Connections . . . . . . . . . . . . . . . 37Defining System Accounts. . . . . . . . . . . . . . . . . . . . . . . . . . . . . . . . . . . . . . . . . . . . . . . . . . . . . . 38Managing Email Messages in the SMTP Server Queues. . . . . . . . . . . . . . . . . . . . . . . . . . . . . . . . . . 39
Section A: Inbound SMTP Configuration. . . . . . . . . . . . . . . . . . . . . . . . . . . . . . . . . . . . . . . . 41Overview . . . . . . . . . . . . . . . . . . . . . . . . . . . . . . . . . . . . . . . . . . . . . . . . . . . . . . . . . . . . . . . . . 41Configure SMTP Settings for the Appliance to Receive Email Messages . . . . . . . . . . . . . . . . . . . . . . . 42Configuring DNSBL Settings to Block Suspicious Messages . . . . . . . . . . . . . . . . . . . . . . . . . . . . . . . 45Configuring Recipient Verification to Block Messages for Unknown Users . . . . . . . . . . . . . . . . . . . . . . 46Enabling Host Reputation Filters to Filter Incoming Spam . . . . . . . . . . . . . . . . . . . . . . . . . . . . . . . . . 48
Section B: Outbound SMTP Configuration . . . . . . . . . . . . . . . . . . . . . . . . . . . . . . . . . . . . . . 49Overview . . . . . . . . . . . . . . . . . . . . . . . . . . . . . . . . . . . . . . . . . . . . . . . . . . . . . . . . . . . . . . . . . 49Configuring SMTP Settings for Outgoing Email Messages. . . . . . . . . . . . . . . . . . . . . . . . . . . . . . . . . 50
Chapter 3: ClustersOverview . . . . . . . . . . . . . . . . . . . . . . . . . . . . . . . . . . . . . . . . . . . . . . . . . . . . . . . . . . . . . . . . . 53About Clusters . . . . . . . . . . . . . . . . . . . . . . . . . . . . . . . . . . . . . . . . . . . . . . . . . . . . . . . . . . . . . 54Creating a New Cluster . . . . . . . . . . . . . . . . . . . . . . . . . . . . . . . . . . . . . . . . . . . . . . . . . . . . . . . 55Adding an Appliance to an Existing Cluster. . . . . . . . . . . . . . . . . . . . . . . . . . . . . . . . . . . . . . . . . . . 56Changing Passphrases or IP Addresses . . . . . . . . . . . . . . . . . . . . . . . . . . . . . . . . . . . . . . . . . . . . 57
3IBM Proventia Network Mail Security System Administrator Guide, Version 1.6

Contents
Part II: Policy ConfigurationChapter 4: Policy Settings
Overview . . . . . . . . . . . . . . . . . . . . . . . . . . . . . . . . . . . . . . . . . . . . . . . . . . . . . . . . . . . . . . . . . 61Enabling Policy Rules for Processing Email Messages . . . . . . . . . . . . . . . . . . . . . . . . . . . . . . . . . . . 62Defining Valid Recipients of Email Messages (Who Objects) . . . . . . . . . . . . . . . . . . . . . . . . . . . . . . . 66LDAP Integration (Directory Objects). . . . . . . . . . . . . . . . . . . . . . . . . . . . . . . . . . . . . . . . . . . . . . . 68Who Object Verification Tool . . . . . . . . . . . . . . . . . . . . . . . . . . . . . . . . . . . . . . . . . . . . . . . . . . . . 72Running Policy Rules (When Objects) . . . . . . . . . . . . . . . . . . . . . . . . . . . . . . . . . . . . . . . . . . . . . . 73Using Conditions for a Policy Rule. . . . . . . . . . . . . . . . . . . . . . . . . . . . . . . . . . . . . . . . . . . . . . . . . 74Applying Responses to Inspected Email Messages . . . . . . . . . . . . . . . . . . . . . . . . . . . . . . . . . . . . . 75
Chapter 5: Spam SettingsOverview . . . . . . . . . . . . . . . . . . . . . . . . . . . . . . . . . . . . . . . . . . . . . . . . . . . . . . . . . . . . . . . . . 81Spam Analysis Modules . . . . . . . . . . . . . . . . . . . . . . . . . . . . . . . . . . . . . . . . . . . . . . . . . . . . . . . 82Bayesian Filter . . . . . . . . . . . . . . . . . . . . . . . . . . . . . . . . . . . . . . . . . . . . . . . . . . . . . . . . . . . . . 86Spam Flow Control. . . . . . . . . . . . . . . . . . . . . . . . . . . . . . . . . . . . . . . . . . . . . . . . . . . . . . . . . . . 90Setting Up End-User Spam Management Accounts . . . . . . . . . . . . . . . . . . . . . . . . . . . . . . . . . . . . . 91
Chapter 6: Message QueuesOverview . . . . . . . . . . . . . . . . . . . . . . . . . . . . . . . . . . . . . . . . . . . . . . . . . . . . . . . . . . . . . . . . . 93Setting Up Directories that Store Archived or Quarantined Email Messages . . . . . . . . . . . . . . . . . . . . 94Searching for Email Messages in the Message Storage Directories. . . . . . . . . . . . . . . . . . . . . . . . . . 95Running Queries to Locate Messages in a Message Storage Directory . . . . . . . . . . . . . . . . . . . . . . . 96Tracking Email Messages . . . . . . . . . . . . . . . . . . . . . . . . . . . . . . . . . . . . . . . . . . . . . . . . . . . . . . 97Deleting Undelivered Email Messages and Log Files from the Appliance Database . . . . . . . . . . . . . . . . 98
Chapter 7: ReportsOverview . . . . . . . . . . . . . . . . . . . . . . . . . . . . . . . . . . . . . . . . . . . . . . . . . . . . . . . . . . . . . . . . . 99Generating a Predefined Report . . . . . . . . . . . . . . . . . . . . . . . . . . . . . . . . . . . . . . . . . . . . . . . . . 100Scheduling When to Run Predefined Reports from the Appliance . . . . . . . . . . . . . . . . . . . . . . . . . . 101Defining Recipients of a Quarantine Report . . . . . . . . . . . . . . . . . . . . . . . . . . . . . . . . . . . . . . . . . 102Customizing the Quarantine Report . . . . . . . . . . . . . . . . . . . . . . . . . . . . . . . . . . . . . . . . . . . . . . 103
Part III: MaintenanceChapter 8: Updates
Overview . . . . . . . . . . . . . . . . . . . . . . . . . . . . . . . . . . . . . . . . . . . . . . . . . . . . . . . . . . . . . . . . 107Updating the Appliance. . . . . . . . . . . . . . . . . . . . . . . . . . . . . . . . . . . . . . . . . . . . . . . . . . . . . . . 108Configuring Automatic Updates . . . . . . . . . . . . . . . . . . . . . . . . . . . . . . . . . . . . . . . . . . . . . . . . . 109Scheduling a One-Time Firmware Installation . . . . . . . . . . . . . . . . . . . . . . . . . . . . . . . . . . . . . . . . 111Rolling Back Updates . . . . . . . . . . . . . . . . . . . . . . . . . . . . . . . . . . . . . . . . . . . . . . . . . . . . . . . . 112Using Advanced Parameters for Update Settings . . . . . . . . . . . . . . . . . . . . . . . . . . . . . . . . . . . . . 113
Chapter 9: System BackupsOverview . . . . . . . . . . . . . . . . . . . . . . . . . . . . . . . . . . . . . . . . . . . . . . . . . . . . . . . . . . . . . . . . 115Options for Backing Up the Appliance . . . . . . . . . . . . . . . . . . . . . . . . . . . . . . . . . . . . . . . . . . . . . 116Backing Up Configuration Settings . . . . . . . . . . . . . . . . . . . . . . . . . . . . . . . . . . . . . . . . . . . . . . . 117Making Full System Backups . . . . . . . . . . . . . . . . . . . . . . . . . . . . . . . . . . . . . . . . . . . . . . . . . . . 118Configuring an FTP Server for Data Backup . . . . . . . . . . . . . . . . . . . . . . . . . . . . . . . . . . . . . . . . . 119Scheduling Administrative Tasks from the Mail Security Policy . . . . . . . . . . . . . . . . . . . . . . . . . . . . 120Backing Up the Appliance’s Log Files . . . . . . . . . . . . . . . . . . . . . . . . . . . . . . . . . . . . . . . . . . . . . 121Using System Tools . . . . . . . . . . . . . . . . . . . . . . . . . . . . . . . . . . . . . . . . . . . . . . . . . . . . . . . . . 122Reinstalling the Appliance . . . . . . . . . . . . . . . . . . . . . . . . . . . . . . . . . . . . . . . . . . . . . . . . . . . . . 123
4 IBM Internet Security Systems

Contents
Chapter 10: Alerts and LogsOverview . . . . . . . . . . . . . . . . . . . . . . . . . . . . . . . . . . . . . . . . . . . . . . . . . . . . . . . . . . . . . . . . 125Configuring Alert Logging for Email and SNMP Alerts . . . . . . . . . . . . . . . . . . . . . . . . . . . . . . . . . . 126Managing System-Related Events . . . . . . . . . . . . . . . . . . . . . . . . . . . . . . . . . . . . . . . . . . . . . . . . 129Enabling Alerts and Logging for Intrusion Prevention Settings . . . . . . . . . . . . . . . . . . . . . . . . . . . . . 130Viewing Log Files for the Appliance. . . . . . . . . . . . . . . . . . . . . . . . . . . . . . . . . . . . . . . . . . . . . . . 133Deleting Undelivered Email Messages and Log Files from the Appliance Database . . . . . . . . . . . . . . . 134Backing Up the Appliance’s Log Files . . . . . . . . . . . . . . . . . . . . . . . . . . . . . . . . . . . . . . . . . . . . . 135
AppendixesAppendix A: End-User Spam Management
Overview . . . . . . . . . . . . . . . . . . . . . . . . . . . . . . . . . . . . . . . . . . . . . . . . . . . . . . . . . . . . . . . . 139Browsing a Quarantine Store for Blocked Email Messages . . . . . . . . . . . . . . . . . . . . . . . . . . . . . . . 140Adding or Deleting Entries from a Personal Block or Allow List . . . . . . . . . . . . . . . . . . . . . . . . . . . . 141Changing a Password on a Personal Block or Allow List Account . . . . . . . . . . . . . . . . . . . . . . . . . . 142Requesting a Quarantine Report on Blocked Email Messages . . . . . . . . . . . . . . . . . . . . . . . . . . . . . 143
Appendix B: Advanced ParametersOverview . . . . . . . . . . . . . . . . . . . . . . . . . . . . . . . . . . . . . . . . . . . . . . . . . . . . . . . . . . . . . . . . 145Advanced Parameter Overview . . . . . . . . . . . . . . . . . . . . . . . . . . . . . . . . . . . . . . . . . . . . . . . . . 146General Advanced Parameters for the Appliance . . . . . . . . . . . . . . . . . . . . . . . . . . . . . . . . . . . . . 147Advanced Parameters for the SMTP Settings . . . . . . . . . . . . . . . . . . . . . . . . . . . . . . . . . . . . . . . 148Advanced Parameters for the Mail Security Policy . . . . . . . . . . . . . . . . . . . . . . . . . . . . . . . . . . . . 149Advanced Parameters for LDAP Directory Servers . . . . . . . . . . . . . . . . . . . . . . . . . . . . . . . . . . . . 150Advanced Parameters for the DNS Blacklist (DNSBL) Check . . . . . . . . . . . . . . . . . . . . . . . . . . . . . 151Advanced Parameters for the Message Storage Directories . . . . . . . . . . . . . . . . . . . . . . . . . . . . . 152Advanced Parameters for a Replication of a Cluster of Appliances . . . . . . . . . . . . . . . . . . . . . . . . . 153Advanced Parameters for End-User Access. . . . . . . . . . . . . . . . . . . . . . . . . . . . . . . . . . . . . . . . . 154
Appendix C: IBM SiteProtector System IntegrationOverview . . . . . . . . . . . . . . . . . . . . . . . . . . . . . . . . . . . . . . . . . . . . . . . . . . . . . . . . . . . . . . . . 155The SiteProtector System Overview . . . . . . . . . . . . . . . . . . . . . . . . . . . . . . . . . . . . . . . . . . . . . . 156Integrating the Appliance with the SiteProtector System . . . . . . . . . . . . . . . . . . . . . . . . . . . . . . . . 158
Appendix D: Safety, Environmental, and Electronic Emissions NoticesOverview . . . . . . . . . . . . . . . . . . . . . . . . . . . . . . . . . . . . . . . . . . . . . . . . . . . . . . . . . . . . . . . . 161
Index . . . . . . . . . . . . . . . . . . . . . . . . . . . . . . . . . . . . . . . . . . . . . . . . . . . . . . . . . . . . . . . . . . . 171
5IBM Proventia Network Mail Security System Administrator Guide, Version 1.6

Contents
6 IBM Internet Security Systems

Preface
Overview
Introduction This guide contains information about using the IBM Proventia Network Mail Security System appliance.
Scope This guide helps you use and manage the protection features of the appliance to meet your specific mail security requirements. It also helps you update and maintain the appliance for optimum performance.
Audience This guide is intended for two types of users:
● The Administrator
● The local end user
The following table shows the task each user performs:
User Performs the following tasks:
The Administrator • Configures and manages SMTP servers
• Manages local end-user accounts and licensing
• Configures mail security policies
• Configures accounts for the local end user to manage personal block and allow lists
• Generates predefined reports on email message usage on the network
• Schedules updates to the spam database
• Manages the appliance from the IBM SiteProtector system
The local end user • Accesses and browses through their spam email messages
• Creates and manages personal block and allow lists
• Generates a daily quarantine report of spam email messages
Table 1: User tasks
7IBM Proventia Network Mail Security System Administrator Guide, Version 1.6

Preface
How to Use the Appliance Documentation
Introduction This guide provides information on how to use the appliance.
Using this guide This guide is organized according to the workflow needed to protect your internal mail servers from being overwhelmed by large amounts of spam:
Related publications The following publications provide more information about the appliance:
Version of the SiteProtector system
You can manage your Mail Security appliance through a SiteProtector Console. The information in this guide about the SiteProtector system refers to IBM Proventia Management SiteProtector 2.0, Service Pack 7.0.
Licensing agreement
For licensing information on IBM Internet Security Systems products, download the Licensing agreement at http://www-935.ibm.com/services/us/iss/html/contracts_landing.html.
Workflow Description
Part I, Network Setup Set up the appliance on the network as an SMTP relay server between the internal mail server and the corporate firewall
Part II, Policy Configuration
Configure mail security policies that monitor mail traffic flow through the appliance
Part III, Maintenance Perform scheduled maintenance, such as product updates and log maintenance, as well as tasks such as troubleshooting and performing unscheduled maintenance
Appendixes Provide end-user spam management capabilities, tune appliance and policy settings, and configure IBM SiteProtector management
Table 2: Mail security workflows in the Administrator Guide
Document Contents
IBM Proventia Network Mail Security System Getting Started Guide
This guide provides information on how to set up the hardware version of the appliance.
IBM Proventia Network Mail Security System Getting Started Guide for VMware Workstation
This guide provides information on how to set up the appliance on VMware.
IBM Proventia Network Mail Security System Help
The online Help is accessed from the Proventia Manager or the Management Interface, and provides information on how to use features of the appliance while you are in the application.
Readme file This file provides the most current information about product issues and updates, including how to contact Technical Support.
Table 3: Reference documentation
8 IBM Internet Security Systems

Getting Technical Support
Getting Technical Support
Introduction IBM ISS provides technical support through its Web site and by email or telephone.
The IBM ISS Web site
The IBM Internet Security Systems (IBM ISS) Resource Center Web site at http://www-935.ibm.com/services/us/index.wss/offerfamily/iss/a1029129 provides direct access to user documentation, current versions listings, detailed product literature, white papers, and the Technical Support Knowledgebase.
Hours of support The following table provides hours for Technical Support at the Americas and other locations:
Location Hours
Americas 24 hours a day
All other locations
Monday through Friday, 9:00 A.M. to 6:00 P.M. during their local time, excluding IBM ISS published holidays
Note: If your local support office is located outside the Americas, you may call or send an email to the Americas office for help during off-hours.
Table 4: Hours for technical support
9IBM Proventia Network Mail Security System Administrator Guide, Version 1.6

Preface
10 IBM Internet Security Systems

Part I
Network Setup


Chapter 1
Getting Started
Overview
Introduction This chapter describes how to start using the appliance after you have configured initial network settings.
In this chapter This chapter contains the following topics:
Topic Page
How the Appliance Works 14
License Keys 17
Opening Ports on the Firewall 20
Appliance Passwords 22
Date and Time Settings 23
Routing Modes 24
Network Interface Settings 25
Deleting Self-Signed SSL Certificates in Firefox 3.x 27
13

Chapter 1: Getting Started
How the Appliance Works
Introduction The appliance functions as a store-and-forward SMTP relay server by observing mail traffic that passes through it, and inspecting the content of email messages with a set of policy rules configured by the Administrator.
Inbound SMTP relay Unlike other SMTP relays, the appliance does not forward email messages directly to internal mail servers. Instead, it stores incoming email messages in a local directory until the messages have been processed and analyzed as defined by the policy rules in place. Once messages are considered “clean,” the appliance releases those messages from the directory, and then relays them to internal destination servers where users connect to access their email accounts.
Outbound SMTP relay
The Administrator should also set up the appliance to inspect outgoing email messages from the network to make sure the appliance doesn’t end up becoming an open relay for unauthorized users and spammers. The appliance will either relay the outgoing messages to external mail domains via SMTP directly to responsible servers on the Internet, or will forward the messages to another mail relay.
Key concepts The following concepts represent the core functionality of the appliance:
● Inbound SMTP relay is only allowed for the domains you host.
● Outbound SMTP relay is allowed to any domain.
● The appliance must not be set up as an open SMTP relay that can be used by unauthorized users or spammers.
● Remote users and servers can establish secure connections with the appliance using TLS certificates.
Contents of a mail security policy
The Administrator configures a mail security policy that contains a set of rules defining how the appliance should inspect and control both incoming and outgoing email messages.
Policy objects A policy is a combination of the following objects (or instructions):
Object Purpose
Who What email address/group or domain name with corresponding IP addresses applies to this rule?
When When is this rule valid?
Preconditions Did any prior rule set a flag for the email message?
Responses What should be done with the email message?
Analysis Modules What content will be handled or inspected in the email message?
Action What action should take place against the email message?
Table 5: Contents of a policy
14

How the Appliance Works
Policy elements At a minimum, a policy should contain the following elements:
● At least two Who objects
● At least one Analysis Module and Action or one Response and Action
Using reports You use predefined reports to understand your mail security status by monitoring traffic flow within the appliance, identifying the top senders and internal recipients of spam-based emails, and by tuning your policy settings.
You can also set up the appliance to generate and send quarantine reports to end users who have been notified that they are a recipient of quarantined email messages. The appliance provides a default template with a list of macros for you to use as a basis for the report.
VMware or hardware version
You can run the appliance on a VMware workstation using a VMware image provided by IBM ISS or you can deploy a hardware version of the appliance on your network.
Standard network setup
The following diagram illustrates how you would set up the appliance (VMware workstation or the hardware version) between the corporate firewall and the internal mail server on the network:
Figure 1: Standard network setup for the appliance
If you are using the... Then...
VMware version Make sure you have consulted the Getting Started Guide for VMware Workstation on the IBM ISS Documentation Web site at http://www.iss.net/support/documentation/ for installation procedures.
Hardware version Make sure you have consulted the Getting Started Guide included in the appliance package or on the IBM ISS Documentation Web site at http://www.iss.net/support/documentation/ for installation procedures.
Table 6: Types of Getting Started Guides for the appliance
15

Chapter 1: Getting Started
Alternate network setup
The following diagram illustrates how you could set up the appliance (VMware workstation or the hardware version) between an SMTP relay and an internal mail server on your network:
Figure 2: Alternate network setup for the appliance
16

License Keys
License Keys
Introduction The appliance requires license key(s) in order for you to download and install updates to the mail security database (signatures, heuristics, etc.). One of the license keys is for antispam updates and the other license key is for antivirus updates.
Ordering license keys
When a Registered End User orders the license key(s) from IBM ISS, they will receive an email message containing order confirmation information and instructions for registering, generating, and downloading the license key(s).
Downloading licensing keys
The Registered End User will need to follow these steps in order to download the license keys from the License Registration Center:
1. Go to the IBM ISS License Registration Center at https://www1.iss.net/lrc/.
2. Enter the order confirmation number (OCN) and the password provided in the email message.
3. Optional: Complete the survey.
4. The key is generated and ready for download.
5. Download the key to a temporary directory on your computer.
License key settings You use the Licensing page in Proventia Manager (Updates > Status & Licensing) to view information about the current status of the license keys, including expiration dates. Additionally, this page lets you view information about how to acquire current license keys.
You can view information for each license key you purchase for your appliance. The following table describes the licensing information for each license key:
Procedure 1. In the navigation pane, click Updates, and then Status & Licensing.
2. Click the Licensing tab.
3. Click Install a new license key.
4. Locate the license key file that you downloaded.
Setting Description
Serial Number The serial number of the license key.
Each license key has its own serial number, unique to the Identity and the OCN.
OCN The Order Confirmation Number (OCN) or your customer number with IBM ISS.
Expiration The date the license key expires, in the yyyy-mm-dd format: 2008-12-31.
Maintenance Expiration The date the maintenance agreement expires, in the yyyy-mm-dd format: 2008-12-31.
Table 7: License key settings
17

Chapter 1: Getting Started
5. Click Install Key.
The appliance installs the license key file in the appropriate directory.
18
Backing Up Configuration Settings
Backing Up Configuration Settings
Introduction The process for updating your appliance is designed to keep your appliance up-to-date while taking the precautionary action of backing up your system before you install updates that alter original configuration settings.
Snapshot files Create a settings snapshot file of your appliance’s original configuration settings before you apply firmware updates or change your configuration settings.
You can also create additional settings snapshot files later if you want to use different configuration settings or test new policy settings for the appliance.
Site certificate issues with Firefox 3.x
If you import and install a backup file that you have previously saved, you may receive a site certificate security warning when you first try to open Proventia Manager or access the End-User Login/Authentication site using the Firefox 3.x browser.
You will need to close your Firefox session after you import and install the backup, and then open a new Firefox session to delete the self-signed certificate. See “Deleting Self-Signed SSL Certificates in Firefox 3.x” on page 27 for more information.
Default settings file FactoryDefault.settings contains the original appliance settings.
Procedure 1. In the navigation pane, click Backup & Restore, and then click System.
2. Click Manage Configuration Backups.
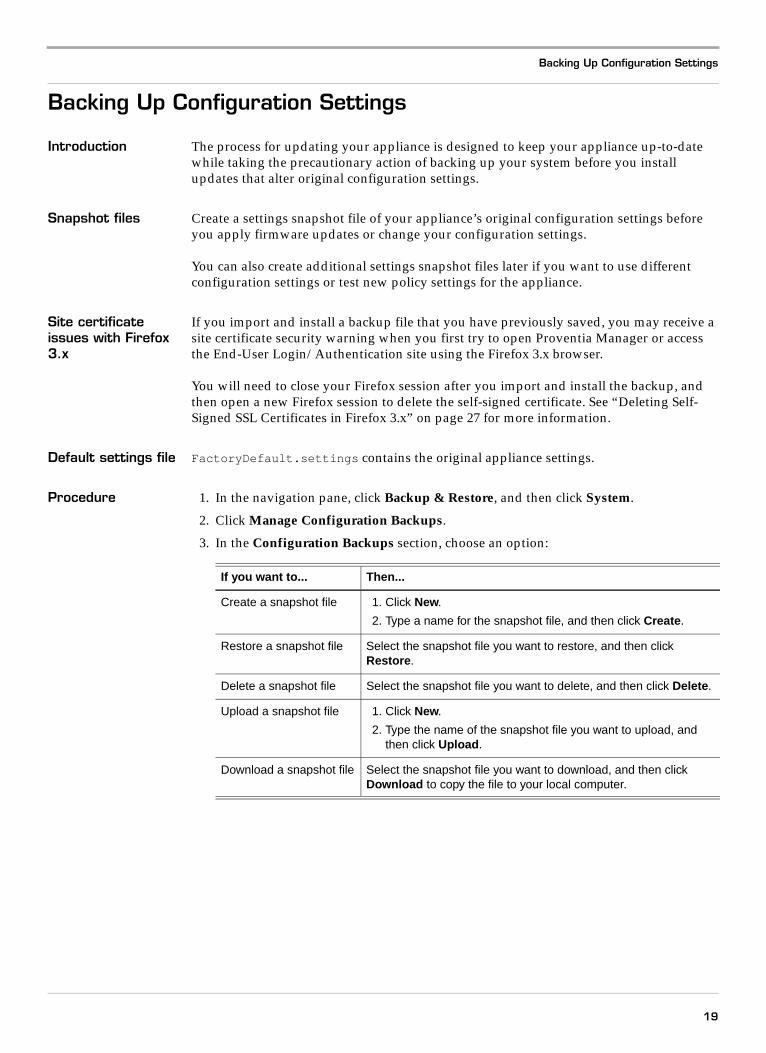
3. In the Configuration Backups section, choose an option:
If you want to... Then...
Create a snapshot file 1. Click New.
2. Type a name for the snapshot file, and then click Create.
Restore a snapshot file Select the snapshot file you want to restore, and then click Restore.
Delete a snapshot file Select the snapshot file you want to delete, and then click Delete.
Upload a snapshot file 1. Click New.
2. Type the name of the snapshot file you want to upload, and then click Upload.
Download a snapshot file Select the snapshot file you want to download, and then click Download to copy the file to your local computer.
19
Chapter 1: Getting Started
Opening Ports on the Firewall
Introduction You will need to open ports on your corporate firewall that enable the appliance to communicate with external servers.
Important: The firewall settings affect the availability of a service on the appliance. Make sure you have enabled the services correctly for each of the appliance’s interfaces (ETH0 - ETH3).
Configuring the ETH1 interface
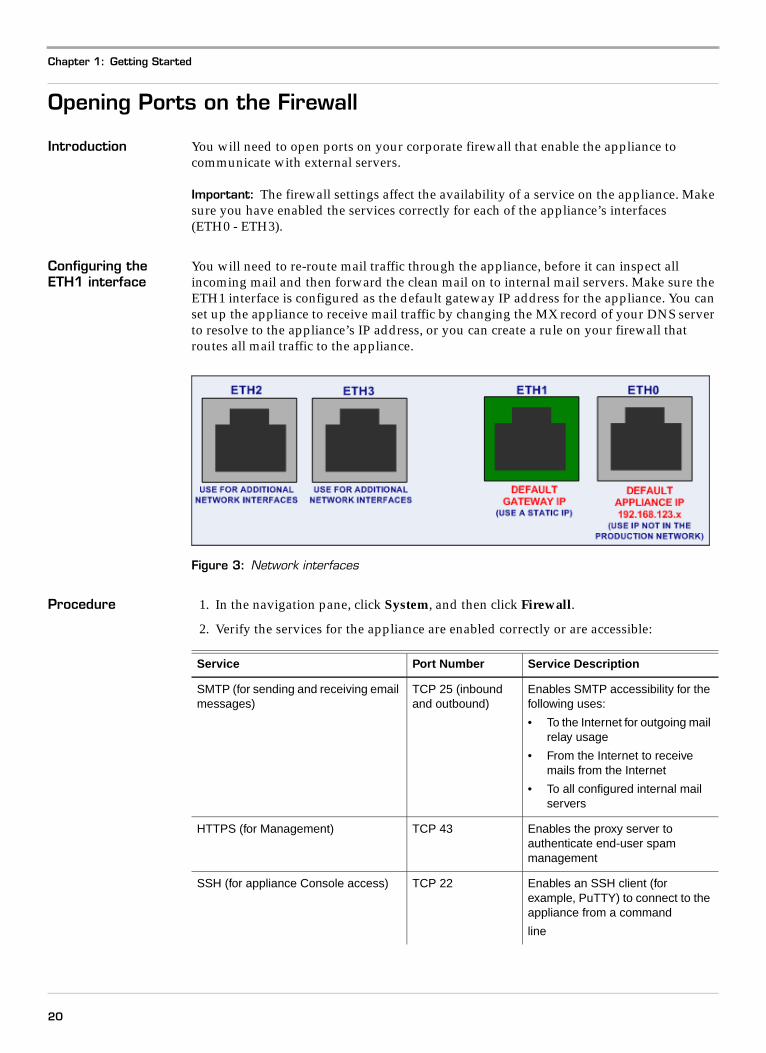
You will need to re-route mail traffic through the appliance, before it can inspect all incoming mail and then forward the clean mail on to internal mail servers. Make sure the ETH1 interface is configured as the default gateway IP address for the appliance. You can set up the appliance to receive mail traffic by changing the MX record of your DNS server to resolve to the appliance’s IP address, or you can create a rule on your firewall that routes all mail traffic to the appliance.
Figure 3: Network interfaces
Procedure 1. In the navigation pane, click System, and then click Firewall.
2. Verify the services for the appliance are enabled correctly or are accessible:
Service Port Number Service Description
SMTP (for sending and receiving email messages)
TCP 25 (inbound and outbound)
Enables SMTP accessibility for the following uses:
• To the Internet for outgoing mail relay usage
• From the Internet to receive mails from the Internet
• To all configured internal mail servers
HTTPS (for Management) TCP 43 Enables the proxy server to authenticate end-user spam management
SSH (for appliance Console access) TCP 22 Enables an SSH client (for example, PuTTY) to connect to the appliance from a command
line
20

Opening Ports on the Firewall
HTTPS (only if end-user access is enabled)
TCP 4443 Enables the end user to access End-User Account Authentication pages for the following purposes:
• Access their spam email messages
• Browse through quarantined email messages
• Manage their block and allow lists
• Generate a daily report of spam email messages
SNMP GET (only if SNMP is enabled) UDP 160 Enables you to set up alerts that notify you of the status of the appliance
Database Access TCP 5432 Enables the clients of a cluster to access the central appliance's database
Cluster Communications TCP 4990 Enables members of a cluster to communicate within the cluster
Service (Continued) Port Number Service Description
21

Chapter 1: Getting Started
Appliance Passwords
Introduction You can change the passwords that you or another Administrator initially set up for the appliance accounts.
Procedure Important: To change a password, you must know the current password.
1. In the navigation pane, click System, and then click Admin Passwords.
2. Choose the password you want to change:
If you want to change the...
Then...
root password 1. In the root section, type the current password
2. Click Enter Password.
3. Type and confirm the new password.
4. Click Save Changes.
Administrative passwords
1. In the Admin section, type the current password.
2. Click Enter Password.
3. Type and confirm the new password.
The password appears as asterisks.
4. Click Save Changes.
22

Date and Time Settings
Date and Time Settings
Introduction You can change the date and the time of the appliance from what you initially set up, and enable the network time protocol (NTP) to synchronize the appliance time with a network time server.
Important impact of saving these settings
The Time Configuration page in the Proventia Manager (System > Time) always contains the last manually configured values for date and time options—not the actual date and time. When you save the settings, the appliance is set to the currently configured values, whether you have changed them or not.
Important: To avoid inadvertently resetting the time and date to the previously configured values, update the time and date before you save the settings.
Procedures 1. In the navigation pane, click System, and then click Time.
2. Choose an option:
If you want to... Then...
Change the date and time of the appliance
1. Click the Date and Time arrow to see the calendar.
2. Select the correct month and date.
3. Use the arrows at the top to change the month and year in the calendar.
4. Select the hour and minutes in the Time boxes.
5. Click outside the calendar to close it.
6. Click the Time Zone arrow and select the correct time zone for your region.
7. Click Save Changes.
Enable the network time protocol
1. Select the Enable NTP check box, and then type the name of the NTP server.
2. Click Save Changes.
23

Chapter 1: Getting Started
Routing Modes
Introduction In routing mode, one of the appliance’s basic functions is to route network traffic from one physical network to another. These networks are connected to the appliance’s multiple interfaces. For routing to occur, you must enable the interfaces and physically connect them to their respective networks. You must also assign network information to the interfaces such as IP addresses and subnet masks. The external and internal interfaces are enabled and configured during the initial setup. You can enable additional internal interfaces as needed to connect to appliance to other internal networks.
How the appliance routes traffic
The appliance routes traffic on the networks and subnetworks connected to it. You must assign IP network settings to the interfaces, including IP addresses, subnetwork mask, and gateway router IP addresses.
Route precedence in the Routing table
If there are two or more routes for identical destinations, the most specific route in the Routing table takes precedence.
Example: In this example, a packet destined to the host 10.1.1.1 uses the 192.168.1.2 route. You configure the routes in the following table:
Adding a static route
1. In the navigation pane, click System, and then click Routes.
2. Click Add.
3. Type the following IP addresses or values:
■ Destination IP address
■ Subnet mask value
■ Gateway IP address
4. If needed, set a value in the Metric field.
The Metric (or hop count) indicates the number of routes or segments between the source and destination.
5. Click OK, and then click Save Changes.
Destination Subnet Mask Gateway IP Address
10.0.0.0 255.0.0.0 192.168.1.1
10.1.1.0 255.255.255.0 192.168.1.2
10.1.0.0 255.255.0.0 192.168.1.3
Table 8: Precedence in routing tables
24

Network Interface Settings
Network Interface Settings
Introduction If needed, you can change the initial configuration of the management port, default gateway port, and DNS servers.
About routing mode Routing Mode is the default network mode for your appliance. You configured the management interface when you set up the appliance with the Setup Assistant.
Important: You already configured the ETH0 and ETH1 interfaces during initial setup of the appliance. Make sure you have configured ETH0 as the default IP address of the appliance, and ETH1 as the default gateway IP address. Use the procedure below to configure the appliance’s additional internal interfaces: ETH2 and ETH3.
Why would you change these settings?
You may need to change the network configuration settings for the following reasons:
● Your company’s network policy has changed
● Your company has relocated
● You have changed your Internet Service Provider
● You have changed addresses
● You want to specify DHCP settings
● You want to change DNS settings
Enabling the external interface
1. In the navigation pane, click System, and then click Networking.
2. Click the External Interface tab.
3. Select the Enabled box.
4. Type the appliance’s hostname.
Use the format appliance.example.com.
5. Click Save Changes.
Selecting the external IP address type
1. In the navigation pane, click System, and then click Networking.
2. Select an IP address type in the IP Address area:
3. Click Save Changes.
IP Type Action
DHCP 1. Select DHCP.
2. If needed, select Enable Mac Cloning, and then type 6 hex pairs, separated by colons. Use the format AA:BB:CC:11:22:33.
Static 1. Select Static.
2. Type the IP address of the appliance’s external interface, and then press ENTER.
3. Provide the subnet mask (network mask) value.
4. Type the gateway IP address. If you want this interface to be the Primary Management Interface for the SiteProtector system, then select the Primary Management Interface box.
25

Chapter 1: Getting Started
Configuring DNS settings for the external interface
You configured this interface when you set up the appliance with the Setup Assistant. Use the following procedure to change those settings.
1. In the navigation pane, click System, and then click Networking.
2. Go to the DNS area. Do you want to use dynamic settings?
■ If yes, select Use Dynamic Settings, and then go to Step 6.
■ If no, go to Step 3.
3. Provide the IP addresses for the primary, secondary, and tertiary DNS servers.
4. Optional: Go to the DNS Search Path section, and then click Add.
The DNS search path appends the domain name to the host name. Associating these names enables the computer to more easily find the domain location.
5. Type the domain name to add to the search list, and then click OK.
6. Click Save Changes.
Enabling the internal interfaces
1. In the navigation pane, click System, and then click Networking.
2. Click the Internal Interface tab.
3. Click Add.
4. Select an interface from the list.
5. Select the Enabled box.
6. Type the following IP addresses or values:
■ Destination IP address
■ Subnet mask value
■ Gateway IP address
7. Click OK, and then click Save Changes.
26

Deleting Self-Signed SSL Certificates in Firefox 3.x
Deleting Self-Signed SSL Certificates in Firefox 3.x
Introduction Firefox uses certificates on secure Web sites to make sure that information is only being sent to the intended recipient. These warnings indicate that there may be an issue if you access a site they have blocked for security reasons.
Issue You may receive the following security warning that there is an issue with the appliance’s self-signed SSL certificate when you first try to access Proventia Manager (the appliance’s Web-based interface) or the End-User Login/Authentication site.
Figure 4: Firefox invalid security certificate warning
Remedy You will need to delete the self-signed SSL certificate to allow Firefox to bypass the security warning.
1. On the Secure Connection Failed warning page, click Or you can add an exception.
Figure 5: Firefox’s “Or you can add an exception” window
27

Chapter 1: Getting Started
2. On the next window, click Add Exception.
The Add Security Exception window appears.
Figure 6: Firefox’s Add Security Exception window
28

Deleting Self-Signed SSL Certificates in Firefox 3.x
3. Click Get Certificate.
4. Read the certificate status on the window describing the problems with the site.
5. Click Confirm Security Exception if you want to trust the site.
Reference For more information on this issue, see the following Web site: http://support.mozilla.com/en-US/kb/Secure+Connection+Failed#Certificate_is_only_valid_for_i_site_name
29

Chapter 1: Getting Started
30

Chapter 2
SMTP Settings
Overview
Introduction This chapter explains how to configure SMTP settings that enable you to integrate the appliance into your existing network environment.
In this chapter This chapter contains the following topics:
Topic Page
About SMTP Mail Routing 32
Using Transport Layer Security (TLS) Certificates to Establish Secure Connections 37
Defining System Accounts 38
Managing Email Messages in the SMTP Server Queues 39
Configure SMTP Settings for the Appliance to Receive Email Messages 42
Configuring DNSBL Settings to Block Suspicious Messages 45
Configuring Recipient Verification to Block Messages for Unknown Users 46
Enabling Host Reputation Filters to Filter Incoming Spam 48
Configuring SMTP Settings for Outgoing Email Messages 50
31IBM Proventia Network Mail Security System Administrator Guide, Version 1.6

Chapter 2: SMTP Settings
About SMTP Mail Routing
Introduction Before you set up and configure the appliance, you should understand the basics of using SMTP, which will help you in determining where to place the appliance on your network.
Performing a DNS lookup
Every domain has a domain name server (DNS) that handles its requests, and a System Administrator who maintains the records in that DNS. These records are used to determine mail routing to and from the Internet. You can easily check what servers are responsible for your domain by performing an nslookup on the MX DNS records for that domain.
Example of performing a DNS lookup
The following example shows how to check the MX DNS records for the iss.net domain:
Open a command prompt, and then enter the following:
nslookup
The output would look something like the following:
Default Server: dns.serverAddress: x.x.x.x
Now enter the following commands (these commands set the DNS query to look up responsible mail servers for the iss.net domain):
set q=mxiss.net
The output would look something like the following:
Server: dns.serverAddress: x.x.x.x
iss.net MX preference = 5, mail exchanger = atla-mx1.iss.net
iss.net MX preference = 10, mail exchanger = colo-mx1.iss.net
iss.net MX preference = 10, mail exchanger = sfld-mx1.iss.net
The Internet mail servers for the iss.net domain use the servers, atla-mx1.iss.net, colo-mx1.iss.net, and sfld-mx1.iss.net to send email messages.
MX preferences MX preferences are used to determine the priority of a mail server. By default, sending Internet mail servers will use the mail server with the lowest preference number (= lowest cost like metric in IP routes). Servers with the lowest preference number have the highest priority.
For example, if the server atla-mx1.iss.net is unreachable, the sending Internet mail servers will use colo-mx1.iss.net or sfld-mx1.iss.net to deliver email messages for the iss.net domain.
Using the same MX preference automatically load balances the mail traffic beyond the servers with the same priority. If you have multiple mail servers available for redundancy
32 IBM Internet Security Systems

About SMTP Mail Routing
and/or load balancing, the use of multiple DNS MX entries with the same MX preference is the easiest and most common way for SMTP to split mail traffic. You will often find multiple mail servers responsible for one domain due to redundancy and load balancing needs.
Reference: See the following Web sites for more information on MX records: http://www.ietf.org/rfc/rfc974.txt or http://en.wikipedia.org/wiki/MX_record.
Example of receiving email
The following diagram illustrates how email messages are relayed through the appliance to internal mail servers on the corporate network after the messages have passed through the corporate firewall, accessible to the Internet:
Figure 7: An example of incoming mail traffic
In the example above, a remote mail server performs a DNS MX lookup on the iss.net domain, which outputs two mail servers with the same MX preference = 10. Since the servers are the same priority, the remote mail server will randomly choose one of the servers to deliver email messages via SMTP on TCP port 25.
You can assign mail servers with the configured MX IP addresses or an external firewall/router/switch can own these IP addresses and forward (for example, destination NAT) incoming SMTP connections on these addresses to the appropriate internal servers. This allows mail traffic to be efficiently balanced so that if one system fails the other system takes over completely (redundancy).
Relaying SMTP traffic through the appliance
After email messages are received and processed by the appliance, the clean email messages are relayed to their internal destination servers where users connect to access their email accounts.
From a deployment perspective, you must make sure that all incoming SMTP traffic on MX IP addresses is routed through the appliance before it is relayed to internal servers. You can do this by changing the destination NAT rules on the firewall(s) to redirect SMTP connections on the MX IP addresses to the appliance. Changes might also be possible on preceding mail relays, load balancers, or content switches.
Important: Make sure that all MX IP addresses for all internal domains are routed through the appliance. The appliance works as an SMTP relay, which is a Layer 7 device.
33IBM Proventia Network Mail Security System Administrator Guide, Version 1.6

Chapter 2: SMTP Settings
The appliance does not forward or route IP traffic; inline deployment is not a deployment option for the appliance.
Important: If you need to change the DNS MX entries on your DNS servers to new addresses, the DNS population over the Internet can take up to three days (72 hours). Make sure you can re-route SMTP traffic on MX IP addresses before you change any DNS records.
Example of sending email
Important: Even if you only want to scan incoming mail traffic, you should still configure outgoing SMTP, which is used for email messages generated from the appliance.
You should set up the appliance to inspect outgoing email messages from your network, for example, configuring the appliance to check for attachments, confidential content, or disclaimers that have been added to outgoing mail.
Figure 8: An example of outgoing mail traffic
The System Administrator for the internal mail server should make sure that all outgoing email messages are being relayed through the appliance (by configuring the relay host/smart host for outgoing mail). If the IP addresses for the internal mail servers have not been configured as relay hosts, email messages may be denied by the built-in anti-relay check that protects the appliance from being used by unauthorized users or spammers to send unsolicited junk mail to other Internet users.
34 IBM Internet Security Systems

About SMTP Mail Routing
The appliance delivers email messages to external mail domains as follows:
● Performs direct MX DNS lookups and then sends the email messages via SMTP directly to responsible servers on the Internet.
Figure 9: DNS resolution method for outgoing mail delivery
● Forwards all outgoing email messages to another mail relay.
Figure 10: Forward method for outgoing mail delivery
■ To forward all outgoing email messages to an IP address, configure *;<IP>.
■ To forward email messages from specific domains to a specific host, configure maildomain1;<IP1>, maildomain2;<IP2>.
35IBM Proventia Network Mail Security System Administrator Guide, Version 1.6

Chapter 2: SMTP Settings
Required services You will need the following services in order to operate the appliance:
Note: You can adjust these settings on the Firewall Settings page in Proventia Manager (System > Firewall).
Service Port Number Required Optional
DNS UDP 53
HTTPS (for Management) TCP 43
SMTP (for sending and receiving email messages)
TCP 25 (inbound and outbound)
SSH (for appliance Console access)
TCP 22
HTTPS (only if end-user access is enabled)
TCP 4443
SNMP GET (only if SNMP is enabled)
UDP 160
SNMP Trap (only if SNMP Trap is enabled)
UDP 161
LDAP (only if LDAP integration is enabled)
TCP 389
the IBM SiteProtector Console if SiteProtector is enabled (disabled by default)
3995
Table 9: Services needed to operate the appliance
36 IBM Internet Security Systems

Using Transport Layer Security (TLS) Certificates to Establish Secure Connections
Using Transport Layer Security (TLS) Certificates to Establish Secure Connections
Introduction To establish a secure connection between the appliance and external servers, you will need to upload certificates that are used by the appliance to authenticate with remote servers, and for those remote servers to authenticate with the appliance. After authentication, remote users can secure their connections to the appliance using TLS encryption.
Important: The appliance only supports the .PEM key file format.
Procedure 1. In the navigation pane, click SMTP, and then click TLS Certificates.
2. Provide the following information:
If you want to upload this certificate...
Then...
Server 1. Click the Server tab.
2. Click Upload.
3. Browse for the location of the Certification file and the Key file, and then click Upload Certificate.
Client 1. Click the Certificates tab.
2. Click Upload.
3. Browse for the location of the Certification file, and then click Upload Certificate.
37IBM Proventia Network Mail Security System Administrator Guide, Version 1.6

Chapter 2: SMTP Settings
Defining System Accounts
Introduction You will need to provide the hostname for your main internal mail domain and define the email accounts that will be used by the appliance to send notification email messages for undelivered or quarantined messages.
Procedure 1. In the navigation pane, click System, and then click SMTP.
2. Click the Global tab.
3. Provide the root domain for your mail server.
4. Provide email addresses for the following accounts:
5. Click Save Changes.
Directory Description
Postmaster The SMTP address of the Administrator.
Error Admin The path to the SMTP address in which each undelivered email message is sent in addition to the original sender of the email message. If you leave the field blank, only the original sender of the email message receives a notification email if the email message was not delivered successfully.
Temporary Error Admin The temporary path to the SMTP address in which each undelivered email message is sent in addition to the original sender of the email message.
Send New Email As The email address shown by the appliance as the sender when a new email message is sent.
Send Quarantine Report As
The email address shown by the appliance as the sender when a quarantine report is sent.
38 IBM Internet Security Systems

Managing Email Messages in the SMTP Server Queues
Managing Email Messages in the SMTP Server Queues
Introduction If there are issues with the flow of mail traffic in the queues, you can browse through the SMTP server queues for problematic email messages or log files (if available) generated by the appliance.
Troubleshooting issues with the SMTP queues
Try the following suggestions to troubleshoot issues with the SMTP queues:
● Access the log files of the message to determine why a message was not delivered
● Respool marked messages in the resend queue and in the frozen queue immediately to the SMTP queue
● Delete messages from the frozen queue using a clean-up job you can set from the Maintenance tab on the SMTP Configuration page (SMTP > Configuration > Maintenance)
Procedure 1. In the navigation pane, click SMTP, and then click Queue Browser.
2. Select the queue in which you want to check email messages:
Message Type Description
unchecked Messages that are waiting to be analyzed by the appliance. Every incoming email message goes to the unchecked queue first. Once the message has been analyzed by the policy in place, the message is removed from the unchecked queue. The email messages in the unchecked queue are considered temporary data; a large unchecked queue indicates that the appliance is receiving more email messages then it can process.
unchecked/processing Messages in the mail queue that are being processed by the appliance.
unchecked/processable
unchecked/processable.cal
unchecked/processable.smtp
unchecked/processable.timeout
unchecked/processable.processing
unchecked/processable.processing.db
unchecked/processable.processing.pgdb
unchecked/processable.processing.unk
Messages that may appear in the queue if there were bad mails or other issues.
Note: These messages are informational and do not require user intervention.
local Messages that were in the unchecked queue, but have been analyzed and then moved from the unchecked queue to the local queue. These email messages are also considered temporary data.
send New messages in the mail queue that are attempting to be delivered from the XMail server.
39IBM Proventia Network Mail Security System Administrator Guide, Version 1.6

Chapter 2: SMTP Settings
3. Optional: Click Respool if you have experienced a slowdown in email message processing that has caused a backlog in one of the spool directories.
frozen Messages that were sent to the target SMTP server but failed to be processed due to a temporary error, such as the server was not reachable, the receiving mail server (remote server) returns a permanent error, or after the email message is unable to be sent within the configured resend interval.
The email message is moved to the resend queue to be resent by the appliance. A large resend queue indicates that there is an email delivery problem.
resend Messages that were sent to the target SMTP server but failed to be processed due to a temporary error, such as the server was not reachable. The email message is moved to the resend queue to be resent by the appliance. A large resend queue indicates that there is an email delivery problem.
Message Type Description
40 IBM Internet Security Systems

SECTION A: Inbound SMTP Configuration
Overview
Introduction This section describes how to enable the appliance to function as a store-and-forward SMTP relay server that locks received messages in a local directory until they have been processed and analyzed using the policy rules in place.
Once the messages are considered clean, the appliance releases the messages from the directory, and then relays those messages to internal destination servers where users connect to access their email accounts.
Prerequisite Make sure you understand the basics of using SMTP or have read “About SMTP Mail Routing” on page 32, which will help you in determining where to place the appliance on your network.
Task overview Complete the following tasks to set up the appliance to receive and process incoming email messages:
Task Description
Configure SMTP settings for the appliance to receive email messages
Configure XMail, TLS, and network settings on the appliance to enable it to function as an SMTP relay server between the corporate firewall and your internal mail servers
Configure DNSBL settings to block suspicious email messages
Add the IP addresses of servers that are known for sending spam to the DNS blacklist check
Configure Recipient Verification to block email messages for unknown users
Configure settings on the appliance that block email messages before they are sent to an unknown user
Enable host reputation filters to determine whether incoming email messages are legitimate
Configure the host reputation filter to quarantine the IP addresses of hosts who send a high percentage of spam
Table 10: Task overview for configuring the appliance’s inbound SMTP settings
41IBM Proventia Network Mail Security System Administrator Guide, Version 1.6

Chapter 2: SMTP Settings
Configure SMTP Settings for the Appliance to Receive Email Messages
Introduction In order for the appliance to function as an SMTP relay server between the corporate firewall and the internal mail servers on the network, you will need to configure XMail, security, and network settings on the appliance.
Note: This is the first of four required tasks for setting up the appliance to receive and process incoming email messages.
Configure XMail settings
The XMail settings enable the appliance to immediately block email messages that are sent to a user who does not exist in your organization.
1. In the navigation pane, click SMTP, and then click Configuration.
2. Click the Receiving SMTP > Settings tab.
3. Select the Enable Logging box to enable the appliance to write log entries to a log file.
The appliance logs two entries per email message (one entry for recipient ok and one entry for sender ok) to the smtp-yyyymmdd0000 log file.
Example:
18BD-17E3-479D-8BD2-212A1BE162E8" "RCPT=OK" "" "0" ""
"example.com" "example.com" "192.168.123.1" "2008-07-14 15:13:30" "bob" "example.com" "[email protected]" "[email protected]" "288718BD-17E3-479D-8BD2-212A1BE162E8" "RECV=OK" "" "5465" ""
4. Provide the following XMail settings:
Setting Description
Port The port number on which the XMail server will accept a connection.
Default: port 25
Max Recipients per Message
The maximum number of mail recipients.
Default: 100 recipients
Max Messages per Session
The maximum number of messages the XMail server can deliver during each session.
Session Timeout The maximum number of seconds before the sessions times out.
Default: The default is 60 seconds after which the server closes the connection if it does not receive a command.
Max Message Size (KB) The maximum message size that is possible to send through the XMail server.
Note: If you set this value to zero, the server will allow any message size.
Allow NULL Sender Enables the XMail server to accept null sender (MAIL FROM:<>) messages.
Max SMTP Errors per Session
The maximum number of SMTP errors the appliance can handle for a session.
42 IBM Internet Security Systems

Configure SMTP Settings for the Appliance to Receive Email Messages
Configure TLS settings
The TLS settings enable the appliance to authenticate with remote servers, and for remote servers to authenticate with the appliance
1. In the navigation pane, click SMTP, and then click Configuration.
2. Click the Receiving SMTP > Settings tab.
3. Enable these settings if you will be using TLS to encrypt mail traffic:
Check Mailer Domain Enable if you want the XMail server to perform a DNS/MX lookup on the domain of the email sender SMTP address for validation. The server will only accept emails from the sender SMTP addresses whose domains are known by DNS/MX.
Max MTA Hops The maximum number of MTA relay steps before the message is looped.
Default: 20
Enable Reverse DNS Lookup
Select if you want XMail to determine if the source IP address of an incoming SMTP connection resolves to an actual valid domain name; otherwise XMail will deny this connection.
Return Path Domain Check
Select if you want XMail to verify that the Return-Path has a valid MX or DNS record.
HELO Domain Check Select if you want XMail to determine whether it can resolve the domain from which the email message is being sent.
Forward Path Domain Check
Select if you want XMail to use the source routing list of hosts and the destination mailbox.
SMTP Greeting The response that the XMail server uses to greet the appliance.
Received Header Choose an option for viewing the email header information:
• Standard (client IP shown, server IP not)
The email message header information contains the client IP address, but not the server IP address.
• Verbose (client IP shown, server IP shown)
The email message header information contains the client IP address and the server IP address.
• Strict (no IP shown)
The email message header information contains no IP addresses.
If you set the Received Header Type to Strict when you open your corporate firewall to receive SMTP traffic, the analysis modules in the Sender Policy Framework will not work because these modules rely on information in the received header.
Setting Description
Setting Description
Require Certificate Tells the SSL link negotiation code to fail if the remote peer does not supply a certificate.
SSLWantCert in the XMail server.tab
43IBM Proventia Network Mail Security System Administrator Guide, Version 1.6

Chapter 2: SMTP Settings
Provide the IP addresses of local domains and relay hosts
For local domains: All incoming email messages from external sources need to be forwarded to your local mail servers. You need to define the IP address for each internal mail exchange domain. If several internal servers are used for the same mail exchanger domain for redundancy reasons, separate the IP addresses with semicolons (;).
For relay hosts: After you have defined local domains, XMail checks if the recipient’s domain actually matches one of the local domains. If not, XMail recognizes the email message as a relay and will deny it. The relay server will accept outgoing email messages addressed to a different domain name other than the local domains if they are being sent from a local mail server. Apart from the above scenario, all outgoing emails are detected as relayed mail. You should enter the IP addresses of the local mail servers, and use the default entry 127.0.0.1 or localhost for system-generated email messages.
1. In the navigation pane, click SMTP, and then click Configuration.
2. Click the Receiving SMTP > Settings tab.
3. Provide the following IP addresses:
Verify Certificate Tells the SSL link negotiation code to verify the remote peer certificate.
SSLWantVerify in the XMail server.tab
Allow Self-Signed Certificates
Allows self-signed certificates supplied by remote peers.
SSLAllowSelfSigned in the XMail server.tab
Setting Description
If you want to... Then...
Add a local domain 1. Click Add in the Local Domains area.
2. Type the local domain and the IP address.
3. Click OK.
Example: If the mail server 10.0.0.1 is down, XMail will try sending it to 10.0.0.2:
Domain= mydomain.com
Mailservers= 10.0.0.1;10.0.0.2
Add a relay host 1. Click Add in the Relay Hosts area.
2. Type the IP address and the subnet mask.
3. Click OK.
44 IBM Internet Security Systems

Configuring DNSBL Settings to Block Suspicious Messages
Configuring DNSBL Settings to Block Suspicious Messages
Introduction You can add IP addresses to the DNSBL server that are known for sending spam emails, either deliberately or unknowingly due to an email address that has been compromised. You can also set scores for each entry on the list so that the DNSBL server can determine whether the email message is spam based on whether or not that IP address has sent spam in the past.
Note: This is the second of four required tasks for setting up the appliance to receive and process incoming email messages.
DNSBL border IP addresses
DNSBL border IPs are IP addresses that specify the outer border of the trusted network around the appliance. The IP addresses that are considered DNSBL border IP addresses for the appliance include:
Important: Use border IP addresses if the appliance is receiving email messages directly from hosts on the Internet. You will not be able to use border IP addresses if the appliance is behind an SMTP relay.
Procedure 1. In the navigation pane, click SMTP, and then click Configuration.
2. Click the Receiving SMTP > DNSBL Settings tab.
3. Select the Enable box.
4. Provide an error code and an error message.
5. Click the DNSBL Settings button.
6. Set a threshold value in the DNSBL Lists area.
Any email message that scores a probability of this value or higher is automatically sent back to the filter and used for learning.
7. Click Add.
8. Select the Enabled box.
9. Type the name of the DNSBL server.
10. Enter the match score, and then click OK.
11. Click Save Changes.
DNSBL Border IP Address How to Configure
Servers that relay to the local domains
SMTP > Configuration > Receiving SMTP > Settings > Local Domains
Servers that relay through the appliance
SMTP > Configuration > Receiving SMTP > Settings > Relay Hosts
Servers that the appliance forwards to
SMTP > Configuration > Sending SMTP > Delivery > Forward
A user-specified list of IP addresses separated by semicolons
DNSBL advanced tuning parameter host_reputation.border_ips (page 145)
Table 11: DNSBL border IP addresses
45IBM Proventia Network Mail Security System Administrator Guide, Version 1.6

Chapter 2: SMTP Settings
Configuring Recipient Verification to Block Messages for Unknown Users
Introduction The appliance uses a modified version of XMail to immediately block email messages that are sent to a user who does not exist in your organization.
Note: This is the third of four required tasks for setting up the appliance to receive and process incoming email messages.
Using XMail The modified version of XMail looks in specific directories for files with the .allowed extension. There can be zero or more of these files, which are read to construct a list of known email addresses. These files contain a single email address on each line. XMail allows limited support of wildcards in allowed email addresses. To allow all email addresses for a domain, XMail accepts addresses in the following format: *@example.com. XMail does not recognize invalid wildcards and treats them as normal email addresses.
XMail has a standard filter mechanism called the “pre-data” filter that is invoked when all header information (From, To) is received from the client and before any email message data is transmitted. The appliance uses a “pre-pre-data” filter that is invoked before the “pre-data” filter is evaluated. If the appliance’s filter allows the email message, XMail will continue and invoke the “pre-data” filters, if present.
The appliance’s filter is called for all recipients of an email message until an allowed recipient is found or the whole list of recipients is processed. If at least one recipient is allowed, the email message is accepted. Errors for invalid recipients (if one or more out of many, but not all, are non-allowed recipients) are produced by standard email message processing. If zero recipients are allowed, the email message is rejected.
Procedure 1. In the navigation pane, click SMTP, and then click Configuration.
2. Click the Receiving SMTP > Recipient Verification tab.
3. Select the Enable Recipient Verification box.
4. Choose how the appliance will handle recipients who are rejected:
Note: If at least one recipient is allowed, the email message is accepted. Errors for invalid recipients (if one or more out of many, but not all, are non-allowed recipients) are produced by standard email message processing. If zero recipients are allowed, the email message is rejected.
5. Provide an SMTP error code and an SMTP error message.
Option Description
Reject with Error The appliance returns the given error code and error message to the SMTP client. The sender knows which SMTP addresses are valid, which can be desired or undesired behavior.
Silent Drop The email message is accepted on the SMTP layer but not analyzed or sent to the recipient, but silently dropped. This prevents the sender from gaining knowledge of valid SMTP addresses and can help to prevent address harvesting.
46 IBM Internet Security Systems

Configuring Recipient Verification to Block Messages for Unknown Users
6. Choose the access type for the recipients:
Default Access Type Description
Denied All recipients that are not on the list of recipients are rejected.
Allowed All recipients that are not on the list of recipients are allowed.
You can either build a list of allowed recipients and reject all others or build a list of rejected recipients and allow all others.
47IBM Proventia Network Mail Security System Administrator Guide, Version 1.6

Chapter 2: SMTP Settings
Enabling Host Reputation Filters to Filter Incoming Spam
Introduction Host reputation filters enable the appliance to determine whether or not an incoming email message should be classified as spam based on whether the sender of the email has sent spam in the past.
Important: Because the filter takes the IP address of the connection host as the host IP address, you can only use the filter if the appliance is receiving email messages directly from the Internet. If the appliance is behind an SMTP relay, you will not be able to use host reputation filters.
Note: This is the last of four required tasks for setting up the appliance to receive and process incoming email messages.
Procedure 1. In the navigation pane, click SMTP, and then click Configuration.
2. Click the Receiving SMTP > Dynamic Host Reputation Filter tab.
3. Select Enable Dynamic Host Reputation.
4. Select what method the appliance should use to reject the email message:
5. Provide an SMTP error code and an SMTP error message.
6. Configure the filter to quarantine the IP addresses of hosts who send a high percentage of spam:
7. Add the IP addresses that are not considered senders of spam to the Allow List.
8. Add the IP addresses that are considered senders of spam to the Deny List.
Option Description
Reject with Error The appliance returns the given error code and error message to the SMTP client. The sender knows which SMTP addresses are valid, which can be desired or undesired behavior.
Silent Drop The email message is accepted on the SMTP layer but not analyzed or sent to the recipient, but silently dropped. This prevents the sender from gaining knowledge of valid SMTP addresses and can help to prevent address harvesting.
Tag If the IP address is on the Deny list, the filter inserts the following tag in the Header field of the email message: X-MSHostReputation:<sender IP>.
Filter Settings Description
Analysis Window (minutes)
The time frame during which IP addresses are analyzed.
Quarantine Duration (minutes)
The amount of time that a host marked as a spammer is quarantined from the system.
Minimum SPAM/Phishing Hits
The minimum amount of spam or phishing email messages sent by a host before that host is considered a spammer.
SPAM/Phishing Percentage
If the system reaches this percentage of ham/spam email messages, the host is marked as a spammer. (Spam/Phishing versus Ham percentage for every IP)
48 IBM Internet Security Systems
Overview
SECTION B: Outbound SMTP Configuration
Overview
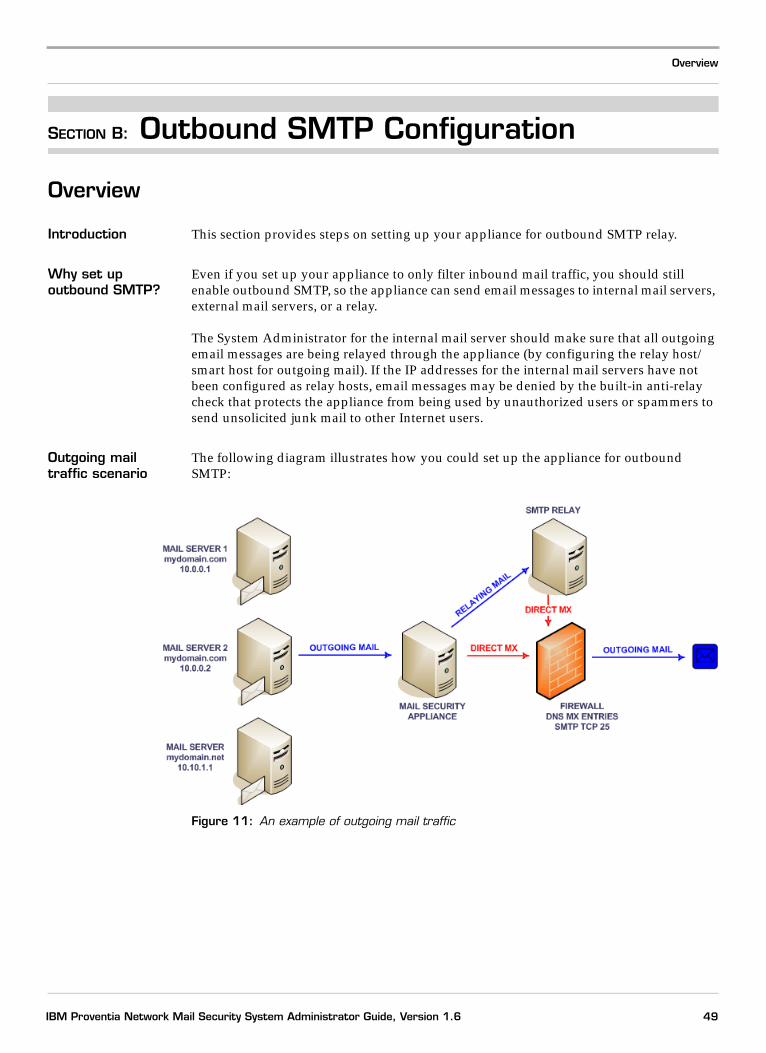
Introduction This section provides steps on setting up your appliance for outbound SMTP relay.
Why set up outbound SMTP?
Even if you set up your appliance to only filter inbound mail traffic, you should still enable outbound SMTP, so the appliance can send email messages to internal mail servers, external mail servers, or a relay.
The System Administrator for the internal mail server should make sure that all outgoing email messages are being relayed through the appliance (by configuring the relay host/smart host for outgoing mail). If the IP addresses for the internal mail servers have not been configured as relay hosts, email messages may be denied by the built-in anti-relay check that protects the appliance from being used by unauthorized users or spammers to send unsolicited junk mail to other Internet users.
Outgoing mail traffic scenario
The following diagram illustrates how you could set up the appliance for outbound SMTP:
Figure 11: An example of outgoing mail traffic
49IBM Proventia Network Mail Security System Administrator Guide, Version 1.6

Chapter 2: SMTP Settings
Configuring SMTP Settings for Outgoing Email Messages
Introduction You should set up the appliance to relay email messages to external mail domains via SMTP directly to responsible servers on the Internet, or to forward those email messages to another mail relay.
Configuring delivery methods
1. In the navigation pane, click SMTP, and then click Configuration.
2. Click the Sending SMTP tab.
3. Select the Enable box.
4. Select the Enable Logging box if you want to enable the appliance to write log entries to a log file.
5. Provide the following settings:
Setting Description
HELO Domain The host name of the domain that you want to send email messages from.
Remove Spool Errors Enable if you want to remove or store email messages in the frozen directory after a failure in delivery or filtering.
Timeout The amount of time the SMTP server should wait after encountering a delivery error before it tries to send an email message.
Maximum Number of Retries
The maximum number of retries before a notification is sent out to the original sender.
Resend Increment Ratio The increment ratio of the reschedule time for sending an email message.
Notify Sender on Retries The notification to the sender if XMail retries to deliver an email message (Status delivery errors).
Number of Cited Lines in Bounces
The amount of lines from the bounced email address that will be used in the notify message.
Always Try TLS Enable if you want the SMTP server to try to use TLS in SMTP communications. If TLS is not supported by the target server, the system will fall back to unencrypted communication.
50 IBM Internet Security Systems
Configuring SMTP Settings for Outgoing Email Messages
6. Click Save Changes.
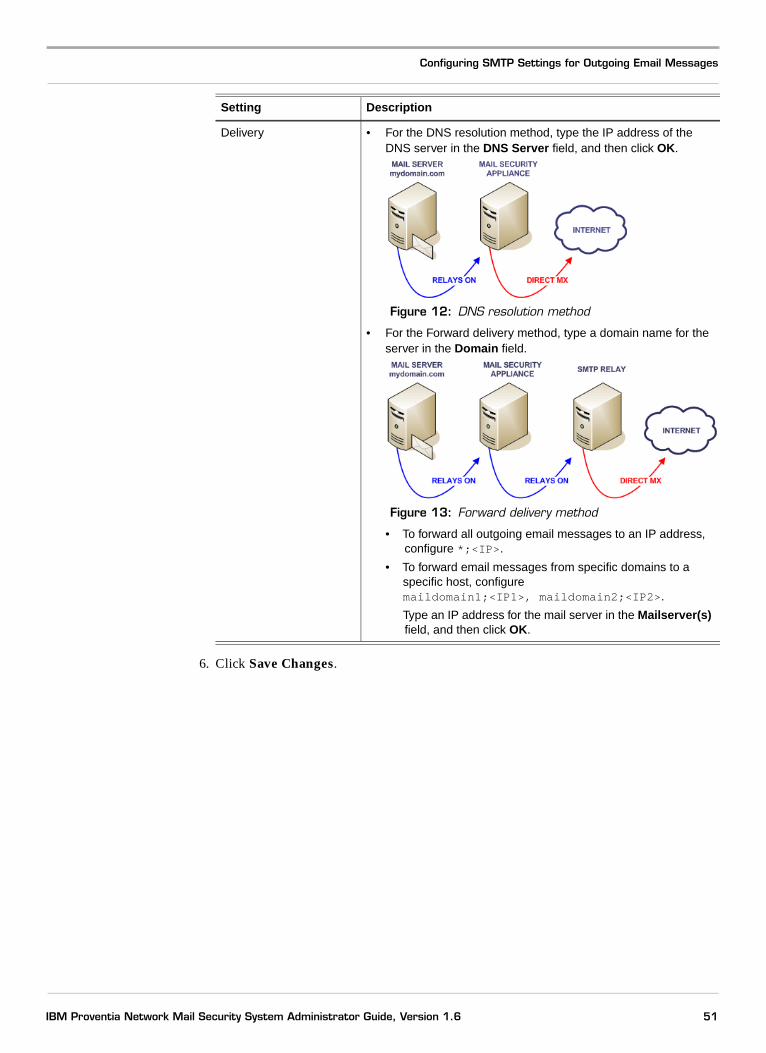
Delivery • For the DNS resolution method, type the IP address of the DNS server in the DNS Server field, and then click OK.
Figure 12: DNS resolution method
• For the Forward delivery method, type a domain name for the server in the Domain field.
Figure 13: Forward delivery method
• To forward all outgoing email messages to an IP address, configure *;<IP>.
• To forward email messages from specific domains to a specific host, configure maildomain1;<IP1>, maildomain2;<IP2>.
Type an IP address for the mail server in the Mailserver(s) field, and then click OK.
Setting Description
51IBM Proventia Network Mail Security System Administrator Guide, Version 1.6

Chapter 2: SMTP Settings
52 IBM Internet Security Systems

Chapter 3
Clusters
Overview
Introduction This chapter explains how to configure and manage a group of appliances in a cluster.
In this chapter This chapter contains the following topics:
Topic Page
About Clusters 54
Creating a New Cluster 55
Adding an Appliance to an Existing Cluster 56
Changing Passphrases or IP Addresses 57
53IBM Proventia Network Mail Security System Administrator Guide, Version 1.6

Chapter 3: Clusters
About Clusters
Introduction A cluster consists of a number of appliances in which one appliance acts as the central appliance (Cluster Central), and the other appliances become clients of the central appliance (Cluster Clients).
Policy configuration settings
All members of the cluster share the policy configuration settings of the central appliance. The policy configuration settings for the central appliance are defined on the Mail Security Policy page (Mail Security > Policy) and the Mail Security Policy Objects page (Mail Security > Policy Objects).
How data is processed in the cluster
The central appliance acts as the central database server for the cluster. Each appliance in the cluster has a local database that stores all the information for the email messages processed on that specific appliance. All appliances in the cluster replicate database changes (such as new data, changed data, or deleted data) from their local database to the central appliance’s database. The central appliance’s database collects that data to allow end users to browse their quarantine stores and to generate and send quarantine reports to end users.
Things to note when using clusters
● When an appliance is promoted to the central appliance in the cluster or an appliance joins an existing cluster, that appliance loses all data.
● Open firewall ports 5432 (database) and 4990 (cluster communication) to allow communication between the central appliance and an appliance that is joining the cluster.
● Make sure all members of the cluster can reach each other on the network.
● Use a network time server to synchronize the time settings on all members of the cluster.
● Some SMTP settings reference the Policy Objects defined under Mail Security. Policy Objects are replicated between cluster members, but SMTP settings are not replicated. You should remove all references to Policy Objects from SMTP > Configuration > Receiving SMTP > Recipient Verification.
● When you create a cluster or add appliances to a cluster, all references to Schedule objects and FTP Server objects must be removed.
● The central appliance generates quarantine reports. Users will only receive one quarantine report containing all quarantined email messages, regardless of which appliance processed the email messages.
54 IBM Internet Security Systems

Creating a New Cluster
Creating a New Cluster
Introduction You can create a cluster of appliances that distribute the functions of a single appliance, such as policy management, over multiple appliances.
Procedure 1. In the navigation pane, click Mail Security, and then click Clustering.
2. Click Create a New Cluster.
3. Type and then confirm the passphrase for the cluster.
Important: Choose a passphrase you can remember. IBM ISS will not be able to reset or recover your passphrase once you have created it.
4. Select an IP address from the Communications IP drop-down list.
5. Click Create Cluster.
55IBM Proventia Network Mail Security System Administrator Guide, Version 1.6

Chapter 3: Clusters
Adding an Appliance to an Existing Cluster
Introduction You can add an appliance to an existing group of appliances that are currently distributing the functions of a single appliance over multiple machines.
Note: When an appliance joins an existing cluster, that appliance loses all data.
Process for joining the cluster
When an appliance joins the cluster, it goes through the following process after it receives the connection parameters to the database for the central appliance:
● Stops processing email messages, including the SMTP server
● Connects to the central appliance’s database
● Deletes all data from its own database
● Replicates all configuration data from the central appliance (Cluster Central) to its own database
● Applies the policy previously read from the central appliance’s database
● Starts processing email messages
Procedure 1. In the navigation pane, click Mail Security, and then click Clustering.
2. Click Join an Existing Cluster.
3. Type and then confirm the passphrase for the cluster.
4. Select an IP address from the Communications IP drop-down list.
5. Click Join Cluster.
Removing a client from the cluster
You can remove an appliance that is a client of the cluster if it is no longer needed.
1. In the navigation pane, click Mail Security, and then click Clustering.
2. Click Manage this Cluster.
3. Choose the client you want to remove from the cluster.
4. Type the passphrase for the cluster.
Note: This is the passphrase that was set when you or another Administrator created the cluster.
5. Click Remove this client.
The client stops processing SMTP traffic and leaves the cluster.
6. Restart the processing of SMTP traffic.
Erasing a cluster of appliances
You can return a cluster of appliances back into a single appliance.
1. In the navigation pane, click Mail Security, and then click Clustering.
2. On the Cluster Central Mode page, click Erase this Cluster.
3. Type the passphrase for the cluster, and then choose to erase the cluster.
56 IBM Internet Security Systems

Changing Passphrases or IP Addresses
Changing Passphrases or IP Addresses
Introduction You can change the passphrase for the central appliance in the cluster, or change an IP address for any members of the cluster.
Procedure 1. In the navigation pane, click Mail Security, and then click Clustering.
2. Click Manage this Cluster.
3. Choose an option:
If you want to change the...
Then...
Passphrase of the primary central appliance
1. Go to the Cluster Central appliance, and then click Change Cluster Passphrase.
2. Type the current passphrase for the cluster, and then type the new passphrase twice to confirm it.
3. Click Change Passphrase.
IP address of a member of the cluster
1. Choose an appliance, and then click Update IP Address.
2. Type the passphrase for the cluster, and then provide a new IP address.
3. Click Change IP Address.
57IBM Proventia Network Mail Security System Administrator Guide, Version 1.6

Chapter 3: Clusters
58 IBM Internet Security Systems

Part II
Policy Configuration


Chapter 4
Policy Settings
Overview
Introduction This chapter explains the settings you use to configure a mail security policy in Proventia Manager.
Contents of a policy A mail security policy contains a set of rules that define how the appliance should inspect and control both incoming and outgoing email messages.
Process for creating a policy
You create a mail security policy by:
● Defining your users or groups of users in the organization
● Defining what type of action should take place once the appliance has identified a suspicious email message
● Creating rules that instruct the appliance on how to handle suspicious email messages
● Defining which analysis modules should be used to examine email messages
In this chapter This chapter contains the following topics:
Topic Page
Enabling Policy Rules for Processing Email Messages 62
Defining Valid Recipients of Email Messages (Who Objects) 66
LDAP Integration (Directory Objects) 68
Who Object Verification Tool 72
Running Policy Rules (When Objects) 73
Using Conditions for a Policy Rule 74
Applying Responses to Inspected Email Messages 75
61IBM Proventia Network Mail Security System Administrator Guide, Version 1.6

Chapter 4: Policy Settings
Enabling Policy Rules for Processing Email Messages
Introduction The appliance uses policy rules to inspect and filter each email message that passes through it.
Policy rules A policy rule is the central point of the mail security policy. You define how the appliance processes email messages by:
● Creating specific rules
● Adding senders, recipients, time ranges, analysis modules, and action responses to the rules
● Defining the action for each matching rule
Contents of a policy rule
A policy rule is a combination of the following four item:
How the appliance processes policy rules
The appliances uses a chain policy system by processing policy rules one by one from top to bottom and left to right (who, when, analysis modules) to determine matches.
Each policy rule displays information (below the policy rule name) on how the appliance should process the policy rule when it becomes a matching rule. The policy rule’s information defines the state of the conditions and determines whether the appliance should stop processing the policy rule based off the Action (Continue, Allow, or Block) in place for the rule.
The appliance processes the policy rule within the context of a single recipient. If an email message that is being analyzed has multiple recipients, the appliance will process the email message separately for each recipient.
When policy rules match
For every matching policy rule, all actions are collected by the appliance. If the Action is set to either Block or Allow, the appliance will stop processing that specific policy rule, and will apply all collected actions. If the Action is set to Allow, the appliance will deliver the email message to a particular recipient. However, if the Action is set to Block, the appliance will drop the email message (if it was not previously stored in an email queue).
Item Description
Who objects A Who object defines who or what group it represents, such as an email address, user name, or a group name from the domain.
When objects A When object defines when a policy rule is valid.
Analysis modules An analysis module defines what spam detection method the appliance will use to inspect the content of an email message.
Responses A response lets you decide what should happen to an email message after it has been analyzed by the appliance.
Table 12: Contents of a policy rule
62 IBM Internet Security Systems

Enabling Policy Rules for Processing Email Messages
Policy rule system The appliance uses the following steps for every active policy rule from the first rule to the last rule (top to bottom) until a rule matches and the specified Action is either Block or Allow, or the end of the rule chain is reached (in which case the default action is Allow):
Figure 14: Policy rule system workflow
63IBM Proventia Network Mail Security System Administrator Guide, Version 1.6

Chapter 4: Policy Settings
Preconfigured rules The appliance provides preconfigured rules that would commonly be used by an Administrator to analyze email messages that pass through the appliance.
Figure 15: Example of preconfigured policy rules
Procedure 1. In the navigation pane, click Mail Security, and then click Policy.
2. Click the Settings > Rules tab.
3. Right-click in the Rules column, and then select Add new empty rule.
4. Configure the following policy settings:
Settings Description
Pre Conditions The conditions or circumstances that are required for this policy rule to be evaluated.
The appliance will not evaluate this policy rule if the required condition is not set or if a condition is set, but the condition entry specifies NOT.
Reference: See “Using Conditions for a Policy Rule” on page 74 for more information about conditions.
Rule Name The name of the policy rule.
Comment A meaningful description of the policy rule.
Senders The Who objects an email sender is checked against.
Reference: See “Defining Valid Recipients of Email Messages (Who Objects)” on page 66 for more information about Who Objects.
Recipients The Who objects an email's recipient is checked against.
Reference: See “Defining Valid Recipients of Email Messages (Who Objects)” on page 66 for more information about Who Objects.
Whens The When objects defining the time the policy rule is valid.
Reference: See “Running Policy Rules (When Objects)” on page 73 for more information about When Objects.
64 IBM Internet Security Systems

Enabling Policy Rules for Processing Email Messages
5. Click Save Changes.
Analysis Modules The type of modules (executed on demand) that will inspect the content of an email message.
The appliance processes email messages as follows:
• Tries to recognize the file type using binary pattern matching
• Breaks each file or attachment down into its unique parts
• Uses the content analysis modules that are enabled for the rule to inspect each piece of content
• Collects all the data from the previous steps and builds up a detailed description of the email message that is being processed by the appliance
Reference: See “Spam Analysis Modules” on page 82 for more information about analysis modules.
Responses The type of responses that are to be taken against the email message.
Reference: See “Applying Responses to Inspected Email Messages” on page 75 for more information about responses.
Action The following actions are available:
• Continue
The Continue action permits an analyzed email message to continue to the next rule in the policy until it matches a Block or Allow action, or the end of the rule system (where it will then be allowed).
• Allow
The Allow action permits an analyzed email message that is deemed safe to be sent or received by its recipients, which ends the processing of the email message by the appliance.
• Block
The Block action blocks email messages, which ends the processing of the email message by the appliance. Blocked email messages are not delivered to recipients.
Reference: See “Policy rule system workflow” on page 63 for more information on how the appliance uses actions while it processes a policy rule.
Settings Description
65IBM Proventia Network Mail Security System Administrator Guide, Version 1.6

Chapter 4: Policy Settings
Defining Valid Recipients of Email Messages (Who Objects)
Introduction You use Who objects to define individual recipients in your internal or external network, including who or what group that object represents.
Who object contents
You can use an email address, user name, or a group name from the domain to define a Who object. The appliance accepts email addresses with wild cards or expressions like *@domain.com or *@*.org as email addresses.
You can also integrate your users list with a directory service (see “LDAP Integration (Directory Objects)” on page 68). You use this list to define your Who objects by populating the Senders and Recipients columns in the policy with valid users and user groups.
Who object priority A Who object follows a sequence of priority. If more than one rule in a certain configuration is invoked during an implementation, the appliance uses the following priority, with the first object being the highest priority:
Figure 16: Who object priority
Procedure 1. In the navigation pane, click Mail Security, and then click Policy Objects.
2. Click the Who tab, and then click Add.
3. Type a name and a comment for the Who object.
4. Select the type of Who object:
5. Click OK, and then click Save Changes.
Type Description
Email The object matches an email address or email pattern.
Directory The object matches a specific Directory object.
Group The object matches if the current SMTP address belongs to the following:
• A user contained within LDAP and NT4
• A group contained within only LDAP
• A group with only an LDAP specified group name in the Directory object
User The object matches if the current SMTP address belongs to a user with a specified user name in the Directory object.
Compound Who A list of Who objects of the same or different types. The Compound Who object matches if one of the Who objects contained in the Compound Who object matches.
66 IBM Internet Security Systems

Defining Valid Recipients of Email Messages (Who Objects)
Configuring an Unknown Who object
You can configure a rule in which email messages that have no valid recipients on the internal mail server are marked as unknown and immediately blocked on the SMTP layer.
1. In the navigation pane, click Mail Security, and then click Policy.
2. Click the Settings > Rules tab.
3. Right-click in the Rules column, and then select Add new empty rule.
4. Provide a name for the rule that indicates that it will be used for identifying users who do not exist in the organization.
5. Make sure you have integrated a Directory object that contains a valid list of SMTP addresses for your organization.
6. Add that Directory object to the Recipients list.
7. Right-click on the Directory object in the Recipients list, and then select Toggle Not.
The directory will now identify SMTP addresses that are not listed in the directory.
8. Click OK, and then click Save Changes.
67IBM Proventia Network Mail Security System Administrator Guide, Version 1.6

Chapter 4: Policy Settings
LDAP Integration (Directory Objects)
Introduction LDAP directory servers provide user and user/group information to the appliance. You can use the information from LDAP queries to map user names and groups to the Who object(s) you are defining for a policy.
Provide LDAP information
1. In the navigation pane, click Mail Security, and then click Policy Objects.
2. Click the Directories tab, and then click Add.
3. Select the Active box.
4. Set the values for the LDAP server:
Configure entry points and attribute entries
5. Optional: Enter the directory entry point for the LDAP search.
Example: DC=domain,DC=com (DC stands for Domain Component)
6. Determine the scope of the LDAP search, including what LDAP entries will be used during the search:
Value Description
Name The name and an optional comment for the LDAP server.
Cache Expiration The length of time to cache user credentials.
Default: 1440 minutes
Type The type of server.
Host name The host name or the IP address of the LDAP server.
Port The port on which the LDAP server will accept a connection.
Default: Port 389 for unencrypted and TLS-encrypted requests, and port 636 for SSL requests
User name The user name of the Administrator.
Password The password for the Administrator.
Mode Description
Basic (default mode) The appliance uses the entry configured at the OU (Directory Entry Point).
One Level The appliance uses only the entries located directly within the entry configured at the OU (Directory Entry Point).
Sub Tree The appliance uses the LDAP entry configured at the OU (Directory Entry Point) and all entries located somewhere below this entry.
68 IBM Internet Security Systems

LDAP Integration (Directory Objects)
7. Provide values for the attribute entries:
Provide a list of SMTP domains for the query
The appliance uses a list of SMTP domains during message processing and end-user login/authentication in order to determine whether to perform LDAP queries.
8. Click OK, and then click Save Changes.
Attribute Description
User and Group Indicates the attribute for Users and Groups:
• ObjectClass
This attribute controls which attributes are required and allowed in an entry. The values of this attribute determine the schema rules the entry must obey.
Name Attribute: The name of the LDAP attribute containing a user name or a group name.
• ObjectCategory
This attribute exists in every LDAP object within an Active Directory. This value uses the same method for determining objects just like the ObjectClass attribute, but with the following differences:
• This attribute only has one value.
• This attribute is usually indexed in the server’s underlying database.
Tip: Use ObjectCategory instead of ObjectClass to improve performance on large domains (more than 10,000 users) or on slow servers.
Name Attribute: The name of the LDAP attribute containing a user name or a group name.
Membership Select the method used for detecting all groups to which a particular user or group belongs:
• Member Object
Any user or group that contains information to which the group belongs.
• Group Object
Any group entry that contains information about the users and groups that belong to the group entry.
Membership Attribute: This is the attribute on the LDAP group object that contains the DNs (distinguished names) of the users or groups who are members of this group: for example, Member.
SMTP Addresses The name of the LDAP attribute containing the SMTP addresses.
If the list of SMTP domains is...
Then the appliance...
Empty Performs LDAP queries as needed
Not empty Searches the list for the domain part of an SMTP address
• If the domain part is in the list, LDAP queries are performed as needed.
• If the domain part is not in the list, no LDAP queries are performed and the SMTP address is treated like an unknown address.
69IBM Proventia Network Mail Security System Administrator Guide, Version 1.6

Chapter 4: Policy Settings
Setting up multiple LDAP servers
You can set up a primary and a secondary LDAP directory server to balance the workload for user/group information and SMTP address queries.
Sample scenario
Set up one LDAP directory server that contains only user/group information (no SMTP addresses), and then set up a second LDAP directory server that only contains SMTP information to test whether those SMTP addresses exist in the organization.
Option 1: Secondary LDAP server with user/group information
Set up a secondary LDAP server containing user/group information:
1. Select LDAP Server with 2nd server in the Type area.
2. Click the LDAP Server with User/Group Information tab.
3. Set the values for the secondary LDAP server. (See the procedure on page 68.)
4. Configure entry points and the scope of the LDAP search. (See the procedure on page 68.)
5. Provide values for the attribute entries. (See the procedure on page 68.)
Option 2: Secondary LDAP server with SMTP addresses
1. Click the LDAP Server with SMTP Addresses tab.
2. Click the LDAP Server tab.
3. Set the values for the LDAP server. (See the procedure on page 68.)
4. Configure entry points and the scope of the LDAP search. (See the procedure on page 68.)
5. Provide values for the attribute entries:
Attribute Description
SMTP Addresses Indicates the attribute containing the SMTP addresses:
• ObjectClass
This attribute controls which attributes are required and allowed in an entry. The values of this attribute determine the schema rules the entry must obey.
Name Attribute: The name of the LDAP attribute containing a user name or a group name.
• ObjectCategory
This attribute exists in every LDAP object within an Active Directory. This value uses the same method for determining objects just like the ObjectClass attribute, but with the following differences:
• This attribute only has one value.
• This attribute is usually indexed in the server’s underlying database.
Tip: Use ObjectCategory instead of ObjectClass to improve performance on large domains (more than 10,000 users) or on slow servers.
Name Attribute: The name of the LDAP attribute containing a user name or a group name.
70 IBM Internet Security Systems

LDAP Integration (Directory Objects)
6. Click OK, and then click Save Changes.
Synchronization Attribute The name of the LDAP attribute containing the user and/or group name of the matching entry on the LDAP Server with User/Group Information.
The matching entry is matched as follows: Any entry <A> at the User/Group LDAP server is considered to contain user/group information for an entry <B> at the SMTP Address LDAP server in one of the following cases: (You enter the Synchronization attribute in the Synchronization field.)
• Case 1: The Synchronization attribute exists at both entries and the attribute values are the same.
• Case 2: The Synchronization attribute exists only at entry <B> at the SMTP Address LDAP server and has the same value as the user/group name attribute of entry <A> at the User/Group LDAP server.
Attribute Description
71IBM Proventia Network Mail Security System Administrator Guide, Version 1.6

Chapter 4: Policy Settings
Who Object Verification Tool
Introduction Use the Who Object Verification tool to determine if you have configured Who objects correctly (such as LDAP-type Who objects) and to verify SMTP addresses against Who objects.
Procedure 1. In the navigation pane, click Mail Security, and then click Verify Who Objects.
2. Select All Who Objects or SMTP Address from the Verify drop-down list, and then click the Submit button.
The appliance displays the following information for each configured Who object:
Column Description
Who The name of the Who object as configured in Mail Security > Policy Objects (or the Mail Security Policy Objects page).
Status The status of the Who object, either active or inactive (shown in italics against a gray background).
The appliance does not use inactive Who objects when it processes the mail security policy for an email message.
Type The type of Who object.
Description A description of the Who object.
SMTP Match (use only for SMTP addresses)
Indicates whether or not the SMTP address matches for the given Who object.
Result The result from verifying the configuration of the Who object, either OK or a specific error message.
Note: Select underlined text or text displayed as a link to view a detailed description of the specific error.
72 IBM Internet Security Systems

Running Policy Rules (When Objects)
Running Policy Rules (When Objects)
Introduction You will need to define when a policy rule is valid.
An example of a When object would be to set up a rule to run against mail traffic during specific periods of time.
Procedure 1. In the navigation pane, click Mail Security, and then click Policy Objects.
2. Click the When tab, and then click Add.
3. Enable the Active box.
4. Type a name for the When object.
5. Click Add in the Timerange area.
6. Set the following values:
Example: This example instructs the appliance to process that rule against mail traffic every day starting with September 1, 2008 from 12:00 P.M. to 06:00 P.M.:
Start: 2008-09-01 12:00:00, Duration 6 hours, repeat every 1 day(s)
7. Click OK, and then click OK again to apply the settings.
8. Click Save Changes.
Value Description
Time Indicates a start time for the time range
Duration Indicates how long from the start time you want the time range to last
Repeat every Indicates how often you want the time range repeated
73IBM Proventia Network Mail Security System Administrator Guide, Version 1.6

Chapter 4: Policy Settings
Using Conditions for a Policy Rule
Introduction You can configure a condition (or a prerequisite) that states under what circumstances a policy rule should be applied to an incoming email message.
These conditions are evaluated and modified separately for every email message that is processed. A condition also allows you to dynamically turn specific rules in the policy on and off by assigning a condition to a rule and toggling it using a response.
Procedure 1. In the navigation pane, click Mail Security, and then click Policy Objects.
2. Click the Conditions tab, and then click Add.
3. Type a name and a comment or description for the condition.
4. Click OK, and then click Save Changes.
74 IBM Internet Security Systems

Applying Responses to Inspected Email Messages
Applying Responses to Inspected Email Messages
Introduction You can set up responses in the policy rules that determine what should happen to an email message after it has been inspected by the appliance.
Modify Field response
The Modify Field response modifies or adds a field to the email header.
Important: You should be careful when you modify the message field. Do not modify compulsory fields that might eventually corrupt or damage your message, causing it to be discarded instead of reaching its recipient.
1. In the navigation pane, click Mail Security, and then click Policy Objects.
2. Click the Responses tab, and then click Add.
3. Type a name for the response.
4. Select Modify Field from the Response drop-down list.
5. Enter the appropriate field from the Field drop-down list.
6. Enter the appropriate macro from the Value drop-down list.
7. Click OK, and then click Save Changes.
Store response The Store response sends the email message to a message storage directory. You can also choose whether to save the original or the current email message (an email message that has been modified by another policy rule).
1. In the navigation pane, click Mail Security, and then click Policy Objects.
2. Click the Responses tab, and then click Add.
3. Type a name for the response.
4. Select Store from the Response drop-down list.
5. Choose which folder you would like to store the detected message.
6. From the Messagetype to Store drop-down list, select what type of message should be stored.
7. Click OK, and then click Save Changes.
Add Disclaimer response
The Add Disclaimer response modifies the content or nature of an original message by adding a standard company disclaimer for every outgoing message.
1. In the navigation pane, click Mail Security, and then click Policy Objects.
2. Click the Responses tab, and then click Add.
3. Type a name for the response.
4. Select Add Disclaimer from the Response drop-down list.
5. Choose where you would like the disclaimer placed in the email message from the Position drop-down list.
6. Type or paste the disclaimer in either the HTML field or the Text field.
7. Click OK, and then click Save Changes.
75IBM Proventia Network Mail Security System Administrator Guide, Version 1.6

Chapter 4: Policy Settings
Add Attachment response
The Add Attachment response modifies the content or nature of an original message by adding an attachment to an outgoing message.
1. In the navigation pane, click Mail Security, and then click Policy Objects.
2. Click the Responses tab, and then click Add.
3. Type a name for the response.
4. Select Add Attachment from the Response drop-down list.
5. Choose whether you would like to attach the current message, the original message, or a file.
6. Click OK, and then click Save Changes.
Remove Attachment response
The Remove Attachment response analyzes attachments found in email messages. If the attachment matches the defined condition, the appliance will remove the attachment (or all attachments) from the original email message.
If you use this action to remove an uuencoded textblock and select the Matching attachments option, other uuencoded parts of the email message are recorded as attachments in the resulting email message.
1. In the navigation pane, click Mail Security, and then click Policy Objects.
2. Click the Responses tab, and then click Add.
3. Type a name for the response.
4. Select Remove Attachment from the Response drop-down list.
5. From the Type drop-down list, choose whether you would like remove all attachments or only previously matched attachments.
6. Click OK, and then click Save Changes.
Send To response The Send To response requests the application to reply to the sender of the analyzed email message or to somebody else such as the Administrator, with different options of message content manipulation. You can perform the following actions with this response:
● Create a new email message to the sender
● Add an attachment
● Attach the original message as an attachment
● Send a redefined warning email message to the original sender
Procedure
1. In the navigation pane, click Mail Security, and then click Policy Objects.
2. Click the Responses tab, and then click Add.
3. Type a name for the response.
4. Select Send To from the Response drop-down list.
76 IBM Internet Security Systems

Applying Responses to Inspected Email Messages
5. Provide the following information:
BCC response The BCC response sends a copy of the email message as BCC to the given recipient. You can modify the email message sent as the BCC with other responses. The BCC action applies to all email messages, whether they are allowed or blocked.
1. In the navigation pane, click Mail Security, and then click Policy Objects.
2. Click the Responses tab, and then click Add.
3. Type a name for the response.
4. Select BCC from the Response drop-down list.
5. List the response recipients using any of the following macros:
Redirect response The Redirect response sends the email message to the given recipient.
1. In the navigation pane, click Mail Security, and then click Policy Objects.
2. Click the Responses tab, and then click Add.
3. Type a name for the response.
4. Select Redirect from the Response drop-down list.
5. List the appropriate recipients using any of the following macros:
Field Description
From The name or address of the sender of the email message. The email message will identify itself as [email protected].
To The name of the designated recipient of the email message.
Subject The subject of the email message.
Body The content for the email message.
Attachment Indicates whether to add an attachment to the email message.
Macro Definition
$(SENDER) Specifies the sender address used for the original email message.
$(RECIPIENTS) A list of all the recipients of the original email message.
$(ALLOWEDRCPTS) A list of all the recipients that were allowed.
$(BLOCKEDRCPTS) A list of all the recipients that were blocked.
$(NEWMSGSENDER) Specifies the sender address used for newly created email messages.
$(POSTMASTER) Sends the detected email message to the original sender as [email protected] and informs the sender that the original email message has been quarantined.
Macro Definition
$(SENDER) Specifies the sender address used for the original email message.
77IBM Proventia Network Mail Security System Administrator Guide, Version 1.6

Chapter 4: Policy Settings
Log response The Log response writes to a plain text file (with replaced macros), but does not write to the database.
1. In the navigation pane, click Mail Security, and then click Policy Objects.
2. Click the Responses tab, and then click Add.
3. Type a name for the response.
4. Select Log from the Response drop-down list.
5. Enter the appropriate macros in the Log Line field.
6. In the Log to File field, determine what information to log to the file using the list of provided macros.
7. Click OK, and then click Save Changes.
Set/Clear Condition response
The Set/Clear Condition response allows you to activate a condition for a specific rule in the policy.
1. In the navigation pane, click Mail Security, and then click Policy Objects.
2. Click the Responses tab, and then click Add.
3. Type a name for the response.
4. Select Set/Clear Condition from the Response drop-down list.
5. From the Set/Clear drop-down list, choose whether to set or clear the response.
6. From the Condition drop-down list, choose which media type to detect.
7. Click OK, and then click Save Changes.
Relay Message response
The Relay Message response relays a specific email message to a specific host.
Example: To relay all email messages from the iss.net domain to a host at the 1.2.3.1 IP address:
1. Create a rule named To iss.net.
2. Use the corresponding Who object in the Recipients column.
3. Add the Relay Message response using the 1.2.3.1 IP address as the recipient address.
$(RECIPIENTS) A list of all the recipients of the original email message.
$(ALLOWEDRCPTS) A list of all the recipients that were allowed.
$(BLOCKEDRCPTS) A list of all the recipients that were blocked.
$(NEWMSGSENDER) Specifies the sender address used for newly created email messages.
$(POSTMASTER) Sends the detected email message to the original sender as [email protected] and informs the sender that the original email message has been quarantined.
Macro Definition
78 IBM Internet Security Systems

Applying Responses to Inspected Email Messages
Procedure
1. In the navigation pane, click Mail Security, and then click Policy Objects.
2. Click the Responses tab, and then click Add.
3. Type a name for the response.
4. Select Relay Message from the Response drop-down list.
5. Type the IP address or the name of the host who is to receive the relay message.
6. Click OK.
Require Encryption response
The Require Encryption response is used when an email message matching a specific policy rule must be delivered using Transport Layer Security (TLS).
Example: The following example shows how you would create a policy rule that uses the Require Encryption response:
If an email message is flagged to be delivered using TLS, but the SMTP counterpart does not support TLS, the system will try to resend the email message as configured for “normal” SMTP traffic by sending non-delivery reports to the sender. If the email message cannot be delivered via TLS, the system will not deliver the message.
1. In the navigation pane, click Mail Security, and then click Policy Objects.
2. Click the Responses tab, and then click Add.
3. Type a name for the response.
4. Select Require Encryption from the Response drop-down list.
5. Click OK.
If you want to... Create this rule...
Send email messages to a specific domain using encryption
From My Domains to this.specific.domain with a Require Encryption response
Require email messages that contain a Company Confidential disclaimer to be sent using encryption
From My Domains if the email message contains ‘Company Confidential’ with a Require Encryption response
79IBM Proventia Network Mail Security System Administrator Guide, Version 1.6

Chapter 4: Policy Settings
80 IBM Internet Security Systems

Chapter 5
Spam Settings
Overview
Introduction This chapter describes the spam analysis techniques used by the appliance.
In this chapter This chapter contains the following topics:
Topic Page
Spam Analysis Modules 82
Bayesian Filter 86
Spam Flow Control 90
Setting Up End-User Spam Management Accounts 91
81IBM Proventia Network Mail Security System Administrator Guide, Version 1.6

Chapter 5: Spam Settings
Spam Analysis Modules
Introduction The appliance uses a variety of spam analysis modules to inspect the content of an email message.
Reference: See the procedure on page 64 for the steps needed to enable a spam analysis module.
Spam Signature Database
The Spam Signature Database allows the appliance to break down every email message into several logical parts (sentences, paragraphs), and computes a unique 128-bit signature for each part. These signatures are subject to minor modifications in the email message, but are still accurate enough to uniquely identify a known spam with a couple of matching signatures in the filter database.
Spam URL Check The Spam URL Check compares data with URL entries found from the Internet. All relevant URLs that appear in spam email messages are stored in the filter database together with the stored spam signatures. A single Spam URL is enough to identify a spam email message.
Spam Heuristics The Spam Heuristics employs an internal scoring system with each heuristic receiving either positive or negative points, depending on whether the heuristic is designed to match spam or ham (normal email message). If the point count reaches a predetermined threshold, the email message is classified as spam.
For example, the following information is used for heuristic analysis:
● Message-ID field characteristics
● Received field invalid or missing
● Checks for “Apparently-To:” or “X-Apparently-To” fields
● Checks for mailing list fields
● Checks for multiple recipients and alphabetic recipient patterns like a@, b@, c@
● Checks for missing fields like “From” and “To”
Spam DNSBL Check The Spam DNS blacklist check uses DNSBL servers to determine if email messages have originated from possible spam sources. You can define multiple servers with relevant scores to generate more precise detection, which provides higher flexibility.
Spam Bayesian Classifier
The Bayesian classifier is a system that determines whether an email message is spam based on email statistics. To train the classifier, thousands of examples of spam and regular email messages are presented to the system and relevant data is extracted and stored in a statistical model. Through this training, the classifier is able to learn the difference between spam and regular email messages. IBM offers an updated, pre-trained Bayesian database that is trained using thousands of different spam types coming from the spam collectors and through end-user feedback.
You can fine tune the filter or train a completely new one by providing additional spam and ham samples to the filter.
82 IBM Internet Security Systems

Spam Analysis Modules
The advantage of the Bayesian classifier is the ability to recognize new types of spam, whereas the signature technology is better in detecting identical and nearly identical spam.
Spam Flow Check The Spam Flow Check analyzes mail flow within a specific time frame. If the same email message (based on a number of similarity measures) is received more than a threshold number of times within the time frame and has different sender domains, then the email message is a classified as spam.
This technology can detect completely unknown types of spam based on the way spam is typically created and sent.
Spam Structure Check
The Spam Structure Check examines the HTML structure of the email message and computes two signatures based on the structure. For example, some spam typically has a bold headline followed by one or more paragraphs in a different color, and then some random text at the bottom. Such layout structures are close to the actual text in the email message and are therefore an excellent addition to the textual spam signatures mentioned above.
The module computes structure signatures are for all known spam (coming from spam collectors and other sources) and stores the spam signatures and URLs in the filter database.
Spam Fingerprint Every email message computes a unique 128-bit signature. You can use the signatures in filter database to identify existing spams.
The appliance computes spam signatures for all known spams (from spam collectors and other sources) and stores the signatures in the filter database.
Spam Keyword The Spam Keyword covers standard keywords and patterns (regular expressions) that are typically found in spam email messages. IBM has extracted relevant keywords and patterns from known spam and weighted individual relevancy for additional spam protection.
Phishing Check Phishing email messages are a type of spam intended to retrieve personal information from potential victims. Typically, phishing email messages look as if they are coming from an individual’s bank or favorite shopping sites, but the intention is to steal that person’s account information, including passwords. In many cases, it is very difficult for the average end user to distinguish a real email message that was sent by their bank from a phishing email message.
For phishing detection, IBM combines a variety of methods. The URL checker is able to detect links to banking and other commercial sites in all spam coming from the spam collectors. Phishing email messages also show typical heuristics compared to regular spam, and are categorized separately from regular spam in the filter database.
Message Field Check
The Message Field Check allows you to scan for expressions within the message fields of the email message using regular expressions. You can use this feature to check for a word in the subject (for example) or to identify HTML email messages (check for the content type header field).
83IBM Proventia Network Mail Security System Administrator Guide, Version 1.6

Chapter 5: Spam Settings
Attachment Check The Attachment Check analyzes the number of attachments, the size of single attachments, or the complete size of all attachments. You can use this feature, for example, if you have bandwidth problems and want to delay the delivery of email messages with big attachments.
Keyword Search The Keyword Search module provides a regular expression search engine. This module allows you to generate your own categories that perform compliance checks.
Media Type The Media Type module is able to detect more than 120 different file types. You can use this, for example, to extract dangerous file types like executables.
URL Check The URL Check analyzes URLs in email messages using content from the filter database. The appliance provides more than 61 categories that allow you to block email messages with unwanted or dangerous links.
Language Check The Language Check module is used by the appliance when you are training the appliance to analyze email messages from different foreign languages. The appliance currently supports more than 40 different languages. It is possible to block or redirect email messages because they are written in a language the employee is not able to read.
User Sender Block List
Each user is able to maintain their own Sender block list. You can specify in detail which user is allowed to use this feature and in which position of the rule chain this check is performed.
User Sender Allow List
Each user is able to maintain their own Sender allow list. You can specify in detail which user is allowed to use this feature and in which position of the rule chain this check is performed.
Sender Policy Framework
Important: If you set the Received Header Type to Strict when you open port on the firewall to receive SMTP traffic, the analysis modules in the Sender Policy Framework will not work since these modules rely on information in the received header.
The Sender Policy Framework module evaluates an SPF record and produces one of the following results:
Result Description
None The domain does not publish SPF data.
Neutral The SPF client must proceed as if a domain did not publish SPF data. This result occurs if the domain explicitly specifies a "?" value, or if processing “falls off the end" of the SPF record.
Pass The message meets the publishing domain's definition of legitimacy. MTAs proceed to apply local policy and may accept or reject the message accordingly.
Fail The message does not meet a domain's definition of legitimacy. MTAs may reject the message using a permanent failure reply code, such as Code 550.
Table 13: Sender Policy Framework module results
84 IBM Internet Security Systems

Spam Analysis Modules
Virus Check The Virus Check module provides two modules that use antivirus software to detect viruses and handle infected email messages:
● Signature Pattern Detection
● Remote Malware Detection
You can choose between a pattern-based scanner such as Sophos (if you have installed a valid license) or the Remote Malware Detection scanner.
Compound The Compound module allows you to combine any of the analysis modules. You can assign different scores to the different modules and define a threshold.
Softfail The message does not meet a domain's strict definition of legitimacy, but the domain cannot confidently state that the message is a forgery. MTAs should accept the message but may subject it to a higher transaction cost, deeper scrutiny, or an unfavorable score. There are two error conditions, one temporary and one permanent.
Error Indicates an error during lookup; an MTA should reject the message using a transient failure code, such as 450.
Unknown Indicates incomplete processing: an MTA must proceed as if a domain did not publish SPF data. When SPF-aware SMTP receivers accept a message, they should prepend a Received-SPF header. SPF clients must use the algorithm described in this section or its functional equivalent. If an SPF client encounters a syntax error in an SPF record, it must terminate processing and return a result of unknown.
Result Description
Table 13: Sender Policy Framework module results (Continued)
85IBM Proventia Network Mail Security System Administrator Guide, Version 1.6

Chapter 5: Spam Settings
Bayesian Filter
Introduction The appliance uses Bayes’s Theorem (a simple mathematical formula) to calculate the probability that elements within an email message indicate that it is spam.
Tokens The elements in an email message are called tokens, and may include the following:
● Words
● Header elements, such as the sender’s name
● Embedded HTML and Javascript strings, such as fF0000, which is the HTML notation for the color bright red
● Special characters, such as dashes, apostrophes, and dollar signs, where they have been specifically included in the analysis as tokens
● The filter ignores any special characters that are not specifically included in the analysis.
About the Bayesian filter
The Bayesian filter uses a corpus (body) of good email messages (ham), and a corpus of spam email messages to determine how frequently each token appears in each corpus. This trains the filter to identify spam using the words and other tokens that routinely appear in your enterprise’s legitimate email stream. This improves the false positive rate, compared to filters that are not trained in your environment. This formula also reduces false positives by weighting the importance of tokens in the legitimate corpus.
The spam filter supports English, French, Italian, German, and Spanish.
Training the appliance
A database merge is when you add token sets from two databases to form a new database. The merge includes all tokens from both databases. If a token occurs in both databases, the merge combines the spam/ham counts for the token. The merge also combines some statistical information from both databases, for example the total number of ham and spam files contained in the respective training sets.
The Bayesian filter is pretrained with a small database by IBM. For the pretrained filter to be useful, you must also use your own custom-trained Bayes database. Since the Bayesian filter only counts words and compares them to the frequency in the training data, results depend on the training data you use. The final spam score is calculated from the word count and the ratio of their occurrence in the training data.
You can train the Bayes database with the following data:
1. Spam: “Your local bank does not want you to know this!!”2. Ham: “Reason for Escalation: CR 28377 has already been created for this”
If you send an email message with the content “Hello Peter, you know you have to go to the bank to get some cache today.”the Bayesian classifier counts the following words as:
“Hello - NOTHINGPeter - NOTHINGyou - SPAMknow - SPAMyou - SPAM
86 IBM Internet Security Systems

Bayesian Filter
have - NOTHINGto - SPAMgo - NOTHINGto - SPAMthe - NOTHINGbank - SPAMto - SPAMget - NOTHINGsome - NOTHINGcache - NOTHINGtoday - NOTHING”
Because of the small training set, the email message appears very spammy to the classifier, since it is not correctly trained.
Using foreign languages in training data
If you train the data using different foreign languages, make sure the ham and spam corpus contain the same proportion of foreign languages. For example, you write normal email messages in English, and you receive spam in Korean and German. If you train the foreign language spam email messages, you may inadvertently train the classifier to block Korean and German email messages, since you have no ham email messages of these languages in the training set.
Using a custom-trained classifier
A big advantage to using a custom-trained classifier is that it is trained for exactly the type of email messages you normally receive at work. For example, if you work at a hospital, the names of drugs are not counted as spammy words and so this prevents overblocking from simpler filters (like the predefined keyword lists), but for other companies, drugs that are advertised in spam email messages are considered spammy for the Bayesian classifier.
Token types The tokeniser uses regular expression matching to extract tokens from various parts of the email message. In addition, some meta tokens are also extracted that relate to the email message as a whole. Tokens are extracted from the following areas of an email message:
● Τhe plain text part of the email message, and the text content of the HTML part of the email message
● The “Subject” header field
● Τhe “Received” header fields
● The “From” header field
● All URLs found in the email message
● The HTML structure of the email message
Meta tokens are extracted from the following areas of an email message:
● Εxistence of “Message-ID” field in header
● Εxistence of “X-MsgInfo” field in header
● Εxistence of very small text in the HTML content
● Encoded format of “Message-ID” field in header
Token extraction Tokens are extracted on a per email message basis. If a token is found more than once in an email message, it counts only once in the analysis.
87IBM Proventia Network Mail Security System Administrator Guide, Version 1.6
Chapter 5: Spam Settings
The classifier uses different regular expressions to extract tokens from email text (including subject), header fields, and URLs. The expression for body text and subject allows all alpha-numeric characters (including “foreign” characters like Ã, Ï), with the optional character separators “.”, “,”, “’”, “-“. The monetary symbols “$”, “¥”, and “” are allowed before numbers (for example, $500,00), and a single “?”, “!”, or “%” is allowed at the end of a word. The following are examples of tokens from body and subject text: “$1.99”, “140%”, “only”, “only!”, “opt-in”.
Tokens from other header fields are restricted to plain alpha-numeric [a-zA-Z0-9] sequences that may contain the “.” character. For example, “213.165.64.20”, “pop.gmx.net”.
Tokens from URLs are either IP addresses or alpha-numeric [a-zA-Z0-9] sequences. Hostnames are split into their constituent parts, as the “.” character is not allowed between sequences. This behavior is designed for spam URLS that frequently contain random character sequences as host parts.
All tokens are case insensitive. “porn”, “PorN”, and “PORN” all equate to the same token. Tokens that consist of the numbers [0-9] are ignored if they are less than five characters in length.
Special tokens Tokens are not extracted from the “Message-ID” field directly, since this field contains random character sequences. Sequences of digits and alpha characters are first encoded up to and including the first “@” character, and the entire coded sequence is taken as a token. For example, the message id token “<dsdsd$sd$d@” has a high spam value in the default database, whereas the token “<sdsd.d@” has a high ham value.
The classifier obtains HTML structure tokens from the top-level structure definition created by the Spam Structure Analysis module.
The training program extracts tokens from email messages that lie in pre-sorted spam and ham directories. The email messages must be in a format compliant with [rfc822]1 or [rfc2045]2 (MIME format). Mailbox format is not supported. A mailbox file will, however, be recognized as a valid email message and parsed normally. If it contains more than one email message, the second and subsequent email messages are treated as text belonging to the first email message, and so header tokens in these email messages are treated incorrectly as plain text tokens. All email messages in mailbox files must be first extracted before being presented for database training.
Tokens are extracted from attachment data if the attachment is in plain text or HTML format, and are “inlined” in the email message. All other attachment data is ignored. UU-encoded data inside a text block is treated as an attachment, and is also ignored. If an email message contains email attachments, the entire email message is ignored.
[rfc822]1 and [rfc2045]2 compliant email messages are created and read by Microsoft Outlook Express. Other email clients, for example, Microsoft Outlook or Lotus Notes may create and read different email formats.
Procedure You can train the Bayesian classifier by providing a set of ham (good) email messages and spam (bad) email messages from your Message Stores.
1. In the navigation pane, click Mail Security, and then click Policy.
2. Click the Settings > Bayesian Classifier tab.
88 IBM Internet Security Systems

Bayesian Filter
3. Select the Enable Bayesian Classifier Learning box.
4. Select Include Default Database to use the Bayesian database provided by IBM as a basis for the training, in addition to the email messages provided in the ham store and the spam store.
5. If you do not include the default database, the database from the training will consist of information gathered from your ham store and spam store.
6. Choose one of your message storage directories to be used as the source for spam and another message storage directory to be used as the source for ham.
7. Do not select the same message storage directory for both ham and spam, or a message storage directory that contains mixed ham and spam messages. You may render the database ineffective.
8. Enable the training, and then choose a schedule.
9. Click Save Changes.
89IBM Proventia Network Mail Security System Administrator Guide, Version 1.6

Chapter 5: Spam Settings
Spam Flow Control
Introduction Spam Flow Control classifies an email message as spam if the count for a similarity measure over a given time period exceeds a predefined threshold.
How Spam Flow Control works
The Spam Flow Control module consists of a number of different email similarity measures. For a given email message, each similarity measure produces a unique signature. A sender address is stored with each signature, and a measure of how often this signature occurs with different sender addresses over a given time frame.
If, over a given time frame, the signature count exceeds a predetermined threshold, the signature is added to the shared database, and will be then available to all email accounts.
Procedure 1. In the navigation pane, click Mail Security, and then click Policy.
2. Click the Settings > Spam Settings tab.
3. Set the number of seconds the appliance should monitor the mail traffic for similar copies of this signature after an email message has been received.
4. Set the predefined threshold.
5. Click Save Changes.
90 IBM Internet Security Systems

Setting Up End-User Spam Management Accounts
Setting Up End-User Spam Management Accounts
Introduction You or another Administrator can set up access for end users who want to:
● Browse or access their quarantined or spam email messages
● Create and manage personal block and allow lists
● Generate a daily quarantine report of quarantined email messages
Procedure 1. In the navigation pane, click Mail Security, and then click Policy.
2. Click the User Access List tab.
3. Select Denied from the Default Access drop-down list.
4. In the Enduser Accessible URL field, type the IP address of the End-User Login/Authentication site followed by the port number 4443. Default: https://192.168.2.1:4443.
5. Select a Who object from the Who drop-down list.
6. Select the Granted access mode in the Access Type drop-down list.
7. Click OK, and then click Save Changes.
Creating a new account for an end user
You can use LDAP to manage the End-User Login/Authentication site where end users create and manage their personal block and allow lists. If you do not use LDAP, the end user must create an account on the End-User Login/Authentication page.
Example if used LDAP: In the User Access List, add a Directory Who object to the Allow List (Mail Security >Policy> User Access List). LDAP users will be able to log on with their SMTP address as their user name without having to create a new account on the End-User Login page.
Example if did not use LDAP: In the User Access List (Mail Security > Policy > User Access List), configure the mail security policy to allow all SMTP addresses *@iss.net. The end user [email protected] can create an account, however [email protected] will not be allowed to create an account.
Procedure for local users
1. Open a Web browser.
2. In the Address field, type the IP address of the End-User Login/Authentication site followed by the port number 4443. Example: https://192.168.2.1:4443
The Login page appears.
3. Click on the Create a New User link.
4. Type the email address of the end user you want to create an account for, and then click Create a New User.
91IBM Proventia Network Mail Security System Administrator Guide, Version 1.6

Chapter 5: Spam Settings
Managing end-user access lists
You can also perform the following additional administrative tasks on the End-User Management page:
1. In the navigation pane, click System, and then click Enduser Manager.
2. Choose an option:
If you want to... Then...
Search for an end user Type a user name in the Filter field, and then click Filter.
Delete an invalid block or allow list for a user
Select one or more end users, and then click Delete Blocklist or Delete Allowlist.
Delete an end user from managing a block or allow list
Select an end user in the list, and then click Delete User.
Reset an end-user's password
Select an end user, and then click Reset Password.
The new password is automatically sent by email message to that user.
92 IBM Internet Security Systems

Chapter 6
Message Queues
Overview
Introduction This chapter describes how the appliance stores and tracks email messages that pass through it.
In this chapter This chapter contains the following topics:
Topic Page
Setting Up Directories that Store Archived or Quarantined Email Messages 94
Searching for Email Messages in the Message Storage Directories 95
Running Queries to Locate Messages in a Message Storage Directory 96
Tracking Email Messages 97
Deleting Undelivered Email Messages and Log Files from the Appliance Database 98
93IBM Proventia Network Mail Security System Administrator Guide, Version 1.6

Chapter 6: Message Queues
Setting Up Directories that Store Archived or Quarantined Email Messages
Introduction Storage directories enable you to store email messages that you want to archive or quarantine.
Types of storage directories
The appliance provides two types of directories that you can use to store email messages:
Creating a storage directory
1. In the navigation pane, click Mail Security, and then click Policy Objects.
2. Click the Email Storages tab.
3. Click Add.
4. Select the type of message storage directory from the Store Type drop-down list.
5. Type a name for the message storage directory.
6. Click the General tab.
7. Set the number of days you would like to store the email messages in that storage directory.
8. Choose when and how the email messages will be delivered to their intended recipient.
9. Select a schedule to define when the appliance will deliver quarantine reports to the intended recipient.
10. Click the MetaData tab.
11. Use the macros that represent which part of the email message you want sent to the recipient of the quarantine report.
12. Click OK, and then click Save Changes.
Deleting email messages from a storage directory
You use the message log cleanup tool to delete unnecessary email messages in order to free up space in a storage directory.
1. In the navigation pane, click Mail Security, and then click Policy Objects.
2. Click the Email Storages tab.
3. Select the Enable box in the Message Log Cleanup area.
4. Set the number of days to keep the logs.
Tip: You should set this value to seven days.
5. Click Save Changes.
Message Storage Type Description
Message Store Stores blocked or delayed email messages, including email messages that are considered bad or problematic.
Quarantine Store Stores email messages that meet certain criteria defined by an Administrator, such as email messages that are infected by viruses or contain confidential data.
Table 14: Types of message storage directories
94 IBM Internet Security Systems

Searching for Email Messages in the Message Storage Directories
Searching for Email Messages in the Message Storage Directories
Introduction You can search for email messages that have been sent to a specific directory based off the policy rules enabled for inspecting that type of email message.
Procedures 1. In the navigation pane, click Mail Security, and then click Email Browser.
2. Choose an option:
If you want to... Then...
Search in a specific folder for an email message
1. Select Folders from the Search drop-down list.
2. In the Folder specific section, select a folder type.
3. Optional: Provide the name and the number of email messages in the folder you want to search for in the message storage.
Search for a specific email message
1. Select Mails from the Search drop-down list.
2. In the Mail specific section, provide the following filtering criteria:
• Message ID
The message identifier.
• Sender
The sender of the email message.
• Recipient
The recipient of the email message.
• Subject
The subject of the email message.
• Metadata
Information about the sender, recipient(s), creation date, and attachments. The types of metadata are dependent on how you have configured the MetaData field for the individual Message Store or Quarantine Store.
• Size
The size of the email message.
• Folder
The location of the email message in the stores.
• In Timerange
The range of time in which to search for the email message. Use the yyyy-mm-dd hh:mm:ss format: 2008-12-31 12:45:10.
3. Click the Search button.
95IBM Proventia Network Mail Security System Administrator Guide, Version 1.6

Chapter 6: Message Queues
Running Queries to Locate Messages in a Message Storage Directory
Introduction Use queries to search for blocked, delayed, or quarantined email messages that are being stored in a message storage directory.
Example of creating and saving a query
To search for email messages addressed to [email protected]:
1. In the navigation pane, click Mail Security, and then click Email Browser.
2. Select Mails from the Source drop-down list.
3. In the Mail Specific section, type [email protected] in the Sender field.
4. Click the Search button.
5. Click Save in the Filter active area.
6. Type the name of the query in the Name field, and then click Save.
7. The next time you want to search for email messages addressed to [email protected], go to Mail Security > Email Browser, select the query from the Favorite drop-down list, and then click Load Query.
Procedures 1. In the navigation pane, click Mail Security, and then click Email Browser.
2. In the Source section, select Favorites from the Search drop-down list.
3. Choose an option:
If you want to... Then...
Search for an often used query
1. In the Favorite specific section, select a query from the Favorite drop-down list.
2. Click the Load Query button to display the query.
Save a Search Favorites query
1. In the Favorite specific section, select a query that you would like to save.
2. Select Save in the Filter Active area.
3. Type a meaningful name for your query, and then click Save Query.
Delete a query from the Search Favorites list
1. In the Favorite specific section, select a query that you would like to delete.
2. Click Delete Query.
96 IBM Internet Security Systems

Tracking Email Messages
Tracking Email Messages
Introduction You can set up the appliance to track incoming email messages, beginning at the SMTP layer, until the messages are sent out or dropped.
Procedure 1. In the navigation pane, click Mail Security, and then click Policy.
2. Click the Message Tracking/Reporting tab.
3. Select one of the following options:
4. Click Save Changes.
Option Description
Disabled The appliance will not track email messages.
Standard The appliance tracks the following information about the email message:
• When it entered the system at the SMTP layer
• When it was processed by the mail security policy
• When it was sent out at the SMTP layer
This option is useful when you use Recipient Verification at the SMTP layer to track the following information about an email message:
• When and why the email message was rejected or dropped at the SMTP layer
• The flow of an email message through the system (such as which sending server accepted the email message)
• The delay between when the email message was accepted at the SMTP layer and analyzed
• Which SMTP server sent out the email message
Verbose (more details) The appliance uses the information it has gathered from the following sources:
• The Standard mode (see above)
• Logging information
• Analysis details
This option is useful if you need to contact Technical Support about an issue you are having with the appliance.
97IBM Proventia Network Mail Security System Administrator Guide, Version 1.6

Chapter 6: Message Queues
Deleting Undelivered Email Messages and Log Files from the Appliance Database
Introduction You can remove undelivered email messages and log files from the appliance that are not stored in a message storage directory or are older than the amount of time you specified for storage.
Note: These tasks run automatically in the background, and do not require user intervention.
Procedure 1. In the navigation pane, click SMTP, and then click Configuration.
2. Click the Maintenance tab.
3. Set the number of days to keep undelivered messages or log files in the database.
4. Click Save Changes.
98 IBM Internet Security Systems

Chapter 7
Reports
Overview
Introduction This chapter explains how to view and generate predefined reports from the appliance.
In this chapter This chapter contains the following topics:
Topic Page
Generating a Predefined Report 100
Scheduling When to Run Predefined Reports from the Appliance 101
Defining Recipients of a Quarantine Report 102
Customizing the Quarantine Report 103
99IBM Proventia Network Mail Security System Administrator Guide, Version 1.6

Chapter 7: Reports
Generating a Predefined Report
Introduction The appliance provides predefined reports that you can use to understand your mail security status. These reports allow you to monitor traffic flow within the appliance, identify the top senders and internal recipients of spam-based email messages, and fine-tune your policy settings.
Procedure 1. In the navigation pane, click Mail Security, and then click Reporting.
2. If applicable, provide the following values:
■ A data source
■ A start time for the report
■ An end time for the report
3. Select one of the following reports, and then click Generate:
4. Print the report.
Report Description
Executive Summary Displays the overall throughput of the appliance versus the email messages that where taken action on, as well as quarantined versus email messages released from quarantine.
Traffic Monitoring Provides information about network traffic over a given period of time.
Matched Rules Provides information about which policy rules matched over a given period of time.
Policy Configuration Provides information about the mail security policy currently in place.
Top 10 Responses Provides information about the top 10 responses that were executed by the mail security policy over a given period of time.
Top 10 Analysis Modules Provides information about the top 10 analysis modules that have matched Analysis modules enabled in the mail security policy.
Top 10 Recipients Provides information on the top 10 recipients by number of received email messages.
Top 10 Senders Provides information on the top 10 senders by number of email messages sent.
Top 10 Viruses Provides information on the top 10 viruses by number of infected email messages.
100 IBM Internet Security Systems

Scheduling When to Run Predefined Reports from the Appliance
Scheduling When to Run Predefined Reports from the Appliance
Introduction You can schedule when to generate a report from the appliance.
Procedure 1. In the navigation pane, click Mail Security, and then click Policy.
2. Click the Message Tracking/Reporting tab.
3. Select the Reporting Enabled box.
4. Set the number of days to keep the report on the filesystem.
5. Optional: Select Database Enabled to save the report to the appliance’s database.
6. Optional: Select SiteProtector Enabled to use graphical reports integrated in SiteProtector.
7. In the Configure Scheduled Reports section, click Add.
8. Select Cluster if the appliance is part of a cluster.
9. Select a report from the drop-down list.
10. In the To field, specify which email addresses should receive the report.
11. Select Enable, and then select a schedule.
12. Choose to schedule the report from either a relative or an absolute time range.
13. Click OK, and then click Apply Settings.
101IBM Proventia Network Mail Security System Administrator Guide, Version 1.6

Chapter 7: Reports
Defining Recipients of a Quarantine Report
Introduction You can specify which email addresses in a quarantine store should be included in the quarantine report.
Defining recipients of a quarantine report
A recipient’s email address is automatically added to the quarantine store if:
● The domain part of the SMTP address is found in one of the SMTP local domains.
● The domain part of the SMTP address is found in the semicolon separated list of additional domains defined in the tuning parameter msgstore.quarantine_domains.
You can also define the recipients of a quarantine report by enabling a setting in the Mail Security Policy page. Each email user, who is defined, receives a periodic report of email messages. They can then decide if they want the email message delivered to their mailbox.
Process for generating a quarantine report
You generate a quarantine report based on a customized template that uses various macros, and on which schedule is in use for the corresponding quarantine store. The appliance delivers the quarantine report directly by email message to any recipient with quarantined email messages.
102 IBM Internet Security Systems

Customizing the Quarantine Report
Customizing the Quarantine Report
Introduction You can define your own quarantine report by modifying the default template.
Line template The line template defines the display of blocked email messages and relevant information including the link to allow delivery. You can add customized messages or notifications to the template to provide information that is needed by email users.
Email message template
The email template must contain at least the $(DAILYLIST) macro, which is replaced with a list of blocked email messages. The line template text file defines each line of that list.
The following provides an example of the line template:
<tr>
<td width="20%">$(ENCODEHTML $(MSG.FROM))</td>
$(ENCODEHTML $(MSG.urn:schemas:httpmail:from))</td>
<td width="60%">
$(ENCODEHTML $(ORIGMSG.SUBJECT))</td>
<td width="20%">
<a href="http://$(HTTPADDRESS):4990/$(CMD.HTTP_DELIVER)">
Deliver</a><br>
<a href="mailto:$(SMTPADDRESS)?subject=$(CMD.DELIVER)">
Deliver by email</a></td>
</tr>
The example above is a mixture of HTML code and the template macros. This example displays a row in a table, and includes information such as Sender, Original Message Subject, and the respective delivery links. You can customize the formatting and usage of macros. You can also make a test email message to trigger the rule to test the output of the quarantine report.
In the template email message, you can only use a few macros that are not specific to a current email message, for example, $(RECIPIENTNAME). If the appliance contains information about the domain or LDAP user name, it will be replaced with the respective user name. Otherwise, the appliance displays the email address of the user.
Important: Do not use special characters such as umlauts when defining the folder names. The use of white may cause problems with email delivery through an http: link.
Procedure 1. In the navigation pane, click Mail Security, and then click Policy Objects.
2. Click the Quarantine Report Templates tab, and then click Add.
3. Type a name for the report.
103IBM Proventia Network Mail Security System Administrator Guide, Version 1.6

Chapter 7: Reports
4. Click the Email Template tab.
5. Click the arrow to the right of the Body tab to display a list of macros:
6. Enter the macro that you want to use for the template.
7. Click the Line Template tab.
8. Enter the macros you want to use for each line.
9. Click OK, and then click Save Changes.
Macro Description
$(TAB) The tabulator macro or \t.
$(CR) The new line macro or \n.
$(DATE) The current date.
$(DATE.DAY) The current day.
$(DATE.MONTH) The current month.
$(DATE.YEAR) The current year.
$(DATE.HOUR) The current hour.
$(DATE.MINUTE) The current minute.
$(HOSTNAME) The host name.
$(ADMINSERVERPORT) The port of the Administrator's server or port 4990.
$(ENDUSERSERVERPORT) The port of the end user server or port 4991.
$(MSGSTORE) The Message Store root directory.
$(LOGDIR) The Log file directory.
$(CONFIGDIR) The configuration directory.
$(ENV.<env>) The value of the environment variable <env>.
$(OPTION.<option>) The value of the tuning parameter <option>.
$(FILE.<filename>) The content of the file <filename>.
$(ENCODEHTML) Encodes the HTML tags in the macro text.
$(NEWMSGSENDER) The value of the Send New Email As configuration item (page 38).
$(POSTMASTER) Sends the detected message to the original sender as [email protected] and informs the sender that the original message has been quarantined.
$(DAILYLIST) This macro is replaced with a list of blocked email messages.
$RECIPIENTNAME) The SMTP address or directory user name of the recipient (if available).
$(RECIPIENT) The SMTP address of the recipient.
$(ENDUSERLINK) The value of the Enduser Accessible URL configuration item.
104 IBM Internet Security Systems

Part III
Maintenance


Chapter 8
Updates
Overview
Introduction This chapter explains how to download and install firmware, database, and security content updates for your appliance.
Attention: You should update your appliance as soon as possible after the initial setup to make sure you have the latest protection capabilities. Updates ensure that the appliance has the latest fixes, features, security content, and database updates.
In this chapter This chapter contains the following topics:
Topic Page
Updating the Appliance 108
Configuring Automatic Updates 109
Rolling Back Updates 112
Using Advanced Parameters for Update Settings 113
107IBM Proventia Network Mail Security System Administrator Guide, Version 1.6

Chapter 8: Updates
Updating the Appliance
Introduction You should always make sure your appliance is running the latest firmware, security content, and database updates. Your appliance retrieves updates from the Download Center, accessible over the Internet.
Types of updates you can install
You can install the following updates:
● Firmware updates
● Security content updates
Update packages and rollbacks
A rollback removes the last update that was installed on the appliance. You cannot roll back firmware updates.
Attention: You should perform a full system backup before you install a firmware update. If you enable automatic firmware updates, you can enable the Perform Full System Backup Before Installation option.
After an update is installed, the appliance deletes the update package and the downloaded package is no longer on your appliance. If you roll back the update, then the appliance finds the update available for download and installation the next time you find updates or at the next scheduled automatic update.
The SiteProtector system management
If you manage your appliance with the SiteProtector system, you can install an update while the appliance is registered with the SiteProtector system’s Agent Manager.
Creating a system backup
Attention: You should create a system backup prior to installing any firmware updates. To ensure that you have a system backup before each automatic firmware update installation, you can enable the Perform Full System Backup Before Installation option on the Automatic Update Settings page.
Troubleshooting download problems
If you experience problems in Proventia Manager after you apply a firmware update, try the following steps:
1. Close your Web browser.
2. Clear your Java cache.
3. Restart your Web browser, and log on to Proventia Manager.
Reference: For more information about how to clear your Java cache, refer to your operating system documentation.
108 IBM Internet Security Systems

Configuring Automatic Updates
Configuring Automatic Updates
Introduction You can configure the appliance to automatically check for firmware or database updates.
Specifying when to check for updates
1. In the navigation pane, click Updates, and then click Automatic Updates.
2. Click the Update Settings tab.
3. Select when the appliance should automatically check for updates:
Configuring automatic security updates
4. You can schedule the appliance to automatically confirm whether there are security updates available for install from the IBM Web site. To specify whether the appliance automatically downloads and installs security updates:
5. Select the Automatically Update Mail Security Database check box if you want to enable that feature.
6. Select the Automatically Download check box if you want to automatically download firmware updates.
7. Select the Perform Full System Backup Before Installation if you want to enable that feature.
This option is enabled by default. You should perform a full system backup before installing a firmware update. Your appliance stores only one system backup, so this option overwrites the previous system backup.
Specifying when to install firmware updates
8. You can schedule the appliance to install firmware updates when they are available from the IBM ISS Web site. To specify when to install firmware updates:
Option Description
Check for updates daily or weekly
Specifies the day of week and time of day
Note: Make sure that your appliance checks for updates at least one hour before automatic installations to ensure sufficient time for downloading updates.
Check for updates at given interval
Specifies an interval (in minutes)
Default: The range is 60 minutes to 1440 minutes (24 hours).
Option Description
Automatically Download Enables the appliance to download any applicable updates it finds
Automatically Install Enables the appliance to automatically install any downloaded updates
Option Description
Do Not Install Requires you to do all installations manually. This option gives you the most control over how an installation impacts your operation.
109IBM Proventia Network Mail Security System Administrator Guide, Version 1.6

Chapter 8: Updates
Automatically Install Updates Updates are installed automatically based on the When To Install choice you selected:
• Delayed: Designates the day of week and time of day the installations occur
• Immediate: Starts the installation as soon as the update is downloaded. This option gives you the least control and predictability of when an installation occurs.
Important: Installing an update can take the system offline while the installation is in progress.
Option Description
110 IBM Internet Security Systems

Scheduling a One-Time Firmware Installation
Scheduling a One-Time Firmware Installation
Introduction You can schedule the appliance to install specific firmware updates that are available for install from the IBM ISS Web site.
What are firmware updates?
A firmware update is an update from the Download Center that contains:
● New program files
● Fixes or patches
● Enhancements
● Online Help
Firmware updates can be automatically downloaded and installed. Some firmware updates require that you reboot your appliance after installation.
Procedure 1. In the navigation pane, click Updates, and then click Automatic Updates.
2. Click the Update Settings tab.
3. Select Schedule One-Time Install in the Firmware Updates section.
4. Select which version you want to install:
5. Click Save Changes.
If you want to install versions up to...
Then...
The most recent version Select All Available Updates.
A specific version number
Select Up To Specific Version, and then type the version.
Example: To install up to version 2.1, type the following in the Version field: 2.1
111IBM Proventia Network Mail Security System Administrator Guide, Version 1.6

Chapter 8: Updates
Rolling Back Updates
Introduction You can roll back updates that have already been applied to the appliance.
What is a rollback? A rollback removes the antispam or antivirus update that was installed on the appliance. You cannot roll back firmware updates or database updates.
Cumulative updates and rollbacks
Updates are cumulative. Refer to the following example for a description of the appliance behavior during a roll back of cumulative updates.
Example: If you install Security Content update version 1.1062 and then wait to install future updates until you install version 1.1065, the appliance is updated with all Security Content to version 1.1065. If you roll back the update, however, the rollback takes the appliance back to version 1.1062.
Update packages and rollbacks
After an update is installed, the appliance deletes the update package. Therefore, the downloaded package is no longer on your appliance. If you roll back the update, then the update will be found as available for download and installation the next time you find updates or at the next scheduled automatic update.
Procedure 1. In the navigation pane, click Updates, and then click Status & Licensing.
2. Select a security content section that contains outdated content.
3. Click Rollback Update.
112 IBM Internet Security Systems

Using Advanced Parameters for Update Settings
Using Advanced Parameters for Update Settings
Introduction You may need to use parameters to tune the update settings for the appliance.
Procedure 1. In the navigation pane, click Updates, and then click Status & Licensing.
2. If needed, review the Export Agreement, select Yes, and then click Submit.
3. Click the Advanced Parameters tab.
4. Do one of the following:
If you want to... Then...
Add a parameter 1. Click Add.
2. Type a parameter name.
3. Type a meaningful description.
4. Specify the value type and value.
5. Click OK.
Edit a parameter 1. Select a parameter, and then click Edit.
2. Edit the parameter, and then click OK.
Copy a parameter 1. Select a parameter, and then click Copy.
2. Click Paste.
3. Edit the parameter as needed, and then click OK.
Remove a parameter Select a parameter, and then click Remove.
113IBM Proventia Network Mail Security System Administrator Guide, Version 1.6

Chapter 8: Updates
114 IBM Internet Security Systems

Chapter 9
System Backups
Overview
Introduction This chapter explains how to back up the appliance’s configuration settings and system settings.
In this chapter This chapter contains the following topics:
Topic Page
Options for Backing Up the Appliance 116
Backing Up Configuration Settings 117
Making Full System Backups 118
Configuring an FTP Server for Data Backup 119
Scheduling Administrative Tasks from the Mail Security Policy 120
Backing Up the Appliance’s Log Files 121
Using System Tools 122
Reinstalling the Appliance 123
115IBM Proventia Network Mail Security System Administrator Guide, Version 1.6

Chapter 9: System Backups
Options for Backing Up the Appliance
Introduction Use the Backup & Restore page to create two types of backup files for your appliance:
If you restore before you make backup files
The default system backup for a new appliance contains the original installation. Therefore, if you restore a system backup or apply settings snapshot files before you create your own backup files, you are restoring the appliance to its installation defaults. The following consequences result:
● You lose the configuration settings you have already applied.
● If you restore from a system backup, you lose any updates you have applied.
● You cannot connect to the Proventia Manager until you reconfigure the appliance.
Important: Use this option to automatically back up your system before it installs updates to avoid having to reconfigure your appliance in case of an emergency.
Clearing the Java cache
After you restore the system from a backup file, be sure to do the following before you log back on to the Proventia Manager:
1. Close all browser windows.
2. Clear the Java cache.
Note: For information about how to clear your Java cache, refer to your operating system documentation. In Windows operating systems, it is typically available in the Control Panel, under Java.
Important: If you do not perform these steps, Proventia Manager may behave unpredictably.
Backup Type Description
Settings Backs up your appliance’s configuration settings. (See page 117.)
Full Backs up the operating system and the configuration settings of the appliance. (See page 118.)
Table 15: Types of backups
116 IBM Internet Security Systems

Backing Up Configuration Settings
Backing Up Configuration Settings
Introduction The process for updating your appliance is designed to keep your appliance up-to-date while taking the precautionary action of backing up your system before you install updates that alter original configuration settings.
Snapshot files Create a settings snapshot file of your appliance’s original configuration settings before you apply firmware updates or change your configuration settings.
You can also create additional settings snapshot files if you want to use different configuration settings or test new policy settings for the appliance.
Site certificate issues with Firefox 3.x
If you import and install a backup file that you have previously saved, you may receive a site certificate security warning when you first try to open Proventia Manager or access the End-User Login/Authentication site using the Firefox 3.x browser.
You will need to close your Firefox session after you import and install the backup, and then open a new session to delete the self-signed certificate. See “Deleting Self-Signed SSL Certificates in Firefox 3.x” on page 27 for more details.
Default settings file FactoryDefault.settings contains the original appliance settings.
Procedure 1. In the navigation pane, click Backup & Restore, and then click System.
2. Click Manage Configuration Backups.
3. In the Configuration Backups section, choose an option:
If you want to... Then...
Create a snapshot file 1. Click New.
2. Type a name for the snapshot file, and then click Create.
Restore a snapshot file Select the snapshot file you want to restore, and then click Restore.
Delete a snapshot file Select the snapshot file you want to delete, and then click Delete.
Upload a snapshot file 1. Click New.
2. Type the name of the snapshot file you want to upload, and then click Upload.
Download a snapshot file Select the snapshot file you want to download, and then click Download to copy the file to your local computer.
117IBM Proventia Network Mail Security System Administrator Guide, Version 1.6

Chapter 9: System Backups
Making Full System Backups
Introduction You should create a full system backup before you apply firmware updates and before you download and apply snapshot files that change the original configuration settings of the appliance.
Backup file restrictions
The following restrictions apply to creating full system backups:
● You can only have one system backup.
● Creating a system backup overwrites the previous backup.
● Creating a system backup takes the appliance offline and disrupts connectivity for several minutes.
Procedure 1. In the navigation pane, click Backup & Restore, and then click System.
2. Click Manage System Backup.
3. Choose an option:
Important: The IP address for the appliance is unavailable during the backup process, and you cannot access the Proventia Manager in the browser window.
If you want to... Then...
Create a full system backup
Click Create System Backup.
Restore a system backup Click Restore System Backup.
118 IBM Internet Security Systems

Configuring an FTP Server for Data Backup
Configuring an FTP Server for Data Backup
Introduction You can configure an FTP server to back up the appliance’s log files.
Procedure 1. In the navigation pane, click Mail Security, and then click Policy Objects.
2. Click the FTP Servers tab.
3. Click the Add icon.
4. Type the name, hostname, port number, root directory, and the user who has access to log on to the FTP server.
5. Confirm the password.
6. Click OK, and then click Save Changes.
119IBM Proventia Network Mail Security System Administrator Guide, Version 1.6

Chapter 9: System Backups
Scheduling Administrative Tasks from the Mail Security Policy
Introduction You can schedule the following tasks from the appliance:
● Back up mail security data
● Clean up the SMTP log
● Deliver quarantine reports to intended recipients
Procedure 1. In the navigation pane, click Mail Security, and then click Policy Objects.
2. Click the Schedules tab, and then click Add.
3. Type a name for the schedule.
Example: Enter Daily 7:00 to schedule the task to run every day at 7:00 A.M.
4. Configure the schedule times in the Timerange area.
Example: The time ranges display as YYYY-MM-DD and use a 24 hour clock. For example, 7:00 P.M. displays as 19:00.
5. Click OK.
120 IBM Internet Security Systems

Backing Up the Appliance’s Log Files
Backing Up the Appliance’s Log Files
Introduction You can back up log files to use for diagnosing issues with the appliance.
Procedure 1. In the navigation pane, click Backup & Restore, and then click Logfiles.
2. Select Enable Backup.
3. Schedule a time to back up the log files.
4. Choose where you would like to back up the files.
5. Click Save Changes.
121IBM Proventia Network Mail Security System Administrator Guide, Version 1.6

Chapter 9: System Backups
Using System Tools
Introduction The appliance provides tools that you use to perform basic system maintenance and diagnostic functions.
Procedure 1. In the navigation pane, click System, and then click Tools.
2. Choose an option:
If you want to... Then...
Reboot the appliance Click Reboot.
Shut down the appliance Click Shut Down.
After the appliance shuts down, you must press the power button on the appliance to manually restart it.
Ping a computer Type the IP address of the computer you want to test, and then click Submit.
Use the traceroute utility 1. Type the IP address you want to trace.
2. Select a protocol, and then click Submit.
Renew the DHCP lease Click Renew Lease.
Clear the DNS entries currently cached in memory
Click Clear Cache.
122 IBM Internet Security Systems

Reinstalling the Appliance
Reinstalling the Appliance
Introduction This topic describes the process and procedures for reinstalling the appliance.
Caution: Reinstalling the appliance firmware clears the appliance’s current configuration settings and all data stored on the appliance.
The Recovery CD The Recovery CD included in the appliance packaging contains the software that was installed on the appliance at the factory. You can reinstall the software from this CD on the appliance.
Important: Reinstalling the appliance means erasing all data from the system and returning it to its factory state. Only perform this procedure under the guidance of IBM ISS Technical Support.
Recovery process Use the following procedure to reinstall the firmware on your appliance:
1. Connect a computer monitor to the appliance.
2. Boot the Recovery CD.
3. At the prompt, type reinstall, and then press ENTER.
The installer reloads the operating system.
Note: When the reinstallation is complete, the appliance automatically reboots. Let the appliance complete the boot process without interruption.
4. When the appliance has rebooted, the unconfigured.appliance login prompt appears.
You can log in with the default user and password of admin/admin and configure the appliance using the Configuration Menu.
Results This process does the following:
● Overwrites software configuration changes you have made since you first installed the appliance.
● Restores the original, default login credentials for the username and password (admin/admin).
123IBM Proventia Network Mail Security System Administrator Guide, Version 1.6

Chapter 9: System Backups
124 IBM Internet Security Systems

Chapter 10
Alerts and Logs
Overview
Introduction This chapter describes the alert and log selections available from the appliance.
In this chapter This chapter contains the following topics:
Topic Page
Configuring Alert Logging for Email and SNMP Alerts 126
Managing System-Related Events 129
Enabling Alerts and Logging for Intrusion Prevention Settings 130
Viewing Log Files for the Appliance 133
Deleting Undelivered Email Messages and Log Files from the Appliance Database 134
Backing Up the Appliance’s Log Files 135
125IBM Proventia Network Mail Security System Administrator Guide, Version 1.6

Chapter 10: Alerts and Logs
Configuring Alert Logging for Email and SNMP Alerts
Introduction Alerts define the types of errors, warnings, or informational messages that should be included in an email notification or SNMP notification, in addition to the recipients of those alert messages.
Defining recipients of alert messages
You can enable the appliance to send alert messages to a designated email address or email group.
1. In the navigation pane, click System, and then click Email & SNMP Alerts.
2. Click the Alerts Recipients tab.
3. In the Email Configuration section, click Add.
4. Provide the following information:
5. Click OK, and then click Save Changes.
Configuring alert logging
You can enable the appliance to send alert messages that notify you of mail security or system-related events.
1. In the navigation pane, click System, and then click Email & SNMP Alerts.
2. Click the Alert Configuration tab.
3. Select any of the following alert logging check boxes to enable logging and notification for that type of event:
■ Alert Logging for Mail Security Events
■ Alert Logging for System Error Events
■ Alert Logging for System Warning Events
Option Description
Name A meaningful name for the email response entry.
SMTP Host The mail server (as a fully qualified domain name or IP address).
Note: The SMTP Host must be accessible to the appliance to send email notifications. Do not use the IP address or the hostname of the appliance.
To An individual recipient or email group.
Subject Format A list of message subject fields.
Body Format A list of message body fields.
Note: This field is blank by default. If you leave this field blank, the email response includes all available fields. You can also customize this content by typing your own text and embedding fields from the list. You should leave this field blank, so that the email response contains all relevant fields.
126 IBM Internet Security Systems

Configuring Alert Logging for Email and SNMP Alerts
■ Alert Logging for System Info Events
Note: If you enable the Send Alerts for System Info Events setting, and then reboot the appliance, you may receive the following message in the Message.log or as an SMTP or SNMP notification message:
Message: Critical entry point(ResponsesdkGetClassObject) of library...
This is expected behavior for this type of message and does not require user intervention.
Enabling SNMP notifications
You can enable an SNMP Get to retrieve a piece of appliance information, or enable an SNMP Trap to report when certain events about the appliance occur.
SNMP traps may be sent out for any of the following reasons:
● If a link goes up or down
● If the disk usage goes below 10%
● If authentication with SNMP Get fails
● If the average system load for each interval exceeds a certain threshold value
Procedure
1. In the navigation pane, click System, and then click Email & SNMP Alerts.
2. Click the Alert Configuration tab.
3. Click Configure SNMP.
4. Choose an option:
If you want to enable an...
Then...
SNMP Get 1. Select the SNMP Get Enabled box.
2. Provide the system name, the system location, contact information, and the appropriate community name.
3. Click Save Changes.
SNMP Trap 1. Select the SNMP Traps Enabled box.
2. Provide the following information:
• Trap Receiver
The IP address running the SNMP Manager. The SNMP host must be accessible to the appliance to send email notification.
• Trap Address
The appropriate community name (public or private).
• Trap Version
The following trap versions are available:
- V1: Simple Network Management Protocol version 1
- V2C: Community-Based Simple Network Management Protocol version 2
127IBM Proventia Network Mail Security System Administrator Guide, Version 1.6

Chapter 10: Alerts and Logs
Adding an event notification advanced parameter
You can add an event notification parameter to the appliance.
1. In the navigation pane, click System, and then click Email & SNMP Alerts.
2. Click the Advanced Parameters tab.
3. Click Add.
4. Type the name of the parameter, a meaningful description, and then specify the value type and value.
5. Click OK, and then click Save Changes.
128 IBM Internet Security Systems
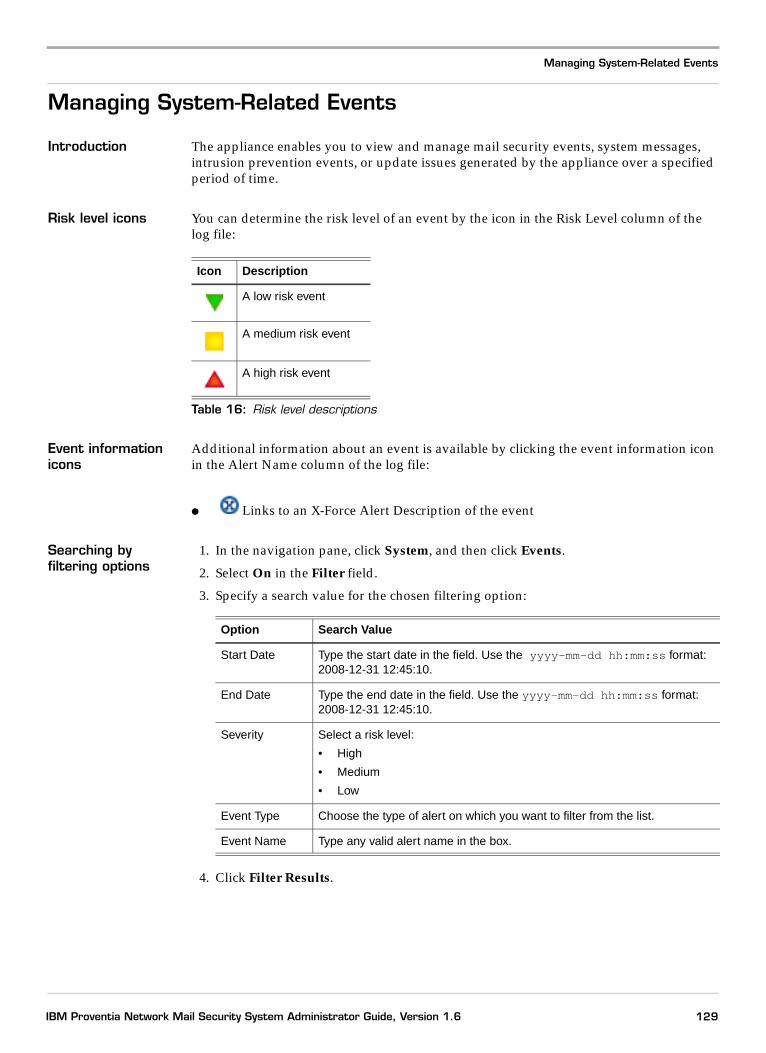
Managing System-Related Events
Managing System-Related Events
Introduction The appliance enables you to view and manage mail security events, system messages, intrusion prevention events, or update issues generated by the appliance over a specified period of time.
Risk level icons You can determine the risk level of an event by the icon in the Risk Level column of the log file:
Event information icons
Additional information about an event is available by clicking the event information icon in the Alert Name column of the log file:
● Links to an X-Force Alert Description of the event
Searching by filtering options
1. In the navigation pane, click System, and then click Events.
2. Select On in the Filter field.
3. Specify a search value for the chosen filtering option:
4. Click Filter Results.
Icon Description
A low risk event
A medium risk event
A high risk event
Table 16: Risk level descriptions
Option Search Value
Start Date Type the start date in the field. Use the yyyy-mm-dd hh:mm:ss format: 2008-12-31 12:45:10.
End Date Type the end date in the field. Use the yyyy-mm-dd hh:mm:ss format: 2008-12-31 12:45:10.
Severity Select a risk level:
• High
• Medium
• Low
Event Type Choose the type of alert on which you want to filter from the list.
Event Name Type any valid alert name in the box.
129IBM Proventia Network Mail Security System Administrator Guide, Version 1.6
Chapter 10: Alerts and Logs
Enabling Alerts and Logging for Intrusion Prevention Settings
Introduction Intrusion prevention settings monitor network traffic and block attacks. The settings seldom change. However, you may occasionally need to perform maintenance tasks to keep the appliance properly configured.
Intrusion Prevention events
The Intrusion Prevention feature takes the following actions:
● Detects and block attacks in progress
● Detects and blocks audits such as unauthorized port scans or network surveillance
● Alerts you by email message, by network message (SNMP traps), or in the IBM SiteProtector Console about attacks, audits, and blocking activity
● Logs attacks, audits, and blocking activity in the system log filters events
Guidelines If you expect a high volume of events, then you should carefully consider the type of alerts and logging you choose. A large number of alerts and log entries can require a significant amount of storage space and processing power.
Enabling alerts and logging for IPS events
1. In the navigation pane, click System, and then click IPS Configuration.
2. Click the Event Notification tab.
3. Select any of the following check boxes to enable alert logging for their category of events:
■ Alert Logging for Blocked Events
■ Alert Logging for Non-Blocked Attack Events
■ Alert Logging for Non-Blocked Audit Events
■ Non-Blocked Audit Event Notification Delivery
4. Select how the appliance notifies you of the event:
If you want to... Then...
Receive alerts by email message 1. Select Email Enabled.
2. Select the email account name from the Email Name drop-down list.
Configure another email account for email notification
Select Configure Email.
Tip: If you use email notification, leave the default setting for the attack.log_one_attack_every advanced parameter. The default setting is 100, which means that if 100 of the same type of event occur only 1 log event record will be written. Therefore, you will receive only one email notification, rather than 100.
Receive network alerts (SNMP traps)
Select SNMP Trap Enabled.
Configure SNMP Get or an SNMP Trap
Select Configure SNMP.
Receive Intrusion Prevention statistics
Select the Status Summary Enabled box.
130 IBM Internet Security Systems

Enabling Alerts and Logging for Intrusion Prevention Settings
5. Click Save Changes.
Enabling alerts and logging for general events
1. In the navigation pane, click System, and then click IPS Configuration.
2. Click the Event Notification tab.
3. Specify whether to receive alerts for the following settings in the Alert Logging for General Events section:
4. Click Save Changes.
Adding event filters Event filters control the events that the appliance generates. Set up event filters when you want the appliance to ignore events on specific hosts or traffic.
1. In the navigation pane, click System, and then click IPS Configuration.
2. Click the Event Notification tab.
3. Choose an option:
Event Result
Quarantine Rule Added Displays an alert if a quarantine rule is added
Quarantine Rule Removed
Displays an alert if a quarantine rule is removed
Quarantine Rule Expired Displays an alert if a quarantine rule has expired
Quarantine Rule Matched
Displays an alert if a quarantine rule matches
Invalid Checksum Drops packets that contain an invalid IP or TCP checksum
Invalid Protocol Drops packets that violate IP protocol
Resource Error Drops packets if there are insufficient resources to inspect the packet
Blocked TCP Connection Drops TCP packets that are not part of an existing connection
If you want to... Then...
Add an event filter 1. Click the Add icon.
2. Type a meaningful name in the Description field.
The description identifies the filter in events and responses.
3. Select Enabled to enable the event filter.
4. Select an issue from the Issue ID list.
5. Click OK, and then click Save Changes.
Add a rule to an event filter
1. Select an event filter entry, and then click Edit.
2. Select an issue from the Issue ID list.
3. In the Event Filter area, click Add.
4. To add other rules, repeat Steps 2 and 3.
5. Click OK, and then click Save Changes.
131IBM Proventia Network Mail Security System Administrator Guide, Version 1.6
Chapter 10: Alerts and Logs
Viewing the IPS issue list
You can view a list of intrusions encountered by the appliance. Intrusions can occur when a device attempts to exploit a vulnerability in your network or when a device attempts to scan your network for information that can be used in an attack at a later time.
1. In the navigation pane, click System, and then click IPS Protection List.
2. Choose an option:
Using IPS advanced parameters
The following advanced parameters are preconfigured for the appliance:
1. In the navigation pane, click System, and then click IPS Configuration.
2. Click the Advanced Parameters tab.
3. Click the Add icon.
4. Type the parameter name, a meaningful description, and then specify the value type and value.
5. Click OK, and then click Save Changes.
If you want to view... Then...
The list Select an issue in the list
A specific issue in the list 1. Select an issue in the list
2. Click Display.
3. Review the details about the issue.
4. Click OK.
Parameter Description
ipm.assume.valid.checksum Assumes all IP and TCP checksums are valid
ipm.drop.invalid.checksum Drops packets that contain an invalid IP or TCP checksum
ipm.drop.invalid.protocol Drops packets that violate IP protocol
ipm.drop.resource.error Drops packets if there are insufficient resources to inspect the packet
ipm.drop.rogue.tcp.packets Drops TCP packets that are not part of an existing connection
Table 17: Advanced parameters for Intrusion Prevention
132 IBM Internet Security Systems

Viewing Log Files for the Appliance
Viewing Log Files for the Appliance
Introduction You can view or download a log file from the appliance to your local machine if you need to troubleshoot an issue you are having with the appliance.
Procedure 1. In the navigation pane, click System, and then click Logfiles.
2. Choose a directory in the Browse Directories area.
3. Select the log file that you want to view.
4. Optional: Click the Download button to download the log file to a directory of your choice.
133IBM Proventia Network Mail Security System Administrator Guide, Version 1.6

Chapter 10: Alerts and Logs
Deleting Undelivered Email Messages and Log Files from the Appliance Database
Introduction You can remove undelivered email messages and log files from the appliance that are not stored in a message storage directory or are older than the amount of time specified for storage.
Note: These tasks run automatically in the background, and do not require user intervention.
Procedure 1. In the navigation pane, click SMTP, and then click Configuration.
2. Click the Maintenance tab.
3. Set the number of days to keep undelivered messages or log files in the database.
4. Click Save Changes.
134 IBM Internet Security Systems

Backing Up the Appliance’s Log Files
Backing Up the Appliance’s Log Files
Introduction You can back up log files to use for diagnosing issues with the appliance.
Procedure 1. In the navigation pane, click Backup & Restore, and then click Logfiles.
2. Select Enable Backup.
3. Schedule a time to back up the log files.
4. Choose where you would like to back up the files.
5. Click Save Changes.
135IBM Proventia Network Mail Security System Administrator Guide, Version 1.6

Chapter 10: Alerts and Logs
136 IBM Internet Security Systems

Appendixes


Appendix A
End-User Spam Management
Overview
Introduction This appendix provides procedures that enable an end user to set up and manage their personal block list or allow list.
In this appendix This appendix contains the following topics:
Topic Page
Browsing a Quarantine Store for Blocked Email Messages 140
Adding or Deleting Entries from a Personal Block or Allow List 141
Changing a Password on a Personal Block or Allow List Account 142
Requesting a Quarantine Report on Blocked Email Messages 143
139

Appendix A: End-User Spam Management
Browsing a Quarantine Store for Blocked Email Messages
Introduction The end user can browse through quarantined email messages to determine if an email message should be added to their personal block list or allow list, or completely removed from the quarantine store.
Procedure 1. Open a Web browser.
2. In the Address field, type the IP address of the End-User Login/Authentication site followed by the port number 4443. Example: https://192.168.2.1:4443
The Login page appears.
3. Type your email address, your password, and the directory/domain.
4. Click Login.
The Welcome page appears.
5. Click the Email Quarantine link.
The Quarantine Store page appears.
6. Mark the quarantined email messages you want to work with, and then do one of the following:
If you want to... Then...
Remove an email message from the store
Click Delete.
Deliver the blocked email message to your personal email address
Click Deliver.
140 IBM Internet Security Systems

Adding or Deleting Entries from a Personal Block or Allow List
Adding or Deleting Entries from a Personal Block or Allow List
Introduction The end user can add or delete email addresses and domains from their personal block or allow lists.
Procedure 1. Open a Web browser.
2. In the Address field, type the IP address of the End-User Login/Authentication site followed by the port number 4443. Example: https://192.168.2.1:4443
3. Type your email address, your password, and the directory/domain.
4. Click Login.
The Welcome page appears.
5. Click the Blocklist/Allowlist Management link.
The Blocklist/Allowlist page appears.
6. Choose an option:
If you want to... Then...
Add an entry to a block list
Switch to Blocklist mode, type the email addresses and domains in the field provided, and then click Add to Blocklist.
Add an entry to an allow list
Switch to Allowlist mode, type the email addresses and domains in the field provided, and then click Add to Allowlist.
Delete an entry from either list
Switch to Allowlist or Blocklist mode, select the entry, and then click on the Trash icon.
141

Appendix A: End-User Spam Management
Changing a Password on a Personal Block or Allow List Account
Introduction The end user can change the password that is used to access their personal block/allow list account.
Important: This functionality is only available if the end user is a local user. If the end user is part of a directory, the functionality does not appear in the user interface.
Procedure 1. Open a Web browser.
2. In the Address field, type the IP address of the End-User Login/Authentication site followed by the port number 4443. Example: https://192.168.2.1:4443
The Login page appears.
3. Type your email address, your password, and the directory/domain.
4. Click Login.
The Welcome page appears.
5. Click the Change Password link.
6. Type the new password, and then click Change Password.
142 IBM Internet Security Systems

Requesting a Quarantine Report on Blocked Email Messages
Requesting a Quarantine Report on Blocked Email Messages
Introduction The end user can request a daily report of email messages currently being quarantined for their email address.
Procedure 1. Open a Web browser.
2. In the Address field, type the IP address of the End-User Login/Authentication site followed by the port number 4443. Example: https://192.168.2.1:4443
The Login page appears.
3. Type your email address, your password, and the directory/domain.
4. Click Login.
The Welcome page appears.
5. Click the Quarantine Report link.
The report is sent to your personal email address.
143

Appendix A: End-User Spam Management
144 IBM Internet Security Systems

Appendix B
Advanced Parameters
Overview
Introduction Advanced Parameters can help diagnose, correct, or improve performance issues you might be experiencing with your network or environment.
Important: You should not change these parameters unless you are instructed by IBM ISS Technical Support personnel.
In this appendix This appendix contains the following topics:
Topic Page
Advanced Parameter Overview 146
General Advanced Parameters for the Appliance 147
Advanced Parameters for the SMTP Settings 148
Advanced Parameters for the Mail Security Policy 149
Advanced Parameters for LDAP Directory Servers 150
Advanced Parameters for the DNS Blacklist (DNSBL) Check 151
Advanced Parameters for the Message Storage Directories 152
Advanced Parameters for a Replication of a Cluster of Appliances 153
Advanced Parameters for End-User Access 154
145IBM Proventia Network Mail Security System Administrator Guide, Version 1.6

Appendix B: Advanced Parameters
Advanced Parameter Overview
Introduction Advanced parameters provide greater control over appliance behavior. Advanced parameters contain a name and value pair. Each name and value pair has a default value. You can change this value to meet your requirements. The value is one of the following:
● Boolean
● Number
● String
Note: The Proventia Manager displays only the most commonly-used advanced parameters for a feature. Other parameters might be available but not displayed.
Working with advanced parameters
1. In the navigation pane, click Mail Security, and then click Policy.
2. Click the Advanced Parameters tab.
3. Do one of the following:
If you want to... Then...
Add a parameter 1. Click Add.
2. Type a parameter name.
3. Type a meaningful description.
4. Specify the value type and value.
5. Click OK.
Edit a parameter 1. Select a parameter, and then click Edit.
2. Edit the parameter, and then click OK.
Copy a parameter 1. Select a parameter, and then click Copy.
2. Click Paste.
3. Edit the parameter as needed, and then click OK.
Remove a parameter Select a parameter, and then click Remove.
146 IBM Internet Security Systems

General Advanced Parameters for the Appliance
General Advanced Parameters for the Appliance
Introduction This topic describes general tuning parameters for the appliance.
Important: You should not change these parameters unless you are instructed by IBM ISS Technical Support.
List of parameters The following table describes the advanced tuning parameters for general appliance settings.
Parameter Description Default
log_level The log level to enable or disable the output of email messages.
The possible values range from 0 (no log output) to 4 (detailed log output).
0
recipient.nospam_learn The recipient email address for the nospam learn mail. [email protected]
recipient.spam_learn The recipient email address for the spam learn mail. [email protected]
sendmail.includetrackingdata If set to true, message tracking data is attached to email messages sent to nospam_learn and spam_learn.
true
display_mailbody.disable If set to true, the message store browser will not display the body of an email message.
false
Resource monitoring
operational.behaviour This value adjusts the thresholds for entering the memory and disk space warning levels at 1 and 2.
0 = The software can use less memory/disk space than normal until the warning levels are reached.
1 = Normal behavior.
2 = The software can use more memory/disk space than normal until the warning levels are reached.
3 = A special value for disabling resource monitoring. You should not use this value.
1
Filter database
dbupdates.maxbandwidth This value limits the bandwidth used during database updates to the given value in KB per second.
A value of 0 does not limit the bandwidth used.
0 (KB per second)
dbupdates.weblearn This value enables the upload of unknown URLs to the Download Server.
false
Table 18: General advanced parameters for the appliance
147IBM Proventia Network Mail Security System Administrator Guide, Version 1.6

Appendix B: Advanced Parameters
Advanced Parameters for the SMTP Settings
Introduction This topic describes SMTP tuning parameters for the appliance.
Important: You should not change these parameters unless you are instructed by IBM ISS Technical Support.
List of parameters The following table describes the advanced tuning parameters for the SMTP settings.
Parameter Description Default
smtp.command_delay This value specifies the delay on each SMTP command. 0 (in milliseconds)
smtp.passthrough If set to true, email messages are not analyzed, but forwarded to the next SMTP relay.
false
xmail.smtp.threads The number of threads used for receiving email messages. 256
smtp.check_helo_domain This value enables the HELO domain check according to RFC2821 4.1.2.
0
smtp.check_return_path This value enables the return path (MAIL FROM) check according to RFC2821 4.1.2.
0
smtp.check_forward_path This value enables the forward path (MAIL FROM) check according to RFC2821 4.1.2.
0
smtp.throttle.unchecked_max_count The maximum calculated value of the fill level for the unchecked queue.
Important: You should not change this value unless it is absolutely necessary.
10000 / 5000
smtp.ipc.send_timeout This value specifies the timeout value of IPC sends to the mailsec daemon.
50000 (in milliseconds)
Table 19: Advanced parameters for the SMTP settings
148 IBM Internet Security Systems

Advanced Parameters for the Mail Security Policy
Advanced Parameters for the Mail Security Policy
Introduction This topic describes policy tuning parameters for the appliance.
Important: You should not change these parameters unless you are instructed by IBM ISS Technical Support.
List of parameters The following table describes the advanced tuning parameters for the mail security policy.
Parameter Description Default
mailthreads.unchecked The number of email processing threads. 8 (hardware)
4 (VMware)
cal.analysis.timeout The amount of time in which an analysis by the Content Analysis Library (CAL) is aborted and the application is restarted.
600 (in seconds)
maillog.append_xml_on_error.enable Enables or disables the appending of the XML results to the error message generated for a Content Analysis Library (CAL) analysis error.
false
host_reputation.spam_perc_unquarantined When a host is quarantined and the quarantine delay has exceeded its limit, it will be tracked as a non-spammer host. In this case, an initial value is used for this IP address. Set this value ranging from 0 to 99%. Higher values will requarantine hosts faster, a value of 0 rates the host as a new host.
0
smtp.command_delay The number of seconds XMail waits before handling an SMTP command.
This value is used when disk or memory shortage is at level 1 or on an unchecked queue overflow.
2
quarantine.deletemsgonrelease.enable If set to true, the appliance deletes the email message from the quarantine store after it has been released.
false
policy.throttle.delayMS Defines the delay value, the policy processing should use for a given fill level of the DBWriter Queue (in ms).
(percent is 0,25,50,60,70,80,85,90,95,100)
0,100,200,400,650,1000,2000,4000,10000,60000
dbwriter.max_sqllines_chunk The maximum count of SQL statements per chunk. 100
dbwriter.ta_max_count The maximum amount of transactions in the queue (used for calculating the fill level).
3600
dbwriter.throttle.normal.delayMS The delay to be used if the DBWriter Queue is running under normal conditions.
0
dbwriter.throttle.warn.delayMS The delay to be used when the DBWriter Queue is in a warn state.
10000
dbwriter.throttle.error.delayMS The delay to be used when the DBWriter Queue is in an error state.
60000
Table 20: Advanced parameters for the mail security policy
149IBM Proventia Network Mail Security System Administrator Guide, Version 1.6
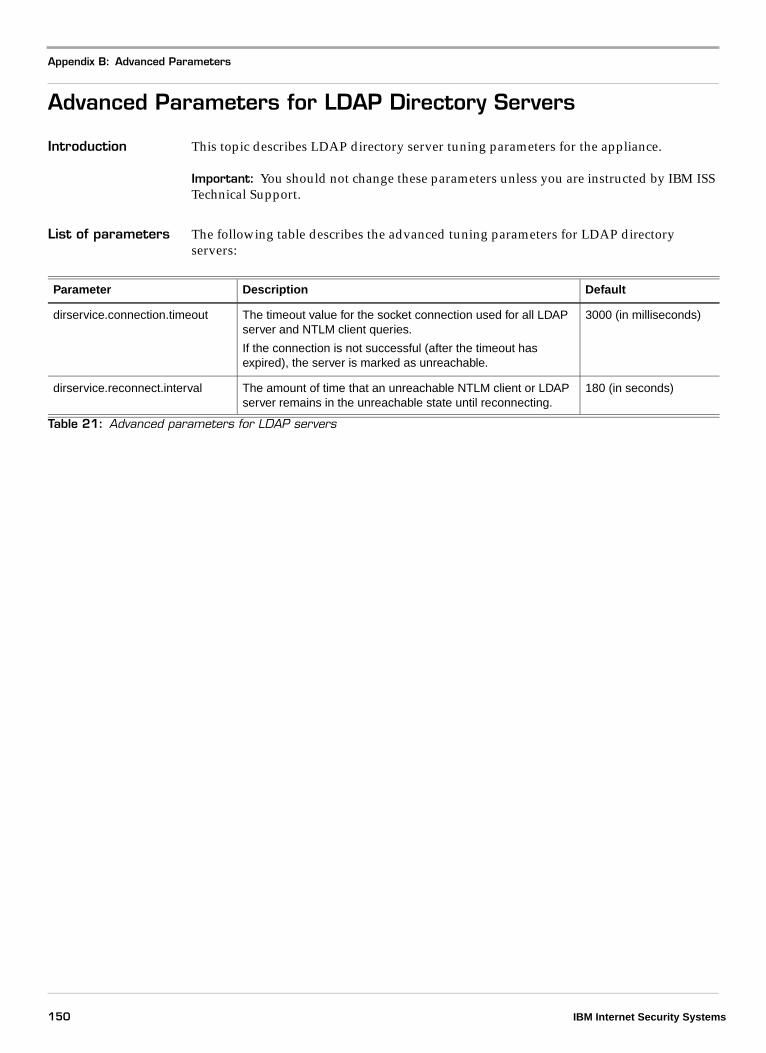
Appendix B: Advanced Parameters
Advanced Parameters for LDAP Directory Servers
Introduction This topic describes LDAP directory server tuning parameters for the appliance.
Important: You should not change these parameters unless you are instructed by IBM ISS Technical Support.
List of parameters The following table describes the advanced tuning parameters for LDAP directory servers:
Parameter Description Default
dirservice.connection.timeout The timeout value for the socket connection used for all LDAP server and NTLM client queries.
If the connection is not successful (after the timeout has expired), the server is marked as unreachable.
3000 (in milliseconds)
dirservice.reconnect.interval The amount of time that an unreachable NTLM client or LDAP server remains in the unreachable state until reconnecting.
180 (in seconds)
Table 21: Advanced parameters for LDAP servers
150 IBM Internet Security Systems

Advanced Parameters for the DNS Blacklist (DNSBL) Check
Advanced Parameters for the DNS Blacklist (DNSBL) Check
Introduction This topic describes the DNS blacklist tuning parameters for the appliance.
Important: You should not change these parameters unless you are instructed by IBM ISS Technical Support.
List of parameters The following table describes the advanced tuning parameters for the DNS blacklist check.
Parameter Description Default
dnsblthreads.count The minimum amount of DNSBL threads used for the DNSBL check.
If needed, the check dynamically allocates threads up to the value of the maximum amount.
20 (hardware)
10 (VMware)
host_reputation.border_ips A semicolon separated list of DNSBL border IP addresses.
Table 22: Advanced parameters for the DNSBL check
151IBM Proventia Network Mail Security System Administrator Guide, Version 1.6

Appendix B: Advanced Parameters
Advanced Parameters for the Message Storage Directories
Introduction This topic describes message storage directory tuning parameters for the appliance.
Important: You should not change these parameters unless you are instructed by IBM ISS Technical Support.
List of parameters The following table describes the advanced tuning parameters for the message storage directories.
Parameter Description Default
msgstore.release.tag.subject.disable If set to false, email messages are tagged when they are released from a quarantine store.
Reference: See msgstore.release.tag.subject.string below.
false
msgstore.release.tag.subject.string This string is added at the beginning of the subject of an email message when the email message is released from a quarantine folder.
Reference: See msgstore.release.tag.subject.disable above.
[Release from Quarantine Store]
nospam.send.to.recipients If set to true, an email message that has been sent to nospam.iss.net will be sent to the original recipient(s) as well.
false
quarantinereport.maxlines The maximum number of email messages reported in one quarantine report.
250
msgstore.quarantine_domains A semicolon separated list of SMTP domains for which a quarantine is allowed (in addition to SMTP local domains).
Table 23: Advanced parameters for the message storages
152 IBM Internet Security Systems

Advanced Parameters for a Replication of a Cluster of Appliances
Advanced Parameters for a Replication of a Cluster of Appliances
Introduction This topic describes cluster replication tuning parameters for the appliance.
Important: You should not change these parameters unless you are instructed by IBM ISS Technical Support.
List of parameters The following table describes the advanced tuning parameters for the replication of a cluster of appliances.
Parameter Description Default
replication.alerting.warn.perc A warning alert is generated if the replication rating exceeds this value.
90
replication.alerting.warn.duration A warning state is applied if the fill level exceeds the warn.perc value for more than given period of time.
30*60 (30 minutes)
replication.alerting.error.perc An error alert is generated if the replication rating exceeds this value.
200
replication.alerting.error.duration An error state is applied if the fill level exceeds the error.perc value for more than given period of time.
60*60 (1 hour)
replication.alerting.critical.perc If the replication rating exceeds this value, the cluster host is forcibly removed from the cluster to avoid overflowing the size of the database.
400
replication.alerting.critical.duration A critical state is applied if the fill level exceeds the critical.perc value for more than given period of time.
24*60*60 (1 day)
Table 24: Advanced parameters for a replication of a cluster of appliances
153IBM Proventia Network Mail Security System Administrator Guide, Version 1.6
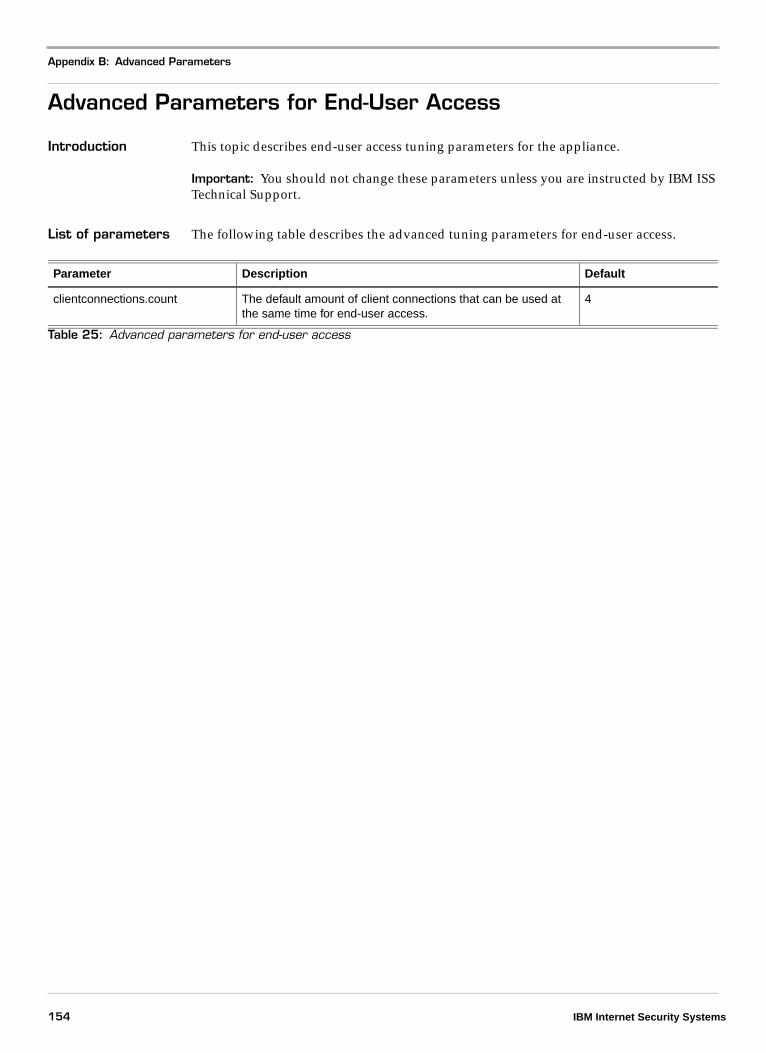
Appendix B: Advanced Parameters
Advanced Parameters for End-User Access
Introduction This topic describes end-user access tuning parameters for the appliance.
Important: You should not change these parameters unless you are instructed by IBM ISS Technical Support.
List of parameters The following table describes the advanced tuning parameters for end-user access.
Parameter Description Default
clientconnections.count The default amount of client connections that can be used at the same time for end-user access.
4
Table 25: Advanced parameters for end-user access
154 IBM Internet Security Systems

Appendix C
IBM SiteProtector System Integration
Overview
Introduction This appendix explains how to set up the appliance to work with the SiteProtector system.
In this appendix This appendix contains the following topics:
Topic Page
The SiteProtector System Overview 156
Integrating the Appliance with the SiteProtector System 158
155

Appendix C: IBM SiteProtector System Integration
The SiteProtector System Overview
Introduction The SiteProtector system is a centralized management system that provides command, control, and monitoring capabilities over all of your IBM ISS products, including the appliance.
Architecture The SiteProtector system consists of the following:
● Components—The SiteProtector system components provide the core SiteProtector system functionality and use specific channels to communicate with each other and other IBM ISS products such as the appliance. For a complete list of the components and ports, see the IBM SiteProtector System Installation Guide Version 2.0, Service Pack 7.0.
● Additional Modules—These provide added SiteProtector system functionality.
● Agents—These are IBM ISS products that work with the SiteProtector system to detect and prevent security events; the appliance is considered an agent in the IBM SiteProtector Console.
Components that work with the appliance
The SiteProtector system consists of different components, each with a very specific function in the SiteProtector system. The following table describes some of the SiteProtector system components that work with the appliance:
Component Description
Agent Manger
The Agent Manager provides you with the ability to configure, update, and manage the appliance in the SiteProtector system. It also provides management for the alternate update server for the appliance called the IBM SiteProtector X-Press Update Server.
As the appliance generates security data, the Agent Manager facilitates the data processing required for you to view the data in the IBM SiteProtector Console.
The appliance sends a heartbeat signal to its Agent Manager on a routine basis to indicate that it is active and to receive policies and updates from the Agent Manager. The amount of time between heartbeats is user-defined.
Central responses
Central responses are alerts, log entries, and responses from the SiteProtector system. For example, when a security event enters the SiteProtector system from the appliance, the SiteProtector system can alert you by email message, by network message (SNMP trap), or in the IBM SiteProtector Console. You can also log the events to a central location in the SiteProtector system for analysis and monitoring. You can request alerts about changes in the appliance’s status.
Console The Console is the interface where you perform all the SiteProtector system tasks, including the following:
• Configure and manage the appliance(s)
• Create and manage security policies
• Enable alerts and logging
• Set up users and user permissions
• Monitor security events and vulnerabilities on your network
• Generate reports
Table 26: The SiteProtector system component descriptions
156 IBM Internet Security Systems

The SiteProtector System Overview
Site Database
The Site Database stores the following information:
• Security data generated by your IBM ISS products
• Statistics for security events
• The update status of all products
• The SiteProtector system user accounts and permissions
X-Press Update Server
The X-Press Update Server is the primary tool for updating the SiteProtector system and the other IBM ISS products that are set up to work with it. The X-Press Update Server does the following:
• Connects to the IBM ISS Download Center
• Downloads firmware and security content updates for the appliance
• Applies firmware and security content updates for the appliance
Important: The X-Press Update Server does not download or apply database updates for the appliance. The appliance must have Internet access to download and apply database updates.
Component Description
Table 26: The SiteProtector system component descriptions (Continued)
157

Appendix C: IBM SiteProtector System Integration
Integrating the Appliance with the SiteProtector System
Introduction You can integrate the appliance with the SiteProtector system.
Related documentation
For information about how to install, configure, and update the SiteProtector system, including information about how to configure and apply policies in the SiteProtector system, see the SiteProtector documentation on the IBM ISS Documentation Web site at http://www.iss.net/support/documentation/.
Before you begin Before you register the appliance with the SiteProtector system, you complete the following tasks:
● Install, configure, and update the SiteProtector system.
● Set up a license for the appliance in the IBM SiteProtector Console. This license is required for the appliance to receive updates from the SiteProtector system.
● Verify that you are running IBM SiteProtector 2.0, Service Pack 7.0.
● Create a group in the IBM SiteProtector Console for the appliance and define the group settings. The group can only contain appliances of the same type.
● Verify the name of the SiteProtector system group to which you want to assign the appliance.
● Verify the IP address and port for each SiteProtector system Agent Manager that will communicate with the appliance. To verify this information, go to the IBM SiteProtector Console and view the properties for the Agent Manager on the Agent View.
● Verify the IP address of the appliance’s primary management interface. This interface is user-defined when you configure the appliance interfaces. To verify the information, go to System > SiteProtector.
● Update the appliance to the latest firmware.
Procedure To configure the SiteProtector system management of your appliance:
1. In the navigation pane, click System > SiteProtector.
2. Select Register with SiteProtector.
3. Do one of the following:
If you want the appliance to...
Then...
Keep its own configuration settings and policies
Select the Local Settings Override SiteProtector Group Settings option.
You should use this option if you have not defined settings for the appliance in the SiteProtector system, and it prevents the appliance from inheriting the default policies included with the SiteProtector system.
Obtain its configuration settings and policies from the SiteProtector system
Clear the Local Settings Override SiteProtector Group Settings option.
You should use this option if you have defined all appliance settings and policies in the SiteProtector system.
158 IBM Internet Security Systems

Integrating the Appliance with the SiteProtector System
4. Complete the following:
5. In the SiteProtector Management Level section, select the level of the SiteProtector system management you want:
6. In the Agent Manager Configuration section, click the Add icon, set up the Agent Manager, and then save the changes:
Option Description
Desired SiteProtector Group for Appliance
The IBM SiteProtector Console organizes network devices into groups for management and configuration purposes. Type the name of the group where you want to register the appliance.
Important: You should create the group in the SiteProtector system before you register the appliance. Otherwise, the SiteProtector system creates the group for you when you register the appliance.
Heartbeat Interval The appliance sends periodic signals to the SiteProtector system to initiate a communication session with the SiteProtector system. Type the number of seconds between these signals.
Allowed Values= 60 to 86,400 seconds
Level Description
Policy Control and Events
Select this option if you want to manage the appliance in the IBM SiteProtector Console.
Events Only Select this option if you want to manage the appliance in Proventia Manager and only send alerts to the IBM SiteProtector Console.
Note: The appliance still registers with the SiteProtector system regardless of this setting. The appliance appears as an agent in the group you specified, and its status appears as Unmanaged.
Option Description
Authentication level Set the trust level between the appliance and the Agent Manager:
• Trust-all—The appliance always trusts connections from the Agent Manager without using the SiteProtector system’s digital certificate.
• First-time Trust—The appliance trusts the first connection with the Agent Manager without using the SiteProtector system’s certificate. During this first connection, the appliance automatically copies the required certificate from the SiteProtector system to the following location on the appliance: /cache/spool/crm/cacerts directory
From this point forward, the appliance uses the certificate to authenticate all future connections with the Agent Manager.
• Explicit Trust—You must do the following:
• Manually copy the SiteProtector system’s certificate to the following location on the appliance: cache/spool/crm/cacerts directory
• Perform the additional setup tasks as described in the knowledgebase article number 2202 located at the IBM ISS Support Web site:http://www.iss.net/support/knowledgebase/
159

Appendix C: IBM SiteProtector System Integration
Agent Manager Name, Address, and Port
Type the name of the Agent Manager, its IP address, and the port used for communicating with it.
Default Port= 3995
Account Name Optional: Type the account name and password that the appliance must use to access the Agent Manager.
Use Proxy Settings Select this option if the appliance must go through a proxy server to access the Agent Manager, and then type the IP address and port of the proxy server.
Option Description
160 IBM Internet Security Systems

Appendix D
Safety, Environmental, and Electronic Emissions Notices
Overview
Introduction Safety notices may be printed throughout this guide. DANGER notices warn you of conditions or procedures that can result in death or severe personal injury. CAUTION notices warn you of conditions or procedures that can cause personal injury that is neither lethal nor extremely hazardous. Attention notices warn you of conditions or procedures that can cause damage to machines, equipment, or programs.
DANGER notices The following DANGER notices apply to this product:
DANGER
DANGER
DANGER
DANGER
To prevent a possible shock from touching two surfaces with different protective ground (earth), use one hand, when possible, to connect or disconnect signal cables. (D001)
Overloading a branch circuit is potentially a fire hazard and a shock hazard under certain conditions. To avoid these hazards, ensure that your system electrical requirements do not exceed branch circuit protection requirements. Refer to the information that is provided with your device or the power rating label for electrical specifications. (D002)
If the receptacle has a metal shell, do not touch the shell until you have completed the voltage and grounding checks. Improper wiring or grounding could place dangerous voltage on the metal shell. If any of the conditions are not as described, STOP. Ensure the improper voltage or impedance conditions are corrected before proceeding. (D003)
An electrical outlet that is not correctly wired could place hazardous voltage on the metal parts of the system or the devices that attach to the system. It is the responsibility of the customer to ensure that the outlet is correctly wired and grounded to prevent an electrical shock. (D004)
161

Appendix D: Safety, Environmental, and Electronic Emissions Notices
DANGER
When working on or around the system, observe the following precautions:
Electrical voltage and current from power, telephone, and communication cables are hazardous. To avoid a shock hazard:
● Connect power to this unit only with the IBM ISS provided power cord. Do not use the IBM ISS provided power cord for any other product.
● Do not open or service any power supply assembly.
● Do not connect or disconnect any cables or perform installation, maintenance, or reconfiguration of this product during an electrical storm.
● The product might be equipped with multiple power cords. To remove all hazardous voltages, disconnect all power cords.
● Connect all power cords to a properly wired and grounded electrical outlet. Ensure that the outlet supplies proper voltage and phase rotation according to the system rating plate.
● Connect any equipment that will be attached to this product to properly wired outlets.
● When possible, use one hand only to connect or disconnect signal cables.
● Never turn on any equipment when there is evidence of fire, water, or structural damage.
● Disconnect the attached power cords, telecommunications systems, networks, and modems before you open the device covers, unless instructed otherwise in the installation and configuration procedures.
● Connect and disconnect cables as described in the following procedures when installing, moving, or opening covers on this product or attached devices.
To disconnect:
1. Turn off everything (unless instructed otherwise).
2. Remove the power cords from the outlets.
3. Remove the signal cables from the connectors.
4. Remove all cables from the devices.
To connect:
1. Turn off everything (unless instructed otherwise).
2. Attach all cables to the devices.
3. Attach the signal cables to the connectors.
4. Attach the power cords to the outlets.
5. Turn on the devices.
(D005)
162 IBM Internet Security Systems

Overview
CAUTION notices The following CAUTION notices apply to this product:
CAUTION
Data processing environments can contain equipment transmitting on system links with laser modules that operate at great than Class 1 power levels. For this reason, never look into the end of an optical fiber cable or open receptacle. (C027)
CAUTION
The battery contains lithium. To avoid possible explosion, do not burn or charge the battery.
Do not:
● Throw or immerse into water
● Heat to more than 100°C (212°F)
● Repair or disassemble
Exchange only with the IBM ISS-approved part. Recycle or discard the battery as instructed by local regulations. In the United States, IBM ISS has a process for the collection of this battery. For information, call 1-800-426-4333. Have the IBM ISS part number for the battery unit available when you call. (C003)
CAUTION
For 19” rack mount products:
● Do not install a unit in a rack where the internal rack ambient temperatures will exceed the manufacturer’s recommended ambient temperature for all your rack-mounted devices.
● Do not install a unit in a rack where the air flow is compromised. Ensure that air flow is not blocked or reduced on any side, front, or back of a unit used for air flow through the unit.
● Consideration should be given to the connection of the equipment to the supply circuit so that overloading the circuits does not compromise the supply wiring or overcurrent protection. To provide the correct power connection to a rack, refer to the rating labels located on the equipment in the rack to determine the total power requirement of the supply circuit.
● (For sliding drawers) Do not pull or install any drawer or feature if the rack stabilizer brackets are not attached to the rack. Do not pull out more than one drawer at a time. The rack might become unstable if you pull out more than one drawer at a time.
● (For fixed drawers) This drawer is a fixed drawer and must not be moved for servicing unless specified by the manufacturer. Attempting to move the drawer partially or completely out of the rack might cause the rack to become unstable or cause the drawer to fall out of the rack.
(R001 Part 2 of 2)
Product handling information
One of the following two safety notices may apply to this product. Please refer to the specific product specifications to determine the weight of the product to see which applies.
163

Appendix D: Safety, Environmental, and Electronic Emissions Notices
CAUTION
This part or unit is heavy but has a weight smaller than 18 kg (39.7 lb). Use care when lifting, removing, or installing this part or unit. (C008)
CAUTION
The weight of this part or unit is between 18 and 32 kg (39.7 and 70.5 lb). It takes two persons to safely lift this part or unit. (C009)
Product safety labels
One or more of the following safety labels may apply to this product.
DANGER
DANGER
World trade safety information
Several countries require the safety information contained in product publications to be presented in their national languages. If this requirement applies to your country, a safety information booklet is included in the publications package shipped with the product. The booklet contains the safety information in your national language with references to the US English source. Before using a US English publication to install, operate, or service this IBM ISS product, you must first become familiar with the related safety information in the booklet. You should also refer to the booklet any time you do not clearly understand any safety information in the US English publications.
Hazardous voltage, current, or energy levels are present inside any component that has this label attached. Do not open any cover or barrier that contains this label. (L001)
Multiple power cords. The product might be equipped with multiple power cords. To remove all hazardous voltages, disconnect all power cords. (L003)
164 IBM Internet Security Systems
Overview
Laser safety information
The following laser safety notices apply to this product:
CAUTION
This product may contain one or more of the following devices: CD-ROM drive, DVD-ROM drive, DVD-RAM drive, or laser module, which are Class 1 laser products. Note the following information:
● Do not remove the covers. Removing the covers of the laser product could result in exposure to hazardous laser radiation. There are no serviceable parts inside the device.
● Use of the controls or adjustments or performance of procedures other than those specified herein might result in hazardous radiation exposure. (C026)
CAUTION
Data processing environments can contain equipment transmitting on system links with laser modules that operate at greater than Class 1 power levels. For this reason, never look into the end of an optical fiber cable or open receptacle. (C027)
Laser compliance All lasers are certified in the U.S. to conform to the requirements of DHHS 21 CFR Subchapter J for class 1 laser products. Outside the U.S., they are certified to be in compliance with IEC 60825 as a class 1 laser product. Consult the label on each part for laser certification numbers and approval information.
Product recycling and disposal
This unit must be recycled or discarded according to applicable local and national regulations. IBM encourages owners of information technology (IT) equipment to responsibly recycle their equipment when it is no longer needed. IBM offers a variety of product return programs and services in several countries to assist equipment owners in recycling their IT products. Information on IBM ISS product recycling offerings can be found on IBM’s Internet site at http://www.ibm.com/ibm/environment/products/prp.shtml.
Esta unidad debe reciclarse o desecharse de acuerdo con lo establecido en la normativa nacional o local aplicable. IBM recomienda a los propietarios de equipos de tecnología de la información (TI) que reciclen responsablemente sus equipos cuando éstos ya no les sean útiles. IBM dispone de una serie de programas y servicios de devolución de productos en varios países, a fin de ayudar a los propietarios de equipos a reciclar sus productos de TI. Se puede encontrar información sobre las ofertas de reciclado de productos de IBM en el sitio web de IBM http://www.ibm.com/ibm/environment/products/prp.shtml.
Notice: This mark applies only to countries within the European Union (EU) and Norway.
Appliances are labeled in accordance with European Directive 2002/96/EC concerning waste electrical and electronic equipment (WEEE). The Directive determines the
165

Appendix D: Safety, Environmental, and Electronic Emissions Notices
framework for the return and recycling of used appliances as applicable through the European Union. This label is applied to various products to indicate that the product is not to be thrown away, but rather reclaimed upon end of life per this Directive.
In accordance with the European WEEE Directive, electrical and electronic equipment (EEE) is to be collected separately and to be reused, recycled, or recovered at end of life. Users of EEE with the WEEE marking per Annex IV of the WEEE Directive, as shown above, must not dispose of end of life EEE as unsorted municipal waste, but use the collection framework available to customers for the return, recycling, and recovery of WEEE. Customer participation is important to minimize any potential effects of EEE on the environment and human health due to the potential presence of hazardous substances in EEE. For proper collection and treatment, contact your local IBM representative.
Remarque: Cette marque s’applique uniquement aux pays de l’Union Européenne et à la Norvège.
L’etiquette du système respecte la Directive européenne 2002/96/EC en matière de Déchets des Equipements Electriques et Electroniques (DEEE), qui détermine les dispositions de retour et de recyclage applicables aux systèmes utilisés à travers l’Union européenne. Conformément à la directive, ladite étiquette précise que le produit sur lequel elle est apposée ne doit pas être jeté mais être récupéré en fin de vie.
Battery return program
This product contains a lithium battery. The battery must be recycled or disposed of properly. Recycling facilities may not be available in your area. For information on disposal of batteries outside the United States, go to http://www.ibm.com/ibm/environment/products/batteryrecycle.shtml or contact your local waste disposal facility.
In the United States, IBM has established a return process for reuse, recycling, or proper disposal of used IBM sealed lead acid, nickel cadmium, nickel metal hydride, and other battery packs from IBM equipment. For information on proper disposal of these batteries, contact IBM at 1-800-426-4333. Please have the IBM part number listed on the battery available prior to your call.
For Taiwan:
Please recycle batteries
166 IBM Internet Security Systems

Overview
For the European Union:
Notice: This mark applies only to countries within the European Union (EU).
Batteries or packing for batteries are labeled in accordance with European Directive 2006/66/EC concerning batteries and accumulators and waste batteries and accumulators. The Directive determines the framework for the return and recycling of used batteries and accumulators as applicable throughout the European Union. This label is applied to various batteries to indicate that the battery is not to be thrown away, but rather reclaimed upon end of life per this Directive.
Les batteries ou emballages pour batteries sont étiquetés conformément aux directives européennes 2006/66/EC, norme relative aux batteries et accumulateurs en usage et aux batteries et accumulateurs usés. Les directives déterminent la marche à suivre en vigueur dans l'Union Européenne pour le retour et le recyclage des batteries et accumulateurs usés. Cette étiquette est appliquée sur diverses batteries pour indiquer que la batterie ne doit pas être mise au rebut mais plutôt récupérée en fin de cycle de vie selon cette norme.
In accordance with the European Directive 2006/66/EC, batteries and accumulators are labeled to indicate that they are to be collected separately and recycled at end of life. The label on the battery may also include a symbol for the metal concerned in the battery (Pb for lead, Hg for the mercury, and Cd for cadmium). Users of batteries and accumulators must not dispose of batteries and accumulators as unsorted municipal waste, but use the collection framework available to customers for the return, recycling, and treatment of batteries and accumulators. Customer participation is important to minimize any potential effects of batteries and accumulators on the environment and human health due to potential presence of hazardous substances. For proper collection and treatment, contact your local IBM representative.
For California:
Perchlorate Material - special handling may apply. See http://www.dtsc.ca.gov/hazardouswaste/perchlorate.
The foregoing notice is provided in accordance with California Code of Regulations Title 22, Division 4.5, Chapter 33. Best Management Practices for Perchlorate Materials. This product, part, or both may include a lithium manganese dioxide battery which contains a perchlorate substance.
167

Appendix D: Safety, Environmental, and Electronic Emissions Notices
Electronic emissions notices
The following statements apply to this IBM product. The statement for other IBM products intended for use with this product will appear in their accompanying manuals.
Federal Communications Commission (FCC) Statement
Note: This equipment has been tested and found to comply with the limits for a Class A digital device, pursuant to Part 15 of the FCC Rules. These limits are designed to provide reasonable protection against harmful interference when the equipment is operated in a commercial environment. this equipment generates, uses, and can radiate radio frequency energy and, if not installed and used in accordance with the instructions contained in the installation manual, may cause harmful interference to radio communications. Operation of this equipment in a residential area is likely to cause harmful interference, in which case the user will be required to correct the interference at his own expense.
Note: Properly shielded and grounded cables and connectors must be used in order to meet FCC emission limits. IBM is not responsible for any radio or television interference caused by using other than recommended cables and connectors, by installation or use of this equipment other than as specified in the installation manual, or by any other unauthorized changes or modifications to this equipment. Unauthorized changes or modifications could void the user’s authority to operate the equipment.
Note: This device complies with Part 15 of the FCC Rules. Operation is subject to the following two conditions: (1) this device may not cause harmful interference, and (2) this device must accept any interference received, including interference that may cause undesired operation.
Canadian Department of Communications Compliance Statement
This Class A digital apparatus complies with Canadian ICES-003.
Avis de conformité aux normes du ministère des Communications du Canada
Cet appareil numérique de las classe A est conform à la norme NMB-003 du Canada.
European Union (EU) Electromagnetic Compatibility Directive
This product is in conformity with the protection requirements of EU Council Directive 2004/108/EEC on the approximation of the laws of the Member States relating to electromagnetic compatibility. IBM ISS cannot accept responsibility for any failure to satisfy the protection requirements resulting from a non-recommended modification of the product, including the fitting of non-IBM ISS option cards.
This product has been tested and found to comply with the limits for Class A Information Technology Equipment according to European Standard EN 55022. The limits for Class equipment were derived for commercial and industrial environments to provide reasonable protection against interference with licensed communication equipment.
Warning:
This is a Class A product. In a domestic environment, this product may cause radio interference in which case the user may be required to take adequate measures.
168 IBM Internet Security Systems
Overview
European Community contact:
IBM Technical Regulations
Pascalstr. 100, Stuttgart, Germany 70569
Telephone: 0049 (0) 711 785 1176
Fax: 0049 (0) 711 785 1283
e-mail: [email protected]
EC Declaration of Conformity (In German)
Deutschsprachiger EU Hinweis: Hinweis für Geräte der Klasse A EU-Richtlinie zur Elektromagnetischen Verträglichkeit
Dieses Produkt entspricht den Schutzanforderungen der EU-Richtlinie 89/336/EWG zur Angleichung der Rechtsvorschriften über die elektromagnetische Verträglichkeit in den EU-Mitgliedsstaaten und hält die Grenzwerte der EN 55022 Klasse A ein.
Um dieses sicherzustellen, sind die Geräte wie in den Handbüchern beschrieben zu installieren und zu betreiben. Des Weiteren dürfen auch nur von der IBM empfohlene Kabel angeschlossen werden. IBM übernimmt keine Verantwortung für die Einhaltung der Schutzanforderungen, wenn das Produkt ohne Zustimmung der IBM verändert bzw. wenn Erweiterungskomponenten von Fremdherstellern ohne Empfehlung der IBM gesteckt/eingebaut werden.
EN 55022 Klasse A Geräte müssen mit folgendem Warnhinweis versehen werden:"Warnung: Dieses ist eine Einrichtung der Klasse A. Diese Einrichtung kann im Wohnbereich Funk-Störungen verursachen; in diesem Fall kann vom Betreiber verlangt werden, angemessene Maßnahmen zu ergreifen und dafür aufzukommen."
Deutschland: Einhaltung des Gesetzes über die elektromagnetische Verträglichkeit von Geräten
Dieses Produkt entspricht dem “Gesetz über die elektromagnetische Verträglichkeit von Geräten (EMVG)“. Dies ist die Umsetzung der EU-Richtlinie 89/336/EWG in der Bundesrepublik Deutschland.
Zulassungsbescheinigung laut dem Deutschen Gesetz über die elektromagnetische Verträglichkeit von Geräten (EMVG) vom 18. September 1998 (bzw. der EMC EG Richtlinie 89/336) für Geräte der Klasse A.
Dieses Gerät ist berechtigt, in Übereinstimmung mit dem Deutschen EMVG das EG-Konformitätszeichen - CE - zu führen.
Verantwortlich für die Konformitätserklärung nach Paragraf 5 des EMVG ist die IBM Deutschland GmbH, 70548 Stuttgart.
Informationen in Hinsicht EMVG Paragraf 4 Abs. (1) 4:
Das Gerät erfüllt die Schutzanforderungen nach EN 55024 und EN 55022 Klasse A
update: 2004/12/07
169

Appendix D: Safety, Environmental, and Electronic Emissions Notices
People’s Republic of China Class A Compliance Statement:
This is a Class A product. In a domestic environment, this product may cause radio interference in which case the user may need to perform practical actions.
Japan Class A Compliance Statement:
This product is a Class A Information Technology Equipment and conforms to the standards set by the Voluntary Control Council for Interference by Information Technology Equipment (VCCI). In a domestic environment, this product may cause radio interference in which case the user may be required to take adequate measures.
Korean Class A Compliance Statement:
170 IBM Internet Security Systems

Index
policy rules 62
symbols.PEM key 37aAction 65Add Attachment response 76Add Disclaimer response 75Admin password 22Administrator tasks 7Agent Manger 156alert logging 126
configuring 126intrusion prevention settings 130
alertsfor intrusion detection and prevention events 130
Allow action 65allow action 62Allow NULL Sender 42Always Try TLS 50Analysis modules 62anti-relay check 49appliance
adding to a cluster 56alternate network setup 16configuration settings 19configure DNSBL settings 45configure TLS settings 43creating cluster 55date and time settings 23defining system accounts 38enabling external interfaces 25external IP address type 25firewall settings 20functionality 14hardware 15how route traffics 24joining cluster 56key concepts 14mail security policy 61network interface settings 25parameters 147passwords 22
IBM Proventia Network Mail Security System Administrator Guid
reboot 122reinstalling 123related publications 8relaying outgoing messages 34required services 36root domain 38shut down 122SMTP settings 32spam analysis modules 82standard network setup 15system tools 122user types 7VMware 15workflow 8
archiving email messages 94Attachment Check 84
bbackups
data 119full system 118mail security data 120options 116restore issues 116restrictions 118
Bayes’s Theorem 86Bayesian classifier 82
training 88Bayesian filter 86
custom-trained classifier 87training data 87training data with foreign languages 87training the appliance 86
BCC response 77Block action 65block action 62block/allow lists
setting up access 91browsing a quarantine store 140
171e, Version 1.6

Index
cCentral Responses 156chain policy system 62cluster
adding an appliance to 56changing IP address for member 57changing passphrase 57creating new 55erasing 56joining 56joining process 56removing a client 56
Cluster Central 54, 56Cluster Clients 54clusters 54
functionality 54issues with 54port 4990 54port 5432 54quarantine reports 54
Compound module 85Compound Who object 66condition
defining 74Conditions 74configuration settings 19, 117
default file 19configuring automatic security update 109configuring DNS Resolution delivery 50configuring the firewall to receive SMTP traffic 32, 54configuring the SiteProtector system management 158Continue action 65customizing quarantine report 103
ddate and time
changing 23saving 23
defining conditions 74defining recipients of quarantine report 102deleting SSL certificates (Firefox) 27DHCP
renew lease 122direct MX DNS lookups 35directory objects 68DNS 32
clear cache 122DNS lookup 32
172
example 32DNS MX entries
changing 34DNS query 32DNS resolution 51DNSBL 45DNSBL border IP addresses 45DNSBL Check
parameters 151DNSBL settings 45dnsblthreads.count 151domain name server 32
eemail and SNMP alerts 126email messages
deleting undelivered 98, 134tracking 97
email notification 126Enable Reverse DNS Lookup 43end-user
accounts 91adding entries to personal block/allow list 141browsing quarantine store 140changing password for personal block/allow list 142creating new account 91deleting 92deleting a list 92deleting entry from personal block/allow list 141parameters 154requesting quarantine report 143resetting password 92searching for 92setting up accounts 91spam management 139tasks 7
ETH1 interface 20event
searching for 129event information 129event notification
for intrusion detection and prevention events 130events
intrusion prevention 130system-related 129
Executive Summary report 100external interfaces 25
DNS settings 26
IBM Internet Security Systems

Index
fFirefox
deleting self-signed SSL certificates 27site certificate issues 19
firewallservices 20SMTP traffic configuration 32, 54
firewall settings 20Forward delivery 51Forward Path Domain Check 43forwarding email messages 35frozen messages 40FTP server 119full system backup 118
ggenerating quarantine report 102
hham 86, 88HELO Domain Check 43heuristics 82host reputation filters 48
configuring 48host_reputation.border_ips 151host_reputation.spam_perc_unquarantined 149
iIBM Internet Security Systems
technical support 9Web site 9
IBM SiteProtector console 156inbound SMTP configuration 41internal interfaces 26intrusion detection and prevention events
alerts and notifications 130logging 130
intrusion prevention issue list 132intrusion prevention settings 130
event filters 131
jJava cache
clearing 116
IBM Proventia Network Mail Security System Administrator Guid
kKeyword Search 84
lLanguage Check 84LDAP
parameters 150LDAP directory servers 68
multiple 70LDAP integration 68
attribute entries 69entry points 68
LDAP queries 68LDAP Server with SMTP Addresses 70LDAP Server with User/Group Information 70License Registration Center 17Licensing Agreement site
IBM Internet Security Systems 8licensing information
IBM Internet Security Systems 8licensing keys
downloading 17ordering 17settings 17
load balancing 33local domains 44
provide IP addresses 44local messages 39log files
backing up 121, 135deleting 98, 134viewing 133
Log response 78logging
for intrusion detection and prevention events 130
mMAIL FROM
42mail queues 39mail security policy 61
contents 61creating 61parameters 149
maintenance
173e, Version 1.6

Index
backups 116Matched Rules report 100Media Type 84Message Field Check 83message queues 39message storage directories 94
creating 94deleting messages from 94running queries 96searching for email messages 95
message storage directoryparameters 152
message store 94Modify Field response 75msgstore.quarantine_domains 152MX preferences 32
nNetwork 25network interface settings 25network time protocol 23notifications
for intrusion detection and prevention events 130NTP server 23
oObjectCategory 69ObjectClass 69OCN 17open relay 49order confirmation number 17outbound SMTP configuration 49
pparameters 145
appliance 147cluster replication 153DNSBL Check 151end-user access 154event notification 128intrusion prevention 132LDAP 150mail security policy 149message storage directory 152SMTP settings 148using 146
174
values 146passwords
Administrative 22changing 22root 22
personal block/allow listadding entries 141changing password 142deleting entry 141
personal block/allow lists 91Phishing Check 83Policy Configuration report 100policy rule
conditions 74content of 62how appliance processes 62
policy rules 62actions 62contents 62enabling 62matching 62preconfigured 64responses 75workflow diagram 63
Pre Conditions 64predefined reports 100
scheduling 101
qquarantine report 102, 143
customizing 103defining recipients 102defining recipients of 102delivery 120generating 102sample template 103
quarantine store 94, 102, 140quarantinereport.maxlines 152quarantining email messages 94
rrecipient verification 46Recovery CD 123recovery process 123Redirect response 77reinstalling the appliance 123relay hosts 44
IBM Internet Security Systems

Index
provide IP addresses 44Relay Message response 78relaying email messages, example 33relaying outgoing email messages 34relaying SMTP traffic 33Remote Malware Detection 85Remote Malware Detection scanner 85Remove Attachment response 76Require Encryption response 79resend messages 40Responses 62, 75Return Path Domain Check 43RFC2821 4.1.2 148risk level 129risk level icons 129rollback 108rolling back updates 108root password 22routing mode 25routing preferences 24Routing table 24routing traffic 24Rule Name 64
ssend messages 39Send To response 76Sender Policy Framework 84Set/Clear Condition response 78setting up access to end user accounts for personal
block/allow lists 91settings backups
description of 116Signature Pattern Detection 85Site Database 157SMTP
configure settings 42configuring outbound delivery methods 50domain list for LDAP query 69inbound configuration 41mail routing 32managing queues 39outbound configuration 49postmaster address 38relaying messages 33relaying traffic through appliance 33settings 32
IBM Proventia Network Mail Security System Administrator Guid
XMail settings 42SMTP log 120SMTP mail routing 32SMTP notification email 38SMTP queues 39
troubleshooting 39SMTP relay 14
inbound 14outbound 14
SMTP settings 32parameters 148
smtp.check_forward_path 148smtp.check_helo_domain 148smtp.check_return_path 148smtp.command_delay 148–149smtp.passthrough 148snapshot file 117snapshot files 19SNMP Get 127SNMP notification 126
enabling 127SNMP Trap 127Sophos 85spam analysis modules 82Spam Bayesian Classifier 82Spam DNSBL Check 82Spam Fingerprint 83Spam Flow Check 83Spam Flow Control 90Spam Heuristics 82Spam Keyword 83Spam Signature Database 82Spam Structure Check 83Spam URL Check 82specifying when to install firmware updates 109SPF record 84Store response 75storing email messages 94Synchronization Attribute 71system accounts 38system backups
options 116
ttechnical support, IBM Internet Security Systems 9the SiteProtector system
architecture 156component descriptions 156configuring management of 158
175e, Version 1.6

Index
integrating appliance with 158the SiteProtector system management 108TLS
configure appliance settings 43using certificates 37
TLS certificates 37tokeniser 87tokens 86
extraction 87types 87
tools 122Top 10 Analysis Modules report 100Top 10 Recipients report 100Top 10 Responses report 100Top 10 Senders report 100Top 10 Viruses report 100traceroute utility 122tracking email messages 97Traffic Monitoring report 100Transport Layer Security 37, 79
uunchecked messages 39unchecked/processing messages 39unknown Who objects 67updates
advanced parameters 113configure automatically 109rolling back 108, 112scheduling one-time 111
URL Check 84User Sender Allow List 84User Sender Block List 84
vVirus Check 85
wWeb site, IBM Internet Security Systems 9When objects 62, 73Who Object Verification tool 72Who objects 62, 66
contents 66LDAP 72LDAP integration 68priority 66unknown 67
176
verification tool 72
xX-Force alert 129XMail 42, 46XMail settings 42xmail.smtp.threads 148X-Press Update Server 157
IBM Internet Security Systems