ibm i agent user guide
TRANSCRIPT

EVault Software
IBM i Agent 6.2
User Guide

Revision: This manual has been updated for Version 6.2 (June 2015).
Software Version: 6.21
2015 EVault Inc.
EVault, A Seagate Company, makes no representations or warranties with respect to the contents hereof and specifically disclaims any implied warranties of merchantability or fitness for any particular purpose. Furthermore, EVault reserves the right to revise this publication and to make changes from time to time in the content hereof without obligation of EVault to notify any person of such revision of changes. All companies, names and data used in examples herein are fictitious unless otherwise noted.
No part of this document may be reproduced, transmitted, transcribed, stored in a retrieval System or translated into any language including computer language, in any form or by any means electronic, mechanic, magnetic, optical, chemical or otherwise without prior written permission of:
EVault, A Seagate Company c/o Corporation Trust Center 1209 Orange Street Wilmington, New Castle Delaware 19801 www.evault.com
EVault, EVault Protect, and EVault DeltaPro, are registered trademarks of EVault Inc. All other products or company names mentioned in this document are trademarks or registered trademarks of their respective owners.
Acknowledgements: Two encryption methods, DES and TripleDES, include cryptographic software written by Eric Young. The Windows versions of these algorithms also include software written by Tim Hudson. Bruce Schneier designed Blowfish encryption.
"Part of the software embedded in this product is gSOAP software. Portions created by gSOAP are Copyright (C) 2001-2006 Robert A. van Engelen, Genivia inc. All Rights Reserved. THE SOFTWARE IN THIS PRODUCT WAS IN PART PROVIDED BY GENIVIA INC AND ANY EXPRESS OR IMPLIED WARRANTIES, INCLUDING, BUT NOT LIMITED TO, THE IMPLIED WARRANTIES OF MERCHANTABILITY AND FITNESS FOR A PARTICULAR PURPOSE ARE DISCLAIMED. IN NO EVENT SHALL THE AUTHOR BE LIABLE FOR ANY DIRECT, INDIRECT, INCIDENTAL, SPECIAL, EXEMPLARY, OR CONSEQUENTIAL DAMAGES (INCLUDING, BUT NOT LIMITED TO, PROCUREMENT OF SUBSTITUTE GOODS OR SERVICES; LOSS OF USE, DATA, OR PROFITS; OR BUSINESS INTERRUPTION) HOWEVER CAUSED AND ON ANY THEORY OF LIABILITY, WHETHER IN CONTRACT, STRICT LIABILITY, OR TORT (INCLUDING NEGLIGENCE OR OTHERWISE) ARISING IN ANY WAY OUT OF THE USE OF THIS SOFTWARE, EVEN IF ADVISED OF THE POSSIBILITY OF SUCH DAMAGE."
The EVault Software Agent, CentralControl, and Director applications (version 4 and above) now have the added encryption option of 128/256 bit AES (Advanced Encryption Standard). Advanced Encryption Standard algorithm (named Rijndael, pronounced “Rain Doll”) was developed by cryptographers Dr. Joan Daemen and Dr. Vincent Rijmen. This algorithm was chosen by the National Institute of Standards and Technology (NIST) of the U.S. Department of Commerce to be the new Federal Information Processing Standard (FIPS). AES is not available when connecting to a vault lower than version 4.1. See: http://csrc.nist.gov/encryption/aes/round2/r2report.pdf for details.
The EVault Software Agent and Director applications (version 4 and above) also have the added security feature of an over the wire encryption method. Over the wire encryption is not available when connecting to a vault lower than version 4.1.

IBM i Agent 6.2 User Guide
i
Contents
1 Introduction ................................................................................................................ 1
1.1 Additional Resources ...................................................................................................................... 1
2 Installing the IBM i Agent ............................................................................................. 2
2.1 Configuring the Network Connection ............................................................................................. 2
2.2 Installing the IBM i Agent from a CD .............................................................................................. 2
2.3 Installing the IBM i Agent from an FTP site .................................................................................... 3
2.3.1 Downloading the Files ................................................................................................. 3
2.3.2 Creating a Temporary Installation Library ................................................................... 3
2.3.3 Sending the Files by FTP .............................................................................................. 3
2.4 Restoring Objects ........................................................................................................................... 4
2.5 Installing the IBM i Agent ............................................................................................................... 4
2.6 Upgrading an Existing IBM i Agent ................................................................................................. 5
2.7 Verifying the Installation ................................................................................................................ 5
2.8 Obtaining a License ........................................................................................................................ 5
3 Working with the IBM i Agent ...................................................................................... 6
3.1 Prerequisites ................................................................................................................................... 6
3.2 Accessing the IBM i Agent Main Menu........................................................................................... 7
3.3 IBM i Agent Main Menu Commands .............................................................................................. 7
4 Configuring the Vault ................................................................................................... 9
4.1 Accessing the Work with the Vault Screen ..................................................................................... 9
4.2 Add Vault Configuration Screen Fields ........................................................................................... 9
4.3 Creating a New Vault .................................................................................................................... 10
4.4 Changing a Vault Configuration .................................................................................................... 11
4.5 Verifying a Vault Configuration .................................................................................................... 11
4.6 Re-Registering a Vault .................................................................................................................. 11
4.7 Deleting a Vault Configuration ..................................................................................................... 12
5 Working with Retention Schemes ............................................................................... 13
5.1 Create a Retention Scheme Screen Fields .................................................................................... 13
5.2 Creating a Retention Scheme ....................................................................................................... 14
5.3 Changing a Retention Scheme ...................................................................................................... 14
5.4 Deleting a Retention Scheme ....................................................................................................... 14

IBM i Agent 6.2 User Guide
ii
6 Throttling Bandwidth ................................................................................................. 15
6.1 Accessing the Bandwidth Throttling Screen ................................................................................. 15
6.2 Bandwidth Throttling Screen Fields.............................................................................................. 15
6.3 Disabling Bandwidth Throttling .................................................................................................... 16
6.4 Configuring Bandwidth Throttling ................................................................................................ 16
7 Encrypting Backup Data ............................................................................................. 17
7.1 IFS Wildcard Exclusions ................................................................................................................ 17
7.2 OBJ Backup Exclusions .................................................................................................................. 18
7.3 Improving Performance with Multi-Threading ............................................................................. 18
7.4 Threading Model Options ............................................................................................................. 18
7.5 Disabling CRC ................................................................................................................................ 19
7.6 Setting Compression and Decompression Algorithms ................................................................. 19
7.7 Creating an Email Notification ...................................................................................................... 19
8 Working with Agent Licenses ...................................................................................... 21
8.1 Entering an IBM i Agent License Key ............................................................................................ 21
9 Working with Jobs ..................................................................................................... 22
9.1 Add New Job Screen Object Backup Fields ................................................................................... 23
9.2 Add New Job Screen IFS Backup Fields ......................................................................................... 26
9.3 Add New Job Screen SYS Backup Fields ........................................................................................ 28
9.4 Creating a Backup Job .................................................................................................................. 29
9.5 Creating Custom Commands ........................................................................................................ 29
9.6 Changing Job Settings ................................................................................................................... 30
9.7 Deleting a Job ............................................................................................................................... 30
10 Working with Safesets ............................................................................................... 31
10.1 Display Safeset Detail Screen Fields ............................................................................................. 31
10.2 Viewing a Safeset ......................................................................................................................... 32
11 Working with Log Files ............................................................................................... 33
11.1 Viewing a Log File ......................................................................................................................... 33
11.2 Converting an .XLOG File to a .LOG File ........................................................................................ 33
12 Working with Schedules ............................................................................................. 34
12.1 Work with Scheduler Screen Fields .............................................................................................. 34
12.2 Creating a Schedule ...................................................................................................................... 35

IBM i Agent 6.2 User Guide
iii
12.3 Changing a Schedule..................................................................................................................... 35
12.4 Deleting a Schedule ...................................................................................................................... 35
12.5 Enabling or Releasing a Schedule ................................................................................................. 36
12.6 Disabling or Holding a Schedule ................................................................................................... 36
13 Working with Backup Jobs ......................................................................................... 37
13.1 Run Backup Screen Fields ............................................................................................................. 37
13.2 Running a Backup ......................................................................................................................... 38
14 Synchronizing Data .................................................................................................... 39
15 Automatic Job Creation .............................................................................................. 40
15.1 Viewing the AUTOJOB Main Menu ............................................................................................... 40
15.2 Select Libraries Screen Fields ....................................................................................................... 40
15.3 Select Libraries Screen Commands............................................................................................... 41
15.4 Selecting a Library and a Job ........................................................................................................ 42
15.5 Retention Schedule Screen Fields ................................................................................................ 43
15.6 Creating a Retention Schedule ..................................................................................................... 43
15.7 Assigning Retention Schedules to Jobs......................................................................................... 44
15.8 Create All Jobs Screen Fields ........................................................................................................ 44
15.9 Creating a Job ............................................................................................................................... 46
16 Restoring Jobs ............................................................................................................ 47
16.1 Run Restore Screen Fields ............................................................................................................ 47
17 Completing a Bare Metal Restore ............................................................................... 54
17.1 Prerequisites ................................................................................................................................. 55
17.2 Preparing the IBM i Agent for Recovery ....................................................................................... 55
17.3 Restoring User Profiles and Configurations .................................................................................. 56
17.4 Start TCP/IP in restricted state ..................................................................................................... 56
17.5 End Resource Monitor and Performance Data Collection ........................................................... 56
17.6 Restoring *IBM Library Objects (*LIB) .......................................................................................... 57
17.7 Restoring *IBM data ..................................................................................................................... 57
17.8 Restoring *ALLUSR Library Objects .............................................................................................. 57
17.9 Restoring *ALLUSR data ............................................................................................................... 58
17.10 Restoring IFS directories and files ................................................................................................ 60
17.11 Restoring system values and job schedules ................................................................................. 60
17.12 Verifying Restores ........................................................................................................................ 61

IBM i Agent 6.2 User Guide
iv
17.13 Verifying PTFs ............................................................................................................................... 61
17.14 Restoring Authority ...................................................................................................................... 61
17.15 Finish with Journals ...................................................................................................................... 61
17.16 Restarting the Computer .............................................................................................................. 61
18 Uninstalling the IBM i Agent ....................................................................................... 62
18.1 Uninstalling an FTP Installation .................................................................................................... 62
18.2 Uninstalling a CD Installation........................................................................................................ 62
19 Recreating a Delta File ............................................................................................... 63
20 Improving the Performance of your IBM i Computer ................................................... 64

IBM i Agent 6.2 User Guide
1
1 Introduction
This Guide is intended for Administrators who use the IBM i Agent to back up IBM i computers. This
Guide provides information and procedures for selecting backup data, configuring the IBM i Agent,
and scheduling backups. This Guide assumes an intermediate knowledge of IBM i computer
operation and administration.
You use the IBM i Agent to automatically back up IBM i data, across a local network, or the Internet,
to a secure server called a Data Protection vault. Tape devices or other backup media are not
required.
You can configure the backup to run automatically on a defined schedule. You use a 3270 or 5250
screen or a terminal emulator to schedule, configure, and monitor backups. You cannot control the
IBM i Agent using Microsoft Windows or Web CentralControl. The Agent license is provided by your
service provider.
1.1 Additional Resources
Press F1 to open general or specific (field-level) help. Field-level help is available in screens that show
or request information. To display field-level help, place your cursor in the field and press F1.

IBM i Agent 6.2 User Guide
2
2 Installing the IBM i Agent
Use one of these methods to install the IBM i Agent:
● From a CD/DVD. See Installing the IBM i Agent from a CD.
● From an FTP site. See Installing the IBM i Agent from an FTP site.
2.1 Configuring the Network Connection
A known issue is that the performance of the IBM 100MB Network Interface Card can degrade to 0.4
Mbps. To correct this issue, use the *AUTO on the DUPLEX parameter on the CHGLINETH command.
For optimal network performance, it is recommended that you set these values:
● On the Ethernet line desc (description):
● GENTSTFRM(*NO)
● LINKSPEED(100M)
● LINESPEED(100M)
● DUPLEX(*AUTO)
● On TCP/IP interface: TOS(*MAXTHRPUT)
● On TCP/IP Route: TOS(*MAXTHRPUT)
You should also install the current cumulative, hyper, and group program temporary fixes (PTFs) from
IBM.
To verify that your network is running optimally, run an FTP transfer test from the IBM i computer to
a local computer.
2.2 Installing the IBM i Agent from a CD
1. Download the Optical Disc image files from your service provider’s website to your computer.
2. Extract the files to a temporary folder. The extracted zip file is IBMi_AGENT.iso.
3. Create an installation CD from the IBMi_AGENT.iso file. For instructions on creating an installation CD, refer to your CD/DVD writing software documentation.
4. Insert the installation disc into the IBM i computer.
5. Open a command prompt and run the LODRUN DEV<Optical device name> command.
6. Install the IBM i Agent. See Installing the IBM i Agent.

IBM i Agent 6.2 User Guide
3
2.3 Installing the IBM i Agent from an FTP site
Complete the following procedures to install the IBM i Agent from your service provider’s FTP site.
2.3.1 Downloading the Files
1. Open your Internet browser and enter the URL for your service provider’s website.
2. Locate and then download these IBM i Agent files to a temporary location on your computer:
● IBMi_Agent.zip
● Agent_IBM_i.pdf
● Agent_IBM_i.txt
3. Extract the IBMi_AGENT.zip file to a temporary location on your Microsoft Windows computer. The extracted file does not have a file extension because it contains the IBM i binary save file data.
2.3.2 Creating a Temporary Installation Library
1. Log on to the IBM i computer 5250 terminal session with the QSECOFR user or equivalent.
2. Create the library by running the CRTLIB EVSAVE command. You can enter a maximum of 10 characters for the library name.
3. Create the savefile by running the following command: CRTSAVF FILE(EVSAVE/IBMIAGENT)
2.3.3 Sending the Files by FTP
1. Click Start and then Run on the computer where you extracted the IBM i Agent files.
2. Enter FTP <IBM i computer IP address> in the Open field. Click OK.
3. Enter your IBM i computer user ID. Press Enter.
4. Enter your IBM i password. Press Enter.
5. Enter BIN. Press Enter.
6. Enter LCD C:\<IBMi_AGENT file location>. Press Enter.
7. Enter put AS400AGENT /QSYS.LIB/EVSAVE.LIB/IBMIAGENT.SAVF. Press Enter.
Note:
If you created a library with a different name, replace LIB with the name of the library.
8. Enter quit. Press Enter.

IBM i Agent 6.2 User Guide
4
2.4 Restoring Objects
1. Run this command to find out the save library:
DSPSAVF SAVF(EVSAVE/IBMIAGENT)
2. Run this command:
RSTOBJ OBJ(*ALL) SAVLIB(savelibrary) DEV(*SAVF)
SAVF(EVSAVE/IBMIAGENT) MBROPT(*ALL) ALWOBJDIF(*ALL)
RSTLIB(EVSAVE)
Where savelibrary is the value found in Step 1.
If you created a library with a different name, replace EVSAVE with the name of the library.
3. Press Enter.
4. Move your cursor to the message at the bottom of the terminal screen.
5. Press F1 and then F10 to open the Display All Messages screen. If the command executed successfully, the message XX objects restored. 0 not restored to EVSAVE appears below the RSTOBJ command.
6. Install the Agent. See Installing the IBM i Agent.
2.5 Installing the IBM i Agent
During installation, upgrade and uninstall, do not use the Agent user. For other Agent operations, log
on as the Agent user.
To install an IBM i Agent:
1. Log on to the IBM i computer with the QSECOFR user or equivalent. Do not log on with the AGENT user.
2. On the IBM i computer run this command:
CALL EVSAVE/ISSETUP
If you created a library with a different name, replace EVSAVE with the name of the library.
3. Press F6 on the IBM i Agent Setup Main Screen.
Note:
The F6 command is not available when an IBM i Agent is already installed on the computer.
4. Complete the fields on the Install IBM i Agent screen. The default library is BUAGENT and the default directory is /buagent.

IBM i Agent 6.2 User Guide
5
2.6 Upgrading an Existing IBM i Agent
To upgrade an existing IBM i Agent:
1. Log on to the IBM i computer with the QSECOFR user or equivalent. Do not log on as the AGENT user.
2. Run a CALL EVSAVE/ISSETUP command.
3. Enter 6 to the left of an IBM i Agent. Press Enter.
4. Enter Yes in the Are you sure you want to upgrade field.
2.7 Verifying the Installation
After installing the IBM i Agent, complete these verification tasks:
● Run the WRKOBJ *ALL/BUAGENT command (where BUAGENT is the library name) to verify the product library exists. The library is listed on the Work with Objects screen.
● Run the WRKLNK ‘/buagent’ (where /buagent is the product directory name) command to verify the product directory exists. The product directory is listed on the Work with Object Links screen.
● Verify the Global.vvc file is in the product directory. Enter 5 on the Work with Object Links screen to confirm the Global.vcc file is in the product directory.
● Run the WRKUSRPRF AGENT command to verify the AGENT user profile exists. The AGENT user profile is listed on the Work with User Profiles screen. The installation automatically creates the AGENT user profile.
● Run the WRKSBS command to verify the subsystem AGENT is available. The subsystem AGENT is listed on the Work with Subsystems screen.
● Run the WRKACTJOB to verify the subsystem AGENT is active. If it appears on the list, it is active.
2.8 Obtaining a License
When you install the IBM i Agent, it is installed with a 30-day trial license. The expiry date for the
license is displayed in the Expiry Date field of the Work with License screen. With a trial license you
can configure the vault, and create retention schemes, jobs, and schedules. However, you cannot do
backups or restores without a full license.
To obtain a full license, contact your service provider. To create a license key, you must provide your
service provider with the model, processor feature, IBM i computer serial number, and software
group of the computer on which the IBM i Agent is installed. This information is displayed on the
Work with License screen. See Working with Agent Licenses.

IBM i Agent 6.2 User Guide
6
3 Working with the IBM i Agent
You must install the Agent software on every IBM i computer that you want to back up and the IBM i
computer must have a network connection. In addition, you must create an account on the vault to
receive the backup data. You use the IBM i Agent Command Line Interface (CLI) to setup Agents, jobs,
scheduling, and monitoring.
Backup data is sent by the IBM i Agent directly to the vault, over the network or the Internet. When
you execute a backup command, backup data is immediately sent to the vault. Likewise, when you
execute a restore command, backup data is immediately sent from the vault
On an IBM i computer the Agent software is responsible for these tasks:
● Saving and restoring DB Files, Objects and Common Files to and from the vault, using Delta processing.
● Synchronizing catalog files between the local system and the vault.
3.1 Prerequisites
Before data can be backed up from an IBM i computer, an IBM i Agent must be installed on the
computer.
After you configure the IBM i Agent, you must register the IBM i computer on the vault. Registering
the IBM i computer allows the Agent to log on to the vault, establish a connection, and back up data.
Your system configuration may allow the Agent to connect to multiple vaults.
A vault name and IP address are required for an Agent to register to a vault. A vault account, user
name and password are also required for registering the Agent to the vault.
When you create a job, it is registered and provides this information during a backup:
● The profile (vault) used.
● The data to be backed up.
● The type of logs to create.
● The encryption type (if any).
● The backup schedule.
Note: The first backup is a seed, or complete backup. Subsequent backups are deltas that contain
only the changes made to the data since the last backup. A delta backup is equivalent to a full backup
and you can use it to access and recover data in single or multiple files, libraries, or objects.
During a Disaster Recovery operation, when you recover your system to a new computer, you must
re-register the new computer to recover and restore the Agent information from the vault.
It is recommended that you review your email notifications (if enabled) and log files to verify that
your scheduled backups have completed properly.

IBM i Agent 6.2 User Guide
7
3.2 Accessing the IBM i Agent Main Menu
A user profile with QSECOFR authority is used for the initial IBM i Agent installation.
After the IBM i Agent installation, log in with the AGENT user profile. This user profile is created
during the IBM i Agent installation. When you log on with this user profile, you are automatically
directed to the IBM i Agent main menu.
It is recommended that you change the password of AGENT user profile to protect against
unauthorized access to the IBM i Agent.
You can use another user profile to access the IBM i Agent main menu. If your user profile for the
Initial Menu parameter is not set to ISAGENT:
● Open a command prompt and type GO <LIBRARY>/ISAGENT (where <LIBRARY> is
the name of the library where the Agent is installed). The default is BUAGENT. ● Press Enter. The ISAGENT screen appears.
3.3 IBM i Agent Main Menu Commands
These are the IBM i Agent main menu commands:
Select this command… To…
Agent Configuration Configure Agent settings
Work with jobs
Create, change, and delete jobs and display safeset and log
information.
Note: You must configure an Agent before you can create a job.
Work with Schedules Create, change, delete, enable, and disable backup schedules.
Note: You must create a job before you can create a schedule.
Backup
Create an immediate backup.
Note: You must configure an Agent and create a job before you
can back up data.
Restore
Restore backup data.
Note: You must complete a valid backup before you can restore
data.
Synchronize Synchronize the Agent and the vault backup data.
Auto Job Creation
Create multiple jobs for backing up all libraries. Creating
multiple jobs makes better use of CPU cycles and can result in
faster backup processing.

IBM i Agent 6.2 User Guide
8
Select this command… To…
Signoff
Exit the ISAGENT CLI program. You do not need to keep the
ISAGENT CLI program running after you have configured and
scheduled a job.

IBM i Agent 6.2 User Guide
9
4 Configuring the Vault
Before you can back up data, you must configure these settings on the Agent:
● The vault name and password.
● The data to back up.
● Email notifications.
● Licensing information.
When you complete the Agent configuration, the scheduled backups run automatically, through the
IBM i Scheduler.
4.1 Accessing the Work with Vault Screen
You use the Work with Vault screen to configure the Vaults that receive backup data from IBM i
Agents. A valid vault connection is required to complete a remote (network) backup.
To access the Work with Vault screen:
1. Go to the IBM i Agent main menu.
2. Enter 1 in the Selection or Command field. Press Enter.
3. Enter 1 in the Selection or Command field. Press Enter.
4.2 Add Vault Configuration Screen Fields
These are the Work with Vault screen fields:
Field Description
Vault Name
The name of the vault where the Agent data is backed up. The
name must be unique for each Agent backup you configure.
Vault names can be a maximum of 15 characters. You can use all
of the letters of the alphabet and the numbers 0 to 9. Special
characters #, @, _, and $ are allowed. The vault name cannot
begin with a number.
There is a maximum of 10 connections for each Agent.
Account Name
The account number or name (maximum of 40 characters)
provided by your vault supplier. More than one Agent may use
this account.
User Name The user name provided by your vault supplier.
Password The password provided by your vault supplier.

IBM i Agent 6.2 User Guide
10
Field Description
Verify Password The password provided by your vault supplier.
Network Address The network address (IP or DNS name) for the vault, provided by
your vault supplier.
Port Number
The port that the IBM i Agent uses to communicate with the vault.
The port is set up by your vault supplier. The default is 2546.
Reconnect delay
The time, in seconds, that the Agent waits to reconnect to the
vault after a communication or session failure. The default is 30
seconds. The maximum value is 1800 seconds.
If a reconnection is successful, the backup will continue without a
loss of data. If the reconnection is unsuccessful, the backup fails,
an error message is added to the log file, and an email notification
is sent (if email notifications are configured).
Retry Timeout
The time, in seconds, the Agent tries to reconnect to the vault.
The default is 3600 seconds. The maximum value is 43200
seconds.
When the retry timeout is reached, the backup fails, an error
message is added to the log file, and an email notification is sent
(if email notifications are configured).
Note: The Retry Timeout value must be greater than the
Reconnect delay value.
Over the wire Encryption
Select YES to encrypt your backup data as it goes from the IBM i
computer to the vault. This is recommended when you are using
an insecure network, such as the Internet. This is different from
the encryption of data jobs on the vault, which requires an
encryption password. The latter is discussed later in this
document.
4.3 Creating a New Vault
To create a new vault:
1. Go to the IBM i Agent main menu
2. Enter 1 in the Selection or Command field. Press Enter.
3. Enter 1 in the Selection or Command field. Press Enter.
4. Press F6.

IBM i Agent 6.2 User Guide
11
5. Complete the fields on the Add Vault Configuration screen. For field descriptions, see Add Vault Configuration Screen Fields.
4.4 Changing a Vault Configuration
To change an existing vault configuration:
1. Go to the IBM i Agent main menu.
2. Enter 1 in the Selection or Command field. Press Enter.
3. Enter 1 in the Selection or Command field. Press Enter.
4. Select a vault configuration and press 2.
5. Edit the fields on the Change Vault Configuration screen. For field descriptions, see Add Vault Configuration Screen Fields.
4.5 Verifying a Vault Configuration
To verify a vault configuration:
1. Go to the IBM i Agent main menu
2. Enter 1 in the Selection or Command field. Press Enter.
3. Enter 1 in the Selection or Command field. Press Enter.
4. Select a vault configuration and press 8.
When the verification is successful, the message vault was verified successfully appears. If
the vault verification is unsuccessful, recheck the vault configuration information and the
hardware and network connections.
4.6 Re-Registering a Vault
Re-registration allows you to recover and restore job configuration information from a vault to an
Agent. To move the global and job files to a new disk on the Agent, you must re-register the new disk
on the vault. You use the Re-register with Vault screen to update the account, user name, and
password information on the vault.
For security reasons, any passwords or system information that might compromise the security of
the system are not restored during re-registration. For this reason, some configuration files might be
incomplete.
An IFS file, named Register.log is created in the IBM i Agent system log directory. Messages similar to
the following appear in the log:
May12 10:44 PARS-W-0002 Due to a computer registration, configuration
file "A" is missing the following information:

IBM i Agent 6.2 User Guide
12
To re-register a vault:
1. Go to the IBM i Agent main menu
2. Enter 1 in the Selection or Command field. Press Enter.
3. Enter 1 in the Selection or Command field. Press Enter.
4. Press F8.
5. Complete the fields on the Re-Register with Vault screen.
Note: Enter *YES in the Is This a DR Test field to perform a disaster recovery test on the
target system.
4.7 Deleting a Vault Configuration
Deleting a vault does not affect any user data.
To delete an existing vault configuration:
1. Go to the IBM i Agent main menu
2. Enter 1 in the Selection or Command field. Press Enter.
3. Enter 1 in the Selection or Command field. Press Enter.
4. Select a vault configuration and press 4.
Note: A vault configuration can not be deleted if it is used by any job.

IBM i Agent 6.2 User Guide
13
5 Working with Retention Schemes
You create a retention scheme to define how many copies of a backup are stored on the vault, how
many days a backup is kept online, and how many days it is held in the archive.
There are always a minimum number of online copies and online days available, even if one is less
than the other. For example, if you specify 7 online copies for 7 online days, there will always be 7
copies even if they are more than 7 days old. In addition, there will always be 7 online days, even if
more days have passed.
The oldest retentions are deleted first. You cannot delete all backups. The most recent copy is always
kept.
5.1 Create a Retention Scheme Screen Fields
These fields appear on the Create a Retention Scheme screen:
Field Description
Retention Name
The retention scheme name.
Retention scheme names can be a maximum of 32 characters. You
can use all of the letters of the alphabet and the numbers 0 to 9.
Special characters #, @, _, and $ are allowed. The retention
scheme name cannot begin with a number.
You can create a maximum of 10 retention schemes for each
Agent.
Online days (1-9999)
The number of days a safeset is stored on the vault before it
expires. When the expiry date is reached, the safeset is
automatically deleted. There will always be at least the number of
online copies (below), regardless of the setting for online days.
Online copies (1-999)
The minimum number of copies of a safeset to maintain online.
When the number of copies is exceeded, the oldest copy is
deleted. The safeset is kept for the number of days specified by
the Online days field.
Archive Backup YES/NO Enter YES, to archive your backup for a specific number of days.
You can choose a value from 365 to 9999.

IBM i Agent 6.2 User Guide
14
5.2 Creating a Retention Scheme
To create a retention scheme:
1. Go to the IBM i Agent main menu.
2. Enter 1 in the Selection or Command field. Press Enter.
3. Enter 2 in the Selection or Command field. Press Enter.
4. Press F6.
5. Complete the fields on the Create a Retention Scheme screen. For field descriptions, see Create a Retention Scheme Screen Fields.
5.3 Changing a Retention Scheme
To change the settings of an existing retention scheme:
1. Go to the IBM i Agent main menu.
2. Enter 1 in the Selection or Command field. Press Enter.
3. Enter 2 in the Selection or Command field. Press Enter.
4. Enter 2 to the left of a retention scheme. Press Enter.
5. Edit the fields on the Create a Retention Scheme screen. For field descriptions, see Create a Retention Scheme Screen Fields.
5.4 Deleting a Retention Scheme
You delete a retention scheme when it is no longer associated a job. To delete a retention scheme:
1. Go to the IBM i Agent main menu.
2. Enter 1 in the Selection or Command field. Press Enter.
3. Enter 2 in the Selection or Command field. Press Enter.
4. Enter 4 to the left of a retention scheme. Press Enter.

IBM i Agent 6.2 User Guide
15
6 Throttling Bandwidth
IBM i Agent 6.0 and later support bandwidth throttling.
You can choose to use all the available network bandwidth for backups and restores, or you can
restrict the amount of bandwidth to a specific value.
6.1 Accessing the Bandwidth Throttling Screen
To access the Bandwidth Throttling screen:
1. Go to the IBM i Agent main menu.
2. Enter 1 in the Selection or command field. Press Enter.
3. Enter 6 in the Selection or command field. Press Enter.
6.2 Bandwidth Throttling Screen Fields
These fields appear on the Bandwidth Throttling screens:
Field Description
Backup/Restore Priority The backup or restore priority. Available values are 1 to 9. The
higher the number, the greater the priority.
Use all available Bandwidth Select YES to use all available network bandwidth when creating a
backup.
Select NO to customize the bandwidth used during a backup.
Limit Bandwidth usage to The amount of bandwidth in kilobytes per second (kb/s) allocated
to the backup.
All Day Select YES to apply the bandwidth settings to an entire day.
Select NO to specify the bandwidth settings to a specific day of
the week.
Start Hours The hour the backup starts.
Start Minutes The minutes the backup starts.
End Hours The hour the backup ends.
End Minutes The minutes the backup ends.
On the following Days The days to which backup throttling applies.

IBM i Agent 6.2 User Guide
16
6.3 Disabling Bandwidth Throttling
To disable bandwidth throttling:
1. Go to the IBM i Agent main menu.
2. Enter 1 in the Selection or command field. Press Enter.
3. Enter 6 in the Selection or command field. Press Enter.
4. Enter *YES in the Use all available Bandwidth field.
6.4 Configuring Bandwidth Throttling
To restrict the bandwidth used during a backup:
1. Go to the IBM i Agent main menu.
2. Enter 1 in the Selection or command field. Press Enter.
3. Enter 6 in the Selection or command field. Press Enter.
4. Enter *NO in the Use all available Bandwidth field.
5. Complete the fields on the second Bandwidth Throttling screen. For field descriptions, see Bandwidth Throttling Screen Fields.

IBM i Agent 6.2 User Guide
17
7 Encrypting Backup Data
Encryption prevents unauthorized access to backup data on the vault. You can select these
encryption types:
● *NONE
● *DES56
● *BLOWFISH65
● *BLOWFISH128
● *TRIPLEDES112
● *AES128 - Advanced Encryption Standard
● *AES256 - Advanced Encryption Standard (strongest)
Note: You must remember your encryption password if you choose to encrypt your data. You cannot
recover data without your encryption password.
7.1 IFS Wildcard Exclusions
These are the valid exclusion formats:
● ‘FOLDER*’
● ‘*FOLDER’
● ‘*FOLDER*
Only the last path element of the selection can contain a wildcard:
* Supported: ‘/Projects/A*’
* NOT Supported: ‘/Projects*/Active’
A path element of a selection can only contain a wildcard:
* Supported: ‘/Projects*’
* NOT Supported: ‘/P*j*’
The Wildcard can appear anywhere in the path element:
* Supported: ‘/Projects*’
* Supported: ‘/*rojects’
The Agent supports one path element with a wildcard per selection:
* Supported: ‘/Projects/User*’
* NOT Supported: ‘/P*/U*’

IBM i Agent 6.2 User Guide
18
When a file appears on an exclusion list, the file is not backed up even if it appears in a folder that is
backed up. The wildcard exclusion patterns allowed are ‘FILE*’, ‘*FILE’ and ‘*FILE*.
7.2 OBJ Backup Exclusions
When an object appears on an exclusion list, the object is not backed up even if it exists in the library
that is backed up. The allowed wildcard exclusion patterns are: ‘OBJECT*’, ‘*OBJECT’ and ‘*OBJECT*’.
7.3 Improving Performance with Multi -Threading
When the Agent is installed on a computer with multiple CPUs, you can use multi-threading to
improve the performance of backups and restores of files larger than 32KB.
These threading models are available:
● Single threading. All the data processing is handled by a single thread.
● Combined threading. Data processing is divided between two threads.
● Block Processor threading. Data processing is divided between four or more threads.
7.4 Threading Model Options
You can select these threading model options in the Threading Model field:
● Default
On a single CPU system, the Single threading model will be used.
On a multi-CPU system the backup settings determine what threading model is used. If
compression or encryption is turned ON, the Block Processor threading model is used. If
compression or encryption is turned OFF, the Combined threading model is used.
● Single
A single threading model is used.
● Combined
The combined threading model is used.
● Block Processor
The block processor threading model is used with up to four processing threads.
● Maximum Block Processor
The block processor threading model is used with up to five processing threads.

IBM i Agent 6.2 User Guide
19
7.5 Disabling CRC
You can disable CRC to improve the performance of backups and restores. If CRC is disabled, it
remains disabled during a restore irrespective of the option selected in the Disable CRC field on the
Restore screen.
7.6 Setting Compression and Decompression Algorithms
To reduce the size of the data transmitted and the size of the data stored on the vault, select one of
these compression types:
● *NONE
● *DEFAULT
● *STANDARD
● *NORMAL
● *MINIMUM
● *BETTER (Default)
● *MAXIMUM
● *FASTERRST (IBM LZ1)
The IBM LZ1 algorithm for compression and decompression improves the performance of restores,
but slows backup performance. To use the IBM LZ1 compression and decompression algorithm, enter
FASTERRST in the Compression Type field.
7.7 Creating an Email Notification
You can configure the Agent to send an email notification to one or more recipients, when a job fails
or succeeds. The email notifications apply to all Agent jobs. An email notification cannot be created
for a specific job.
To create an email notification:
1. Go to the IBM i Agent main menu
2. Enter 1 in the Selection or command field. Press Enter.
3. Enter 4 in the Selection or command field. Press Enter.
4. Enter one of these options in the Email Notification field:
● *NONE - if you do not want to receive notifications.
● *ALL - to receive a notification when a job is successful or fails.
● *SUCCESS – to receive a notification when a job is successful.
● *FAIL - to receive a notification when a job is unsuccessful
5. Enter an email address in the From Email Address field.

IBM i Agent 6.2 User Guide
20
6. Enter the email addresses of the recipients in the Recipients field.
7. Enter the address of the Simple Messaging Transport Protocol Server for sending the emails in the SMTP field.
IBM i Agent 6.2 User Guide
21
8 Working with Agent Licenses
When you install the IBM i Agent, it is installed with a 30-day trial license. The expiry date for the
license is displayed in the Expiry Date field of the Work with License screen. With a trial license you
can configure the vault, and create retention schemes, jobs, and schedules. However, you cannot do
backups or restores without a full license.
To obtain a full license, contact your service provider. To create a license key, you must provide your
service provider with the model, processor feature, IBM i computer serial number, and software
group of the computer on which the IBM i Agent is installed.
8.1 Entering an IBM i Agent License Key
You cannot change the information on the top of the Work with License screen. To enter an IBM I
Agent license key:
1. Go to the IBM i Agent main menu.
2. Enter 1 in the Selection or command field. Press Enter.
3. Enter 5 in the Selection or command field. Press Enter.
4. Enter the license key supplied to you by your service provider in the License Key field. The format of the license key is twenty-seven (27) upper-case characters in the format XXX-XXXXXXXX-XXXXXXXX-XXXXXXXX.
5. Press Enter to validate the license key. The Agent will reply with a success or error message at the bottom section of the display.

IBM i Agent 6.2 User Guide
22
9 Working with Jobs
You must create a job to back up data. There is no limit to the number of jobs you can create. You
can select one of these types of data backup:
● *OBJ – Backs up libraries and objects in the native system.
● *IFS – Backs up folders and stream files in the Integrated File System.
● *SYS – Backs up system state data that contains system security data (by SAVSECDTA command), configuration objects (by SAVCFG command), system values, TCP configuration and all *JOBSCD objects in QUSRSYS library.
● *ALLUSR – General set of *OBJ job. It backs up all user libraries, including some libraries supplied by IBM. This job is equivalent to SAVLIB LIB(*ALLUSR).
● *IBM – General set of *OBJ job. It backs up all system (IBM) libraries. This job is equivalent to SAVLIB (*IBM). In addition, *CMD, *MENU and *PNLGRP objects in QSYS library will be automatically added to the job.
A System State Backup includes the following IBM i System items:
● System Values (WRKSYSVAL *ALL) with system API
● User Profiles, Authorities List (SAVSECDTA)
● User Profiles (*USRPRF)
● Authorization Lists (*AUTL)
● Authority Holders (*AUTHLR)
● Configuration Objects (SAVCFG)
● Line descriptions
● Controller descriptions
● Device descriptions
● Mode descriptions
● Class-of-service descriptions
● Network interface descriptions
● Network server descriptions
● NetBIOS descriptions
● Connection lists
● Configuration lists
● Hardware resource data
● Token-ring adaptor data

IBM i Agent 6.2 User Guide
23
● TCP configuration objects (SAVOBJ)
● The following objects in the QUSRSYS library: *.MGTCOL, *.JOBSCD, QAPZ*.FILE, QASO*.*, QAOS*.*, QATOCIFC*.*, QATOCLIFC.*, QAOK*.*, QATM*.*, QATOC*.*, QAZSP*.*, QPTMPLPD *.*, QTCP *.*, QTCPASC *.*, QTCPEBC *.*, QTFTP *.*, QTMFQ00021.*, QTMFTPS *.*, QTMHHTTP *.*, QTMSMTPS *.*, QTMSTRACE .*, QTPPPOUTQ .*, QWEBADMIN .*, QZDATRC *.*, QZHQTRC *.*, QZMF*.*, QZRCTRC *.*, QZSOTRC *.*
● Job scheduler objects (SAVOBJ)
● All *JOBSCD objects in QUSRSYS library
9.1 Add New Job Screen Object Backup Fields
These are the fields that appear on the Add New Job – Object Backup screen:
Field Description
Job Name The job name.
Job names can be a maximum of 30 characters. You can use all of the
letters of the alphabet and the numbers 0 to 9. Special characters #,
@, _, and $ are allowed.
Vault Name The name of the vault where the Agent data is backed up. The name
must be unique for each Agent backup you configure.
Vault names can be a maximum of 15 characters. You can use all of
the letters of the alphabet and the numbers 0 to 9. Special characters
#, @, _, and $ are allowed. The vault name cannot begin with a
number.
This will be a vault you have already created. Press F4 to see the list
of available vault names that can be entered here.
ASP Device The name of the auxiliary storage pool (ASP) device where the Agent
data is backed up. These are the available options:
● Name – The name of the ASP device to which you want to back up data.
● SYSBAS – Data is backed up to the system ASP.

IBM i Agent 6.2 User Guide
24
Field Description
Include Objects The objects to include in the backup. The list can include a maximum
of 128 items. You can choose one of these options:
● *ALL - Saves all objects in the specified library. ● *ALLUSR - Saves all objects in the user libraries. QSYS becomes
the only legal library name. If you include *ALLUSR more than once, all the other entries are removed.
● *IBM - Saves all objects in system (IBM) libraries. QSYS becomes the only legal library name. If you *IBM include more than once, all the other entries are removed.
● generic* - A character string with one or more valid characters followed by an asterisk (*). Saves a group of objects in the specified library.
● Library – Saves all objects in the library you specify. Enter QSYS to save all objects in all libraries.
● Type – Saves objects of a specific type. Enter *ALL to save all types.
Exclude Objects The objects to exclude from the backup. The list can include a
maximum of 128 items. You can choose one of these options:
● *ALL ● *ALLUSR ● *IBM ● generic name - Generic names start with one or more valid
characters, followed by the wildcard. ● Library – Excludes all objects in the library you specify. Enter
QSYS to exclude all objects in all libraries. ● Type – Excludes objects of a specific type. Enter *ALL to exclude
all types.
Recursive Specifies whether sub-directories are included in the backup.
Small object size (KB) The size limit for backed up objects. Objects bigger than the user-
defined values are backed up with an IBM API. Backing up small
objects can improve restore times.
Save savefile data Save file or header information.
Save active Specifies if backup triggers are added to PF-DTA objects contained in
the job include list. During the creation or edit of an *OBJ job with
the *TRIGGER setting, a confirm screen is displayed. These options
are available:
● NONE ● SYSDFN ● TRIGGER

IBM i Agent 6.2 User Guide
25
Field Description
Save active/trigger wait time The time in seconds that the trigger waits for database activity to
stop, before starting the backup. You can enter a maximum value of
99999, or NOMAX (wait forever). The default is 120 seconds.
Trigger retry period The time in seconds that the trigger waits up to retry starting the
backup. You can enter a maximum value of 99999, or NOMAX (wait
forever). If the retry is unsuccessful, the backup does not start, and
an error message is added to the log file. The default is 3600 seconds.
Threading Model On a multi-CPU computer, you can use multi-threading to improve
backup and restore performance. Choose one of these options:
● DEFAULT ● SINGLE ● COMBINED ● BLOCK PROCESSOR ● MAXIMUM BLOCK PROCESSOR
Encryption
The type of encryption standard to use to protect Agent data. These
options are available:
● NONE ● DES56 ● BLOWFISH56, ● BLOWFISH128 ● TRIPLEDES112 ● AES128 ● AES256
Compression The compression type. Choose one of these options:
● NONE ● DEFAULT ● STANDARD ● NORMAL ● MINIMUM ● BETTER ● MAXIMUM ● FASTERRST
Deferring The time to wait in minutes before starting the next backup job. You
can enter a value 15 to 2880. Enter NODEFER to keep the backup
going until it is finished.
Quick File Scanning Quick File Scanning (QFS) reduces the amount of data read during the
backup process. Any file streams that have not changed since the last
backup are skipped. Without QFS, files are read in their entirety.

IBM i Agent 6.2 User Guide
26
Field Description
Update History Update the backup history. Enter YES to update the time and date of
the backup data.
Log Detail The amount and type of backup information to include in the log
files. Choose from these options:
● FILE ● NONE ● SUMMARY ● DIRECTORY
Disable CRC Disable CRC can improve the performance of backups and restores.
9.2 Add New Job Screen IFS Backup Fields
These are the screens that appear on the Add New Job – IFS Backup screen:
Field Description
Include IFS stream files The objects to include in the IFS backup. The list can include a
maximum of 128 items. The paths and file names are case-sensitive.
Use WRKLNK command to verify the proper case for paths you will
explicitly include.
Exclude IFS stream files The objects to exclude from the IFS backup. The list can include a
maximum of 128 items.
Threading Model On a multi-CPU computer, you can use multi-threading to improve
backup and restore performance. Choose one of these options:
● DEFAULT ● SINGLE ● COMBINED ● BLOCK PROCESSOR ● MAXIMUM BLOCK PROCESSOR
Encryption
The type of encryption standard to use to protect Agent data. These
options are available:
● NONE ● DES56 ● BLOWFISH56, ● BLOWFISH128 ● TRIPLEDES112 ● AES128 ● AES256

IBM i Agent 6.2 User Guide
27
Field Description
Compression The compression type. Choose one of these options:
● NONE ● DEFAULT ● STANDARD ● NORMAL ● MINIMUM ● BETTER ● MAXIMUM ● FASTERRST
Deferring The time to wait in minutes before starting the next backup job. You
can enter a value 15 to 2880. Enter NODEFER to keep the backup
going until it is finished.
Quick File Scanning Quick File Scanning (QFS) reduces the amount of data read during the
backup process. Any file streams that have not changed since the last
backup are skipped. Without QFS, files are read in their entirety.
Suppress archive-bit process Update file archive-bit attribute. Enter *NO to update this attribute
after backup.
Log Detail The amount and type of backup information to include in the log
files. Choose from these options:
● FILE ● NONE ● SUMMARY ● DIRECTORY
Disable CRC Disable CRC can improve the performance of backups and restores.

IBM i Agent 6.2 User Guide
28
9.3 Add New Job Screen SYS Backup Fields
These are the screens that appear on the Add New Job – SYS Backup screen:
Field Description
Threading Model On a multi-CPU computer, you can use multi-threading to improve
backup and restore performance. Choose one of these options:
● DEFAULT ● SINGLE ● COMBINED ● BLOCK PROCESSOR ● MAXIMUM BLOCK PROCESSOR
Encryption
The type of encryption standard to use to protect Agent data. These
options are available:
● NONE ● DES56 ● BLOWFISH56, ● BLOWFISH128 ● TRIPLEDES112 ● AES128 ● AES256
Deferring The time to wait in minutes before starting the next backup job. You
can enter a value 15 to 2880. Enter NODEFER to keep the backup
going until it is finished.
Compression The compression type. Choose one of these options:
● NONE ● DEFAULT ● STANDARD ● NORMAL ● MINIMUM ● BETTER ● MAXIMUM ● FASTERRST
Log Detail The amount and type of backup information to include in the log
files. Choose from these options:
● FILE ● NONE ● SUMMARY ● DIRECTORY
Disable CRC Disable CRC can improve the performance of backups and restores.
IBM i Agent 6.2 User Guide
29
9.4 Creating a Backup Job
To create a backup job:
1. Go to the IBM i Agent main menu.
2. Enter 2 in the Selection or Command field. Press Enter.
3. Press F6.
4. Enter a job name in the Job name field.
5. Enter a vault name in the vault name field.
6. Enter one of these values in the Data type field:
● *OBJ to back up libraries and objects in the native system.
● *IFS to back up folders and stream files in the Integrated File System.
● *SYS to backup system state data containing system security data (SAVSECDTA), configuration objects, and system values.
7. Press Enter.
8. Complete the fields on the Add New Job screen. For field descriptions, see Add New Job Screen Object Backup Fields, Add New Job Screen IFS Backup Fields and Add New Job Screen SYS Backup Fields.
9. Press F10 to display more options.
9.5 Creating Custom Commands
To create a custom command before or after a backup job:
1. Go to the IBM i Agent main menu.
2. Enter 2 in the Selection or Command field. Press Enter.
3. Press 3 in the OPT column of the job that you want to add the custom command. Press Enter.
4. Enter one of these values in the Command class field:
● *PRE to run the custom command before the backup runs.
● *POST to run the custom command after the backup runs.
5. Enter a valid command in the Command field. You can specify:
a. any valid command
b. CALL PGM() to run program
c. SBMJOB to run a batch job.

IBM i Agent 6.2 User Guide
30
9.6 Changing Job Settings
To change the settings of an existing job:
1. Go to the IBM i Agent main menu.
2. Enter 2 in the Selection or Command field. Press Enter.
3. Enter 2 in the OPT column of the job you want to edit. Press Enter.
4. Edit the fields on the Change Job screen. For field descriptions, see Add New Job Screen Object Backup Fields, Add New Job Screen IFS Backup Fields and Add New Job Screen SYS Backup Fields.
Note: You cannot edit the Job name, Job ID, or vault name fields.
5. Press F10 to edit more fields.
Note:
If you modify the suppress archive bit processing setting, the Agent turns off QFS (Quick File
Scanning) for the next backup. For *OBJ backups, this parameter is shown as Update History.
When QFS is turned off, the backup can run longer than expected.
9.7 Deleting a Job
When you delete a job, the job information is deleted from your local Agent. Existing backup data is
not deleted.
To delete a job:
1. Go to the IBM i Agent main menu.
2. Enter 2 in the Selection or Command field. Press Enter.
3. Enter 4 in the OPT column of the job you want to delete. Press Enter.
4. Press Enter.

IBM i Agent 6.2 User Guide
31
10 Working with Safesets
When a job is executed and a backup is created, the backup data is held in a safeset that is stored in
the vault. A sequential number is assigned to each safeset after every backup. The date and time the
safeset is created is also recorded, and you can use this information to select a safeset created on a
specific date.
The Status column on the Display Safeset screen displays these values:
● Online – You can use the safeset for a restore.
● Work Area – The data is in transition to Online status. You can either wait for the system to change the status, or you can execute a Synchronize command
● Archived – The safeset is stored off-line from the vault.
You cannot edit the fields on the Display Safeset Detail screen.
10.1 Display Safeset Detail Screen Fields
These are the fields that appear on the Display Safeset Detail screen:
Field Description
Job Name The name of the job that created the safeset.
Catalog Number The sequential number assigned to this safeset.
Location The name and address of the vault where this safeset is kept.
Status The safeset status. These options are available:
● Online – You can use the safeset for a restore. ● Work Area - The data is in transition to Online status. You can
either wait for the system to change the status, or you can execute a Synchronize command
● Archived - The safeset is stored off-line from the vault.
Backup Time The date and time the safeset was created.
Backup Type The type of backup. These options are available:
● Full ● Full-Delta
Storage Size The size of the backup. These fields are available:
● Original – The size of the original backed up data. ● Deltized – The amount of deltized data (zero for the initial seed). ● Compressed – The size of the data stored on the vault.

IBM i Agent 6.2 User Guide
32
Field Description
Retention The retention plan for the safeset. These fields are available:
● Days – The number of days this safeset is kept. ● Copies – The number of backup copies kept. ● Archived Days – The number of days an archive copy is kept.
Encrypted Indicates if the backup data was encrypted.
Compressed Indicates if the backup data was compressed.
Media Type The type of media used to store the backup data.
Expiry The date the safeset will be deleted.
10.2 Viewing a Safeset
To view a safeset:
1. Go to the IBM i Agent main menu.
2. Enter 2 in the Selection or Command field. Press Enter.
3. Enter 5 in the OPT column to display the safeset for the job. Press Enter.
4. Select a safeset and press 5.
5. Press F3 to exit the Display Safeset Detail screen.

IBM i Agent 6.2 User Guide
33
11 Working with Log Files
A log file is created for every backup, synchronize, or restore. You can view the log file to determine if
the backup, synchronize, or restore was successful, the date and time the event completed, and what
objects were backed up or restored. The amount of detail included in the log file depends on your
choice of log detail when you created the job.
You specify the amount and type of backup information to include in the log files when you create a
job. To view the options available for the Log Detail field, see Add New Job Screen Object Backup
Fields, Add New Job Screen IFS Backup Fields or Add New Job Screen SYS Backup Fields.
The safeset number is used to name the backup logs. For example, 00000001.LOG. Restore logs are
named RSTYYYYMMDD-HHMMSS. The SYNCH.LOG is the most current log file.
11.1 Viewing a Log File
To view a log file:
1. Go to the IBM i Agent main menu.
2. Enter 2 in the Selection or Command field. Press Enter.
3. Enter 6 in the OPT column to display the log files for the job. Press Enter.
4. Select a log file and press 5.
5. Select one of these options to navigate through the log file:
● Page Up
● Page Down
● Type B on the Control field and press Enter to move to the bottom of the log file
● Type T on the Control field and press Enter to move to the top of the log file
11.2 Converting an .XLOG File to a .LOG File
You use the XLOGMAIN utility to convert an .XLOG file to a .LOG file. Open a command prompt and
execute this command:
CALL PGM(XLOGMAIN) PARM('/<path>/file.XLOG' '/<path>/file.LOG')
The .XLOG file must be in the specified location and you must provide the complete path for the .LOG
file generated by the XLOGMAIN tool.

IBM i Agent 6.2 User Guide
34
12 Working with Schedules
You can create a schedule to run a backup or synchronize job at a pre-determined time. You can also
run jobs manually (ad-hoc, or unscheduled).
To complete a backup, the IBM i Agent needs a minimum of *ALLOBJ rights. That is, the Agent needs
enough rights to be able to open/read all libraries and objects.
Note:
Do not use the IBM Advanced Scheduler to submit Agent jobs. The Agent job scheduler requires
multi-threading. The IBM Advanced Scheduler uses the RCLRSC command, which is not compatible
with multi-threaded applications.
12.1 Work with Scheduler Screen Fields
These are the fields that appear on the Work with Scheduler screen:
Field Description
Command The type of job to run. These options are available:
● Backup ● Synchronize ● Custom
Custom Command The IBM i command to run.
Job Name The name of an existing job.
Retention Name The name of an existing retention plan.
Command Cycle The frequency that the schedule runs. These options are available:
● Weekly ● Monthly
Minutes/Hours The time the schedule starts.
Day of week The day of the week that the schedule starts.
Quick File Scanning Quick File Scanning (QFS) reduces the amount of data read during the backup
process. Any file streams that have not changed since the last backup are
skipped. Without QFS, files are read in their entirety.

IBM i Agent 6.2 User Guide
35
Field Description
Deferring The time to wait in minutes before starting the next backup job. These fields
are available:
● Disable – Disables or enables backup deferring ● Times – The time to defer the backup job. You can enter a value from
15 to 2880. If the backup job does not complete in the specified time, the backup pauses and continues at the next scheduled Backup time.
To stop the backup, the operating system must abnormally stop the backup
job (the Backup API). This creates errors in the Backup.log, but they are
expected. The log will also have a message similar to:
“BKUP-W-0363 Backup window expired, intra-file defer.”
You can ignore all object related errors that appear after this line because the
deferred object will be backed up during the following Backup.
12.2 Creating a Schedule
To create a schedule:
1. Go to the IBM i Agent main menu.
2. Enter 3 in the Selection or Command field. Press Enter.
3. Press F6.
4. Complete the fields on the Work with Scheduler screen. For field descriptions, see Work with Scheduler Screen Fields.
12.3 Changing a Schedule
To change the settings of an existing schedule:
1. Go to the IBM i Agent main menu.
2. Enter 3 in the Selection or Command field. Press Enter.
3. Select a schedule.
4. Press 2 and then Enter.
5. Edit the fields on the Work with Scheduler screen. For field descriptions, see Work with Scheduler Screen Fields.
12.4 Deleting a Schedule
To delete an existing schedule:
1. Go to the IBM i Agent main menu.

IBM i Agent 6.2 User Guide
36
2. Enter 3 in the Selection or Command field. Press Enter.
3. Select a schedule.
4. Press 4 and then Enter.
12.5 Enabling or Releasing a Schedule
You use the enable or release option to make a job active in the IBM i job queue. To enable or
release a schedule:
1. Go to the IBM i Agent main menu.
2. Enter 3 in the Selection or Command field. Press Enter.
3. Select a schedule.
4. Press 6 and then Enter.
12.6 Disabling or Holding a Schedule
You can pause a backup by holding it in the queue. To make the backup active, you must enable it. To
disable or hold a schedule:
1. Go to the IBM i Agent main menu.
2. Enter 3 in the Selection or Command field. Press Enter.
3. Select a schedule.
4. Press 3 and then Enter.

IBM i Agent 6.2 User Guide
37
13 Working with Backup Jobs
After you set up the Agent and create a schedule, the backups run automatically. The first backup
that is run is a seed. This first time the backup runs, the backup copies everything you specify in a
compressed format to the vault. The next time the backup runs, only the data that has changed is
copied to the vault. This methodology reduces the time and resources required to back up data.
When you review a backup log file, the size of the data that is copied to the vault is less than the data
in the files.
The vault constantly monitors the backups and identifies what data is new, and what data is
unchanged. This ensures that the backup data is always current when you do a restore.
To run a one-time backup, you can modify an existing Agent and job or create a new one.
13.1 Run Backup Screen Fields
These are the fields that appear on the Run Backup screen:
Field Description
Job Name The name of an existing job.
Retention Scheme The name of an existing retention plan.
Quick File Scanning Quick File Scanning (QFS) reduces the amount of data read during the backup
process. Any file streams that have not changed since the last backup are
skipped. Without QFS, files are read in their entirety. *YES is the default.
Disable Deferring Two options are available:
● NO - The backup runs until the time specified by the Defer after field is reached. The backup is paused until the next scheduled backup. You might select this option for a large backup that takes several scheduled periods, and you want the backup to run after hours when the computer is not busy.
● YES - The Backup runs until it is finished, even if it overlaps the time of the next scheduled backup. When you select Yes, the Defer after field is not visible.
Defer after The time in minutes to defer the backup. You can enter a value from 15 to
2880. The default is 480. If this time is reached and the backup is not finished,
the backup pauses until the next scheduled backup time.

IBM i Agent 6.2 User Guide
38
13.2 Running a Backup
To run a backup:
1. Go to the IBM i Agent main menu.
2. Enter 4 in the Selection or Command field. Press Enter.
3. Complete the fields on the Run Backup screen. For field descriptions, see Run Backup Screen Fields.

IBM i Agent 6.2 User Guide
39
14 Synchronizing Data
You run the Synchronize command to ensure that the latest backup is available for an immediate
restore.
When you run the Synchronize option, the IBM i Agent compares and updates the remote vault files
with the local safeset catalog files. You can configure the IBM i Agent to delete catalog files that are
no longer required.
The Synchronize job is submitted to the Agent System with the message: “Synchronize Job <name>
has been submitted to the AGENT system.
To synchronize the IBM i Agent data with the vault:
1. Go to the IBM i Agent main menu.
2. Enter 9 in the Selection or Command field. Press Enter.
3. Enter the name of the job you want synchronize in the Job name field. Press Enter.
IBM i Agent 6.2 User Guide
40
15 Automatic Job Creation
You use automatic job creation to back up an entire IBM i computer. With automatic job creation,
you can create multiple jobs to back up all libraries. Creating multiple jobs better utilizes computer
resources and can reduce the time needed to complete a backup. You can only use automatic
job creation once.
15.1 Viewing the AUTOJOB Main Menu
To view the AUTOJOB main menu:
1. Open a command prompt and type GO <LIBRARY>/ISAGENT (where <LIBRARY> is the name of the library where the Agent is installed). The default is BUAGENT.
2. Press Enter. The ISAGENT screen appears.
3. Enter 10 in the Selection or Command field. Press Enter.
4. Select each of these options in turn:
● Create Database - Create the Job Creation Database. The Job Creation Database contains information about all the libraries and objects inside the libraries in the system, and the size and count of the objects that reside in each library.
● Library/Job Selection - Exclude, select, or assign libraries to jobs.
● Retention Schedule - Configure retention schedules. You can also set up deferring and quick file scanning.
● Create Job(s) - Assign multiple retention schemes to jobs and create auto scheduler entries for the backup.
● Schedule Jobs - Create jobs with default parameters.
15.2 Select Libraries Screen Fields
These fields appear on the Select Libraries screen:
Field Description
Total Object Size The size of all the libraries and the objects inside the libraries selected for the
job.
Total Object Count The number of objects in multiples of 1000 selected for jobs.
Job Limit The number of jobs to create. By default, this value is the number of CPUs
(including LPAR CPUs) multiplied by 4. If the number of CPUs cannot be
determined, the default is 1.
IBM i Agent 6.2 User Guide
41
Field Description
Obj Size/Job The optimal object size per job. The size of the job can be more or less than the
calculated value of object size/job.
Obj Count/Job The optimal object count in multiples of 1000. The count of the objects can be
more or less than the calculated value of object count/job.
Lib/Job The name of the library or the job. Enter X to include the library in the backup.
By default, all libraries except QSYS, QGPL, and QUSRSYS are selected.
15.3 Select Libraries Screen Commands
These commands are available on the Select Libraries screen:
Command Description
F2 Save your changes.
F3 Exit without saving your changes.
F4 Recalculate the parameters and arrangement of libraries and jobs.
F5 Replaces the current screen with the original list of libraries and values.
F6 Create an Include and Exclude list for the job.
When the Include/Exclude count of one or more jobs exceeds 128, you must
choose one of these options:
● Yes - automatically reshuffle the libraries and reduce the include/exclude list. In some circumstances the list cannot be automatically reduced and you must reduce the list manually
● No - Return to the Select Libraries screen and increase or decrease the number of jobs manually.
F7 View the previous job.
F8 View the next job.
F9 Sort the jobs alphabetically.
F10 Sort the jobs by size in descending order.

IBM i Agent 6.2 User Guide
42
Command Description
F11 Display the list of job names with their include or exclude count.
The job names are formed with the first character of the include/exclude
library names. Libraries starting with “A” are included where the maximum
number of libraries starting with an “A” are found and so is the case for all
other libraries except “Q”. Libraries starting with “Q” are not be included as
generic Q*. The exclude list does not support the use of generic library names
like A*.
Special characters “, @, #, $, / are replaced by $ in job names.
If all libraries are removed from the job, the job name list is empty.
When the include/exclude list is finished, press F3 three times to view the
Auto Job menu.
Considering the backup of future libraries the generic include for A* to Z*,
@*, #*, $* and /* except Q* are added in different jobs.
15.4 Selecting a Library and a Job
To select a library and a job:
1. Go to the IBM i Agent main menu.
2. Enter 10 in the Selection or Command field. Press Enter.
3. Enter 2 in the Selection or command field. Press Enter.
4. Enter the libraries you want to exclude. You cannot use wildcard characters in the library names.
- or -
Press F6 to view and edit fields on the Select Libraries screen. For field descriptions, see
Select Libraries Screen Fields.
5. Press F2.
- or -
Select a command on the Select Libraries screen. See Select Libraries Screen Commands.

IBM i Agent 6.2 User Guide
43
15.5 Retention Schedule Screen Fields
These fields appear on the Retention Schedule screen:
Field Description
Retention The retention schedule name from the Agent repository (Global.vvc) file.
If a retention schedule is deleted from the Agent, it still appears on the Retention
Schedule screen.
Period The frequency that the job runs. These options are available:
● *WEEKLY ● *MONTHLY
Days/Month
(MTWTFSS/1-31):
The day of the month that the job runs. You can enter a value from Monday to
Sunday, the dates from 1 to 31, or *First, *Last.
For example, you enter _T_T__S to run a job on Tuesday, Thursday and Sunday.
You must include spaces for days that will not be scheduled.
Time The time the job runs in hours and minutes. The hour is in 24 hours format.
Quick Scan Back up any objects that have not changed since the last backup. Two options are
available:
● *YES – To not back up file streams or objects that are unchanged since the last backup.
● *NO – To back up all objects.
Defer Disable Two options are available:
● NO - The backup runs until the time specified by the Defer time column is reached. The backup is paused until the next scheduled backup.
● YES - The Backup runs until it is finished, even if it overlaps the time of the next scheduled backup.
Defer Time The time in minutes to defer the backup. You can enter a value from 15 to 2880.
The default is 480. If this time is reached and the backup is not finished, the
backup pauses until the next scheduled backup time.
15.6 Creating a Retention Schedule
Note: You cannot create a retention schedule when creating a database.
To create a retention schedule:
1. Go to the IBM i Agent main menu.
2. Enter 10 in the Selection or Command field. Press Enter.

IBM i Agent 6.2 User Guide
44
3. Enter 3 in the Selection or command field. Press Enter.
4. Complete the fields on the Retention Schedule screen. For field descriptions, see Retention Schedule Screen Fields.
5. Press F2.
15.7 Assigning Retention Schedules to Jobs
Note: Retention schedules deleted after the database is created are displayed in the Retention
Selection screen.
To assign a retention schedule to a job:
1. Go to the IBM i Agent main menu.
2. Enter 10 in the Selection or Command field. Press Enter.
3. Enter 4 in the Selection or command field. Press Enter.
4. Enter X in a job column to apply the retention schedule to the job.
5. Press F2.
15.8 Create All Jobs Screen Fields
These fields appear on the Create All Jobs screen:
Field Description
Vault name The name of the vault where the Agent data is backed up. Press F4 to enter a
vault name. Press F4 twice to view a list of existing vault names.
Vault names can be a maximum of 15 characters. You can use all of the letters of
the alphabet and the numbers 0 to 9. Special characters #, @, _, and $ are
allowed. The vault name cannot begin with a number.
Recursive Specifies whether all libraries and their contents (objects) are included in the
backup.
Save savefile data Specifies whether the contents of the save file or only header information is
backed up.
Save active Specifies if backup triggers are added to PF-DTA objects contained in the job
include list. During the creation or edit of an *OBJ Job with the *TRIGGER
setting, a confirm screen is displayed. These options are available:
● NONE ● SYSDFN ● TRIGGER

IBM i Agent 6.2 User Guide
45
Field Description
Save active /trigger
wait time (120)
The time in seconds that the trigger waits for database activity to stop, before
starting the backup. You can enter a maximum value of 99999, or NOMAX (wait
forever). The default is 120 seconds.
Trigger retry period The time in seconds that the trigger waits up to retry starting the backup. You
can enter a maximum value of 99999, or NOMAX (wait forever). If the retry is
unsuccessful, the backup does not start, and an error message is added to the
log file. The default is 3600 seconds.
Encryption type The type of encryption standard to use to protect Agent data. These options are
available:
● NONE ● DES56 ● BLOWFISH56, ● BLOWFISH128 ● TRIPLEDES112 ● AES128 ● AES256
New password The password used to access encryption settings
New password (to
verify)
The password used to access encryption settings
Quick File Scanning Quick File Scanning (QFS) reduces the amount of data read during the backup
process. Any file streams that have not changed since the last backup are
skipped. Without QFS, files are read in their entirety.
Update history Update the backup history. Enter YES to update the time and date of the backup
data.
Log detail The amount and type of backup information to include in the log files. Choose
from these options:
● FILE ● NONE ● SUMMARY ● DIRECTORY

IBM i Agent 6.2 User Guide
46
15.9 Creating a Job
To create a job:
Note:
You must create a database before you can create a job.
1. Go to the IBM i Agent main menu.
2. Enter 10 in the Selection or Command field. Press Enter.
3. Enter 4 in the Selection or command field. Press Enter.
4. Complete the fields on the Create All Jobs screen. For field descriptions, see Create All Jobs Screen Fields.
To edit the job name before you submit the job, press F11. Press F2 to save your changes.
5. Press F6 to create the job with the current settings. This process can take several minutes.

IBM i Agent 6.2 User Guide
47
16 Restoring Jobs
You can use the Run Restore screen to restore backup data.
You can use a terminal session to run an OBJ or IFS restore. However, a SYS restore must be run on
the console and it will put the system into restricted state automatically.
After you complete the SYS restore, you need to re-start all subsystems manually. A system state
restore generates a special log file named SYSYYYYMMDD-HHMMSS. To view the log, see Working
with Log Files.
16.1 Run Restore Screen Fields
These fields appear on the Run Restore screens for the *OBJ data type:
Field Description
Job name The job name.
Safeset No A sequential number from 1 - 99999999 that identifies the safeset.
Enter *LASTONLINE to retrieve the most current backup.
Data type
The type of data to include in the restore:
*OBJ - to restore libraries and objects in the native system.
Include objects The objects to include in the restore. The list can include a maximum of
128 items. You can configure these options:
● Name – The name of the object to restore. Select generic* and enter a character string with one or more valid characters followed by an asterisk (*) to restore a group of objects in the specified library. Enter *ALL to restore all objects.
● Library – The name of the library to restore. Enter QSYS to restore all objects in all libraries.
● Type – The object type to restore. Enter *ALL to restore all types.
● File member – The database file members to restore. Select generic* and enter a character string with one or more valid characters followed by an asterisk (*) to restore a group of objects in the specified library. Select *NONE to restore only the file object. Enter *ALL to restore all file members.

IBM i Agent 6.2 User Guide
48
Field Description
Exclude objects The objects to exclude from the restore. The list can include a maximum
of 128 items. You can configure these options:
● Name – The name of the object to exclude from the restore. Select generic* and enter a character string with one or more valid characters followed by an asterisk (*) to exclude a group of objects in a specific library. Enter *ALL to exclude all objects.
● Library – The name of the library to exclude from the restore. Enter QSYS to exclude all objects in all libraries.
● Type – The object type to exclude from the restore. Enter *ALL to exclude all types.
● File member – The database file members to exclude from the restore. Select generic* and enter a character string with one or more valid characters followed by an asterisk (*) to exclude a group of objects in a specific library. Select *NONE to exclude only the file object. Enter *ALL to exclude all file members.
Data base member option The database member to include in the restore. These are the available
options:
● *ALL ● *MATCH ● *NEW ● *OLD
If an object is deleted and restored to the same system, it is
automatically linked to the authorization list. When an object is
restored to a different system, the authorization list is not linked, unless
you specify ALWOBJDIF(*ALL) on the restore command.
Spool file data Restores spooled file data and attributes. These are the available
options:
● *NEW – Select this option to restore spooled file data saved with the output queue if it does not currently exist.
● *NONE
Allow object differences These are the available options:
● *NONE ● *COMPATIBLE ● *ALL ● *AUTL ● *FILELVE ● *OWNER ● *PGP
This option specifies whether differences are allowed between the
saved objects and the restored objects.

IBM i Agent 6.2 User Guide
49
Field Description
Restore Library The library to restore to. You select the original source library or a
different one.
Restore Database Performance. When restoring a database,
performance will be enhanced if the database does not already exist in
the destination location, as the replace operation is more time
consuming.
When restoring database files, you must specify *FILE in the Type field
and enter the specific object name and not a wildcard name. For
example, /QSYS.LIB/SOMELIB.LIB/./SOMEFILE.FILE. The IBM I Agent
automatically appends the following line in the vpr file to restore the
members: /QSYS.LIB/SOMELIB.LIB/SOMEFILE.FILE/*.MBR. The vault
does not support wildcards at the folder level.
Restore ASP Device Restores data to an auxiliary storage pool (ASP) device. These are the
available options:
● Name – The name of the ASP device to which you want to restore data.
● SAVASPDEV – Data is restored to the same ASP device from which it was saved.
Restore ASP Number Objects are restored to the auxiliary storage pool (ASP) from which
they were saved or to the system ASP (ASP number 1) or to a basic user
ASP (ASP numbers 2 through 32).
File Overwrite/Rename Obj Overwrite or skip overwrite if object exists.
● *OVRWRT - Overwrite Existing file) ● *PMTOVRWRT - Prompt Before Overwrite Existing Files ● *NOOVRWRT - Do not overwrite Existing Files
Ignore security data Turn on or off the granting of private authorities on an object after it is
restored. Enter *YES to ignore the security data and stop the
GRTOBJAUT command from executing. It is recommend that you enter
*YES to improve restore performance. You can later run the RSTAUT
command to set private authorities.
No. of Jobs for small objects The number of jobs to run concurrently when you save restore and
backup objects with the save file method. You can enter values from 1-8
(default is 4).

IBM i Agent 6.2 User Guide
50
Field Description
Log Detail The amount and type of backup information to include in the log files.
Choose from these options:
● *FILE ● *NONE ● *SUMMARY ● *DIRECTORY
These fields appear on the Run Restore screens for *IFS data type:
Field Description
Job name The job name.
Safeset No A sequential number from 1 - 99999999 that identifies the safeset.
Enter *LASTONLINE to retrieve the most current backup.
Data type
The type of data to include in the restore:
*IFS - to restore folders and stream files in the Integrated File System
Include IFS stream files The IFS stream files to restore. The list can include a maximum of 128
items. You can configure these options: Paths and file names are case
sensitive.
● Absolute path – the absolute path for the stream files saved on the vault.
● File – The files in a specific directory to restore. ● Recursive – Includes sub-directories in the restore.
Exclude IFS stream files The IFS stream files to exclude from the restore. The list can include a
maximum of 128 items. You can configure these options: (Paths and file
names are case sensitive.)
● Absolute path – the absolute path for the stream files saved on the vault.
● File – The files in a specific directory to exclude from the restore.
● Recursive – Excludes sub-directories in the restore.
Restore ASP Device Restores data to an auxiliary storage pool (ASP) device. These are the
available options:
● Name – The name of the ASP device to which you want to restore data.
● SAVASPDEV – Data is restored to the same ASP device from which it was saved.
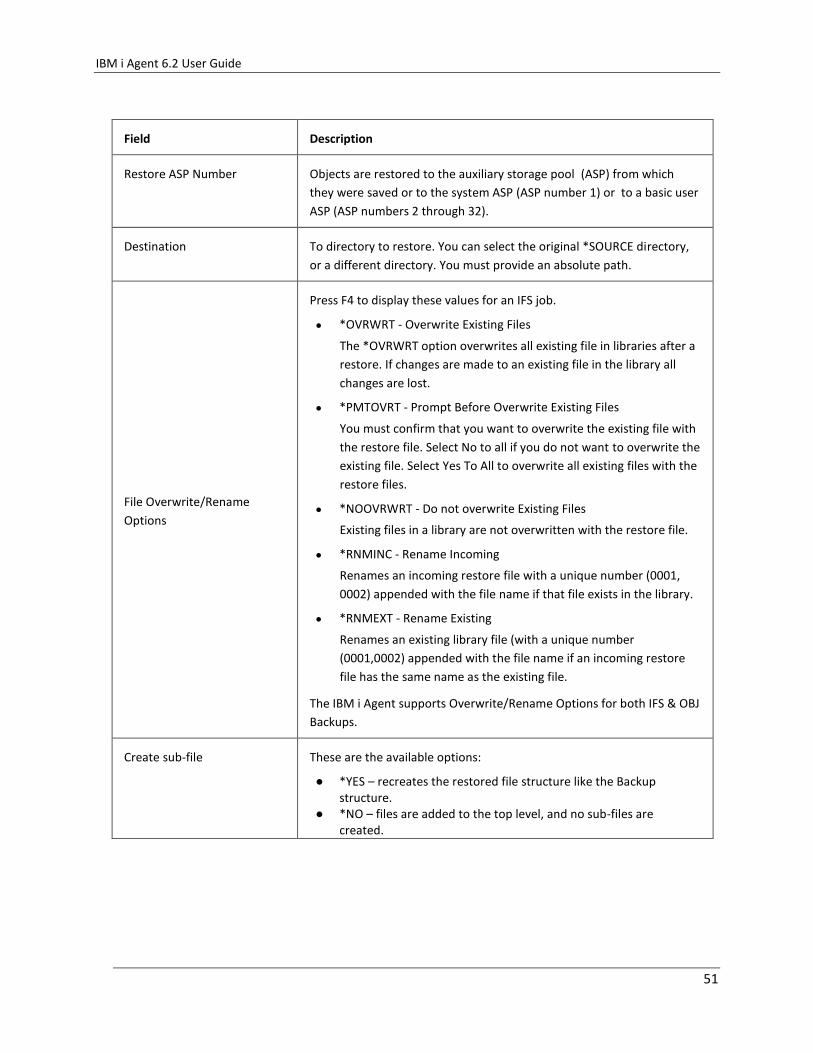
IBM i Agent 6.2 User Guide
51
Field Description
Restore ASP Number Objects are restored to the auxiliary storage pool (ASP) from which
they were saved or to the system ASP (ASP number 1) or to a basic user
ASP (ASP numbers 2 through 32).
Destination To directory to restore. You can select the original *SOURCE directory,
or a different directory. You must provide an absolute path.
File Overwrite/Rename
Options
Press F4 to display these values for an IFS job.
● *OVRWRT - Overwrite Existing Files
The *OVRWRT option overwrites all existing file in libraries after a
restore. If changes are made to an existing file in the library all
changes are lost.
● *PMTOVRT - Prompt Before Overwrite Existing Files
You must confirm that you want to overwrite the existing file with
the restore file. Select No to all if you do not want to overwrite the
existing file. Select Yes To All to overwrite all existing files with the
restore files.
● *NOOVRWRT - Do not overwrite Existing Files
Existing files in a library are not overwritten with the restore file.
● *RNMINC - Rename Incoming
Renames an incoming restore file with a unique number (0001,
0002) appended with the file name if that file exists in the library.
● *RNMEXT - Rename Existing
Renames an existing library file (with a unique number
(0001,0002) appended with the file name if an incoming restore
file has the same name as the existing file.
The IBM i Agent supports Overwrite/Rename Options for both IFS & OBJ
Backups.
Create sub-file These are the available options:
● *YES – recreates the restored file structure like the Backup structure.
● *NO – files are added to the top level, and no sub-files are created.

IBM i Agent 6.2 User Guide
52
Field Description
Log Detail The amount and type of backup information to include in the log files.
Choose from these options:
● *FILE ● *NONE ● *SUMMARY ● *DIRECTORY
These fields appear on the Run Restore screens for *SYS data type:
Field Description
Job name The job name.
Safeset No A sequential number from 1 - 99999999 that identifies the safeset.
Enter *LASTONLINE to retrieve the most current backup.
Data type
The type of data to include in the restore. These are the available
options:
● *SYS - to restore system state data containing user profiles,system security data (SAVSECDTA), configuration objects, and system values, TCP/IP configurations, and job schedule entries..
System states The type of system data to restore. These are the available options:
● *ALL ● *CFG ● *USRPRF ● *SYSVAL ● *QUSRSYS ● *JOBSCD
If you use the RSTUSRPRF and RSTCFG commands to restore *USRPRF
and *CFG data, and you restore a non-existing user profile, the new
(restored) profile is created without its password or group connection.
You must reset them.
Prompt RSTxxx command These are the available options:
● *YES – You must enter individual restore commands. If you enter an incorrect system command, it fails. For example, if you enter an incorrect user name, the RSTUSRPRF command exits and an error message is added to the log file.
● *NO – the IBM I Agent completes the without individual restore commands.

IBM i Agent 6.2 User Guide
53
Field Description
Log Detail The amount and type of backup information to include in the log files.
Choose from these options:
● *FILE ● *NONE ● *SUMMARY ● *DIRECTORY

IBM i Agent 6.2 User Guide
54
17 Completing a Bare Metal Restore
When your computer hardware or software fails and you cannot recover the source (IPL) disk, you
must complete a bare metal restore. A bare metal restore is the process of recovering and restoring
data to a computer without an operating system.
For a bare metal restore, complete the following tasks:
1. Re-install the same LIC (Licensed Internal Code) and OS. Basic OS requirements:
a. QGPL
b. QUSRSYS
c. Extended Base Support
d. Extended Base Directory Support
e. TCP/IP Connectivity Utilities
There are two ways to prepare the OS system
1. SAVSYS tape. It is recommended to include QSYS2, QGPL, and all QUSR* libraries on your SAVSYS tape.
2. IBM supplied DVD media.
2. Configure TCP/IP connectivity to the LAN/WAN. Typically, you configure the TCP/IP settings when you install the IBM AS/400 operating system. If you cannot configure the TCP/IP settings when you install the operating system, you must use a separate TCP/IP utility installation.
3. Install the IBM i Agent.
4. Re-register the IBM i Agent with the vault to recover and restore the global and job files. You use your user name and password to authorize the recovery and restoration of the configuration files. If you are restoring data to the original computer, a new license is not required. However, if you are restoring data to a new computer, contact your Service Provider for a new license.
5. Restore the *SYS backup (System State) if a recent SAVSYS tape is not available.
6. Restore *IBM data
7. Restore *ALLUSR data
8. Restore user data.
9. Load recent PTFs if a recent SAVSYS tape is not available.
10. Run the RSTAUT command to apply private authorities.

IBM i Agent 6.2 User Guide
55
17.1 Prerequisites
Before completing a bare metal restore, the computer must have:
1. An operating system.
2. Network access to a vault.
3. An IBM i Agent installed.
4. *SYS, *IBM, *ALLUSR, *IFS jobs and valid backups on vault. *IFS job should contain IBM-supplied directories such as /QIBM, /QOpenSys, etc.
17.2 Preparing the IBM i Agent for Recovery
To prepare the IBM i Agent for recovery:
1. Go to the IBM i Agent main menu.
2. Enter 1 [Agent Configuration] in the Selection or Command field. Press Enter.
3. Enter 1 [Work with Vaults] in the Selection or Command field. Press Enter.
4. Press F8 and complete these fields:
a. Network Address
b. Account
c. User Name
d. Password
5. Press Enter.
6. Enter 1 to the left of the computer you want to use as the source for the recovery. Press Enter.
7. Verify the settings are correct. Press Enter.
Note:
● An error message appears if the destination host name does not match the source host name. Correct the host name settings in the vault registration.
8. Press F12.
9. Enter 5 in the in the Selection or Command field. Press Enter.
10. Enter your original license key in the License Key field. Press Enter.
11. Press F12 twice.
12. Enter 2 in the Selection or Command field. Press Enter.
13. Select a job and press 8. Repeat until all jobs are synchronized.

IBM i Agent 6.2 User Guide
56
17.3 Restoring User Profiles and Configurations
You must perform this procedure from the console because the Agent puts the system into a
restricted state to restore user profiles and configuration objects.
To restore user profiles and configurations:
1. Go to the IBM i Agent main menu.
2. Enter 2 in the Selection or Command field. Press Enter.
3. Enter 9 to the left of the *SYS job. Press Enter.
4. Enter *CFG and *USRPRF in the System States field.
5. Enter *YES in the Prompt RSTxxx command field. Press Enter.
6. When RSTUSRPRF command is prompted, verify that AGENT appears in the User profile to omit field. Press Enter.
7. When RSTCFG command is prompted, verify that *NONE appears in the System Resource Management field. Press Enter.
8. Open and verify the restore logs contain the correct entries for RSTyyyymmdd-hhmmss and SYSyyyymmdd-hhmms. Ignore all configuration restore errors.
Note:
● System Value and Job Schedule will be restored later. ● It is not necessary to restore the TCP/IP configuration from the SYS job.
17.4 Start TCP/IP in restricted state
To start TCP/IP in restricted state:
1. Run command STRSBS SBSD(QSYSWRK) to start QSYSWRK subsystem.
2. Run command WRKACTJOB to monitor jobs in QSYSWRK are started and idle.
3. Run command ENDTCP OPTION(*IMMED) ENDSVR(*YES) to stop all TCP servers.
4. Run command STRTCP STRSVR(*NO) STRIFC(*YES) STRPTPPRF(*NO) STRIP6(*NO) to start TCP/IP interface.
5. Run command PING ‘<Vault IP>’ to ensure vault connectivity
17.5 End Resource Monitor and Performance Data Collection
At this point a few services are also started, end these services to avoid impact in the following
procedures.
If resource monitor is activated, do the following:
1. Run command ENDJOB JOB(QCSTSRCD) OPTION(*IMMED) LOGLMT(0) to stop resource monitor.

IBM i Agent 6.2 User Guide
57
2. Run command DSPJOB QCSTSRCD to list all job logs for the job
3. Delete all the job logs for QCSTSRCD job
If performance data collection service is activated, do the following:
1. Run command ENDPFRCOL FRCCOLEND(*YES) to stop performance data collection.
17.6 Restoring *IBM Library Objects (*LIB)
To restore all *IBM library objects:
1. Go to the IBM i Agent main menu.
2. Enter 2 in the Selection or Command field. Press Enter.
3. Enter 9 to the left of the job that contains *IBM objects. Press Enter.
4. Specify “Include objects” as *ALL QSYS *LIB *ALL
5. Verify “Restore library” is set to *SOURCE
6. Verify “File Overwrite/Rename Obj” is set to *NOOVRWRT
7. Press Enter.
8. Open and verify the restore log contains the correct entry for RSTyyyymmdd-hhmmss.
17.7 Restoring *IBM data
To restore *IBM objects:
1. Go to the IBM i Agent main menu.
2. Enter 2 in the Selection or Command field. Press Enter.
3. Enter 9 to the left of the job that contains *IBM objects. Press Enter.
4. Specify “Include objects” as *ALL QSYS *ALL *ALL
5. Verify “Restore library” is set to *SOURCE
6. Verify “File Overwrite/Rename Obj” is set to *OVRWRT
7. Press Enter to start restore.
8. Open and verify the IBM restore log contains the correct entry for RSTyyyymmdd-hhmmss. The log may contain errors. If the log contains errors, see Verifying Restores.
17.8 Restoring *ALLUSR Library Objects
To restore *ALLUSR library objects (*LIB):
1. Go to the IBM i Agent main menu.
2. Enter 2 in the Selection or Command field. Press Enter.
3. Enter 9 to the left of the job that contains *ALLUSR objects. Press Enter.

IBM i Agent 6.2 User Guide
58
4. Specify “Include objects” as *ALL QSYS *LIB *ALL
5. Verify “Restore library” is set to *SOURCE
6. Verify “File Overwrite/Rename Obj” is set to *NOOVRWRT
7. Press Enter to start restore.
8. Open and verify the OBJ restore log contains the correct entry for RSTyyyymmdd-hhmmss. The log may contain errors. If the log contains errors, see Verifying Restores.
17.9 Restoring *ALLUSR data
Multiple restores run in sequence are required to minimize impacts.
Step 1: Restore all Journal Receivers (*JRNRCV)
1. Go to the IBM i Agent main menu.
2. Enter 2 in the Selection or Command field. Press Enter.
3. Enter 9 to the left of the job that contains *ALLUSR objects. Press Enter.
4. Specify “Include objects” as *ALL QSYS *JRNRCV *ALL
5. Verify “Restore library” is set to *SOURCE
6. Specify “File Overwrite/Rename Obj” as *NOOVRWRT
7. Press Enter to start restore.
8. Open and verify the OBJ restore log contains the correct entry for RSTyyyymmdd-hhmmss. The log should not contain W (warning) or E (error) messages. If the log contains errors, see Verifying Restores.
Step 2: Restore all Journals (*JRN)
1. Enter 9 to the left of the OBJ job that contains *ALLUSR objects. Press Enter.
2. Specify “Include objects” as *ALL QSYS *JRN *ALL
3. Verify “Restore library” is set to *SOURCE
4. Specify “File Overwrite/Rename Obj” as *NOOVRWRT
5. Press Enter to start restore.
6. Open and verify the OBJ restore log contains the correct entry for RSTyyyymmdd-hhmmss. The log should not contain W (warning) or E (error) messages. If the log contains errors, see Verifying Restores.
Step 3: Restore all *USRQ and *DTAQ objects
1. Enter 9 to the left of the OBJ job that contains *ALLUSR objects. Press Enter.
2. Specify “Include objects” as *ALL QSYS *DTAQ *ALL, *ALL QSYS *USRQ *ALL
3. Verify “Restore library” is set to *SOURCE

IBM i Agent 6.2 User Guide
59
4. Specify “File Overwrite/Rename Obj” as *NOOVRWRT
5. Press Enter to start restore.
6. Open and verify the OBJ restore log contains the correct entry for RSTyyyymmdd-hhmmss. The log should not contain W (warning) or E (error) messages. If the log contains errors, see Verifying Restores.
Step 4: Restore QUSRDIRDB and QSYS2 libraries
1. Enter 9 to the left of the OBJ job that contains *ALLUSR objects.
2. Specify “Include objects” as *ALL QSYS2 *ALL *ALL, *ALL QUSRDIRDB *ALL *ALL
3. Specify “Exclude objects” as (*ALL QSYS *JRNRCV *ALL), (*ALL QSYS *JRN *ALL), (*ALL QSYS *DTAQ *ALL), (*ALL QSYS *USRQ *ALL)
4. Verify “Restore library” is set to *SOURCE
5. Specify “File Overwrite/Rename Obj” as *OVRWRT
6. Press Enter to start restore.
7. Open and verify the OBJ restore log contains the correct entry for RSTyyyymmdd-hhmmss. The log may contain warning and error messages. If the log contains errors, see Verifying Restores.
Step 5: Restore QGPL, QUSRSYS libraries
1. Enter 9 to the left of the OBJ job that contains *ALLUSR objects.
2. Specify “Include objects” as (*ALL QGPL *ALL *ALL), (*ALL QUSRSYS *ALL *ALL)
3. Specify “Exclude objects” as (*ALL QSYS *JRNRCV *ALL), (*ALL QSYS *JRN *ALL), (*ALL QSYS *DTAQ *ALL), (*ALL QSYS *USRQ *ALL)
4. Verify “Restore library” is set to *SOURCE
5. verify “File Overwrite/Rename Obj” is set to *OVRWRT
6. Press Enter to start restore.
7. Open and verify the OBJ restore log contains the correct entry for RSTyyyymmdd-hhmmss. The log may contain warning and error messages. If the log contains errors, see Verifying Restores.
Step 6: Restore the rest of *ALLUSR data
1. Enter 9 to the left of the OBJ job that contains *ALLUSR objects.
2. Specify “Include objects” as *ALL QSYS *ALL *ALL
3. Specify “Exclude objects” as (*ALL QSYS *JRNRCV *ALL), (*ALL QSYS *JRN *ALL), (*ALL QSYS *DTAQ *ALL), (*ALL QSYS *USRQ *ALL), (*ALL QMGTC *ALL *ALL) , (*ALL QMGTC2 *ALL *ALL) , (*ALL QMPGDATA *ALL *ALL) , (*ALL QPFRDATA *ALL *ALL) , (*ALL QGPL *ALL *ALL) , (*ALL QUSRSYS *ALL *ALL) , (*ALL QSYS2 *ALL *ALL) , (*ALL QUSRDIRDB *ALL *ALL) , (*ALL BUAGENT *ALL *ALL)

IBM i Agent 6.2 User Guide
60
4. Verify “Restore library” is set to *SOURCE
5. Verify “File Overwrite/Rename Obj” is set to *OVRWRT
6. Press Enter to start restore.
7. Open and verify the OBJ restore log contains the correct entry for RSTyyyymmdd-hhmmss. The log may contain warning and error messages. If the log contains errors, see Verifying Restores.
17.10 Restoring IFS directories and files
To restore IFS directories and files: (path and files are case sensitive)
1. Go to the IBM i Agent main menu.
1. Enter 2 in the Selection or Command field. Press Enter.
2. Enter 9 to the left of the *IFS job which contains IBM-supplied directories. Press Enter.
3. Specify “Include IFS stream files” as ‘/’ ‘*.*’ *YES
4. Specify “Exclude IFS stream files” as ‘/buagent’ ‘*.*’ *YES
5. Verify “Destination” is set to *SOURCE
6. Verify “File Overwrite/Rename Options” is set to *OVRWRT
7. Press Enter to start restore.
8. Open and verify the IFS restore log contains the correct entry for RSTyyyymmdd-hhmmss. The log may contain warning and error messages. If the log contains errors, see Verifying Restores.
17.11 Restoring system values and job schedules
To restore system values and job schedules:
1. Go to the IBM i Agent main menu.
2. Enter 2 in the Selection or Command field. Press Enter.
3. Enter 9 to the left of the *SYS job, Press Enter.
4. Specify “System States” to *SYSVAL and *JOBSCD
5. Press Enter to start restore.
6. Open and verify the restore logs contain the correct entries for RSTyyyymmdd-hhmmss and SYSyyyymmdd-hhmms. The log may contain warning and error messages for system value overwrite, use WRKSYSVAL command to check and fix the error.
7. Once job schedules are restored, use WRKJOBSCDE command to verify. You may Hold the schedule entries in order to avoid impact in next operations.

IBM i Agent 6.2 User Guide
61
17.12 Verifying Restores
If the SYS, IBM, OBJ, and IFS log files display errors, you might need to check the job log for more
details. If the object restore fails by associate object not found, you might need to restore those
individual objects or libraries again. In some circumstances, it might be necessary to delete and
restore the library one more time.
17.13 Verifying PTFs
Check PTFs on the restored system
1. Run command Go PTF
2. Enter 5 to display PTF
3. Specify LICPGM(*ALL) SELECT(*ALL) RLS(*ALL) COVERONLY(*NO)
If a PTF is not restored, install it from IBM-Supplied media.
17.14 Restoring Authority
1. Open a command prompt and run the ENDSYS *ALL *IMMED command.
2. Run the DSPMSG QSYSOPR to verify the server is in restricted state.
3. Run the RSTAUT command.
17.15 Finish with Journals
After restoring journals, the journal receivers may need to be re-associated with the journals and
then apply the journals to bring all journaled objects current.
WRKJRN will show all journals or by select library. Use Option 9 to associate receivers with their
respective journals.
Command APYJRNCHG is used to apply the journal changes.
17.16 Restarting the Computer
IPL the system from B – Normal mode.
1. Run CHGIPLA command to place the computer into *NORMAL mode.
2. Run command PWRDWNSYS OPTION(*IMMED) RESTART(*YES) IPLSRC(B)
to restart the computer.

IBM i Agent 6.2 User Guide
62
18 Uninstalling the IBM i Agent
Use one of these methods to uninstall the IBM i Agent:
● Uninstalling an FTP Installation
● Uninstalling a CD Installation
The uninstall operation removes these components:
● Product library (BUAGENT or other name from client).
● Product directory (/BUAgent or other name from client).
● Scheduled Jobs (Agent associated scheduled jobs if it’s the only Agent).
● Applied triggers (Agent associated triggers).
● AGENT subsystem
● AGENT user profile
18.1 Uninstalling an FTP Installation
To uninstall an IBM i Agent installed from an FTP:
1. On the IBM i computer run this command:
Call EVSAVE/ISSETUP
If you created a library with a different name, replace EVSAVE with the name of the library
2. Enter 4 to the left of an IBM i Agent. Press Enter.
3. Enter Yes in the Are you sure you want to uninstall field.
18.2 Uninstalling a CD Installation
To uninstall an IBM i Agent installed from an FTP:
1. Open a command prompt and run the LODRUN DEV<Optical device name> command.
2. Enter 4 to the left of an IBM i Agent. Press Enter.
3. Enter Yes in the Are you sure you want to uninstall field.

IBM i Agent 6.2 User Guide
63
19 Recreating a Delta File
To recreate the DTA (delta) file, you re-register the IBM i Agent and then run job synchronization.
After you recreate the delta file, you can run the backup.
If you cannot recreate the delta file by re-registering the IBM i Agent and running synchronization,
you can use reseeding to rebuild the delta file. Reseeding only applies to the CLI; the UI is unaffected.
To use reseeding to rebuild the delta file, open a command prompt and run this command:
SBMJOB CMD(CALL PGM(BUAGENT/VV) PARM(BACKUP JOB1 '/forcereseed'))
JOB(JOB1_B) JOBD(BUAGENT/AGENT)
(Replace BUAGENT if the agent is installed to different library.)
When you run this command, the backup is forced to reseed if the recreated file is unusable.
You can only recreate a delta file if the backup was done from an IBM i Agent version 6 or newer to a
vault version 6 or newer. For example, if you back up a safeset using an IBM i Agent version 6 or
newer to a vault version 5 or later, and then upgrade the vault to version 6, a delta file cannot be
recreated.
When you attempt to recreate a delta file on an unsupported version of the IBM i Agent or the vault,
error messages indicating that the delta file recreation failed are added to the restore log. However,
the restore still functions. Use the forcereseed command to create new delta files that are
compatible with a version 6 or greater vault.

IBM i Agent 6.2 User Guide
64
20 Improving the Performance of your IBM i Computer
Typically, before the installation of the IBM i Agent, a full system save 21 is completed on an IBM i
computer once a week or once a month. When a system save 21 is running, the IBM i computer can
be unavailable for several hours. When you move to IBM i Agent backup, it is recommended that you
complete a system save 22 (system data only). The system save 22 saves the operating system and
licensed programs, and consumes less computer resources. The IBM i Agent can save system state
information (security data, configuration data, and system values) while the computer is running. You
only need to run the save 22 when you load PTFs or upgrade your OS. After you run save 22, it is
recommended that you run a SAVLIB of QGPL, QUSRSYS and QSYS2 to the same tape, adding them to
the end. If you follow these recommendations, you can significantly reduce the down time of your
computer.
The IBM i Agent supports the *IBM special value to back up licensed programs. However, a job to
back up *IBM is not required because the necessary files are included with the system save 22.
The IBM i Agent supports the *ALLUSR special value to back up all user libraries. However, the IBM i
Agent is not limited to a single device. To improve performance it is recommended that you divide
the libraries into multiple jobs.
Here are some additional recommendations for improving the performance of your IBM i computer:
● Create 3 or more jobs for each available CPU.
● For *OBJ jobs, keep the total object count per job to 10,000 or less.
● Create separate jobs for volatile objects like databases and journal receivers and for non-volatile objects like programs, service programs even if they reside in the same library.
● When using save 22, ensure QUSRSYS, QGPL, and QSYS2 are saved and restore from tape before you start the Agent.
● Exclude QMPGDATA (Performance Data Library) from the *ALLUSR job in backups and restores.
● Do not run *SYS Backup and *ALLUSR backups at the same time. If *SYS Backup and *ALLUSR backups are running at the same time, you may receive mutex errors in the *ALLUSR backup log because some objects may be locked while the other process times out. *SYS backup only runs for a few minutes and you can run it first.