htek 277v instruction sheet - il502118en - … la perilla de ajuste mecánico en sentido horario. 4....
TRANSCRIPT
INS #
Brand Logo reversed out of black
INS #IL502118EN
Installation Instructions – Adapter for HTEK 277V Lighting Track System HTEK100Adaptadores para HTEK 120V Sistema De Iluminación En Riel HTEK100Adaptateurs pour HTEK 120V Système D’ Éclairage Sur Rail HTEK100
WARNINGRISK OF ELECTRIC SHOCK—Disconnect power at fuse or circuit breaker before installing or servicing.
WARNINGRisk of fire/electric shock. If not qualified, consult an electrician.
WARNINGRisk of fire or electric shock. Luminaire’s wiring, ballasts, or other electrical parts may be damaged when drilling for installation of reflector kit hardware. Check for enclosed wiring and components.
WARNINGWhen installing or using this track system, basic safety precautions should always be followed, including the following:
NOTE: DO NOT solder connectors as this will prohibit the adapters circuit switch to move freely from circuit to circuit. Adapters and accessories are made of strong polycarbonate material. To clean, use only a damp cloth.
NOTE: DO NOT expose to any lubricants, solvents or cleaning solutions, as they may impair the strength of the product.
NOTE: Also, when changing the location of a fixture/adapter DO NOT slide the adapter down the track as it will damage the connectors and cause faulty lighting. Fixture must be taken out of track and placed to its desired location.
1. Read all of these installation instructions before installing the HTEK 277V lighting track system. 2. The HTEK 277V track system is intended for use only with components and fixtures marked for use with HTEK system. 3. The system is designed to be fed by two branch circuits rated 277VAC, 20A, eg. the system is a two-circuit/ two-neutral track and care must be taken to keep circuits designed as circuit 1 and circuit 2 separate. 4. Do not install the track in damp or wet locations. 5. Do not install any parts of the track system less than 8 ft above the floor. 6. Do not install any fixtures closer than six inches from combustible materials. 7. Do not use this track with a power supply cord or convenience receptacle adapter. 8. Do not install the track with electric power connected. Similarly, disconnect electricity when installing or removing fixtures or components or changing the configuration of the track. 9. Do not attempt to energize anything other than Lighting Track Fixtures on the track. To reduce the risk of fire and electrical shock, do not attempt to connect power tools, extension cords, appliances and the like to the track. 10. Do not use any lubricants, solvents or cleaning solutions as they may impair the strength of the product. 11. Do not slide the adapter on the track. 12. Terminal screws tightening moment 0,4 - 0,8 Nm. SAVE THESE INSTRUCTIONS FOR FUTURE REFERENCE WHEN ADDING FIXTURES OR CHANGING THE TRACK CONFIGURATION.
2EATON IL502118EN Installation instructions
2-Circuit Lighting Track/Riel de iluminación de doble circuito/Rail d’éclairage à 2 circuits avec conducteurs
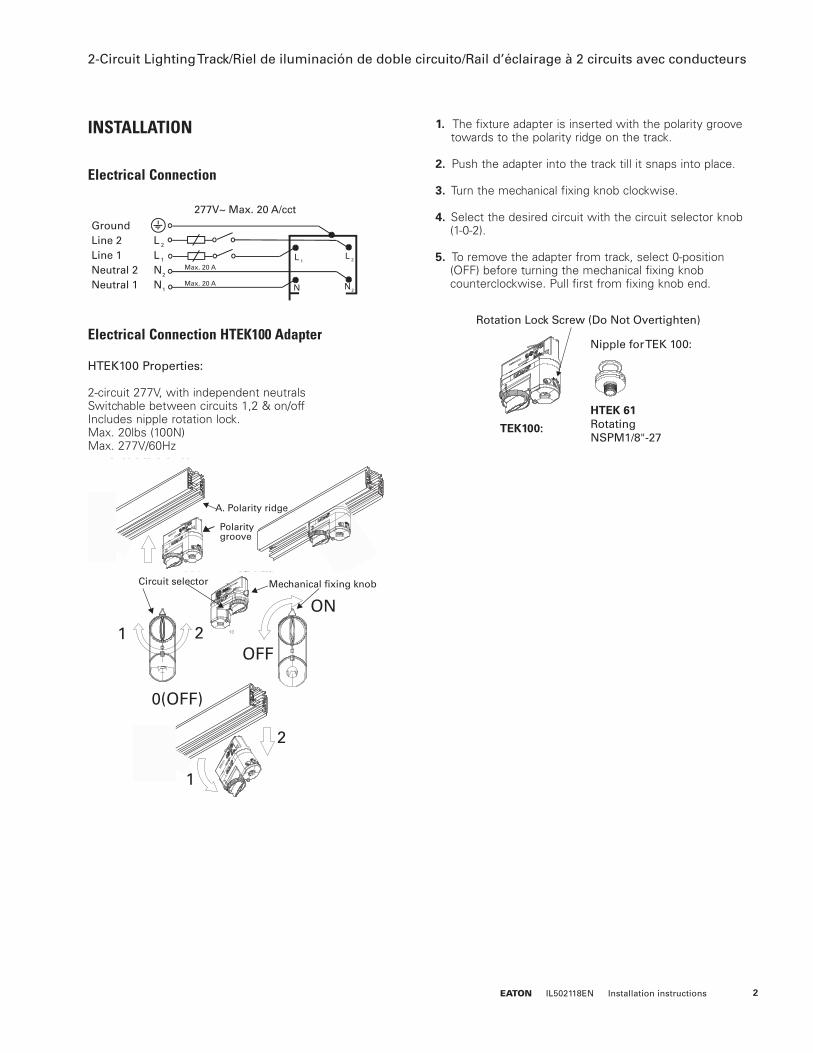
INSTALLATION
Electrical Connection
Electrical Connection HTEK100 Adapter HTEK100 Properties: 2-circuit 277V, with independent neutrals Switchable between circuits 1,2 & on/off Includes nipple rotation lock. Max. 20lbs (100N) Max. 277V/60Hz
2
1
GroundLine 2Line 1Neutral 2Neutral 1
LLNN
2
1
277V~ Max. 20 A/cct
1L 2L
2NN
Max. 20 A
Max. 20 A
Align the ri
Push the a
Turn the m
Select the
To removeturning theknob end.
1.
2.
3.
4.
5.
HTroNS
TEK 68 w
TEK 68
rotation lockscrew
groove
fixing knob
circuit selector
Circuit selector Mechanical fixing knob
OFF
ON
0(OFF)
1
1
2
2
Rotation Lock Screw (Do Not Overtighten)
Nipple for TEK 100:
TEK100:
HTEK 61RotatingNSPM1/8"-27
Align the ri
Push the a
Turn the m
Select the
To removeturning theknob end.
1.
2.
3.
4.
5.
HTroNS
TEK 68 w
TEK 68
rotation lockscrew
groove
fixing knob
circuit selector
A. Polarity ridge
Polarity groove
1. The fixture adapter is inserted with the polarity groove towards to the polarity ridge on the track. 2. Push the adapter into the track till it snaps into place. 3. Turn the mechanical fixing knob clockwise. 4. Select the desired circuit with the circuit selector knob (1-0-2). 5. To remove the adapter from track, select 0-position (OFF) before turning the mechanical fixing knob counterclockwise. Pull first from fixing knob end.
3EATON IL502118EN Installation instructions
2-Circuit Lighting Track/Riel de iluminación de doble circuito/Rail d’éclairage à 2 circuits avec conducteurs
ADVERTENCIARIESGO DE DESCARGA ELÉCTRICA: Desconecte la alimentación en el disyuntor o fusible antes de instalar o realizar tareas de mantenimiento.
ADVERTENCIARiesgo de incendio y descarga eléctrica. Si no está cualificado, consulte con un electricista.
ADVERTENCIARiesgo de inflamabilidad o de descarga eléctrica. El cableado de la luminaria, el balasto u otras piezas eléctricas podrían dañarse cuando realice las perforaciones para la instalación de los accesorios del kit reflector. Verifique que los cables y los componentes se encuentren encerrados.
ADVERTENCIACuando instale o utilice este sistema de rieles, siempre debe seguir precauciones de seguridad básicas, incluidas las siguientes:
NOTA: NO suelde los conectores, ya que esto impedirá que el interruptor de circuito de los adaptadores se mueva libremente de circuito a circuito. Los adaptadores y accesorios están hechos de material de policarbonato resistente. Para limpiarlos, utilice un trapo húmedo.
NOTA: NO los exponga a ningún lubricante, solvente o solución de limpieza, ya que estos pueden afectar la resistencia del producto.
NOTA: Además, al modificar la ubicación de una luminaria/adaptador, NO deslice el adaptador debajo de la vía, ya que dañará los conectores y generará fallas en la iluminación. La luminaria debe extraerse del riel y colocarse en su ubicación deseada.
1. Lea por completo estas instrucciones de instalación antes de instalar el sistema de iluminación en riel HTEK 120V. 2. El sistema de riel HTEK 120V tiene como fin su uso únicamente con los componentes y luminarias especificadas HTEK. 3. El sistema está diseñado para recibir alimentación de dos circuitos de rama de 120 VCA y 20 A; por ej.: el sistema es de doble circuito/vía doble neutra y deben tomarse precauciones para mantener los circuitos diseñados como circuito 1 y 2 de forma separada. 4. No instale el sistema de rieles en ubicaciones húmedas o mojadas. 5. No instale ninguna de sus piezas a menos de 8 pies (2,43 metros) por encima del suelo. 6. No instale las luminarias a menos de seis pulgadas (2,36 centímetros) de materiales combustibles. 7. No utilice este riel con un cable de fuente de alimentación ni con un adaptador para receptáculos. 8. No instale el riel con la alimentación eléctrica conectada. De igual manera, desconecte la electricidad al instalar o extraer las luminarias o componentes, o al cambiar la configuración del riel. 9. No intente encender en el riel ningún otro componente que no sean las luminarias de montaje en rieles. Para disminuir el riesgo de incendio y descarga eléctrica, no intente conectar herramientas eléctricas, cables de extensión, aparatos o elementos similares en el sistema de rieles. 10. NO use ningún lubricante, solvente o solución de limpieza, ya que estos pueden afectar la resistencia del producto. 11. No deslice el adaptador en el riel. 12. Momento de ajuste de los tornillos del terminal a 0,4-0,8 Nm (4,08-8,16 lb-pulg.) CONSERVE ESTAS INSTRUCCIONES PARA TENERLAS COMO REFERENCIA FUTURA AL MOMENTO DE AGREGAR LUMINARIAS O CAMBIAR LA CONFIGURACIÓN DEL RIEL.
4EATON IL502118EN Installation instructions
2-Circuit Lighting Track/Riel de iluminación de doble circuito/Rail d’éclairage à 2 circuits avec conducteurs
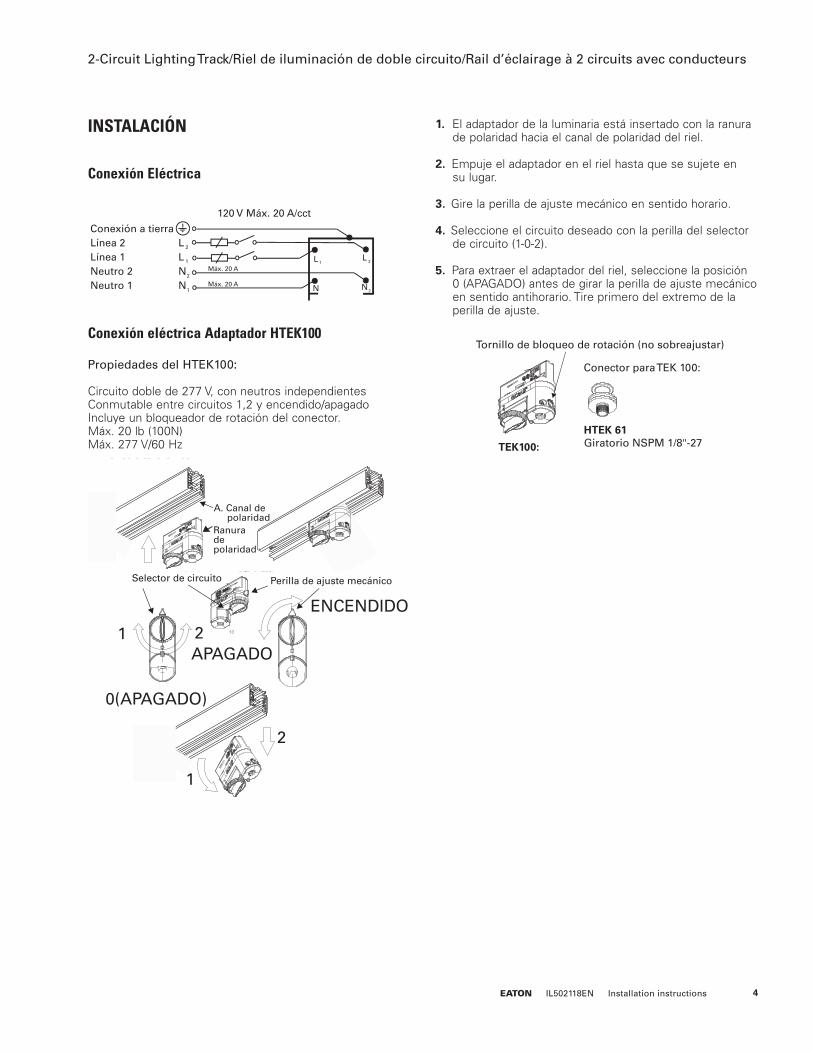
INSTALACIÓN
Conexión Eléctrica
Conexión eléctrica Adaptador HTEK100 Propiedades del HTEK100: Circuito doble de 277 V, con neutros independientes Conmutable entre circuitos 1,2 y encendido/apagado Incluye un bloqueador de rotación del conector. Máx. 20 lb (100N) Máx. 277 V/60 Hz
2
1
Conexión a tierraLínea 2Línea 1Neutro 2Neutro 1
LLNN
2
1
120 V Máx. 20 A/cct
1L 2L
2NN
Máx. 20 A
Máx. 20 A
Align the ri
Push the a
Turn the m
Select the
To removeturning theknob end.
1.
2.
3.
4.
5.
HTroNS
TEK 68 w
TEK 68
rotation lockscrew
groove
fixing knob
circuit selector
Selector de circuito Perilla de ajuste mecánico
APAGADO
ENCENDIDO
0(APAGADO)
1
1
2
2
Tornillo de bloqueo de rotación (no sobreajustar)
Conector para TEK 100:
TEK100:
HTEK 61Giratorio NSPM 1/8"-27
Align the ri
Push the a
Turn the m
Select the
To removeturning theknob end.
1.
2.
3.
4.
5.
HTroNS
TEK 68 w
TEK 68
rotation lockscrew
groove
fixing knob
circuit selector
A. Canal de polaridadRanura de polaridad
1. El adaptador de la luminaria está insertado con la ranura de polaridad hacia el canal de polaridad del riel. 2. Empuje el adaptador en el riel hasta que se sujete en su lugar. 3. Gire la perilla de ajuste mecánico en sentido horario. 4. Seleccione el circuito deseado con la perilla del selector de circuito (1-0-2). 5. Para extraer el adaptador del riel, seleccione la posición 0 (APAGADO) antes de girar la perilla de ajuste mecánico en sentido antihorario. Tire primero del extremo de la perilla de ajuste.
5EATON IL502118EN Installation instructions
2-Circuit Lighting Track/Riel de iluminación de doble circuito/Rail d’éclairage à 2 circuits avec conducteurs
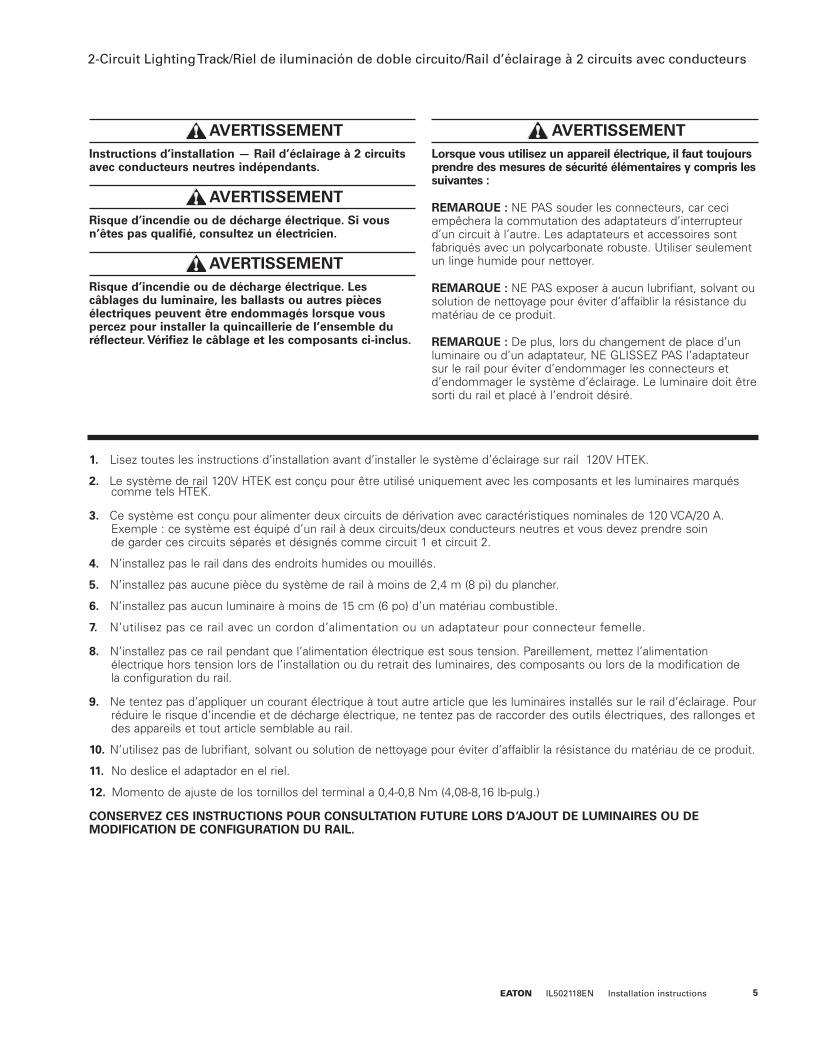
AVERTISSEMENTInstructions d’installation — Rail d’éclairage à 2 circuits avec conducteurs neutres indépendants.
AVERTISSEMENTRisque d’incendie ou de décharge électrique. Si vous n’êtes pas qualifié, consultez un électricien.
AVERTISSEMENTRisque d’incendie ou de décharge électrique. Les câblages du luminaire, les ballasts ou autres pièces électriques peuvent être endommagés lorsque vous percez pour installer la quincaillerie de l’ensemble du réflecteur. Vérifiez le câblage et les composants ci-inclus.
AVERTISSEMENTLorsque vous utilisez un appareil électrique, il faut toujours prendre des mesures de sécurité élémentaires y compris les suivantes :
REMARQUE : NE PAS souder les connecteurs, car ceci empêchera la commutation des adaptateurs d’interrupteur d’un circuit à l’autre. Les adaptateurs et accessoires sont fabriqués avec un polycarbonate robuste. Utiliser seulement un linge humide pour nettoyer.
REMARQUE : NE PAS exposer à aucun lubrifiant, solvant ou solution de nettoyage pour éviter d’affaiblir la résistance du matériau de ce produit.
REMARQUE : De plus, lors du changement de place d’un luminaire ou d’un adaptateur, NE GLISSEZ PAS l’adaptateur sur le rail pour éviter d’endommager les connecteurs et d’endommager le système d’éclairage. Le luminaire doit être sorti du rail et placé à l’endroit désiré.
1. Lisez toutes les instructions d’installation avant d’installer le système d’éclairage sur rail 120V HTEK. 2. Le système de rail 120V HTEK est conçu pour être utilisé uniquement avec les composants et les luminaires marqués comme tels HTEK. 3. Ce système est conçu pour alimenter deux circuits de dérivation avec caractéristiques nominales de 120 VCA/20 A. Exemple : ce système est équipé d’un rail à deux circuits/deux conducteurs neutres et vous devez prendre soin de garder ces circuits séparés et désignés comme circuit 1 et circuit 2. 4. N’installez pas le rail dans des endroits humides ou mouillés. 5. N’installez pas aucune pièce du système de rail à moins de 2,4 m (8 pi) du plancher. 6. N’installez pas aucun luminaire à moins de 15 cm (6 po) d’un matériau combustible. 7. N’utilisez pas ce rail avec un cordon d’alimentation ou un adaptateur pour connecteur femelle. 8. N’installez pas ce rail pendant que l’alimentation électrique est sous tension. Pareillement, mettez l’alimentation électrique hors tension lors de l’installation ou du retrait des luminaires, des composants ou lors de la modification de la configuration du rail. 9. Ne tentez pas d’appliquer un courant électrique à tout autre article que les luminaires installés sur le rail d’éclairage. Pour réduire le risque d’incendie et de décharge électrique, ne tentez pas de raccorder des outils électriques, des rallonges et des appareils et tout article semblable au rail. 10. N’utilisez pas de lubrifiant, solvant ou solution de nettoyage pour éviter d’affaiblir la résistance du matériau de ce produit. 11. No deslice el adaptador en el riel. 12. Momento de ajuste de los tornillos del terminal a 0,4-0,8 Nm (4,08-8,16 lb-pulg.) CONSERVEZ CES INSTRUCTIONS POUR CONSULTATION FUTURE LORS D’AJOUT DE LUMINAIRES OU DE MODIFICATION DE CONFIGURATION DU RAIL.
6EATON IL502118EN Installation instructions
2-Circuit Lighting Track/Riel de iluminación de doble circuito/Rail d’éclairage à 2 circuits avec conducteurs
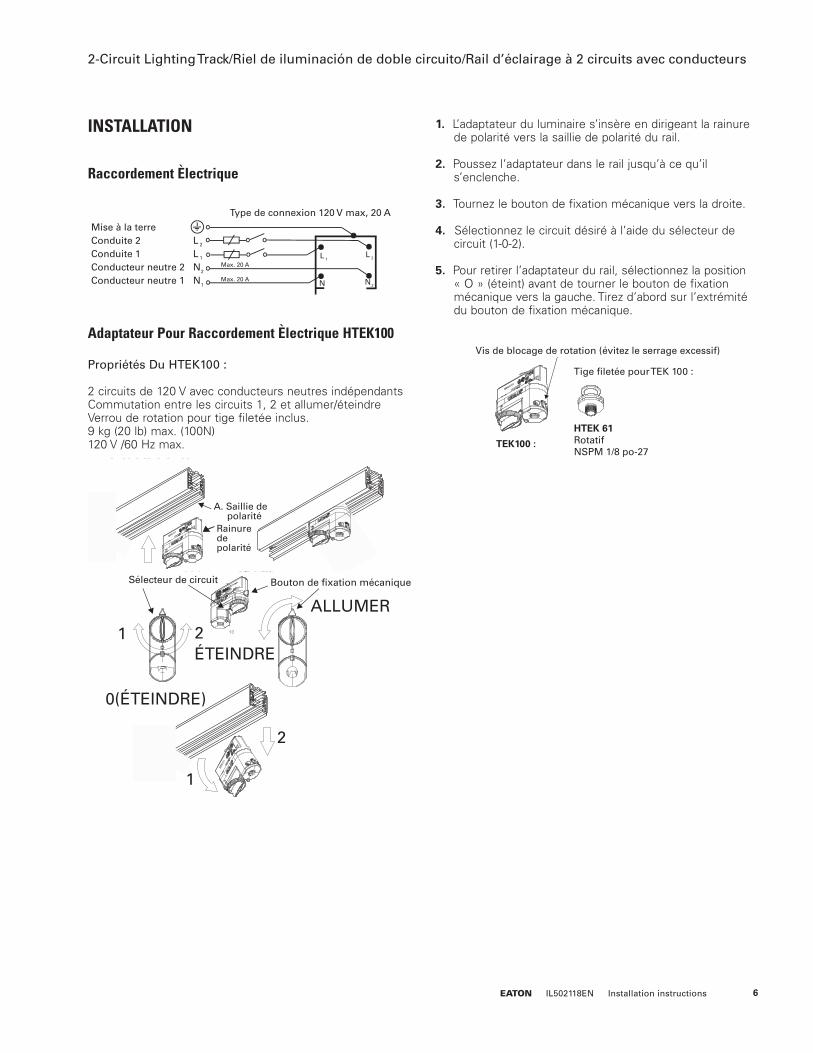
INSTALLATION
Raccordement Èlectrique
Adaptateur Pour Raccordement Èlectrique HTEK100 Propriétés Du HTEK100 : 2 circuits de 120 V avec conducteurs neutres indépendants Commutation entre les circuits 1, 2 et allumer/éteindre Verrou de rotation pour tige filetée inclus. 9 kg (20 lb) max. (100N) 120 V /60 Hz max.
2
1
Mise à la terreConduite 2Conduite 1Conducteur neutre 2Conducteur neutre 1
LLNN
2
1
Type de connexion 120 V max, 20 A
1L 2L
2NN
Max. 20 A
Max. 20 A
Align the ri
Push the a
Turn the m
Select the
To removeturning theknob end.
1.
2.
3.
4.
5.
HTroNS
TEK 68 w
TEK 68
rotation lockscrew
groove
fixing knob
circuit selector
Sélecteur de circuit Bouton de fixation mécanique
ÉTEINDRE
ALLUMER
0(ÉTEINDRE)
1
1
2
2
Vis de blocage de rotation (évitez le serrage excessif)
Tige filetée pour TEK 100 :
TEK100 :
HTEK 61Rotatif NSPM 1/8 po-27
Align the ri
Push the a
Turn the m
Select the
To removeturning theknob end.
1.
2.
3.
4.
5.
HTroNS
TEK 68 w
TEK 68
rotation lockscrew
groove
fixing knob
circuit selector
A. Saillie de polaritéRainure de polarité
1. L’adaptateur du luminaire s’insère en dirigeant la rainure de polarité vers la saillie de polarité du rail. 2. Poussez l’adaptateur dans le rail jusqu’à ce qu’il s’enclenche. 3. Tournez le bouton de fixation mécanique vers la droite. 4. Sélectionnez le circuit désiré à l’aide du sélecteur de circuit (1-0-2). 5. Pour retirer l’adaptateur du rail, sélectionnez la position « O » (éteint) avant de tourner le bouton de fixation mécanique vers la gauche. Tirez d’abord sur l’extrémité du bouton de fixation mécanique.
Eaton1121 Highway 74 SouthPeachtree City, GA 30269P: 770-486-4800www.eaton.com/lighting
Canada Sales 5925 McLaughlin RoadMississauga, Ontario L5R 1B8P: 905-501-3000F: 905-501-3172
© 2016 EatonAll Rights ReservedPrinted in USAImprimé aux États-UnisImpreso en los EE. UU.Publication No. IL502118ENJanuary, 2016
Eaton is a registered trademark.All trademarks are property of their respective owners.
Eaton est une marque de commercedéposée. Toutes les autres marques de commerce sont la propriété de leur propriétaire respectif.
Eaton es una marca comercialregistrada. Todas las marcas comerciales son propiedad de sus respectivos propietarios.
Product availability, specifications, and compliances are subject to change without notice
La disponibilité du produit, les spécifications et les conformités peuvent être modifiées sans préavis
La disponibilidad de productos, las especificaciones y los cumplimientos están sujetos a cambio sin previo aviso
Warranties and Limitation of LiabilityPlease refer to www.eaton.com/LightingWarrantyTerms for our terms and conditions.
Garanties et limitation de responsabilitéVeuillez consulter le site www.eaton.com/LightingWarrantyTerms pour obtenir les conditions générales.
Garantías y Limitación de ResponsabilidadVisite www.eaton.com/LightingWarrantyTerms para conocer nuestros términos y condiciones.