hris job role training - az · new hire process forms: zh11.1, xp31.1, ... hris new hire flow chart...
TRANSCRIPT

HRIS Job Role Training
New Hire ProcessForms: ZH11.1, XP31.1, XP52.4, XP52.1, PA26.1,

Table of Contents HRIS New Hire Flow Chart.........................................................................................................4 New Hire Process with Hiring Gateway......................................................................................5
Hiring Gateway Overview .......................................................................................................5 Hiring Gateway Process .........................................................................................................5 Hiring Gateway Email .............................................................................................................5
Hiring Gateway Email when Employee does not exist in HRIS ...........................................6 Hiring Gateway Email when Employee does exist in HRIS and is in a Terminated, Retired or Deceased Status.............................................................................................................6 Hiring Gateway Email when Employee does exist in HRIS and is not in a Terminated, Retired or Deceased Status ................................................................................................6
Hiring Gateway Problems – No Email Received.....................................................................7 Hire an Applicant (XP52.4) With Hiring Gateway- Parameters Tab (APP-HIRE1)..................8 Hire an Applicant (XP52.4) With Hiring Gateway- Selected Items 1 Tab (APP-HIRE1)........11 Hire an Applicant (XP52.4) With Hiring Gateway- Selected Items 2 Tab (APP-HIRE1)........13 Hire an Applicant (XP52.4) With Hiring Gateway- Selected Items 3 Tab (APP-HIRE1)........15 New Hire Process with Hiring Gateway – Process Update ...................................................19
New Hire Process Without Hiring Gateway ..............................................................................20 Overview...............................................................................................................................20 Applicant Form (XP31.1) – Main Tab....................................................................................21 Hire an Applicant (XP52.4) Without Hiring Gateway- Parameters Tab (APP-HIRE1)...........24 Hire an Applicant (XP52.4) Without Hiring Gateway- Selected Items 1 Tab (APP-HIRE1)...27 Hire an Applicant (XP52.4) Without Hiring Gateway- Selected Items 2 Tab (APP-HIRE1)...29 Hire an Applicant (XP52.4) Without Hiring Gateway- Selected Items 3 Tab (APP-HIRE1)...31 New Hire Process without Hiring Gateway – Process Update ..............................................36
New Hire Process Continued ...................................................................................................37 Overview...............................................................................................................................37 Individual Action (XP52.1)- Parameters Tab (HIRE-REHR2)................................................38 Individual Action (XP52.1)- Selected Items 1 Tab (HIRE-REHR2) .......................................41 Individual Action (XP52.1)- Selected Items 2 Tab (HIRE-REHR2) .......................................43 Individual Action (XP52.1)- Selected Items 3 Tab (HIRE-REHR2) .......................................46 Individual Action (XP52.1)- Parameters Tab (HIRE-REHR3)................................................49 Individual Action (XP52.1)- Selected Items 1 Tab (HIRE-REHR3) .......................................52 Review Form (PA26.1)..........................................................................................................56
New Hire Process dc2-18-101 3
Introduction
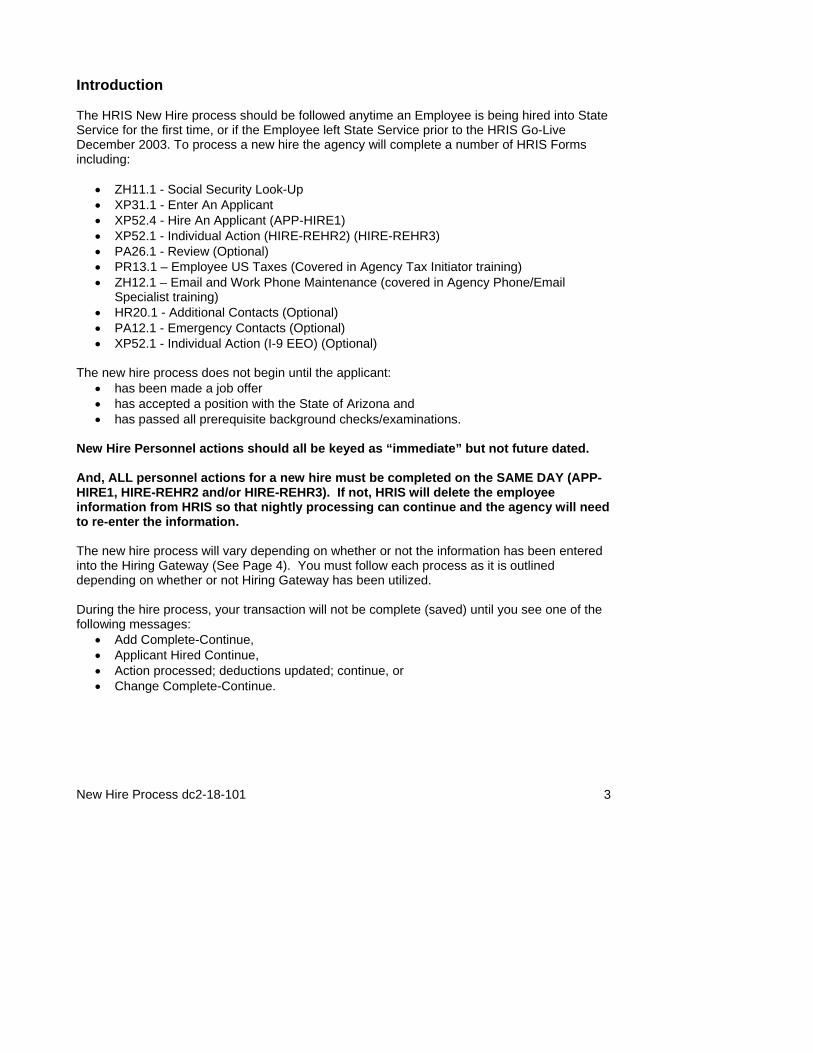
The HRIS New Hire process should be followed anytime an Employee is being hired into State Service for the first time, or if the Employee left State Service prior to the HRIS Go-Live December 2003. To process a new hire the agency will complete a number of HRIS Forms including:
• ZH11.1 - Social Security Look-Up • XP31.1 - Enter An Applicant • XP52.4 - Hire An Applicant (APP-HIRE1) • XP52.1 - Individual Action (HIRE-REHR2) (HIRE-REHR3) • PA26.1 - Review (Optional) • PR13.1 – Employee US Taxes (Covered in Agency Tax Initiator training) • ZH12.1 – Email and Work Phone Maintenance (covered in Agency Phone/Email
Specialist training) • HR20.1 - Additional Contacts (Optional) • PA12.1 - Emergency Contacts (Optional) • XP52.1 - Individual Action (I-9 EEO) (Optional)
The new hire process does not begin until the applicant: • has been made a job offer • has accepted a position with the State of Arizona and • has passed all prerequisite background checks/examinations.
New Hire Personnel actions should all be keyed as “immediate” but not future dated. And, ALL personnel actions for a new hire must be completed on the SAME DAY (APP-HIRE1, HIRE-REHR2 and/or HIRE-REHR3). If not, HRIS will delete the employee information from HRIS so that nightly processing can continue and the agency will need to re-enter the information. The new hire process will vary depending on whether or not the information has been entered into the Hiring Gateway (See Page 4). You must follow each process as it is outlined depending on whether or not Hiring Gateway has been utilized. During the hire process, your transaction will not be complete (saved) until you see one of the following messages:
• Add Complete-Continue, • Applicant Hired Continue, • Action processed; deductions updated; continue, or • Change Complete-Continue.

New Hire Process dc2-18-101 4
With HiringGateway
Without HiringGateway
Email from HiringGateway toAgency Rep
Informing of NewHire
ZH11 SocialSecurity Number
Look-Up
Process Applicanton XP31.1
Process XP52.4 -Hire An Applicant
APP-HIRE1
Process XP52.1 -Individual ActionHIRE-REHIRE2
Process XP52.1 -Individual ActionHIRE-REHIRE3
Process XP52.1 -Individual Action
I-9 - EEO
Process PA12.1- Emergency
Contact
Process HR20.1 -Additional
Contact Numbers
Process PR13.1- Employee USTaxes, Federal
and State
Process XP52.4 -Hire An Applicant
APP-HIRE1
Process PA26.1- Employee
Review Criteria
Process ZH12.1 -Email and Work
PhoneMaintenance
HRIS New Hire Flow Chart
Page 5 Process covered in Agency
HR Initiator SSN Lookup Training
Page 21 Page 8 Page 24 Page 38 Page 49 Required forms appear as:
Process covered in Agency HR Initiator I-9 – EEO Training
Page 56 Optional forms appear as: Process covered in the Agency Taxes Initiator Training
Process covered in the Agency HR Initiator General Employee Information Training
Process covered in the Agency HR Initiator
General Employee Information Training
Process covered in the Agency HR Email and Work Phone Maintenance Training
New Hire Process dc2-18-101 5
New Hire Process with Hiring Gateway
Hiring Gateway Overview The Human Resources Division of the Arizona Department of Administration is implementing a new, paper-less recruiting and hiring system - Hiring Gateway. All departments and agencies in State government will share the Hiring Gateway system. The system will provide opportunities to streamline and improve current hiring/recruiting processes, reduce costs, improve access to information for hiring managers and their agency human resources personnel. Hiring Gateway will assist recruiters and hiring managers in every stage of the recruiting process; from the development and approval of hiring requisitions, to posting job openings, to storing and sorting thousands of resumes, to automated candidate tracking actions, and finally, to extending an offer. Hiring Gateway will also integrate selected applicant data for new hires into our existing HRIS system. Hiring Gateway will greatly improve services to job seekers by providing a one-stop internet job board for applicants to apply for any posted opening in the State of Arizona through easy, on-line resume submittal.
Hiring Gateway Process An email will be generated from Hiring Gateway and sent to your agency contact. This email will be the notification to your agency contact than an applicant has been hired through Resumix and Hiring Gateway. This email will contain the Applicant Number and the position number of the new Employee. After you have received the email, you will continue with the hiring process using the Hire an Applicant Form (XP52.4). The path to follow is the Hire an Applicant (XP52.4) With Hiring Gateway – Parameters Tab (APP-HIRE1) (Page 8). When hiring an Employee through Hiring Gateway, it is not required that you complete the Social Security Look-Up Form (ZH11.1) and the Applicant Form (XP31.1). The information you would enter on these forms will be pre-populated for you from Hiring Gateway.
Hiring Gateway Email Once the Hiring Gateway process is complete and the information is moved into HRIS, the Hiring Coordinator at your agency will receive an email from Hiring Gateway. Once this email is received, the coordinator can then go into HRIS and begin the hiring process. The email that will be received from hiring gateway contains different information depending on whether or not the Employee has ever worked for the State of Arizona.

New Hire Process dc2-18-101 6
Hiring Gateway Email when Employee does not exist in HRIS When a Decision Accept has occurred for a candidate whose Social Security Number (SSN) does not match any SSN entries in the Lawson database.
Subject: “Candidate Added into XP31.1 form successfully1” Body: “Databridge has successfully added candidate on XP31.1. Requisition Number = …. Last Name = …. First Name = …. Home Phone = …. Applicant Number = …. Position# = …..
Hiring Gateway Email when Employee does exist in HRIS and is in a Terminated, Retired or Deceased Status
When a Decision Accept has occurred for a candidate whose Social Security Number (SSN) matches an SSN entry in the Lawson database and the employee status is either T1 or T2 or T3 or R1 or R2 or R3 or U1 or U2.
Subject: “Re-Hire has been made from Resumix.” Body: “Received a Re-Hire request from Resumix, which has been ignored by Databridge. Databridge has not sent any value to Lawson/HRIS. Requisition Number = …. Last Name = …. First Name = …. Home Phone = …. EIN# = …. Position# = …. Hire Date = ….
Hiring Gateway Email when Employee does exist in HRIS and is not in a Terminated, Retired or Deceased Status
When a Decision Accept has occurred for a candidate whose Social Security Number (SSN) matches an SSN entry in the Lawson database and the employee status is not T1 or T2 or T3 or R1 or R2 or R3 or U1 or U2.
Subject: “Internal Transfer has been made from Resumix.” Body: “Received an Internal Transfer request from Resumix, which has been ignored by Databridge. Databridge has not sent any value to Lawson/HRIS. Requisition Number = …. Last Name = …. First Name = …. Home Phone = …. EIN# = …. Position# = …. Hire Date = ….”
New Hire Process dc2-18-101 7
Hiring Gateway Problems – No Email Received If you do not receive an email from Hiring Gateway, you should complete the following steps before attempting to Hire the Employee without Hiring Gateway:
• Review your agency hiring source document for the Employee’s information. • Use the Applicant Form (XP31.1) to do a name OR SSN search for the applicant. To do
a search, you will click the drop down arrow at the end of the Applicant field, click ont he Search box in the menu bar, and type your search criteria into the boxes provided.
o If you find the Applicant you need, continue with the New Hire Process with Hiring Gateway.
o If you do not find the Applicant you need. You will need to contact your agency recruiter to determine if the Hiring Gateway process was completed.
• Depending on your agency policies and guidelines you may need to wait until the recruiter has completed the Hiring Gateway process. If your agency allows, you could complete the New Hire Process without Hiring Gateway.
New Hire Process dc2-18-101 8
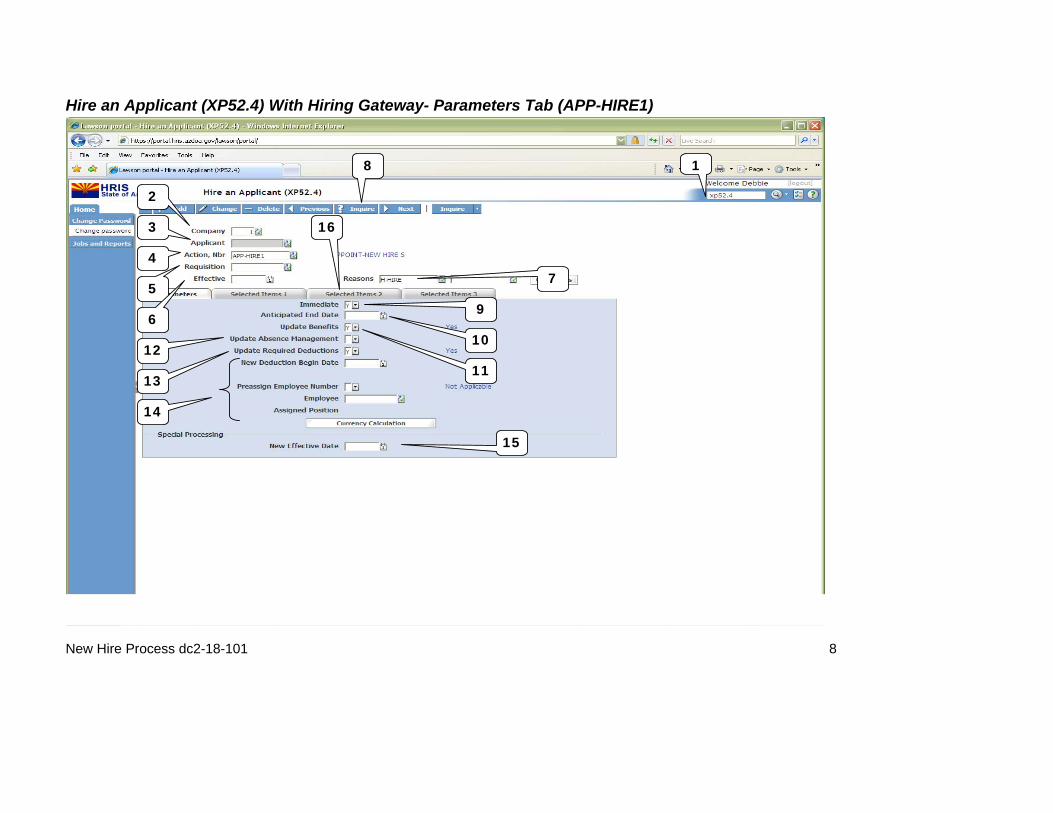
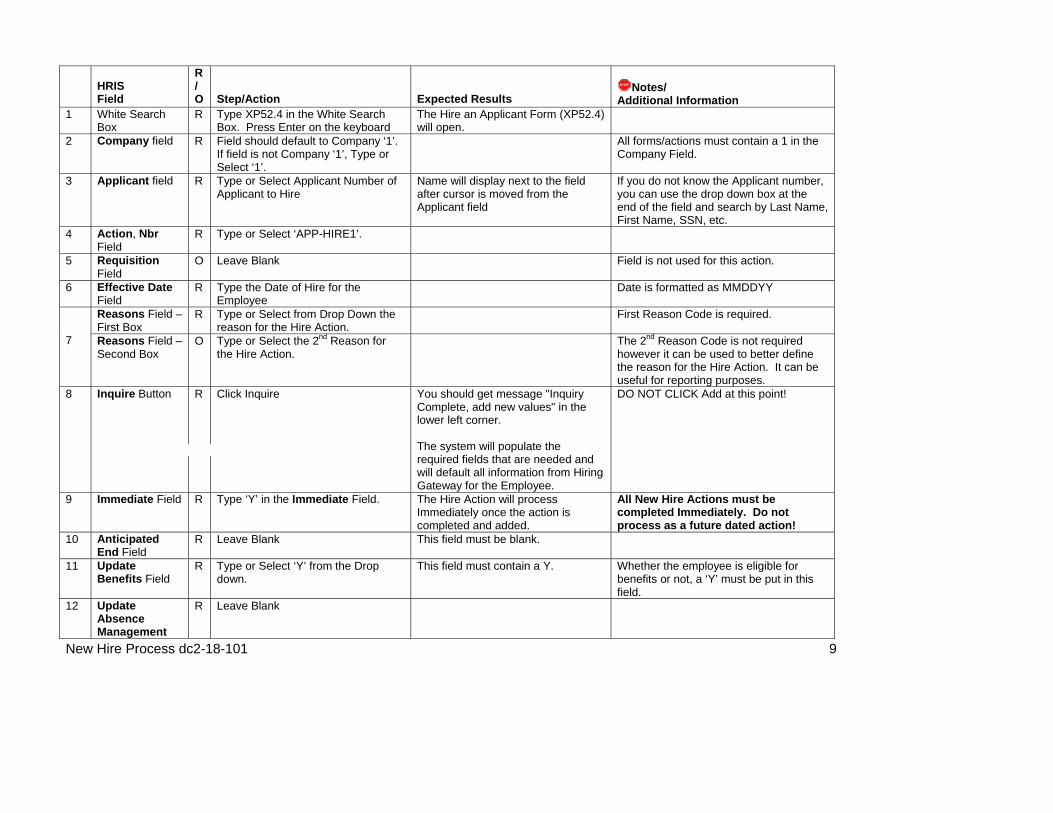
Hire an Applicant (XP52.4) With Hiring Gateway- Parameters Tab (APP-HIRE1)
1
2
3
4
5
6
7
8
9
10
11 12
13
14
15
16
New Hire Process dc2-18-101 9
HRIS Field
R / O
Step/Action
Expected Results
Notes/
Additional Information 1 White Search
Box R Type XP52.4 in the White Search
Box. Press Enter on the keyboard The Hire an Applicant Form (XP52.4) will open.
2 Company field R Field should default to Company ‘1’. If field is not Company ‘1’, Type or Select ‘1’.
All forms/actions must contain a 1 in the Company Field.
3 Applicant field R Type or Select Applicant Number of Applicant to Hire
Name will display next to the field after cursor is moved from the Applicant field
If you do not know the Applicant number, you can use the drop down box at the end of the field and search by Last Name, First Name, SSN, etc.
4 Action, Nbr Field
R Type or Select ‘APP-HIRE1’.
5 Requisition Field
O Leave Blank Field is not used for this action.
6 Effective Date Field
R Type the Date of Hire for the Employee
Date is formatted as MMDDYY
Reasons Field – First Box
R Type or Select from Drop Down the reason for the Hire Action.
First Reason Code is required.
7
Reasons Field – Second Box
O Type or Select the 2nd Reason for the Hire Action.
The 2nd Reason Code is not required however it can be used to better define the reason for the Hire Action. It can be useful for reporting purposes.
8 Inquire Button R Click Inquire You should get message "Inquiry Complete, add new values" in the lower left corner. The system will populate the required fields that are needed and will default all information from Hiring Gateway for the Employee.
DO NOT CLICK Add at this point!
9 Immediate Field R Type ‘Y’ in the Immediate Field. The Hire Action will process Immediately once the action is completed and added.
All New Hire Actions must be completed Immediately. Do not process as a future dated action!
10 Anticipated End Field
R Leave Blank This field must be blank.
11 Update Benefits Field
R Type or Select ‘Y’ from the Drop down.
This field must contain a Y. Whether the employee is eligible for benefits or not, a ‘Y’ must be put in this field.
12 Update Absence Management
R Leave Blank

New Hire Process dc2-18-101 10
HRIS Field
R / O
Step/Action
Expected Results
Notes/
Additional Information field
13 Update Required Deductions Field
R Type or Select ‘Y’ from the Drop down.
This field must contain a Y. This will activate the new hires required deductions.
14 New Deduction Begin Date Field Pre-Assign Employee Nbr Field Employee Field
R Leave Blank When the action is processed the system will default in the correct date.
The system will assign the new employee’s EIN in the Employee field when processing is completed. The other fields listed here must also be left blank.
15 New Effective Date Field
R Leave Blank
16 Selected Items 1 Tab
R Click on the Selected Items 1 tab The Selected Items 1 section will appear with the necessary fields to be populated.
Information that was imported from Hiring Gateway will default in.
New Hire Process dc2-18-101 11
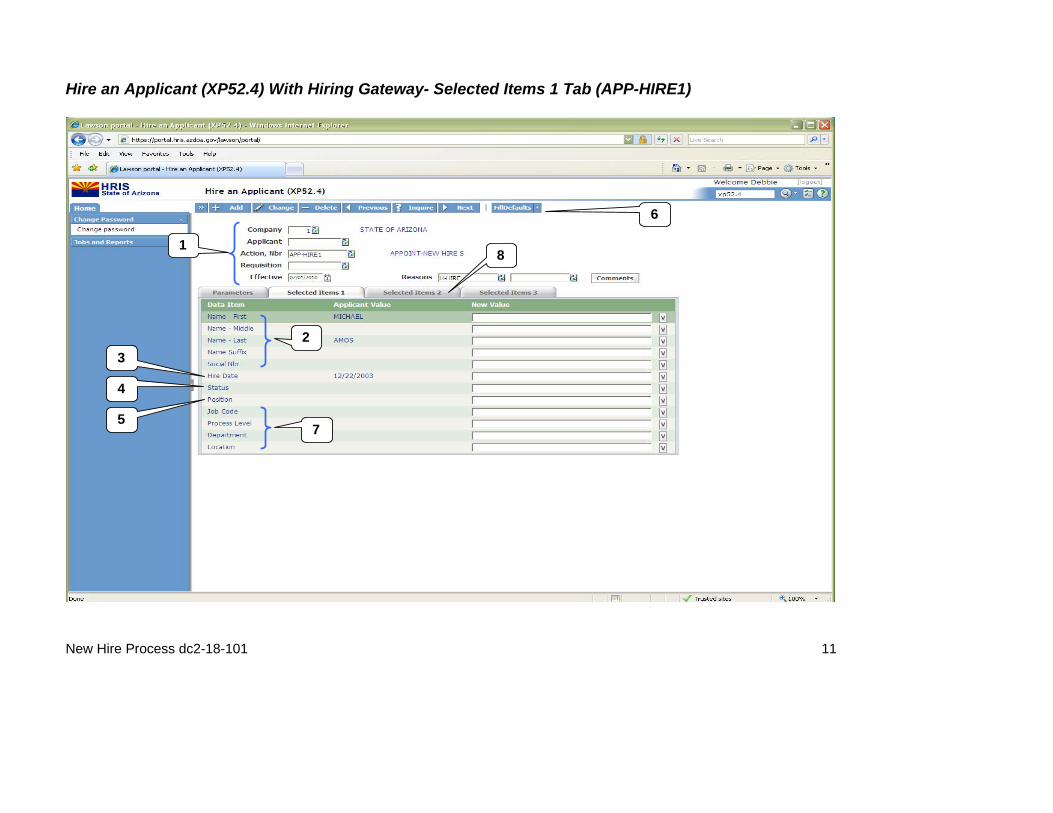
Hire an Applicant (XP52.4) With Hiring Gateway- Selected Items 1 Tab (APP-HIRE1)
1
2 3
4
5
6
7
8
New Hire Process dc2-18-101 12
HRIS Field
R / O
Step/Action
Expected Results
Notes/
Additional Information 1 Company field
Applicant Field Action, Nbr Field Requisition Field Effective Date Field Reasons Fields
R R R R R R
No Action Required, these fields will default to what was entered on the Parameters Tab.
2 Name-First Field Name-Middle Field Name-Last Field Name-Suffix Field Social Nbr Field
R O R O R
Verify the information that is populated from Hiring Gateway is correct. Information is displayed in the Applicant Value column. **If information is not correct (or is not displayed), type corrected information in the New Value field.
If information is entered, it will be displayed in the New Value column/ If the field is not changing, the information will be displayed in the Applicant Value column.
SSN Format is 123-45-6789
3 Hire Date Field R Type the Employee’s Hire Date Format is MMDDYYYY Date entered here automatically defaults to the Adjusted Hire Date, Anniversary Date and Seniority Date fields.
4 Status Field R Type or Select from the drop down the Employee’s Status.
To access the drop down menu, click the V at the end of the Selected Value field.
5 Position Field R Type the Employee’s Position Number
6 FillDefaults Button R Click Fill Defaults All information related to the position will be defaulted in. You will receive the message ‘Review defaulted fields’.
This is very important. Let the system default the information in from the position.
7 Job Code Field Process Level Field Department Field Location Field
R R R R
Leave default information in this field.
All information needed from the position will be defaulted in.
This is very important. Let the system default the information in from the position. If the information that defaulted in is not accurate, the information must be changed on the position, not the employee.
8 Selected Items 2 R Click on the Selected Items 2 tab The Selected Items 2 section will appear with the necessary field to be populated.
Information that was imported from Hiring Gateway will default in.
New Hire Process dc2-18-101 13
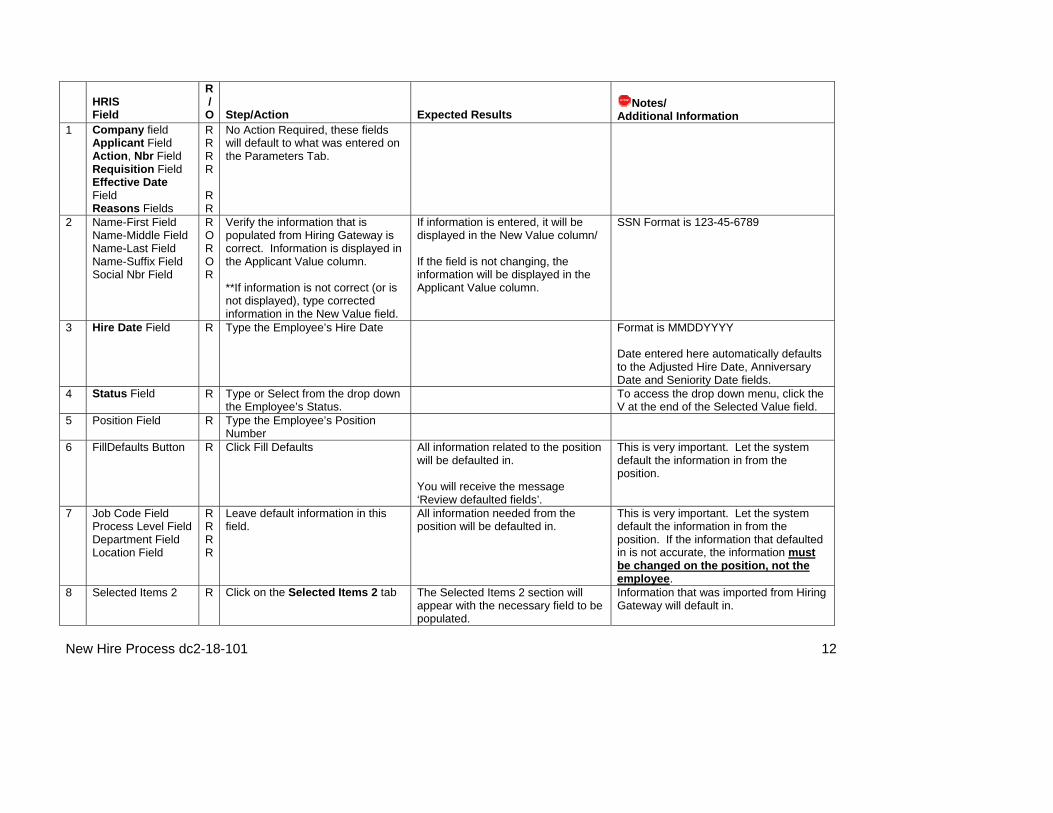
Hire an Applicant (XP52.4) With Hiring Gateway- Selected Items 2 Tab (APP-HIRE1)
1
2
3 4
5
6

New Hire Process dc2-18-101 14
HRIS Field
R / O
Step/Action
Expected Results
Notes/
Additional Information 1 Company field
Applicant Field Action, Nbr Field Requisition Field Effective Date Field Reasons Fields
R R R R R R
No Action Required, these fields will default to what was entered on the Parameters Tab.
2 Supervisor Field User Level Field Pay Frequency Field Salary Class Field
R R R R
Leave default information in these fields. No Action Required.
All information needed from the position will be defaulted in.
This is very important. Let the system default the information in from the position. If the information that defaulted in is not accurate, the information must be changed on the position not the employee.
3 Rate of Pay Field R Type the Rate of Pay for the Employee.
Format for Rate of Pay ‘00.0000’
4 Schedule Field Grade Field Step Field Exempt from Overtime Field Pay Plan Field Annual Hours Field
RRR RR R
Leave default information in these fields. No Action Required.
All information needed from the position will be defaulted in.
This is very important. Let the system default the information in from the position. If the information that defaulted in is not accurate, the information must be changed on the position not the employee.
5 FTE Field R Enter the employee’s FTE Full time =1.0, ¾ time = .75, ½ time = .50, and ¼ time = .25
6 Selected Items 3 R Click on the Selected Items 3 tab The Selected Items 3 section will appear with the necessary field to be populated.
Information that was imported from Hiring Gateway will default in.
New Hire Process dc2-18-101 15
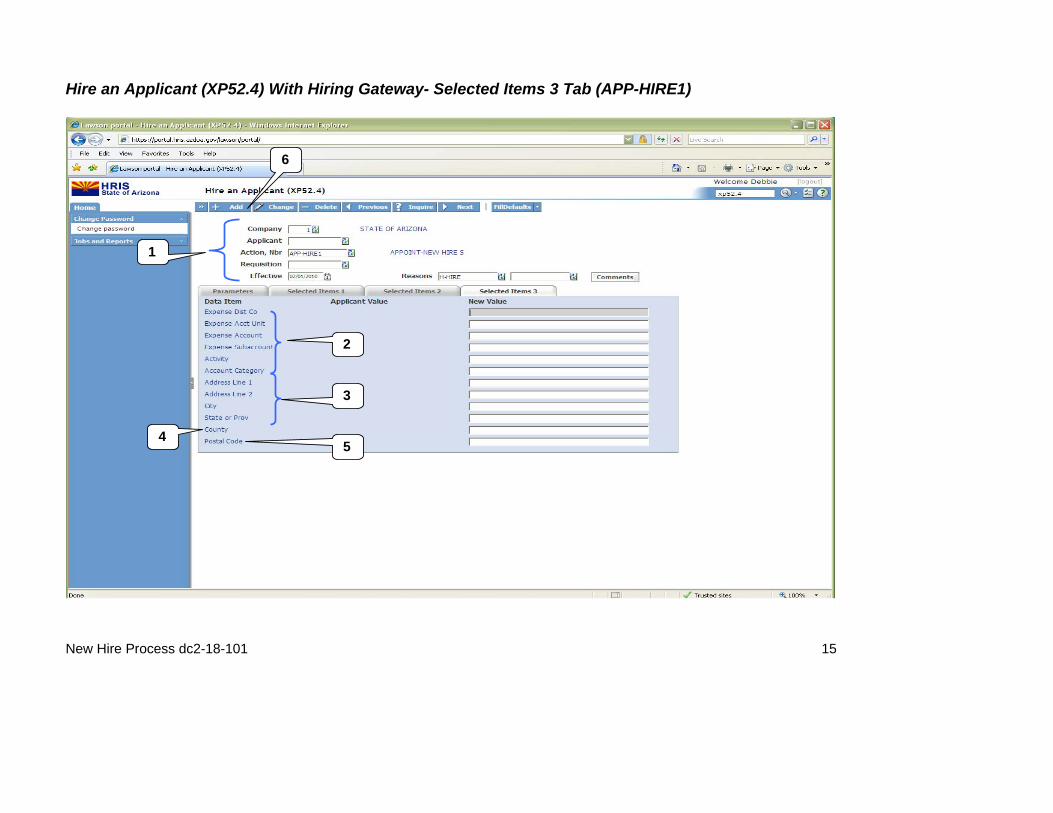
Hire an Applicant (XP52.4) With Hiring Gateway- Selected Items 3 Tab (APP-HIRE1)
1
2
3
4 5
6

New Hire Process dc2-18-101 16
HRIS Field
R / O
Step/Action
Expected Results
Notes/
Additional Information 1 Company field
Applicant Field Action, Nbr Field Requisition Field Effective Date Field Reasons Fields
R R R R R R
No Action Required, these fields will default to what was entered on the Parameters Tab.
2 Expense Dist Co Field Expense Acct Unit Field Expense Account Field Expense Sub-Account Field Activity Field Account Category Field
R R R R R R
Leave default information in these fields. No Action Required.
All information needed from the position will be defaulted in.
This is very important. Let the system default the information in from the position. If the information that defaulted in is not accurate, the information must be changed on the position not the employee.
3 Address Line 1 Field Address Line 2 Field City Field State or Prov Field
R O R R
Verify the information that is populated from Hiring Gateway is correct. Information is displayed in the Applicant Value column. **If information is not correct (or is not displayed), type corrected information in the New Value field.
If information is entered, it will be displayed in the New Value column. If the field is not changing, the information will be displayed in the Applicant Value column.
Information must be in ALL CAPS. Do not include Punctuation.
4
County Field R Type in the County where the Employee resides.
Information will appear in the New Value Column.
Information must be in ALL CAPS. Do not include Punctuation. County name must be spelled out, example ‘MARICOPA’.
5
Postal Code Field R Verify the information that is populated from Hiring Gateway is correct. Information is displayed in the Applicant Value column. **If information is not correct (or is not displayed), type corrected information in the New Value field.
If information is entered, it will be displayed in the New Value column. If the field is not changing, the information will be displayed in the Applicant Value column.
Information must be in ALL CAPS. Do not include Punctuation.

New Hire Process dc2-18-101 17
HRIS Field
R / O
Step/Action
Expected Results
Notes/
Additional Information Add button R Click Add You will receive a message in the
lower left corner “Warning! Action will be immediate; press OK to continue.
There is not an OK tab to click. See next step.
6
Add button R Click Add Again Message in lower left corner “Applicant hired; continue
The action has now processed and a Personnel Action Comments form (PA56.1) should appear. It is not recommended, however you can make comments on this form. You must be very careful what you say and how it is worded if you use it. This is the Official Employee Personnel file.
New Hire Process dc2-18-101 18
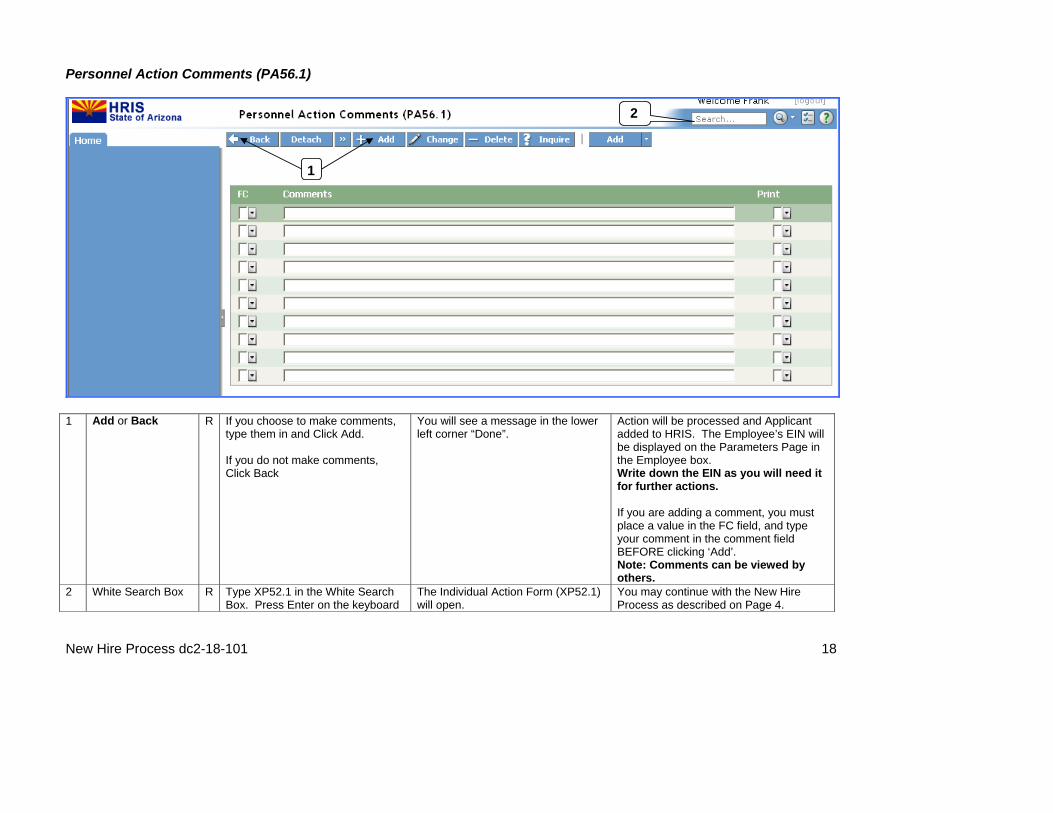
Personnel Action Comments (PA56.1)
1 Add or Back R If you choose to make comments,
type them in and Click Add. If you do not make comments, Click Back
You will see a message in the lower left corner “Done”.
Action will be processed and Applicant added to HRIS. The Employee’s EIN will be displayed on the Parameters Page in the Employee box. Write down the EIN as you will need it for further actions. If you are adding a comment, you must place a value in the FC field, and type your comment in the comment field BEFORE clicking ‘Add’. Note: Comments can be viewed by others.
2 White Search Box R Type XP52.1 in the White Search Box. Press Enter on the keyboard
The Individual Action Form (XP52.1) will open.
You may continue with the New Hire Process as described on Page 4.
1
2
New Hire Process dc2-18-101 19
New Hire Process with Hiring Gateway – Process Update After the completion of the APP-HIRE1 action on the XP52.4, you will continue with the New Hire Process by completing the following steps as outlined in the HRIS New Hire Process Chart (Page 4):
• HIRE-REHIRE2 on the Individual Action Form (XP52.1) - Required • HIRE-REHIRE3 on the Individual Action Form (XP52.1) - Required • I-9 – EEO Action on the Individual Action Form (XP52.1) - Optional
o Form is covered in the Agency HR Initiator I-9 – EEO Training Material • Employee State and Federal Taxes on PR13 Employee US Taxes - Required
o Form is covered in the Agency Taxes Initiator Maintain Tax Deduction Training. • Additional Contacts on the Additional Contacts Form (HR20.1) – Optional
o Form is covered in the Agency HR Initiator General Employee Information Training. • Emergency Contact Information on the Emergency Contacts Form (PA12.1) – Optional
o Form is covered in the Agency HR Initiator General Employee Information Training. • Initial Review Information on the Review Form (PA26.1) – Required if used by your agency • Email and Work Phone Maintenance Form (ZH12.1) - Required
o Form is covered in the Agency HR Initiator Email and Work Phone Maintenance Training
For the steps to complete these processes skip to section New Hire Process Continued – Page 37

New Hire Process dc2-18-101 20
New Hire Process Without Hiring Gateway
Overview The New Hire Process without Hiring Gateway will be followed anytime an Employee is hired outside of the Hiring Gateway product; this may typically apply to Direct Hires. When this occurs, there are additional steps that must be completed in HRIS to ensure that the Employee has not previously worked for the State or Arizona. When an Employee is hired directly, the first step is always to check their SSN against the HRIS database to see if they exist. If the Employee does not exist they will be added to the system as an Applicant, then hired from Applicant to Employee. After the Employee has been hired, the process is then identical to the New Hire process With Hiring Gateway. To complete the process, follow the steps as outlined below.
• Lookup the Employee SSN using the ZH11.1 - Social Security Look-Up o Form is covered in the Agency HR Initiator SSN Lookup Training Material
• If the SSN does not appear, add the person to HRIS as an applicant using the XP31.1 Enter An Applicant
o If SSN does appear, hire the employee using the HRIS Rehire process. • Hire the applicant as an Employee using the XP52.4 Hire An Applicant • Complete the hire process using the XP52.1 Individual Action • Update the Employees federal and state tax withholdings using the PR13.1 Employee
US Taxes o Form is covered in the Agency Taxes Initiator Training Material
• Enter any additional contact numbers using the HR20.1 Additional Contacts o Form is covered in the Agency HR Initiator General Employee Information
Training Material • Record and emergency contacts using the PA12.1 Emergency Contacts
o Form is covered in the Agency HR Initiator General Employee Information Training Material
• If applicable, setup the Employee’s initial performance review using the PA26.1 Review. • Set Employee’s email and work phone number using the Email and Work Phone
Maintenance Form (ZH12.1) - Required o Form is covered in the Agency HR Initiator Email and Work Phone Maintenance
Training
New Hire Process dc2-18-101 21
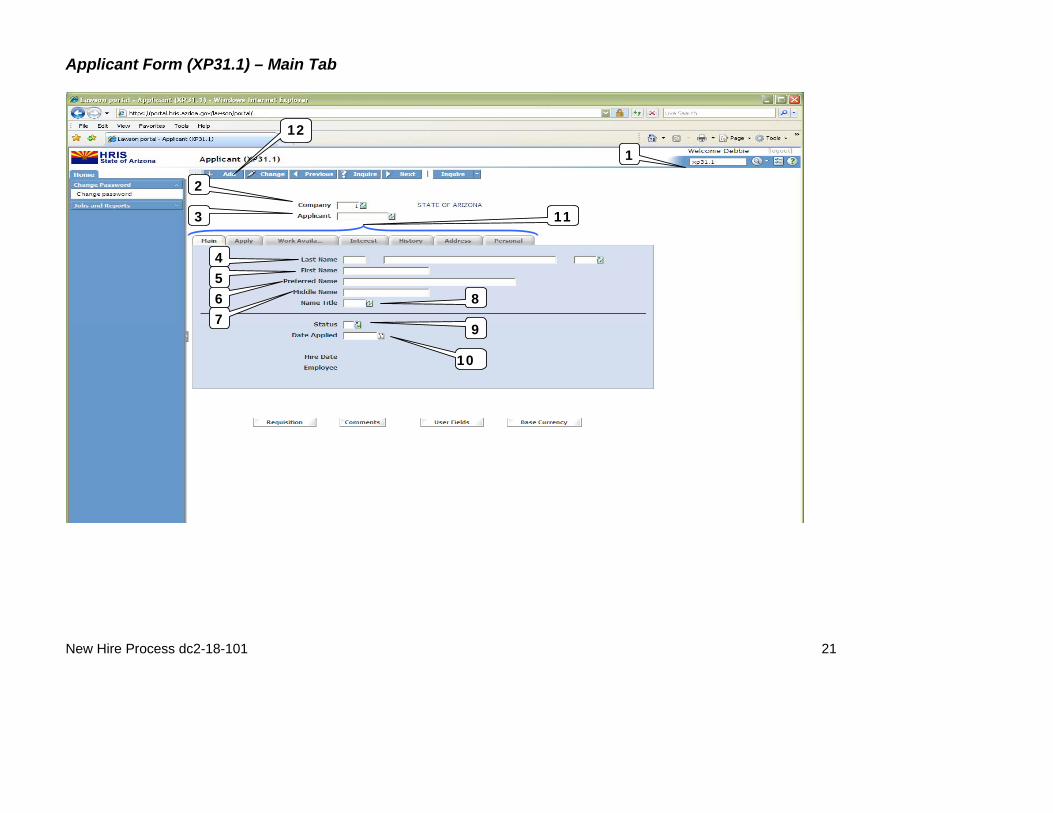
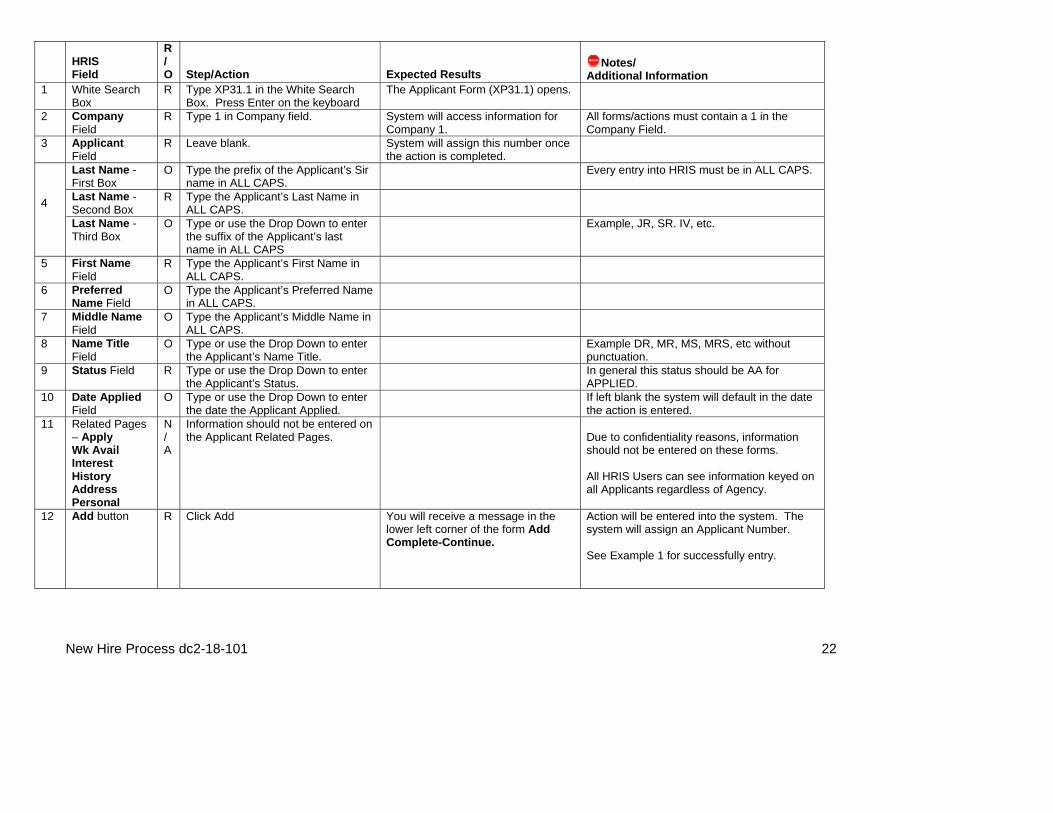
Applicant Form (XP31.1) – Main Tab
1
2
3
4 5 6 7
8
9
10
11
12
New Hire Process dc2-18-101 22
HRIS Field
R / O
Step/Action
Expected Results
Notes/
Additional Information 1 White Search
Box R Type XP31.1 in the White Search
Box. Press Enter on the keyboard The Applicant Form (XP31.1) opens.
2 Company Field
R Type 1 in Company field. System will access information for Company 1.
All forms/actions must contain a 1 in the Company Field.
3 Applicant Field
R Leave blank. System will assign this number once the action is completed.
Last Name - First Box
O Type the prefix of the Applicant’s Sir name in ALL CAPS.
Every entry into HRIS must be in ALL CAPS.
Last Name -Second Box
R Type the Applicant’s Last Name in ALL CAPS.
4 Last Name -
Third Box O Type or use the Drop Down to enter
the suffix of the Applicant’s last name in ALL CAPS
Example, JR, SR. IV, etc.
5 First Name Field
R Type the Applicant’s First Name in ALL CAPS.
6 Preferred Name Field
O Type the Applicant’s Preferred Name in ALL CAPS.
7 Middle Name Field
O Type the Applicant’s Middle Name in ALL CAPS.
8 Name Title Field
O Type or use the Drop Down to enter the Applicant’s Name Title.
Example DR, MR, MS, MRS, etc without punctuation.
9 Status Field R Type or use the Drop Down to enter the Applicant’s Status.
In general this status should be AA for APPLIED.
10 Date Applied Field
O Type or use the Drop Down to enter the date the Applicant Applied.
If left blank the system will default in the date the action is entered.
11 Related Pages – Apply Wk Avail Interest History Address Personal
N/A
Information should not be entered on the Applicant Related Pages.
Due to confidentiality reasons, information should not be entered on these forms. All HRIS Users can see information keyed on all Applicants regardless of Agency.
12 Add button R Click Add You will receive a message in the lower left corner of the form Add Complete-Continue.
Action will be entered into the system. The system will assign an Applicant Number. See Example 1 for successfully entry.
New Hire Process dc2-18-101 23
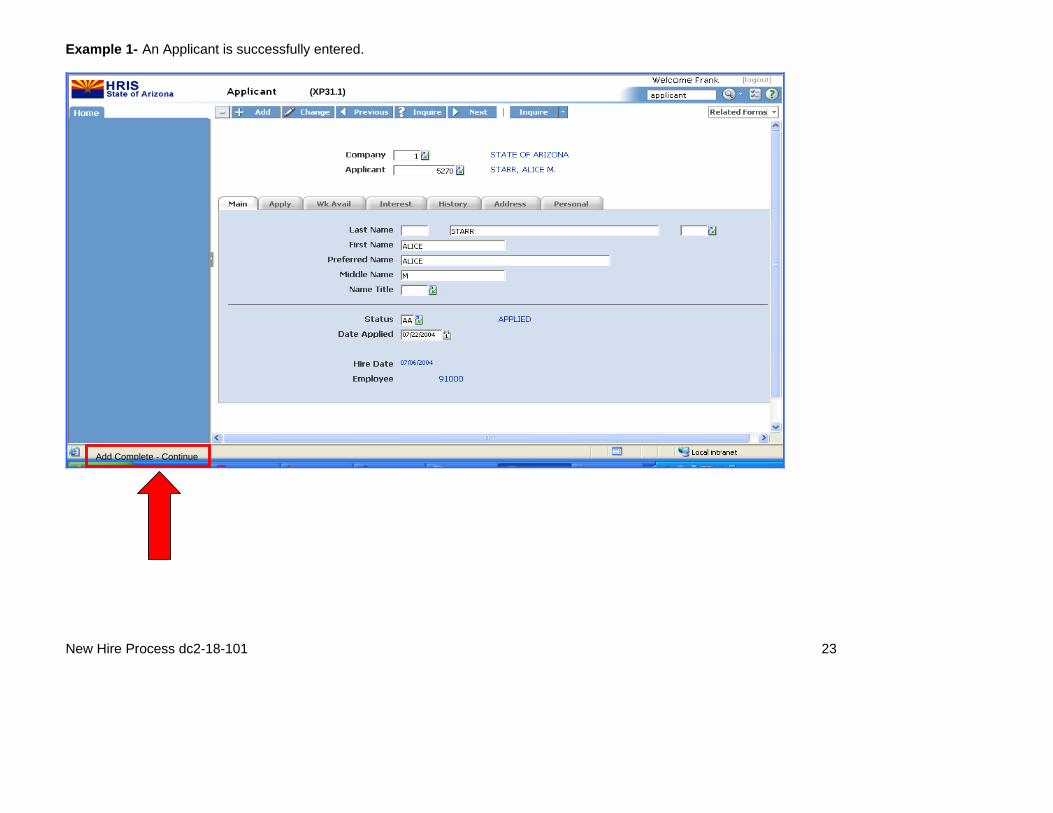
Example 1- An Applicant is successfully entered.
(XP31.1)
Add Complete - Continue
New Hire Process dc2-18-101 24
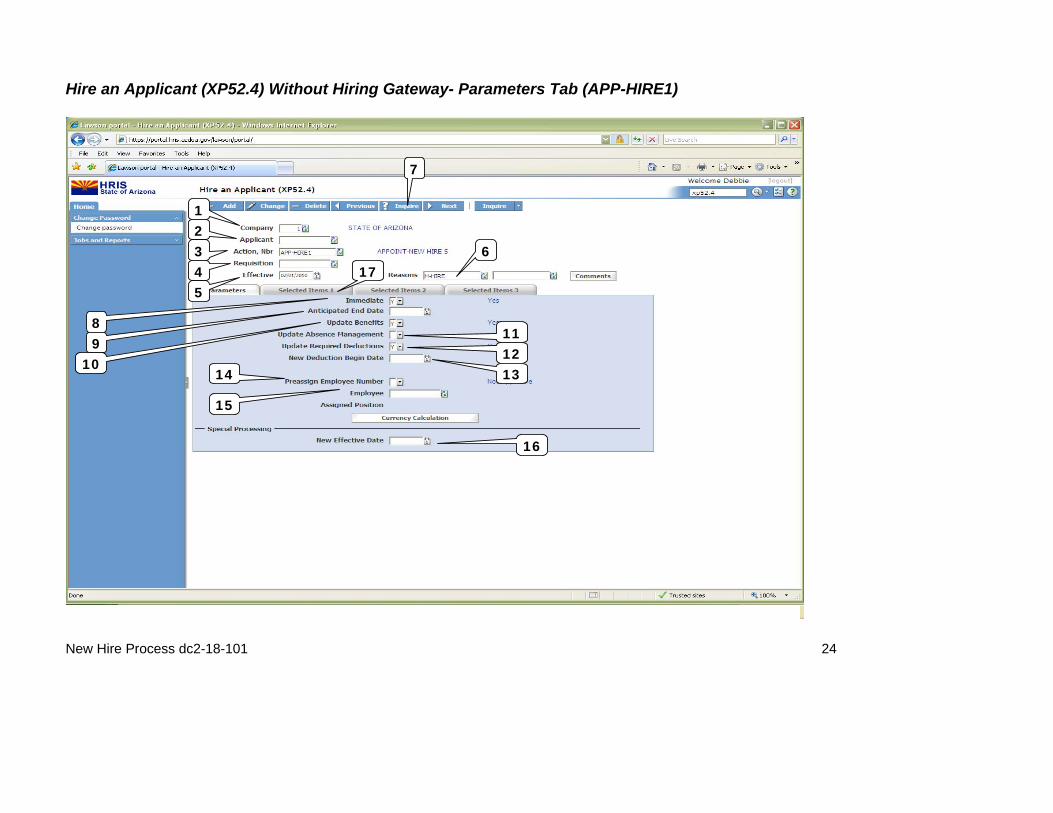
Hire an Applicant (XP52.4) Without Hiring Gateway- Parameters Tab (APP-HIRE1)
1 2 3 4 5
6 17
7
8 9
10
11 12 13 14
15
16

New Hire Process dc2-18-101 25
HRIS Field
R / O
Step/Action
Expected Results
Notes/
Additional Information 1 Company field R Field should default to Company ‘1’.
If field is not Company ‘1’, Type or Select ‘1’.
All forms/actions must contain a 1 in the Company Field.
2 Applicant field R Type or Select Applicant Number of Applicant to Hire
Name will display next to the field after cursor is moved from the Applicant field
If you do not know the Applicant number, you can use the drop down box at the end of the field and search by Last Name, First Name, SSN, etc.
3 Action, Nbr Field
R Type or Select ‘APP-HIRE1’.
4 Requisition Field
O Leave Blank Field is not used for this action.
5 Effective Date Field
R Type the Date of Hire for the Employee
Date is formatted as MMDDYY
Reasons Field – First Box
R Type or Select from Drop Down the reason for the Hire Action.
First Reason Code is required.
6 Reasons Field - Second Box
O Type or Select the 2nd Reason for the Hire Action.
The 2nd Reason Code is not required however it can be used to better define the reason for the Hire Action. It can be useful for reporting purposes.
7 Inquire Button R Click Inquire You should get message "Inquiry Complete, add new values" in the lower left corner. The system will populate the required fields that are needed and will default all information from Hiring Gateway for the Employee.
DO NOT CLICK Add at this point!
8 Immediate Field R Type ‘Y’ in the Immediate Field. The Hire Action will process Immediately once the action is completed and added.
All New Hire Actions must be completed Immediately. This is what will give you the EIN for the New Hire once the action has been completed and added.
9 Anticipated End Field
R Leave Blank This field must be blank.
10 Update Benefits Field
R Type or Select ‘Y’ from the Drop down.
This field must contain a Y. Whether the employee is eligible for benefits or not, a ‘Y’ must be put in this field.
11 Update Absence Management Field
R Leave Blank This field must be blank.
12 Update Required
R Type or Select ‘Y’ from the Drop down.
This field must contain a Y. This will activate the new hires required deductions.
New Hire Process dc2-18-101 26
HRIS Field
R / O
Step/Action
Expected Results
Notes/
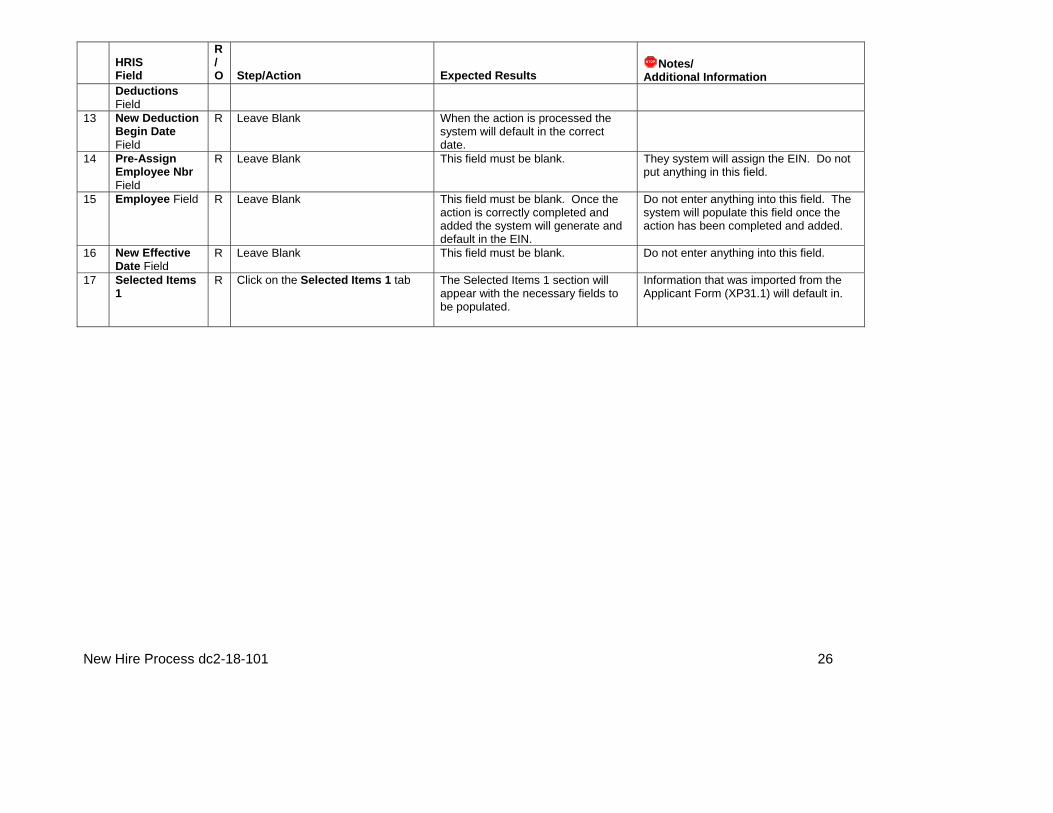
Additional Information Deductions Field
13 New Deduction Begin Date Field
R Leave Blank When the action is processed the system will default in the correct date.
14 Pre-Assign Employee Nbr Field
R Leave Blank This field must be blank. They system will assign the EIN. Do not put anything in this field.
15 Employee Field R Leave Blank This field must be blank. Once the action is correctly completed and added the system will generate and default in the EIN.
Do not enter anything into this field. The system will populate this field once the action has been completed and added.
16 New Effective Date Field
R Leave Blank This field must be blank. Do not enter anything into this field.
17 Selected Items 1
R Click on the Selected Items 1 tab The Selected Items 1 section will appear with the necessary fields to be populated.
Information that was imported from the Applicant Form (XP31.1) will default in.
New Hire Process dc2-18-101 27
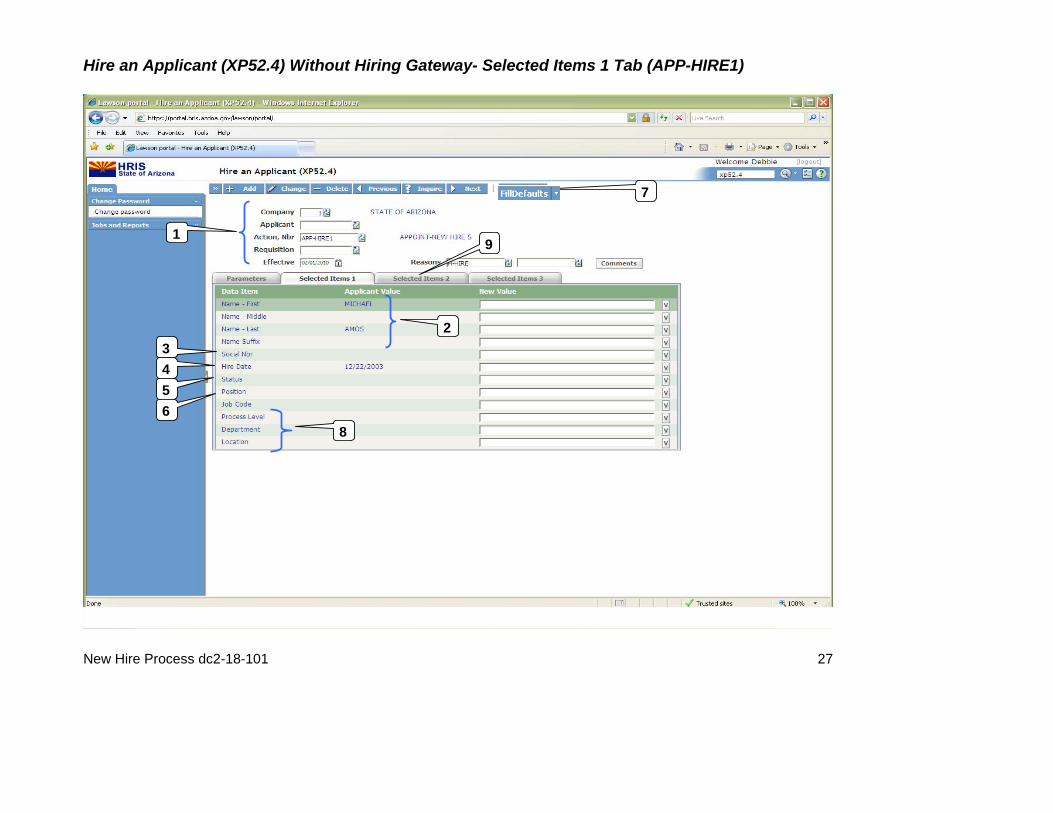
Hire an Applicant (XP52.4) Without Hiring Gateway- Selected Items 1 Tab (APP-HIRE1)
1
2 3 4 5 6
7
8
9

New Hire Process dc2-18-101 28
HRIS Field
R / O
Step/Action
Expected Results
Notes/
Additional Information 1 Company field
Applicant Field Action, Nbr Field Requisition Field Effective Date Field Reasons Fields
R R R R R R
No Action Required, these fields will default to what was entered on the Parameters Tab.
2 Name-First Field Name-Middle Field Name-Last Field Name-Suffix Field
R O R O
Verify the information that is populated from the Applicant Form (XP31.1) is correct. Information is displayed in the Applicant Value column. **If information is not correct (or is not displayed), type corrected information in the New Value field.
If information is entered, it will be displayed in the New Value column/ If the field is not changing, the information will be displayed in the Applicant Value column.
3 Social Nbr Field R Type Employee SSN in the New Value Field
Format is 123-45-6789.
4 Hire Date Field R Type the Employees Hire Date Format is MMDDYYYY Date entered here automatically defaults to the Adjusted Hire Date, Anniversary Date and Seniority Date fields.
5 Status Field R Type or Select from the drop down the Employee’s Status.
To access the drop down menu, click the V at the end of the Selected Value field.
6 Position Field R Type the Employee’s Position Number
7 Fill Defaults button R Click Fill Defaults All information related to the position will be defaulted in. You will receive the message ‘Review defaulted fields’.
This is very important. Let the system default the information in from the position.
8 Job Code Field Process Level Field Department Field Location Field
R R R R
Leave default information in this field.
All information needed from the position will be defaulted in.
This is very important. Let the system default the information in from the position. If the information that defaulted in is not accurate, the information must be changed on the position, not the employee.
9 Selected Items 2 R Click on the Selected Items 2 tab The Selected Items 2 section will appear with the necessary fields to be populated.
Information that was imported from Hiring Gateway will default in.

New Hire Process dc2-18-101 29
Hire an Applicant (XP52.4) Without Hiring Gateway- Selected Items 2 Tab (APP-HIRE1)
1
2
3
4
5
6

New Hire Process dc2-18-101 30
HRIS Field
R / O
Step/Action
Expected Results
Notes/
Additional Information 1 Company field
Applicant Field Action, Nbr Field Requisition Field Effective Date Field Reasons Fields
R R R R R R
No Action Required, these fields will default to what was entered on the Parameters Tab.
2 Supervisor Field User Level Field Pay Frequency Field Salary Class Field
R R R R
Leave default information in this field. No Action Required.
All information needed from the position will be defaulted in.
This is very important. Let the system default the information in from the position. If the information that defaulted in is not accurate, the information must be changed on the position not the employee.
3 Rate of Pay Field R Type the Rate of Pay for the Employee.
Format for Rate of Pay ‘00.0000’
4 Schedule Field Grade Field Step Field Exempt from Overtime Field Pay Plan Field Annual Hours Field
RRR R R R
Leave default information in this field. No Action Required.
All information needed from the position will be defaulted in.
This is very important. Let the system default the information in from the position. If the information that defaulted in is not accurate, the information must be changed on the position not the employee.
5 FTE Field R Enter the employee’s FTE Full time =1.0, ¾ time = .75, ½ time = .50, and ¼ time = .25
6 Selected Items 3 R Click on the Selected Items 3 tab The Selected Items 3 section will appear with the necessary fields to be populated.
Information that was imported from XP31.1 will default in.
New Hire Process dc2-18-101 31
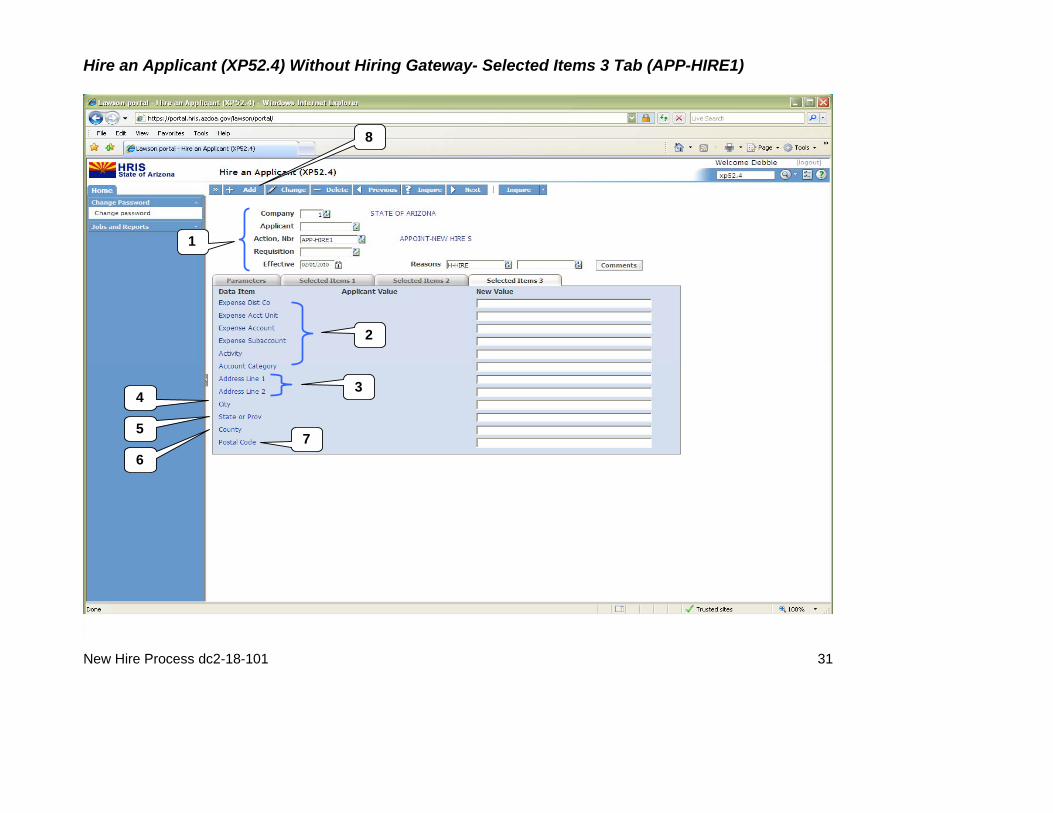
Hire an Applicant (XP52.4) Without Hiring Gateway- Selected Items 3 Tab (APP-HIRE1)
1
2
3 4
5
6 7
8
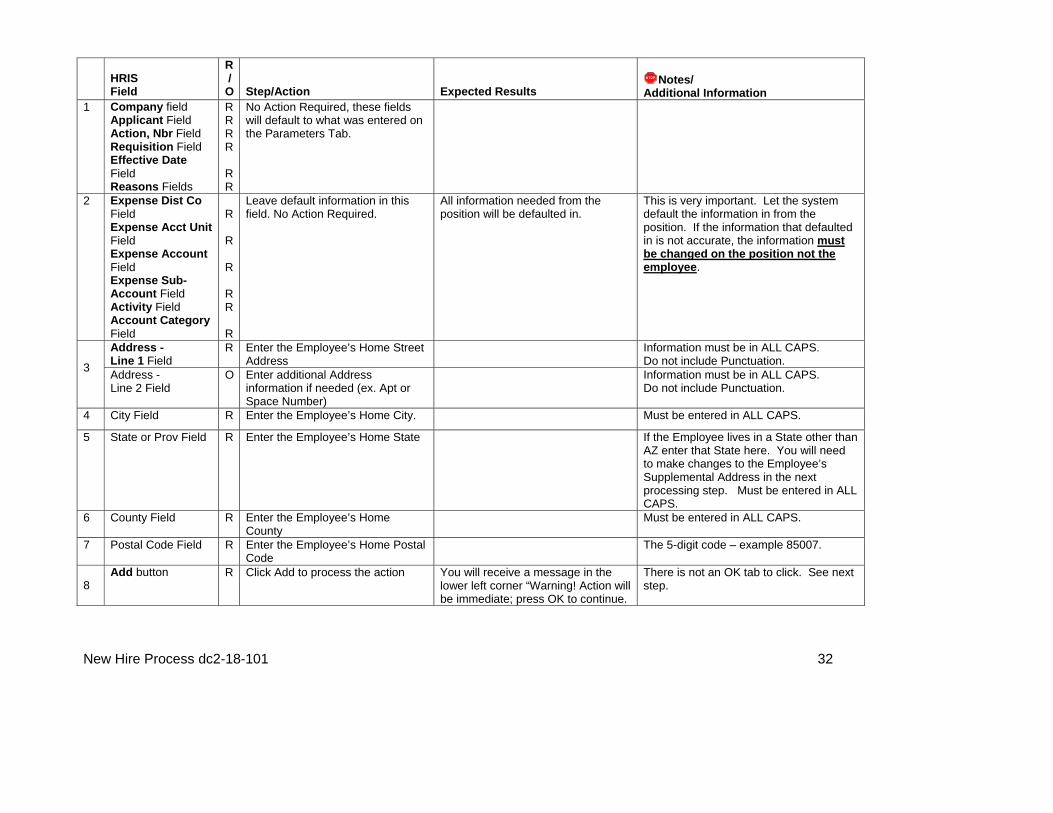
New Hire Process dc2-18-101 32
HRIS Field
R / O
Step/Action
Expected Results
Notes/
Additional Information 1 Company field
Applicant Field Action, Nbr Field Requisition Field Effective Date Field Reasons Fields
R R R R R R
No Action Required, these fields will default to what was entered on the Parameters Tab.
2 Expense Dist Co Field Expense Acct Unit Field Expense Account Field Expense Sub-Account Field Activity Field Account Category Field
R R R R R R
Leave default information in this field. No Action Required.
All information needed from the position will be defaulted in.
This is very important. Let the system default the information in from the position. If the information that defaulted in is not accurate, the information must be changed on the position not the employee.
Address - Line 1 Field
R Enter the Employee’s Home Street Address
Information must be in ALL CAPS. Do not include Punctuation. 3
Address - Line 2 Field
O Enter additional Address information if needed (ex. Apt or Space Number)
Information must be in ALL CAPS. Do not include Punctuation.
4 City Field R Enter the Employee’s Home City. Must be entered in ALL CAPS.
5 State or Prov Field R Enter the Employee’s Home State If the Employee lives in a State other than AZ enter that State here. You will need to make changes to the Employee’s Supplemental Address in the next processing step. Must be entered in ALL CAPS.
6 County Field R Enter the Employee’s Home County
Must be entered in ALL CAPS.
7 Postal Code Field R Enter the Employee’s Home Postal Code
The 5-digit code – example 85007.
8 Add button R Click Add to process the action You will receive a message in the
lower left corner “Warning! Action will be immediate; press OK to continue.
There is not an OK tab to click. See next step.

New Hire Process dc2-18-101 33
HRIS Field
R / O
Step/Action
Expected Results
Notes/
Additional Information Add button R Click Add Again Message in lower left corner
“Applicant hired; continue The action has now processed and a Personnel Action Comments form (PA56.1) should appear. It is not recommended, however you can make comments on this form. You must be very careful what you say and how it is worded if you use it. This is the Official Employee Personnel file.

New Hire Process dc2-18-101 34
Personnel Action Comments (PA56.1)
HRIS Field
R / O
Step/Action
Expected Results
Notes/
Additional Information 1 Add or Back R If you choose to make comments,
type them in and Click Add. If you do not make comments, Click Back
You will see a message in the lower left corner “Done”.
Action will be processed and Applicant added to HRIS. The Employee’s EIN will be displayed on the Parameters Page in the Employee box. Write down the EIN as you will need it for further actions. If you are adding a comment, you must place a value in the FC field, and type your comment in the comment field BEFORE clicking ‘Add’ Note: Comments can be viewed by others.
2 White Search Box R Type XP52.1 in the White Search The Individual Action Form (XP52.1) You may continue with the New Hire
1
2

New Hire Process dc2-18-101 35
HRIS Field
R / O
Step/Action
Expected Results
Notes/
Additional Information Box. Press Enter on the keyboard will open. Process as described on Page 4.
New Hire Process dc2-18-101 36
New Hire Process without Hiring Gateway – Process Update After the completion of the APP-HIRE1 action on the XP52.4, you will continue with the New Hire Process by completing the following steps as outlined in the HRIS New Hire Process Chart (Page 4):
• HIRE-REHIRE2 on the Individual Action Form (XP52.1) - Required • HIRE-REHIRE3 on the Individual Action Form (XP52.1) - Required • I-9 – EEO Action on the Individual Action Form (XP52.1) – Optional • Employee State and Federal Taxes on PR13 Employee US Taxes (See Taxes Initiator) -
Required • Additional Contacts on the Additional Contacts Form (HR20.1) - Optional • Emergency Contact Information on the Emergency Contacts Form (PA12.1) - Optional • Initial Review Information on the Review Form (PA26.1) – Required if used by your agency • Email and Work Phone Maintenance Form (ZH12.1) - Required
For the steps to complete these processes skip to section New Hire Process Continued – Page 37
New Hire Process dc2-18-101 37
New Hire Process Continued
Overview For both New Hires with and without Hiring Gateway, the remaining New Hire Process will be identical. After completing the APP-HIRE1 action on the XP52.4, you will continue with the New Hire Process by completing the following steps as outlined in the HRIS New Hire Process Chart (Page 4):
• HIRE-REHIRE2 on the Individual Action Form (XP52.1) - Required • HIRE-REHIRE3 on the Individual Action Form (XP52.1) - Required • Initial Review Information on the Review Form (PA26.1) – Required if used by your agency
Some fields may be completed if Hiring Gateway was utilized, those fields will be identified in the Notes section of the table.

New Hire Process dc2-18-101 38
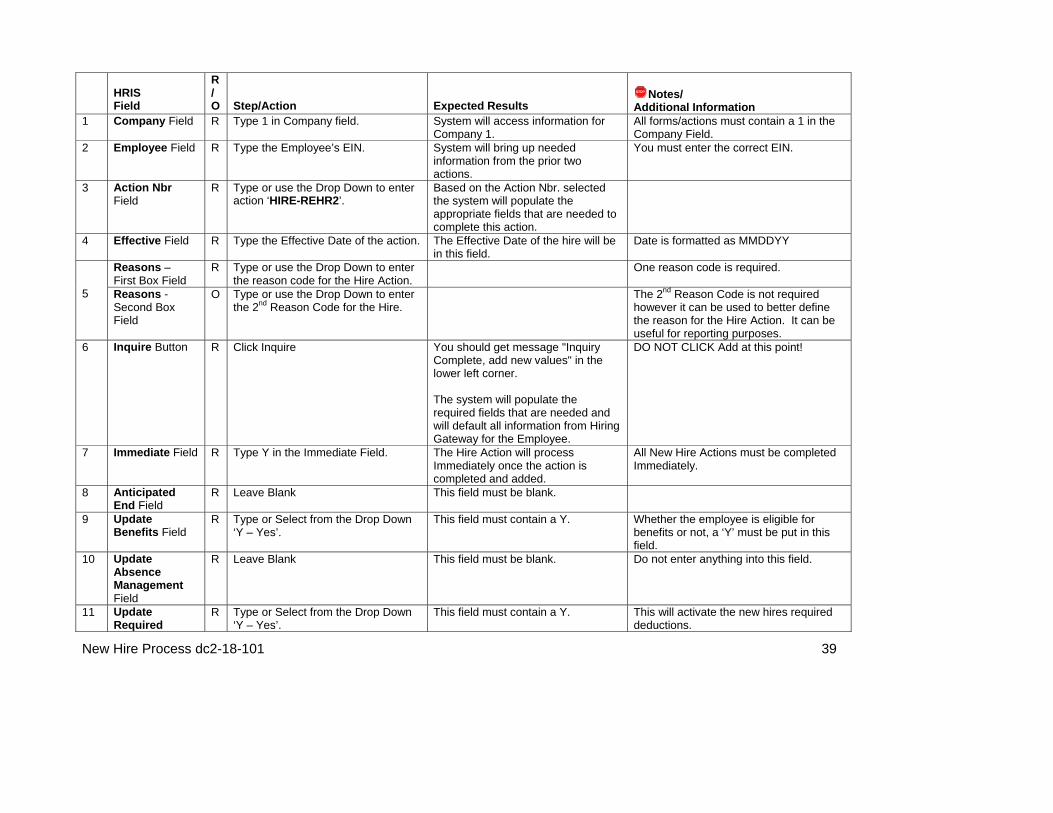
Individual Action (XP52.1)- Parameters Tab (HIRE-REHR2)
1 2 3 4
5
6
7 8 9
10 11 12 13
14
New Hire Process dc2-18-101 39
HRIS Field
R / O
Step/Action
Expected Results
Notes/
Additional Information 1 Company Field R Type 1 in Company field. System will access information for
Company 1. All forms/actions must contain a 1 in the Company Field.
2 Employee Field R Type the Employee’s EIN. System will bring up needed information from the prior two actions.
You must enter the correct EIN.
3 Action Nbr Field
R Type or use the Drop Down to enter action ‘HIRE-REHR2’.
Based on the Action Nbr. selected the system will populate the appropriate fields that are needed to complete this action.
4 Effective Field R Type the Effective Date of the action. The Effective Date of the hire will be in this field.
Date is formatted as MMDDYY
Reasons – First Box Field
R Type or use the Drop Down to enter the reason code for the Hire Action.
One reason code is required.
5
Reasons - Second Box Field
O Type or use the Drop Down to enter the 2nd Reason Code for the Hire.
The 2nd Reason Code is not required however it can be used to better define the reason for the Hire Action. It can be useful for reporting purposes.
6 Inquire Button R Click Inquire You should get message "Inquiry Complete, add new values" in the lower left corner. The system will populate the required fields that are needed and will default all information from Hiring Gateway for the Employee.
DO NOT CLICK Add at this point!
7 Immediate Field R Type Y in the Immediate Field. The Hire Action will process Immediately once the action is completed and added.
All New Hire Actions must be completed Immediately.
8 Anticipated End Field
R Leave Blank This field must be blank.
9 Update Benefits Field
R Type or Select from the Drop Down ‘Y – Yes’.
This field must contain a Y. Whether the employee is eligible for benefits or not, a ‘Y’ must be put in this field.
10 Update Absence Management Field
R Leave Blank This field must be blank. Do not enter anything into this field.
11 Update Required
R Type or Select from the Drop Down ‘Y – Yes’.
This field must contain a Y. This will activate the new hires required deductions.
New Hire Process dc2-18-101 40
HRIS Field
R / O
Step/Action
Expected Results
Notes/
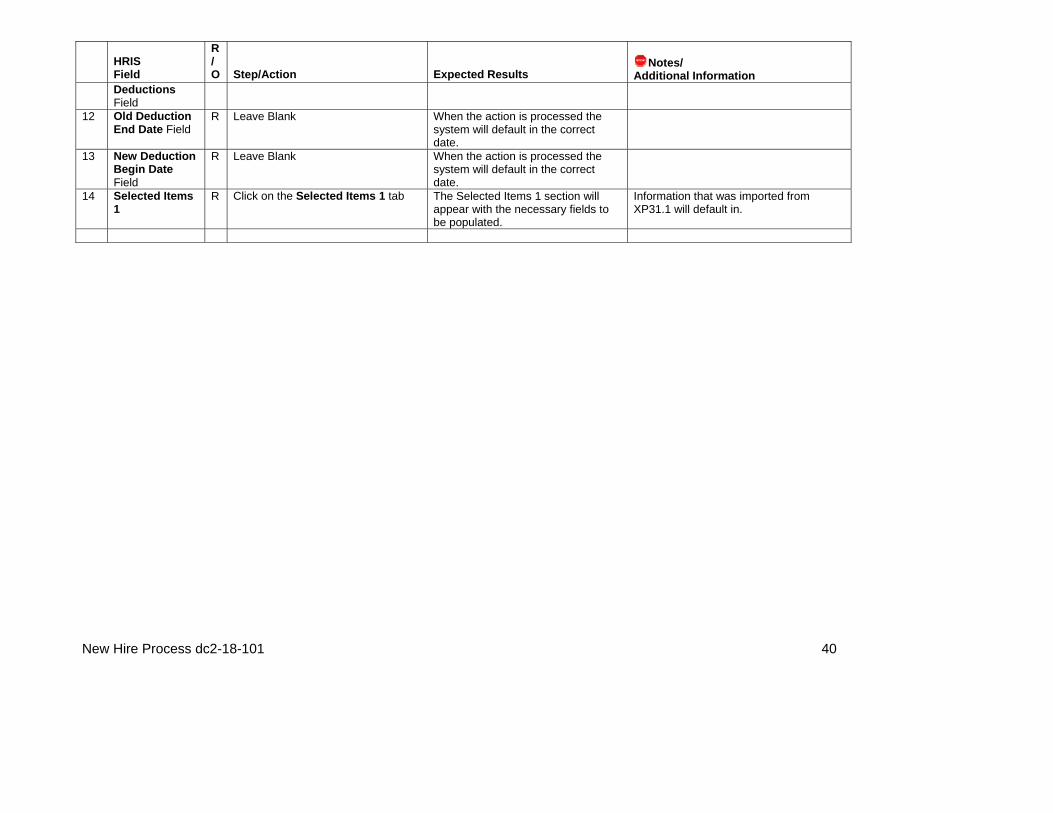
Additional Information Deductions Field
12 Old Deduction End Date Field
R Leave Blank When the action is processed the system will default in the correct date.
13 New Deduction Begin Date Field
R Leave Blank When the action is processed the system will default in the correct date.
14 Selected Items 1
R Click on the Selected Items 1 tab The Selected Items 1 section will appear with the necessary fields to be populated.
Information that was imported from XP31.1 will default in.

New Hire Process dc2-18-101 41
Individual Action (XP52.1)- Selected Items 1 Tab (HIRE-REHR2)
1 2
3
4
5
6
7
8
9
10
11
12
13
14

New Hire Process dc2-18-101 42
HRIS Field
R / O
Step/Action
Expected Results
Notes/
Additional Information 1 Company field
Employee Field Action, Nbr Field Requisition Field Effective Date Field Reasons Fields
R R R R R R
No Action Required, these fields will default to what was entered on the Parameters Tab.
2 Preferred Name Field
O Key the Employee’s Preferred Name. The Employee’s Preferred Name will be in the record.
If this information was entered on the PA31 it will default into this field.
3 Disability Field R Key or use the drop down to indicate if the Employee has a disability.
Valid values are N = No, Y = Yes.
4 Gender Field R Key or use the drop down to enter the Employee’s Gender.
Valid values are M = Male, F = Female
5 Marital Status Field R Key or use the drop down to enter the Employee’s Marital Status, this is not for tax purposes.
6 Ethnicity Field R Key or use the drop down to enter the Employee’s Ethnicity.
7 EEO-4 Group Field R Type the EEO-4 Functional Group for your agency
Valid Values are 01, 02, 03, 04, 06, 08, 09, 10, 11, 12, 14, 15 or 99. See the Agency List with EEO-4 Functional Groups document to find the one in which you agency is located.
8 Exclude from EEO-4 Field
R Type ‘Y’ or ‘N’ as applicable to the Employee. All Employees should be ‘N’, except for those listed in the EEO-4 Group 99.
9 Veteran Field R Key or use the drop down to enter the Employee’s Veteran Status.
This must be a correct status. If you indicate the Employee was born in 1980 and put the Employee is a Vietnam Era Veteran that would not be accurate.
10 RETIREMENT CODE Field
R Key or use the drop down to enter the appropriate code for the Employee.
11 Shift Field O You only need to enter a shift code if the Employee is on a shift other than 1. The system will default 1 in.
Valid codes are 1 – day shift, 2 – second, swing or evening shift, 3 – night or graveyard shift.
12 UNDER/OVER FILL Field
O If the Employee is an Under or Over fill, key or use the drop down to enter the Under/Over fill.
This field must be completed if the Employee is an Under/Over fill.
13 Hire Source Field O This is an Optional Field. If utilizing Hiring Gateway this field will be defaulted in. The default value will be HGR.
14 Selected Items 2 R Click on the Selected Items 2 tab. The Selected Items 2 section will appear.
Information that was imported from XP31.1 will appear.

New Hire Process dc2-18-101 43
Individual Action (XP52.1)- Selected Items 2 Tab (HIRE-REHR2)
1 2
3
4
5
6
7
8
9
10
11
12
13

New Hire Process dc2-18-101 44
HRIS Field
R / O
Step/Action
Expected Results
Notes/
Additional Information 1 Company field
Employee Field Action, Nbr Field Requisition Field Effective Date Field Reasons Fields
R R R R R R
No Action Required, these fields will default to what was entered on the Parameters Tab.
2 Auto Time Record Field
R The system will default a Y in for Yes. No Action Required.
This field must contain a Y.
3 Automatic Deposit Field
R The system will default a Y in for Yes. No Action Required.
This field must contain a Y.
4 Annual Leave Plan Field
R Type or Select from the Drop Down the correct Annual Leave Plan for the Employee.
The employee should be place in an Annual Leave plan appropriate for their status and FTE. Example: Employee is a covered ½ time employee they should be in the Covered ½ time Annual Leave Plan.
5 Sick Leave Plan Field
R Type or Select from the Drop Down the correct Sick Leave Plan for the Employee.
The employee should be place in a Sick Leave plan appropriate for their status and FTE. Example: Employee is a covered ½ time employee they should be in the Covered ½ time Sick Leave Plan.
6 Cash/Comp Field R Type or Select from the Drop Down the correct Cash/Comp Plan for the Employee.
The Employee should be placed in the appropriate Cash/Comp plan based on their FLSA designation and the Cash/Comp Election form completed by the Employee. Valid values are: Cash Comp Either None
7 Education Field O Select the Education field as applicable for your agency.
This is an Optional Field. Field is not used by all agencies. If your agency does not have an Educational Stipend, do not enter data into this field.
8 Adjusted Hire Date Field
R Type the Adjusted Hire Date, if applicable.
If you do not enter an Adjusted Hire Date the system will default the Hire Date into this field

New Hire Process dc2-18-101 45
HRIS Field
R / O
Step/Action
Expected Results
Notes/
Additional Information Date format is MMDDYY.
9 Agency Hire Date Field
O Type the Agency Hire Date, if applicable.
This is an optional date field. Key the date the Employee starts with the Agency. Date format is MMDDYY.
10 Orig State Hire Date Field
R Type the Original State Hire Date. Date format is MMDDYY.
11 Job Code Hire Date Field
O Type the Job Code Hire Date. This is an optional date field. Date format is MMDDYY.
12 Status Term Date Field
O Type the Status Term Date, if applicable for the Employee Status.
Example - If the Employee is in a probationary status there must be a Status Term Date.
13 Work Schedule Field
R Type or select from the drop down menu the Employee’s appropriate work schedule.
Note: What is in the field affects the Employee’s time entry.
14 Selected Items 3 R Click on the Selected Items 3 tab. The Selected Items 3 section will appear with the necessary fields to be populated.
Information that was imported from XP31.1 will appear.

New Hire Process dc2-18-101 46
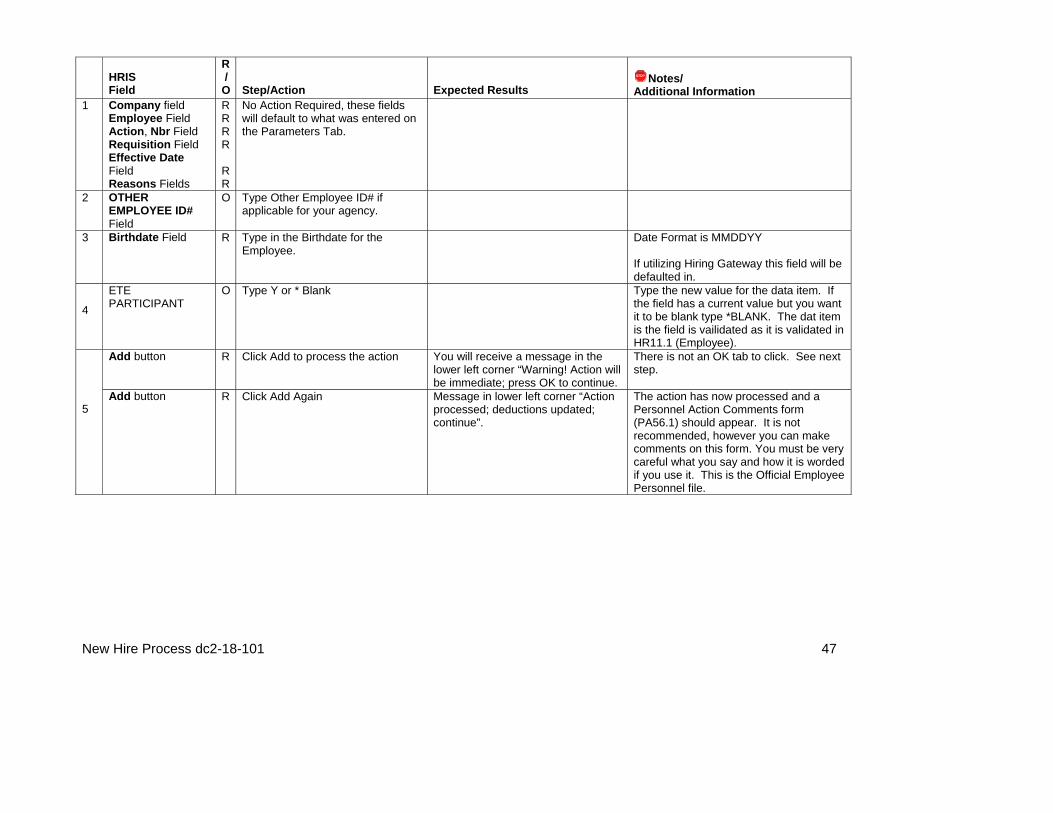
Individual Action (XP52.1)- Selected Items 3 Tab (HIRE-REHR2)
1
2
3
4
5
New Hire Process dc2-18-101 47
HRIS Field
R / O
Step/Action
Expected Results
Notes/
Additional Information 1 Company field
Employee Field Action, Nbr Field Requisition Field Effective Date Field Reasons Fields
R R R R R R
No Action Required, these fields will default to what was entered on the Parameters Tab.
2 OTHER EMPLOYEE ID# Field
O Type Other Employee ID# if applicable for your agency.
3 Birthdate Field R Type in the Birthdate for the Employee.
Date Format is MMDDYY If utilizing Hiring Gateway this field will be defaulted in.
4
ETE PARTICIPANT
O Type Y or * Blank
Type the new value for the data item. If the field has a current value but you want it to be blank type *BLANK. The dat item is the field is vailidated as it is validated in HR11.1 (Employee).
Add button R Click Add to process the action You will receive a message in the lower left corner “Warning! Action will be immediate; press OK to continue.
There is not an OK tab to click. See next step.
5
Add button R Click Add Again Message in lower left corner “Action processed; deductions updated; continue”.
The action has now processed and a Personnel Action Comments form (PA56.1) should appear. It is not recommended, however you can make comments on this form. You must be very careful what you say and how it is worded if you use it. This is the Official Employee Personnel file.

New Hire Process dc2-18-101 48
Personnel Action Comments (PA56.1)
HRIS Field
R / O
Step/Action
Expected Results
Notes/
Additional Information 1 Add or Close R If you choose to make comments,
type them in and Click Add. If you do not make comments, Click Close
You will see a message in the lower left corner “Done”.
Action will be processed and Employee’s record will be updated. If you are adding a comment, you must place a value in the FC field, and type your comment in the comment field BEFORE clicking ‘Add’ Note: Comments are viewable by others.
2 White Search Box R Type XP52.1 in the White Search Box. Press Enter on the keyboard
The Individual Action Form (XP52.1) will open.
You may continue with the New Hire Process as described on Page 4.
1
2
New Hire Process dc2-18-101 49
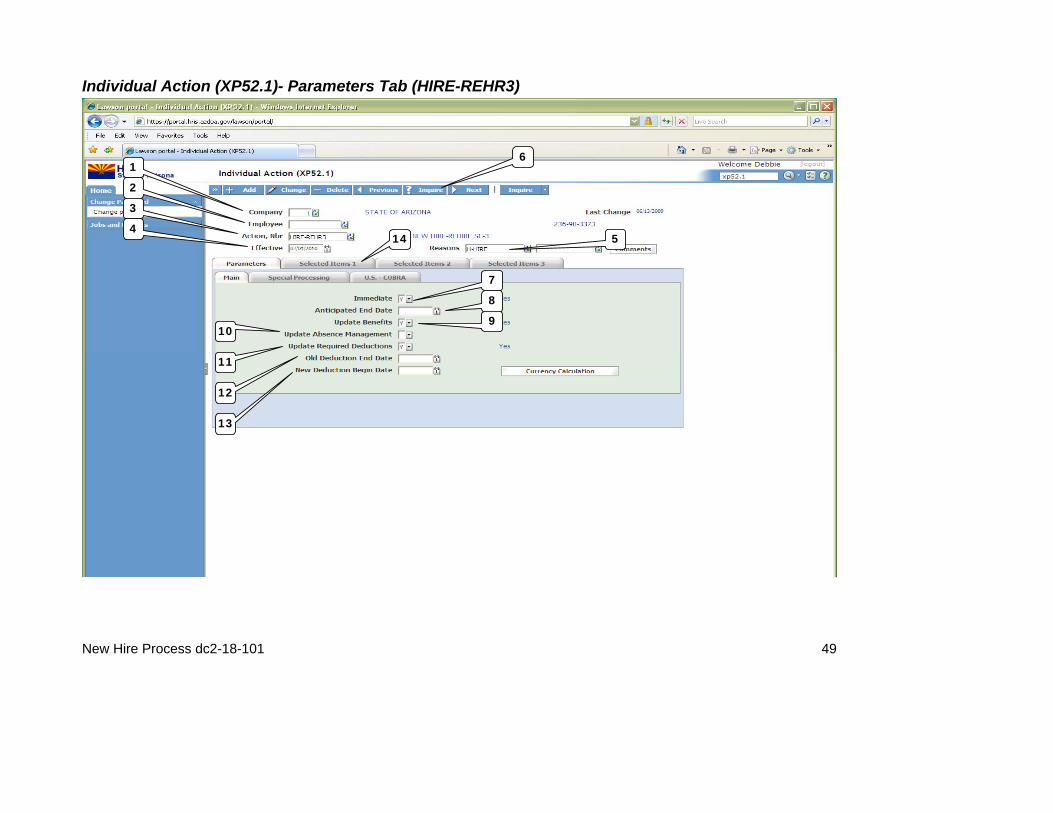
Individual Action (XP52.1)- Parameters Tab (HIRE-REHR3)
1
2
3
4 5
6
7
8
9 10
11
12
13
14
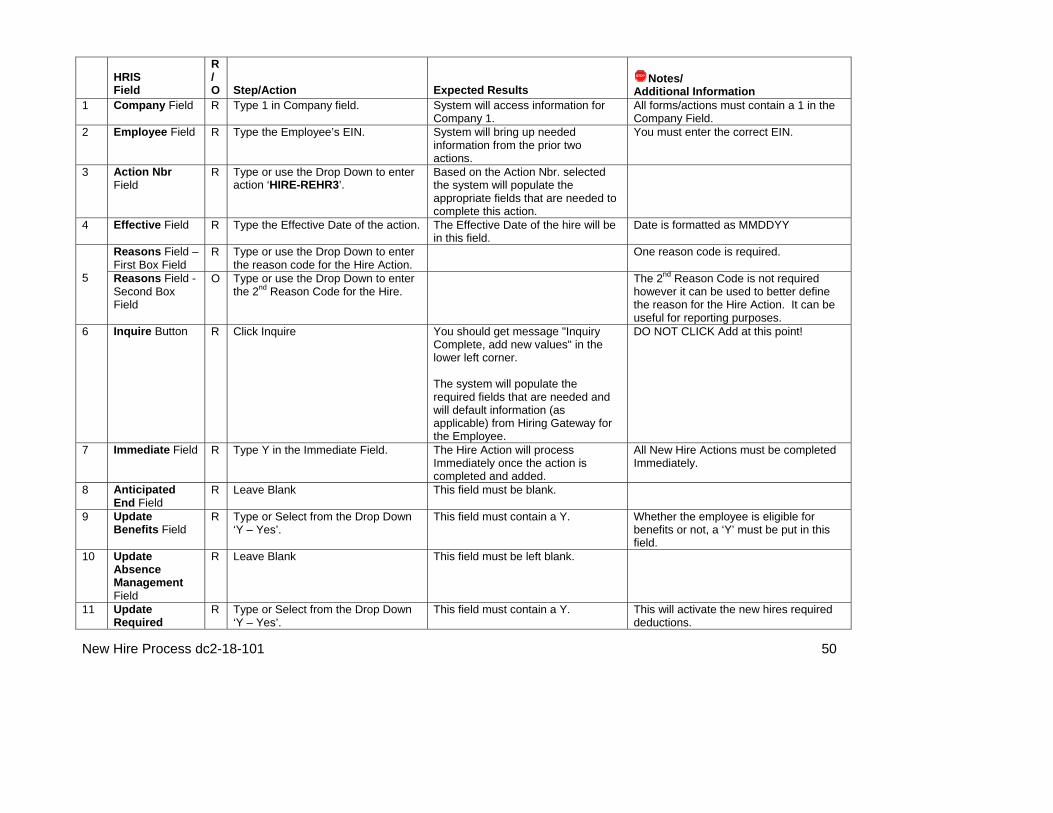
New Hire Process dc2-18-101 50
HRIS Field
R / O
Step/Action
Expected Results
Notes/
Additional Information 1 Company Field R Type 1 in Company field. System will access information for
Company 1. All forms/actions must contain a 1 in the Company Field.
2 Employee Field R Type the Employee’s EIN. System will bring up needed information from the prior two actions.
You must enter the correct EIN.
3 Action Nbr Field
R Type or use the Drop Down to enter action ‘HIRE-REHR3’.
Based on the Action Nbr. selected the system will populate the appropriate fields that are needed to complete this action.
4 Effective Field R Type the Effective Date of the action. The Effective Date of the hire will be in this field.
Date is formatted as MMDDYY
Reasons Field – First Box Field
R Type or use the Drop Down to enter the reason code for the Hire Action.
One reason code is required.
5
Reasons Field - Second Box Field
O Type or use the Drop Down to enter the 2nd Reason Code for the Hire.
The 2nd Reason Code is not required however it can be used to better define the reason for the Hire Action. It can be useful for reporting purposes.
6 Inquire Button R Click Inquire You should get message "Inquiry Complete, add new values" in the lower left corner. The system will populate the required fields that are needed and will default information (as applicable) from Hiring Gateway for the Employee.
DO NOT CLICK Add at this point!
7 Immediate Field R Type Y in the Immediate Field. The Hire Action will process Immediately once the action is completed and added.
All New Hire Actions must be completed Immediately.
8 Anticipated End Field
R Leave Blank This field must be blank.
9 Update Benefits Field
R Type or Select from the Drop Down ‘Y – Yes’.
This field must contain a Y. Whether the employee is eligible for benefits or not, a ‘Y’ must be put in this field.
10 Update Absence Management Field
R Leave Blank This field must be left blank.
11 Update Required
R Type or Select from the Drop Down ‘Y – Yes’.
This field must contain a Y. This will activate the new hires required deductions.

New Hire Process dc2-18-101 51
HRIS Field
R / O
Step/Action
Expected Results
Notes/
Additional Information Deductions Field
12 Old Deduction End Date Field
R Leave Blank When the action is processed the system will default in the correct date.
13 New Deduction Begin Date Field
R Leave Blank When the action is processed the system will default in the correct date.
14 Selected Items 1
R Click on the Selected Items 1 tab. The Selected Items 1 section will appear with the necessary fields to be populated.

New Hire Process dc2-18-101 52
Individual Action (XP52.1)- Selected Items 1 Tab (HIRE-REHR3)
1 2
3
4
5
6
7
8
9
10
11
12
13
14
Formatted

New Hire Process dc2-18-101 53
HRIS Field
R / O
Step/Action
Expected Results
Notes/
Additional Information 1 Company field
Employee Field Action, Nbr Field Requisition Field Effective Date Field Reasons Fields
R R R R R R
No Action Required, these fields will default to what was entered on the Parameters Tab.
2 Supplemental Addr 1 Field
R This field will default in from the Home Address. Type an Address 1 if applicable for the Employee (see Notes)
. If the Employee lives in a state other than Arizona, you must place an Arizona Address in the supplemental address fields.
3 Supplemental Addr 2 Field
R This field will default in from the Home Address Type an Address 2 if applicable for the Employee (see Notes)
If the Employee lives in a state other than Arizona, you must place an Arizona Address in the supplemental address fields.
4 Supplemental City Field
R This field will default in from the Home City. Type a City if applicable for the Employee (see Notes)
If the Employee lives in a state other than Arizona, you must place an Arizona Address in the supplemental address fields.
5 Supp State or Prov Field
R This field will default in from the Home State. Type a State if applicable for the Employee (see Notes)
If the Employee lives in a state other than Arizona, you must place an Arizona Address in the supplemental address fields.
6 Supplemental Postal Field
O This field will default in from the Home Postal. Type a Postal if applicable for the Employee (see Notes)
If the Employee lives in a state other than Arizona, you must place an Arizona Address in the supplemental address fields.
7 Telephone-Work N DO NOT UPDATE THIS

New Hire Process dc2-18-101 54
HRIS Field
R / O
Step/Action
Expected Results
Notes/
Additional Information Field /
A INFORMATION USING THIS FIELD. Information should be updated using the Email and Work Phone Maintenance Form (ZH12.1)
8 Telephone-Work Ext Field
O DO NOT UPDATE THIS INFORMATION USING THIS FIELD. Information should be updated using the Email and Work Phone Maintenance Form (ZH12.1)
9 Badge Number Field O Type in the Employee’s Badge number if applicable for you agency.
This is an optional field.
10 Badge Code Field O Type in the Employee’s Badge Code if applicable for your agency.
This is an optional field.
11 DPS-SDA Field O This is an optional field used by specific agencies.
12 Seniority Date Field O The Seniority Date will default from the Hire Date.
This date must be the same as the hire date.
13 E-Mail Address Field N/A
DO NOT UPDATE THIS INFORMATION USING THIS FIELD. Information should be updated using the Email and Work Phone Maintenance Form (ZH12.1)
Add button R Click Add to process the action You will receive a message in the lower left corner “Warning! Action will be immediate; press OK to continue.
There is not an OK tab to click. See next step.
14
Add button R Click Add Again Message in lower left corner “Action processed; deductions updated; continue”.
The action has now processed and a Personnel Action Comments form (PA56.1) should appear. It is not recommended, however you can make comments on this form. You must be very careful what you say and how it is worded if you use it. This is the Official Employee Personnel file. Note: The Selected Items 2 & 3 tabs are blank in this Action. No Action is required on these tabs.

New Hire Process dc2-18-101 55
Personnel Action Comments (PA56.1)
HRIS Field
R / O
Step/Action
Expected Results
Notes/
Additional Information 1 Add or Close R If you choose to make comments,
type them in and Click Add. If you do not make comments, Click Close
You will see a message in the lower left corner “Done”.
Action will be processed and Employee’s record will be updated. If you are adding a comment, you must place a value in the FC field, and type your comment in the comment field BEFORE clicking ‘Add’ Note: Comments are viewable by others.
2 White Search Box R Type XP52.1 in the White Search Box. Press Enter on the keyboard
The Individual Action Form (XP52.1) will open.
You may continue with the New Hire Process as described on Page 4.
1
2

New Hire Process dc2-18-101 56
Review Form (PA26.1)
1
2 4
5
6
7
8 9
10
3
11
13
12

New Hire Process dc2-18-101 57
1 Company Field R Type 1 in Company field. System will access information for Company 1.
All forms/actions must contain a 1 in the Company Field.
2 Employee Field R Type the Employee’s EIN. System will access information for that EIN.
3 Inquire button R Click Inquire The system will access needed information for the EIN.
4 Scheduled Date Field
R In the Scheduled Date field, type the appropriate date of the review.
Date must be in the format of MMDDYY.
5 Review Type Field
R In the Review Type field, select the type of review from the drop down menu.
For a new hire the review type should be defined – example ‘ORIG PROB’.
6 Review Date Field
O Leave Blank Date must be in the format of MMDDYY. If this field is left blank, it will default to the scheduled date.
7 Rating Field O Leave Blank 8 Reviewed By
Field O Leave Blank
9 Review Schedule Field
O Leave Blank This information will default in from the ZM90 form once completed.
10 Next Review Date Field
O Leave Blank
11 Next Review Type Field
O Leave Blank
12 Schedule Next Review Field
O Leave Blank
13 Add button R Click Add You will see a message in the lower left corner “Add Complete - Corner”.
Set up Review for Employee is completed.
HRIS Field
R / O
Step/Action
Expected Results
Notes/
Additional Information
New Hire Process dc2-18-101 58
New Hire Process
Conclusion For both New Hires, with and without Hiring Gateway, the remaining New Hire Process is identical. After completing the HIRE-REHR2 and HIRE-REHR3 actions on the XP52.1, you should look at the Personnel Action History file in the Drill Around on the employee and ensure that all your actions and keyed fields are showing. Then, you will continue with the New Hire Process by completing the following steps as outlined in the HRIS New Hire Process Chart (Page 4):
• I-9 – EEO Action on the Individual Action Form (XP52.1) - Optional Form training is covered in the Agency HR Initiator I-9 – EEO Training Material
• Employee State and Federal Taxes on PR13 Employee US Taxes - Required Form training is covered in the Agency Taxes Initiator Maintain Tax Deduction Training.
• Additional Contacts on the Additional Contacts Form (HR20.1) – Optional Form training is covered in the Agency HR Initiator General Employee Information Training.
• Emergency Contact Information on the Emergency Contacts Form (PA12.1) – Optional Form training is covered in the Agency HR Initiator General Employee Information Training.
• Email and Work Phone Maintenance Form (ZH12.1) - Required Form training is covered in the Agency HR Initiator Email and Work Phone Maintenance Training
Please refer to these sections for additional instruction.