how to use filt robot 1-1. before to use filt robot ng: … · 2017-10-19 · how to use filt_robot...
TRANSCRIPT

How to use Filt_Robot
1-1. Before to use Filt_Robot
[requirements]
* TCL/Tk8.4 or newer
* csh
* spectrum data in NMRView format (see the NMRPipe macros)
currently limited type of spectrum data can be used
PLEASE be careful to set axis order: ex. 3D-HNCO HN(x)-CO(y)-N15(z)
DO NOT USE additional "." in the filename of spectrum
NG: hnco.2017.01.nv, OK: hnco_2017.nv
* please place spectrum data (hnco.nv...) in matrix directory
* OpenMPI ver 1.10.x (CNTK required this version)
please install it if necessary
https://www.open-mpi.org/software/ompi/v1.10/
* CNTK ver. 2.0 CPU only for Linux
You can download compiled binary from the Microsoft web-site
(see bash_example.txt how to setup)
https://cntk.ai/dllc-2.0.html
* Supported OS: RedHat,CentOS6,Ubuntu14/16
need some additional libraries to execute compiled binary
for CentOS7
yum install ld-linux.so.2
for Ubuntu14/16
sudo apt-get install tcl8.5 tk8.5
sudo apt-get install g++-multilib
sudo apt-get install csh
* need 4-6GB memory... depending on the size of protein and spectrum data
!! current version does not support 32-bit Linux !!
[The easiest way to try demo data]
VirtualBox image would be useful to setup all stuffs quickly. Please download ova file
From our web-page (~2.6GB).
http://bmrbdep.pdbj.org/en/nmr_tool_box/Filt_Robot.html
http://bmrbdep.pdbj.org/pub/files/virtimage/UB1605F.ova
*** the ova file name will change ***
Including Ubuntu16.04TLS and ready to start Filt_Robot
All you have to do is installation of VirtualBox on your PC, and extend the ova file.
(need Filt_Robot package and demo data)
See the VirtualBox section on this manual.
CYANA (FLYA), NMRView (option) are also available from LA-systems and One Moon Scientific.

1-2. Full package of program and the demo data
Filt_Robot package
http://bmrbdep.pdbj.org/en/nmr_tool_box/Filt_Robot.html
http://bmrbdep.pdbj.org/en/license_agreement/Download_Filt_Robot.html
The whole compiled binary and related Tcl/Tk scripts are packaged in the file.
Please extract it where you want to run.
BMRB FID data: bmr16647
http://bmrb.pdbj.org/ftp/pub/bmrb/timedomain/bmr16647/timedomain_data/
Ramelot et al., (2010) Solution NMR structure of SH3 domain from CPF_0587 (fragment 415-479)
from Clostridium perfringens. Northeast Structural Genomics Consortium (NESG) Target CpR74A.
The related PDB structure also available 2KRS:
https://pdbj.org/mine/summary/2krs
NMR-Pipe scripts (including proc.com for conversion of NMR spectra in NMR-View and Sparky
UCSF format):
http://bmrbdep.pdbj.org/pub/files/bmr16647_NMRPipe_demo_scripts2.tar.gz
*** gz file name will change ***
2D 1H-15N HSQC, 1H-13C HSQC aliphatic and aromatic
3D HNCO, HNCACB, CBCA(CO)NH
3D HCCH-TOCSY for aliphatic, 15N-edited NOESY 13C-edited NOESY
for aliphatic and aromatic
1. cd CpR74A
2. cd spectrum directory that you want to process
3. run fid.com
4. edit proc.com
remove comment out "#" if you want to process NMRView format data
5. run proc.com
processed NMR spectrum data (~320MB):
http://bmrbdep.pdbj.org/pub/files/bmr16647_NMRPipe_demo2.tar.gz
*** gz file name will change ***
including above spectrum data in NMR-View and Sparky UCSF formats.
MagRO data-sets (~680MB):
http://bmrbdep.pdbj.org/pub/files/bmr16647_maxtrix_demo2.tar.gz
including above spectrum data sets and demo data for FLYA and CYANA calculations.
VirtualBox ova file (~2.6GB)
http://bmrbdep.pdbj.org/pub/files/virtimage/UB1605F.ova
*** gz file name will change ***
Including Ubuntu16.04TLS, OpenMPI, CNTK 2.0 for CPU and ready to use Filt_Robot.
[Quick demo]
1. If you edit run_temp_C.csh, then execute it. You will see the statup module.
2. Press “Start Acs”
3. Type name of path for peak preparation in the entry ex) flay_test.
4. Press “Pick All spectra”
5. Press “1st Noise Filter”
6. Press “CNN Noise filter” (please wait for a while…10-20min)
7. Press “Convert xpk-> FLYA” or “xpk-> Sparky”
8. If you want to run FLYA, press “Export Flya files”

1-3. Other related tools
BMRB converter
## the scripts are useful for MagRO user ##
Just go to the Filt_Robot_v.1.47.26.0K/tools/BMRB
This tool can extract assigned chemical shifts from the file in BMRB format.
Please download bmrb chemical shift data in NMR-STAR 3.1 file format
This tool requires Tcl/Tk8.4. or newer and can handle single chain system only.
Execute scripts one by one.
09_extract_assemble.tcl bmr18876.str
10_extract_chem_star.tcl bmr18876.str
20_export_MagDB.tcl bmr18876.str
if all script file work fine, you will find "MagDB" directory.
please copy MagDB into matrix directory
TALOS+
Open TALOS+ input file module and type the file name
for example: talosp.tab
then run TALOS+
ex) talos+ -in talosp.tab
pred.tab should be placed on matrix directory
CYANA calculation using FLYA calculated chemical shifts
1. for FLYA calculation, see detail in the how to use FLYA section.
2. Import assigned chemical shifts calculated by FLYA
Open FLYA module, then type flya directory in the top entry.
press Import FLYA-->ACS
restart the program
3. prepare NOESY peak lists and TALOS+ pred.tab (option)
for example, copy *noe*_cnn.xpk in the FLYA directory to matrix directory
also copy pred.tab file in matrix directory.
4. Open Cyana export module (see CYANA section for more detail)
5. set protein name, path of CYANA calculation
and select CYANA version (for ver. 3.97 and 3.98, select 4.x)
6. press next button
7. press autoset
disable :Fix angle if you don't like to fix maximal angle.
set the number of CPUs (4 is default)
8. run CAYNA calculation, for example;
~/opt/cyana-3.97/cyana CALC.cya
on Ubuntu14.04TLS using 2-Core (3.5GHz), it will take 5~10min.

[Note] CYANA can be available from LA-systems:
http://www.las.jp/english/products/cyana.html
You can purchase version 2.1.
FLYA is a part of function in CYANA ver. 3.9x.
Please ask Prf. Peter Güntert to provide the version after get the CYANA license.
http://www.bpc.uni-frankfurt.de/guentert/wiki/index.php/FLYA
Fit_Robot (sorry for this confusing name…)
This program can be used for identification of automated ordered regions in structure ensemble
and overlay fitting. Please check our web-site to download the program (free);
http://bmrbdep.pdbj.org/en/nmr_tool_box/fit_robot.html
You can also find the fit_robot.exe in MAGRO_modules/bin/linux
run fit_robot.exe to automatically find ordered regions and export overlaid PDB files:
fit_robot.exe final.pdb
you will find final_lev_1_0.pdb (depending separation of ordered core convergence)
Export Sparky peak lists
Filt_Robot module has a function to convert xpk files into the peak list that can be loaded in
Sparky.
The Sparky USCF files should be stored in matrix/Sparky
And the function requires a short text file that describes axis order of spectrum data sets:
Matrix/Sparky/sparky_list.txt
## sptp axis-order
Chsqc 2 1
chsqc-ar 2 1
hsqc 1 2
hnco 3 2 1
cbcaconh 3 2 1
hncacb 3 2 1
hccht 3 1 2
n15noe 2 3 1
c13noe-al 2 3 1
c13noe-ar 3 2 1
Press “xpkSparky” to begin the file conversion.
The converted peak lists can be found in matrix/Sparky
For example, hnco_cnn.xpk hnco_cnn.list

How to use Filt_Robot interface: similar to MagRO (start-up)
2-1. How to install and update Filt_Robot
To install Filt_Robot, user can place the directory of program directory that you want (anywhere is OK),
and for update just replace the old one with new one.
For example:
tar xvzf Filt_Robot_v.1.42.26.06H.tar.gz
Then copy run_temp_C.csh and edit it for your system.
[Important] You need to prepare spectrum data sets in NMR-View format (see the othersections)
And if you want to use new data project, you have to prepare sequence file (one-letter code) as *.seq
In matrix directory.

2-2. Initial setup of Filt_Robot
Press "Open Acs" to start Filt_Robot.
If you have not set any project before, the program will ask you to setup sequence of sample with the
following popped up windows;
To load protein sequence file, you have to press “AddChain” then select library. For example, select
Library: protein_res.lib;
Then the window will change;
To load protein sequence file, press "File:" button. The sequence should be described in 1-let code in a text
file. If you load the file, you will see the sequence in the textbox;
Any space, tab and return codes will be ignored. The sequence should not be included non-standard amino
acid. To finish the setting up, press "Start setup".
[Important] Current version of Filt_Robot only supports single-chain protein only. If you want to
multi-chain and special residue, please contact us.

2-3. Detail of the startup window
1) To add spectrum files
The listbox on the left-side of startup window lists spectrum files populated in the working directory (in the
sample case, /home/naohiro/nv_PH8/matrix)
To add the spectrum file to the file name entry, firstly activate one of the target entries, then double-click
one of the spectrum file in the listbox.
If you would like to use the added spectrum file, press check-box in the left side of the target entry.
The startup module uses the following names of NMR spectrum;
name of spectra in startup full name of spectra
2D 15N HSQC 2D 1H-15N HSQC
2D 13C HSQC-aliph 2D 1H-13C HSQC for allregion or apliphatic
2D 13C HSQC-aro 2D 1H-13C HSQC for aromatic
HNCO 3D HNCO
HNCACO 3D HN(CA)CO
HNCOCA 3D HN(CO)CA
HNCA 3D HNCA
CBCA(CO)NH 3D CBCA(CO)NH
HNCACB 3D HNCACB
HBHA(CO)NH 3D HBHA(CBCA)(CO)NH
CC(CO)NH 3D CC(CO)NH
H(CCCO)NH 3D H(CCCO)NH
15N NOESY 3D 1H-15N HSQC NOESY
13C NOESY 3D 1H-13C HSQC NOESY for all region or apliphatic
13C NOESY arom 3D 1H-13C HSQC NOESY for aromatic
HCCH-COSY 3D H(C)CH-COSY for aliphatic
HCCH-TOCSY 3D H(C)CH-TOCSY for aliphatic
CCH-TOCSY 3D (H)CCH-TOCSY for aliphatic
HCCH-COSY arom 3D H(C)CH-COSY for aromatic
HCCH-TOCSY arom 3D H(C)CH-TOCSY for aromatic
If you do not find spectrum type in the above list, you can use "other1, other2...."
[Important] If you want to use special type of spectrum, please consult us.
Entry for file name Check box to use spectrum
file listbox

2) Symbolic names for NMR spectra used in MagRO and Filt_Robot
MagRO and Filt_Robot uses short-cut names of NMR spectra as shown below. They are used in control UIs
of MagRO system.
Symbolic names Spectrum names
hsqc 2D 1H-15N HSDC
chsqc 2D 1H-13C HSQC for all region or aliphatic
chsqc-ar 2D 1H-13C HSQC for aromatic
hnco 3D HNCO
hncaco 3D HN(CA)CO
hncoca 3D HN(CO)CA
hnca 3D HNCA
cbcaconh 3D CBCA(CO)NH
hncacb 3D HNCACB
hbhaconh 3D HBHA(CBCA)(CO)NH
hnhahb 3D HNHAHB
ccconh 3D C(CC)(CO)NH
hccconh 3D H(CC)(CO)NH
nnoesy 3D 1H-15N HSQC NOESY
cnoesy 3D 1H-13C HSQC NOESY for all region or aliphatic
cnoesy-ar 3D 1H-13C HSQC NOESY for aromatic
hcchc 3D H(C)CH-COSY for aliphatic
hccht 3D H(C)CH-TOCSY for aliphatic
ccht 3D (H)CCH-TOCSY for aliphatic
hcchc-ar 3D H(C)CH-COSY for aromatic
hccht-ar 3D H(C)CH-TOCSY for aromatic

If you look at the startup up window, you will find the following buttons;
If you press 15N, 13C-al and 13C-ar, you can switch sync-jump attribute of the startup window.
1H-1H spectra 13C-aliphatic spectra
13C-aromatic spectra
15N spectra

3) Detail settings on startup window
You can set threshold, width and aspect of the spectrum strip
(if you want use auto-threshold controller, please leave them)
Press "Save" button to save the current settings.
strip width (ppm)
aspect ratio
threshold

4) Start Filt_Robot
To start Filt_Robot, press "Open Acs" button.
See the section for the operation of Filt_Robot.
5) offset correction of 13C signals (option)
If 13C offsets are systematically shifted for all the spectra, user can specify the offset value correction in the
entry.
This function may not modify the value of spectrum reference.
The offset correction will be applied for making the input files for the program such as TALOS and FLYA
which are all sensitive to the correctness of the calculation results.

2-4. Conversion of NMRPipe format to NMRView format and axis order of spectrum
MagRO and Filt_Robot system can handle only spectrum data in NMRView format.
To convert NMRPipe format into NMRView format, user can use NMRPipe.
Followings are the example of macro command for the conversion
xyz2pipe -in /home/naohiro/NMRPipe/ft/n15noe_%03d.ft3 -x -verb \
| pipe2xyz -out n15noe.nv -nv -ov
If you execute the macro, you will see the following output and you will get the converted file;
555 1024 32 18 32 1 31 1 500.13 3257.16 4.80 614.00 H
256 256 16 16 16 18 15 5 500.13 6756.76 4.80 128.00 HN
128 128 8 16 16 288 7 9 50.68 1315.79 120.12 64.00 N
[Important1] You will have to check axis order from the standard output. Above example showing axis
order is H-HN-N
[Important2] Please be careful of the axis order for 3D HCCH-TOCSY, HCCH-COSY.
Their x-dimension should be “in-direct” dimension, not direct (acquisition) dimension.
Please transpose if you don’t get bad results.
For the analysis with MagRO and Filt_Robot system, 15N or 13C dimension for 3D spectrum should be set
Z-axis. For example;
Spec-category Spectrum types Axis order
15N HNCO, HNCACB, CBCACONH HN-C-15N
15N edited NOESY, H(CCCO)NH HN-H-15N
13C HCCH-TOCSY, 13C-edited NOESY HC-H-13C
For all above examples 15N and 13C dimension is set Z-axis and the indirect dimension are set Y-axis.
If you find the converted spectrum data is need to be transposed, you have to execute NMRPipe macro as
followings;
xyz2pipe -in /home/naohiro/NMRPipe/ft/n15noe_%03d.ft3 -x -verb \
| pipe2xyz -out n15noe.nv -nv -ov
Or Transpose command
xyz2pipe -in /home/naohiro/NMRPipe/ft/n15noe_%03d.ft3 -x -verb \
| nmrPipe –fn TL \
| pipe2xyz -out n15noe.nv -nv -ov
Please try TL, ZTL to get proper axis order.
(see the examples in Pipe macro examples which can be available from our web-site)

2-5. Directories and files used for MagRO system
The project directories and files included under the matrix directory
matrix -----------|
|
MagDB
protein_0_0_acs.db Assigned chemical shift table
protein_0_0_seq.db sequence table
backup Backup directory
xpkfiles Peka list (xpk file) direcotry
CYANA_results Storing files for CYANA result analysis
000temp directory for temprary files
lib user customized library
BPNN neural network tool will use
The most important directory is MagDB. The directory has the file for assigned chemical shift table
(*_acs..db) and sequence table file (*_seq.db).
It is strongly recommended that user should take the backup of the directory periodically.
000temp stores several temporary files for setting window size and position. The directory can be deleted if
you have some problem to display window UIs.
The directory "CYANA_results" includes temporary files which can be recreated automatically. So user can
delete them if necessary.

How to Use FLYA/CYANA module with Deep Neural Network
5.1 How to use the functions from the ACS module (magenta)
1) required files for FLYA calculation
FLYA setup module will help you to generate files required for FLYA calculation. FLYA is a function
implemented in CYANA which can be used for fully automated signal assignment and structure calculation.
(CYANA ver. 3.75-3.98)
Recommended spectrum data sets for backbone signal assignments;
2D 1H-
15N HSQC, 3D-HNCO, 3D-HN(CA)CO, 3D-HNCACB, 3D-CBCA(CO)NH
For assignments of all signals including backbone and side-chain atoms (automated structure determination);
3D-HCCH-TOCSY for aliphatic and aromatic
3D-15
N edited NOESY, 3D-13
C edited NOESY for aliphatic and aromatic
It is strongly recommended that you should increase the data points for the NOE or 13
C/15
N dimension using
zero-filling, linear prediction and non-linear sampling. The followings are the successful examples of spectrum
data sets (complex);
3D HCCH-TOCSY X: 2048 Y:256 Z:256 15
N-edited NOESY X: 1024 Y:512 Z:256 13
C edited NOESY X: 2048 Y:512 Z:256
For the FLYA calculation, the following files are required;
CACL.cya, int.cya Setting files for FLYA calculation.
*.seq Sequence file
*.peaks Peak table file
For CNN/FNN noise filter
CNTK ver. 2.0 is required. Please download CPU-only version from the Microsoft web-site:
https://cntk.ai/dllc-2.0.html
just download CNTK-2-0-Linux-64bit-CPU-Only.tar.gz
tar xvzf /home/naohiro/opt/CNTK-2-0-Linux-64bit-CPU-Only.tar.gz
Install OpenMPI ver. 1.10.x
https://www.open-mpi.org/software/ompi/v1.10/
download and extract the compressed file, then install it. (If you don’t know what to do please consult your
system administrator), or see the bashrc_eample.txt in the Filt_Robot package.
[Important]
The accuracy of the automated assignments strongly depends on spectrum quality. If you find that the peaks in
the spectra are significantly overlapped and signal missing, you will have to reconsider the plan of automated
signal assignments.
[Warning]
The peak lists from the spectrum folded (peaks are detected in folded/aliased/frame-shifted positions) may
decrease accuracy of automated assignments. However, if you have 13C-HSQC for full region, the program
MagRO can recover the folded peaks in HCCH-TOCSY and 13C-edited NOESY to unfolded position.

2) Lets start FLYA calculation
Press "Import/Export" button on the Acs module, then select "Export/Import Flya files"
Then you will see the setting up window as
shown in the left panel.

a) Firstly, you have to choice type of assignments, backbone signal only or all signals.
And select version of CYANA (FLYA). The default is 3.97 compatible for ver. 3.98.
b) Secondary, set the directory path for FLYA calculation. Directly type the path or get the directory by
pressing ".." button. If you would like to create the directory, press "MakeDir" button.
c) Press "Pick All spectra" button to start automated peak picking for all spectra.
The check-button “autothres” means the quick-picker runs automated threshold control mode.
The check-button “deep” means the quick-picker runs automated threshold control mode and will set a little
lower threshold. Generated peak lists will be stored in the specified directory as *_auto.xpk.
[Important] If the “autothres: OFF and “deep: OFF”, you have to set spectrum threshold properly for each
spectrum window. Press check-button auto-thres to run the quick-picker with automated threshold control
mode. Press check-button deep which means the quick-picker will pick the peaks for deep learning noise
filter mode. If you activate “deep: ON” you will get 20,000-80,000 peaks (depends on the spectrum quality).
d) Press "1st Noise Filter" button to start noise filtration for all peak tables.
Noise filter function will use peak lists derived from 2D 15
N-HSQC and 13
C-HSQC for aliphatic and aromatic
as mask table. (hsqc_auto.xpk, chsqc_auto.xpk and chsqc-ar_auto.xpk files will be used)
The filter process is an option but strongly recommended to use with deep picking mode otherwise the too
many noise peaks are detected in the peak lists. The filtered files are labeled *_filt.xpk.
Select assignment types
Number of CPUs
Path of Job directory
Automated peak picking
1st Noise filter
CNN noise filter
Export files for FLYA calculation
Auto unfold peak positions
Conversion of xpk file to XEASY format
Conversion of xpk file to Sparky peak list file

e) CNN Noise filter [New function]
This is the new function of MagRO using deep neural networks. User has to install CNTK ver. 2.0 and
OpenMPI ver. 1.10.x. CNTK has to run as “cntk” command in your Linux system. Please consult your system
administrator if you do not know what to do (see the section to setup).
This function needs at least 4-6GB memory and 2-4-CPUs (2.0-3.0GHz). It will take 20-30min to prepare
image data for CNTK recognition. After the automated filtration jobs you will find *_cnn.xpk files in the job
directory. The check-button “strong” means the power level of CNN filtration. Press “ExportxpkFiles” you
can run the final stage of CNN filtration jobs without image generation (It usually takes a few seconds).
[Important] The capability of the noise elimination power is around 95-99.0% depends on the spectrum
quality and peak separation. Also user has to be careful as this filter eliminates a little number of real peaks
(2~3%). Although FLYA and CYANA have a high tolerance to a few percent of noise and missing signals, it
would be recommended user to inspect visually the filtered peak lists (if you have refined the peak lists, they
should be saved as *_refine.xpk).
f) Unfold peak lists (3D 13
C-edited NOESY, HCCH-TOCSY, HCCH-COSY only)
You can refold peaks in folded/aliased/frame-shifted position by pressing "Unfold peaks" button.
The unfolded peak lists are stored as _unfold.xpk.
[Important] To use this function, you need to prepare spectra for 2D 13
C-HSQC for aliphatic and aromatic
regions (chsqc and chsqc-ar) which have been acquired without spectrum folding in 13
C dimension. After the
automated unfolding jobs you will find *_unfold.xpk files in the job directory.
g) Conversion of xpk files to CYANA (XEASY) peak format
To convert the peak table files for FLYA calculation, press "Convert xpk-->FLYA" button.
The check-button “NOE cut-off” means the convertor will filter weak peaks whose intensity is smaller than the
2.0 x threshold value (default: ON).
The priority is set for the conversion based on the following file name:
*_auto.xpk -> *_filt.xpk -> *_cnn.xpk -> *_refine.xpk -> *_unfold.xpk
If you correct or edit the peak lists manually, you have to store the peak lists as *_refine.xpk so that the auto
conversion will use the files with highest priority (Be careful if you use folded peak lists).
h) Setup FLAYA calculation
Press “Export FLYA files”, the program automatically prepare file for FLYA calculations such as CALC.cya,
init.cya, sequence file (as protein.seq).
If you want to run FLYA for fully-automated signal assignments and structure calculation, press “detail” then
check “Calc struct” (default:OFF).

3) Detail of the files created by FLYA setup module
CLAC.cya, A macro file for FLYA calculation. You can describe spectrum names,
structure file name
init.cya Settings for FLYA calculations such as CPU number, sequence file name, library
file name, etc.
protein.seq Sequence of target protein. Should be described by three letter codes
***_auto.xpk Peak table identified by auto peak picking
***_filt.xpk Peak table filtered by 1st Noise filter command
***_cnn.xpk CNN/FNN filtered peaks
***_unfold.xpk Peak table with unfolded peaks
***_refine.xpk Peak table refined by user
***.peaks Peak table in XEASY format
[Important] If you edit xpk file, you should overwrite ***_refine.xpk as mentioned above.
4) Execute FLYA calculation
You can start FLYA calculation on the job directory using following command. For example;
/opt/cyana3.97/cyana CALC.cya
The calculation time using 4CPUs is 5~10min for backbone signals and 60-90min for all signals.
5) Import results of FLYA calculation
After the FLYA calculation you will find an assigned chemical shift table as flya.tab.
In this table the most important parameter is "inside" on the 5th column. The values are estimated from the
frequency of the assigned chemical shift value in the calculation. The FLYA module will pick up the assigned
chemical shifts with the value above 80% (labeled with strong) as they are trustful enough.
Backbone signals All signals
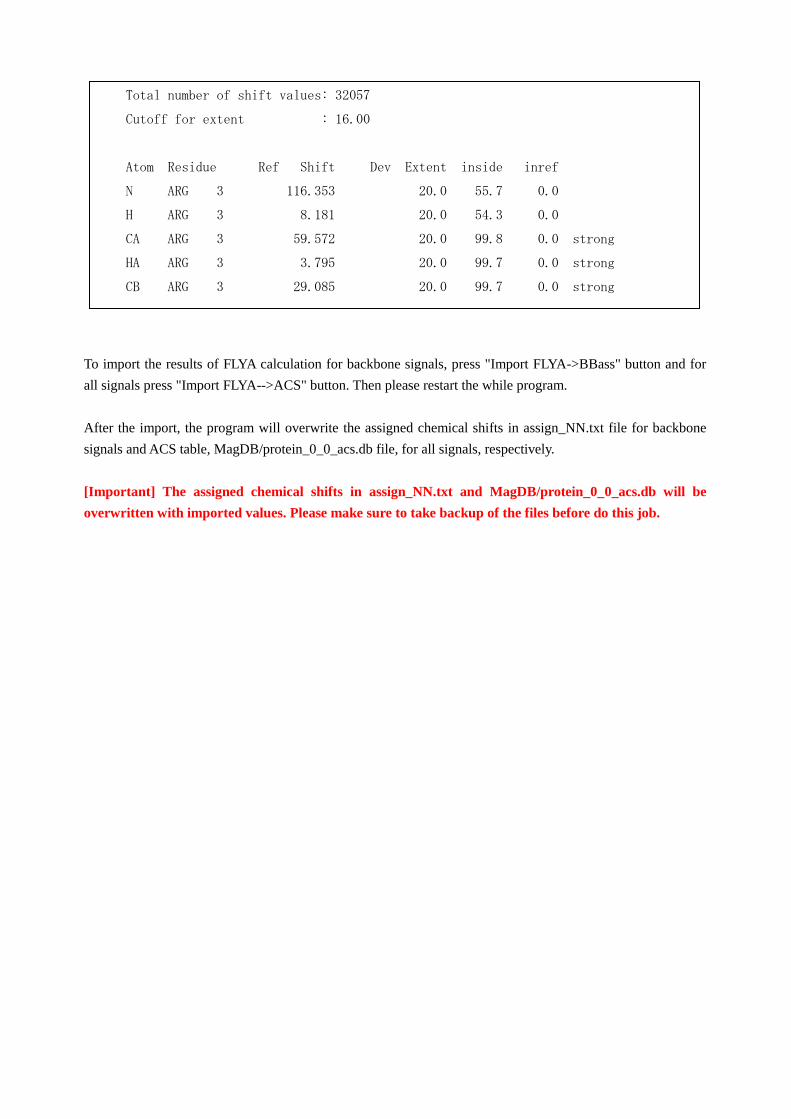
To import the results of FLYA calculation for backbone signals, press "Import FLYA->BBass" button and for
all signals press "Import FLYA-->ACS" button. Then please restart the while program.
After the import, the program will overwrite the assigned chemical shifts in assign_NN.txt file for backbone
signals and ACS table, MagDB/protein_0_0_acs.db file, for all signals, respectively.
[Important] The assigned chemical shifts in assign_NN.txt and MagDB/protein_0_0_acs.db will be
overwritten with imported values. Please make sure to take backup of the files before do this job.
Total number of shift values: 32057
Cutoff for extent : 16.00
Atom Residue Ref Shift Dev Extent inside inref
N ARG 3 116.353 20.0 55.7 0.0
H ARG 3 8.181 20.0 54.3 0.0
CA ARG 3 59.572 20.0 99.8 0.0 strong
HA ARG 3 3.795 20.0 99.7 0.0 strong
CB ARG 3 29.085 20.0 99.7 0.0 strong

How to use VirtualBox for Filt_Robot
Please download VirtualBox in your OS from the following site:
https://www.virtualbox.org/wiki/Downloads
The recommended version is 5.1.18 (tested on Windows7, Windows10, Ubuntu14/16.04LTS and MacOSX
ver.10.7-11)
Also download extension-pack corresponding to the VirtualBox version.
Install the virtualbox first, then install the extension pack.
2. Setting VirtualBox
Recommended settings:
Disable automated update (VirtualBox may not stable sometime…not true the newer the better)
Set the “Host key” for virtual machine (for example: alt+shift)
3. restore Ubuntu image
Download ova file from our web-page (~2.6GB)
From the main-menu of VirtualBox select import appriance, then select the downloaded ova file.
Extract the image (may require 20GB space in your storage)
4. Start the Ubuntu virtual machine
Recommended settings:
2-CPU, 4-6GB memory
Set the Shared folder (make the directory for data sharing)
For example (i:/ShareVB)
Set the Shared folder for ram-disk (option: not necessary)
This may store exported grayscale images for checking how the CNN recognizes the peak images.
Username: nmruser
Password: protein
[important] Please change the password that you want immediately.
5. Prepare demo data
Please download demo data and Filt_Robot package from our web-page.
Then place it on shared folder (ex: i:/ShareVB/)
cd /media/sf_ShareVB
tar xvzf bmr16647_matrix_demo.tar.gz
tar xvzf Filt_Robot_v.1.42.76.0K.tar.gz
[Important] Please change keyboard mapping as the default state is set at JP109.
For the operation of Filt_Robot, see the page for how to use Filt_Robot.