how to sew button-back box pleated...
TRANSCRIPT
1
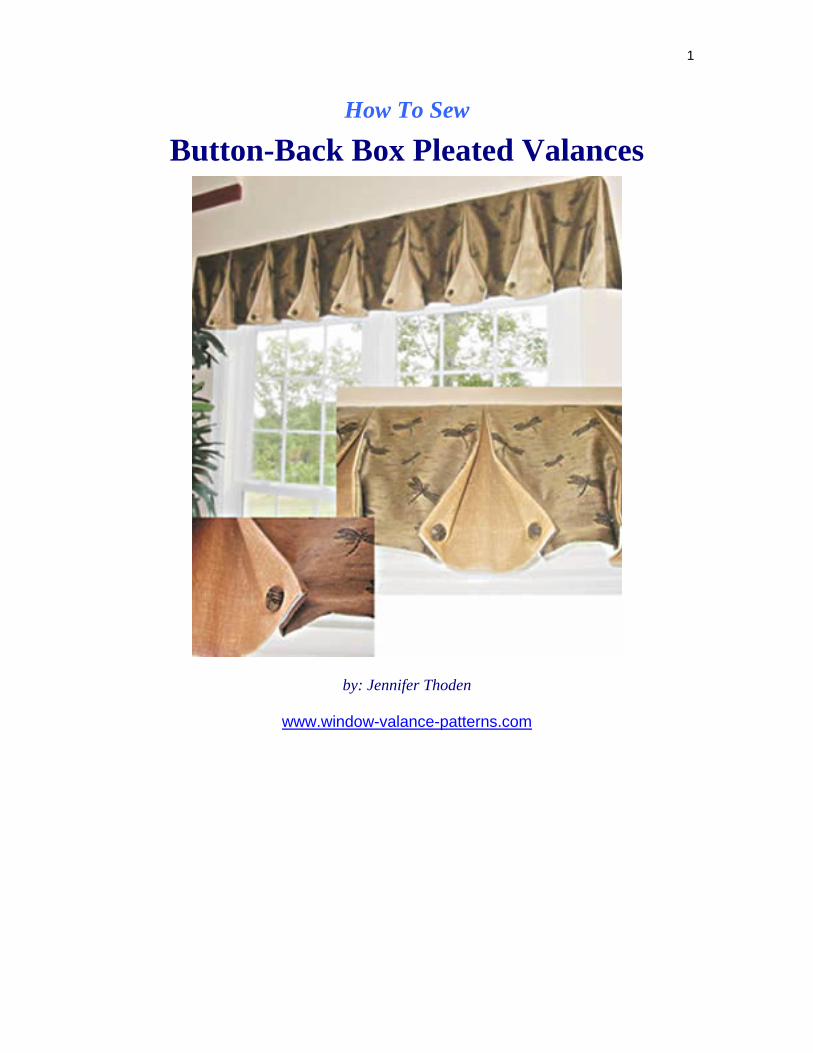
How To Sew
Button-Back Box Pleated Valances
by: Jennifer Thoden
www.window-valance-patterns.com
2
Copyright Notices Copyright © 2006 Thoden Publications LLC No part of this publication may be reproduced or transmitted in any form or by any means, mechanical or electronic, including photocopying and recording, or by any information storage and retrieval system, without permission in writing from the publisher. Requests for permission or further information should be addressed to Thoden Publications LLC, 4524 Boat Club Road, Suite 196, Fort Worth, TX 76135 or [email protected].
Legal Notices
While all attempts have been made to verify information provided in this publication, the author does not assume any responsibility for errors, omissions or contrary interpretation of the subject matter herein. The purchaser or reader of this publication assumes responsibility for the use of these materials and information. The author assumes no responsibility or liability whatsoever of the behalf of any purchaser or reader of these materials. Any perceived slights of specific people or organizations are unintentional.
How To Sew A Button-Back Box Pleat Valance
www.window-valance-patterns.com Jennifer Thoden
3
Table of Contents 1: Introduction............................................................................................................... 4
2: Sewing Plan................................................................................................................ 5
3: Supplies ...................................................................................................................... 6 Sewing supplies .............................................................................................................. 6 Installation supplies ........................................................................................................ 6 4: Window Worksheet .................................................................................................. 7
5: Measure your window .............................................................................................. 8
6: Install Your Board Mount........................................................................................ 9
7: Final Measurements................................................................................................ 11
8: Cut Dimensions ....................................................................................................... 12 Cut fabric and lining length .......................................................................................... 12 Cut lining width ............................................................................................................ 12 Cut Fabric Width........................................................................................................... 13 9: Yardage Formulas .................................................................................................. 14
Fabric yardage............................................................................................................... 14 Fabric yardage for fabric with a print ........................................................................... 15 Lining yardage .............................................................................................................. 16 10: Cut Your Fabric Panels.......................................................................................... 17
Fabric A ........................................................................................................................ 17 Fabric B......................................................................................................................... 17 Lining............................................................................................................................ 17 11: Sewing the Valance ................................................................................................. 18
12: Folding the Box Pleats ............................................................................................ 21
13: Install Your Valance ............................................................................................... 22
14: How To Cut Your Fabric ....................................................................................... 30 Cut the fabric length...................................................................................................... 30 Cut the fabric width ...................................................................................................... 32 15: How To Piece Your Lining..................................................................................... 33
16: Making a Perfect Stitch .......................................................................................... 34
17: How To Wrap A Dust Board ................................................................................. 36
18: Related Resources ................................................................................................... 38 How To Make Roman Shades ...................................................................................... 38 Roman Shades Supplies and Drapery Making Supplies............................................... 38 How to Sew Pleated Drapes.......................................................................................... 38 Simple Sewing Projects ................................................................................................ 38 Home Decorating Ideas................................................................................................. 39
How To Sew A Button-Back Box Pleat Valance
www.window-valance-patterns.com Jennifer Thoden
4
1: Introduction Welcome to How To Sew A Button-Back Box Pleat Valance. In this manual, I'm going to show you everything you need to know to make a button-back box pleat valance. I'll show you how to sew your valance… all the way through installation. A button-back box pleat valance is a valance that is made of 2 contrasting or coordinating fabrics. The box pleats’ corners are pulled back to reveal the contrasting color… and secured with buttons. This style can be made with one pleat in the center or multiple pleats running across your window. What You Get in This Manual First, I'll show you what you’ll need to make your Box Pleated valance. Next, I'll break down into small easy-to-follow illustrated steps to making the Button-Back Box Pleated valance. I give you a worksheet to fill out as you work through your project helping you keep track of measurements and design decisions. Finally, I show you how install your valance to your window. Plus, I'll break down - step-by-step – skills that you made need to learn, such as how to sew a blind hem stitch. So are you ready to get started? Let’s go!
How To Sew A Button-Back Box Pleat Valance
www.window-valance-patterns.com Jennifer Thoden
5
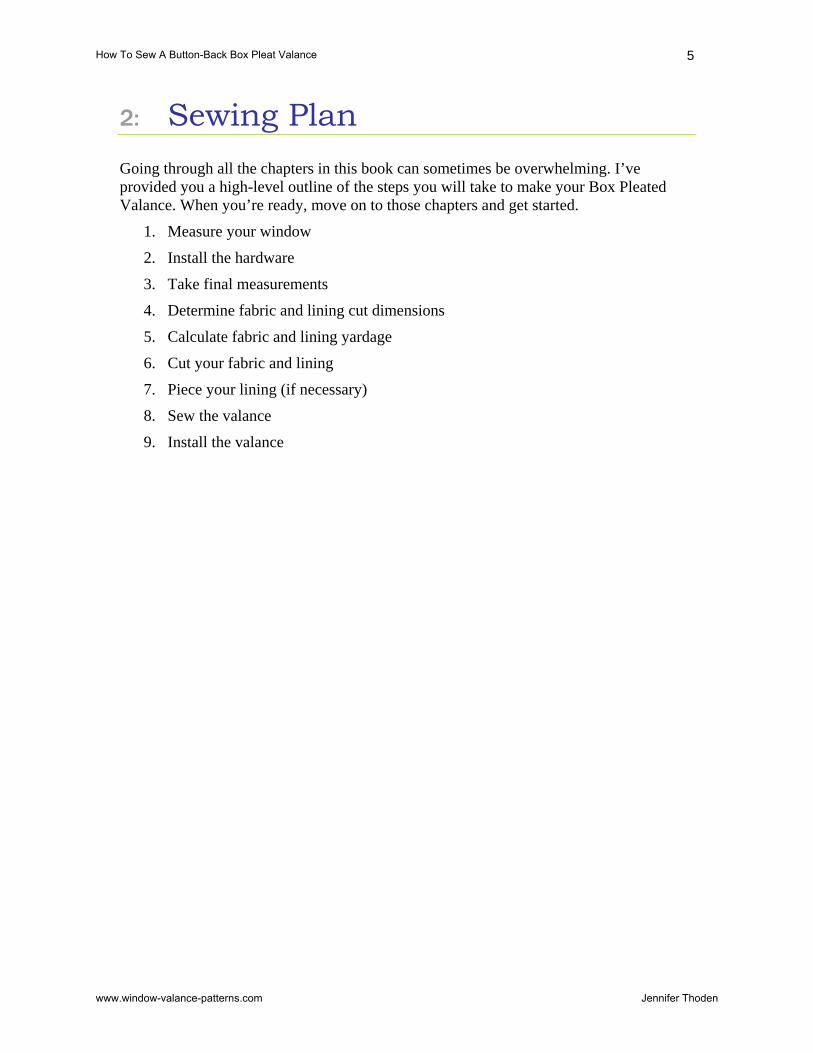
2: Sewing Plan Going through all the chapters in this book can sometimes be overwhelming. I’ve provided you a high-level outline of the steps you will take to make your Box Pleated Valance. When you’re ready, move on to those chapters and get started.
1. Measure your window
2. Install the hardware
3. Take final measurements
4. Determine fabric and lining cut dimensions
5. Calculate fabric and lining yardage
6. Cut your fabric and lining
7. Piece your lining (if necessary)
8. Sew the valance
9. Install the valance
How To Sew A Button-Back Box Pleat Valance
www.window-valance-patterns.com Jennifer Thoden

6
3: Supplies
Sewing supplies • Face Fabric (refer to Yardage Formulas for the # of yards) • Matching thread • Sewing machine • New sewing machine needle • T-square or right angle • Straight pins • Measuring tape • Button forms (preferred size) or pre-made buttons • Contrast Fabric (refer to Yardage Formulas for the # of yards)
Installation supplies • Level • Pencil • Measuring tape • Drill / screw driver • Dry wall brackets if needed • Screws • L-Brackets • Staple gun and staples • 1” x 2” board cut to the finished width of the valance (1” x 3” is ok)
Tip Leave your board a few inches longer than the desired width. When you’re done sewing and folding your valance… cut your board to the finished width of the sewn valance. Getting your button-back valance to be the exact width is tough. So don’t sweat it.
You can find your lining, button forms and installation hardware at www.draperysewingsupplies.com.
How To Sew A Button-Back Box Pleat Valance
www.window-valance-patterns.com Jennifer Thoden
7
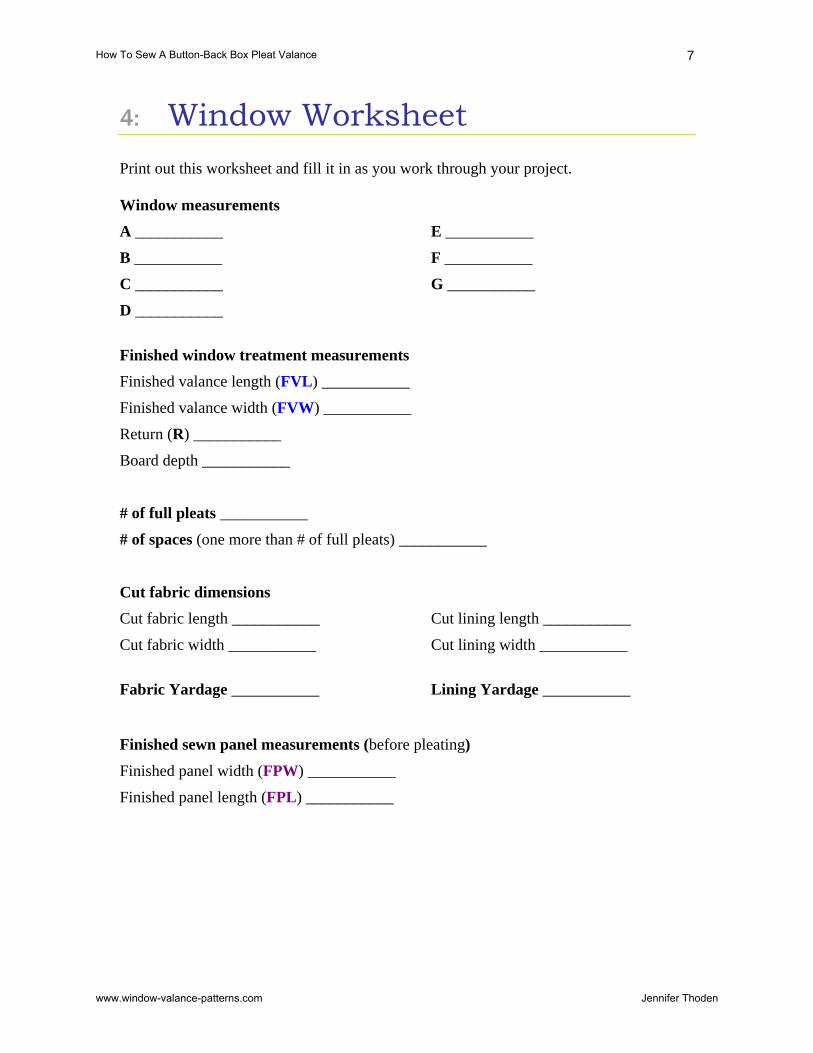
4: Window Worksheet Print out this worksheet and fill it in as you work through your project. Window measurements A ___________
B ___________
C ___________
D ___________
E ___________
F ___________
G ___________
Finished window treatment measurements Finished valance length (FVL) ___________
Finished valance width (FVW) ___________
Return (R) ___________
Board depth ___________
# of full pleats ___________
# of spaces (one more than # of full pleats) ___________
Cut fabric dimensions Cut fabric length ___________
Cut fabric width ___________
Cut lining length ___________
Cut lining width ___________
Fabric Yardage ___________ Lining Yardage ___________ Finished sewn panel measurements (before pleating)
Finished panel width (FPW) ___________
Finished panel length (FPL) ___________
How To Sew A Button-Back Box Pleat Valance
www.window-valance-patterns.com Jennifer Thoden

8
5: Measure your window Now it’s time to get to know your window. There are a few measurements you will need to take. These measurements will help you to figure out how much fabric you will need to buy… and to define how you will sew your shade. Accurate measurements are critical to your success. So use a metal tape measure if you have one. Have a friend hold the other end… have her help you keep the tape measure level horizontally or straight up and down vertically. This will help with getting just the right measurements… if you hold your measuring tool at an angle… you could be off by as much as a ¼ inch. And this error can be compounded as you cut your fabric and make your hems. Take your window’s measurements 3 times. Start with the first measurement and record your first number. Measure all sides of your window… then do it all over again… then one more time just to be sure. Print out the Window Worksheet page. Then refer to the illustration and record the window’s measurements. When you’re ready… move on to the next chapter. A. Width of window (inside frame)
B. Width of window (outside frame)
C. Length of window (inside frame)
D. Entire length of window
E. Top of outside frame to window sill
F. Width of window sill
G. Top of window frame to top of installed board
OR top of window to top of installed board
NOTE: Your window may not have an outer frame… so disregard B and E and first option of G.
How To Sew A Button-Back Box Pleat Valance
www.window-valance-patterns.com Jennifer Thoden
9
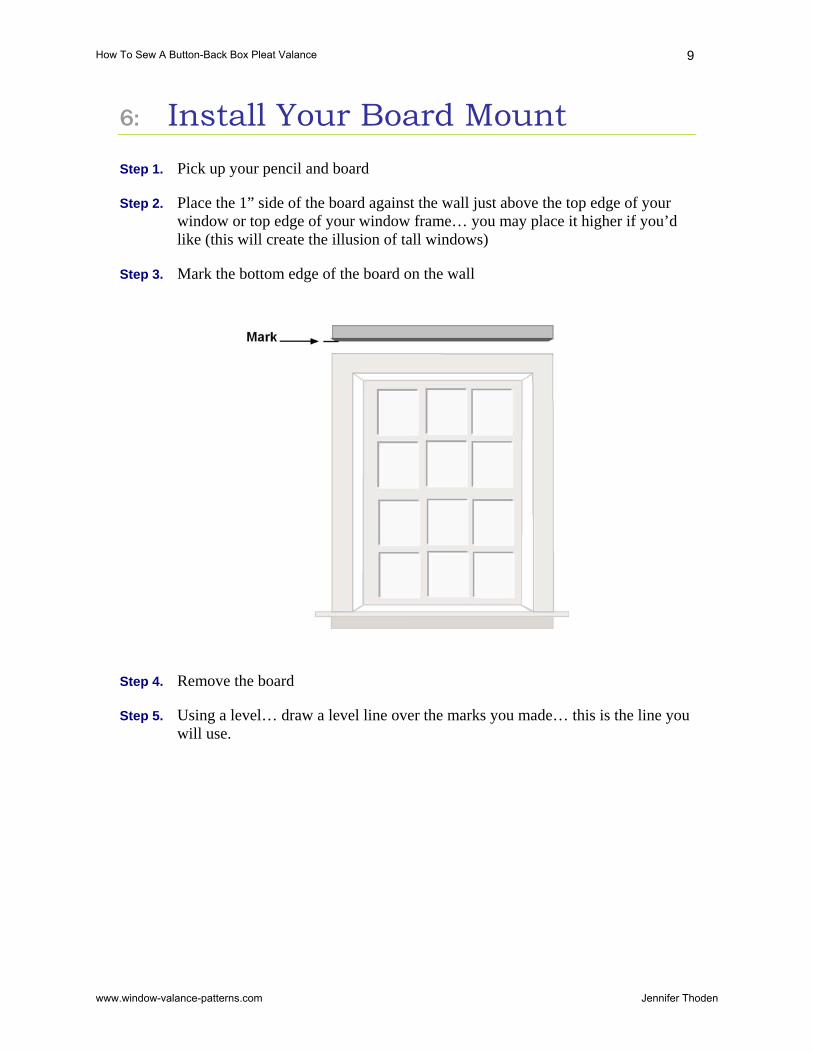
6: Install Your Board Mount Step 1. Pick up your pencil and board
Step 2. Place the 1” side of the board against the wall just above the top edge of your window or top edge of your window frame… you may place it higher if you’d like (this will create the illusion of tall windows)
Step 3. Mark the bottom edge of the board on the wall
Step 4. Remove the board
Step 5. Using a level… draw a level line over the marks you made… this is the line you will use.
How To Sew A Button-Back Box Pleat Valance
www.window-valance-patterns.com Jennifer Thoden

10
Step 6. Place the L-brackets slightly below the mark and screw in place. One on each side… approximately 3” from the edge of the board. You will need to use your stud finder to make sure you are screwing into wood and not dry wall. If you can not find a stud, use dry wall brackets or dry wall screws instead.
How To Sew A Button-Back Box Pleat Valance
www.window-valance-patterns.com Jennifer Thoden

11
7: Final Measurements Now that you have your hardware installed, it’s time to record the “official” measurements of your box-pleated valance. Make sure you have your worksheet with you for this.
Step 1. Lay the board on top of the L-Brackets. Measure from the top of the board to the desired length of your valance. Record this measurement as FVL.
Step 2. Measure from edge to edge of your board. Record this measurement as FW.
Step 3. Measure the returns.
The return is the distance from the front edge of the board to the wall. If you are installing an inside board mount, then your return measurement is 0.
Return
Return
Add FW + the returns. This is the finished valance width (FVW). Record this measurement on your worksheet.
Example FW = 36” Return = 3” 36” + 3” + 3” = 42” Finished valance width (FVW) = 42”
Tip Don’t get too attached to the finished valance width you just measured. If you’re a beginner, it’s tough to get your sewn valance to be exactly the correct width. My advice is to leave the board a few inches too long. When you’re done sewing and folding your valance, trim the board to the width of the sewn valance.
How To Sew A Button-Back Box Pleat Valance
www.window-valance-patterns.com Jennifer Thoden

12
8: Cut Dimensions These are the cut dimensions for a button-back box pleat valance… a valance with a contrasting fabric inside the box pleat… with the corners pulled back to reveal the inside of the pleat. Refer to your worksheet for your valance’s finished measurements. And record the calculated cut dimensions.
Cut fabric and lining length Cut fabric length = FVL + 2” + board depth Cut lining length = FVL + 1” + board depth
Cut lining width Cut lining width = FVW + 1” + ((# of full pleats + 1) x 12”)
Example FVW = 57” # of full pleats = 1 Cut lining width = 57” + 1” + (2 x 12) = 58 + 24 = 82”
How To Sew A Button-Back Box Pleat Valance
www.window-valance-patterns.com Jennifer Thoden
13
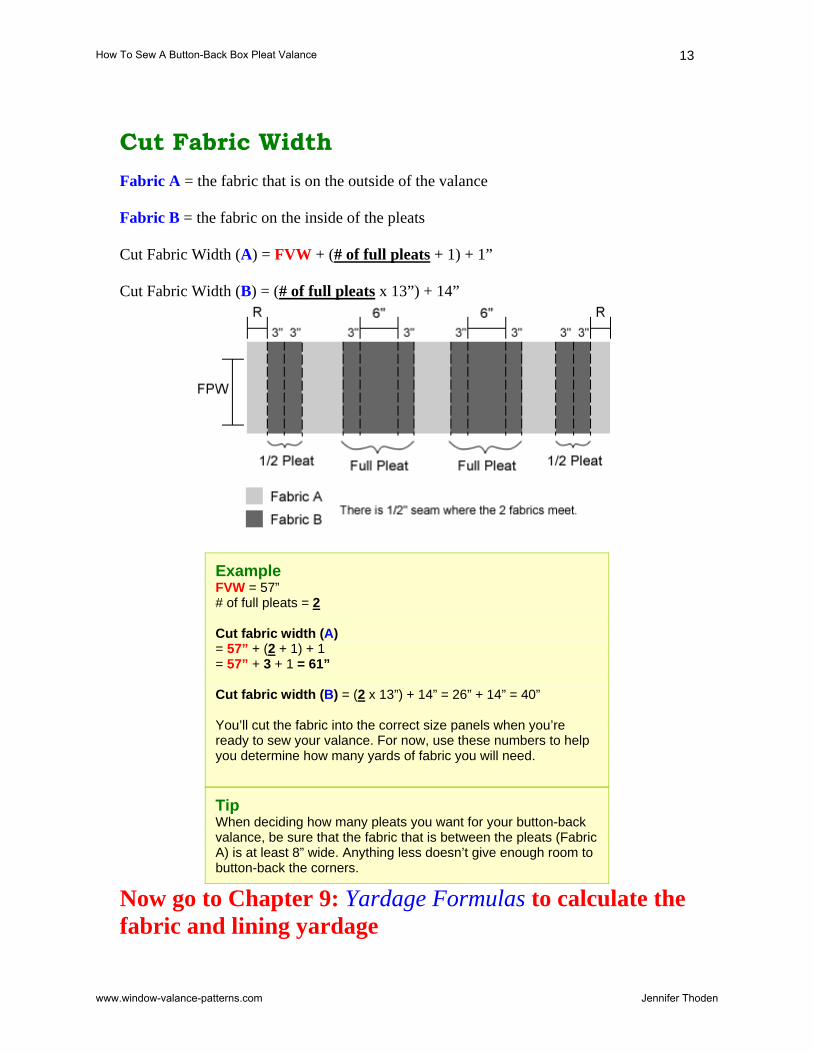
Cut Fabric Width Fabric A = the fabric that is on the outside of the valance Fabric B = the fabric on the inside of the pleats Cut Fabric Width (A) = FVW + (# of full pleats + 1) + 1” Cut Fabric Width (B) = (# of full pleats x 13”) + 14”
Example FVW = 57” # of full pleats = 2 Cut fabric width (A) = 57” + (2 + 1) + 1 = 57” + 3 + 1 = 61” Cut fabric width (B) = (2 x 13”) + 14” = 26” + 14” = 40” You’ll cut the fabric into the correct size panels when you’re ready to sew your valance. For now, use these numbers to help you determine how many yards of fabric you will need.
Tip When deciding how many pleats you want for your button-back valance, be sure that the fabric that is between the pleats (Fabric A) is at least 8” wide. Anything less doesn’t give enough room to button-back the corners.
Now go to Chapter 9: Yardage Formulas to calculate the fabric and lining yardage
How To Sew A Button-Back Box Pleat Valance
www.window-valance-patterns.com Jennifer Thoden
14
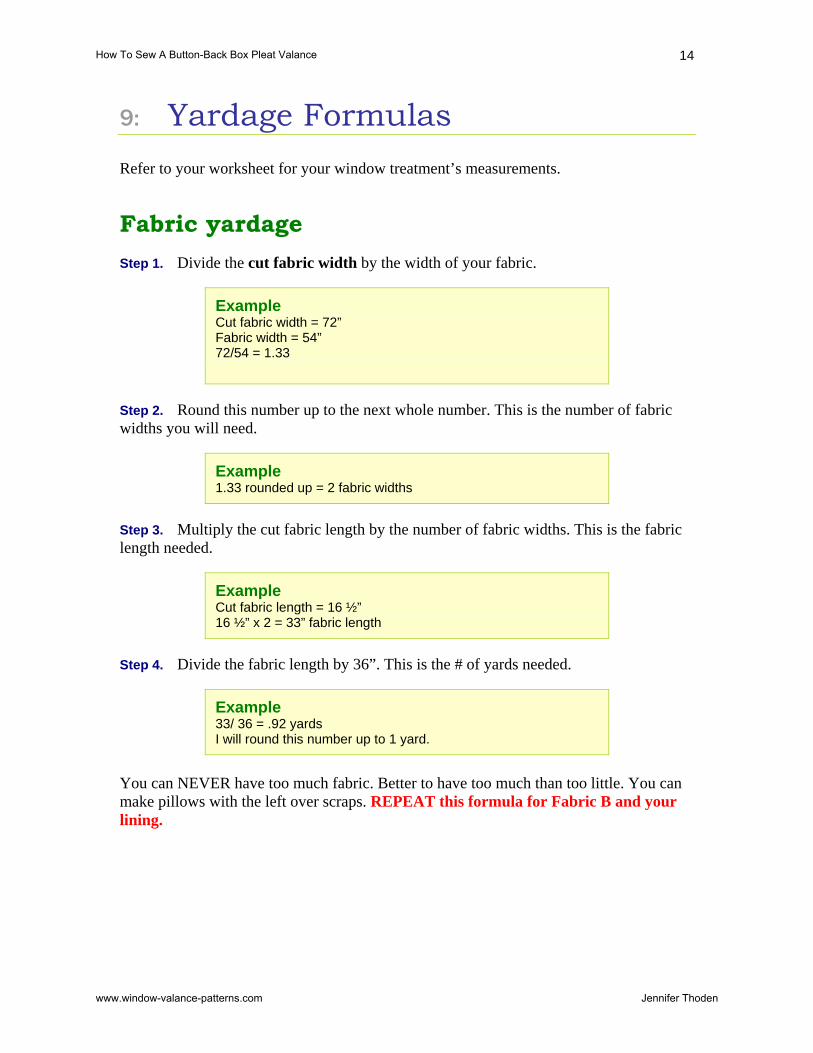
9: Yardage Formulas Refer to your worksheet for your window treatment’s measurements.
Fabric yardage Step 1. Divide the cut fabric width by the width of your fabric.
Example Cut fabric width = 72” Fabric width = 54” 72/54 = 1.33
Step 2. Round this number up to the next whole number. This is the number of fabric widths you will need.
Example 1.33 rounded up = 2 fabric widths
Step 3. Multiply the cut fabric length by the number of fabric widths. This is the fabric length needed.
Example Cut fabric length = 16 ½” 16 ½” x 2 = 33” fabric length
Step 4. Divide the fabric length by 36”. This is the # of yards needed.
Example 33/ 36 = .92 yards I will round this number up to 1 yard.
You can NEVER have too much fabric. Better to have too much than too little. You can make pillows with the left over scraps. REPEAT this formula for Fabric B and your lining.
How To Sew A Button-Back Box Pleat Valance
www.window-valance-patterns.com Jennifer Thoden
15
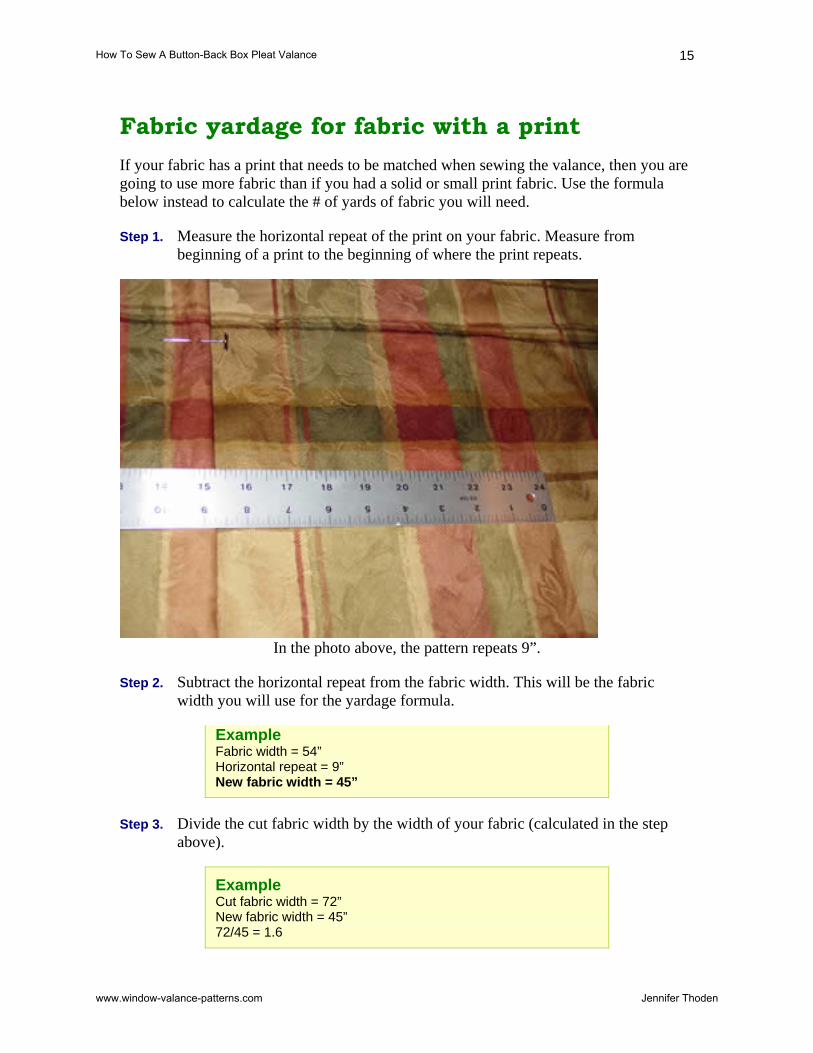
Fabric yardage for fabric with a print If your fabric has a print that needs to be matched when sewing the valance, then you are going to use more fabric than if you had a solid or small print fabric. Use the formula below instead to calculate the # of yards of fabric you will need.
Step 1. Measure the horizontal repeat of the print on your fabric. Measure from beginning of a print to the beginning of where the print repeats.
In the photo above, the pattern repeats 9”.
Step 2. Subtract the horizontal repeat from the fabric width. This will be the fabric width you will use for the yardage formula.
Example Fabric width = 54” Horizontal repeat = 9” New fabric width = 45”
Step 3. Divide the cut fabric width by the width of your fabric (calculated in the step above).
Example Cut fabric width = 72” New fabric width = 45” 72/45 = 1.6
How To Sew A Button-Back Box Pleat Valance
www.window-valance-patterns.com Jennifer Thoden
16
Step 4. Round this number up to the next whole number. This is the number of fabric widths you will need.
Example 1.6 rounded up = 2 fabric widths
Step 5. Measure the vertical repeat of the print on your fabric. Measure from beginning of a print to the beginning of where the print repeats.
Step 6. Add the vertical repeat to the cut fabric length measurement. Use this measurement as the cut fabric length for this yardage formula.
Example Cut fabric length = 16 ½” Vertical repeat = 9” New cut fabric length = 25 ½”
Step 7. Multiply the cut fabric length (calculated in the step above) by the number of fabric widths. This is the fabric length needed.
Example Cut fabric length = 25 ½” 25 ½” x 2 = 51” fabric length
Step 8. Divide the fabric length by 36”. This is the # of yards needed.
Example 51 / 36 = 1.42 yards To be safe, I will round this number up to 2 yards.
Step 9. Repeat for the second fabric if needed.
Lining yardage You will need the same amount of lining as total yards of fabric.
How To Sew A Button-Back Box Pleat Valance
www.window-valance-patterns.com Jennifer Thoden
50
10: Cut Your Fabric Panels Once you have your fabric and lining, it’s time to cut your fabric for your button-back valance. Refer to Chapter 14: How To Cut Your Fabric to learn how to cut your fabric and lining for the best result.
Fabric A Panels A1 Cut (2)
Width = Return + 1” Length = Cut fabric length
Panels A2 Cut (# of full pleats + 1)
Width = {FVW / (# of full pleats + 1)} + 1” Length = Cut fabric length
Example for Panels A2 Cut fabric length = 16 ½” # of full pleats = 2 FVW = 69” Width = (69” / (2+ 1)) + 1” = (69” / 3) + 1” = 23” + 1” = 24” I will cut 3 panels that are 24” by 16 ½”
Fabric BPanels B1 Cut (2)
Width = 7” Length = Cut fabric length
Panels B2 Cut (# of full pleats ) Width = 13” Length = Cut fabric length
Lining Cut your lining to the lining cut width and cut length. The cut width may be wider than the width of your lining. You can do one of 2 things:
1. Turn your lining sideways with the selvage edge running the width of the valance and cut one lining panel.
2. Piece your lining panels together. Refer to How To Piece Your Lining.
How To Sew A Button-Back Box Pleat Valance
www.window-valance-patterns.com Jennifer Thoden
18
11: Sewing the Valance Once you have cut your fabric and lining, it’s time to sew your valance. This chapter is for sewing a button-back box pleated valance or the 2-tone box pleated valance.
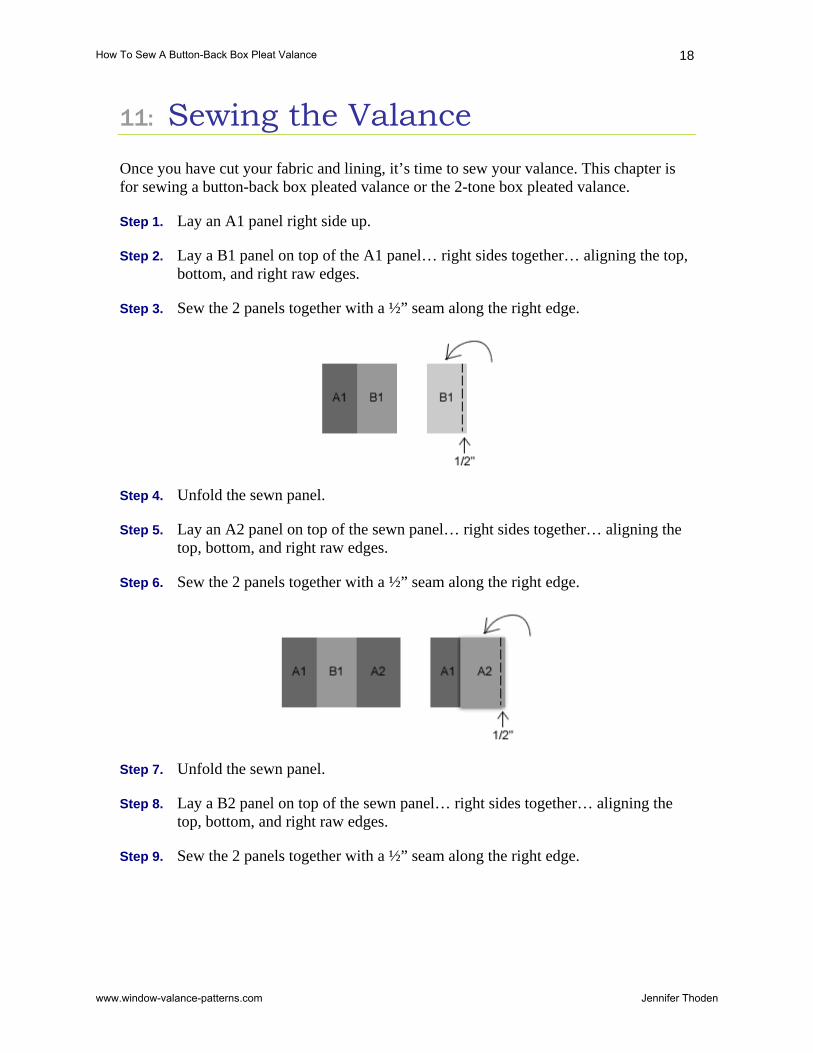
Step 1. Lay an A1 panel right side up.
Step 2. Lay a B1 panel on top of the A1 panel… right sides together… aligning the top, bottom, and right raw edges.
Step 3. Sew the 2 panels together with a ½” seam along the right edge.
Step 4. Unfold the sewn panel.
Step 5. Lay an A2 panel on top of the sewn panel… right sides together… aligning the top, bottom, and right raw edges.
Step 6. Sew the 2 panels together with a ½” seam along the right edge.
Step 7. Unfold the sewn panel.
Step 8. Lay a B2 panel on top of the sewn panel… right sides together… aligning the top, bottom, and right raw edges.
Step 9. Sew the 2 panels together with a ½” seam along the right edge.
How To Sew A Button-Back Box Pleat Valance
www.window-valance-patterns.com Jennifer Thoden

19
Step 10. Repeat steps 4 through 9 until you run out of A2 and B2 panels.
Step 11. Sew the remaining B1 panel to the right edge of the sewn panel
Step 12. Sew the remaining A1 panel to the right edge of the sewn panel
Step 13. Press all seams open.
Step 14. Lay the lining on top of the sewn fabric panel right sides together… aligning side edges and bottom edges.
Step 15. If the lining is wider than the fabric, trim the lining to the width of the fabric
Step 16. Sew the bottom edge with a ½” seam
Step 17. Slide the bottom seam up the valance so that 1 ½” of fabric is on the lining side of the valance… the top raw edges should align. Don’t worry too much if the amount of fabric that is folded over to the lining side is not exactly 1 ½”. (Valance is still right sides together)
Step 18. Press the seam toward the fabric
Step 19. Sew the side edges with a ½” seam
How To Sew A Button-Back Box Pleat Valance
www.window-valance-patterns.com Jennifer Thoden
20
Step 20. Turn the valance right side out and press
Step 21. Go to Folding the Box Pleats
How To Sew A Button-Back Box Pleat Valance
www.window-valance-patterns.com Jennifer Thoden

21
12: Folding the Box Pleats
Refer to the diagram above. This is essentially what your sewn panel will look like. The dashed lines represent fold lines. The outer dashed lines of the full pleat should meet in the center of the Fabric B 6” panel.
When you are all done folding the pleats you will have Fabric A only showing across your valance.
Tip As you fold and press each pleat, secure the pleats with pins both at the top of the valance and near the bottom hem.
How To Sew A Button-Back Box Pleat Valance
www.window-valance-patterns.com Jennifer Thoden
22
13: Install Your Valance In this chapter I’m going to show you the cleanest and most professional way to attach your valance to your dust board. Yes, you could just staple the valance to the top of the board… and that would be fine… but if you’re going to put this much time and money into a window treatment, it’s worth it to take the extra few minutes to finish it the right way. Plus, if you’re considering making this window valance for a client or decorator, you want to be sure you’re giving them the best presentation. It’s what’s going to separate you from “just someone” who makes window treatments.
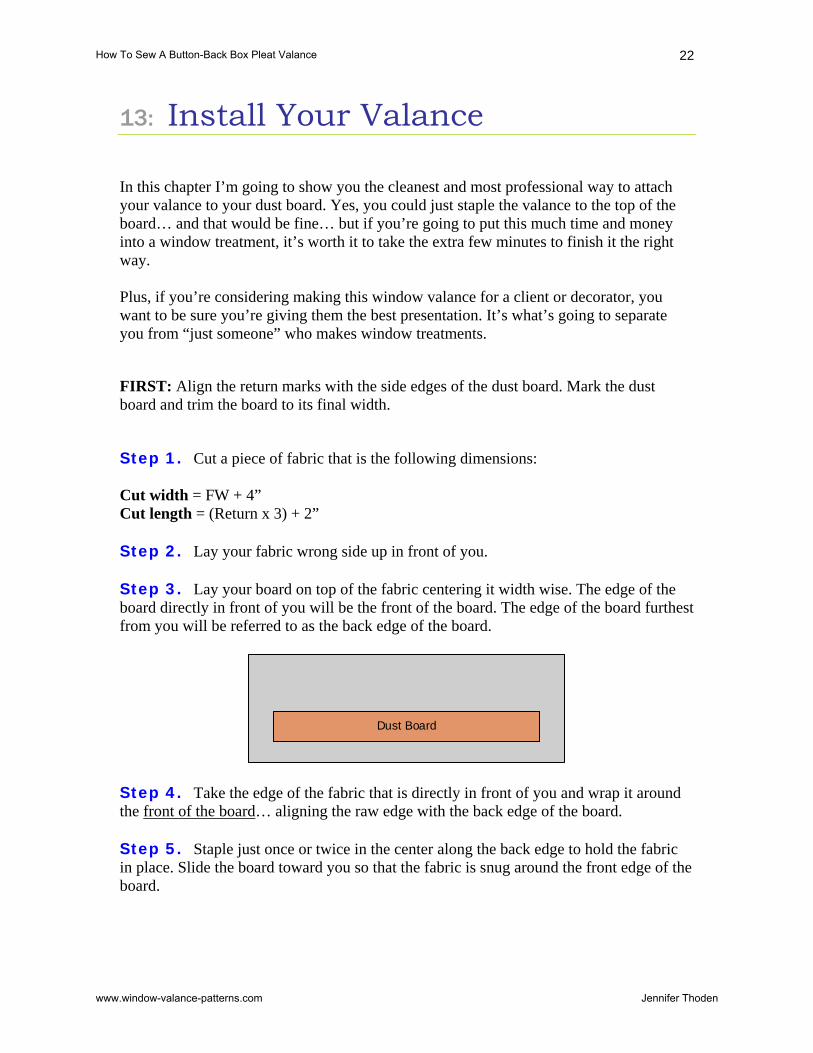
FIRST: Align the return marks with the side edges of the dust board. Mark the dust board and trim the board to its final width.
Step 1. Cut a piece of fabric that is the following dimensions: Cut width = FW + 4” Cut length = (Return x 3) + 2” Step 2. Lay your fabric wrong side up in front of you. Step 3. Lay your board on top of the fabric centering it width wise. The edge of the board directly in front of you will be the front of the board. The edge of the board furthest from you will be referred to as the back edge of the board.
Dust Board
Step 4. Take the edge of the fabric that is directly in front of you and wrap it around the front of the board… aligning the raw edge with the back edge of the board. Step 5. Staple just once or twice in the center along the back edge to hold the fabric in place. Slide the board toward you so that the fabric is snug around the front edge of the board.
How To Sew A Button-Back Box Pleat Valance
www.window-valance-patterns.com Jennifer Thoden
23
Dust Board
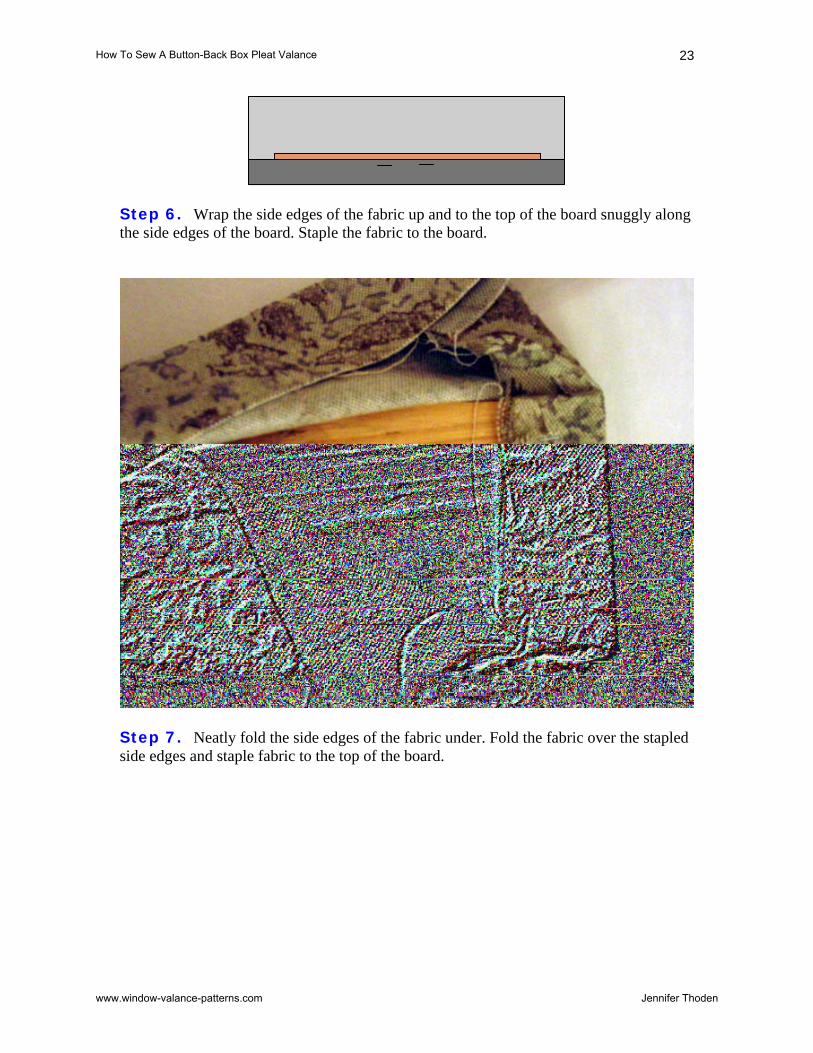
Step 6. Wrap the side edges of the fabric up and to the top of the board snuggly along the side edges of the board. Staple the fabric to the board.
Step 7. Neatly fold the side edges of the fabric under. Fold the fabric over the stapled side edges and staple fabric to the top of the board.
How To Sew A Button-Back Box Pleat Valance
www.window-valance-patterns.com Jennifer Thoden
24
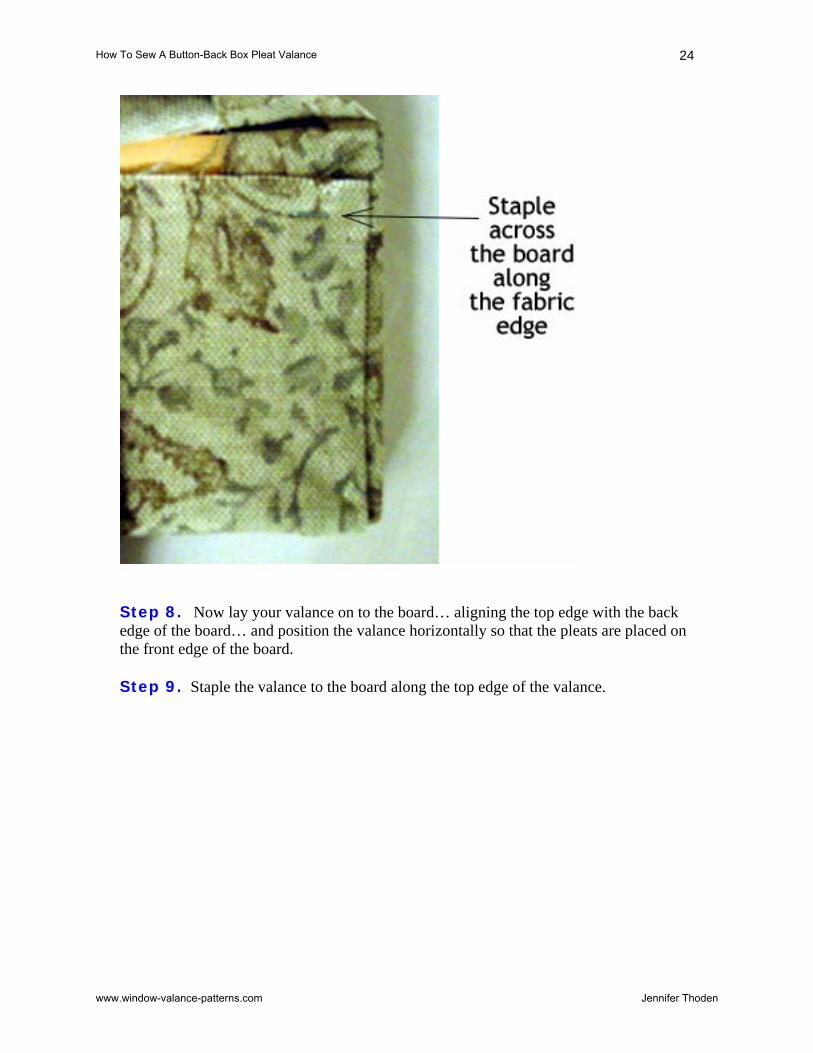
Step 8. Now lay your valance on to the board… aligning the top edge with the back edge of the board… and position the valance horizontally so that the pleats are placed on the front edge of the board. Step 9. Staple the valance to the board along the top edge of the valance.
How To Sew A Button-Back Box Pleat Valance
www.window-valance-patterns.com Jennifer Thoden
25
Step 10. Before you finish stapling the valance to the board, you need to fold the return side of the valance along the board’s side edge and then fold the extra fabric over to the top of the board… stapling the valance to the board.
How To Sew A Button-Back Box Pleat Valance
www.window-valance-patterns.com Jennifer Thoden
26
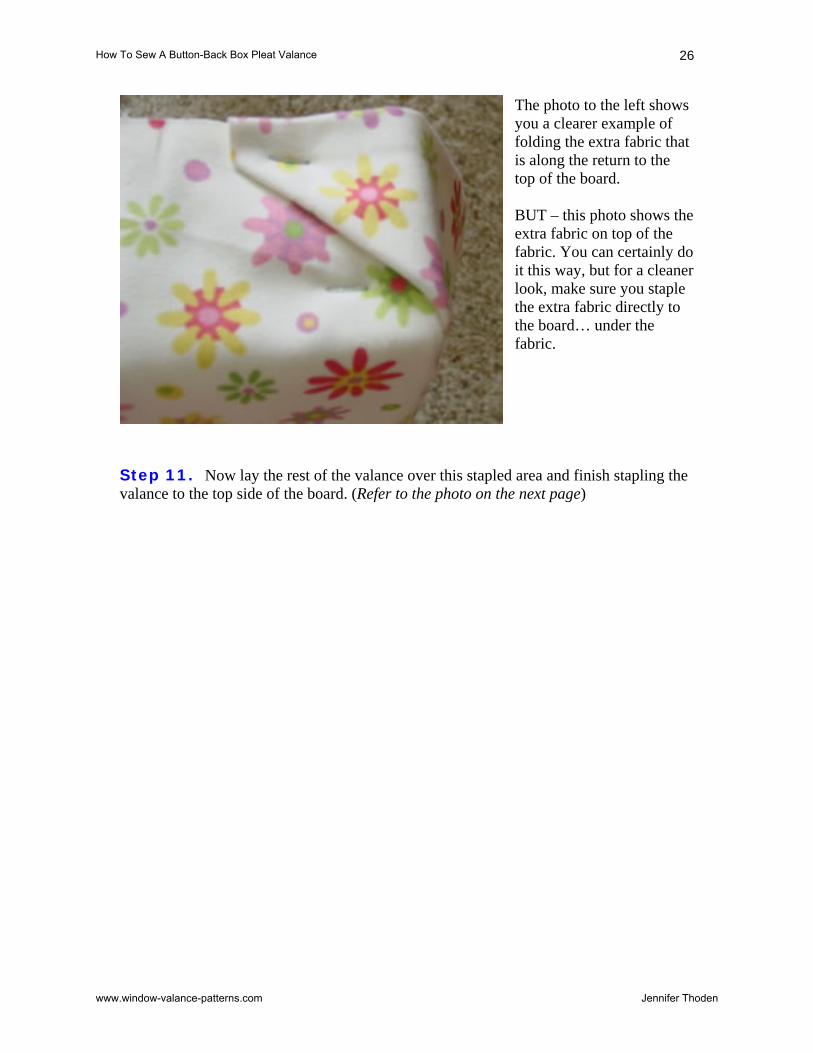
The photo to the left shows you a clearer example of folding the extra fabric that is along the return to the top of the board. BUT – this photo shows the extra fabric on top of the fabric. You can certainly do it this way, but for a cleaner look, make sure you staple the extra fabric directly to the board… under the fabric.
Step 11. Now lay the rest of the valance over this stapled area and finish stapling the valance to the top side of the board. (Refer to the photo on the next page)
How To Sew A Button-Back Box Pleat Valance
www.window-valance-patterns.com Jennifer Thoden
27
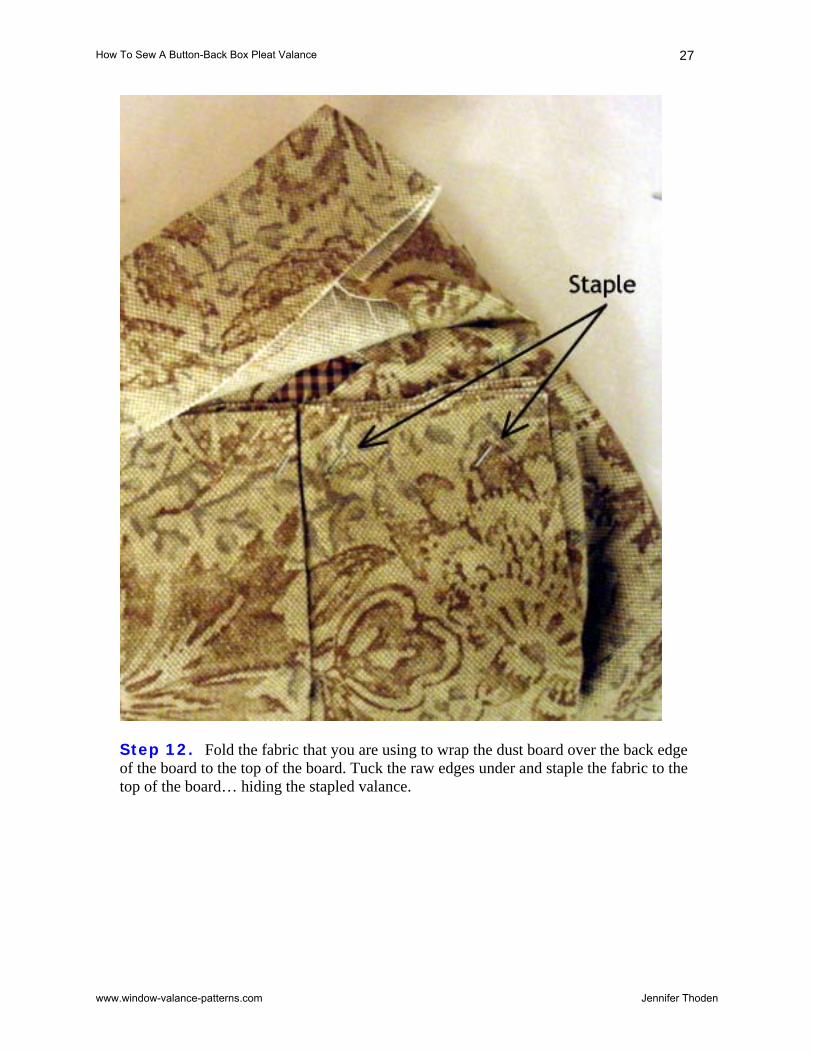
Step 12. Fold the fabric that you are using to wrap the dust board over the back edge of the board to the top of the board. Tuck the raw edges under and staple the fabric to the top of the board… hiding the stapled valance.
How To Sew A Button-Back Box Pleat Valance
www.window-valance-patterns.com Jennifer Thoden

28
Nice and neat! Step 13. Now install your dust board to your wall. Refer to the next chapter if you need help.
Note For the button-back valance, lay your board on a table or some place that allows your valance to hang. Pin back the corners of your box pleats revealing Fabric B. Measure to make sure your corners are folded back the same across your valance. Secure the corners with fabric covered buttons.
How To Sew A Button-Back Box Pleat Valance
www.window-valance-patterns.com Jennifer Thoden
29
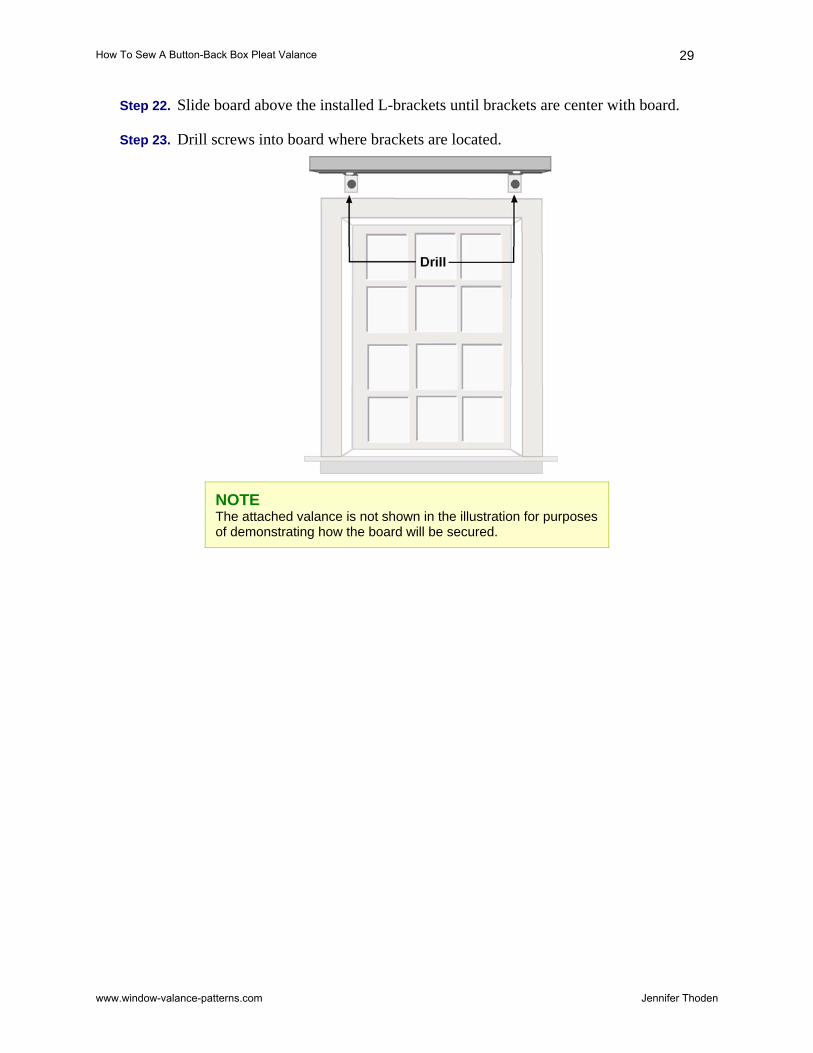
Step 22. Slide board above the installed L-brackets until brackets are center with board.
Step 23. Drill screws into board where brackets are located.
NOTE The attached valance is not shown in the illustration for purposes of demonstrating how the board will be secured.
How To Sew A Button-Back Box Pleat Valance
www.window-valance-patterns.com Jennifer Thoden
30
14: How To Cut Your Fabric This chapter will give you step-by-step instructions on how to cut your fabric for the absolute best result when sewing your box-pleated valance.
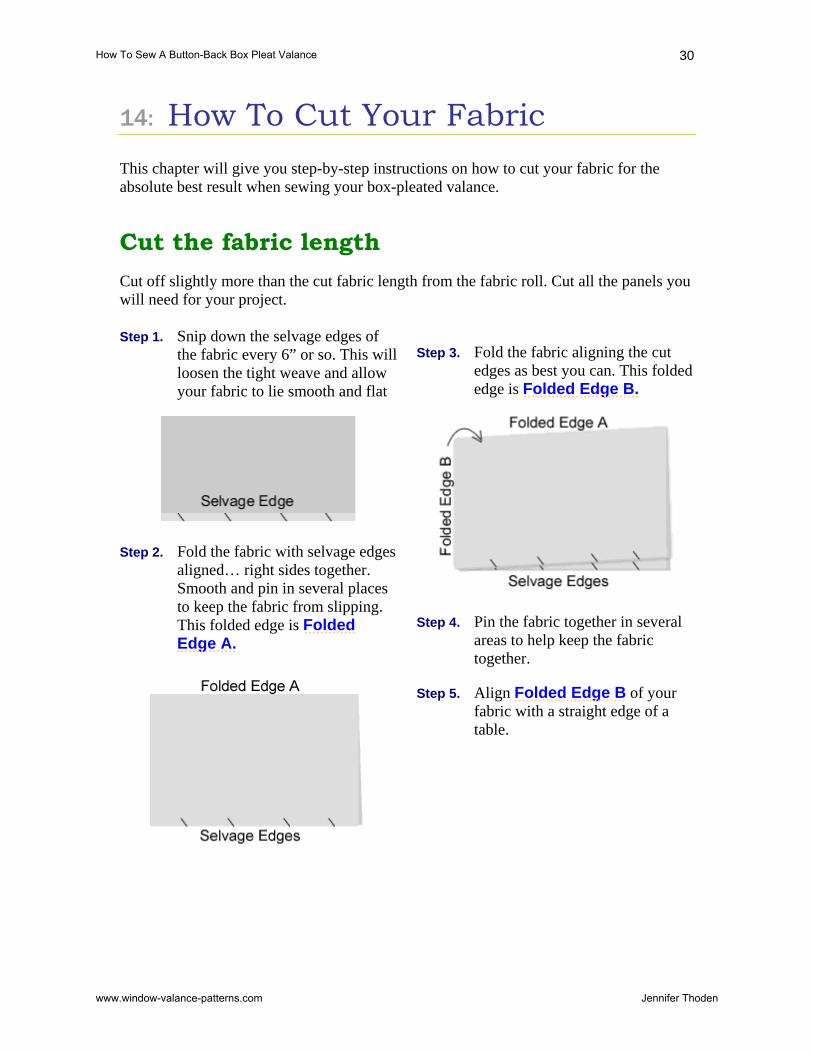
Cut the fabric length Cut off slightly more than the cut fabric length from the fabric roll. Cut all the panels you will need for your project. Step 1. Snip down the selvage edges of
the fabric every 6” or so. This will loosen the tight weave and allow your fabric to lie smooth and flat
Step 2. Fold the fabric with selvage edges aligned… right sides together. Smooth and pin in several places to keep the fabric from slipping. This folded edge is Folded Edge A.
Step 3. Fold the fabric aligning the cut edges as best you can. This folded edge is Folded Edge B.
Step 4. Pin the fabric together in several areas to help keep the fabric together.
Step 5. Align Folded Edge B of your fabric with a straight edge of a table.
How To Sew A Button-Back Box Pleat Valance
www.window-valance-patterns.com Jennifer Thoden
31
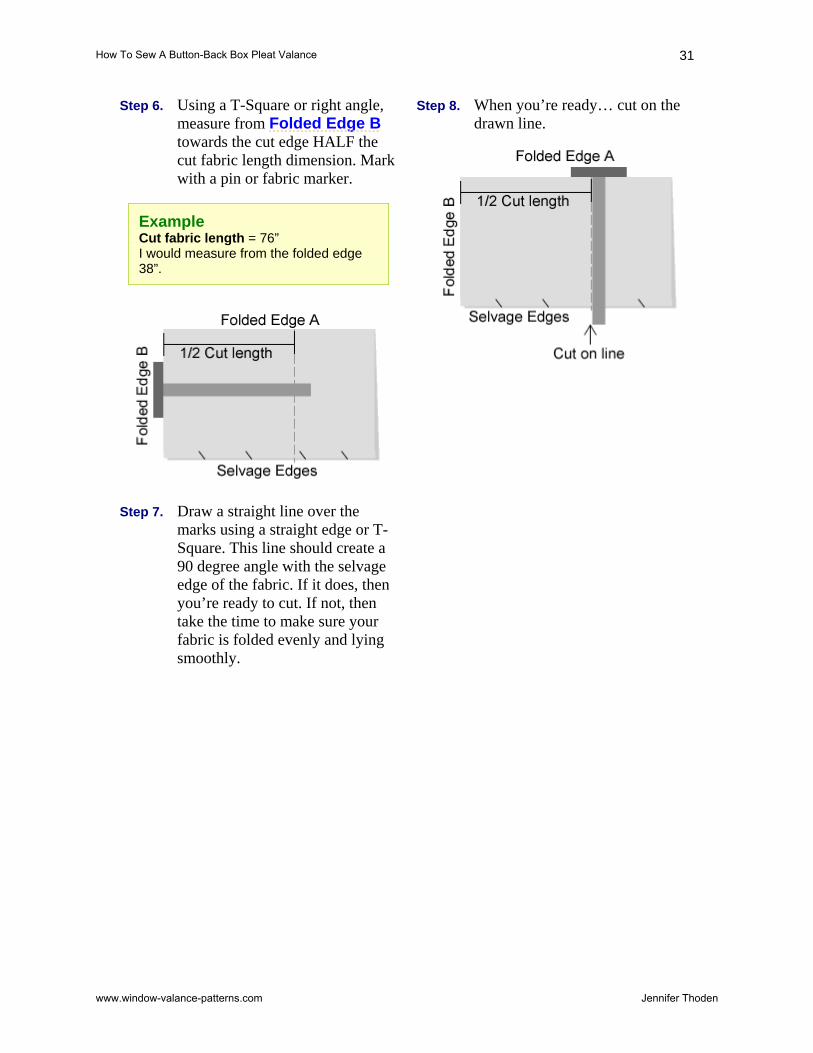
Step 6. Using a T-Square or right angle, measure from Folded Edge B towards the cut edge HALF the cut fabric length dimension. Mark with a pin or fabric marker.
Example Cut fabric length = 76” I would measure from the folded edge 38”.
Step 7. Draw a straight line over the marks using a straight edge or T-Square. This line should create a 90 degree angle with the selvage edge of the fabric. If it does, then you’re ready to cut. If not, then take the time to make sure your fabric is folded evenly and lying smoothly.
Step 8. When you’re ready… cut on the drawn line.
How To Sew A Button-Back Box Pleat Valance
www.window-valance-patterns.com Jennifer Thoden
32
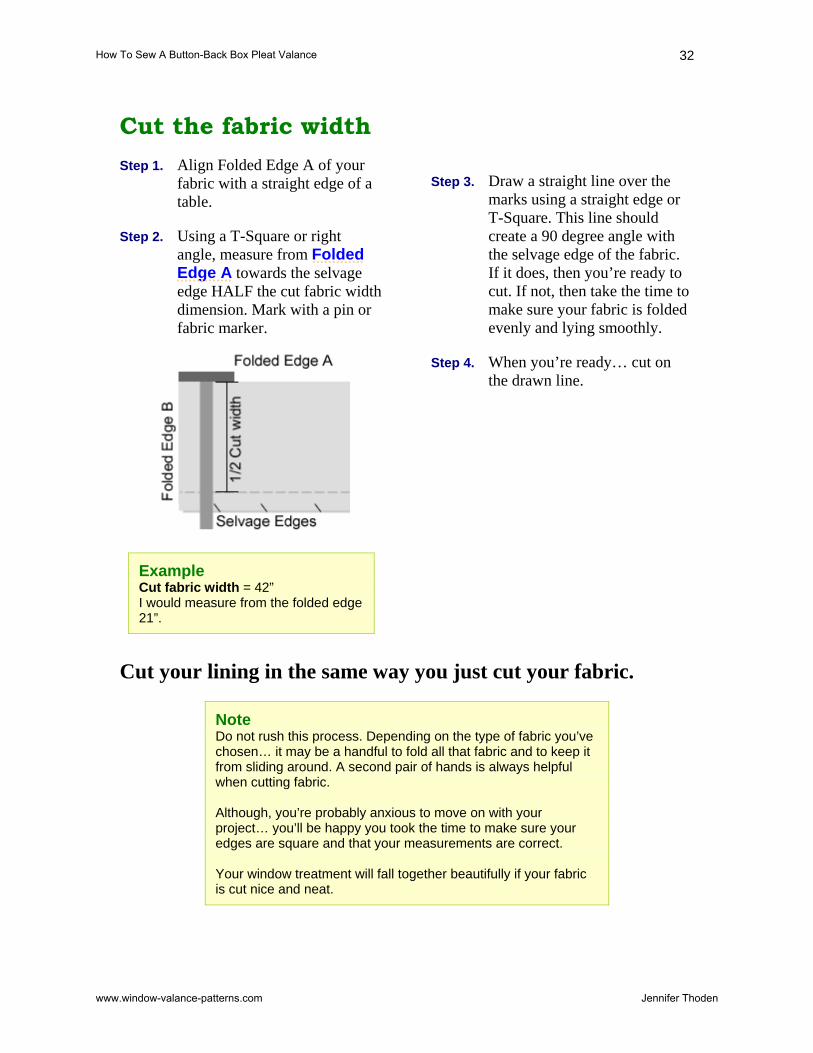
Cut the fabric width Step 1. Align Folded Edge A of your
fabric with a straight edge of a table.
Step 2. Using a T-Square or right angle, measure from Folded Edge A towards the selvage edge HALF the cut fabric width dimension. Mark with a pin or fabric marker.
Example Cut fabric width = 42” I would measure from the folded edge 21”.
Step 3. Draw a straight line over the marks using a straight edge or T-Square. This line should create a 90 degree angle with the selvage edge of the fabric. If it does, then you’re ready to cut. If not, then take the time to make sure your fabric is folded evenly and lying smoothly.
Step 4. When you’re ready… cut on the drawn line.
Cut your lining in the same way you just cut your fabric.
Note Do not rush this process. Depending on the type of fabric you’ve chosen… it may be a handful to fold all that fabric and to keep it from sliding around. A second pair of hands is always helpful when cutting fabric. Although, you’re probably anxious to move on with your project… you’ll be happy you took the time to make sure your edges are square and that your measurements are correct. Your window treatment will fall together beautifully if your fabric is cut nice and neat.
How To Sew A Button-Back Box Pleat Valance
www.window-valance-patterns.com Jennifer Thoden
33
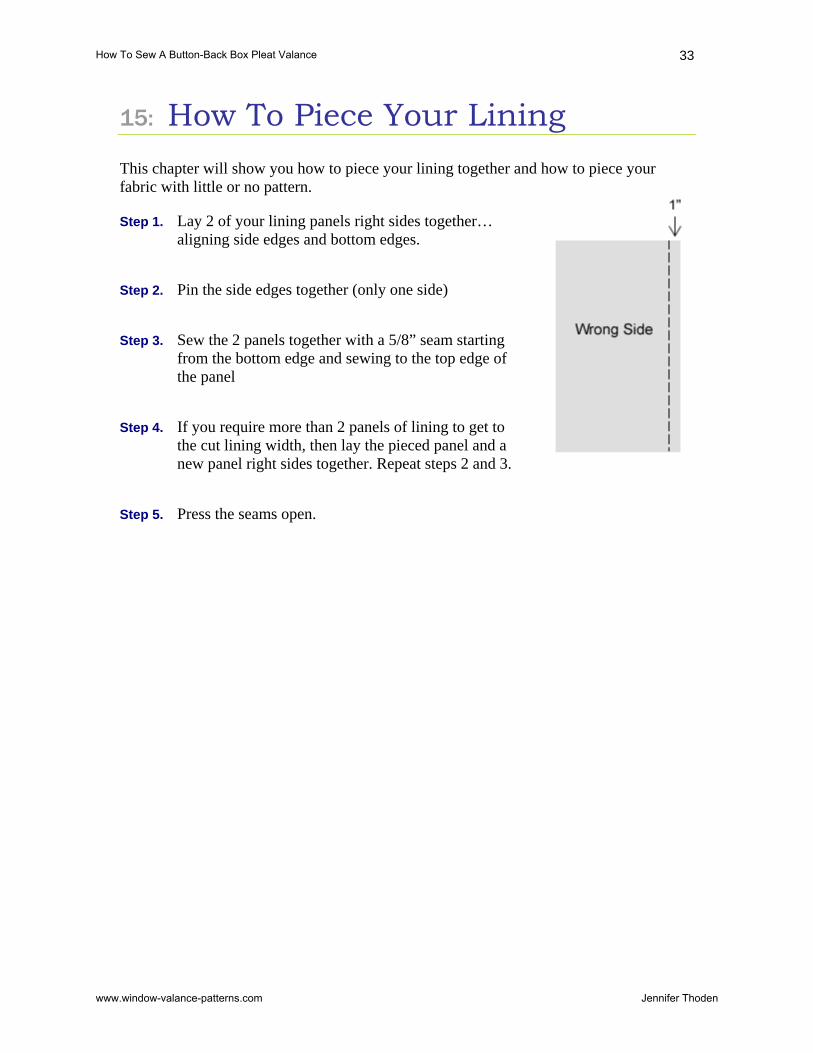
15: How To Piece Your Lining This chapter will show you how to piece your lining together and how to piece your fabric with little or no pattern.
Step 1. Lay 2 of your lining panels right sides together… aligning side edges and bottom edges.
Step 2. Pin the side edges together (only one side)
Step 3. Sew the 2 panels together with a 5/8” seam starting from the bottom edge and sewing to the top edge of the panel
Step 4. If you require more than 2 panels of lining to get to the cut lining width, then lay the pieced panel and a new panel right sides together. Repeat steps 2 and 3.
Step 5. Press the seams open.
How To Sew A Button-Back Box Pleat Valance
www.window-valance-patterns.com Jennifer Thoden
34
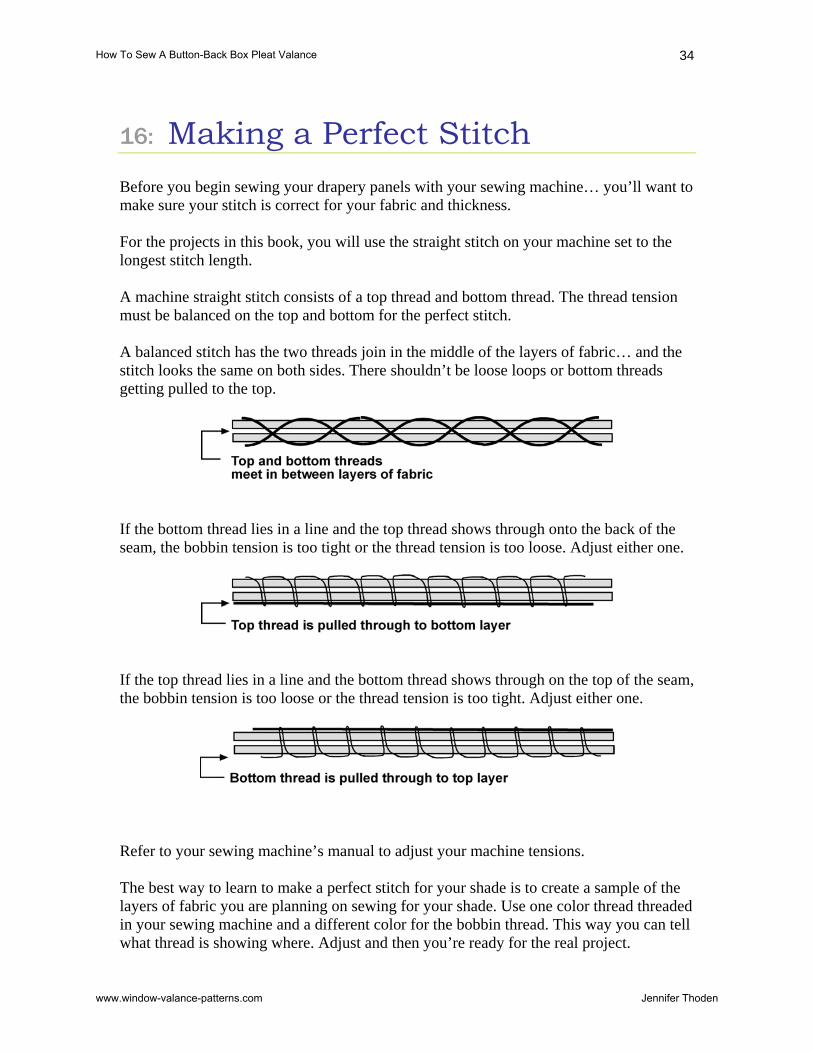
16: Making a Perfect Stitch Before you begin sewing your drapery panels with your sewing machine… you’ll want to make sure your stitch is correct for your fabric and thickness. For the projects in this book, you will use the straight stitch on your machine set to the longest stitch length. A machine straight stitch consists of a top thread and bottom thread. The thread tension must be balanced on the top and bottom for the perfect stitch. A balanced stitch has the two threads join in the middle of the layers of fabric… and the stitch looks the same on both sides. There shouldn’t be loose loops or bottom threads getting pulled to the top.
If the bottom thread lies in a line and the top thread shows through onto the back of the seam, the bobbin tension is too tight or the thread tension is too loose. Adjust either one.
If the top thread lies in a line and the bottom thread shows through on the top of the seam, the bobbin tension is too loose or the thread tension is too tight. Adjust either one.
Refer to your sewing machine’s manual to adjust your machine tensions. The best way to learn to make a perfect stitch for your shade is to create a sample of the layers of fabric you are planning on sewing for your shade. Use one color thread threaded in your sewing machine and a different color for the bobbin thread. This way you can tell what thread is showing where. Adjust and then you’re ready for the real project.
How To Sew A Button-Back Box Pleat Valance
www.window-valance-patterns.com Jennifer Thoden

35
How To Sew A Button-Back Box Pleat Valance
www.window-valance-patterns.com Jennifer Thoden
36
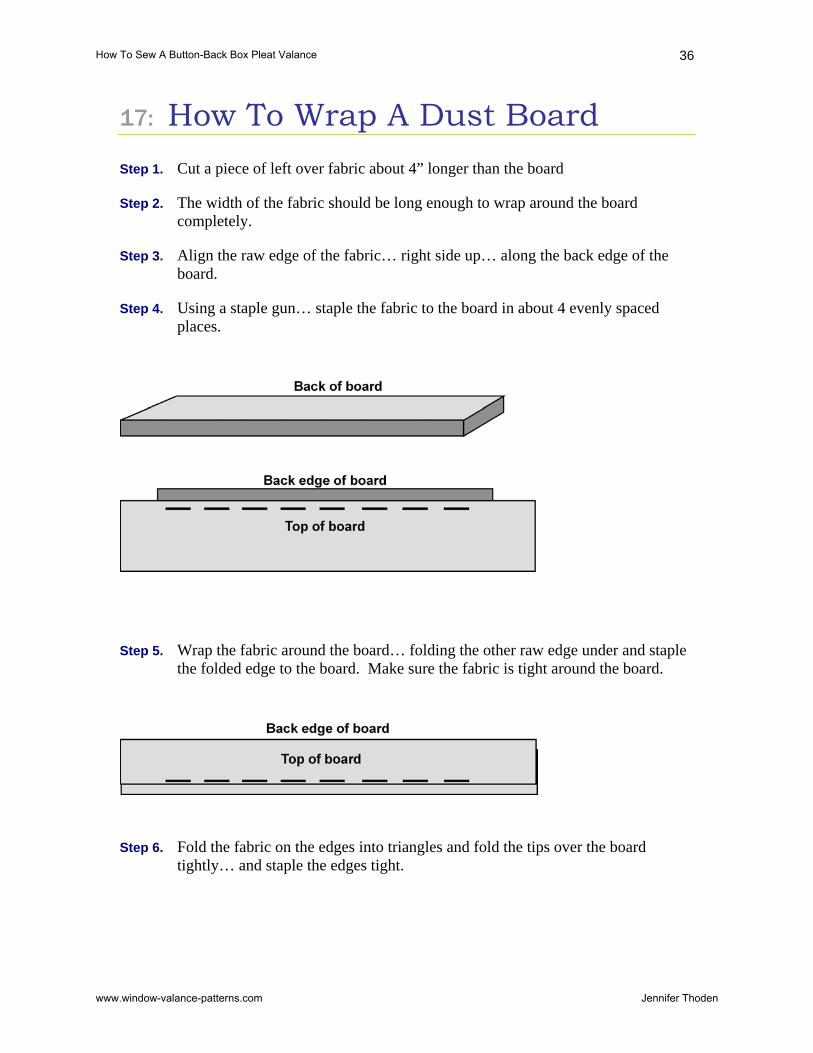
17: How To Wrap A Dust Board Step 1. Cut a piece of left over fabric about 4” longer than the board
Step 2. The width of the fabric should be long enough to wrap around the board completely.
Step 3. Align the raw edge of the fabric… right side up… along the back edge of the board.
Step 4. Using a staple gun… staple the fabric to the board in about 4 evenly spaced places.
Step 5. Wrap the fabric around the board… folding the other raw edge under and staple the folded edge to the board. Make sure the fabric is tight around the board.
Step 6. Fold the fabric on the edges into triangles and fold the tips over the board tightly… and staple the edges tight.
How To Sew A Button-Back Box Pleat Valance
www.window-valance-patterns.com Jennifer Thoden
37
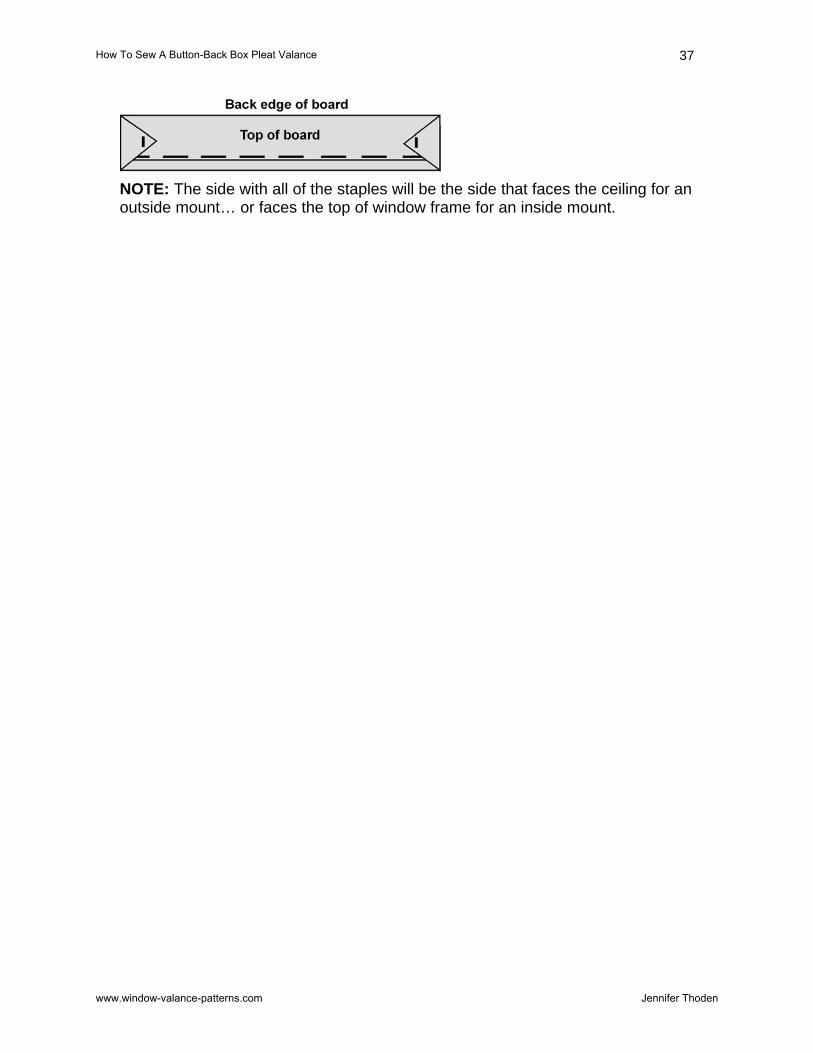
NOTE: The side with all of the staples will be the side that faces the ceiling for an outside mount… or faces the top of window frame for an inside mount.
How To Sew A Button-Back Box Pleat Valance
www.window-valance-patterns.com Jennifer Thoden

38
18: Related Resources Here is a listing of e-books and web sites that I personally own and recommend to anyone interested in home decoration and sewing. Whether it's making your own window treatments, decorating your home to make it more beautiful or functional... I think you will enjoy these e-books and free web sites.
How To Make Roman Shades http://www.sewng-roman-shades.com Learn how to make 8 different types of roman shades with these detailed, illustrated step-by-step instructions. If you want to save thousands of dollars by sewing your own roman shades, then this guide is your answer!
Roman Shades Supplies and Drapery Making Supplies http://www.draperysewingsupplies.com Now you can order your roman shade supplies and drapery sewing supplies... online... through me! Fast delivery and discount pricing. Check it out!
How to Sew Pleated Drapes http://www.easy-pleated-curtains.com Learn how to easily make pinch pleated drapes with simple step-by-step illustrated instructions. Learn triple pinch pleats, double pinch pleats, goblet pleats, reverse pleats and butterfly pleats. From design to installation, it’s all there.
Simple Sewing Projects http://www.simplesewingprojects.com Discover dozens of free home sewing projects... all step by step and easy to follow. Browse, enjoy and get sewing!
How To Sew A Button-Back Box Pleat Valance
www.window-valance-patterns.com Jennifer Thoden
39
Home Decorating Ideas http://www.homedecoratingideas4u.com You'll find dozens of free home decorating ideas, expert interior design tips and decorating articles... so you can decorate your home beautifully. Browse, enjoy and get decorating!
How To Sew A Button-Back Box Pleat Valance
www.window-valance-patterns.com Jennifer Thoden