how to - rope bed - sca.claypool.mesca.claypool.me/ropebed.pdf · how to make an inexpensive rope...
TRANSCRIPT
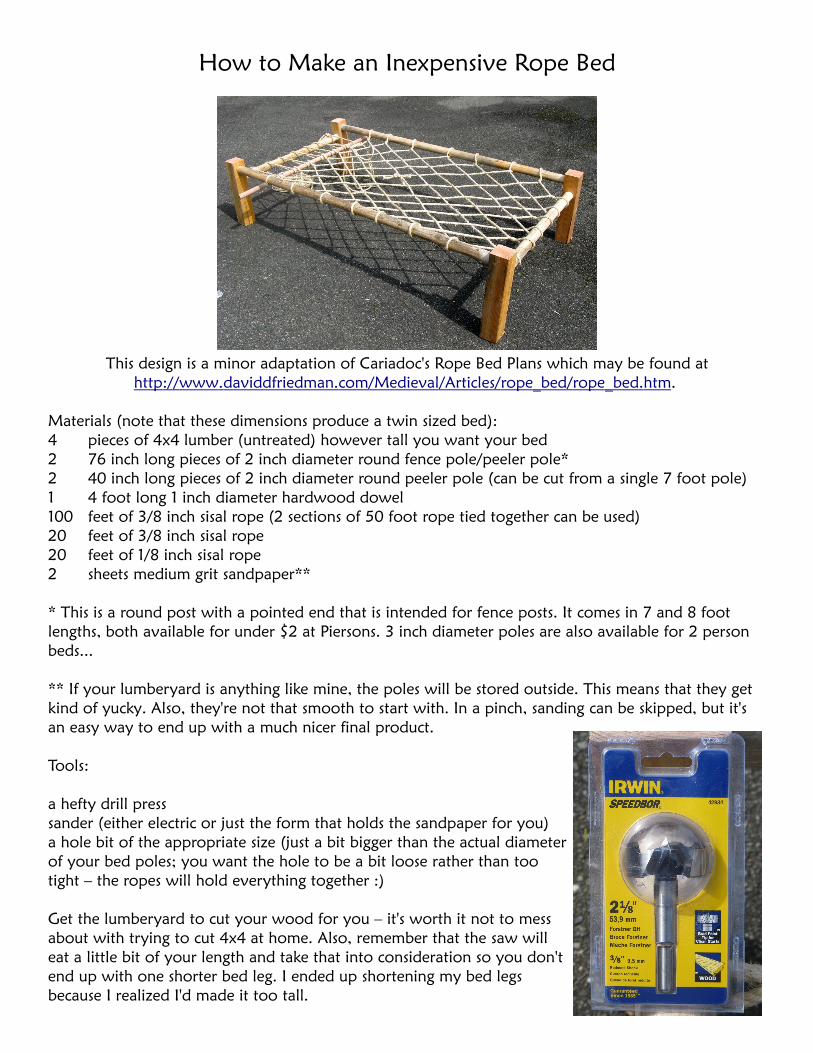
How to Make an Inexpensive Rope Bed
This design is a minor adaptation of Cariadoc's Rope Bed Plans which may be found at http :// www . daviddfriedman . com / Medieval / Articles / rope _ bed / rope _ bed . htm .
Materials (note that these dimensions produce a twin sized bed):4 pieces of 4x4 lumber (untreated) however tall you want your bed2 76 inch long pieces of 2 inch diameter round fence pole/peeler pole*2 40 inch long pieces of 2 inch diameter round peeler pole (can be cut from a single 7 foot pole)1 4 foot long 1 inch diameter hardwood dowel100 feet of 3/8 inch sisal rope (2 sections of 50 foot rope tied together can be used)20 feet of 3/8 inch sisal rope20 feet of 1/8 inch sisal rope2 sheets medium grit sandpaper**
* This is a round post with a pointed end that is intended for fence posts. It comes in 7 and 8 foot lengths, both available for under $2 at Piersons. 3 inch diameter poles are also available for 2 person beds...
** If your lumberyard is anything like mine, the poles will be stored outside. This means that they get kind of yucky. Also, they're not that smooth to start with. In a pinch, sanding can be skipped, but it's an easy way to end up with a much nicer final product.
Tools:
a hefty drill presssander (either electric or just the form that holds the sandpaper for you)a hole bit of the appropriate size (just a bit bigger than the actual diameter of your bed poles; you want the hole to be a bit loose rather than too tight – the ropes will hold everything together :)
Get the lumberyard to cut your wood for you – it's worth it not to mess about with trying to cut 4x4 at home. Also, remember that the saw will eat a little bit of your length and take that into consideration so you don't end up with one shorter bed leg. I ended up shortening my bed legs because I realized I'd made it too tall.

Assuming you've gotten the lumberyard to cut your pieces for you, this is almost a tinker toy project :) The only part that requires any tools is the drilling. Find a friend with a sturdy drill press. I ended up begging the shop teacher of the local high school for some shop time.
In order for a 4x4 to accommodate 2 inch poles, you need to offset your holes. That is, you need to drill the holes for the head and foot poles lower than those for the side poles. (Lowering the head and foot helps to counteract the effect where the sag of the rope bed makes your head and feet much higher than your middle.) I put the centers of my holes at 2 inches from the top for the side poles and 5 inches from the top for the head & foot poles. Note that offsetting the holes like this adds to the stability of the bed tremendously – I had to reengineer my beds because I didn't offset my holes the first time
around. You'll want to drill your holes 2 ½ or 3 inches deep. You want them pretty deep, but you don't want them to punch all the way through your 4x4 (which is really only 3.5x3.5). Also note that you will be drilling 2 pairs of legs that are mirror images of each other . (see picture above)
Once you have your holes drilled, it's time to assemble and lace your bed. Don't worry if the bed seems a bit wobbly before lacing – the ropes will hold it together :) You'll be lacing between the head, sides, and the wooden dowel. The dowel will be lashed to the foot, and when your ropes stretch you'll just tighten this lashing and your bed will not be saggy anymore :) If you use the photo of my bed (left) as a pattern, your rope will tie back onto itself, forming a complete loop.
When lacing at first, I lay the dowel across the sides about 12 inches from the foot pole, and gently lash it into place using 7 loops of sisal. (By the way, this is that extra 20 feet of sisal from the material list.) Then tie off one end of your long rope(s) to a pole and follow the lacing pattern, making sure that your ropes go between the lashings on the dowel (7 lashing loops = 6 spaces for your net). You'll be weaving over and under the other ropes, which is a pain at the beginning when it's hard to tell whether to go over or under since the

ropes aren't all there. Don't try to pull it tight – just follow the photo and get the pattern set. Lacing the bed for the first time is tecnhically possible with just one person, but it's much less frustrating for two, so get a buddy to help you. If you're using a couple of 50 foot lengths, tie the second onto the first when you run out of length (I recommend using the same kind of knot they use to tie necklace cords – my dad calls it a fisherman's knot). You'll probably run out of rope a couple feet from the end. Not to worry – leave it for now and go back to the beginning. Now you're going to tighten the bed. Follow the rope from the beginning, but this time pull it tight at you go. A second person comes in very handy here! Keep an eye on your bed – if it's starting to skew out of square, concentrate on pulling tighter the ropes that will pull it back into shape. When you get to the end, you should have enough length to finish your lacing and tie the ends together (you could use another fisherman's knot, or just a square knot). Now go to the end of the bed and loosen the dowel lashings. Wiggle the dowel so it's no longer resting on the side poles, but is now underneath them. This way you won't crack it by resting your weight on it. Now tighten the lashings. Your bed should be really taut now :) Go ahead and lie down on it – not super comfy without a mattress, but far from awful. Wiggle around a little. The bed should be very sturdy. When you get up, your ropes will probably have stretched and you can tighten the dowel lashings again.
Here's the cool thing – having gone to all this trouble once, you don't need to rerope your bed ever again. First, loosen the tension rope quite a bit. Now take that 20 feet of 1/8 inch sisal rope, and run it through the outer loops of your net, in the same loops the outer poles are going through. Then tie it to itself so it goes all the way around the net and then tie it off to itself. This keeps the net intact in case a pole slips out of its spot. When you want to transport your bed, untie & remove the dowel rope. The net should become slack, allowing you to slide the side poles out of the leg holes. Squish the whole net away from the head and foot of the bed and twist the head and dowel to secure the ropes. When you get to the event just untwist, put the poles into the legs, spread the net out, and lash the dowel to the foot. (I lay it across the sides, lash it, wiggle it under the poles, and then tighten.) After sleeping on it a few nights, I did end up needing to retighten the net, but that's much easier than reroping the whole bed :)
This design can easily be changed to accommodate other sizes of mattress. In fact, I have heard of people who use one set of head and foot poles (and rope net) when camping alone, and another (wider) set when camping with their husband/wife.
A nice extension of this project would be to make the head legs longer and cut slits in them that a headboard could slot into. Then you could carve or paint the headboard... Also, if you have a friend with a lathe you could make much fancier looking legs than boring old 4x4 :) However, the basic project is sturdy, period, comfortable, not unattractive, and only costs about $50 to make.**
** $50 not counting the hole bit, which cost me about $20 – get a bunch of people who all want rope beds and share the cost of the hole bit!