how to make lithophanes for the led holiday litho-lantern€¦ · now from the gimp menu, pick...
TRANSCRIPT

Bob Eaton (Festus440)
How to make Lithophanes for the LED Holiday Litho-Lantern
Creating the lithophanes for the lantern is quite easy. You need to have some limited photo editing skill
but if you're new to that these instructions will get you started.
There are a number of software packages available to create the actual STL files including several slicer
programs. I will show you how to do it with the Cura slicer program which is free and open source.
Go to this site and download the version of Cura for your computer:
http://software.ultimaker.com/
Install the software. The install wizard will ask for details about your printer. If you don't plan on using
Cura to actually print the part, these setting won't be critical and you also won't need to install the Arduino
drivers.
You will also need some type of photo editing software. For this example I will use Gimp 2 which is also
free and open source:
http://www.gimp.org/
Note: I'm using the Windows versions of these software packages, but they are also available for
Mac and Linux.
Editing the Image
I'll go through the steps I used to create the lithophane of my granddaughter. (I like this photo because she
has this odd "what the heck is going on" look :-) Depending on the image, the exact procedure you use
may need to be different but this should get you started. This is only one way to get the desired result.
A high resolution is not
needed. The actual image
size in pixels we will use is
230 wide by 325 pixels high.
The size of the finished
lithophane should be 46mm
wide by 65mm tall and 6mm
thick. I chose the 6mm
thickness because that is
what I use when I cut
lithophanes with my CNC
mill. This thickness gives a
good range of light to dark
contrast. Since the overall
size is small, it doesn't
require much plastic or
printing time.

Start the Gimp 2 program and load your image.
For images of people, a close up will work best since the lithophane doesn't have as much resolution as a
photo. You want an image that has a quite a bit of contrast. Also if you see any very small very bright
spots, you may want remove them or reduce their brightness because these can bloom in the lithophane.
(For example the glint in people's eyes.) I'm not going to cover how to do that here.
Since her face in this photo is already centered about in the right place vertically, I will scale the whole
image height to the final 325 pixel size in the vertical direction first.
In Gimp, select "Image" and then
"Scale Image"
Make sure the small Lock symbol is
"locked". And as I said in this case I'm
going to make the entire image 325
pixels tall.
Click scale. The result won't appear
too much different just smaller and
lower resolution.
You can hold the CTRL key and use
your mouse wheel to zoom back in on
the image.

Now I need to crop the image so that the width is 230 pixels.
From the menu click on the rectangle selection tool.
Then draw a
rectangle on
the image.
Grab the
corners of the
rectangle so
that the top and
bottom overlay
the top and
bottom edges
of the image
Next, on the left side of the screen type in the dimensions of the final
image.
Make sure that the drop down menu is set to pixels (px).
You can click in the center of the selection box and move it around
until everything is centered.
When you are happy with the results click "Image" and then
"crop to selection".
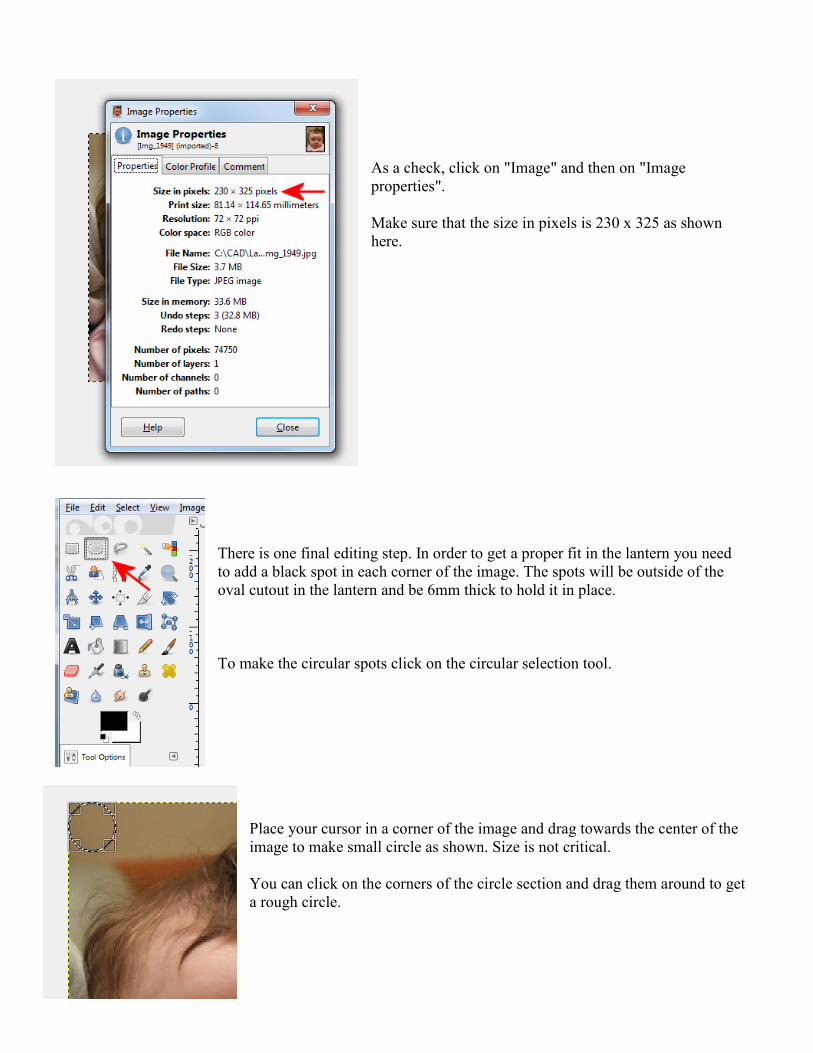
As a check, click on "Image" and then on "Image
properties".
Make sure that the size in pixels is 230 x 325 as shown
here.
There is one final editing step. In order to get a proper fit in the lantern you need
to add a black spot in each corner of the image. The spots will be outside of the
oval cutout in the lantern and be 6mm thick to hold it in place.
To make the circular spots click on the circular selection tool.
Place your cursor in a corner of the image and drag towards the center of the
image to make small circle as shown. Size is not critical.
You can click on the corners of the circle section and drag them around to get
a rough circle.

We are going to fill the circle with black using the fill tool. Go ahead and click
that. It looks like a bucket.
Make sure the foreground color is black (where the arrow is pointing. If not,
click on the upper color swatch and select pure black from the color palette
(all the color values will be zero).
Also make sure the settings in the tool options below the color swatch match
what I have shown.
When you are set, click in the center of the
circular selection to fill it with black.
Now repeat this process in all four corners of the image.
(Hard to see the one in the upper right corner.)

Now we need to "Export" the image.
Click on "File" and then "Export.."
Type in the image name you want to use then add the ".jpg"
extension to the name.
A dialog for JPG options will appear now.
You can crank up the quality to 100%
Now we actually create the STL file for the lithophane.
Start Cura.
Click "File" and then "Load Model File..."
Navigate to the place where you image was stored and select the JPG image you just created.
The following dialog box will appear.
Change the settings to the same as shown here.
You don't need to change the "Depth". It should come out just slightly
larger than 65mm.
NOTE: Entering text into the "Width" text box is a little weird in this
version. I found the easiest way to enter "46" was to enter the numbers
backwards, type "6" and then "4".

When everything is set,
click "OK" and the model
will be created.
The final step is to save the
STL file.
Click "File" and then save
your creation with the file
extension of ".stl".
Print your lithophane using natural (white) PLA. I used a
layer thickness of 0.15mm.
Infill should be set to 100%
The 6mm thickness also give the image an interesting
3D effect :-)
The lithophane should be mounted in the lantern with the
rough side facing outwards.

BONUS!
Use the above method to create a custom shape lithophane!
Load your image into Gimp
For this process to work there shouldn't be any areas that are too
white in the image or they will print very thin.
If there are areas that are too bright, you can use reduce the
brightness of the image a little clicking "Colors" and then
"Brightness - Contrast".
In this photo the white blouse isn't "pure" white, but in hindsight
I should have reduced the brightness of the image a little bit.
The result was still pretty good.
Use the circle or rectangle tool to draw a shape around your
subject. I'm going to create an oval shape.
Now from the Gimp menu, pick "Select" and then "Invert".
It will look the same but now you have selected the area on the
outside of the oval shape.
Click on the color swatch on the left side of Gimp and make sure
the "R" , "G", and "B" values are all set to "0".
Now use the fill tool (bucket symbol) to fill the outside of the
oval with pure black.

Now using the circle selection tool again, draw an oval a little
larger than the first oval.
Now once again pick "Select" and "Invert".
Click on the color swatch on the left side of Gimp and make sure
the "R" , "G", and "B" values are all set to "255" (pure white).
Now pick the fill tool and click outside of the oval to fill the outside
area with white.

Now lets add a hanger loop.
Pick the circle selection tool again and draw a circle at the tool
the overlaps the black oval slightly.
Change the color back to black again and fill the circle with
black.
Using the same process as above, draw a circle in the center
of the black circle and fill it with pure white.

And finally, with the rectangle selection tool draw around the
outside of the image.
Then select "Image" and then "Crop to selection" so that the
image is not larger than needed.
Now save your image using "File" and "Export".
Now load your image into Cura.
This time we are going to set the "Base" to "0mm"
Set your desired height. I used 4mm.
Set the width or depth to whatever you like but don't
make it too large because you may run out of memory
:-)

Click ok to create the new
model.
Now it looks like there is a
rectangular background on the
model.
However because it is so thin it
won't actually print.
Even if it does print, it will be
easy to remove.
Go ahead and use the "Save
Model" command to export
your lithophane.
Here is the printed result!