how to make bows, hair pins and more: 33 diy hair accessories
TRANSCRIPT


How to Make Bows, Hair Pins and More: 33 DIY Hair Accessories
Find great craft projects at www.FaveCrafts.com. 2
How to Make Bows, Hair Pins and More: 33 DIY Hair Accessories
Copyright 2013 by Prime Publishing LLC
All rights reserved. No part of this book may be reproduced or transmitted in any form or by
any means, electronic or mechanical, including photocopying, recording, or by any information
storage or retrieval system, without written permission from the publisher, except in the case
of brief quotations embodied in critical articles and reviews.
Trademarks are property of their respective holders. When used, trademarks are for the benefit
of the trademark owner only.
Published by Prime Publishing LLC, 3400 Dundee Road, Northbrook, IL 60062 – www.primecp.com
Free Craft Projects
Free Crochet Projects Free Knitting Projects Free Holiday Craft Projects
Free Sewing Projects Free Quilt Projects Free Jewelry Projects
Free Christmas Crafts Free Kids’ Craft Projects Free Crochet Afghan Patterns

How to Make Bows, Hair Pins and More: 33 DIY Hair Accessories
Find great craft projects at www.FaveCrafts.com. 3
Letter from the Editors
Hello, Readers!
Summer is a great time to add a little flair to your hair, and with this collection of 33 DIY Hair
Accessories, you’ll be able to create fun summertime headbands, barrettes, clips, and more that
are great for girls of all ages. Best of all, several of these projects can be made in an hour or
less…and oftentimes with materials that you probably have on hand already! So pull out that
junk drawer and get ready to turn all those little odds and ends into cute and fashionable hair
accessories that you can wear the whole year through!
You can find more craft projects, great activities for kids and decorating ideas at
www.FaveCrafts.com.
Our eBooks, like all of our craft projects, are absolutely FREE. Please feel free to share with
family and friends and ask them to sign up at our website for free newsletters from
FaveCrafts.com.
We hope you enjoy reading and creating!
Sincerely,
The Editors of FaveCrafts www.FaveCrafts.com www.FaveCraftsBlog.com

How to Make Bows, Hair Pins and More: 33 DIY Hair Accessories
Find great craft projects at www.FaveCrafts.com. 4
How to Make Bows, Hair Pins and More: 33 DIY Hair Accessories eBook
Table of Contents
Hair Bows ....................................... 5
Crochet Hair Bows ........................................ 5
No Sew Hair Bow .......................................... 6
Sweet Vintage Bow ...................................... 8
Sassy Hair Bow ........................................... 10
Curly Hair Bows .......................................... 12
Looped Ribbon Hair Bow ............................ 13
Back to School Hair Bows ........................... 14
Hair Pins ........................................16
Beaded Bobby Pins ..................................... 16
Easy Peasy Hairpins .................................... 17
Scrap Fabric Rosette Barrette ..................... 18
Easter Beaded Hair Clip .............................. 19
Glittered Snowflake Barrette ...................... 20
Hair Accessories with Buttons .................... 21
Fashion Hair Pins ........................................ 23
DIY Headbands .............................24
Burst Blossom Headband ........................... 24
Doily Stenciled Headbands ......................... 25
Flowers in Your Hair Band .......................... 28
Tee Shirt Braided Headbands ..................... 29
Thrifty Tee Shirt Headband ......................... 30
Look of Vintage Floral Headband ................ 31
Holographic Ribbon Headband ................... 32
Hats and Other Accessories ......... 33
How to Make Vintage Fascinator Hats ........ 33
Chain Headpiece ........................................ 35
Wool Roving Dreadlocks ............................. 36
Recycled Polka Dot Headpiece .................... 37
Kitty Clip-on Barrettes ................................ 39
Floral Hair Accessories ................ 41
Charming Hair Flower ................................. 41
Sunshine Daisy Headband .......................... 42
Ruffled Lace Flower Headband ................... 44
Oilcloth and Mesh Bow .............................. 45
Fabric Flower Hairbands ............................. 46
Flower Power Accessory ............................. 47
Scrap Fabric Rosette ................................... 49

How to Make Bows, Hair Pins and More: 33 DIY Hair Accessories
Find great craft projects at www.FaveCrafts.com. 5
Hair Bows
Crochet Hair Bows
By: Melissa for The Hob-bee Hive
These adorable Crochet Hair Bows are so easy to make that you can easily have one in all your favorite colors in a little under an hour. Great for beginners and advanced crocheters alike, these cute bows are great for dressing up your hair do. Attach them to hair clips or create a simple headband to show off your new bow!
Materials:
Yarn, in the colors of your choice Small crochet hook (anything smaller than a 6.5
sized hook should be fine)
Instructions:
1. For a smaller bow, chain 11. For a larger bow, chain 16.
2. Single crochet in second stitch from hook, and in each stitch following until the end (10, 15 single crochets). Turn.
3. Chain 1, single crochet in second stitch from hook and in each stitch following. Turn.
4. Repeat step three 4 more times, or more if you want a larger bow.
5. To assemble, fold bow in half hot dog wise and wrap yarn around the middle of the bow. Tie off to secure.
6. If you want to wear the bow in your hair, just wiggle a hair clip through the back of the wrapped part of the bow. I don’t glue mine to the barrette, but you can if you want. I like to switch out my bows to match my outfit, and using a strong barrette like this works great for my thick hair.

How to Make Bows, Hair Pins and More: 33 DIY Hair Accessories
Find great craft projects at www.FaveCrafts.com. 6
No Sew Hair Bow
By: Savannah Starr
No sew fabric projects are perfect for everyone from beginners to craft experts. Grab your favorite fabric and Aleene's Peel & Stick Sheets for this easy accessory. Wear your No Sew Hair Bow the next time you hit the town.
Materials:
Fabric (I recycled a cotton knit top) Aleene’s Fabric Fusion Peel & Stick Sheets Scissors Aleene’s Stiffen Quik Fabric Stiffening Spray Bobby pins (to put bow in hair)
Instructions:
1. This top got a lot of great wear but it was time for an upcycle! I cut it apart to create rectangles of fabric to the sizes that I wanted for this project.
2. For my bow, I started with a piece of fabric about 12″ x 8″. (You can enlarge or reduce the size depending on what size you want your finished bow.) Place fabric wrong side up on work table. Cut pieces of Aleene’s Fabric Fusion Peel & Stick Sheets to fit the inside of your bow fabric. Remove the liner paper and stick the glue side down on the fabric.
3. I like to use a craft stick to press around the edges of the Peel & Stick sheets. This helps to transfer the adhesive to the fabric.
4. Peel off the liner paper to expose the adhesive.
5. Fold in the sides of the fabric starting with the shorter sides first.
6. Then fold the other sides to the middle.

How to Make Bows, Hair Pins and More: 33 DIY Hair Accessories
Find great craft projects at www.FaveCrafts.com. 7
7. You should now have a piece that looks like this.
8. Cut a smaller rectangle for the center of your bow. Apply Aleene’s Fabric Fusion Peel & Stick Glue to the center.
9. Remove liner paper to reveal adhesive.
10. Fold to center along long edges to create fabric strip.
11. Squeeze bow fabric in center.
12. Wrap fabric strip around center of bow.
13. Add a small piece of Aleene’s Fabric Fusion Peel & Stick Sheet to end, remove liner, wrap around bow center overlapping until you have achieved desired look for center of bow.
14. If any of the end pieces are not even, tuck and re-fold them into the bow. If wanted, add a strip of glue to close the ends of the bow.
15. On fabric like this t-shirt knit that is really soft, I found that I wanted a little bit more body to my bow so I sprayed it with Aleene’s Stiffen Quik. Let dry completely. I use bobby pins to pin the bow underneath my messy bun!

How to Make Bows, Hair Pins and More: 33 DIY Hair Accessories
Find great craft projects at www.FaveCrafts.com. 8
Sweet Vintage Bow
By: Jamielyn Nye for I Heart Nap Time
Try making one of these Sweet Vintage Bow projects and you’ll soon have homemade baby hair bows in all colors of the rainbow! These vintage inspired felt bows are great no sew projects that are perfect for babies, teens, and even adults!
Materials:
Felt Hot Glue Scissors or rotary cutter Measuring tape Trim or lace
Instructions:
1. To start the felt bow, cut 2 pieces of felt (A) 1in x 6in and (B) 1in x 4in.
2. Take piece (A) and fold one edge into center and glue. This should measure 1 1/2 inches. Then take the other end and fold into center, bumping heads with the other edge.
3. Put a dab of glue in the center and pinch together. Hold for 10 seconds.
4. Cut a small piece of felt (C) 1/2in x 2in.
5. Put hot glue on piece B.
6. Lay piece A on top of B. Make sure you have enough glue on there to make it stick well.
7. Cut off the extra felt (into the curve) with your scissors.
8. Cut ends to a point.

How to Make Bows, Hair Pins and More: 33 DIY Hair Accessories
Find great craft projects at www.FaveCrafts.com. 9
9. To finish the felt bow take piece C and wrap around the center of the bow.
10. Glue the two ends on the back side.
11. Attach trim, lace, rhinestones to center (optional).
12. Attach elastic, pin or hair clip to the back of the felt bow if desired.
13. Enjoy your new felt bows! Felt comes in a variety of colors, so you can have one in every color!
14. Another fun way to dress them up is to sew or glue a ruffle on the back of the bow.
15. You can even get a little more creative and add some tulle!

How to Make Bows, Hair Pins and More: 33 DIY Hair Accessories
Find great craft projects at www.FaveCrafts.com. 10
Sassy Hair Bow
By: Sarah Forhan for Consumer Crafts
Are you looking for projects on how to make unique hair bows? Try making this Sassy Hair Bow from Consumer Crafts! It's always fun to make your own hair bows, because you can make them as fun and sassy as you are.
Materials:
Mini Bowdabra Bowdabra Bow Wire Hair Bow Tool & Ruler Assorted Ribbon Pink Boa Black Boa Darice Finishing Accents Hair Clip
Instructions:
1. Begin by placing the Hair Bow Tool & Ruler on top of the Mini Bowdabra. Then cut a piece of 18″ Bowdabra Bow Wire and fold it in half and place it into the Mini Bowdabra.
2. Following the instructional CD that comes with the Hair Bow Tool & Ruler follow the instructions to create a 5″ wide Basic Bow with tails, a 4″ wide Boutique Bow, and a small 3″ wide bow tie bow. Bowdabra’s instructional CD provides step-by-step instructions for making each of these bows along with a ribbon length chart to pre-cut your ribbon.
3. Scrunch the bow down with the Mini Bowdabra Wand.
4. While the bow is still in the Mini Bowdabra, thread the two loose ends of the Mini Bowdabra Bow Wire through the loop at the other end.
5. Pull the Bowdabra Bow Wire tightly while the bow is still in the Mini Bowdabra. Gently pull the bow out of the Mini Bowdabra.

How to Make Bows, Hair Pins and More: 33 DIY Hair Accessories
Find great craft projects at www.FaveCrafts.com. 11
6. Separate the two loose ends of the Bowdabra Bow Wire and bring them around to the back of the bow and knot. Fluff the bow.
7. Use the Mini Bowdabra and Hair Bow Tool & Ruler to create the bottom of this bow. Add large loops of pink boa, black boa, yarn, and lace.
8. Once complete scrunch the bow and tie the Bowdabra Bow Wire. Trim away excess wire. Next, tie the top bow to the bottom bow using the Bowdabra Bow Wire from the first bow. Once tied twist the top bow several times to join the two bows tightly. Line an alligator clip with ribbon and use the remaining Bowdabra Bow Wire to attach the bow to the clip. Trim away excess ribbon.
9. Your funky hair bow is complete and ready to be worn!

How to Make Bows, Hair Pins and More: 33 DIY Hair Accessories
Find great craft projects at www.FaveCrafts.com. 12
Curly Hair Bows
By: Beth Madland for Caron Yarn
Crochet some bright and curly hair bows to tie around a ponytail. These beginner crochet bows can also be made into bookmarks or key chains. Materials:
Yarn: Caron International's Simply Soft Brites 1 skein color of your choice
Crochet hook size G (4.0 mm)
Instructions:
1. Crochet chain 14 stitches.
2. Working in the top loop of each chain work 6 double crochets in the fourth chain from the hook.
3. Work 7 double crochets in each remaining chain (there should be ten more chains left.) Keep your hook in the final loop. You should have a nice curlicue shape.
4. With the crochet hook in a loop at the top of the curlicue, chain 30 more stitches.
5. Now you are going to create another curlicue. Work 6 double crochets in the fourth chain from the hook.
6. Work 7 double crochets in the next 10 chain stitches. There should be about 15 chain stitches in between the curlicues. Use this area to tie around a pony tail.
7. Cut the yarn off, pull the yarn through the final yarn loop and finish the project by weaving the loose string through the curlicue.

How to Make Bows, Hair Pins and More: 33 DIY Hair Accessories
Find great craft projects at www.FaveCrafts.com. 13
Looped Ribbon Hair Bow
By: Glue Dots
No little girl's hairdo is complete without a cute hair bow! This looped ribbon hair bow is adorable and easy to make, and you can use your child's favorite colors or festive holiday ribbon! These hair bows to make are so simple.
Materials:
Glue Dots® Glue Lines 22” of 5/8” wide purple satin 22” of 5/8” wide gray satin 22” of 3/8” black grosgrain with white stitch 22” of 3/8” orange grosgrain with red stitch 2” French Clip Bowdabra Bow Wire
Instructions:
1. Begin by cutting 4 strands of ribbon of 22” long ribbon.
2. Attach the Glue Dots® Glue Lines to the center of the grosgrain ribbon.Press the satin and the grosgrain ribbons together to create your own unique style ribbon.Create two strands of unique ribbon.
3. Attach the ribbon strands to a large French clip. The French clip is the easiest to work with if you remove the centerpiece and place it to the side.
4. Dovetail and seal the ends of the two strands. Attach the end to the French clip using Bowdabra Bow Wire.
5. Create loops with the two strands. Once the two loops are formed wrap the wire once around the ribbon and the clip. Continue forming strands and crisscrossing the ribbon.
6. Create loops until you reach the end of the clip. Remember after each set of loops is formed to wrap the Bowdabra Bow Wire around the ribbon and the clip.
7. When you reach the end knot the wire and dovetail and seal the ends.Trim away excess wire and re-insert the metal centerpiece of the French clip.
8. Your unique fall hair bow with custom ribbons is complete.

How to Make Bows, Hair Pins and More: 33 DIY Hair Accessories
Find great craft projects at www.FaveCrafts.com. 14
Back to School Hair Bows
By: Sarah Forhan for Consumer Crafts
Learn how to make hair bows using just a Bowdabra and a ruler! Make Back to School Hair Bows in every color of the rainbow for a sweet addition to every outfit. A snap clip wrapped in ribbon makes these hair bows easy to fasten and gentle on hair. Materials:
Glue gun 3/8" wide grosgrain ribbon 2 snap clips Bowdabra Hair Bow Tool & Ruler and interactive CD 7/8" wide grosgrain ribbon Mini Bowdabra Bowdabra Bow Wire
Instructions:
1. First begin by hot gluing the 3/8″ wide ribbon to the end of the snap clip. Place the ribbon onto the top of the snap clip and hot glue it in place.
2. Wrap the ribbon tightly around one side of the snap clip. Hot glue the ribbon onto the clip to hold it in place.
3. Next, wrap the ribbon around the point of the snap clip, hot glue and pinch the ribbon together. Bring the ribbon around to the other side.
4. Wrap the other side of the snap clip tightly and hot glue the ribbon end. Make two matching snap clips.
5. Using the Hair Bow Tool and Ruler’s interactive CD follow the simple instructions to make a Quad Pinwheel Bow using 7/8″ wide Grosgrain Ribbon and add a small Boutique Bow using the same 3/8′ wide ribbon that you lined the snap clips with.

How to Make Bows, Hair Pins and More: 33 DIY Hair Accessories
Find great craft projects at www.FaveCrafts.com. 15
6. Make two matching bows using the Mini Bowdabra, Hair Bow Tool and Ruler, and Bowdabra Bow Wire.
7. Trim away extra Bowdabra Bow Wire, hot glue a finishing ribbon onto the bows, and then hot glue the bows onto the metal ends of the lined snap clips.
8. Make several bows using different colored ribbon to match your daughter’s outfits.

How to Make Bows, Hair Pins and More: 33 DIY Hair Accessories
Find great craft projects at www.FaveCrafts.com. 16
Hair Pins
Beaded Bobby Pins
By: Tamara from Etcetorize
Add some sparkle to your hair do with these Beaded Bobby Pins. Made with small beads, wire, and some simple hair pins, these hair accessories are easy and fun to make for girls of all ages. They also make great gifts and are fun to do with a group of friends!
Materials:
Wire cutters Straight nose pliers Beads Bobby pins Wire
Instructions:
1. Using your wire cutters, cut a piece of wire around 8"-9" (20-23 cm). This isn't exact because it depends on the length of your bobby pin and the size of beads that you're using. A good estimate to use is about 3 times the length of your pin.
2. Wrap the end around the rounded end of the bobby pin a few times and squeeze it down with your straight nose pliers. Make sure the wire isn't sticking towards the inside of the pin or it will catch on your hair.
3. Start adding your beads. As you add beads wrap the wire around the pin, leaving the underside free of beads.
4. Just keep adding and wrapping until you get to the bottom of your pin.
5. At the end just wrap the wire around itself 3 to 4 times and once again squeezing the end down with your fingers or straight nose pliers.
6. And that, my friends, is that! So easy...but so pretty!

How to Make Bows, Hair Pins and More: 33 DIY Hair Accessories
Find great craft projects at www.FaveCrafts.com. 17
Easy Peasy Hairpins
By: Cheri Heaton for I Love to Create
These Easy Peasy Hairpins are similar to the fashionable hair accessories for women sold in Anthropologie stores...but much less expensive! These easy DIY cheap hair accessories can be made with ease! And no one will know the difference!
Materials:
Hairpins and clips (you can find these at craft stores, like Hobby Lobby)
Vintage earrings Aleen's SUPER Gel Adhesive Wire cutters
Instructions:
1. I used some wire cutters to snap off the back of the earrings.
2. We brushed on some adhesive and added the earrings.
3. You only have to hold the pin to the earring for a minute or two until it's really on there and dry.
4. Buttons also work well for this project. You just have to use ones that don't have a loop on the back.

How to Make Bows, Hair Pins and More: 33 DIY Hair Accessories
Find great craft projects at www.FaveCrafts.com. 18
Scrap Fabric Rosette Barrette
By: Haley Pierson-Cox for The Zen of Making
Making fabric flowers is a cinch with this tutorial. Make these Scrap Fabric Rosette Barrettes as a cute hair accessory that also uses up scraps of fabric.
Materials:
Fabric strips Felt scraps Barrettes or hair clips Thread Hot glue gun Fabric scissors Sewing needle
Instructions:
1. Cut fabric scraps into strips. You can adjust the size of your rosette by changing the length and width of the strips.
2. Roll fabric strips into rosettes. Fold the fabric strip in half horizontally. Fold one end over several times, creating the center. Holding on to these folds, begin wrapping the fabric around the center (the fabric will build on itself). To create the rose petal texture, twist the fabric as you wrap. When you reach the end of the fabric strip, place a dot of hot glue on the back, then fold the fabric end over and press into place.
3. Cut circles out of felt. (Make them just large enough for your rosettes to fit.)
4. Glue rosettes to the felt using your hot glue gun.
5. Cut off any extra felt.
6. With your needle and thread, secure the rosette group to the hair clip. Make sure that your first stitch goes through the felt so it stays securely in place.
7. Tie off the thread, and it's ready to wear!

How to Make Bows, Hair Pins and More: 33 DIY Hair Accessories
Find great craft projects at www.FaveCrafts.com. 19
Easter Beaded Hair Clip
By: Misha Lengling for Rings and Things
Create a colorful beaded hair clip with ladybugs and flowers, perfect for Easter and throughout spring. The delicate glass beads are sewn to a piece of fabric before adorning the hair clip for an easier Easter beaded jewelry project. Materials:
1 rectangular alligator hair clip 11 Toho® Japanese glass seed beads, crystal 2 Czech glass ladybug beads, red 30 5.5mm glass flower spacer beads, assorted colors 5ft Kreinik™ very fine #4 braid thread, blue zircon Fabric scissors Jewel Bond adhesive big-eye needle Super glue
Instructions:
1. Cut a 1' long piece of Kreinik cord, thread your needle and tie a knot at one end.
2. Cut a small piece of fabric, roughly 3½"x 1½".
3. Center the alligator clip on the fabric, draw an outline on the cloth and fold edges along outline.
4. Using the big-eye needle, sew from the bottom side to the top side of the fabric, stitching the folded sides together. NOTE: Instead of sewing, you can glue the folded sides using an adhesive like Jewel Bond.
5. Attach flower and ladybug beads to the fabric, one at a time, sewing from underside of fabric to top. When using center-drilled beads (like the flower beads), first thread the bead, then add a seed bead and go back through the larger bead until the seed bead rests at the center of the flower bead. The seed bead functions as a flower piston.
6. Repeat until desired effect is achieved or until entire fabric is covered with beads.
7. Glue fabric to the alligator clip using super glue.

How to Make Bows, Hair Pins and More: 33 DIY Hair Accessories
Find great craft projects at www.FaveCrafts.com. 20
Glittered Snowflake Barrette
By: Savannah Starr for FaveCrafts.com
Add some glitz and glamor to your winter accessories with this fun and sassy Glittered Snowflake Barrette. By layering snowflake designs, you can create your own unique snowflake that looks beautiful sitting softly in your hair! If you have smaller snowflakes, you could use the same technique to create fun earrings and necklaces for you and your friends.
Materials:
Aleene's Fast Grab Tacky Spray Aleene's Spray Acrylic - Gloss Tulip Fashion Glitter - dark blue, light blue or colors of your choice Glove Newspapers or box lid (for spraying glue onto buttons) Paper plates (for collecting glitter) Glitter snowflake ornaments Snowflake buttons Pearl bead E-6000 Glue Clothespins Barrette
Instructions:
1. To glitter your buttons, working in a well ventilated area, spray one side of buttons with Fast Grab Tacky Spray. Sprinkle with glitter. Shake off excess. Let dry. If desired, repeat glittering on other side of buttons.
2. Spray glittered pieces with Gloss. Let dry. This will help to keep the glitter from falling off when you wear your barrette.
3. If needed, cut hanger from snowflake ornament. Apply E-6000 Glue to back of barrette. Glue to back of ornament, holding in place with clothespins while the glue dries.
4. Continue to glue glitter snowflakes on top of ornament and finish by gluing pearl on top.
5. Keeping the clothespins in place, suspend the barrette over the top of a jar to hold it flat and does not wobble while all the glue dries.

How to Make Bows, Hair Pins and More: 33 DIY Hair Accessories
Find great craft projects at www.FaveCrafts.com. 21
Hair Accessories with Buttons
By: Blumenthal Lansing Co.
Show your fashion side with your stylish hair. Create your own hair accessories using buttons. You can make your own headband and barrette.
Materials:
Headband
1/4" wide elastic headbands, 3 bands Favoite Findings Ocean #434, 1 bag Confetti button #3203, 1 card Glass e-beads, turquoise Needle and thread to match Scissors
Button Barrette
4" metal barrette Glass e-beads, turquoise Favoite Findings Citrus #426, 1 bag Confetti button #3220, 1 card Ribbon scrap 22 gauge wire Scissors Wire cutter Needle nose pliers Ruler Glue
Instructions:
Headband
1. Center Confetti button on one headband and stitch in place with needle and thread with an e-bead in center of button. Stitch in place, and carefully knot on back.
2. Stitch 4 stacks of 2 or 3 smaller buttons - also with beads at the center of either side of the large button as above. Alternate button colors and stacks. Repeat with 4 stacks on the other side of the large button.

How to Make Bows, Hair Pins and More: 33 DIY Hair Accessories
Find great craft projects at www.FaveCrafts.com. 22
3. On a second headband, stitch 5 stacks of smaller buttons as before. Repeat with 5 stacks on a third headband.
Barrette
1. Glue a small piece of coordinating ribbon to top of barrette.
2. Cut 9 pieces of wire 6" long. Thread the wire up through one hole of a Confetti button, two smaller stacked buttons, then through a bead. Thread the wire down through the buttons to the back. Even out both ends of the wire and twist at the back of the button to secure.
3. Repeat step 2 on each 8 sets of smaller stacked buttons alternating colors.
4. Wrap the wire ends of large button stack around the barrette in the center, and twist the wire ends together under the button. Cut the twisted wires to about a half inch, and curl the ends up under the button with the pliers.
5. Repeat step 4 with the small button stacks, arranging 4 stacks on either side of the center button to cover the barrette.

How to Make Bows, Hair Pins and More: 33 DIY Hair Accessories
Find great craft projects at www.FaveCrafts.com. 23
Fashion Hair Pins
By: Anna Smith
These adorable hair pins are the perfect stand in for the pricey ones seen in upscale department stores. They’re super easy, quick and inexpensive to make. You can coordinate them with your (or your little one’s) wardrobe, and a set makes a fabulous gift!
Materials:
Hot glue gun & glue Needle nose pliars Bobbi Pins with Pads Decorative Brads
Instructions:
1. Plug in the glue gun to heat the glue.
2. Meanwhile, select the brad you will use on your hair pin.
3. Bend the metal tacks on the back of the brads to flatten them.
4. Place some hot glue on the bobbi pin pad.
5. Place the flattened brad onto the hot glue and add a little pressure to hold secure. Let dry. That’s it!
How to Make Bows, Hair Pins and More: 33 DIY Hair Accessories
Find great craft projects at www.FaveCrafts.com. 24
DIY Headbands
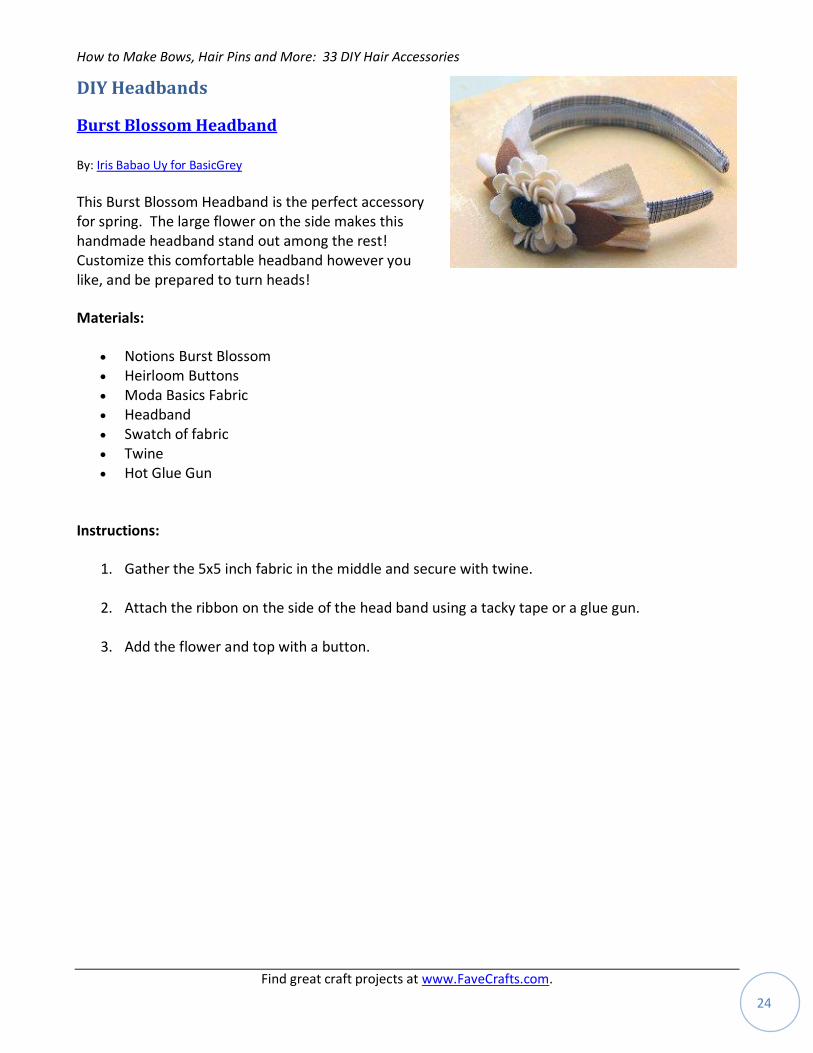
Burst Blossom Headband
By: Iris Babao Uy for BasicGrey
This Burst Blossom Headband is the perfect accessory for spring. The large flower on the side makes this handmade headband stand out among the rest! Customize this comfortable headband however you like, and be prepared to turn heads!
Materials:
Notions Burst Blossom Heirloom Buttons Moda Basics Fabric Headband Swatch of fabric Twine Hot Glue Gun
Instructions:
1. Gather the 5x5 inch fabric in the middle and secure with twine.
2. Attach the ribbon on the side of the head band using a tacky tape or a glue gun.
3. Add the flower and top with a button.

How to Make Bows, Hair Pins and More: 33 DIY Hair Accessories
Find great craft projects at www.FaveCrafts.com. 25
Doily Stenciled Headbands
By: Gloria Uhler for Domestic Diva
Use a simple doily to create a beautiful pattern on a regular satin headband. These Doily Stenciled Headbands are great gifts for young girls and a sure fire way to add a little pop of color to your favorite outfit. The cute colored flowers are so easy to make and can also be used to jazz up purses, scarves, jackets, and much more.
Materials:
Aztek airbrush Grape Purple paint Orange paint White paint Plain white satin headband Organza fabric - approximately 5” x 45” Fast Finish Decoupage Fabri-Tac glue Wide brush Scissors Rotary Cutter with decorative edge wave blade Scotch tape Craft sticks Painters tape Decorative button Wire cutters Small piece of felt or fleece Repositionable stencil adhesive Rectangular paper doily For Purple Headband - Sheer white ribbon 3/8” x 36” Freezer paper
Instructions:
1. Decoupage is used in this project to change the texture of the delicate fabric, giving the flowers on each headband body and preventing their edges from fraying. Applying the decoupage is easy work if you first bond the fabric to freezer paper. Do this by ironing the shiny side of the paper to the wrong side of the fabric. This only takes seconds.

How to Make Bows, Hair Pins and More: 33 DIY Hair Accessories
Find great craft projects at www.FaveCrafts.com. 26
2. After bonding, pour some decoupage in a shallow container and use a wide brush to apply it evenly to the fabric. Let it dry completely.
3. Using a rotary cutter with a decorative wave blade, cut seven 3” squares from the bonded fabric by tracing a Post-it note. Cut an eighth square slightly smaller than the others.
4. Spray four of the large squares and the smaller one, applying purple paint more heavily on the outer edges and fading to no paint in the centers.
5. When the painted squares are dry, remove the fabric from the freezer paper by attaching a piece of tape to one of the fabric corners and pulling. Also remove the paper from the unpainted fabric squares.
6. Spray paint the sheer ribbon purple. Set aside while you create the flower.
7. Fold all squares in half twice and cut along the folds to within 1/8” of the center. This will create the four petals of each flower section. Make several ¼” deep cuts close together on some of the wavy edges.
8. Lay all petals flat and apply a thin line of Fabri-Tac to one side of each near the center.
9. Fold the center edges of the petal together until they hold.
10. Repeat on all four petals of each flower section.
11. Cut a piece of felt into a small square measuring about ½”. Using the glue, attach the center of a large painted flower section to the center of the felt. Add three more sections with centers facing each other. Attach the unpainted flower sections on top of the painted ones in the same way.
12. Finish assembling the flowers by centering the smaller painted section over the others. Apply pressure in the center with a craft stick to adhere all layers.
13. Cut the shank from the back of a decorative button with wire cutters. Glue the button to the center of the flower.
14. Glue one end of the painted ribbon to the inside of the headband and wind it around the band leaving ½” between each wrap. Glue the opposite end of the ribbon to the inside of the band.

How to Make Bows, Hair Pins and More: 33 DIY Hair Accessories
Find great craft projects at www.FaveCrafts.com. 27
15. Mix white paint with orange to achieve the shade you like.
16. Cut a corner from a rectangular paper doily large enough to cover a three-inch square. Spray stencil adhesive to the right side of the doily.
17. Glue the felt base flower to the side of headband.
18. Press the doily piece on top of a fabric square with three corners matching. Spray with orange paint. Repeat with all squares. When the squares are dry, remove the fabric from the freezer paper.
19. Fold all squares in half twice and cut along the folds to within 1/8” of the center. This will create the four petals of each flower section.
20. Apply a small line of Fabri-Tac to one side of each petal near the center. Fold the edges of the petal together until they hold. Repeat on all four petals of each flower section. Cut a piece of felt into a small square measuring about ½”. Using the glue, attach four large flower sections to the middle of the felt with centers facing each other. Attach four more on top.
21. Finish assembling the flowers by centering the smaller painted section over the others. Apply pressure in the center with a craft stick to adhere all layers.
22. Spray the front of one lacy edge of the doily with stencil adhesive. Place the sticky side against the headband with the center of the doily and center of the headband matching. Use painters tape to hold in position if necessary.
23. Cut away excess doily and cover the headband completely with the decorative paper. Mask off the under side of the band with painters tape which will also help to hold the doily strip in place. Spray the doily with orange paint.
24. When the paint is dry, remove the tape and doily and glue the felt flower base to the side of the headband.
25. Cut the shank from the back of a decorative button and glue it with the cut side down into the center of the flower.

How to Make Bows, Hair Pins and More: 33 DIY Hair Accessories
Find great craft projects at www.FaveCrafts.com. 28
Flowers in Your Hair Band
By: Sharon for Sharon Sews
Whether you're going to San Francisco or grocery shopping, this Flowers in Your Hair Band is just the thing to complete your look. This artsy flower headband is easy to make and to wear...and looks great with short and long hair!
Materials:
A purchased applique Felt Headband Hot glue gun
Instructions:
1. Determine where you want the applique to be on the headband. Take note of how much of the applique will be attached to the headband.
2. Cut a shaped piece of felt to match the part of the applique that will be attached to the headband. Hot glue the felt to the back of the applique.
3. Hot glue to one side of the headband.
4. Cut a piece of felt 1" wide and 2" shorter than the shaped piece of felt. Hot glue to the back of the headband. The headband will be sandwiched between the applique and this strip of felt.

How to Make Bows, Hair Pins and More: 33 DIY Hair Accessories
Find great craft projects at www.FaveCrafts.com. 29
Tee Shirt Braided Headbands
By: Latrice Murphy
These Tee Shirt Braided Head Bands are a great way to use up old tee shirts. Perfect for kids and adults alike, these hair accessories are easy to make and a fun way to add some color to your outfit. Mix and match designs and colors so you always have something fun to wear, no matter what the season!
Materials:
New or old t-shirts Hot glue gun Flower embellishments (crochet, fabric or buttons) Hard plastic headbands Scissors
Instructions:
1. Cut your t-shirt into strips and stretch to get them to roll up a bit.
2. Using 6 strands of t-shirt braid either loose or tight depending on the stretchy-ness you would like.
3. If attaching to a headband you’ll wrap the ends with an extra piece of t-shirt to cover the bottom of the cut off braid.
4. If making a stretchy headband you can also use an extra piece of t-shirt to cover your overlapped seam. You can cover it with a flower or button.
5. Mix and match colors for a fun look and try different thicknesses.

How to Make Bows, Hair Pins and More: 33 DIY Hair Accessories
Find great craft projects at www.FaveCrafts.com. 30
Thrifty Tee Shirt Headband
By: Amanda Formaro for FaveCrafts.com
You or your little girl can wear this Thrifty Tee Shirt Headband. Old tee shirt crafts like this are great for those special tees that mean so much, but that you'll never wear again. Now you can simply wear them differently! T-shirt crafts like this are easy, fun, and great for girls to do together or with their mom.
Materials:
Recycled T-shirts Plain headband Hot glue gun Scissors
Instructions:
1. Cut t-shirt into long strips about 3/4" wide.
2. Glue the end of a strip to the inside end of the headband, about an inch up the band. Fold strip around the band end and glue to the outside as well, this will tack it in place.
3. Gluing as you go, tightly wrap the strip around the headband. If you run out of shirt-strip before finishing, simply tack the end of the first strip in place and begin with another until the headband is completely covered.
4. Rubber band or tie three strips together then braid them. Glue the braid to the top of the head band. Carefully trim the ends and glue in place.

How to Make Bows, Hair Pins and More: 33 DIY Hair Accessories
Find great craft projects at www.FaveCrafts.com. 31
Look of Vintage Floral Headband
By: Linda Peterson
Add a touch of class to your wardrobe with a homemade Look of Vintage Floral Headband. You can never go wrong with wearable crafts. Ideas for sprucing up your wardrobe have never been this cute! Wear one throughout spring and summer.
Materials:
Aleene’s Original Tacky Glue Cheese cloth – dyed to color of choice Headband Torn strips of muslin – dyed to color of choice Eyelash trim or trim of choice Miscellaneous beads and embellishments Scissors Bow
Instructions:
1. Mix 3 parts water to 1 part Original Aleene’s Tacky Glue. You can adjust the stiffness by the amount of water you add to the glue. Dip cheese cloth into glue mixture and squeeze out as much liquid as possible.
2. Lay onto a non-stick sheet and arrange cheese cloth to look like a leaf. Allow to dry.
3. While the leaf is drying, coil strips of torn muslin and glue to form a vintage rose.
4. Glue pearl beads to center of flower.
5. Glue rose to eyelash trim. Attach stiffened leaves to flower where desired with glue. Glue rose to headband. Allow glue to dry.

How to Make Bows, Hair Pins and More: 33 DIY Hair Accessories
Find great craft projects at www.FaveCrafts.com. 32
Holographic Ribbon Headband
By: Kreinik
Add a bit of sparkle to a store-bought headband with holographic ribbon. You can weave the holographic ribbon through an open design or wrap the ribbon around the headband.
Materials:
Headband Kreinik 1/8" Ribbon in holographic colors Large-eye needle
Instructions:
1. This headband came from a discount store with the green ribbon already attached. We simply threaded our needle with the 1/8" Ribbon, and tied one end into a knot. Starting at one end, work that knot into the backside of the green ribbon, bring your needle up to the top, and begin weaving it in and out of the suede ribbon.
2. End by securing your thread and tucking the end under the green ribbon.
3. Kreinik Treasure Tape (double-sided tape) is your best friend in many craft projects. Use it here to wrap extra ribbon on the ends to hide the pointed ends (raw edges) of your headband embellishment.
4. If you buy a plain plastic headband and embroider a strip of ribbon or fabric, the easiest way to secure that embellished fabric to the headband is with Treasure Tape. Buy 1/4" or 1/2" tape to match the thickness of your headband.

How to Make Bows, Hair Pins and More: 33 DIY Hair Accessories
Find great craft projects at www.FaveCrafts.com. 33
Hats and Other Hair Accessories
How to Make Vintage Fascinator Hats
By: Maureen Wilson for FaveCrafts.com
Fascinator Hats have become all the rage in Hollywood, and now you can learn to make one for all your party going needs! With this How to Make Vintage Fascinator Hats tutorial, you'll learn how to embellish a Fascinator hat of your very own. These hats are great to wear to parties, weddings, balls, and even for Halloween.
Materials:
Felt Netting or tulle Interfacing (med weight) Trims Pipe cleaners Feathers Hot glue gun
Supply Tips:
You’ll need felt. You can make do with the 8 x 10 sheets you buy at the craft store, but I prefer felt off the bolt because it tends to be a little stiffer.
You’ll also need netting. I prefer the coarser netting with larger holes, but it doesn’t matter too much.
You’ll need trim. Rhinestones, pearl strands, or sequins will work. Feathers are fun too. (I buy my feathers at Sportsman’s Warehouse, in the fly fishing section.)
Finally, you’ll need some medium-weight interfacing. This is sold in the sewing section on a bolt and is very inexpensive. It will stiffen your fabric and keep the pipe cleaners’ outline from showing beneath the hat.
Instructions:
1. Begin by hot gluing a piece of interfacing to a piece of felt. You want the surface to be smooth, not lumpy, so hold the tip of the glue gun directly to the interfacing and spread the glue thinly. Adhere together.
2. Draw your hat shape on the interfacing. For this hat, I’m doing a half-sun shape. So I’m tracing half of a small plate, then tracing the corners of a square scrap to make pointed ray shapes.

How to Make Bows, Hair Pins and More: 33 DIY Hair Accessories
Find great craft projects at www.FaveCrafts.com. 34
Cut out your shape and make sure that the interfacing and felt are adhered well.
3. Next add your trim. Trace the outline of your shape with trim.
4. Now comes the netting. Fold the netting in half so it’s of double thickness. Round off the corners to make a large circle shape. For this fascinator, I’m folding the circle in half and pulling the straight edge together, like a fortune cookie. Adhere to the center of the hat.
5. I’m making a little bow from velvet ribbon and adhering that over the spot where I glued the netting.
6. Next glue pipe cleaners to the underside of the hat, following the outline of the shape. This will make the hat stiff but flexible, so you can bend it to the curve of your head for a flattering fit.
7. You can use a blowdryer to get rid of any visible hot glue strands. Add some feathers if you’d like.
8. This second hat will be a simple circle shape.
9. Follow the steps of gluing the interfacing, tracing, and cutting out.
10. Again, cut out a double-layered circle from netting. This time, pinch the circle in the middle, and adhere to the center of the hat.
11. Add trim around the edge of the hat, and a little in the center over the netting.
12. Add pipe cleaners to the back and feathers if you’d like.
13. For the last fascinator, I cut out a rounded rectangle and added rows of pearls.
14. To wear, bend the fascinator gently so that it fits the curve of your head. Secure with small bobby pins.

How to Make Bows, Hair Pins and More: 33 DIY Hair Accessories
Find great craft projects at www.FaveCrafts.com. 35
Chain Headpiece
By: Savannah Starr for FaveCrafts.com
This funky Chain Headpiece is easy to make and a great way to accent a Halloween costume! Use this headdress to add flair to a flapper outfit or hippie costume. It's easy to make and a cheap way to create something you could use for years!
Materials:
Chain necklace (I found mine at Forever 21) Wire cutters Jump rings Jewelry pliers (flat nose to open and close jump rings) Optional: rhinestones by the yard
Instructions:
1. To determine placement for cutting lengths, put necklace onto head and position where comfortable/desired. Giving yourself plenty of clearance so that the cut chains do not reach your eyes, mark cutting points.
2. Remove necklace from head and place on work surface. Cut off chains to desired lengths according to measurements that you marked. Before you cut too many, place back on head to determine if cuts are correct. Save the excess chain that you are cutting off.
3. Vary the lengths slightly for a nice look.
4. Using jump rings and pliers, add the cut pieces back to the necklace to add more volume to the front area - what I now call the chain bangs.
5. If desired, add additional bead drops or rhinestones by the yard to bling out your new headpiece.

How to Make Bows, Hair Pins and More: 33 DIY Hair Accessories
Find great craft projects at www.FaveCrafts.com. 36
Wool Roving Dreadlocks
By: Maria Nerius
Dreadlocks are a fun way to cure a bad hair day without making it a permanent situation! Use your imagination for this hair craft and try making these Wool Roving Dreadlocks out of all kinds of wool roving!
Materials:
Wool roving Liquid soap (do not use antibacterial soaps) Hot water Sink with running water Hair findings of your choice (ponytail bands,
bobby pins, etc) Ruler Scissor Towel
Instructions:
1. Decide on your hair finding. You are going to create the dreadlock on the item, then you’ll have an easy way to attach it to your hair. You can do a single dreadlock on a bobby pin or multiply dreadlocks on a pony or pigtail band. You’ll attach with a larks head knot before felting.
2. Decide on long you want the dreadlock to be. Pull, measure, and cute roving to length (the roving will probably lengthen as you work it so cut this measurement a little short of your goal length. And remember if you are going to be folding the length at center onto the hair finding (larks head knot) you should do this now.
3. Add liquid soap to hot water. Add around 2 T per gallon of water. Place the length of roving into the hot water to soak, you do want it saturated. Once completely wet, pick up one end of the roving and start to rub and agitate the wool roving into a tip. If you’ve attached to a hair finding you’ll do one end at a time.
4. Place the roving onto your towel. Keep rolling, rubbing, and making the fibers move and bond. Once the dreadlock is shaped and firm as you like, rinse in clean water. Allow to dry.
5. Attach dreadlock to your choice of hair finding.

How to Make Bows, Hair Pins and More: 33 DIY Hair Accessories
Find great craft projects at www.FaveCrafts.com. 37
Recycled Polka Dot Headpiece
By: Savannah Starr
Channel your inner goddess and create a Recycled Polka Dot Headpiece! This creative accessory can be created using cardboard from a cereal box. Recycled craft ideas have never looked so stylish and funky!
Materials:
Aleene’s Original Tacky Glue Cardboard (I used a cereal box) Hole punch – 1″ circle (or design of your choice), small punch (for jumprings) Pencil with eraser Acrylic paint – black Paint brush Paper plate Glitter – black (or color of your choice) Rhinestones Jewelry findings: jump rings, jewelry chain, fishhook earring findings Jewelry pliers
Instructions:
1. Punch circles from cardboard. You will need two circles for each pendant.
2. Punch small hole into top of circles. Be sure to line the circles up and punch in the same spot.
3. To add dimension to circles, place one at a time in the palm of your hand. Press in the center of the circle with your thumb.
4. I also like to use the eraser end of a pencil to press along the outside edge which gives more dimension, too.
5. Paint each circle black. Let dry. Brush glue over painted side.
6. Place on plate and sprinkle with glitter. Shake off excess. Let dry.

How to Make Bows, Hair Pins and More: 33 DIY Hair Accessories
Find great craft projects at www.FaveCrafts.com. 38
7. Glue two glittered circles together lining up the punched holes.
8. Glue rhinestones in place. Let dry. Insert jump rings through holes. To create headpiece, attach jump ring to chain. To create earrings, attach fishhook earring findings. For my headpiece, I also created smaller glittered pendants to hang on my headpiece chain. To wear the headpiece, use bobby pins to pin into hear.

How to Make Bows, Hair Pins and More: 33 DIY Hair Accessories
Find great craft projects at www.FaveCrafts.com. 39
Kitty Clip-on Barrettes
By: Megan Nicolay
These cute Kitty Clip-on Barrettes are purrfect for Halloween and children's birthday parties! You can make them any color and even add sparkles. It's fast, fun, and easy to decorate these delightful barrettes.
Materials:
Pen or pencil Scrap of paper Colorful felt All-purpose scissors Fabric scissors Metal snap barrettes Aleene's Fabric Fusion fabric glue Tulip Fashion Glitter Shimmer Transfer Sheets Pressing cloth Iron
Instructions:
1. Use the pen and paper to sketch out a slightly rounded triangle, about 2" high. Add 1/2" at the base of the triangle and then mirror the shape below it to create the template. Cut it out with the all-purpose scissors. (You can also fold the paper at the base after you've drawn the top triangle and the extended base, and cut around the shape through both layers.)
2. Fold over the felt and lay the template on top of the folded section. Use the fabric scissors to cut around the template, through both layers
3. Mark and cut a second template, in the shape of a rounded triangle, about 1/4" smaller on all sides than the original triangle in Step 1.

How to Make Bows, Hair Pins and More: 33 DIY Hair Accessories
Find great craft projects at www.FaveCrafts.com. 40
4. Select a color from the iron-on glitter sheets and trace the second template twice onto the shiny surface. Use the all-purpose scissors to cut them out. Peel away the shiny surface layer and arrange them on the felt ear pieces. Lay a pressing cloth over the ears, and press firmly with the iron for about 40 seconds. (Repeat if necessary to set the glitter transfer.)
5. Clip the metal barrettes in the center, on each side of each felt ear piece, so that the top of the barrette corresponds to the wrong side of the ear piece and vice versa. Generously apply fabric glue around the edge of the wrong side of the ear piece. (Felt absorbs a lot of the glue, so don't hold back!)
6. Fold the ear piece around the top of the barrette to seal the glue, and repeat on the second barrette.
7. Let dry. Optional: Clip the layers together with extra barrette clips while the glue dries!
8. Quick! Try them on before the actual cat who's been helping you craft gets a little too interested and starts batting them off your workspace

How to Make Bows, Hair Pins and More: 33 DIY Hair Accessories
Find great craft projects at www.FaveCrafts.com. 41
Floral Hair Accessories
Charming Hair Flower
By: Doris Sander for Jenni Bowlin Studios
Make flowers from fabric with this charming hair flower project. This adorable bloom makes a great hair accessory for a little girl!
Materials:
Fabric scraps Thread Needle Scissors JBS Charms
Instructions:
1. I used leftover fabric bits--the teeniest tiniest bits in my stash. They were all about one inch wide by 4 to 10 inches long. I didn't have enough of any one print, so I pulled several pieces of the same color but different prints together. This turned out to make quite a cool look. So to get started, first you will need to cut pointy "teeth" along one side of all your strips.
2. Next you will run a simple basting stitch along the straight edge of your fabric. When you pull the fabric tight it will gather. I used some old cotton thread that I acquired from my mother.
3. When you have as much gathered length as you think you will need, tie it off. Leave a length of thread hanging though in case you decide that you need to add more fabric. Now start rolling the fabric onto itself and repeatedly stitching through the base to keep it together.
4. Once you're done, sew a few JBS Charms in the center! Sew Charming!

How to Make Bows, Hair Pins and More: 33 DIY Hair Accessories
Find great craft projects at www.FaveCrafts.com. 42
Sunshine Daisy Headband
By: Moira Durano-Abesmo
Looking for free crochet headband patterns with a flower? This Sunshine Daisy Headband is perfect for girls of all ages! You could even use this flower to add flair to scarves, hats, purses, or sweaters!
Materials:
1/4-in thick yarn from a white shirt 1 white button 5-inch garter 3/0-4/0 double-pointed aluminum crochet
hook (I used the 3/0 side) 1 tapestry needle for weaving ends 1 sewing needle White sewing thread
Instructions:
Headband
1. Ch 120, equivalent to a length from behind my left ear to the back of my right ear.
2. Ch 1, sc in all 120 chs. Ch 1, turn.
3. 3sc, ch 114, 3 sc on the other end. Ch 1, turn.
4. 120 sc. Break off and weave in ends.
Flower
1. Round 1: Ch 2. Work 5 sc in the 2nd ch from hook. Join with sl st to first sc.
2. Round 2: (Ch 2, 3 dc, ch 2, sl st) in the same sc, sl st to the next sc. Repeat 4 more times, making 5 petals.
3. Round 3: Ch 2. Going behind the petals, sc around the post of the first sc on round 1, ch 3. (Sc around the post of the next sc on round 1, ch 3) 4 times. Join with sl st to beginning sc. There are now 5 ch 3 spaces.

How to Make Bows, Hair Pins and More: 33 DIY Hair Accessories
Find great craft projects at www.FaveCrafts.com. 43
4. Round 4: (Sc, 4 tr, sc) in next ch 3 space and in each ch 3 space around. Join with sl st to beginning sc. Break yarn and pull through. Do not weave in ends.
5. Ch 2, (sc around post, ch 3) 5x, sl st to first sc. Break off and weave in ends.
6. Attach new color in sc. [Ch 1, (sc, hdc, dc, tr, dc, hdc, sc) in ch-3 sp. Ch 1, turn. (Sc and hdc) in st, 2dc in next st, 2tr in next, (tr, dtr, tr) in next st, 2tr in next, 2 dc in next and (hdc and sc) in last st. Sl st to sc of previous color. Turn. 15 sl st across petal, sl st to sc of previous color.] Repeat 5x. Weave in ends.
Assembly
1. Sew the flower on the head band.
2. On one end sew the button and on the other end the garter.

How to Make Bows, Hair Pins and More: 33 DIY Hair Accessories
Find great craft projects at www.FaveCrafts.com. 44
Ruffled Lace Flower Headband
By: Jamielyn Nye for I Heart Nap Time
This cute and feminine Ruffled Lace Flower Headband is great for toddlers, girls, and even adults! This beautiful lace flower can be added to pins and necklaces as well, and would make a great accent to a sweater or tee shirt!
Materials:
Lace Felt circle Hot glue gun Headband or ribbon Bead or button
Instructions:
1. Cut out a 2in felt circle and about 20 inches of lace trim. The lace trim can be found at most fabric stores and comes in many different colors and sizes.
2. Apply glue around one corner. Place the lace trims raw edge directly on the glue. Keep gluing (about an inch at a time) and follow the curve with the lace, pressing it down as you go.
3. Angle the lace down slightly and keep gluing around the circle till you reach the center and have a full flower.
4. I cut my lace here, so I could leave room for a button.
5. Then I glued the button in the center and applied stretchy elastic to the back. You could also add a clip or pin. There’s so many different things you could do with these flowers. Attach them to a purse, put them on pillows… get creative!

How to Make Bows, Hair Pins and More: 33 DIY Hair Accessories
Find great craft projects at www.FaveCrafts.com. 45
Oilcloth and Mesh Bow
By: Marisa Pawelko of Modern Surrealist LLC
Create a decorative bow with oilcloth and mesh to decorate a gift, use as a decorative accent or wear as an accessory. Materials:
Eileen Hulls Sizzix Scoreboard Bow Die Westcott Titanium Non-Stick Shears Cardstock Marvy Uchida Brush Markers Art Glitter Ultrafine Neon Glitter Crushed Velvet Mexican oilcloth Mesh Tulle Fabric Mod Podge Paper Mod Podge Blumenthal Lansing Favorite Findings Buttons Wire twist tie
Instructions:
1. Color a pattern on one side of paper with Marvy Uchida Brush markers. For the mesh pieces, color both sides of the paper, since the paper shows through the mesh.
2. Apply paper to pieces of velvet, mesh tulle and oilcloth using Fabric Mod Podge and let dry.
3. Brush on Paper Mod Podge over marker pattern and apply ultrafine neon glitter by Art Glitter and let dry.
4. Run the finished layered pieces through a Sizzix Big Shot machine using the Bow die from the Eileen Hull Sizzix Scoreboards collection.
5. Layer buttons from Blumenthal Lansing with the custom buttons you just made using the bow die (which cuts both bow strips and buttons) by threading through a 12” piece of coordinating wire twist tie. Then add the bow strips, starting with the small size and be sure to twist the strips for the 3D bow effect. You can also lie them flat for a more low profile bow.
6. Finally pull everything tight from the back and twist in place to secure all the pieces. Now you are left with a beautiful decorative bow which can be used for a variety of purposes.

How to Make Bows, Hair Pins and More: 33 DIY Hair Accessories
Find great craft projects at www.FaveCrafts.com. 46
Fabric Flower Hairbands
By: Cecilia for So Tei-Tei
Make flowers from fabric to decorate your hair in style! These fabric flower hairbands are pretty enough for a little girl, but chic enough for a fashionista.
Materials:
Guaze Needle Thread Button Hot glue gun and glue (optional) Hairband (optional) Felt (optional)
Instructions:
1. Cut a 10 x 1.5 inches strip of gauze (gauze can be ripped, it gives a nice finishing).
2. Use needle and thread to make long stitches along the edge (not the ripped edge, leave that one for the outside).
3. Pull the thread to gather the fabric.
4. Starting from one end, overlap the fabric to form a spiral.
5. Stitch to secure in place and sew or hot glue a button in the center.
6. Optional: Hot glue flower to a hairband, then attach a piece of felt to secure.

How to Make Bows, Hair Pins and More: 33 DIY Hair Accessories
Find great craft projects at www.FaveCrafts.com. 47
Flower Power Accessory
By: Maya Murillo for I Love to Create
Show off your flower power this with this amazing hair accessory! This accent is perfect for a barrette, headband, as a pin or even on a purse! With a fabulous project like this, the possibilities are endless.
Materials:
CraftyChica or Tulip Glitter Aleene's Tacky Glue OR Crafty Chica Extreme Embellishment Glue Tulip Fabric Markers Pin backs or hair clips or a headband
Instructions:
1. Separate the petals on all the flowers as shown, and saving the pistil.
2. Next, add some more color POP using Tulip Beads In A Bottle! This is definitely going to turn heads!
3. For each color, decorate it in a different way to add contrast in the design. From experimenting, I found it was easier to use Aleene's Brush On Tacky Glue to apply the glitter!
4. I used Tulip Fabric Markers to draw on some cute designs. Let the petals dry before placing them together.
5. After they are all dry, and stack them in contrasting colors and by size. You can also trim with scissors if you need to, anything to make them look good! Then, glue on any backing of your choice.
6. Ta Dah! Here they are! Now I'm ready to enjoy spring time the appropriate way! You can use these as pins, the final touch on a shirt, hat, or purse. OR you can even attach them back on to the stems to make a bouquet!

How to Make Bows, Hair Pins and More: 33 DIY Hair Accessories
Find great craft projects at www.FaveCrafts.com. 48

How to Make Bows, Hair Pins and More: 33 DIY Hair Accessories
Find great craft projects at www.FaveCrafts.com. 49
Scrap Fabric Rosette
By: Amy Renea for A Nest for All Seasons
This cute Scrap Fabric Rosette can be added to anything, from purses to shoes, tee shirts to head bands! This is also a great way to use up cheap fabric scraps that are too small to use for other projects. Make a beautiful bouquet for spring!
Materials:
Fabric Scraps Scissors Hot Glue
Instructions:
1. Cut a scrap into a square...no need for perfection, but it needs to be more square than rectangle.
2. Now simply use fabric scissors, start at the outside edge and create a curly cue.
3. Start rolling with the ugly outside edge. You want to save the nice inner circle for the end.
4. Roll the ugly outside part into the middle of the flower.
5. Keep wrapping around and around until the petals start to have a nice curled edge.
6. Every once in awhile press the flower down on the front to even out the layers.
7. Tuck that perfect end piece onto the back with a dab of hot glue to cover up the mess.

How to Make Bows, Hair Pins and More: 33 DIY Hair Accessories
Find great craft projects at www.FaveCrafts.com. 50
Special Thanks
BasicGrey Caron Yarns
Consumer Crafts Amanda Formaro
Glue Dots The Hob-bee Hive I Love to Create
Jenni Bowlin Studios Latrice Murphy
Maria Nerius Jamielyn Nye
Marisa Pawelko Linda Peterson
Haley Pierson-Cox Rings & Things
Anna Smith Savannah Starr
Gloria Uhler Maureen Wilson
Blumenthal Lansing Co. Cecilia for So Tei-Tei
Moira Durano-Abesmo Kreinik
Megan Nicolay Amy Renea from A Nest for All Seasons
Sharon for Sharon Sews Tamara from Etcetorize

How to Make Bows, Hair Pins and More: 33 DIY Hair Accessories
Find great craft projects at www.FaveCrafts.com. 51
Create your own unique hair accessories with the fun and easy projects you’ll find in How to Make Bows, Hair Pins and More: 33 DIY Hair Accessories. With lots of cute headbands, bows, floral accents and more, these cute hair
accessories are great for girls of all ages and perfect for adding a colorful touch to your favorite outfit!