how to make an e book cover with gimp part 2 25467
TRANSCRIPT

How to Make an E-Book Cover with Gimp PART 2
Copyright 2012 by J.R. Whittaker
Smashwords Edition
All rights reserved. This book or any portion thereof may not be reproduced or used in any manner whatsoever without the express written permission of the author
or publisher except for the use of brief quotations in critical articles or reviews.
This eBook is licensed for your personal enjoyment only. This eBook may not be re-sold or given away to other people. If you would like to share this book with
another person, please purchase an additional copy for each person.

Premium
Step Thirty – Open blank book coverStep Thirty One – Size of new book coverStep Thirty Two – BorderStep Thirty Three – Create textStep Thirty Four – Cutting out image to use on book coverStep Thirty Five – Open apple imageStep Thirty Six – Open apple image continuedStep Thirty Seven – Free select toolStep Thirty Eight – ‘Cutting’ with the free select toolStep Thirty Nine – Finish cuttingStep Forty – Scale pictureStep Forty One – Copy cut out imageStep Forty Two – Pasting picture to book cover (Issue)Step Forty Three – Layers quicklyStep Forty Four – Undo pasteStep Forty Five – Add new layerStep Forty Six – New layer continuedStep Forty Seven – Paste imageStep Forty Eight – Book cover createdStep Forty Nine – Move cut out image aroundStep Fifty – Fill backgroundStep Fifty One – Anchor layerStep Fifty Two – BackgroundStep Fifty Three – Filled backgroundStep Fifty Four – Book coverSpecial Notes

PremiumNow we have learnt the basics of creating a book cover lets go over a few advanced techniques to give use more options in creating a cover.
In the Premium section we will be creating a book cover with an image that we have cut out from stock art and use it in our new book cover.

Step Thirty – Open blank book cover
Click ‘File’ – ‘New’
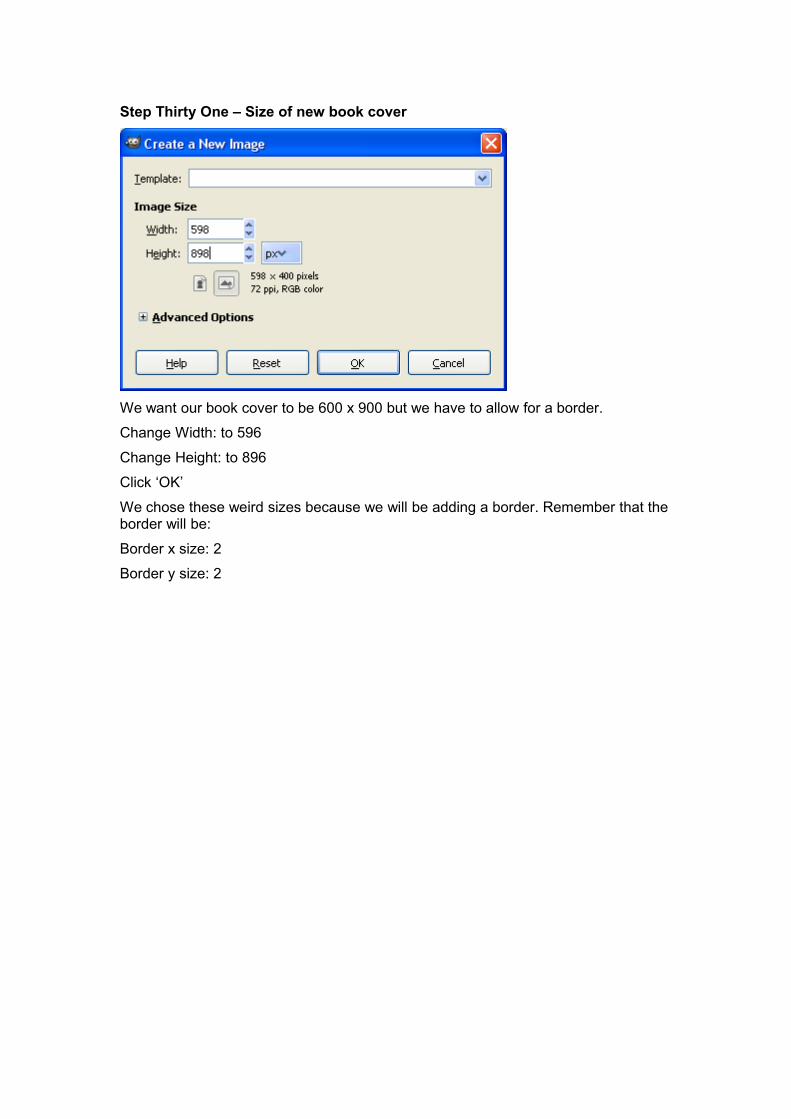
Step Thirty One – Size of new book cover
We want our book cover to be 600 x 900 but we have to allow for a border.
Change Width: to 596
Change Height: to 896
Click ‘OK’
We chose these weird sizes because we will be adding a border. Remember that the border will be:
Border x size: 2
Border y size: 2

Step Thirty Two - Border
Your blank book cover will look like this.
Go ahead and add the border. (‘Filters’ – ‘Décor’ – ‘Add Border’)
(Refer to Step Ten if you need to)

Step Thirty Three – Create text
I have created the title of my book and put my name in it.
I have chosen Serif and black text. I have justified it Centered.
(Refer to Step Seventeen for adding text title and authors name)

Step Thirty Four – Cutting out image to use on book cover
I have gone to a stock art website and found the picture I wish to use.
As you can see it is a red apple, but I don’t want the black and blue background.
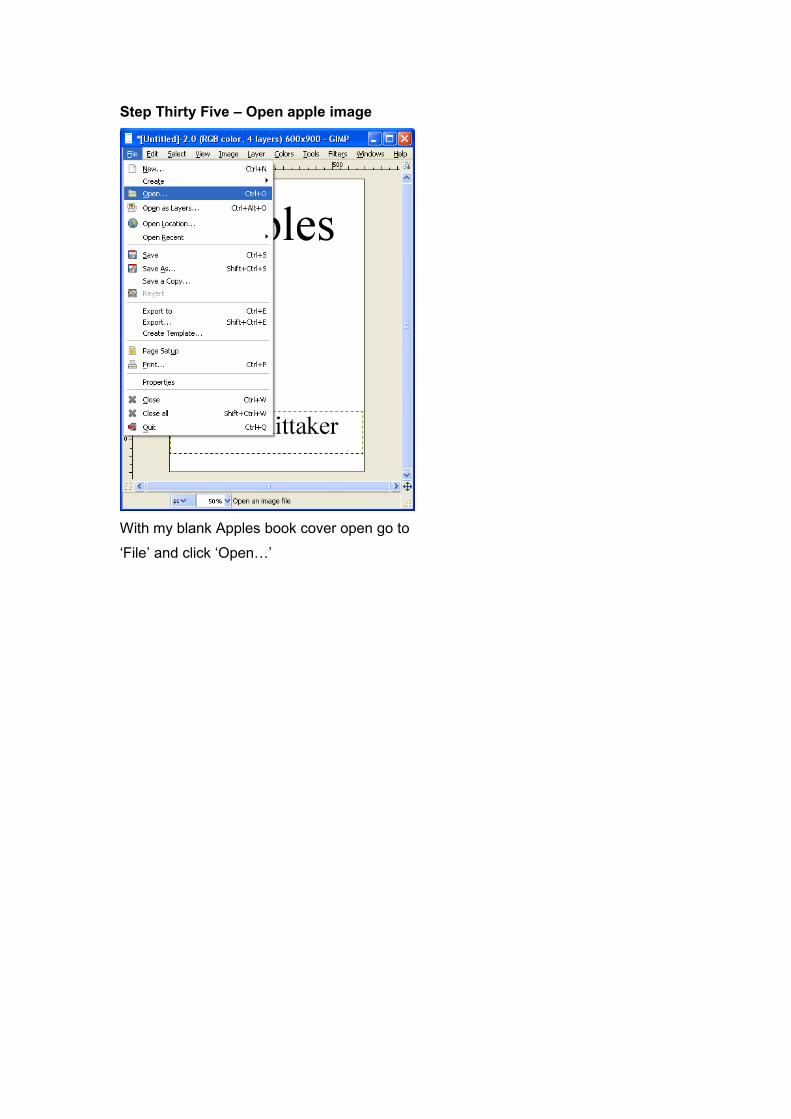
Step Thirty Five – Open apple image
With my blank Apples book cover open go to
‘File’ and click ‘Open…’

Step Thirty Six – Open apple image continued
You may have to search for where you have saved it. As you can see I saved it on my desktop where the fork and measuring tape picture is.
Click ‘Open’.

Step Thirty Seven – Free select tool
The free select tool is what we will use to cut out the apple picture. It is the third item in the Toolbox and looks a bit like a lasso.
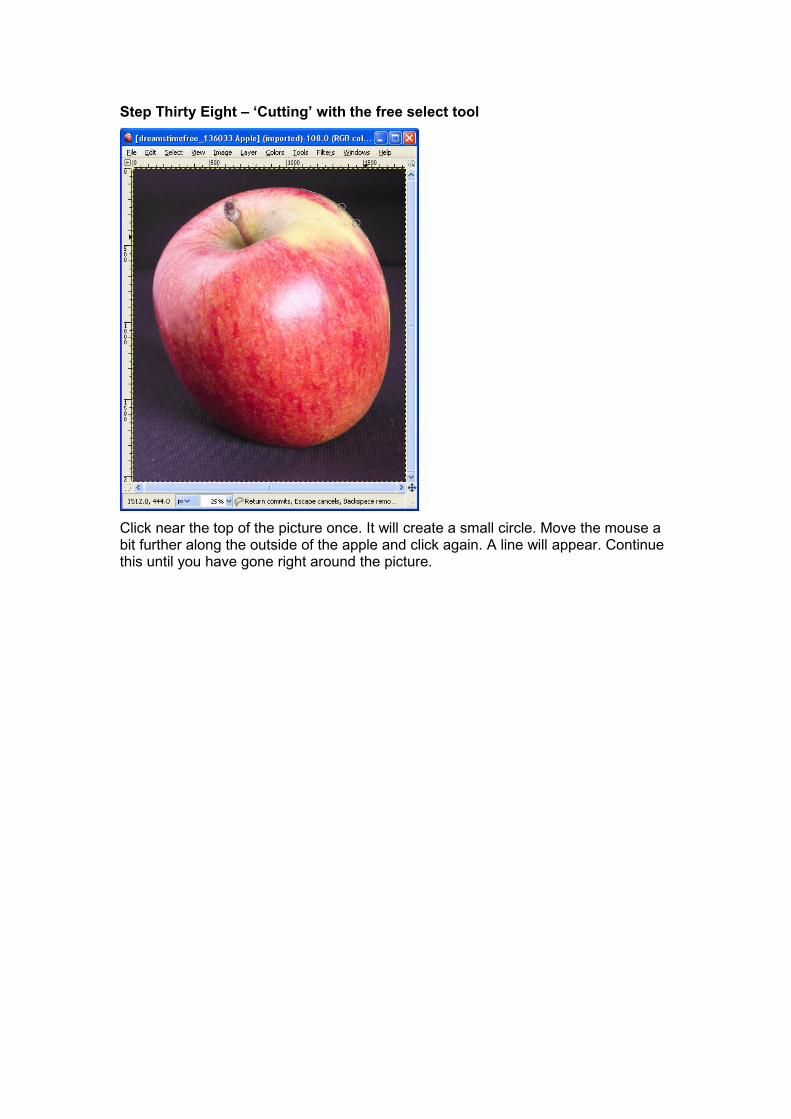
Step Thirty Eight – ‘Cutting’ with the free select tool
Click near the top of the picture once. It will create a small circle. Move the mouse a bit further along the outside of the apple and click again. A line will appear. Continue this until you have gone right around the picture.

Step Thirty Nine – Finish cutting
When you get right around the picture and back to where you started, make sure you click on the first circle to complete the outline. It should flash with a broken line.

Step Forty – Scale picture
There is a fair chance that any picture you get will be too big or too small for our book cover.
Click ‘Image’ – ‘Scale Image…’
Change the Width: to 300
Change the Height: to 450
Remember the link or chain needs to be click.
Press ‘Scale’.

As you can see the image of the apple has been shrunk.
You can change the 25% size which is located down the bottom of the window so you are better able to work with it.

Step Forty One – Copy cut out image
With the mouse cursor roughly in the middle of the picture –
Right click mouse button.
Click on ‘Edit’.
Click ‘Copy’.

Step Forty Two – Pasting picture to book cover (Issue)
Right mouse click on your book cover.
Click ‘Edit’.
Click ‘Paste’.
As you can see there is a problem.
This is because we have not created a Layer for it.

Step Forty Three – Layers quickly
Each time we add something to our book cover we create a layer.
If you press and hold the Control (Ctrl) button on your keyboard, then press ‘L’ you will get the Layers window.
As you can see there is ‘J.R. Whittaker, Apples, Border Layer etc.
Because we want to add a small, cut out image (apple) we must create a new layer for it.

Step Forty Four – Undo paste
Because our picture is not right, let’s undo it.
Click ‘Edit’.
Click ‘Undo Paste’.

Step Forty Five – Add new layer
With the picture gone,
Click ‘Layer’
Click ‘New Layer’.

Step Forty Six – New layer continued
You can rename the Layer if you like.
Make sure the Width is 600 and Height 900
Click ‘OK’.

Step Forty Seven – Paste image
Trust that you have created a new layer or press and hold Ctrl on your keyboard and press the ‘L’ to view layers.
Right mouse click on your book cover.
Click ‘Edit’.
Click ‘Paste’.

Step Forty Eight – Book cover created
Great, your book cover should be complete.
If you need to move the picture it is easily done.

Step Forty Nine – Move cut out image around
In the Toolbox click on the four arrowed icon called ‘Move’.
With the mouse you can now move the picture around like so

Step Fifty – Fill background
In the Toolbox click on the bucket that is pouring water.
It is called ‘Bucket Fill’.
Click on the colored square to change the color. As you can see I have it set to red.
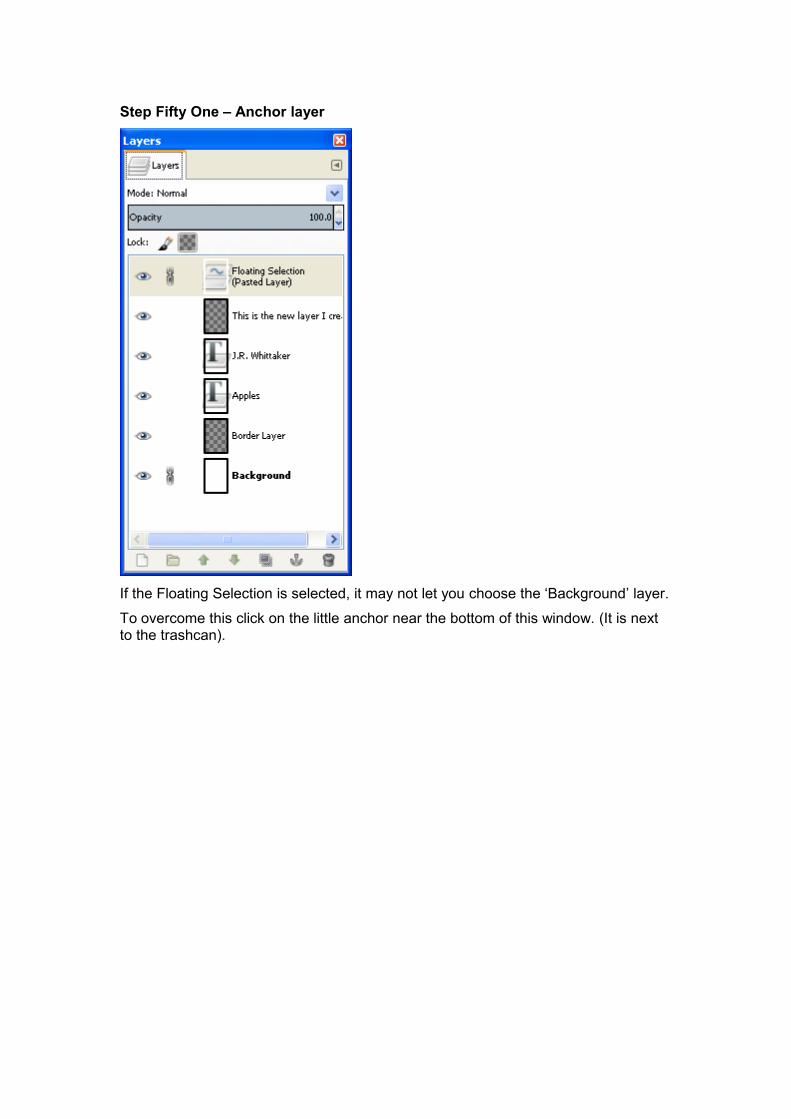
Step Fifty One – Anchor layer
If the Floating Selection is selected, it may not let you choose the ‘Background’ layer.
To overcome this click on the little anchor near the bottom of this window. (It is next to the trashcan).

Step Fifty Two - Background
Make sure the background is selected and close this window by pressing the red ‘x’.

Step Fifty Three – Filled background
Click with the Bucket Fill on the blank background and it will fill like so.
Keep in mind that if text or pictures disappear, then check the colors you have used and make sure you are on the correct layer. (Ctrl + L)

Step Fifty Four – Book cover
Don’t forget to save your work to .xcf (special GIMP format) first.
Export your work to Jpeg for uploading to book retailers second.
(Steps Twenty Five to Twenty Seven)

Special Notes
You have learnt the basic skills to making e-book covers.
With the skills learnt you can easily make an all text book cover, alternate covers with slogans and by-lines by using multiple text boxes.
Experiment with using different fonts, colors, sizes, pictures and layout.
###