how to make a lineart and color it in photoshop
DESCRIPTION
TRANSCRIPT

How to make a Lineart and color it in Photoshop.
A lineart is lines and curves of a drawing. Coloring is the colors between/inside the lines. I will be demonstrating the steps to create the lineart and the coloring inside
Photoshop. There are many different ways to create a lineart and color it but I will be
doing the simplest form to do so.

Requirements:•Photoshop (version cs2 and higher)•Basic computer skills•At least the basic knowledge of Photoshop (i.e., knowing what Photoshop is and what it is used for
The tools/palettes inside of Photoshop that are going to be used•Brush tool•Polygonal lasso tool•Rectangular marquee tool•Smudge tool•Dodge tool•Layer palette•Channel palette•Color Selecting Box

The Hot keysHot keys are shortcuts. These keys are located at the keyboard of your computor or laptop. These are hot keys that will be used in this tutorial:• Alt Backspace - this is to fill a selection with the foreground color of the color swatch.•Ctrl Backspace – this is to fill a seletion with the background color of the color swatch.•Ctrl D – this is to deselect a selection. It removes a selection.•Shift Ctrl I – This is inverse a selection.
The main stepsThere will be three main steps to complete this tutorialStep 1: Making the Lineart.Step 2: Coloring the lineart.Step 3: The Background.

This will be the
image I’ll be using
Open image in Photoshop
Making the Lineart.

•Go to Image in the top left. Scroll to Adjustments and then scroll to Brightness/contrast. Click on Brightness/Contrast.•A popup should come with name of Brightness/Contrast.•Play with the levels until the white background of the drawing is pure white and the lines are black

•Go to the Channel Palette.•Press the Ctrl key and click on the thumbnail of the first layer . A selection should be made.•Now select inverse. Press the keys: Shift Ctrl I. Now the selection should differ.•Now Click the new channel button. This button make the selection saved.
Note: clicking this button will make this layer

Go back to the layer paletteCreate two new layers.
•Name the first new layer as “Lineart”
•The second layer should be named as “white
background”.
•Now fill the selection with black in the first layer. Press the keys: Alt Backspace.•Fill the second layer with white. •Press the keys: Ctrl Backspace.
Note: Make sure color swatches are at default. (at black and white)
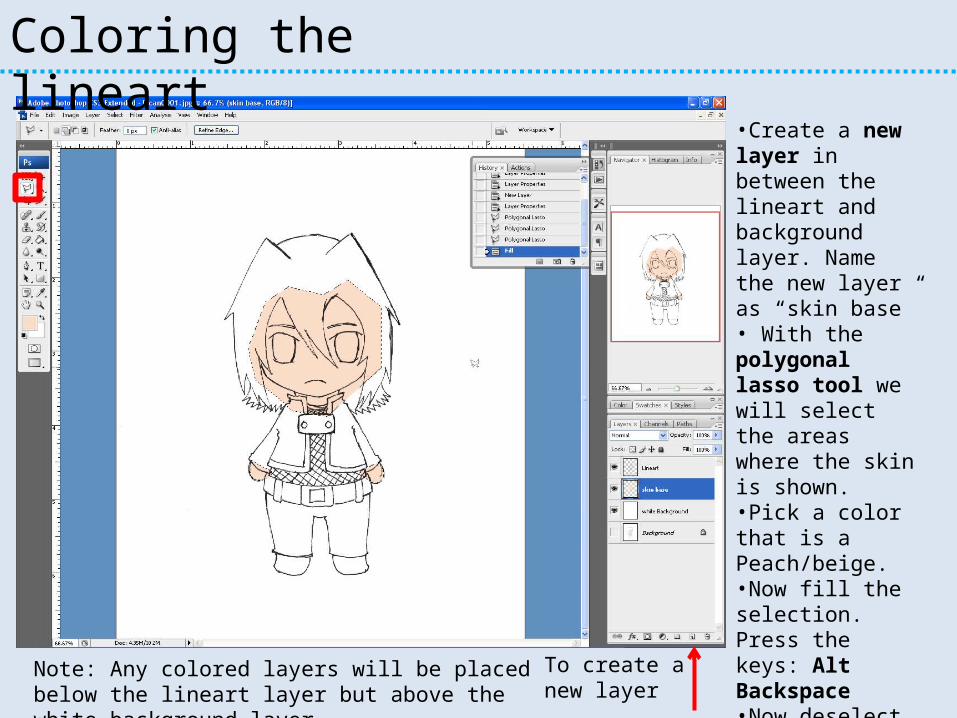
•Create a new layer in between the lineart and background layer. Name the new layer as “skin base”• With the polygonal lasso tool we will select the areas where the skin is shown.•Pick a color that is a Peach/beige.•Now fill the selection. Press the keys: Alt Backspace•Now deselect. Press the keys: Ctrl DNote: Any colored layers will be placed below
the lineart layer but above the white background layer.
Coloring the lineart
To create a new layer

•Create a new layer on top of the skin base layer.•Right-click on the layer.•Select the option “Create Clipping Mask”
Note: Creating Clipping mask is like grouping a layer to a other desired layer.

•Name the clipping layer as “shadow”.•Now go to the layer blending option.•Select Multiply.Note: Setting the mode to Multipy will
darken a color.

•Create a new layer on the very top. Name it as “direction of light” This layer will be a reminder to show where the direction of light is coming from. Draw arrows.•On the shadow layer color the parts where skin shadows are usually located at with the brush tool. Be sure to have the original color.

Now we are going to use the Smudge tool
•Use a soft rounded brush.•Now we blend the shadow strokes.
Note: See how the shadow shading is blended to the base color.
Note: The Smudge tool is used to soften or blend.

•Make a new layer, name it “Hair base”•Make a selection using the polygonal lasso tool on the hair.•Fill the selection with a golden yellow. Press the keys: Alt Backspace.•Deselect the selection. Press the keys: Ctrl D

•Create a new layer above the Hair base layer. Name it as “shadow”.•Right-click on the layer and select the option “create clipping mask”.•Set the layer blending mode as Multiply.•Now shade the areas where the shadows would be in the hair.
• Again we will use the Smudge tool.
• Smudge the shading until it is blended to the
hair base color.

•Create a new layer. Name this new layer as “light”.•Right-click on the layer and select the option “create clipping mask”•Now change the layer blending mode to Screen.Note: Setting the mode to screen make
a color lighter.

•On the Light/screen layer shade the areas where the lighter tone of the hair is usually placed.•Use the direction of light to direct where most of light shading should be color at.
Use the Smudge
tool to soften the shading

• Now use the dodge tool.
• This tool will highlight the
color.• Use the dodge tool only at the sections where the direction of
the light is hitting at the
most. Note: See how highlighted it is from the previous image.
Note: The Dodge tool is
used to hightlight: shadow,
midtones and highlights.

•Create a new layer and name it as “Eyes”.•Use the Polygonal lasso tool to select the eyes.•Once the selection is made fill the selection with a brown color. Press the keys: Alt Backspace.
• Create a new layer and name it as “Gradient”.
• Right-click on the layer and select the option “create clipping
mask”.• Now we will use the Gradient
tool.• In the drop down menu for the
Gradient tool, choose the thumbnail with the foreground
color as brown to transparent. It should be the second thumbnail.
• Now fill the gradient into the selection.
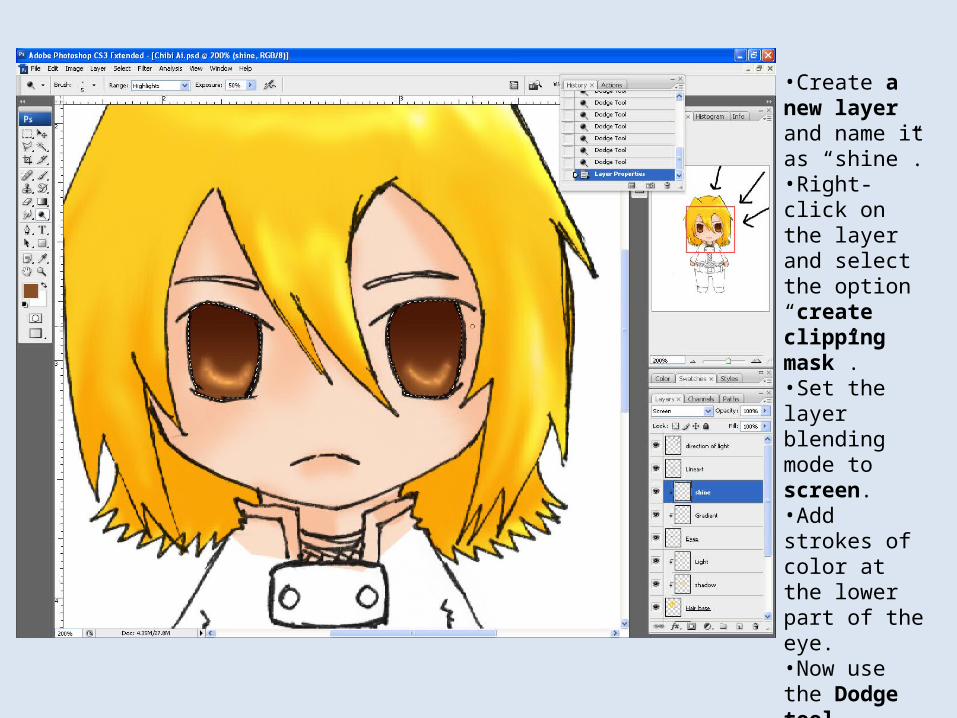
•Create a new layer and name it as “shine”.•Right-click on the layer and select the option “create clipping mask”.•Set the layer blending mode to screen.•Add strokes of color at the lower part of the eye.•Now use the Dodge tool. Highlight some of the strokes.

•Create a new layer and name it as “black”.•Right-click on the layer and choose the option “create clipping mask”.•Use the brush tool to color the black part of the eye.•Use the smudge tool to soften the edges of the black shading.•Once the color the eye is done. Deselect the selection, press the keys: Ctrl D

•Create a new layer and name it as “white eye part and eyebrows”•Drag this layer below the “Eye layer”•Color the white part of the eye with white.•Now color the eyebrows with the same color as the hair.

Repeat the coloring steps with the rest of the subject.

The Background•Remove the direction of light layer. Either by deleting the layer or making it invisible.•Make a new layer above the “White Background” layer.•Fill this layer with any color desired. Press the keys: Alt backspace.•There are many ways to create a background. A simple fill can be done like this or a gradient can be used. •But if a drawn background was in the original drawing, the coloring steps would be applied to coloring the background.

Congratulations. You now have completed this tutorial. You now have the knowledge to create a lineart and color it inside
of Photoshop. There are many different ways to create a lineart and color it. I know the one I have demonstrated is the simplest and easiest way to
create one in saving time and effort.Now that you know the steps to create a lineart and
color it in Photoshop you can now explore more complicated and different ways if you choose to learn
more.