how to make a cropping action script (advanced...
TRANSCRIPT

Batch Processing and Cropping using Actions Scripting (Advanced Photoshop Technique).
Cropping trims an area from an image. Below, for example, is a screenshot of a desktop:
For the sake of this example, the only part of this image needed is the upper right quarter of the screen, which contains 3 icons. Cropping in Photoshop can isolate the useful parts of the picture, as shown below:
Prepared by ET Partners, IET Mediaworks, UC Davis

Batch Cropping allows the user to crop any number of images in a folder in an automated manner, using the "Actions” scripting feature found in the full version of Photoshop. This is called Automation, and in this case, Batch Processing. Automation uses a set of user-defined actions to perform a series of tasks automatically. For example, when slides are scanned in bulk, they often have a thick black border around the resultant images. Using Batch Cropping, you could remove these borders from a folder full of images with only a few clicks, rather than manually cropping out the black border from each slide.
The following steps demonstrate how to use Actions scripting to batch crop.
Before you begin your work with Photoshop, you must prepare the folders of your scanned files. You should organize your scanned images into 2 folders: Vertical and Horizontal, so you can preserve the landscape or portrait orientation of the images without distorting them.
1. In Photoshop, click on “Window” on the menu bar, and make sure the “History” option is checked.
a. Under the History menu, choose the Actions tab.
Prepared by ET Partners, IET Mediaworks, UC Davis
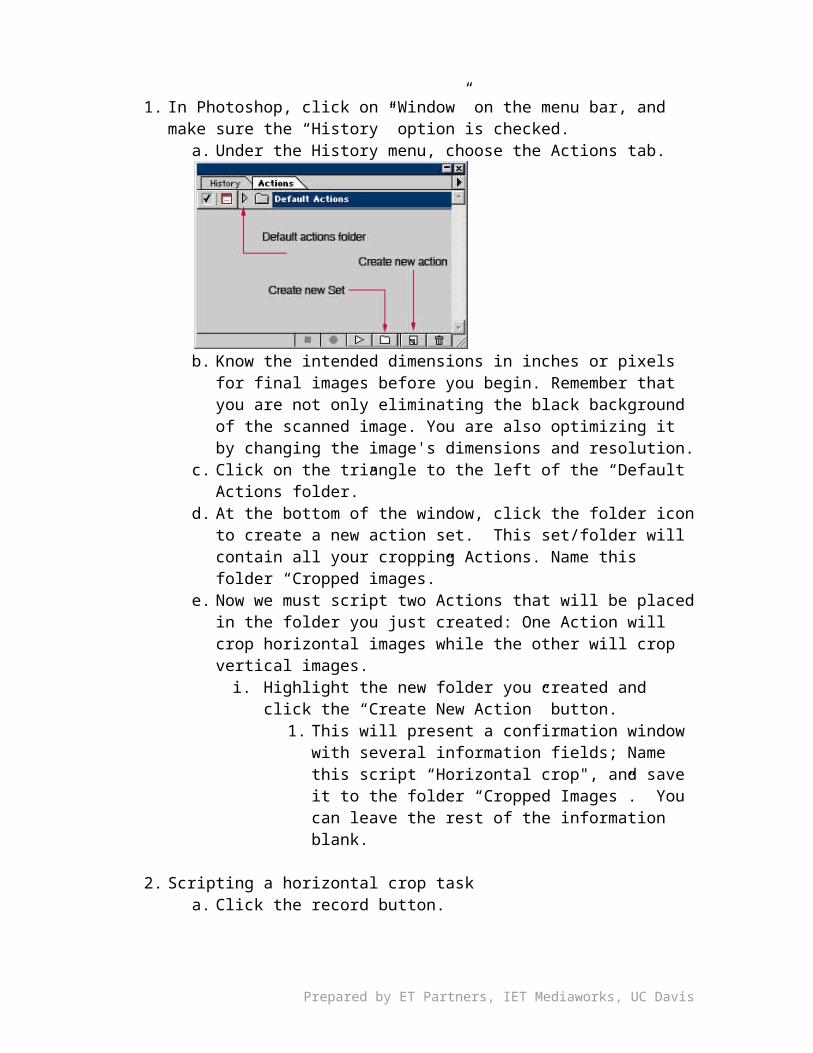
b. Know the intended dimensions in inches or pixels for final images before you begin. Remember that you are not only eliminating the black background of the scanned image. You are also optimizing it by changing the image's dimensions and resolution.
c. Click on the triangle to the left of the “Default Actions folder.”d. At the bottom of the window, click the folder icon to create a new
action set. This set/folder will contain all your cropping Actions. Name this folder “Cropped images.”
e. Now we must script two Actions that will be placed in the folder you just created: One Action will crop horizontal images while the other will crop vertical images.
i. Highlight the new folder you created and click the “Create New Action” button.
1. This will present a confirmation window with several information fields; Name this script “Horizontal crop", and save it to the folder “Cropped Images”. You can leave the rest of the information blank.
2. Scripting a horizontal crop taska. Click the record button.b. Before opening your file, make sure you are opening a landscape
oriented image (longer horizontally than vertically) with the proper resolutions and dimensions. (You can change the dimensions if the image is in an “image pack” format).
c. Next, open your image file.i. Select “Image” from the Photoshop menu bar and select
“Image Size”. Enter your preferred resolution for the image (note: standard monitor resolution, which is important for PowerPoint and web applications, is 72 pixels/inch, while commercial print resolution is 300 pixels per inch, or dpi).
d. There are two ways to get rid of unwanted borders and/or crop an image: using the crop tool located in the Photoshop tool bar, or by resizing the canvas area.
i. Using the crop tool
Prepared by ET Partners, IET Mediaworks, UC Davis

1. The crop tool is located in the upper left area of the Photoshop toolbar. It resembles a black squared outline cut diagonally with a thinner black line (as shown below).
2. With the crop tool selected, Click and drag your cursor to select the area you wish to keep. You will note that the area outside of your shape is shaded to identify what will be cut from your image. To apply your crop, press “Enter”.
ii. Using canvas resizing to crop your image1. In Photoshop, the canvas is the entirety of your
image. The canvas is the actual picture itself; if the canvas is resized, elements of the picture will be cut off, rather than making the whole image smaller.
2. To resize the image canvas, select “Image>Canvas Size…” on the Photoshop menu bar. This will present you with a popup menu allowing you to change your canvas size (as shown below).
Prepared by ET Partners, IET Mediaworks, UC Davis

a. It may take some experimentation to get a crop right; remember to use the undo command (ctrl+z on PC, and Apple+Z on the Mac) to step backward.
3. Next, save a copy of the image by clicking “File>Save As” on the Photoshop menu bar. Save the image with an amended file name, so as not to overwrite the original, unedited file. For programs like PowerPoint or for use in websites etc., save the file in JPG format in a new folder.
4. Note: when using actions to create a script to batch crop, the crop tool can yield imprecise results. Experiment to find what works best for you.
5. Click the stop button.iii. You can repeat the same steps to script a series of Actions
to batch crop vertical images, changing only your intended dimensions. You will also need to save these files to a different folder than you did with the horizontal images.
Prepared by ET Partners, IET Mediaworks, UC Davis

When opening a vertical image, make sure it is in the portrait orientation.
3. Batch Croppinga. Once you have Actions scripted to crop images you can batch crop
all images in a folder.i. In Photoshop, click “File>Automate>Batch” on the menu bar.
This will present you with a menu, as shown in the image below.
1. At the top of the Batch menu, click on the field labeled “Set” and select “Cropped Images”, which was created earlier.
2. Next, click on the field labeled “Action”, and select either “Vertical Crop” or “Horizontal Crop”, depending on which task will be performed.
3. Next, select the field labeled “Source”, and select “folder” from the drop down menu that appears. Below is a button labeled “Choose.” Click this to navigate to the appropriate image folder for your task.
4. Below the source settings, you will find similarly labeled fields to set a destination for your processed files.
5. Click on the field labeled “Destination” and select “Folder”. Then click on the button labeled “Choose” to select a folder to save your cropped images to.
ii. After setting source and destination folders, click “Ok” in the upper right corner of the batch menu. This will begin processing the images in your selected source folder.
Prepared by ET Partners, IET Mediaworks, UC Davis

iii. You can repeat this process as needed.
Prepared by ET Partners, IET Mediaworks, UC Davis