how to configure ipso vrrp
DESCRIPTION
VRRPTRANSCRIPT

16 April 2012
How To Configure IPSO VRRP

© 2012 Check Point Software Technologies Ltd.
All rights reserved. This product and related documentation are protected by copyright and distributed under licensing restricting their use, copying, distribution, and decompilation. No part of this product or related documentation may be reproduced in any form or by any means without prior written authorization of Check Point. While every precaution has been taken in the preparation of this book, Check Point assumes no responsibility for errors or omissions. This publication and features described herein are subject to change without notice.
RESTRICTED RIGHTS LEGEND:
Use, duplication, or disclosure by the government is subject to restrictions as set forth in subparagraph (c)(1)(ii) of the Rights in Technical Data and Computer Software clause at DFARS 252.227-7013 and FAR 52.227-19.
TRADEMARKS:
Refer to the Copyright page (http://www.checkpoint.com/copyright.html) for a list of our trademarks.
Refer to the Third Party copyright notices (http://www.checkpoint.com/3rd_party_copyright.html) for a list of relevant copyrights and third-party licenses.

Important Information Latest Software
We recommend that you install the most recent software release to stay up-to-date with the latest functional improvements, stability fixes, security enhancements and protection against new and evolving attacks.
Latest Documentation
The latest version of this document is at: http://supportcontent.checkpoint.com/documentation_download?ID=15321
For additional technical information, visit the Check Point Support Center (http://supportcenter.checkpoint.com).
Revision History
Date Description
4/16/2012 First release of this document
Feedback
Check Point is engaged in a continuous effort to improve its documentation.
Please help us by sending your comments (mailto:[email protected]?subject=Feedback on How To Configure IPSO VRRP ).

Contents
Important Information ............................................................................................. 3 How To configure IPSO VRRP ............................................................................... 5 Objective ................................................................................................................. 5
Supported Versions ............................................................................................. 5 Supported OS ...................................................................................................... 5 Supported Appliances ......................................................................................... 5
Before You Start ..................................................................................................... 5 Related Documents and Assumed Knowledge .................................................... 5
VRRP Overview ....................................................................................................... 6 Configuring VRRP................................................................................................... 6
Configuring VRRP in Voyager ............................................................................. 6 VRRP Configuration Parameters List: ................................................................. 8 Example for VRRP Configuration using Simplified Mode. .................................... 9 Follow the Same Steps on the Backup Member, but with Priority of 95. .............. 9
Configuring Monitored-Circuit VRRP using the Full (Legacy) Method ............. 10 Additional VRRP Parameters Used in Full (Legacy) Method ..............................11
Creating Gateway Cluster Objects in SmartDashboard ..................................... 12 Enable Cluster Membership for Check Point High Availability ......................... 17
Commands to Check Sync Status ......................................................................17 Other Commands: ..............................................................................................18
Index ...................................................................................................................... 21

How To configure IPSO VRRP
How To Configure IPSO VRRP | 5
How To configure IPSO VRRP
Objective This document gives step by step instructions to setup VRRP on Check Point IP Appliance Gateways.
Supported Versions Any IPSO version
Any Check Point SmartDashboard version
Supported OS IPSO
Supported Appliances Any IP series Appliance
Before You Start
Related Documents and Assumed Knowledge Voyager Reference Guides (for IPSO 6.1
(http://downloads.checkpoint.com/dc/download.htm?ID=9887)/6.0 (http://downloads.checkpoint.com/dc/download.htm?ID=9308)/4.2 (http://downloads.checkpoint.com/dc/download.htm?ID=9844))
sk39676 (https://supportcenter.checkpoint.com/supportcenter/portal?eventSubmit_doGoviewsolutiondetails=&solutionid=sk39676&js_peid=P-114a7bc3b09-10006&partition=General&product=IPSO"): VRRP FAQ
sk41314 (https://supportcenter.checkpoint.com/supportcenter/portal?eventSubmit_doGoviewsolutiondetails=&solutionid=sk41314&js_peid=P-114a7bc3b09-10006&partition=General&product=Security): VRRP Failover Failed FAQ
sk39324 (https://supportcenter.checkpoint.com/supportcenter/portal?eventSubmit_doGoviewsolutiondetails=&solutionid=sk39324&js_peid=P-114a7bc3b09-10006&partition=General&product=IPSO"): VRRP doesn't work on Cisco switches
sk40656 (https://supportcenter.checkpoint.com/supportcenter/portal?eventSubmit_doGoviewsolutiondetails=&solutionid=sk40656&js_peid=P-114a7bc3b09-10006&partition=General&product=IPSO"): VRRP Interoperability Concerns with Switches
sk41089 (https://supportcenter.checkpoint.com/supportcenter/portal?eventSubmit_doGoviewsolutiondetails=&solutionid=sk41089&js_peid=P-114a7bc3b09-10006&partition=Advanced&product=IPSO"): How to troubleshoot and isolate the cause of VRRP transitions?

VRRP Overview
How To Configure IPSO VRRP | 6
sk41102 (https://supportcenter.checkpoint.com/supportcenter/portal?eventSubmit_doGoviewsolutiondetails=&solutionid=sk41102&js_peid=P-114a7bc3b09-10006&partition=Expert&product=IPSO"): VRRP interface is in INIT state
sk38524 (https://supportcenter.checkpoint.com/supportcenter/portal?eventSubmit_doGoviewsolutiondetails=&solutionid=sk38524&js_peid=P-114a7bc3b09-10006&partition=General&product=Security): What is VRRP Monitored Circuits?
sk39019 (https://supportcenter.checkpoint.com/supportcenter/portal?eventSubmit_doGoviewsolutiondetails=&solutionid=sk39019&js_peid=P-114a7bc3b09-10006&partition=General&product=Security): Should "Monitor Firewall State" feature be disabled during IPSO or Check Point upgrade?
VRRP Overview Virtual Router Redundancy Protocol (VRRP) provides dynamic failover of IP addresses from one router to another in the event of failure.
VRRP uses a virtual router to allow end hosts to use an IP address that is part of the virtual router as the default first-hop router. A virtual router is defined as a unique virtual router ID (VRID) with the router IP addresses of the default route on a LAN. It is comprised of a master router and at least one backup router. If the master node fails, VRRP specifies an election protocol that dynamically assigns responsibility to a backup node to forward IP traffic sent to the IP address of the virtual router.
These VRRP modes are available:
Monitored-Circuit VRRP simplified method: Nokia recommends that you use this simplified version of monitored-circuit VRRP, which is a Nokia enhancement to VRRP.
Monitored-Circuit VRRP full (legacy) method: Use this method if you work with a system on which VRRP has already been configured with this method, or if you need control over the configuration of each individual interface.
VRRPv2 (legacy): Use this method only if you do not have an extra IP address to use for monitored-circuit VRRP.
Configuring VRRP
Configuring VRRP in Voyager Make sure that you have the same version of Check Point Security and HFAs installed on both of the Nokia appliances that are to be the members of the cluster.
Also make sure that the build version is the same on the Nokia modules, either run: uname –r on the
console or in the main screen on the Voyager GUI.
1. In the Voyager GUI, click Configuration -> High Availability > VRRP.
2. Change the VRRP configuration to:
Accept connections to VRRP IP’s: Enabled
Monitor firewall status: Disabled (for now) Note: If no firewall is installed, the option has no influence on the system.
Options: Disabled / Enabled.

Configuring VRRP
How To Configure IPSO VRRP | 7
Default: Enabled.
3. Click Save.
4. Enter an ID number for the Monitored-Circuit Virtual Router in the field, Create a new Monitored-Circuit Virtual Router. The same number should be configured on both of the members for each interface that is to be clustered. In the example below, the number 5 is entered, and the first clustered interface is created.
5. Click Save. The VRRP Configuration window opens.
On one gateway, configure all the interfaces that have higher priority than the other gateways. The member with the higher priority interfaces is the active one by default unless a failover occurs.

Configuring VRRP
How To Configure IPSO VRRP | 8
6. Configure:
Priority: Specifies this router priority during election for a failed router addresses. Of the backup routers, the one with the priority of highest value takes over the addresses.
Range: 1-254
Default: 100
Priority Delta: Specifies the interface dependencies associated with the monitored circuit virtual router. The UP/DOWN status is tracked for the Backup Address listed. When the interface associated with the Backup Address goes DOWN, the priority delta is subtracted from the base priority. The effective priority is calculated with the base priority, and subtracts the priority delta for each DOWN monitored interface. This effective priority is the value actually used in the VRRP master election for the virtual router.
Range: 1-254
Default: No default.
Backup Address: Displays the IP addresses associated with this virtual router and provides an edit-box to allow you to add an IP address. The IP address(es) associated with the virtual router must not match the real IP address of any host or router on the interface network. To add an IP address to the virtual router, enter it in the edit-box, and click Apply.
Range: Dotted-quad ([0-255].[0-255].[0-255].[0-255])
Default: No Default
VRRP Configuration Parameters List:
Configuring VRRP
How To Configure IPSO VRRP | 9
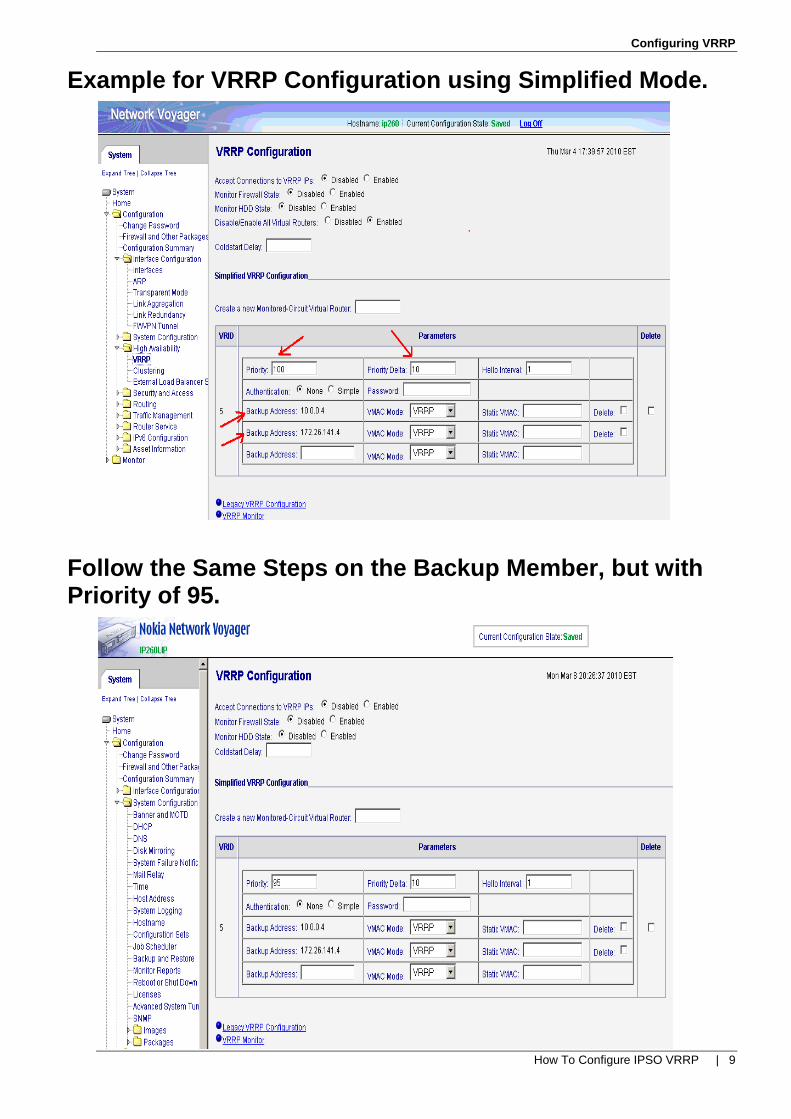
Example for VRRP Configuration using Simplified Mode.
Follow the Same Steps on the Backup Member, but with Priority of 95.
Configuring Monitored-Circuit VRRP using the Full (Legacy) Method
How To Configure IPSO VRRP | 10
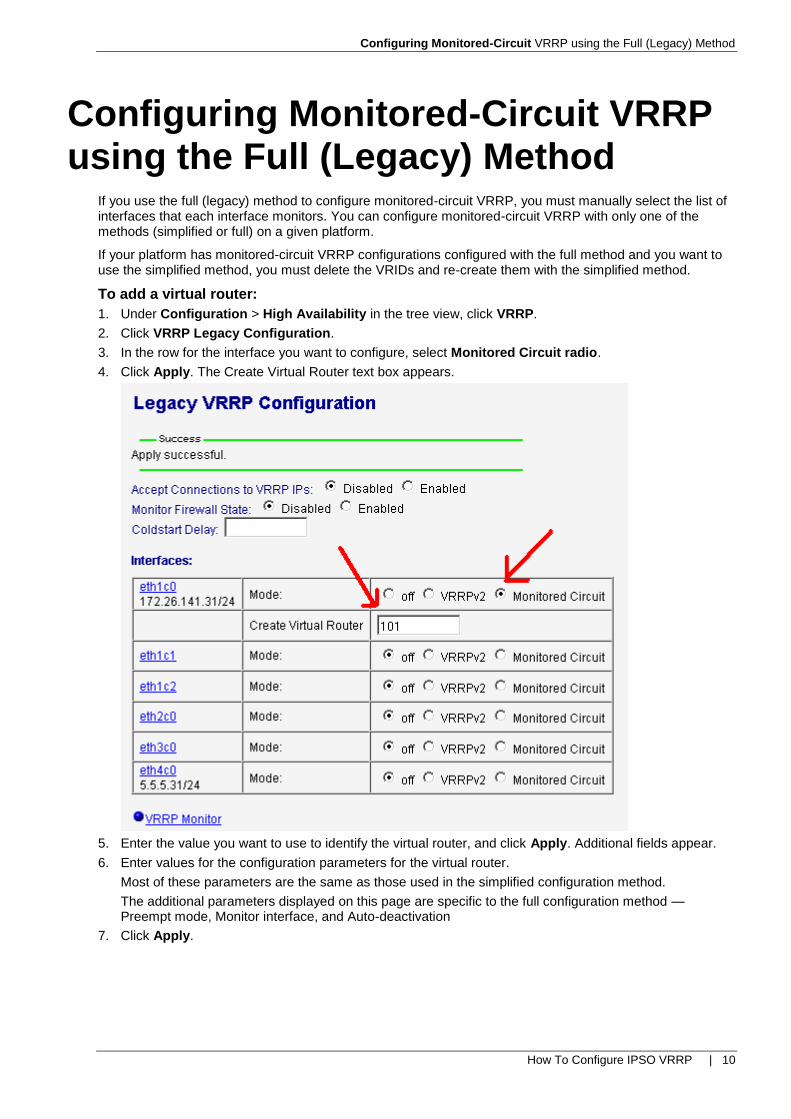
Configuring Monitored-Circuit VRRP using the Full (Legacy) Method
If you use the full (legacy) method to configure monitored-circuit VRRP, you must manually select the list of interfaces that each interface monitors. You can configure monitored-circuit VRRP with only one of the methods (simplified or full) on a given platform.
If your platform has monitored-circuit VRRP configurations configured with the full method and you want to use the simplified method, you must delete the VRIDs and re-create them with the simplified method.
To add a virtual router:
1. Under Configuration > High Availability in the tree view, click VRRP.
2. Click VRRP Legacy Configuration.
3. In the row for the interface you want to configure, select Monitored Circuit radio.
4. Click Apply. The Create Virtual Router text box appears.
5. Enter the value you want to use to identify the virtual router, and click Apply. Additional fields appear.
6. Enter values for the configuration parameters for the virtual router.
Most of these parameters are the same as those used in the simplified configuration method.
The additional parameters displayed on this page are specific to the full configuration method — Preempt mode, Monitor interface, and Auto-deactivation
7. Click Apply.

Configuring Monitored-Circuit VRRP using the Full (Legacy) Method
How To Configure IPSO VRRP | 11
8. Click Save to make your changes permanent.
Additional VRRP Parameters Used in Full (Legacy) Method

Creating Gateway Cluster Objects in SmartDashboard
How To Configure IPSO VRRP | 12
Creating Gateway Cluster Objects in SmartDashboard
This section outlines the steps needed to create a gateway cluster object in the SmartDashboard.
1. Create a new cluster object.
2. Under the Check Point products section, under the General Properties tab, clear the ClusterXL check box.

Creating Gateway Cluster Objects in SmartDashboard
How To Configure IPSO VRRP | 13
3. Select Cluster Members and add the gateway objects.
4. This screen pops up. Click Yes.
5. Both gateways are added to the cluster object.

Creating Gateway Cluster Objects in SmartDashboard
How To Configure IPSO VRRP | 14
6. Select the 3rd Party Configuration tab, and in 3rd party solution, select Nokia VRRP.

Creating Gateway Cluster Objects in SmartDashboard
How To Configure IPSO VRRP | 15
7. Select Topology and get the topology from all the members. That includes Cluster Topology.
8. Make sure the cluster topology shows the correct Virtual IP addresses.
The sync interface should be set as 1st Sync.

Creating Gateway Cluster Objects in SmartDashboard
How To Configure IPSO VRRP | 16
All VRRP interfaces should be set as Cluster.
9. Both VRRP member objects now show within the cluster object.

Enable Cluster Membership for Check Point High Availability
How To Configure IPSO VRRP | 17
Enable Cluster Membership for Check Point High Availability
Enable cluster membership for the gateway. This is required for state table synchronization.
1. In the CLI of the gateway, run cpconfig:
ip260[admin]# cpconfig
Configuration Options:
----------------------
(1) Licenses and contracts
(2) SNMP Extension
(3) Group Permissions
(4) PKCS#11 Token
(5) Random Pool
(6) Secure Internal Communication
(7) Enable cluster membership for this gateway
(8) Disable Check Point SecureXL
(9) Automatic start of Check Point Products
(10) Exit
Enter your choice (1-10):
ip260[admin]#
2. Run cphaprob stat on both members to verify that both members show as Active.
ip260[admin]# ip260[admin]# cphaprob stat
Cluster Mode: Sync only (IPSO cluster))
Number Unique Address Firewall State (*)
1 (local) 4.4.4.22 Active 2 4.4.4.23 Active
(*) In IP Clustering/VRRP FW-1 also monitors the cluster
status
ip260[admin]#
3. Run the same command on the other member:
IP260LIP[admin]# cphaprob stat
Cluster Mode: Sync only (IPSO cluster))
Number Unique Address Firewall State (*)
1 4.4.4.22 Active 2 (local) 4.4.4.23 Active
(*) In IP Clustering/VRRP FW-1 also monitors the cluster
status
IP260LIP[admin]#
Commands to Check Sync Status 1. Run this command to verify if connections table are synced on both members: fw tab -t
connections -s
IP260LIP[admin]# fw tab -t connections -s HOST NAME
ID #VALS #PEAK #SLINKS localhost connections
8158 7 15 7

Enable Cluster Membership for Check Point High Availability
How To Configure IPSO VRRP | 18
IP260LIP[admin]# IP260LIP[admin]#
2. Run fw ctl pstat and verify sync status.
Sync:
Version: new Status: Able to Send/Receive sync packets Sync packets sent: total : 209560, retransmitted : 0, retrans reqs
: 0, acks : 6 Sync packets received: total : 71727, were queued : 0, dropped by net
: 0 retrans reqs : 0, received 6 acks retrans reqs for illegal seq : 0 dropped updates as a result of sync overload: 0 IP260LIP[admin]#
Other Commands:
IP260LIP[admin]# cphaprob syncstat
Sync Statistics (IDs of F&A Peers - 1):
Other Member Updates: Sent retransmission requests................... 0 Avg missing updates per request................ 0 Old or too-new arriving updates................ 0 Unsynced missing updates....................... 0 Lost sync connection (num of events)........... 1 Timed out sync connection ..................... 0
Local Updates: Total generated updates ....................... 217948 Recv Retransmission requests................... 0 Recv Duplicate Retrans request................. 0
Blocking Events................................ 0 Blocked packets................................ 0 Max length of sending queue.................... 0 Avg length of sending queue.................... 0 Hold Pkts events............................... 0 Unhold Pkt events.............................. 0 Not held due to no members..................... 0 Max held duration (sync ticks)................. 0 Avg held duration (sync ticks)................. 0
Timers: Sync tick (ms)................................. 100 CPHA tick (ms)................................. 100
Queues: Sending queue size............................. 512 Receiving queue size........................... 256
IP260LIP[admin]#

Enable Cluster Membership for Check Point High Availability
How To Configure IPSO VRRP | 19
IP260LIP[admin]# cphaprob -a if
eth4c0 sync(secured), broadcast <<------syncinterface eth1c0 non sync(non secured)
IP260LIP[admin]# cphaprob -i list Built-in Devices:
Device Name: IPSO member status Current state: OK
Registered Devices:
Device Name: Synchronization Registration number: 0 Timeout: none Current state: OK Time since last report: 553357 sec
Device Name: Filter Registration number: 1 Timeout: none Current state: OK Time since last report: 553340 sec
Device Name: cphad Registration number: 2 Timeout: 5 sec Current state: OK Time since last report: 0.5 sec
Device Name: fwd Registration number: 3 Timeout: 5 sec Current state: OK Time since last report: 1.1 sec
IP260LIP[admin]#
IP260LIP[admin]# clish -c "show vrrp"
VRRP State
VRRP Router State: Up Flags: On,LocalReceive,MonitorFirewall Interface enabled: 2 Virtual routers configured: 2 In Init state 0 In Backup state 0 In Master state 2
IP260LIP[admin]#

Enable Cluster Membership for Check Point High Availability
How To Configure IPSO VRRP | 20
IP260LIP[admin]# clish -c "show vrrp interfaces"
VRRP Interfaces
Interface eth-s4p3c0
Number of virtual routers: 1 Flags: MonitoredCircuitMode Authentication: NoAuthentication VRID 15 State: Master Time since transition: 0 Master: 1.1.1.1
BasePriority: 100 Effective Priority: 100 Master transitions: 1 Flags: Advertisement interval: 1 Router Dead Interval: 3 VMAC Mode: VRRP VMAC: 00:00:5e:00:01:0f Primary address: 1.1.1.1 Master expire: 0 Number of Addresses: 1 1.1.1.10 Monitored circuits eth-s4p4c0 (priority 10)
Interface eth-s4p4c0 Number of virtual routers: 1 Flags: MonitoredCircuitMode Authentication: NoAuthentication VRID 15 State: Master Time since transition: 0 Master: 2.2.2.1
BasePriority: 100 Effective Priority: 100 Master transitions: 1 Flags: Advertisement interval: 1 Router Dead Interval: 3 VMAC Mode: VRRP VMAC: 00:00:5e:00:01:0f Primary address: 2.2.2.1 Master expire: 0 Number of Addresses: 1 2.2.2.10 Monitored circuits eth-s4p3c0 (priority 10)
IP260LIP[admin]#
Note - Each instance of VRRP on a supported interface may monitor the link state of other interfaces. The monitored interfaces do not have to run VRRP. If a monitored interface loses its link state, then VRRP decrements its priority over a VRID by the specified delta value and then sends out a new VRRP HELLO packet. If the new effective priority is less than the priority a backup platform has, then the backup platform begins to send out its own HELLO packet. Once the master sees this packet with a priority greater than its own, it releases the VIP.

Index A
Additional VRRP Parameters Used in Full (Legacy) Method • 11
B
Before You Start • 5
C
Commands to Check Sync Status • 17 Configuring Monitored-Circuit VRRP using the
Full (Legacy) Method • 10 Configuring VRRP • 6 Configuring VRRP in Voyager • 6 Creating Gateway Cluster Objects in
SmartDashboard • 12
E
Enable Cluster Membership for Check Point High Availability • 17
Example for VRRP Configuration using Simplified Mode. • 9
F
Follow the Same Steps on the Backup Member, but with Priority of 95. • 9
H
How To configure IPSO VRRP • 5
I
Important Information • 3
O
Objective • 5 Other Commands: • 18
R
Related Documents and Assumed Knowledge • 5
S
Supported Appliances • 5 Supported OS • 5 Supported Versions • 5
V
VRRP Configuration Parameters List: • 8 VRRP Overview • 6