helix media delivery platform quick start...
TRANSCRIPT

HELIX MEDIA DELIVERY PLATFORM QUICK START GUIDEHelix™ Universal Server Version 15.1 and Helix™ Proxy Server Version 15.1
Revision Date: 10 December 2013

RealNetworks, Inc. PO Box 91123 Seattle, WA 98111-9223 U.S.A.
http://www.real.com http://www.realnetworks.com
©2013 RealNetworks, Inc. All rights reserved.
Information in this document is subject to change without notice. No part of this document may be reproduced or transmitted in any form or by any means, electronic or mechanical, for any purpose, without the express written permission of RealNetworks, Inc.
Printed in the United States of America.
Helix, the Helix Logo, Real, the Real "bubble" (logo), RealJukebox, RealOne, Real-rTV, RealArcade, RealAudio, RealDownload, RealNetworks, RealPix, RealPlayer, RealPresenter, RealProducer, RealProducer Plus, RealPoducer Pro, RealProxy, RealPublisher, RealSites, RealSystem, RealText, RealVideo, Rhapsody, ra/ve, SureStream, The Future is Real, TurboPlay, and Xing are trademarks or registered trademarks of RealNetworks, Inc.
Other product and corporate names may be trademarks or registered trademarks of their respective companies.

CONTENTS
iii
INTRODUCTION 1
How this Guide Is Organized.........................................................................................................1Conventions Used in this Manual ..................................................................................................2
Terminology.............................................................................................................................2Typographical Conventions.......................................................................................................2
CHAPTER 1: INSTALLATION............................................................................................................................3
Installing Helix Server ....................................................................................................................3Obtaining a License Key ................................................................................................................5Selecting Port Values.....................................................................................................................5
Administration Ports ................................................................................................................5Streaming Protocol Ports ..........................................................................................................6Feature Control Ports ...............................................................................................................6
Creating Certificate Files ...............................................................................................................7Specifying Certificate Information..............................................................................................8Requesting a Signed Certificate .................................................................................................8Using Self-Signed Certificates ....................................................................................................8Running the OpenSSL Program .................................................................................................9
Installing Helix Proxy.....................................................................................................................9
CHAPTER 2: STARTUP AND SHUTDOWN .....................................................................................................11
Memory Use...............................................................................................................................11Starting the Server on Windows...................................................................................................11
Running a Windows Service ....................................................................................................11Modifying Access Privileges .....................................................................................................12Using the Start Menu or a Desktop Icon ..................................................................................12Starting Up from the Windows Command Line ........................................................................13
Starting the Server on Linux or Solaris ..........................................................................................14Running the Startup Script......................................................................................................14Starting Up from the Command Line .......................................................................................14
Stopping the Server.....................................................................................................................15Shutting Down on Windows ...................................................................................................15Shutting Down on Solaris or Linux...........................................................................................15
CHAPTER 3: AMAZON EC2 SETUP ................................................................................................................16
Signing Up with Amazon Web Services.........................................................................................16Creating an Instance from the Marketplace ..................................................................................16
Finding the Helix Server Product ..............................................................................................16Setting Options for the Instance ..............................................................................................17
Creating an Instance from the EC2 Console .................................................................................18Setting the Instance Size..........................................................................................................19Configuring Instance Details ...................................................................................................20Adding Storage.......................................................................................................................20Defining Instance Tags............................................................................................................21Selecting the Security Group....................................................................................................22

Contents
iv
Choosing a Key Pair ............................................................................................................... 22Managing an Instance................................................................................................................ 23
Actions Menu ........................................................................................................................ 24Public URL ............................................................................................................................ 24Helix Server Configuration...................................................................................................... 25
Logging in with SSH................................................................................................................... 25Browser SSH Login ................................................................................................................ 25Windows PuTTY Client........................................................................................................... 26Linux SSH Login..................................................................................................................... 26
Changing Helix Server Memory ................................................................................................... 27Creating an EBS Volume............................................................................................................. 28
Using a Volume Snapshot ...................................................................................................... 29Enabling an EBS Volume ........................................................................................................ 29
Helix Server EC2 Reference ......................................................................................................... 31Basic Settings ........................................................................................................................ 31Security Group Port Settings................................................................................................... 32vi Editor Basics ...................................................................................................................... 33
CHAPTER 4: HELIX ADMINISTRATOR .......................................................................................................... 34
Starting Helix Administrator ....................................................................................................... 34Helix Administrator Address ................................................................................................... 34User Name and Password....................................................................................................... 35Changing the Default Password.............................................................................................. 35Adding a New Administrative User.......................................................................................... 36Inactivity Timeout.................................................................................................................. 36
Using the Helix Administrator Interface ....................................................................................... 37Samples ................................................................................................................................ 38License File ............................................................................................................................ 39Online Help........................................................................................................................... 39
Applying Configuration Changes ................................................................................................ 40Restarting the Server or Proxy ................................................................................................. 41Queuing Changes for a Later Restart....................................................................................... 41Closing Open Connections..................................................................................................... 41
Using Feature Setup Pages.......................................................................................................... 41Server Setup .......................................................................................................................... 41Media Delivery....................................................................................................................... 43DRM..................................................................................................................................... 43Broadcasting ......................................................................................................................... 44Broadcast Distribution........................................................................................................... 45Content Management............................................................................................................ 46Security ................................................................................................................................. 46Logging and Monitoring......................................................................................................... 47Proxy Features ....................................................................................................................... 47Virtual Hosting ...................................................................................................................... 48
Media Security........................................................................................................................... 48Helix Session Manager ........................................................................................................... 48Helix Security Manager........................................................................................................... 48
CHAPTER 5: ON-DEMAND DELIVERY........................................................................................................... 49
Content Directory ...................................................................................................................... 49URLs for Media in the Content Directory................................................................................. 49Managing Content Mount Points ........................................................................................... 49HTTP Downloads .................................................................................................................. 52

Contents
v
SFTP Access to an Amazon EC2 Instance ................................................................................ 53Linux SFTP Login ................................................................................................................... 54
HLS and DASH Streaming.......................................................................................................... 54HLS and DASH Client URLs ................................................................................................... 54Segments Directory ................................................................................................................ 55Adding On-demand Content Sources for HLS or DASH ........................................................... 55Tips for Streaming to HLS and DASH Clients .......................................................................... 56
Flash Content ............................................................................................................................ 57Flash Content for Flash Player ................................................................................................ 57H.264/AAC Single-rate Content for Flash Player ...................................................................... 57H.264/AAC Multi-rate Content for Flash Player....................................................................... 57
RTSP Clients.............................................................................................................................. 58SDPGen Client Mount Point................................................................................................... 58Flash H.264/AAC Content for RTSP Clients ............................................................................ 58
Windows Media and Silverlight................................................................................................... 58Windows Media Player........................................................................................................... 59Silverlight Clients ................................................................................................................... 59
Universal Delivery....................................................................................................................... 60Media Encoding for Universal Delivery .................................................................................... 60Universal Clip Source Directory and Request URLs................................................................... 63
CHAPTER 6: BROADCAST METHODS .......................................................................................................... 64
Understanding Broadcasts ......................................................................................................... 64H.264/AAC Broadcasts.......................................................................................................... 64Broadcast Archives ................................................................................................................ 65Encoder Redundancy ............................................................................................................. 65Standby Messages ................................................................................................................. 65Bandwidth Constraints .......................................................................................................... 65Server Monitor for Incoming Streams...................................................................................... 65
Enabling Broadcast Sources for HLS and DASH .......................................................................... 66Flash Broadcasts........................................................................................................................ 67
Flash Broadcast Connection Steps.......................................................................................... 67Flash Broadcast Setup............................................................................................................ 68Flash Broadcast URLs ............................................................................................................ 69
MPEG-2 Network Encoders ........................................................................................................ 69MPEG-2 TS Broadcast Connection Steps ................................................................................ 69MPEG-2 Broadcast Setup....................................................................................................... 70MPEG-2 Broadcast URLs ....................................................................................................... 71
RTP Push Broadcast Method...................................................................................................... 71RTP Push Broadcast Connection Steps ................................................................................... 71RTP Push Setup ..................................................................................................................... 72RTP Broadcast URLs.............................................................................................................. 72
Helix Broadcast Methods ........................................................................................................... 73Helix Broadcast Connection Steps .......................................................................................... 73Helix Broadcast Setup............................................................................................................ 75Helix Push Broadcast URLs..................................................................................................... 76
Windows Media Broadcasts ....................................................................................................... 77Windows Media Push and Pull Modes .................................................................................... 77Windows Media Broadcast Setup ........................................................................................... 77
APPENDIX A: NONSTANDARD INSTALLATIONS .......................................................................................... 78
Installing the Server and Proxy on the Same Machine ................................................................... 78Machine Requirements for Dual Use....................................................................................... 78

Contents
vi
Installing the Server for Dual Use ............................................................................................ 78Installing the Proxy for Dual Use ............................................................................................. 79Starting the Server with a Heartbeat Option ............................................................................ 80
Installing Helix Server with a Web Server..................................................................................... 81Use Nonstandard Ports for Helix Server................................................................................... 81Bind Helix Server to Specific IP Addresses ................................................................................ 81
APPENDIX B: HELIX SERVER FILE FORMATS AND CODECS.......................................................................... 82
File Format Summary ................................................................................................................. 82Codec Summary ........................................................................................................................ 83AAC .......................................................................................................................................... 84AMR ......................................................................................................................................... 84H.263 ....................................................................................................................................... 84H.264 ....................................................................................................................................... 85
ISMA Compliance.................................................................................................................. 85H.264 Levels.......................................................................................................................... 85
MP3.......................................................................................................................................... 85MPEG-4 Part 2 .......................................................................................................................... 86QCELP ...................................................................................................................................... 86QuickTime................................................................................................................................. 86RealMedia and Windows Media ................................................................................................. 87
RealAudio ............................................................................................................................. 87RealVideo.............................................................................................................................. 87Windows Media .................................................................................................................... 88
Uncompressed and Older Formats.............................................................................................. 88
INDEX 89
1
INTRODUCTION
Welcome to Helix™ Universal Server Version 15.1. This guide explains how to install and run Helix Server and Helix Proxy. It shows you how to use the Helix Administrator interface to configure Helix Server or Helix Proxy. It also covers the basic link formats for on-demand clips and live broadcast.
How this Guide Is OrganizedThis administration guide contains the following chapters and appendixes.
Chapter 1: Installation
This chapter explains how to prepare your operating system and install Helix Server or Helix Proxy on a local machine.
Chapter 2: Startup and Shutdown
This chapter describes the methods for starting Helix Server and Helix Proxy software installed on a local machine. Startup methods can include a number of parameters that affect memory use and other features.
Chapter 3: Amazon EC2 Setup
You can run Helix Server as a virtual instance on Amazon Web Services. This chapter describes how to create and configure a Helix Server instance on the Amazon Elastic Compute Cloud (EC2).
Chapter 4: Helix Administrator
Helix Administrator is the browser-based administration tool that you use to configure Helix Server or Helix Proxy. This chapter explains how to use Helix Administrator and access its online help.
Chapter 5: On-Demand Delivery
This chapter explains where to place on-demand content files on Helix Server. It explains the basics of the URL formats that allow media clients to request content. It also shows how to use Helix Producer to encode a H.264/AAC clip that can be delivered to a wide number of media clients.
Chapter 6: Broadcast Methods
This chapter explains the various broadcast methods that you can use to deliver a stream from a live encoder to Helix Server. It summarizes URL formats used by media clients to receive live broadcast streams.
Appendix A: Nonstandard Installations
This appendix complements Chapter 1 by explaining less common methods for installing Helix Server and Helix Proxy.

Helix Media Delivery Platform Quick Start Guide Introduction
2
Appendix B: Helix Server File Formats and Codecs
This appendix summarizes the on-demand file formats and the media codecs that Helix Server can stream.
Conventions Used in this ManualThis section explains some conventional terms and formats used throughout the book.
Terminology
• Because this guide is designed for the Helix Server administrators, the term you refers to the administrator. Persons who play clips served by Helix Server are referred to as visitors, viewers, or users.
• Media players such as RealPlayer or Windows Media Player are referred to as media players or, more generically, as clients.
• The terms clips, content, media clips, and media files are used interchangeably to indicate the material that Helix Server streams.
• Production tools used to create the media clips that Helix Server streams are referred to collectively as encoders.
Typographical Conventions
The following table explains the typographic conventions used in this manual.
Notational Conventions
Convention Meaning
syntax This font is used for syntax of configuration files, URLs, or command-line instructions.
variables Italic text represents variables. Substitute values appropriate for your system.
emphasis Bold text is used for emphasis.
. . . Ellipses indicate nonessential information omitted from examples.
[ ] Square brackets indicate optional material. If you choose to use the material within the brackets, don’t type the brackets themselves. An exception to this is in the basic access log, where statistics generated by the StatsMask variable are enclosed in regular brackets.
3
C H A P T E R
1 Chapter 1: INSTALLATION
This chapter describes the installation process for Helix Server and Helix Proxy on a local server machine running Linux, Solaris, or Windows. It covers initial port selection and explains how to generate certificate files for secure HTTP.
Note: Refer to Appendix A for information about installing both Helix Server and Helix Proxy on the same machine or on a machine that includes a Web server. To install an instance of Helix Server on Amazon Web Service’s Elastic Cloud Computing (EC2), refer to Chapter 3.
Installing Helix ServerTo install Helix Server, you need a binary installation file and a license file that enables the Helix Server features. License files are delivered by e-mail after you receive your Helix Server installer and generate your machine ID as described in Step 4 below.
Tip: If you are upgrading from an earlier version, log into your PAM account at https://pam.realnetworks.com and see Knowledge Base article 905 for tips about preparing an existing installation for upgrade.
➤ To install Helix Server:
1. If you are running Windows Server 2008, the account that runs the installation program must have administrator privileges. On Linux or Solaris, log into the account that will own the Helix Server process.
Note: After installation on Windows, you can modify the configuration file access privileges to allow other users to run Helix Server. See “Modifying Access Privileges” on page 12.
2. Launch the setup file. On Windows, double-click the file. On Solaris or Linux, ensure that the program has executable permission. Then open a command line and run the installer:
./program_name.bin
3. Read the installation recommendations and click Next.
4. Click Browse to navigate to the license key file you received from RealNetworks. Then click Next. See “Obtaining a License Key” on page 5 if you do not yet have a license key.
Tip: The installation process copies the specified license file to the License subdirectory under the main Helix Server directory. On startup, Helix Server reads this local copy of the license. The original license file is no longer required but should be stored securely in case reinstallation is required.

Helix Media Delivery Platform Quick Start Guide CHAPTER 1: Installation
4
5. Read the end-user license agreement, signifying your agreement to its terms by clicking Accept.
6. Enter or browse to the path where you want to install Helix Server. On Windows, you may choose to accept the default path in the C:\Program Files directory or choose another directory path.
7. Enter a user name and password, which are required to access various Helix Server features, such as Helix Administrator. Confirm your case-sensitive password by entering it again.
In the bottom two fields, the installer generates random values for the Helix Administrator ports. Accept the values or choose new values, which are used to log into the Helix Administrator configuration tool described in Chapter 4.
Helix Administrator Log-in Credentials and Administration Ports
For More Information: See “Administration Ports” on page 5.
8. In the next set of screens, you select the default ports that Helix Server uses to listen for requests for specific streaming protocols (RTSP, RTMP, HTTP, HTTPS).
For More Information: See “Streaming Protocol Ports” on page 6.
9. On the certificate files screen, you enter location information used to generate a request file sent to a certificate signing authority. You can leave these fields blank only if you do not plan to use the secure HTTP (HTTPS) features of Helix Server.
For More Information: The section “Creating Certificate Files” on page 7 explains the information fields and the certification process.
10. Select port values used for HTTP requests to specific Helix Server features. To use secure HTTP (HTTPS) for these ports, check the Enable Control Port Security box.
For More Information: See “Feature Control Ports” on page 6.
11. On Windows, the services page of the installer presents two options:

Helix Media Delivery Platform Quick Start Guide CHAPTER 1: Installation
5
• The default installation sets up Helix Server as a service. This is recommended, but you can prevent this by unchecking the Install Helix Server as a Windows service box. In this case, you run Helix Server as an application as described in Chapter 2.
Note: You can later set up Helix Server to run as a service as described in the Helix Administrator online help topic Server Operation > Windows Service Options.
• This installer page also presents the option to Install SNMP Master Agent as a Windows service. If you check this box, the Simple Network Monitoring Protocol master agent is installed as a service. The SNMP option is significant only if you have licensed the SNMP feature.
12. In the final confirmation screen, review the installation information. Click Install to complete the installation process.
Obtaining a License KeyIf you have not received your license file from RealNetworks, copy the 32-character machine ID shown on the second screen of the installation program. Then follow the instructions in the e-mail sent to you when you downloaded the server or proxy installer. This generates a license file valid for the machine on which the installer is running.
If you did not receive an e-mail message, log into your product and maintenance account (PAM) at the following Web page:
https://pam.realnetworks.com
Navigate to the download section for your server and click on the Download license key button.
For More Information: If you have problems generating the machine ID or receiving a license, contact RealNetworks Technical Support at http://realnetworks.com/helix/streaming-media-support.
Selecting Port ValuesThe following sections provide guidelines for choosing port values when installing Helix Server. RealNetworks recommends accepting the default ports unless those values conflict with existing port assignments. You do not need to configure ports for transport-layer protocols such as TCP and UDP.
Tip: You can change port assignments after installation. Start Helix Administrator (see Chapter 4) and navigate to the Server Setup > Ports page (Proxy Setup > Ports page on Helix Proxy). For instructions about changing ports, click the Help link.
Administration Ports
Helix Administrator can connect to Helix Server using HTTP or HTTPS. The installation program generates a random port value used for each protocol. RealNetworks recommends

Helix Media Delivery Platform Quick Start Guide CHAPTER 1: Installation
6
that you accept the default values, but you may choose values for any open ports. Be sure to remember or record the values that are used.
For More Information: The section “Starting Helix Administrator” on page 34 explains how to access Helix Administrator using these ports.
Streaming Protocol Ports
The following are the standard ports used for streaming protocols. RealNetworks recommends using these port values whenever possible. Media clients use these ports by default when requesting content.
Nonstandard Values for Protocol Ports
If you choose a different port number for a protocol, you may need to include the port number in URLs used to request media. Once you start Helix Server, you can find more information about nonstandard port use by logging into Helix Administrator, navigating to the Server Setup > Ports page (Proxy Setup > Ports page on Helix Proxy), and clicking the Help link.
Starting as root in Solaris and Linux
On Solaris and Linux, you have to log in as root to start Helix Server if you set port values lower than 1000. You can, however, change the ownership of the Helix Server process to a different user after startup. After you log into Helix Administrator, navigate to the Server Setup > User/Group Name page (Proxy Setup > User/Group Name page on Helix Proxy) to set up this feature.
Feature Control Ports
The following port assignments set HTTP/HTTPS ports that are used only with the RTSP fast-channel switching feature and the server-side playlist feature, which is supported for both RTSP and HLS clients.
Tip: The server-side playlist feature is distinct from the playlists used with HLS and DASH clients, which end in the file extension .m3u8 or .mpd. You do not need to set up the server-side playlist feature to generate playlists and segment files for HLS and DASH clients.
RTSP Fast Channel Switching API Port (8008)
This port is used with the RTSP fast channel switching feature. Helix Server listens on this port for HTTP requests to switch a channel stream to a new source. If you do not use the channel switching feature, you do not need to define this port value, which defaults to 8008.
HTTP 80
HTTPS 443
RTSP 554
MMS 1755
RTMP 1935

Helix Media Delivery Platform Quick Start Guide CHAPTER 1: Installation
7
Server-Side Playlist API Port (8009)
Helix Server uses this port with the server-side playlist feature for RTSP and HLS clients. It listens on this port for HTTP requests to switch to different parts of an externally controlled playlist. The default value is 8009. Note the following about this port:
• If you do not use the server-side playlist feature, you do not need to define this port value.
• You can set this port to the same value as another HTTP port, such as the main HTTP port (default value of 80), the FCS port (default value of 8008), or the content management port (default value of 8010).
• If you leave the port value undefined, any Helix Server port capable of handling HTTP communication can accept playlist controller requests.
Content Management Port (8010)
Helix Server listens on this port for HTTP API requests to add or delete content. This port is used with the server-side playlist feature as well as virtual hosting. The default value is 8010. Note the following about this port:
• A port value must be assigned even if you do not use a feature that requires the use of content management APIs.
• You can set this port to the same value as another HTTP port, such as the main HTTP port (default value of 80), the FCS port (default value of 8008), or the playlist control port (default value of 8009).
• If Helix Server runs on a multi-homed machine, RealNetworks recommends that you configure your firewall to block this port on any public IP address that Helix Server uses. The Web portal should then contact Helix Server on this port using a private IP address.
For More Information: For details about using content management APIs, refer to the Helix Administrator online help topic Helix Administrator > Server Setup > Mount Points > Content Management APIs.
Control Port Security
If you check the Enable Control Port Security box, all feature ports described in the preceding sections accept only HTTPS connections. If you leave the box unchecked, the ports accept only HTTP connections. Do not enable control port security if you plan to use port 80 for any of the port values.
Creating Certificate FilesDuring installation, the Helix Server or Helix Proxy installer generates 2048-bit security keys and a certificate signing request (.csr file). A certificate signing authority uses this request file to validate the identity of your server for secure HTTP (HTTPS) transactions.
Tip: After you install Helix Server or Helix Proxy, you can modify HTTPS settings by, for example, turning off support for certain versions of SSL. In the Helix Administrator online help, refer to the topic Configuration File > Security Configuration > SSL Certificates Configuration.

Helix Media Delivery Platform Quick Start Guide CHAPTER 1: Installation
8
Specifying Certificate Information
The Helix Server or Helix Proxy installation program asks for the following information needed to generate a certificate request:
Warning! Leaving non-optional fields blank invalidates the certificate request.
For More Information: You can find a list of ISO country codes at http://www.iso.org/iso/country_codes/.
Requesting a Signed Certificate
The installation process generates the certificate signing request file, key.csr, in the Certificates subdirectory of the main installation directory. You send this file to the certificate signing authority to receive an officially signed certificate. RealNetworks does not endorse the use of any specific signing authority.
For More Information: You can learn more about the signing process at the Web site of any signing authority, such as http://www.verisign.com/.
Using Self-Signed Certificates
Until you receive a response from a signing authority, your certificates are self-signed. These certificates will function with HTTPS requests. Note the following about using self-signed certificates, however:
• Browsers warn the user that the server is untrusted. Users may then choose to add an exception for the server.
• HTTPS requests for content segmented for HLS and DASH clients do not work with self-signed certificates.
Country Code Two-letter ISO code used to identify the country in which the server resides. For the United States, for example, the code is US.
State/Province Your state or province spelled out fully, as in Washington.
Locality The full name of your city, as in Seattle.
Organization The official business name of your organization, as in RealNetworks, Inc. Do not include special characters such as & or @ in the organization name. Spell out these symbols or omit them.
Org. Unit Optional. Organizational unit of your company, as in Technology and Products.
Common Name The name of the server, as in helixserver.example.com. Include the host name (for example, helixserver) along with the domain name (for instance, example.com). If you register only the domain name, browsers contacting the specific host will warn of a certificate mismatch. The signing authority may accept all host names if you enter a wild card, as in *.example.com. Verify this with your signing authority first.
Contact E-mail Your e-mail address, as in [email protected].
CSR Name Name of the authority that will sign the certificate, as in Verisign.

Helix Media Delivery Platform Quick Start Guide CHAPTER 1: Installation
9
Running the OpenSSL Program
Helix Server or Helix Proxy generates .pem and .key files using the OpenSSL program provided by the OpenSSL Project. The executable file, openssl.exe, is included in the Bin subdirectory of the main installation directory. This program has many uses, including regenerating the .csr and .pem files without running the installation program.
Tip: On Windows, the install.log file in the main installation directory records the commands used with the openssl.exe program to generate the .csr and .pem files. On Linux and Solaris, this information is written to stdout and not saved unless you redirect the installer output to a file.
For More Information: Documentation for the openssl.exe program is available at the OpenSSL Project Web site, http://www.openssl.org/.
Installing Helix ProxyTo install Helix Proxy, you need a binary installation file and a license file that enables the Helix Proxy features. License files are delivered by e-mail after you receive your Helix Proxy installer and generate your machine ID as described in Step 4 below.
➤ To install Helix Proxy:
1. If you are running Windows Server 2008, the account that runs the installation program must have administrator privileges. On Linux or Solaris, log into the account that will own the Helix Proxy process.
Warning! After installation on Windows, you can modify the configuration file access privileges to allow other user to run Helix Proxy as described in “Modifying Access Privileges” on page 12.
2. Launch the setup file. On Windows, double-click the file. On Solaris or Linux, ensure that the program has executable permission. Then open a command line and run the installer:
./program_name.bin
3. Read the installation recommendations and click Next.
4. Click Browse to navigate to the license key file you received from RealNetworks. Then click Next. See “Obtaining a License Key” on page 5 if you do not yet have a license key.
Tip: The installation process copies the specified license file to the License subdirectory under the main Helix Proxy directory. On startup, Helix Proxy reads this local copy of the license. The original license file is no longer required, but should be stored securely in case reinstallation is required.
5. Read the end-user license agreement, signifying your agreement to its terms and conditions by clicking Accept.
6. Enter a path where you want to install Helix Proxy. On Windows, you may choose to accept the default path or specify a different path.
7. Enter a user name and password required to access Helix Administrator. Confirm your case-sensitive password by entering it again. In the bottom fields, the installer generates
Helix Media Delivery Platform Quick Start Guide CHAPTER 1: Installation
10
values for the ports used to access Helix Administrator. Accept the values or choose new values.
For More Information: See “Administration Ports” on page 5.
8. In the next screen, you define the port that Helix Proxy uses for the RTSP protocol. RealNetworks recommends accepting the default port unless that value will cause conflicts with other applications.
For More Information: See “Streaming Protocol Ports” on page 6. If installing on Solaris or Linux, see also “Starting as root in Solaris and Linux” on page 6.
9. On the certificate files screen, you enter location information used to generate a request file sent to a certificate signing authority. You can leave these fields blank only if you do not plan to use the secure HTTP (HTTPS) features of Helix Proxy.
For More Information: The section “Creating Certificate Files” on page 7 explains the information fields and the certification process.
10. On Windows, the services page of the installer presents two options:
• The default installation sets up Helix Proxy as a service. This is recommended, but you can prevent this by unchecking the Install Helix Mobile Gateway as a Windows service box. In this case, you run Helix Proxy as an application as described in Chapter 2.
Note: You can later set up Helix Proxy to run as a service as described in the Helix Administrator online help topic Server Operation > Windows Service Options.
• This installer page also presents the option to Install SNMP Master Agent as a Windows service. If you check this box, the Simple Network Monitoring Protocol master agent is installed as a service. The SNMP option is significant only if you have licensed the SNMP feature.
11. In the final confirmation screen, review the installation information. Click Install to complete the installation process.
11
C H A P T E R
2 Chapter 2: STARTUP AND SHUTDOWN
This chapter explains how to start up and shut down Helix Server or Helix Proxy running on a local machine. It also describes how to assign a maximum memory use value to the server process.
For More Information: For information about shutting down or rebooting a Helix Server instance running on Amazon EC2, refer to the section “Managing an Instance” on page 23.
Memory UseBy default, Helix Server or Helix Proxy uses up to 80 percent of physical RAM with an absolute limit of 1.6 GB. For example, on a machine with 1 GB of physical RAM, Helix Server or Helix Proxy may request up to 800 MB of memory. On a machine with 2 GB or 4 GB of RAM, it will request up to 1.6 GB of memory as needed. As shown in the examples in this chapter, you can use the -m startup option to set a new value in Megabytes for memory allocation.
For More Information: After you start Helix Server or Helix Proxy, you can learn more about memory use from the Helix Administrator online help topic Server Operation > Memory Allocation.
Starting the Server on WindowsThe following sections explain how to start Helix Server or Helix Proxy as a Windows service, from the Start menu, or from the Windows command line:
Running a Windows Service
In its default Windows installation, Helix Server or Helix Proxy is set up as a service under the product name. The application always runs in the background, and you do not need to start it. You may, however, want to add startup parameters to change the maximum allowable memory. The following procedure explains how to edit the Windows registry to add start-up options to a server or proxy running as a Windows service.
Note: Do not add start-up parameters to the Start parameters field of the service’s Properties dialog.
➤ To add options to a Windows service:
1. Choose Start > Settings > Control Panel.
2. Double-click Administrative Tools.
3. Launch Services.

Helix Media Delivery Platform Quick Start Guide CHAPTER 2: Startup and Shutdown
12
4. Right-click the service name, such as Helix Server or Helix Proxy, and choose Stop.
5. Choose Start > Run to open the Windows Registry Editor.
6. Enter the following command:
regedit
7. Navigate to the following registry key, in which ServiceName is the name of the service, such as Helix Server:
HKEY_LOCAL_MACHINE\SYSTEM\ControlSet001\Services\ServiceName
8. Click the key name, then click the StartupParams entry in the right-hand pane.
9. Choose Modify.
10. Add the command option to the end of the Value data field. For example, the following -m startup option sets a memory allocation of two Gigabytes:
"C:\Program Files\Real\Helix Server\rmserver.cfg" -m 2048
11. Click OK.
12. Return to the Services list, highlight the service name, right-click, and choose Start.
For More Information: The Helix Administrator online help topic Server Operation > Startup Command Options explains all of the startup options.
Modifying Access Privileges
You will need to change the access privileges on the Helix Server or Helix Proxy configuration file if the following are true:
• You plan to run Helix Server or Helix Proxy as an application rather than a service.
• You want to run Helix Server or Helix Proxy under an account other than Administrator. This includes all users in the administrator group other than the actual Administrator account.
➤ To change configuration file access privileges:
1. Log into Windows Server with the Administrator account.
2. Open Windows Explorer and browse to the main Helix Server or Helix Proxy installation directory.
3. Right-click the configuration file (rmserver.cfg or rmproxy.cfg) and choose Properties.
4. On the Security tab, click Edit and mark the file for Full control by the Users group or another group as appropriate for your organization’s security policies.
5. Click OK to exit the dialog.
Using the Start Menu or a Desktop Icon
To start up from the Windows desktop, double-click the server or proxy icon added to the desktop by the installation program. Or, from the Start menu, select the Helix Server or Helix Proxy entry. By default, the server or proxy uses the configuration file created by the

Helix Media Delivery Platform Quick Start Guide CHAPTER 2: Startup and Shutdown
13
installation program (rmserver.cfg or rmproxy.cfg). If necessary, you can change startup options as described in the following procedures.
➤ To change the startup options in a desktop or Start menu icon:
1. Stop the server if it is running (see page 15).
2. Right-click the application icon on the desktop or in the Start menu.
3. Select Properties.
4. In the Target field, change the name of the configuration file or add the command options to the end of the command line syntax. For example, the following -m option sets the maximum memory usage at two Gigabytes:
"C:\Program Files\Real\Helix Server\Bin\rmserver.exe" "C:\Program Files\Real\Helix Server\rmserver.cfg" -m 2048
5. Save the properties and close the dialog.
6. Repeat this procedure for each shortcut icon that you use to start the server or proxy.
7. Double-click the icon to restart the server.
For More Information: For more about memory usage, see the Helix Administrator online help topic Server Operation > Memory Allocation. You can also include any of the startup options described in the topic Server Operation > Startup Command Options.
Starting Up from the Windows Command Line
From the Start menu, open the command prompt and navigate to the main installation directory. Enter the following command to start Helix Server with its default configuration file and memory use:
Bin\rmserver.exe rmserver.cfg -option1 -option2 ...
The following command starts Helix Proxy:
Bin\rmproxy.exe rmproxy.cfg -option1 -option2 ...
You may want to set a memory maximum by including the -m startup option. For example, the following allows Helix Server to use up to two Gigabyte of memory:
Bin\rmserver.exe rmserver.cfg -m 2048
Note: If configuration file variables contain relative paths, you must start the server or proxy from its main installation directory to ensure that the paths resolve.
For More Information: For more about memory usage, see the Helix Administrator online help topic Server Operation > Memory Allocation. You can also include any of the startup options described in the topic Server Operation > Startup Command Options.

Helix Media Delivery Platform Quick Start Guide CHAPTER 2: Startup and Shutdown
14
Starting the Server on Linux or SolarisIf you performed a default installation of Helix Server or Helix Proxy, the RTSP port is set lower than 1024, requiring the user who starts the server or proxy to log in as root. If you do not want the server or proxy to inherit root privileges, you can switch it to another user and group name immediately after it starts up changing the settings in the User/Group Name page in the Setup section of Helix Administrator.
Running the Startup Script
The Bin directory of Helix Server and Helix Proxy contains a shell script called rmserver or rmproxy that uses ulimit to set a maximum number of file descriptors and starts the server with one Gigabyte of available application memory as shown here:
ulimit -n 102400 ./rmserver.bin -m 1024 ../rmserver.cfg
You can modify the shell script as needed. Run the script from the Bin directory. For example:
./rmserver
For More Information: For additional information about file descriptors, the Helix Administrator online help topic Server Operation > Operating System Modifications.
Starting Up from the Command Line
To start Helix Server or Helix Proxy directly from the command line, open any shell and navigate to the main Helix Server or Helix Proxy installation directory. Start Helix Server using the following command, in which the use of & to run the server or proxy as a background process is optional:
Bin/rmserver.bin rmserver.cfg -option1 -option2 ... &
Use the following command with Helix Proxy:
Bin/rmproxy.bin rmproxy.cfg -option1 -option2 ... &
A common practice is to change the amount of memory that the server or proxy can use. Do this by including the -m parameter and the amount of memory in Megabytes. For example, the following allows Helix Server to use up to four Gigabytes of memory:
Bin/rmserver.bin rmserver.cfg -m 4096 &
Note: If configuration file variables contain relative paths, you must start the server or proxy from its main installation directory to ensure that the paths resolve.
For More Information: For more about memory usage, see the Helix Administrator online help topic Server Operation > Memory Allocation. You can also include any of the startup options described in the topic Server Operation > Startup Command Options.

Helix Media Delivery Platform Quick Start Guide CHAPTER 2: Startup and Shutdown
15
Stopping the ServerIt’s generally not necessary to stop Helix Server or Helix Proxy when it’s running. You can make configuration changes while the application runs. If changes require a restart, you can restart the server or proxy using Helix Administrator as described in “Restarting the Server or Proxy” on page 41.
Tip: By implementing delayed shutdown on the server or proxy, you can allow media players to report playback statistics before the shutdown commences. In Helix Administrator, navigate to the Delayed Shutdown page of the Setup section.
Shutting Down on Windows
If Helix Server or Helix Proxy was started as a Windows service, stop it through the Services control panel. Give the Start > Settings > Control Panel command. Then double-click Administrative Tools and Services. Locate the service name on the list (such as Helix Server or Helix Proxy), highlight it, and click Stop.
If you started Helix Server or Helix Proxy manually, switch to the command window and press Ctrl+c. You can also use the Task Manager (Ctrl+Alt+Del) to stop the application.
Shutting Down on Solaris or Linux
To stop Helix Server or Helix Proxy on Solaris or Linux, obtain the parent process identification number, and then issue the kill command with that process number.
PID File Location
A text file records the current value of the process ID of the parent process (rmserver or rmproxy) The file, named rmserver.pid or rmproxy.pid, is stored in the directory indicated by the PidPath variable. If PidPath is omitted from the configuration file, the server or proxy stores the information in the directory specified by the LogPath variable.
Kill Command Using the PID File
From the command line, navigate to the directory that contains the PID file, and type the following, where pidfile is the name of the PID file:
kill ‘cat pidfile‘

16
C H A P T E R
3 Chapter 3: AMAZON EC2 SETUP
This chapter explains how to create a virtual instance of Helix Server running on CentOS Linux on Amazon Elastic Compute Cloud (EC2). It covers the installation process on Amazon Web Services and explains how to assign extra EBS storage to the instance.
For More Information: For background on EC2, refer to the Amazon documentation at http://docs.aws.amazon.com/AWSEC2/latest/UserGuide/. For more about the Helix Server cloud-based service, refer to the RealNetworks Web site at http://www.realnetworks.com/helix/helix-cloud/.
Signing Up with Amazon Web ServicesIf you do not have an Amazon Web Services (AWS) account, you can sign up for Web services at the Marketplace Web site:
https://aws.amazon.com/marketplace
Click the Create a new account link at the top of the page. You can use an existing Amazon account or create a new account associated with your e-mail address. Follow the instructions on the screen to set up the account details.
Creating an Instance from the MarketplaceIf you are new to the EC2 service on AWS, using the 1-click installation method from the AWS Marketplace is the simplest way to create a Helix Server instance. However, you cannot create a new security key pair (a .pem file) if one or more keys are associated with your AWS account already. You are also limited in the options you can set. For example, the instance you create will have a predefined root volume size of 10 Gigabytes, although you can later create an additional EBS volume to provide more disk space for media files.
Tip: For more flexibility when setting up your Helix Server instance, create the instance using the EC2 console as described beginning on page 18.
Finding the Helix Server Product
To begin using the 1-click installation method, click the Sign in link at the top of the Marketplace page:
https://aws.amazon.com/marketplace
In the page’s search bar, search for Helix Universal Server. The Helix Server product pages provide information about and pricing for the Helix Server products that you can run on EC2. To begin creating the instance, select the page for the Helix Server product you want to use, review the pricing details, and click Continue.

Helix Media Delivery Platform Quick Start Guide CHAPTER 3: Amazon EC2 Setup
17
Helix Server Pricing Information on the AWS Marketplace
Setting Options for the Instance
On the next AWS page, configure the Helix Server instance under the 1-Click Launch tab. When you set the basic features described below, deploy the instance by clicking the Launch with 1-Click button. You can then use the instance as described in “Managing an Instance” on page 23.
Version
The Version entry defaults to the latest Helix Server version available on EC2. To choose a different version, toggle the drop-down and select the version number.
Region
For Region, use the drop-down to select the region where the virtual instance will be hosted. This is typically the geographical region closest to the primary audience for your streaming content.
Tip: On the Launch with EC2 Console tab, you can select the region and then finish the installation with the console, which allows you to choose more options than with 1-click installation. After you move to the console, click Continue on the first wizard page. Then follow the instructions in the section “Setting the Instance Size” on page 19.
EC2 Instance Type
Under EC2 Instance Type, choose the memory, CPU, and maximum storage capacity of the Helix Server instance. The amount of memory is the total available to the instance, including the CentOS operating system and Helix Server. For help choosing which EC2 instance size is appropriate for your streaming needs, consult your RealNetworks representative.
VPC Settings
A virtual private cloud (VPC) resembles a datacenter network running within Amazon Web Services. If you create a VPC, you can assign it a range of IP addresses, set up subnets, and enable multiple security layers. Using a VPC may help you to manage multiple Helix Server instances more effectively. To install a single instance without a VPC, choose EC2 Classic.

Helix Media Delivery Platform Quick Start Guide CHAPTER 3: Amazon EC2 Setup
18
For More Information: If you want to set up a VPC, refer to the guide at http://docs.aws.amazon.com/AmazonVPC/latest/UserGuide/VPC_Introduction.html.
Security Group
The security group setting determines which ports on the virtual machine are accessible to outside processes. In most cases, you can choose the predefined Helix Server security group that displays by default. Click the heading to show all available security groups or create a new one.
Warning! Do not choose the default security group. This is a general EC2 default that does not provide the appropriate firewall settings for Helix Server.
For More Information: The Security Group drop-down has a link to the Amazon documentation that explains how security groups work. “Security Group Port Settings” on page 32 explains the port settings in the standard security group.
Key Pair
The key pair allows you to log into the Helix Server instance securely. If your AWS account already has one or more keys associated with it, select a key here. If you have not yet created a key pair, you can provide a name for a new key and save the .pem file. For instance, a key named Helix Example downloads a file called HelixExample.pem to your browser.
Warning! Keep the .pem file in a secure location. For security reasons, you cannot download additional copies of the .pem file after it is created. If you lose the .pem file, you will not have root access to any Helix Server instance that is created using this key.
Creating an Instance from the EC2 ConsoleCreating a Helix Server instance from the EC2 console provides greater flexibility in specifying the options when the instance is created. Open the AWS EC2 page in your browser:
• https://console.aws.amazon.com/ec2/home
From the top banner of the page, choose the region where the instance will be deployed.
EC2 Region Selection
On the EC2 Dashboard at the left side of the console page, click the Images category and the AMIs (Amazon Machine Images) link.

Helix Media Delivery Platform Quick Start Guide CHAPTER 3: Amazon EC2 Setup
19
AMI Selection
In the page’s filter banner, you can search for the machine image used to create the Helix Server instance. Select Public Images and search for Helix Universal Server.
AMI Search for Helix Universal Server
The results show the available Helix Server image types. Select the image that corresponds to the version of the service you want to install. Click the Launch button to start the instance configuration wizard.
For More Information: For more about using optional instance features, refer to http://docs.aws.amazon.com/AWSEC2/latest/UserGuide/LaunchingAndUsingInstances.html.
Setting the Instance Size
On the first page of the installation wizard, click a category to display all instance types or only the instances that meet certain criteria such as memory optimization. In the main list, select the instance you want to deploy based on memory, storage, and CPU capability. The memory amount is the total available to the instance, including the operating system and Helix Server. Click Next to proceed.
Instance Type Selection
Warning! The T1 Micro size is not supported for Helix Server instances.
Helix Media Delivery Platform Quick Start Guide CHAPTER 3: Amazon EC2 Setup
20
For More Information: For help choosing the instance size that is appropriate for your streaming needs, consult your RealNetworks representative.
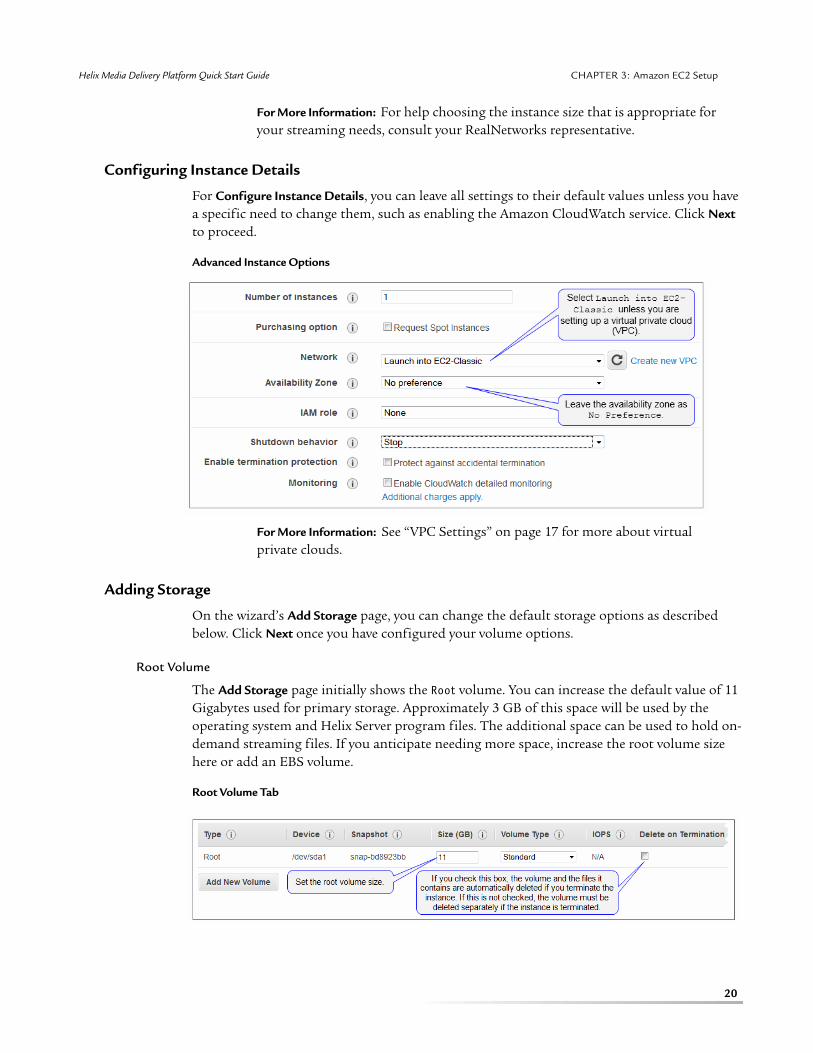
Configuring Instance Details
For Configure Instance Details, you can leave all settings to their default values unless you have a specific need to change them, such as enabling the Amazon CloudWatch service. Click Next to proceed.
Advanced Instance Options
For More Information: See “VPC Settings” on page 17 for more about virtual private clouds.
Adding Storage
On the wizard’s Add Storage page, you can change the default storage options as described below. Click Next once you have configured your volume options.
Root Volume
The Add Storage page initially shows the Root volume. You can increase the default value of 11 Gigabytes used for primary storage. Approximately 3 GB of this space will be used by the operating system and Helix Server program files. The additional space can be used to hold on-demand streaming files. If you anticipate needing more space, increase the root volume size here or add an EBS volume.
Root Volume Tab

Helix Media Delivery Platform Quick Start Guide CHAPTER 3: Amazon EC2 Setup
21
Tip: Placing on-demand clips on the root volume is simpler than using EBS storage. Your Helix Server instance is preconfigured to stream files from the root volume. If you use an EBS volume, you must configure the volume using the Linux command line as described on page 29 and modify the Helix Server mount points as described on page 49.
Note: Once the instance is created, the root volume size cannot be increased. However, you can add an EBS volume to an existing instance to supplement the root volume storage space.
EBS Volume
Click Add New Volume to attach an additional EBS (Elastic Block Store) to the instance. This volume can be used to hold streaming media files in addition to or instead of the root volume. You must later configure the volume settings as described in “Enabling an EBS Volume” on page 29.
EBS Volume
Device
The Device setting indicates the volume’s device name. The Helix Server instance is preconfigured to use /dev/sdb.
Snapshot
Leave Snapshot blank to create a blank volume. If you have a volume defined as a snapshot (see page 29), you can choose that snapshot to copy its contents to the new volume.
Size
For the volume size, specify the Gigabytes appropriate for your streaming needs. Your EC2 account will be charged based on the volume size whether or not the disk space is utilized.
Note: You cannot increase the size of an EBS volume after it has been created. However, you can create a snapshot from it (see page 29), create a larger volume from the snapshot, then attach the new volume to the instance. Refer to the Amazon EC2 documentation for details.
Defining Instance Tags
Tags are metadata value pairs that you can add to your instance to identify the resource or to facilitate billing. Add a unique name for the instance as the value of the predefined Name key. This helps you to identify the instance in the console. Optionally you can create up to nine more tags. Click Next to proceed.
Helix Media Delivery Platform Quick Start Guide CHAPTER 3: Amazon EC2 Setup
22
Instance Tags
For More Information: For more about the various uses for tags, refer to http://docs.aws.amazon.com/AWSEC2/latest/UserGuide/Using_Tags.html.
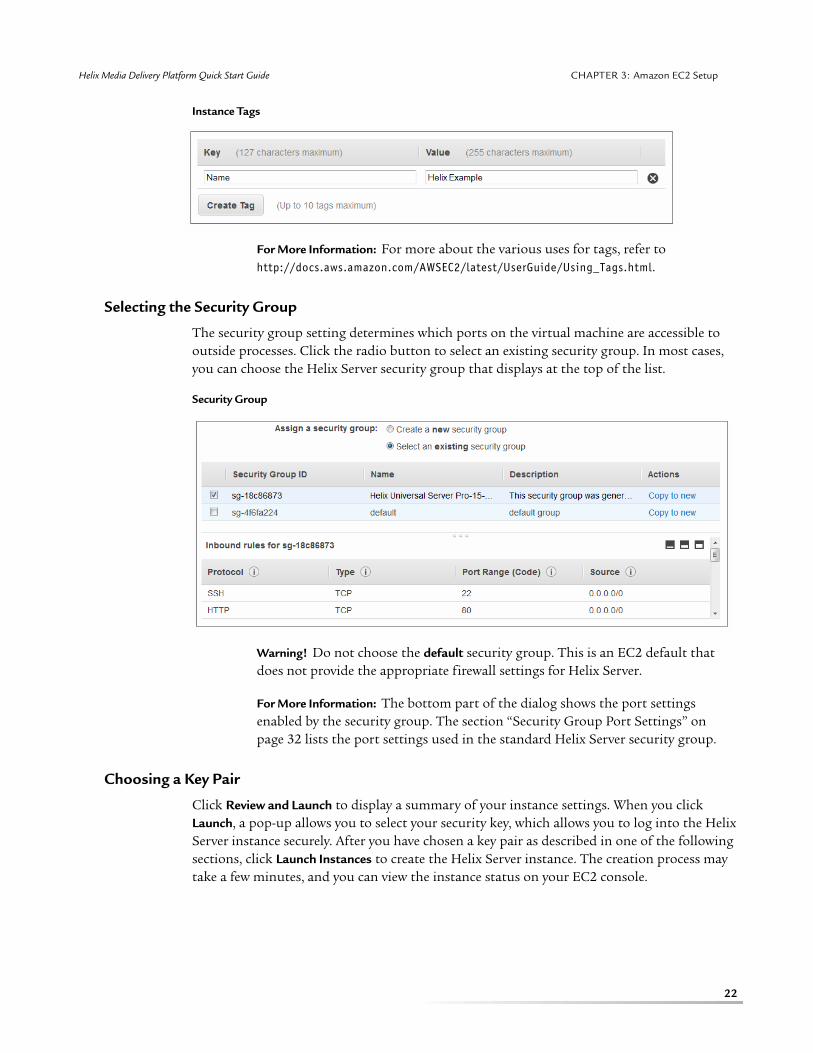
Selecting the Security Group
The security group setting determines which ports on the virtual machine are accessible to outside processes. Click the radio button to select an existing security group. In most cases, you can choose the Helix Server security group that displays at the top of the list.
Security Group
Warning! Do not choose the default security group. This is an EC2 default that does not provide the appropriate firewall settings for Helix Server.
For More Information: The bottom part of the dialog shows the port settings enabled by the security group. The section “Security Group Port Settings” on page 32 lists the port settings used in the standard Helix Server security group.
Choosing a Key Pair
Click Review and Launch to display a summary of your instance settings. When you click Launch, a pop-up allows you to select your security key, which allows you to log into the Helix Server instance securely. After you have chosen a key pair as described in one of the following sections, click Launch Instances to create the Helix Server instance. The creation process may take a few minutes, and you can view the instance status on your EC2 console.

Helix Media Delivery Platform Quick Start Guide CHAPTER 3: Amazon EC2 Setup
23
Using an Existing Key Pair
If you have an existing key pair, you can use that key by selecting Choose an existing key pair in the first drop-down. Select the key pair in the second drop-down and check the acknowledgment box.
Existing Key Selection
Creating a New Key Pair
If you do not have a key pair defined for your AWS account, select Create a new key pair in the drop-down, provide a name for the key, click the download button, and save the .pem file. For instance, a key named Helix Example creates a file called HelixExample.pem.
New Key Generation
Tip: You can use the same key for all instances you create, or you can create multiple key pairs for use with different instances.
Warning! Keep each .pem file in a secure location. For security reasons, you cannot download additional copies of the .pem file after it is created. If you lose the .pem file, you will not have root access to any Helix Server instance that is created using that key.
Managing an InstanceAfter a Helix Server instance deploys, you can configure it from the EC2 console page:
• https://console.aws.amazon.com/ec2/home
Helix Media Delivery Platform Quick Start Guide CHAPTER 3: Amazon EC2 Setup
24
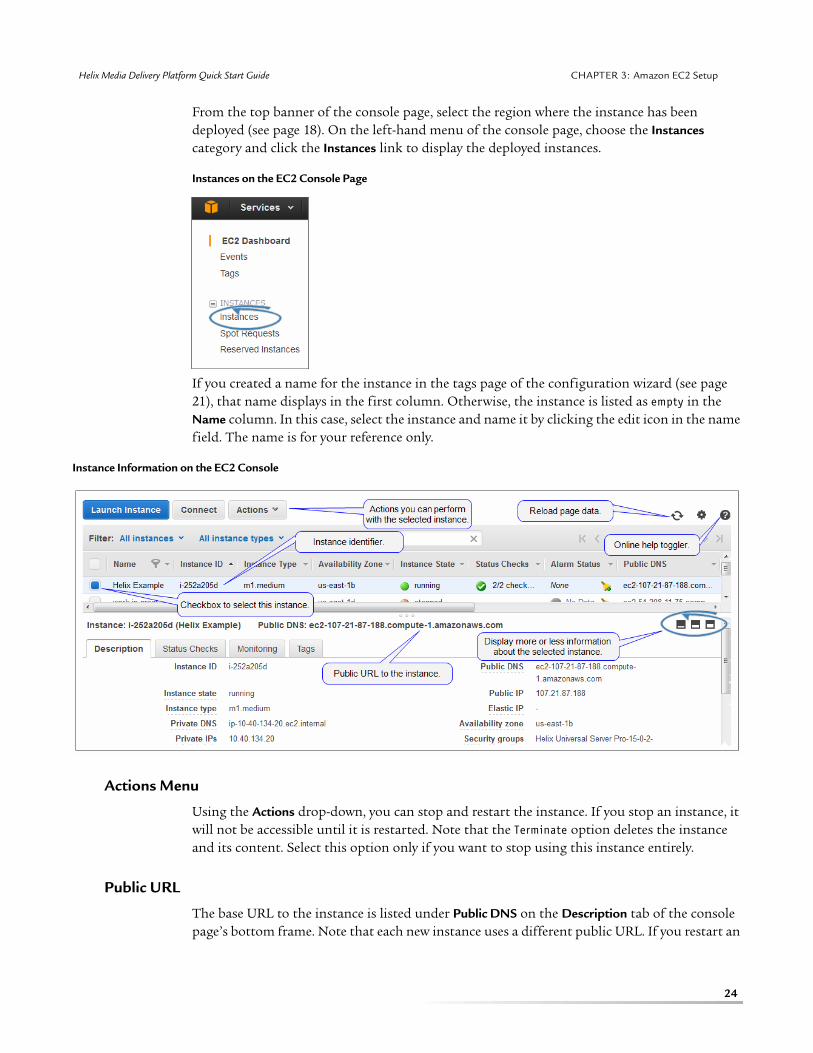
From the top banner of the console page, select the region where the instance has been deployed (see page 18). On the left-hand menu of the console page, choose the Instances category and click the Instances link to display the deployed instances.
Instances on the EC2 Console Page
If you created a name for the instance in the tags page of the configuration wizard (see page 21), that name displays in the first column. Otherwise, the instance is listed as empty in the Name column. In this case, select the instance and name it by clicking the edit icon in the name field. The name is for your reference only.
Instance Information on the EC2 Console
Actions Menu
Using the Actions drop-down, you can stop and restart the instance. If you stop an instance, it will not be accessible until it is restarted. Note that the Terminate option deletes the instance and its content. Select this option only if you want to stop using this instance entirely.
Public URL
The base URL to the instance is listed under Public DNS on the Description tab of the console page’s bottom frame. Note that each new instance uses a different public URL. If you restart an

Helix Media Delivery Platform Quick Start Guide CHAPTER 3: Amazon EC2 Setup
25
instance or if you delete it and replace it with a new instance, you will need to update the URLs that media players use to request content. To create a stable IP address associated with your AWS account rather than a specific instance, set up an elastic IP address as explained here:
http://docs.aws.amazon.com/AWSEC2/latest/UserGuide/elastic-ip-addresses-eip.html
For More Information: Chapter 5 explains URLs to on-demand content. Chapter 6 covers live broadcasts.
Helix Server Configuration
The EC2 console controls the overall operation of the instance. To configure the streaming features of Helix Server, you use a separate browser-based interface called Helix Administrator. If you do not need to add an EBS volume or change Helix Server memory use as described later in this chapter, refer to Chapter 4 beginning on page 34 for information about logging into Helix Administrator.
Logging in with SSHYour Helix Server instance supports secure shell (SSH), which you can use to log into the root level of the instance using the secure key you generated. Using SSH, you can change memory usage (see page 27), enable an EBS volume (see page 29), or make root-level changes to the instance’s operating system.
Tip: When you log in using any method, SSH warns that the instance cannot be authenticated. This is normal, and the SSH program allows you to designate the instance as a trusted source.
For More Information: The section “SFTP Access to an Amazon EC2 Instance” on page 53 explains how to log into the instance to transfer content using the secure FTP protocol.
Browser SSH Login
You can use SSH from any Java-enabled browser. On the instances page of the EC2 console (Instances > Instances), select the instance and click Connect at the top of the console. In the pop-up browser window, click the radio button to use a Java SSH client and enter the full path to the key file (.pem). Once you have selected the key, click Launch SSH Client.
SSH Login from a Java-Enabled Browser

Helix Media Delivery Platform Quick Start Guide CHAPTER 3: Amazon EC2 Setup
26
Windows PuTTY Client
On Windows, you can use the PuTTY client to log in with SSH. This is more flexible than using a browser. Download the PuTTY client from your preferred shareware site or directly from http://www.putty.org/.
Configuring Basic SSH Settings
After you install and launch the client, configure access using SSH on port 22 with the public address of the Helix Server instance (see page 24). You can automatically log into the root account using the following as the address:
root@InstancePublicAddress
For example:
PuTTY Windows Client Setup
Tip: You can save the log-in parameters under a user-defined name. This allows you to reload the SSH session properties later.
Converting the Key
PuTTY does not support the use of the key in the .pem format, but you can convert the key to the supported .ppk format using the PuTTYgen utility that was installed with the PuTTY client. Refer to the following Amazon documentation for instructions:
http://docs.aws.amazon.com/AWSEC2/latest/UserGuide/putty.html#putty-private-key
Note: The .ppk file can also be used by the WinSCP client to transfer media files to the instance (see page 53).
Logging In
Once you have loaded the security key in the .ppk format, log into the instance. If you did not configure the basic access credentials to log in as root automatically, the SSH client asks for this login name. No password is required.
Note: All SSH commands are case-sensitive.
Linux SSH Login
On Linux, you can use SSH from any command-line shell to log in with the public address of the Helix Server instance (see page 24).
➤ To log into the instance using SSH on Linux:
1. Navigate to the directory that holds the .pem file. For example:

Helix Media Delivery Platform Quick Start Guide CHAPTER 3: Amazon EC2 Setup
27
cd /home/helix
2. SSH will not use the .pem file if the file does not have appropriate file access restrictions. The following command provides your account with read and write access to the .pem file but restricts other users from accessing it:
chmod 600 pem_file
For example:
chmod 600 HelixExample.pem
3. You can then log into the instance using SSH:
ssh -i pem_file root@InstancePublicAddress
For example:
ssh -i HelixExample.pem [email protected]
Changing Helix Server MemoryBy default, a Helix Server instance uses up to 80 percent of RAM with an absolute limit of 1.6 GB. For example, on a virtual machine with 1 GB of physical RAM, Helix Server may request up to 800 MB of memory. If there is 2 GB or 4 GB of RAM, Helix Server will request up to 1.6 GB of memory as needed. To utilize more memory on your Helix Server instance, edit the last line of the /etc/rc.local file, which contains the Helix Server start-up command.
➤ To change the Helix Server memory allocation:
1. Log into the Helix Server instance using SSH (see page 25).
2. Navigate to the /etc directory:
cd /etc
3. Edit the rc.local file using the vi text editor:
vi rc.local
4. Scroll to the bottom of the file. The following line is the default Helix Server startup command:
/opt/hus/Bin/rmserver /opt/hus/rmserver.cfg &
Tip: The vi editor should allow you to move through the file using your keyboard arrow keys. Alternately, you can use command keys to navigate as described on page 33.
5. Set the maximum memory by inserting -m NNNN in front of the closing ampersand. Here, NNNN is the amount of memory in Megabytes. For example, the following allows Helix Server to use up to four Gigabytes of memory:
/opt/hus/Bin/rmserver /opt/hus/rmserver.cfg -m 4096
If you are unfamiliar with vi, you can do the following:
a. Use the arrow keys to pace the cursor to the left of the closing ampersand.
b. Start text insertion mode by typing: a
c. Add the memory amount as shown above, making sure to preserve the closing ampersand, which allows Helix Server to run as a background process.

Helix Media Delivery Platform Quick Start Guide CHAPTER 3: Amazon EC2 Setup
28
d. Press the Esc key to return to command mode.
e. Save and exit by first typing this:
:x
f. Then press the Enter key.
6. After you log into Helix Administrator as described in Chapter 4, you can restart the server as described in the section “Restarting the Server or Proxy” on page 41. This allows the server to utilize the new memory allocation.
For More Information: For details about how Helix Server uses memory, refer to the online help topic Server Operation > Memory Allocation. For information about accessing the online help, refer to the section “Online Help” on page 39.
Creating an EBS VolumeIf you need to add an EBS storage volume to an existing instance, you can use the EC2 console to create the volume and associate it with the Helix Server instance. If you already created the EBS volume when you set up the instance (see page 20), enable the volume as described in the section “Enabling an EBS Volume” on page 29.
➤ To create a new EBS volume:
1. On the EC2 dashboard, go to the instances page (Instances > Instances), select the instance, and click the Description tab on the bottom portion of the screen. Note the zone (such as us-east-1a) where the instance has been created. You must create the new volume in the same zone.
2. Display the volumes console page (Elastic Block Store > Volumes).
3. Click the Create Volume button at the top of the page.
4. In the dialog, create a standard volume at any size up to 1 Tebibyte. Select the same zone as the instance and, optionally, choose a snapshot (see page 29).
EBS Volume Creation
5. Once the volume is created, it will appear in the list of volumes. From the Actions drop-down, select Attach Volume.

Helix Media Delivery Platform Quick Start Guide CHAPTER 3: Amazon EC2 Setup
29
EBS Volume Attachment
6. In the dialog, choose the instance from the drop-down and set the device name as:
/dev/sdb
7. Click Yes, Attach. Once the action succeeds, you will see the instance listed in the volume’s attachment information.
8. Associate the volume with Helix Server as explained in “Enabling an EBS Volume” on page 29.
Using a Volume Snapshot
If you have an EBS volume that contains streaming media files, you can turn that volume into a snapshot to replicate its contents. You can then create additional volumes from that snapshot. This is possible only with an EBS volume, not a root volume.
On the volumes console page (Elastic Block Store > Volumes), select the volume and choose Create Snapshot from the Actions drop-down. A dialog allows you to name the snapshot and create a description for it. After the snapshot is created, you can view it on the snapshots console page (Elastic Block Store > Snapshots).
Note: A snapshot creates a separate volume, not a single volume that is shared between instances. After the new volume is created from the snapshot, changes in the original volume are not automatically replicated to the new volume.
Enabling an EBS Volume
After you attach an EBS volume to an instance, you must update the Linux file system table to assign an operating system mount point to the device name. If you are using only the instance’s root volume, you can skip this procedure.
Adding a Volume Mount Point
The first step is to create an operating system mount point for the EBS volume. Helix Server is predefined to use the mount point /mnt/streaming.
➤ To enable the EBS volume mount point:
1. Log into the Helix Server instance using SSH (see page 25).
2. Navigate to the /etc directory:
Helix Media Delivery Platform Quick Start Guide CHAPTER 3: Amazon EC2 Setup
30
cd /etc
3. Edit the fstab file using the vi text editor:
vi fstab
4. Move the cursor to the last line of the file (see page 33 for a vi command summary):
#/dev/sdb /mnt/streaming ext3 defaults 1 1
5. As long as you created the volume to use the /dev/sdb device name, you need only to delete the # at the front of the line. With the cursor on this pound sign, press:
x
The line should now look like this:
/dev/sdb /mnt/streaming ext3 defaults 1 1
Tip: If you used a different device name when defining the volume (such as /dev/sdc), you must update the device entry as well. You may change the /mnt/streaming entry to a different mount point, such as /mnt/media. Do not alter the /mnt path, however.
6. Save and exit by typing the following and then pressing Enter:
:x
Building the File System
You must next build the file system so that the operating system recognizes the volume and its associated mount point.
➤ To build the file system:
1. At the SSH command line, enter the following command to build the file system:
/sbin/mkfs -t ext3 /dev/sdb
Accept the warning that the new file system is an entire device. The program then updates the operating system, which may take several minutes.
2. Log out of SSH by typing exit on the command line.
3. Reboot the instance from the EC2 instances console page (Instances > Instances) by choosing Reboot from the Actions drop-down.
4. Once the image reboots, which may take a few minutes, you can verify that the volume is attached to the instance’s file system by logging back in with SSH and entering this:
df
You will see a listing for /dev/sda1 (root volume) and /dev/sdb (EBS volume). The /dev/sdb entry will indicate that it is accessible through the mount point /mnt/streaming.
Creating Content Directories
To use the EBS volume to host streaming content, you may want to create your own directories through SSH using the Linux mkdir command. Or you can copy the existing Helix Server content directories from the root volume.
Tip: Use the Linux ls command to list directories.

Helix Media Delivery Platform Quick Start Guide CHAPTER 3: Amazon EC2 Setup
31
For More Information: To allow Helix Server to access content on the volume, you must define streaming mount points to the directories you create as described in the section “Managing Content Mount Points” on page 49.
Creating New Content Directories
Create new content directories on the EBS volume using the Linux mkdir command. For example:
cd /mnt/streaming mkdir Media
Change the ownership of the directories you create from the root account to helixserver, which is the account that owns the Helix Server process:
chown -R helixserver:helixserver /mnt/streaming
Copying the Helix Server Content Directory to the Volume
To simplify the creation of directories to hold streaming content on the volume, you can copy the existing Helix Server content directory from the root volume to the EBS volume. You can do this whether you plan to use the EBS volume as your primary or your secondary clip repository. From SSH, give the following command:
cp -r /opt/hus/Content /mnt/streaming
To hold segments and playlists for HLS and DASH clients, create a Segments directory:
mkdir /mnt/streaming/Segments
Next, change the ownership of the directories from the root account to helixserver, which is the account that owns the Helix Server process:
chown -R helixserver:helixserver /mnt/streaming
Tip: Use the ls command to list directories that are created.
Warning! Even if you plan to use the EBS volume as your primary clip repository, do not delete the Content directory from the root volume. That directory contains non-media files that Helix Server requires to deliver content.
Helix Server EC2 ReferenceThe following sections provide reference material for setting up and managing a Helix Server instance on Amazon EC2.
Basic Settings
The following table summarizes basic settings and parameters on Helix Server EC2 instances.
Helix Server Instance Basic Settings
Parameter Use
root Linux account for logging into the instance with the secure key over SSH (see page 25). No other accounts are allowed to log-in using the key.
helixserver User name and group name for the Linux account that owns the Helix Server process once it starts up.
(Table Page 1 of 2)

Helix Media Delivery Platform Quick Start Guide CHAPTER 3: Amazon EC2 Setup
32
Security Group Port Settings
When you create an instance, you assign it a security group (see page 22) that defines the firewall settings. The standard Helix Server security group settings open the following ports.
helixadmin Helix Server internal account (not a Linux account) for accessing Helix Server through Helix Administrator (see page 34).
22 Port for accessing Helix Server through SSH (see page 25) or SFTP (see page 53).
25001 Port for accessing Helix Administrator through HTTPS (see page 34).
4qztqOkBkFxf Default password for Helix Administrator (see page 35).
/opt/hus Path to the Helix Server files.
/opt/hus/Content Default content directory on the root volume (see page 49).
/opt/hus/Segments Default directory for storing segments and playlists generated for HLS and DASH clients (see page 54).
/dev/sda1 Default device name for the root volume and partition (see page 20).
/dev/sdb Recommended device name for an EBS volume (see page 29).
/mnt/streaming Predefined mount point for an EBS volume (see page 29).
/etc/rc.local File that contains the Helix Server startup command and memory options (see page 27).
Helix Server Instance Basic Settings (continued)
Parameter Use
(Table Page 2 of 2)
Helix Server Instance Open Ports
Port Transport Use
22 TCP Secure shell access (see page 25) and SFTP (see page 53).
80 TCP HTTP requests from media clients (see page 49).
443 TCP Secure HTTP requests from media clients (see page 49).
554 TCP RTSP requests from RealPlayer and 3GPP media clients (see page 49).
1755 TCP MMS requests from Windows Media clients (see page 49).
1935 TCP RTMP requests from Flash clients (see page 49).
2030 TCP/ UDP
Pull-splitting requests for data sent between transmitters and receivers in a splitting arrangement (refer to the online help).
5000- 5003
UDP Data from RTP-based live stream encoders (see page 71).
8008 TCP Fast-channel switching requests from RTSP media clients (see page 6).
8009 TCP API port for server-side playlist requests (see page 7).
8010 TCP Content management port (see page 7).
9090 TCP Server monitor port (see page 65).
25001 TCP Helix Administrator HTTPS port (see page 34).
50000- 50050
TCP/ UDP
Live data from Helix Producer in Helix Push mode (see page 73).
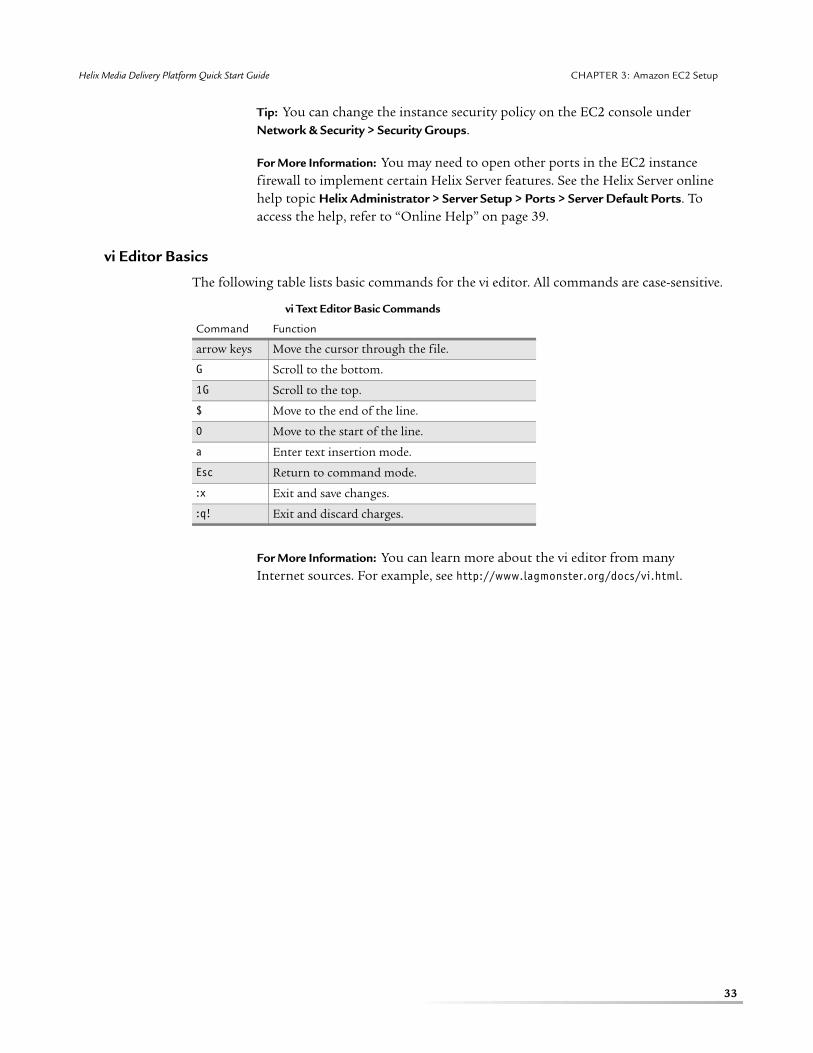
Helix Media Delivery Platform Quick Start Guide CHAPTER 3: Amazon EC2 Setup
33
Tip: You can change the instance security policy on the EC2 console under Network & Security > Security Groups.
For More Information: You may need to open other ports in the EC2 instance firewall to implement certain Helix Server features. See the Helix Server online help topic Helix Administrator > Server Setup > Ports > Server Default Ports. To access the help, refer to “Online Help” on page 39.
vi Editor Basics
The following table lists basic commands for the vi editor. All commands are case-sensitive.
For More Information: You can learn more about the vi editor from many Internet sources. For example, see http://www.lagmonster.org/docs/vi.html.
vi Text Editor Basic Commands
Command Function
arrow keys Move the cursor through the file.
G Scroll to the bottom.
1G Scroll to the top.
$ Move to the end of the line.
0 Move to the start of the line.
a Enter text insertion mode.
Esc Return to command mode.
:x Exit and save changes.
:q! Exit and discard charges.
34
C H A P T E R
4 Chapter 4: HELIX ADMINISTRATOR
This chapter introduces you to Helix Administrator, the Web-based tool for configuring Helix Server and Helix Proxy. It describes how to use this tool to configure server features, access sample media players, and display the online help.
Starting Helix AdministratorTo log into Helix Administrator, you connect to Helix Server or Helix Proxy using any browser. For Helix Server instances running on Amazon EC2, HTTPS connections are supported. For local machines, you can use either HTTP or HTTPS. The latter is recommended if you are administering Helix Server or Helix Proxy across the public Internet.
Helix Administrator Address
To display Helix Administrator in your browser, open one of the following locations in your Web browser:
• For secure HTTP (HTTPS):
https://address:SecureAdminPort/admin/index.html
• For HTTP (local machines only):
http://address:AdminPort/admin/index.html
Local Machine Address and Ports
If your browser is on the same computer as the server or proxy, you can typically use localhost, which is the local IP address 127.0.0.1. For example:
https://localhost:SecureAdminPort/admin/index.html
HTTP and HTTPS communication use separate port numbers that were set randomly during installation (see page 5). Helix Administrator does not use the standard HTTP and HTTPS ports of 80 and 443. The two port numbers are the values of the AdminPort and SecureAdminPort variables in the configuration file (rmserver.cfg or rmproxy.cfg), which you can open using any text editor.
Tip: After you have logged into Helix Administrator, you can change the port values on the Server Setup > Ports page.
Amazon EC2 Address and Port
For a Helix Server instance running on Amazon EC2, use the instance’s public DNS address (see “Public URL” on page 24). Only secure connections (HTTPS) are supported. For example:
https://ec2-54-226-58-244.compute-1.amazonaws.com:25001/admin/index.html
HTTPS communication to Helix Administrator running on an EC2 instance is preconfigured to use port 25001. To enhance security, change the port value on the Server Setup > Ports page

Helix Media Delivery Platform Quick Start Guide CHAPTER 4: Helix Administrator
35
after you have logged into Helix Administrator. You can use any port in the range 1025–65535 that is not in use already (do not use port 443). You will also have to update the firewall settings on the Amazon EC2 console (Network & Security > Security Groups) to allow TCP access to the new Helix Administrator HTTPS port.
Tip: Because the Helix Server instance does not contain signed security certificates when it is created, your browser will warn of an untrusted connection but allow you to store an exception for the log-in URL.
User Name and Password
Helix Administrator asks for a case-sensitive user name and password:
• For a local machine installation, the user name and password were chosen during installation.
• For an Amazon EC2 installation, the user name and password are set to the following default values:
Tip: The main Helix Administrator password is the value of the MonitorPassword variable in the configuration file (rmserver.cfg).
Changing the Default Password
The following procedure explains how to change the default administrative password. Do this for each Amazon EC2 instance you have created. For a local machine, this is optional because a unique password was selected during installation.
➤ To change the main Helix Administrator password:
1. In Helix Administrator, click Security > Authentication.
Helix Server Authentication Dialog
2. In the dialog, highlight the SecureAdmin realm.
user name helixadmin
password 4qztqOkBkFxf

Helix Media Delivery Platform Quick Start Guide CHAPTER 4: Helix Administrator
36
3. Click the Change User Password link.
Helix Server Administrator Password Change
4. Enter the user name:
5. Enter a new case-sensitive password in both the New Password and Confirm New Password fields.
6. Click OK.
Adding a New Administrative User
Optionally, you can add new Helix Server administrators whether you are running Helix Server on a local machine or as an Amazon EC2 instance.
➤ To add a new administrator:
1. In Helix Administrator on Helix Server, click Security > Authentication.
2. Highlight the SecureAdmin realm.
3. Click Add a User to Realm.
4. In the pop-up, enter the new user account name (single word) and a case-sensitive password.
5. Click OK.
Tip: Click Browse Users in Realm to display all users that have administrator access.
Inactivity Timeout
Helix Administrator has an inactivity timeout set to 15 minutes. After the timeout elapses, access to Helix Administrator requires reauthorization with a valid user name and password.
Note: RealNetworks strongly recommends quitting the browser by closing all windows and tabs when you have finished using Helix Administrator.
on a local machine admin
for an Amazon EC2 instance helixadmin

Helix Media Delivery Platform Quick Start Guide CHAPTER 4: Helix Administrator
37
Using the Helix Administrator InterfaceHelix Administrator consists of HTML pages that you use to configure Helix Server or Helix Proxy. The left-hand frame organizes features into functional areas. Pages that display in the right-hand frame typically consist of forms that include fields and pull-down lists.
Sample Helix Administrator Page on Helix Server
Helix Administrator Top Frame Links
The top frame of Helix Administrator for Helix Server displays links to the following information pages and features.
Control Icons on Setup Pages
In Helix Administrator pages that list multiple elements, you can use the control icons depicted in the following illustration.
Helix Administrator Controls
Monitor Server Monitor, a Java-based tool that indicates the server’s incoming and outgoing connections (see page 65).
Samples Links to sample clips you can play on Helix Server (see page 38).
License Details about the server or proxy license (see page 39).
Library Documentation resources on the RealNetworks Web site.
Help Online help installed with the server or proxy (see page 39).
Tech Support RealNetworks technical support Web site.

Helix Media Delivery Platform Quick Start Guide CHAPTER 4: Helix Administrator
38
Samples
On Helix Server, click the Samples link of Helix Administrator to display a page containing links to sample clips included in the content directory (see page 49). If your Helix Server machine does not have a media player needed to stream one of the clips, you can request the sample clip from another machine on your network by logging into Helix Administrator from that machine.
Sample Flash Player
On the samples page, click the Flash Player link to pop up an embedded Flash player that you can use to test any Flash or Flash-compatible content on Helix Server.
Sample Flash Player
For More Information: For more about streaming on-demand Flash content, see “Flash Content” on page 57.
Sample Silverlight Player
On the samples page, click the Silverlight Player link to pop up an embedded Silverlight player that you can use to test any Silverlight-compatible content on Helix Server.

Helix Media Delivery Platform Quick Start Guide CHAPTER 4: Helix Administrator
39
Sample Silverlight Player
For More Information: For more about streaming on-demand Silverlight content, see “Windows Media and Silverlight” on page 58.
License File
At least one valid, text-based license file must reside in the License subdirectory of the main installation directory. This file is in an XML format that you can read with a text editor. You can also display information about your licensed features by clicking the License link on the Helix Administrator interface. You generally do not need to do anything with the license file as long as the server or proxy reads it correctly on startup.
Tip: If you have multiple license files, Helix Administrator shows the values for all of the licenses at once. In this case, you need to read each file individually and calculate additive features, such as the total number of licensed streams.
Warning! Making any changes to a license file invalidates the license and prevents the server or proxy from starting. If you encounter problems with the license, contact RealNetworks for a valid license file.
Online Help
You can view context-sensitive help for Helix Server or Helix Proxy by clicking the Help link at the top of any Helix Administrator page. The HTML-based help system opens in a new browser window. Use the left-hand pane to navigate among topics, which include Helix Administrator operation, configuration file variables, and server registry properties used in reports.
Tip: If you have installed Helix Server or Helix Proxy on a local machine, you do not need to run Helix Administrator to view the help system. In the installation directory, navigate to the HelixAdministrator/Docs directory. Open and bookmark home.html in your browser.
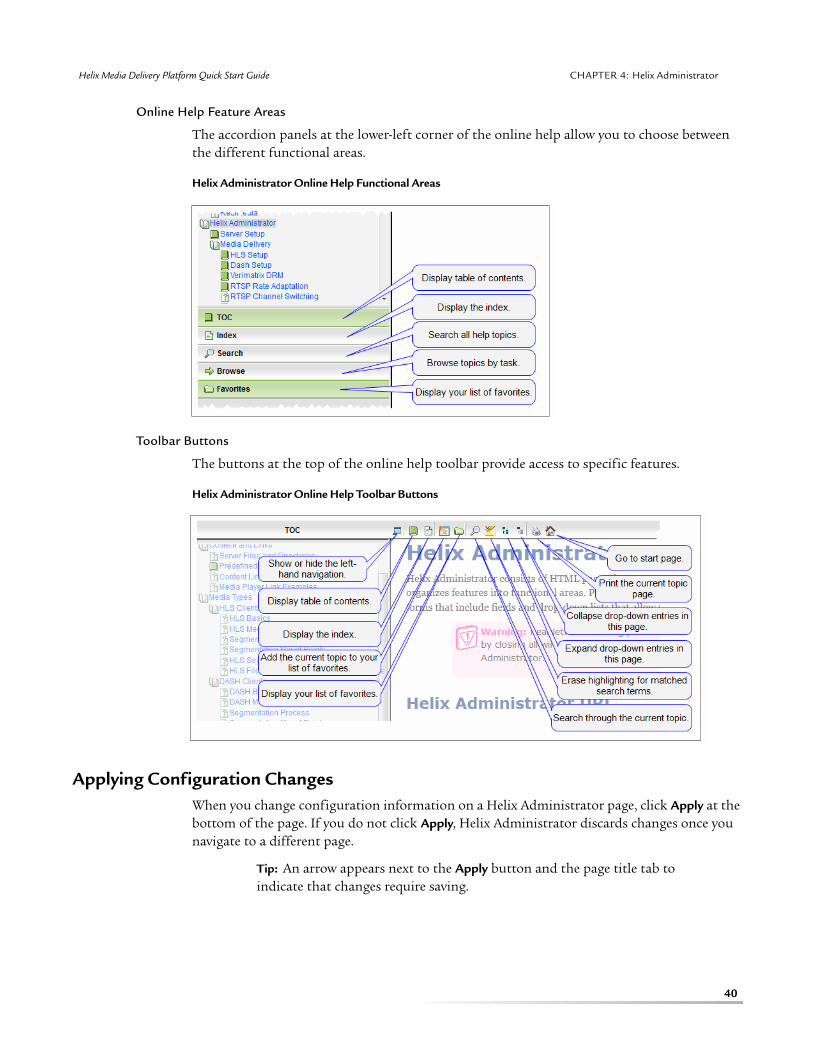
Helix Media Delivery Platform Quick Start Guide CHAPTER 4: Helix Administrator
40
Online Help Feature Areas
The accordion panels at the lower-left corner of the online help allow you to choose between the different functional areas.
Helix Administrator Online Help Functional Areas
Toolbar Buttons
The buttons at the top of the online help toolbar provide access to specific features.
Helix Administrator Online Help Toolbar Buttons
Applying Configuration ChangesWhen you change configuration information on a Helix Administrator page, click Apply at the bottom of the page. If you do not click Apply, Helix Administrator discards changes once you navigate to a different page.
Tip: An arrow appears next to the Apply button and the page title tab to indicate that changes require saving.

Helix Media Delivery Platform Quick Start Guide CHAPTER 4: Helix Administrator
41
Restarting the Server or Proxy
Some configuration changes you make in Helix Administrator require a server or proxy restart. In these cases, the Helix Administrator interface indicates that a restart is needed by popping up a message when you click Apply. Click the Restart Server button to restart the server.
Queuing Changes for a Later Restart
It is not necessary to restart Helix Server or Helix Proxy immediately after you make a configuration change. In this case, the Pending Changes flag appears in the upper-right corner of Helix Administrator. This flag reminds you that all pending changes will go into effect the next time the server or proxy is started.
Closing Open Connections
Restarting the server or proxy shuts down open connections for live events or clips streamed on demand. It’s best, therefore, to make these changes during periods of low use. Two features help you to minimize the impact of a restart:
• The delayed shutdown feature allows media players to report playback statistics before the restart commences. See “Delayed Shutdown” on page 42.
• The redundant servers or proxies feature redirects RealPlayers to other servers or proxies to finish their media sessions. See “Redundant Servers (Helix Server) or Redundant Proxies (Helix Proxy)” on page 42.
Using Feature Setup PagesUsing Helix Administrator, you can configure various features of your server or proxy. The left-hand side of Helix Administrator organizes features into functional areas. Click the banner for the functional area to display links for its various feature setup pages. To read detailed configuration instructions for each of the following features, display the feature’s administration page and click the Help link.
Server Setup
You can find the following feature set-up pages in the Server Setup area of Helix Server. Helix Proxy has similar (although fewer) features organized under its Proxy Setup section.
Ports
The installation program sets the main ports used by the server or proxy. You can change these values on the Ports administration page.
IP Bindings
By default, the server or proxy binds to all IP addresses and the localhost address on the machine. The IP bindings feature allows you to bind the server or proxy to a subset of the available addresses if necessary.

Helix Media Delivery Platform Quick Start Guide CHAPTER 4: Helix Administrator
42
MIME Types
The MIME types for the files that Helix Server commonly delivers using HTTP or HTTPS are predefined. If you need to add a MIME type for HTTP delivery, you can do so in this set-up page.
Mount Points
An on-demand mount point is a virtual path in a URL that corresponds to a directory where Helix Server finds content. When you create a new storage area for content, such as a directory on a shared network disk, use this set-up page to define the URL mount point that identifies the content.
HTTP/HTTPS Delivery
By default, Helix Server does not allow HTTP access to the content directory where clips streamed over RTMP or RTSP reside. Using the HTTP delivery feature, you can define which mount points support HTTP or HTTPS for download or progressive download of clips.
For More Information: See “HTTP Downloads” on page 52.
Connection Control (Helix Server) or Bandwidth Management (Helix Proxy)
Both the server and the proxy allow you to limit the amount of bandwidth used for streaming. If necessary, use this set-up page to set a bandwidth limit lower than that allowed by your license file.
Redundant Servers (Helix Server) or Redundant Proxies (Helix Proxy)
Helix Server and Helix Proxy use this feature to instruct RealPlayers to reconnect to a different server if the current server goes offline. This feature does not affect other types of media players.
URL Aliasing
This Helix Server feature allows you to shorten long URLs by creating aliases for directory paths or files.
Proxy Cache Directives
When Helix Server works with RTSP proxies, its cache directives feature allows you to define which content the proxies cannot cache.
Delayed Shutdown
Delayed shutdown gives media players time to close their connections and report statistics on a server shutdown. It is intended primarily for desktop media players such as RealPlayer and QuickTime Player. It generally does not affect mobile media players.
User/Group Name
This feature is available on Solaris and Linux. It shifts ownership of the server or proxy process to a user other than root after startup.

Helix Media Delivery Platform Quick Start Guide CHAPTER 4: Helix Administrator
43
Media Delivery
The following feature set-up pages in the Media Delivery area of Helix Administrator affect general streaming features and media client support.
HLS Setup
HTTP Live Streaming (HLS) uses HTTP to deliver media to devices such as the Apple iPhone and iPad as a series of small files. This setup page allows you to determine which live and on-demand sources are segmented for HLS devices. It also determines where segments are stored.
DASH Setup
Dynamic Adaptive Streaming over HTTP (DASH) uses HTTP to deliver media to a variety of devices as a series of small files. This setup page allows you to determine which live and on-demand sources are segmented for DASH devices. It also determines where segments are stored.
RTSP Rate Adaptation
RTSP rate adaptation allows Helix Server to vary the rate of an RTSP stream to compensate for fluctuating network conditions. This rate control mechanism is useful for RTSP media players that do not implement a client-side rate control mechanism, such as 3GPP clients.
RTSP Fast Channel Switching
RTSP fast channel switching allows a media player to receive a new media stream within an existing RTSP session. This eliminates the time required to set up a new RTSP session for each new stream.
Server-Side Playlists
Using server-side playlists, you can enable seamless transitions between a predefined set of media streams, whether live streams or on-demand clips. Server-side playlists support RTSP and HLS clients. They can define rules for which clips can be searched or skipped.
Stream Bookmarking
Bookmarking works with HLS, DASH, Flash, and RTSP media players to record the last media position in an on-demand session. When a viewer revisits the presentation, the media restarts near the point it last stopped.
Differentiated Services
The server and proxy can set the bits for precedence and quality of service in IPv4 packets for several streaming media protocols. This allows networks to manage media packets according to different criteria.
DRM
The DRM area of Helix Administrator enables third-party digital rights management technologies for securing different types of media content.
Helix Media Delivery Platform Quick Start Guide CHAPTER 4: Helix Administrator
44
Verimatrix DRM
In this page you configure Helix Server to retrieve key files from a Verimatrix VCAS server for encrypting HLS segments. A Verimatrix ViewRight client can then retrieve playlists and segments from Helix Server while obtaining the key files from the VCAS server.
BuyDRM
Helix Server can secure HLS client accesses using key files generated with the BuyDRM Web service. HLS clients that incorporate BuyDRM technology can then retrieve segments and playlists from Helix Server while requesting the encryption key files from the BuyDRM server.
Broadcasting
The feature set-up pages in the Broadcasting area of Helix Administrator control basic broadcasting features such as receiving live streams from different types of encoders.
Helix Push Live Streams
In a Helix Push broadcast, a RealNetworks encoder delivers a live stream in any of its supported broadcast formats. The connection is verified against a username/password combination stored in the authentication database.
RTP Live Streams
Live streams generated by QuickTime, MPEG-4, and 3GPP encoders use the RTP packet format. If a stream is encoded with H.264/AAC, Helix Server can deliver the broadcast to a variety of media players, including Flash, HLS, DASH, and RTSP clients.
Flash Live Streams
Flash encoders can deliver a live stream to Helix Server on its RTMP port. If the Flash stream uses H.264/AAC encoding, Helix Server can deliver it to media players other than Flash Player.
MPEG2-TS Live Streams
Helix Server can acquire an MPEG-2 Transport Stream encoded as H.264/AAC from a server or a multicast address, broadcasting the content to Flash, HLS, DASH, and RTSP clients.
Windows Media Live Streams
In a Windows Media pull broadcast, Helix Server pulls a stream from Windows Media Encoder over an HTTP connection. In a push broadcast, Windows Media Encoder initiates the broadcast by delivering an authenticated stream to Helix Server.
HLS Time Shifting
When you enable a live source path for time-shifting, Helix Server maintains a buffer of HLS transport segments on disk, allowing an HLS client to rewind through the broadcast.
Broadcast Archiving
Broadcast archiving can save a copy of any live encoder stream that uses the H.264/AAC, RealMedia, or MP3 format. Once a broadcast ends, you can stream the archive as an on-demand clip.
Helix Media Delivery Platform Quick Start Guide CHAPTER 4: Helix Administrator
45
Encoder Redundancy
Encoder redundancy allows for back-up streams in a push broadcast from most types of encoders. If an encoder connection drops, clients are redirected to the next available stream.
Broadcast Distribution
The feature set-up pages in the Broadcast Distribution area of Helix Administrator control advanced broadcasting features such as multicasting and splitting.
Transmitter Setup
A Helix Server transmitter can deliver a live RTSP stream (or an RTMP stream converted to RTSP) to one or more Helix Server receivers. In push splitting, the transmitter delivers the stream to the receivers as soon as the encoder connects to the transmitter. In pull splitting, a receiver pulls the stream from the transmitter only when a client requests the stream from the receiver.
Receiver Setup
A Helix Server receiver can receive a live RTSP stream (or an RTMP stream converted to RTSP) from a transmitter. In push splitting, the transmitter delivers the stream to the receiver as soon as the encoder starts to send the live packets. In pull splitting, the receiver pulls the stream from the transmitter when a client requests the stream from the receiver.
HLS Push
Using HLS Push, you can transfer HLS segment files and playlists for a live broadcast to a Content Distribution Network (CDN). As the segments and playlists are generated during the broadcast, Helix Server transfers the files to the CDN using HTTP POST actions.
RTMP Push
RTMP Push transmits a live Flash stream (or an H.264/AAC stream from any encoder) to another RTMP server or CDN. As soon as the encoder begins to transmit the live stream, Helix Server uses the RTMP protocol to rebroadcast the stream to targets set up in this page.
Scalable Multicasting
Scalable multicasting is available to RTSP desktop players such as RealPlayer and QuickTime Player that reside on a multicast-enabled network. An unlimited number of media clients are supported. You can announce the multicast using SAP.
Back-Channel Multicasting
Live, back-channel multicasting is available on a multicast-enabled network of RealPlayers. This multicast method maintains a TCP control channel between the RealPlayers and Helix Server. It supports user authentication and quality of service statistics.
Windows Media Multicasting
Windows Media Multicasting allows unlimited Windows Media clients to connect to a live stream on a local, multicast-enabled network.

Helix Media Delivery Platform Quick Start Guide CHAPTER 4: Helix Administrator
46
Session Announcement
Using Session Announcement Protocol (SAP) you can publicize scalable multicasts to any program that listens for Session Description Protocol (SDP). The SDP allows clients to connect to the multicast.
Content Management
The Content Management area defines general features of on-demand content viewing and distribution.
Content Caching
Content caching transfers on-demand media clips between two or more Helix Servers. When a media player requests a clip from a subscriber, the subscriber retrieves the content from the publisher if the file is not already available locally.
ISP Hosting
ISP Hosting allots a maximum number of simultaneous RTSP or RTMP connections to different users who have media files stored in personal directories.
Content Browsing
This feature uses the browser running Helix Administrator to display information about the content stored on Helix Server.
View Source
The View Source feature allows RealPlayer users to view information about media clips and the markup for SMIL presentations. Using the setup page, you can control which source paths are available for viewing.
Security
Features in the Security section restrict access to Helix Server or Helix Proxy based on IP address or user name and password authentication.
For More Information: See also “Media Security” on page 48.
Access Control
The Access Control feature restricts connections to the server based on the IP address of the request. You can block a single IP address or a range or addresses using a netmask. For each IP address, you can block access to all ports or only specific ports.
User Databases
Databases store the access credentials used to authenticate users and set up commerce rules. Typically you do not need to change the database settings unless you want to create a new database or use a relational database instead of a flat file.

Helix Media Delivery Platform Quick Start Guide CHAPTER 4: Helix Administrator
47
Authentication
Realms determine which protocol (such as Basic or Digest) is used to authenticate username/password combinations stored in a database. Different realms and databases are used for different types of connections.
Commerce Rules
Commerce rules enforce authentication by defining protected paths. When a protected path appears in a URL request, Helix Server requires username/password authentication from the user and can evaluate each user's access based on the commerce rules defined for that user.
SSL Certificates
In this page you indicate the location of the SSL certificates that Helix Server uses to validate its secure HTTP connections to clients.
Logging and Monitoring
The Logging & Monitoring area organizes the features that allow you to monitor server activity and define reports.
Server Monitor
The Server Monitor displays performance, connection, and file activity. Use the monitor to see real-time data about how the server is being used.
Basic Logging
The basic access log and error log hold information about media streams that have been requested and errors that have occurred. You can choose between several styles of basic logging that each collect different sets of access data.
Advanced Logging
Using the advanced logging templates, you can construct reports about client access attempts as well as server activity. Reports can be displayed on the console, written to text files, posted to a Web server, or delivered to a specific IP address and port.
SNMP Setup
Using Simple Network Monitoring Protocol (SNMP), you can monitor Helix Server from an SNMP management system. This allows you to change Helix Server configuration from a third-party tool and to send notice of important events to an external program.
Proxy Features
Using Helix Administrator, you can set up the following features on Helix Proxy.
Proxy Routing
Proxy routing allows Helix Proxy to request content from another proxy instead of a server.
Helix Media Delivery Platform Quick Start Guide CHAPTER 4: Helix Administrator
48
Pull Splitting
Helix Proxy attempts to conserve bandwidth by splitting all live broadcasts originating on a server. This feature allows you to modify or disable the splitting of live streams.
Cache
On the proxy Cache page, you can modify the proxy cache size, change the directory used for the cache, or even turn off caching.
Virtual Hosting
Virtual hosting allows Helix Server to host on-demand and live streams on behalf of separate accounts. Each account shares the same basic configuration such as the same HTTP, RTSP, and RTMP ports. Each account uses a separate configuration file to define which streaming features the account uses, however.
For More Information: Virtual hosting cannot be configured using the Helix Administrator interface. For more information, refer to the Virtual Hosting section of the Helix Server online help.
Media SecurityAs noted in the section “Security” on page 46, Helix Server and Helix Proxy provide support for username/password challenges to desktop media players that attempt to access media placed under a secure mount point. To provide media security for desktop as well as mobile media players, Helix Server provides two additional security products.
Helix Session Manager
Helix Session Manager allows Helix Server to integrate with any external, third-party authorization server to verify access attempts. Helix Server uses HTTP posts to notify the authorization server of the client IP address and requested URL. The authorization server responds with instructions to allow the request, deny the request, or redirect the request to a different clip on Helix Server or a different server.
For More Information: For information about configuring the Helix Session Manager plug-in on Helix Server, refer to the topic Session Manager in the Helix Server online help.
Helix Security Manager
Helix Security Manager generates tamper-proof, time-limited URLs to live or on-demand content. It runs on a Java application server such as Apache Tomcat and works in conjunction with the security manager plug-in on Helix Server or Helix Proxy. Helix Security Manager does not require integration with a third-party Web server, although an external server can be used to reauthorize URL requests that are rejected.
For More Information: For information about setting up and using Helix Security Manager, refer to Helix Security Manager Deployment Guide.

49
C H A P T E R
5 Chapter 5: ON-DEMAND DELIVERY
This chapter describes the basics of streaming on-demand clips to various types of media clients from Helix Server. It explains where to place content on Helix Server and how to write links to on-demand clips.
Content DirectoryThe Content directory inside the main Helix Server installation directory is designed to hold on-demand streaming clips. It contains sample files and predefined subdirectories that hold demonstration content. The segsrc subdirectory is set up to hold clips for HLS and DASH clients as described on page 54.
For More Information: For a description of the files and subdirectories within the Content directory, see the Helix Administrator online help topic Server Operation > Server Files and Directories.
URLs for Media in the Content Directory
You can create any number of nested subdirectories within the Content directory to organize your on-demand clips. The URL to an on-demand clip within the Content directory uses the following structure:
protocol://HelixServerAddress:port/client_mount_point/subdirectory/clip.ext
The protocol and port values are one of the following:
Tip: The port number for the selected protocol does not need to be included if the default ports are used (see page 6). You can view and change port values on the Helix Administrator Server Setup > Ports page.
Managing Content Mount Points
If necessary, you can change the content directories or add new ones on any file system accessible to Helix Server. Each new content directory must be associated with a streaming
http:// HyperText Transfer Protocol for delivering content to HLS clients and DASH clients. The default port is 80.
https:// Secure Hypertext Transfer Protocol, the encrypted variation of HTTP. The default port is 443.
mms:// Microsoft Media Services for Windows Media Player and Silverlight clients. The default port is 1755.
rtmp:// Real-Time Messaging Protocol for Flash clients. The default port is 1935.
rtsp:// Real-Time Streaming Protocol for RealMedia, 3GPP, and MPEG-4 clients. The default port is 554.
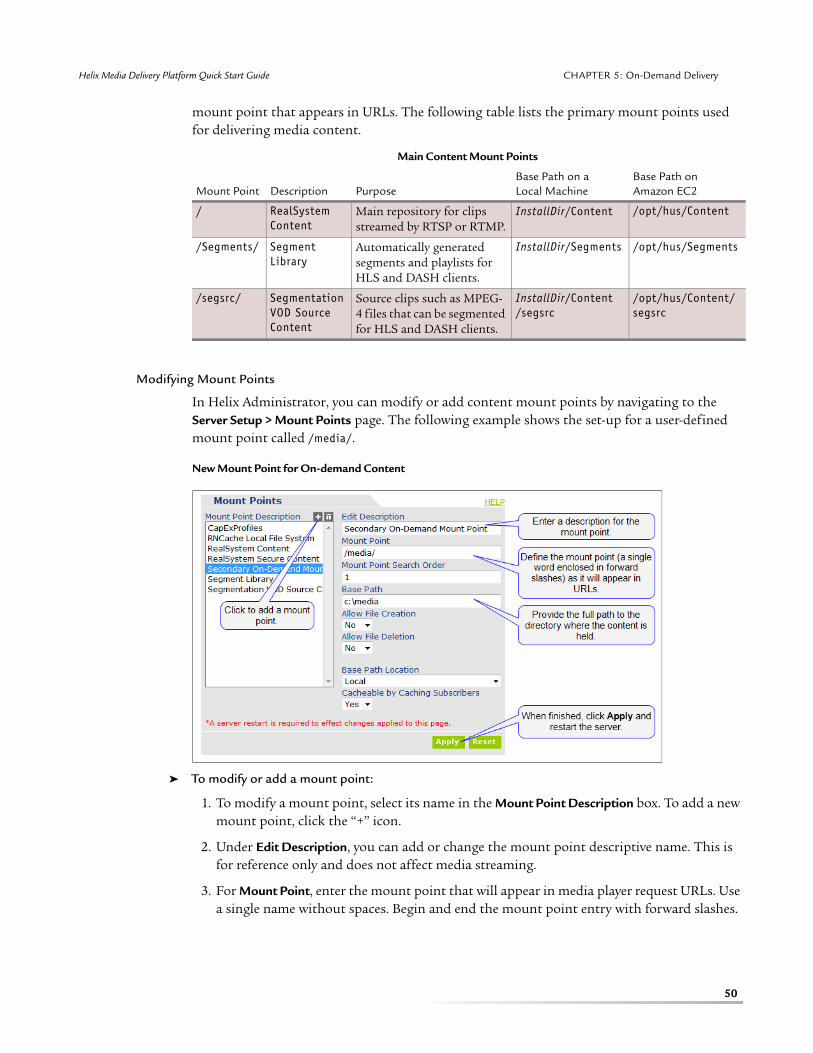
Helix Media Delivery Platform Quick Start Guide CHAPTER 5: On-Demand Delivery
50
mount point that appears in URLs. The following table lists the primary mount points used for delivering media content.
Modifying Mount Points
In Helix Administrator, you can modify or add content mount points by navigating to the Server Setup > Mount Points page. The following example shows the set-up for a user-defined mount point called /media/.
New Mount Point for On-demand Content
➤ To modify or add a mount point:
1. To modify a mount point, select its name in the Mount Point Description box. To add a new mount point, click the “+” icon.
2. Under Edit Description, you can add or change the mount point descriptive name. This is for reference only and does not affect media streaming.
3. For Mount Point, enter the mount point that will appear in media player request URLs. Use a single name without spaces. Begin and end the mount point entry with forward slashes.
Main Content Mount Points
Mount Point Description PurposeBase Path on a Local Machine
Base Path on Amazon EC2
/ RealSystem Content
Main repository for clips streamed by RTSP or RTMP.
InstallDir/Content /opt/hus/Content
/Segments/ Segment Library
Automatically generated segments and playlists for HLS and DASH clients.
InstallDir/Segments /opt/hus/Segments
/segsrc/ Segmentation VOD Source Content
Source clips such as MPEG-4 files that can be segmented for HLS and DASH clients.
InstallDir/Content /segsrc
/opt/hus/Content/ segsrc

Helix Media Delivery Platform Quick Start Guide CHAPTER 5: On-Demand Delivery
51
4. For Base Path, enter the full path to the directory that will hold the content. Use file paths appropriate for the Helix Server operating system.
5. At the bottom of the page, click Apply.
6. Restart Helix Server (see page 41).
Tip: In most cases, you can leave the remaining fields set to their default values. Click the Helix Administrator HELP link from the Mount Points page for more information about these fields.
Managing Volumes on an EC2 Instance
If you are using a single root volume for a Helix Server instance on Amazon EC2, the instance is predefined to use content in the default /opt/hus/Content path. In this case, you do not need to make any changes. If you created an EBS volume (see page 29), you can make the EBS volume your primary or secondary streaming source.
Using the EBS Volume as the Primary Clip Repository
To use the EBS volume as the primary repository for streaming clips, copy over the root volume content directory as described on page 31. Next use the Helix Administrator Mount Points page to change the base paths of the primary streaming mount points to paths on the EBS volume.
Using the EBS Volume as a Secondary Clip Repository
To use the EBS volume as a secondary repository for streaming clips, you may want to copy over the default content directory as described on page 31 to set up a basic directory structure. You can also create your own directories as needed under /mnt/streaming. Next, use the Helix Administrator Mount Points page to create new mount points for the content paths on the EBS volume.
In the examples shown above, the last three table rows are secondary, user-defined mount points for content on the EBS volume. When you configure Helix Server features, you can
Primary Content Mount Points on an EBS Volume
Mount Point Description Default Base Path New Base Path
/ RealSystem Content /opt/hus/Content /mnt/streaming/Content
/Segments/ Segment Library /opt/hus/Segments /mnt/streaming/Segments
/segsrc/ Segmentation VOD Source Content
/opt/hus/Content/segsrc /mnt/streaming/Content/segsrc
Example of Secondary Content Mount Points on an EBS Volume
Mount Point Type Description Base Path
/ default RealSystem Content /opt/hus/Content
/Segments/ default Segment Library /opt/hus/Segments
/segsrc/ default Segmentation VOD Source Content
/opt/hus/Content/segsrc
/media/ user-defined Secondary Content /mnt/streaming/Content
/SegmentsEBS/ user-defined EBS Segment Library /mnt/streaming/Segments
/segsrc_ebs/ user-defined EBS VOD Source Content /mnt/streaming/Content/segsrc

Helix Media Delivery Platform Quick Start Guide CHAPTER 5: On-Demand Delivery
52
decide whether to use primary mount points on the root volume or secondary mount points on the EBS volume. For HLS clients (see page 54), for example, you can choose to store segments and playlists under the /Segments/ mount point on the root volume or the /SegmentsEBS/ mount point on the EBS volume.
Note: When you create a new mount point to hold segment files and playlists (/SegmentsEBS/ shown above), you must enable that mount point for HTTP downloads as described on page 52. You do not need to enable new source mount points (segsrc-ebs shown above) for HTTP, however.
HTTP Downloads
By default, Helix Server does not allow HTTP delivery of content such as MPEG-4 clips meant to stream over RTMP or RTSP. This prevents browsers from downloading and caching the content. To allow HTTP downloading for a content directory or a new mount point that you have created to store segments and playlists, do one of the following:
• Create a subdirectory in the Content directory to serve as the download area. For example, create Content/downloads where you place downloadable clips.
• Define a new mount point as described in “Modifying Mount Points” on page 50. The mount point’s base directory can be on any file system accessible to Helix Server.
Allowing HTTP Downloads for a Path
For each new download directory, enable HTTP or HTTPS for the path on the Server Setup > HTTP/HTTPS Delivery page in Helix Administrator.
HTTP Delivery for a Source Path
This page holds separate dialogs for HTTP and HTTPS delivery. To enable a source path for one of the protocols, click the “+” icon, enter the URL path in the Edit Path field, and click Apply.

Helix Media Delivery Platform Quick Start Guide CHAPTER 5: On-Demand Delivery
53
Tips for Defining HTTP Download Paths
• If you define the source path as a mount point (such as the /media path corresponding to the user-defined /media/ mount point), all content in any subdirectory under the mount point’s base path will be downloadable.
• If you set the source path as a mount point plus a subdirectory (such as /media/downloads), only the content within the subdirectory (and any of its nested subdirectories) can be downloaded.
• If the path does not refer to a user-defined mount point, the path is considered to be a subdirectory in the Content directory. For example, the path /downloads would resolve to the Content\downloads subdirectory.
Tip: You do not need to make any changes in this page to support HLS and DASH clients using the HTTP or HTTPS protocol.
SFTP Access to an Amazon EC2 Instance
For a Helix Server instance running on Amazon EC2, you can use SFTP (secure file transfer protocol) to copy files from your local machine to the base directories of the Helix Server content mount points. Unsecured FTP connections are not supported. You can run SFTP from Linux or Windows, transferring media files in binary mode using the root login (see page 35).
Note: Transferred files are owned by the root account. The helixserver account that owns the Helix Server process will be able to read the files, however, and can stream them using RTSP or RTMP. Segments and playlists created for DASH and HLS clients will be owned by the helixserver account.
Windows SFTP Access with the WinSCP Client
On Windows, you can use the WinSCP client. Download it from your preferred shareware site or directly from http://www.winscp.net/. After you install and launch the client, configure access using SFTP on port 22 with the public address of the Helix Server instance (see page 24). Set the user name as root with no password. For the private key file, you can use the .ppk file created for use with the PuTTY client (see page 26).
WinSCP Sample SFTP Setup
Once the client connects, you will be able to browse the instance file system in the right-hand pane while using the left-hand pane to select files to copy from your local machine.
Helix Media Delivery Platform Quick Start Guide CHAPTER 5: On-Demand Delivery
54
Linux SFTP Login
On Linux, you can use SFTP from any command-line shell. Navigate to the directory that holds the .pem key file and log in using the public address of the Helix Server instance (see page 24):
ssh -i pem_file root@InstancePublicAddress
For example:
ssh -i HelixExample.pem [email protected]
For More Information: Many Internet resources are available to explain the use of FTP commands. For example, refer to http://pc.net/resources/commands/ftp.
HLS and DASH StreamingThe segsrc subdirectory of the Content directory is predefined to hold on-demand content to be segmented and delivered to DASH clients or HLS clients such as an Apple iPhone or iPad. The typical file formats for source clips are MPEG-4 (.mp4), 3GPP (.3gp), F4V (.f4v), and QuickTime (.mov). The single-rate or multi-rate content of the file must be encoded using the H.264 video codec (baseline profile, up to level 3) and an AAC or AAC+ audio codec.
For More Information: For background about HLS and DASH media support, refer to the Helix Administrator online help topics Media Types > HLS Clients and Media Types > DASH Clients.
HLS and DASH Client URLs
The URL for an HLS client request uses a format like the following:
http://helixserver.example.com/m3ugen/segsrc/news.mp4
The URL for a DASH client request uses a similar format:
http://helixserver.example.com/dashgen/segsrc/news.mp4
The /m3ugen/ or /dashgen/ portion of the URL is a client mount point, a virtual path that instructs Helix Server to turn the original clip into a series of segment files. When the URL request contains one of these client mount points, Helix Server segments the content into MPEG-2 transport files (.ts) for HLS clients or MP4 segments (.m4s) for DASH clients.
Each segment file encodes a portion of the stream, typically enough data to provide 4 to 10 seconds of playback. When requesting the individual transport stream files, the client refers to a playlist file that lists the segments in their playback order. HLS clients receive a text-based .m3u8 file while DASH clients use an XML-formatted .mpd file.
For More Information: To select the initial streaming rate for HLS clients, see the Helix Administrator online help topic Media Types > HLS Clients > HLS Media Requests. The topic Media Types > DASH Clients > DASH Media Requests explains how to request MPEG-2 transport segments (.ts) instead of MP4 segments (.m4s) for DASH clients.

Helix Media Delivery Platform Quick Start Guide CHAPTER 5: On-Demand Delivery
55
Segments Directory
Segments and playlists generated for HLS and DASH clients are created in the Segments directory, which allows HTTP delivery of the files. When you install Helix Server on a local machine, the Segments directory is parallel to the Content directory. On an Amazon EC2 instance, the segments directory is contained within the Content directory and uses all lower-case letters.
Within the Segments directory, Helix Server creates a directory structure like the following to hold the segments and playlist files for HLS clients:
|_Segments |_HLS_TS |_segsrc |_HLS playlists and segment subdirectories
Content for DASH clients is not shared with HLS clients. It is generated separately under the Segments directory:
|_Segments |_DASH_MP4 |_segsrc |_DASH playlists and segment subdirectories
For More Information: The Helix Administrator online help topics Media Types > HLS Clients > HLS File Names and Media Types > HLS Clients > DASH File Names explain the segment directory and file naming conventions.
Adding On-demand Content Sources for HLS or DASH
To place HLS or DASH source content in a directory other than segsrc, you must enable the source path for segmentation. For example, suppose that you want to place source content for HLS and DASH clients under the user-defined /media/ mount point (see page 49).
You define the new HLS and DASH source separately in Helix Administrator using the following set-up pages:
• Media Delivery > HLS Setup
• Media Delivery > DASH Setup
The setup for both HLS clients and DASH clients is similar. Midway down each page, the Source Paths box indicates the on-demand and broadcast mount points for content that can be segmented.
Enabling a New HLS or DASH Source

Helix Media Delivery Platform Quick Start Guide CHAPTER 5: On-Demand Delivery
56
Click the “+” icon to add a new source and do the following:
1. Under Edit Source Path, enter the path where the content will be stored:
• If you define the source path as just the mount point (such as /media/), the content can fall under any subdirectory under the mount point’s base path.
• If you set the source path as the mount point plus a subdirectory (such as /media/sources), only content within the subdirectory (and any of its nested subdirectories) can function as an HLS or DASH source.
2. Set Enable Source Path to Yes.
3. Under Destination Mount Point, choose the mount point where segments and playlists are generated. The destination /Segments/ indicates the default Segments directory (see page 55).
Note: If you want to store HLS and DASH segments and playlists in a destination other than the Segments directory, set up a new mount point as described on page 49 and enable it for HTTP delivery as described on page 52.
4. At the bottom of the page, click Apply.
For More Information: These set-up pages define many additional features used with HLS and DASH clients. Click the Help link on either page for setup instructions.
Tips for Streaming to HLS and DASH Clients
Keep the following points in mind when delivering content to HLS or DASH clients:
• Request URLs must always start with the HTTP (http://) or HTTPS (https://) protocol. The source content (such as an MPEG-4 file) does not need to be in a directory that allows HTTP downloading. Only the directory that holds segments and playlist files needs to allow HTTP downloads. By default, the segsrc subdirectory is not enabled for HTTP but the Segments directory is.
• Request URLs must always contain the /m3ugen/ client mount point for HLS clients and the /dasgen/ mount point for DASH clients.
• Segments and playlists are generated on the first request for the source clip. The playlists and segments are reused on subsequent requests.
• If you update the source clip, Helix Server automatically generates new segments and playlists the next time a client requests the clip. This ensures that clients receive the updated content. You do not need to delete the existing segments and playlists manually if you update the source clip.
• If you remove the source clip, the client request generates an error even if the playlist and segments still exist.
• Using query string parameters with the playlist request URL, you can screen out low bit rates streams, high bit rate streams, or both. See the Helix Administrator online help topic Content and Links > Rate Selection Parameters.

Helix Media Delivery Platform Quick Start Guide CHAPTER 5: On-Demand Delivery
57
• Helix Server can encrypt media segments for HLS clients. For more information, see the Helix Administrator online help topic Media Types > HLS Clients > HLS Segment Encryption.
Flash ContentHelix Server does not require any setup to make the following types of on-demand Flash content available to Flash Player:
• FLV
FLV content is typically encoded with codecs such as VP6, MP3, or Nellymoser. Helix Server delivers FLV content to Flash Player only.
• F4V
The newer F4V format (.f4v) is preferred for streaming to Flash clients. It uses the standards-based H.264 and AAC codecs. You can also stream F4V clips to RTSP media players, HLS clients, and DASH clients.
Tip: To test content URLs, you can use the sample Flash Player included with Helix Administrator. See “Sample Flash Player” on page 38.
For More Information: For more about Flash media support, refer to the Helix Administrator online help section Media Types > Flash Content.
Flash Content for Flash Player
You can stream FLV or F4V content to Flash Player using an RTMP URL directed toward Helix Server’s RTMP port, which is 1935 by default. For example, the following on-demand clip resides in a user-defined flash subdirectory of the Helix Server Content directory:
rtmp://helixserver.example.com/flash/sports.f4v
Note: Flash content streamed to Flash Player must reside within a subdirectory of the Content directory. If you are using F4V content that you also want to segment for HLS or DASH clients, you can place the F4V clip in the segsrc subdirectory.
H.264/AAC Single-rate Content for Flash Player
Content encoded with H.264/AAC codecs but not contained in an F4V file can also be streamed to Flash Player. Common file formats include the MPEG-4 (.mp4) or the 3GPP format (.3gp). In the following example, Helix Server streams the MPEG-4 H.264/AAC content as if it were an F4V clip:
rtmp://helixserver.example.com/media/movie.mp4
H.264/AAC Multi-rate Content for Flash Player
For MPEG-4 or 3GPP clips that contain multi-rate content, the /flashgen/ mount point is included in an HTTP URL to the content:
http://helixserver.example.com/flashgen/media/movie.mp4

Helix Media Delivery Platform Quick Start Guide CHAPTER 5: On-Demand Delivery
58
The /flashgen/ mount point causes Helix Server to generate a file that lists the multi-rate content as a set of single-rate streams, one for each encoded bandwidth. Using this file, Flash Player chooses the appropriate rate based on its bandwidth conditions. It then requests the media using the RTMP protocol.
RTSP ClientsTo receive a media clip or live broadcast over RTSP, a media client requests the stream using an RTSP URL directed toward Helix Server’s RTSP port, which is 554 by default. For example, the following URL is for an MPEG-4 clip stored in the Content directory:
rtsp://helixserver.example.com/movie.mp4
SDPGen Client Mount Point
For Web pages rendered in browsers that cannot redirect the RTSP link to a media player, links can use the HTTP protocol and include the /sdpgen/ mount point:
http://helixserver.example.com/sdpgen/movie.mp4
The MIME stream in the HTTP response sent by Helix Server causes the user’s browser to launch the media player and pass it the RTSP URL to the clip.
Flash H.264/AAC Content for RTSP Clients
RTSP media players that do not natively support the Flash file format can request on-demand F4V clips (.f4v) and live Flash content that is encoded using H.264/AAC codecs. Helix Server streams the Flash content to these media players as if the content were an MPEG-4 stream.
In the following example, a browser uses HTTP to request an on-demand F4V clip stored in the flash subdirectory of the Helix Server Content directory. The /sdpgen/ mount point launches the RTSP media player, which then receives and plays the H.264/AAC content encoded into the F4V file:
http://helixserver.example.com/sdpgen/flash/sports.f4v
An RTSP URL can point directly to this content without using the /sdpgen/ mount point:
rtsp://helixserver.example.com/flash/sports.f4v
Windows Media and SilverlightHelix Server can stream on-demand Windows Media clips to Windows Media Player and Silverlight clients. Streaming of Windows Media to mobile devices (cellular telephones or wireless, handheld devices) is not supported.
For More Information: For more about these formats, refer to the Helix Administrator online help topic Media Types > Windows Media and Silverlight.
Helix Media Delivery Platform Quick Start Guide CHAPTER 5: On-Demand Delivery
59
Windows Media Player
To stream on-demand Windows Media content to Windows Media Player, use an MMS link like the following, which includes the content mount point and any subdirectory paths. Include the MMS port number if 1755 is not used as the MMS port:
mms://helixserver.example.com/video.wmv
Windows Media Player 11 and later rejects the MMS URL but contacts Helix Server over HTTP, receiving the stream as WM-HTTP, which protects the content from proxy caching, browser caching, and HTTP download.
ASXGen Mount Point
As an alternative for Windows Media Player, you can use an HTTP URL that includes the /asxgen/ client mount point:
http://helixserver.example.com/asxgen/video.wmv
Multiple Bit Rate (MBR) Streams
Helix Server supports multiple bit rate (MBR) encoding of on-demand clips and live streams for Windows Media version 7 only. It does not provide streaming capability for MBR clips encoded as Windows Media version 9 and later. Single-rate clips encoded in Windows Media version 9 and later are supported, however.
RTSP Streaming Not Supported
Although Windows Media Player versions 11 and higher support RTSP, the Windows Media method for supporting RTSP is not available with Helix Server.
Silverlight Clients
You can stream Windows Media content to Silverlight clients using an MMS link like the following:
mms://helixserver.example.com:80/video.wmv
Include the Helix Server HTTP port number (not the MMS port number). Helix Server then delivers the content using WM-HTTP. Multi-rate content can be used, but only one stream (typically the highest bandwidth) is used throughout the presentation.
Tip: To test content URLs, you can use the sample Silverlight included with Helix Administrator. See “Sample Silverlight Player” on page 38.
H.264/AAC Content
Silverlight clients support the playback of on-demand content encoded using H.264 video and AAC audio in any supported format, such as MP4 or F4V. Helix Server progressively downloads the on-demand content over HTTP. HTTPS, WM-HTTP, and live delivery are not supported. Segmentation of Silverlight content into separate transport files is not supported.
Tip: Single-rate H.264/AAC content is recommended to minimize data transfer. Multi-rate content is supported, but all streams are delivered to the client and only one stream (typically the highest bandwidth) is used during playback.
Helix Media Delivery Platform Quick Start Guide CHAPTER 5: On-Demand Delivery
60
For More Information: The section “HTTP Downloads” on page 52 explains how to enable HTTP downloading for a source path that contains on-demand H.264/AAC content for Silverlight clients.
Universal DeliveryThis section builds on the preceding information by illustrating how to use Helix Producer and Helix Server to reach a variety of media players using a single media stream. Using this process, you can deliver content to the following media players without having to encode a separate stream in each media player’s preferred format:
• Flash Player 10 or higher
• Desktop RealPlayer
• Desktop MPEG-4 players
• Desktop QuickTime Player
• DASH clients
• HLS clients such as the Apple iPhone and iPad
• Mobile media players supporting H.264/AAC streams over RTSP
• 3GPP Release 6 Media Players, including mobile players based on Helix DNA
Note: This section illustrates the encoding and delivery of a single-rate, on-demand stream. Multi-rate encoding and live delivery are also supported for universal delivery.
Media Encoding for Universal Delivery
To reach the widest range of media players with a single stream, use Helix Producer to encode content using the H.264 video and AAC audio codecs. For universal delivery, Helix Producer supports H.264/AAC encoding in either the MPEG-4 or 3GPP Release 6 file format. The following sections walk you through the process of using the Helix Producer graphical application to encode a single-rate MPEG-4 (.mp4) clip.
Tip: With the mobile version of Helix Producer, encode the output using the 3GPP Release 6 format if you need to reach media players that support 3GPP Release 6 but not the MPEG-4 file format.
For More Information: For more about Helix Producer, visit the RealNetworks Web site at http://www.realnetworks.com/helix/.
Create an MPEG-4 Output
The first step for encoding a clip from a file such as an AVI is to select the input file on the Helix Producer Input tab. This tab also allows you to apply prefilters to modify the input file. You may want to crop or resize the input, for example, to fit the screens of your intended audiences.
Next, switch to the Output tab and add an MPEG-4 output by clicking the Add button— . In the context menu, choose an MPEG-4 output type as shown in the following illustration.
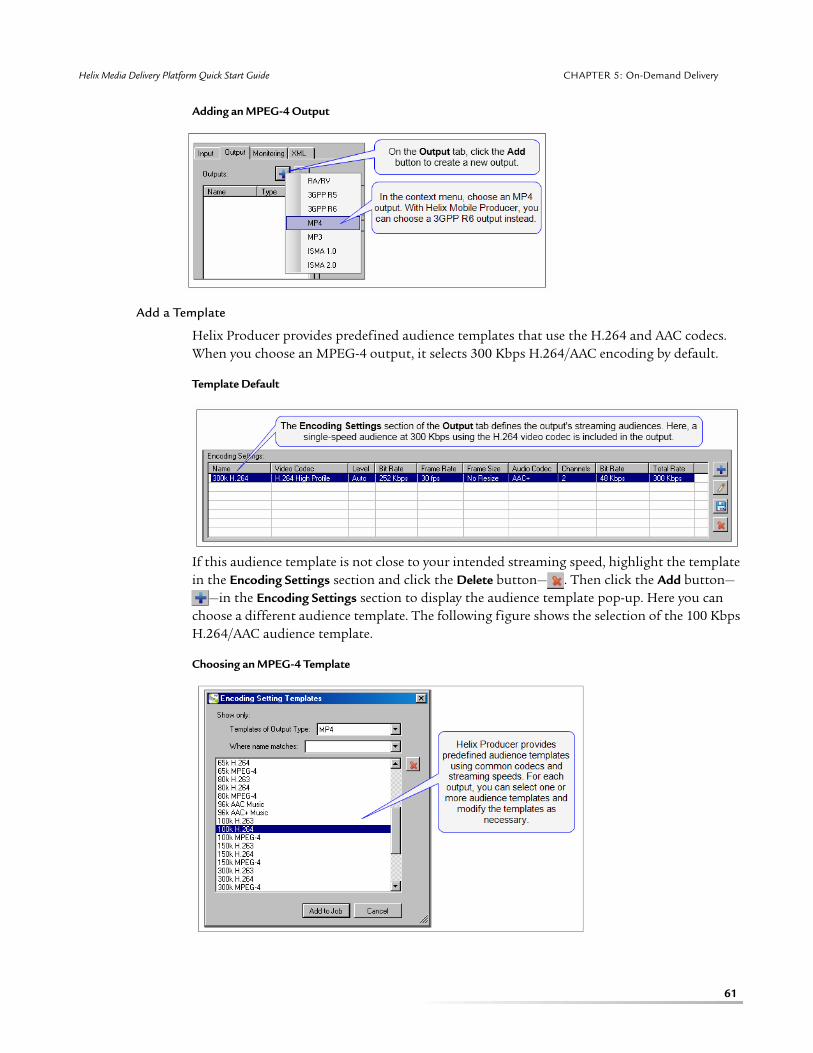
Helix Media Delivery Platform Quick Start Guide CHAPTER 5: On-Demand Delivery
61
Adding an MPEG-4 Output
Add a Template
Helix Producer provides predefined audience templates that use the H.264 and AAC codecs. When you choose an MPEG-4 output, it selects 300 Kbps H.264/AAC encoding by default.
Template Default
If this audience template is not close to your intended streaming speed, highlight the template in the Encoding Settings section and click the Delete button— . Then click the Add button—
—in the Encoding Settings section to display the audience template pop-up. Here you can choose a different audience template. The following figure shows the selection of the 100 Kbps H.264/AAC audience template.
Choosing an MPEG-4 Template

Helix Media Delivery Platform Quick Start Guide CHAPTER 5: On-Demand Delivery
62
Customize the Template
In many cases, you will want to modify the audio and video settings from the template to set the precise characteristics for this audience. To do this, highlight the template in the Encoding Settings section and click the Edit button— . This displays the encoding settings pop-up.
Customizing a Template in the Encoding Settings Pop-up
H.264 Video
The Video section of the Encoding Settings pop-up allows you to change the settings for the H.264 codec. For mobile and desktop media players, video streaming speeds are typically in the range of 80 Kbps to 1 Mbps.
Tip: Use the Baseline profile to reach the widest audience. You can set Level to Auto to have Helix Producer select the appropriate codec level based on the other output settings.
AAC Audio
In the Audio section of the Encoding Settings pop-up, you can change the AAC settings as needed. Streaming speeds typically range from 24 Kbps to 320 Kbps in mono or stereo. All AAC-capable players support AAC-LC, making low-complexity encoding the safest choice.
Tip: The Apple iPhone and Flash 10 players support AAC Plus as well. Not all 3GPP media players may support AAC Plus, however.
Save the MPEG-4 Clip
In the Output File section of the Output tab, select the location and name of the output clip. In this chapter, the sample clip is named universal.mp4. For streaming delivery, include the hinting option.

Helix Media Delivery Platform Quick Start Guide CHAPTER 5: On-Demand Delivery
63
Save the Output as an MPEG-4 Clip
Encode the output by clicking the Start Job button— —on the Helix Producer toolbar. After the encoding process has finished, the clip is ready to be streamed by Helix Server.
Universal Clip Source Directory and Request URLs
Once Helix Producer has encoded the output, move the clip to Helix Server for streaming. The simplest method is to place the clip in the predefined Content directory under the main Helix Server installation directory. To allow streaming to HLS and DASH clients, place the clip in the segsrc subdirectory. The following table summarizes the media client request URLs, which are described earlier in this chapter.
HLS http://helixserver.example.com/m3ugen/segsrc/universal.mp4
DASH http://helixserver.example.com/dashgen/segsrc/universal.mp4
Flash Single-Rate rtmp://helixserver.example.com/segsrc/universal.mp4
Flash Multi-Rate http://helixserver.example.com/flashgen/segsrc/universal.mp4
RTSP rtsp://helixserver.example.com/segsrc/universal.mp4 –Or– http://helixserver.example.com/sdpgen/segsrc/universal.mp4

64
C H A P T E R
6 Chapter 6: BROADCAST METHODS
Helix Server can broadcast live streams in H.264/AAC, RealMedia, Windows Media, and Flash formats. This chapter explains the basic methods of broadcasting in which Helix Server receives a live stream from an encoder and replicates the stream to various media clients.
Tip: The SLTA section of the Helix Administrator online help explains how to deliver a prerecorded clip as if it were a live event. This is a good way to test broadcasting before streaming a live event.
Understanding BroadcastsIn a broadcast, an encoder such as Helix Producer delivers a live stream to Helix Server, which then duplicates the stream for each media player. Viewers typically receive the broadcast by clicking a Web page link that includes one or more mount points that determine how Helix Server delivers the live stream to the media player.
H.264/AAC Broadcasts
By encoding live streams using the H.264 video codec and the AAC or AAC+ audio codec, you can reach the widest audience of media players, including Flash Player, HLS clients, DASH clients, and RTSP-based players. In the request URL, mount points instruct Helix Server to deliver the content using the media player’s expected method. Helix Server provides connection support for the following types of encoders capable of generating H.264/AAC live streams:
• Flash Media encoders
Most encoders that produce live Flash streams can create content using H.264/AAC codecs. The Flash broadcast method (see page 67) supports connections from Flash encoders to Helix Server.
• MPEG-2 encoders
MPEG-2 network encoders are used with television production. Helix Server supports live streams encoded in H.264/AAC format for broadcast to media players (see page 69).
• RTP-based encoder (MPEG-4 or 3GPP)
Most RTP-based media encoders, such as MPEG-4 and 3GPP encoders, can transmit live H.264/AAC streams to Helix Server using the RTP Push broadcast method (see page 71).
• Helix Producer
Helix Producer can encode H.264/AAC as either an MPEG-4 or 3GPP Release 6 output type. (The output type matters only when saving the broadcast stream to file on the Helix Producer machine.) For details, see page 73.

Helix Media Delivery Platform Quick Start Guide CHAPTER 6: Broadcast Methods
65
Broadcast Archives
Helix Server can archive broadcasts that stream in the RealMedia, MP3, or H.264/AAC format. An H.264/AAC stream is saved in the MPEG-4 file format (.mp4). You can stream archived files immediately after they are recorded. In Helix Administrator, navigate to the Broadcasting > Broadcast Archiving page to set up archiving.
Encoder Redundancy
When broadcasting any media format, you can specify one or more backup encoders. When the encoders connect to Helix Server to deliver their live event streams, they form a queue based on their connection order. To modify encoder redundancy settings, navigate to Broadcasting > Encoder Redundancy in Helix Administrator.
Standby Messages
If a live broadcast has not started or is interrupted, you can send a message that indicates general information about the broadcast, such as when it is scheduled to play and what viewers can do if the stream is interrupted. You do this by making a clip that contains the message you want to display. You then place the clip in a subdirectory with the same name as the live mount point.
For More Information: There is no Helix Administrator page for creating standby messages. For instructions about creating the messages, refer to the online help topic Helix Administrator > Broadcasting > Standby Messages.
Bandwidth Constraints
In standard broadcasting (also called unicasting), each client stream uses bandwidth, so you are also limited by Helix Server’s available, outgoing bandwidth. Unicasting from a single Helix Server is generally suited for light- to medium-volume broadcasts. For events with a large number of viewers, you can use splitting, multicasting, or a combination of the two to deliver a large number of broadcast streams or to conserve outgoing bandwidth.
For More Information: For more about multicasting and splitting, refer to the Helix Administrator online help.
Server Monitor for Incoming Streams
Helix Administrator includes a Java-based server monitor that you can display in a pop-up window by clicking the Monitor link at the top of the screen. You can also display the monitor by clicking the Logging & Monitoring > Server Monitor.

Helix Media Delivery Platform Quick Start Guide CHAPTER 6: Broadcast Methods
66
Server Monitor Showing an Encoder Stream
Under the monitor’s Connections tab, you can see the stream names of encoder connections in the Filename column. In the preceding example, the /mptslive/ mount point is displayed with the stream name to indicate that the encoded H.264/AAC media is in the MPEG-2 transport stream format.
For More Information: For details about using Server Monitor, click the monitor’s Help link to display the Helix Administrator online help topic Helix Administrator > Logging and Monitoring > Server Monitor.
Enabling Broadcast Sources for HLS and DASHAll broadcast sources are preconfigured for delivery to HLS and DASH clients. These sources are not enabled, however. You need to use Helix Administrator to select which broadcast sources are supported for HLS and DASH clients. You do this for HLS and DASH separately using the following set-up pages:
• Media Delivery > HLS Setup
• Media Delivery > DASH Setup
Midway down each setup page, the Source Paths box indicates the on-demand and broadcast mount points for content that can be segmented.
Enabling a Broadcast Source for HLS or DASH
Do the following to enable broadcasting for HLS or DASH clients:

Helix Media Delivery Platform Quick Start Guide CHAPTER 6: Broadcast Methods
67
1. In the Source Paths box, highlight the broadcast mount point you want to enable:
2. Set Enable Source Path to Yes.
3. Under Destination Mount Point, choose the mount point where segments and playlists are generated. The destination /Segments/ indicates the default Segments directory (see page 55).
Note: If you want to store HLS and DASH segments and playlists in a destination other than the Segments directory, set up a new mount point as described on page 49 and enable it for HTTP delivery as described on page 52.
4. Repeat the preceding steps for each broadcast source you want to enable.
5. At the bottom of the page, click Apply.
Flash BroadcastsHelix Server can receive single-rate or multi-rate media streams from most Flash media encoders, delivering the stream to Flash Players. If the content is H.264/AAC, Helix Server can stream the content to RTSP, HLS, and DASH clients as well.
Flash Broadcast Connection Steps
The following figure illustrates the interaction between a Flash encoder, Helix Server, and media clients. Helix Server can deliver H.264/AAC content to RTSP, HLS, and DASH clients as well as to Flash Player.
Flash Push Broadcast to Multiple Media Clients
/broadcast/ Broadcasts from Helix Producer (see page 73).
/mptslive/ Broadcasts from an MPEG-2 network encoder (see page 69).
/rtmplive/ Live streams from a Flash media encoder (see page 67).
/rtpencoder/ Live streams from an RTP-based encoder (see page 71).
Encoders Adobe Flash Media Live Encoder and most hardware encoders such as Media Excel HERO.
Server Setup Helix Server defines the RTMP port where an encoder delivers the stream and sets a range of IP addresses for encoders that are allowed to connect.
Mount Point /rtmplive/
Transport RTMP/TCP

Helix Media Delivery Platform Quick Start Guide CHAPTER 6: Broadcast Methods
68
1. The Flash encoder begins to stream packets to Helix Server on a designated RTMP port.
2. Each media client requests the broadcast from Helix Server, typically through a link in a Web page. The Flash encoder sets both an application name and a stream name, which are required by Flash Player. The application name is a virtual path that precedes the stream name in the request URL. For example, the application name live and the stream name news appear as follows in a URL:
...Helix Server request URL.../live/news
Note: How the application name and stream name are set may vary by encoder. Consult your encoder documentation for more information.
3. Helix Server delivers the broadcast data to the media client. The URL format (see page 69) causes Helix Server to deliver the content in the format expected by the client.
Flash Broadcast Setup
You set up Flash broadcasting in the Broadcasting > Flash Live Streams page of Helix Administrator. Here you define the RTMP port on Helix Server where Flash encoders direct stream data. No authentication is used to verify the encoder connections. To enable RTMP live stream connections from any Flash encoder, set Enable Flash Encoding to Yes and click Apply.
Flash Encoder Setup
For More Information: For configuration details, refer to the Helix Administrator online help topic Helix Administrator > Broadcasting > Flash Live Streams > Flash Encoder Setup.

Helix Media Delivery Platform Quick Start Guide CHAPTER 6: Broadcast Methods
69
Flash Broadcast URLs
Flash broadcasts use the /rtmplive/ mount point. The following are examples of delivering a H.264/AAC stream named live/news (application name and stream name) to different types of media clients.
For More Information: See the Helix Administrator online help section Content and Links.
MPEG-2 Network EncodersHelix Server supports most industry-standard MPEG-2 encoders that deliver an MPEG-2 transport stream to the server’s IP address or a multicast address. Helix Server supports only H.264/AAC streams, which it can serve to Flash Player, RTSP clients, HLS clients, and DASH clients.
MPEG-2 TS Broadcast Connection Steps
The following figure illustrates the interaction between an MPEG-2 encoder, Helix Server, and media clients.
MPEG-2 Live Stream Broadcast to Multiple Media Clients
1. The MPEG-2 encoder directs an H.264/AAC MPTS or SPTS stream to the Helix Server IP address or a multicast address on a specified port. If input is a single-rate program stream, the Helix Server configuration can choose which program, video stream, and audio stream to broadcast.
HLS Live http://helixserver.example.com/m3ugen/rtmplive/live/news
DASH Live http://helixserver.example.com/dashgen/rtmplive/live/news
Flash Live rtmp://helixserver.example.com/rtmplive/live/news
RTSP Live rtsp://helixserver.example.com/rtsplive/rtmplive/live/news –Or– http://helixserver.example.com/sdpgen/rtsplive/rtmplive/live/news
Encoders Support for most industry-standard MPEG-2 encoders generating single-rate or multi-rate H.264/AAC streams.
Server Setup Helix Server defines the connection port and stream name. For an MPTS stream, it defines which audio and video streams are selected.
Mount Point /mptslive/
Transport MPTS or SPTS, unicast or multicast

Helix Media Delivery Platform Quick Start Guide CHAPTER 6: Broadcast Methods
70
2. Each media client requests the broadcast from Helix Server, typically through a link in a Web page.
3. Helix Server delivers the broadcast data to the media client. The URL format (see page 71) causes Helix Server to deliver the content in the format expected by the client.
MPEG-2 Broadcast Setup
You set up MPEG-2 stream broadcasting in the Broadcasting > MPEG2-TS Live Streams page of Helix Administrator. Here you define the IP address and port where each encoder directs its stream data. For single-rate MPTS streams, you can also select the program number along with the audio and video stream. No authentication is used to verify the encoder connections.
MPEG-2 Encoder Setup
For More Information: For specific configuration details, refer to the Helix Administrator online help topic Helix Administrator > Broadcasting > MPEG-2 TS Live Streams > MPEG-2 Encoder Setup.
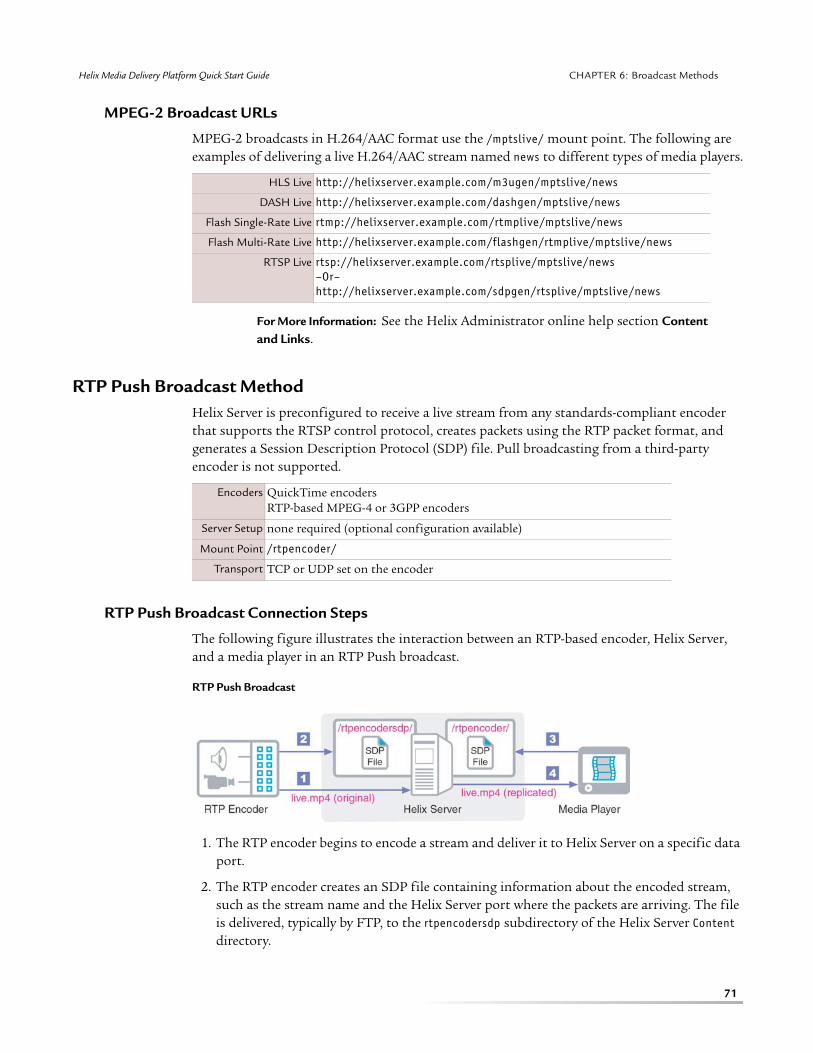
Helix Media Delivery Platform Quick Start Guide CHAPTER 6: Broadcast Methods
71
MPEG-2 Broadcast URLs
MPEG-2 broadcasts in H.264/AAC format use the /mptslive/ mount point. The following are examples of delivering a live H.264/AAC stream named news to different types of media players.
For More Information: See the Helix Administrator online help section Content and Links.
RTP Push Broadcast MethodHelix Server is preconfigured to receive a live stream from any standards-compliant encoder that supports the RTSP control protocol, creates packets using the RTP packet format, and generates a Session Description Protocol (SDP) file. Pull broadcasting from a third-party encoder is not supported.
RTP Push Broadcast Connection Steps
The following figure illustrates the interaction between an RTP-based encoder, Helix Server, and a media player in an RTP Push broadcast.
RTP Push Broadcast
1. The RTP encoder begins to encode a stream and deliver it to Helix Server on a specific data port.
2. The RTP encoder creates an SDP file containing information about the encoded stream, such as the stream name and the Helix Server port where the packets are arriving. The file is delivered, typically by FTP, to the rtpencodersdp subdirectory of the Helix Server Content directory.
HLS Live http://helixserver.example.com/m3ugen/mptslive/news
DASH Live http://helixserver.example.com/dashgen/mptslive/news
Flash Single-Rate Live rtmp://helixserver.example.com/rtmplive/mptslive/news
Flash Multi-Rate Live http://helixserver.example.com/flashgen/rtmplive/mptslive/news
RTSP Live rtsp://helixserver.example.com/rtsplive/mptslive/news –Or– http://helixserver.example.com/sdpgen/rtsplive/mptslive/news
Encoders QuickTime encoders RTP-based MPEG-4 or 3GPP encoders
Server Setup none required (optional configuration available)
Mount Point /rtpencoder/
Transport TCP or UDP set on the encoder

Helix Media Delivery Platform Quick Start Guide CHAPTER 6: Broadcast Methods
72
3. The media player requests the live stream.
4. Helix Server delivers the replicated live stream to the media player.
RTP Push Setup
Helix Server is configured by default to stream an RTP Push broadcast. Optionally, you can navigate to Broadcasting > RTP Live Streams in Helix Administrator to change default settings.
RTP Live Stream Setup
The default action is to check for the SDP file when the first media player requests the broadcast. If you set Enable SDP Directory Scan to Yes, Helix Server scans the SDP upload directory periodically. When it finds a new SDP file, it acquires the stream immediately.
For More Information: See the Helix Administrator online help topic Helix Administrator > Broadcasting > RTP Live Streams for details about setup options and SDP file format requirements.
RTP Broadcast URLs
RTP broadcasts use the /rtpencoder/ mount point. The following are examples of delivering an H.264/AAC live stream named news to different types of media players.
For More Information: See the Helix Administrator online help section Content and Links.
HLS Live http://helixserver.example.com/m3ugen/rtpencoder/news
DASH Live http://helixserver.example.com/dashgen/rtpencoder/news
Flash Single-Rate Live rtmp://helixserver.example.com/rtmplive/rtpencoder/news
Flash Multi-Rate Live http://helixserver.example.com/flashgen/rtmplive/rtpencoder/news
RTSP Live rtsp://helixserver.example.com/rtpencoder/news –Or– http://helixserver.example.com/spdgen/rtpencoder/news
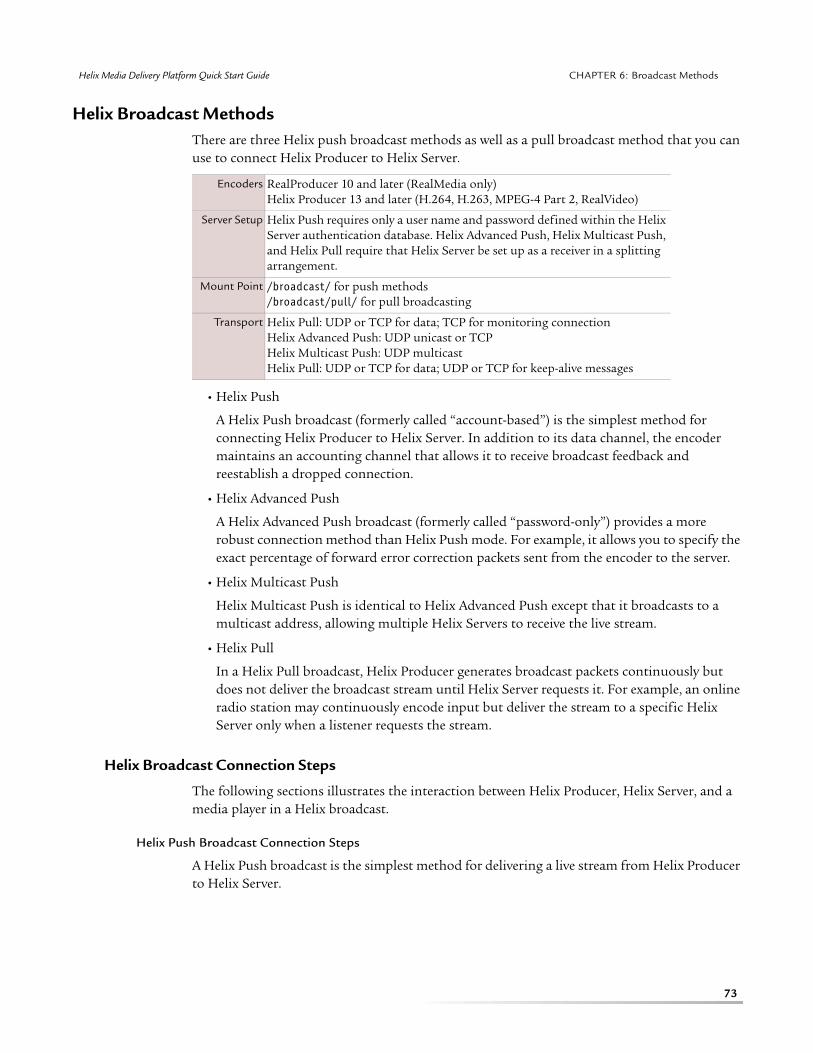
Helix Media Delivery Platform Quick Start Guide CHAPTER 6: Broadcast Methods
73
Helix Broadcast MethodsThere are three Helix push broadcast methods as well as a pull broadcast method that you can use to connect Helix Producer to Helix Server.
• Helix Push
A Helix Push broadcast (formerly called “account-based”) is the simplest method for connecting Helix Producer to Helix Server. In addition to its data channel, the encoder maintains an accounting channel that allows it to receive broadcast feedback and reestablish a dropped connection.
• Helix Advanced Push
A Helix Advanced Push broadcast (formerly called “password-only”) provides a more robust connection method than Helix Push mode. For example, it allows you to specify the exact percentage of forward error correction packets sent from the encoder to the server.
• Helix Multicast Push
Helix Multicast Push is identical to Helix Advanced Push except that it broadcasts to a multicast address, allowing multiple Helix Servers to receive the live stream.
• Helix Pull
In a Helix Pull broadcast, Helix Producer generates broadcast packets continuously but does not deliver the broadcast stream until Helix Server requests it. For example, an online radio station may continuously encode input but deliver the stream to a specific Helix Server only when a listener requests the stream.
Helix Broadcast Connection Steps
The following sections illustrates the interaction between Helix Producer, Helix Server, and a media player in a Helix broadcast.
Helix Push Broadcast Connection Steps
A Helix Push broadcast is the simplest method for delivering a live stream from Helix Producer to Helix Server.
Encoders RealProducer 10 and later (RealMedia only) Helix Producer 13 and later (H.264, H.263, MPEG-4 Part 2, RealVideo)
Server Setup Helix Push requires only a user name and password defined within the Helix Server authentication database. Helix Advanced Push, Helix Multicast Push, and Helix Pull require that Helix Server be set up as a receiver in a splitting arrangement.
Mount Point /broadcast/ for push methods /broadcast/pull/ for pull broadcasting
Transport Helix Pull: UDP or TCP for data; TCP for monitoring connection Helix Advanced Push: UDP unicast or TCP Helix Multicast Push: UDP multicast Helix Pull: UDP or TCP for data; UDP or TCP for keep-alive messages

Helix Media Delivery Platform Quick Start Guide CHAPTER 6: Broadcast Methods
74
Helix Push Broadcast
1. Helix Producer contacts Helix Server on its HTTP port and establishes a monitoring connection. Using this connection, Helix Producer sends a user name and password to authenticate its access attempt.
2. Helix Server validates the Helix Producer user name and password in its authentication database. It then informs Helix Producer how to make the broadcast connection, telling it which server ports to use, for example.
3. Helix Producer establishes the broadcast stream connection to Helix Server. It begins to send the encoded packets whether or not any media players have requested the broadcast yet.
4. A viewer requests the broadcast by clicking a link in a Web page.
5. Helix Server delivers the broadcast data to the media client. The URL format (see page 76) causes Helix Server to deliver the content in the format expected by the client.
Helix Advanced Push and Multicast Push Broadcast Connection Steps
The following figure illustrates the interaction between Helix Producer, Helix Server, and a media player in a Helix Advanced Push or Helix Multicast Push broadcast.
Helix Advanced Push Broadcast
1. As soon as it starts encoding the broadcast stream, Helix Producer sends the stream packets to Helix Server. The password required by the Helix Server receiver is encoded into the data stream. The stream periodically encodes metadata values that allow Helix Server to reconnect to the stream if it has been dropped.
2. A viewer requests the broadcast by clicking a link in a Web page.
3. Helix Server delivers the broadcast data to the media client. The URL format (see page 76) causes Helix Server to deliver the content in the format expected by the client.
Helix Pull Broadcast Connection Steps
The following figure illustrates the interaction between Helix Producer, Helix Server, and a media player in a Helix Pull broadcast.

Helix Media Delivery Platform Quick Start Guide CHAPTER 6: Broadcast Methods
75
Helix Pull Broadcast
1. Helix Producer begins encoding the stream, but the output is not immediately sent to Helix Server.
2. The first audience member requests the broadcast, typically by clicking a link in a Web page.
3. Helix Server requests the broadcast stream from Helix Producer, sending the encoder information about the server address and ports to use. Once the connection is established, Helix Server sends keep-alive requests to Helix Producer as long as viewers are receiving the broadcast.
4. Helix Producer sends the broadcast stream to Helix Server, terminating the stream when it receives no more keep-alive messages.
5. Helix Server streams the broadcast to media players.
Note: The first viewer may experience a longer-than-normal delay as Helix Server contacts Helix Producer to acquire the broadcast stream. After the server acquires the stream, however, subsequent viewers experience no additional delay.
Helix Broadcast Setup
Setup steps for Helix broadcasting methods vary by the method. Helix Push is the easiest to set up. The other Helix methods require that you set up Helix Server as a receiver in a splitting arrangement.
Helix Push Setup
You set up Helix Push broadcasting in Helix Administrator by navigating to the Broadcasting > Helix Push page. Here you can configure the range of data ports (50001 to 50050 by default) and define a user name and password in the SecureRBSEncoder realm.
Helix Push Setup

Helix Media Delivery Platform Quick Start Guide CHAPTER 6: Broadcast Methods
76
Note: On Helix Producer, you set up a Helix Push broadcast method (“account-based” on older versions), specifying the Helix Server IP address along with the same user name and password recorded in the server database.
For More Information: For specific configuration details, refer to the Helix Administrator online help topic Helix Administrator > Broadcasting > Helix Push.
Helix Advanced Push Setup
You set up Helix Advanced Push or Multicast Push broadcasting in Helix Administrator in the Broadcast Distribution > Receiver Setup page. Here you define information such as the password used by the Helix Producer encoder, which acts as the transmitter in a splitting arrangement. The Helix Multicast Push method differs from Helix Advanced Push only in that the receiver definition specifies a multicast address for the transmitter and defines the transport as udp/multicast.
Note: On Helix Producer, you set up a Helix Advanced Push or Helix Multicast Push broadcast method, specifying the Helix Server IP address or multicast address along with the same password recorded in the receiver configuration.
For More Information: For configuration details, refer to the online help topic Helix Administrator > Broadcast Distribution > Receiver Setup > Defining a Receiver.
Helix Pull Setup
You set up Helix Pull broadcasting in Helix Administrator in the Broadcast Distribution > Receiver Setup page. Here you set up a receiver and enable it for pull splitting. On Helix Producer, you set up a Helix Pull broadcast destination and specify the same listen port value and password defined on the receiver.
For More Information: For specific configuration details, refer to the Helix Administrator online help topic Helix Administrator > Broadcast Distribution > Receiver Setup > Enabling Pull Splitting Requests.
Helix Push Broadcast URLs
Helix broadcasts in H.264/AAC format use the /broadcast/ mount point. The following are examples of delivering a live, pushed stream in H.264/AAC format to different types of media players. Live broadcast streams from Helix Producer may include a file extension such as .mp4, although this is not required.
HLS Live http://helixserver.example.com/m3ugen/broadcast/news.mp4
DASH Live http://helixserver.example.com/dashgen/broadcast/news.mp4
Flash Single-Rate Live rtmp://helixserver.example.com/rtmplive/broadcast/news.mp4
Flash Multi-Rate Live http://helixserver.example.com/flashgen/rtmplive/broadcast/news.mp4
RTSP Live rtsp://helixserver.example.com/broadcast/news.mp4 –Or– http://helixserver.example.com/spdgen/broadcast/news.mp4

Helix Media Delivery Platform Quick Start Guide CHAPTER 6: Broadcast Methods
77
Note: URLs for Helix Pull broadcasts build on the basic URL formats used with push broadcasts. A pull URL includes information about both the receiver and the transmitter, however. For details, see the Helix Administrator online help topic Helix Administrator > Broadcast Distribution > Splitting Basics > Links to Split Content > Pull Splitting Links.
For More Information: For additional explanation about URL formats, see the Helix Administrator online help section Content and Links.
Windows Media BroadcastsHelix Server is preconfigured to deliver live broadcast streams in the Windows Media format. It includes support for the MMS protocol, a Windows Media broadcast mount point, and an ASXgen mount point for launching Windows Media Player.
Windows Media Push and Pull Modes
Broadcasting in the Windows Media format can use a push or pull mode:
• In a Windows Media pull broadcast, Helix Server pulls a stream from Windows Media Encoder version 7 or later over an HTTP connection, delivering the stream to Windows Media Players over the MMS or HTTP protocol.
• In a Windows Media push broadcast, Helix Server receives a stream from Windows Media Encoder version 9 or later on a predefined port. It then delivers the stream to Windows Media Players over the MMS or HTTP protocol.
Note: Multiple bit rate (MBR) encoding is supported only with pull broadcasting with Windows Media Encoder version 7. It is not supported with push or pull broadcasting using Windows Media Encoder version 9 or later.
Windows Media Broadcast Setup
To set up a Windows Media broadcast, navigate to Broadcasting > Windows Media Live Streams in Helix Administrator. Refer to the Helix Administrator online help topic Helix Administrator > Broadcasting > Windows Media Live Streams for detailed instructions about running a Windows Media broadcast.
Encoders Windows Media Encoder version 7 or later
Server Setup Helix Server defines the pull sources or the push encoding port.
Mount Point /wmtencoder/
Transport HTTP

78
A P P E N D I X
A Appendix A: NONSTANDARD INSTALLATIONS
Chapter 1 explains the standard procedures for installing Helix Server or Helix Proxy on a dedicated machine. This appendix explains issues in the specific cases of installing Helix Server and Helix Proxy on the same machine. It also covers installing Helix Server on a machine that runs a Web server.
Installing the Server and Proxy on the Same MachineRealNetworks recommends that each Helix Server and each Helix Proxy runs on a dedicated machine. However, it is possible to install both applications on the same machine as long streaming loads are light.
Machine Requirements for Dual Use
To host both applications, a computer must meet the following criteria:
• The machine cannot host a Web server in addition to both Helix Server and Helix Proxy.
• At least 1 Gigabyte of RAM is needed.
• The machine must have adequate disk space for caching media clips. Helix Server also needs adequate disk space for the clips that it streams. In addition, you need approximately 50 Megabytes of free space for the software and log files.
For More Information: The Helix Proxy online help topic Helix Administrator > Proxy Setup > Cache explains how to change the cache size after installation.
• The machine needs at least two IP addresses, one for Helix Server and one for Helix Proxy. You can accomplish this by using a multi-homed machine that has two or more network interfaces. Most operating systems also support virtual addressing in which you assign multiple IP addresses to one physical network card. Be sure to have your IP addressing configured on the Helix Gateway machine before you install the applications.
For More Information: Consult your hardware or operating system documentation for information about installing a network interface card or assigning virtual IP addresses, respectively.
Installing the Server for Dual Use
The following procedure outlines the steps for installing Helix Server. After you do this, you can install Helix Proxy on the same machine.
➤ To install Helix Server on the Gateway Machine:
1. Run the installation program according to the instructions in the section “Installing Helix Server” on page 3. This installs the necessary software files.

Helix Media Delivery Platform Quick Start Guide APPENDIX A: Nonstandard Installations
79
2. After the installation, do not start Helix Server. If Helix Server is running because you installed it as a Windows Service, for example, shut it down according to the instructions in the section “Shutting Down on Windows” on page 15.
3. Using any text editor, open the Helix Server configuration file, which resides in the directory in which you installed Helix Server. The default configuration file name is rmserver.cfg.
4. In the configuration file, find the following lines, or add them to the bottom of the configuration file if they are not already present:
<List Name="IPBindings"> <Var Address_1="any"/> </List>
This list defines the IP addresses that Helix Server uses. The default value of any for Address_1 binds Helix Server to all IPv4 or IPv6 addresses used by the machine. This will cause conflicts with Helix Proxy. You therefore need to change this value to the IPv4 or IPv6 address that you want Helix Server to use. The following is an IPv4 example. Substitute one of your machine’s IP addresses for the Address_1 value:
<List Name="IPBindings"> <Var Address_1="197.168.0.100"/> </List>
Tip: Be careful to change only the numeric values. If you accidentally delete one of the quotation marks that surrounds the IP value, for instance, Helix Server will not correctly bind to that IP address.
Note: Do not bind Helix Server to the localhost address (127.0.0.1 for IPv4 or ::1 for IPv6). Helix Proxy will use this address instead.
5. Save and close the configuration file. Be sure to save the file as plain text.
6. Do not restart Helix Server until after you have installed Helix Proxy. The section “Starting the Server with a Heartbeat Option” on page 80 provides start-up instructions.
Installing the Proxy for Dual Use
After you install Helix Server on the Helix Gateway machine, install Helix Proxy as described in the following procedure.
➤ To install Helix Proxy on the Gateway Machine:
1. Run the binary installer according to the instructions in the section “Installing Helix Proxy” on page 9. This installs the necessary software files.
2. After the installation completes, do not start Helix Proxy. If Helix Proxy is running because you installed it as a Windows Service, for example, shut it down according to the instructions in the section “Shutting Down on Windows” on page 15.
3. Using any text editor, open the Helix Proxy configuration file, which resides in the directory in which you installed Helix Proxy. The default configuration file name is rmproxy.cfg.
Helix Media Delivery Platform Quick Start Guide APPENDIX A: Nonstandard Installations
80
4. In the configuration file, find the following lines, or add them to the bottom of the configuration file if they are not already present:
<List Name="IPBindings"> <Var Address_1="any"/> </List>
This list defines the IP addresses that Helix Proxy uses. The default value of any for Address_1 binds Helix Proxy to all IP addresses used by the machine. You therefore need to change this value to the IPv4 or IPv6 address that you want Helix Proxy to use, which must be different from the IP address that you assigned to Helix Server.
Additionally, create a new line using the variable Address_2 to assign the localhost address (127.0.0.1 for IPv4 or ::1 for IPv6) to Helix Proxy. The following is an IPv4 example. Substitute your machine’s IP address for the Address_1 value:
<List Name="IPBindings"> <Var Address_1="197.168.0.101"/> <Var Address_2="127.0.0.1"/> </List>
5. Save and close the configuration file. Be sure to save the file as plain text.
6. You can start Helix Proxy now or after you have started Helix Server. For start-up instructions, refer to Chapter 2 .
Starting the Server with a Heartbeat Option
After you have installed and configured the IP addresses for both applications, you can start Helix Server with a heartbeat start-up parameter, --hbi, that prevents server operation from conflicting with the proxy. Add the parameter along with the IP address to which Helix Server is bound.
For More Information: See the Helix Administrator online help topic Server Operation > Startup Command Options for more about the heartbeat option.
Startup Example
The following example illustrates the heartbeat check and memory allocation options used when starting Helix Server from the command line:
Bin\rmserver rmserver.cfg --hbi 197.168.0.100 -m 512
Startup Procedures
Refer to thee following sections for information about including startup options in the various procedures for starting the server or proxy:
• “Running a Windows Service” on page 11
• “Using the Start Menu or a Desktop Icon” on page 12
• “Starting Up from the Windows Command Line” on page 13
• “Starting the Server on Linux or Solaris” on page 14

Helix Media Delivery Platform Quick Start Guide APPENDIX A: Nonstandard Installations
81
Installing Helix Server with a Web ServerRealNetworks recommends that you do not install Helix Server on the same physical machine that runs a Web server. This helps to balance loads so that streaming is not affected by heavy Web server use. If you decide to install Helix Server on a Web server machine, both products may try to claim ports 80 and 443 for HTTP and HTTPS requests. There are two ways to avoid this conflict.
Use Nonstandard Ports for Helix Server
During Helix Server installation, you can set ports other than 80 and 443 for HTTP requests. In this case, all HTTP URLs directed toward Helix Server must specify the alternate port number. This creates potential for errors in writing URLs, however, and may limit client access if firewalls restrict HTTP requests to ports 80 and 443.
Bind Helix Server to Specific IP Addresses
A better approach for avoiding port conflicts is to use two IP addresses for the same computer, one for Helix Server and the other for the Web server. This requires a multihomed machine that has two or more network interfaces.
In a multihomed configuration, you assign an IP address to each network interface and bind Helix Server to one of the IP addresses. In this way, Helix Server and your Web server both use ports 80 and 443 on a different network addresses.
Note, though, that Helix Server attempts to bind to all available IP addresses on startup. The following procedure explains how to work around this problem.
➤ To prevent an HTTP port conflicts on a multihomed machine:
1. When installing Helix Server, choose any unused ports other than 80 and 443 for HTTP and HTTP, respectively. This prevents Helix Server startup from failing due to a port conflict with the Web server.
2. After installation, start Helix Server and bind it to one or more IP addresses not used by the Web server on the multihomed machine.
Tip: In Helix Administrator, choose Server Setup > IP Binding. Refer to the online help for details about IP binding options.
3. Change Helix Server’s HTTP port to 80 and its HTTPS port to 443.
Tip: In Helix Administrator, choose Server Setup > Ports. Refer to the online help for detailed information.
4. Restart Helix Server. It now claims ports 80 and 443 only on the IP addresses on which it is bound.

82
A P P E N D I X
B Appendix B: HELIX SERVER FILE FORMATS AND CODECS
Helix Server can stream a wide variety of media formats as live broadcasts or on-demand clips. This appendix explains the file formats and codecs that Helix Server can deliver.
File Format SummaryThe following table lists common file formats used for audio and video. A Yes value in the Supported? column means that Helix Server can read this file format. The Protocol column indicates the streaming protocol used to deliver the content.
Note: The preceding table is a guide to file format support, not codec support. For example, although Helix Server does not stream the raw AAC file format (.aac), it can deliver content encoded with AAC codecs into other file formats, such as MPEG-4 (.mp4).
For More Information: In addition to streaming protocols, Helix Server supports HTTP download for any file. Progressive download is supported for file formats that allow it.
Common Streaming Media File Formats Supported by Helix Server
File Format Common File Extensions Supported? Protocol
3GPP Release 5 .3gp Yes RTSP
3GPP Release 6 .3gp Yes RTSP, RTMP
3GPP2 .3g2 Yes RTSP
FLV .flv Yes RTMP
F4V .f4v Yes RTMP, RTSP
MP3 .mp3 Yes RTSP
MPEG-1 .mpg No n/a
MPEG-2 .m2p, .m2v, .mpv No n/a
MPEG-2 Transport Stream .ts Yes HTTP Live
MPEG-4 .mp4, .m4a Yes RTSP, RTMP
Qualcomm QCELP .qcp No n/a
QuickTime .mov Yes RTSP
Raw AAC .aac No n/a
Raw AMR .amr No n/a
RealMedia .rm, .ra, .rv, .rmvb Yes RTSP
Windows Media .asf, .wma, .wmv Yes MMS, WM-HTTP

Helix Media Delivery Platform Quick Start Guide APPENDIX B: Helix Server File Formats and Codecs
83
Codec SummaryThe following table summarizes popular codec choices for compressing audio and video data. The second column indicates the file formats typically used with these codecs for on-demand clips.
Codecs Supported by Helix Server
Codec Common Container Formats More Information
AAC F4V, MPEG-4, 3GPP, 3GPP2, QuickTime, MPEG-2 transport stream
page 84
AAC Plus F4V, MPEG-4, 3GPP, 3GPP2, QuickTime, MPEG-2 Transport Stream
page 84
EAAC Plus MPEG-4, 3GPP, QuickTime page 84
AMR-NB MPEG-4, 3GPP, 3GPP2, QuickTime page 84
AMR-WB MPEG-4, 3GPP, QuickTime page 84
DV14 QuickTime page 86
G.711 QuickTime page 86
G.722 QuickTime page 86
G.726 QuickTime page 86
H.261 QuickTime page 86
H.723.1 QuickTime page 86
H.263 MPEG-4, 3GPP, 3GPP2, QuickTime page 84
H.264 F4V, MPEG-4, 3GPP, 3GPP2, QuickTime, MPEG-2 transport stream
page 85
MP3 MP3, MPEG-4, QuickTime page 85
MPEG-4 Part 2 MPEG-4, 3GPP, 3GPP2, QuickTime page 86
QCELP 3GPP2 page 86
RealAudio RealMedia page 87
RealVideo RealMedia page 87
Sorenson QuickTime page 86
VP6 FLV page 57
Windows Media Audio Windows Media page 88
Windows Media Video Windows Media page 88

Helix Media Delivery Platform Quick Start Guide APPENDIX B: Helix Server File Formats and Codecs
84
AACAdvanced Audio Coding (AAC) codecs encode mixed audio content for a large range of bit rates. Helix Server can stream AAC-LC (low complexity), AAC Plus (also known as HE-AAC), and Enhanced AAC Plus (also known as EACC+ and HE-AAC v2).
Note: The raw AAC file format (.aac) is not supported for streaming by Helix Server. EACC+ is not supported for segmentation into MPEG-2 transport streams for HLS clients.
AMRThe Adaptive Multirate speech codec (AMR) encodes voice data at a variety of speeds. The narrowband codec (AMR-NB) encodes at 7.4 to 12.2 Kbps. The AMR-WB codec, also known as G722.2, encodes up to 23.85 Kbps.
Note: The raw AMR file format (.amr) is not supported for streaming by Helix Server.
H.263The H.263 video codec is suitable for lower-speed content streamed to mobile devices. Because it requires less processing power to decode than H.264, it is recommended for older devices that have slower processors.
Audio Type music
Channels 1 or 2
File Formats Flash F4V (.f4v), MPEG-4 (.mp4, .m4a), 3GPP (.3gp), 3GPP2 (.3g2), QuickTime (.mov), MPEG-2 transport stream (.ts)
Hinting not required
Audio Type speech
Channels 1
File Formats MPEG-4 (.mp4, .m4a), 3GPP (.3gp), 3GPP2 (.3g2), QuickTime (.mov)
Hinting not required
Profiles all
Levels all
File Formats MPEG-4 (.mp4), 3GPP (.3gp), 3GPP2 (.3g2), QuickTime (.mov)
Hinting not required for levels 0 and 3; required for all other levels

Helix Media Delivery Platform Quick Start Guide APPENDIX B: Helix Server File Formats and Codecs
85
H.264The H.264 codec is also known as MPEG-4 Part 10 and MPEG-4 AVC.
ISMA Compliance
Helix Server support for H.264 is compliant with ISMA 1.0 as well as with Profile 2 and Profile 3 of ISMA 2.0. Helix Producer can also encode output using the high-speed Profile 4 of the ISMA 2.0 specification. Profile 4 is not compatible with streaming from Helix Server, however.
H.264 Levels
The following table lists the maximum bit rate and frame size for the H.264 levels that Helix Server can stream.
The maximum frame size is defined as the width in pixels multiplied by the height in pixels, divided by 256. Using this formula, the frame size of 352×288 results in a value of 396, requiring the use of level 1.1 or higher.
MP3The MP3 codec is the audio layer of the MPEG-1 standard.
Profiles Constrained Baseline, Baseline, Main
Levels Levels 1 to 3.1 with maximum speed up to 15 Mbps
File Formats Flash F4V (.f4v), MPEG-4 (.mp4), 3GPP (.3gp), 3GPP2 (.3g2), QuickTime (.mov), MPEG-2 transport stream (.ts)
Hinting not required
H.264 Encoding Levels
Level Maximum Bit Rate Maximum Frame Size (Width x Height/256)
1 64 Kbps 99
1b 128 Kbps 99
1.1 192 Kbps 396
1.2 384 Kbps 396
1.3 768 Kbps 396
2 2 Mbps 396
2.1 4 Mbps 792
2.2 4 Mbps 1620
3 10 Mbps 1620
3.1 14 Mbps 3600
Audio Type music
Channels 1 or 2
File Formats MP3 (.mp3), MPEG-4 (.mp4, .m4a), QuickTime (.mov)
Hinting not applicable with .mp3 format; required for other file formats

Helix Media Delivery Platform Quick Start Guide APPENDIX B: Helix Server File Formats and Codecs
86
Helix Server uses a proprietary stream packetization method when streaming the MP3 file format (.mp3). This makes the stream compatible only with RealPlayer and media players based on Helix DNA. Alternatively, you can generate MP3 content in the QuickTime (.mov) or MPEG-4 (.mp4 or .m4a) format, making the clip compatible with any streaming MP3 player that can read the file format.
MPEG-4 Part 2Helix Server can stream MPEG-4 Part 2 video in several common file formats.
QCELPThe Qualcomm QCELP codec encodes voice at 14 Kbps (full-rate) or 6.8 Kbps (half-rate).
Note: The raw QCELP file format (.qcp) is not supported for streaming by Helix Server.
QuickTimeQuickTime is a general-purpose format that can be used as the container for a number of standards-based codecs, such as AAC and H.264. Helix Server can also stream QuickTime clips encoded with popular proprietary codecs such as the following:
• Sorenson
• Cinepak
• Qualcomm PureVoice
• Qdesign
Profiles Simple (ISO/IEC 11172-2), Advanced Simple (ISO/IEC 14496-2)
Levels all
File Formats MPEG-4 (.mp4), 3GPP (.3gp), 3GPP2 (.3g2), QuickTime (.mov)
Hinting not required for Simple profile; required for Advanced Simple profile
Audio Type voice
Channels 1
File Formats 3GPP2 (.3g2)
Hinting required
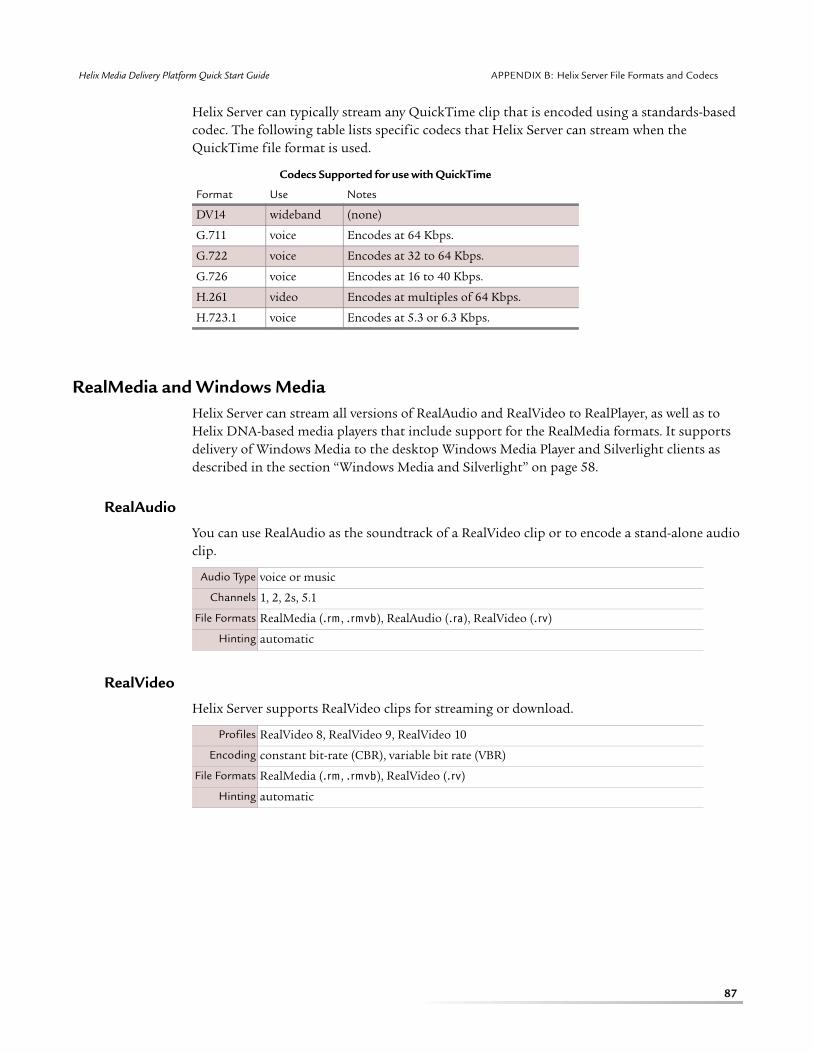
Helix Media Delivery Platform Quick Start Guide APPENDIX B: Helix Server File Formats and Codecs
87
Helix Server can typically stream any QuickTime clip that is encoded using a standards-based codec. The following table lists specific codecs that Helix Server can stream when the QuickTime file format is used.
RealMedia and Windows MediaHelix Server can stream all versions of RealAudio and RealVideo to RealPlayer, as well as to Helix DNA-based media players that include support for the RealMedia formats. It supports delivery of Windows Media to the desktop Windows Media Player and Silverlight clients as described in the section “Windows Media and Silverlight” on page 58.
RealAudio
You can use RealAudio as the soundtrack of a RealVideo clip or to encode a stand-alone audio clip.
RealVideo
Helix Server supports RealVideo clips for streaming or download.
Codecs Supported for use with QuickTime
Format Use Notes
DV14 wideband (none)
G.711 voice Encodes at 64 Kbps.
G.722 voice Encodes at 32 to 64 Kbps.
G.726 voice Encodes at 16 to 40 Kbps.
H.261 video Encodes at multiples of 64 Kbps.
H.723.1 voice Encodes at 5.3 or 6.3 Kbps.
Audio Type voice or music
Channels 1, 2, 2s, 5.1
File Formats RealMedia (.rm, .rmvb), RealAudio (.ra), RealVideo (.rv)
Hinting automatic
Profiles RealVideo 8, RealVideo 9, RealVideo 10
Encoding constant bit-rate (CBR), variable bit rate (VBR)
File Formats RealMedia (.rm, .rmvb), RealVideo (.rv)
Hinting automatic

Helix Media Delivery Platform Quick Start Guide APPENDIX B: Helix Server File Formats and Codecs
88
Windows Media
Helix Server supports Windows Media clips for streaming or download.
Uncompressed and Older FormatsThe following table summarizes uncompressed and older audio formats that Helix Server can stream. These are considered legacy formats that are not recommended for streaming, either because of their large bandwidth requirements or because newer compression technologies are more effective.
Profiles Windows Media 7 and later
Encoding constant bit-rate (CBR) for all versions multiple bit rate (MBR) with Windows Media 7 only
File Formats Advanced Systems Format (.asf), Windows Media Audio (.wma), Windows Media Video (.wmv)
Hinting automatic
Uncompressed and Older Formats
Format File Container Type
a-Law WAV (.wav) Companding audio algorithm
AIFF AIFF (.aiff) Apple uncompressed audio
AU AU (.au) Sun Microsystems uncompressed audio
AVI AVI (.avi) Microsoft uncompressed video
Indeo AVI (.avi) Intel video codec
μ-Law WAV (.wav) Companding audio algorithm
PCM AVI (.avi) or WAV (.wav) Pulse code modulation for audio or video
WAV WAV (.wav) Microsoft uncompressed audio

89
INDEX
A AAC and AAC+, 84Administration system, see Helix AdministratorAmazon Web Services, see EC2AMR-NB and AMR-WB, 84archiving broadcasts, 65ASXgen mount point, 59
B background processEC2, 27Solaris and Linux, 14
bandwidth for broadcasts, 65bookmarking, 43/broadcast/ mount point, 73broadcasting, 71
archives, 65bandwidth constraints, 65Flash, 67Helix encoders, 73MPEG-2 transport streams, 69overview, 64redundant encoders, 65RTP-based media
overview, 71setting up the broadcast, 72URL formats, 72
SDP files, 71standby message, 65Windows Media, 77
C certificate files for HTTPS, 7codec support, 83content directories
creating new content directories, 49default directory
EC2 instance, 32local machine, 49
enabling for HTTP download, 52
D DASHMP4 and MPEG-2 TS segments, 54on-demand streaming, 54segments directory, 55source directories, 55tips for streaming, 56URL formats
Flash broadcast, 69Helix broadcast, 76
MPEG-2 broadcast, 71on-demand streaming, 54RTP-based broadcast, 72
E EBS volumescreating, 28enabling, 29mount point, 29snapshots, 29
EC21-click installation, 16basic parameters, 31console installation, 18
instance details, 20instance size, 19key pairs, 22security group, 22tags, 21volumes
EBS, 21root, 20
content directory, 32firewall settings, 32fstab file, 30FTP access, 53Helix product pages, 16instance configuration, 23memory use, 27password
Helix Administrator, 35SSH, 25
rc.local file, 27server directory, 27server startup parameter, 27SFTP access
Linux login, 54Windows login, 53
SSH, 25URLs to instancesl, 24vi editor, 33
end-user license, 4
F F4V, 57fast channel switching API port, 6file format support, 82Flash
broadcasting

Index
90
application name, 68overview, 67server setup, 68
F4V, 57FLV, 57H.264/AAC content, 57on-demand streaming, 57sample player, 38URL formats
Flash broadcast, 69Helix broadcast, 76MPEG-2 broadcast, 71on-demand streaming, 57RTP-based broadcast, 72
FLV, 57FTP
EC2 instances, 53WinSCP client, 53
G Gateway installationproxy
installation, 79start-up, 80
serverinstallation, 78start-up, 80
system requirements, 78
H H.263, 84H.264
Flash Player, 57for universal delivery, 60HLS and DASH content, 54RTSP clients, 58Silverlight, 59supported profiles and levels, 85
Helix Administratoradding users, 36Admin port, 5, 34applying changes, 40features, 41interface, 37online help, 39page icons, 37password, 4, 9, 35restarting the server, 41SecureAdmin port
EC2, 34local machine, 5, 34
starting, 34timeout, 36top frame, 37user name, 4, 9, 35
Helix broadcastingbroadcast steps, 73Helix Advanced Push, 73
Helix Multicast Push, 73Helix Pull, 73Helix Push, 73overview, 73server setup, 75URL formats, 76
Helix Producerbroadcasts, 73H.264/AAC encoding, 60
help system, 39HLS
on-demand streaming, 54segments directory, 55source directories, 55tips for streaming, 56URL formats
Flash broadcast, 69Helix broadcast, 76MPEG-2 broadcast, 71on-demand streaming, 54RTP-based broadcast, 72
HTTP downloads, 52HTTP port
conflict resolution, 81nonstandard port use, 81
HTTPScertificate file generation, 7OpenSSL, 9self-signed certifcates, 8
I installation, 3, 4EC2 console, 18EC2 marketplace, 16machine ID, 5multi-homed machine, 81testing, 38Windows service, 4
IP binding, 41iPhone and iPad streaming, see HLS
L license filedelivery, 3invalid files, 39location, 39machine ID, 5multiple files, 39
LinuxPID, 15starting the server, 14stopping the server, 15
LogPath variable, 15
M machine ID, 5memory use
EC2 image, 27

Index
91
local machine, 11MIME type configuration, 42MP3, 85MP3 broadcast archives, 65MPEG-2 broadcasting
overview, 69server setup, 70URL formats, 71
/mptslive/ mount point, 69multi-homed machine installation, 81
O online help, 39OpenSSL, 9
P password for Helix Administrator, 35PID file, 15PidPath variable, 15playlist management
control port, 7file system control port, 7
portscontent management, 7control port security, 7fast channel switching, 6Helix Administrator
EC2, 34local machine, 34
HTTP, 81nonstandard values, 6port 80 conflict, 81selecting, 5server-side playlist APIs, 7streaming protocols, 6
Process ID, 15proxy
features, 41installation, 9
PuTTY for SSH, 26
Q QuickTimebroadcasting, 71codec support, 86hinting, 86overview, 86
R RealMedia broadcast archives, 65redundant encoders, 65restarting the server, 41root privilege for Linux and Solaris, 6/rtmplive/ mount point, 67RTP-based broadcasting
overview, 71server setup, 72URL formats, 72
/rtpencoder/ mount point, 71RTSP clients
H.264/AAC content, 58on-demand streaming, 58/sdpgen/ mount point, 58URL formats
Flash broadcast, 69Helix broadcast, 76MPEG-2 broadcast, 71RTP-based broadcast, 72
RTSP for Windows Media, 59
S SDP files for broadcasts, 71/sdpgen/ mount point, 58segments directory, 55server features, 41Silverlight
H.264/AAC content, 59on-demand streaming, 59sample player, 38
SNMP, 5, 10Solaris
PID, 15starting the server, 14stopping the server, 15
SSH on EC2Browser login, 25Linux login, 26password, 25PuTTY client, 26Windows login, 26
starting upSolaris and Linux, 14
background process, 14startup script, 14
Windows, 11stopping the server
EC2, 24Solaris and Linux, 15Windows, 15
T test clips, 38
U universal delivery of content, 60URL formats
DASHFlash broadcast, 69Helix broadcast, 76MPEG-2 broadcast, 71on-demand, 54RTP-based broadcast, 72
FlashFlash broadcast, 69Helix broadcast, 76MPEG-2 broadcast, 71

Index
92
on-demand, 57RTP-based broadcast, 72
HLSFlash broadcast, 69Helix broadcast, 76MPEG-2 broadcast, 71on-demand, 54RTP-based broadcast, 72
port numbers in URLs, 49RTSP clients
Flash broadcast, 69Helix broadcast, 76MPEG-2 broadcast, 71on-demand, 58RTP-based broadcast, 72
URL structure, 49
V vi editor, 33
W Web serverinstalling with Helix Server, 81multi-homed machine installation, 81
Windowsaccount privileges, 3, 9, 12proxy service, 10server service, 4starting the server, 11stopping the server, 15
Windows Media, 59broadcasts, 77MBR support, 59on-demand streaming, 58RTSP support, 59
WinSCP client, 53