heavy-duty breaker hammer kit with cart · heavy-duty breaker hammer kit with cart owner’s manual...
TRANSCRIPT

HEAVY-DUTY BREAKER HAMMER
KIT WITH CART OWNER’S MANUAL
WARNING: Read carefully and understand all ASSEMBLY AND OPERATION INSTRUCTIONS before operating. Failure to follow the safety rules and other basic safety precautions may result in serious personal injury.
Item# 45998

Page of 17
2
Thank you very much for choosing an Ironton product! For future reference, please complete the owner’s record below: Model: _______________ Purchase Date: _______________ Save the receipt, warranty and these instructions. It is important that you read the entire manual to become familiar with this product before you begin using it. This machine is designed for certain applications only. The distributor cannot be responsible for issues arising from modification. We strongly recommend this machine not be modified and/or used for any application other than that for which it was designed. If you have any questions relative to a particular application, DO NOT use the machine until you have first contacted the distributor to determine if it can or should be performed on the product. For technical questions please call 1-800-222-5381.
INTENDED USE Your Ironton Demolition Breaker has been designed for rapid breaking and chipping of concrete, block and masonry products.
TECHNICAL SPECIFICATIONS Motor: 120V, 60Hz Input power: 2050 W Impact rates: 1030 BPM
GENERAL SAFETY RULES
WARNING: Read and understand all instructions. Failure to follow all instructions listed below may result in serious injury.
CAUTION: Do not allow persons to operate or assemble this Demolition Breaker until they have read this manual and have developed a thorough understanding of how the Demolition Breaker works.
WARNING: The warnings, cautions, and instructions discussed in this instruction manual cannot cover all possible conditions or situations that could occur. It must be understood by the operator that common sense and caution are factors which cannot be built into this product, but must be supplied by the operator.
SAVE THESE INSTRUCTIONS

Page of 17
3
IMPORTANT SAFETY CONSIDERATIONS
WARNING: Read all safety warnings and all instructions. Failure to follow the warnings and instructions may result in electric shock, fire and/or serious injury. Save all warnings and instructions for future reference. The term “power tool” in the warnings refers to your corded power tool.
1. Work area safety a. Keep work area clean and well lit. Cluttered or dark areas invite accidents. b. Do not operate power tools in explosive atmospheres, such as in the presence of flammable liquids, gases or dust. Power tools create sparks, which may ignite the dust or fumes. c. Keep children and bystanders away while operating a power tool. Distractions can cause you to lose control. 2. Electrical safety a. Power tool plugs must match the outlet. Never modify the plug in any way. Do not use any adapter plugs with grounded power tools. Unmodified plugs and matching outlets will reduce risk of electric shock. b. Avoid body contact with earthed or grounded surfaces, such as pipes, radiators, ranges and refrigerators. There is an increased risk of electric shock if your body is grounded. c. Do not expose power tools to rain or wet conditions. Water entering a power tool will increase the risk of electric shock. d. Do not abuse the cord. Never use the cord for carrying, pulling or unplugging the power tool. Keep cord away from heat, oil, sharp edges or moving parts. Damaged or entangled cords increase the risk of electric shock. e. When operating a power tool outdoors, use an extension cord suitable for outdoor use. Use of a cord suitable for outdoor use reduces the risk of electric shock. f. If operating a power tool in a damp location is unavoidable, use a residual current device (RCD) protected supply. Use of an RCD reduces the risk of electric shock. 3. Personal safety a. Stay alert, watch what you are doing and use common sense when operating a power tool. Do not use a power tool while you are tired or under the influence of drugs, alcohol or medication. A moment of inattention while operating power tools may result in serious personal injury. b. Use personal protective equipment. Always wear eye protection. Protective equipment such as dust mask, non-skid safety shoes, hard hat, or hearing protection used for appropriate conditions will reduce personal injuries. c. Prevent unintentional starting. Ensure the switch is in the off-position before connecting to power source and/or battery pack, picking up or carrying the tool. Carrying power tools with your finger on the switch or carrying a tool when the power is on, invites accidents. d. Remove any adjusting key or wrench before turning the power tool on. A wrench or a key left attached to a rotating part of the power tool may result in personal injury.

Page of 17
4
e. Do not overreach. Keep proper footing and balance at all times. This enables better control of the power tool in unexpected situations. f. Dress properly. Do not wear loose clothing or jewelry. Keep your hair, clothing and gloves away from moving parts. Loose clothes, jewelry or long hair can be caught in moving parts. g. If devices are provided for the connection of dust extraction and collection facilities, ensure these are connected and properly used. Use of dust collection can reduce dust-related hazards. 4. Power tool use and care a. Do not force the power tool. Use the correct power tool for your application. The correct power tool will do the job better and safer at the rate for which it was designed. b. Do not use the power tool if the switch does not turn it on and off. Any power tool that cannot be controlled with the switch is dangerous and must be repaired. c. Disconnect the plug from the power source and/or the battery pack from the power tool before making any adjustments, changing accessories, or storing power tools. Such preventive safety measures reduce the risk of starting the power tool accidentally. d. Keep cutting tools sharp and clean. Properly maintained cutting tools with sharp cutting edges are less likely to bind and are easier to control. e. Use the power tool, accessories and tool bits etc. in accordance with these instructions, taking into account the working conditions and the work to be performed. Use of the power tool for operations different from those intended could result in a hazardous situation. 5. Service a. Have your power tool serviced by a qualified repair person using only identical replacement parts. This will ensure that the safety of the power tool is maintained. b. If the supplied power cord is damaged, it must be replaced by the manufacturer, its service agent or similarly qualified persons in order to avoid a hazard.
DEMOLITION BREAKER USE AND CARE • Do not modify the Demolition Breaker in any way. Unauthorized modification may impair the
function and/or safety and could affect the life of the equipment. There are specific applications for which the Demolition Breaker was designed.
• Always check of damaged or worn out parts before using the Demolition Breaker. Broken parts will affect the Demolition Breaker operation. Replace or repair damaged or worn parts immediately.
• Store idle Demolition Breaker. When Demolition Breaker is not in use, store it in a secure place out of the reach of children. Inspect it for good working condition prior to storage and before re-use.
• Wear ear protection. Always use ear protection when operating the Demolition Breaker to prevent potential hearing loss.
• Hold power tool by insulated gripping surfaces, when performing an operation where the cutting accessory may contact hidden wiring or its own cord. Cutting accessory contacting a “live” wire may make exposed metal parts of the power tool “live” and could give the operator an electric shock.
WARNING: This Demolition Breaker should not be used by persons (including children) with reduced physical, sensory or mental capabilities, or lack of experience and knowledge,

Page of 17
5
unless they have been given supervision or instruction concerning use of the appliance by a person responsible for their safety.
• Always use an approved extension cord suitable for the power input of this tool. Before use, inspect the extension cord for signs of damage, wear and ageing. Replace the extension cord if damaged or defective.
• When using an extension cord on a reel, always unwind the cord completely. Use of an extension cord not suitable for the power input of the tool or which is damaged or defective may result in a risk of fire and electric shock.
• It is recommended that the extension cord is a maximum of 82 feet in length. Do not use multiple extension cords.
• Before drilling into walls, ceilings etc, ensure there are no concealed power cables or pipes in the cavity.
• Keep the cord clear of the accessory being used. Do not wrap the cord around your arm or wrist. • Hold the tool by the insulated gripping surfaces when performing an operation where the
accessory may contact hidden wiring or its own cord. • Use thick cushioned gloves and limit the exposure time by taking frequent breaks. • Vibration caused by the hammer action may be harmful to your hands and arms. • When removing an accessory from the tool avoid contact with skin and use proper protective
gloves when grasping the bit or accessory. Accessories may be hot after prolonged use.
ASSEMBLY Assembly of Demolition Breaker Chisels come with or without collars. Figure 1 shows installation of a chisel without a collar (the two included chisels are without a collar). Figure 2 shows installation of a chisel with a collar.
Without a Collar: 1. Pull the retaining ring to the side just far enough to allow the bit to be inserted, as shown in
Figure 1. 2. Insert the bit. Slide the chisel in as far as it will go. 3. Pull the retaining ring down approximately 120º until it contacts the housing. Physically check
that the chisel is secure before operating. Note: If the Chisel Bit doesn’t slide in easily, apply some grease on the loading end of the Chisel Bit.

Page of 17
6
With a Collar: 1. Pull the retaining ring open about 30-40º to the second engaging position as shown in Figure 2. 2. Insert the collared chisel. 3. Return the retaining ring to close to its original position to lock the chisel in place. Physically
check that the chisel is secure before operating. Before each use, check the Chisel for cracks or other damage: Never use a damaged chisel.
CAUTION: Always assure that the chisel is securely retained; test retention by attempting to pull the chisel out of the tool hold after completing the above procedure. If the chisel is loose, check the retaining ring to ensure it is fully engaged.

Page of 17
7
Assembly of Cart a. Attach the wheels 1) Insert the axle into the bottom bracket as shown.
2) Attach the wheels to the axle.
3) Place the appropriate washer (Φ15, as shown), then insert cotter pin.
4) Bend cotter pin into place as shown; the wheel is now attached.

Page of 17
8
b. Assemble the cart frame 1) Turn over the frame, so that it lies flat on the floor.
2) Install the screw M8 x 50 with nut as shown,
3) Attach the frame and the wheel axle together by bolt M8 x 40 as shown

Page of 17
9
4) Install the plastic cap,
5) Assemble the handle onto the frame and fixed them together by screw M8 x 35, use wrench M5.
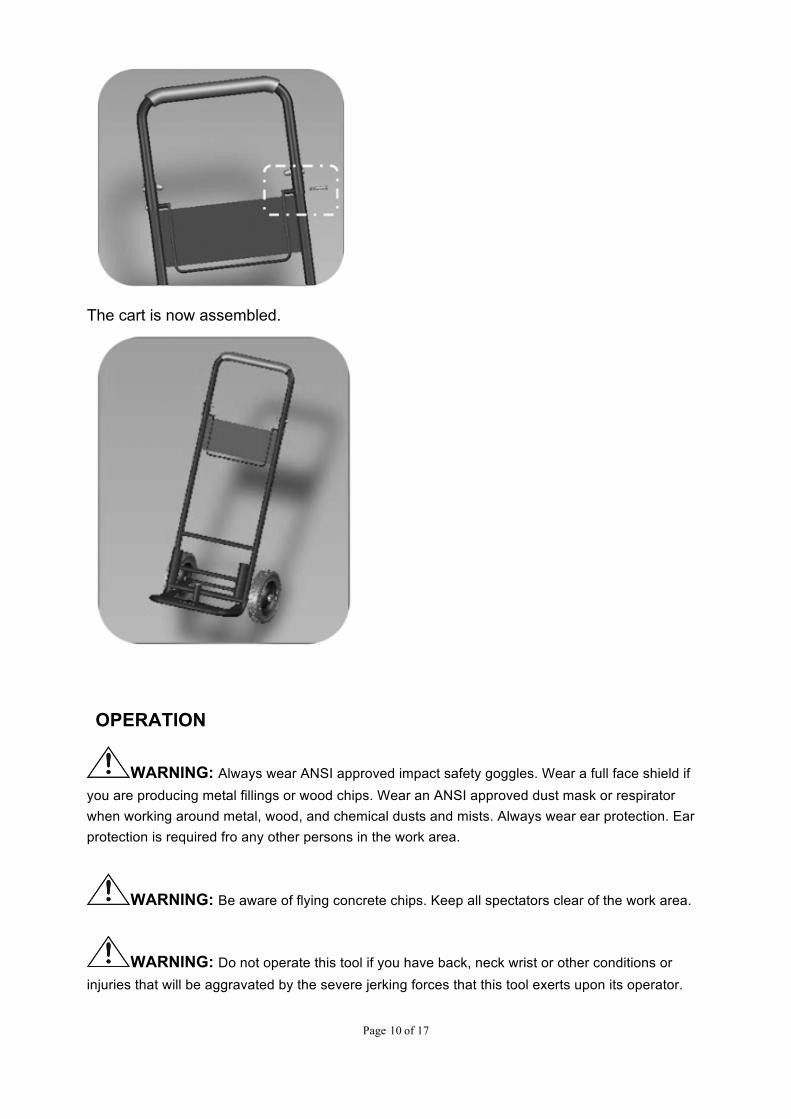
c. Assemble the machine holder Align the screwed hole of the machine holder with the through-hole on the frame, then attach them together with screw M6 x 35.
Page of 17
10
The cart is now assembled.
OPERATION
WARNING: Always wear ANSI approved impact safety goggles. Wear a full face shield if you are producing metal fillings or wood chips. Wear an ANSI approved dust mask or respirator when working around metal, wood, and chemical dusts and mists. Always wear ear protection. Ear protection is required fro any other persons in the work area.
WARNING: Be aware of flying concrete chips. Keep all spectators clear of the work area.
WARNING: Do not operate this tool if you have back, neck wrist or other conditions or injuries that will be aggravated by the severe jerking forces that this tool exerts upon its operator.

Page of 17
11
WARNING: If the Breaker Hammer ever gets out of your control, immediately release the Switch Knob (87)
Note: Use the weight of Breaker Hammer to help you break up concrete. Use the tool in the vertical position whenever possible. This tool was intended to break up larger pieces of concrete.
Chipping a Straight Line 1. Use chalk or another suitable writing material and mark you work surface to delineate the area
you intend to harmer. 2. Plug in the Breaker Hammer. 3. Grasp the handles firmly with both hands. Always be sure you have a firm footing. When you are
sure that no people or animals are in the vicinity, and it’s safe to begin, depress the Switch Knob (#87)
4. The Breaker Hammer will begin the break the top layer of concrete. If you push down, it will begin to break the next layer as well.
5. Keep moving the Breaker Hammer along the line you want to section, breaking concrete as you go. If the Breaker Hammer jumps off of the line or section, release the Switch Knob (#87) and reposition the Breaker Hammer.
6. When you are finished, release the Switch Knob (#87) and unplug the Breaker Hammer. Breaking up Concrete 1. Place the bit on the center of a piece of concrete. 2. Grasp the handles firmly with both hands. Always be sure you have a firm footing. When you are
sure that no people or animals are in the vicinity, and it’s safe to begin, depress the Switch Knob (#87)
3. As you break the concrete into big chunks, release the Switch Knob (#87) and move to other large pieces until all of the larger pieces are broken. Do not try to break up smaller pieces with this tool as it is too powerful and aggressive to control on small pieces.
4. When you are finished, release the Switch Knob (#87) and unplug the Breaker Hammer.
MAINTENANCE • Maintain your Demolition Breaker. It is recommended that the general condition of any
Demolition Breaker be examined before it is used. Keep your Demolition Breaker in good repair

Page of 17
12
by adopting a program of conscientious repair and maintenance. Have necessary repairs made by qualified service personnel.
WARNING: Make sure the Breaker Hammer is unplugged before doing any maintenance.
1. Wipe the tool with a lint free cloth after each use. Remove all dust and grit from the tool.
2. Add a drop or two of a lightweight oil to the Switch assembly area to lubricate the Switch Knob
(#87).
3. Examine the tool before each use. Mare sure the Chisel Bit is sharp and not dull or cracked.
Replace worn or broken bits with approved replacement bits from Northern Tool + Equipment.
4. Store in temperatures no lower than 50-60º F.

Page of 17
13
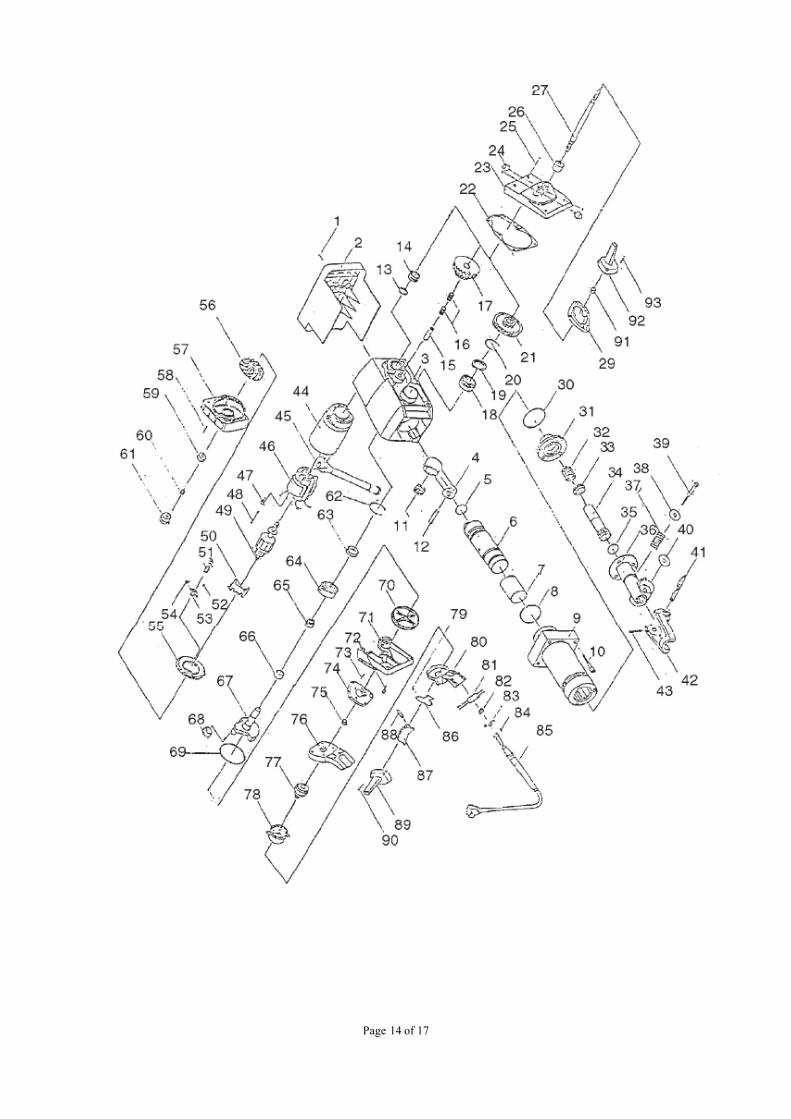
DIAGRAM & PARTS LIST
Demolition Breaker
Page of 17
14

Page of 17
15
Cart Parts List

Page of 17
16
Page of 17
17
WARNING Some dust created by power sanding, sawing, grinding, drilling, and other construction activities contains chemicals known to the State of California to cause cancer, birth defects or other reproductive harm. Some examples of these chemicals are: • lead from lead-based paints, • crystalline silica from bricks and cement and other masonry products, and • arsenic and chromium from chemically-treated lumber. Your risk from these exposures varies, depending on how often you do this type of work. To reduce your exposure to these chemicals: work in a well ventilated area, and work with approved safety equipment, such as those dust masks that are specially designed to filter out microscopic particles.
Distributed by
Northern Tool + Equipment Co., Inc. Burnsville, Minnesota 55306
NorthernTool.com Made in China