hd pvr viewer’s guide – v1.02 page 1 of...
TRANSCRIPT

HD PVR Viewer’s Guide – V1.02
Page 1 of 30

HD PVR Viewer’s Guide – V1.02
Page 2 of 30
TABLE OF CONTENTS
1 FRONT PANEL .................................................................................................................................................3
2 BACK PANEL ....................................................................................................................................................4
3 THE HD PVR REMOTE CONTROL..................................................................................................................5 3.1 REMOTE CONTROL BASICS .......................................................................................................................................................... 5 3.2 TV, ALT, TV GUIDE, LANGUAGE AND MUTE BUTTONS.................................................................................................................. 6 3.3 THE DIAL.................................................................................................................................................................................... 6 3.4 COLOUR BUTTONS ...................................................................................................................................................................... 7 3.5 ACTION BUTTONS ....................................................................................................................................................................... 7
4 THE BASICS .....................................................................................................................................................8 4.1 THE I-PLATE : NORMAL............................................................................................................................................................... 8 4.2 THE I-PLATE WHEN “BANNER BROWSING”.................................................................................................................................... 9 4.3 THE I-PLATE : EXTENDED MODE ............................................................................................................................................... 10 4.4 VIEWING MODES ...................................................................................................................................................................... 11 4.5 THE CHANNEL GRIDS ................................................................................................................................................................ 11 4.6 REMINDERS .............................................................................................................................................................................. 12 4.7 INTERACTIVE SERVICES & DSTV TOUCH .................................................................................................................................... 13 4.8 PARENTAL CONTROL.................................................................................................................................................................. 14 4.9 LANGUAGE SELECTION .............................................................................................................................................................. 15 4.10 SUBTITLES / TELETEXT.............................................................................................................................................................. 15 4.11 DSTV AUDIO CHANNELS ........................................................................................................................................................... 15
5 PVR BASICS ...................................................................................................................................................16 5.1 THE BUFFER.............................................................................................................................................................................. 16 5.2 WHAT IS LIVE TV? ................................................................................................................................................................... 16 5.3 AUTOMATIC STANDBY (ALSO KNOWN AS SLEEP MODE) .............................................................................................................. 16 5.4 THE STATUS BAR ...................................................................................................................................................................... 17
6 PVR ICONS.....................................................................................................................................................18 6.1 PVR ICONS : DISPLAYED ON PROGRAMME INFORMATION ............................................................................................................ 18 6.2 ONSCREEN PVR ICONS ............................................................................................................................................................. 18 6.3 PVR HARD DISK USAGE ........................................................................................................................................................... 19
7 THE TV GUIDE ...............................................................................................................................................20 7.1 FAVOURITE CHANNELS .............................................................................................................................................................. 20 7.2 ALL CHANNELS.......................................................................................................................................................................... 21
8 SETTING RECORDINGS AND THE SCHEDULED RECORDINGS SCREEN..............................................22 8.1 HOW TO SET A RECORDING....................................................................................................................................................... 22 8.2 SCHEDULED RECORDINGS ......................................................................................................................................................... 25
9 VIEWING YOUR RECORDINGS ....................................................................................................................26 9.1 THE PLAYLIST ........................................................................................................................................................................... 26
10 OTHER FEATURES ....................................................................................................................................28 10.1 EXTENDING A RECORDING IN PROGRESS .................................................................................................................................... 28 10.2 STOPPING A RECORDING IN PROGRESS ...................................................................................................................................... 28 10.3 BOOKMARKS ............................................................................................................................................................................. 28 10.4 SLOW MOTION.......................................................................................................................................................................... 28 10.5 THE SAFETY NET....................................................................................................................................................................... 29 10.6 FAST FORWARDING ................................................................................................................................................................... 29 10.7 REWINDING .............................................................................................................................................................................. 30
The whole of this Viewer’s Guide / Manual, including the graphics, menus and information
contained herein are the subject of intellectual property rights, including copyright, under domestic law and international conventions. All rights are reserved.
The information in this Viewer’s Guide supplements the information supplied with the packaging of
the HD PVR, as well as the HD PVR Decoder Menu Manual.
Due to software upgrades, the features and functionalities in this Viewer’s Guide may differ from
those on your HD PVR.
Version 1.02 (October 2008) pre DTP e&eo
HD PVR Viewer’s Guide – V1.02
Page 3 of 30
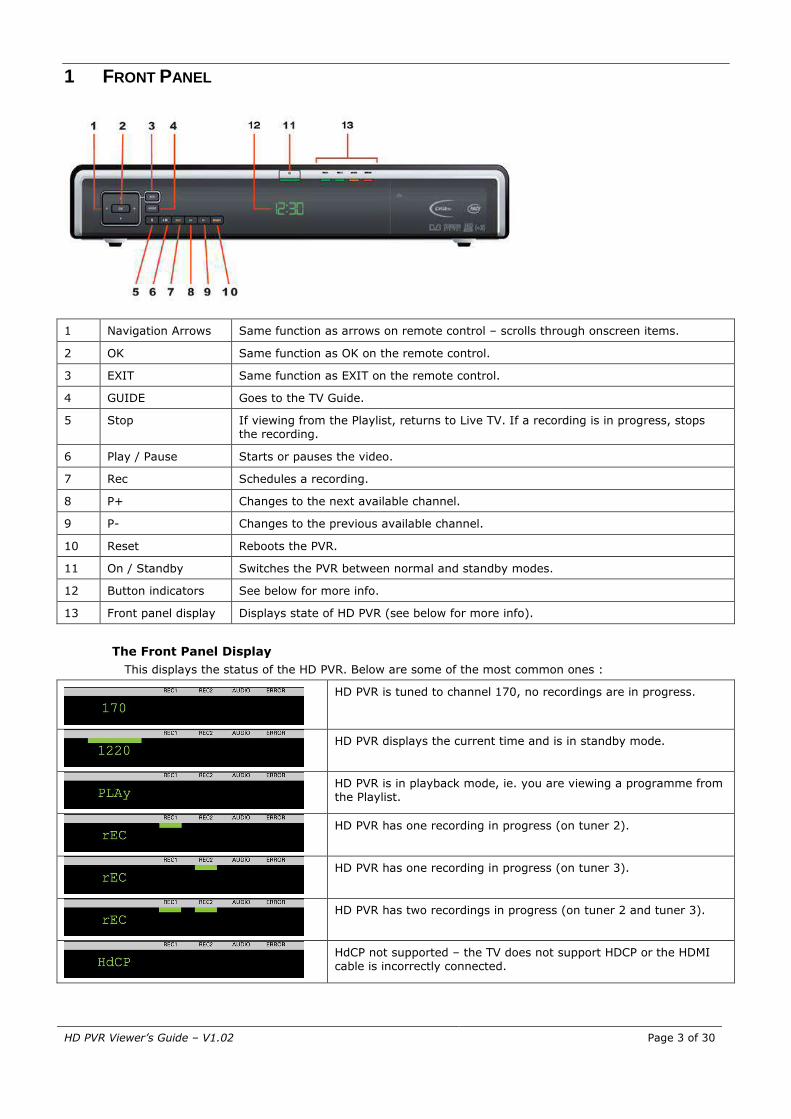
1 FRONT PANEL
1 Navigation Arrows Same function as arrows on remote control – scrolls through onscreen items.
2 OK Same function as OK on the remote control.
3 EXIT Same function as EXIT on the remote control.
4 GUIDE Goes to the TV Guide.
5 Stop If viewing from the Playlist, returns to Live TV. If a recording is in progress, stops the recording.
6 Play / Pause Starts or pauses the video.
7 Rec Schedules a recording.
8 P+ Changes to the next available channel.
9 P- Changes to the previous available channel.
10 Reset Reboots the PVR.
11 On / Standby Switches the PVR between normal and standby modes.
12 Button indicators See below for more info.
13 Front panel display Displays state of HD PVR (see below for more info).
The Front Panel Display
This displays the status of the HD PVR. Below are some of the most common ones :
HD PVR is tuned to channel 170, no recordings are in progress.
HD PVR displays the current time and is in standby mode.
HD PVR is in playback mode, ie. you are viewing a programme from the Playlist.
HD PVR has one recording in progress (on tuner 2).
HD PVR has one recording in progress (on tuner 3).
HD PVR has two recordings in progress (on tuner 2 and tuner 3).
HdCP not supported – the TV does not support HDCP or the HDMI cable is incorrectly connected.

HD PVR Viewer’s Guide – V1.02
Page 4 of 30
2 BACK PANEL
1 RF In and RF Out Connect RF In to the terrestrial antenna.
Connect RF Out to the TV antenna input.
2 Video Out Connect to the video input of the TV.
3 Audio Left and Audio Right Connect to the audio inputs of the TV.
4 Component Video (YPrPb) Connect to the component video inputs of the TV.
5 SCART Connect to the SCART connector of the TV.
6 Satellite Inputs 1 to 4 Connect to the quad (4-wire) LNB feeds from the dish.
If using a SatCR LNB feed, connect to input 1.
7 S/PDIF Digital Audio Out Connect to the optical input of the Home Theatre amplifier.
8 Coaxial Digital Audio Output Connect to the coaxial input of the Home Theatre amplifier.
9 HDMI Digital AV Connect to the HDMI input of the HD TV or Home Theatre system.
10 Ethernet Reserved for future use.
11 ESATA Reserved for future use.
12 USB Reserved for future use.
13 Mains Connector Connect to the mains supply.
Note : The HD PVR is designed to work with a 4-wire LNB installation.
If you have technical
comments or want to chat to other users about the installation and set-up of the HD PVR, please visit the forums on www.dstv.com
HD quality content
is only available via HDMI. The HDMI must be HDCP compliant.
The 5.1 surround sound
is sent through the optical and digital coaxial audio outputs and is not available via HDMI.

HD PVR Viewer’s Guide – V1.02
Page 5 of 30
3 THE HD PVR REMOTE CONTROL
3.1 REMOTE CONTROL BASICS

HD PVR Viewer’s Guide – V1.02
Page 6 of 30
3.2 TV, ALT, TV GUIDE, LANGUAGE AND MUTE BUTTONS
The five buttons at the top of the remote control each have a secondary function (sometimes also referred to as the “shifted” mode).
If you have not first pressed SHIFT, these buttons do the following :
• TV : always take you to Live TV. If you are watching in the buffer, pressing TV takes you to Live TV on the current channel. If you are watching in playback, pressing TV stops playback and takes you to Live TV on the current channel.
• ALT : goes to the last viewed channel.
• TV GUIDE : goes to the TV Guide.
• LANGUAGE : Displays the Language / Soundtrack pop-up.
• MUTE : switches the audio on or off (depends on the current audio status).
To activate the secondary functionality, press SHIFT followed by the required button. After pressing SHIFT, the SHIFT button will flash, confirming the mode of the remote control. It is not necessary to hold both buttons down at the same time.
• SHIFT TV : goes to the Audio Bouquet.
• SHIFT ALT : displays the Subtitles / Teletext pop-up (Note : Subtitles / Teletext are not currently available on the HD PVR).
• SHIFT TV GUIDE : currently disabled.
• SHIFT LANGUAGE : goes to the Parental Control Menu (Note : you need the valid PG PIN code to enter the Parental Control Menu).
• SHIFT MUTE : currently disabled.
3.3 THE DIAL
The dial should be set to TV1 for use with the HD PVR. The “window” in the dial (where you see TV1) lights up when any button is pressed, confirming that the remote control is active and that the command has been sent to the decoder.

HD PVR Viewer’s Guide – V1.02
Page 7 of 30
3.4 COLOUR BUTTONS
The colour buttons on the remote control have different functions depending on what you are doing on the HD PVR.
When using the Decoder Menu or the TV Guide, please refer to the onscreen instructions (at the bottom of the screen) that clearly indicate functionality for each colour button.
When viewing TV, the colour buttons do the following :
• Press the RED button to go to the Playlist (see page 26).
• Press the BLUE button to insert a Bookmark (see page 28).
• Press the WHITE button to watch in slow motion (see page 28).
• Press the YELLOW button to display the Status Bar (see page 17).
• The GREEN button is currently disabled in viewing mode.
3.5 ACTION BUTTONS
Button While watching Live TV While watching a recording (playback)
STOP Disabled if there are no recordings in
progress.
If there is a recording(s) in progress, you are able to stop the recording(s).
Stops playback and returns you to the Playlist.
REWIND
(See page 30)
Press once : Instant Replay (rewinds 10 seconds) *
Hold : rewinds programme. **
* only in Live TV where buffer is available (see
page 16)
** only where buffer is available (see page 16)
Press once : Instant Replay (rewinds 10 seconds)
Hold : rewinds programme.
PLAY / PAUSE Toggles between PLAY and PAUSE. Toggles between PLAY and PAUSE.
FAST FORWARD
(See page 29)
Disabled (unless in buffer). Fast Forwards recorded programme.
REC Schedules recording. See page 22. Disabled.

HD PVR Viewer’s Guide – V1.02
Page 8 of 30
4 THE BASICS
4.1 THE I-PLATE : NORMAL
The information plate (i-Plate) is displayed when you press i.
1 Instruction bar – provides helpful information as well as options available.
2 i-Plate Header.
3 Starting times of programme.
4 Current time.
5 Channel number & name.
6 Today’s date.
7 PVR Icons (see page 18).
8 Programme titles.
9 PG Lock & PG Rating.
10 Press the DOWN arrow to access programming information for the next 24 hours on this channel.
The colour of the i-Plate indicates the viewing mode (see page 11).
A blue header indicates that you are in
ALL CHANNELS.
A purple header indicates that you are in FAVOURITE CHANNELS.
You can personalise the time for which the i-Plate is displayed.
• Press MENU.
• Select Personalise.
• Go to #5 (Display Timeout).
• Follow the onscreen instructions.
HD PVR Viewer’s Guide – V1.02
Page 9 of 30
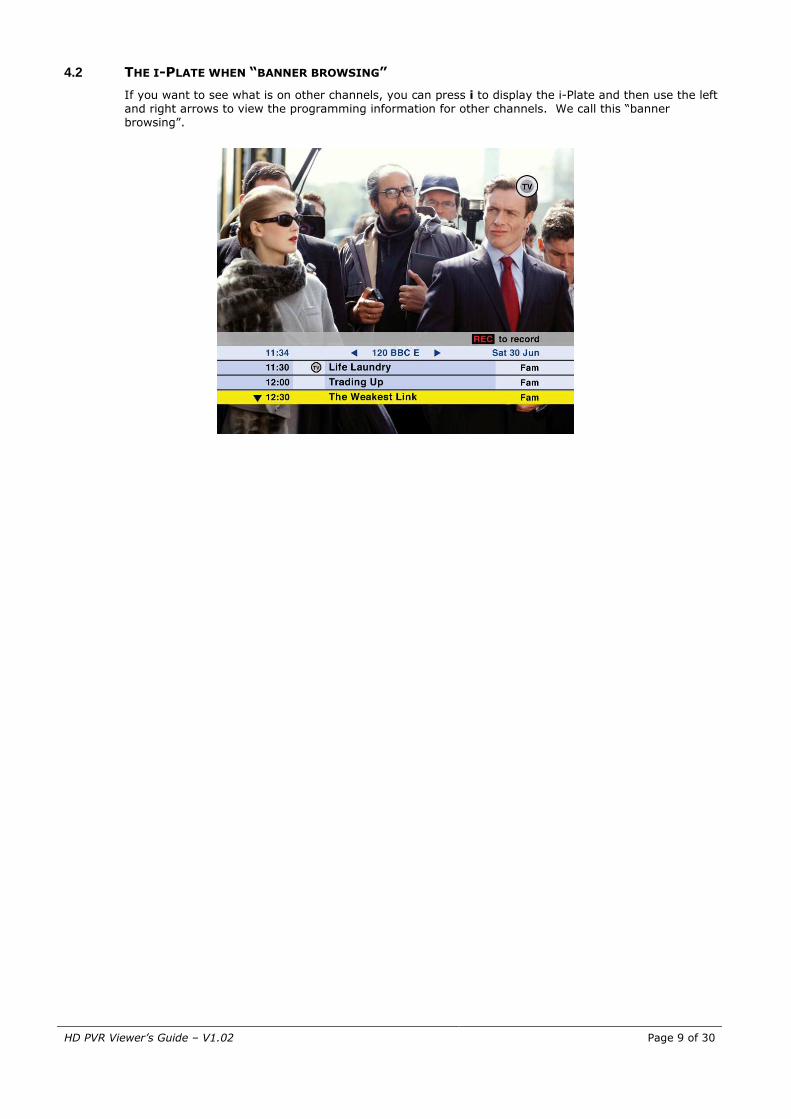
4.2 THE I-PLATE WHEN “BANNER BROWSING”
If you want to see what is on other channels, you can press i to display the i-Plate and then use the left and right arrows to view the programming information for other channels. We call this “banner browsing”.

HD PVR Viewer’s Guide – V1.02
Page 10 of 30
4.3 THE I-PLATE : EXTENDED MODE
To see more information on a highlighted programme, press i to display the extended information. You can also “banner browse” in extended mode.
1 Extended information header.
2 Live TV / Buffer indicator.
3 Viewing mode - All Channels or Favourite Channels.
4 Programme title.
5 Channel number & name.
Programme start and end time.
Date of programme.
6 PVR icons, example Scheduled Recording, Autotune Banner.
7 Synopsis (programme information).
8 PG information.
9 Current time.
10 Current channel number & name.
11 Today’s date.
12 i-Plate header.
13 Starting times of programmes.
14 Press the DOWN arrow to access programming information for the next 24 hours on this channel.
15 PVR Icons (see page 18).
16 Programme titles.
17 PG Lock & PG Rating.

HD PVR Viewer’s Guide – V1.02
Page 11 of 30
4.4 VIEWING MODES
The HD PVR has two viewing modes - All Channels or Favourite Channels. What’s the difference?
• In All Channels mode, ALL available channels are displayed, including those to which you are not subscribed.
• In Favourite Channels mode, only the channels you selected as your Favourite Channels are
available when you banner browse or surf through the channels, so no tripping over unwanted
channels. (For more on how to set up your Favourite Channels, see page 20.)
The colour of the i-Plate indicates
the viewing mode.
A blue header indicates that you are in ALL CHANNELS.
A purple header indicates that you are in FAVOURITE CHANNELS.
When viewing Live TV,
you can switch modes by pressing TV and selecting the other mode from the pop-up which displays.
4.5 THE CHANNEL GRIDS
There are two channel grids on the HD PVR, the All Channels Grid and the Favourite Channels Grid (one for each viewing mode).
The channel grid is a quick way to tune between channels or to quickly access programming info for another channel.
When watching TV, press the LEFT, RIGHT or DOWN arrow to display the All Channels Grid.
When watching TV, press the UP arrow to display the Favourite Channels Grid.
Use the arrows to move the highlight and press OK to tune to the selected channel, or press i to display extended info.
Both channel grids are available when viewing in playback.

HD PVR Viewer’s Guide – V1.02
Page 12 of 30
4.6 REMINDERS
There are two types of reminders. These can be used to either “remind” you of a programme or to automatically tune the decoder to a channel at a specific time. A Banner reminder will display a pop-up at the start of the programme for which you set the reminder. You can ignore the reminder or choose to tune to the selected programme by pressing OK. An Autotune reminder can tune the decoder to another channel, but will first display a pop-up at the
start of the programme for which you set the reminder. You can cancel the reminder or tune to the selected programme. If you do nothing, the decoder will automatically tune to the selected channel.
How to Set a Reminder
To set a banner reminder, select the required programme (either on the i-Plate or TV Guide) and press
OK. A appears next to the programme, confirming that a banner reminder has been set.
To change the reminder from a banner to an autotune, press OK again. The icon changes to a confirming that an autotune banner has been set. All scheduled reminders are listed on the Reminders screen.
How to Delete a Reminder
Option 1 : To delete the reminder, highlight the programme which has the autotune reminder set for it and press OK.
Option 2 : You can also delete reminders by going to the Reminders screen.
The Reminders Screen
This screen lists all reminders that have been set. To go to the Reminders screen, press RED to go to the Playlist and then press the RIGHT arrow twice). From this screen you can delete scheduled reminders (by pressing RED) or sort the list of reminders (by pressing WHITE).

HD PVR Viewer’s Guide – V1.02
Page 13 of 30
4.7 INTERACTIVE SERVICES & DSTV TOUCH
SuperSport Active is currently the only interactive service available.
• To access SuperSport Active, press OK to display the DStv touch menu and then press OK again to load SuperSport Active.
Interactive Services are only available when viewing Live TV, ie. you cannot access DStv touch when
viewing in the buffer or in Playback.
Using Interactive Services clears the buffer.

HD PVR Viewer’s Guide – V1.02
Page 14 of 30
4.8 PARENTAL CONTROL
The HD PVR has a Parental Control feature to control viewing in your home. Access to this feature is
controlled by the PG PIN code. To go to Parental Control menu :
• Press MENU to go to the Decoder Menu, then select #2 (Parental Control), or
• Press TV GUIDE to go to the TV Guide, then press BLUE.
The default PG PIN code is 1234.
If the PG PIN code is entered incorrectly 5 times it is blocked. If this happens, you will need to call your nearest
MultiChoice Contact Centre to have it reset.
Global Blocking
Global Blocking Options :
• No Block : all programmes are cleared for viewing. Parental levels do not apply.
• Total Block : all programmes are blocked and can only be viewed with the valid PG PIN code.
• Personalise : select what you want to block based on PG settings.
If you select “Personalise”, you must select a Parental Guidance Setting (#2).
Parental Guidance Settings
If you select “Personalise” as the Global Blocking option, you need to select a Parental Guidance Setting.
• None : all programmes are cleared for viewing.
• FAM : FAM rated programmes are cleared for viewing. All others are blocked.
• PG 13 : FAM and PG13 rated programmes are cleared for viewing. All others are blocked.
• 16 : FAM, PG13 and 16 rated programmes are cleared for viewing. All others are blocked.
• 18 : FAM, PG13, 16 and 18 rated programmes are cleared for viewing. All others are blocked.
Changing the PG PIN Code
Changing the PG PIN Code :
• Press BLUE on the Parental Control Menu.
• Enter the new PIN code twice (the PIN code can be any 4 digits).
• Press OK to confirm the new PIN code.

HD PVR Viewer’s Guide – V1.02
Page 15 of 30
Channel Blocking
This option differs from Global Blocking as it allows
you to block an entire channel. The channel can only be viewed on entering the valid PG PIN code.
Press WHITE to edit.
• Select the channels you want to block and
press the WHITE button to block them.
• Once a channel is blocked, press WHITE to unblock it.
• Press RED to unblock all channels.
• Press OK to confirm your selection.
4.9 LANGUAGE SELECTION
Some programmes have multiple language or soundtrack options available. For a list of available options on the programme that you are viewing, press the LANGUAGE button.
4.10 SUBTITLES / TELETEXT
Subtitles and Teletext are not currently supported on the HD PVR.
4.11 DSTV AUDIO CHANNELS
DStv has a great selection of audio channels available. To go to the audio channels, you can :
• Press SHIFT TV, or
• Press TV GUIDE and select the required audio channel from the All Channels list.
• To return to TV channels, press SHIFT TV again.

HD PVR Viewer’s Guide – V1.02
Page 16 of 30
5 PVR BASICS
5.1 THE BUFFER
The buffer is the part of the hard disk that temporarily records Live TV and allows you to pause or rewind Live TV. On the HD PVR, the buffer always stores the last 120 minutes or up to the last time you changed channels (if within the last 120 minutes).
The buffer is cleared :
• When you change channels.
• When the decoder is reset.
• When the decoder is rescanned.
• When the decoder is in automatic standby.
• When you use an Interactive Service.
5.2 WHAT IS LIVE TV?
Live TV is when you are watching programmes as they are being broadcast, ie. you have not
pressed pause.
How do I know when I’m watching Live TV?
Press i to display the i-Plate. If you are watching Live TV, the Live TV icon is displayed in the top right corner.
If you are watching behind Live TV, ie. from the buffer, a timer is displayed in the top right corner indicating how far you are behind Live TV.
5.3 AUTOMATIC STANDBY (ALSO KNOWN AS SLEEP MODE)
To extend the lifespan of the HD PVR, you have the option to disable the hard drive during periods when you are not using the PVR. When the HD PVR is in automatic standby, the hard disk goes to “sleep”.
To set Automatic Standby :
• Press MENU
• Select Personalise
• Go to #7 (Automatic Standby)
• Use the arrow keys to select the required time period (The HD PVR will automatically go into standby after the selected period of inactivity).
Recordings are not impacted by standby and still take place if the decoder is in automatic standby.
If an autotune reminder triggers while the HD PVR is in
standby, the decoder will come out of standby and tune to the required channel.
HD PVR Viewer’s Guide – V1.02
Page 17 of 30
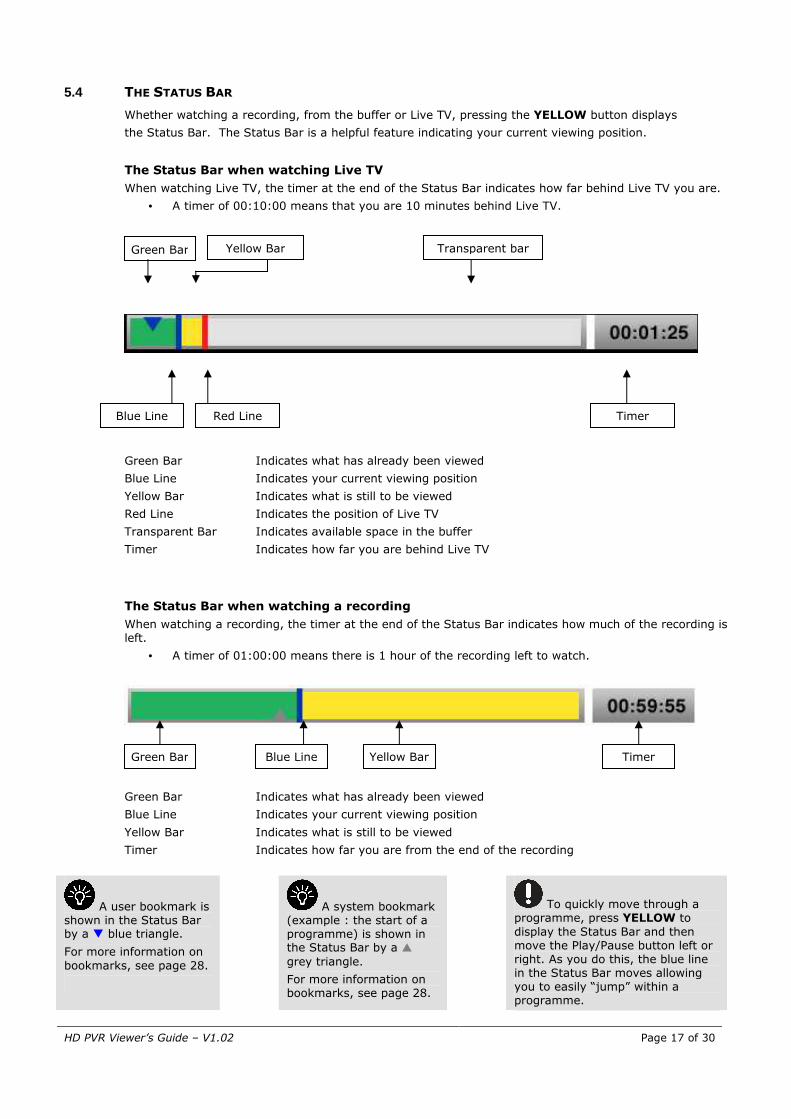
5.4 THE STATUS BAR
Whether watching a recording, from the buffer or Live TV, pressing the YELLOW button displays
the Status Bar. The Status Bar is a helpful feature indicating your current viewing position.
The Status Bar when watching Live TV
When watching Live TV, the timer at the end of the Status Bar indicates how far behind Live TV you are.
• A timer of 00:10:00 means that you are 10 minutes behind Live TV.
Green Bar Indicates what has already been viewed
Blue Line Indicates your current viewing position
Yellow Bar Indicates what is still to be viewed
Red Line Indicates the position of Live TV
Transparent Bar Indicates available space in the buffer
Timer Indicates how far you are behind Live TV
The Status Bar when watching a recording
When watching a recording, the timer at the end of the Status Bar indicates how much of the recording is left.
• A timer of 01:00:00 means there is 1 hour of the recording left to watch.
Green Bar Indicates what has already been viewed
Blue Line Indicates your current viewing position
Yellow Bar Indicates what is still to be viewed
Timer Indicates how far you are from the end of the recording
A user bookmark is shown in the Status Bar by a � blue triangle.
For more information on
bookmarks, see page 28.
A system bookmark (example : the start of a programme) is shown in the Status Bar by a �
grey triangle.
For more information on bookmarks, see page 28.
To quickly move through a programme, press YELLOW to
display the Status Bar and then move the Play/Pause button left or right. As you do this, the blue line in the Status Bar moves allowing you to easily “jump” within a programme.
Green Bar Yellow Bar Transparent bar
Blue Line Red Line Timer
Blue Line Green Bar Yellow Bar Timer

HD PVR Viewer’s Guide – V1.02
Page 18 of 30
6 PVR ICONS
6.1 PVR ICONS : DISPLAYED ON PROGRAMME INFORMATION
These icons may appear next to programme titles in the i-Plate, TV Guide, Playlist or Scheduled Recordings screens. They may also be displayed in extended information screens.
Scheduled Recording.
You are watching a recording.
Recording in Progress.
This is Live TV.
Recurring Scheduled Recording.
You can set recurring Time Based Recordings (see page 24).
This content is in the buffer, ie. you are watching behind Live TV.
Recurring Recording in Progress.
Alert Icon. This appears on the Playlist or Schedules Recordings screens. To get more info on why the alert icon is displayed, press i.
6.2 ONSCREEN PVR ICONS
These icons appear onscreen each time you change channel as well as when the i-Plate is displayed.
PVR Recording icon
This indicates a recording in progress as well as the channel details and the time remaining.
PVR Recording Error icon
This indicates an error with a recording in progress and is most likely caused by loss of signal. It may also indicate an error on tuner 2 or 3.
The recording will not resume following an error.
PVR Pause Live TV icon
This indicates that Live TV has been paused and the time behind Live TV. The blue line is where you paused the programme, the red line indicates Live TV.
PVR Play icon
This indicates that you are watching buffer content and the time behind Live TV. The green is what you have viewed and the yellow is what you still have to view (to catch up to Live TV).
PVR Playback Fast Forward icon
This indicates that you are fast forwarding the recording. Different speeds are indicated by the number of arrows.

HD PVR Viewer’s Guide – V1.02
Page 19 of 30
6.3 PVR HARD DISK USAGE
Disk space usage is displayed by icons in the Playlist, Scheduled Recordings and
Reminders screens.
This icon appears onscreen when you have less than 10% disk space.
Remember to delete your recordings once you have watched them to ensure that you always have space for new recordings.
When the HD PVR has less than 10% disk space, it will automatically delete recordings (starting with the
oldest) to make space for new recordings.
HD PVR Viewer’s Guide – V1.02
Page 20 of 30
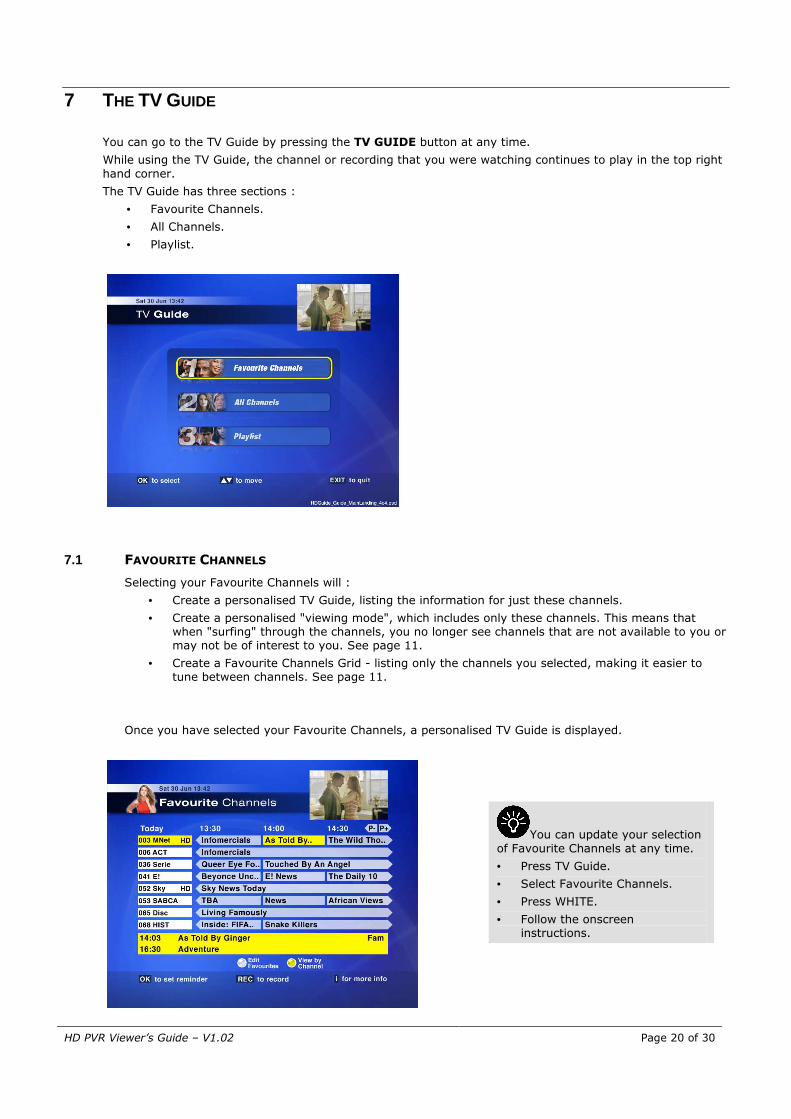
7 THE TV GUIDE
You can go to the TV Guide by pressing the TV GUIDE button at any time.
While using the TV Guide, the channel or recording that you were watching continues to play in the top right
hand corner.
The TV Guide has three sections :
• Favourite Channels.
• All Channels.
• Playlist.
7.1 FAVOURITE CHANNELS
Selecting your Favourite Channels will :
• Create a personalised TV Guide, listing the information for just these channels.
• Create a personalised "viewing mode", which includes only these channels. This means that when "surfing" through the channels, you no longer see channels that are not available to you or may not be of interest to you. See page 11.
• Create a Favourite Channels Grid - listing only the channels you selected, making it easier to tune between channels. See page 11.
Once you have selected your Favourite Channels, a personalised TV Guide is displayed.
You can update your selection
of Favourite Channels at any time.
• Press TV Guide.
• Select Favourite Channels.
• Press WHITE.
• Follow the onscreen instructions.
HD PVR Viewer’s Guide – V1.02
Page 21 of 30
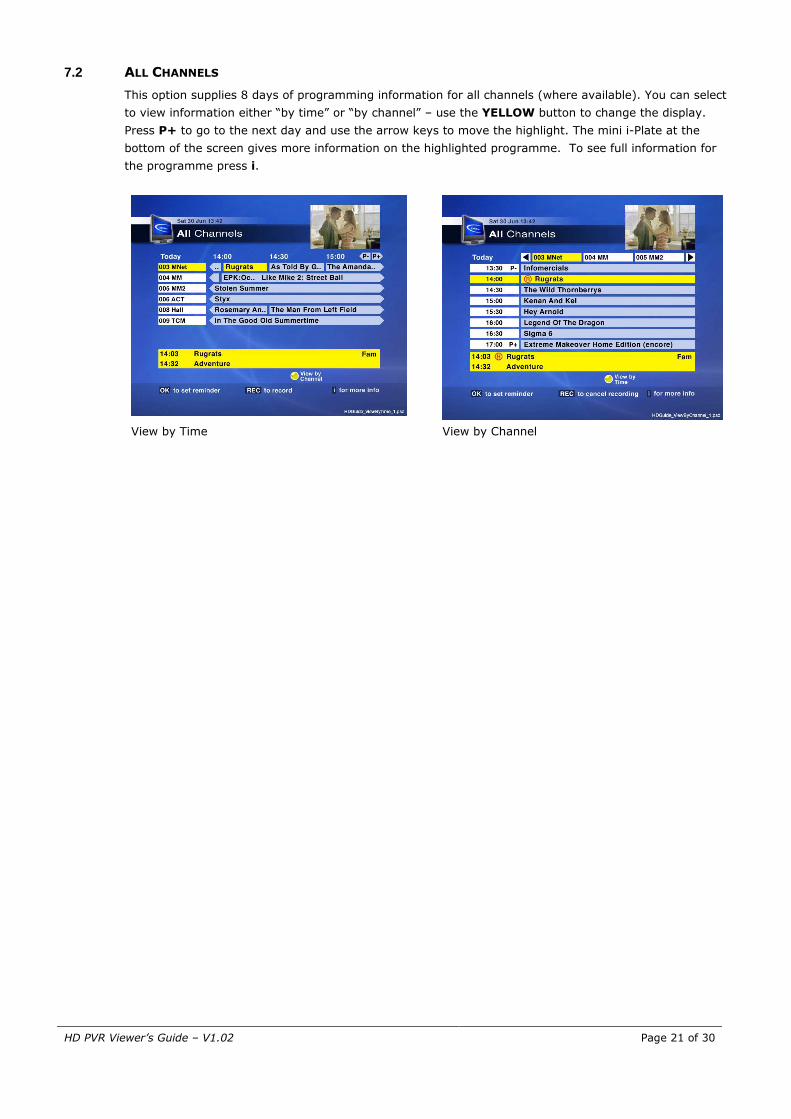
7.2 ALL CHANNELS
This option supplies 8 days of programming information for all channels (where available). You can select
to view information either “by time” or “by channel” – use the YELLOW button to change the display.
Press P+ to go to the next day and use the arrow keys to move the highlight. The mini i-Plate at the
bottom of the screen gives more information on the highlighted programme. To see full information for
the programme press i.
View by Time View by Channel

HD PVR Viewer’s Guide – V1.02
Page 22 of 30
8 SETTING RECORDINGS AND THE SCHEDULED RECORDINGS SCREEN
8.1 HOW TO SET A RECORDING
There are five ways to set recordings :
1. Record what I’m watching (impulse recording).
2. Record a programme using the i-Plate.
3. Record a programme using a Channel Grid.
4. Record a programme using the TV Guide.
5. Record a specific time slot :
• Record a specific time slot once.
• Record a specific time slot on a recurring basis.
Record what I’m watching (impulse recording)
When watching Live TV, press REC at any time to instantly start a recording of what you are watching.
���� What Now?
o The PVR Recording icon will appear onscreen, confirming the start of the recording.
o The recording will automatically stop at the end of the programme.
o The recording will be listed in the Playlist with an ALERT icon, indicating a partial recording.
���� What else can I do?
o You can extend the recording (see page 28).
o You can stop the recording (see page 28).
���� What else could happen?
o The PVR Recording Error icon (indicating a problem) might appear (see page 18).
o If the recording request conflicts with existing recordings, a pop-up will be displayed indicating that the recording cannot be scheduled.
You cannot set an
impulse recording from the buffer.
The programme will
only record from when you press REC, ie. it will be a partial recording.
The PVR Recording Error icon
could indicate a signal problem on the channel you are recording, and may also indicate an error with the tuner being used for the recording.
(Tuner 2 + Tuner 3 are used for recordings).
HD PVR Viewer’s Guide – V1.02
Page 23 of 30
Record a programme using the i-Plate
Press i to display the i-Plate. Select a programme to record and press REC.
���� What Now?
o The PVR Recording icon will appear onscreen, confirming the start of the recording
o If the programme has already started, a recording icon will be displayed next to the
programme title.
o If the programme has already started, the recording will automatically stop at the end of the programme and will be listed in the Playlist with an ALERT icon, indicating a partial recording.
o If the programme has not yet started, a scheduled recording icon will be displayed next to the programme title and the programme will be listed in the Scheduled Recordings screen.
���� What else can I do?
o You can cancel scheduled recordings (see page 25).
���� What else could happen?
o If the recording request conflicts with existing recordings, a pop-up will be displayed indicating that the recording cannot be scheduled.
Record a programme using the Channel Grid
While watching TV (either Live TV or in playback), press any of the arrow keys to display a Channel Grid. Select the channel on which you would like to schedule a recording and press i to display the extended info. Select a programme to record and press REC.
���� What Now?
o If the programme has already started, a recording icon will be displayed next to the programme title.
o If the programme has already started, the recording will automatically stop at the end of the programme and will be listed in the Playlist with an ALERT icon, indicating a partial recording.
o If the programme has not yet started, a scheduled recording icon will be displayed next
to the programme title and the programme will be listed in the Scheduled Recordings screen.
���� What else can I do?
o You can cancel scheduled recordings (see page 25).
���� What else could happen?
o If the recording request conflicts with existing recordings, a pop-up will be displayed
indicating that the recording cannot be scheduled.
Record a programme using the TV Guide
Press TV GUIDE. Then from either Favourite Channels or All Channels, select a programme to record and press REC.
���� What Now?
o If the programme has already started, a recording icon will be displayed next to the programme title.
o If the programme has already started, the recording will automatically stop at the end of the programme and will be listed in the Playlist with an ALERT icon, indicating a partial recording.
o If the programme has not yet started, a scheduled recording icon will be displayed next to the programme title and the programme will be listed in the Scheduled Recordings screen.
���� What else can I do?
o You can cancel scheduled recordings (see page 25).
���� What else could happen?
o If the recording request conflicts with existing recordings, a pop-up will be displayed indicating that the recording cannot be scheduled.

HD PVR Viewer’s Guide – V1.02
Page 24 of 30
Record a specific time slot (Time Based Recording)
This option allows you to record a specific channel for a set period of time. You can record a channel for a
specific time slot and set the frequency to once, daily, weekly or on weekdays.
• To set-up a time based recording, press RED to go to the Playlist and then the RIGHT arrow to go to the Scheduled Recordings screen.
• Press BLUE to go to the set-up screen for time based recordings.
Name The name of this recording as it will appear in the Scheduled Recordings or Playlist screens. To
change the default name, press the LEFT arrow to delete the default name and use the number keys on the remote control to type a new name.
Channel Which channel do you want to record? The default is the one which you are currently tuned to.
Frequency How often should this recording be scheduled? The default is “Once”.
Your options are once, daily, weekly or on weekdays.
Start Date On which date should this recording start? The default is today’s date.
Start Time Enter the start time using the number keys on the remote control. The default is the current time. Note : the time must be entered in the 24 hour format, 3pm = 15:00.
End Time Enter the end time using the number keys on the remote control. The default is the current time + 1 hour. Note : the time must be entered in the 24 hour format, 3pm = 15:00.
Lock / Unlock Locking the scheduled recording ensures that nobody can delete your programme.
���� What Now?
o A single time based recording is listed in the Scheduled Recordings screen.
o For recurring time based recordings, only the next two incidents are listed in the Scheduled Recordings screen.
���� What else can I do?
o You can cancel scheduled recordings (see page 25).
���� What else could happen?
o If the recording request conflicts with existing recordings, a pop-up will be displayed indicating that the recording cannot be scheduled.
o If the time for the time based recording exceeds 12 hours, a pop-up will be displayed indicating that the recording cannot be scheduled.
Safety net settings to do
not apply to time based recordings. For more info on safety net settings, see page 29.
Your recurring time based
recording will keep recording indefinitely until you cancel it.

HD PVR Viewer’s Guide – V1.02
Page 25 of 30
8.2 SCHEDULED RECORDINGS
The Scheduled Recordings screen lists all scheduled recordings.
To go to the Scheduled Recordings screen, press RED to go to the Playlist and then the RIGHT arrow to go to Scheduled Recordings.
1 Header - Displays the name of the section you are in. If you press the RIGHT arrow, you go to the Reminders screen. If you press the LEFT arrow, you go to the Playlist.
2 Disk Usage indicator.
3 Indicates the number of pages in this section. Press P+ to go to the next page in the list, P- to go to the previous page in the list.
4 Titles of scheduled recordings.
5 PVR icons.
6 Day and date of scheduled recording.
7 Start time of scheduled recording. This time includes the safety net setting (see page 29).
8 Channel number & name.
9 Mini i-Plate.
10 Start and end time of the scheduled recording. This time includes the safety net setting (see page 29).
11 Programme title.
12 Synopsis.
13 PG Rating.
14 PG Lock and PG Block icons. A blue key indicates a locked programme. A black key indicates this programme is blocked due to the PG Rating.
15 Colour buttons :
RED = delete a scheduled recording.
BLUE = set up a time based recording (see page 24).
WHITE = sort your scheduled recordings according to date or the alphabet.

HD PVR Viewer’s Guide – V1.02
Page 26 of 30
9 VIEWING YOUR RECORDINGS
9.1 THE PLAYLIST
The Playlist is where you find all the programmes you have recorded. You get to choose what you want to watch, when you want to watch it!
To ensure that you always have space for new recordings, remember to delete recordings that you have already watched and no longer want to keep. When the HD PVR has less than 10% disk space, it will automatically delete recordings (starting with the oldest) to make space for new recordings.
1 Header - Displays the name of the section you are in. If you press the RIGHT arrow, you go to Scheduled Recordings. If you press the LEFT arrow, you go to the Reminders screen.
2 Disk Usage indicator.
3 Indicates the number of pages in this section. Press P+ to go to the next page in the list, P- to go to the previous page in the list.
4 Titles of recordings.
5 PVR icons.
6 Recording date.
7 Duration of recording.
8 Channel number and name.
9 Mini i-Plate.
10 Duration of recording.
11 Programme title.
12 Synopsis.
13 PG Rating.
14 PG Lock and PG Block icons. A blue key indicates a locked programme. A black key indicates this programme is blocked due to the PG Rating.
15 Colour buttons :
RED = delete a recording.
WHITE = Options. You can rename, lock or sort the recordings in the Playlist.
HD PVR Viewer’s Guide – V1.02
Page 27 of 30
Selecting a recording to watch
Press RED to go to the Playlist and select a programme to watch.
Press OK to start.
���� What Now?
o The programme will start playing and you are now in playback mode.
o The i-Plate will be aqua blue. This indicates that you are watching a recording.
���� What else can I do?
o You can pause, fast forward or rewind the programme. You can also watch in slow motion (see pages 28, 29 & 30).
o You can set a bookmark (see page 28).
o You can press STOP to stop playback and return to the Playlist.
���� What else could happen?
o If the recording has been partially viewed, a pop-up displays with options to resume from where you left off or to start from the beginning.
o If the recording is PG blocked, you first need to enter the correct PG PIN code.
Why is there often more than one programme
listed on the Playback i-Plate, when I only recorded one programme?
The programme you recorded is usually second on the list. The PVR inserts a safety net at the beginning and end of each scheduled recording to ensure as much as possible, that variances in actual broadcast times do not impact your recordings. For info on the safety net, see page 29.
HD PVR Viewer’s Guide – V1.02
Page 28 of 30
10 OTHER FEATURES
10.1 EXTENDING A RECORDING IN PROGRESS
You can extend the recording of any recording in progress.
• Select the programme being recorded in the i-Plate, TV Guide, Playlist or Scheduled Recordings screen.
• Press i to display the extended information, then press BLUE to extend the recording and follow the onscreen instructions.
• If the recording extension cannot be accommodated due to conflict with other existing scheduled recordings, an error message is displayed.
10.2 STOPPING A RECORDING IN PROGRESS
You can stop any recording in progress.
• Press STOP.
• An onscreen banner is displayed. Select the recording you want to stop and press OK.
• The recording will be listed in the Playlist with an ALERT icon, indicating a partial recording.
10.3 BOOKMARKS
A bookmark marks a selected place in a recorded programme and allows you to easily find your favourite moments and watch them again.
So, while you are watching a recording, you could set a bookmark for each try of the rugby match and later, watch them all again, one after another.
Setting a bookmark
• When watching a recording, press BLUE to set a bookmark.
• The status bar is displayed and the BLUE triangle inserted to indicate the bookmark.
Using bookmarks
• To view your bookmarks, press YELLOW to display the status bar.
• Once the status bar is displayed, use the LEFT and RIGHT arrows to jump to the bookmark(s).
Deleting bookmarks
• To view your bookmarks, press YELLOW to display the status bar.
• Once the status bar is displayed, use the LEFT and RIGHT arrows to jump to the bookmark you want to delete.
• Then press the BLUE button. The BLUE triangle which indicated the bookmark is deleted.
10.4 SLOW MOTION
You are able to view programmes in slow motion.
• Press the WHITE button to watch the action in slow motion.
• Press the WHITE button again to watch at even a slower pace.
• Press the WHITE button a third time to return to normal speed.
HD PVR Viewer’s Guide – V1.02
Page 29 of 30
10.5 THE SAFETY NET
When you schedule a recording, the HD PVR automatically adds 3 minutes to the beginning and 10
minutes to the end of the recording (so long as the safety net doesn’t clash with other existing
recordings).
You can change the default settings for the safety net. To do this :
• Press MENU to go to the Decoder Menu.
• Select Personalise.
• Go to #4 (Safety Net Settings).
• Press WHITE to edit.
• Change the settings and press OK to save.
The new setting will only take effect on recordings scheduled after you made the change, ie. recordings
already scheduled retain the previous safety net settings.
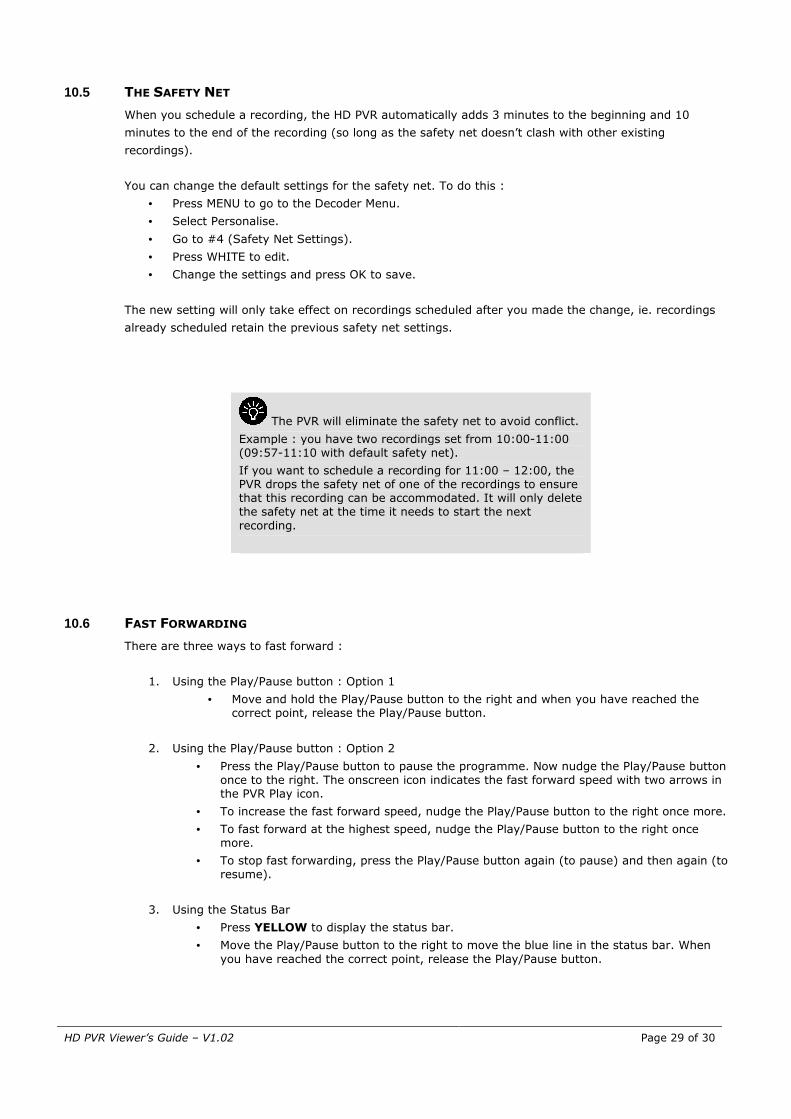
The PVR will eliminate the safety net to avoid conflict.
Example : you have two recordings set from 10:00-11:00 (09:57-11:10 with default safety net).
If you want to schedule a recording for 11:00 – 12:00, the PVR drops the safety net of one of the recordings to ensure that this recording can be accommodated. It will only delete the safety net at the time it needs to start the next
recording.
10.6 FAST FORWARDING
There are three ways to fast forward :
1. Using the Play/Pause button : Option 1
• Move and hold the Play/Pause button to the right and when you have reached the correct point, release the Play/Pause button.
2. Using the Play/Pause button : Option 2
• Press the Play/Pause button to pause the programme. Now nudge the Play/Pause button once to the right. The onscreen icon indicates the fast forward speed with two arrows in the PVR Play icon.
• To increase the fast forward speed, nudge the Play/Pause button to the right once more.
• To fast forward at the highest speed, nudge the Play/Pause button to the right once more.
• To stop fast forwarding, press the Play/Pause button again (to pause) and then again (to resume).
3. Using the Status Bar
• Press YELLOW to display the status bar.
• Move the Play/Pause button to the right to move the blue line in the status bar. When
you have reached the correct point, release the Play/Pause button.
HD PVR Viewer’s Guide – V1.02
Page 30 of 30
10.7 REWINDING
There are three ways to rewind :
1. Using the Play/Pause button : Option 1
• Move and hold the Play/Pause button to the left and when you have reached the correct point, release the Play/Pause button.
2. Using the Play/Pause button : Option 2
• Press the Play/Pause button to pause the programme. Now nudge the Play/Pause button once to the left. The onscreen icon indicates the rewind speed with two arrows in the PVR Play icon.
• To increase the rewind speed, nudge the Play/Pause button to the left once more.
• To rewind at the highest speed, nudge the Play/Pause button to the left once more.
• To stop rewinding, press the Play/Pause button again (to pause) and then again (to resume).
3. Using the Status Bar
• Press YELLOW to display the status bar.
• Move the Play/Pause button to the left to move the blue line in the status bar. When you have reached the correct point, release the Play/Pause button.
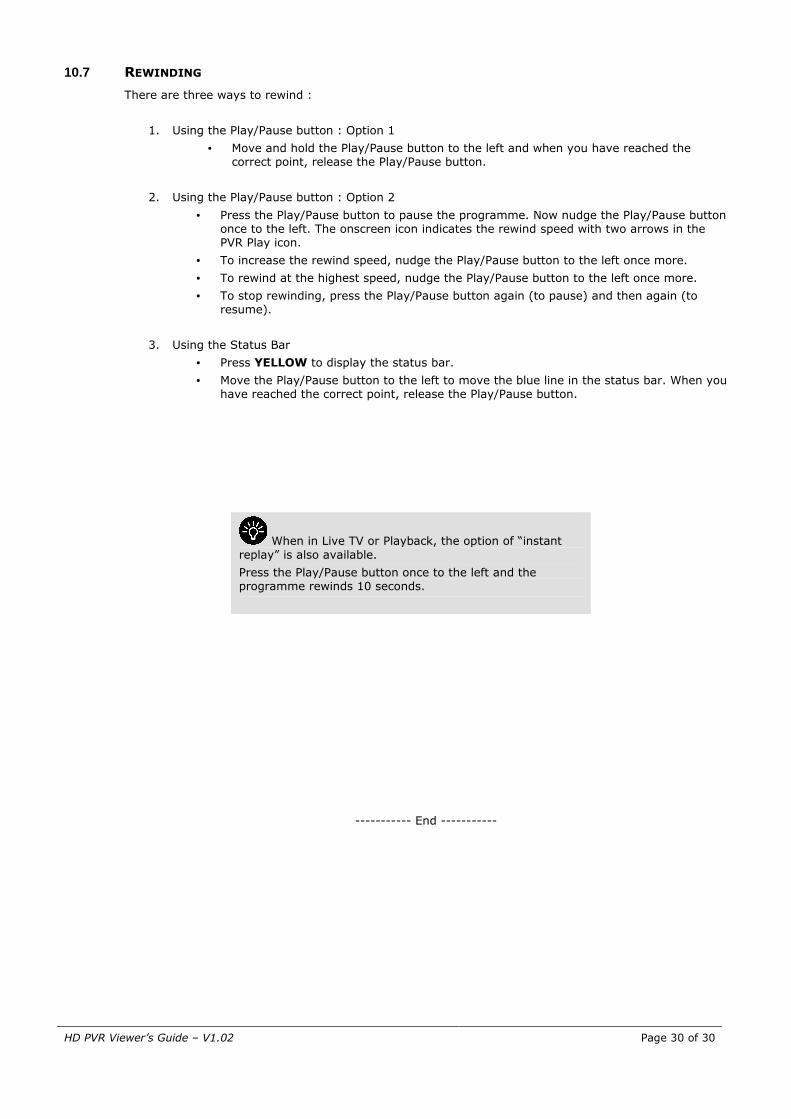
When in Live TV or Playback, the option of “instant
replay” is also available.
Press the Play/Pause button once to the left and the programme rewinds 10 seconds.
----------- End -----------