hd meeting user manual
TRANSCRIPT

HD Meeting User Manual
HD Meeting Service unifies cloud video conferencing, simple Online Meeting and Mobile collaboration into One easy-to-use platform. Our solution Offers the best video and Web Screen- Sharing quality across Windows, Mac, iOS, and android platforms.
1

Getting Started You should have received an email that will confirm who you are by asking you to Click here to activate your account. You’ll be asked to enter your account password, and type the new password a second time to confirm you typed it correctly. Click the Go button. Confirm your Name, Phone Number and Company information, and click the option boxes that you wish to activate followed by the Save Changes button on the Profile screen.
https://www.hostediphdmeeting.net/
Note: Save this link to your favorites. this is the link you can use to update your profile at any time you wish.
Click the My Meetings tab. Click on the Start button on the far right of the screen to start a meeting.
HD Meeting will automatically download a desktop application onto your computer. Depending on your browser, you may have to open the downloadable file on the bottom left of your web browser. Follow the on-screen prompts to complete the download if it doesn’t download automatically.
Desktop Application You will see a new icon on your desktop (shown).
HD Meeting
2

Double-click the icon to open the main dialog box (shown). The default tab is Home.
This dialog box allows you to:
• Click on Start without video to start a meeting sharing your desktop or application.
• Click on Start with video to start a video meeting.
• Click on Schedule to set up a future meeting.
• Click on Join to join a meeting that has already been started.
Note: click on the account drop-down arrow to view your profile, check for updates, switch accounts, and log-out.
HD
3

Starting a Screen Share Meeting If you would like to start an instant meeting using screen share, you can do so by selecting the Start without video icon on the Home tab screen.
A screen share meeting starts with screen sharing and audio (VoIP/computer audio or phone call-in). Video is not turned on automatically. After selecting Start without video your meeting will start.
• You will first be prompted to selectthe window or desktop to share.
• Then, you will be prompted to inviteother participant(s) to your screenshare meeting.
• Video is not automatically turned onduring the screen share meeting.
• During your screen sharing, anyparticipant can start their screensharing. There is no need to passpresenter functionality.
• You must stop screen sharing toallow another participant to sharetheir screen.
Note: you can prevent a participant from showing their screen by locking the screen share to only your screen. this is done within the participants panel.
4

Switching windows During Screen Sharing While in screen share mode your screen share menu bar can ‘float’ meaning you can move it around your screen to a location that is more convenient. You can do this by holding a left mouse click on the menu bar and dragging it to another part of your screen. During screen sharing, you can switch between different windows or desktop by moving the cursor on your screen over the Meeting Options Bar at the top of your screen (as seen below). Click the Share a New Window menu option.
A new dialog box will appear showing the screens you currently have open (as show below).
Click the Show all windows link to expend the screen selection if you have more than 3 applications open.
Click on the screen you now want to share and it will be highlighted in green, then click the Share Screen icon. By sharing your Desktop (either 1 or 2 if you have split screens) you can show anything you open or already have open on that screen.
Other options during screen sharing include:
• Mouse/ keyboard control
• Annotate
• Record5

• Mute
• Chat
• Show participant list
• Open video
• Pause the screen sharing
Stop Share To end your screen share meeting, simply select Stop Share and then select End Meeting for All.
Note: if you started your video screen share, when you click Stop Share your meeting will return to the Video Meeting mode.
Switching to Video Meeting If you would like to add video during screen sharing click the Start Video menu option as seen below.
Video Layouts There are 4 video layouts for single-monitor systems: • Window View
• Full Screen View
• Gallery View
• Mini View
For Dual-monitor setup, you can view your screen share presentation on one monitor and the participant(s) video on the second monitor.
Video Layout During Screen Sharing There are 3 layouts if you enabled video during screen-sharing:
• Minimized View – shows who’s talking via text only
• active Speaker View – shows active speaker only
• all Speaker View – shows all speakers (4 at a time) with up and down scrolling
6

Note: you can move the window layout at any time.
Pin Video when Viewing Shared content Pin Video is an option that allows you to only view a specific participant when someone is screen sharing. You can only pin video with the participants that have video turned on.
To activate the Pin Video option, have your participants turn on their video. You will see a side panel with participants’ video. Then, share a screen. All participants will then be viewing the same screen. To view a specific participant’s video, right click on the participants video that you wish to view and select Pin Video.
You will now be viewing the specific participant’s screen. This will affect your local view only (i.e. other participants do not see the pinned video).
You can switch back to shared content or to active speaker by clicking on the icons in the top left corner of your screen.
Fit to window There is an option in Settings to Fit to Window as default.
Note: you can switch between video layouts at any time during your meeting. you can also move the video layout panel to a different location on your screen by holding down a left mouse click on the video panel and dragging it to a different location.
7

You can also make this change when Viewing a shared screen/presentation.
Starting a Video Meeting There are several ways to Host a Video Meeting. Listed below are 3 different ways to start that process:
i. Start a meeting via the web-portalTo host a video meeting, you can go to https://www.hostediphdmeeting.net/
1. and click the Host a Meeting button.
2. You will be taken to the login page where you can enter the Email and Passwordthat you have created for your account.
3. Then click on the Start Meeting button.
ii. Start a meeting via your desktopapplication
1. On your desktop, click the HDMeeting icon.
2. The HD Meeting app will now openas shown. Click the Start withvideo icon to start your meetingwith video. This will start yourwebcam (if you have one) as well aseveryone else in the meeting shouldtheir personal settings and webcamsettings allow for it to automaticallystart.
8

iii. Start a Meeting via your mobile app
1. Access your mobile device. Find the HD Meeting app on the device (If you don’thave the app downloaded to your device, you can easily find the app in iTunes orGooglePlay by searching for HD Meeting and download the app for free).
2. Touch the app to open it. You will see the screen below after logging in.
3. Touch Schedule or Host a Meeting option to start your meeting.
9

Schedule a Meeting There are multiple ways to schedule a meeting. We’ll cover two different ways that are the easiest and best ways to schedule in conjunction with your calendar.
1. One way to schedule a meeting, first you must open your HD Meeting applicationand log in. Then click the Schedule icon as shown below.
When you have opened the meeting scheduler, you can then start to setup your future HD Meeting meetings.
Note: all scheduled meetings can be started by the host at anytime, regardless of the date and time settings.
10

The Schedule icon will open the window as shown below. This will let you schedule meetings that can easily be added to your Calendar (Outlook, Gmail, etc.).
• topic: Choose a topic/name for your meeting.
• when: Select a date and time for your meeting. If you want a recurring meeting,check the box.
• Video (when joining a meeting): As a host you can control whether videoturns on automatically for yourself as a host or for participants by selecting onor off options.
• audio Options: By selecting the audio Telephone Only or Voip Only options, thehost and participants will only be able to join audio via that option. We recommendselecting Both so all participants have the option of each for that scheduled call.
• Meeting Options: Select any of these options to better handle your meeting.
• require meeting password: By selecting this added security option,your participants will be required to enter a password to gain access to
Page 11
11
the meeting. When selecting this option, another field will open for you to enter the password itself for meeting access. Your participants will see this password in their meeting invite.
• enable join before host: This option will allow the meeting to startbefore the host joins.
• use personal Meeting iD: This option allows you to schedule a meetingusing your Personal Meeting ID (PMI). Note: You can change your PMI to anumber you always remember by clicking on the Meetings icon on the HD MtgApp and then Edit under your PMI listed at the top of the screen.
• calendar: Add to any selected calendar and send out invites to participants.Depending on the Calendar option you have chosen, a meeting invite will open forthat application. Within the body of the meeting invite, the HD Meeting informationto access your newly scheduled meeting is automatically populated. Simply addinvitees to the meeting invite and send at the date and time you have designated.Note: choosing Other Calendars will allow you to copy and paste the scheduledmeeting information such as date, time, and meeting url into the email that you maysend to invitees.Note: Non-recurring meeting iD’s will expire 30 days after the meeting is started. you can re-start the same meeting iD as many times as you would like, within the 30 day window.Note: recurring meeting iD will expire 365 days after the meeting is started on the firstoccurrence.you can re-use the meeting iD for future occurrences within the 365 daywindow.
• Click the Schedule button to finish.
2. another way to schedule a meeting, is to download the Outlook Plug-in (Note: thismethod will only work for those that use Outlook as their default calendar). Go to the HD meeting website page: https://hostediphdmeeting.net/ and click the Download menu option at the bottom of this page. You’ll be taken to the HD Meeting Download Center page. Click the Download button in the Microsoft Outlook Plug-in section. Follow the steps in the download wizard until the download completes (Note: if you already have Outlook open, you’ll need to restart Outlook for the changes to take effect). Now you can schedule or start HD Meetings right from your calendar.
Page 12
12

Simply click the Schedule a Meeting in the HD Meeting section of your title bar as shown below.
Note: you can also start a meeting from Outlook by clicking the Start Instant Meeting button.
An HD Meeting window to schedule the meeting will open as shown below.
Fill in the required fields of the HD Meeting windows to set up the meeting as you wish, and click Continue.
The meeting information will now populate in the body of the Outlook meeting invite. Now, all you have to do is treat the meeting invite like you would any other Outlook invitation…select the participants, set the meeting time and a reminder, and send.
Meeting Option
• If you want to have participants enter the meeting via a password, enter the desiredpassword in the space provided.
• If you want an open forum to start before you open the meeting, check the Enablejoin before host box.
Page 13
13

Note: the meeting will end after 40 minutes if the host doesn’t join.
Join a Meeting There are many ways to join a meeting.
1. Join via your desktopapplication. After clicking theJoin icon, a new window will open.Enter the meeting ID you are tryingto join. If you’ve previously joineda meeting that used the same id(eg. meeting hosts PMI used for allof their meetings), click the downarrow in the meeting id field topick the meeting id. You also havethe option to not automaticallyconnect via PC audio and turn offvideo before joining. Click Join.
14

2. Join via URL link in meeting invite. Each meeting invite comes with a link thatallows participants to join simply by clicking on it. Participants will be taken rightinto the meeting without a need to enter the meeting ID first. Users may be askedfor their name if that’s required by the host as a way to identify everyone on the call.
3. Join via IM chat. The meeting invite link can also be applied to a chat session.A participant can click on the link to open the meeting from the Chat application.
4. Join via the http://hostediphdmeeting.net/ webpage. Click on the Join aMeeting button. Enter your HD Meeting ID to join as shown below.
5. Join using Dial-in from your phone. You can join a meeting via teleconferencingby using your landline or mobile device by dialing the number provided in theinvitation you received. You will be asked to enter the meeting ID.
Note: if you are already in the meeting via a computer for the screen share/video portion, you will also be asked to enter your 2-digit participant ID number so that your access to the meeting is synchronized. if you do not enter via computer and don’t know your participant ID, do not enter anything on your phone and you’ll be placed into the call as a caller only.
Inviting Others to Join Your Meeting There are many ways to invite participants onto your hosted calls.
1. Schedule an invite via your desktop application. Open your desktop application andclick the Schedule icon. After you finish setting up your meeting, the calendar youchoose will open with your pre-populated meeting information in the body. As youwould normally add invitees to your meeting requests, simply add anyone you wantto invite to this scheduled meeting and send the invite.
15

2. Invite contacts while in an HD Meeting by selecting the Invite tab in your in-meeting toolbar as shown below.
From Here, you can:
• Invite using your Default, Google, or Yahoo Email Contacts.
• Invite using your Favorites, Google, or Facebook IM Contacts.
• You can Copy URL or Copy Invitation and paste it anywhere for your contacts to clickon and join the meeting.
See the screen below for these details.
16
Scheduled Meetings Select the Meetings tab to view, start, edit, or delete your scheduled meetings and recorded meetings.
• Start: Select start to begin the pre-scheduled meeting that you have listed in yourupcoming meetings.
• edit: You can edit or update your scheduled meeting.
• Delete: Selecting delete will permanently delete your scheduled meeting.
• copy URL: You can copy your scheduled meeting(s) URL and manually paste intoan email, IM, SMS, etc.
Note: if you do not see your scheduled meeting, click the refresh tab in the upper right-hand corner to update/refresh the meeting list.
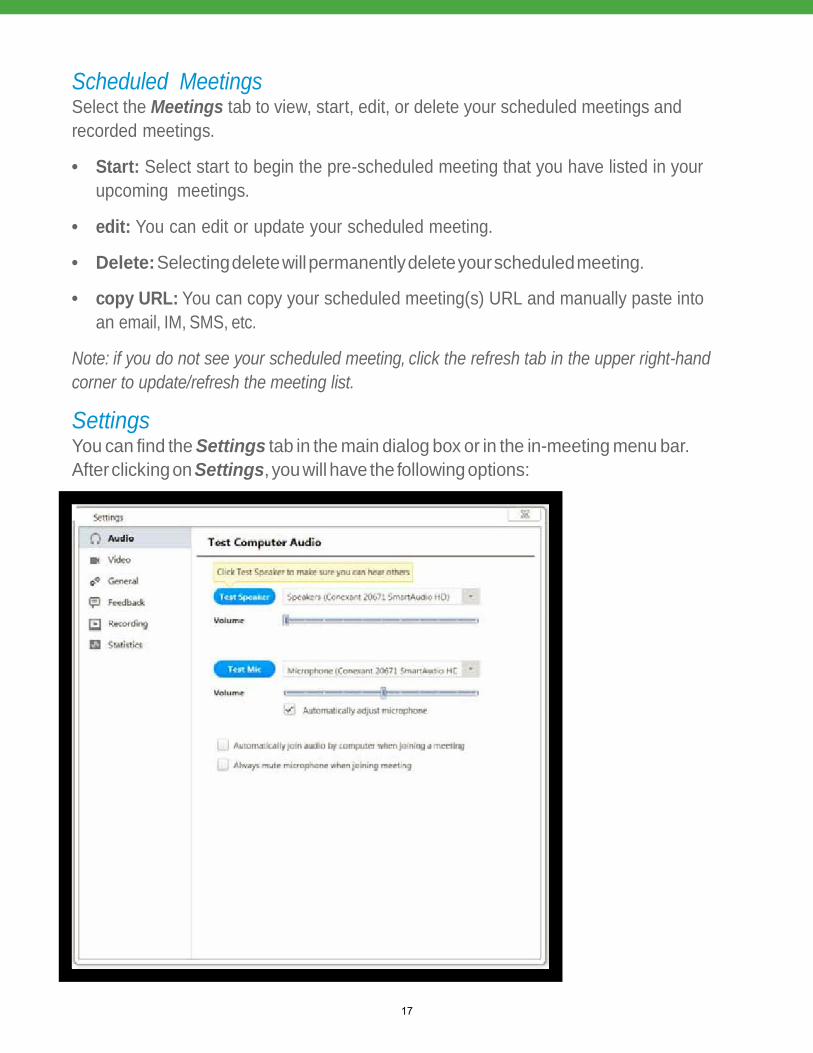
Settings You can find the Settings tab in the main dialog box or in the in-meeting menu bar. After clicking on Settings, you will have the following options:
17

• audio: You can test, select and adjust your speakers and microphone in the audiosection. We suggest that you do this prior to your meeting for the best meetingexperience.
• Video: You can test and select your video camera for the best HD experience based onthe video cameras available to you.
• general: You can select additional preferences.
• Feedback: We welcome any suggestions, questions, comments, or feedback that youmay have on making this product even better.
• recording: You can browse or open your stored recordings (all recordings are storedon your local device/computer).
• Statistics: This section will show your meeting diagnostics like; send/receive rate ofaudio, video and screen sharing, bandwidth used, latency, jitter, packet loss, resolution,frames per second, and processing of your CPU and RAM. These diagnostics will helpyou to understand your systems performance as it relates to a High Definition meeting.If problems are experienced, we highlight those areas in orange or red.
• Orange indicates that there may be quality issues.
• Red indicates that there most likely will be quality issues.
To fix the potential quality issues, here’s a description of each performance metric that we analysis for you:
• Latency – The delay between packet being sent and received. For examplethe time between you speaking and the other user receiving the audioon their end.
• Jitter – The variation in the time between packets arriving, caused bynetwork congestion, timing drift, or route changes.
• packet Loss – The total amount of data that fails to reach the finaldestination.
• resolution – The number of pixels in each dimension that can bedisplayed. Higher usually means higher quality.
• Frames per Second – The rate at which the device can produceunique images, or frames.
18

What You Can Do in a Meeting When you have started or joined a meeting, you can perform the following actions from the menu bar located at the bottom of the meeting window (move your mouse to toggle):
• Invite more people to join by Email, IN, SMS (mobile users) or via meeting ID (link)
• Screen share your desktop or specific application window
• Start a group or private chat
• Record your meeting
• Manage participants
• Mute and Un-mute your audio
• Select audio connect to dial-in via phone and disconnect computer audio
• Stop and start your video
• Leave or end the meeting
• Test your Audio and Video in Settings prior to a meeting
Shortcut Keys Shortcut keys can be used by both the host and participants to more easily manage their HD Meeting session.
Screen Sharing and annotations To start the screen sharing click the Share Screen button located in your in-meeting toolbar.
19

After selecting Share Screen, you can choose to share your desktop or an individual application/window open on your computer. You also have the option to choose Whiteboard, which is a blank page to use with participants to brainstorm using the annotate tools outlined below.
Note: you can select to share computer audio when sharing a video clip such as a youtube or locally stored video clip.
Note: if using dual monitor set-up, you can show the screen sharing on one monitor and the participants on the second monitor.
During your screen share you will have the option of using several features. By selecting the Annotate button (shown below) on the top menu bar you can perform the following tasks:
• Select Mouse (set as default).
• Select Select to choose a section of the document.
• Select Text to write in the document.
• Select Draw to write on the document with a pen or highlighter, to mark thedocument with a line or arrow, or to add a block or circle in solid or outline form.
• Select Spotlight to change the mouse to a red circle, or to place a block arrow onthe spot you want to reference.
• Select the Erase option to erase any of the marking made to the screen.
• Select Format to set one of 16 colors for pen and highlighter markings, as well assetting the thickness of the markings used.
• Select Undo to remove the last marking made.
• Select Redo to add the marking back after removing it.
• Select Clear to clear all markings off of the screen.
• Select Save to save your document.Page 20
20

Audio, Video and More
• The Audio option allows you to connect via phone, and disconnect thecomputer audio
• The Video option turns video on or off depending on how you started the meeting(Screen Share mode or Video mode).
• The More option gives you added features including:
1. chat – gives you the ability to chat with someone in the meeting
2. record – gives you the ability to record the meeting
3. invite – gives you the ability to invite more people
4. Disable attendee annotation – allows you to remove participants’ abilityto use the annotate feature
5. audio Options – gives you audio options to join via phone or computer.You can also test your computer mic and speakers
6. Video Settings – gives you access to your video settings
7. Optimize for Full-Screen Video clip – play an optimized video to remoteattendees to ensure they have the best quality experience
8. end Meeting – allows you to not only stop sharing, but will also give you anoption to close the meeting for all
Record a Meeting To record a meeting, you need to either be the host or the host must grant you permission to record.
While you are in an HD Meeting, move you mouse around the screen to toggle the menu bar (Depending on the mode you’re in, the toolbar will be the top or bottom of the screen).
1. Select the Record button in the More tab of the upper toolbar. The Record buttonis located by itself on the lower screen toolbar.
2. Optional – click on a participant to allow them to record
Page 21
21

3. All participants in the meeting will see a recording indicator in the upper-left cornerof the screen as shown below.
4. While recording you have the option to pause and resume recording. When inscreen share mode, pause and resume recording is found under the More optionin the menu bar. When you click Pause, participants will see Recording Pausedin upper-left corner of screen.
5. When the meeting ends, recording will automatically stop, or you can stop therecording prior to the meeting ending.
What You can Record You can record the active speaker, content sharing with active video panel and M4A audio.
Saved Recording Files To access your saved recorded meetings, open your desktop application. Then select Meetings, and on the top part of window select the Recorded tab as shown below.
All recorded meetings are stored locally on your device or computer.
Note: your recorded meeting will be converted and added after you have ended the meeting that you were currently recording.
What Can I Do with My Saved Recording? Using you mouse, toggle over your saved recording to view your options.
• play video: Selecting Play from your desktop application will play the saved meetingwith your default media player.
22

Page 22
23

Open: Selecting Open will allow you to view your saved file in your device or computer’s folder.
• Delete: After deleting your saved recorded meeting, it will still be saved to your localdevice or computer.
Recording Formats After you have ended your meeting, your recorded file will be converted and saved to your local device/computer. You will have four (4) different file types to choose from.
• M3u playlist: A playlist to play the individual MP4 files – Windows only
• Mp4 file: Video file or split video and screen sharing files – Windows and Mac
• M4a file: A single audio only file
• Mp4 file: A single file for video and screen sharing – Mac Only
• HD Meeting also records the Chat messages that occurred during the meetingin Notepad form as well as a png file for any in meeting whiteboard or annotationsession
Note: the single Mp4 (Mac) file can also be opened by quicktime player. you can convert the file to .MOv and edit using iMovie.
Change the Location Of Stored Recordings You can change the location of where your recorded meeting file is stored on your computer.
Open the desktop application and click the Settings button. On the left menu, click the Recording option. From here you can:
• Change where your recorded file will be stored.
• Select an option to pop up a location selection each time a recorded meeting ends.
24

Join By Teleconferencing You can join an HD Meeting via teleconferencing/audio conferencing using a traditional dial-up phone. This is useful in occasions where:
• You don’t have a microphone or speaker on your PC/Mac
• You don’t have a smartphone (iOS or Android) while on the road
• You could not connect to a network for video and VoIP/computer audio
Joining by Teleconferencing Join by computer for video and phone for audio.
• Join an HD Meeting at https://hostediphdmeeting.net/ and enter your 9 or10 digit meeting ID.
• When you are in the meeting, select the Audio option in the menu bar.
• To use computer audio (which will open up the mic and speaker from your computer),select the Join by Computer tab.
• Follow the instructions in the dialog box to Use Telephone as shown below.
About Settings In the HD Meeting desktop application you will have a Settings option. Under Settings, you will have the following options:
25

• audio: You can test, select and adjust your speakers and microphone in the audiosection. We suggest that you do this prior to your meeting for the best meetingexperience.
• Video: You can test and select your video camera for the best HD experience basedon the video cameras available to you.
• general: You can select additional preferences.
• Feedback: We welcome any suggestions, questions, comments, or feedback that youmay have on making this product even better.
• recording: You can browse or open your stored recordings (all recordings are storedon your local device/computer).
• Statistics: Open the statistics window to see performance diagnostics for yourcomputer and the network your using.
26

Getting Started With IOS and Android HD Meeting works on your iPhone, iPad, or any other iOS device and Android™ devices. You can download the HD Meeting app from the Apple App Store or GooglePlay. Simply type HD Meeting in the search option.
When you have the HD Meeting app installed, tap the HD Meeting application icon on your mobile device to open the meeting controls.
Meet Now, Join, Schedule, Upcoming Meetings
• Meet now: Will allow you to start an instant meeting and invite up to 25 participants.
• Join a Meeting: Will allow you to enter a 9-digit meeting ID and instantly join anotherhost’s meeting.
• Schedule: Will allow you to set up a future HD Meeting.
• Upcoming Meetings: View all of your future scheduled meetings.
Note: if you don’t link your account, your meeting(s) will be timed via our free trial account offer,
and each meeting will end after 40 minutes. you will get a warning after 30 minutes that only 10 minutes remain before your meeting will end.
Link Your Account Login You can Link your HD Meeting, Google or Facebook account by selecting the Settings icon and then choosing Link Account.
Page 26
27

To logout, simply select unlink account.
By linking your account, you will also be able to view any upcoming meetings you have associated with your account.
Note: linking your account will also allow you to find more contacts and use features like
Personal Meeting ID.
Settings When you’ve completed linking your account, you can access more HD
Meeting features and settings for your mobile device. In
“Settings” you can:
• Add a profile picture and choose a screen name
• View your Linked account
• View your personal 10-digit meeting ID
• See what version of HD Meeting you’re using
• Send us feedback
• Spread the word about HD Meeting
• Add already existing contacts from your mobile device
• Receive pop-up notifications from IM messages
• Enable/Disable Safe Driving ModePage 27
28

• Connect HD Meeting to another computer/device using Airplay!
Note: your screen name will show as your name in your HD Meeting application.
Personal Meeting ID (PMI) Personal Meeting ID (PMI) is assigned to you automatically as a permanent virtual room. You can start it at anytime or schedule it for a future use.
You can customize your personal meeting id to something you can remember.:
1. Open your HD Meeting desktop application or mobile app.Click on the Meetings button on the Home page as shown below.
2. Then click the Edit button as shown below.
3. Then click Change your Personal Meeting ID as shown below.
29

4. Click Schedule dropdown and select Copy Invitation, then paste the invitationinto an Email/SMS/IM message to someone you want to join a meeting.
Advanced Meeting Features There are several features available to a meeting host that need to be enabled in the In Meeting (Advanced) Setting on your profile page:
• Breakout Rooms
• Remote Support
• Virtual Background
• Closed Caption
• Share Dual Camera Control
To enable these features, click on My Profile in the HD Meeting App.
Then, click on the Settings tab, scroll down to the In Meeting (Advanced) Settings section and click on Edit located across from the In Meeting (Advanced) Section.
30

To enable or disable this function, click on the checkboxes next to features, then click Save Changes.
Note: Remote Support and Breakout Room cannot be enabled at the same time. This is by design. The host must pick one or the other to enable. The host can change which features are enabled at any time.
Breakout Rooms The Breakout Rooms feature allows the host to split up their HD Meeting into 50 separate sessions. The meeting host can choose to split the participants of the meeting into these separate sessions automatically or manually, and can switch between sessions at any time. Breakout room participants have full audio, video and screen share capabilities.
Note: The host needs to ensure Remote Support is enabled through the In Meeting (Advanced) Settings option.
Select Breakout Rooms in the menu bar. The Create Breakout Rooms screen will then appear.
Then, select the number of sessions you would like to create. Click the Automatically or Manually radio button, then click Create Rooms.
automatically – HD Meeting splits your participants up evenly into each of the sessions
Manually – host manually assigns the participants to the breakout rooms
If the host chose Manually, they need to assign participants to the Breakout Rooms. To do this, select Assign next to the session you wish to assign participants to and select the checkbox next to each participant you wish to assign to that session. Repeat these steps for each session.
31

Once a participant has been assigned, the number of participants will show in place of the Assign button.
Your sessions will be created, but will not start automatically. Once the sessions are created, you can manage the sessions prior to starting them.
• Move to – select a session to move the participant to
• exchange – select a participant in another session to swap the selectedparticipant with
• Delete Session – delete the selected session
• recreate – allows you to start the Breakout Session creation from scratch
• add a room – add another breakout room
Click Open All Rooms to start the sessions. All participants will be moved to their respective sessions after confirming the prompt to join the Breakout Session.
32

The host will be left in the main meeting until manually joining one of the sessions. The participants (and the host when manually joining a session) will see this message when being moved to the Breakout Session:
Joining Breakout Session. It might take a few moments
If a participant has not joined the session yet, it will be noted with not joined next to their name.
The host can manage breakout sessions in progress:
• Join (session) – allows the host to join the breakoutsession selected
• Leave (session) – allows the host to leave the sessionand return to the main meeting (Leave only shows when in a Breakout Session)
• Close All Rooms – Will stop all sessions after a 30 second countdown, shown to the hostand participants, and return all participants back to the main meeting
A participant can press the Ask for Help button in the menu bar. The meeting host will be prompted to join the session where the request originated from.
If the host selects Join Breakout Room, the host will be added to the session requesting help.
Remote Support Remote Support allows the host to access a desktop application or restart a Windows or Mac computer remotely.
33

Note: The host needs to ensure Remote Support is enabled in the In Meeting (Advanced) Settings.
The host initiating the support session can:
• Request Desktop Control
• Request Application Control
• Request Computer Restart
Click Support in the menu tool bar to see the following options:
Request Desktop Control
The host selects Request Desktop Control which will prompt the participant to share their desktop.
The host will get a message indicating the user needs to approve the request.
The participant gets a request to grant host permission to control desktop.
Once permission is granted, the host sees a message that they are controlling the user’s screen. They can now control the user’s desktop. When finished, click Options then Give up Remote Control. This will give desktop control back to the user. If the host chooses Stop Remote Support, then the remote support session will end.
34

The user can end remote control at any time by clicking on Remote Control in their menu bar and selecting Stop Remote Control.
Request Application Control
If the host selects Application Control, it will prompt the participant to share a specific application on their desktop.
To do this, the participant should select an application to share, then click Confirm. The host can now control the specific application shared. They do not see, nor can they get to other applications on the user’s computer. When finished, the host can click Options, then Give up Remote Control. This will give application control back to the user. If the host chooses Stop Remote Support, then the remote support session will end automatically.
The participant can end remote control at any time by clicking on Remote Control in their menu bar and selecting Stop Remote Control.
Request Computer Restart
To request a computer restart, the host will select the Request Computer Restart option which will prompt the host to restart the participant’s computer.
The participant will then get a message that the host is requesting permission to restart their computer. The participant will automatically be rejoined into the meeting once the computer has restarted.
35

Once the participant clicks Restart Computer the host gets a message the participant approved request and the participant’s computer automatically reboots.
After the participant’s computer reboots and they log back in, they will automatically rejoin the meeting.
Virtual Background Virtual background allows you to select a picture to appear as your background. This can provide a more professional background and can limit distractions for participants.
Note: The host needs to ensure Virtual Background is enabled in the In Meeting (Advanced) Settings option.
Select Setting in your HD Meeting App, then select Video Background.
Once selected, you will have the option to select a desired virtual background. Choose one of the images provided, or Add Image to select. Select by highlighting an image.
36
Recommendations:
• To achieve the best virtual background effect, use a green background
• Recommended backgrounds can be found here and here
• Another option is to place a green poster board behind you
• Uniform lighting and color are highly recommended
• Ensure you are not wearing clothing the same color as the virtual background
• Higher quality cameras result in a better virtual background. Please ask yourcarrier for camera recommendations.
• You computer must have Dual Core 2Ghz or Higher (i5/i7 or AMD equivalent) processor
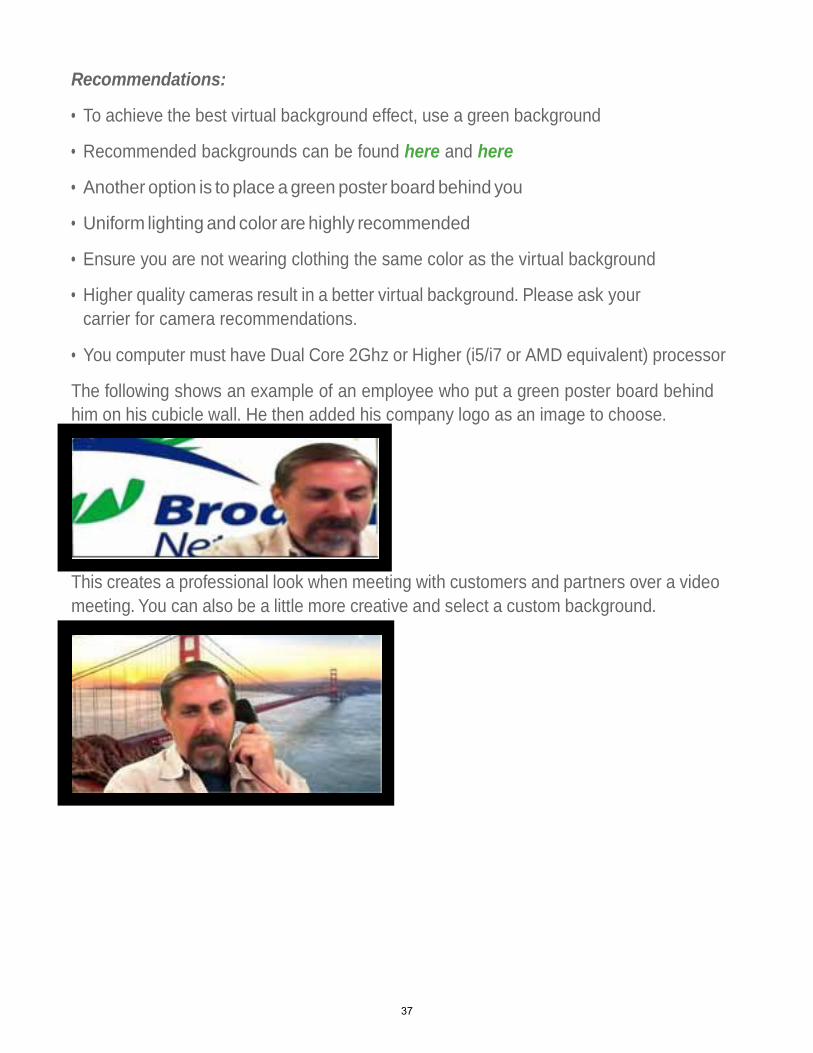
The following shows an example of an employee who put a green poster board behind him on his cubicle wall. He then added his company logo as an image to choose.
This creates a professional look when meeting with customers and partners over a video meeting. You can also be a little more creative and select a custom background.
37

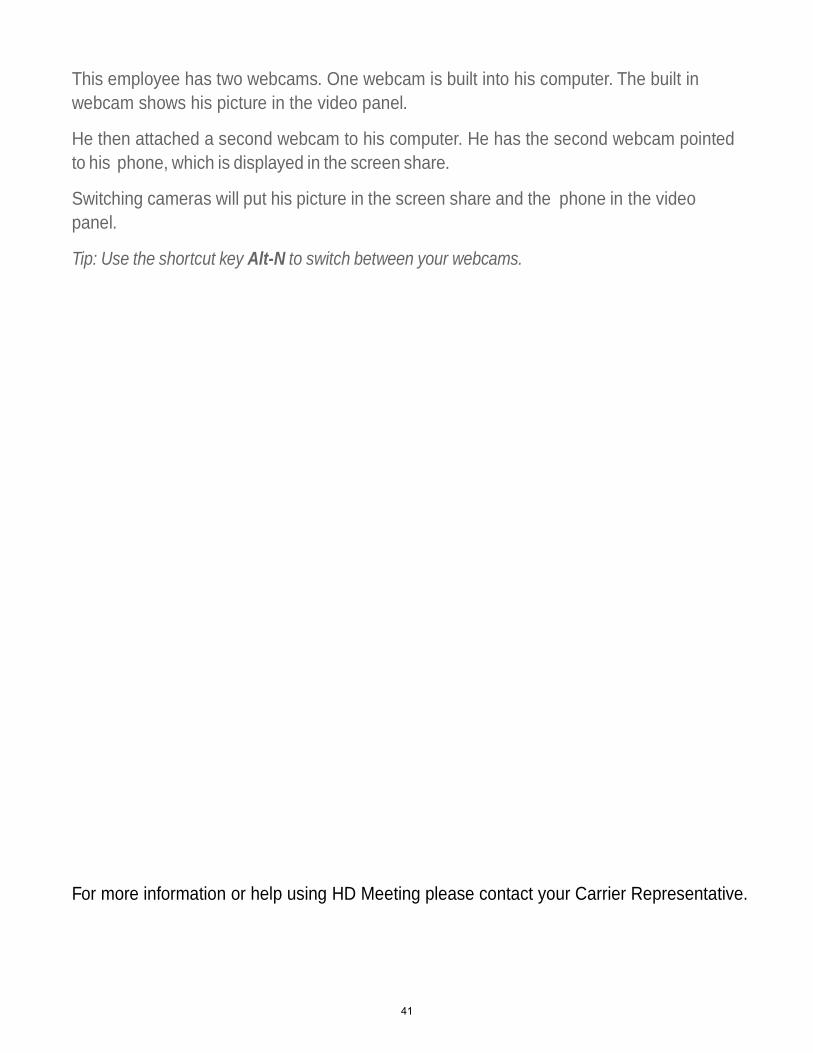
If you don’t use a green screen (see recommendations listed above) your video will look muted. Here’s an example of the employee in front of the Golden Gate bridge when there is no green screen behind him.
Closed Caption Closed Caption allows for a hearing impaired individual or someone with no audio capability to be included in the discussion. Either the host or a designated participant must type what is being said in the meeting.
Note: The host needs to ensure Closed Captioning is enabled through the In Meeting (Advanced)Settings option.
The host must click Closed Caption in the menu bar at the bottom of the screen, or if in screen share mode, click on More in the menu bar to choose Closed Caption. The following box will pop up on the host’s screen. They can either designate a participant to type, or choose to type themselves.
If the host chooses a participant to type, the participant menu opens and they will select Assign to type Closed Caption.
38

The chosen participant will then see a message pop up on their screen above their menu bar.
The participant assigned to type will then click the Closed Caption option on their menu bar and the Closed Caption box will appear. The participant can then begin typing. If the host chooses themselves to type, the Closed Caption box will appear on the host’s screen so they can begin typing.
39

Designated participant (or host if they chose themselves to type), can enter the text here. The text will appear in the box above when they hit enter.
All other attendees will get a message on their menu bar that Closed Caption is available.
The attendees will then click on Closed Caption and the Closed Caption box will appear on their screen so they can read what is being said in the meeting.
Share Dual Camera Control Screen sharing a camera input allows you to share a webcam connected to your computer. This allows two cameras to operate at once during a meeting, which is useful when recording training videos.
Note: The host needs to ensure the Share Dual Camera option is enabled through the In Meeting (Advanced) Settings option.
To use two cameras, start by sharing screen to bring up windows and applications you can share. Select Camera, then click Share Screen in bottom right corner. Your webcam will then be shared with meeting participants.
You can switch between your two webcams during the meeting.
40
This employee has two webcams. One webcam is built into his computer. The built in webcam shows his picture in the video panel.
He then attached a second webcam to his computer. He has the second webcam pointed to his phone, which is displayed in the screen share.
Switching cameras will put his picture in the screen share and the phone in the video panel.
Tip: Use the shortcut key Alt-N to switch between your webcams.
For more information or help using HD Meeting please contact your Carrier Representative.
41