hd-4 color display user manual
TRANSCRIPT

ENGLISH
HD-4Color DisplayUser Manual


| 1Preface | Honda HD-4 User manual
PrefaceHonda is continuously improving this product, therefore we retain the right to make changes to the product at any time which may not be refl ected in this version of the manual. Please contact your nearest Honda dealer if you require any further assistance. It is the owner’s sole responsibility to install and use the equipment in a manner that will not cause collisions, personal injury or property damage. The user of this product is solely responsible for observing safe boating practices.American Honda Motor Co., Inc. disclaims all liability for any use of this product in a way that may cause accidents, damage or that may violate the law.Governing Language: This statement, any instruction manuals, user guides and other information relating to the product (Documentation) may be translated to, or has been translated from, another language (Translation). In the event of any confl ict between any Translation of the Documentation, the English language version of the Documentation will be the offi cial version of the Documentation.This manual represents the product at the time of printing. Honda and its subsidiaries, branches and affi liates reserve the right to make changes to specifi cations without notice.
CopyrightAll rights reserved — © 2017 American Honda Motor Co., Inc.

2 | Preface | Honda HD-4 User manual
WarrantyThis warranty is limited to Honda Marine parts, accessories and apparel when distributed by American Honda Motor Co., Inc., 1919 Torrance Blvd., Torrance, California 90501-2746.Length of Warranty: (from date of original retail purchase):
Non-commercial - 12 monthsCommercial - 3 monthsGovernment - 3 months
See the Distributor’s Limited Warranty section onpage 49 for complete details.
Declaration of Conformity
This equipment is intended for use in international waters as coastal sea area administered by countries of the E.U. and E.E.A.
This gauge complies with the following regulations:• CE under EMC directive 2004/108/EC• Level 2 devices of the Radio communications (Electromagnetic Compatibility) standard 2008The Declaration of conformity is available fromwww.simrad-yachting.com

| 3Introduction | Honda HD-4 User manual
IntroductionThis manual is a reference guide for operating the Honda HD-4 Color Display. Important text that requires special attention is emphasized as follows:
Note: Used to draw attention to a comment or important information.
For your safetyYour safety and the safety of others are very important. We have provided important safety messages in this manual. This information alerts you to potential hazards that could hurt you or others. Please read these messages carefully.Of course, it is not practical or possible to warn you about all the hazards associated with operating this display/gauge. You must use your own good judgment.
Safety InstructionsYou will fi nd important safety information in a variety of forms:Instructions – how to use this display/gauge correctly and safely

4 | Introduction | Honda HD-4 User manual
Safety Messages – preceded by a safety alert symbol and one of three signal words, DANGER, WARNING, or CAUTION. Each message tells you what the hazard is, what can happen, and what you can do to avoid or reduce injury. These signal words mean:
You WILL be KILLED or SERIOUSLY HURT if you don’t follow instructions.
You CAN be KILLED or SERIOUSLY HURT if you don’t follow instructions.
You CAN be HURT if you don’t follow instructions.
Damage Prevention Messages – you will also see other important messages that are preceded by the word NOTICE. This word means:
Notice: Your display/gauge, other property or the environment can be damaged if you don’t follow instructions.
SoftwareThis manual is written for: Honda HD-4 Color Display software version 1.0 Please check www.marine.honda.com for details on release version.

| 5Contents | Honda HD-4 User manual
ContentsIntroduction 3Software 4Honda HD-4 Color Display 7Display and keys 7Default display pages 8Page transition 8Initial setup 9
Select languauge 9Time 9Units 10Vessel Setup 10Engine Display Setup 11Gauge Limits 11Pop-Ups Setup 12
Operation 13Menu operation 13
Page menu 13Settings 13
Backlight 14Display group 15Backlight level 15Night mode 15Night mode color 15
Pages 16Static gauge 16Default fi xed data pages 17Template pages 20Enabling/disabling a page 21Replacing/adding a page 21Confi guring page data 22AutoScroll 23
Trip Log 24Start/Stop Trip Log 24Reset Trip Log 24

6 | Contents | Honda HD-4 User manual
Refueling 25Adding fuel for the fi rst time 25Adding fuel 26Fuel Used 26
Fuel Used Reset 27Settings 29Engine alarms 29System alarms 30
Enabling an alarm (alarm on/off ) 30Alarms Setting status 31Alarm limits 31Alarm indication 32Acknowledging an alarm 32Active Alarms 32Alarm History 33Engine Alarm settings 34Alarm Siren 34
Damping 35System 35
Network 35Confi gure 37Units 37Decimal places 38Language 38Time 38Simulate 39Restore defaults 39Forced factory reset 39
Files 40Connecting a Micro-USB device 40Export system settings 41Import system settings 41
Software 42About 42Remote device software upgrade 42HD-4 Color Display software upgrade 43
Maintenance 45Specifi cations 47Distributor’s Limited Warranty 49

| 7Honda HD-4 Color Display | Honda HD-4 User manual
Honda HD-4 Color DisplayThe Honda HD-4 Color Display is a NMEA 2000® networked gauge that displays the vessel’s engine data and fuel tank information. It can also display instrument data including speed, depth, heading, position, wind and environmental data measured by optional sensors and other equipment connected to the network.
Display and keys
1
2 4
3
1 DISPLAY3.5” Color LCD 320 x 240 Resolution
2 MENU keyShort press Page menu / Return
to previous menu
Long press Shortcut to Standby and Display setup
3 UP/DOWN key
Scrolls up / down through menu / set values / active page transition
4 ENTER keyShort press Enter sub menu /
Confi rm selection
Long press Shortcut to Enabled pages
1

8 | Honda HD-4 Color Display | Honda HD-4 User manual
Default display pagesWhen starting for the fi rst time, the gauge is set with three default pages showing engine and system information. It is possible to add pages via the Pages menu and to change the template pages via the template page sub menu.The information displayed on fi xed data pages cannot be edited by the user. The type of information shown depends on what devices are connected on the network.
Note: Data fi elds are prioritized automatically. Adding or removing devices from the network may change which data types are displayed on the gauge.
See the Pages section of this manual for more information on page setup and confi guration.
Page transitionUse the UP/DOWN keys to scroll through the active pages.

| 9Honda HD-4 Color Display | Honda HD-4 User manual
Initial setupSelect the Language, Time, Units, Vessel setup, Engine data display setup, and Gauge limits.
Select Language
Set the preferred language for the gauge. Use the UP/DOWN keys to scroll through the languages. Press the ENTER key to save the selection.
Time
Set the Local time off set and the preferred time/date formats. Use the UP/DOWN keys to scroll through the options. Press the ENTER key to select an option to update. Press the ENTER key again to exit the option. Select NEXT to save the selections.

10 | Honda HD-4 Color Display | Honda HD-4 User manual
UnitsSet the preferred Units. Use the UP/DOWN keys to scroll through the options. Press ENTER to save the selection.
Vessel SetupSet the number of engines, fuel tanks and total fuel capacity. Use the UP/DOWN keys to scroll through the options. Select OK to save the selections.
Note: When entering the Total Fuel Capacity, press the ENTER key to advance to the next digit.
Note: These settings are applied to all devices on the network.
| 11Honda HD-4 Color Display | Honda HD-4 User manual
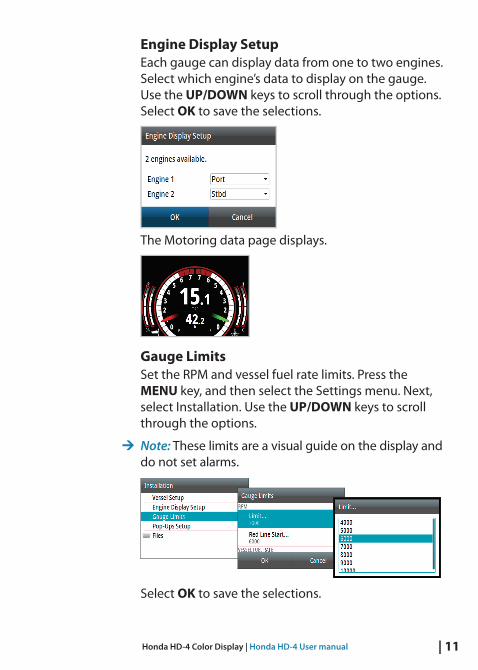
Engine Display SetupEach gauge can display data from one to two engines. Select which engine’s data to display on the gauge. Use the UP/DOWN keys to scroll through the options. Select OK to save the selections.
The Motoring data page displays.
Gauge LimitsSet the RPM and vessel fuel rate limits. Press the MENU key, and then select the Settings menu. Next, select Installation. Use the UP/DOWN keys to scroll through the options.
Note: These limits are a visual guide on the display and do not set alarms.
Select OK to save the selections.
12 | Honda HD-4 Color Display | Honda HD-4 User manual
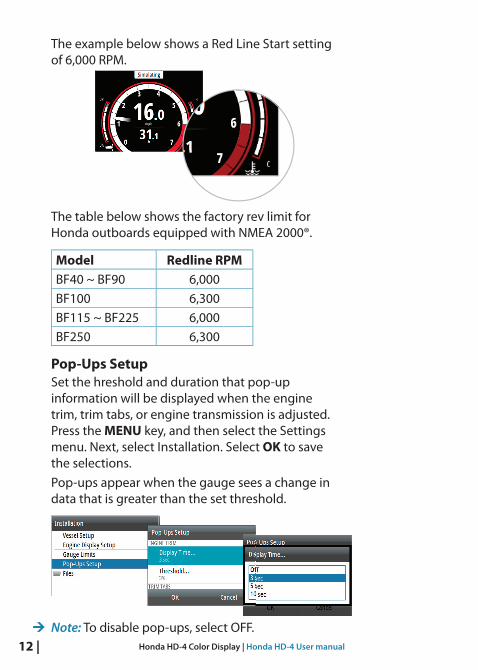
The example below shows a Red Line Start setting of 6,000 RPM.
The table below shows the factory rev limit for Honda outboards equipped with NMEA 2000®.
Model Redline RPMBF40 ~ BF90 6,000BF100 6,300BF115 ~ BF225 6,000BF250 6,300
Pop-Ups SetupSet the hreshold and duration that pop-up information will be displayed when the engine trim, trim tabs, or engine transmission is adjusted. Press the MENU key, and then select the Settings menu. Next, select Installation. Select OK to save the selections.Pop-ups appear when the gauge sees a change in data that is greater than the set threshold.
Note: To disable pop-ups, select OFF.

| 13Operation | Honda HD-4 User manual
Operation
Menu operation
Page menuThe Page menu options vary from page to page. Pressing the MENU key once on any page will show the available menu options.
Note: All page menus have a Settings option. Any other option refers to the current page.
SettingsThe Settings menu is where display options, display settings, system settings, source selection and calibration can be accessed.
2
14 | Operation | Honda HD-4 User manual
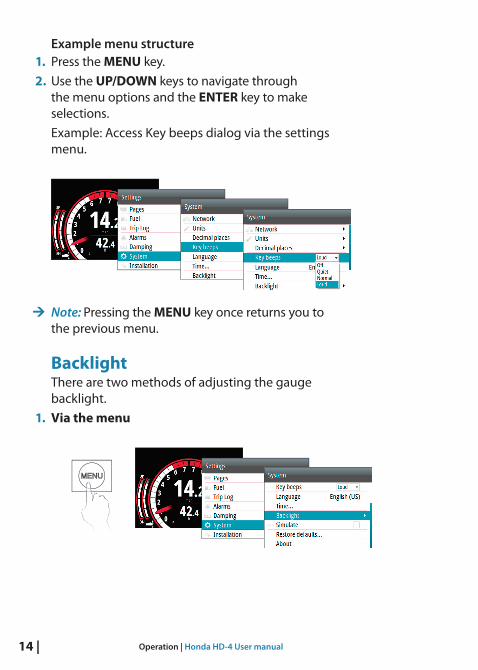
Example menu structure1. Press the MENU key.2. Use the UP/DOWN keys to navigate through
the menu options and the ENTER key to make selections.Example: Access Key beeps dialog via the settings menu.
Note: Pressing the MENU key once returns you to the previous menu.
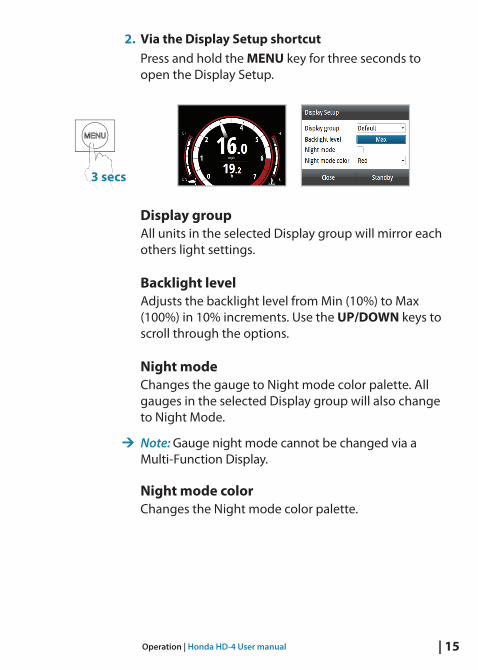
BacklightThere are two methods of adjusting the gauge backlight.
1. Via the menu
| 15Operation | Honda HD-4 User manual
2. Via the Display Setup shortcutPress and hold the MENU key for three seconds to open the Display Setup.
Display groupAll units in the selected Display group will mirror each others light settings.
Backlight levelAdjusts the backlight level from Min (10%) to Max (100%) in 10% increments. Use the UP/DOWN keys to scroll through the options.
Night modeChanges the gauge to Night mode color palette. All gauges in the selected Display group will also change to Night Mode.
Note: Gauge night mode cannot be changed via a Multi-Function Display.
Night mode colorChanges the Night mode color palette.
3 secs

16 | Operation | Honda HD-4 User manual
Pages
Static gaugeSome pages have a static gauge at the bottom of the display showing two pieces of dynamic data, engine trim, temperature and an RPM dial.
31
2 4
5
No. Description No. Description1 Dynamic data fi eld 4 Engine block temp2 Engine trim 5 RPM dial3 Dynamic data fi eld
Note: Dynamic data fi elds on the gauge pages and the static gauge automatically populate and the data type shown depends on what devices are on the network.
Static gauge dynamic data fi eld priority order1. Speed (Speed Over Ground preferred. Requires
GPS, paddle wheel, Pitot)2. Depth (Requires depth data on the network)3. RPM4. Fuel economy5. Fuel fl ow
Note: When data from two engines is displayed, only RPM, Engine trim and Engine block temp are shown.
| 17Operation | Honda HD-4 User manual
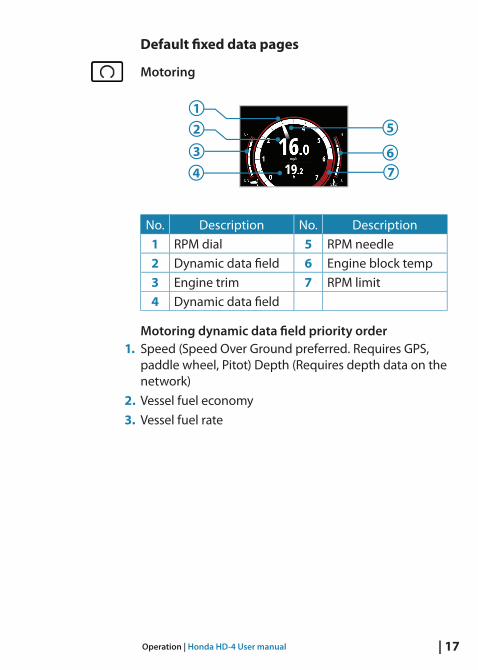
Default fi xed data pages
Motoring
3
21
6
5
74
No. Description No. Description1 RPM dial 5 RPM needle2 Dynamic data fi eld 6 Engine block temp3 Engine trim 7 RPM limit4 Dynamic data fi eld
Motoring dynamic data fi eld priority order1. Speed (Speed Over Ground preferred. Requires GPS,
paddle wheel, Pitot) Depth (Requires depth data on the network)
2. Vessel fuel economy3. Vessel fuel rate

18 | Operation | Honda HD-4 User manual
Fuel economy
3
4
5
2
1
No. Description No. Description1 Vessel fuel remaining 4 Fuel rate2 Dynamic data fi eld 5 Static gauge3 Fuel used
Fuel dynamic data fi eld priority order1. Vessel fuel economy (GPS)2. Vessel fuel economy (water)3. Vessel fuel (rate)
Note: Vessel fuel remaining will only be shown when fuel fl ow data is available and a fuel stor-age device such as a Fuel Data Manager is on the network.

| 19Operation | Honda HD-4 User manual
Engine
3
42
1
5
No. Description No. Description1-4 Dynamic data fi elds 5 Static gauge
Engine dynamic data fi eld priority order1. Engine block temp2. Alternator voltage3. Engine hours4. Engine trim
20 | Operation | Honda HD-4 User manual
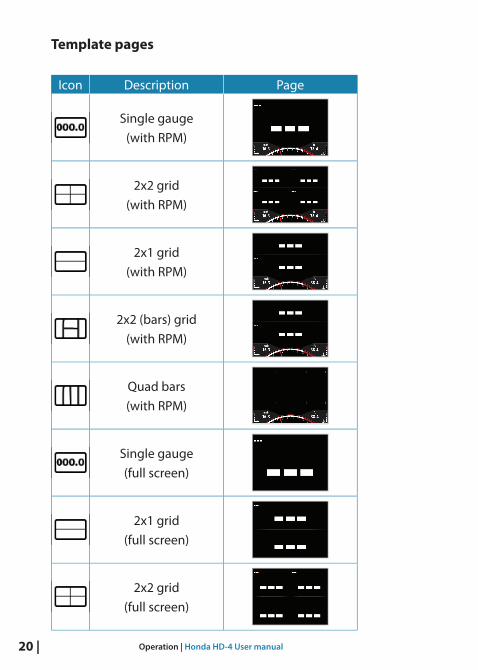
Template pages
Icon Description Page
Single gauge (with RPM)
2x2 grid(with RPM)
2x1 grid(with RPM)
2x2 (bars) grid(with RPM)
Quad bars(with RPM)
Single gauge (full screen)
2x1 grid(full screen)
2x2 grid(full screen)

| 21Operation | Honda HD-4 User manual
Enabling/disabling a pageTo enable/disable a page you need to fi rst ensure it has been added to the pages list shown in Replacing/adding a page.
1. Press the ENTER key on the desired page to open the Enabled/Replace dialog.
2. Press the ENTER key to toggle On/Off .
Replacing/adding a page1. Select the page you want to add/replace.2. Press the ENTER key to open the Enabled/Replace
dialog.

22 | Operation | Honda HD-4 User manual
3. Select the desired page from the Replace Page list.
The selected page is shown in the active pages list.
Confi guring page dataOnce selected, a template page can be confi gured to show any available system data.
Note: A template page cannot be edited until it has been selected and enabled as one of the active display pages.
1. Select a page that can be changed, i.e. 2x1 grid.2. Press the MENU key.3. Select Change data.4. Select the desired fi eld.5. Select the desired data type from the menu
options.
Once selected, a check mark appears in the check box and the gauge will revert to the page.
| 23Operation | Honda HD-4 User manual
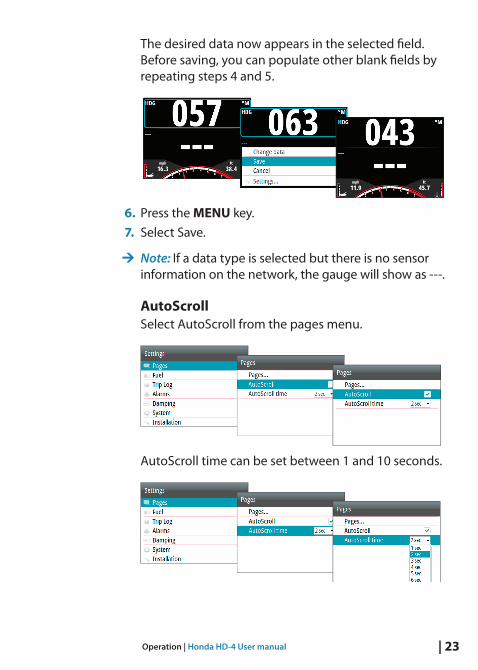
The desired data now appears in the selected fi eld. Before saving, you can populate other blank fi elds by repeating steps 4 and 5.
6. Press the MENU key.7. Select Save.
Note: If a data type is selected but there is no sensor information on the network, the gauge will show as ---.
AutoScrollSelect AutoScroll from the pages menu.
AutoScroll time can be set between 1 and 10 seconds.

24 | Operation | Honda HD-4 User manual
Trip LogThe Trip Log shows trip duration, distance, average speed and max speed from the time the Trip Log was started/reset.
Note: Trip information is calculated using GPS or the paddlewheel if GPS is not present. No Trip Log information is recorded while the Trip Log is stopped.
Start/Stop Trip LogStarts/Stops the trip log recording.
Reset Trip LogResets all trip log information to zero.

| 25Refueling | Honda HD-4 User manual
Refueling
Adding fuel for the fi rst timeTo accurately calculate fuel capacity, fi ll the tank and select Set to full in the Vessel Refuel dialog. Estimating existing fuel level incorrectly could result in inaccurate fuel remaining and fuel range calculations.
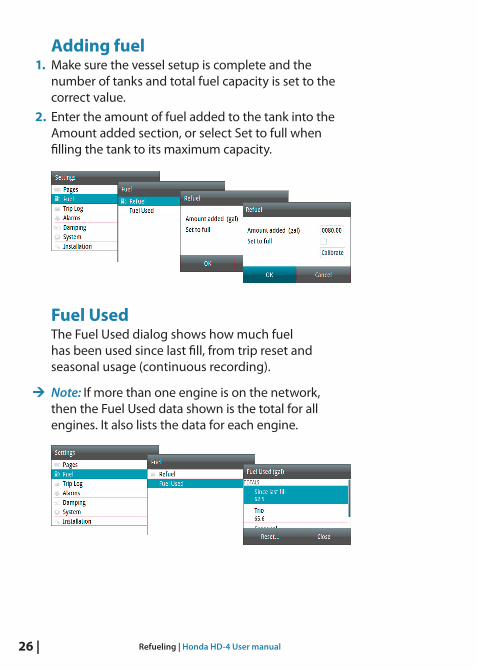
1. Make sure the vessel setup is complete and the number of tanks and total fuel capacity is set to the correct value.
Note: The number of tanks and fuel capacity can be updated using the Vessel Setup page in the installation menu, or by using the initial set-up wizard.
2. Go to the Refuel dialog via the Settings menu.
3
26 | Refueling | Honda HD-4 User manual
Adding fuel1. Make sure the vessel setup is complete and the
number of tanks and total fuel capacity is set to the correct value.
2. Enter the amount of fuel added to the tank into the Amount added section, or select Set to full when fi lling the tank to its maximum capacity.
Fuel UsedThe Fuel Used dialog shows how much fuel has been used since last fi ll, from trip reset and seasonal usage (continuous recording).
Note: If more than one engine is on the network, then the Fuel Used data shown is the total for all engines. It also lists the data for each engine.

| 27Refueling | Honda HD-4 User manual
Fuel Used ResetTo access reset to zero options, select Reset at the bottom of the Fuel Used page. Then select the desired reset option from the list.
Note: You can reset the total for one engine or all engines.
Reset option DescriptionNone Returns to Fuel Used pageTrip Reset Trip fuel used onlySeasonal Reset Seasonal fuel used onlyBoth Reset Trip and Seasonal fuel used
28 | Refueling | Honda HD-4 User manual
THIS PAGE INTENTIONALLY LEFT BLANK
| 29Settings | Honda HD-4 User manual
Settings
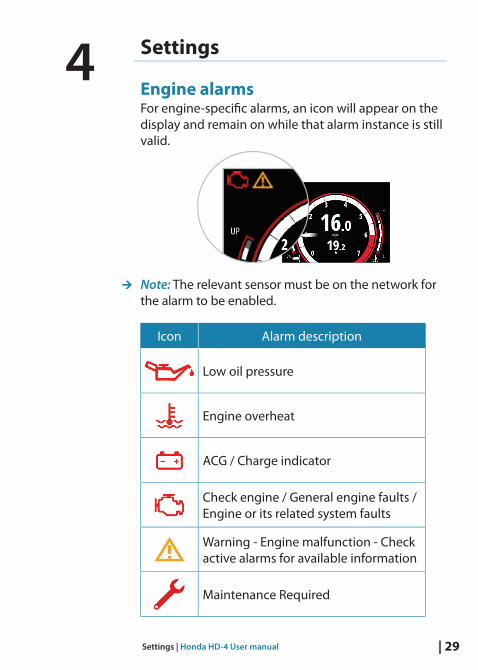
Engine alarmsFor engine-specifi c alarms, an icon will appear on the display and remain on while that alarm instance is still valid.
Note: The relevant sensor must be on the network for the alarm to be enabled.
Icon Alarm description
Low oil pressure
Engine overheat
ACG / Charge indicator
Check engine / General engine faults / Engine or its related system faults
Warning - Engine malfunction - Check active alarms for available information
Maintenance Required
4

30 | Settings | Honda HD-4 User manual
System alarmsIf a sensor is connected to the network, you can enable alarms by selecting them from the list in the Alarm Settings menu.
Enabling an alarm (alarm on/off )Turns an alarm on or off via the Alarm Settings menu.
| 31Settings | Honda HD-4 User manual
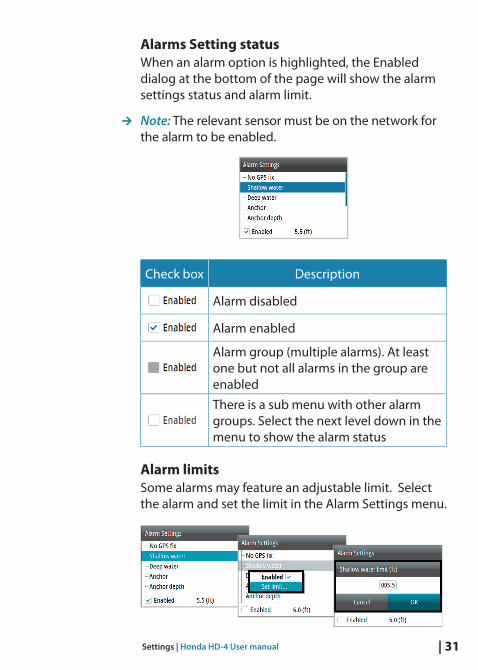
Alarms Setting statusWhen an alarm option is highlighted, the Enabled dialog at the bottom of the page will show the alarm settings status and alarm limit.
Note: The relevant sensor must be on the network for the alarm to be enabled.
Check box Description
Alarm disabled
Alarm enabled
Alarm group (multiple alarms). At least one but not all alarms in the group are enabledThere is a sub menu with other alarm groups. Select the next level down in the menu to show the alarm status
Alarm limitsSome alarms may feature an adjustable limit. Select the alarm and set the limit in the Alarm Settings menu.

32 | Settings | Honda HD-4 User manual
Alarm indicationThe alarm is triggered if any settings are exceeded. Alarms are indicated with an alarm text and an audible alarm (optional).
Acknowledging an alarmAn alarm is acknowledged by pressing the ENTER key. This removes the alarm notifi cation and silences the alarm. In some cases the alarm icon remains on the gauge until the fault is resolved.
Active AlarmsLists active alarms on the network. These alarms will be present until the alarm instance is cleared.

| 33Settings | Honda HD-4 User manual
Alarm HistoryThe alarm history can be accessed via the Alarm History menu. This stores alarm messages until they are manually cleared.
Alarm detailsSelect an alarm instance to show more details of that specifi c occurrence and the action taken.
Clear Alarm History1. Open Alarm History list.2. Press the ENTER key.3. Select Clear all.

34 | Settings | Honda HD-4 User manual
Engine alarm settingsSet all Engine Alarms on or off . If multiple engines are in use, Custom Setting can be used to select which engines alarms are on or off .
Setting Description
All All alarms for all engine are on
Custom Individually select which engines alarms will be all on or all off
Alarm SirenWhen enabled, an audible alarm sounds when an instance is triggered.
Note: The relevant sensor must be on the network for the alarm to be enabled.
| 35Settings | Honda HD-4 User manual
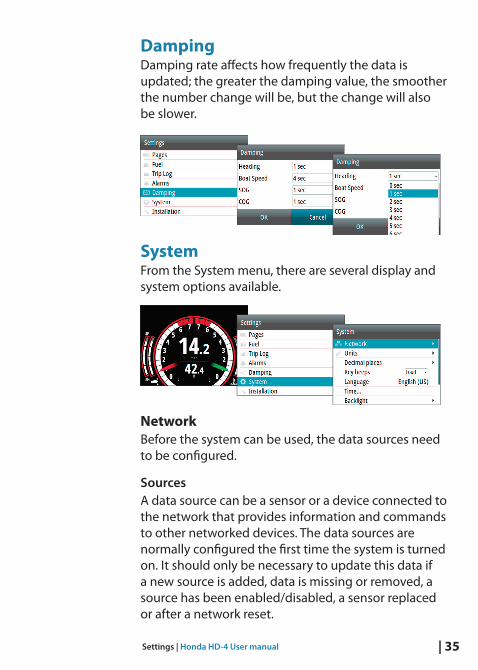
DampingDamping rate aff ects how frequently the data is updated; the greater the damping value, the smoother the number change will be, but the change will also be slower.
SystemFrom the System menu, there are several display and system options available.
NetworkBefore the system can be used, the data sources need to be confi gured.
SourcesA data source can be a sensor or a device connected to the network that provides information and commands to other networked devices. The data sources are normally confi gured the fi rst time the system is turned on. It should only be necessary to update this data if a new source is added, data is missing or removed, a source has been enabled/disabled, a sensor replaced or after a network reset.

36 | Settings | Honda HD-4 User manual
Auto SelectThe Auto Select option looks for all sources connected to the network. If more than one source is available for each item, the gauge automatically selects from the internal device priority list.
Device listShows a list of all devices connected to the network.
Selecting a device in this list brings up additional details and actions.

| 37Settings | Honda HD-4 User manual
Confi gureAll units come pre-confi gured, but they can be modifi ed once connected to the network. The example below shows how to confi gure the engine location.
Note: Confi guring the engine location correctly is im-portant when more than one engine is on the network.
Some devices show additional options specifi c to the device. For example, the Calibrate option allows easy setup of a device. Calibration options vary depending on the device.
DiagnosticsNMEA 2000® Bus diagnostic data on the network.
Units Set the unit of measurement for how you want the data to be displayed.
38 | Settings | Honda HD-4 User manual
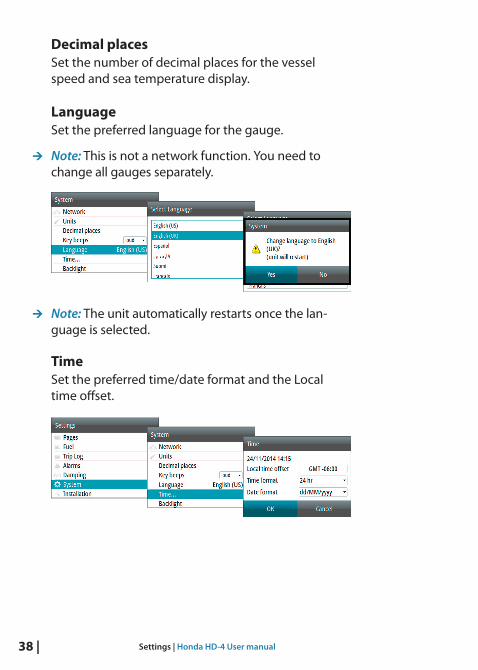
Decimal placesSet the number of decimal places for the vessel speed and sea temperature display.
LanguageSet the preferred language for the gauge.
Note: This is not a network function. You need to change all gauges separately.
Note: The unit automatically restarts once the lan-guage is selected.
Time Set the preferred time/date format and the Local time off set.

| 39Settings | Honda HD-4 User manual
SimulateSends simulated data to the gauge.
Note: All other gauges on the network continue to display the current vessel data and do not change to simulate mode. A Simulating warning box fl ashes on and off at the top of the display.
Note: To exit the simulate mode, disable the Simulate option in the System menu.
Restore defaultsRestore all system settings of the gauge to factory defaults.
Note: This is not a network function. This only resets and deletes history on the individual gauges selected.
Forced factory resetIf the gauge does not respond to the normal restore procedures, press and hold the UP/DOWN keys while powering the unit on. A beep signifi es the reset has been completed.

40 | Settings | Honda HD-4 User manual
Files Access an attached USB device, import/export system settings, template page, and vessel setup. Upgrade the software on the engine gauge and remote devices.
Note: Each gauge on the network needs to be up-graded individually.
Connecting a Micro-USB device1. Remove the USB cover from the rear of the gauge.2. Insert a USB Micro USB adaptor and mass storage
device.

| 41Settings | Honda HD-4 User manual
Export system settings1. Insert a USB Micro USB adaptor and mass storage
device.2. Go to the Files menu.3. Select System Settings.4. Press the ENTER key to export system settings to the
USB mass storage device.
Import system settings1. Insert a USB Micro USB adaptor and mass storage
device.2. Go to the Files menu.3. Select the Settings.iset fi le from the USB memory,
the details dialog will appear. Press the ENTER key to confi rm import.
Note: Importing system settings overwrites all existing system settings and restarts the gauge!
42 | Settings | Honda HD-4 User manual
Software
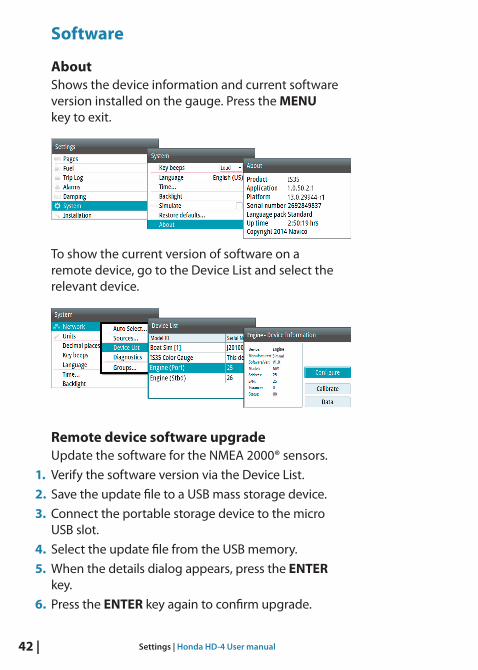
AboutShows the device information and current software version installed on the gauge. Press the MENU key to exit.
To show the current version of software on a remote device, go to the Device List and select the relevant device.
Remote device software upgradeUpdate the software for the NMEA 2000® sensors.
1. Verify the software version via the Device List.2. Save the update fi le to a USB mass storage device.3. Connect the portable storage device to the micro
USB slot.4. Select the update fi le from the USB memory.5. When the details dialog appears, press the ENTER
key.6. Press the ENTER key again to confi rm upgrade.
| 43Settings | Honda HD-4 User manual
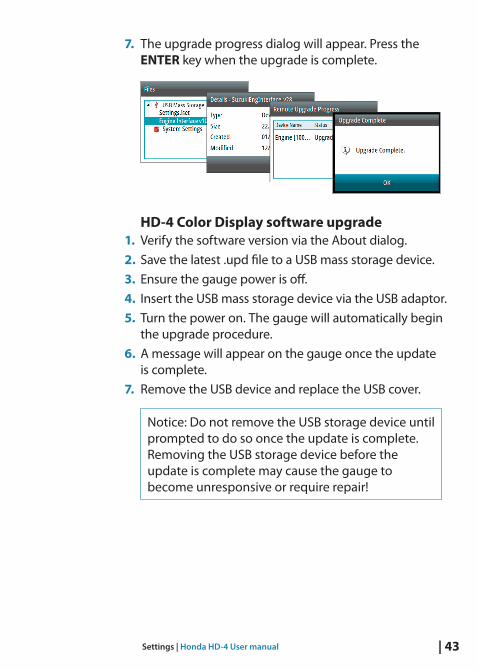
7. The upgrade progress dialog will appear. Press the ENTER key when the upgrade is complete.
HD-4 Color Display software upgrade1. Verify the software version via the About dialog.2. Save the latest .upd fi le to a USB mass storage device.3. Ensure the gauge power is off .4. Insert the USB mass storage device via the USB adaptor.5. Turn the power on. The gauge will automatically begin
the upgrade procedure. 6. A message will appear on the gauge once the update
is complete.7. Remove the USB device and replace the USB cover.
Notice: Do not remove the USB storage device until prompted to do so once the update is complete. Removing the USB storage device before the update is complete may cause the gauge to become unresponsive or require repair!

44 | Settings | Honda HD-4 User manual
THIS PAGE INTENTIONALLY LEFT BLANK

| 45Maintenance | Honda HD-4 User manual
MaintenanceIf the gauge needs to be cleaned, use fresh water and a mild soap solution (not a detergent). Avoid using chemical cleaners containing hydrocarbons, such as diesel, gasoline etc.
Checking the keysMake sure that none of the keys are stuck in the down position.
Checking the connectorThe connector should be checked by visual inspection only. Ensure that the cable is connected correctly and the USB port cover is in place.
5

46 | Maintenance | Honda HD-4 User manual
THIS PAGE INTENTIONALLY LEFT BLANK

| 47Specifi cations | Honda HD-4 User manual
Specifi cations
Mass (weight) 0.28 kg (0.60 lbs)Power consumption
130 mA at 13.5VNMEA 2000® Load Equivalency
Number (LEN): 3Network load Maximum 10 gaugesColor BlackDisplay
Size 3.5” (Diagonal) 4:3 Aspect ratioType Transmissive TFT-LCD
White LED back-lightResolution 320 x 240 pixelsIllumination White (day mode)
Red/Green/Blue (night mode)Environmental Protection IPX7
Safe distance to compass 0.3 m (1.0 ft)
TemperatureOperating -15 to +55ºC (+5 to +131ºF)Storage -25 to +65ºC (-13 to +149ºF)
6

48 | Specifi cations | Honda HD-4 User manual
THIS PAGE INTENTIONALLY LEFT BLANK

| 49Distributor’s Limited Warranty | Honda HD-4 User manual
Distributor’s Limited Warranty
Accessories and Replacement PartsThis warranty is limited to Honda Marine parts, accessories and apparel when distributed by American Honda Motor Co., Inc., 1919 Torrance Blvd., Torrance, California 90501-2746.Length of Warranty: (from date of original retail purchase):NON-COMMERCIAL - 12 monthsCOMMERCIAL/RENTAL - 3 monthsSTATE/LOCAL/FEDERAL GOVERNMENT - 3 months
To Qualify for This Warranty:1. The accessories or replacement parts must be
purchased from American Honda or a dealer, distributor, or distributor’s dealer authorized by American Honda to sell those products in the United States, Puerto Rico, and the U.S. Virgin Islands. Parts and Accessories must be purchased for installation on original Honda equipment or engines to be eligible for warranty coverage. Installing Parts and Accessories on non-Honda products or engines voids this warranty.
2. You must be the fi rst retail purchaser. This warranty is not transferable to subsequent owners.
7
50 | Distributor’s Limited Warranty | Honda HD-4 User manual
What American Honda Will Repair or Replace Under Warranty:American Honda will repair or replace, at its option, any marine product accessories or replacement parts that are proven to be defective in material or workmanship under normal use during the applicable warranty time period. Anything replaced under warranty becomes the property of American Honda Motor Co., Inc.All parts replaced under warranty will be considered as part of the original product and any warranty on those parts will expire coincidentally with the original product warranty.Accessories and replacement parts, installed by a dealer who is authorized by American Honda to sell them, will be repaired or replaced under warranty without charge for parts or labor. If installed by anyone else, accessories and replacement parts will be repaired or replaced under warranty without charge for parts, but any labor charges will be the responsibility of the purchaser.
To Obtain Warranty Service:You must, at your expense, take the Honda Outboard Motor product accessory or replacement part or the outboard motor or boat on which the accessory or replacement part is installed, and proof of purchase to any Honda Marine authorized service facility or dealer in the United States, Puerto Rico, or the U.S. Virgin Islands, during normal business hours.
| 51Distributor’s Limited Warranty | Honda HD-4 User manual
Exclusions:This warranty does not extend to accessories or parts aff ected or damaged by collision, normal wear, use in an application for which the product was not designed or any other misuse, neglect, incorporation or use of unsuitable attachments or parts, unauthorized alteration, improper installation, or any causes other than defects in material or workmanship of the product. Installing parts and accessories on non-Honda products or engines voids this warranty.
Disclaimer of consequential damage and limitation of implied warranties:American Honda disclaims any responsibility for loss of time or use of the outboard motor, or the boat on which the product is installed, transportation, commercial loss, or any other incidental or consequential damage. Any implied warranties are limited to the duration of this written warranty. Some states do not allow limitations on how long an implied warranty lasts and/or do not allow the exclusion or limitation of incidental or consequential damages, so the above exclusions and limitations may not apply to you.This warranty gives you specifi c legal rights, and you may also have other rights, which vary from state to state.
52 | Distributor’s Limited Warranty | Honda HD-4 User manual
NOTES


www.marine.honda.comPOM54790.MID.160.2017.03
*988
-114
27-0
02*