hatching classroom projects - 4-h
TRANSCRIPT

HatchingHatchingClassroomProjects
Helper's GuideBeginner
Grades 2-5Helper's Guide
Beginner
Grades 2-5
National 4-H CurriculumBU-07595

Dear Educator,
Embryology: Hatching Classroom Projects designed to provide you with backgroundinformation and exciting experiential activities dealing with life science for use in yourclassroom. Each activity is designed to be grade-level appropriate and has been correlated to U.S. National Science Education Standards.
Children have a natural sense of curiosity about living things in the world around them.Building on this curiosity, students can develop an understanding of biology through directexperience with living things, their life cycles and their habitats. This curriculum was developedwith your students in mind. Many believe students learn best by interacting with the world—by listening, observing, experimenting and applying their knowledge to real-world situations.Each activity within this curriculum follows these steps in the experiential learning model.
An additional goal of this curriculum is to help students develop life skills. Life skills help anindividual live a productive and satisfying life. Within this curriculum your students will have the opportunity to develop life skills related to science processes, managing, thinking, working,relating and living a healthy lifestyle.
We hope that Embryology: Hatching Classroom Projects is an enjoyable experience for bothyou and your students as well as a beneficial unit in your life science curriculum. Here are afew quotes from kids who worked with our pilot:
The best part of learning about chickens and embryos was...
“Watching the eggs hatch and getting to play with the littlechicks.”
“Seeing the cute little chicks after they hadhatched.”
“Seeing how the embryos develop insidethe shells. I also liked watching thechicks get their first white feathers andsee them grow.”
“It was fun the whole time.”
“The best part was seeing how thechick hatched. It was cool how itpecked its way around the shell.”
“The best thing was when theyhatched. It was really exciting.I also liked learning abouthatching eggs. I learned so much that I didn't know before.”
AcknowledgementsDesign Team: Phillip J. Clauer, Design Team
Chairperson, Extension Poultry Specialist, Virginia Tech;Donna Bailey, 4-H Extension Agent, Maryland; Caitlin Boon,
Poultry Science Student; Debbie Curry, Vice President Programs and Education, Discovery Place, Inc., Nature Museum;Gary Davis, Extension Poultry Specialist, NC State University;Mickey Hall, Extension Poultry Specialist, Clemson; Ed Maxa, Extension 4-H Specialist, NC Cooperative Extension Service.
Writing: Mark JostEditing: Kate McCarthyPhotography: Mark Sumner, Virginia TechDesign and Production: Northern Design Group, MN
Other assistance from:Tom Zurcher Jim Adams Pam Segall–Roberts

1
Table of ContentsIntroduction
Embryology and the National Science Standards _______ 2
Experiential learning model ________________________ 3
Life skill development_____________________________ 4
Science skills ___________________________________ 4
Activity matrix___________________________________ 5
Getting organizedPlanning and scheduling __________________________ 6
Background for a successful project__________________ 7
The reproductive system and fertilization_____________ 10
Daily embryonic development _____________________ 12
The activitiesEggsploring the egg_____________________________ 14
Pick a chick ___________________________________ 16
Warming up with eggs ___________________________ 18
Building an eggs-ray viewer_______________________ 20
Playing peek-a-boo with embryos __________________ 22
Building a home ’tweet home______________________ 24
Counting the chicks _____________________________ 26
Caring and handling_____________________________ 28
Eggsploring careers_____________________________ 30
References Glossary______________________________________ 32
Student assessment rubric _______________________ 34
Reproducible student activity sheets ________________ 36
Embryology record sheet _________________________ 42
Resources ____________________________________ 44
Insert: A Closer Look embryology poster
HatchingClassroomProjects
2
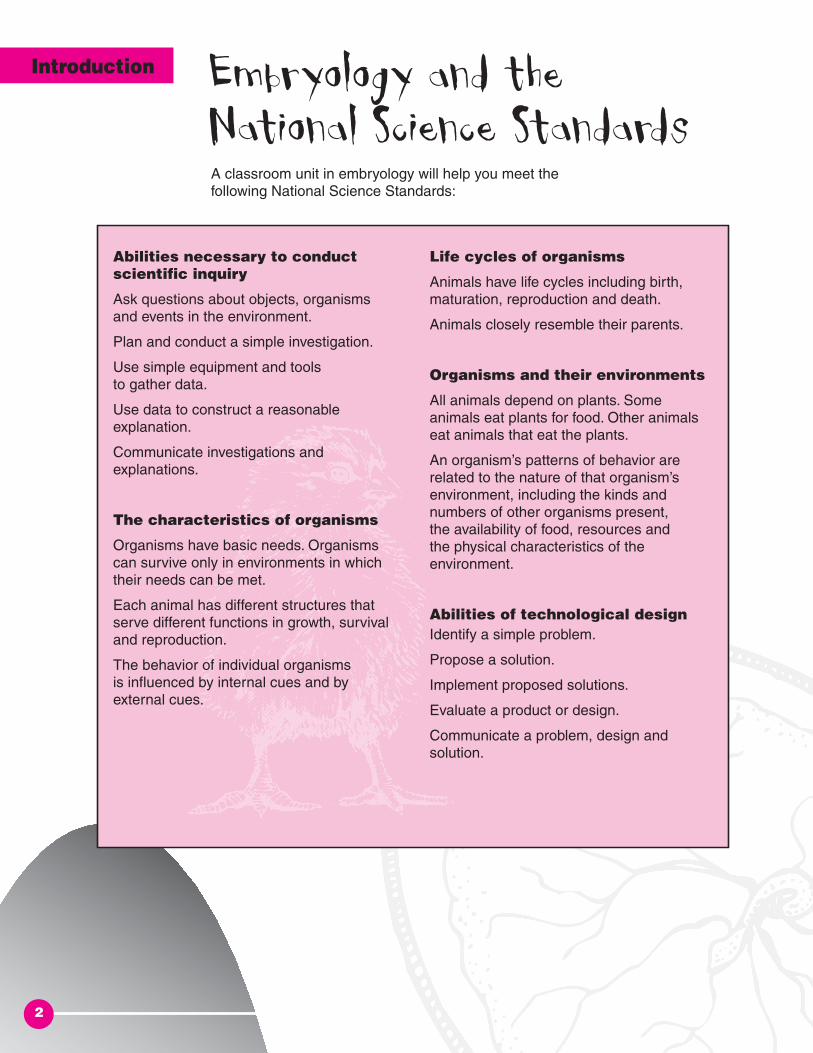
Embryology and the National Science StandardsA classroom unit in embryology will help you meet thefollowing National Science Standards:
Abilities necessary to conductscientific inquiry
Ask questions about objects, organismsand events in the environment.
Plan and conduct a simple investigation.
Use simple equipment and tools to gather data.
Use data to construct a reasonableexplanation.
Communicate investigations andexplanations.
The characteristics of organisms
Organisms have basic needs. Organismscan survive only in environments in whichtheir needs can be met.
Each animal has different structures thatserve different functions in growth, survivaland reproduction.
The behavior of individual organisms is influenced by internal cues and byexternal cues.
Life cycles of organisms
Animals have life cycles including birth,maturation, reproduction and death.
Animals closely resemble their parents.
Organisms and their environments
All animals depend on plants. Someanimals eat plants for food. Other animalseat animals that eat the plants.
An organism’s patterns of behavior arerelated to the nature of that organism’senvironment, including the kinds andnumbers of other organisms present, the availability of food, resources and the physical characteristics of theenvironment.
Abilities of technological designIdentify a simple problem.
Propose a solution.
Implement proposed solutions.
Evaluate a product or design.
Communicate a problem, design andsolution.
Introduction

3
Experiential learning means having students do hands-onactivities, reflect on the meaning and apply what theylearned. This process helps ensure that the students learnactively and make knowledge a part of their world. It alsohelps students answer questions such as “Why should Ilearn this?” and “Now that I know this, what do I do next?”
Experiential learning model
Pfeiffer, J.W., & Jones, J.E., “Reference Guide to Handbooks andAnnuals” © 1983 John Wiley & Sons, Inc. Reprinted with permission
of John Wiley & Sons, Inc.
Pfeiffer and Jones’ Model
ExperienceThe model begins with experience,action. This immediately focuses theattention on the learner rather than the teacher. This requires active co-operation from the learner, coupledwith guidance from the teacher to help maintain the learner’s curiosity.Teaching becomes a cooperativeenterprise.
ShareSharing is simply asking the group orindividuals, What did you do? Whathappened? What did it feel like to do(whatever)? This step should generatelots of information to lead to theprocess step.
ProcessThe questions and discussion nowbecome more focused on what wasmost important about the experience.Common themes that emerge from thesharing session are explored further.Often the key teaching points relatedto the subject matter are discussed.
GeneralizeIn this step the experience is related toa real-world example. This step helpsthe student to answer the questions,Why should I learn this? What did theexperience mean to me personally? Tomy everyday life? Subject matter andlife skill development can be discussedin this step. For example, if you hopethat the activity helps students developteamwork skills, then questions aboutteamwork would be appropriate.
ApplyThis step helps the student answer thequestion, Now that I know this, what doI do next? Can students express whatthey learned? Can they use what theylearned? Can the student actuallyapply the learning to a new situation?
Providing an experience alone does not create“experiential learning.” The activity comes first. Thelearning comes from the thoughts and ideas createdas a result of the experience. This is a “learn by doing”or experiential process. Addressing each step in the process assures a purposeful plan to obtain aspecific goal.
Applywhat was learned
to a similar ordifferent situation;
practice
Share the results,reactions,
observationspublicly
Experiencethe activity; perform,
do it
Generalize to connect theexperience to
real-world examples
Processthe experience;
discuss, analyze,reflect
1.
5. 2.
3.4.
Experiential Learning
Model

4
These skills represent the scientific thinking and process skills that are essential to scientificinquiry. An inquiry based science classroom usesand encourages the use of these skills in science activities.
Observing – Generating reasonable questions aboutthe world based on observation.
Examples:Seeing, hearing, tasting, smelling and feeling.
Comparing and measuring – Using simplemeasurement tools to provide consistency in an investigation.
Examples:Sensory observations, weight, quantity, quality,temperature and capacity.
Relating – Developing solutions to unfamiliarproblems through reasoning, observation and experimentation.
Examples:Asking questions, making a hypothesis,understanding relationships, designing andconducting simple investigations, identifying thecontrol and variables in an investigation.
Life skilldevelopment
Scienceskill
A skill is a learned ability to do something well. Lifeskills are abilities we can learn that will help us to besuccessful in living a productive and satisfying life.The following is a list of skills that students willdevelop through experiencing the activities withinthis curriculum. Also included is a set of criteria thatcan act as indicators to determine if the life skill isbeing developed.
Planning and organizing –A method for doingsomething that has been thought out ahead of time; how the parts can be put together.
Indicator:Student can develop a part of a plan.
Keeping records – Recording selected usefulinformation, usually focused for a specific purpose.
Indicator:Student is able to categorize information andselect useful information.
Teamwork –Work done by two or more people,each doing parts of the whole task. Teamworkinvolves communicating effectively, identifying andagreeing on a common task, dividing a task byidentifying contributions by each person, acceptingresponsibility for one’s part of the task, workingtogether to complete the task and sharingaccomplishment.
Indicator:Understands roles as essential and enjoysworking together with others of similarinterests/abilities.
Poultry incubation

55
The Activities Embryology Skill Life Skill Science Skill
Eggsploring the egg Identifying Learning to learn ObservingPage 14
parts of eggs
Pick a chick Selecting chicken breeds Communication and CategorizingPage 16 by characteristics decision making
Warming up with eggs Incubation of Planning and organizing ObservingPage 18 fertile eggs
Building an Preparing a candler Relating to others, Comparing andeggs-ray viewer cooperation measuring
Page 20
Playing peek-a-boo Observation of Record keeping Observing,with embryos embryos communicating, relating
Page 22
Building a home Preparing a brooder Planning and Comparing and‘tweet home organizing measuring
Page 24
Counting the chicks Connecting embryology Record keeping Comparing andPage 26 and math measuring
Caring and handling Handling chicks Relating to others Observing andPage 28 safely communicating
Eggsploring careers Exploring careers in Developing NonePage 30 the poultry industry teamwork

6
One to six months before you plan to start the project□ Plan the exact dates during which you wish
to do this project.
Dates of the embryology project:
______________________ to ________________________ .
□ Before you order eggs, decide what you will dowith the chicks that hatch. Contact a farmer, zooor other animal caretakers who are equipped toproperly care for the chicks.
The chicks will be placed with______________________________________________________.
□ To insure egg availability, order the eggs at leastone to three months in advance of the day youplan to set them.
□ Secure an incubator at least a month before thestart of the project and be sure it worksproperly.
□ Read the lesson plan and secure any materialsyou will need at least a month before the projectbegins.
Starting the project□ Set up the incubator in a safe area and start
running it 48 hours before eggs are to arrive.□ Prepare the students a few days before the
project begins. Help them understand theprinciples of incubation and embryology.Discuss what the class wishes to accomplishand what role they will play in reaching thegoals of the project. This includes preparingcalendars and other project resources.
□ If your class plans to incubate eggs, prepare the eggs for incubation.
□ Turn the eggs three times daily.□ Keep water pans full at all times. Always add
water that is warm to the touch.□ Keep daily records of all activities involving the
eggs (i.e., turning, temperature, water added,candling, and other activities). These recordsare extremely helpful for trouble-shootingcauses of poor hatches.
□ Candle the eggs every three days to checkprogress.
□ Stop turning eggs three days (after 18 days for chicken eggs) prior to expected hatch.
□ Prepare brooder box at least two days prior to expected hatch.
□ Remove the chicks from the incubator and placethem in a warm brooder within two to six hoursafter they hatch.
□ Remove and discard all remaining unhatchedeggs 60 hours after the first chick hatches,then disconnect incubator power.
□ Clean and disinfect the incubator as soon as the power is disconnected.
□ Let the incubator dry. Then store it in a safe,cool and dry place.
Planning and schedulingchecklist
Planning is crucial to the success of an embryology project.Use this section as a checklist to help you plan the project activities.
As you complete each part check it off so you know what has been finished.Other important details to assist you with this project follow this checklist.
6
Getting Organized

7
Important procedures to consider A. Plan the exact dates for your project. Many teachers
use this material as a supplement to a specificcurriculum like biology, human sexuality, humandevelopment or other related topics. It is extremelyimportant that you understand that this is acontinuous project for at least a 25-day period.Plan the project around holidays and testing periods.It is usually best to plan to set your eggs on a Tuesday.This allows you to prepare on Monday and insuresthat the chicks will not hatch on a weekend.
B. To prevent bacterial contamination, make sure that allstudents and teachers wash their hands afterhandling the eggs, raw egg products, incubated eggs,chicks and litter.
C. Before you order eggs, plan what you will do with the chicks that hatch. Contact a farmer, zoo or otheranimal caretakers who are equipped to care for thechicks properly. NEVER allow chicks to go home with students from your class. It is your responsibility to make sure that the chicks get a good home.
About the eggsA. Obtaining fertile hatching eggs. Locating fertile
eggs may present a problem, especially in an urbanarea. Most eggs sold in grocery stores are not fertile and cannot be used for incubation.Fertile eggs can usually be obtained fromhatcheries or poultry breeding farms. Largehospitals may also be able to provide them.Contact your local Extension office for suggestions.
1. For a basic observation and hatching project,12 eggs per incubator are adequate. If you are planning to do an experiment or activities,additional eggs may be required.
2. When you obtain fertile eggs from a sourcethat does not routinely hatch its own eggs, youmay want to test the eggs in an incubator toensure that good fertility and hatchability canbe obtained before you use the eggs as partof the class project. The presence of a malewith a laying hen does not guarantee fertility orhatchability.You are also strongly encouragedto use chicken or coturnix quail eggs to hatchin the classroom. Duck, goose, pheasant andother species of fowl can be more difficult tohatch in classroom incubators. Duck andgoose eggs often rot and may explode in theincubator.
3. When you have located a source of fertileeggs, pick them up yourself, if possible, rather than have them shipped or mailed.It is difficult for hatcheries, the postal serviceand transportation companies to properlyhandle small orders of eggs.
B. Caring for eggs prior to incubation. Timing,temperature and position are critical to safe storage.
1. The eggs should be collected within four hoursafter they are laid.
2. If it is necessary to store fertile eggs beforesetting, store small end down at a temperaturebetween 50 and 65°F and at 70 percenthumidity.
3. Never store eggs more than 10 days after theeggs are laid. Hatchability drops quickly if theyare stored for more than 10 days.
4. Transport fertile eggs in a protective carton, smallend down. Do not leave eggs in the sun or a hotcar. In winter, don’t let the eggs get below 35°F.
5. It is always best to set the fertile eggs in aheated incubator within 24 hours of obtainingthem.
7
Background for a successful project

X0
8
About the incubator and incubation
A. Secure an incubator and make sure it is in goodworking order.You may choose a new or usedincubator.
1. If buying a new incubator, order at least onemonth prior to the start of the project. Forced airincubators (with a fan to circulate the air) arebest. Once the new incubator arrives, assemble if necessary and follow instructions for operation.
2. Used incubators should be checked one monthprior to the start of the project. Make sure yourequipment is clean and working correctly. Thiswill allow you time to order parts or a newincubator if necessary.
B. Turn the incubator on a couple of weeks before theproject starts and run it for 48 hours to insure thateverything is working properly. Once you know it is in proper working order, unplug and set in a safearea until a few days before the start of the project.
C. Inform the administration and maintenance staff thatyou are doing this project and ask them to tell you if the electricity needs to be shut off for any reason.
D. Proper incubator placement in the classroom helpsavoid problems.
1. Set up the incubator in a room that stays above65°F.
2. Make sure the electrical outlet that you are usingwill be “on” 24 hours a day. Some schools turnoff entire sections of the school at night and onweekends.
3. Place the incubator on a sturdy level surface.
4. Place the incubator at least six inches awayfrom the edge of the surface to avoid accidentalbumps.
5. Avoid high traffic areas, hot sunny windows,heating and cooling vents, drafty windows anddoors.
E. Turn incubator on 36 to 48 hours prior to setting theeggs.
1. Adjust the incubator so it holds the desiredtemperature. Follow manufacturer guidelines for adjusting the temperature. In still-air units(without fans) adjust the temperature to 101°F.In forced-air units (with fans), adjust thetemperature to 100°F. Always adjust thethermostat so the heat source goes off when the temperature reaches the desired temperatureand comes on when the temperature drops belowthe desired temperature.
2. Use at least two thermometers to insure you are getting an accurate temperature reading.
3. Check the temperature often. Impropertemperature can result in a poor hatch andweak chicks.
C. Preparing the eggs for incubating. Fertile eggsfrom a commercial hatchery are usually alreadypresorted. However, it is usually wise to check youreggs before setting them.
1. Candle eggs prior to setting to check for crackedeggs, thin-shelled eggs and double-yolked eggs.Do not incubate these eggs since they usuallydo not hatch.
2. Do not wash the eggs unless necessary. Theeggs have a natural protective coating that isremoved by washing. Only wash eggs that arevisibly dirty. Then wipe the egg clean with a wetcloth warmer (at least 10 degrees warmer) thanthe temperature on the eggs. Do not set eggsthat are excessively dirty.
3. Bring fresh eggs to be placed in the incubator to room temperature two hours prior to setting.
4. Mark the eggs with “X” and “O” on oppositesides to aid in daily turning. Also, number theeggs on the top of the large end to aid inidentification and record keeping during theproject. When marking eggs always use a pencilor wax crayon. Do not use permanent or toxicink pens or markers.
5. Eggs that are warmed to room temperatureshould be immediately placed in the incubator.
8
Setting eggs thatare marked withX’s and O’s.
Do not setcracked eggs.

99
During incubation
A. Turn the eggs three times daily. Stop turning eggsthree days (after 18 days for chicken eggs) prior to expected hatch. Remember to wash hands.
B. Keep water pans full at all times. Always add waterthat is warm to the touch. It is best to add the waterwhen you open the incubator to turn the eggs.
C. Keep daily records of all activities involving the eggs(i.e., turning, temperature, water added, candling,and other activities). These records are extremelyhelpful for trouble-shooting causes of poor hatches.
D. Candle the eggs every three days to check progress.
E. Stop turning eggs three days (after 18 days forchicken eggs) prior to expected hatch.
F. Never help the chicks from the shell.
G. Remove the chicks from the incubator and placethem in a warm brooder within two to six hours after they hatch. If your incubator has good levels of humidity the chicks may not dry in the incubator.They will dry once moved to the brooder.
H. Remove and discard all remaining unhatched eggs60 hours after the first chick hatches, then disconnectincubator power.
I. Clean and disinfect the incubator as soon as thepower is disconnected. Once the dirt has dried to thesurface, it becomes difficult to remove.
J. Let the incubator dry. Then store it in a safe, cool anddry place.
Brooding the chicks
A. Make sure the brooder box is working 2 to 4 daysprior to hatch.
B. Brooders should maintain a temperature of 92 to 95°F(taken at one inch above the floor level, the height of the chick’s back) during the first week. If you keep the chick beyond the first week, decrease thetemperature 5°F per week until room temperature is reached.
C. The brooder should have textured, absorbent litter on the floor. If the floor is slippery, the chicks candamage their legs. Pine or cedar shaving or texturedpaper towel work best in the classroom.
D. Feed 18 to 22 percent protein chicken starter food.This completely balanced ration can be obtained fromany feed and garden store. The feed can be placed in jar lids, egg cartons, small tuna-sized cans or acommercial chick feeder.
E. Water should be available at all times. Use wateringequipment that will not allow the chick to get into thewater and drown. Commercially made water fountainsfor use with a quart jar work best. If you need to usea watering device that is not proven, it is recommendedthat you place clean marbles or gravel in the water so the chicks can drink between them but not get intothe water and drown.
F. Clean the waterer and brooder daily. This will preventodors and keep the brooder dry. Dampness providesfavorable conditions for the development of moldsand bacteria.
Turn eggthree timesdaily untilthe 18th day.
The end result:A newly hatched chick.

The henThe reproductive system of the female chicken is in two parts: the ovary and oviduct. Unlike most femaleanimals, which have two functioning ovaries, the chickenusually has only one. The right ovary stops developingwhen the female chick hatches, but the left one continuesto mature.
The ovary is a cluster of sacs attached to the hen’s backabout midway between the neck and the tail. It is fullyformed when the chick hatches and contains severalthousand tiny ova—each ovum within its own follicle. Asthe female reaches maturity, these ova develop a few at a time into yolks. (Figure 7)
The oviduct is a tube-like organ lying along the backbonebetween the ovary and the tail. In a mature hen, it is about25 to 27 inches long. The yolk is completely formed in theovary. When a yolk is fully developed, its follicle ruptures atthe stigma line, releasing it from the ovary. It then entersthe infundibulum, the entrance of the oviduct (Figure 8).
The other parts of the egg are added to the yolk as itpasses through the oviduct. The chalazae, albumen, shellmembranes and shell then form around the yolk to makethe complete egg, which is then laid. This complete cycleusually takes from 23 to 32 hours. About 20 minutes afterthe egg is laid, another yolk is released and the processrepeats itself. Development takes place as follows:
10
The roosterThe male fowl has two testes along its back. These neverdescend into an external scrotum, as do those of otherfarm animals. A testis consists of a large number of veryslender, convoluted ducts. The linings of these ducts give off sperm. The ducts eventually lead to the ductusdeferens, a tube that conducts the sperm to a smallpapilla. Together, the two papilla serve as an intermittentorgan. They are on the rear wall of the cloaca.
The rooster responds to light in the same way as the hen.Increasing day length causes the pituitary to releasehormones. These, in turn, cause enlargement of thetestes, androgen secretion and semen production, whichstimulates mating behavior.
The reproductive systemand fertilization
Parts Length Time Functionof oviduct of part there of part
Infundibulum 2 in. 15 min. Picks up yolk, egg fertilized
Magnum 13 in. 3 hr. 40–50% of white laid down,thick albumen
10% albumen shellIsthmus 4 in. 11/4 hr. membrane laid down,
shape of egg determined
40% of albumen, shellUterus 4.2 in. 203/4 hr. formed, pigment of
cuticle laid down
Vagina and 4 in. — Egg passes throughcloaca as it is laid
Figure 7 – Ovary
Figure 8 – Oviduct

11
How eggs are fertilizedEach gender, the rooster and the hen, contributessomething to the egg. The rooster provides sperm;the hen provides an ovum. When a rooster mates with a hen, it deposits sperm in the end of the oviduct. Thesesperm, containing male germ cells, travel the length ofthe oviduct and are stored in the infundibulum. On thesurface of every egg yolk there can be seen a tiny,whitish spot called the blastodisc. This contains a singlefemale cell. If sperm is present when a yolk enters theinfundibulum, a single sperm penetrates the blastodisc,fertilizing it and causing it to become a blastoderm.Technically, the blastoderm is the true egg. Shortly afterfertilization, the blastoderm begins to divide into two,four, eight and more cells. The first stages of embryonicdevelopment have begun and continue until the egg is laid. Development then subsides until the egg isincubated. The joining of sperm and ovum is calledfertilization. After fertilization, the egg can develop andbecome a chick.
The rooster must be present for an egg to be fertilized.Supermarket eggs are from hens that are raised withouta rooster. Roosters are not necessary at farms whereeggs are produced for people to consume. Eggs forincubation are grown at special farms called breederfarms where roosters are with the hens.
Development during incubationAs soon as the egg is heated and begins incubation, the cluster of cells in the blastoderm begins to multiplyby successive divisions. The first cells formed are alike.Then, as the division of cells progresses, somedifferences begin to appear.
These differences become more and more pronounced.Gradually the various cells acquire specific characteristicsof structure and cell grouping or layer. These cellgroupings are called the ectoderm, mesoderm andendoderm. These three layers of cells constitute thematerials out of which the various organs and systemsof the body develop.
From the ectoderm, the skin, feathers, beak, claws,nervous system, lens and retina of the eye, linings of themouth and vent develop. The mesoderm develops intothe bone, muscle, blood, reproductive and excretoryorgans. The endoderm produces the linings of thedigestive tract and the secretory and respiratory organs.
Development from a single cell to a pipping chick is acontinuous, orderly process. It involves many changesfrom apparently simple to new, complex structures.From the structures arise all the organs and tissues of the living chick.
Physiological processes within the eggMany physiological processes take place duringthe transformation of the embryo from egg to chick.These processes are respiration, excretion, nutritionand protection.
For the embryo to develop without being connected to the hen’s body, nature has provided membranesoutside the embryo’s body to enable the embryo to useall parts of the egg for growth and development. These“extra-embryonic” membranes are the yolk sac, amnion,chorion and allantois.
The yolk sac is a layer of tissue growing over thesurface of the yolk. Its walls are lined with a specialtissue that digests and absorbs the yolk material toprovide food for the embryo. As embryonic developmentcontinues, the yolk sac is engulfed within the embryoand completely reabsorbed at hatching. At this time,enough nutritive material remains to feed the chick forup to three days.
The amnion is a transparent sac filled with colorlessfluid that serves as a protective cushion during embryonicdevelopment. This amniotic fluid also permits thedeveloping embryo to exercise. Specialized musclesdeveloped in the amnion gently agitate the amnioticfluid. The movement keeps the growing parts free fromone another, preventing adhesions and malformations.
The chorion contains the amnion and yolk sac. Initially,the chorion has no apparent function, but later theallantois fuses with it to form the choric-allantoicmembrane. This enables the capillaries of the allantoisto touch the shell membrane, allowing calciumreabsorption from the shell.
The allantois membrane has many functions. It:
• serves as an embryonic respiratory organ
• receives the excretions of the embryonic kidneys
• absorbs albumen, which serves as nutriment (protein)for the embryo
• absorbs calcium from the shell for the structuralneeds of the embryo.
The allantois differs from the amnion and chorion in thatit arises within the body of the embryo. In fact, its closestportion remains within the embryo throughout thedevelopment.

Daily embryonicdevelopmentBefore egg laying• Fertilization.
• Division and growth of living cells.
• Segregation of cells into groups with special functions.
Between laying and incubation• Very little growth; inactive stage of embryonic life.
During incubation Day 1
Major developments visible under microscope:
18 hours — Appearance of alimentary tract.
19 hours — Beginning of brain crease.
20 hours — Appearance of vertebral column.
21 hours — Beginning of formation of brain and nervoussystem.
22 hours — Beginning of formation of head.
23 hours — Appearance of blood island.
24 hours — Beginning of formation of eyes.
Day 2
24 hours — Embryo begins to turn on left side.
24 hours — Blood vessels appear in the yolk sac.
24 hours — Major developments visible under microscope.
25 hours — Beginning of formation of veins and heart.
30 hours — Second, third and fourth vesicles of brainclearly defined, as is the heart, which starts to beat.
35 hours — Beginning of formation of ear pits.
36 hours — First sign of amnion.
46 hours — Formation of throat.
Day 3 (see figure)
Beginning of formation of beak, wings, legs and allantois.
Amnion completely surrounds embryo.
Day 4 (see figure)
Beginning of formation of tongue.
Embryo completely separates from yolk sac and turns on left side.
Allantois breaks through amnion.
Day 5
Proventriculus and gizzard formed.
Formulation of reproductive organs — sex division.
Day 6 (see figure)
Beak and egg tooth begin to form.
Main division of legs and wings.
Voluntary movement begins.
Day 7
Digits on legs and wings become visible.
Abdomen becomes more prominent due to developmentof viscera.
12Day 3 Day 6 Day 9
CloseupDay 3
Leg budTail
Wingbud
Eye
Ear
Heart

13
Day 8
Feathers begin to form.
Day 9 (see figure)
Embryo begins to look bird-like.
Mouth opening appears.
Day 10
Beak starts to harden.
Skin pores visible to naked eye.
Digits completely separated.
Day 11
Days 10 to 12 tend to run together. No different changesvisible on these days.
Day 12 (see figure)
Toes fully formed.
Down feathers visible.
Day 13
Scales and claws become visible.
Body fairly well covered with feathers.
Day 14
Embryo turns its head toward blunt end of egg.
Day 15
Small intestines taken into body.
Day 16
Scales, claws and beak becoming firm and horny.
Embryo fully covered with feathers.
Albumen nearly gone and yolk increasingly important as nutrient.
Day 17
Beak turns toward air cell, amniotic fluid decreases andembryo begins preparation for hatching.
Day 18 (see figure)
Growth of embryo nearly complete.
Day 19
Yolk sac draws into body cavity through umbilicus.
Embryo occupies most of space within egg except air cell.
Day 20 (see figure)
Yolk sac completely draws into body cavity
Embryo becomes chick, breaks amnion and startsbreathing air in air cell.
Allantois ceases to function and starts to dry up.
Day 21
Chick hatches.
Although used only to break through the shell, the eggtooth serves its critical purpose well.
Coturnix (Japanese) quail .............................. 16–18 days
Chicken ................................................................ 21 days
Pheasants ...................................................... 24–26 days
Ducks ................................................................... 28 days
Geese................................................................... 28 days
Guinea.................................................................. 28 days
Turkey................................................................... 28 days
Swan .................................................................... 35 days
Muscovy duck....................................................... 35 days
Ostrich.................................................................. 42 days
Day 12 Day 15 Day 18 Day 2013

14
IntroductionHave you ever wondered how the parts of an egg stay separate until youare ready to scramble them for breakfast? Or why there is that stringything in the white of an egg?
In this activity, you will learn the parts of the egg and what each partdoes. Listen carefully, and by the time you are finished, you will be an“eggspert.”
Get readyWhen buying eggs, allow extra eggs for each group; students maydamage eggs they are using before completing all of the activities. If youdon’t mind a little extra clean-up, let the students break their own eggs.If you want to avoid the mess, break them a few minutes beforehand andput them into plates. (If you break eggs too early, they dry up.)
For the last part of the activity, prepare eggs in vinegar a few days beforethe class by putting them in bowls or glasses and completely immersethem in vinegar. Allow the eggs to soak in the vinegar solution for up to two days. The shells should dissolve completely. Once the shellsdissolve, carefully remove the eggs from the vinegar and place them in a bowl of water.
Do it1. Allow the class to break up into small groups of three to five students.
Each group should have a plate and an egg.
2. Make sure that after handling the raw eggs all students wash theirhands to prevent bacterial contamination.
3. In this activity, students are asked to identify parts of an egg using the definitions. Allow time for the students to experiment with findingthe structures and complete the “Eggsploring the Parts” sheet (seeactivity on page 36) on their own. Should they need help in locatingspecific structures, try to ask questions like:
• Where would you expect to find the inner thick albumen?
• What might its relationship to the yolk be?
• How might you be able to separate the inner and outer albumen?
• Where would you find the air cell in the eggshell?
• How does each part aid the developing embryo?
4. Show each group the egg that has been in vinegar so that thestudents can see the shell membranes.
Embryology skill: Identifying parts of eggs
Life skill: Learning to learn
Science skill: Observing
School subjectssupported:Biology
Preparation time:20 minutes
Activity time:20 minutes
What you need:□ Eggs□ Copies of Student Activity Sheet
“Eggsploring Parts” (page 36)□ Plates□ Two glasses or bowls□ Vinegar□ Water□ Receptacle for eggs
after the activity
Eggsploring the egg
14

• The 1999 estimate for eggs produced were192.5 million cases.
• The top 10 egg-producing states are:
1. Ohio
2. Iowa
3. California
4. Indiana
5. Pennsylvania
6. Texas
7. Minnesota
8. Georgia
9. Nebraska
10. Florida
C O N S I D E R this
F rom a local farm, obtain eggs of different shapes, colors, sizes, with
calcium deposits, and with meat and bloodspots. Ask the class to examine the eggs,find the differences, learn why the variationsoccur, and why they normally don’t see themin the store.
Visit the AEB Web site at:www.aeb.org
Obtain the record for eggproduction in one yearand the number of eggsthat the average consumeruses each year.
Share• What new parts did you learn?
• Why is it necessary to wash your hands after workingwith raw eggs?
Process• How is each part of the egg important to the
development of the embryo?• What will you do differently the next time you identify
egg parts? Why?• How did the real egg help or hinder learning
the parts?
Generalize• What other ways do you like to learn parts
of items? Why?
Apply• How will your understanding of egg parts affect your
use of eggs in the future?
• Can your students find thestates listed above?
Other questions you may ask.• How might you learn this
information in a different way?
• What senses did you use?When have you used yoursenses to learn before?
15
□ Can students identify the
parts of the egg?
□ Can students tell how the
parts contribute to embryo
development?
TTaallkk iitt oovveerr
ON THE

16
IntroductionIf you’ve seen one chicken, you’ve seen them all, right? Wrong. Actually,chickens, like many domesticated (tame) animals, are grouped by certainbreeds and characteristics. Just as a Dalmatian is different from a SaintBernard, a Rhode Island Red chicken is different from a Buff Cochin.In this unit, your students will learn how chickens are classified and how toidentify the group in which they belong.
Get readyDivide the class into five groups. Give each group a set of poultry catalogsor the Chicken Breeds & Varieties publication. Breed and variety photos arealso available on the suggested www site. Place the name of the chickenclasses in an egg carton. Have someone from each group pick one of thefive classes: American, Asiatic, Mediterranean, English and Games.
Do it1. Have the students talk about the characteristics that set apart the
different breeds.
2. Ask the students to pick a specific breed of chicken they want to learnmore about. Or place the names for that class in the egg carton andhave the students pull one out at random.
3. After the students have chosen the breed they want to work with, ask them to select the key features that describe this bird and playthe game “I Spy.”
4. For example, with a chicken that is in the American Class, like aRhode Island Red breed, single comb variety, the game might go likethis:
Student: I spy.
Class: Who do you spy?
Student: Someone with a “single comb.”
Class: The class guesses.
Student: The student can respond with more clues about origin,color, or a special feature of a Single Comb Rhode IslandRed chicken.
5. Continue with the rest of the breeds the students have picked.
Embryology skill: Selecting chicken breedsby characteristics
Life skill: Communicating anddecision-making
Science skill: Categorizing
Preparation time:One hour
Obtain pictures of chicken breedsand place them in an egg carton.Pictures may be obtained bypurchasing the UW-MadisonExtension Service’s Chicken Breeds& Varieties, searching for hatcheriesor breeds on the Web or askinghatcheries for old catalogs.
Activity time:One class period
What you need:□ Paper□ Scissors□ Egg cartons□ Poultry hatchery catalogs□ Publication: Chicken Breeds
& Varieties□ Copies of Student Activity Sheet
“Chick Breed Maker Notebook”(page 37)
Pick a chick
16
Breed Cornish Houdon Orpington Langshan Wyandotte Dorking Brahma Rhode Island
Class English Continental English Asiatic American English Asiatic American

The American Poultry Association offers a book called the Standard of Perfection, which contains a complete description and pictures of more than300 recognized breeds of chickens. There are morethan 350 combinations of physical features in chickens with different colors, sizes and shapes.
American Poultry AssociationLorna Rhodes, Secretary/Treasurer133 Millville StreetMendon MA 01756Phone: (508) 473-8769
There are also two sizes of chickens: standard andbantam. Bantams are one-third to one-fifth the sizeof standard chickens. There is an American BantamAssociation, which offers a standard for bantams.
American Bantam AssociationEleanor Vinhage, SecretaryP. O. Box 127Augusta NJ 07822Phone: (973) 383-6944Fax: (973) 383-8633
The system of classification for chickens is separated into three components: class, breedand variety. See glossary for definitions.
Make a “chicken collage”
(See activity on page 37.)
1. Find pictures of different chicken breeds.
2. Cut out your favorite parts from each breed,for example, feathered shanks, rose comband buff-colored body.
3. Put these different parts together.
4. Give this new breed of chicken a name that would reflect the changes that you havemade, for example “Booted Buff Rose CombPlymouth Rock.”
5. Using this collage of your new chickenbreed and the new breeds from other classor club members, have a chicken show.Have your principal judge the show.
□ Do students know the
components that make up the
classification system for chickens?
□ Do students know why there
is a classification system for chickens?
Or for other living things?
□ How many breeds were the students able
to identify by the chicken’s characteristics?
□ Were students able to see the benefit
of planning in other situations?
C O N S I D E R this
Share• What makes each breed of chicken different?• Why did you choose your breed?• What made selecting a breed difficult?
Process• What were the most common characteristics used
to determine chicken breeds?• Why is it important to categorize chickens into breeds?• How did you determine the order of characteristics
to help students guess?
Generalize• Describe something that you planned or a choice that
you made by looking at more than one possibility.• Why is communication or decision making important
at school? At home?• Where could decision making help you with other tasks?
Apply• How do you plan for new arrivals at your home, such
as a dog or cat or new brother or sister?• How does your family plan for special activities?• For what things can you not plan?• Why is it important to put plans in writing?
17
TTaallkk iitt oovveerr

18
IntroductionWe’re all used to seeing things grow and develop—watching changesthat take place over months and years. But watching chicken embryos is different. Huge changes happen in days or weeks. It’s like putting thegrowth process on fast forward.
In this lesson you will study chicken embryos as they grow. The scienceof studying the unborn—and in the chicken’s case, the unhatched—isembryology. The unhatched chick is called the embryo, and thedevelopment of the embryo is called embryogenesis.
We use a thermometer to measure temperature. Temperature regulation isvery important during the incubation process. The range of temperaturesinside the incubator should be from 98°F to 101°F with 99.5°F being thebest. We should not let the temperature rise above 101°F because highertemperatures can harm or kill the embryo. Temperatures below 98°F candelay the hatch time.
The chicks inside the eggs need humidity to keep them from drying out.At Day 18, increase the humidity by adding small, wet dish sponges nextto the water canals or pan. When they begin to hatch, increase the humidityto soften the eggshell membranes.
The eggs need to be turned at least three times a day. This will keep thedeveloping embryo from sticking to one side of the eggshell.
It takes about 21 days for the chicks to hatch. When a chick hatches, it has a special structure at the end of its beak called an egg tooth. Theegg tooth helps the chick to break out of its shell. A few days after hatch,the egg tooth will fall off.
Get readyYou may wish to discuss the information in the introduction with theclass. Ask your students how they keep track of turning the eggs,checking the temperature and ensuring that the canals are full of water.
Do it1. Divide the students into teams of three to five.
Have each team answer the following questions:
How will you mark the eggs?
How will you turn the eggs?
How will you fill the water canals or water pan?
How will you monitor the temperature?
(See activity on page 38.)
Embryology skill: Incubation of fertile eggs
Life skill: Planning and organizing
Science skill: Observing
School subjectssupported:Science
Preparation time:10 minutes
Activity time:20 minutes (egg preparation),
10 minutes daily (turning eggs, fillingwater canals or water pan), and
4 to 12 hours (hatching process)
What you need:□ Incubator□ Fertile eggs□ No. 2 pencil□ Embryology record sheet
(page 42)□ Dish sponge (1/2 inch
by 4 inches)□ Brooder box□ Copies of Student Activity Sheet
“Warming up with eggs” (page 38)
Warming up with eggs
18

Share• Why was marking the eggs important?• Describe your team’s plan for incubating the eggs.• How did your marks on the eggs differ from others?• What is your team’s plan for the best way to mark the eggs?• What is your team’s average incubator temperature?• What is your team’s plan for the best way to fill the water canals or pan?
Process• What things might we use to identify the eggs?• Why should we use a pencil instead of a pen to mark the eggs?• What ways can you think of to keep the humidity at the required levels?• How could you determine that turning the eggs three times a day is
necessary?• How might you maintain the proper temperature if electricity were
no longer available?• Why should the incubator temperature be properly regulated?• What will you do differently the next time you hatch chicks?
Why?
Generalize• How does the thermostat that controls the heating and
air conditioning at home compare to the incubator?• What other thermometers have you read?• How are those thermometers different from the one
inside the incubator?
Apply• What did you learn about working as a group that
you can use in the future?
Using the Embryology recordon page 42, have the
students record the temperatureinside the incubator each timethe eggs are turned. Take adaily average and an overallaverage at the end of theproject.
Using human thermometers to measure body temperature,have the students measuretheir own body temperatureevery hour during the schoolday and take an average ofeach individual.
If the incubator does nothave to be returned rightaway, consider incubatingother things to observebacterial growth. Try a tableegg broken out in a dish, a piece of a potato or a piece of an apple. After afew days, note any changesin these substances.
2. Have the teams share their plans with the class. Discussthe plans and determine which plan provides for the bestcare of the eggs and the incubator by reviewing thepreceding questions.
3. A suggested plan follows:
With a No. 2 pencil, mark an “X” on one side of each eggand an “O” on the other side. Do not use ink because it maypoison the embryos. Set the eggs in the incubator with all“X” sides up. This arrangement will help you monitor eggturning.
Fill the water canals or water pan with tap water. Adjust theincubator temperature to 100°F or as close as possible.Turn the eggs three times per day from Day 2 in theincubator to Day 18.
19
Did the students learn…
□ the importance of turning the eggs?
□ the importance of keeping the water
canals filled?
□ the importance of proper regulation
of the incubator temperature?
□ about the egg tooth and its function?
□ how long it takes a chick to hatch?
□ how to average numbers?
TTaallkk iitt oovveerr

20
IntroductionIf you like sneak previews, then candling is for you. Candling fertile eggsplays an important role in the embryology project. A candler is used toexamine fertile eggs by shining a bright light through the egg. Candlingserves three important functions.
1. Candling eggs before they are set identifies cracked eggs thatmight burst.
2. Candling helps detect which eggs are developing into an embryo.
3. Candling the eggs every few days allows you to watch the embryogrow and develop without damaging the egg.
In the poultry industry, eggs are candled for two reasons.
1. At the hatchery, eggs are candled to help remove cracked eggsbefore setting and infertile eggs that are not developing after a week of incubation.
2. At the consumer egg grading plants, eggs are candled to helpremove cracked eggs and those that have defects making themundesirable for human markets.
Get readyInvolve the students in building a candler by dividing the class into teams.Supply each team with the same supplies and ask each group to designand build their own candler. Plans for an overhead candler are alsoincluded so that you (the teacher) can build a candler for class use if youwould like. However, you are encouraged to use a candler designed andbuilt by one of the teams.
Do it1. Divide the class into teams of three to five students. Each team should
use the Building an Eggs-ray Viewer sheet (see activity on page 39)to help them design and build a candler. Explain that they have 30minutes to design and build an egg candler with the supplies you givethem. Also, show them the overhead projector and explain that it willbe the source of light for their candler. Basic questions to answerinclude:
Does the candler provide enough light to see cracks in aneggshell or the embryo inside the egg?
Can you candle eggs without damaging them?
Does the candler limit the amount of light that escapes so theroom can be darkened properly to allow seeing inside the egg?
Does the way the egg sets on the candler allow optimalviewing of the different parts of the egg and embryo?
Embryology skill: Preparing a candler
Life skill: Relating to others, cooperation
Science skills: Comparing and measuring
School subjectssupported:Math
Preparation time:An hour to secure the neededmaterials. This can beshortened if you ask thestudents to bring thecardboard and small boxesfrom home.
Activity time:30 to 40 minutes
What you need:□ Heavy cardboard boxes at
least 1 foot by 1 foot in size□ Small box, such as a pencil
box (at least 3 inches by 4inches, and 1 inch deep)
□ Scissors□ Electrical or duct tape□ Overhead projector
(with light source frombelow the glass surface)
□ Copies of Student ActivitySheet “Building an Eggs-ray Viewer” (page 39)
Building an eggs-ray viewer
20

TTaallkk iitt oovveerr
Share• How did your candler differ from the
others that were built?
• What do you like about your team’s plan compared to the others? Why?
Process• Why do we candle eggs?
• What things make a good candler?
• How would you improve your candler?
• What plans did you have to makebefore starting this project?
Generalize• What other items have you built?
How was this building process like or different from those?
• How can planning and organizing help you in other parts of your life?
• How did not having instructions andspecifications affect the buildingprocess?
Apply• What did you learn about working as
a group that you can use in the future?
• What will you do differently the next timeyou plan to build something?
Have studentsdesign and make
their own egg candler athome (with a flashlight rather
than an overhead projector).
Candle some eggs at home andshow your family how to look ateggs. Why does the store-boughtegg look different from the onesat school?
2. Have the teams share their candler with the class.Ask them to explain:
How the team decided on the plan before they began to build.
What was unique about their plan.
How their plan met the basic needs of a candlermentioned in step 1 above.
3. Try each candler in a darkened room and discuss whichcandler best allows the students to see inside the egg. If youalready have a candler, compare it with the class designs.
The following instructions provide information for developmentof a typical candler.You may want to build one of these for use in class or to compare it to the candlers developed by the class.
1. Cut out a flat 1 by 1 foot pieceof cardboard.
2. Remove one of the large sidesof the small box.
3. Cut an egg-shaped hole 1.5inches by 1 inch in the topsideof the small box (opposite fromthe side you just removed).This hole holds the egg so you can see the embryo whilehandling the egg as little aspossible.
4. Place the small box on the center of the piece of cardboard and trace the box outline. Cut a hole in the center of the piece ofcardboard the same size as the small box.
5. With duct tape, fasten thesmall box to the piece ofcardboard (with the egg-shaped hole up).
6. Place thecardboard on top of theglass base ofthe overheadprojector, andyou are readyto candle.
□ Did the students learn the three
reasons why candling is performed?
□ Were the students able to make
measurements to construct a candler?
□ Did all students make a contribution
to constructing the candler?
21

22
IntroductionThe overhead candling method allows the students to observe thedevelopment of a chicken embryo without damaging it.
Get readyReview the suggested activities for this lesson and the science of thedeveloping embryo. Determine which of the suggestions would be mostappropriate for your students.
Ask the class to list the safety measures they should use to be sure thatthe embryos and class members aren’t put at risk. Conduct this activity in a way that ensures hygiene and safe handling of the eggs.
Do it1. Before candling any eggs, ask the students to record what they think
a three-day-old chicken embryo will look like. (Have them write, drawor both; see activity on page 40). Encourage them to use theirimagination and draw or write from their background and experience.
2. With the candler, compare a fresh refrigerated egg to an egg that hasbeen kept at room temperature for three to five days. Identify the aircell and yolk. Look for cracks. Gently crack an egg to see what thecrack looks like.
3. Candle each developing egg and select an egg that has an embryo in a good viewing position.
4. To candle the egg, set the candler on an overhead projector. Placethe overhead projector on the floor or on a low tabletop so studentscan see. Darken the room. (The darker the room the better the view.)Remove a fertile egg from the incubator, and place it on the hole ofthe candler. With the egg on its side, gently rotate the egg until youget the best view of the embryo.
5. Ask the students to observe a three-day-old chicken embryo, thenask them to discuss what they saw. How might the embryo changebetween observations? Is anything moving?
6. Observe an embryo at Day 3, 4, 6, 9, 13, 18 and 20. If possible allowthe students to candle the eggs after the first day or two.
7. After they have finished observing the developing embryo, ask themto record (orally, written, drawn or combination) how the embryo wasdifferent than what they expected.
Embryology skill: Observation of embryos
Life skill: Record keeping
Science skill: Observing, communicating,relating
School subjectssupported:Biology
Preparation time:5 minutes, unless you need tobuild a candler (see “Building aneggs-ray viewer”)
Activity time:10 minutes to allow students to record their observations
5 minutes on Day 3, 4, 6, 9, 13,18 and 20 of development toobserve the embryo
What you need:□ Soap and water (for washing
hands before and afterhandling eggs)
□ Overhead candler (see page20, “Building an eggs-rayviewer”)
□ Box-style overhead projector(light comes from underplatform) with an extensioncord, if necessary
□ Fresh eggs of assorted colors□ Fertile eggs developing in the
incubator (white-shelled eggswork best for viewing)
□ Darkened room (for best view)□ Copies of Student Activity
Sheet “Playing peek-a-boo withembryos” (page 40)
Playing peek-a-boo with embryos
22

□ Did students candle the eggs and
explain what they saw?
□ Did the students identify differences
between the eggs in the incubator?
□ Did the students observe critical
stages of embryonic development?
□ Were the students fascinated
or surprised by what they saw?
D id you know that egg producers usecandlers to help them grade and sort
eggs that are sent to market?
23
Share• What happened as the class observed the
embryo for the first time?
• What differences did you see between the eggs? Any movement?
• Are all embryos developing? If not, why not?
• How has the embryo changed since you last saw it?
• Which embryo parts were most easily seen?
Process• Why should you not allow the eggs to cool too much
while candling?
• Why is it helpful to candle the eggs and see what is happening at different stages?
• Why is the heart and eye developing so fast?
Generalize• Why is it important to wash your hands before
and after handling eggs?
• What did you learn about the importance of keepingrecords or graphs?
• Why would it be helpful for a doctor to be able to view an unborn baby?
• How do we view the developing fetus in human or animal pregnancies?
Apply• Why is it important to chart the growth of a developing
fetus?
• How will what you learned in this lesson be useful in the future?
• What other times might it be important to keep records?
TTaallkk iitt oovveerr
6-Day embryo under candling light.Notice distinct blood system and eye (black spot).
12-Day embryoThe egg becomes darker and the
air cell gets larger as the embryo grows.

Introduction:Ever wanted to be a mother hen? Now is your chance. When you raisechicks in a brooder, you are taking the place of the chicks’ female parent.Through the brooder, you provide warmth, shelter and food. And youlearn a lot about how to take care of a baby—even though that baby ismostly fuzz and just a few inches tall.
Get readyBecause there is little time when the chicks hatch, build the brooder orset up at least two days before hatching. The brooder should maintain a temperature of 95°F (temperature taken at chick level) during the firstweek. If you keep chicks beyond one week, decrease the temperature5°F per week until you reach room temperature. Use pine shavings orpaper towels on top of several layers of newspaper for litter. Do not usenews or magazine paper without paper towels because the surface maybecome slick, which can cause the chicks to develop “spraddle legs.”
Do it1. Involve the students in planning a brooder for their chicks. Divide the
students into teams of three to five. Each team should use the studentsheet (see activity on page 41) to help them develop a plan for thebrooder. Have the teams share their brooder plan with the class. Basicquestions to consider are:
Does the brooder provide shelter for the chicks?
Does the brooder provide heat for the chicks?
Does the brooder provide food for the chicks?
2. Discuss the plans and determine which plan provides for the bestbrooder.
3. Build one brooder box as a total class project.The instructions on thenext page provide information for development of a typical brooder.You may wish to build one of these and compare it to the one built by the class.
Embryology skill: Preparing a brooder
Life skill: Planning and organizing
Science skill: Comparing and measuring
School subjectssupported:Math
Preparation time:45 minutes
Activity time:60 minutes (will vary)
What you need:□ Cardboard box 24 to 36
inches square□ Cardboard box about 12
inches by 18 inches, and at least 12 inches tall
□ Goose necked lamp□ 40-watt light bulb□ Waterer□ Newspapers, magazines,
or pine shavings□ Roll of paper towels□ Thermometer□ Student Activity Sheet
“Building a home ‘tweethome”(page 40)
24
Building a home 'tweet home
Teacher note:You may choose which brooder you would like your class to build.
The courtyard brooder will be used for anexample in this lesson since it is easily madewith supplies in an everyday classroom.However, teachers who plan to do this projectagain and would like to construct something morepermanent may wish to build a wooden observation brooder.

Share• What materials did you use to make the brooder? Why?• What is your team’s plan for the best brooder?
Process• What does the chick need to stay alive?• How could you help the chick if it is shivering
or panting?• Why was it necessary to have pine shavings
or paper towels in the bottom of the brooder box?• How was the planning process different from
other items you have planned?
Generalize• Why is it important to organize your plan
before doing it? • How was the final brooder plan alike
or different from the ideas generated at the beginning of class?
Apply• How can you use what you learned
about planning and organizing in otherassignments?
A t home, read aboutanimals that are
cold-blooded. Make a list and share it with your class at school.A warm-blooded animalis called homeothermic.A cold-blooded animal iscalled poikilothermic.
1. The 24- to 36-inch-square cardboard box serves as thechick courtyard. Cover the bottom with about two inches of pine shavings. If shavings are not available, placenewspapers (about five layers) on the bottom and coverwith paper towels to provide traction.
2. Place the feeder and waterer in the box.
3. If you are using a goose neck lamp, bend it over the side of the box. Never place the light closer than 18 inches fromthe brooder floor or walls.
4. Test the brooder temperature for several days before thechicks hatch. To test, place a thermometer on the bottomsurface. The temperature should be 95°F for the first week.After that, lower by 5 degrees each succeeding week.Raise or lower the light bulb or change the light bulb size to change the temperature. After the chicks hatch, if thechicks appear cold (shivering), move the light closer. If thechicks appear too hot (panting), move the light farther away.
5. If you would like to make a brooder window on the side ofthe box, cut a hole large enough to see through, and coverthe hole with clear plastic wrap.
6. Place the box at your students’ eye level for best viewing.
25
□ Did the students learn why a brooder
box is required for chicks?
□ Did students learn the proper
temperatures to brood chicks?
□ Did the students learn why the bottom
of the brooder box must be covered
with pine shavings or paper towels?
□ Do the students understand the
importance of planning and organizing?
TTaallkk iitt oovveerr
Ready for the chicks
A warm new home
Courtyard brooder

IntroductionChildren need to see how mathematical ideas are related. Math conceptsneed to be connected to everyday experiences both in and out of school,so kids become aware of the usefulness of mathematics. Learning andusing math across all curriculum areas is important to develop broad-basedskills in mathematical connections.
Get readyReview the following suggestions for math enhancements to theembryology curriculum. Check the suggestions that would be mostappropriate for your students.
Embryology skill: Connecting embryology and math
Life skill: Keeping records
Science skill: Comparing and measuring
School subjectssupported:Math
Preparation time:Variable
Activity time:Variable
What you need:Varies by the activity
□ Scale□ Rulers□ Thermometers□ Measuring tape□ Calculator□ Graph paper
26
Counting the chicks
Do it1. Grouping
□ Have the students compareand contrast the eggs orchicks and then organizethem into categories, likecolor, texture, behavior, etc.
2. Ordering□ Arrange the stages of
development in the egg in the correct order.
3. Measuring□ Eggs
Measure weight, length and diameter.
□ ChicksMeasure weight, height.
□ Caring for chicksMeasure daily temperatureand humidity, and amounts of feed and water.
□ Making an apparatusUse measurements in building the brooder and candler.
4. Estimation□ Conversion of Celsius and
Fahrenheit temperatures—For a quick estimate ofCelsius, subtract 30 from the Fahrenheit temperatureand divide by 2. For a quickestimate of Fahrenheit,multiply the Celsiustemperature by 2 and thenadd 30.
□ Estimate amounts of beddingand feed that will be neededfor the project.
5. Percent□ Calculate percentage of
hatch.□ Chicks should be given food
that is 18 to 22 percentprotein. Discuss with studentswhat that means.
6. Graphing□ Plot timeline of incubation
period of 21 days.□ Graph incubator temperature
and humidity.□ Graph number of eggs at
beginning of project, numberused for experimentation andnumber that hatch or do nothatch.
□ Graph weights of eggs andchicks over the length of theincubation and after hatched.

Share• What did you do?• What happened?• What was most difficult? Easiest?
Process• What did you learn about _______?• What else would you like to know about _______?• What was the most important thing you learned?• What would you do differently next time?
Generalize• What else might you try?• What did you learn about the importance
of keeping records like graphs?
Apply• How will what you learned be useful in the future?• What could you do to become even better at
math or keeping records?• How will you help others learn
about ________?
7. Problem-solving□ Have students develop a method to
assign responsibility and keep track of egg-turning.
□ Calculate intervals in which eggsshould be turned.
□ Develop a budget for the classembryology unit.
□ Develop word problems related to embryology.
For example, if you spend 50 cents a day on food and it takes ___ daysbefore a chick starts laying eggs, howmuch money should you charge for adozen eggs in order to make a profit?
8. Number computation□ Calculate differences between
human’s and chicks’ bodytemperatures, length of developmentfor embryos and size.
□ Calculate average daily temperaturein incubator or brooder, averageweight of chicks and average weightof growth of chicks over one week.
□ Convert temperatures from Celsius to Fahrenheit.
To convert Fahrenheit temperatures to Celsius, subtract 32 from theFahrenheit temperature and multiply by 5/9.
To convert Celsius temperature to Fahrenheit, multiply the Celsiustemperature by 5/9 and add 32.
27
TTaallkk iitt oovveerr
The egg toothThe egg tooth is only presentto help the chick break from
the egg. Within 12 to 24 hoursafter the chick hatches, the
egg tooth will dry and fall off.
□ Can students apply math skills
to real-world experiences?
□ Can students collect and organize
data?
□ Can students explain the process
of how they determined the answer
to a math problem?

Caring and handlingIntroduction
Did you know you could be dangerous even though you don’t want to be?When you handle something as small and delicate as a chick, you shouldbe extra careful not to hurt it. Give it lots of time to rest after you pick itup. Here’s an even bigger surprise. That cute, warm and fuzzy ball of furcould be dangerous to you. No, it won’t bite or punch you, but it mightcarry germs that could make you sick. That’s why it is important to washyour hands after you have picked up a chick. Then both you and the chickwill be healthy and strong.
Get readyOnce the chicks have hatched, students naturally want to hold them. Butnewly hatched chicks should not be handled much, if at all. Some childrenmay not have the coordination needed to handle chicks appropriately.Proper handling is important to keep an animal as fragile as a babychick from being stressed or harmed.
Most students understand the importance of washing their hands afterthey go to the bathroom. It is also important to wash after handling achick.This exercise was designed to ensure proper handling of the chick,proper hand washing for the safety of the child and the prevention ofdisease in the child or the chick.
Your students should work in pairs or groups of three or four, with onechick per group. Students will have to sit on the floor, so have a blanketor sheet available for them to sit on. Also, set up a hand-washing stationin the classroom. This station could be a sink or just a bowl of warm soapywater. Include some paper towels.
Do itThe students should sit down on their sheet with their feet touching eachother. Pass around a wind-up chick, Beanie Baby or stuffed animal thesize of a chick until each child has held it. An adult should supervise thisactivity, so the students learn to handle the object correctly.
After this initial activity, place a real chick in the center of the circle andallow the chick to run around. When the chick goes to someone in thegroup, he or she may pick it up (under adult supervision) for one minute.Then the student should put the chick down in the circle and let it go tosomeone else, who may hold it for a minute. This continues until eachchild has held the chick for a minute. After all the students have held thechick, put it back into the brooder.
After holding the chick, rub “Glitter Bug Potion” on the hands of eachstudent.
Ask them to hold their hands under a black light and look forsigns of germs. Ask them to describe what the germs look like.
Then ask your students to wash their hands with antibacterialsoap and dry them thoroughly. They should again hold themunder the black light to see whether the germs are gone.
Embryology skill: Handling chicks safely
Life skill: Relating to others
Science skill: Observing and communicating
School subjectssupported:Health and safety
Preparation time:One hour
Activity time:One class period
What you need:□ Ultraviolet light□ Antibacterial hand soap□ Paper towels□ Water
28

29
Share• How did it feel to hold a baby chick?
Process• Why did you handle the Beanie Baby chicken
before you handled the real chicken? • How could improper handling of a chick hurt it? • Why is it important to wash your hands after
handling a chick?
Generalize• When you were holding the chick, how did the
chick tell you that it was comfortable oruncomfortable?
• How do other baby animals let you know whenthey are comfortable or uncomfortable?
Apply• What do you do when you are uncomfortable?
Too hot? Too cold?• Why is washing your hands important?• What will you do differently the next time you
handle chicks?
How would you make agerm-free environment?
Take it homeList all the different activitiesafter which you wash yourhands.
After the chicks hatchout of their shell, they must
stay in the incubator until their downis completely dry. Birds should be moved
to an environment (such as a brooder) thatprovides the following: supplemental heat, food
(such as a chick starter diet), and good cleanwater. Students should not handle chicks a lot
because too much handling can stress them and allowthem to get sick.
To pick up a chick, always move slowly and gently. Cupyour left hand with the fingers pointing upward. Place yourright hand around the chick (fingers pointing downward)until you can pick it up. Place the chick in your left hand.Hold your right hand cupped around the top of the chick(fingers still pointing downward) so the chick will not escape.
Some of your students’ motor skills may not be fully developed,depending on their ages. For example, a child might hold thechick too tightly, suffocating it. Or a child might hold thechick loosely, allowing it to fall.
Children and adults who handle chicks also need to know theimportance of hand washing. All warm-blooded animals,(like dogs, humans and birds) carry salmonella,a bacterium that can cause severe diarrhea anddehydration.You and your students should
thoroughly wash with antibacterial soap to preventcontamination.To ensure that students wash
properly, place a harmless dye on thestudents’ hands and look at them with
a black light.
For
2nd and
3rd Grade
Kids Only
Trace your hands and color in
the spots where you found the
most germs.
Ticklers
How many of your students know
how to play “Ring around the
Rosie?” Ask the students in their
groups to join hands, circle
around their blanket or sheet
and then sit down on the
sheet.
C O N S I D E R this
TTaallkk iitt oovveerr Share itTeach a younger brother, sister or friendto wash their hands properly.

Eggsploring careersIntroduction
How does an egg get from the chicken on a farm to the grocery store andinto our homes? Many people with different jobs help to provide safe andhigh-quality poultry products.You may not realize how many careers areavailable in the poultry industry. This activity will help you to betterunderstand the poultry industry and its career possibilities.
Get readyBefore doing this activity, ask the students to list as many poultry careersas they can. Write these on slips of paper. Make sure you have at leastone career for each student.You also may want to write the careers on a chalkboard or flip chart and talk about them to get everyone involved.Doing this will help the youth describe the careers in this activity.
Do it1. Split the class into groups of eight.
2. Tape one slip of paper with the name of a career onto each student’sback without letting him or her see what the paper says.
3. Have the team members sit in circles. Take turns having one personin the middle while everyone in the circle describes that career.
4. When the person in the middle has guessed what his or her career is,another person moves to the middle.
5. Repeat until everyone has been in the middle.
Embryology skill: Exploring careers in the poultryindustry
Life skill: Developing teamwork
School subjectssupported:Social studies
Preparation time:15 minutes
Activity time:20 minutes
What you need:□ Slips of paper that are labeled:
• Producer• Plant manager • Poultry scientist • Food scientist • Marketer• Veterinarian• USDA inspector• Truck driver
□ Create a few “wild card” slips thatcan be filled in later as the studentsidentify other careers in the poultryindustry.
30

H ave students expand thisexperience by talking with adults
about careers and writing what theylearned in a journal.
A sk someone in the poultryindustry to visit the class and
talk about what they do.
Share• What did you like about this activity?• What poultry careers did you learn about?
Process• Why is it important to learn how to describe jobs
to people?• Why is it important for the people in these jobs
to work together?
Generalize• How did you work as a team to help the person
in the middle guess the career?• How would you describe a job that you would like
when you get older?• How can you learn more about jobs in the poultry
industry?
Apply• How will this activity help you think about
possible career choices?• How can you learn more about jobs
in the poultry industry?
31
The poultryindustry involves many
companies from around theworld.There is a career for almost
any interest connected to poultry.Poultry producers are responsible for
providing housing and care for birds,while grain farmers provide the soybean, corn
and cottonseed that goes into feed. Poultryscientists work to improve genetic characteristics,feed and disease prevention. Food scientists createnew poultry food products and improve the qualityof food already on the market.
Marketers find new ways to promote poultry.Processing plant managers make sure the rightnumber of birds are ready for processing on a givenday, and that the plant can handle those birds.Professors do research to improve the industry and teach future industry leaders. USDA inspectorsexamine poultry products and make sure theyare safe and of a high quality.Truck driverstransport birds to farms, processing plants,stores and restaurants. All of these people
and jobs are essential to the poultryindustry, which offers an array of
opportunities for up-and-comers.
□ Did the students discuss their ideas
about careers?
□ Did students learn about careers
in the poultry industry?
□ Did students work together in these
career exploration activities?
TTaallkk iitt oovveerr

Air cell – The air pocket that formsbetween the inner and outer shellmembranes to replace moisture theegg loses as it cools and is stored.
Albumen – A combination of thefour layers of a whitish waterysubstance (88 percent water, 11percent protein) that surrounds andcontains the yolk within the center of the egg shell. Inner and outerthick albumen is the major source of egg riboflavin and protein. In high-grade eggs, it stands higher andspreads less than the thin albumen. Inlower grade eggs, it thins and lookslike the thin albumen.
Allantois – An organ in the embryoof birds which develops into part of the umbilical cord and unites with the chorion, forming the placenta.Responsible for respiration,absorption of minerals from the shelland handling waste.
Amnion – A membranous, fluid-filled sac surrounding the embryo.Important for protection, it allows the embryo to exercise duringdevelopment.
Avian – Of, or pertaining to, Aves or birds.
Bacteria – Microscopic, single-celled organisms.
Bantam – A miniature fowl, somedistinctive breeds, others beingminiatures of a large breed orvariety, approximately one-fourth (1/4)to one-fifth (1/5) normal weight.
Blastoderm or germinal spot –The collective mass of cellsproduced by the splitting of afertilized ovum from which theembryo develops.
Blastodisc or germinal disc – Thegerminal spot on the ovum fromwhich the blastoderm develops afterthe ovum is fertilized by the sperm.
Bloom – The coating or covering on the eggshell that seals its pores.
Breed – A group of birds that have the same physical features, such asbody shape or body type, skin color,number of toes, feathered or non-feathered shanks (legs) and carriageor station.
Brood – Baby chicks hatched fromone nest (setting) of eggs.
Brooding – Caring for the young of animals.
Candling – Shining a bright lightthrough an egg in order to observe its interior.
Carbohydrate – Compoundscontaining carbon, hydrogen, andoxygen, a sugar or starch.
Career – Profession that isundertaken as a long-termcommitment.
Chalazae – Prolongations of thethick inner-white, or albumen, thatare twisted like ropes at each end ofthe yolk. Their function is to anchorthe yolk in the center of the eggshellcavity.
Chick – A newly hatched babychicken.
Chorion – A membrane envelopingthe embryo, external to andenclosing the amnion.
Chromosomes – A series of pairedbodies in the nucleus, constant innumber in any one kind of plant oranimal.
Class – A group of chicken breedsfrom the same geographical origin(large fowl) or showing similarcharacteristics (bantams).
Dorsal – Of, on or near the back.
Dry-bulb thermometer – Expresses a temperature reading in number of degrees Fahrenheit or centigrade/Celsius.
Ectoderm – A cell layer groupingresponsible for the development of the skin, feathers, beak, claws,nervous system, lens and retina of the eye, linings of the mouth and vent.
Egg (avian) – The femalereproductive cell (ovum) surroundedby a protective calcium shell and, if fertilized by the male reproductivecell (sperm) and properly incubated,capable of reproduction.
Egg tooth – Also called “chickentooth.” The temporary horny cap onthe chick’s upper beak which servesfor pipping (breaking through) theshell. Usually dries and falls offwithin 18 hours after chick hatches.
Embryo – A fertilized egg at anystage of development prior tohatching. In its later stages, it clearlyresembles the fully developed chick.
Embryology – The study of theformation and development of plantand animal embryos.
Endoderm – A cell layer groupingresponsible for the development of the linings of the digestive tract andthe secretory and respiratoryorgans.
Evaporation – Changing ofmoisture (liquid) into vapor (gas).
Experiment – A test made todemonstrate a known truth, toexamine the validity of a hypothesis,or to determine the efficacy ofsomething previously untried.
Fahrenheit – A temperature scale that registers freezing point of wateras 32°F and boiling point as 212°Funder standard atmosphericpressure. Named after Gabriel D.Fahrenheit (1686–1736).
Fertile egg – An egg that has beenfertilized by sperm or is capable ofdeveloping an embryo.
32
BeginnerReferences
Glossary
33
Gene – An element in thechromosome of the germ cell thattransmits hereditary characteristics.
Germs – Microorganisms that cancause sickness or disease.
Hatchery – A facility where eggs areincubated commercially.
Hatching egg – A fertilized egg withthe potential of developing anembryo.
Humidity – See “relative humidity.”
Incubate – To maintain favorableconditions for developing andhatching fertile eggs.
Incubator – A container with theproper humidity and temperature to allow fertile eggs to hatch.
Infundibulum – The entrance to theoviduct.
Membrane – Soft, pliable sheet orlayer of tissue covering an organ.
Mesoderm – A cell layer groupingresponsible for the development of the bones, muscle, blood and thereproductive and excretory organs.
Nutritious – (Food or feed) containssubstances necessary to sustain lifeand growth.
Ovary – The female reproductivegland in which eggs are formed.
Oviduct – The tube through whicheggs pass after leaving the ovary.
Ovum – The female reproductivecell.
Pecking order – The basic pattern of social organization within a flock of poultry in which each bird canpeck the birds lower in the orderwithout fear of retaliation. Socialhierarchy.
Pipping – A baby chick breakingfrom its shell.
Pores – Miniature openings in theshell of an egg through which gasesare exchanged.
Protein – One of a group ofnitrogenous compounds commonlyknown as amino acids.
Relative humidity – The amount ofmoisture in the air compared with theamount that the air could contain atspecific temperatures. Expressed as a percentage.
Shell – The egg’s outer coveringconsisting mainly of calciumcarbonate. The shell is the egg’sfirst line of defense against bacterialcontamination.
Shell membrane – The membranesbetween the shell and the liquidportion of the egg. The outer shellmembrane is fused to the shell, and the inner shell membranesurrounds the liquid portion of theegg. The air cell forms between thetwo membranes, usually at the largeend of the egg.
Still-air incubator – A container forhatching chicks that does not havemechanical ventilation.
Strain – Families or breedingpopulations of chickens that possesscommon traits.
System – A functioning unit of the anatomy, such as the skeletal,muscular, glandular, respiratory and digestive systems.
Testes – The male genital glands(plural) testicle, testis (singular).
Variety – A subdivision of a breed.Different characteristics include feathercolor, comb type and the presence of a beard and muffs.
Vitamin – A fat- or water-solublesubstance necessary, in very smallamounts, to allow for normal growthand maintenance of life.
Vitelline membrane – The clear sealthat holds the yolk.
Wet-bulb thermometer – A device used to measure the amount ofmoisture or water vapor in the air.
Yolk – A globular mass of yellow,nutritious semi-liquid contained in atransparent membrane (the vitellinemembrane) and located in the centerof an egg. The yolk is the chick’s foodduring its pre-hatching life and its firstfood after it emerges from the shell.
Yolk sac – A membrane sac thatsurrounds the yolk of the egg.

34
Science as inquiry
□ 5 points Student demonstrates above averageability to ask questions, plan and conduct simple experiments, use data, and communicate results.
□ 3 pointsStudent demonstrates satisfactory abilityto ask questions, plan and conduct simpleexperiments, use data, and communicateresults.
□ 1 pointStudent demonstrates unsatisfactoryability to ask questions, plan and conductsimple experiments, use data, andcommunicate results.
Characteristics of living things
□ 5 pointsStudent demonstrates above averageunderstanding of the basic needs of developing embryo and chick.
□ 3 pointsStudent demonstrates satisfactoryunderstanding of the basic needs of developing embryo and chick.
□ 1 pointStudent does not demonstrateunderstanding of the basic needs of developing embryo and chick.
□ 5 pointsStudent demonstrates above averageunderstanding of egg and chicken partsand their functions.
□ 3 pointsStudent demonstrates satisfactoryunderstanding of egg and chicken partsand their functions.
□ 1 pointStudent demonstrates unsatisfactoryunderstanding of egg and chicken partsand their functions.
Life cycle
□ 5 pointsStudent demonstrates above averageunderstanding of chicken’s life cycle.
□ 3 pointsStudent demonstrates satisfactoryunderstanding of chicken’s life cycle.
□ 1 pointStudent demonstrates unsatisfactoryunderstanding of chicken’s life cycle.
□ 5 pointsStudent demonstrates above averageunderstanding that chicks closelyresemble their parents.
□ 3 pointsStudent demonstrates satisfactoryunderstanding that chicks closelyresemble their parents.
□ 1 pointStudent demonstrates no understandingthat chicks closely resemble their parents.
Organisms and environment
□ 5 pointsStudent demonstrates above averageunderstanding that chicks’ behavior relatesto environment, i.e., warmth, shelter, food.
□ 3 pointsStudent demonstrates satisfactoryunderstanding that chicks’ behavior relatesto environment, i.e., warmth, shelter, food.
□ 1 pointStudent demonstrates no understandingthat chicks’ behavior relates toenvironment, i.e., warmth, shelter, food.
Abilities of technological design
□ 5 pointsStudent demonstrates above averageunderstanding of steps in the designprocess, i.e., identify the problem, proposesolution, try out solution, evaluate andimprove, communicate the solution.
□ 3 pointsStudent demonstrates satisfactoryunderstanding of steps in the designprocess, i.e., identify the problem, proposesolution, try out solution, evaluate andimprove, communicate the solution.
□ 1 pointStudent demonstrates no understanding of the steps in design process, i.e., identifythe problem, propose solution, try outsolution, evaluate and improve,communicate the solution.
Planning and organizing skills
□ 5 pointsStudent is capable of considering thesituation and coming up with an above-average plan.
□ 3 pointsStudent is capable of considering thesituation and coming up with a satisfactoryplan.
□ 1 pointStudent developed an unsatisfactory planfor the situation.
Record keeping skills
□ 5 pointsStudent demonstrates above-averageability to categorize and select usefulinformation.
□ 3 pointsStudent shows satisfactory ability tocategorize and select useful information.
□ 1 pointStudent shows unsatisfactory ability tocategorize and select useful information.
Embryology Beginner Student Assessment Rubric

35
Teamwork skills
□ 5 pointsStudent understands role in the team andenjoys working with others.
□ 3 pointsStudent shows some understanding of rolein the team and likes to work with others.
□ 1 pointStudent does not understand role as part ofa team and does not like to work with others.
Science skill of observation
□ 5 pointsStudent generates reasonable questionsabout the world based on observation.Student uses all senses when observing.
□ 3 pointsStudent generates some reasonablequestions about the world based onobservation. Student uses most senseswhen observing.
□ 1 pointStudent does not generate reasonablequestions about the world based onobservation. Student uses only one sensewhen observing.
Science skill of comparing andmeasuring
□ 5 pointsStudent demonstrates above-averageability to use simple measurement tools to provide consistency in an experiment.
□ 3 pointsStudent demonstrates satisfactory ability touse simple measurement tools to provideconsistency in an experiment.
□ 1 pointStudent is not able to use simplemeasurement tools to provide consistencyin an experiment.
Science skill of relating
□ 5 pointsStudent demonstrates above-averageability to develop solutions to unfamiliarproblems through observation andexperimentation.
□ 3 pointsStudent demonstrates satisfactory ability to develop solutions to unfamiliar problemsthrough observation and experimentation.
□ 1 pointStudent demonstrates inability to developsolutions to unfamiliar problems throughobservation and experimentation.
Student name
Adding up
Total points
Science as inquiry . . . . . . . . . . . . . . . . . . . . ____________
Characteristics of living things . . . . . . . . . . ____________
Life cycle . . . . . . . . . . . . . . . . . . . . . . . . . . . . ____________
Organisms and environment . . . . . . . . . . . . ____________
Abilities of technological design . . . . . . . . ____________
Planning and organizing skills . . . . . . . . . . ____________
Record-keeping skills . . . . . . . . . . . . . . . . . ____________
Teamwork skills . . . . . . . . . . . . . . . . . . . . . . ____________
Science skill of observation . . . . . . . . . . . . ____________
Science skill of comparing and measuring ____________
Science skill of relating . . . . . . . . . . . . . . . . ____________

Student Activity Sheet
Name
36Hatching Classroom Projects - Eggsploring the egg - Page 14
Eggsploring the parts Match the name with the egg part and write it on diagram.
air cell
albumen
chalaza
germinal disc
inner membrane
outer membrane
shell
yolk
vitelline membrane

Student Activity Sheet
Name
37Hatching Classroom Projects - Pick a Chick - Page 16
Chick breed-maker notebook
Do it1. Three-hole punch your plain paper.
2. Cut the paper into three equal sections (about 3 2/3 inchesby 81/2 inches each).
3. Place the paper into a three-ring binder. Have the top thirdof the paper in the top ring, the middle third of the plainpaper in the middle ring and the bottom third of the paperin the bottom ring.
4. Cut out pictures of chickens from poultry catalogs.
5. Divide the pictures of the chickens into three parts: thetop third showing the neck and head, the middle thirdshowing the body and the bottom third showing the legs.
6. Glue the pictures of the top third of the chicken to the topthird of the paper. Glue the pictures of middle third of thechicken to the middle third of the paper. Glue the picturesof bottom third of the chicken to the bottom third of thepaper.
7. Repeat for 10 different breeds.
8. Mix and match them to come up withthe different combinations. How manydifferent breeds can you come up with?
9. Display your favorite new breedyou created and give it a name.
What you need□ 10 sheets of blank
paper
□ Scissors
□ Glue
□ Three-hole punch
□ Three-ring binder

Student Activity Sheet
38
Warming up with eggs
Name
Hatching Classroom Projects - Warming up with Eggs - Page 18
What could youdo to improveyour ideas?
With your teacher’shelp, work as a classto turn the eggs, fill
the water canals, andmonitor the incubatortemperature. Considersetting up a schedule
that would allowteams to rotateresponsibilities.
Test yourmeasurements.
Using the embryologyrecord sheet, recordthe temperature eachtime you turn the eggsand take an average.
What’s the problem? Write about why we need to turn the eggs, fill the watercanals and monitor the incubator temperature.
_________________________________________________
_________________________________________________
_________________________________________________
_________________________________________________
_________________________________________________
How could you solve the problem? Write about your ideas for turning the eggs, filling thewater canals, and monitoring the incubator temperature.
_________________________________________________
_________________________________________________
_________________________________________________
_________________________________________________
How could you test your plan?Share the plan. Listen as each team shares its plans.Write down the ideas that you think are best.
_________________________________________________
_________________________________________________
_________________________________________________
_________________________________________________
_________________________________________________
1
2

39
Student Activity Sheet
What’s the problem? Write about why we need to candle fertilechicken eggs.
__________________________________________
__________________________________________
__________________________________________
How could you solve the problem? Write about your ideas for the candler.
__________________________________________
__________________________________________
__________________________________________
How could you test your plan?
__________________________________________
__________________________________________
__________________________________________
Share the plan.Listen as each team shares their plans.Write down the ideas that you think are best.
__________________________________________
__________________________________________
__________________________________________
How could you improve the candler?
Name
Try it yourself
Building an eggs-ray viewerHave you thought about what the chick might look like as it is developing inside theegg? With the candler, you will be able to see different parts of the egg and portionsof the chick as it develops. Use your planning skills to design a candler. Answer thefollowing questions to make your plan.
Draw a picture of what the candler will look like.
Draw a new picture.
Hatching Classroom Projects - Building an eggs-ray viewer - Page 20
1
2
3
4
5
□ Help your team designand make a candler.
□ Test your candler.Candle an egg. Can you see what is inside?
Write down the egg parts that you canidentify with the aid of your candler.
__________________________________________
__________________________________________

Hatching Classrom Projects - Playing peek-a-boo with embryos - Page 22
What did you learn?
□ What shape didthe embryo havefor the first fivedays ofincubation? Drawthe shape andlabel the head,heart and tail.
□ Circle the firstpart of theembryo younoticed.
Where does the embryo get its food to help it grow?
_______________________________________________________________________________________________
What supplied food for you when you were developing in your mother?
_______________________________________________________________________________________________
What does the amnion (the sac of clear fluid that surrounds the embryo) do for the embryo?
_______________________________________________________________________________________________
Student Activity Sheet
Playing peek-a-boowith embryos
How does this activity relate to other life experiences?
Have you ever gotten involved insomething or started a project and
found that your expectations and what actually happened
were different?
How did you adjust your approach to the situation?
What did you learn from those situations?
Did you know a chicken embryo looks a lot like you did during your first three months of lifeinside your mother? Don’t feel bad. Many embryos look alike during their early development.
What makes chickens special is that the embryo develops outside the mother’s body.This arrangement lets us get a closer look at how the embryo develops without harmingthe mother or other embryos.
Use the back of this paper to write or draw what you think a chicken embryo looks like.
After you have observed a developing embryo, draw what yousaw in the space below.Then answer the questions.
Compare what you expected to see and what you actually saw.Write a paragraph explaining the difference between yourexpectations and what you actually experienced.
1
2
3
40
Name

41
Student Activity Sheet
Building a home 'tweet home
What’s the problem?
Describe what your chick needs in a new home.
__________________________________________
__________________________________________
__________________________________________
__________________________________________
How could you solve the problem?
On a separate piece of paper, write or drawabout your ideas for the brooder and what thebrooder will look like.
How could you test your plan?
__________________________________________
__________________________________________
__________________________________________
__________________________________________
Share the plan.
Listen as each team shares their plans. Writedown the ideas that you think are best.
__________________________________________
__________________________________________
__________________________________________
__________________________________________
What could you do to make the brooderbetter?
With your teacher’s help, work as a class to makea brooder for your chicks. Place a thermometerin the brooder. Record the temperature threetimes a day for two days.
Day One Day Two
Test one _________ Test one_________
Test two _________ Test two _________
Test three ________ Test three________
What changes could you make to your brooderto keep the temperature at 95°F?
__________________________________________
__________________________________________
Name
Use your planning skills to design a brooder, or new home, for your chicksonce they hatch. Answer the following questions to make your plan.
Ever wanted to be a mother hen? Now is your chance. When you raise chicks in a brooder, you are taking the place of the chicks’ mother hen. Through the brooder,you provide warmth, shelter and food. And you learn a lot about how to take care of a baby—even though that baby is mostly fuzz and just a few inches tall.
Hatching Classroom Projects - Building a home ’tweet home - Page 24
1
6
7
2
3
4
Draw a new picture of how the brooder will look.
5

Individual Egg ProgressNumber each egg on the air cell end of the egg.Keep a record of what happens to each egg.
Egg Number 1 2 3 4 5 6 7 8 9 10 11 12 13 14 15 16 17 18
Not Fertile
Fertile did not pip
Fertile and pipped
Hatched
Died
42
Beginner
Embryology Record Sheet
Where did you get the eggs?
______________________________________
What kind of eggs did you set in the incubator?
______________________________________
What temperature is the incubator? __________
When do you add water?
______________________________________
How often do the eggs need to be turned?
______________________________________
How will you check fertility? ________________
______________________________________
______________________________________
Name
Day Set:________________________________________________ Number Eggs Set: _____________
Day Stop Turning: ________________________________________ Number Eggs Fertile: ___________
Day Expected to Hatch:____________________________________ Number Eggs Hatched: _________
Addition and SubtractionA. If you collect two eggs from one nest,
four eggs from another nest and threefrom the final nest, how many eggs willyou have to set in the incubator?
B. Mary had two dozen eggs in herbasket. She dropped the basket andbroke seven eggs. How many eggs arestill unbroken?
C. If you set 18 eggs in the incubator and11 hatched, how many eggs did nothatch?
D. If a hen laid one egg on 19 differentdays during the month of March, howmany days did the hen not lay an egg?
Percentages E. If a hen laid one egg on 20 different
days during the month of April, whatpercent of April did the hen not lay anegg?
F. If you tested ten eggs for fertility andfound that six were fertile, how manyeggs out of 1,000 eggs from the flockwould you expect to be fertile?

43
Egg-stra notes

44
Poultry resourcesBreed reference
American Bantam StandardAmerican Bantam AssociationP. O. Box 127Augusta NJ 07822e-mail: [email protected]
American Standard of PerfectionAmerican Poultry Association133 Millville St.Mendon MA 01756-1210(508) 473-8769e-mail: [email protected]
Extension publications
The following publications are available from:
Extension Publications630 W. Mifflin St.Madison WI 53706(608) 262-3346
Bantams NCR 209Chicken Breeds and VarietiesA2880 (1989)Home Slaughter of Poultry A1478(1989)Poultry for Fun and Food 4H281(1993)Pigeons 4H135 (1985)Raising a Small Turkey FlockNCR060 (1981)Raising Waterfowl A3311
4-H “Skills for Life” Poultry ScienceSeries
NCR 507 Poultry 1 – Scratching the SurfaceNCR 508 Poultry 2 – Testing Your WingsNCR 509 Poultry 3 – Flocking TogetherNCR Poultry 4 – Group Activity Guide
Minnesota Chicken Pattern BU–2350Distribution Center20 Coffey HallMinnesota Extension ServiceUniversity of MinnesotaSt. Paul MN 55108(612) 625-8173
Poultry Judging 408-050Cooperative Extension BulletinDistributionP. O. Box 68583University of NebraskaLincoln NE 68583(402) 472-9712(402) 472-0542 faxe-mail: [email protected]
National poultry archives
National 4-H Poultry and EggConferenceContact: Ken Koelkebeck282 Animal Sciences Lab1207 West Gregory Dr.University of IllinoisUrbana IL 61801(217) 244-0195http://www.ext.vt.edu/national4hpoultry/index.html
Organizations
American Egg Board1460 Renaissance Dr.Park Ridge IL 60608http://www.aeb.org/
American Bantam AssociationP. O. Box 127Augusta NJ 07822
American Poultry Association133 Millville St.Mendon MA 01756-1210(508) 473-8769e-mail: [email protected]://www.ampltya.com/
Poultry Science Association111 N. Dunlap Ave.Savoy IL 01874(217) 356-3182http://www.psa.uiuc.edu/
National Chicken Council1155 15th St. NWWashington DC 20005(202) 296-2622http://www.eatchicken.com/
The National Turkey Federation1225 New York Ave. NW, Suite 400Washington D.C. 20005(202) 898-0100(202) 898-0203 faxhttp://www.turkeyfed.org/U.S. Poultry & Egg Association
1530 Cooledge RoadTucker GA 30084Telephone: (770) 493-9401Fax: (770) 493-9257http://www.poultryegg.org/
Periodicals
Game Breeders Gazette1155 E. 4780 South SSLake City UT 84117
Hen House Herald(exhibition poultry)Box 1647Easley SC 29641
Poultry Digest(egg and meat chickens)Watt Publishing Co.122 S. Wesley Ave.Mount Morris IL 61054
Poultry Press (monthly)P. O. Box 542Connersville NY 47331http://www.poultrypress.com/pp
Turkey WorldWatt Publishing Co.122 S. Wesley Ave.Mount Morris IL 61054
Supply catalogs
Carolina Biological Supply2700 York Rd.Burlington NC 27212(800) 334-5551
Wards Natural Science, Inc.5100 West Henrietta Rd.P. O. Box 92912Rochester NY 14692(800) 962-2660
“Development of the Chicken Embryo”(color poster)Jamesway Incubator Company1712 Williams Rd.P. O. Box 629Monroe NC 28111(704) 291-9113
Science, Engineeringand TechnologyAgricultural Science• Afterschool AgricultureAnimal Science• Beef • Meat Goat• Cat • Pets• Dairy Cattle • Poultry• Dairy Goat • Rabbit• Dog • Sheep• Embryology • Swine• Entomology • Veterinary Science• Exploring Farm Animals • Horse
Engineering and Technology• Aerospace Adventures• Electric Excitement• Computer• Exploring 4-H Robotics • Geospatial• Sewing Expressions• Small Engines• Woodworking Wonders
Environmental Science• Exploring Your Environment• Forestry—Forests of Fun• Fishing for Adventure• Outdoor Adventures
Plant Science• Down-to-Earth—Gardening in the Classroom• Gardening
Science Discovery• Science Discovery Series
Healthy LivingHealth and Fitness• Bicycle Adventures• Child Development—Kids on the Grow• Keeping Fit and HealthyNutrition• Foods• Microwave Magic
CitizenshipCommunication and Expressive Arts • A Palette of Fun• Communications—Express Yourself!• Photography• ¡Qué Rico! Latino Cultural Arts • Theatre Arts• Visual ArtsCommunity Action• Citizenship—Public Adventures• Service LearningLeadership• Exploring 4-H• Step Up To LeadershipPersonal Development• Consumer Savvy• Financial ChampionsWorkforce Preparation• Be the E—Entrepreneurship• Get in the Act!
Resources• Experiential Learning Video
Find more about Embryologyand other projects online at:
www.4-hcurriculum.org
Discover over 180 National 4-H Curriculum titles in mission areas of Science, Engineeringand Technology; Healthy Living; and Citizenship.Youth activity guides are filled with fun,engaging experiences that cultivate abilities youth need for everyday living as theyprogressively gain knowledge about subjects that interest them.
All titles have been reviewed and recommended by the National 4-H Curriculum Jury Reviewprocess, signifying their excellence in providing hands-on learning experiences for youth.

6 Day Embryo Under Candling Light
12 Day Embryo Under Candling Light
The 4-H PledgeI pledge
my Head to clearer thinking,my Heart to greater loyalty,
my Hands to larger service, andmy Health to better living,
for my club, my community,my country, and my world.
Explore more curriculum projects online at:
www.4-hcurriculum.org