handout for demonstration of greet net
TRANSCRIPT

Handout for demonstration of GREET net
The objective of this document is to provide a step by step instructions for creating a simple pathway in GREET, and if
time allows a new vehicle.
The example we’ll be using is the Activated Carbon pathway, which already exists in GREET, but we’ll create a duplicate
of that pathway for instruction purposes.

Step 1. Installation of GREET.net 2015 (you can skip to Step 2, if you’ve GREET installed in your PC)
1.1. Go to the website https://greet.es.anl.gov/greet/.
1.2. Click the link “Download the new GREET 2015 software” that downloads the “greet.application” file.
1.3. Double click “greet.application” file to start the installation process:
1.4. Click the “Install” button:
1.5. GREET.net 2015 should then automatically start:
You may need to install the .Net 4.5 Framework on your computer:
http://www.microsoft.com/en-us/download/details.aspx?id=30653

Step 2. Create a new resource and provide a name for it, e.g., “Activated Carbon Test”
2.1. In the main window of GREET.net, click “Data Editors”
2.2. Click the “Resources” menu and select “Add Resource”. Then enter the following attributes:
Name: “Activated Carbon Test” Density: 2.0 g/cm^3 Market Value: 1250$/t
2.3. Click the button “Add as New”. This will add your newly created resource “Activated Carbon Test” to the
database. (In order to save it to the data file, please click the “File” menu, then “Save”).
Step 3. Create a new stationary process and provide a name for it, e.g., “Production of Activated Carbon Test”
3.1. In the main window of GREET.net, click “Data Editors” (same as Step 2.1)
3.2. Click the “Processes” menu and select “Add Stationary Process” to open the stationary process editor.
3.3. Click the “Resources” tab at the lower left corner of the GREET form to display the available resources.

3.4. Find “Activated Carbon Test” and drag & drop it into the upper right “Main Output” panel. Enter the “Quantity”,
which is the amount of the output of this process in the adjacent textbox (e.g., 1 ton).
3.5. Find “Natural Gas” and drag & drop it into the middle “Inputs” panel. Enter or set the following information:
Quantity: 12 mmBtu Source: Single Pathway
Pathway: NA NG from Shale and Regular Recovery as Stationary Fuels
3.6. Find “Forest Residue” and drag & drop it into the middle “Inputs” panel. Enter or set the following information:
Quantity: 5 ton Source: Single Pathway
Pathway: Forest Residue Production for Ethanol plant
3.7. Click the “Special Items” tab at the lower left corner to bring up the special emission items. Find “CO2” and drag
& drop it into the middle right “Other Output” panel. Enter “-3060237 g”.
3.8. Rename the process (i.e., “Production of Activated Carbon Test”).
Commented [a1]: You need to mention here what is this credit for.
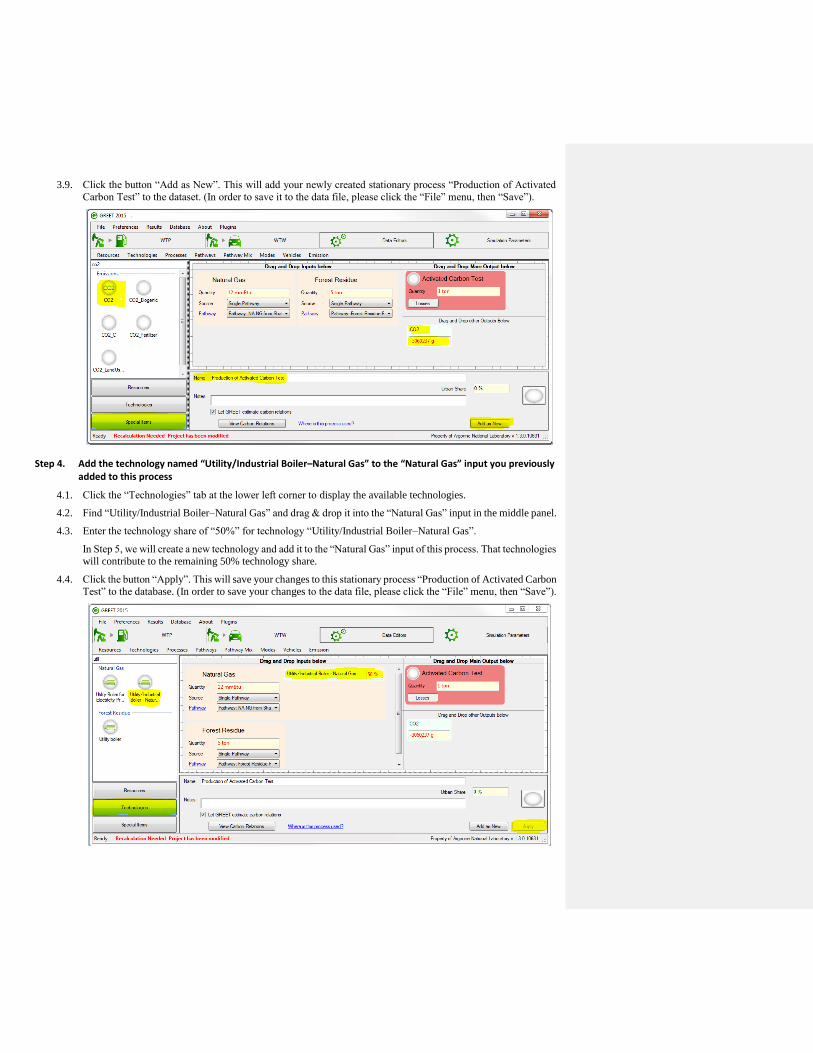
3.9. Click the button “Add as New”. This will add your newly created stationary process “Production of Activated
Carbon Test” to the dataset. (In order to save it to the data file, please click the “File” menu, then “Save”).
Step 4. Add the technology named “Utility/Industrial Boiler–Natural Gas” to the “Natural Gas” input you previously added to this process
4.1. Click the “Technologies” tab at the lower left corner to display the available technologies.
4.2. Find “Utility/Industrial Boiler–Natural Gas” and drag & drop it into the “Natural Gas” input in the middle panel.
4.3. Enter the technology share of “50%” for technology “Utility/Industrial Boiler–Natural Gas”.
In Step 5, we will create a new technology and add it to the “Natural Gas” input of this process. That technologies
will contribute to the remaining 50% technology share.
4.4. Click the button “Apply”. This will save your changes to this stationary process “Production of Activated Carbon
Test” to the database. (In order to save your changes to the data file, please click the “File” menu, then “Save”).

Step 5. Create a new technology “NG Boiler for Activated Carbon Production” and add it to the process “Production of Activated Carbon Test”
5.1. In the main window of GREET.net, click “Data Editors” (same as Step 2.1)
5.2. Click the “Technologies” menu and select “Add Technology”.
5.3. In the popup resource selection window, find “Natural Gas” and double click it to open the technology editor.
5.4. Click the “Add year” button and type in “2015” then hit “Ok”.
5.5. From the dropdown window, select and add the following emissions one by one. Enter the emission factors for
all emissions except for SOx and CO2.

5.6. Right click the emission factor numbers of SOx and CO2, and select “Switch to calculated values”. Emission
factors for these two species will be automatically calculated based on the sulfur and carbon content of the fuel
(i.e., Natural gas in this case)
5.7. Rename the technology (i.e., “NG Boiler for Activated Carbon Production”).
5.8. Click the button “Add as New”. This will add your newly created technology “NG Boiler for Activated Carbon
Production” to the database. (In order to save it to the data file, please click the “File” menu, then “Save”).
5.9. Reopen the stationary process “Production of Activated Carbon Test” by clicking “Data Editor” ==> “Processes”
==> “Modify Process”. In the popup process selection window, find “Production of Activated Carbon Test” and
double click it to open the stationary process in editing mode.
5.10. Repeat Step 4 to add newly created technology “NG Boiler for Activated Carbon Production” to the input
“Natural Gas” in the middle panel.
5.11. Enter the technology share of “50%” for technology “NG Boiler for Activated Carbon Production”.
5.12. Click the button “Apply”. This will save your changes to the existing stationary process “Production of Activated
Carbon Test” to the database. (In order to save your changes to the data file, please click the “File” menu, then
“Save”).

Step 6. Create a new transportation process “Transportation of Activated Carbon Test”
6.1. In the main window of GREET.net, click “Data Editors” (same as Step 2.1)
6.2. Click the “Processes” menu and select “Add Transportation Process” to open the transportation process editor.
6.3. Select the resource to be transported (i.e., “Activated Carbon Test” in this case).
6.4. From the upper left “Location” panel, drag & drop “Bulk Terminal” (under “Stations, Terminals, and Storages”)
as the starting location and “Bio-refinery” as the destination location (under “Plants”) to the main working panel.
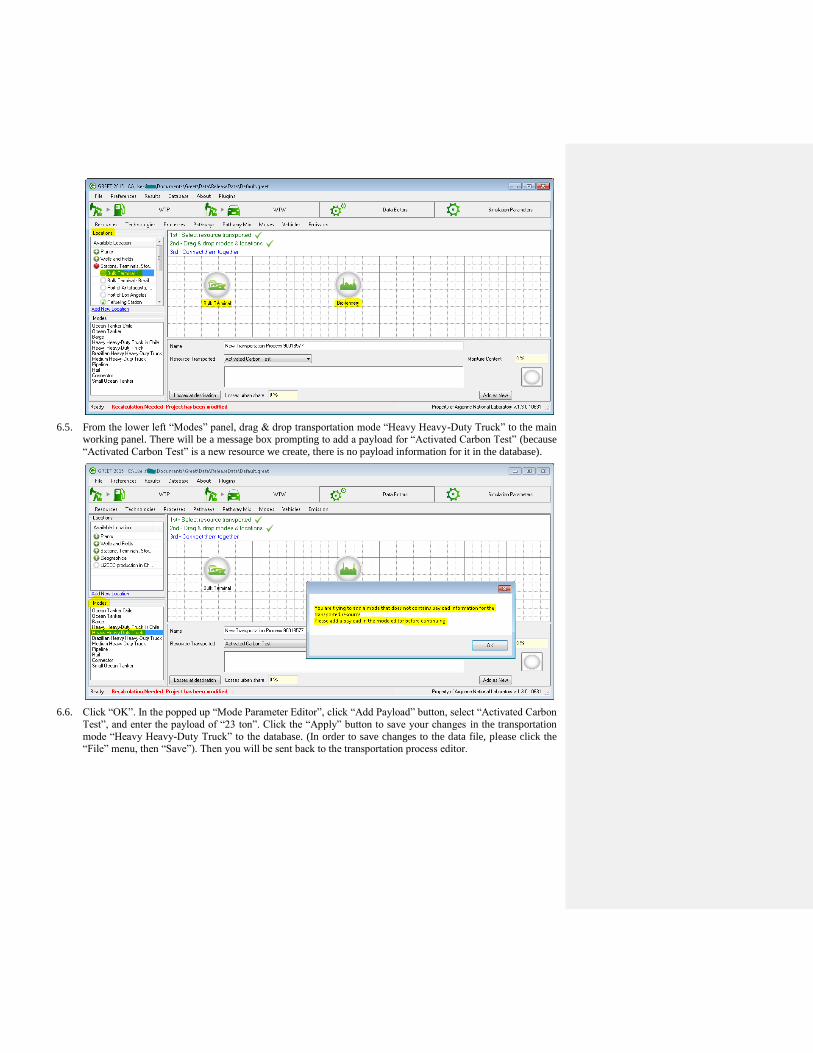
6.5. From the lower left “Modes” panel, drag & drop transportation mode “Heavy Heavy-Duty Truck” to the main
working panel. There will be a message box prompting to add a payload for “Activated Carbon Test” (because
“Activated Carbon Test” is a new resource we create, there is no payload information for it in the database).
6.6. Click “OK”. In the popped up “Mode Parameter Editor”, click “Add Payload” button, select “Activated Carbon
Test”, and enter the payload of “23 ton”. Click the “Apply” button to save your changes in the transportation
mode “Heavy Heavy-Duty Truck” to the database. (In order to save changes to the data file, please click the
“File” menu, then “Save”). Then you will be sent back to the transportation process editor.

6.7. From the lower left “Modes” panel, drag & drop transportation mode “Heavy Heavy-Duty Truck” again to the
main working panel. It would be visually better to place mode “Heavy Heavy-Duty Truck” between the two
locations “Bulk Terminal” and “Bio-refinery”.
6.8. Move the mouse to the right edge of “Bulk Terminal” until a blue rectangle is shown. Click and drag the mouse
to the left edge of “Heavy Heavy-Duty” Truck until another blue rectangle is shown. Release the mouse to make
a connection between “Bulk Terminal” and “Heavy Heavy-Duty Truck”.
6.9. Repeat Step 6.8 to make a connection between “Heavy Heavy-Duty Truck” and “Bio-refinery”.
6.10. Double click the mode “Heavy Heavy-Duty Truck”. In the popped up window “Heavy Heavy-Duty Truck mode
parameter”, enter the following information, and click the “Apply” button.
Distance: 50 mi Share: 100% Urban Share: 0%
Fuel Share: Default Account for backhaul travel: checked
6.11. Rename the transportation process (i.e., “Transportation of Activated Carbon Test”).

6.12. Click the button “Add as New”. This will add your newly created transportation process “Transportation of
Activated Carbon Test” to the dataset. (In order to save it to the data file, please click the “File” menu, then
“Save”).
Step 7. Create a new pathway “Production Pathway of Activated Carbon Test” from the two processes you created above
7.1. In the main window of GREET.net, click “Data Editors” (same as Step 2.1)
7.2. Click the “Pathways” menu and select “Add Pathway” to open the pathway editor.
7.3. In the upper left “Compatible Process” panel, find the newly created stationary process “Production of Activated
Carbon Test”. Drag & drop it to the main working panel.
7.4. Repeat Step 7.3to drag & drop the newly created transportation process “Transportation of Activated Carbon
Test” to the main working panel.
7.5. In the middle left “Compatible pathway outputs” panel, drag & drop output “Activated Carbon Test” to the main
working panel.

7.6. Select the “Connector” icon (the third icon on the upper left corner of the main working panel, see figure below).
Connect the output “Activated Carbon Test” of the stationary process “Production of Activated Carbon Test” to
the input “Activated Carbon Test” of the transportation process “Transportation of Activated Carbon Test”.
Connect the output “Activated Carbon Test” of the transportation process “Transportation of Activated Carbon
Test” to the pathway “OUT” icon.
7.7. Rename the pathway (i.e., “Production Pathway of Activated Carbon Test”).
7.8. Click the button “Add as New”. This will add the newly created pathway “Production Pathway of Activated
Carbon Test” to the database. (In order to save it to the data file, please click the “File” menu, then “Save”).
Step 8. Calculate and view WTP results of the newly created pathway “Production Pathway of Activated Carbon Test”
8.1. Run the simulation by either clicking the “Results” ==> “Calculate” or by pressing “F9”.
8.2. Wait until the calculation indicator disappears.
8.3. In the main window of GREET.net, click “WTP”.
8.4. In the upper left “Products” panel, find our newly created pathway “Production Pathway of Activated Carbon
Test”.
8.5. Click the pathway “Production Pathway of Activated Carbon Test” and it will be shown in the right panel.
8.6. Click the “OUT” icon of this pathway to view the detailed WTP results in the lower left “Results” panel.

8.7. Change the default functional unit “Per 1 kg” of Activated Carbon Test” to “Per 1 ton” by clicking the “1 kg”
button in the lower left “Results” panel. Choose “Use user preference”, unit group “mass”, unit “ton”, and
amount “1”. Click “Apply and Close”. Then the WTP results are expressed as per 1 ton production of “Activated
Carbon Test”.