habits of a successful school orchestra - gia publications · habits of a successful school...
TRANSCRIPT

Habits of a successful school orchestra
Tools and sTraTegies for Taking Your Middle and HigH scHool orcHesTras To THe nexT level
Using Fundamentals Time to Improve Your Orchestra’sTone, Articulation, Intonation, Rhythm and Reading Ability
cHrisTopHer r. selbY
GIA Publications, Inc.Chicago

A-ha Moments
• Rule of Sevens • Inversion Principal
Why Fundamentals Time? Identify three pieces that you would like to teach your students if their technique was a little better.
1. ________________________________________
2. ________________________________________
3. ________________________________________
Think specifically about the pieces you identified above, and describe the skills that your students would need to learn better before they could perform these pieces well enough to get a superior at concert festival.
__________________________________ ________________________________
__________________________________ ________________________________
Key Concept #1: The Need for Fundamentals Time If Orchestra Directors want to teach great orchestral repertoire to their students—and have their students play this music well—they must devote part of their rehearsal to teaching students the fundamental and advancing skills these pieces require. Fundamentals Time is the classroom rehearsal time that you devote to improving student skills and technique. We spend time at the beginning of rehearsals, but also time embedded within the rehearsal to teach and reinforce good technique that improves student performance. What will you take away from this session? Today, we will identify tools and strategies for teaching and improving intonation, rhythmic literacy, and orchestral tone quality during fundamentals time.

Part 1: Teaching Resonant Intonation
Why upper-level middle and high school string students play out of tune 1. Their instruments are out of tune
a. Students must learn to tune themselves; insist on quality instruments b. Students must learn to listen and use a “tuning tone” c. Cross-tuning is required
2. Poor hand position and instrument position increase the difficulty of an instrument that is already challenging to play in tune
a. Increase strategies: Constantly look for new, better ways to teach technique; keep adding to your bag of tricks
b. Decrease tolerance of poor position (zero-tolerance is a good goal to have)
3. Finger patterns don’t agree with the key signature a. Student fingers are not familiar or comfortable with the finger patterns;
solution: spend more time on finger patterns—including cello extensions—to increase muscle memory and aural awareness and skills to differentiate between the patterns
b. Students are not cognitively aware ( or paying attention to) to the key/key signature; solution: spend more time studying 4th and 7th scale degrees in each key
4. Students lack fine tuning skills and experience a. Sing b. Tuning Canon and Chords c. Chorales
5. Range—higher registers pose new challenges with the above mentioned skills a. Shifting b. Scales, Arpeggios, and Thirds c. More study of Higher Positions
1. Tuning Our Instruments Teach Students to Tune Themselves Teach “Tuning Tone”: Using a soft, transparent tone allows students to hear the correct pitch while they tune their strings. Cross Tuning For Classes Comfortable Tuning Themselves
1. The leader plays the A; the students listen for 5 seconds, and then tune their A string at the tip of the bow. Once the A is in tune, the leader turns off the A and instructs the class to “tune up” the rest of their strings. The class tunes their instruments quietly using the tip of the bow and stops playing when they are finished.

2. Even accomplished high school orchestras are still a little out of tune at this point, and the student leader should then take the class through the Cross-Tuning procedure.
A. Everyone plays their A string again to make sure it is perfect. B. Violin/bass play their A strings while violas and cellos tune their D strings. C. Players “switch.” Violas/cellos play their A while violins/basses tune their
D. D. Violins/basses continue to play their D; violas and cellos cross over and
tune their G string. E. Players “switch;” viola/cellos play their D while violin/basses tune their G
string. F. Violins and basses continue to play their G string; violas and cellos cross
over and fine tune their C string. G. Finally, violas and cellos play their A string, while the violins tune their E
string. Then, violas and cellos drop out, and basses tune their E string to the violins. Basses may take few extra seconds to double check their tuning using harmonics.
2. Instrument Left Hand Position Allocate fundamentals time at the beginning of rehearsals for reviewing hand, body and instrument position and technique.
• Have upper instruments stand up; it’s easier for them to play, and for you to see and correct problems.
• Get off the podium and move around the room. • Use calisthenics and maintain zero tolerance for position problems and flaws—
Don’t be an enabler by allowing poor positions. 3. Finger Patterns, then Key Signature Agreement Use exercises that focus on specific patterns to develop muscle memory. Basics: Highs, Lows, Extensions
5II Lower Positions: Finger Patterns, Intonation, and Velocity
?11 œ œ œ œ œ œ œ œ œ œ œ œ# œ œn œ œ œ œb œ œ œ œ œ œ œ œ œ œ œ œ œ œ œ œœœœ� œœœœ
�Œ
? # 44 .... .... .... .... .... ....œ œ œ œ œ œ œ œ œ œ œ œ œ œ œ œ œ œ œ œ œ œ œ œ � Ó
? bbb 44 œ œ œ œ œ œ œ œ œ œ œ œ œ œ, � œ œ œ œ œ œ œ œ œ œ œ œ Œ
? bbb 44 .... .... .... .... .... .... .... ....œ4
œn œ œ œ œb œ œ œ4
œ2
œn œ œ œ œb œ œ œ œ œ1
œ œ œ œ œ œ œ œn œ œ œ œb
? 44 œ œ œ œ œ œ œ œ œ œ œ œ œ œ œ œ œ œ œ œ œb œ œ œ œ œ œ œ œb œ œ œ œ œb œ œ œ œ œ œ?6 œ œ œ œ# œ œ œ œ œ œ œ œ# œ œ œ œ œ œ œ œ œ œ œN œ œ œ œ œ œ œ œ œ œ œ œ œ œ œ œ œ
? 44 .... .... .... .... ....œ3 œ#2
œ œ œ# 4 œ2 œ œ œ3 œ1
œ œ œ# œ œ œ œ# œ# œ œ œ œ œ œN œ1
œ# œ œ œ œ# œ2 3 4
? 44 .... .... .... .... .... .... .... ....œ œ œ œ œ œ# œ# œ3 x2 œ œ# œ# œ œ œN œ œ œ œ œ œ# œ œ œ# œ œ œ œ œn œ œ œ# œ
? ### 44 .... ....œ œ œ œ œ œ œ œ2 œ œ œ œ œ œ œ œx2 œ œ œ œ œ œ œ œ3 œ œ œ œ œ œ œ œx2 � Ó
II Lower Positions: Finger Patterns,Intonation, and Velocity
12. Natural & Sharp A. B. C.
13. Mary Had a Little Lamb (Backward Extension)
14. Backward Extension Exercises A. B. C. D.
15. Dominant Etude
16. Forward Extension Exercises * A. B. C. D.
17. Scale and Arpeggio Forward Extensions A. B. C. D.
18. Extension Etude
* 16A and B: Match the 3rd finger with open G. Keep 2nd finger perpendicular to string with the thumb directly behind it. Always keep 4th finger curved, relaxed—never stretched and straight. The extension (space) occurs between the 1st and 2nd fingers.
16C: Play all of “Mary” with the 2nd finger perpendicular to the string, and 4th finger curved and relaxed. 16D: When 2nd finger moves from F to Fs, keep it perpendicular to the string and move the thumb with it.

Tetrachord Etude The purpose of the Tetrachord Etude is to efficiently focus on finger patterns.
• It can be used as a daily warm-up or in a rehearsal to review the problematic finger pattern and transfer the pattern to the music.
• The etude is to be learned and performed on one string. Cellos shift between two positions in a way that is common for them; basses will shift through three positions and use bass pivot fingerings.
Tetrachord Etude Strategies
1. Set the tuner to a low E pedal tone and begin with the Dorian pattern written below.
2. Students should learn one measure at a time while listening and adjusting their fingertips to finely tune the notes in the pattern.
3. After students can play the Tetrachord Etude with the dorian pattern, teach them the other patterns. A “pedal C” on the tuner works better for Phrygian and Lydian patterns.
4. After all the patterns have been learned, have students perform them one after another, to help them hear and understand the differences.
5. To practice changing modes in quick succession, omit measure one (tuning notes), and perform only measures two and three after each repeat.
6. Have students perform the etude on other strings or in higher positions to perfect the intonation and tone quality of all other notes on the instrument.
6 Habits of a Successful String Musician - Violin
& b 44 .œ œ œ œ œ œ œ œ œ œ .œ œ .œŸ
œ œ .œ œ œ œ œ œ œ œ œ œ .œ œ .œŸ
œ œ
& b .œ œ# œ œ œ œ œ œ œ œ .œ œ .œŸ
œ œ .œ œ œ œ œ œ œ œ œN œ .œ œ .œŸ
œ œ
& b .....œ œ .œŸ
œ œ .œ œ .œŸ
œ œ � Ó
& œ œ œ œ œ œ œ œ œ œ œ œ œ œ œ œ
& œ œ œ œ œ œ œ œ œ œ œ œ œ œ œ œ œ œ œ œ œ œ œ œ œ œ œ œ œ œ œ œ& œ œ œ œ œ œ œ œ œ œ œ œ œ œ œ œ œ œ œ œ œ œ œ œ
& œ œ œ# & œ œ œN & œ œb œ
& œ œ# œ# œ & œ œ# œn œ & œ œn œ œ & œb œ œ œ & œb œ œ œb
& 812 .... .....œU .œ#U .œU .œU4
œ œ œ œ# œ œ œ œ œ œ œ œ4 4 œ œ# œ œ œ œ œ œ œ œ œ œ .w
19. Tetrachord Etude
Tuning Notes (Dorian Tetrachord) Etude
After learning the Etude with the Dorian tetrachord above, play it with one of the other tetrachords below.
Tetrachords: Major Dorian Phrygian Lydian Major (half pos.)
20. Velocity Etude
Perform as written first, and then perform with the different finger patterns (#2. Fn and #3. Ef) shown below.
& 44 œ œ œ# œ œ œ œ# œ œ œ œ œ œ œ œ# œ œ œ œ œ œ œ œ œ œ œ œ œ œ œ œ# œ œ œ œ œ œ œ œ œ œ Finger Pattern #1 #2 #3
Velocity Etude Variations A. B. C. D. E. F. G. H.
I. J. K. L. M. N.
O. P. Q. R.
21. Trills The trills on beats 2 and 4 are performed the same way.

Teaching Velocity Use velocity exercises develop finger speed and accuracy while maintaining a relaxed left hand. This Velocity Etude also improves bow management and tone production.
• Once the Major pattern is learned, teach the Minor and Phrygian patterns. • Perform the etude with all three patterns in succession as a group without
stopping. This is Variation A; the other variations can be taught the same way. • Find the students’ maximum relaxed tempo; write down this “speed limit” and
make it a goal to extend this limit during the course of the year. Always check for relaxed left hands (especially thumbs.) Relaxation is a key component of these exercises, as tension slows fingers down.
Additional Finger Pattern Studies
11IV Higher Positions and Alternate Clefs
& œ œ œ œ œ œ œ œ œ œ œ œ œ œ œ œ œ œ œ œ œ œ œ œ& œ œ œ œ œ œ œ œ œ œ œ œ œ œ œ œ œ œ œ œ œ œ œ œ
& œ œ œ#1
2
Third Pos.
Second Pos.3 4
2 3 & œ œ œN & œ œb œ
IV Higher Positions and Alternate Clefs48. Velocity Etude in Higher PositionsPerform as written first, and then perform with the different finger patterns (#2. Fn and #3. Ef) shown below.
& 44 œ œ œ# œ œ œ œ# œ œ œ œ œ œ œ œ# œ œ œ œ œ œ œ œ œ œ œ œ œ œ œ œ# œ œ œ œ œ œ œ œ œ œFinger Positions #1 #2 #3
Velocity Etude Variations A. B. C. D. E. F.
G. H. J. K. M. N.
Alternate ClefsAdvanced violinists should learn alto clef, so they can double on viola if needed.
Treble Clef
Alto Clef
C D E F G A B C
&B
ww
ww
ww
ww
ww
ww
ww
ww
C D E F G A B C
B 44 .... .....œ Jœ œ œ œ œ œ �
& .œ Jœ œ œ œ œ œ � Bœ � œ œ œ �
& 44 œ œ œ œ B œ œ œ œ & œ œ œ œ B œ œ œ œ & œ œ œ œ B œ œ œ œ & œ œ œ œ B œ œ œ œ
& # 44 œ œ œ œ œ œ œ œ œ œ œ œ œ œ B œ œ œ œ œ œ œ œ œ œ œ œ œ œ � Ó49. G Major Scale with Alternate Clef same as measures 1 and 2
50. Scotland’s Burning
51. Viva la Musica
& # 44 œ œ œ œ œ œ œn œ œn œ œ œ œ œ œ œb œ œ# œ œn œ œ œn œ œ# œn œb œ œ œb œ œn œ œ œ œ w
& b 44 œ œ œ œ œ œ œb œ œb œ œ œ œ œ œ œb œ œn œ œb œ œ œb œ œn œb œb œ œ œb œ œb œ œ œ œ w
& bb 44 œ œ œ œ œ œ œb œ œb œ œ œ œ œ œ œb œ œn œ œb œ œ œb œ œn œb œb œ œ œb œ œb œ œ œ œ w
& 43 œ œ# œ œ# œ œ3 4 0 1 -1 2
21 -1œ# œ œ# œ œ# œ-2 3 4 0 1 -1
2 3 4 2
œ œ# œ œ# œ œ2 -2 3 4 0 1
-1 2
œ# œ œ# œ œ# œ-1 2 -2 3 -3 4
2 -1 2 -1 2 3
Œx4
4
&œ œ œb œ œb œ4 -4 3 -3 2 -2
3 2 1 -4 3
œb œ œ œb œ œb1 -1 0 4 3 2
2
œ œ œb œ œb œ-2 1-1 0 4 3
1 -21
œb œ œ œb œ œb2 -2 1 -1 0 4
1 -2 1.
3
Chromatic and Jazz ScalesA chromatic scale is made entirely of half steps.
185. Two Octave Chromatic C Scale
Mixolydian and Blues Scales
& 44 œ œ œ œ œ œ œb œ œb œ œ œ œ œ œ œb œ œ# œ œb œ œ œb œ œ# œn œb œ œ œb œ œb œ œ œ œ w
186. Bf Mixolydian Blues Scale and Arpeggio
187. F Mixolydian Blues Scale and Arpeggio
188. C Mixolydian Blues Scale and Arpeggio
189. G Mixolydian Blues Scale and Arpeggio
& ### 44 œ œ œ œ œ œ œn œ œn œ œ œ œ œ œ œn œ œ# œ œn œ œ œn œ œ# œn œn œ œ œn œ œn œ œ œ œ w
& ## 44 œ œ œ œ œ œ œn œ œn œ œ œ œ œ œ œn œ œ# œ œn œ œ œn œ œ# œn œn œ œ œn œ œn œ œ œ œ w190. D Mixolydian Blues Scale and Arpeggio
191. A Mixolydian Blues Scale and Arpeggio
39V Scales, Arpeggios, and Thirds
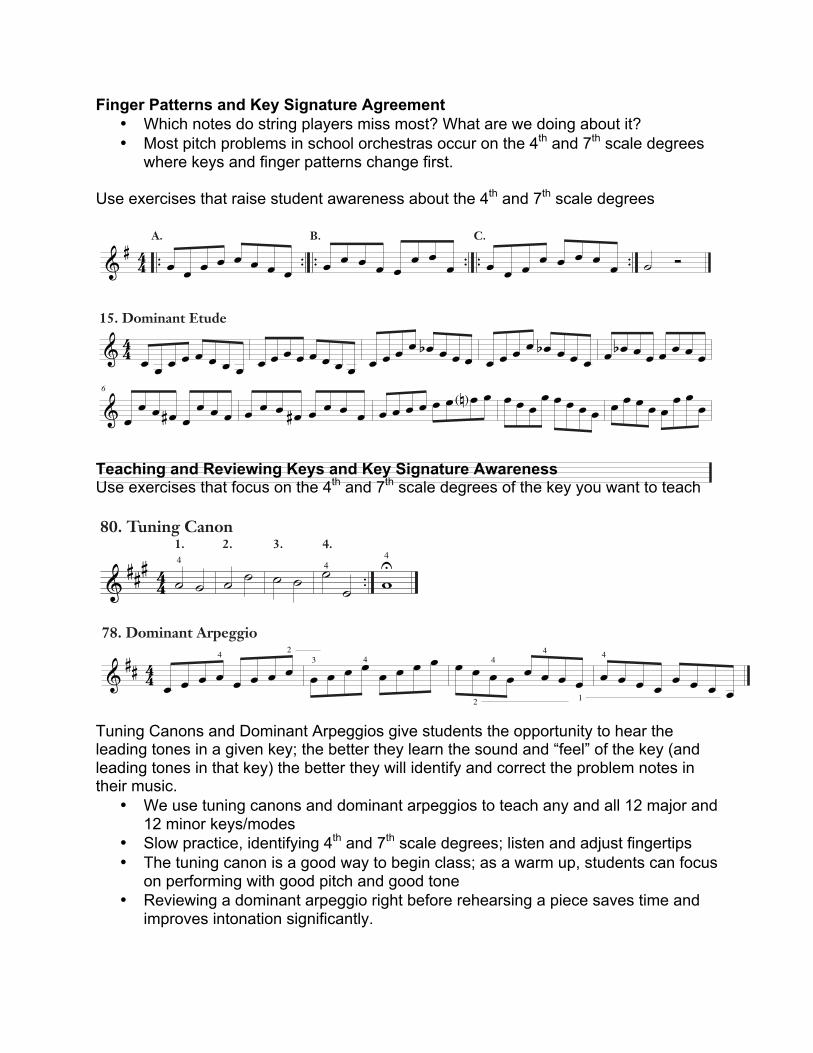
Finger Patterns and Key Signature Agreement • Which notes do string players miss most? What are we doing about it? • Most pitch problems in school orchestras occur on the 4th and 7th scale degrees
where keys and finger patterns change first. Use exercises that raise student awareness about the 4th and 7th scale degrees
Teaching and Reviewing Keys and Key Signature Awareness Use exercises that focus on the 4th and 7th scale degrees of the key you want to teach
Tuning Canons and Dominant Arpeggios give students the opportunity to hear the leading tones in a given key; the better they learn the sound and “feel” of the key (and leading tones in that key) the better they will identify and correct the problem notes in their music.
• We use tuning canons and dominant arpeggios to teach any and all 12 major and 12 minor keys/modes
• Slow practice, identifying 4th and 7th scale degrees; listen and adjust fingertips • The tuning canon is a good way to begin class; as a warm up, students can focus
on performing with good pitch and good tone • Reviewing a dominant arpeggio right before rehearsing a piece saves time and
improves intonation significantly.
5II Lower Positions: Finger Patterns, Intonation, and Velocity
& 44 .... .... .... .... .... .... .... ....œ œ œ œ œ œ# œ# œ œ œ# œ# œ œ œN œ œ œ œ œ œ# œ œ œ# œ4 œ œ œ œn œ œ œ# œ
4
& 44 .... .... .... .... ....œ œ#2
œ œ œ# œ œ œ œ œ1
œ œ œ# œ œ œ œ# œ# œ œ œ œ œ œN œ1œ# œ œ œ œ# œ
& 44 œ œ œ œ œ œ œ œ œ œ œ œ œ œ œ œ œ œ œ œ œb œ œ œ œ œ œ œ œb œ œ œ œ œb œ œ œ œ œ œ
& bbb 44 .... .... .... .... .... .... .... ....œ3
œn œ œ œ œb œ œ œ œ œn œ œ œ œb œ3
œ œ œ œ1
œ œ œ œ œ œ œ œn œ œ œ œb
& bbb 44 œ œ œ œ œ œ œ œ œ œ œ œ œ œ, � œ œ œ œ œ œ œ œ œ œ œ œ Œ
& # 44 .... .... .... .... .... ....œ œ œ œ œ œ œ œ œ œ œ œ œ œ œ œ œ œ œ œ œ œ œ œ � Ó
II Lower Positions: Finger Patterns,Intonation, and Velocity
12. Natural & Sharp A. B. C.
13. Mary Had a Little Lamb (Backward Extension)
14. Backward Extension Exercises A. B. C. D.
15. Dominant Etude
&6
œ œ œ œ# œ œ œ œ œ œ œ œ# œ œ œ œ œ œ œ œ œ œ œN œ œ œ œ œ œ œ œ œ œ œ œ œ œ œ œ œ
&11 œ œ œ œ œ œ œ œ œ œ œ œ# œ œn œ œ œ œb œ œ œ œ œ œ œ œ œ œ œ œ œ œ œ œœœ
� œœœ� Œ
16. Forward Extension Exercises A. B. C. D.
17. Scale and Arpeggio Forward Extensions A. B. C. D.
& ### 44 .... ....œ œ œ œ œ œ œ œ œ œ œ œ œ œ œ œ4
œ œ œ œ œ œ œ œ œ œ œ œ œ œ œ œ � Ó18. Extension Etude
18 Habits of a Successful String Musician - Violin
& ### 44 ..� �4 � � � � � �4 wU4
& ### 44 wU wU wwU
div.
wwU wU wU wwU wwU
& ### 44 œ œ œ œ œ œ œ1
œ œ œ œ œ œ œ4 4
w & ### 44 œ œ œ œ œ œ1
4
w& ### 44 œ œ œ œ œ œ œ œ œ œ œ œ œ œ
1
œ œ œ œ œ œ œ4 œ œ œ œ œ œ œ4 4
w& ### 44 œ œ œ œ œ œ-1
IV
œ œ œ œ œ œ-1
I w & ### 44 œ œ œ œ œ œ œ œ œ œ œ œ œ œ-1
III
A
& ### œ œ œ œ œ œ œ4-11E
VI
œ œ œ œ œ œ œ4-3
x4
III
œ œ œ œ œ œ œ-2 4
I
œ œ œ œ œ œ œ4 4
w
& ### 44 œ œ œ œ œ œ-1 3 1A
IV
D œ œ œ œ œ œ-1 3 14
1 3G A
VII
œ œ œ œ œ œ-1 -1
13 1D
IV I w
& ### 44 œ œ œ œ œ œ œ œ1 2 0
œ œ œ œ œ œ œ œ1
œ œ œ œ œ œ œ œ1
4
œ œ œ œ œ œ œ œ1
4 2 1 -14
& ### 44 œ œ œ œ œ œ œ œ4
1
œ œ œ œ œ œ œ4
1
0 œ œ œ œ œ œ œ œ4
1œ œ œ œ œ œ œ4 1 -1
& ### œ œ œ œ œ œ œ œ4
1
œ œ œ œ œ œ œ1
œ œ œ œ œ œ œ œ4
1
œ œ œ œ œ œ œ41
A Major
80. Tuning Canon 81. Tuning Chords 1. 2. 3. 4.
82. Scales and Arpeggios - One Octave
Two Octaves
Three Octaves
83. Dominant Arpeggio
84. Thirds - Lower Octave
Upper Octave
17V Scales, Arpeggios, and Thirds
& ## 44 ..� � � � � � � � wU & ## 44 wU wU wwUdiv.
wwU wU wU-2 wwU wwU
& ## 44 œ œ œ œ œ œ œ œ œ œ œ œ œ œ4
w4 & ## 44 œ œ œ œ œ œ
4
w4
& ## 44 œ œ œ œ œ œ œ œ œ œ œ œ œ œ-1
III 1
œ œ œ œ œ œ œ œ œ œ œ œ œ œ-2 4
Iw4
& ## 44 œ œ œ œ œ œ-1
III 1
œ œ œ œ œ œ0
I
2
w & ## 44 œ œ œ œ œ œ œ21GD
III
œ œ œ œ œ œ œ-111AE
V
& ## œ œ œ œ œ œ œ-1 -1
4
VII XI
� œ œ œ œ œ œ œx4-3
-4 3
VI
œ œ œ œ œ œ œ-34A
III
œ œ œ œ œ œ œ4 4D G
w2
& ## 44 œ œ œ œ œ œ-12 4 2 13D A
III V
G
1
œ œ œ œ œ œ-1x4
23 3 1E
VIII
� œ œ œ œ œ œ-4
1 A1 23
D G
III
4
w2
& ## 44 œ œ œ œ œ œ œ œ4 2
œ œ œ œ œ œ œ œ3 4 œ œ œ œ œ œ œ œ2
44
1
œ œ œ œ œ œ œ œ4
& ## 44 œ œ œ œ œ œ œ œ4
1
œ œ œ œ œ œ œ1
œ œ œ œ œ œ œ œ4
1
œ œ œ œ œ œ œ4
1
& ## œ œ œ œ œ œ œ œ-2III
œ œ œ œ œ œ œ-2
V
œ œ œ œ œ œ œ œ-2
I
-2
III
œ œ œ œ œ œ œ4
1
D Major
75. Tuning Canon 76. Tuning Chords 1. 2. 3. 4.
77. Scales and Arpeggios - One Octave
Two Octaves
Three Octaves
78. Dominant Arpeggio
79. Thirds - Lower Octave
Upper Octave
15V Scales, Arpeggios, and Thirds
& œ œ œ œ œ œ œ œ4 œ œ œ œ œ œ œ-2
III 1
œ œ œ œ œ œ œ œ-2
I
œ œ œ œ œ œ œ4
& 44 œ œ œ œ œ œ œ œ4I
3
1
œ œ œ œ œ œ œ œ œ œ œ œ œ œ œ4
1œ œ œ œ œ œ œ
4
1
& 44 œ œ œ œ œ œ œ œ1
œ œ œ œ œ œ œ œ œ œ œ œ œ œ œ œ1
œ œ œ œ œ œ œ œ4 4
& 44 œ œ œ œ œ œ4œ œ œ œ œ œx4
4
w & 44 œ œ œ œ œ œ œ2 1
II
G D œ œ œ œ œ œ œ-111
IV
AE
& 44 œ œ œ œ œ œ œ œ œ œ œ œ œ œ-1
III
œ œ œ œ œ œ œ4 œ œ œ œ œ œ œ-2 4 4
Iw
& 44 œ œ œ œ œ œ œ œ œ œ œ œ œ œ4 4
w & 44 œ œ œ œ œ œ1
w
& 44 ..� � � � � �4 � � wU & 44 wU wU wwUdiv.
wwU wU wU wwU -2 wwU
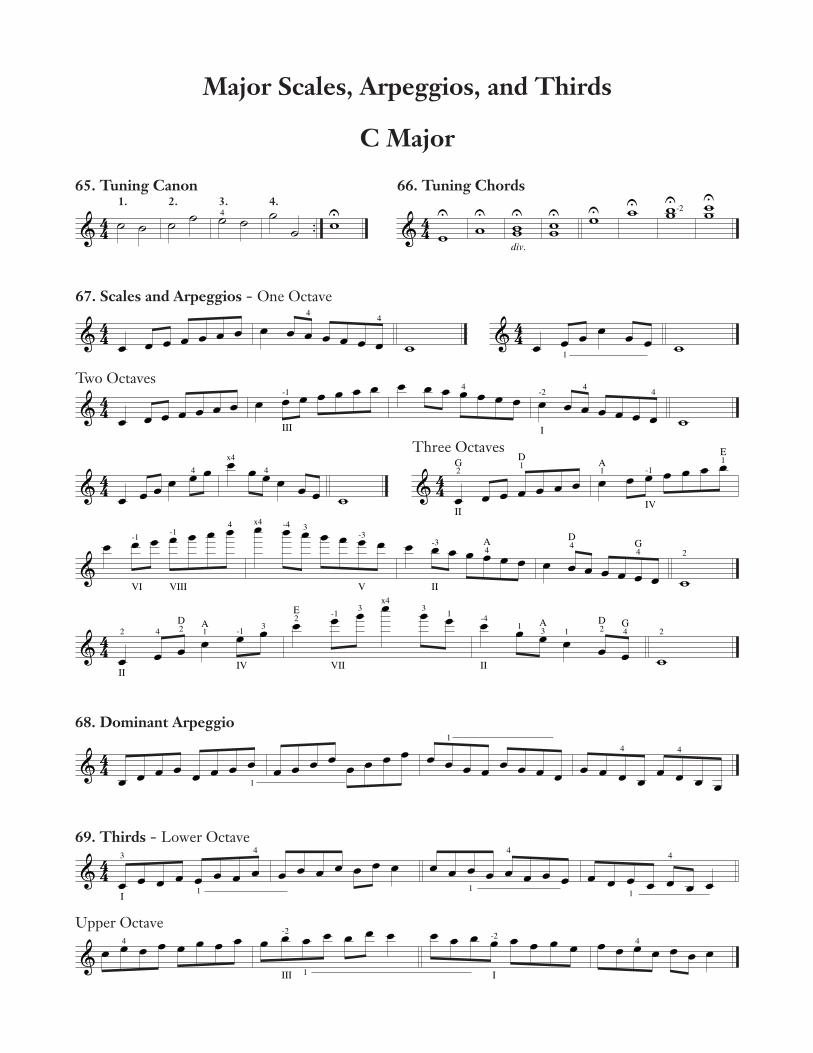
Major Scales, Arpeggios, and Thirds
C Major
65. Tuning Canon 66. Tuning Chords 1. 2. 3. 4.
67. Scales and Arpeggios - One Octave
Two Octaves
Three Octaves
&œ œ œ œ œ œ œ
-1 -14
VI VIII
œ œ œ œ œ œ œx4-3
-4 3
V
œ œ œ œ œ œ œ-34A
II
œ œ œ œ œ œ œ4
4
D G
w2
& 44 œ œ œ œ œ œ-12 4 2 1 3D A
IIIV
œ œ œ œ œ œ-1x4
23 3 1E
VII
œ œ œ œ œ œ-4
1 A1 2 43
D G
II w2
68. Dominant Arpeggio
69. Thirds - Lower Octave
Upper Octave
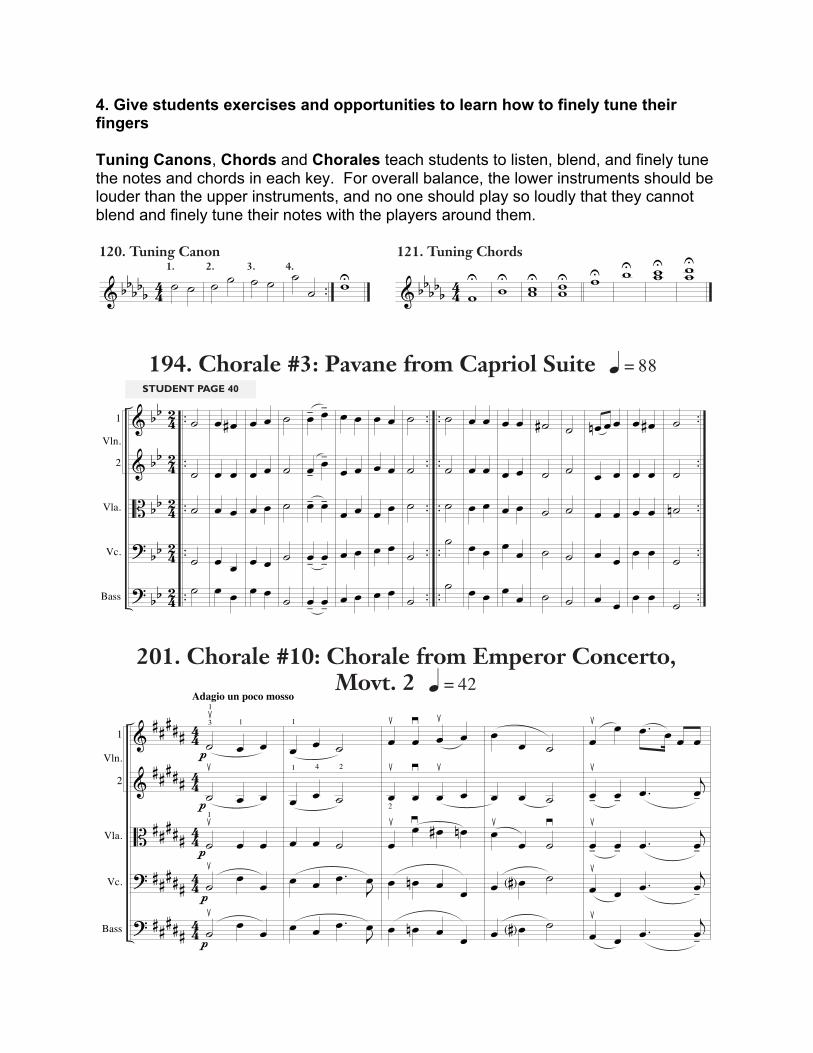
4. Give students exercises and opportunities to learn how to finely tune their fingers Tuning Canons, Chords and Chorales teach students to listen, blend, and finely tune the notes and chords in each key. For overall balance, the lower instruments should be louder than the upper instruments, and no one should play so loudly that they cannot blend and finely tune their notes with the players around them.
26 Habits of a Successful String Musician - Violin
& bbbbb 44 ..� � � � � � � � wU & bbbbb 44 wU wU wwU wwU wU wU wwU wwU
& bbbbb 44 œ œ œ œ œ œ œ1
œ œ œ œ œ œ œ w & bbbbb 44 œ œ œ œ œ œ w
& bbbbb 44 œ œ œ œ œ œ œ œ œ œ œ œ œ œ-1
III 1
œ œ œ œ œ œ œ œ œ œ œ œ œ œ-2 4
Iw
& bbbbb 44 œ œ œ œ œ œ-1III
œ œ œ œ œ œ-1
Iw & bbbbb 44 œ œ œ œ œ œ œ2
1GD
III
œ œ œ œ œ œ œ-111AE
V
& bbbbb œ œ œ œ œ œ œ-1 -1
4
VII IX
� œ œ œ œ œ œ œx4-3
-4 3
VI
œ œ œ œ œ œ œ-4 -34A
III
œ œ œ œ œ œ œ4 4D G
w2
& bbbbb 44 œ œ œ œ œ œ-12 4 2 13D A
III V
œ œ œ œ œ œ-1x4
23 3 1E
VIII
� œ œ œ œ œ œ-4
1 A1 2 43
D G
IIIw2
& bbbbb 44 œ œ œ œ œ œ œ œI
3
1
œ œ œ œ œ œ œ œ œ œ œ œ œ œ œ œ œ œ œ œ œ œ œ œ
& bbbbb 44 œ œ œ œ œ œ œ œ11
œ œ œ œ œ œ œ œ œ œ œ œ œ œ œ œ œ œ œ œ œ œ1
& bbbbb œ œ œ œ œ œ œ œ-2III
1 œ œ œ œ œ œ œ-2
V
œ œ œ œ œ œ œ œ-2
I
-2
III
1 œ œ œ œ œ œ œ
Df Major
120. Tuning Canon 121. Tuning Chords 1. 2. 3. 4.
122. Scales and Arpeggios - One Octave
Two Octaves
Three Octaves
123. Dominant Arpeggio
124. Thirds - Lower Octave
Upper Octave
119VI Chorales
&&B??
bbb bb bb bb b
4242424242
..
..
..
..
..
..
..
..
..
..
..
..
..
..
..
..
..
..
..
..
1
2
Vla.
Vc.
Bass
Vln.
˙˙˙˙˙
œ œ#œ œœ œœ œœ œ
œ œœ œœ œœ œœ œ
˙˙˙˙˙
œ- œ-
œ- œ-œ- œ-
œ- œ-œ- œ-
œ œœ œœ œœ œœ œ
œ œœ œœ œœ œœ œ
˙˙˙˙˙
˙˙˙˙˙
œ œœ œœ œœ œœ œ
œ œœ œœ œœ œœ œ
˙#˙˙˙˙
˙˙˙˙˙
œn œ œœ œœ œœ œœ œ
œ œ#œ œœ œœ œœ œ
˙˙˙n˙˙
193. Chorale #2: Hydrofol q = 88
&&B??
4343434343
..
..
..
..
..
..
..
..
..
..
1
2
Vla.
Vc.
Bass
Vln.
˙ œŒ œ! œ˙ œ˙ œ˙ œ
4
.œ Jœ œ
.œ jœ œ˙ œ˙ œ˙ œ
˙ œŒ œ œœ œ œœ œ œœ œ œ
4
4
œ œ œœ œ œœ œ œœ œ œœ œ œ
˙ œŒ œ! œœ œ œ œœ œ œœ œ œ
˙ œ
˙ œ˙ œ œ˙ œ˙ œ
4 œ œ œœ œ œ˙ œœ œ œ
˙ œ
4
.˙
.˙
.˙
.˙
.˙
"̇- œ-"̇- œ-"̇- œ-"
."̇
."̇
œ œ œœ œ œ-̇ œ-
˙ œ-˙ œ-
-̇ œ--̇ œ-œ œ œ.˙.˙
4
œ œ œœ œ œœ œ œœ œ œœ œ œ
&&B??
1
2
Vla.
Vc.
Bass
Vln.
13
-̇ œ--̇ œ--̇ œ-˙ œ˙ œ
œ œ œœ œ œ˙ œ˙ œ-
˙ œ-
œ œ œœ œ œ˙ œ˙ œ-
˙ œ
.˙œ œ œ
.˙
.˙
.˙
œ! œ œœ! œ œ!̇ œ!̇ œ.!̇
4 4
œ œ œ.œ Jœ œ˙ œ˙ œ.˙
œ œ œ˙ œ˙ œœ œ œ˙ œ"
4 œ œ œ œ œœ œ œ œ œ˙ œ˙ œ œ˙ œ œ
˙ œœ œ œœ œ œ
.˙
.˙
4
œ œ œ
œ œ œ˙ œœ œ œœ œ œ
4
˙ œ˙ œ˙ œœ œ œ˙ œ
4 .˙
.˙
.˙
.˙
.˙
194. Chorale #3: Pavane from Capriol Suite q = 88
STUDENT PAGE 40
STUDENT PAGE 40
128 Habits of a Successful String Musician - Conductor
&&B??
###### # # # ## # # # ## # # # ## # # # #
1
2
Vla.
Vc.
Bass
Vln.
6
œ! œ .œ œ œ œ
œ-!œ- .œ jœ-
œ-! œ- .œ jœ-œ! œ .œ jœ-œ! œ .œ jœ-
œ œ‹ œ Œ
œ œ œ Œ
œ œ œ Œœ œ œ Œœ œ œ Œ
cresc.
cresc.
cresc.
cresc.
cresc.
œ œ œ Œ
œ œ œ Œ
œ œ œ Œœ œ œ Œœ œ œ Œ
œ"1 œ œ œ2 œ
œ" œ œ œ œœ" œ œ œœ" œ œ œœ" œ œ œ
fffff
œ œ œ Œ
œ œ œ Œ
œ œ œ Œœ œ œ Œœ œ œ Œ
dim. pdim.
dim.
dim.
dim.
pppp
&&&BB
bbbbb
1
2
Vla.
Vc.
Bass
Vln.
25 .œ Jœ œ œ˙ œ œb.œ Jœ œ œ.œ Jœ œ œ.œ Jœ œ œ
˙ ˙˙ ˙˙ ˙˙ ˙˙ ˙
œ œ œ œœ œN ˙
œ œ œ œ˙ ˙˙ ˙
wwwœ œ œ œw
.œ Jœ œ œ
.œ Jœ œ œ
.œ Jœ œ œ
.œ Jœ œ œ
.œ Jœ œ œ
˙ ˙˙ ˙˙ ˙˙ œ œ˙ ˙
œ œ .œ Jœ˙ œ œ˙ œ œ˙ ˙˙ ˙
wwwww
&&B??
###### # # # ## # # # ## # # # ## # # # #
44
44
44
44
44
1
2
Vla.
Vc.
Bass
Vln.˙!3
œ œ˙!œ œ
!̇1 œ œ!̇ œ œ!̇ œ œ
ppp
1
1
pp
Adagio un poco mosso
œ œ ˙œ1
œ4
˙2
œ œ ˙œ œ .œ Jœœ œ .œ Jœ
1 œ! œ" œ! œ
œ!2œ"œ!œ
œ! œ" œ# œn
œ œn œ œœ œn œ œ
œ œ ˙œ œ ˙œ! œ "̇
œ œa ˙
œ œa ˙
œ! œ .œ œ œ œœ-!œ- .œ jœ-
œ-! œ- .œ jœ-œ! œ .œ jœ-œ! œ .œ jœ-
(200. Chorale #9: In the Bleak Midwinter - continued)
201. Chorale #10: Chorale from Emperor Concerto,Movt. 2 q = 42
STUDENT PAGE 42

5. Teaching Range Shifting Teach students about the different kinds of shifts: Both Same and Different Finger Shifts
Use shifting exercises that develop skills throughout the entire range of the instrument. These exercises also help students develop well-balanced instrument positions to shift easily and correctly.
Use different etudes to teach different kinds of shifting patterns
7III Shifting Exercises
& # 44 œ œ œ œ-1
œ œ �-1 œ œ œ œ-1 œ œ �-2
œ œ œ œ-2 œ œ �-1 œ œ œ œ-3 œ œ �-2
& # 44 œ ‚ œ �-3 œ ‚ œ �-2 œ ‚ œ �-3 œ ‚ œ �-1 œ œ �-1 œ œ �
-2 œ œ �-1 œ œ �-3
& # 44 œ œ �-2
III
œ œ �-3
I
.œ œ œ �-2
III
.œ œ œ �-3
I
œ ‚ œ �-3
III
œ ‚ œ �-1
I
& # 44 œ œ �-1
III
œ œ �-2
I
.œ œ œ �-1
III
.œ œ œ �-2
I
œ ‚ œ �-2
III
œ ‚ œ �-1
I
& # 44 œ œ �-1
II
œ œ �-1
Iœ œ �-1
III
œ œ �-1
Iœ œ �-1
IV
œ œ �-1
Iœ œ �-1
V
œ œ �-1
I
& # 44 œ œ �-1
III
œ œ �-1
I
œ œ �-2
III
œ œ �-2
I
œ œ �-3
III
œ œ �-3
I
& # 44 œ œ �3 œ œ � œ œ �-1
III
œ œ �-1
I
œ œ �4 œ œ � œ œ �-2
III
œ œ �-2
I
& ## 44 œ Œ œ Œ0sul D
œ Œ œ Œ1 œ Œ œ Œ2 œ Œ œ Œ3 œ Œ œ Œ3
œ Œ œ Œ2
œ Œ œ Œ1
� Ó0
III Shifting Exercises
22. Shifting to the Harmonic
23. Shifting to the Same Finger Perform all shifting exercises with and without slurs.
24.
25. Shifting Up the String
� 26. Shifting to a Different Finger
27.
28.
29. Etude in E Minor Mark the silent shifts with a dot or a diamond.
9III Shifting Exercises
& #### 44 œ œ œ œ œ œ œ œ1
I
œ œ œ œ œ œ œ œ-1
III
œ œ œ œ œ œ œ œ-1
V
œ œ œ œ �-2
VI
& #### œ œ œ œ œ œ œ œ-2
IV
œ œ œ œ œ œ œ œ-2
II
œ œ œ œ œ œ œ œ-2
1/2
œ œ œ œ �-1
I
& # 44 .... œ œ œ œ œ œ œ œ3-3
III
œ œ œ œ œ œ œ œ-3
4
I
œ œ œ œ œ œ œ œ-4
III
œ œ œ œ œ œ œ œ-4
-3
I III
& # ....œ œ œ œ œ œ œ œ-3
I
œ œ œ œ œ œ œ œ-3
-3-4
IIII III
œ œ œ œ œ œ œ œ-4
I
1.œ œ œ œ œ œ œ œ-4-4
III I
2.œ œ œ œ œ œ œ-4 -4
III I
& b 44 œ œ œ œ-2
III
œ œ �-3
I
œ œ œ œ-3
III
œ œ �-4
I
œ œ œ œ-4
III
œ œ �-2
I
œ œ œ œ4 -2
III
œ œ �2 -4
I
& ### 44 œ œ œ œ-2
III
œ œ �-2 4
I
œ œ œ œ-2
III
œ œ �-3
I
œ œ œ œ-3
III
œ œ �-2
I
œ œ œ œ-4
III
œ œ �-3
I
& bbb 44 .... .... .... ....œ œ œ œ œ œ œ-1 -1
-1
œ œ œ œ œ œ œ-2 -2
x4 -4 -3œ œ œ œ œ œ
-1 -3
w
& bbb 44 œ œ œ œ-1 -1
œ œ œ œ-1 -1
œ œ œ œ-1 -1
œ œ œ œ-1 -1
œ œ œ œ-1 -1
œ œ œ œ-1 -1
œ œ œ œ-1 -1
� �-1
& bbb œ œ œ œ-1 -1 œ œ œ œ-1 -1 œ œ œ œ-1 -1 œ œ œ œ-1 -1 œ œ œ œ-1 -1 œ œ œ œ-1 -1 œ œ œ œ-1 -1 � �-1
& ## 44 .... .... .... ....œ œ œ œ œ œ œ-1
-1
4 œ œ œ œ œ œ œ-2-4
-3 œ œ œ œ œ œ-1
4
-2
-4
w39. D Major Scale and Arpeggio - on One String
40. Ef Major Scale and Arpeggio - on One String
41. Up and Down the Octave To reach higher positions, bring the elbow and arm around the instrument, and the thumb around the neck.
42. Etude in F Major
43. Etude in Fs Minor
44. Etude in E Major
45. Etude in G Major (Finger Replacement)
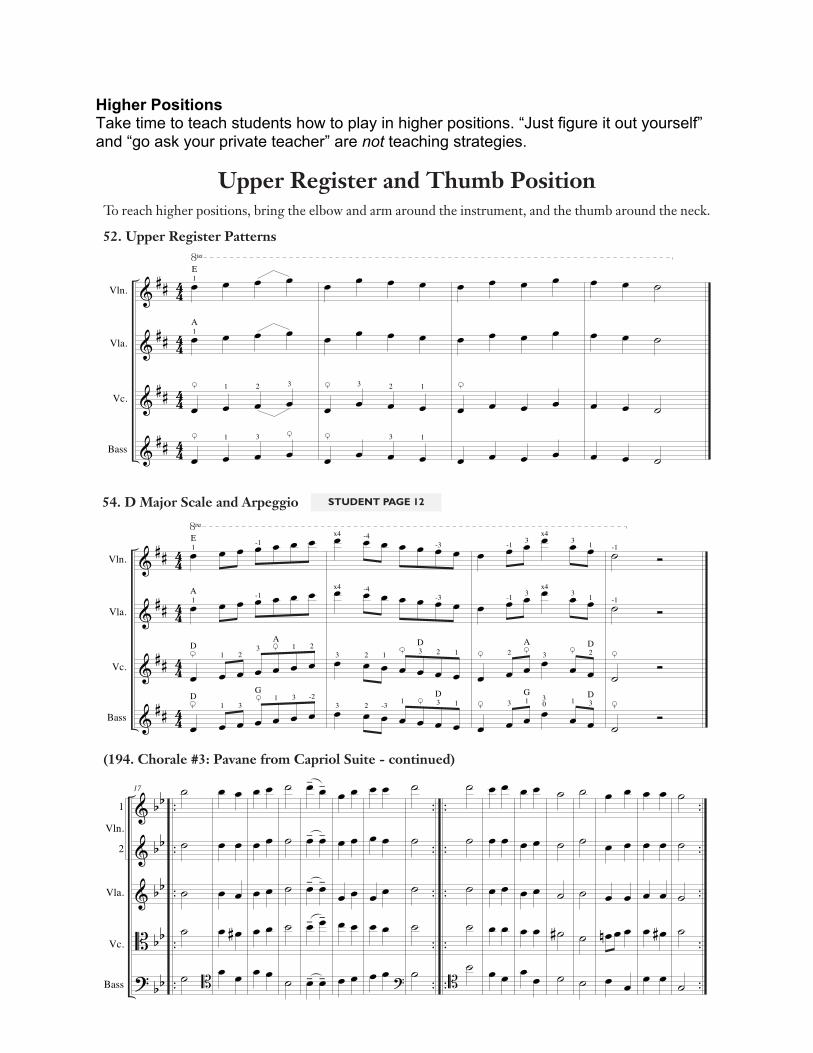
Higher Positions Take time to teach students how to play in higher positions. “Just figure it out yourself” and “go ask your private teacher” are not teaching strategies.
33IV Higher Positions and Alternate Clefs
&B?
?
44
44
44
44
Vln.
Vla.
Vc.
Bass
œ œ œ œ Bœ œ œ œ &œ œ œ œ B
œ œ œ œ B1D
III
1G
œ œ œ œ &
œ œ œ œ B
œ œ œ œ ?
œ œ œ œ ?
œ œ œ œ Bœ œ œ œ
&œ œ œ œ Bœ œ œ œ B
-1
III-1
III
-1 4
IV
œ œ œ œ &œ œ œ œ Bœ œ œ œ ?
œ œ œ œ ?
œ œ œ œ Bœ œ œ œ
&œ œ œ œ
B
œ œ œ œB
30
-4
IV
œ œ œ œ &œ œ œ œ Bœ œ œ œ ?
œ œ œ œ ?
œ œ œ œ Bœ œ œ œ &œ œ œ œ B
œ œ œ œ B1D
III
1G
-4
I
D
œ œ œ œ
œ œ œ œ
œ œ œ œ
œ œ œ œ
B
&B
B
44
44
44
44
..
..
..
........
..
..
..
........
Vln.
Vla.
Vc.
Bass
.œ Jœ œ œ œ
.œ Jœ œ œ œ
.œ Jœ œ œ œ
.œ Jœ œ œ œ30
-4 12 1
4-4
IV I
IIIV
œ œ ˙&
œ œ ˙
œ œ ˙ &
œ œ ˙ &-1 2
II1/2
.œ Jœ œ œ œ
.œ Jœ œ œ œ
.œ jœ œ œ œ
.œ jœ œ œ œ-1 230 2 1
-1
IV
V
œ œ ˙ B
œ œ ˙ B
œ œ ˙ ?
œ œ ˙ ?-4 1
-4
I
III
œ ˙ œœ ˙ œœ ˙ œœ ˙ œ-2
I
œ œ ˙œ œ ˙
œ œ ˙
œ œ ˙0 B
B
&
&
&
&&
##### ## #
44
44
44
44
Vln.
Vla.
Vc.
Bass
!œ œ œ œ
œ œ œ œ
œ œ œ œ
œ œ œ œ
1 2 3
1 3
1
1A
E œ œ œ œ
œ œ œ œ
œ œ œ œ
œ œ œ œ
3 2 1
3 1
œ œ œ œ
œ œ œ œ
œ œ œ œ
œ œ œ œ
œ œ ˙œ œ ˙
œ œ ˙œ œ ˙
Upper Register and Thumb PositionTo reach higher positions, bring the elbow and arm around the instrument, and the thumb around the neck.
52. Upper Register Patterns
50. Scotland’s Burning
51. Viva la Musica
STUDENT PAGE 12
32 Habits of a Successful String Musician - Conductor
&
&BB
###
## #
# # #
# # #
44
44
44
44
Vln.
Vla.
Vc.
Bass
!œ œ œ œ œ œ œ
œ œ œ œ œ œ œ
œ œ œ œ œ œ œ
œ œ œ œ œ œ œaA1 3
D1 3
G
1 2 3 1 2D A
1E
-1
0A
-1
œ œ œ œ œ œ œœ œ œ œ œ œ œœ œ œ œ œ œ œœ œ œ œ œ œ œ1 3 1 3 1
D A
3 2 1 3 2 1D
x4 -4 -3
x4 -4 -2
œ œ œ œ œ œ
œ œ œ œ œ œ
œ œ œ œ œ œ
œ œ œ œ œ œ3 12
1 3
22A
D
-1 3x4
3 1
404
-4
˙ Ó
˙ Ó
˙ Ó˙ Ó
-1
&
&
&&
##### ## #
44
44
44
44
Vln.
Vla.
Vc.
Bass
!œ œ œ œ œ œ œ
œ œ œ œ œ œ œ
œ œ œ œ œ œ œ
œ œ œ œ œ œ œ
1 23 1 2D
A
1 31 3 -2D
G
1E -1
-1A1
œ œ œ œ œ œ œœ œ œ œ œ œ œ
œ œ œ œ œ œ œœ œ œ œ œ œ œ
3 2 1 3 2 1D
3 2 -3 1 3 1D
x4 -4
x4 -4
-3
-3
œ œ œ œ œ œ
œ œ œ œ œ œ
œ œ œ œ œ œ
œ œ œ œ œ œ
2 3 2A D
3 1 30 1 3
G D
-1
-1
3x4
3x4
3 1
3 1 ˙ Ó˙ Ó
˙ Ó
˙ Ó
-1
-1
&
&
&&
##### ## #
44
44
44
44
Vln.
Vla.
Vc.
Bass
!œ œ œn œ
œ œ œn œ
œ œ œn œ
œ œ œn œ
1 2 3
1 2
œ œ œn œ
œ œ œn œ
œ œ œn œ
œ œ œn œ
3 2 1
2 1
œn œ œ œœn œ œ œ
œn œ œ œœn œ œ œ
œn œ ˙œn œ ˙
œn œ ˙œn œ ˙
53. A Major Scale and Arpeggio
54. D Major Scale and Arpeggio
STUDENT PAGE 12
STUDENT PAGE 12
122 Habits of a Successful String Musician - Conductor
&&B??
##### ## ## #
1
2
Vla.
Vc.
Bass
Vln.
11 .˙#.˙.˙.˙.˙
œ œ# œ˙ œœ œ œœ œ œœ œ œ
œ ˙˙ œ#œ ˙œ ˙œ ˙
˙ œ˙ œN˙ œ
˙ œ˙ œ
fffff
˙ œ˙ œ˙ œ˙ œ˙ œ
˙ œ˙ œ˙ œ˙ œ˙ œ
˙ œ˙ œ˙ œ˙ œ˙ œ
.˙#
.˙
.˙
.˙
.˙
œ œ# œ˙ œœ œ œœ œ œœ œ œ
œ ˙˙ œ#œ ˙œ ˙œ ˙
.˙#
.˙
.˙
.˙
.˙
&&&B?
bbb bb b
b b
b b
..
..
..
..
..
..
..
..
..
..
..
..
..
..
..
..
..
..
..
..
1
2
Vla.
Vc.
Bass
Vln.
17 ˙˙˙˙˙ B
œ œœ œœ œœ œ#œ œ
œ œ
œ œœ œœ œœ œ
˙˙˙˙
˙
œ- œ-
œ- œ-œ- œ-œ- œ-
œ- œ-
œ œœ œ
œ œœ œ
œ œ
œ œœ œ
œ œœ œœ œ ?
˙˙˙˙˙
˙˙˙˙˙B
œ œœ œœ œœ œœ œ
œ œ
œ œœ œœ œœ œ
˙˙˙˙#˙
˙˙˙˙˙
œ œ
œ œœ œœn œ œœ œ
œ œœ œœ œœ œ#œ œ
˙˙˙˙
˙
&&B??
##### ## ## #
4343434343
1
2
Vla.
Vc.
Bass
Vln.
œ œ œ#œ œ œœ œ œœ œ œœ œ œ
FFFFF
˙ œ
˙ œ œ˙ œ˙ œ˙ œ
˙ œ.œ jœ œ˙ œ˙ œ˙ œ
.˙#
.˙
.˙
.˙
.˙
œ œ œ
œ œ œœ œ œœ œ œœ œ œ
cresc.
cresc.
cresc.
cresc.
cresc.
œ ˙˙ œ#œ ˙œ ˙œ ˙
˙ œ˙ œN˙ œ
˙ œ˙ œ
fffff
˙ œ˙ œ˙ œ˙ œ˙ œ
˙ œ˙ œ˙ œ˙ œ˙ œ
˙ œ˙ œ˙ œ˙ œ˙ œ
(194. Chorale #3: Pavane from Capriol Suite - continued)
195. Chorale #4: Coventry Carol q = 98
STUDENT PAGE 40

Scales and Arpeggios The purpose of studying scales and arpeggios is to improve intonation and tone by learning patterns and technique required in different keys across the range of the instrument. Introducing New Scales and Arpeggios to students of different levels
Using Differentiated Instruction to teach students of different levels at the same time:
1. Set the classroom tuner to drone the tonic note of the key. 2. Have everyone play the one-octave scale and arpeggio to get familiar with the
new tonality and patterns. 3. Next, more advanced students can move on to the two-octave scale; one-octave
students stay on the one-octave scale. When teaching multiple levels, the students performing more octaves should begin their scale first.
4. Next, three-octave students can move to the three-octave scale, while the other students stay on the number of octaves appropriate for their level. Again, students performing more octaves begin their scale first
Differentiating Instruction to Accommodate Instrument Differences The difficulty of a scale can vary depending on the instrument. In a high school class, for example, violin students will likely be ready to learn a three-octave B-flat scale long before their lower string peers. We recommend differentiating instruction (below) to make scale levels appropriate for everyone.
14 Habits of a Successful String Musician - Violin
V Scales, Arpeggios, and ThirdsStudents should focus on the skills and octaves that are appropriate for their level of ability and experience.
before moving to the next note. Then, add a pulse and learn half and quarter notes, the printed rhythm, and finally add slurs, as shown below.
Students of different levels can learn and perform scales at the same time. Those performing more octaves should begin their scale first, as shown below.
Use the following checklist to guide your practice:
& �U
�U �U �U �U �U �UA �U �U �U & � � � � � � �
B � � �
& œ œ œ œ œ œ œC œ œ œ & 44 œ œ œ œ œ œ œD œ œ œ
& 44 œ œ œ œ œ œ œE œ & 44 œ œ œ œ œ œ œ
F œ & 44 œ œ œ œ œ œ œG œ
&
&
&
#
#
#
44
44
44
œ œ œ œ œ œ œ�
�
3-Octave
2-Octave
1-Octave
œ œ œ œ œ œ œ
œ œ œ œ œ œ œ�
œ œ œ œ œ œ œ
œ œ œ œ œ œ œ
œ œ œ œ œ œ œ
œ œ œ œ œ œ œ
œ œ œ œ œ œ œ
œ œ œ œ œ œ œ
œ œ œ œ œ œ œ
œ œ œ œ œ œ œ
w
œ œ œ œ œ œ œ
w�
w�
�
Tone
Intonation
Tempo andRhythm
Sound projects well with an excellent tone quality. Contact point is correctly distanced between bridge and fingerboard.The bow angle is perpendicular to the string and rotated correctly.Bow weight and speed are well-matched and appropriate. Bow placement (frog, lower half, balance point, middle, upper half, tip) is correct.
Notes are consistently correct and in tune, especially 4th and 7th scale degrees.Hand placement is correct on fingerboard, not sharp or flat.
Fingertips adjust quickly, refining the pitch after finger placement.
Rhythm is correct.Exercise is memorized when appropriate.
41V Scales, Arpeggios, and Thirds
Arpeggios can be taught the same way.
&
&
&
#
#
#
44
44
44
œ œ œ œ œœ
Ó œ œ œ!
3-Octave
2-Octave
1-Octave
œ œ œ œ œ œ
œ œ œ œ œ œ
œ œ œ œ œ œ
œ œ œ œ œ œœ œ œ ˙
w
w!
!
Differentiated Instruction by Instrument SectionThe difficulty of a scale can vary depending on the instrument. In a high school class, for example, violin students will likely be ready to learn a three-octave Bf scale long before their lower string peers. Instead of asking the violas to play a three-octave Bf scale before they are ready, use the strategies for differentiated instruction described above to make scale levels appropriate for everyone. In the example below, the violin students can learn their three-octave Bf scale while the rest of the students just play two.
&B?
bb
b b
b b
44
44
44
œ œ œ œ œ œ œ!
!
Violin
Viola
Cello/Double Bass
œ œ œ œ œ œ œ
œ œ œ œ œ œ œ
œ œ œ œ œ œ œ
œ œ œ œ œ œ œ
œ œ œ œ œ œ œ
œ œ œ œ œ œ œ
œ œ œ œ œ œ œœ œ œ œ œ œ œœ œ œ œ œ œ œ
œ œ œ œ œ œ œœ œ œ œ œ œ œœ œ œ œ œ œ œ
œ œ œ œ œ œ œw
w
w!
!
Dominant ArpeggiosNo exercise teaches students the patterns and feel of a particular key better than the dominant arpeggio, where the “high” and “low” fingered notes occur in close proximity. Set the tuner to drone the 5th scale degree (the root note of the dominant arpeggio). Focus especially on keeping the 7th scale degree high and the 4th scale degree low; this is where most of the intonation problems in young string groups occur.
Broken ThirdsStudents should learn the lower octave first, and then progress to the upper octave. Where differentiated instruction is required, the 1-octave students can repeat the lower octave as the 2-octave students perform both lines.
Mixolydian and Blues ScalesJazz string musicians use a variety of styles and scales; of these, the Mixolydian and Blues scales are two of the most common. Swing the 8th notes when playing these scales. When students focus on one scale, it is a good idea to learn the neighboring upper scale (IV: Subdominant) and lower scales (V: Dominant) as well. Understanding these relationships will allow students to play and improvise over popular progressions like the 12-bar blues.

Part 2: Rhythmic Literacy and Sight Reading
The goal of teaching rhythm is to develop independent string musicians who can decipher, recall and perform written rhythms without the help of a teacher. We need to be careful how we respond to the most frequently asked question in music education: “How does this go?” If we are not careful, teachers can unintentionally create students that become rhythmically dependent upon the teacher or other players. All rhythm has two components: the pulse and the rhythm that goes over the pulse. The teacher must develop both components for a student to properly understand and perform rhythms. Pulse should always be taught and established first; students need to learn that there can be a pulse without a rhythm, but there is no such thing as good rhythm without a pulse.
Additional Sight Reading Exercises
45VII Rhythm Charts in a Musical Context
& #4242œ œ œ œœ œ œ œ
jœ ‰ jœ ‰Jœ ‰ Jœ ‰
jœ ‰ ‰ jœJœ ‰ ‰ Jœ
œ œ ‰ jœœ œ ‰ Jœ
‰ jœ jœ ‰‰ Jœ Jœ ‰
‰ jœ ‰ jœ‰ Jœ ‰ Jœ
Œ ‰ jœŒ ‰ Jœ
jœ ‰ œjœ ‰ œ
& #4343œ œ ‰ jœœ� œ ‰ Jœ
œ ‰ jœ œœ ‰ Jœ œ
œ œ ‰ jœ ‰ jœœ œ ‰ jœ ‰ Jœ
‰ jœ �‰ jœ �
& #4242œ ‰ jœœ� ‰ Jœ
œ œ œœ œ œ
œ œ œœ œ œ
œ œ œœ œ œ
œ œ œ œœ œ œ œ
‰ jœ œ‰ Jœ œ
& #4343œ œ œ œœ� œ œ œ
œ œ œ œ œœ œ œ œ œ
œ œ œ œ œ œœ œ œ œ œ œ
œ œ œ œœ œ œ œ
Œ ‰ jœ œŒ ‰ Jœ œ
‰ jœ �‰ jœ �
& #4444œ œ œ œ œ œœ� œ œ œ œ œ
.œ jœ .œ jœ
.œ jœ .œ Jœœ œ œ œ œ œœ œ œ œ œ œ
jœ .œ jœ .œJœ� .œ Jœ .œ
jœ œ jœ jœ œ jœJœ œ Jœ Jœ œ jœ
jœ œ jœ œ œ œJœ œ Jœ œ œ œ
& #4444œ œ œ .œ jœœ� œ œ .œ Jœ
jœ .œ ‰ .œJœ .œ ‰ .œ
œ œ œ jœ .œœ œ œ Jœ .œ
.œ jœ jœ .œ
.œ jœ Jœ .œœ œ œ œ œœ œ œ œ œ
B. Ties, Dotted Quarter Notes, and Eighth Rests208a. and b.
209a. and b.
210a. and b.
211a. and b.
212a. and b.
213a. and b.
For additional practice with ties, dotted quarter notes and eighth rest patterns, go to Part VIII Sight Reading Exercises 270–283.
47VII Rhythm Charts in a Musical Context
& #8383œ œ œœ œ œ
.œ
.œœ œ ‰œ œ ‰
��
œ jœœ� Jœ
œ ‰œ ‰
‰ œ œ‰ œ œ
‰ œ‰ œ
& #8686œ œ œ œ œ œœ� œ œ œ œ œ
œ jœ .œœ Jœ .œ
��
œ jœ œ œ ‰œ� Jœ œ œ ‰
œ jœ jœ œœ jœ jœ œ
jœ œ jœ œJœ œ Jœ œ
& #8686œ œ ‰ jœ œœ� œ ‰ Jœ œ
‰ œ œ ‰ œ œ‰ œ œ ‰ œ œ
œ ‰ œ œ œ ‰œ ‰ œ œ œ ‰
œ ‰ œ ‰ œ œœ ‰ œ ‰ œ œ
‰ jœ ‰ ‰ œ‰ Jœ ‰ ‰ œ
œ ‰ œ .œœ ‰ œ .œ
& #8686
.œ œ œ œ
.œ� œ œ œœ œ œ œ œ œœ œ œ œ œ œ
jœ œ œ jœjœ œ œ jœ
.œ Œ jœ
.œ Œ jœœ jœ jœ œœ jœ jœ œ
jœ œ .œjœ œ .œ
& #8989œ œ œ œ jœ .œœ� œ œ œ Jœ .œ
jœ œ œ ‰ œ œ œ ‰
Jœ œ œ ‰ œ œ œ ‰œ jœ Œ . ‰ œ œœ jœ Œ . ‰ œ œ
œ jœ jœ œ .œœ jœ jœ œ .œ
& #812812œ œ œ œ jœ jœ œ .œœ� œ œ œ Jœ Jœ œ .œ
œ œ ‰ ‰ œ œ Œ . œ jœœ œ ‰ ‰ œ œ Œ . œ Jœ
.� ‰ œ œ ‰ œ
.� ‰ œ œ ‰ œ.œ œ jœ Œ . .œ.œ œ jœ Œ . .œ
D. Intermediate Triple Meter220a. and b.
221a. and b.
222a. and b.
223a. and b.
224a. and b.
225a. and b.
For additional practice with intermediate triple meter patterns, go to Part VIII Sight Reading Exercises 298–308.
54 Habits of a Successful String Musician - Violin
VIII Sight-Reading by Level
& ## 42 � Œ œ � œ Œ œ œ Œ œ Œ œ �
& ## Œ œ œ Œ œ Œ Œ œ � œ Œ Œ œ œ œ
& # 42 œ œ œ œ œ Œ Œ œ œ œ œ œ œ œ œ œ œ Œ œ� œ Œ œ
& 42 œ œ œ œ œ Œ œ œ œ œ œ � Œ œ� œ œ œ �
& b 42 œ œ œ Œ œ œ œ œ œ Œ œ� œ œ œ œ œ œ œ �
& ## 43 œ œ œ œ Œ œ� � œ œ œ Œ œ Œ Œ œ œ œ& ## Œ œ œ � œ Œ œ Œ œ Œ œ Œ œ� œ .�
& 43 � œ � œ œ œ œ œ œ œ œ � œ œ œ œ œ œ œ œ œ œ œ œ œ œ .�
& # 43 œ> œ> œ>F� œ œ
pœ œ œ. œ. œ œ œ. œ. œ Œ Œ œ œ œ
fœ. œ. � œ œ œ œ œ � Œ
p
260.
261.
262.
263.
264.
265.
266.
& # 44 œ œ Œ œ œ œ � œ œ œ œ Œ œ � œ Œ Œ œ œ Œ œ� œ � Œ œ � �267.
A. Quarter Notes and Rests; Eighth Notes
57VIII Sight-Reading by Level
& # 42 œ œ œ. œ.F
œ œ Jœ œ jœ œ Œ Œ ‰ Jœ œ œ œ. œ.f
jœ œ. jœ. �P& ### 42 � jœ œ Jœ œ œ� œ œ œ ‰ Jœ jœ œ Jœ œ œ œ Jœ œ Jœ �
& 43 .œ jœ œ œ œ œ œ ‰ Jœ œ œ œ œ œ œ Œ ‰ Jœ œ œ œ œ œ .œ Jœ Jœ œ jœ œ œ Jœ œ Jœ œ
& ### 43 .œ Jœ œ œ � Jœ .œ œ ‰ œ jœ œ jœ œ jœ œ œ .œ Jœ œ ‰ Jœ œ œ œ Jœ œ Jœ œ
& bb 43 .œ Jœ œFœ œ œ œ œ œ jœ œ œ Jœ œ � Jœ œ jœ œ œp
œ œ œ œ œ œ œ .œŸ Jœf� Œ
& bb 43 œ jœ .œ Jœ œ Jœ œ œ œ œ œ œ œ ‰ œ jœ œ jœ œ jœ œ œ œ œ œ œ jœ .œ ‰ jœ ‰ jœ ‰ jœ� œ
& ### 43 œ .œ Jœ œ œ .œ ‰ Jœ œ œ Jœ .œ Jœ œ Œ ‰ œ� jœ œ œ œ œ Jœ œ œ Jœ .œ Jœ œ
& # 44 jœ œ jœ
Moderato
Fœ œ œ. œ. œ.
3 jœ œ Jœ œ œ œ œ œ. œ. œ œ œ œ œ œ Jœ œ Jœ œ. œ. Œ œ�
286.
287.
288.
289.
290.
291.
292.
293.
& ## 42 œ œ Jœ œ jœ œ œ œ œ .œ jœ jœ œ jœ œ œ œ Jœ .œ �
& bb 42 œ œ jœ œ jœ œ œ œ œ .œ jœ jœ œ jœ œ œ œ jœ# .œ �
284.
285.
C. Syncopation

Getting Started
1. Establish and model the tempo and counting style students are to use during the rhythmic example. Students are to count the pulse (not the rhythm of the music) out loud. After they demonstrate their ability to keep a steady pulse counting, they can begin performing the rhythm of the music with their bow hand while continuing to count out loud. Count using the smallest denomination used in the music; for example:
a. If the example is mostly quarters and half notes, count quarter notes (1, 2, 3, 4.) b. If the example has dotted quarters and eighth-notes, count the pulse and division
(1 & 2 & 3 & 4 &) c. Dotted eighths and sixteenth-notes: 1 e & a, 2 e & a, 3 e & a, 4 e & a
2. While counting out loud, students perform the rhythm exercises with their bow.
a. Air bow first. Students can get a preliminary feel of the rhythm as they count the pulse out loud. Longer notes should be bowed with a slow, sustained motion. The Teacher can check to make sure students are counting and watch the bows to assess who is struggling most.
b. After students demonstrate success with air bowing, have them count and bow the rhythm on an open string. Watch students closely to make sure they continue counting as they play; the students who don’t count will not know when to come in after long notes and rests.
c. When they are ready, have students look at the line with the pitches. Remind them to look at the key signature, and have them mentally practice (silently air bowing and putting fingers on the string) before the class plays together. This important step gives the non-readers with good ears a chance to practice reading without having the opportunity to listen to the person next to them.
d. Instruct students to perform the notes and rhythms on the second line with their bows. If they seem to need it, students may take the intermediate step of counting and playing pizzicato before playing the notes arco.
Counting Out Loud To genuinely understand a rhythm pattern, students must perform the rhythm while simultaneously keeping a consistent pulse somewhere else in their body. The biggest benefit to this strategy is that students are counting while they perform through long or dotted notes and rests, which is the most important time to count. Students will find it easier to “count in their head” (and they will beg their teachers to let them do this) because in truth, they temporarily stop counting during the toughest rhythms; instead, they should count out loud, especially when the rhythms are difficult. Modeling is encouraged, but avoid teaching rhythm through repetition. Hammering a rhythm over and over may clean up rhythmic inaccuracies, but the students are only learning to copy the teacher, and not learning to count and independently perform the rhythm. Each time a rhythm or exercise is repeated, the students with good ears and poor reading ability have less need to read. So, avoid repetition, and remember that the best time to teach rhythmic literacy is every time students are learning new exercises or music.
Additional Teaching Strategies Teaching rhythm and notation As a general rule, teach students how a rhythm sounds first, and then teach how it looks. Students will learn how to count and recall rhythms within a pulse in the next section.
1. Use 2/4 to teach quarters and half notes; use 3/4 to teach dotted halves, and 4/4 to teach whole notes. Instruct students play quarter notes with their bow on an open string while they count to two, three, or four with and without the metronome depending on the meter the teacher has chosen. Have students play half notes, dotted-half, and whole notes with their bows on an open string while counting to two, three, or four respectively. Demonstrate the rhythms taught in this section on an instrument, and ask students to write down the rhythms they hear.
2. Use a syllable system (like 1 & 2 & for 8th notes and 1 e & a 2 e & a for 16th notes) to teach eighth and sixteenth notes with and without a metronome. Students can march or clap the pulse while counting 8th and 16th notes to reinforce the connection between the two. Have students play 8th or 16th notes with their bows on an open string while counting (and/or marching) to two, three, or four with a consistent pulse. Demonstrate 8th and 16th notes in different time signatures, and ask students to write down the rhythms they hear.
3. Syncopation, dotted and tied rhythms are much easier to learn after the quarters, 8th and 16th notes addressed in the previous section. In this category of rhythm, the dot, tie, or syncopation holds the note over a beat. This is more easily explained visually in terms of 8th and 16th notes that are contained in each note of the rhythm. When students begin playing these rhythms over a pulse in the next section, it is imperative that the students count through the rhythm to keep track of the beat that is contained in the dot, tie, or syncopation.
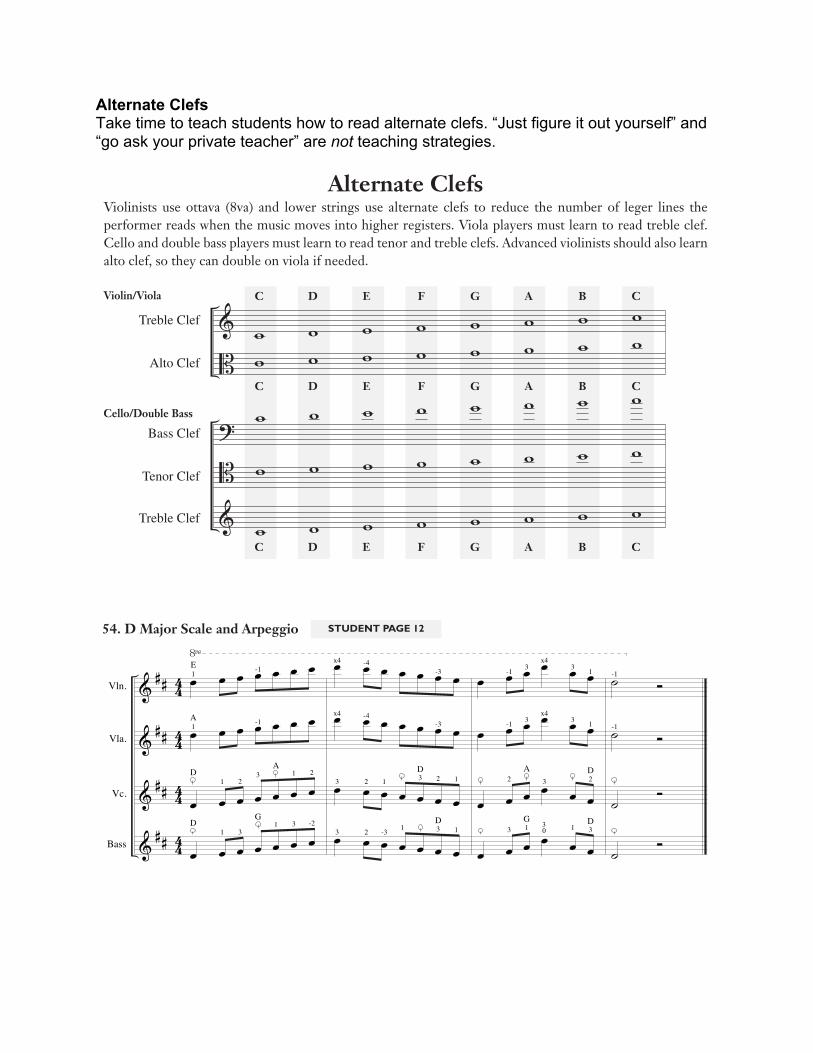
Alternate Clefs Take time to teach students how to read alternate clefs. “Just figure it out yourself” and “go ask your private teacher” are not teaching strategies.
32 Habits of a Successful String Musician - Conductor
&B?
?
#
#
#
#
44
44
44
44
Vln.
Vla.
Vc.
Bass
œ œ œ œ œ œ œœ œ œ œ œ œ œ
œ œ œ œ œ œ œ
œ œ œ œ œ œ œ4D -1
0
-1 -10
3
œ œ œ œ œ œ œ Bœ œ œ œ œ œ œ &œ œ œ œ œ œ œ Bœ œ œ œ œ œ œ B
-4
30 3 -4 -4
œ œ œ œ œ œ œ
œ œ œ œ œ œ œœ œ œ œ œ œ œ
œ œ œ œ œ œ œ
4D
-10
-1 -10 3
œ œ œ œ œ œ œœ œ œ œ œ œ œœ œ œ œ œ œ œœ œ œ œ œ œ œ
-4
30 3 -4 -4
˙ Ó
˙ Ó
˙ Ó
˙ Ó
&B???
Vln.
Vla.
Vc.
Bass
œ œ œ œœ œ œ œœ œ œ œœ œ œ œ
œ œ œ œ
œ œ œ œœ œ œ œœ œ œ œœ œ œ œœ œ œ œ
œ œ œ œœ œ œ œœ œ œ œœ œ œ œœ œ œ œ
œ œ œ œœ œ œ œœ œ œ œœ œ œ œ
œ œ œ œ
œ œ œ œœ œ œ œœ œ œ œœ œ œ œœ œ œ œ
œ œ œ œœ œ œ œœ œ œ œœ œ œ œ
œ œ œ œ
Alternate ClefsViolinists use ottava (8va) and lower strings use alternate clefs to reduce the number of leger lines the performer reads when the music moves into higher registers. Viola players must learn to read treble clef. Cello and double bass players must learn to read tenor and treble clefs. Advanced violinists should also learn alto clef, so they can double on viola if needed.
49. G Major Scale with Alternate Clef same as measures 1 and 2
G. H. J. K. M. N.
Treble Clef
Alto Clef
C D E F G A B C
&Bww
ww
ww
ww
ww
ww
ww
ww
C D E F G A B CViolin/Viola
Cello/Double Bass
C D E F G A B C
?B&
www
www
www
www
www
www
www
www
Bass Clef
Tenor Clef
Treble Clef
STUDENT PAGE 11
32 Habits of a Successful String Musician - Conductor
&
&BB
###
## #
# # #
# # #
44
44
44
44
Vln.
Vla.
Vc.
Bass
!œ œ œ œ œ œ œ
œ œ œ œ œ œ œ
œ œ œ œ œ œ œ
œ œ œ œ œ œ œaA1 3
D1 3
G
1 2 3 1 2D A
1E
-1
0A
-1
œ œ œ œ œ œ œœ œ œ œ œ œ œœ œ œ œ œ œ œœ œ œ œ œ œ œ1 3 1 3 1
D A
3 2 1 3 2 1D
x4 -4 -3
x4 -4 -2
œ œ œ œ œ œ
œ œ œ œ œ œ
œ œ œ œ œ œ
œ œ œ œ œ œ3 12
1 3
22A
D
-1 3x4
3 1
404
-4
˙ Ó
˙ Ó
˙ Ó˙ Ó
-1
&
&
&&
##### ## #
44
44
44
44
Vln.
Vla.
Vc.
Bass
!œ œ œ œ œ œ œ
œ œ œ œ œ œ œ
œ œ œ œ œ œ œ
œ œ œ œ œ œ œ
1 23 1 2D
A
1 31 3 -2D
G
1E -1
-1A1
œ œ œ œ œ œ œœ œ œ œ œ œ œ
œ œ œ œ œ œ œœ œ œ œ œ œ œ
3 2 1 3 2 1D
3 2 -3 1 3 1D
x4 -4
x4 -4
-3
-3
œ œ œ œ œ œ
œ œ œ œ œ œ
œ œ œ œ œ œ
œ œ œ œ œ œ
2 3 2A D
3 1 30 1 3
G D
-1
-1
3x4
3x4
3 1
3 1 ˙ Ó˙ Ó
˙ Ó
˙ Ó
-1
-1
&
&
&&
##### ## #
44
44
44
44
Vln.
Vla.
Vc.
Bass
!œ œ œn œ
œ œ œn œ
œ œ œn œ
œ œ œn œ
1 2 3
1 2
œ œ œn œ
œ œ œn œ
œ œ œn œ
œ œ œn œ
3 2 1
2 1
œn œ œ œœn œ œ œ
œn œ œ œœn œ œ œ
œn œ ˙œn œ ˙
œn œ ˙œn œ ˙
53. A Major Scale and Arpeggio
54. D Major Scale and Arpeggio
STUDENT PAGE 12
STUDENT PAGE 12

33IV Higher Positions and Alternate Clefs
&B?
?
44
44
44
44
Vln.
Vla.
Vc.
Bass
œ œ œ œ Bœ œ œ œ &œ œ œ œ B
œ œ œ œ B1D
III
1G
œ œ œ œ &
œ œ œ œ B
œ œ œ œ ?
œ œ œ œ ?
œ œ œ œ Bœ œ œ œ
&œ œ œ œ Bœ œ œ œ B
-1
III-1
III
-1 4
IV
œ œ œ œ &œ œ œ œ Bœ œ œ œ ?
œ œ œ œ ?
œ œ œ œ Bœ œ œ œ
&œ œ œ œ
B
œ œ œ œB
30
-4
IV
œ œ œ œ &œ œ œ œ Bœ œ œ œ ?
œ œ œ œ ?
œ œ œ œ Bœ œ œ œ &œ œ œ œ B
œ œ œ œ B1D
III
1G
-4
I
D
œ œ œ œ
œ œ œ œ
œ œ œ œ
œ œ œ œ
B
&B
B
44
44
44
44
..
..
..
........
..
..
..
........
Vln.
Vla.
Vc.
Bass
.œ Jœ œ œ œ
.œ Jœ œ œ œ
.œ Jœ œ œ œ
.œ Jœ œ œ œ30
-4 12 1
4-4
IV I
IIIV
œ œ ˙&
œ œ ˙
œ œ ˙ &
œ œ ˙ &-1 2
II1/2
.œ Jœ œ œ œ
.œ Jœ œ œ œ
.œ jœ œ œ œ
.œ jœ œ œ œ-1 230 2 1
-1
IV
V
œ œ ˙ B
œ œ ˙ B
œ œ ˙ ?
œ œ ˙ ?-4 1
-4
I
III
œ ˙ œœ ˙ œœ ˙ œœ ˙ œ-2
I
œ œ ˙œ œ ˙
œ œ ˙
œ œ ˙0 B
B
&
&
&
&&
##### ## #
44
44
44
44
Vln.
Vla.
Vc.
Bass
!œ œ œ œ
œ œ œ œ
œ œ œ œ
œ œ œ œ
1 2 3
1 3
1
1A
E œ œ œ œ
œ œ œ œ
œ œ œ œ
œ œ œ œ
3 2 1
3 1
œ œ œ œ
œ œ œ œ
œ œ œ œ
œ œ œ œ
œ œ ˙œ œ ˙
œ œ ˙œ œ ˙
Upper Register and Thumb PositionTo reach higher positions, bring the elbow and arm around the instrument, and the thumb around the neck.
52. Upper Register Patterns
50. Scotland’s Burning
51. Viva la Musica
STUDENT PAGE 12
35IV Higher Positions and Alternate Clefs
B
&BB
####
# #
# #
44
44
44
44
Vln.
Vla.
Vc.
Bass
œ œ œ œœ œ œ œ
œ œ œ œœ œ œ œ
1 2
1 3
1A
œ œ œ œœ œ œ œ
œ œ œ œœ œ œ œ
œ œ ˙
œ œ ˙
œ œ ˙
œ œ ˙2 3
3 1
-1
œ œ ˙
œ œ ˙
œ œ ˙
œ œ ˙
œ œ œ œ œ œœ œ œ œ œ œœ œ œ œ œ œœ œ œ œ œ œ
1 3 2
1 33 1
3D
œ œ œ œ œ œœ œ œ œ œ œœ œ œ œ œ œœ œ œ œ œ œ
3A
-1
œ œ ˙œ œ ˙
œ œ ˙œ œ ˙
1
0
œ œ ˙œ œ ˙
œ œ ˙œ œ ˙
B
&B
B
##
#
#
43
43
43
43
Vln.
Vla.
Vc.
Bass
.œ Jœ œ
.œ jœ œ
.œ Jœ œ
.œ Jœ œ
.œ Jœ œ œ
.œ jœ œ œ
.œ Jœ œ œ
.œ Jœ œ œ
3
1
œ œ œ œ œ
œ œ œ œ œœ œ œ œ œœ œ œ œ œ3
1 3 1
1
.œ Jœ œ œ
.œ jœ œ œ
.œ Jœ œ œ
.œ Jœ œ œ
.œ Jœ œ œ
.œ jœ œ œ
.œ Jœ œ œ
.œ Jœ œ œ
œ œ œ œ œ œ
œ œ œ œ œ œœ œ œ œ œ œœ œ œ œ œ œ
.œ Jœ œ
.œ jœ œ
.œ Jœ œ
.œ Jœ œ
.˙
.˙
.˙
.˙
B
&
&
&
##
#
#
44
44
44
44
Vln.
Vla.
Vc.
Bass
Œ œ! œ œ
Œ œ! œ œ
Œ œ!œ œ
Œ œ!œ œ1 2
3 1
˙ ˙
˙ ˙
˙ ˙
˙ ˙3
2
Œ œ! œ œ
Œ œ! œ œ
Œ œ! œ œ
Œ œ! œ œ1
3
˙ ˙
˙ ˙
˙ ˙
˙ ˙2
1
Œ œ! œ œ
Œ œ! œ œ
Œ œ! œ œ
Œ œ! œ œ
3
˙ ˙
˙ ˙
˙ ˙
˙ ˙1
Œ œ! œ œ
Œ œ! œ œ
Œ œ!œ œ
Œ œ! œ œ1
3
˙ ˙
˙ ˙
˙ ˙
˙ ˙
1
2
61. Arirang
62. This Land Is Your Land
60. Frere Jacques STUDENT PAGE 13
STUDENT PAGE 13
STUDENT PAGE 13
128 Habits of a Successful String Musician - Conductor
&&B??
###### # # # ## # # # ## # # # ## # # # #
1
2
Vla.
Vc.
Bass
Vln.
6
œ! œ .œ œ œ œ
œ-!œ- .œ jœ-
œ-! œ- .œ jœ-œ! œ .œ jœ-œ! œ .œ jœ-
œ œ‹ œ Œ
œ œ œ Œ
œ œ œ Œœ œ œ Œœ œ œ Œ
cresc.
cresc.
cresc.
cresc.
cresc.
œ œ œ Œ
œ œ œ Œ
œ œ œ Œœ œ œ Œœ œ œ Œ
œ"1 œ œ œ2 œ
œ" œ œ œ œœ" œ œ œœ" œ œ œœ" œ œ œ
fffff
œ œ œ Œ
œ œ œ Œ
œ œ œ Œœ œ œ Œœ œ œ Œ
dim. pdim.
dim.
dim.
dim.
pppp
&&&BB
bbbbb
1
2
Vla.
Vc.
Bass
Vln.
25 .œ Jœ œ œ˙ œ œb.œ Jœ œ œ.œ Jœ œ œ.œ Jœ œ œ
˙ ˙˙ ˙˙ ˙˙ ˙˙ ˙
œ œ œ œœ œN ˙
œ œ œ œ˙ ˙˙ ˙
wwwœ œ œ œw
.œ Jœ œ œ
.œ Jœ œ œ
.œ Jœ œ œ
.œ Jœ œ œ
.œ Jœ œ œ
˙ ˙˙ ˙˙ ˙˙ œ œ˙ ˙
œ œ .œ Jœ˙ œ œ˙ œ œ˙ ˙˙ ˙
wwwww
&&B??
###### # # # ## # # # ## # # # ## # # # #
44
44
44
44
44
1
2
Vla.
Vc.
Bass
Vln.˙!3
œ œ˙!œ œ
!̇1 œ œ!̇ œ œ!̇ œ œ
ppp
1
1
pp
Adagio un poco mosso
œ œ ˙œ1
œ4
˙2
œ œ ˙œ œ .œ Jœœ œ .œ Jœ
1 œ! œ" œ! œ
œ!2œ"œ!œ
œ! œ" œ# œn
œ œn œ œœ œn œ œ
œ œ ˙œ œ ˙œ! œ "̇
œ œa ˙
œ œa ˙
œ! œ .œ œ œ œœ-!œ- .œ jœ-
œ-! œ- .œ jœ-œ! œ .œ jœ-œ! œ .œ jœ-
(200. Chorale #9: In the Bleak Midwinter - continued)
201. Chorale #10: Chorale from Emperor Concerto,Movt. 2 q = 42
STUDENT PAGE 42
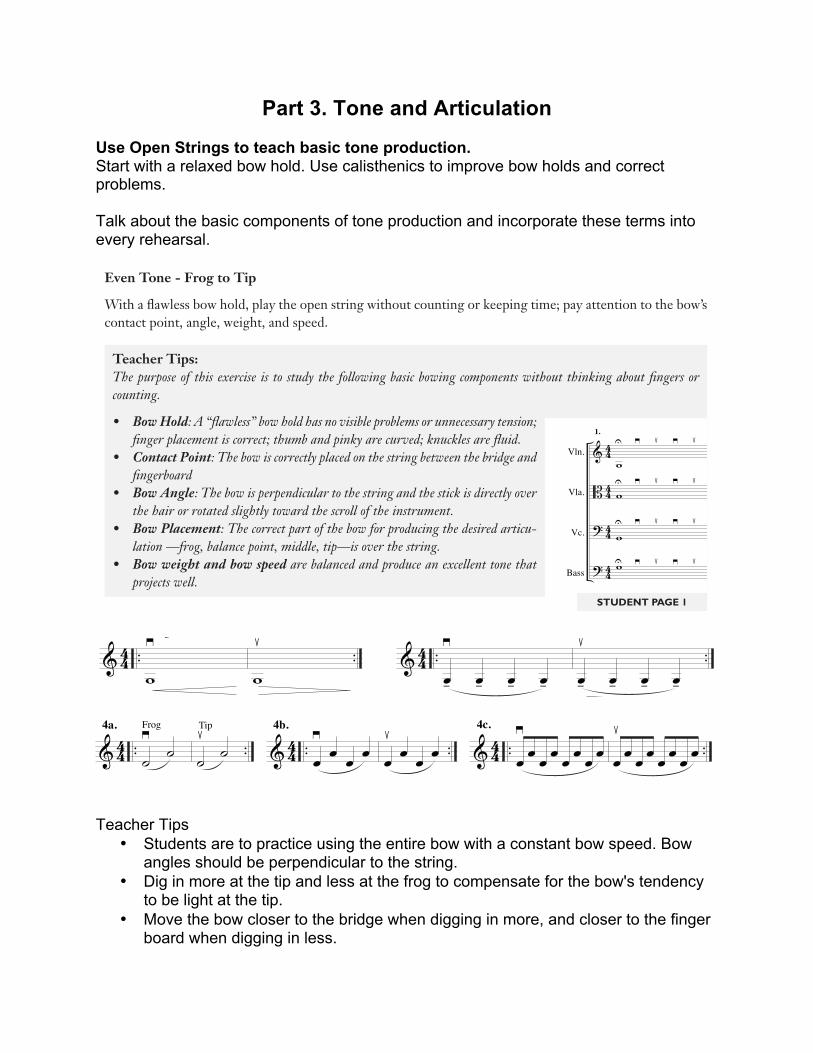
Part 3. Tone and Articulation Use Open Strings to teach basic tone production. Start with a relaxed bow hold. Use calisthenics to improve bow holds and correct problems. Talk about the basic components of tone production and incorporate these terms into every rehearsal.
Teacher Tips
• Students are to practice using the entire bow with a constant bow speed. Bow angles should be perpendicular to the string.
• Dig in more at the tip and less at the frog to compensate for the bow's tendency to be light at the tip.
• Move the bow closer to the bridge when digging in more, and closer to the finger board when digging in less.
&
B?
?
44
44
44
44
..
..
..
..
..
..
..
..
Vln.
Vla.
Vc.
Bass
w!
w!
w!
w!
Frog
Frog
Frog
Frog
2a.
w"
w"
w"
w"
Tip
Tip
Tip
Tip
&
B?
?
44
44
44
44
..
..
..
..
..
..
..
..
œ-!
œ- œ- œ-œ-! œ- œ- œ-œ-! œ- œ- œ-œ-! œ- œ- œ-
Frog
Frog
Frog
Frog
2b.
œ-"
œ- œ- œ-œ-" œ- œ- œ-œ-" œ- œ- œ-œ-" œ- œ- œ-
Tip
Tip
Tip
Tip
I Tone and ArticulationOpen String Exercises
Even Tone - Frog to Tip
contact point, angle, weight, and speed.
Teacher Tips:The purpose of this exercise is to study the following basic bowing components without thinking about fingers or counting.
Bow Hold: A “flawless” bow hold has no visible problems or unnecessary tension; finger placement is correct; thumb and pinky are curved; knuckles are fluid.Contact Point: The bow is correctly placed on the string between the bridge and fingerboardBow Angle: The bow is perpendicular to the string and the stick is directly over the hair or rotated slightly toward the scroll of the instrument.Bow Placement: The correct part of the bow for producing the desired articu-lation —frog, balance point, middle, tip—is over the string.Bow weight and bow speed are balanced and produce an excellent tone that projects well.
&B?
?
44
44
44
44
Vln.
Vla.
Vc.
Bass
wU ! " ! "
wU ! " ! "
wU ! " ! "
wU ! " ! "
1.
Even Bow Distribution
Teacher Tips:
the string.
STUDENT PAGE 1
STUDENT PAGE 1
1I Tone and Articulation
& 44 .. ..œ œ œ œ œ œ œ œ œ œ œ œ œ œ œ œ4f.
& 44 wU � � � �1.
& 44 .. ..w�Frog2a.
w�Tip & 44 .. ..œ-
�œ- œ- œ-
Frog2b.
œ-�
œ- œ- œ-Tip
& 44 .. ..w�Frog2c.
w�Tip & 44 .. ..œ-
�œ- œ- œ-
2d.
œ-�
œ- œ- œ-& 44 .. ..w
�2e.
w� & 44 .. ..œ-
�œ- œ- œ-
2f.
œ-�
œ- œ- œ-
& 44 .. ..œ-� Œ œ-
� Œ3a.
& 44 .. ..œ.� œ.� œ.� œ.� œ.
� œ.� œ.� œ.�3b.
& 44 .. ..œ.� œ. œ- œ.
� œ. œ-3c.
& 44 .. ..œ.� œ.� œ.� œ.� œ.� œ. œ. œ. œ. œ. œ. œ. œ. œ. œ. œ.
3d.
œ.� œ.� œ.� œ.� œ.� œ. œ. œ. œ. œ. œ. œ. œ. œ. œ. œ.
& 44 .. ..�� �Frog4a.
�� �Tip
& 44 .. ..œ� œ œ œ
4b.
œ� œ œ œ & 44 .. ..œ
� œ œ œ œ œ œ œ4c.
œ� œ œ œ œ œ œ œ
& 44 .. ..œ� œœ œ œ œœ œœ œ œ œ œ œœ œ
4d.
œ� œœ œœ œ œ œœ œœ œœ œœ œ & 44 .. ..œ
� œœ œœ� œœ œœ œ œ œœ œœ œ
Middle Bow4e.
I Tone and ArticulationOpen String Exercises
Even Tone - Frog to Tip
With a flawless bow hold, play the open string without counting or keeping
Grab and Release
Grab the string with the hair of the bow to begin each note with a crisp attack.
Even Bow Distribution
Crossings Strings
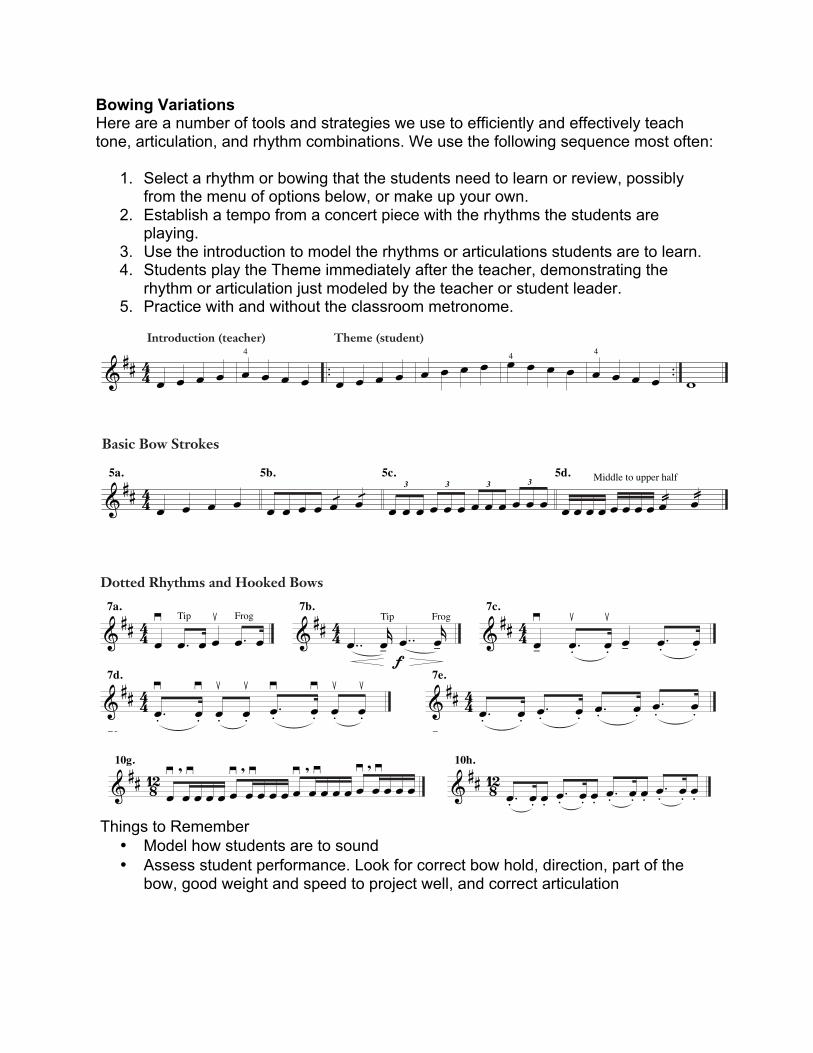
Bowing Variations Here are a number of tools and strategies we use to efficiently and effectively teach tone, articulation, and rhythm combinations. We use the following sequence most often:
1. Select a rhythm or bowing that the students need to learn or review, possibly from the menu of options below, or make up your own.
2. Establish a tempo from a concert piece with the rhythms the students are playing.
3. Use the introduction to model the rhythms or articulations students are to learn. 4. Students play the Theme immediately after the teacher, demonstrating the
rhythm or articulation just modeled by the teacher or student leader. 5. Practice with and without the classroom metronome.
Things to Remember
• Model how students are to sound • Assess student performance. Look for correct bow hold, direction, part of the
bow, good weight and speed to project well, and correct articulation
2 Habits of a Successful String Musician - Violin
& ## 44 œ�
.œ œ œ� .œ œ
Tip Frog7a.
& ## 44 . .œ rœ- . .œ rœ-fTip Frog
7b.
& ## 44 œ-�
.œ.�
œ.� œ- .œ. œ.
7c.
& ## 44 .œ.�
œ.�
œ�. œ.
� .œ.� œ.
� œ.� œ.
�7d.
& ## 44 .œ. œ. .œ. œ. .œ. œ. .œ. œ.7e.
& ## 44 .œ.�
œ-� .œ.
� œ-� .œ. œ- .œ. œ-
7f.
& ## 44 � œ œ � � œ œ � � œ œ � � œ œ �7g.
& ## 44 œ- œ- œ- œ- œ- œ- œ- œ-fFrog Tip
6a.
.œ jœ- .œ jœ-f6b.
œ- œ- œ- œ- œ- œ- œ- œ- œ- œ- œ- œ- œ- œ- œ- œ-TipFrog
6c.
� �f6d.
& ## 44 jœ� ‰ jœ
� ‰ jœ� ‰ jœ� ‰Frog Tip Frog Tip
grand martelé6e.
œ�> œ- œ- œ- œ- œ- œ- œ
�> œ- œ- œ- œ- œ- œ-
Tip Frog
f
6f.
œ- œ.�œ. œ. œ. œ. œ. œ- œ.
�œ. œ. œ. œ. œ.
up-bow staccato6g.
& ## 44 .. ..œ œ œ œ œ œ œ œ4
œ œ œ œ œ œ œ œ œ œ œ œ4 œ œ œ œ4
w
& ## 44 œ œ œ œ5a.
œ œ œ œ œ! œ!5b.
œ œ œ œ œ œ œ œ œ œ œ œ3 3 3 3
5c.
œ œ œ œ œ œ œ œ œ@ œ@Middle to upper half5d.
& ## 44 œ- œ. œ. œ- œ. œ.U.H. L.H.5e.
œ- œ.� œ.� œ- œ.
� œ.�5f.
œ. œ œ. œ œ. œ œ. œ5g.
œ-� ‰ jœ
, � œ-� ‰ jœ
, �Keep thumband pinky curved.5h.
& ## 44 œ œ œ œ œ. œ. œ œ œ œ œ. œ.5j.
œ œ œ œ œ œ œ œ œ œ œ œ5k.
œ œ œ œ œ œ œ œ œ œ œ œ5m.
œ- œ� œ œ œ œ-� œ� œ œ œ
5n.
Bowing VariationsPerform the theme using one of the rhythm or articulations from the variations below.
Introduction (teacher) Theme (student)
Basic Bow Strokes
Full Bow Exercises
Dotted Rhythms and Hooked Bows
3I Tone and Articulation
& ## 44 jœ. œ. jœ jœ œ. jœ.8a.
& ## 44 ‰ œ. jœ. ‰ œ. jœ.8b.
& ## 44 œ. œ. œ. œ. œ œ œ. œ. œ. œ.8c.
& ## 44 � œ. œ. œ. œ. � œ. œ. œ. œ.8d.
& ## 44 œ.� ,
œ.� ,
œ.� ,
œ.� ,9a.
& ## 44 ‰ jœ� , ‰ jœ
� , ‰ jœ�, ‰ jœ�
,9b.
& ## 44 œ�.,œ�., Œ œ�.
,œ�., Œ
9c.
& ## 44 Œ œ.� ,œ.� , Œ œ.
� , œ.� ,9d.
& ## 44 ‰ œ.�œ.�œ.� ,‰ œ.
� œ.� œ.�9e.
& ## 44 œ. œ. œ. œ. œ. œ. œ. œ.9f.
& ## 44 œ-�
œ.�œ.� œ-� œ.
� œ.�9g.
& ## 44 œ. œ. œ. œ. œ. œ. œ. œ. œ. œ. œ. œ.3 3 3 3
9h.
& ## 44 œ- œ. œ. œ. œ- œ. œ. œ.3 3
9j.
& ## 44 œ-�
œ.�œ. œ. œ. œ-
� œ.� œ. œ. œ.
9k.
& ## 44 œ,
- � œ�. œ. œ. œ
,- � œ�. œ. œ.
9m.
& ## 44 œ.�œ. œ. œ.
�œ. œ.� œ. œ. œ.
� œ.riccochet9n.
Syncopated Patterns
Spiccato Exercises
and fluid.
& ## 812 œ jœ œ jœ œ jœ œ jœ10a.
& ## 812 œ- œ. œ. œ- œ. œ. œ- œ. œ. œ- œ. œ.10b.
& ## 812 ‰ œ ‰ œ ‰ œ ‰ œ10c.
& ## 812 œ jœ œ jœ œ jœ œ jœ10d.
& ## 812 œ œ œ œ œ œ œ œ œ œ œ œ œ œ œ œ10e.
& ## 812 .œ œ œ œ .œ œ œ œ .œ œ œ œ .œ œ œ œ10f.
& ## 812 œ� ,œ�œ œ œ œ
� ,œ�œ œ œ œ�,œ�œ œ œ œ�
,œ� œ œ œ
10g.
& ## 812 .œ. œ. œ. .œ. œ. œ. .œ. œ. œ. .œ. œ. œ.10h.
Triple Patterns
2 Habits of a Successful String Musician - Violin
& ## 44 œ�
.œ œ œ� .œ œ
Tip Frog7a.
& ## 44 . .œ rœ- . .œ rœ-fTip Frog
7b.
& ## 44 œ-�
.œ.�
œ.� œ- .œ. œ.
7c.
& ## 44 .œ.�
œ.�
œ�. œ.
� .œ.� œ.
� œ.� œ.
�7d.
& ## 44 .œ. œ. .œ. œ. .œ. œ. .œ. œ.7e.
& ## 44 .œ.�
œ-� .œ.
� œ-� .œ. œ- .œ. œ-
7f.
& ## 44 � œ œ � � œ œ � � œ œ � � œ œ �7g.
& ## 44 œ- œ- œ- œ- œ- œ- œ- œ-fFrog Tip
6a.
.œ jœ- .œ jœ-f6b.
œ- œ- œ- œ- œ- œ- œ- œ- œ- œ- œ- œ- œ- œ- œ- œ-TipFrog
6c.
� �f6d.
& ## 44 jœ� ‰ jœ
� ‰ jœ� ‰ jœ� ‰Frog Tip Frog Tip
grand martelé6e.
œ�> œ- œ- œ- œ- œ- œ- œ
�> œ- œ- œ- œ- œ- œ-
Tip Frog
f
6f.
œ- œ.�œ. œ. œ. œ. œ. œ- œ.
�œ. œ. œ. œ. œ.
up-bow staccato6g.
& ## 44 .. ..œ œ œ œ œ œ œ œ4
œ œ œ œ œ œ œ œ œ œ œ œ4 œ œ œ œ4
w
& ## 44 œ œ œ œ5a.
œ œ œ œ œ! œ!5b.
œ œ œ œ œ œ œ œ œ œ œ œ3 3 3 3
5c.
œ œ œ œ œ œ œ œ œ@ œ@Middle to upper half5d.
& ## 44 œ- œ. œ. œ- œ. œ.U.H. L.H.5e.
œ- œ.� œ.� œ- œ.
� œ.�5f.
œ. œ œ. œ œ. œ œ. œ5g.
œ-� ‰ jœ
, � œ-� ‰ jœ
, �Keep thumband pinky curved.5h.
& ## 44 œ œ œ œ œ. œ. œ œ œ œ œ. œ.5j.
œ œ œ œ œ œ œ œ œ œ œ œ5k.
œ œ œ œ œ œ œ œ œ œ œ œ5m.
œ- œ� œ œ œ œ-� œ� œ œ œ
5n.
Bowing VariationsPerform the theme using one of the rhythm or articulations from the variations below.
Introduction (teacher) Theme (student)
Basic Bow Strokes
Full Bow Exercises
Dotted Rhythms and Hooked Bows

Additional Bowing Variation Strategies Students can perform each variation in unison or in canon. They can also overlap and perform multiple variations simultaneously to develop deeper rhythmic understanding and ensemble skills.
1. Perform the variation in unison. The best strategy for using the Bowing Variations is the no-talking “Call and Response” method. Demonstrate in the introduction how the students should look and sound; then, without a pause, the students play the variation over the Theme, demonstrate the rhythm and articulation modeled by the teacher. While students play, the teacher watches and listens to make sure that the students are performing
a. With a flawless bow hold, curved pinky and thumb, and relaxed knuckles b. In the correct part of the bow with the correct bow angle and contact point c. With enough bow speed and weight to produce a good tone that projects
well d. With correct rhythms and a consistent pulse
If the students need to play it again, play the Introduction again as soon as the students finish the Theme, modeling again what the students need to improve. If the students are ready for a different rhythm or bowing, introduce a new variation right after students finish the theme. This Call and Response method is most efficient when done with as little talking as possible.
2. Perform the variation as a canon in two, three, and four parts. Divide the class into multiple sections; when the first section gets to the third pitch, the next section begins.
3. Overlap and perform complementary variations at the same time. Without the introduction, have one group of students perform a variation with a dotted rhythm or syncopated pattern while a second group performs a variation with consistent 8th or 16th notes; then have groups switch parts. Both groups should listen to each other to learn and perform dotted rhythms or syncopations more accurately. In addition to overlapping variations with complementary rhythms, competing rhythms—like duple against triple—can be overlapped.
4. Practice transitioning from one rhythm to another by having students play the introduction only. In concert music, problems frequently arise in the transitions between different rhythms (like going from 8th to 16th notes) or articulations (going on and off the string). To teach challenging transitions, have students play the Introduction with one rhythm/articulation, and then repeat the Intro with the other rhythm/articulation. Practice going back and forth between variations with a metronome. Three or more variations can also be practiced in a series.
Modeling. It is very important for the teacher or student leader to model the rhythm and articulation. It helps the students understand how they are to look and sound. It also helps the teacher make sure the tempo is correct, since the action of the bow can change dramatically with different tempos.

Slurring Variations can be used to teach slurs and detaché (including sautillé) • Use a metronome: Start with a slow tempo and gradually increase speed. • Use more weight on the slurs, and more bow on separate notes.
Velocity Etude for Bow Management While we use the velocity etude primarily for developing left hand speed, it has also been a good tool for teaching students to manage their bow speed. Students must pay attention to contact point, bow weight and speed to produce a good tone from the first note to the last.
Chorales are great tools for teaching tone, balance, blend, and phrasing. This chorale also teaches bow management, requiring students to pay attention to contact point and bow speed.
4 Habits of a Successful String Musician - Violin
& # 44 .. ..œ œ œ œ œ œ œ œ œ4 œ œ œ œ
4
œ œ œ11a.
w & # 44 .. ..œ œ œ œ œ œ œ œ œ4 œ œ œ œ
4
œ œ œ11b.
w& # 44 .. ..œ œ œ œ œ œ œ œ œ
4 œ œ œ œ4
œ œ œ11c.
w & # 44 .. ..œ�œ œ œ œ œ œ
� œ� œ�4
œ œ œ œ4
œ œ�œ�11d.
w& # 44 .. ..œ œ œ œ œ œ œ œ œ
4 œ œ œ œ4
œ œ œ11e.
w & # 44 .. ..œ œ œ œ œ œ œ œ œ4 œ œ œ œ
4
œ œ œ11f.
w& # 44 .. ..œ œ œ œ œ œ œ œ œ œ œ œ œ œ œ œ11g.
w & # 44 .. ..œ�œ œ œ
�œ� œ œ œ œ œ œ œ œ œ œ œ
11h.
w
Slurs6 Habits of a Successful String Musician - Violin
& b 44 .œ œ œ œ œ œ œ œ œ œ .œ œ .œŸ
œ œ .œ œ œ œ œ œ œ œ œ œ .œ œ .œŸ
œ œ
& b .œ œ# œ œ œ œ œ œ œ œ .œ œ .œŸ
œ œ .œ œ œ œ œ œ œ œ œN œ .œ œ .œŸ
œ œ
& b .....œ œ .œŸ
œ œ .œ œ .œŸ
œ œ � Ó
& œ œ œ œ œ œ œ œ œ œ œ œ œ œ œ œ
& œ œ œ œ œ œ œ œ œ œ œ œ œ œ œ œ œ œ œ œ œ œ œ œ œ œ œ œ œ œ œ œ& œ œ œ œ œ œ œ œ œ œ œ œ œ œ œ œ œ œ œ œ œ œ œ œ
& œ œ œ# & œ œ œN & œ œb œ
& œ œ# œ# œ & œ œ# œn œ & œ œn œ œ & œb œ œ œ & œb œ œ œb
& 812 .... .....œU .œ#U .œU .œU4
œ œ œ œ# œ œ œ œ œ œ œ œ4 4 œ œ# œ œ œ œ œ œ œ œ œ œ .w
19. Tetrachord Etude
Tuning Notes (Dorian Tetrachord) Etude
After learning the Etude with the Dorian tetrachord above, play it with one of the other tetrachords below.
Tetrachords: Major Dorian Phrygian Lydian Major (half pos.)
20. Velocity Etude
Perform as written first, and then perform with the different finger patterns (#2. Fn and #3. Ef) shown below.
& 44 œ œ œ# œ œ œ œ# œ œ œ œ œ œ œ œ# œ œ œ œ œ œ œ œ œ œ œ œ œ œ œ œ# œ œ œ œ œ œ œ œ œ œ Finger Pattern #1 #2 #3
Velocity Etude Variations A. B. C. D. E. F. G. H.
I. J. K. L. M. N.
O. P. Q. R.
21. Trills The trills on beats 2 and 4 are performed the same way.
125VI Chorales
&&B??
##
###
4444
444444
1
2
Vla.
Vc.
Bass
Vln.
Ó!̇
Ó "̇
Ó!̇
Ó œ! œw!
œ œ- œ œw!œ œ- "̇
˙ œ œw
w"
œ œ- "̇œ œ- œ œ˙ ˙w
œ œ- ˙œ œ- œ œw˙ ˙w
œ œ- ˙˙ ˙wœ œ- œ œw
wœ œ- ˙w!.˙ œ-w
wœ œ- ˙œ œ! œ œœ œ ˙.˙ œ
198. Chorale #7: Fantasia in G q = 76
&&B??
#####
1
2
Vla.
Vc.
Bass
Vln.
8 ˙ œ œ œ œ
w˙ ˙œ œ œ ˙˙ ˙
w
˙ ˙wœ œ- œ œ.˙ œ
œ œ! "̇
œ œ- œ œww˙ ˙
œ# œ .œ œ œ ˙
˙ ˙˙ ˙˙ œ œ˙ œ" œ
˙ ˙#.˙ œ˙ ˙œ œ ˙w
w
˙ ˙˙ ˙œ œ- œ œw
wœ œ- œ œœ œ- ˙˙ ˙w#
&&B??
#####
1
2
Vla.
Vc.
Bass
Vln.
15 w.˙ œœ œ- œ œœ œ- ˙w
œ œ- ˙˙ ˙wœ œ-! œ œw
œ œ- œ œœ œ- ˙w˙# œ œw
.˙ œ-
˙ œ# œœ œ ˙#œ œ !̇!̇ œ!, œ
.œ# œ œ ˙˙ œ œ˙ œ œwœ œ œ œ
˙ ˙#œ œ œ œww"
˙ ˙
w
www!
w
STUDENT PAGE 41

What to do with Fundamentals Time in an Orchestra Rehearsal Think broadly and identify the skills that your students need to develop. These could be skills that the students were lacking when they came into your program from another teacher. They could be skills that would have made your students perform better at last year’s concert festival. __________________________________ ____________________________________
__________________________________ ____________________________________
__________________________________ ____________________________________
__________________________________ ____________________________________
__________________________________ ____________________________________
__________________________________ ____________________________________
__________________________________ ____________________________________
Key Concept #2: Identify the “components of string playing” students need to learn during fundamentals time and organize them in a sequential and meaningful format. Musical Components Basic Elements Range and Organization Ensemble Concepts Creativity: Musical Choice Tone Color Palette Blend Choice of timbre & vibrato
speed Intonation (Sharp/flat)
Register and Key Tuning Intervals/Chords Melodic/Harmonic Improv
Pulse & Rhythm Tempo and Meter “Ensemble” Agreement Rhythmic Improv; Tempo Choice
Articulation Attacks & Releases Style: Consistency Style: Fluency (Baroque to Jazz)
Volume Dynamics Balance Phrasing Technical Components General Technique • Stretching and
Breathing • Balance: Standing and
Sitting • Spine, Shoulders,
Arms
Left Hand • Position • Basic Motion • Finger Patterns • Fingertip Adjustment • Velocity, Shifting,
Vibrato
Right Hand • Position and Basic
Motion • Tone Production • Advancing
Articulations • Advancing Rhythms
Cognitive Components: Literacy, Culture, History, Occupational Awareness

Key Concept #3. Use a sequential system of warm-up exercises that develop the musical and technical skills required in the orchestral repertoire the students are to perform.
• Bowing exercises improve tone, articulation, and specific rhythm patterns • Finger pattern exercises improve intonation, intervals, velocity • Shifting and Scale exercises improve intonation, tone and shifting throughout the
entire range of the instrument • Tuning Canons, Chords, and Chorales teach fine tuning, balance and blend • Sequenced Rhythm and Sight Reading Examples improve sight reading ability
Key Concept #4: Fundamentals Time should include sequential and comprehensive sight reading
• Introduce your desired counting system • Use rhythm charts reinforced with pitches • Sightread notes and rhythms with an emphasis on timing • Sightread at a tempo that insures a successful performance of everything that is
on the page • Sightread with an emphasis on the "components of playing" • Musical sight reading must be developed over time with a logical sequence in
place Key Concept #5: Fundamentals must ultimately lead to great music making
• Cross the threshold from the "components of playing" to "thoughts about phrasing and musicianship"
• Sing and use solfege to combat "musical wandering" • Include music-making exercises as part of the curriculum • Get off of the podium and let them play • Strive for an artistic performance

GIA Publications, Inc.7404 S. Mason Avenue • Chicago, IL 60638800-442-1358 • 708-496-3800 • Fax 708-496-3828www.giamusic.com SELBY2015
Habits of a Successful String MusicianA Comprehensive Curriculum for Use During Fundementals Time
Christopher Selby • Scott Rush • Rich Moon
Habits of a Successful String Musician is a field-tested, vital, and - most important - musical collection of almost 400 sequenced exercises for building fundamentals.
Perfect to use with the entire string orchestra or solo player at virtually any skill level, this series contains carefully sequenced warm-ups, sight-reading etudes, rhythm vocabulary studies, chorales, tuning canons, and much more. In one place, this series collects everything an aspiring player needs to build fundamental musicianship skills and then be able to transfer those skills directly into the performance of great literature.
Habits of a Successful String Musician:
• Presents a differentiated, sequential, and comprehensive method for developing skills that lead to the mastery of reading rhythms, and ultimately, to musical sight-reading.
• Creates a method for teaching scales, arpeggios and thirds that simultaneously accommodates students of different ability levels.
• Organizes tone, rhythm and articulation patterns into a flexible and sequential series.• Creates finger pattern and velocity studies that address the most common problems encountered by
intermediate orchestra students.• Provides beginning through advanced shifting exercises for students of every level.• Creates exercises for learning alternate clefs and higher positions.• Provides chorales for the development of intonation, tone quality, blend and musicianship.• Presents rhythm charts in a new format that allows transfer from timing and rhythm to pitches in a musical
context.• Provides audition sight-reading in a classroom “full ensemble” format that is well planned in scope and
sequence. There are over 130 sight-reading examples in this book.• Promotes the idea that students should cross the threshold from the “technical components of playing” to
music making.
Each Student Book just $9.95. G-8624 Violin, G-8625 Viola, G-8626 Cello, G-8627 Bass, G-8628 Strings Full Score and Conductor’s Edition, $34.95
Christopher Selby is the National Board Certified Orchestra Director at the School of the Arts High School in Charleston, SC. He is a graduate of the Hartt School of Music and holds master’s and doctorate degrees from the University of South Carolina. He has taught orchestra for over 20 years and served 11 years as the Richland School District’s Orchestra Coordinator. Ensembles under his direction have con-sistently received superior ratings and placed 1st in the 2012 ASTA National Orchestra Festival. Selby is the recipient of the 2009 SC ASTA Orchestra of the Year Award and is a past president of the SC Music Association. He is current chair of ASTA Committee on School Orchestras and Strings, and chair-elect for NAfME National Council for Orchestral Education. Christopher Selby is an active clinician, speaker, adjudicator, and conductor through the U.S. He is a co-author of Habits of a Successful String Musician (GIA) and the 2010 SC Performance Standards for Instrumental Music.