gx configurator-sc version 2 operating manual (protocol · pdf fileprogrammable controller...
TRANSCRIPT

GX Configurator-SC Version 2Operating Manual(Protocol FB support function)
-SW2D5C-QSCU-E

A - 1 A - 1
• SAFETY PRECAUTIONS • (Always read these instructions before using this equipment.)
Before using this product, please read this manual and the relevant manuals introduced in this manual carefully and pay full attention to safety to handle the product correctly. The instructions given in this manual are concerned with this product. For the safety instructions of the programmable controller system, please read the CPU module user's manual. In this manual, the safety instructions are ranked as " ! WARNING" and " ! CAUTION".
Indicates that incorrect handling may cause hazardous conditions, resulting in death or severe injury. Indicates that incorrect handling may cause hazardous conditions, resulting in minor or moderate injury or property damage.
Note that the ! CAUTION level may lead to a serious consequence according to the circumstances. Always follow the instructions of both levels because they are important to personal safety. Please save this manual to make it accessible when required and always forward it to the end user. [Startup/Maintenance Precautions]
! CAUTION • Before starting online operations such as a communication test, consider the operation of the
connected device and fully ensure safety.
! WARNING
! CAUTION

A - 2 A - 2
• CONDITIONS OF USE FOR THE PRODUCT • (1) Mitsubishi programmable controller ("the PRODUCT") shall be used in conditions;
i) where any problem, fault or failure occurring in the PRODUCT, if any, shall not lead to any major or serious accident; and ii) where the backup and fail-safe function are systematically or automatically provided outside of the PRODUCT for the case of any problem, fault or failure occurring in the PRODUCT.
(2) The PRODUCT has been designed and manufactured for the purpose of being used in general industries. MITSUBISHI SHALL HAVE NO RESPONSIBILITY OR LIABILITY (INCLUDING, BUT NOT LIMITED TO ANY AND ALL RESPONSIBILITY OR LIABILITY BASED ON CONTRACT, WARRANTY, TORT, PRODUCT LIABILITY) FOR ANY INJURY OR DEATH TO PERSONS OR LOSS OR DAMAGE TO PROPERTY CAUSED BY the PRODUCT THAT ARE OPERATED OR USED IN APPLICATION NOT INTENDED OR EXCLUDED BY INSTRUCTIONS, PRECAUTIONS, OR WARNING CONTAINED IN MITSUBISHI'S USER, INSTRUCTION AND/OR SAFETY MANUALS, TECHNICAL BULLETINS AND GUIDELINES FOR the PRODUCT. ("Prohibited Application") Prohibited Applications include, but not limited to, the use of the PRODUCT in; Nuclear Power Plants and any other power plants operated by Power companies, and/or any other cases in which the public could be affected if any problem or fault occurs in the PRODUCT.
Railway companies or Public service purposes, and/or any other cases in which establishment of a special quality assurance system is required by the Purchaser or End User.
Aircraft or Aerospace, Medical applications, Train equipment, transport equipment such as Elevator and Escalator, Incineration and Fuel devices, Vehicles, Manned transportation, Equipment for Recreation and Amusement, and Safety devices, handling of Nuclear or Hazardous Materials or Chemicals, Mining and Drilling, and/or other applications where there is a significant risk of injury to the public or property.
Notwithstanding the above, restrictions Mitsubishi may in its sole discretion, authorize use of the PRODUCT in one or more of the Prohibited Applications, provided that the usage of the PRODUCT is limited only for the specific applications agreed to by Mitsubishi and provided further that no special quality assurance or fail-safe, redundant or other safety features which exceed the general specifications of the PRODUCTs are required. For details, please contact the Mitsubishi representative in your region.

A - 3 A - 3
REVISIONS
* The manual number is given on the bottom left of the back cover.
Print Date * Manual Number Revision Jan., 2003 SH (NA)-080393E-A First printing Jun., 2003 SH (NA)-080393E-B Partial corrections
Section 6.3, Section 7.1, Section 7.2.3, Section 7.4, Section 8.2.4, Section 8.3, Section 10.3
Partial additions Section 9.2.1, Appendix 3
Feb., 2004 SH (NA)-080393E-C Partial corrections Section 1.1, Section 7.2.1, Section 7.2.3 to 7.2.4, Section 7.3.2, Section 7.4, Section 8.2.1, Appendix 1
Partial additions Appendix 4 to 5
Sep., 2004 SH (NA)-080393E-D Partial corrections Section 3.2, Section 6.2, Section 7.2.3, Section 7.2.4
Partial additions Section 8.2.4, Section 9.3
Jul., 2005 SH (NA)-080393E-E Partial corrections Section 6.3, Section 6.4, Section 8.2.4
Apr., 2006 SH (NA)-080393E-F Partial corrections Section 7.2.3
Aug., 2006 SH (NA)-080393E-G Partial corrections Section 8.2.4, Section 8.3, Appendix 5
Jan., 2008 SH (NA)-080393E-H Partial corrections Generic Terms and Abbreviations Used in This Manual, Chapter 2
May, 2008 SH (NA)-080393E-I Partial corrections Section 7.3
Jun., 2009 SH (NA)-080393E-J Model Addition
Q06PHCPU, Q10UDEHCPU, Q20UDEHCPU
Partial corrections
Section 5.1
Partial additions
About Manuals, Generic Terms and Abbreviations Used in This Manual, Chapter 2, Section 9.2.2, Section 9.4, Appendix 1

A - 4 A - 4
* The manual number is given on the bottom left of the back cover.
Print Date * Manual Number Revision Jan., 2010 SH (NA)-080393E-K Model Addition
L02CPU, L26CPU-BT
Partial corrections
About Manuals, Generic Terms and Abbreviations Used in This Manual, Chapter 1, Section 1.1, Section 3.1, Section 4.3, Chapter 5, Section 5.1, Section 5.3.1, Section 5.3.6, Section 6.1, Section 6.3 to 6.5, Section 7.1, Section 7.2.1, Section 7.2.3, Section 7.4, Section 8.1 Section 8.2, Section 8.2.1, Section 8.2.4, Chapter 9, Section 9.1, Section 9.2.1, Section 9.2.2, Section 9.3, Section 9.3.3, Section 9.4, Appendix 1, Appendix 2, Appendix 4, Appendix 5
Partial additions
CONDITIONS OF USE FOR THE PRODUCT, Appendix 6
Sep., 2010 SH (NA)-080393E-L Partial corrections
Generic Terms and Abbreviations Used in This Manual, Chapter 2, Section 3.1, Section 7.2.1, Section 7.2.3, Section 9.1, Section 9.4, Section 11.2.2
Japanese Manual Version SH-080377-N
This manual confers no industrial property rights or any rights of any other kind, nor does it confer any patent licenses. Mitsubishi Electric Corporation cannot be held responsible for any problems involving industrial property rights which may occur as a result of using the contents noted in this manual.
© 2003 MITSUBISHI ELECTRIC CORPORATION

A - 5 A - 5
INTRODUCTION
Thank you for choosing the Mitsubishi MELSOFT series Integrated FA software. Read this manual and make sure you understand the functions and performance of MELSEC series programmable controller thoroughly in advance to ensure correct use.
CONTENTS
SAFETY PRECAUTIONS..............................................................................................................................A- 1 CONDITIONS OF USE FOR THE PRODUCT .............................................................................................A- 2 REVISIONS....................................................................................................................................................A- 3 INTRODUCTION............................................................................................................................................A- 5 CONTENTS....................................................................................................................................................A- 5 About Manuals ...............................................................................................................................................A- 8 How to Use This Manual................................................................................................................................A- 9 Generic Terms and Abbreviations Used in This Manual ..............................................................................A-10
1. OVERVIEW 1- 1 to 1- 4
1.1 Features .................................................................................................................................................. 1- 2
2. OPERATING ENVIRONMENT 2- 1 to 2- 2
3. FUNCTION LIST 3- 1 to 3- 2
3.1 Function List ............................................................................................................................................ 3- 1 3.2 Menu List ................................................................................................................................................. 3- 2
4. SCREEN DISPLAY 4- 1 to 4- 6
4.1 Screen Display ......................................................................................................................................... 4- 1 4.2 Toolbar...................................................................................................................................................... 4- 2 4.3 Status Bar................................................................................................................................................. 4- 3 4.4 Project Tree.............................................................................................................................................. 4- 4
4.4.1 System project tree ........................................................................................................................... 4- 4 4.4.2 User project tree................................................................................................................................ 4- 5
5. START AND END OF PROTOCOL FB SUPPORT FUNCTION AND PROJECT CREATION 5- 1 to 5- 8
5.1 Starting the Protocol FB Support Function.............................................................................................. 5- 2 5.2 Exiting the Protocol FB Support Function ............................................................................................... 5- 3 5.3 Creating a Project .................................................................................................................................... 5- 4
5.3.1 Creating a new project ...................................................................................................................... 5- 4 5.3.2 Opening the project........................................................................................................................... 5- 6 5.3.3 Closing the project............................................................................................................................. 5- 6 5.3.4 Saving the project.............................................................................................................................. 5- 7 5.3.5 Deleting the project of the protocol FB support function.................................................................. 5- 7 5.3.6 Changing the module type................................................................................................................ 5- 8

A - 6 A - 6
6. PROTOCOL FB CREATION OPERATING PROCEDURE 6- 1 to 6-12
6.1 Protocol FB Construction Data ................................................................................................................ 6- 1 6.2 Communication Control Program Creating Procedure........................................................................... 6- 3 6.3 Operating Procedure for Use of System Project..................................................................................... 6- 4 6.4 Operating Procedure for Use of User Project ......................................................................................... 6- 6 6.5 Operating Procedure for Utilization of Converted FB on GX Developer................................................ 6-11
7. SETTING OF PROTOCOL FB DATA 7- 1 to 7-24
7.1 Module Setting ......................................................................................................................................... 7- 1 7.2 Packet Information ................................................................................................................................... 7- 3
7.2.1 Creating new packet information ...................................................................................................... 7- 3 7.2.2 Opening the packet construction information................................................................................... 7- 5 7.2.3 Setting the packet construction information ..................................................................................... 7- 6 7.2.4 Setting the packet data information .................................................................................................. 7-11 7.2.5 Duplicating the packet information ................................................................................................... 7-13 7.2.6 Renaming the packet information..................................................................................................... 7-14 7.2.7 Deleting the packet information ........................................................................................................ 7-14
7.3 Sequence Information.............................................................................................................................. 7-15 7.3.1 Creating new sequence information................................................................................................. 7-15 7.3.2 Setting the sequence information ..................................................................................................... 7-16 7.3.3 Duplicating the sequence information .............................................................................................. 7-19 7.3.4 Renaming the sequence information................................................................................................ 7-20 7.3.5 Deleting the sequence information ................................................................................................... 7-21 7.3.6 Confirming the I/O variables ............................................................................................................. 7-22
7.4 FB Conversion of Sequence Information ................................................................................................ 7-23
8. HOW TO USE PROTOCOL FB 8- 1 to 8-13
8.1 Outline ...................................................................................................................................................... 8- 1 8.2 How to Use Protocol FBs on GX Developer ........................................................................................... 8- 2
8.2.1 Module start I/O No. setting .............................................................................................................. 8- 2 8.2.2 Converting (compiling) the protocol FB whose module start I/O No. was set................................. 8- 3 8.2.3 Pasting the protocol FB to the sequence program .......................................................................... 8- 3 8.2.4 Creating the I/O areas of the pasted protocol FBs........................................................................... 8- 4 8.2.5 Converting (compiling) the sequence program................................................................................ 8- 9
8.3 Sequence Program Example Using Protocol FBs.................................................................................. 8-10
9. DEBUGGING SUPPORT FUNCTIONS 9- 1 to 9-16
9.1 Module Selection...................................................................................................................................... 9- 2 9.2 Circuit Trace ............................................................................................................................................. 9- 3
9.2.1 Starting the circuit trace .................................................................................................................... 9- 3 9.2.2 Circuit trace option ............................................................................................................................ 9- 5 9.2.3 Transmission/receive packet list....................................................................................................... 9- 7 9.2.4 Opening the circuit trace file ............................................................................................................. 9- 9 9.2.5 Saving the circuit trace file ................................................................................................................ 9- 9

A - 7 A - 7
9.3 Communication Test ................................................................................................................................ 9-10
9.3.1 Communication test after direct input ............................................................................................... 9-10 9.3.2 Communication test after selection of packet data .......................................................................... 9-11 9.3.3 Transmission monitoring time designation....................................................................................... 9-13
9.4 State Monitor ............................................................................................................................................ 9-14
10. PRINT 10- 1 to 10- 9
10.1 Start ...................................................................................................................................................... 10- 1 10.2 Operations Common to Screens ......................................................................................................... 10- 6 10.3 Print Examples ..................................................................................................................................... 10- 8
11. SEQUENCE INFORMATION AND LABEL VARIABLES OF SYSTEM PROJECT 11- 1 to 11-16
11.1 System Project Classified by Supported Device Controllers.............................................................. 11- 1 11.2 Supported Device Controller List......................................................................................................... 11- 2
11.2.1 OMRON make............................................................................................................................... 11- 2 11.2.2 YAMATAKE make......................................................................................................................... 11-15
APPENDICES App- 1 to App- 9
Appendix 1 Help Function..........................................................................................................................App- 1 Appendix 2 Project Name Specifications ..................................................................................................App- 2 Appendix 3 Character Strings That Cannot Be Used as Input Variables and Output Variables.............App- 2 Appendix 4 Packet setting example ..........................................................................................................App- 3 Appendix 5 Newly added functions ...........................................................................................................App- 7 Appendix 6 Compatibility with existing applications..................................................................................App- 9
INDEX Index- 1 to Index- 2

A - 8 A - 8
About Manuals
The following lists the manuals relevant to this software package. These manuals are separately available if necessary.
Related Manuals
Manual Name Manual Number (Model Code)
Q Corresponding Serial Communication Module User's Manual (Basic) Explains the outline, applicable system configuration, specifications, pre-operation procedure, basic data
communication method with the other device, maintenance, inspection, and troubleshooting for use of
the module. (Sold separately)
SH-080006 (13JL86)
MELSEC-L Serial Communication Module User's Manual (Basic) Explains the specifications and usage of the module's special functions, the settings for use of the
special functions, and the method of data communication with the other device. (Sold separately)
SH-080894ENG (13JZ40)
Serial Communication Module User's Manual (Application) Explains the specifications and usage of the module's special functions, the settings for use of the
special functions, and the method of data communication with the other device. (Sold separately)
SH-080007 (13JL87)
MELSEC Communication Protocol Reference Manual Explains how the other device performs read, write, etc. of PLC CPU data by making communication in
the MC protocol using the serial communication module/Ethernet module. (Sold separately)
SH-080008 (13JF89)
GX Developer Version 8 Operating Manual (Startup) Explains the system configuration, installation method, and startup method of GX Developer.
(Sold separately)
SH-080372E (13JU40)
GX Developer Version 8 Operating Manual Explains the program creation method, printout method, monitor method, debugging method, etc. using
GX Developer. (Sold separately)
SH-080373E (13JU41)
GX Developer Version 8 Operating Manual (Function Block) Explains the function block creation method, printout method, etc. using GX Developer.
(Sold separately)
SH-080376E (13JU44)
GX Configurator-SC Version 2 Operating Manual (Pre-defined protocol support function) Explains the features and usage of the pre-defined protocol support function, and the setting for
protocols. (Sold separately)
SH-080850ENG (13JU66)
REMARK
The manuals are available separately in printed form as options. Please place an order with the manual number (model code) in the above table.

A - 9 A - 9
How to Use This Manual
The symbols used in this manual and their definitions and examples will be explained.
Symbol Description Example
[ ] Menu name of the menu bar [Project] << >> Tab name of the dialog box <<Main>>
" " Item name of the dialog box "Name"
Command button of the dialog box Setting Button
PURPOSE
Purpose of the operation that is explained in the corresponding chapter, section or item.
BASIC OPERATION
Operation performed until the screen for actually achieving the purpose is displayed.
DISPLAY/SETTING SCREEN
Screen used to make setting and/or provide a display for the purpose.
DISPLAY/SETTING DETAILS
Explains the display/setting screen items.
Explains the especially noted items of the explanation, functions desired to be known, etc..
REMARK
Gives information useful as the knowledge related to the explanation.

A - 10 A - 10
Generic Terms and Abbreviations Used in This Manual
In this manual, the following generic terms and abbreviations are used to represent the GX Configurator-SC software package and PLC CPU modules. The module/ package name is given when the target model name must be pointed out explicitly.
Generic Term/Abbreviation Description
GX Configurator-SC Generic product name of the model names SWnD5C-QSCU-E and SWnD5C-QSCU-EA. (n means Version 2 or later.)
Protocol FB support function Means the protocol FB support function of GX Configurator-SC. Protocol FB Abbreviation of the communication control function block.
C24 Generic term for QJ71C24, QLJ71C24-R2, QJ71C24N, QLJ71C24N-R2, QLJ71C24N-R4, LJ71C24 and LJ71C24-R2.
Q Series C24N Generic term for QJ71C24N, QLJ71C24N-R2 and QLJ71C24N-R4. L Series C24 Generic term for LJ71C24 and LJ71C24-R2. Device controller Generic term for the external devices that communicate with the C24 modules. Intelligent function module utility Utility in GX Configurator-SC. Communication control program Program for communication with the device controller. Module initialization FB FB that performs the initial setting of the module among the protocol FBs. Send FB FB that sends data to the device controller among the protocol FBs. Receive FB FB that receives data from the device controller among the protocol FBs. I/O variable Label used in an FB (FB variable).
Windows R 7
Generic term for the following: Microsoft R Windows R 7 Starter Operating System, Microsoft R Windows R 7 Home Premium Operating System, Microsoft R Windows R 7 Professional Operating System, Microsoft R Windows R 7 Ultimate Operating System, Microsoft R Windows R 7 Enterprise Operating System
Windows Vista R
Generic term for the following: Microsoft R Windows Vista R Home Basic Operating System, Microsoft R Windows Vista R Home Premium Operating System, Microsoft R Windows Vista R Business Operating System, Microsoft R Windows Vista R Ultimate Operating System, Microsoft R Windows Vista R Enterprise Operating System
Windows R XP Generic term for the following: Microsoft R Windows R XP Professional Operating System, Microsoft R Windows R XP Home Edition Operating System
GX Developer Generic product name of the product model names SWnD5C-GPPW-E, SWnD5C-GPPW-EA, SWnD5C-GPPW-EV and SWnD5C-GPPW-EVA. (n means Version 8 or later.)
FB Abbreviation of the function block.
QCPU (Q mode)
Generic term for the Q00J, Q00UJ, Q00, Q00U, Q01, Q01U, Q02(H), Q02PH, Q02U, Q03UD, Q03UDE, Q04UDH, Q04UDEH, Q06H, Q06PH, Q06UDH, Q06UDEH, Q10UDH, Q10UDEH, Q12H, Q12PH, Q12PRH, Q13UDH, Q13UDEH, Q20UDH, Q20UDEH, Q25H, Q25PH, Q25PRH, Q26UDH, and Q26UDEHCPU.
LCPU Generic term for L02CPU and L26CPU-BT.

1 - 1 1 - 1
MELSOFT1 OVERVIEW
1 OVERVIEW
GX Configurator-SC Version 2 (hereafter abbreviated to GX Configurator-SC) is the software added into GX Developer for use. Conventionally, to perform the communication processing of the serial communication module/modem interface module (hereafter abbreviated to C24 module) with a device controller, a wide variety of complicated sequence programs, e.g. device-specific message format creation and data communication, had to be created by the user in the nonprocedural protocol. On this software, user-created communication control programs are available as function blocks (hereafter abbreviated to FBs). The user can create a communication control program easily by making use of these FBs. Also, since the communication debugging functions necessary for system startup are provided, operations from communication control program creation to system startup-time debugging can be performed with this software only.
GX Configurator-SC
Device controller
C24
Debugging support functions
State monitor Circuit trace
Receive packet
Send packet
Select system project.Sequence program
FB conversion
FB support function
1
1 - 2 1 - 2
MELSOFT1 OVERVIEW
1.1 Features
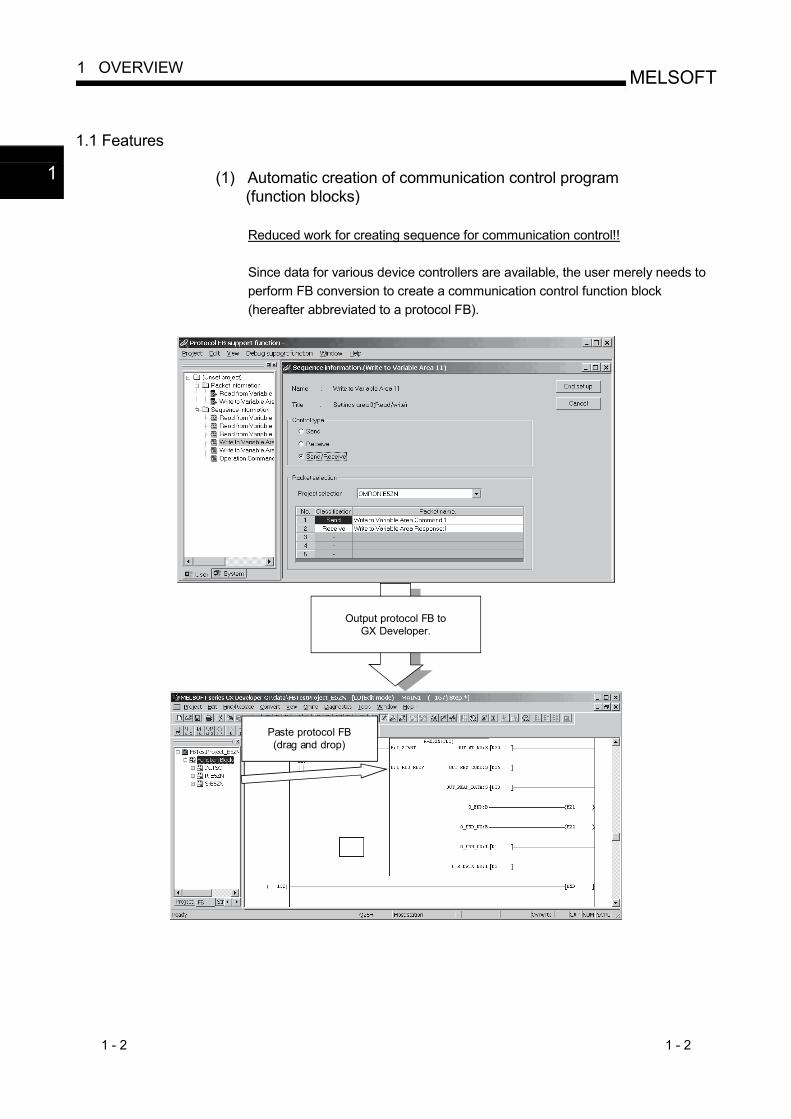
(1) Automatic creation of communication control program (function blocks)
Reduced work for creating sequence for communication control!!
Since data for various device controllers are available, the user merely needs to perform FB conversion to create a communication control function block (hereafter abbreviated to a protocol FB).
Output protocol FB toGX Developer.
Paste protocol FB(drag and drop)
1

1 - 3 1 - 3
MELSOFT1 OVERVIEW
(a) No requirement of packet construction specific to device controller
The protocol FB support function has preset data for various data controllers. The user merely needs to select the device controller and its processing items to create a protocol FB automatically without being conscious of dedicated instruction.
(b) Desired setting of data communication procedure When the user constructs any packet originally, setting can be made easily for each device controller.
(2) Communication debugging support
Reduced debugging work for system startup!!
The debugging functions required for system startup for communication of the C24 module with the device controller are available. Packet data on the line can be confirmed without any other tool being used.

1 - 4 1 - 4
MELSOFT1 OVERVIEW
(a) Circuit trace The transmission/receive packet data and communication signal wire condition between the C24 module and device controller can be traced.
1) Transmission/receive packet details display The transmission/receive packet data obtained by circuit trace are displayed in detail on the basis of the packet information.
2) Transmission/receive packet list display The transmission/receive packet data obtained by circuit trace are displayed separately in lists on a packet-by-packet basis.
(b) Communication test Test transmission (any/set data) can be made from the C24 module to the device controller. By starting the circuit trace and the following state monitor simultaneously, the packet communication data on the line can be confirmed.
(c) State monitor The error status, communication signal wire condition, etc. of the C24 module can be monitored.

2 - 1 2 - 1
MELSOFT2 OPERATING ENVIRONMENT
2 OPERATING ENVIRONMENT
This chapter explains the operating environment of the personal computer that uses the protocol FB support function.
Item Peripheral device
Installation (add-in) target *1 Add-in to GX Developer Version 8 (English version) or later *2*3*4 Computer Windows R -based personal computer
CPU Required memory
Refer to the following table "Operating system and performance required for personal computer".
For installation 65MB or more Hard disk space For operation 20MB or more Display 800 600 dots or more resolution *5
Operating system
Microsoft R Windows R 95 Operating System (English version) Microsoft R Windows R 98 Operating System (English version) Microsoft R Windows R Millennium Edition Operating System (English version) Microsoft R Windows NT R Workstation Operating System Version 4.0 (English version)Microsoft R Windows R 2000 Professional Operating System (English version) Microsoft R Windows R XP Professional Operating System (English version) Microsoft R Windows R XP Home Edition Operating System (English version) Microsoft R Windows Vista R Home Basic Operating System (English version) Microsoft R Windows Vista R Home Premium Operating System (English version) Microsoft R Windows Vista R Business Operating System (English version) Microsoft R Windows Vista R Ultimate Operating System (English version) Microsoft R Windows Vista R Enterprise Operating System (English version) Microsoft R Windows R 7 Starter Operating System (English version) Microsoft R Windows R 7 Home Premium Operating System (English version) Microsoft R Windows R 7 Professional Operating System (English version) Microsoft R Windows R 7 Ultimate Operating System (English version) Microsoft R Windows R 7 Enterprise Operating System (English version)
*1: Install GX Configurator-SC in GX Developer Version 8 or higher in the same language. GX Developer (English version) and GX Configurator-SC (Japanese version) cannot be used in combination, and GX Developer (Japanese version) and GX Configurator-SC (English version) cannot be used in combination.
*2: The protocol FB support function cannot be used if it is added into GX Developer Version 7 or earlier. *3: To use LCPU and L Series C24, use GX Developer Version 8.89T or later. *4: To install GX Configurator-SC to a Windows R 7-based personal computer, use GX Developer Version 8.91V or later. *5: Resolution of 1024 × 768 dots or more is recommended for Windows Vista R or Windows R 7.
For precautions in installation of GX Configurator-SC for each operating system, refer to "Method of installing the MELSOFT Series" included in the utility package. For Windows Vista R and Windows R 7, refer to the technical bulletin: "Installation procedure, precautions, and corrective actions for problems regarding Windows Vista-based personal computer" and "Products compatible with Windows 7 and precautions for installation", as additional information.
2

2 - 2 2 - 2
MELSOFT2 OPERATING ENVIRONMENT
Operating system and performance required for personal computer
Performance required for personal computer Operating system
CPU Required memory
Windows R 95 (Service Pack 1 or later) Pentium R 300MHz or more 64MB or more Windows R 98 Pentium R 300MHz or more 64MB or more Windows R Me Pentium R 300MHz or more 64MB or more Windows NT R 4.0 Workstation (Service Pack 3 or later) Pentium R 300MHz or more 64MB or more Windows R 2000 Professional Pentium R 300MHz or more 64MB or more Windows R XP Professional Pentium R 300MHz or more 128MB or more Windows R XP Home Edition Pentium R 300MHz or more 128MB or more Windows Vista R Home Basic Pentium R 1GHz or more 1GB or more Windows Vista R Home Premium Pentium R 1GHz or more 1GB or more Windows Vista R Business Pentium R 1GHz or more 1GB or more Windows Vista R Ultimate Pentium R 1GHz or more 1GB or more Windows Vista R Enterprise Pentium R 1GHz or more 1GB or more Windows R 7 Starter Pentium R 1GHz or more 1GB or more Windows R 7 Home Premium Pentium R 1GHz or more 1GB or more Windows R 7 Professional Pentium R 1GHz or more 1GB or more Windows R 7 Ultimate Pentium R 1GHz or more 1GB or more Windows R 7 Enterprise Pentium R 1GHz or more 1GB or more
When Windows R XP, Windows Vista R or Windows R 7 is used, the following new functions cannot be used. If any of the following new functions is used, this product may not operate normally.
Start of application in Windows R compatible mode Fast user switching Remote desktop Big fonts (Details setting of Screen properties)
Additionally, 64-bit Windows R XP, Windows Vista R and Windows R 7 are not available.
In Windows Vista R and Windows R 7, log in as a user having User authority or higher.
When Windows R 7 is used, the following new functions cannot be used. Windows XP Mode Windows Touch
2

3 - 1 3 - 1
MELSOFT3 FUNCTION LIST
3 FUNCTION LIST
This chapter explains the functions and menu of the protocol FB support function. 3.1 Function List
The functions of the protocol FB support function are listed below. (1) Protocol FB support function
Function Function outline Reference Section
Module setting Make the initial setting of the module used with the protocol FB support function. Used at the time of protocol FB conversion.
Section 7.1
Packet construction information setting
Set the packet construction elements (message format) of the device controller.
Section 7.2.3
Packet data information setting
Set detailed data to the construction elements of the packet construction information to set the data for actual communication.
Section 7.2.4
Sequence information setting
Set the communication processing control type (send, receive, communication) and the packet data that matches that type to set the information for creation of a protocol FB.
Section 7.3
FB conversion of sequence information
Convert the specified sequence information into a protocol FB. The created protocol FB is inserted into the <<FB>> tab of GX Developer.
Section 7.4
(2) Debugging support functions
Function Function outline Reference Section
Traces the transmission/receive packet data and communication signal wire condition.
Transmission/receive packet details display The packet information is collated with the transmission/receive data obtained by circuit trace and the details of each packet are displayed. Transmission/receive packet list display The obtained transmission/receive packet data are displayed separately in lists on a packet-by-packet basis.
Section 9.2 Circuit trace
Save/read of trace data Saves/reads the data obtained by circuit trace.
Section 9.2.5
Communication test Performs a communication test on any packet data from the C24 module to the device controller.
Section 9.3
State monitor Monitors the error status, communication signal wire, etc. of the C24 module.
Section 9.4
The following table shows the modules to which the protocol FB support functions can be applied and their function ranges.
Applicable modules and function ranges
Debugging Support Function Applicable module
Protocol FB support function Circuit trace Communication test State monitor
QJ71C24, QJ71C24-R2 Q series C24 modules QJ71C24N, QJ71C24N-R2,
QJ71C24N-R4
LCPU LJ71C24, LJ71C24-R2
3
3 - 2 3 - 2
MELSOFT3 FUNCTION LIST
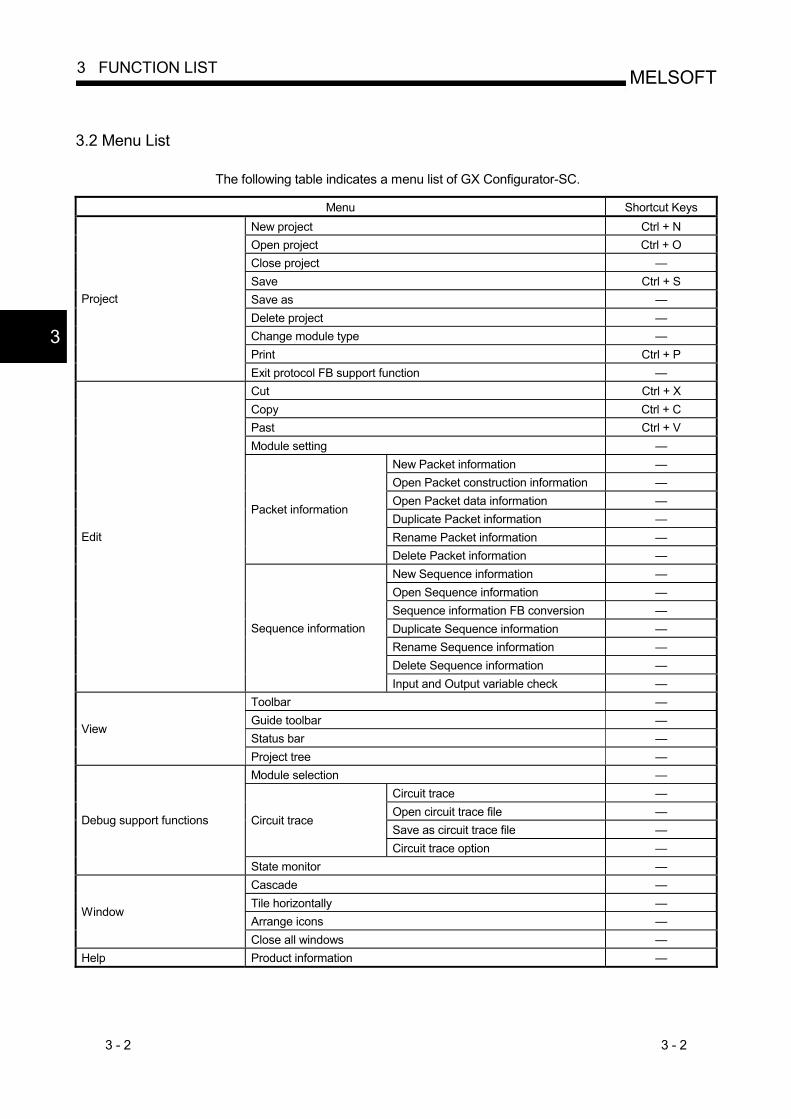
3.2 Menu List
The following table indicates a menu list of GX Configurator-SC.
Menu Shortcut Keys New project Ctrl + N Open project Ctrl + O Close project — Save Ctrl + S Save as — Delete project — Change module type — Print Ctrl + P
Project
Exit protocol FB support function — Cut Ctrl + X Copy Ctrl + C Past Ctrl + V Module setting —
New Packet information — Open Packet construction information — Open Packet data information — Duplicate Packet information — Rename Packet information —
Packet information
Delete Packet information — New Sequence information — Open Sequence information — Sequence information FB conversion — Duplicate Sequence information — Rename Sequence information — Delete Sequence information —
Edit
Sequence information
Input and Output variable check — Toolbar — Guide toolbar — Status bar —
View
Project tree — Module selection —
Circuit trace — Open circuit trace file — Save as circuit trace file —
Circuit trace
Circuit trace option —
Debug support functions
State monitor — Cascade — Tile horizontally — Arrange icons —
Window
Close all windows — Help Product information —
3
4 - 1 4 - 1
MELSOFT4 SCREEN DISPLAY
4 SCREEN DISPLAY
This chapter explains the screen display and names of the protocol FB support function.
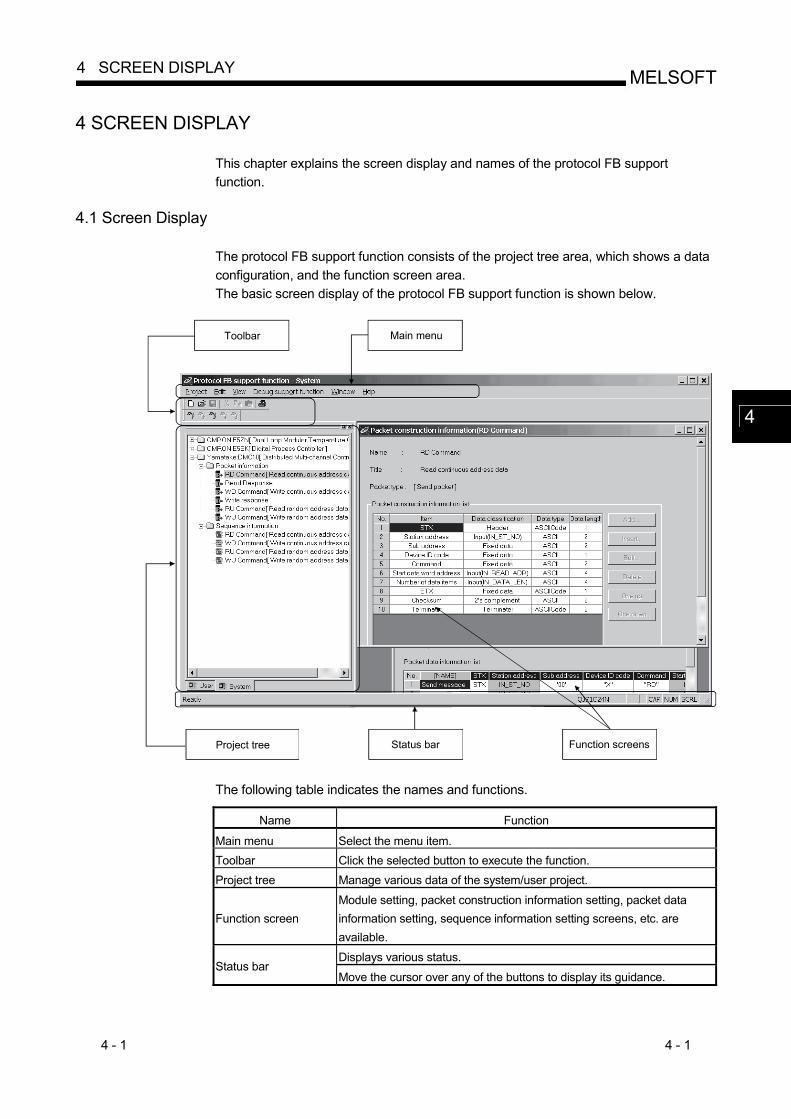
4.1 Screen Display
The protocol FB support function consists of the project tree area, which shows a data configuration, and the function screen area. The basic screen display of the protocol FB support function is shown below.
Toolbar
Project tree
Main menu
Function screensStatus bar
The following table indicates the names and functions.
Name Function
Main menu Select the menu item. Toolbar Click the selected button to execute the function. Project tree Manage various data of the system/user project.
Function screen Module setting, packet construction information setting, packet data information setting, sequence information setting screens, etc. are available.
Displays various status. Status bar
Move the cursor over any of the buttons to display its guidance.
4

4 - 2 4 - 2
MELSOFT4 SCREEN DISPLAY
4.2 Toolbar
The toolbar consists of the tool buttons and guide tool buttons. When the cursor is moved over any of the buttons, the tool tip is displayed, and at the same time, its guidance is displayed on the status bar. The toolbar can be displayed or hidden by choosing [View] [Toolbar]. The following table lists the tool buttons.
Tool Button Tool Tip Guidance
New project Create a new project.
Open project Open the existing project.
Save Save the project over the old one.
Cut Cut the selected data.
Copy Copy the selected data.
Paste Past the selected data.
Print Print the project data.
The guide tool buttons display the protocol FB creating procedure in Step 1 to Step 5. A protocol FB can be created by making setting in order of Step 1 to Step 5. The following table lists the guide tool buttons.
Guide Tool Button Tool Tip Guidance
Open Module Setting Open the module setting screen.
New Packet information Create new packet information.
Open packet data information
Open the packet data information.
New sequence information Create new sequence information.
FB conversion of sequence information
Convert the sequence information to generate the user FB.
4

4 - 3 4 - 3
MELSOFT4 SCREEN DISPLAY
4.3 Status Bar
The status bar displays status data. The status bar can be displayed or hidden by choosing [View] [Status bar].
DISPLAY/SETTING SCREEN
1) 2) 3) 4) 5)
DISPLAY/SETTING DETAILS No. Display/Setting Details
1) Displays the guidance and packet data information item setting information. 2) Displays the model name of the C24 module.
3) Displays the Caps Lock status.
4) Displays the Num Lock status.
5) Displays the Scroll Lock status.

4 - 4 4 - 4
MELSOFT4 SCREEN DISPLAY
4.4 Project Tree
The project tree consists of a system project tree and user project tree. Display screen switching is executed by clicking the tab. The system project indicates the packet construction information, packet data information and sequence information for various device controllers registered at installation of GX Configurator-SC.
4.4.1 System project tree
PURPOSE To display the packet construction information, packet data information and sequence information of various device controllers already entered.
BASIC OPERATION 1. Click the <<System>> tab in the project tree. 2. The system project tree is displayed.
DISPLAY/SETTING SCREEN
1)
2)
3)

4 - 5 4 - 5
MELSOFT4 SCREEN DISPLAY
DISPLAY/SETTING DETAILS No. Item Display/Setting Details
1) Device controller name The entered device controller names are displayed.
2) System packet information name
The system packet information names are displayed.
3) System sequence information name
The system sequence information names are displayed.
4.4.2 User project tree
PURPOSE To display the packet information and sequence information of the project created by the user.
BASIC OPERATION 1. Click the <<User>> tab in the project tree. 2. The user project tree is displayed.
DISPLAY/SETTING SCREEN
1)
3)
2)

4 - 6 4 - 6
MELSOFT4 SCREEN DISPLAY
DISPLAY/SETTING DETAILS No. Item Display/Setting Details
1) User project name The project names set by the user are displayed.
2) User packet information name
The user packet information names created by the user are displayed.
3) User sequence information name
The user sequence information names created by the user are displayed.

5 - 1 5 - 1
MELSOFT5 START AND END OF PROTOCOL FB SUPPORT FUNCTION
AND PROJECT CREATION
5 START AND END OF PROTOCOL FB SUPPORT FUNCTION AND PROJECT CREATION
This chapter explains the methods for starting and ending the protocol FB support function and the functions required to create a project.
REMARK
Unless otherwise specified, a "project" indicates the "project of the protocol FB support function".
If using the protocol FB support function, select "Use label" when creating a new project with GX Developer. If "Do not use label" is selected, only the debugging support functions can be used. The protocol FB support function can be used when the project file of GX Developer Version 8 or later is used with the QCPU (Q mode)/LCPU.
5
5 - 2 5 - 2
MELSOFT5 START AND END OF PROTOCOL FB SUPPORT FUNCTION
AND PROJECT CREATION
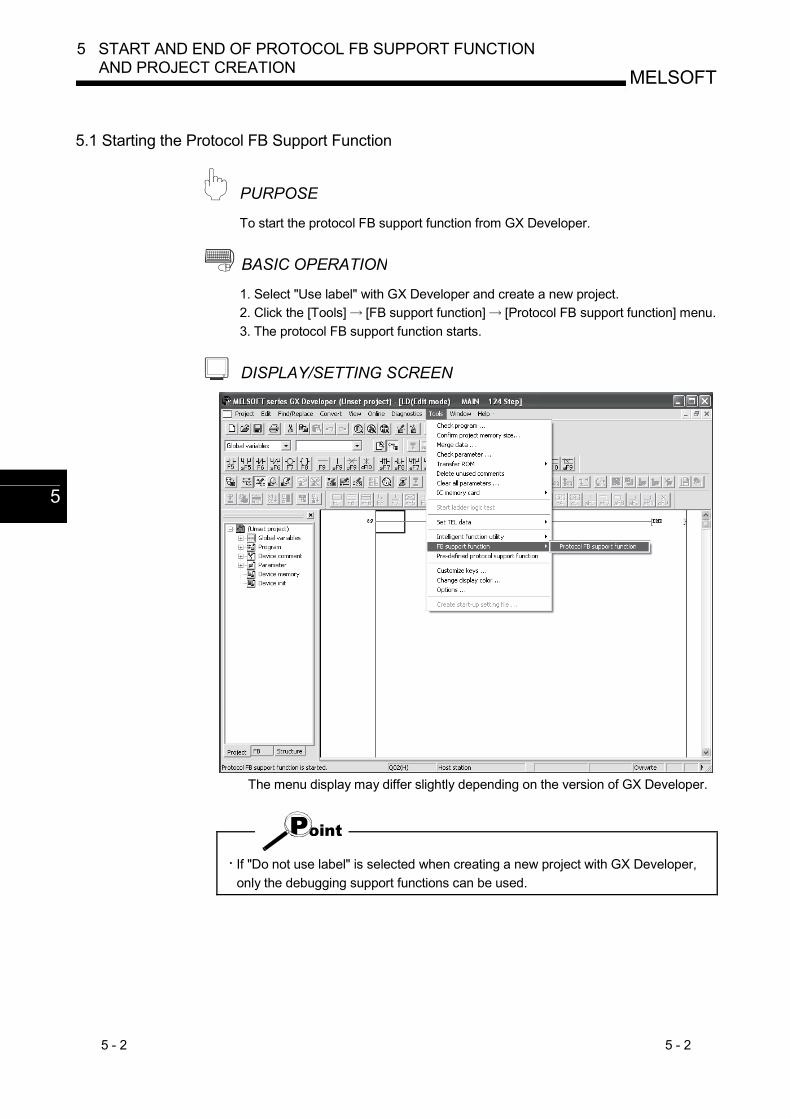
5.1 Starting the Protocol FB Support Function
PURPOSE To start the protocol FB support function from GX Developer.
BASIC OPERATION 1. Select "Use label" with GX Developer and create a new project. 2. Click the [Tools] [FB support function] [Protocol FB support function] menu. 3. The protocol FB support function starts.
DISPLAY/SETTING SCREEN
The menu display may differ slightly depending on the version of GX Developer.
If "Do not use label" is selected when creating a new project with GX Developer, only the debugging support functions can be used.
5

5 - 3 5 - 3
MELSOFT5 START AND END OF PROTOCOL FB SUPPORT FUNCTION
AND PROJECT CREATION
5.2 Exiting the Protocol FB Support Function
PURPOSE To end the protocol FB support function.
BASIC OPERATION Click the [Project] [Exit Protocol FB Support Function] menu.
DISPLAY/SETTING SCREEN

5 - 4 5 - 4
MELSOFT5 START AND END OF PROTOCOL FB SUPPORT FUNCTION
AND PROJECT CREATION
5.3 Creating a Project
The following indicates a project function list.
Function Function outline
New project Creates a new project. Open project Opens the existing project. Close project Closes the currently open project. Save project "Saves" or "Saves as" the currently edited project. Delete project Deletes the project. Change module type Changes the object module of the currently open project.
Module information, packet information and sequence information are saved into the project.
5.3.1 Creating a new project
PURPOSE To create a new project of the protocol FB support function. The created project is inserted into the user project tree.
BASIC OPERATION 1. Click the [Project] [New project] menu ( ).
2. Select the "Module type" on the New project screen. 3. Set the "Project path". 4. Set the "Project name". 5. Set the "Title". 6. Click the OK button. 7. A new project is created.
REMARK
"Project file name specification" can be done either before or after program creation.
5 - 5 5 - 5
MELSOFT5 START AND END OF PROTOCOL FB SUPPORT FUNCTION
AND PROJECT CREATION
DISPLAY/SETTING SCREEN
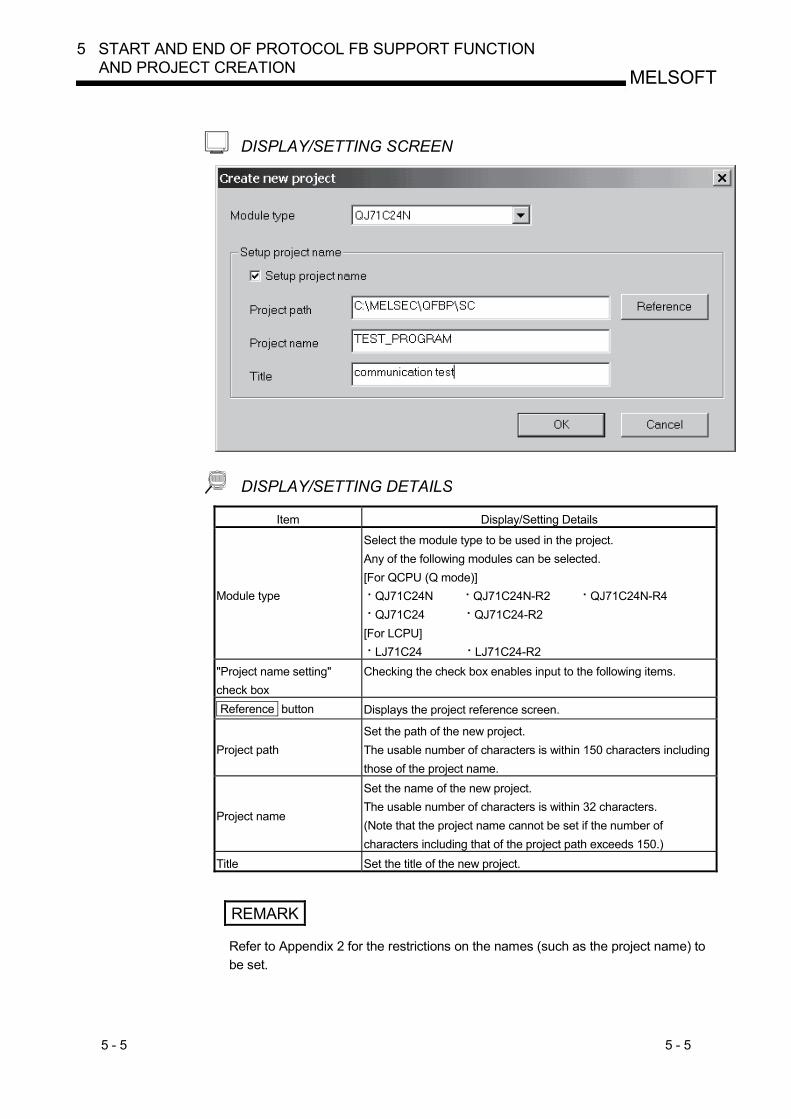
DISPLAY/SETTING DETAILS Item Display/Setting Details
Module type
Select the module type to be used in the project. Any of the following modules can be selected. [For QCPU (Q mode)]
QJ71C24N QJ71C24N-R2 QJ71C24N-R4 QJ71C24 QJ71C24-R2
[For LCPU] LJ71C24 LJ71C24-R2
"Project name setting" check box
Checking the check box enables input to the following items.
Reference button Displays the project reference screen.
Project path Set the path of the new project. The usable number of characters is within 150 characters including those of the project name.
Project name
Set the name of the new project. The usable number of characters is within 32 characters. (Note that the project name cannot be set if the number of characters including that of the project path exceeds 150.)
Title Set the title of the new project.
REMARK
Refer to Appendix 2 for the restrictions on the names (such as the project name) to be set.

5 - 6 5 - 6
MELSOFT5 START AND END OF PROTOCOL FB SUPPORT FUNCTION
AND PROJECT CREATION
5.3.2 Opening the project
PURPOSE To read the existing project.
BASIC OPERATION 1. Click the [Project] [Open project] menu ( ).
2. Click the project name. 3. Click the Open button.
5.3.3 Closing the project
PURPOSE To close the open project file.
BASIC OPERATION 1. Click the [Project] [Close project] menu. 2. If the setting has been changed, the project save confirmation screen is
displayed. Click the Yes button to save and close the project. Click the No button to close the project without saving it.

5 - 7 5 - 7
MELSOFT5 START AND END OF PROTOCOL FB SUPPORT FUNCTION
AND PROJECT CREATION
5.3.4 Saving the project
PURPOSE To save the currently edited project file.
BASIC OPERATION (1) Saving the project over the old one
1. Click the [Project] [Save] menu ( ).
2. The currently edited project file is saved over the old one. (2) Saving the project with a name
1. Click the [Project] [Save as] menu. 2. Set the "Project path" and "Project name". 3. Click the Save button. 4. The currently edited project file is saved with a name.
5.3.5 Deleting the project of the protocol FB support function
PURPOSE To delete the project file.
BASIC OPERATION 1. Click the [Project] [Delete project] menu. 2. Specify the "Drive/Path" and "Project name" to be deleted. 3. Click the Delete button. 4. As the project deletion confirmation screen is displayed, click the Yes button. 5. The project is deleted.

5 - 8 5 - 8
MELSOFT5 START AND END OF PROTOCOL FB SUPPORT FUNCTION
AND PROJECT CREATION
5.3.6 Changing the module type
PURPOSE To change the type of the preset C24 module.
BASIC OPERATION 1. Click the [Project] [Change module type] menu. 2. Select a new module type. 3. After the setting is completed, click the OK button.
The module type is changed.
DISPLAY/SETTING SCREEN
DISPLAY/SETTING DETAILS Item Display/Setting Details
Module type
Select a new module type. Any of the following modules can be selected. [For QCPU (Q mode)]
QJ71C24N QJ71C24N-R2 QJ71C24N-R4 QJ71C24 QJ71C24-R2
[For LCPU] LJ71C24 LJ71C24-R2
When the module type is changed, the following data return to the default values.
Transmission speed of module information

6 - 1 6 - 1
MELSOFT6 PROTOCOL FB CREATION OPERATING PROCEDURE
6 PROTOCOL FB CREATION OPERATING PROCEDURE
6.1 Protocol FB Construction Data
The protocol FB support function creates protocol FBs for communication with the device controller. Make the following settings to create protocol FBs. (1) Module setting (2) Creation of send/receive FBs
(This operation is not required when the system project is used.)
The following shows the purpose and entry procedure of each data.
GX Configurator-SC
Device controller
C24
Receive packet
Send packet
FB support function
Select system project.Sequence program
FB conversion
(1) Module setting
Set the parameters necessary for the initial setting of the C24 module. The settings are reflected on the "Send/receive data" and "Module initialization FB". For details, refer to "Section 7.1 Module Setting".
6

6 - 2 6 - 2
MELSOFT6 PROTOCOL FB CREATION OPERATING PROCEDURE
(2) Creation of send/receive FBs
To create send/receive FBs, it is required to set the packet construction information, packet data information and sequence information. (a) Packet construction information
Entry the structure (header, fixed data, terminator, etc.) of the device controller to be communicated with.
(b) Packet data information Entry the data to be transmitted (actual message) into the packet construction information entered in (a).
(c) Sequence information Entry the data to be transmitted. By performing the FB conversion of this sequence information, a protocol FB for communication of the entry data is created.
The following shows the set data that comprise send and receive FBs.
FB
FBNo.
1
2
3
4
Header StationNo. Command Address Data
01
02
2000
RD
WR
0100
0110
0200
0210
1500
2500
3000
01
02
RD
WR@
Sequence informationSequence information
Sequence information
@
@
@
FBPacket constructioninformation
Packet datainformation
6

6 - 3 6 - 3
MELSOFT6 PROTOCOL FB CREATION OPERATING PROCEDURE
6.2 Communication Control Program Creating Procedure
This section explains the procedure for creating a communication control program using the protocol FB support function. When the target device controller is in the system project, use the system project. Protocol FBs can be created easily. When the target device controller is not in the system project, protocol FBs can be created by modifying the system project or creating a new project. The following flowchart indicates the creating procedure.
End
‚È ‚¢
Yes
Yes
Since FBs will be used, selectLabel setting: Use label.
No
Convert the protocol FB.
Module head I/O setting
Create a sequence program andpaste the protocol FB.
Connect with the device controllerand perform debugging.
Select the packet data to be set to the sequence information.
Step 1: Make module setting.
Duplicate the similar packet information from the system project.
Create a new user project.
Change the contents of the duplicated packet information intothe user project.
Is there
Start GX Developer.
Start
Create the project of GX Developer.
Step 1: Make module setting.
Step 5: With the sequenceinformation being selected,convert it into a protocol FB.
Is there a
Step 2: With the packet informationbeing selected, create new packet information.
Step 3: With the packet informationbeing selected, open the packet data information.
Set the packet data information.
GX Developer
Protocol FBsupport function
GX Developer
Protocol FBsupport function
No
Start the protocol FB support function.
Step 4: With the sequence information being selected, create new sequence information.
Refer to Section 6.3.
Refer to Section 6.4.
1)
2)
3)
in the system project?similar packet information
Step 5: With the sequence information being selected, convert it into a protocol FB.
device controller to be used
project?with the system
10)
11)
12)
Convert the sequence program.13)
4)
5)
6)
7)
8)
9)
Refer to Section 6.5.
Refer to Chapter 9.
Reusing the system project,
Create a new user project.
* The numbers, 1) to 13) in the flowchart correspondto 1) to 13) shown in section 6.3 to 6.5.
create protocol FBs.

6 - 4 6 - 4
MELSOFT6 PROTOCOL FB CREATION OPERATING PROCEDURE
6.3 Operating Procedure for Use of System Project
The operating procedure for use of the system project will be explained using the actual screen as an example.
Starting the protocol FB support function selects the <<System project>> tab.
1) Make module setting. Operation:
Click or choose [Edit] [Module setting].
Make the initial setting of the C24 module, and click the End set up button.
REMARK
Executing [FB conversion of sequence information] reflects the settings of the channel, which has been specified as "Channel" on the FB conversion check screen, in "Module initialization FB (INITSC)".
2) Select the sequence information from the system project. Operation:
Select the device controller to be communicated with from among the sequence information in the system project tree.

6 - 5 6 - 5
MELSOFT6 PROTOCOL FB CREATION OPERATING PROCEDURE
Convert into a protocol FB.
Operation: Click or choose [Edit] [Sequence information] [FB conversion of sequence information]. Input the FB program name, etc. and click the OK button. REMARK This will create an FB program for the channel specified in "Channel".
The protocol FB and module initialization FB are inserted into the <<FB>> tab of GX Developer.
Inserted into GX Developer.
Precautions for creating multiple module initialization FBs At the time of [FB conversion of sequence information], a module initialization FB is created under the FB program name of "INITSC". If the module initialization FB (INITSC) exists in a GX Developer's project, the new FB is overwritten to the existing one. Therefore, when multiple module initialization FBs are needed for respective applications or channels, change the FB program name on GX Developer after [FB conversion of sequence information].

6 - 6 6 - 6
MELSOFT6 PROTOCOL FB CREATION OPERATING PROCEDURE
6.4 Operating Procedure for Use of User Project
When the system project does not have the target device controller, create a user program by reusing the system project or by creating all information such as packet information and sequence information. This section explains the method of reusing the system project using the actual screen as an example. 3) Crete a new user project.
Operation: Choose [Project] [New project]. A new user project is created.
4) Make module setting.
Operation: Click or choose [Edit] [Module setting]. Make the initial setting of the C24 module, and click the End set up button.
REMARK Executing [FB conversion of sequence information] reflects the settings of the channel, which has been specified as "Channel" on the FB conversion check screen, in "Module initialization FB (INITSC)".

6 - 7 6 - 7
MELSOFT6 PROTOCOL FB CREATION OPERATING PROCEDURE
5) Duplicate the packet information from the system project.
Operation:
Choose [Edit] [Packet information] [Duplicate Packet information].
From the system project, select the packet information similar to the protocol of the target device controller and duplicate it in the user project.
Set the packet information name of the duplication destination.
6) Change the duplicated packet information into the user project. Operation:
Choose [Edit] [Packet information] [Open packet data information].
The packet data information opens.

6 - 8 6 - 8
MELSOFT6 PROTOCOL FB CREATION OPERATING PROCEDURE
Set the packet data.
For details, refer to "Section 7.2 Packet Information".
7) Create new sequence information. Operation:
Click or choose [Edit] [Sequence information] [New sequence information]. New sequence information is created.
8) Set the packet data to the sequence information.
Double-click "Packet name". The packet information screen opens.

6 - 9 6 - 9
MELSOFT6 PROTOCOL FB CREATION OPERATING PROCEDURE
Select the packet information. Select the packet to create a protocol FB.
Operation: Select the packet data information. The packet data selected here is created as a protocol FB.
The packet data is set to the sequence information.

6 - 10 6 - 10
MELSOFT6 PROTOCOL FB CREATION OPERATING PROCEDURE
9) Convert into a protocol FB.
Operation: Click or choose [Edit] [Sequence information] [FB conversion of sequence information]. Input the FB program name, etc. and click the OK button. REMARK This will create an FB program for the channel specified in "Channel".
The protocol FB and module initialization FB are inserted into the <<FB>> tab of GX Developer.
Inserted into GX Developer.
Precautions for creating multiple module initialization FBs At the time of [FB conversion of sequence information], a module initialization FB is created under the FB program name of "INITSC". If the module initialization FB (INITSC) exists in a GX Developer's project, the new FB is overwritten to the existing one. Therefore, when multiple module initialization FBs are needed for respective applications or channels, change the FB program name on GX Developer after [FB conversion of sequence information].

6 - 11 6 - 11
MELSOFT6 PROTOCOL FB CREATION OPERATING PROCEDURE
6.5 Operating Procedure for Utilization of Converted FB on GX Developer
The procedure for pasting the protocol FB to a sequence program to create a communication control program will be explained using the actual screen as an example.
The protocol FB is inserted into the <<FB>> tab. The inserted FB names are the FB name specified in "FB conversion of sequence information" and INITSC (initialization FB).
10) Module head I/O setting Operation:
Choose [Project] [Function Block] [FB Change module address]. The protocol FB has been created with the C24 module installed on Slot 0. If it is not installed on Slot 0, change the module head I/O.
Operation:
Input the module head I/O where the C24 module is installed. The example assumes that the module is installed on Slot 1.
11) Convert (compile) the protocol FB. Operation:
[Convert] [Convert/Compile (All programs)]. Since the protocol FB has not yet been convert (not yet been compiled), convert (compile) it before use.

6 - 12 6 - 12
MELSOFT6 PROTOCOL FB CREATION OPERATING PROCEDURE
12) Create a sequence program and paste the protocol FB.
Operation: (1) Put the sequence program in the
edit condition. (2) Open the <<FB>> tab and drag the
desired program FB to the sequence program.
(3) Create the I/O area of the pasted protocol FB to complete the communication control program.
13) Convert the sequence program. The protocol FB is pasted to the sequence program. Operation:
[Convert] [Convert/Compile]. Since the sequence program has not yet been convert (not yet been compiled), convert (compile) it before use.

7 - 1 7 - 1
MELSOFT7 SETTING OF PROTOCOL FB DATA
7 SETTING OF PROTOCOL FB DATA
7.1 Module Setting
PURPOSE To set various parameters necessary for the initial setting of the C24 module. The settings are reflected on the "Module initialization FB" and "Protocol FB" at the FB conversion of sequence information. Various parameters are as indicated below.
Mode change Data communication time monitoring Transmission control Transmitting area Communication control Data reception Half duplex communication control Reception area
BASIC OPERATION 1. Click the [Edit] [Module setting] menu ( ). 2. Set various parameters and used channels on the Module setting screen. 3. Click the End set up button. 4. The module information is set.
DISPLAY/SETTING SCREEN
2)
1)
7

7 - 2 7 - 2
MELSOFT7 SETTING OF PROTOCOL FB DATA
DISPLAY/SETTING DETAILS No Item Display/Setting Details
1) Module setting items
Set the setting items of the module. The input methods are as follows.
Decimal : 0 to 9 Hexadecimal : 0 to 9, A to F, a to f
2) Use channel Set the used channels in the check boxes.
The module can be initialized using either of the "module initialization FB" and "module initialization by intelligent function utility" (hereafter abbreviated to the "module initialization by utility"). Note the following points since the initialization timing differs.
"Module initialization FB" Initializes the module when the module initialization FB is executed. Use this FB to initialize the module during program execution.
"Module initialization by utility" Initializes the module when the CPU is reset. Since matching with the protocol FB may be lost, do not use this FB when using the protocol FB.
If the module is not initialized with the "module initialization FB", always make module setting.
7

7 - 3 7 - 3
MELSOFT7 SETTING OF PROTOCOL FB DATA
7.2 Packet Information
Set the packet construction information (message format) and packet data (message) for communication with the device controller.
7.2.1 Creating new packet information
PURPOSE To create new packet construction. New packet construction cannot be created in the system project. Execute this function in the user project.
BASIC OPERATION 1. Click the [Edit] [Packet information] [New Packet information] menu ( ). 2. The Create new packet information screen is displayed. 3. Set the "Name", "Title" and "Packet type", and click the OK button.
DISPLAY/SETTING SCREEN
DISPLAY/SETTING DETAILS Item Display/Setting Details
Name Set the name of packet information. The number of usable characters is within 32. For restrictions on name, refer to Appendix 2.
Title
Set the title of packet information. The number of usable characters is within 32. For restrictions on name, refer to Appendix 2.
Packet type
Select the packet type from the followings. Send packet/Receive packet/Receive (specified length) packet. The packet type cannot be changed after packet information creation.

7 - 4 7 - 4
MELSOFT7 SETTING OF PROTOCOL FB DATA
Specifying Receive packet/Receive (specified length) packet Specify either of the following types according to the packet construction or final data to be received. (1) Receive packet
Specify this type to create a receive frame that includes header, any data and end judgment data. The following shows the construction of the receive packet supported by GX Configurator-SC. • Header + Any data*1 + End judgment data*2
Q series C24 module Other node
Header Any data End judgment data
Receive packet (example)
Terminator, fixed data, or fixed data + error check code (For setting restrictions, refer to Point in Section 7.2.3)
(2) Receive (specified length) packet Specify this type to create a receive frame with fixed packet length, header and no end judgment data. The following shows the construction of the receive (specified length) packet supported by GX Configurator-SC. • Header + Any data *1
Q series C24 module Other node
Header Any data
Receive (specified length) packet(example)
Specified length (byte)
*1: Any data indicates the data located behind header of the packet sent from other
node, or between the header and end judgment data. This data can be omitted. Fixed data and output variables are used as any data when receiving data.
*2: End judgment data is used to identify the final data of each packet when the C24 module receives and processes the packet (data array) sent from other node. The following shows the combination of end judgment data. • Terminator only • Fixed data only • Fixed data + error check code For example, CR (code: ODH) and ETX (code: 03H) data can be used as end judgment data.

7 - 5 7 - 5
MELSOFT7 SETTING OF PROTOCOL FB DATA
7.2.2 Opening the packet construction information
PURPOSE To read the packet construction information already set. Used to change the contents of the packet construction information. The packet construction information of the system project cannot be changed. When it is desired to reuse it, make a duplicate. For details, refer to "Section 7.2.5 Duplicating the packet information".
BASIC OPERATION 1. Click the [Edit] [Packet information] [Open Packet construction information]
menu ( ). 2. The Packet construction information screen is displayed.

7 - 6 7 - 6
MELSOFT7 SETTING OF PROTOCOL FB DATA
7.2.3 Setting the packet construction information
PURPOSE To set each item of the packet construction (message format). The protocol FB support function sets the packet on the basis of this information. The setting items are the item name, data classification, data type, and data length.
BASIC OPERATION 1. Click the [Edit] [Packet information] [Open Packet construction information]
menu ( ). 2. The Packet construction information screen is displayed. 3. Click the Add or Insert button to display the Packet construction information
setting screen. 4. After the setting of the Packet construction information setting screen is
completed, click the Setting button. 5. The data are set to the Packet construction information screen. 6. Click the Close button on the Packet construction information screen.
DISPLAY/SETTING SCREEN

7 - 7 7 - 7
MELSOFT7 SETTING OF PROTOCOL FB DATA
DISPLAY/SETTING DETAILS Item Display/Setting Details
Name Display the name of the packet information. Title Display the title of the packet information. Packet type Display the packet type of the packet information.
Number of specified length data Displays the data length set in the packet construction information setting only when the packet type is Receive (specified length) packet.
Packet construction information list
Displays the packet construction elements set in the packet construction information setting.
Add button
Adds the item of the packet construction. Displays the Packet construction information setting screen and sets the packet construction information. Data are inserted into the position one line lower than the cell containing the focus.
Insert button
Inserts the item of the packet construction. Displays the Packet construction information setting screen and sets the packet construction information. Data are inserted into the position one line higher than the cell containing the focus.
Edit button Edits the item of the packet construction information already set.
Delete button Deletes the specified item.
One up button Moves the set packet construction information item one place up.
One down button Moves the set packet construction information item one place down.
DISPLAY/SETTING SCREEN

7 - 8 7 - 8
MELSOFT7 SETTING OF PROTOCOL FB DATA
DISPLAY/SETTING DETAILS Item Display/Setting Details
Item name setting Set the name of the item to be added or changed. The usable number of characters is within 32 characters.
Data classification selection
Select the data classification to be added or changed with the radio button. <In the case of Send/Receive packet>
(1) Header (2) Terminator (3) Fixed data (4) I/O variable
Set the variable name corresponding to the I/O label of the protocol FB after FB conversion (compile).
(5) Error check code Set the error check code type and calculation range.
a) Error check code type Horizontal parity (2 bytes) ASCII Horizontal parity (1 byte) BIN *1 2's complement (2 bytes) ASCII SUM (1 byte) BIN SUM (2 bytes) BIN SUM (1 byte) ASCII SUM (2 bytes) ASCII
b) Calculation range A header (Head frame) is included in the calculation range. Do not include the fixed data prior to error check code in calculation range.*2*3
<In the case of Receive (specified length) packet> (1) Header (2) Fixed data (3) Output variable
Set the variable name that corresponds to the protocol FB output label after FB conversion (compile).
Data type selection Select the data type of the item to be added or changed. Selection is disabled when the error check code is selected.
Data length selection
Select the data length of the item to be added or changed. Selection is disabled when the error check code is selected. When ASCII (character string) or ASCII Code is selected in Data type selection, the data length can be set to 1 to 50 bytes. However, when the input variable or output variable is selected in Data type selection, the data length than can be set is 1 to 49 bytes. Check Fixed length to achieve the data length set in Specified length after selection of the input variable or output variable. When it is not checked, the data length will be the variable length within the range set in Specified length. However, variable length setting is not available when Receive (specified length) packet is selected.

7 - 9 7 - 9
MELSOFT7 SETTING OF PROTOCOL FB DATA
*1: "Horizontal parity (1 byte) BIN" can be set when using any of the following modules:
QJ71C24, QJ71C24N-R2, QJ71C24N-R4, LJ71C24 or LJ71C24-R2 *2: "Do not include the fixed data prior to error check code in calculation range" can be set only when "SUM (2 bytes)
ASCII" is set for the error check code. *3: "Do not include the fixed data prior to error check code in calculation range" can be check-marked when using the
following modules: QJ71C24, QJ71C24N-R2 or QJ71C24N-R4 (Use a function version B module with a serial number of which the first five digits are ‘06062’ or higher.) LJ71C24 or LJ71C24-R2 When a module other than the above is used, messages will not be sent or received properly even if "Do not include the fixed data prior to error check code in calculation range" is checked.
The following table explains calculation ranges for the error check code in the basic packet structure.
Calculation range setting
A header (Head frame) is included in the calculation range
Do not include the fixed data prior to error check code in calculation range
Basic packet structure and error check code calculation range
1 Not checked
Not checked
Header I/O variable Fixed Terminator
Error check code calculation range
data codeError check
2 Checked
Not checked
Header I/O variable Fixed Terminator
Error check code calculation range
data codeError check
3 Not checked
Checked
Header I/O variable Fixed Terminator
Error check code Total bytes of 2 data are up to 78.
data codeError check
calculation range
4 Checked
Checked
Header I/O variable Fixed Terminator
Total bytes of 2 data are up to 78.
data codeError check
Error check code calculation range

7 - 10 7 - 10
MELSOFT7 SETTING OF PROTOCOL FB DATA
Restrictions on the packet construction items at the time of packet construction information setting
The maximum used items are 32 items. The number of items usable for input variables is up to 8 items. The number of items usable for output variables is up to 19 items. When multiple output variables are to be set, the output variable that can be set to a variable length is only the last output variable.
Restrictions on the packet construction when FB conversion is performed from sequence information <In the case of send packet>
The maximum size of the send packet is 255 bytes. The number of registrations (number of bytes) of each item is within the following ranges.
A = number of bytes of items other than the input variable 3 B = number of items for input variables (label variables) 30 The packet cannot be created if A + B exceeds 270.
<In the case of receive packet> The packet data requires the header, the error check code or terminator. When multiple output variables are to be set, the output variable that can be set to a variable length is only the last output variable. The maximum size of the receive packet is 255 bytes. The number of registrations (number of bytes) of each item is within the following ranges.
A = number of bytes of items other than the output variable 3 B = number of items for output variables (label variables) 17 The packet cannot be created if A + B exceeds 340.
Add all packet information set to the sequence information.
Restrictions on the order of packet construction information on a data classification basis <Header>
Always set the header at the beginning of the packet data. No other data can be inserted before the header.
<Terminator> Always set the terminator at the end of the packet data. No other data can be added after the terminator.
<I/O variable> Set it between a header and error check code.
For a receive packet, I/O variable cannot be set at the top or end of packet data. For a receive (specified length) packet, I/O variable cannot be set at the top of packet data.
<Fixed data> Set it between a header and terminator.
<Error check code> When a terminator exists, set an error check code before the terminator. When setting an error check code at the end of packet data, set fixed data immediately before the error check code.
Restrictions on the variable name of the input variable/output variable Refer to Appendix 3 for details.

7 - 11 7 - 11
MELSOFT7 SETTING OF PROTOCOL FB DATA
7.2.4 Setting the packet data information
PURPOSE To set detailed data to the construction elements of the packet construction information to set the actually transmitted data, according to the packet construction information.
BASIC OPERATION 1. Click the [Edit] [Packet information] [Open packet data information] menu
( ). 2. The Packet data information screen is displayed. 3. Input a name into the [NAME] field of the packet data information list. 4. Set the detailed data of the construction elements set in the packet construction
information. When the data type is "ASCII Code", the "ASCII Code input" dialog box is displayed. The grayed areas need not be set since the data of the input/output variables (input/output variables of FB) set in the packet construction information setting are inserted.
5. Click the Close button to entry the data.
DISPLAY/SETTING SCREEN

7 - 12 7 - 12
MELSOFT7 SETTING OF PROTOCOL FB DATA
DISPLAY/SETTING DETAILS Item Display/Setting Details
Name Displays the name set in the creation of new packet information.
Title Displays the title set in the creation of new packet information.
Packet type Displays the packet type set in the creation of new packet information.
Packet data information list
[NAME] Set the [NAME] field to differentiate between packet data. The usable number of characters is within 32 characters.
Packet data information list
Set data on a construction element basis. Set these data according to the data of the packet construction information. Up to 32 patterns of data can be set to one packet construction. The item whose first line is blue is in the calculation range of the "error check code".
DISPLAY/SETTING SCREEN
DISPLAY/SETTING DETAILS Item Display/Setting Details
ASCII Code input Select the ASCII code from the combo box. 33 different ASCII codes have been entered.
NUL (0x00) to US (0x1F) DEL (0x7F)
Insert button Inputs the selected ASCII code into the cursor position.
Delete button Deletes the ASCII code in the cursor position.
<< >> button Moves the cursor position left to right in the already input ASCII code list.

7 - 13 7 - 13
MELSOFT7 SETTING OF PROTOCOL FB DATA
7.2.5 Duplicating the packet information
PURPOSE To duplicate the packet information. Use this function when reusing the already set packet information. When reusing the system project, execute this function after creating a user project. When this function is executed on the system project side, the packet information is inserted into the user project.
BASIC OPERATION 1. Put the packet information to be duplicated in a selected condition, and click the
[Edit] [Packet information] [Duplicate packet information] menu. 2. Set the "Reproduction name" and "Title" and click the OK button.
The packet information is duplicated.
DISPLAY/SETTING SCREEN
DISPLAY/SETTING DETAILS Item Display/Setting Details
Target name Displays the name of the target packet.
Reproduction name Set the name of the reproduction packet. The usable number of characters is within 32 characters.
Title Set the title. The usable number of characters is within 32 characters.

7 - 14 7 - 14
MELSOFT7 SETTING OF PROTOCOL FB DATA
7.2.6 Renaming the packet information
PURPOSE To rename the packet information.
BASIC OPERATION 1. Click the [Edit] [Packet information] [Rename packet information] menu. 2. Set the "Changed name" and "Title" and click the OK button.
The packet information is renamed.
DISPLAY/SETTING SCREEN
DISPLAY/SETTING DETAILS Item Display/Setting Details
Target name Displays the target name.
Changed name Set a new name. The usable number of characters is within 32 characters.
Title Set the title. The usable number of characters is within 32 characters.
7.2.7 Deleting the packet information
PURPOSE To delete the packet information. When the packet information to be deleted is used in the sequence information, the data entered in the sequence information is deleted. Execute this function after changing the data of the sequence information.
BASIC OPERATION 1. Click the [Edit] [Packet information] [Delete packet information] menu. 2. A confirmation message is displayed before the deletion of the packet
information is executed. Click the Yes button to delete the packet information.

7 - 15 7 - 15
MELSOFT7 SETTING OF PROTOCOL FB DATA
7.3 Sequence Information
In the sequence information, set the communication processing control type (send, receive, send/receive) and the packet data that matches the control type to set the information for creating a protocol FB.
7.3.1 Creating new sequence information
PURPOSE To create new sequence information. New sequence information cannot be created in the system project. Execute this function in the user project.
BASIC OPERATION 1. Select "Sequence information" in the project tree, and click the [Edit]
[Sequence information] [Create new sequence information] menu ( ).
2. The New sequence information screen is displayed. Set the "Name" and "Title" and click the OK button.
3. New sequence information is created.
DISPLAY/SETTING SCREEN
DISPLAY/SETTING DETAILS Item Display/Setting Details
Name Set the name of the sequence information. The usable number of characters is within 32 characters.
Title Set the title for the sequence information. The usable number of characters is within 32 characters.
REMARK
Refer to Appendix 2 for the restrictions on the set names, etc.

7 - 16 7 - 16
MELSOFT7 SETTING OF PROTOCOL FB DATA
7.3.2 Setting the sequence information
PURPOSE To set the communication processing control type (send, receive, send/receive) and the packet data that matches the control type to set the information for creating a protocol FB.
BASIC OPERATION 1. Click the [Edit] [Sequence information] [Open sequence information]
menu. 2. The Sequence information screen is displayed. 3. Set the "Control type", "Project selection" and "Classification". 4. Double-click the "Packet name" cell to display the Packet information selection
screen. 5. Make setting and click the End set up button. 6. The settings are entered.
DISPLAY/SETTING SCREEN

7 - 17 7 - 17
MELSOFT7 SETTING OF PROTOCOL FB DATA
DISPLAY/SETTING DETAILS Item Display/Setting Details
Name Displays the name set in the creation of the sequence information. Title Displays the title set in the creation of the sequence information. Control type Select the control type. Project selection Select the project for selection of the packet information.
Classification Select the classification that can be set by making control type selection. Click the Classification cell and make selection from the combo box.
Packet name.
After moving the focus to the specified cell, double-click it. 1) The Packet information selection screen is displayed.
Select the packet information. 2) The Packet data selection screen is displayed.
Select the packet data.
DISPLAY/SETTING SCREEN
DISPLAY/SETTING DETAILS Item Display/Setting Details
Packet information list Displays the packet information that can be selected. After making selection with the cursor, click the Selection button.
Selection button Displays the packet information selected with the cursor. Displays the Packet data selection screen.
Cancel button Cancels the setting and closes the screen.

7 - 18 7 - 18
MELSOFT7 SETTING OF PROTOCOL FB DATA
DISPLAY/SETTING SCREEN
DISPLAY/SETTING DETAILS Item Display/Setting Details
Packet data information list Displays the packet information that can be selected. After making selection with the cursor, click the Selection button. The item whose first line is blue is in the calculation range of the "error check code".
Selection button Sets to the sequence information the packet data information selected with the cursor. Returns to the Sequence information screen.
Cancel button Cancels the setting and closes the screen.

7 - 19 7 - 19
MELSOFT7 SETTING OF PROTOCOL FB DATA
7.3.3 Duplicating the sequence information
PURPOSE To duplicate the sequence information. Use this function when reusing the already set sequence information. When reusing the system project, execute this function after creating a user project. When this function is executed on the system project side, the sequence information is inserted into the user project.
BASIC OPERATION 1. Click the [Edit] [Sequence information] [Duplicate sequence information]
menu. 2. Set the "Reproduction name" and "Title" and click the OK button.
The sequence information is duplicated.
DISPLAY/SETTING SCREEN
DISPLAY/SETTING DETAILS Item Display/Setting Details
Target name Displays the target name.
Reproduction name Set the reproduction name. The usable number of characters is within 32 characters.
Title Set the title. The usable number of characters is within 32 characters.

7 - 20 7 - 20
MELSOFT7 SETTING OF PROTOCOL FB DATA
7.3.4 Renaming the sequence information
PURPOSE To rename the sequence information.
BASIC OPERATION 1. Click the [Edit] [Sequence information] [Rename sequence information]
menu. 2. Set the "Changed name" and "Title" and click the OK button.
The sequence information is renamed.
DISPLAY/SETTING SCREEN
DISPLAY/SETTING DETAILS Item Display/Setting Details
Target name Displays the target name.
Changed name Set a new name. The usable number of characters is within 32 characters.
Title Set the title. The usable number of characters is within 32 characters.

7 - 21 7 - 21
MELSOFT7 SETTING OF PROTOCOL FB DATA
7.3.5 Deleting the sequence information
PURPOSE To delete the sequence information.
BASIC OPERATION 1. Click the [Edit] [Sequence information] [Delete sequence information]
menu. 2. A confirmation message is displayed before the deletion of the sequence
information is executed. Click the Yes button to delete the sequence information.

7 - 22 7 - 22
MELSOFT7 SETTING OF PROTOCOL FB DATA
7.3.6 Confirming the I/O variables
PURPOSE To display a list of the input/output variables used in the packet information selected in the sequence information. The input/output variables displayed here are defined as the sequence FB variables of a protocol FB.
BASIC OPERATION 1. Click the [Edit] [Sequence information] [Input/Output variable] menu. 2. The Input/Output variable screen is displayed. 3. The data set in the packet construction information setting are displayed in the
Input/Output variable list.
DISPLAY/SETTING SCREEN

7 - 23 7 - 23
MELSOFT7 SETTING OF PROTOCOL FB DATA
7.4 FB Conversion of Sequence Information
PURPOSE To convert the sequence information into an FB program. There are three different FB program types: initialization FB, send FB*1 and receive FB*2. *1: Send FB: When Send or Send/Receive is selected as the control type in the
sequence information *2: Receive FB: When Receive or Send/Receive is selected as the control type in
the sequence information
BASIC OPERATION 1. Click the [Edit] [Sequence information] [FB conversion of sequence
information] menu ( ). 2. The FB conversion screen is displayed. 3. Set the "FB program name", "FB program title", "Reservation D device" and
"Module start I/O No.". 4. Select the channel used for the target sequence information. 5. Click the Communication setting check button and confirm the data of the
object module. 6. Click the OK button. 7. The protocol FB is created and inserted into the <<FB>> tab of GX Developer.
DISPLAY/SETTING SCREEN

7 - 24 7 - 24
MELSOFT7 SETTING OF PROTOCOL FB DATA
DISPLAY/SETTING DETAILS Item Display/Setting Details
FB program name
Set the name to the protocol FB. The name set here is used as the FB name. The usable number of characters is within 6 characters. The FBs are displayed on GX Developer as indicated below.
Send FB: S- Receive FB: R-
FB program title Set the title to the protocol FB. The title set here is used as the FB title. The usable number of characters is within 32 characters.
Reservation D device
Set the D device to be used in the protocol FB to be output. Since the specified D device (2 words) is used in the FB, it cannot be used in the sequence program. Make the settings within the range from D0 to D12287.
Module start I/O No.
Set the head address of the module used in the FB program to be output. The FB program will be generated depending on the head address set here. The setting range varies with the PLC CPU used. Therefore, make the settings within the following range.
0 to E0 : Q00JCPU, Q00UJCPU 0 to 3E0 : Q00CPU, Q01CPU, Q00UCPU, Q01UCPU, L02CPU 0 to 7E0 : Q02UCPU 0 to FE0 : Other QCPU (Q mode), L26CPU-BT
Channel Specify the target channel of the sequence information (protocol FB).
Communication setting check button Displays the communication settings. The display data are the settings made on the Module setting screen.
Classification Displays the data of the sequence information. Packet name Displays the data of the sequence information.
DISPLAY/SETTING SCREEN

8 - 1 8 - 1
MELSOFT8 HOW TO USE PROTOCOL FB
8 HOW TO USE PROTOCOL FB
This chapter explains the procedure to use protocl FB with GX Developer. 8.1 Outline
The procedure to create and use protocol FBs is described below.
1) Convert the sequence information into a protocol FB. 2) GX Developer can also be used to change the module head I/O No. of the protocol
FB created by FB conversion. 3) Convert (compile) the protocol FB. 4) Paste the protocol FB to the sequence program. 5) Create the I/O area of the pasted protocol FB. 6) Convert (compile) the sequence program.
The procedure of steps 1) to 6) will now be represented in a flowchart. The details of 1) to 6) will be explained in the next section.
GX Developer
Convert the sequence information into a protocol FB.
(Change the module head I/O No.)
Convert (compile) the protocol FB.
Paste the protocol FB to the sequenceprogram.
Create the I/O area of the pasted protocolFB.
Convert (compile) the sequence program.
Protocol FB supportfunction
Start
End
1)
2)
5)
4)
6)
3)
Refer to Section 8.2.1.
Refer to Section 8.2.2.
Refer to Section 8.2.3.
Refer to Section 8.2.4.
Refer to Section 8.2.5.
Refer to Section 7.4.
8

8 - 2 8 - 2
MELSOFT8 HOW TO USE PROTOCOL FB
8.2 How to Use Protocol FBs on GX Developer
When sequence information is converted into protocol information FBs, the following three different protocol FBs are inserted into GX Developer.
1) Module initialization FB: INITSC 2) Send FB: S- 3) Receive FB: R-
is the name set at the time of sequence information FB conversion.
A communication control program can be created by creating the I/O areas of the protocol FBs inserted into GX Developer. The procedure will now be explained.
8.2.1 Module start I/O No. setting
PURPOSE To set the module start I/O No. of the protocol FB. For use at the time of changing the module start I/O No. after FB conversion.
BASIC OPERATION 1. Open the target FB program on GX Developer. 2. Change to the write mode. 3. Click the [Project] [Function block] [Module start I/O No. setting] menu. 4. Input the new module start I/O No. on the Module start I/O No. setting screen.
Input module start I/O No.
With GX Configurator-SC Version 2.03D (SW2D5C-QSCU) or earlier versions, the module start I/O No. is 0 if a conversion is made. Change the module start I/O No. of the protocol FB using this function.
8

8 - 3 8 - 3
MELSOFT8 HOW TO USE PROTOCOL FB
8.2.2 Converting (compiling) the protocol FB whose module start I/O No. was set
PURPOSE To convert (compile) the protocol FB, whose module start I/O No. has been set, so that it can be used on GX Developer.
BASIC OPERATION Click the [Convert] [Convert/Compile] menu of GX Developer. For details, refer to the "GX Developer Version 8 Operating Manual (Function Block)".
8.2.3 Pasting the protocol FB to the sequence program
PURPOSE To paste the protocol FB to the sequence program for use in it.
BASIC OPERATION Switch from the <<Project>> tab to the <<FB>> tab of GX Developer, and drag and drop the protocol FB to be used onto the sequence program. For details, refer to the "GX Developer Version 8 Operating Manual (Function Block)".

8 - 4 8 - 4
MELSOFT8 HOW TO USE PROTOCOL FB
8.2.4 Creating the I/O areas of the pasted protocol FBs
There are the following two different I/O variable types for protocol FBs. Using these I/O variables, create a communication control program. 1) I/O variables created by the protocol FB support function 2) I/O variables used by the user in the sequence information
For the I/O variables of the protocol FBs created from the system project, refer to "Chapter 11 SEQUENCE INFORMATION AND LABEL VARIABLES OF SYSTEM PROJECT". The I/O variables used in the sequence information can be confirmed on the Input/Output variable screen. For details, refer to "Section 7.3.6 Confirming the I/O variables".
How to use the I/O variables of the module initialization FB, send FB and receive FB will now be explained. (1) Module initialization FB
The module initialization FB has the following I/O variables. Using these I/O variables, make the initial setting of the C24 module.
No. I/O variable Description Input/Output
1 I_START FB execution request: Turn ON to start the module initialization processing.
Input
2 O_RUN FB execution completion flag: Turns ON at completion of the initialization processing preparation. *1
Output
3 O_END FB end notification: Turns ON at completion of the initialization processing. Also turns ON at abnormal completion.
Output
4 O_END_NG FB abnormal end notification: Turns ON at abnormal completion only.
Output
*1: FB execution completion flag (O_RUN) is an output variable for interlock. It is added from SW2D5C-QSCU, Version 2.14Q.

8 - 5 8 - 5
MELSOFT8 HOW TO USE PROTOCOL FB
The sequence program example that uses the module initialization FB is shown below.
FB executionrequest
FB abnormal endnotification FB end notification
The module initialization FB is the FB that initializes the module. Always execute it before using the send or receive FB. When the module is initialized directly by the sequence program, the module need not be initialized using the module initialization FB.
(2) Send FB
The send FB has the following I/O variables. Data can be sent using these I/O variables and the input variables set in the sequence information.
No. I/O variable Description Input/Output
1 I_START FB execution request:
Turn ON to start the FB. Input
2 I_REQ_SEND Send request:
Turn ON to execute send. Input
3 O_RUN FB execution completion flag:
Turns ON at completion of send preparation. *1 Output
4 O_END FB end notification:
Turns ON at completion of send. Also turns ON at abnormal completion. Output
5 O_END_NG FB abnormal end notification:
Turns ON at abnormal completion only. Output
6 O_ERR_CD
Error code: The error code at abnormal completion is stored. For details of the error codes, refer to the "Q Corresponding Serial Communication Module User's Manual (Basic)" or "MELSEC-L Serial Communication Module User's Manual (Basic)".
Output
*1: FB execution completion flag (O_RUN) is an output variable for interlock. It is added from SW2D5C-QSCU, Version 2.14Q.

8 - 6 8 - 6
MELSOFT8 HOW TO USE PROTOCOL FB
The sequence program example that uses the send FB and its timing chart are shown below.
Set before FB execution request turns ON.
At error occurrence,error code is output
to outside.
FB executioncompletion flagFB end
notification
FB abnormal endnotification
ReceiveFB's FB executioncompletion flag.
FB executionrequest
Send request
FB execution completion flag (O_RUN)
Send request (I_REQ_SEND)
Input variable setting
IN_ST_NO
IN_READ_ADR
IN_ELEN_NUM
Send processing
FB end notification (O_END)
FB abnormal end notification (O_END_NG)
Error code setting (O_ERR_CD)
Set data
Error code
Set data
Set data
FB execution request (I_START)
Sendprocessing

8 - 7 8 - 7
MELSOFT8 HOW TO USE PROTOCOL FB
(3) Receive FB
The receive FB has the following I/O variables. Data can be received using these I/O variables and the output variables set in the sequence information.
No. I/O variable Description Input/Output
1 I_START FB execution request:
Turn ON to start the FB. Input
2 I_REQ_RECV Receive request:
Turn ON to enable receive. Input
3 O_RUN FB execution completion flag:
Turns on at completion of receive preparation. *2 Output
4 O_END FB end notification:
Turns ON at completion of receive. Also turns ON at abnormal completion. Output
5 O_END_NG FB abnormal end notification:
Turns ON at an abnormal end only. When it has turned ON, refer to the error code (O_ERR_CD).
Output
6 O_ERR_CD
When O_END_NG is ON, either of the following error codes is stored.
O_ERR_CD = 0 : Receive packet size error
The received packet size is outside the range of the set packet construction size.
O_ERR_CD 0 : Module detection error
Refer to the "Q Corresponding Serial Communication Module User's Manual (Basic)" or "MELSEC-L Serial Communication Module User's Manual (Basic)".
Output
7 O_R_DATA_NO
Receive data No.: When the receive packet entered on the Sequence information screen matches the receive data, that packet No. (1 to 4) is stored. On a mismatch, "0" is stored.
Output
*2: FB execution completion flag (O_RUN) is an output variable for interlock. It is added from SW2D5C-QSCU, Version 2.14Q.
(1) When using the receive FB and send FB in the sequence program, create a program in which the input variable, I_START of the receive FB turns on earlier than or at the same time as I_START of the send FB.
(2) When multiple send FBs exist, do not execute 2 or more send FBs concurrently. (Do not create a program in which more than one I_START of send FBs will turn ON at the same time.) Also, when multiple receive FBs exist, do not execute 2 or more receive FBs concurrently. (Do not create a program in which more than one I_START of receive FBs will turn ON at the same time.) Doing so will result in abnormal operation and only the processing based on the send/receive FB executed at the last will be executed.
(3) When executing receive FB and send FB concurrently, execute the send processing after FB execution completion flag (O_RUN) of receive FB turns on. Executing the send processing before FB execution completion flag of receive FB turns on causes the error in the module. (Error code: 7FF5H)

8 - 8 8 - 8
MELSOFT8 HOW TO USE PROTOCOL FB
The sequence program example that uses the receive FB and its timing chart are shown below.
FB abnormal endnotification
FB executioncompletion flag
FB end notification
At error occurrence,error code is output
to outside.Receive data No.
FB executionrequest
Receiverequest
*3
*3: Variables used when output variables are specified by the user in the packet construction information
FB execution completion flag (O_RUN)
Receive request (I_REQ_RECV)
Receive processing
FB end notification (O_END)
FB abnormal end notification (O_END_NG)
Receive data No. (O_R_DATA_NO)
Error code setting (O_ERR_CD)
Receive division No.
Error code
FB execution request (I_START)
Receiveprocessing

8 - 9 8 - 9
MELSOFT8 HOW TO USE PROTOCOL FB
About echo data Since a two-wire transmission path receives send data by itself, the first receive data must be ignored. This processing is not performed in the protocol FBs. Therefore, perform programming so that echo data is ignored in the sequence program. Specifically, receive data can be ignored by turning ON Receive read completed (Yn1) on the first leading edge of Receive read request (Xn3) or Receive error detection (Xn4) of the C24 module I/O signal. However, when the packet construction of the send data differs from that of the receive data (head differs), no special measures are not required since the receive of the echo data can be ignored on the C24 module side. For details of Receive read request, Receive error detection and Receive read completed, refer to the "Q Corresponding Serial Communication Module User's Manual (Basic)" or "MELSEC-L Serial Communication Module User's Manual (Basic)".
8.2.5 Converting (compiling) the sequence program
PURPOSE To convert (compile) the sequence program, where protocol FBs have been pasted, to make it executable.
BASIC OPERATION Click the [Convert] [Convert/Compile] menu of GX Developer.
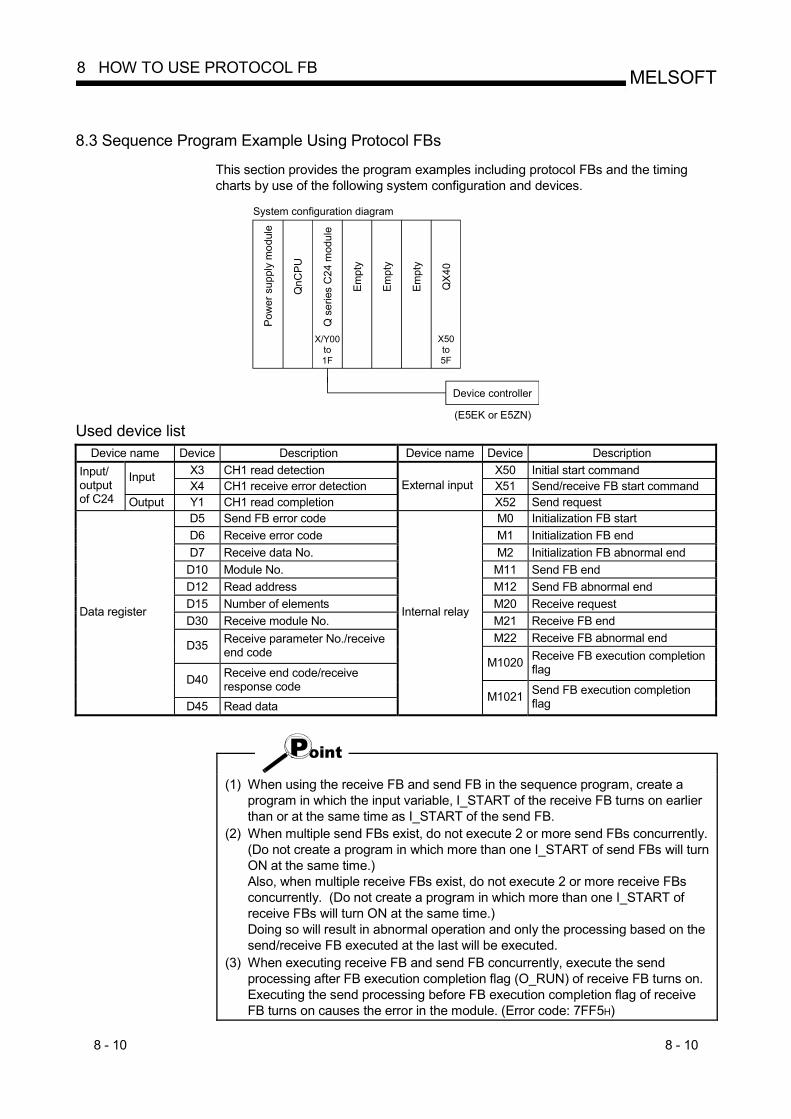
8 - 10 8 - 10
MELSOFT8 HOW TO USE PROTOCOL FB
8.3 Sequence Program Example Using Protocol FBs
This section provides the program examples including protocol FBs and the timing charts by use of the following system configuration and devices.
System configuration diagram
Device controller
(E5EK or E5ZN)
Pow
er s
uppl
y m
odul
e
QnC
PU
Empt
y
QX
40
Q s
erie
s C
24 m
odul
eX50to5F
X/Y00to1F
Empt
y
Empt
y
Used device list Device name Device Description Device name Device Description
X3 CH1 read detection X50 Initial start command Input X4 CH1 receive error detection X51 Send/receive FB start command
Input/ output of C24 Output Y1 CH1 read completion
External input X52 Send request
D5 Send FB error code M0 Initialization FB start D6 Receive error code M1 Initialization FB end D7 Receive data No. M2 Initialization FB abnormal end
D10 Module No. M11 Send FB end D12 Read address M12 Send FB abnormal end D15 Number of elements M20 Receive request D30 Receive module No. M21 Receive FB end
M22 Receive FB abnormal end D35 Receive parameter No./receive end code
M1020 Receive FB execution completion flag
D40 Receive end code/receive response code
Data register
D45 Read data
Internal relay
M1021 Send FB execution completion flag
(1) When using the receive FB and send FB in the sequence program, create a program in which the input variable, I_START of the receive FB turns on earlier than or at the same time as I_START of the send FB.
(2) When multiple send FBs exist, do not execute 2 or more send FBs concurrently. (Do not create a program in which more than one I_START of send FBs will turn ON at the same time.) Also, when multiple receive FBs exist, do not execute 2 or more receive FBs concurrently. (Do not create a program in which more than one I_START of receive FBs will turn ON at the same time.) Doing so will result in abnormal operation and only the processing based on the send/receive FB executed at the last will be executed.
(3) When executing receive FB and send FB concurrently, execute the send processing after FB execution completion flag (O_RUN) of receive FB turns on. Executing the send processing before FB execution completion flag of receive FB turns on causes the error in the module. (Error code: 7FF5H)

8 - 11 8 - 11
MELSOFT8 HOW TO USE PROTOCOL FB
(1) When there is no echo data skip processing
Use the sequence information "parameter read 12" of OMRON’s E5EK.
Initialization ON
Initialization success
Initialization failure
Sets "00" to module No.
FB normal end
FB abnormal end
Send FB error code storage
Receive request setting
Receive module No. storage
Receive parameter No. storage
Receive end code storage
Read data storage
FB normal end
FB abnormal end
Receive error code storage
Receive data No. storage
Receive request resetting
Send FB preparation completion
Receive FB preparation completion
Initialization
Reception processing
Transmission processing
Reception demand processing

8 - 12 8 - 12
MELSOFT8 HOW TO USE PROTOCOL FB
(2) When there is echo data skip processing
Use the sequence information "variable area read information 3" of OMRON’s .
Initialization ON
Initialization success
Initialization failure
Sets "00" to module No.
Sets "0000" to read address.
Sets "0001" to number of elements.
FB normal end
FB abnormal end
Send FB error code storage
CH1 read completion setting
CH1 read completion resetting
Receive request setting
Receive module No. storage
Receive end code storage
Receive response code storage
Read data storage
FB normal end
FB abnormal end
Receive error code storage
Receive data No. storage
Receive request resetting
Send FB preparation completion
Receive FB preparation completion
Initialization
Skipping processing echo data
Reception processing
Reception processing
Refer to Section 8.2.4 for details of the protocol FBs used in the above sequence program examples.

8 - 13 8 - 13
MELSOFT8 HOW TO USE PROTOCOL FB
(3) Input/output timing of the send/receive FB
Receive processing
Receive FB end notification (O_END)
Receive FB abnormal end notification(O_END_NG)
Receive request (I_REQ_RECV)
Error code setting (O_ERR_CD)
Send FB end notification (O_END)
Send FB abnormal end notification(O_END_NG)
Error code setting (O_ERR_CD)
Receive data No. setting(O_R_DATA_NO)
: Receive FB processing: Send FB processing
Error code
Sendprocessing
Receiveprocess-
ing
Receive division No.
Error code
Send FB execution request(I_START)
Send processing
Receive FB execution completion flag(O_RUN)
Send FB execution completion flag(O_RUN)
Send request (I_REQ_SEND)
Receive FB execution request(I_START)

9 - 1 9 - 1
MELSOFT9 DEBUGGING SUPPORT FUNCTIONS
9 DEBUGGING SUPPORT FUNCTIONS
The debugging support functions are designed to support the debugging of communication processing with device controller. The following functions are available to ease system startup work.
Circuit trace Communication test State monitor
The following outlines the debugging support functions.
GX Configurator-SC
Sequence program
Buffer memory Transmission/receive packet data and communication control signal status are accumulated in buffer memory.
Monitor dataarea
C24 Data are read from buffer memory.
Circuit trace
State monitor
Check communication control wires, etc.Refer to Section 9.4 for details.
Trace data accumulated in buffer memory are displayed.Refer to Section 9.2 for details.
Receive packet
Transmission test packet
Device controller
Communication test
Any packet data can be set and sent.Refer to Section 9.3 for details.
9
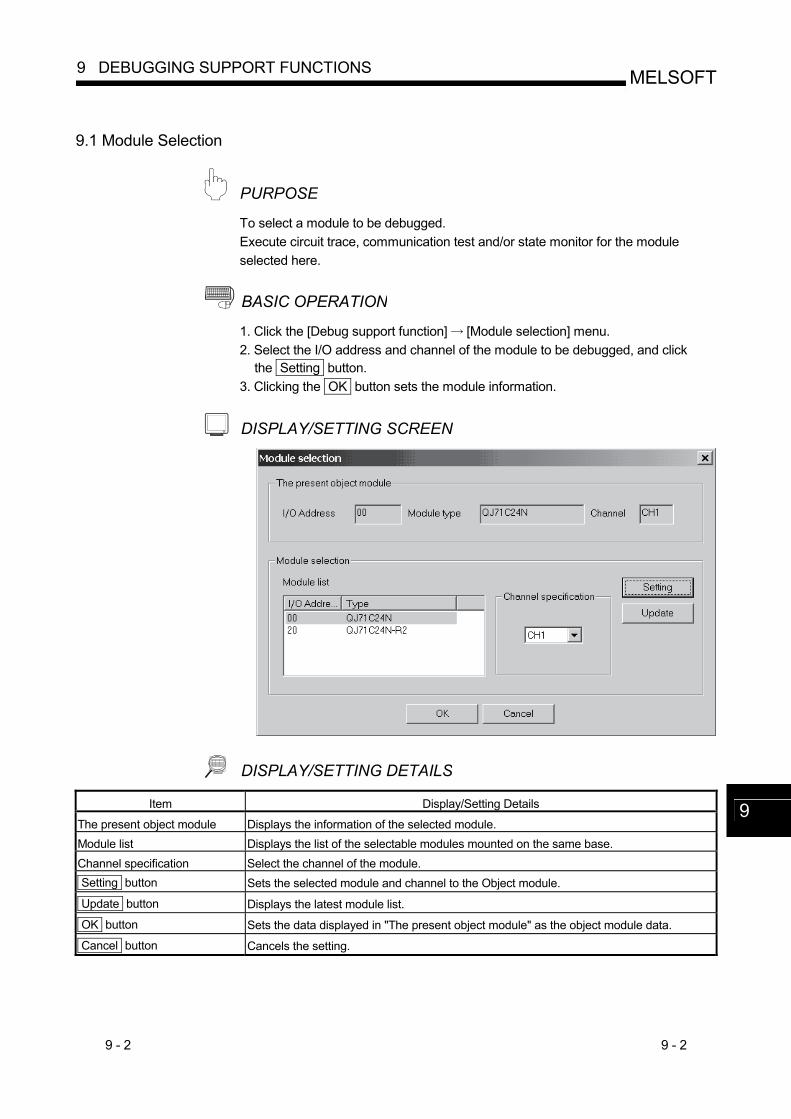
9 - 2 9 - 2
MELSOFT9 DEBUGGING SUPPORT FUNCTIONS
9.1 Module Selection
PURPOSE To select a module to be debugged. Execute circuit trace, communication test and/or state monitor for the module selected here.
BASIC OPERATION 1. Click the [Debug support function] [Module selection] menu. 2. Select the I/O address and channel of the module to be debugged, and click
the Setting button. 3. Clicking the OK button sets the module information.
DISPLAY/SETTING SCREEN
DISPLAY/SETTING DETAILS Item Display/Setting Details
The present object module Displays the information of the selected module. Module list Displays the list of the selectable modules mounted on the same base. Channel specification Select the channel of the module. Setting button Sets the selected module and channel to the Object module.
Update button Displays the latest module list.
OK button Sets the data displayed in "The present object module" as the object module data.
Cancel button Cancels the setting.
9

9 - 3 9 - 3
MELSOFT9 DEBUGGING SUPPORT FUNCTIONS
9.2 Circuit Trace
PURPOSE To trace the communication data and communication control signals with device controller.
REMARK
The circuit trace function displays the data accumulated in the monitor buffer of a module.
9.2.1 Starting the circuit trace
PURPOSE To trace the communication data and communication control signal status, store the trace data in the monitor buffer.
BASIC OPERATION 1. Click the [Debug support function] [Circuit trace] [Circuit trace] menu. 2. Click the Start button to start trace. 3. When the monitor buffer becomes full or the Stop button is clicked, the trace
data are displayed. 4. Confirm the transmission/receive packets and communication control signals
from the displayed trace result.
When the circuit trace or communication data monitoring function has already been executed, the following confirmation message is displayed. For details of the communication data monitoring function, refer to the "MELSEC-Q/L Serial Communication Module User's Manual (Application)".
Item Display/setting
Yes button The circuit trace is stopped and the data already accumulated are read and displayed.
No button The dialog box closes. However, the trace is in the execution status.

9 - 4 9 - 4
MELSOFT9 DEBUGGING SUPPORT FUNCTIONS
DISPLAY/SETTING SCREEN
DISPLAY/SETTING DETAILS Circuit trace screen
Item Display/Setting Details
Object module Displays the information of the module on which circuit trace will be performed.
Transmission/receive packets Displays send data and receive data respectively. For the data display format, the ASCII code or hexadecimal can be selected.
Communication control signals
The RS, ER, DR, CS and CD signal status and receive error are displayed as described below.
RS, ER, DR, CS and CD signals All signals are displayed with blue lines -.
When signal is ON : When signal is OFF:
When the obtained data does not have signal information, the signal is displayed as an OFF status.
Receive error Three different errors of overrun error, parity error and framing error are displayed.
Overrun error: (Green) Parity error : (Light blue) Framing error: (Purple)
Start button Starts tracing.
Communication test button Sends the specified packet. For details, refer to "Section 9.3 Communication Test".
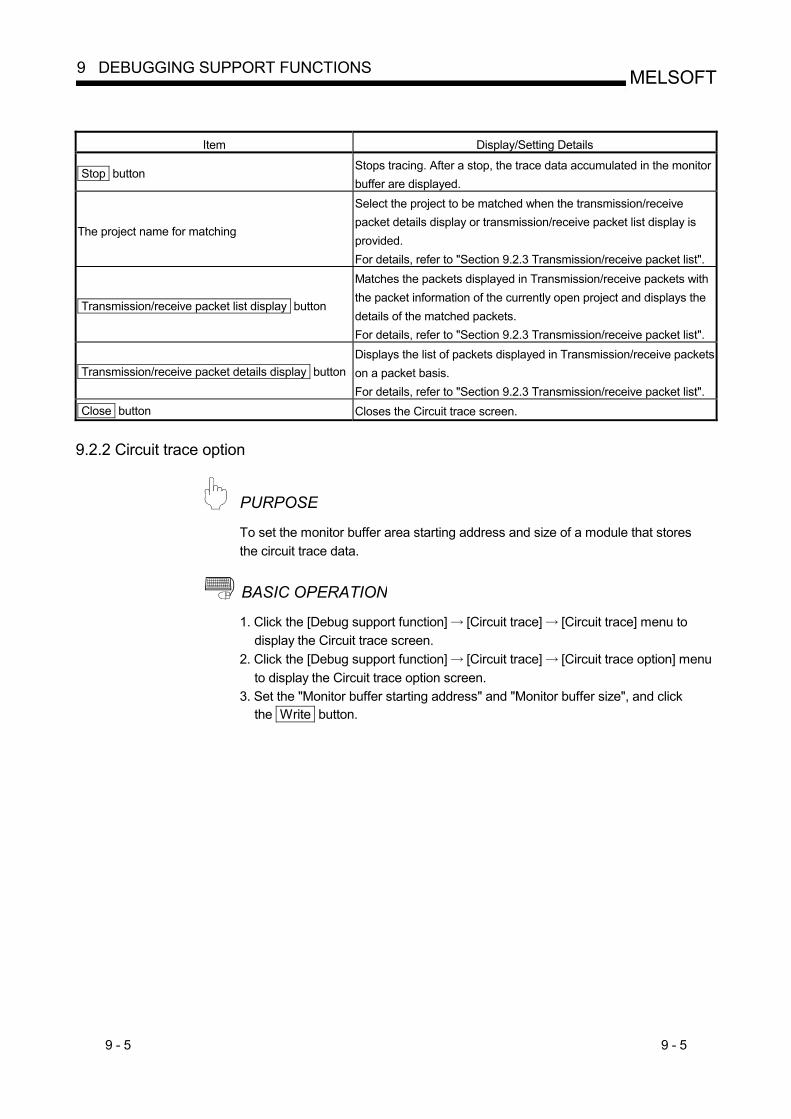
9 - 5 9 - 5
MELSOFT9 DEBUGGING SUPPORT FUNCTIONS
Item Display/Setting Details
Stop button Stops tracing. After a stop, the trace data accumulated in the monitor buffer are displayed.
The project name for matching
Select the project to be matched when the transmission/receive packet details display or transmission/receive packet list display is provided. For details, refer to "Section 9.2.3 Transmission/receive packet list".
Transmission/receive packet list display button
Matches the packets displayed in Transmission/receive packets with the packet information of the currently open project and displays the details of the matched packets. For details, refer to "Section 9.2.3 Transmission/receive packet list".
Transmission/receive packet details display button Displays the list of packets displayed in Transmission/receive packets on a packet basis. For details, refer to "Section 9.2.3 Transmission/receive packet list".
Close button Closes the Circuit trace screen.
9.2.2 Circuit trace option
PURPOSE To set the monitor buffer area starting address and size of a module that stores the circuit trace data.
BASIC OPERATION 1. Click the [Debug support function] [Circuit trace] [Circuit trace] menu to
display the Circuit trace screen. 2. Click the [Debug support function] [Circuit trace] [Circuit trace option] menu
to display the Circuit trace option screen. 3. Set the "Monitor buffer starting address" and "Monitor buffer size", and click
the Write button.
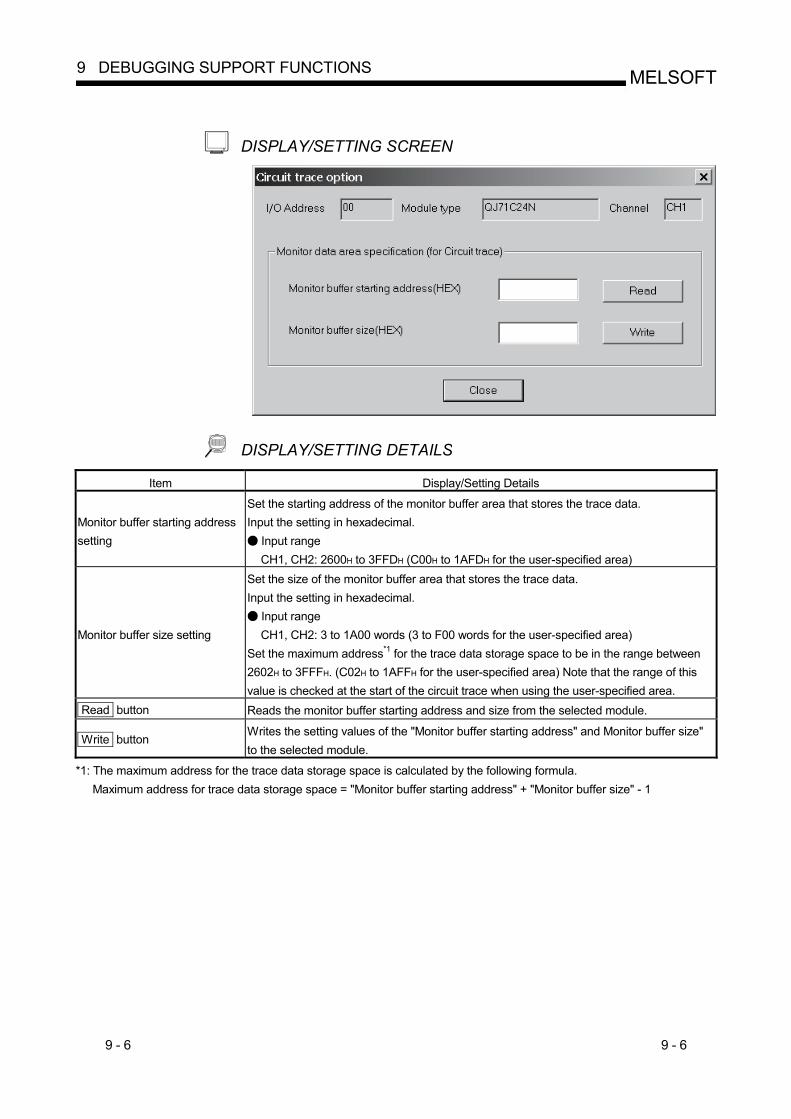
9 - 6 9 - 6
MELSOFT9 DEBUGGING SUPPORT FUNCTIONS
DISPLAY/SETTING SCREEN
DISPLAY/SETTING DETAILS Item Display/Setting Details
Monitor buffer starting address setting
Set the starting address of the monitor buffer area that stores the trace data. Input the setting in hexadecimal.
Input range CH1, CH2: 2600H to 3FFDH (C00H to 1AFDH for the user-specified area)
Monitor buffer size setting
Set the size of the monitor buffer area that stores the trace data. Input the setting in hexadecimal.
Input range CH1, CH2: 3 to 1A00 words (3 to F00 words for the user-specified area)
Set the maximum address*1 for the trace data storage space to be in the range between 2602H to 3FFFH. (C02H to 1AFFH for the user-specified area) Note that the range of this value is checked at the start of the circuit trace when using the user-specified area.
Read button Reads the monitor buffer starting address and size from the selected module.
Write button Writes the setting values of the "Monitor buffer starting address" and Monitor buffer size" to the selected module.
*1: The maximum address for the trace data storage space is calculated by the following formula. Maximum address for trace data storage space = "Monitor buffer starting address" + "Monitor buffer size" - 1

9 - 7 9 - 7
MELSOFT9 DEBUGGING SUPPORT FUNCTIONS
9.2.3 Transmission/receive packet list
PURPOSE To display the list of transmission/receive packets to analyze the transmission/receive packets obtained by the circuit trace.
BASIC OPERATION 1. Click the [Debug support function] [Circuit trace] [Circuit trace] menu to
display the Circuit trace screen. 2. Select the corresponding project of the device controller debugged in "Project
name for matching". 3. Click the Transmit/receive packet list button on the Circuit trace screen.
DISPLAY/SETTING SCREEN

9 - 8 9 - 8
MELSOFT9 DEBUGGING SUPPORT FUNCTIONS
DISPLAY/SETTING DETAILS Item Display/Setting Details
Classification Displays whether the packet is a transmission packet or receive packet.
Packet data Displays the transmission/receive packet data.
Data length Displays the data length (byte) of the transmission/receive packet data.
Name
Displays the packet names of the packet construction information that matches the corresponding packets.
Display 1) When there is only one packet that matches:
The packet name that matched is displayed. 2) When there are more than one packet that matches:
"Match with several packets" is displayed. 3) When there are no packets that match:
"No matching packets" is displayed.
Transmission/receive packet details display button Displays the details of the selected transmission/receive packet configuration.
Display form Either "ASCII" or "HEX" can be selected as the display format.
Close button Closes the Transmit/receive packet list screen.
Packet data matching is performed in the following order. 1) The data length of the packet data is obtained (the variable area has the
maximum data length), and whether the full data length is equal to the object packet data length or not is checked.
2) The object packet data is divided in terms of the data length of each item, and whether it is equal to the preset packet data or not is checked.
The following communication data configurations cannot match. 1) The data is configured by error check codes only. 2) The data starts with an error check code.
REMARK
With the click of the mouse right button, the display data of the Transmission/receive packet list display screen can be copied.
9 - 9 9 - 9
MELSOFT9 DEBUGGING SUPPORT FUNCTIONS
9.2.4 Opening the circuit trace file
PURPOSE To read and display the trace data saved in the personal computer.
BASIC OPERATION Click the [Debug support function] [Circuit trace] [Open circuit trace file] menu.
9.2.5 Saving the circuit trace file
PURPOSE To save the trace data obtained by the circuit trace to the personal computer.
BASIC OPERATION Click the [Debug support function] [Circuit trace] [Save circuit trace file] menu.

9 - 10 9 - 10
MELSOFT9 DEBUGGING SUPPORT FUNCTIONS
9.3 Communication Test
Send any data or preset data to the device controller to confirm the operation. The communication data result of the communication test can be confirmed on the Circuit trace screen. The packet data to be sent can be created either by inputting send data directly or by selecting the packet data entered in the project.
Before performing the communication test, set "0" to the following items on the tested channel in "CH Non procedure system setting" of the intelligent function module utility.*1 If any other than "0" is set, the communication test will not be performed normally. • Output head pointer designation • Output count designation
*1: The setting can be written into the buffer memory from the sequence program.
Write "0" into the following 2 areas in the buffer memory. • Output head pointer designation (buffer memory address 184 (B8H), 344 (158H)) • Output count designation (buffer memory address 185 (B9H), 345 (159H))
9.3.1 Communication test after direct input
PURPOSE To send any data to the device controller.
BASIC OPERATION 1. Click the [Debug support function] [Circuit trace] [Circuit trace] menu to
display the Circuit trace screen. 2. Click the Communication test button on the Circuit trace screen to display the
Communication test screen. 3. Input data directly to the combo box of the Communication test screen in
hexadecimal. 4. Click the Send button.

9 - 11 9 - 11
MELSOFT9 DEBUGGING SUPPORT FUNCTIONS
DISPLAY/SETTING SCREEN
DISPLAY/SETTING DETAILS Item Display/Setting Details
Select packet from inside the project button Displays the Packet data selection screen.
Send data Displays the packet data to be sent. Send button Sends the input packet data.
Setting button Displays the Communication test setting screen. (Refer to Section 9.3.3.)
Close button Closes the Communication test screen. 9.3.2 Communication test after selection of packet data
PURPOSE To select the packet data entered in the project and send them to the device controller.
BASIC OPERATION 1. Click the [Debug support function] [Circuit trace] [Circuit trace] menu to
display the Circuit trace screen. 2. Click the Communication test button on the Circuit trace screen. 3. Click the Select packet from inside the project button on the Communication
test screen to display the Packet data selection screen. 4. After selecting the project from the Packet data selection screen, select the
packet to be sent, and click the OK button. The Communication test data input screen is displayed.
5. Input data from the Communication test data input screen, and click the OK button.
6. Click the Send button on the Communication test screen.

9 - 12 9 - 12
MELSOFT9 DEBUGGING SUPPORT FUNCTIONS
DISPLAY/SETTING SCREEN
DISPLAY/SETTING DETAILS Item Display/Setting Details
Project name Select the project name. Packet information list Displays the packet information. OK button Selects the send packet and closes the screen.
DISPLAY/SETTING SCREEN
DISPLAY/SETTING DETAILS Item Display/Setting Details
Project name Displays the selected project name. Packet details information Set the packet details information. OK button Determines the setting and closes the screen.

9 - 13 9 - 13
MELSOFT9 DEBUGGING SUPPORT FUNCTIONS
9.3.3 Transmission monitoring time designation
PURPOSE To set the transmission monitoring time to a module. If receive is not completed within the set time, a send or receive error occurs.
BASIC OPERATION 1. Click the [Debug support function] [Circuit trace] [Circuit trace] menu to
display the Circuit trace screen. 2. Click the Setting button on the Communication test screen.
The Communication test setting screen is displayed. The currently set transmission monitoring time is displayed.
3. Input the transmission monitoring time from the Communication test setting screen, click the Write button, and then click the Close button.
DISPLAY/SETTING SCREEN
DISPLAY/SETTING DETAILS Item Display/Setting Details
Transmission monitoring time The displayed time is the transmission monitoring time set to the module. Input the transmission monitoring time in units of 100ms. The setting range is 0 to 3000 ( 100ms).
Write button Sets the specified transmission monitoring time to the module.
Close button Closes the screen.

9 - 14 9 - 14
MELSOFT9 DEBUGGING SUPPORT FUNCTIONS
9.4 State Monitor
PURPOSE To monitor the signals, communication error information and operation setting switches.
BASIC OPERATION 1. Click the [Debug support function] [State monitor] menu. 2. Click the Monitor start button. 3. Click the <<Signal>> tab and confirm the signal status. 4. Click the <<Error information>> tab and confirm the error information. 5. Click the <<Operation setting switch>> tab and confirm the operation setting
switch setting status.
(1) <<Signal>> tab
DISPLAY/SETTING SCREEN
DISPLAY/SETTING DETAILS Item Display/Setting Details
X signal state monitor Displays the ON/OFF status of the X signals. Y signal state monitor Displays the ON/OFF status of the Y signals. RS-232 signal monitor Displays the ON/OFF status of the RS-232 control signals.
For details, refer to the user's manual of a target module.

9 - 15 9 - 15
MELSOFT9 DEBUGGING SUPPORT FUNCTIONS
(2) <<Error information>> tab
DISPLAY/SETTING SCREEN
DISPLAY/SETTING DETAILS Item Display/Setting Details
Communication error status Displays the communication error status. Switch setting, mode switching error Displays the switch setting and/or mode selection error status. Communication result Displays the error status of the communication result.
Error reset button Resets the error information when XnE on CH1 or XnF on CH2 is ON. Masked in any other cases.
For details, refer to the user's manual of a target module.

9 - 16 9 - 16
MELSOFT9 DEBUGGING SUPPORT FUNCTIONS
(3) <<Operation setting switch>> tab
DISPLAY/SETTING SCREEN
DISPLAY/SETTING DETAILS Item Display/Setting Details
Operation setting switch Displays the operation switch setting status. Mode switch Displays the communication protocol setting. Station switch Displays the station number setting.
For details, refer to the user's manual of a target module.

10 - 1 10 - 1
MELSOFT10 PRINT
10 PRINT
10.1 Start
PURPOSE To print the system project, user project or trace data.
BASIC OPERATION Click the [Project] [Print] menu ( ).
[Setting details of each tab]
<<Main>> Select the item to be printed from among the module information, project data and trace data.
<<Project data>> Select the details printing option when the project data is selected as the print item.
<<Trace data>> Select the details printing option when the trace data is selected as the print item.
[Setting details of each tab]
Except the header and footer, the printed data are the same as those of each function screen.
(1) <<Main>> tab
DISPLAY/SETTING SCREEN
10

10 - 2 10 - 2
MELSOFT10 PRINT
DISPLAY/SETTING DETAILS Item Display/Setting Details
Print item
Select the item to be printed by checking the check box. Module information: The data set in the module setting are printed. Project data: The information of the specified project is printed. Set the print item on the
Project screen. Trace data: The saved trace data are printed. Set the print item on the Trace screen.
Select the project data to be printed from the pull-down list.
Project data Select the project data to be printed from the combo box. The projects displayed in the combo box are the currently open user project and the system project. (Unopened projects are not the targets.)
Trace data Specify the file name of the trace data to be printed. Click the Reference button and select the trace data file.
Reference button Select the file name of the trace data to be printed. Click this button to display the dialog box.
Printer setting button Displays the printer setting dialog box.
Print button Executes printing.
Printer preview button Displays the print preview.
Close button Closes the Print dialog box.
10

10 - 3 10 - 3
MELSOFT10 PRINT
(2) <<Project data>> tab
DISPLAY/SETTING SCREEN
*1
*1: When "Project data" has not been selected in the <<Main>> tab, this area is dimmed.
DISPLAY/SETTING DETAILS Item Display/Setting Details
Project name Displays the project name specified as the project data in the <<Main>>tab. Print item Select All items or Item selection.
Item specification When Item selection has been selected, select which item will be printed by checking the check box.

10 - 4 10 - 4
MELSOFT10 PRINT
(3) <<Trace data>> tab
DISPLAY/SETTING SCREEN
*2
*2: When "Trace data" has not been selected in the <<Main>> tab, this area is dimmed.
DISPLAY/SETTING DETAILS Item Display/Setting Details
Trace data file Displays the file name specified as the trace data in the <<Main>>tab. Print item Select All items or Item selection.
Item specification
When Item selection has been selected, select which item will be printed by checking the check box. Circuit trace: The circuit trace image is printed. Transmit/receive packet list: The transmit/receive packet list is printed.
Transmission/receive packet listWhen printing the transmit/receive packets, specify either the BIN or ASCII print format. Valid only when "Transmit/receive packet list" is selected.

10 - 5 10 - 5
MELSOFT10 PRINT
Error dialog box
Displayed dialog box
Error cause Corrective action • After "Project data" was selected, the Print/Print preview
button was clicked with no packet information existing. • When the packet construction information is selected, the
packet construction information exists but the construction information items do not exist.
• When the packet construction information is selected, there are no contents of packet data information.
• When the sequence information is selected, sequence information does not exist.
• The selected trace data file does not have transmission/receive packet data.
• Deselect the project data or create packet information. • Deselect the packet construction information or create
packet construction information items. • Deselect the packet data information or create packet data
information. • Deselect the sequence information or create sequence
information. • Deselect the transmission/receive packet list or create
transmission/receive packet data.

10 - 6 10 - 6
MELSOFT10 PRINT
10.2 Operations Common to Screens
PURPOSE To display the print preview.
BASIC OPERATION Click the Print preview button in the Print dialog box.
DISPLAY/SETTING SCREEN

10 - 7 10 - 7
MELSOFT10 PRINT
DISPLAY/SETTING DETAILS Item Display/Setting Details
Page scrolling (first page) Jumps to the first page.
Page scrolling (previous page) Scrolls to the previous page.
Page Displays the previewed page.
Page scrolling (next page) Scrolls to the next page.
Page scrolling (last page) Jumps to the last page.
Enlarge/reduce Displays the enlarged/reduced preview screen.
Display switching Switches to the whole page, page width, 2 pages, thumbnail, 150%, 100%, 75%, 50% or 25%.
Print Print button Clicking the Print button ends the print preview and displays the print dialog box.
Close Close button Closes the print preview and displays the Print dialog box.

10 - 8 10 - 8
MELSOFT10 PRINT
10.3 Print Examples
(1) Module information
1/1
Project name or system name of system project is printed. Title is printed.
Print date is printed.
Page number is printed. [Module information]

10 - 9 10 - 9
MELSOFT10 PRINT
(2) Trace data (horizontal)
Trace data file name is printed.
Page number is printed.

11 - 1 11 - 1
MELSOFT11 SEQUENCE INFORMATION AND LABEL VARIABLES OF
SYSTEM PROJECT
11 SEQUENCE INFORMATION AND LABEL VARIABLES OF SYSTEM PROJECT
This chapter explains the sequence information compatible with the third party commands supported by the system project and the I/O variables after FB conversion of sequence information.
11.1 System Project Classified by Supported Device Controllers
The system project defines the supported device controller-compatible communication frames (packet construction information, packet data information) and their transmission procedures (sequence information). In the sequence information, the data compatible with the commands of the supported models have been set. Also, the label variables necessary for achieving various commands in FBs have been set. When a communication control program is created on the GX Developer side, the values that match the application and purpose must be set to the label variables. The next section gives the supported model list, the tables that indicate correspondences between the supported model commands and sequence information, and the label variable lists. The following denotes how to use the lists in the next section.
Command Sequence Information
Setting area 0 (read only) Variable area read 1 [Setting area 0 (read only)]Setting area 0 (accessible) Variable area read 2 [Setting area 0 (accessible)]Setting area 1 (accessible) Variable area read 3 [Setting area 1 (accessible)]
Variable Area Read Command Variable Area Read Response
Input variables Datatype(Data length)
Output bariables Datatype(Data length)
ModuleNo.IN_ST_NO
Character string (2)
Module No.OUT_ST_NO
Read addressIN_READ_ADR
Character string (2)(MAX Value: 6)
Character string (2)
Number of elementsIN_ELEM_NUM
End codeOUT_EXE_RESULT
Response codeOUT_RES_CODE
Data readOUT_READ_DATA1 element: 8 bytes
Character string (2)
Character string (2)
Character string (4)
Function name 1:1 correspondence
Character string (48)Number of
elements 8 bytes
1) Variable area read
List of the I/O variables used with the function.All sequence information in the function uses the same I/O variables.
11

11 - 2 11 - 2
MELSOFT11 SEQUENCE INFORMATION AND LABEL VARIABLES OF
SYSTEM PROJECT
11.2 Supported Device Controller List
The following table lists the supported device controllers.
Maker Classification Model name
Modular temperature controller In-panel NEO (Model E5ZN) Thermack K (Model E5 K-AA201 ) Thermack K (Model E5 K-AA202 )
OMRON Digital controller
Thermack K (Model E5 K-AA203 ) YAMATAKE Modular controller DMC10
11.2.1 OMRON make
(1) Model E5ZN series 1) Variable area read
Command correspondence list
Command Sequence Information
Setting area 0 (read only) Variable area read 1 [Setting area 0 (read only)] Setting area 0 (accessible) Variable area read 2 [Setting area 0 (accessible)] Setting area 1 (accessible) Variable area read 3 [Setting area 1 (accessible)]
Label variable list
Variable Area Read Command Variable Area Read Response
Input variables Data type
(Data length) Output variables
Data type (Data length)
Module No. OUT_ST_NO
Character string (2) Module No. IN_ST_NO
Character string (2) End code
OUT_EXE_RESULT Character string (2)
Read address IN_READ_ADR
Character string (4) Response code
OUT_RES_CODE Character string (4)
Number of elementsIN_ELEM_NUM
Character string (4) (MAX Value: 6)
Data read OUT_READ_DATA 1 element: 8 bytes
Character string (48)Number of
elements 8 bytes
11

11 - 3 11 - 3
MELSOFT11 SEQUENCE INFORMATION AND LABEL VARIABLES OF
SYSTEM PROJECT
2) Variable area write
Command correspondence list
Command Sequence Information
Setting area 0 (accessible) Variable area write 1 [Setting area 0 (accessible)] Setting area 1 (accessible) Variable area write 2 [Setting area 1 (accessible)]
Label variable list
Variable Area Write Command Variable Area Write Response
Input variables Data type
(Data length) Output variables
Data type (Data length)
Module No. IN_ST_NO
Character string (2) Module No.
OUT_ST_NO Character string (2)
Write address IN_RED_ADR
Character string (4) End code
OUT_EXE_RESULT Character string (2)
Number of elementsIN_ELEM_NUM
Character string (4) (MAX Value: 6)
Write data IN_WRITE_DATA 1 element: 8 bytes
Character string (48)Number of
elements 8 bytes
Response code OUT_RES_CODE
Character string (4)
3) Operation commands
Command correspondence list
Command Sequence Information
Communication write prohibited Operation command 1 [Communication write prohibited]
Communication write allowed Operation command 2 [Communication write allowed]
CH1 run Operation command 3 [CH1 run] CH1 stop Operation command 4 [CH1 stop] CH2 run Operation command 5 [CH2 run] CH2 stop Operation command 6 [CH2 stop]
CH1 target value 0 selection Operation command 7 [CH1 target value 0 selection]
CH1 target value 1 selection Operation command 8 [CH1 target value 1 selection]
CH2 target value 0 selection Operation command 9 [CH2 target value 0 selection]
CH3 target value 1 selection Operation command 10 [CH3 target value 1 selection]
CH1 AT stop Operation command 11 [CH1 AT stop] CH1 AT execution Operation command 12 [CH1 AT execution] CH2 AT stop Operation command 13 [CH2 AT stop] CH2 AT execution Operation command 14 [CH2 AT execution]
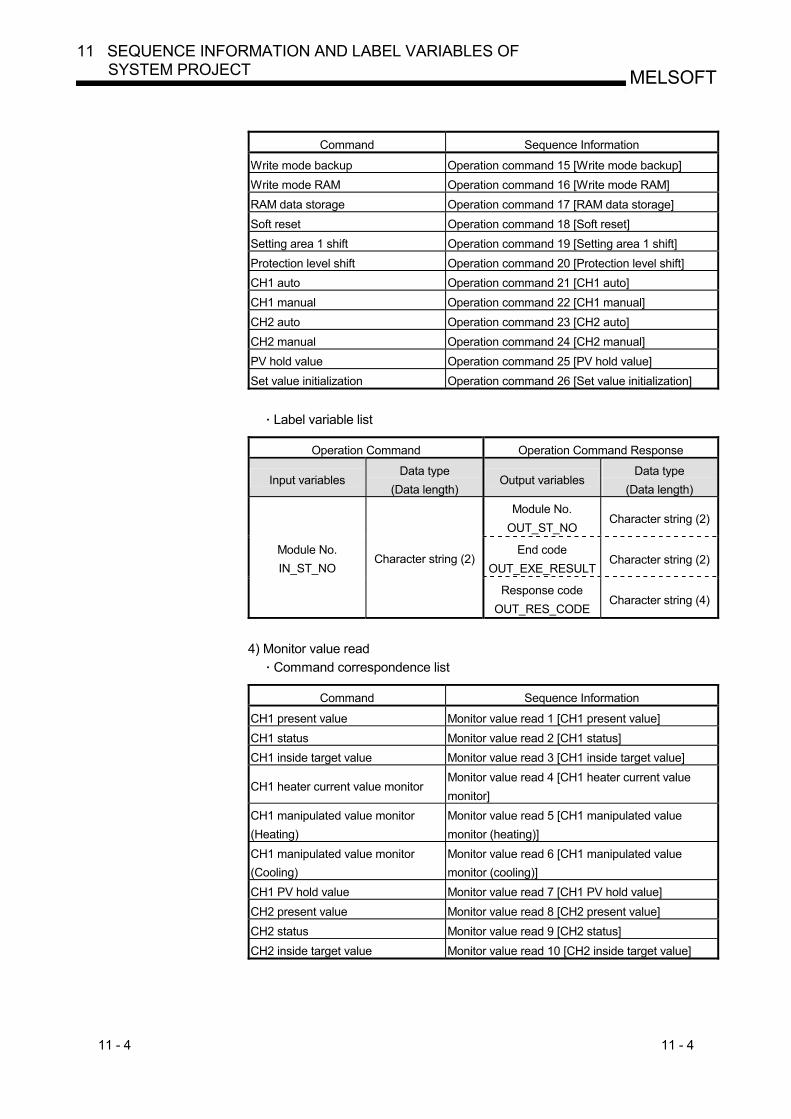
11 - 4 11 - 4
MELSOFT11 SEQUENCE INFORMATION AND LABEL VARIABLES OF
SYSTEM PROJECT
Command Sequence Information
Write mode backup Operation command 15 [Write mode backup] Write mode RAM Operation command 16 [Write mode RAM] RAM data storage Operation command 17 [RAM data storage] Soft reset Operation command 18 [Soft reset] Setting area 1 shift Operation command 19 [Setting area 1 shift] Protection level shift Operation command 20 [Protection level shift] CH1 auto Operation command 21 [CH1 auto] CH1 manual Operation command 22 [CH1 manual] CH2 auto Operation command 23 [CH2 auto] CH2 manual Operation command 24 [CH2 manual] PV hold value Operation command 25 [PV hold value] Set value initialization Operation command 26 [Set value initialization]
Label variable list
Operation Command Operation Command Response
Input variables Data type
(Data length) Output variables
Data type (Data length)
Module No. OUT_ST_NO
Character string (2)
End code OUT_EXE_RESULT
Character string (2) Module No. IN_ST_NO
Character string (2)
Response code OUT_RES_CODE
Character string (4)
4) Monitor value read
Command correspondence list
Command Sequence Information
CH1 present value Monitor value read 1 [CH1 present value] CH1 status Monitor value read 2 [CH1 status] CH1 inside target value Monitor value read 3 [CH1 inside target value]
CH1 heater current value monitor Monitor value read 4 [CH1 heater current value monitor]
CH1 manipulated value monitor (Heating)
Monitor value read 5 [CH1 manipulated value monitor (heating)]
CH1 manipulated value monitor (Cooling)
Monitor value read 6 [CH1 manipulated value monitor (cooling)]
CH1 PV hold value Monitor value read 7 [CH1 PV hold value] CH2 present value Monitor value read 8 [CH2 present value] CH2 status Monitor value read 9 [CH2 status] CH2 inside target value Monitor value read 10 [CH2 inside target value]

11 - 5 11 - 5
MELSOFT11 SEQUENCE INFORMATION AND LABEL VARIABLES OF
SYSTEM PROJECT
Command Sequence Information
CH2 heater current value monitor Monitor value read 11 [CH2 heater current value monitor]
CH2 manipulated value monitor (Heating)
Monitor value read 12 [CH2 manipulated value monitor (heating)]
CH2 manipulated value monitor (Cooling)
Monitor value read 13 [CH2 manipulated value monitor (cooling)]
CH2 PV hold value Monitor value read 14 [CH2 PV hold value]
Label variable list
Monitor Value Read Command Monitor Value Read Response
Input variables Data type
(Data length) Output variables
Data type (Data length)
Module No. OUT_ST_NO
Character string (2)
End code OUT_EXE_RESULT
Character string (2)
Response code OUT_RES_CODE
Character string (4)
Module No. IN_ST_NO
Character string (2)
Monitor Value OUT_MONITOR_DATA
Character string (8)
5) Set data read commands
Command correspondence list
Command Sequence Information
CH1 setting area 0 Set data read 1 [CH1 setting area 0] CH1 setting area 1 Set data read 1 [CH1 setting area 1] CH2 setting area 0 Set data read 1 [CH2 setting area 0] CH2 setting area 1 Set data read 1 [CH2 setting area 1]
Label variable list
Set Data Read Command Set Data Read Response
Input variables Data type
(Data length) Output variables
Data type (Data length)
Module No. OUT_ST_NO
Character string (2) Module No. IN_ST_NO
Character string (2)
End code OUT_EXE_RESULT
Character string (2)
Response code OUT_RES_CODE
Character string (4) Address
IN_READ_ADR Character string (4)
Set data OUT_SET_DATA
Character string (8)

11 - 6 11 - 6
MELSOFT11 SEQUENCE INFORMATION AND LABEL VARIABLES OF
SYSTEM PROJECT
6) Protection level
Command correspondence list
Command Sequence Information
CH1 operation/adjustment Protection level setting 1 [CH1 operation/adjustment] CH1 initial/communication Protection level setting 2 [CH1 initial/communication] CH1 setting change Protection level setting 3 [CH1 setting change] CH2 operation/adjustment Protection level setting 4 [CH2 operation/adjustment] CH2 initial time/communication Protection level setting 5 [CH2 initial time/communication]CH2 setting change Protection level setting 6 [CH2 setting change]
Label variable list
Protection Level Command Protection Level Response
Input variables Data type
(Data length) Output variables
Data type (Data length)
Module No. OUT_ST_NO
Character string (2) Module No. IN_ST_NO
Character string (2)
End code OUT_EXE_RESULT
Character string (2) Protection level set
data
IN_PROT_LEVEL Character string (8) Response code
OUT_RES_CODE Character string (4)

11 - 7 11 - 7
MELSOFT11 SEQUENCE INFORMATION AND LABEL VARIABLES OF
SYSTEM PROJECT
7) Set data write
Command correspondence list
Command Sequence Information
CH1 setting area 0 Set data write 1 [CH1 setting area 0] CH1 setting area 1 Set data write 2 [CH1 setting area 1] CH2 setting area 0 Set data write 3 [CH2 setting area 0] CH2 setting area 1 Set data write 4 [CH2 setting area 1]
Label variable list
Set Data Write Command Set Data Write Response
Input variables Data type
(Data length) Output variables
Data type (Data length)
Module No. IN_ST_NO
Character string (2) Module No.
OUT_ST_NO Character string (2)
Address IN_READ_ADR
Character string (4) End code OUT_EXE_RESULT
Character string (2)
Number of elementsIN_ELEM_NUM
Character string (4) (MAX Value :6)
Set data IN_WRITE_DATA 1 element: 8 bytes
Character string (48)Number of
elements 8 bytes
Response code OUT_RES_CODE
Character string (4)
8) Others
Command correspondence list
Command Sequence Information
Body attribute read Body attribute read [Format and communication buffer size]
Controller status read Controller status [Operating condition read] Echo back test Echo back test

11 - 8 11 - 8
MELSOFT11 SEQUENCE INFORMATION AND LABEL VARIABLES OF
SYSTEM PROJECT
Label variable list
Body Attribute Read Command Body Attribute Read Response
Input variables Data type
(Data length) Output variables
Data type (Data length)
Module No. OUT_ST_NO
Character string (2)
End code OUT_EXE_RESULT
Character string (2)
Response code OUT_RES_CODE
Character string (4)
Format OUT_ATTRIBUTE
Character string (2)
Module No. IN_ST_NO
Character string (2)
Buffer size OUT_BUFF_SIZE
Character string (2)
Label variable list
Controller Status Read Command Controller Status Read Response
Input variables Data type
(Data length) Output variables
Data type (Data length)
Module No. OUT_ST_NO
Character string (2)
End code OUT_EXE_RESULT
Character string (2)
Response code OUT_RES_CODE
Character string (4)
Operating condition (status)
OUT_OPE_STATUS Character string (2)
Module No. IN_ST_NO
Character string (2)
Related information OUT_INFORMATION
Character string (2)
Label variable list
Echo Back Test Command Echo Back Test Response
Input variables Data type
(Data length) Output variables
Data type (Data length)
Module No. OUT_ST_NO
Character string (2) Module No. IN_ST_NO
Character string (2) End code
OUT_EXE_RESULT Character string (2)
Response code OUT_RES_CODE
Character string (4) Test data
IN-TEST_DATA Character string (23)
(0 to 23 bytes) Test data OUT_TEST_DATA
Character string (23)(0 to 23 bytes)

11 - 9 11 - 9
MELSOFT11 SEQUENCE INFORMATION AND LABEL VARIABLES OF
SYSTEM PROJECT
(2) Model E5 K series
1) Parameter read Command correspondence list
Command Sequence Information
Present value monitor Parameter read 1 [Present value monitor] Lamp target value monitor Parameter read 2 [Lamp target value monitor]
Manipulated value (heating) monitor Parameter read 3 [Manipulated value (heating) monitor]
Manipulated value (cooling) monitor Parameter read 4 [Manipulated value (cooling) monitor]
Remote SP monitor Parameter read 5 [Remote SP monitor] Valve opening monitor Parameter read 6 [Valve opening monitor] Target value Parameter read 7 [Target value] Target value 0 Parameter read 8 [Target value 0] Target value 1 Parameter read 9 [Target value 1] Target value 2 Parameter read 10 [Target value 2] Target value 3 Parameter read 11 [Target value 3] Alarm value 1 Parameter read 12 [Alarm value 1] Alarm value 2 Parameter read 13 [Alarm value 2] Alarm value 3 Parameter read 14 [Alarm value 3] Proportional band Parameter read 15 [Proportional band] Integral time Parameter read 16 [Integral time] Derivative time Parameter read 17 [Derivative time] Cooling coefficient Parameter read 18 [Cooling coefficient] Dead band Parameter read 19 [Dead band]
Position-proportional dead band Parameter read 20 [Position-proportional dead band]
Manual reset value Parameter read 21 [Manual reset value] Adjustment sensitivity (heating) Parameter read 22 [Adjustment sensitivity (heating)]Adjustment sensitivity (cooling) Parameter read 23 [Adjustment sensitivity (cooling)]Control period (heating) Parameter read 24 [Control period (heating)] Control period (cooling) Parameter read 25 [Control period (cooling)] Heater current value monitor Parameter read 26 [Heater current value monitor] Heater off detection Parameter read 27 [Heater off detection] SP lamp time unit Parameter read 28 [SP lamp time unit] SP lamp set value Parameter read 29 [SP lamp set value] LBA detection time Parameter read 30 [LBA detection time] Stop-time manipulated value Parameter read 31 [Stop-time manipulated value] Error-time manipulated value Parameter read 32 [Error-time manipulated value]
Manipulated value upper limit value Parameter read 33 [Manipulated value upper limit value]
Manipulated value lower limit value Parameter read 34 [Manipulated value lower limit value]
Operation change ratio limit value Parameter read 35 [Operation change ratio limit value]

11 - 10 11 - 10
MELSOFT11 SEQUENCE INFORMATION AND LABEL VARIABLES OF
SYSTEM PROJECT
Command Sequence Information
Input digital filter Parameter read 36 [Input digital filter] Switching hysteresis Parameter read 37 [Switching hysteresis] Alarm 1 hysteresis Parameter read 38 [Alarm 1 hysteresis] Alarm 2 hysteresis Parameter read 39 [Alarm 2 hysteresis] Alarm 3 hysteresis Parameter read 40 [Alarm 3 hysteresis] Upper limit temperature input compensation value
Parameter read 41 [Upper limit temperature input compensation value]
Lower limit temperature input compensation value
Parameter read 42 [Lower limit temperature input compensation value]
Input classification Parameter read 43 [Input classification] Scaling upper limit value Parameter read 44 [Scaling upper limit value] Scaling lower limit value Parameter read 45 [Scaling lower limit value] Decimal point position Parameter read 46 [Decimal point position] Temperature unit Parameter read 47 [Temperature unit] Control output 1 assignment Parameter read 48 [Control output 1 assignment] Control output 2 assignment Parameter read 49 [Control output 2 assignment] Auxiliary output 1 assignment Parameter read 50 [Auxiliary output 1 assignment] Auxiliary output 2 assignment Parameter read 51 [Auxiliary output 2 assignment] Alarm 1 classification Parameter read 52 [Alarm 1 classification] Alarm 1 non-excitation Parameter read 53 [Alarm 1 non-excitation] Alarm 2 classification Parameter read 54 [Alarm 2 classification] Alarm 2 non-excitation Parameter read 55 [Alarm 2 non-excitation] Alarm 3 classification Parameter read 56 [Alarm 3 classification] Alarm 3 non-excitation Parameter read 57 [Alarm 3 non-excitation] Forward/reverse action Parameter read 58 [Forward/reverse action] Target upper limit value Parameter read 59 [Target upper limit value] Target lower limit value Parameter read 60 [Target lower limit value] PID ON/OFF Parameter read 61 [PID ON/OFF] ST Parameter read 62 [ST] ST settling band width Parameter read 63 [ST settling band width] Parameter read 64 [ ] At calculation gain Parameter read 65 [At calculation gain] Standby sequence restart Parameter read 66 [Standby sequence restart] Display automatic return time Parameter read 67 [Display automatic return time] AT hysteresis Parameter read 68 [AT hysteresis] LBA detection width Parameter read 69 [LBA detection width] Heater off latch Parameter read 70 [Heater off latch] Travel time Parameter read 71 [Travel time] PV dead band Parameter read 72 [PV dead band] Remote SP valid Parameter read 73 [Remote SP valid] Remote SP upper limit value Parameter read 74 [Remote SP upper limit value] Remote SP lower limit value Parameter read 75 [Remote SP lower limit value] SP tracking Parameter read 76 [SP tracking]

11 - 11 11 - 11
MELSOFT11 SEQUENCE INFORMATION AND LABEL VARIABLES OF
SYSTEM PROJECT
Label variable list
Parameter Read Command Parameter Read Response
Input variables Data type
(Data length) Output variables
Data type (Data length)
Module No. OUT_ST_NO
Character string (2)
Parameter No. OUT_PARAM
Character string (2)
End code OUT_EXE_RESULT
Character string (2)
Module No. IN_ST_NO
Character string (2)
Read data OUT_READ
Character string (4)
2) Parameter write
Command correspondence list
Command Sequence Information
Target value Parameter write 1 [Target value] Target value 0 Parameter write 2 [Target value 0] Target value 1 Parameter write 3 [Target value 1] Target value 2 Parameter write 4 [Target value 2] Target value 3 Parameter write 5 [Target value 3] Alarm value 1 Parameter write 6 [Alarm value 1] Alarm value 2 Parameter write 7 [Alarm value 2] Alarm value 3 Parameter write 8 [Alarm value 3] Proportional band Parameter write 9 [Proportional band] Integral time Parameter write 10 [Integral time] Derivative time Parameter write 11 [Derivative time] Cooling coefficient Parameter write 12 [Cooling coefficient] Dead band Parameter write 13 [Dead band]
Position-proportional dead band Parameter write 14 [Position-proportional dead band]
Manual reset value Parameter write 15 [Manual reset value]
Adjustment sensitivity (heating) Parameter write 16 [Adjustment sensitivity (heating)]
Adjustment sensitivity (cooling) Parameter write 17 [Adjustment sensitivity (cooling)]Control period (heating) Parameter write 18 [Control period (heating)] Control period (cooling) Parameter write 19 [Control period (cooling)] Heater off detection Parameter write 20 [Heater off detection] SP lamp time unit Parameter write 21 [SP lamp time unit] SP lamp set value Parameter write 22 [SP lamp set value] LBA detection time Parameter write 23 [LBA detection time] Stop-time manipulated value Parameter write 24 [Stop-time manipulated value] Error-time manipulated value Parameter write 25 [Error-time manipulated value]

11 - 12 11 - 12
MELSOFT11 SEQUENCE INFORMATION AND LABEL VARIABLES OF
SYSTEM PROJECT
Command Sequence Information
Manipulated value upper limit value Parameter write 26 [Manipulated value upper limit value]
Manipulated value lower limit value Parameter write 27 [Manipulated value lower limit value]
Operation change ratio limit value Parameter write 28 [Operation change ratio limit value]
Input digital filter Parameter write 29 [Input digital filter] Switching hysteresis Parameter write 30 [Switching hysteresis] Alarm 1 hysteresis Parameter write 31 [Alarm 1 hysteresis] Alarm 2 hysteresis Parameter write 32 [Alarm 2 hysteresis] Alarm 3 hysteresis Parameter write 33 [Alarm 3 hysteresis] Upper limit temperature input compensation value
Parameter write 34 [Upper limit temperature input compensation value]
Lower limit temperature input compensation value
Parameter write 35 [Lower limit temperature input compensation value]
Input classification Parameter write 36 [Input classification] Scaling upper limit value Parameter write 37 [Scaling upper limit value] Scaling lower limit value Parameter write 38 [Scaling lower limit value] Decimal point position Parameter write 39 [Decimal point position] Temperature unit Parameter write 40 [Temperature unit] Control output 1 assignment Parameter write 41 [Control output 1 assignment] Control output 2 assignment Parameter write 42 [Control output 2 assignment] Auxiliary output 1 assignment Parameter write 43 [Auxiliary output 1 assignment] Auxiliary output 2 assignment Parameter write 44 [Auxiliary output 2 assignment] Alarm 1 classification Parameter write 45 [Alarm 1 classification] Alarm 1 non-excitation Parameter write 46 [Alarm 1 non-excitation] Alarm 2 classification Parameter write 47 [Alarm 2 classification] Alarm 2 non-excitation Parameter write 48 [Alarm 2 non-excitation] Alarm 3 classification Parameter write 49 [Alarm 3 classification] Alarm 3 non-excitation Parameter write 50 [Alarm 3 non-excitation] Forward/reverse action Parameter write 51 [Forward/reverse action] Target upper limit value Parameter write 52 [Target upper limit value] Target lower limit value Parameter write 53 [Target lower limit value] PID ON/OFF Parameter write 54 [PID ON/OFF] ST Parameter write 55 [ST] ST settling band width Parameter write 56 [ST settling band width] Parameter write 57 [ ] At calculation gain Parameter write 58 [At calculation gain] Standby sequence restart Parameter write 59 [Standby sequence restart] Display automatic return time Parameter write 60 [Display automatic return time] AT hysteresis Parameter write 61 [AT hysteresis] LBA detection width Parameter write 62 [LBA detection width] Heater off latch Parameter write 63 [Heater off latch] Travel time Parameter write 64 [Travel time]

11 - 13 11 - 13
MELSOFT11 SEQUENCE INFORMATION AND LABEL VARIABLES OF
SYSTEM PROJECT
Command Sequence Information
PV dead band Parameter write 65 [PV dead band] Remote SP valid Parameter write 66 [Remote SP valid] Remote SP upper limit value Parameter write 67 [Remote SP upper limit value] Remote SP lower limit value Parameter write 68 [Remote SP lower limit value] SP tracking Parameter write 69 [SP tracking]
Label variable list
Parameter Write Command Parameter Write Response
Input variables Data type
(Data length) Output variables
Data type (Data length)
Module No. OUT_ST_NO
Character string (2) Module No. IN_ST_NO
Character string (2)
Parameter No. OUT_PARAM
Character string (2)
End code OUT_EXE_RESULT
Character string (2) Write data
IN_WRITE_DATA Character string (4)
Write data OUT_WRITE_DATA
Character string (4)

11 - 14 11 - 14
MELSOFT11 SEQUENCE INFORMATION AND LABEL VARIABLES OF
SYSTEM PROJECT
3) Special commands
Command correspondence list
Command Sequence Information
Run/stop Special command 1 [Run/stop] Remote/local Special command 2 [Remote/local] RAM write mode Special command 3 [RAM write mode] RAM data storage Special command 4 [RAM data storage] AT execution/stop Special command 5 [AT execution/stop] SP mode Special command 6 [SP mode] Setting level 1 shift Special command 7 [Setting level 1 shift] Soft reset Special command 8 [Soft reset] Status Special command 9 [Status]
Label variable list
Special Command Special Response
Input variables Data type
(Data length) Output variables
Data type (Data length)
Module No. OUT_ST_NO
Character string (2) Module No.
IN_ST_NO Character string
(2) Parameter No.
OUT_COMMAND Character string
(2)
End code OUT_EXE_RESULT
Character string (2)
Command code
IN_COMMAND_CODECharacter string
(4) Command code
OUT_COMMAND_CODE Character string
(4)

11 - 15 11 - 15
MELSOFT11 SEQUENCE INFORMATION AND LABEL VARIABLES OF
SYSTEM PROJECT
11.2.2 YAMATAKE make
(1) DMC10 series Command correspondence list
Command Sequence Information
Fixed-length continuous data read command (RD command)
Fixed-length continuous data read [RD command]
Fixed-length continuous data write command (WD command)
Fixed-length continuous data write [WD command]
Fixed-length random data read command (RU command)
Fixed-length random data read [RU command]
Fixed-length random data write command (WU command)
Fixed-length random data write [WU command]
Label variable list
Fixed-length Continuous Data Read
Command Data Read Response
Input variables Data type
(Data length) Output variables
Data type (Data length)
Device address IN_ST_NO
Character string (2) Device address OUT_ST_NO
Character string (2)
Head data Word address
IN_READ_ADR Character string (4)
End code OUT_RESULT_CODE
Character string (2)
Number of data IN_DATA_LEN
Character string (4) (MAX: 12 data)
Read data
OUT_READ_DATA
1 data: 4 bytes
Character string(48)Number of data 4
bytes
Label variable list
Fixed-length Continuous Data Write
Command Data Write Response
Input variables Data type
(Data length) Output variables
Data type (Data length)
Device address IN_ST_ADR
Character string (2) Device address OUT_ST_NO
Character string (2)
Head data Word address
IN_WRITE_ADR Character string (4)
Write data IN_WRITE_DATA
Character string (48)(MAX: 12 data) 1 data: 4 bytes
End code OUT_RESULT_CODE
Character string (2)

11 - 16 11 - 16
MELSOFT11 SEQUENCE INFORMATION AND LABEL VARIABLES OF
SYSTEM PROJECT
Label variable list
Fixed-length Random Read Command Data Read Response
Input variables Data type
(Data length) Output variables
Data type (Data length)
Device address OUT_ST_NO
Character string (2)Device address IN_ST_NO
Character string (2)
End code OUT_RESULT_CODE
Character string (2)
Data address IN_READ_ADR
Character string (48)(MAX: 12 data)
Number of data 4 bytes
Read data
OUT_READ_DATA
Character string (48)Number of data 4
bytes
Label variable list
Fixed-length Random Data Write Command Data Write Response
Input variables Data type
(Data length) Output variables
Data type (Data length)
Device address IN_ST_NO
Character string (2) Device address OUT_ST_NO
Character string (2)
Write data IN_WRITE_DATA
Character string (48)MAX: 12 data
Number of data 4 bytes
End code OUT_RESULT_CODE
Character string (2)

App - 1 App - 1
MELSOFTAPPENDICES
APPENDICES
Appendix 1 Help Function
The help function displays the product information.
BASIC OPERATION Click the [Help] [Product information] menu.
1)
2)
3)
No. Name Description
1) Version Displays the version of the GX Configurator-SC function.
2) Name Displays the name set at the time of installation.
3) Company name Displays the company name set at the time of installation.
App

App - 2 App - 2
MELSOFTAPPENDICES
Appendix 2 Project Name Specifications
The following table indicates the restrictions on the set names (such as the project name).
Item Display/setting
Project name
Maximum number of characters: 32 characters (If the project name is created within 32 characters, setting is disabled when the total number of characters including those of the project path exceeds 150 characters.) The space after the project name is deleted automatically. A "." (period) cannot be used at the end of the project name. Special characters ( / : ; * ? " < > | ,) and particular words*1 cannot be used.
Project comment Maximum number of characters: 32 characters
Project path
Maximum number of characters: Within 150 characters including those of the project name Path: The project name already existing in the path cannot be specified. The space after the project name is deleted automatically. Special characters ( / : ; * ? " < > | ,) and particular words*1 cannot be used.
Packet information name
Maximum number of characters: 32 characters The same name cannot be set within the same project. (Case independent.) The spaces before and after the name are deleted automatically.
Sequence information
Maximum number of characters: 32 characters The same name cannot be set within the same project. (Case independent.) The spaces before and after the information are deleted automatically.
*1: The following words cannot be used.
COM1 to COM9 LPT1 to LPT9 AUX PRN CON NUL CLOCK$ Appendix 3 Character Strings That Cannot Be Used as Input Variables and Output Variables
When the protocol FB support function is used, the following character strings cannot be used as input and output variables. The following character strings are used by the protocol FB function in the system. The following character strings are set as labels when FBs are created with the protocol FB function and read to GX Developer.
[Unusable character strings]
I_REQ_RECV, I_REQ_SEND, I_START, O_END, O_ERR_CD, O_END_NG, O_R_DATA_NO, V_COMP, V_CTRL_DATA, V_LEN_MAX, V_P1, V_P2, V_R_RESULT, V_RUN, V_S_RESULT, V_WK_B_DATA, V_WK_DATA, V_WK_RECV, V_WK_LEN, V_WK_RECV_B, V_WK_R_O_LEN, V_WK_SEND, V_WK_W_LEN, V_WK_PTR, V_LEN_IDATA, V_PLEN, V_PLEN_END, V_FOR_COUNT, V_DUMMY, V_I_RESULT
App

App - 3 App - 3
MELSOFTAPPENDICES
Appendix 4 Packet setting example
This section provides the GX Configurator-SC setting screens that correspond to packet examples when sending/receiving data between C24 module and other node. (1) Send packet setting example
(06H) (n)
1 1 4 1
7 bytes
(Code)
number of bytes
Packet construction
Header Any data Terminator
TerminatorData 2Data 1StationNo.
ACK
Create new Packet information screen
Packet construction information screen
Packet data screen
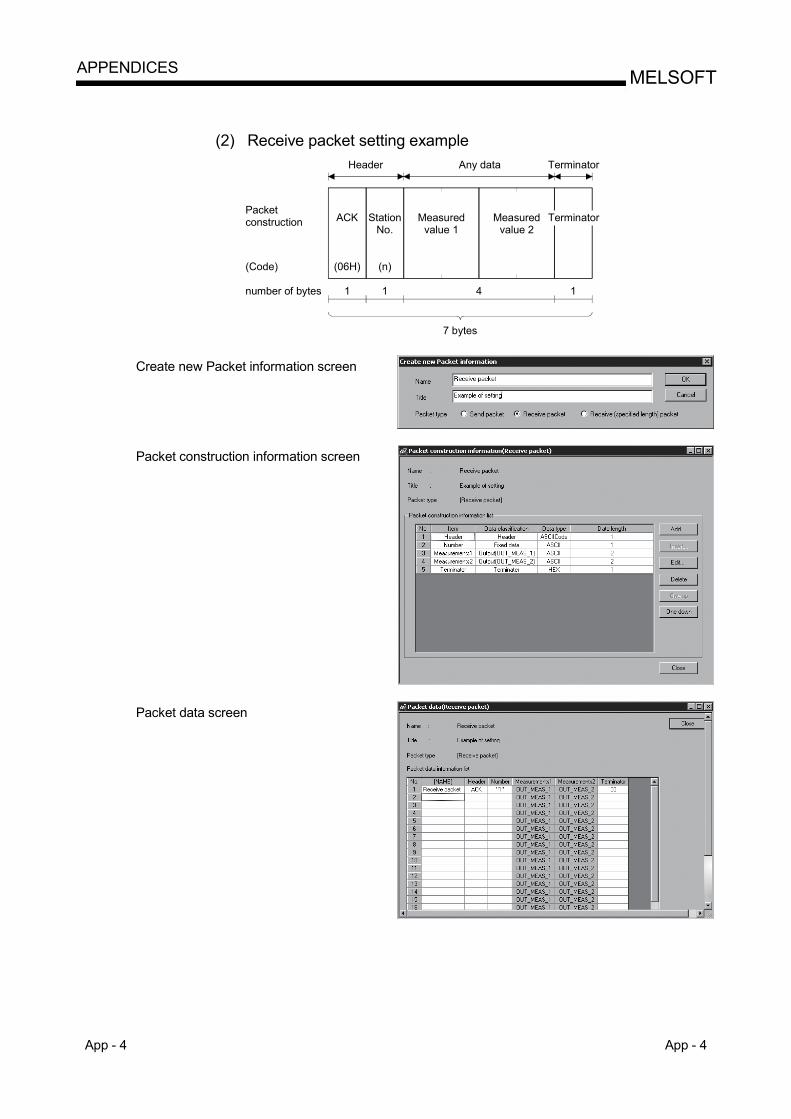
App - 4 App - 4
MELSOFTAPPENDICES
(2) Receive packet setting example
(06H) (n)
1 1 4 1
7 bytes
(Code)
number of bytes
Packet construction
Header Any data Terminator
TerminatorMeasuredvalue 2
Measuredvalue 1
StationNo.
ACK
Create new Packet information screen
Packet construction information screen
Packet data screen

App - 5 App - 5
MELSOFTAPPENDICES
(3) Receive (specified length) packet setting example (Fixed data)
(06H) (n)
1 1
2 bytes
(Code)
number of bytes
Packet construction
Header
StationNo.
ACK
Create new Packet information screen
Packet construction information screen
Packet data screen

App - 6 App - 6
MELSOFTAPPENDICES
(4) Receive (specified length) packet setting example (Variable data)
(06H) (n)
1 1 4
6 bytes
(Code)
number of bytes
Packet construction
Header Any data
Measuredvalue 2
Measuredvalue 1
StationNo.
ACK
Create new Packet information screen
Packet construction information screen
Packet data screen
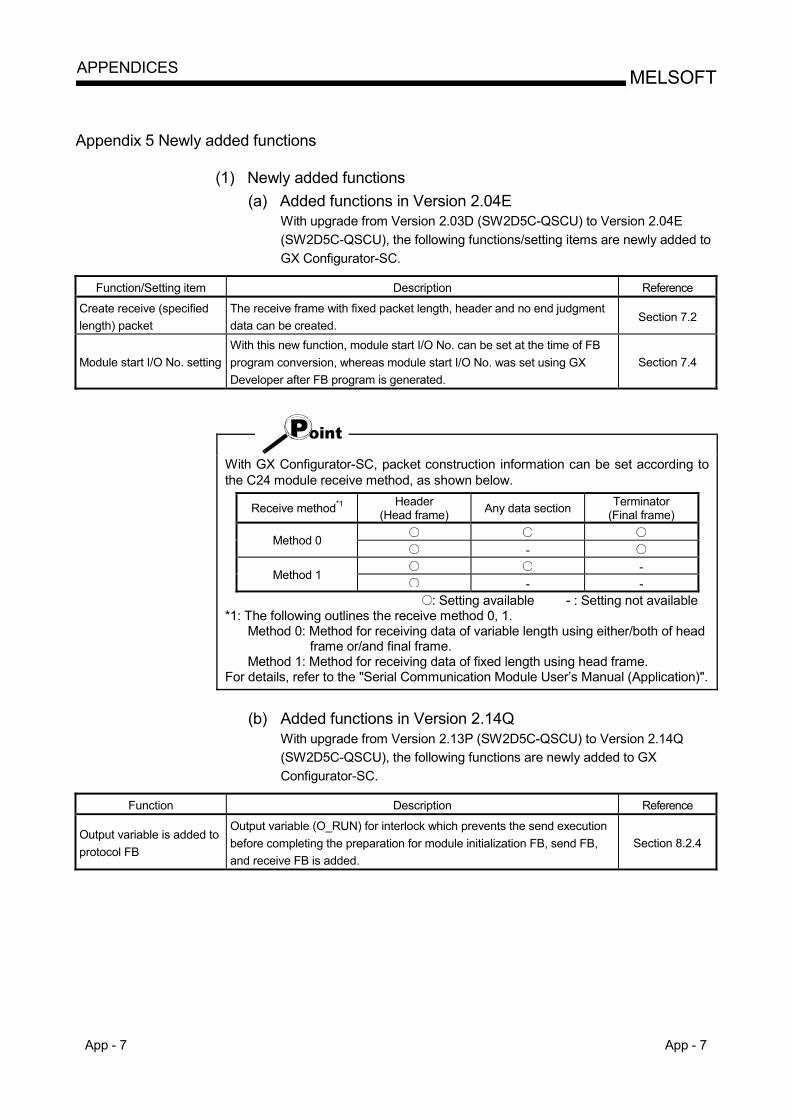
App - 7 App - 7
MELSOFTAPPENDICES
Appendix 5 Newly added functions
(1) Newly added functions (a) Added functions in Version 2.04E
With upgrade from Version 2.03D (SW2D5C-QSCU) to Version 2.04E (SW2D5C-QSCU), the following functions/setting items are newly added to GX Configurator-SC.
Function/Setting item Description Reference
Create receive (specified length) packet
The receive frame with fixed packet length, header and no end judgment data can be created.
Section 7.2
Module start I/O No. setting With this new function, module start I/O No. can be set at the time of FB program conversion, whereas module start I/O No. was set using GX Developer after FB program is generated.
Section 7.4
With GX Configurator-SC, packet construction information can be set according to the C24 module receive method, as shown below.
Receive method*1 Header (Head frame) Any data section Terminator
(Final frame) Method 0 - -
Method 1 - -
: Setting available - : Setting not available *1: The following outlines the receive method 0, 1.
Method 0: Method for receiving data of variable length using either/both of head frame or/and final frame.
Method 1: Method for receiving data of fixed length using head frame. For details, refer to the "Serial Communication Module User’s Manual (Application)".
(b) Added functions in Version 2.14Q
With upgrade from Version 2.13P (SW2D5C-QSCU) to Version 2.14Q (SW2D5C-QSCU), the following functions are newly added to GX Configurator-SC.
Function Description Reference
Output variable is added to protocol FB
Output variable (O_RUN) for interlock which prevents the send execution before completing the preparation for module initialization FB, send FB, and receive FB is added.
Section 8.2.4

App - 8 App - 8
MELSOFTAPPENDICES
(c) Added functions in Version 2.21X
With upgrade from Version 2.20W (SW2D5C-QSCU) to Version 2.21X (SW2D5C-QSCU), the following functions are newly added to GX Configurator-SC.
Function Description Reference
Addition of applicable CPU Now compatible with L02CPU and L26CPU-BT. - Addition of target modules Now compatible with LJ71C24 and LJ71C24-R2. Section 3.1
(2) Checking the GX Configurator-SC software version
Check the version within the GX Developer product information. ( [Help] [Product information] )
The GX Configurator-SC versionis displayed in this section.
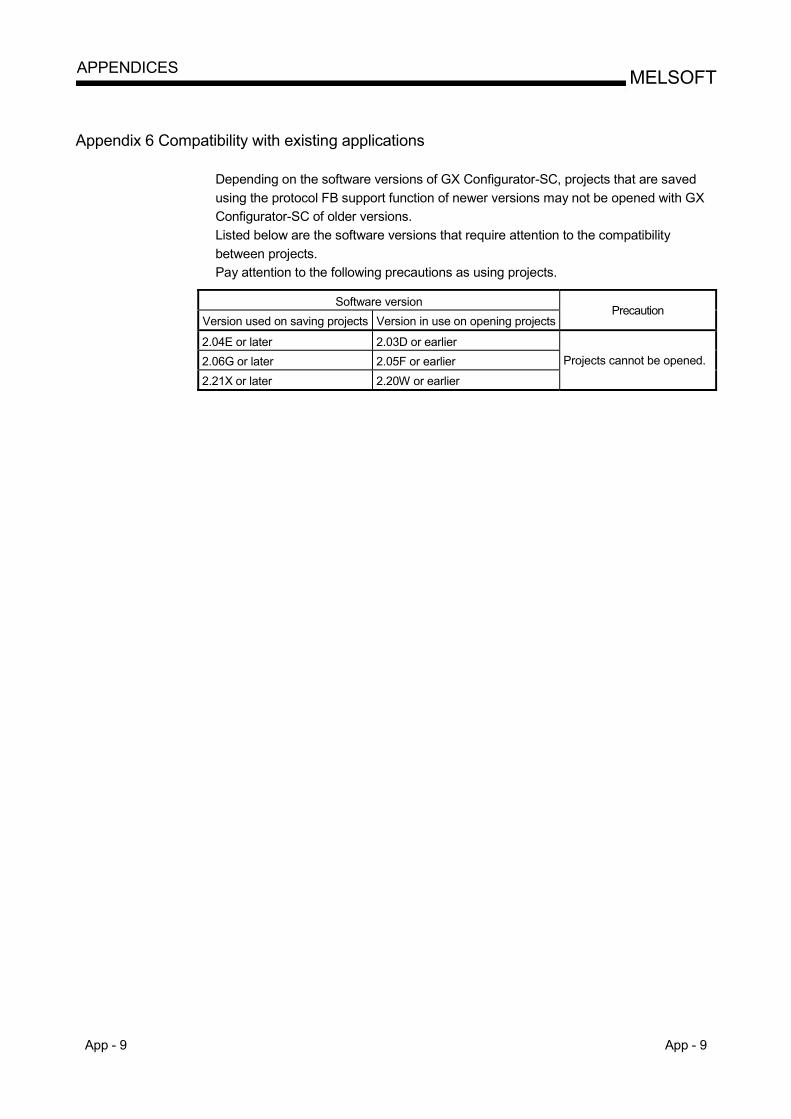
App - 9 App - 9
MELSOFTAPPENDICES
Appendix 6 Compatibility with existing applications
Depending on the software versions of GX Configurator-SC, projects that are saved using the protocol FB support function of newer versions may not be opened with GX Configurator-SC of older versions. Listed below are the software versions that require attention to the compatibility between projects. Pay attention to the following precautions as using projects.
Software version
Version used on saving projects Version in use on opening projectsPrecaution
2.04E or later 2.03D or earlier 2.06G or later 2.05F or earlier 2.21X or later 2.20W or earlier
Projects cannot be opened.

Index - 1 Index - 1
INDEX
[A]
Applicable modules and applicable function ........................................................................ 3- 1
[C] Changing the module type............................. 5- 8 Character Strings That Cannot Be Set as Input ....................................................................App- 2 Circuit Trace ................................................... 9- 3 Circuit trace option screen
Monitor buffer head address setting .......... 9- 6 Monitor buffer size setting .......................... 9- 6 Read............................................................ 9- 6 Write............................................................ 9- 6
Circuit trace screen Transmission / receive packets.................. 9- 4 Communication control signals .................. 9- 4 Start............................................................. 9- 4 The project name for matching .................. 9- 5 Transmission/receive packet list display ............................................................9- 5, 9- 8 Transmission/receive packet details display ............................................................9- 5, 9- 8
Communication data monitoring function....... 9-3 Communication Test ..................................... 9-10 Communication test data input screen
Project name.............................................. 9-12 Packet details information ......................... 9-12
Communication test screen Select packet from inside the project........ 9-11 Send data................................................... 9-11 Send........................................................... 9-11
Communication test setting screen Transmission monitoring time ................... 9-13 Write........................................................... 9-13
Creating new packet information ................... 7- 3 Creating new sequence information............. 7-15
[D] Debugging Support Function......................... 3- 1 Deleting the packet information .................... 7-14 Deleting the sequence information ............... 7-21
Duplicating the packet information ................7-13 Duplicating the sequence information...........7-19
[E]
Echo data ........................................................8- 9 Exit...................................................................5- 3
[F] FB Conversion of Sequence Information......7-23
[G] Guide tool buttons...........................................4- 2
[H] Help Function............................................. App- 1 How to input ASCII code ...............................7-12
[I] Input/Output variable .....................................7-22
[L] Label variables of system project.................11- 1
[M] Menu List.........................................................3- 2 Module initialization FB...................................8- 4 Module mounting I/O No. setting....................8- 2 Module selection for debugging support functions .........................................................................9- 2 Module selection screen
The present object module .........................9- 2 Module selection .........................................9- 2 Module list ...................................................9- 2 Channel specification..................................9- 2
Module Setting ................................................7- 1
[O] Opening the circuit trace file ...........................9- 9 Opening the packet construction information .........................................................................7- 4 Operating procedure
Use of system project .................................6- 4 Use of user project ......................................6- 6 Creating communication control program on GX Developer ...................................................6-11
Ind

Index - 2 Index - 2
[P]
Packet data selection screen Project name.............................................. 9-12 Packet information list ............................... 9-12
Pasting the protocol FB to the sequence program ........................................................................ 8- 3 Print............................................................... 10- 1 Print Examples ............................................. 10- 8 Project Name Specifications......................App- 2 Protocol FB..................................................... 1- 2 Protocol FB support function
Function List ............................................... 3- 1 Project function list ..................................... 5- 4 Creating a new project ............................... 5- 4 Opening the project .................................... 5- 6 Closing the project...................................... 5- 6 Saving the project....................................... 5- 7 Delete project.............................................. 5- 7
[R]
Receive FB..................................................... 8- 7 Renaming the packet information................. 7-14 Renaming the sequence information............ 7-20 Receive (specified length) packet.................. 7- 4
[S] Saving the circuit trace file ............................. 9- 9 SCREEN DISPLAY........................................ 4- 1 Send FB.......................................................... 8- 5
Setting of I/O variables of pasted protocol FBs .................................................................... 8- 4
Sequence information of system project ..... 11- 1 Setting the packet construction information .. 7- 5 Setting the packet data information .............. 7-11 Setting the sequence information ................. 7-16 Start ................................................................ 5- 2 State Monitor ................................................. 9-14 State monitor screen<<Error information>> tab
Communication error status...................... 9-15 Switch setting, mode selection error......... 9-15 Communication result................................ 9-15 Error reset .................................................. 9-15
State monitor screen<<Operation setting switch>> tab
Operation setting switch............................ 9-16 Mode switch............................................... 9-16 Station switch............................................. 9-16
State monitor screen<<Signal>> tab
X signal state monitor ................................9-15 Y signal state monitor ................................9-15 RS-232 signal monitor ...............................9-15
Status Bar .......................................................4- 3 Supported Device Controller List .................11- 2 System project tree.........................................4- 4
[T] Tool Button......................................................4- 2
[U] User project tree .............................................4- 5
[V] Version ....................................................... App- 8
Ind

Microsoft, Windows, Windows NT, Windows Vista are registered trademarks of Microsoft Corporation in the United States and other countries. Pentium is trademark of Intel Corporation in the United States and other countries. Ethernet is a trademark of Xerox. Co., Ltd in the United States. All other company names and product names used in this manual are trademarks or registered trademarks of their respective companies.
SH (NA)-080393E-L


SH(NA)-080393E-L(1009)MEEMODEL: GXCON-SC-O-FB-EMODEL CODE: 13JU46
Specifications subject to change without notice.
When exported from Japan, this manual does not require application to theMinistry of Economy, Trade and Industry for service transaction permission.
HEAD OFFICE : TOKYO BUILDING, 2-7-3 MARUNOUCHI, CHIYODA-KU, TOKYO 100-8310, JAPANNAGOYA WORKS : 1-14 , YADA-MINAMI 5-CHOME , HIGASHI-KU, NAGOYA , JAPAN