guided immediate loading implant surgery planned with ... · guided immediate loading implant...
TRANSCRIPT

Guided immediate loading implant surgery planned with Implant Studio D.D.S. Jae-min, Lee
Jung-plant Dental office
1 PROLOGUE How can we deal with the immediate loading implant cases easier and more accurate than before?
This question has always been on my mind for the past few years. Even after I became confident on applying immediate loading protocol to fully or partially edentulous patients, still it was very hard to place implants with properly made temporary prosthesis at the same time. After a surgery has ended, there always were stitches, blood and damaged soft tissue in the mouth. These things made it hard to make provisional prosthesis right after the surgery has ended. This led me to draw a conclusion that immediate loading case should go with planned surgery and pre-fabricated provisional prosthesis.
So I started to search for a proper guide surgery system which would offer me an accurate surgical guide and prefabricated immediate prosthesis at the same time. However the guide surgery systems on the market at that time, did not satisfy my needs completely. Their work-flow was very hard to follow, from diagnosis to guide fabrication. Moreover, it was much harder to make immediate prosthesis with their system. Even though the guide was made with CAD system, still temporary prosthesis should be made upon the cast model by help of the guide.
Figure 1 . Designing and fabricating surgical guide with Nobel Guide – Nobel Guide can plan surgery digitally, but designing implant prosthesis should be done manually over the stone cast.

It was early 2014 that I first started dental CAD/CAM to make dental prosthesis in my office. At that time, I purchased Trios 2 and a wet mill machine to produce one-day restorations. One day, my partner from Dio implant, one of the major 3Shape’s resellers, told me there was a nice surgical guide system from 3Shape. My eyes opened wide when I first heard of it. Because it was exactly what I was looking for. With Implant Studio, I could plan the whole surgery and also design the temporary prosthesis. There was no reason to hesitate trying this and I started guide surgeries supported by Implant Studio.
2 WHAT IS IMPLANT STUDIO? Implant Studio is a CAD program which is developed by 3Shape, one of the leading companies in dental
CAD/CAM market. What makes Implant Studio more special than other systems is that it can both plan implant surgery and design implant prosthesis at the same time.
This could be achieved by 3Shape’s highly advanced dental CAD technology and their state of the art intraoral scanner Trios and model scanner D-series. 3Shape’s scanners do not allow more than 0.05mm of error and the integration procedure between CBCT data and oral scan data is very accurate. Through this integrated data, Implant Studio can plan surgeries in a fully digitalized way, with great precision that is ever seen before.
3 HOW IMPLANT STUDIO WORKS? It would be better showing a case done with Implant Studio than describing the work flow in a
narrative way. Here, one of my case will be followed.
3.1 PATIENT HISTORY This patient was wearing a removable partial denture on lower jaw when he visited my office for the
first time. He said 3unit bridged crowns on lower right side had problems. From X-ray view, I could find periapical lesions around the root tip of lower right canine and lower left incisor and there were also secondary caries around the margin of bridged crowns.
Figure 3. Trios and D2000, 3Shape’s most advanced oral scan solutions
Figure 2. A captured image from Implant Studio – Implant Studio can both plan surgery and design prosthesis in a fully digitalized way

Figure 4. Panoramic X-ray and a Photo taken on the first visit
He already knew that those teeth needed to be extracted at that time. But there was one thing he eagerly wanted, he wanted to maintain his RPD in use, until the implants on both side of lower jaw are finished. So we agreed to extract #41, 43 and place implants on left side first. Until the implant treatment is finished, he would be able to use his RPD which was fixed to be used further. After the implant crowns on left side were set then the implants on left side were supposed to be placed.
On the first treatment day, as planned, #41 and 43 were extracted and two implants were placed on the left side of lower jaw. And his RPD was repaired to be used as a temporary denture.
However, after 5weeks, the denture was completely separated into two parts. The patient was very disappointed about not being able to chew anything with his remained teeth. He insisted on repairing the RPD but it was impossible due to the sublingual bar was
completely broken. As he wanted temporary prosthesis on both sides of his lower jaw, there wasn’t any choice but the immediate loading implants on the
right side. I suggested an immediate loading guided implant surgery on the right side and finishing the prosthetic procedures on the left side earlier than the plan. He agreed, and I could start preparing for the guide with Implant Studio.
Figure 5. #41, #43 were extracted on the first treatment day. Implants were placed on #34, #35 position.

3.2 PLANNING SURGERY WITH IMPLANT STUDIO
Figure 6. Order page
It all starts with this page, here you should load scan files and CT scan files in dicom format. After that, you can input the details about the surgery.

Figure 7. Cropping CT image
You can cut out the unnecessary area of CT image here. This can reduce the file size so that the program can be operated more stable.
Figure 8. Oral Scan Image
Here, markers are attached to get better integration. With those radiopaque material, you can get additional points to integrate a CT image and an oral scan image.

Figure 9. Scan Alignment
This process is the most important one among all the procedures while operating Implant Studio because if the integration fails then the whole surgical plan can go failure also. As you can see from the picture, there are 3 points you should pick. Normally natural teeth are the best choice for the integration, because they are not blurred in CT image and easily seen in the oral scan image. In this picture, PFM crowns were blurred in CT image and due to the multiple loss of teeth, both end sides of lower jaw do not have points to be used as integration points. In this case, the markers can act like natural teeth so that you may get the integration easier and more accurate.

Figure 10. Nerve Definition
To keep the inferior alveolar nerve unharmed, drawing nerve line must be done. It is easy and intuitive, just pick some points from the start to end of the nerve the line is drawn automatically.
Figure 11. Provisional Crown Design
Just drag and tilt the preformed crowns as you have in mind.
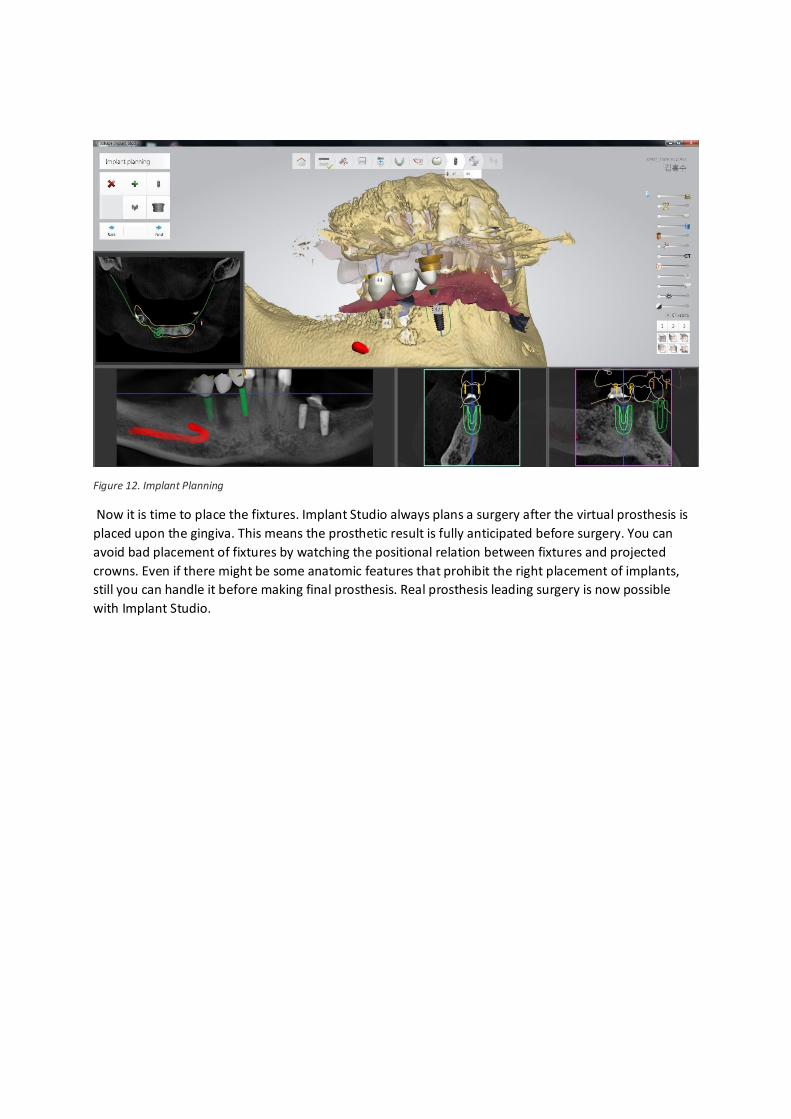
Figure 12. Implant Planning
Now it is time to place the fixtures. Implant Studio always plans a surgery after the virtual prosthesis is placed upon the gingiva. This means the prosthetic result is fully anticipated before surgery. You can avoid bad placement of fixtures by watching the positional relation between fixtures and projected crowns. Even if there might be some anatomic features that prohibit the right placement of implants, still you can handle it before making final prosthesis. Real prosthesis leading surgery is now possible with Implant Studio.

3.3 SURGERY
Figure 13. Photos taken before the surgery
As the plan had changed, 2nd surgery on the left side was done prior than the previous schedule.

Figure 14. Surgical Guide and Provisional Prosthesis
Implant Studio can design surgical guide, temporary crowns and customized titanium abutments. They all can be prepared before surgery.

Figure 15. Drilling Protocol
Implant Studio will output drilling protocol in the form of pdf file after the surgery has planned completely. You may print it out or you can just check it on your computer before the surgery. It contains the information of sleeve offset and the size of the implants.
Sleeve offset is sum of the gingiva depth and the length of sleeve. If you sum up the length of the implant and the offset, then you can get the drill length.

Figure 16. Placement of the Surgical Guide and Drilling
Surgical guides made from Implant Studio always fit nicely without any additional fixations into the bone, as the guide is made from the accurate soft tissue model made from the oral scan data.

Figure 17. Placing the Implants
The implants were inserted until the guide stop on the fixture driver met the sleeve. When the guide stop reaches metal sleeve, it means that the implant has placed at the right position.

Figure 18. Placing the Provisional Prosthesis
After the surgery is done, provisional crowns with pre-fabricated customized abutments were seated. As the surgery went flapless, tissue damage was hardly seen.

Figure 19. Post-op Panoramic X-ray view and Photos
Adjustment was minimal on provisional crowns on the right side. As the upper dentition worn badly, it was very hard to reproduce the anatomic features on the occlusal surface of crowns. Provisional crowns on the left side were made manually with stock abutments on.

3.4 FINAL PROSTHESIS After 2 months of waiting, it was started to make final prosthesis.
Figure 20. Model scan with D2000 to make PMMA provisional crowns and customized Ti abutments on the left side
The provisional crowns on both sides were severely worn out on the day he visited our office after 2 months. Due to the abrasion of crowns, the bite of this patient became unstable at that time. I delayed making final crowns, and decided to make provisional prosthesis including customized Ti abutments on the left side first, as the crowns on the right side were preserved better than left. This was intended to reestablish the occlusal relationship to help making final prosthesis easier.

Figure 21. Designing Ti Customized Abutments and PMMA Provisional Crowns
The cast models were scanned by D2000. D2000 has a texture scan function and it allows for dental technicians to distinguish gum rubber portion from stone model easily. And if there is something drawn on the stone model, D2000 will show it on the surface of the digital scan model too. This is very useful
when you want to write something on the cast model, like a special request on the case or a margin line that should be drawn on the cast or anything that should be written on the cast.
Figure 22. PMMA Provisional Crowns and Customized Ti Abutments on the Model
The holes over the PMMA crowns will act as a jig for the placement of customized abutments.
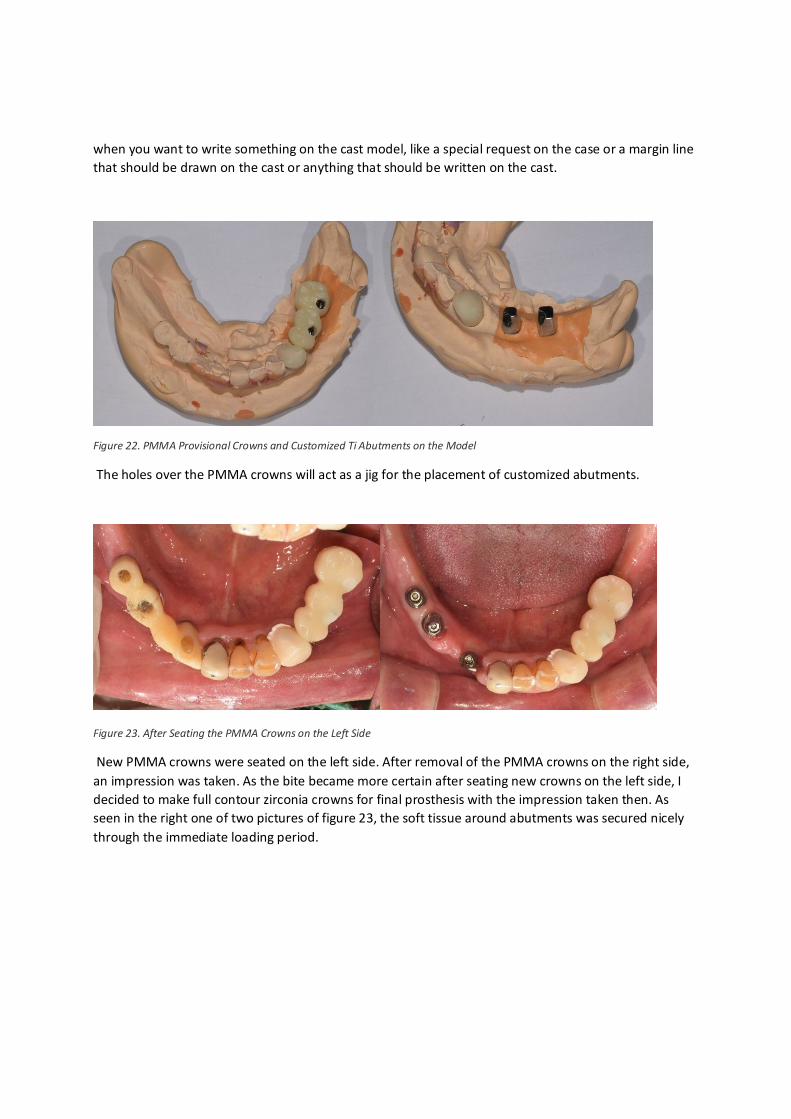
Figure 23. After Seating the PMMA Crowns on the Left Side
New PMMA crowns were seated on the left side. After removal of the PMMA crowns on the right side, an impression was taken. As the bite became more certain after seating new crowns on the left side, I decided to make full contour zirconia crowns for final prosthesis with the impression taken then. As seen in the right one of two pictures of figure 23, the soft tissue around abutments was secured nicely through the immediate loading period.

Figure 24. Designing and Seating Full Contour Zirconia Crowns on the Right Side
Final crowns were nicely seated as they were designed for. Customized Ti abutments for temporary crowns were used for the final prosthesis again.

Figure 25. Photos, CBCT, Panoramic X-ray View after Finishing the Treatment
CBCT shots and Panoramic X-ray view show that the implants are placed right at exact locations. Even after the 2 months of immediate loading period, marginal bone loss was not seen.

4 BENEFIT OF IMPLANT STUDIO As this case shows, Implant Studio anticipates every aspect of the implant treatment prior to surgery. Due to the final aim of implant treatment lies in a perfect restoration of edentulous site, the implant surgery should be planned and done with delicate prosthetic strategy. In that sense, it can be said that Implant Studio is the most advanced and easiest way to achieve the real goal of implant treatment, because it helps dentists to plan surgery under prosthetic considerations in a very intuitive way.
With Implant Studio, dentists can get prosthetic benefit from placing the implants at the right position for final prosthesis. Implant Studio also helps to fabricate immediately loaded provisional prosthesis before surgery in cooperation with 3shape’s versatile CAD program Dental Designer. This is a huge benefit for fully or partially edentulous patients who cannot eat anything without temporary prosthesis.
Besides the prosthetic advantage, Implant Studio also gives surgical benefit through delicately planned surgical strategy. For example, you can avoid damaging the important anatomical features like, sinus cavity, nasal cavity or inferior alveolar nerve while surgery with help of the precisely planned drilling protocol of Implant Studio. Additionally, with Implant Studio, the whole surgery can be finished without flap reflection. This means patients will have less damage while surgery and from what I have experienced, patients love this, because they feel less pain and discomfort after the surgery has ended.
Figure 26. Implants Placed Avoiding Sinus Cavity and Extraction Site by Delicately Planned Surgery with Implant Studio

In short, Implant Studio gives benefit of
1. Real prosthesis leading surgery, assuring exact place and path of implants for final prosthesis 2. Placing provisional prosthesis along with the placement of implants 3. Avoidance from damaging important anatomic features, like Inferior Alveolar Nerve, Sinus
Cavity 4. Minimally invasive surgery without flap reflection
5 EPILOGUE There might be still lots of dentists who think that they do not need a guide for their surgeries. Of course, it is true. However I want to make it clear that if a skilled oral surgeon meets Implant Studio, he could improve his quality of treatments in both surgical and prosthetic aspects. Implant Studio also supports dentists who are not familiar with implant surgeries. In brief, Implant Studio is a good friend of every dentist who practices implant treatment.
I highly recommend this innovative derivative from state of the art dental CAD/CAM technology to every dentist who does implant surgery. Your patients will like what they experience while their implant treatments, less blood, less pain, less discomfort from having provisional prosthesis on the day of surgery. Just give it a try and you’ll love it!