guía de configuración y uso setup & operation guide … · guía de configuración y uso...
TRANSCRIPT

Cre
atin
g an
d pr
intin
g a
labe
l (Fo
r Win
dow
s)
STEP1
Intro
duct
ion
STEP2
STEP3
For W
indo
wsFo
r Mac
into
sh
STEP4
Bef
ore
usin
g th
e pr
inte
rM
aint
enan
ce a
nd
Trou
bles
hoot
ing
Con
nect
ing
to y
our P
C
BROTHER QL-500/550
Setup & Operation GuideGuía de configuración y uso
(Brother QL-500/550)
Be sure to read this manual before using the printer. We recommend that you keep this manual nearby for future reference.Asegúrese de leer este manual antes de usar la impresora. Le recomendamos conservar este manual a mano para poder consultarlo como referencia en el futuro.
Introduction2
Congratulations on purchasing the Brother QL-500/550.Your new Brother QL-500/550 is a label printer that connects to your personal computer, enabling you to quickly and easily print professional custom labels that you have created on your personal computer using the label editing software provided.
We provide service & support for users who register their products on our website. We recommend that you take this opportunity to register with us by visiting us at:
Online User Registration http://www.registermybrother.com/
Online Support Page http://solutions.brother.com/
NOTE: It is also possible to access the above sites from the online user registration window of the CD-ROM installer disk which is included with the printer. We look forward to your registration.
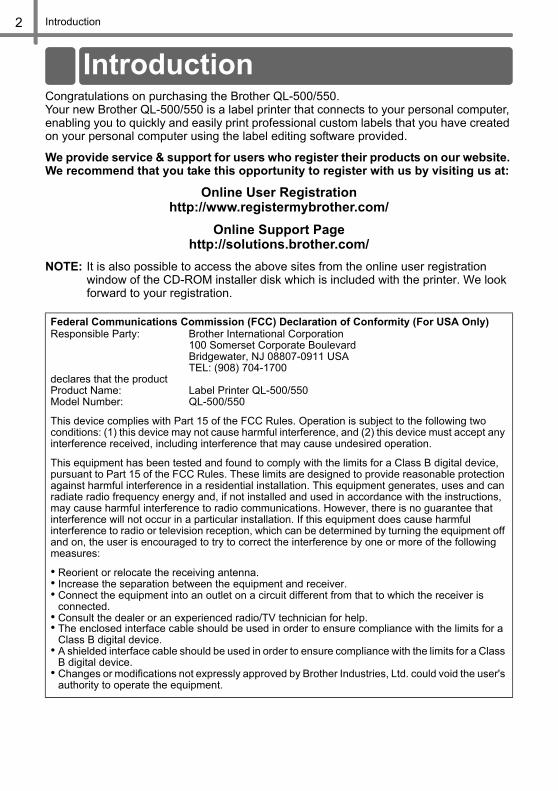
Federal Communications Commission (FCC) Declaration of Conformity (For USA Only)Responsible Party: Brother International Corporation
100 Somerset Corporate BoulevardBridgewater, NJ 08807-0911 USATEL: (908) 704-1700
declares that the productProduct Name: Label Printer QL-500/550Model Number: QL-500/550
This device complies with Part 15 of the FCC Rules. Operation is subject to the following two conditions: (1) this device may not cause harmful interference, and (2) this device must accept any interference received, including interference that may cause undesired operation.
This equipment has been tested and found to comply with the limits for a Class B digital device, pursuant to Part 15 of the FCC Rules. These limits are designed to provide reasonable protection against harmful interference in a residential installation. This equipment generates, uses and can radiate radio frequency energy and, if not installed and used in accordance with the instructions, may cause harmful interference to radio communications. However, there is no guarantee that interference will not occur in a particular installation. If this equipment does cause harmful interference to radio or television reception, which can be determined by turning the equipment off and on, the user is encouraged to try to correct the interference by one or more of the following measures:
• Reorient or relocate the receiving antenna.• Increase the separation between the equipment and receiver.• Connect the equipment into an outlet on a circuit different from that to which the receiver is
connected.• Consult the dealer or an experienced radio/TV technician for help.• The enclosed interface cable should be used in order to ensure compliance with the limits for a
Class B digital device.• A shielded interface cable should be used in order to ensure compliance with the limits for a Class
B digital device.• Changes or modifications not expressly approved by Brother Industries, Ltd. could void the user's
authority to operate the equipment.
Introduction

3
TEP1
TEP2
TEP3
For W
indo
wsFo
r Mac
into
sh
TEP4
Intro
duct
ion
Bef
ore
usin
g th
e pr
inte
rM
aint
enan
ce a
nd
Trou
bles
hoot
ing
Con
nect
ing
to y
our P
CC
reat
ing
and
prin
ting
a la
bel (
For W
indo
ws)
S
S
S
S
• The contents of this manual are subject to change without notice. • No part of this manual may be reproduced in any form, including photocopying or
reprinting, without prior consent.• This manual has been carefully created. However, if you notice an error or something
questionable, feel free to contact us. • We shall not be liable to you or others for any damage, lost earnings, or any claims of
third parties arising out of the use of this printer or printed labels, and lost or altered data caused by printer failure, repair or battery life.
• Microsoft®, Windows® are registered trademarks of Microsoft Corporation in the US and other countries.
• The printer includes the software module "USBPRINT.SYS" and "USBMON.DLL" in which Microsoft Corporation wholly retains its rights and interests.
• Apple®, Apple® logo, Macintosh® and Mac® OS are registered trademarks of Apple Computer, Inc.
• Adobe®, Adobe® logo, Acrobat® and Adobe® Reader® are registered trademarks of Adobe Systems Incorporated.
• QR code is a registered trademark of DENSO WAVE Incorporated. • All other software and product names mentioned are trademarks or registered
trademarks of their respective companies. • The rights and copyrights of bundled software (including but not limited to the program,
images, clip art, templates and text incorporated into the software) and attached manuals and other documents, and any copies of the software, are owned by Brother Industries, Ltd. and its suppliers.
• The user may not resell, duplicate, change, reverse-engineer, disassemble, or decompile any part of the above software without prior written permission.

Introduction4
Brother® One-Year Limited Warranty and Replacement Service(USA Only)
Who is covered: • This limited warranty ("warranty") is given only to the original end-use/retail purchaser
(referred to in this warranty as "Original Purchaser") of the accompanying product, consumables and accessories (collectively referred to in this warranty as "the machine").
• If you purchased a product from someone other than an authorized Brother reseller in the United States or if the product was used (including but not limited to floor models or refurbished product), prior to your purchase you are not the Original Purchaser and the product that you purchased is not covered by this warranty.
What is covered: • The machine includes a Machine and Consumable and Accessory Items. Consumable
and Accessory Items include but are not limited to label cassettes, cutters, stamps, power adapters, cases and batteries.
• Except as otherwise provided herein, Brother warrants that the Machine and the accompanying Consumable and Accessory Items will be free from defects in materials and workmanship, when used under normal conditions.
• This warranty applies only to products purchased and used in the United States. For products purchased in, but used outside, the United States, this warranty covers only warranty service within the United States (and does not include shipping outside the United States).
What is the length of the Warranty Periods:• Machines: one year from the original purchase date.• Accompanying Consumable and Accessory Items: 90 days from the original purchase
date or the rated life of consumable, whichever comes first.What is NOT covered:This warranty does not cover:(1) Physical damage to the machine;(2) Damage caused by improper installation, improper or abnormal use, misuse, neglect or
accident (including but not limited to transporting the machine without the proper preparation and/or packaging);
(3) Damage caused by another device or software used with the machine (including but not limited to damage resulting from use of non Brother®-brand parts and Consumable and Accessory Items);
(4) Consumable and Accessory Items that expired in accordance with a rated life; and,(5) Problems arising from other than defects in materials or workmanship.This limited warranty is VOID if the machine has been altered or modified in any way (including but not limited to attempted warranty repair without authorization from Brother and/or alteration/removal of the serial number).What to do if you think your Product is eligible for warranty service:Report your issue to our P-touch Customer Service Hotline at 1-877-478-6824 or to a Brother Authorized Service Center within the applicable warranty period. Supply Brother or the Brother Authorized Service Center with a copy of your dated bill of sale showing that the machine was purchased within the U.S. For the name of local Brother Authorized Service Center(s), call 1-800-521-2846.What Brother will ask you to do:After contacting Brother or a Brother Authorized Service Center, you may be required to deliver (by hand if you prefer) or send the Product properly packaged, freight prepaid, to the Authorized Service Center together with a photocopy of your bill of sale.You are responsible for the cost of shipping, packing product, and insurance (if you desire). You are also responsible for loss or damage to the machine in ship-ping.

5
TEP1
TEP2
TEP3
For W
indo
wsFo
r Mac
into
sh
TEP4
Intro
duct
ion
Bef
ore
usin
g th
e pr
inte
rM
aint
enan
ce a
nd
Trou
bles
hoot
ing
Con
nect
ing
to y
our P
CC
reat
ing
and
prin
ting
a la
bel (
For W
indo
ws)
S
S
S
S
What Brother will do:If the problem reported concerning your Machine and/or accompanying Consumable and Accessory Items is covered by this warranty and if you first reported the problem to Brother or an Authorized Service Center within the applicable warranty period, Brother or its Authorized Service Center will repair or replace the Machine and/or accompanying Consumable and Accessory Items at no charge to you for parts or labor. The decision as to whether to repair or replace the Machine and/or accompanying Consumable and Accessory Items is made by Brother in its sole discretion. Brother reserves the right to supply a refurbished or remanufactured replacement Machine and/or accompanying Consumable and Accessory Items and use refurbished parts provided such replacement products conform to the manufacturer's specifications for new product/parts. The repaired or replacement Machine and/or accompanying Consumable and Accessory Items will be returned to you freight prepaid or made available for you to pick up at a con-veniently located Authorized Service Center.If the Machine and/or accompanying Consumable and Accessory Items are not covered by this warranty (either stage), you will be charged for shipping the Machine and/or accompanying Consumable and Accessory Items back to you and charged for any ser-vice and/or replacement parts/products at Brother's then current published rates.
The foregoing are your sole (i.e., only) and exclusive remedies under this warranty.
What happens when Brother elects to replace your Machine:When a replacement Machine is authorized by Brother, and you have delivered the Machine to an Authorized Service Center, the Authorized Service Center will provide you with a replacement Machine after receiving one from Brother. If you are dealing directly with Brother, Brother will send to you a replacement Machine with the understanding that you will, after receipt of the replacement Machine, supply the required proof of purchase information, together with the Machine that Brother agreed to replace. You are then expected to pack the Machine that Brother agreed to replace in the package from the replacement Machine and return it to Brother using the pre-paid freight bill supplied by Brother in accordance with the instructions provided by Brother. Since you will be in pos-session of two machines, Brother will require that you provide a valid major credit card number. Brother will issue a hold against the credit card account number that you provide until Brother receives your original Product and determines that your original Product is entitled to warranty coverage. Your credit card will be charged up to the cost of a new Product only if: (i) you do not return your original Product to Brother within five (5) busi-ness days; (ii) the problems with your original Product are not covered by the limited war-ranty; (iii) the proper packaging instructions are not followed and has caused damage to the product; or (iv) the warranty period on your original Product has expired or has not been sufficiently validated with a copy of the proof of purchase (bill of sale). The replace-ment Machine you receive (even if refurbished or remanufactured) will be covered by the balance of the limited warranty period remaining on the original Product, plus an addi-tional thirty (30) days. You will keep the replacement Machine that is sent to you and your original Machine shall become the property of Brother. Retain your original Accessory Items and a copy of the return freight bill, signed by the courier.

Introduction6
Limitations:Brother is not responsible for damage to or loss of any equipment, media, programs or data related to the use of the machine. Except for that repair or replacement as described above, Brother shall not be liable for any direct, indirect, incidental or consequential dam-ages or specific relief. Because some states do not allow the exclusion or limitation of consequential or incidental damages, the above limitation may not apply to you.THIS WARRANTY IS GIVEN IN LIEU OF ALL OTHER WARRANTIES, WRITTEN OR ORAL, WHETHER EXPRESSED BY AFFIRMATION, PROMISE, DESCRIPTION, DRAWING, MODEL OR SAMPLE. ANY AND ALL WARRANTIES OTHER THAN THIS ONE, WHETHER EXPRESS OR IMPLIED, INCLUDING IMPLIED WARRANTIES OF MERCHANTABILITY AND FITNESS FOR A PARTICULAR PURPOSE, ARE HEREBY DISCLAIMED.• This Limited Warranty is the only warranty that Brother is giving for the machine. It is the
final expression and the exclusive and only statement of Brother's obligations to you. It replaces all other agreements and understandings that you may have with Brother or its representatives.
• This warranty gives you certain rights and you may also have other rights that may vary from state to state.
• This Limited Warranty (and Brother's obligation to you) may not be changed in any way unless you and Brother sign the same piece of paper in which we (1) refer to the machine and your bill of sale date, (2) describe the change to this warranty and (3) agree to make that change.
Important:We recommend that you keep all original packing materials, in the event that you ship the machine.

7
TEP1
TEP2
TEP3
For W
indo
wsFo
r Mac
into
sh
TEP4
Intro
duct
ion
Bef
ore
usin
g th
e pr
inte
rM
aint
enan
ce a
nd
Trou
bles
hoot
ing
Con
nect
ing
to y
our P
CC
reat
ing
and
prin
ting
a la
bel (
For W
indo
ws)
S
S
S
S
Should you have questions, or need information about your Brother Product, we have a variety of support options for you to choose from:
USA-Customer Service:Customer Service877-478-6824 (voice)
Customer Service901-379-1210 (fax)
Automated Faxback800-521-2846
World Wide Webwww.brother.com
Supplies / Accessorieswww.brothermall.comor 888-879-3232
BROTHER INTERNATIONAL CORPORATION100 SOMERSET CORPORATE BLVD.BRIDGEWATER, NEW JERSEY 08807-0911
Record your model and serial number and your date and location of Purchase below for your records. Keep this information with your proof of purchase (bill of sale) in case your Product requires service.
Model # __________________________________________
Serial # __________________________________________
Date of purchase: __________________________________
Store where purchased: _____________________________
Location of store: __________________________________
Important: We recommend that you keep all original packing materials, in the event that you need to ship the machine.
Save Time - Register On-Line!Don’t stand in line at the post office or worry about lost mail. Visit us on-line at
www.registermybrother.comYour product will immediately be registered in our database and you can be on your way!
Also, while you're there, look for contests and other exciting information!
Important Information

Introduction8
The following manuals are provided to help you use the printer correctly and to utilize its features. Be sure to read this manual before using the printer.
Setup & Operation Guide (This manual) Read this manual first. It gives information which should be read before using the printer, such as cautions, installation and setup, and the procedures for printing labels without using your computer. This also describes the installation of the bundled software to be used on a personal computer.
Software User's Guide (PDF Manual)It explains how to create labels using the software supplied with the printer, by installing it on a computer after connecting the printer to the computer. It also explains how to clean the printer, and how to perform some troubleshooting.
•To browse the Software User's Guide (PDF Manual), you need to install Adobe® Reader® or Adobe® Acrobat® Reader®. (For Macintosh®, the standard "Preview" program bundled with the OS can also be used.)
• When using Windows®, this manual can be viewed from the P-touch Setup application when it is run from the CD-ROM. Additionally, this manual may be viewed from the Start menu if it is installed on the computer.
• When using Macintosh, refer to the PDF files in the [Manuals] folder on the CD-ROM supplied with the printer.
The symbols used throughout this guide are as follows:
This symbol indicates information or directions that should be followed. If ignored, the result may be injury, damage, or failed operations.
This symbol indicates information or directions that can help you better understand and use the printer more efficiently.
Manuals
Symbols Used in this Manual
9
TEP1
TEP2
TEP3
For W
indo
wsFo
r Mac
into
sh
TEP4
Intro
duct
ion
Bef
ore
usin
g th
e pr
inte
rM
aint
enan
ce a
nd
Trou
bles
hoot
ing
Con
nect
ing
to y
our P
CC
reat
ing
and
prin
ting
a la
bel (
For W
indo
ws)
S
S
S
S
To prevent injury and damage, important notes are explained using various symbols. The symbols and their meanings are as follows:
The symbols used in this manual are as follows:
Warning This indicates the possibility of death or serious injury if instructions are ignored.
Caution This indicates the possibility of personal injury or property damage if instructions are ignored.
symbol indicates prohibition. Detailed prohibited matters are shown in the figure (e.g. the left figure shows the prohibition against disassembly).
symbol indicates special instructions. Detailed instructions are shown in the figure (e.g. the left figure shows the method for pulling the power plug out of the outlet).
WarningThe Printer
Follow the followings to avoid fire, damage, electric shock, and choke.
Do not disassemble the printer.For inspection, adjustment, and repair of the printer, contact the retail outlet where the printer was purchased or your local authorized service center. (If the damage is made by the disassembly or modify by the customer, the Brother will provide fare-paying service whether the duration of the warranty is still valid or not.) Do not drop, hit or otherwise bang the printer.Do not grab and lift the printer by the DK Roll cover. The cover could come off and the printer could fall and become damaged.Do not touch any metal parts near the print head. The print head becomes very hot during use and remains very hot immediately after use. Do not touch it directly with your hands.
Do not wet the printer with drinks such as coffee and juice. Do not pour the water of a flower base and wet the printer.Do not use the printer with a foreign object in it. If water or any foreign object enters the printer, unplug the power cord from the electric outlet and contact the retail outlet where the printer was purchased or your local authorized service center. Do not wear a packing plastic bag. Dispose or keep the plastic bag at the place children cannot reach. If you wear it and play, choke could result. Unplug the power cord immediately and stop using when you notice abnormal odor, heat, discoloration, deformation or anything unusual while using or storing it.
Safety Precautions

Introduction10
Power CordFollow the followings to avoid fire, damage, and electric shock.
Use only the authorized power source (120VAC) for the printer.Do not plug too many leads into a single socket.Do not damage or modify the power cord or plug. Also, do not place furniture or any heavy objects onto it, bend or pull it by constraint.
Do not use the power cord when it is damaged. Do not touch the power cord or plug with wet hands.Insert the power plug completely. Do not insert the power cord into dilapidated power outlet.Do not use the extension cord which does not have a ground wire. The protection function will be invalid.
CautionThe Printer
Follow the followings to avoid personal injury and damage of the printer.
The standard electrical outlet shall be installed near the printer and shall be easily accessible.
Power CordFollow the followings to avoid personal injury and damage of the printer.
If the printer will not be used for an extended period, remove the power supply cord from the electrical outlet.
Always hold the power plug when removing the power cord from or inserting it into the outlet. Pulling on the power cord could cause a problem with the power cord.
Warning

11
TEP1
TEP2
TEP3
For W
indo
wsFo
r Mac
into
sh
TEP4
Intro
duct
ion
Bef
ore
usin
g th
e pr
inte
rM
aint
enan
ce a
nd
Trou
bles
hoot
ing
Con
nect
ing
to y
our P
CC
reat
ing
and
prin
ting
a la
bel (
For W
indo
ws)
S
S
S
S
CutterFollow the followings to avoid personal injury and damage of the printer.
Do not touch the blade of the cutter unit. Do not open the top cover when operating the cutter unit.
Do not apply excessive pressure to the cutter unit.
Installation/Storage Follow the followings to avoid personal injury and damage of the printer.
When using the printer, do not place it on a unstable environment, such as dilapidated table or top of the shelf.
Do not place any heavy objects on top of the printer.
DK Roll (DK Label, DK Tape)Follow the followings to avoid damage of the printer.
Be careful not to drop the DK Roll. DK Roll uses thermal paper and thermal film so that the color of the label will fade by sunlight or heat. Do not use DK Roll when you use them for outdoor and other circumstances which requires their durability.
Depending on the location, material, and environmental conditions, the label may have the difficulties to peel or unpeel, or the color of the label will be changed or transferred to other objects. In prior to adhere the label, check the environmental condition and the material, and then test the label by affixing a small piece of it to an inconspicuous area of the intended surface.
Caution

Introduction12
The Printer• The printer may malfunction if left near a television, radio, etc. Do not use the printer near
any printer that can cause electromagnetic interference.• Do not expose the printer to direct sunlight or near heaters or other hot appliances, in
any location exposed to extremely high or low temperatures, high humidity or dusty locations. The recommended temperature range is between 50°F to 95 °F (10°C to 35°C).
• Do not use paint thinner, benzene, alcohol or any other organic solvents to clean the printer. Doing so may cause damage to the surface finish. Use a soft, dry cloth to clean the printer.
• Do not insert any objects into or block the label output slot, USB port, or serial port.• Use only the interface cable (USB cable) included with the printer.• When not in use for an extended period, remove the DK Roll from the printer.• Do not attempt to print labels while the DK Roll cover is open.• There is a noise from the printer while printing due to
the speed printing (this is not a failure of the printer).Set "print quality" of the printer driver setting to reduce the noise.
• If a paper jam should occur due to a build up of adhesive on the paper guide surface, unplug the power cord from the electrical outlet and wipe away the adhesive buildup on the paper guide surface with a cloth dipped in ethanol or isopropyl (rubbing) alcohol. It is recommended that you clean the paper guide when replacing the cutter unit.
DK Roll (DK Label and DK Tape)• Use only genuine Brother accessories and supplies (with , marks). Do not use any
unauthorized accessories or supplies.• If the label is attached to a wet, dirty, or oily surface, it may peel off easily. Before
applying the label, clean the surface to which the label will be applied.• DK Roll uses thermal paper and thermal film so that ultraviolet rays, wind, and rain may
cause the color of the label to fade and the ends of the label to peel off.• Do not expose the DK Rolls to direct sunlight, high temperatures, high humidity, or dust.
Store in a cool, dark place. Use the DK Rolls soon after opening the package.• Scratching the printed surface of the label with your finger nails or metal objects, or
touching the printed surface with hands dampened by water, sweat, or medicated cream, etc., can cause the color to change or fade.
• Do not apply labels to any persons, animals, plants, or in public locations.• As the end of the DK Roll is designed to not adhere to the label spool, the last label may
not be cut properly.If this happens, remove the remaining labels, insert a new DK Roll, and reprint the last label.Note: To account for this, the number of DK Labels included on each DK Roll may be more than indicated on the package.
• When peeling a DK Label, some portion of the label may remain. Remove the remaining portion before attaching a new label.
• Some DK Rolls use permanent adhesive for their labels. These labels cannot be neatly peeled off once attached.
General Precautions
Paper guide surface
13
TEP1
TEP2
TEP3
For W
indo
wsFo
r Mac
into
sh
TEP4
Intro
duct
ion
Bef
ore
usin
g th
e pr
inte
rM
aint
enan
ce a
nd
Trou
bles
hoot
ing
Con
nect
ing
to y
our P
CC
reat
ing
and
prin
ting
a la
bel (
For W
indo
ws)
S
S
S
S
CD/DVD Film Labels• In prior to use, be sure to follow the instructions in your CD/DVD player's instruction
manual regarding applying CD/DVD labels.• Do not use CD/DVD labels in a slot loading CD/DVD player, for example a CD player in
a car where the CD is slid into a slot in the CD player.• Do not peel off the CD/DVD label once it is applied to the CD/DVD.• A thin surface layer may come off, resulting in damage to the disk.• Do not apply CD/DVD labels to CD/DVD disks designed for use with ink jet printers.
Labels peel off of these disks easily, and using disks with peeled labels can result in loss or damage of data.
• When applying CD/DVD labels, use the applicator included with the CD/DVD label rolls. Doing so could cause damage to the CD/DVD player.
• User's shall take full responsibility for applying CD/DVD labels. Brother accepts no responsibility for any loss or damage of data caused by the inappropriate use of CD/DVD labels.
CD-ROM and Software• Do not scratch the CD-ROM and place the CD-ROM onto the place with extremely high
or extremely low temperatures.Also, do not put heavy objects on the CD-ROM or apply force to the CD-ROM.
• The software contained on the CD-ROM is meant for use with the printer only. See License on CD for further details. This software may be installed on multiple personal computers for use at an office, etc.
Cutter• The average number of cuts is 5,000 or more depending on the operating environment.
Dull cut, the inability to cut straight, or frequent paper jams may indicate that the cutter life is near the end. Replace the cutter if these conditions occur.
Note that Brother does not assume responsibility for any damage, etc. arising from failure to follow the precautions listed.
Introduction14
Introduction ••••••••••••••••••••••••••••••••••••••••••••••••••••••••••••••••••••• 2Important Information ••••••••••••••••••••••••••••••••••••••••••••••••••••••••••••••••••• 7Manuals ••••••••••••••••••••••••••••••••••••••••••••••••••••••••••••••••••••••••••••••••••• 8Symbols Used in this Manual ••••••••••••••••••••••••••••••••••••••••••••••••••••••••• 8Safety Precautions •••••••••••••••••••••••••••••••••••••••••••••••••••••••••••••••••••••• 9General Precautions •••••••••••••••••••••••••••••••••••••••••••••••••••••••••••••••••••• 12Contents••••••••••••••••••••••••••••••••••••••••••••••••••••••••••••••••••••••••••••••••••• 14
Before using the printer ••••••••••••••••••••••••••••••••••••••• 171 Accessory Checklist••••••••••••••••••••••••••••••••••••••••••••••••••••••••••• 182 Parts Description••••••••••••••••••••••••••••••••••••••••••••••••••••••••••••••• 19
Main Printing Unit•••••••••••••••••••••••••••••••••••••••••••••••••••••••••••••••••••••••• 19Button descriptions•••••••••••••••••••••••••••••••••••••••••••••••••••••••••••••••••••••• 20LED Lamp••••••••••••••••••••••••••••••••••••••••••••••••••••••••••••••••••••••••••••••••• 20
3 Setting the DK Roll •••••••••••••••••••••••••••••••••••••••••••••••••••••••••••• 21Applicable DK Rolls ••••••••••••••••••••••••••••••••••••••••••••••••••••••••••••••••••••• 21Setting the DK Roll •••••••••••••••••••••••••••••••••••••••••••••••••••••••••••••••••••••• 21
4 Attaching the paper guide•••••••••••••••••••••••••••••••••••••••••••••••••••• 225 Connecting the power supply ••••••••••••••••••••••••••••••••••••••••••••••• 23
Connecting the printer to your PC •••••••••••••••••••••••••••• 25For Windows•••••••••••••••••••••••••••••••••••••••••••••••••••••••••••••••••••• 26
1. Software description ••••••••••••••••••••••••••••••••••••••••••••••••••••••••••••••••• 262. Notes on installation ••••••••••••••••••••••••••••••••••••••••••••••••••••••••••••••••• 273. Installing the software ••••••••••••••••••••••••••••••••••••••••••••••••••••••••••••••• 27
For Macintosh •••••••••••••••••••••••••••••••••••••••••••••••••••••••••••••••••• 311. Software description ••••••••••••••••••••••••••••••••••••••••••••••••••••••••••••••••• 312. Notes on installation ••••••••••••••••••••••••••••••••••••••••••••••••••••••••••••••••• 313. Software installation ••••••••••••••••••••••••••••••••••••••••••••••••••••••••••••••••• 32
Creating and printing a label (For Windows) •••••••••••••••• 371 Label Creation Outline •••••••••••••••••••••••••••••••••••••••••••••••••••••••• 382 Creating an Address Label using P-touch Editor •••••••••••••••••••••••• 403 Creating an Address Label using Microsoft Word Add-In•••••••••••••• 424 Creating an Address Label using Microsoft Outlook Add-In••••••••••• 445 Creating a Banner Label ••••••••••••••••••••••••••••••••••••••••••••••••••••• 466 Creating a Name Badge Label using Auto Format Wizard function••••• 48
Contents
STEP1STEP1
STEP2STEP2
STEP3STEP3
TEP1
TEP2
TEP3
For W
indo
wsFo
r Mac
into
sh
TEP4
Intro
duct
ion
Bef
ore
usin
g th
e pr
inte
rM
aint
enan
ce a
nd
Trou
bles
hoot
ing
Con
nect
ing
to y
our P
CC
reat
ing
and
prin
ting
a la
bel (
For W
indo
ws)
15
S
S
S
S
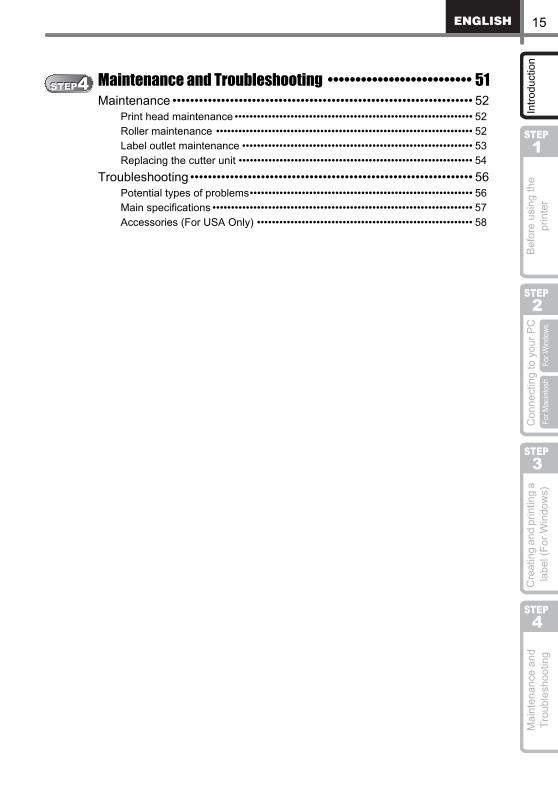
Maintenance and Troubleshooting •••••••••••••••••••••••••• 51Maintenance •••••••••••••••••••••••••••••••••••••••••••••••••••••••••••••••••••• 52
Print head maintenance •••••••••••••••••••••••••••••••••••••••••••••••••••••••••••••••• 52Roller maintenance ••••••••••••••••••••••••••••••••••••••••••••••••••••••••••••••••••••• 52Label outlet maintenance •••••••••••••••••••••••••••••••••••••••••••••••••••••••••••••• 53Replacing the cutter unit ••••••••••••••••••••••••••••••••••••••••••••••••••••••••••••••• 54
Troubleshooting•••••••••••••••••••••••••••••••••••••••••••••••••••••••••••••••• 56Potential types of problems•••••••••••••••••••••••••••••••••••••••••••••••••••••••••••• 56Main specifications •••••••••••••••••••••••••••••••••••••••••••••••••••••••••••••••••••••• 57Accessories (For USA Only) •••••••••••••••••••••••••••••••••••••••••••••••••••••••••• 58
STEP4STEP4

Introduction16
17
STEP1STEP1 STEP1
TEP2
TEP3
For W
indo
wsFo
r Mac
into
sh
TEP4
Bef
ore
usin
g th
e pr
inte
rM
aint
enan
ce a
nd
Trou
bles
hoot
ing
Con
nect
ing
to y
our P
CC
reat
ing
and
prin
ting
a la
bel (
For W
indo
ws)
Intro
duct
ion
S
S
S
Before using the printer
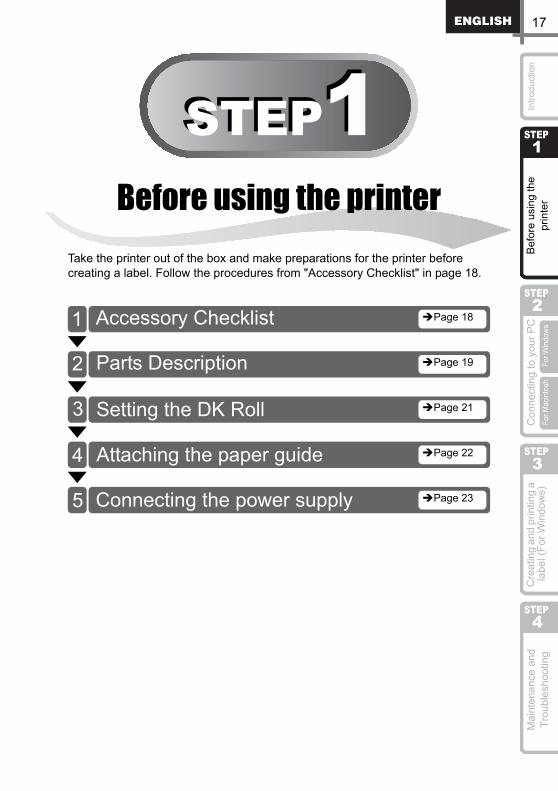
Take the printer out of the box and make preparations for the printer before creating a label. Follow the procedures from "Accessory Checklist" in page 18.
Accessory Checklist Page 18
Parts Description Page 19
Setting the DK Roll Page 21
Attaching the paper guide Page 22
Connecting the power supply Page 23
1
2
3
4
5

STEP1 Before using the printer18
Before using this printer, check that the printer package contains all of the following accessories. If any of these accessories are missing or found faulty, contact your local distributor.
Brother QL-500/550
USB cable Setup & Operation Guide(English and Spanish)
CD-ROM DK Label & Tape Guide
Starter roll
The QL-500 includes one starter roll of DK Die-cut Standard Address Labels (100 labels).The QL-550 includes one starter roll of DK Die-cut Standard Address Labels (100 labels), and one starter roll of DK Continuous Durable Paper Tape 2-3/7" (25 feet).
Warranty Card
Paper guide
Cleaning Sheet
1 Accessory Checklist
QL-500 QL-550

19
TEP1
TEP2
TEP3
For W
indo
wsFo
r Mac
into
sh
TEP4
Bef
ore
usin
g th
e pr
inte
rM
aint
enan
ce a
nd
Trou
bles
hoot
ing
Con
nect
ing
to y
our P
CC
reat
ing
and
prin
ting
a la
bel (
For W
indo
ws)
Intro
duct
ion
S
S
S
S
Front face
If the DK Roll compartment cover is left open, dust will collect on the print head. Always close the cover.
Rear view
QL-500 QL-550
QL-500/QL-550
2 Parts DescriptionMain Printing Unit
FEED buttonLED lampON/OFF buttonCUT lever
DK Roll compartment cover
FEED button
LED lampON/OFF button
CUT button
DK Roll compartment cover
Power cord
USB port

STEP1 Before using the printer20
The functions of the buttons on the QL-500/550 are described below.
Use CUT lever when cutting a printed label with QL-500.
LED lamp on the QL-500/550 indicates the current operating condition.
Button ConditionON/OFF button Turns power to the QL-500/550 on and off.
CUT button(QL-550 only)
Cuts the label from the DK Roll. Use this button to cut labels when the "Auto Cut" option in the Print dialog box is unchecked.
FEED button
• When using DK Die-cut Labels, feeds the DK Label Roll to the beginning of the first label on the roll. If this button is held for more than one second, the DK Label Roll is fed to the beginning of the next label on the roll.
• When using DK Continuous Tapes, feeds 1" (25.4 mm) of the DK Label Roll.
• If there is no DK Label Roll installed, the mode changes to a cleaning mode and the roller rotates for 1/3" (8 mm). If this button is held for more than one second, the roller rotates for 4" (100 mm).
Lamp ConditionNot lit
Power is OFF.
Lit Power is ON.(Normally lit while power is on, the LED flashes during cleaning or if an error has occurred.)
Flashing fast
Indicates one of the following errors.• Cutter error• Label sensor error
(DK Roll not installed correctly, end of DK Roll, or label jam)• DK Roll compartment cover is open during operation• Incorrect DK Roll installed• No DK Roll installed
Flashing slow Cooling(Waiting for temperature of print head to lower)
Turns off after flashing fast ten times
System error
Turn the QL-500/550 off and then on again.If this error re-occurs, contact the retail outlet where the QL-500/550 was purchased or your local authorized service center.
Button descriptions
QL-500 QL-550CUT Lever CUT Button
LED Lamp
21
TEP1
TEP2
TEP3
For W
indo
wsFo
r Mac
into
sh
TEP4
Bef
ore
usin
g th
e pr
inte
rM
aint
enan
ce a
nd
Trou
bles
hoot
ing
Con
nect
ing
to y
our P
CC
reat
ing
and
prin
ting
a la
bel (
For W
indo
ws)
Intro
duct
ion
S
S
S
S
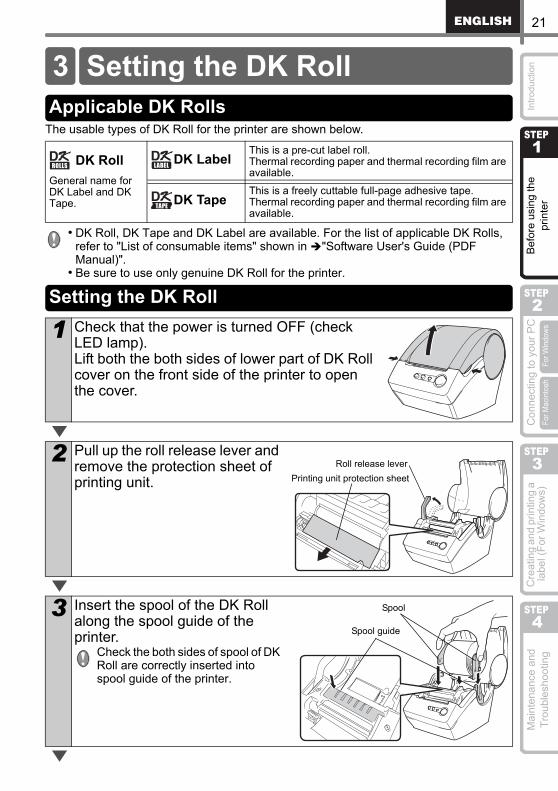
The usable types of DK Roll for the printer are shown below.
• DK Roll, DK Tape and DK Label are available. For the list of applicable DK Rolls, refer to "List of consumable items" shown in "Software User's Guide (PDF Manual)".
• Be sure to use only genuine DK Roll for the printer.
DK RollGeneral name for DK Label and DK Tape.
DK LabelThis is a pre-cut label roll.Thermal recording paper and thermal recording film are available.
DK TapeThis is a freely cuttable full-page adhesive tape.Thermal recording paper and thermal recording film are available.
1 Check that the power is turned OFF (check LED lamp).Lift both the both sides of lower part of DK Roll cover on the front side of the printer to open the cover.
2 Pull up the roll release lever and remove the protection sheet of printing unit.
3 Insert the spool of the DK Roll along the spool guide of the printer.
Check the both sides of spool of DK Roll are correctly inserted into spool guide of the printer.
3 Setting the DK RollApplicable DK Rolls
Setting the DK Roll
Roll release leverPrinting unit protection sheet
Spool
Spool guide

STEP1 Before using the printer22
The printer contains a paper guide which can hold up to 10 individual label sheets.
4 Check that the roll release lever is in the up position.Insert the edge of DK Roll into the printing unit, and pull it out to just in front of the cutter.
5 Push down the roll release lever and close the DK Roll cover.
When the DK Roll could not be pulled out to just before the cutter in the step 4, insert the edge of DK Roll as possible and pull down the roll release lever, and then close the roll release lever.Pressing Feed button feeds the DK Roll to the correct position (when using DK Tape, cut the fed tape as needed).
1 As shown right, attach the paper guide to the front face of the printer.
When printing more than 10 labels continuously using the auto cut function, remove the paper guide to prevent a paper jam.
Roll release lever
Printing unitCutter
4 Attaching the paper guidePaper guide
23
TEP1
TEP2
TEP3
For W
indo
wsFo
r Mac
into
sh
TEP4
Bef
ore
usin
g th
e pr
inte
rM
aint
enan
ce a
nd
Trou
bles
hoot
ing
Con
nect
ing
to y
our P
CC
reat
ing
and
prin
ting
a la
bel (
For W
indo
ws)
Intro
duct
ion
S
S
S
S
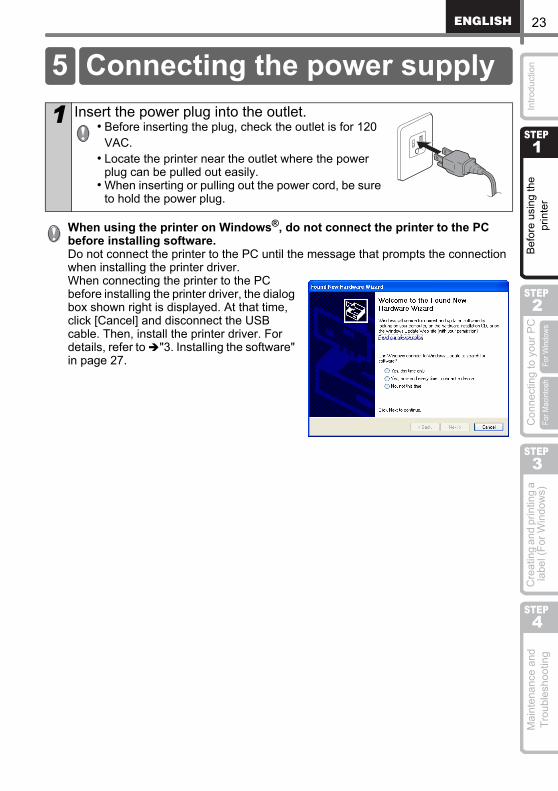
When using the printer on Windows®, do not connect the printer to the PC before installing software.Do not connect the printer to the PC until the message that prompts the connection when installing the printer driver.When connecting the printer to the PC before installing the printer driver, the dialog box shown right is displayed. At that time, click [Cancel] and disconnect the USB cable. Then, install the printer driver. For details, refer to "3. Installing the software" in page 27.
1 Insert the power plug into the outlet.• Before inserting the plug, check the outlet is for 120
VAC.• Locate the printer near the outlet where the power
plug can be pulled out easily.• When inserting or pulling out the power cord, be sure
to hold the power plug.
5 Connecting the power supply

STEP1 Before using the printer24
STEP2STEP225
STEP1
TEP2
TEP3
For W
indo
wsFo
r Mac
into
sh
TEP4
Bef
ore
usin
g th
e pr
inte
rM
aint
enan
ce a
nd
Trou
bles
hoot
ing
Con
nect
ing
to y
our P
CC
reat
ing
and
prin
ting
a la
bel (
For W
indo
ws)
Intro
duct
ion
S
S
S
Connecting the printer to your PC
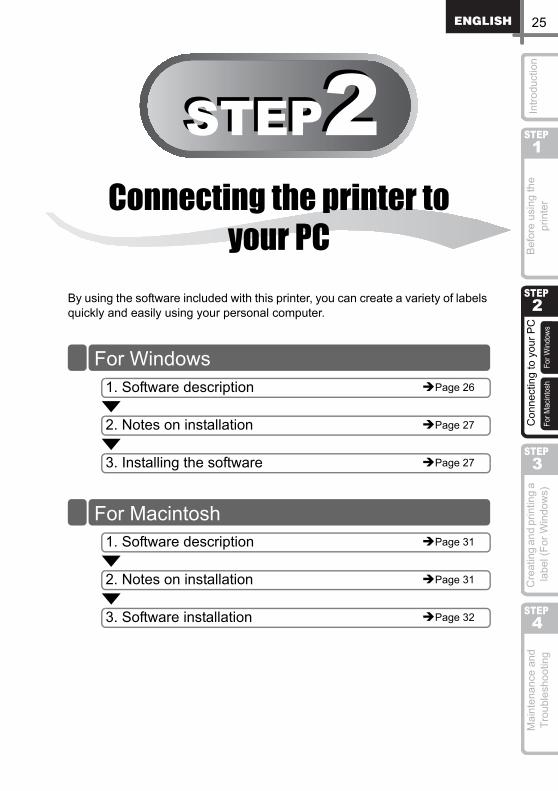
By using the software included with this printer, you can create a variety of labels quickly and easily using your personal computer.
For Windows
For Macintosh
1. Software description Page 26
2. Notes on installation Page 27
3. Installing the software Page 27
1. Software description Page 31
2. Notes on installation Page 31
3. Software installation Page 32

STEP2 Connecting the printer to your PC26
The software included with this printer is compatible with the following operating systems:The software is available for the following operating system.Microsoft® Windows® 2000 Professional/XP
For details on software, refer to "Software User's Guide (PDF Manual)".
The CD-ROM included with this printer contains the following software and printer driver.
P-touch Editor 4.2It is possible to create various types of labels such as address labels and CD/DVD labels. It is also possible to link previously created databases (database function) and to manage information such as names and address (label list function).The following tools will be also installed.• P-touch Library 2.0
The label created by P-touch Editor can be printed again quickly and easily.• P-touch 4.2 Add-Ins Utility
By using the Add-In icon set for Microsoft® Word 97/2000/2002/2003, Microsoft® Outlook® 2000/2002/2003, Microsoft® Excel 97/2000/2002/2003, it is possible to create a label from each bit of data.
P-touch Address Book 1.0It is possible to manage the address to print the address label easily.It is also possible to import the contact data from contact information of Microsoft® Outlook®.
Printer DriverWhen using the printer together with a PC, it is necessary to install this printer driver.
Software User's Guide (PDF Manual)How to use each software is described. It can be referenced by using Adobe® Acrobat® Reader® or Adobe® Reader®.It is also possible to reference it directly from the CD-ROM.
Above software information may change in future, please check the latest software inBrother solution site.http://solutions.brother.com/
For Windows
1. Software description

27
TEP1
TEP2
TEP3
For W
indo
wsFo
r Mac
into
sh
TEP4
Bef
ore
usin
g th
e pr
inte
rM
aint
enan
ce a
nd
Trou
bles
hoot
ing
Con
nect
ing
to y
our P
CC
reat
ing
and
prin
ting
a la
bel (
For W
indo
ws)
Intro
duct
ion
S
S
S
S
• Do not connect this printer to a PC until the prompt message appears. If this printer has already been connected to a PC prior to software installation, immediately remove the USB plug from the PC and wait for the software prompt.
• When installing it to Windows® 2000/XP, log in by the authority of administrator.• When installing the software, the screen shown right may be
displayed. At this time, click [OK] and install it all over again. • After terminating all other applications, begin installing the
software. Especially, when the application of Microsoft® Office® is running, Add-In may not be set correctly.
• P-touch Transfer Manager 1.2 and P-touch Backup Manager 1.2 are included in the CD-ROM, however, it is not possible to use them with QL-500/550.
This section explains how to install the P-touch Editor 4.2, P-touch Address Book 1.0, Printer Driver, and User's Guide as a whole.The procedure for installing them varies depending on the OS of your PC.The following is the example for Windows XP.
1 Start up the PC and insert the CD-ROM into CD-ROM drive.QL-series Installer starts up and P-touch Setup screen is displayed.
• It may take a time to display the screen.• If it does not start up automatically, double click "Setup.exe" icon in CD-ROM.
2 Click "Standard Installation".The preparation for installing the software starts and License Agreement screen is displayed.
Each button enables the following operation.
Standard InstallationP-touch Editor 4.2, P-touch Address Book 1.0, Printer Driver, and User's Guide can be installed as a whole.
Custom InstallationP-touch Editor 4.2, P-touch Address Book 1.0, Printer Driver, and User's Guide can be installed individually.
Show User's GuideSoftware User's Guide (PDF Manual) can be referenced without installing it.
Install Acrobat Reader"Adobe® Acrobat® Reader®" to reference Software User's Guide (PDF Manual) can be installed.
Adobe® Acrobat® Reader® 5.0 will be installed. If you have higher version, do not install it.
2. Notes on installation
3. Installing the software
12341
2
3
4
STEP2 Connecting the printer to your PC28
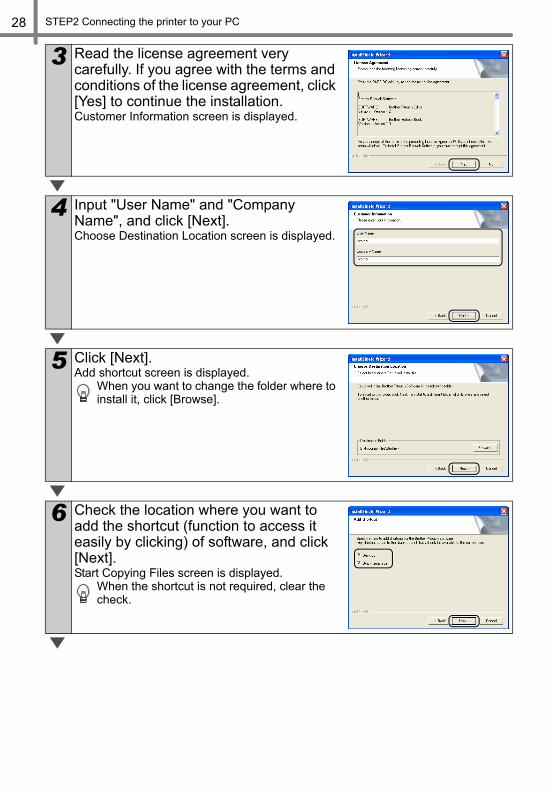
3 Read the license agreement very carefully. If you agree with the terms and conditions of the license agreement, click [Yes] to continue the installation.Customer Information screen is displayed.
4 Input "User Name" and "Company Name", and click [Next].Choose Destination Location screen is displayed.
5 Click [Next].Add shortcut screen is displayed.
When you want to change the folder where to install it, click [Browse].
6 Check the location where you want to add the shortcut (function to access it easily by clicking) of software, and click [Next].Start Copying Files screen is displayed.
When the shortcut is not required, clear the check.

29
TEP1
TEP2
TEP3
For W
indo
wsFo
r Mac
into
sh
TEP4
Bef
ore
usin
g th
e pr
inte
rM
aint
enan
ce a
nd
Trou
bles
hoot
ing
Con
nect
ing
to y
our P
CC
reat
ing
and
prin
ting
a la
bel (
For W
indo
ws)
Intro
duct
ion
S
S
S
S
7 Check the setting, and if it is set correctly, click [Next].Add-In settings screen is displayed.
• It may take a time to display the screen.• If it is not set correctly, click [Back] and set it
again.
8 Check the software with which you want to set the Add-In, and click [Next].Driver Setup (Brother P-touch) screen is displayed.
Check the every application of Microsoft® Office® is quitted, and go to the next step.For details on Add-In setting, refer to
"Software User's Guide (PDF Manual)".
9 Click [OK] on the Driver Setup (Brother P-touch) screen to start the installation.
10 Click [Next].The installation of the driver is completed, the User Registration screen is displayed.
11 Select if you do the user registration at once, and click [Next].• When selecting "Yes, display the page.", the
screen for online user registration is displayed via internet. After the user registration, continue the installation (registration is recommended).
• When selecting "No, do not display the page.", the installation continues.
STEP2 Connecting the printer to your PC30
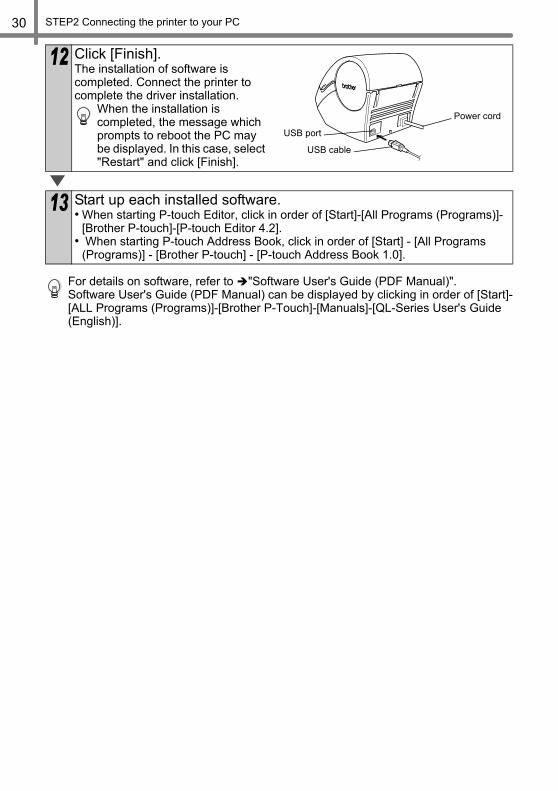
For details on software, refer to "Software User's Guide (PDF Manual)".Software User's Guide (PDF Manual) can be displayed by clicking in order of [Start]-[ALL Programs (Programs)]-[Brother P-Touch]-[Manuals]-[QL-Series User's Guide (English)].
12 Click [Finish].The installation of software is completed. Connect the printer to complete the driver installation.
When the installation is completed, the message which prompts to reboot the PC may be displayed. In this case, select "Restart" and click [Finish].
13 Start up each installed software.• When starting P-touch Editor, click in order of [Start]-[All Programs (Programs)]-
[Brother P-touch]-[P-touch Editor 4.2].• When starting P-touch Address Book, click in order of [Start] - [All Programs
(Programs)] - [Brother P-touch] - [P-touch Address Book 1.0].
USB cable
Power cord
USB port

31
TEP1
TEP2
TEP3
For W
indo
wsFo
r Mac
into
sh
TEP4
Bef
ore
usin
g th
e pr
inte
rM
aint
enan
ce a
nd
Trou
bles
hoot
ing
Con
nect
ing
to y
our P
CC
reat
ing
and
prin
ting
a la
bel (
For W
indo
ws)
Intro
duct
ion
S
S
S
S
When using the printer connecting to Macintosh®, it is necessary to install the software from included CD-ROM.The software is available for the following OSs.Mac OS® X 10.1 ~ 10.4.7
For details on software, refer to "Software User's Guide (PDF Manual)".
The included CD-ROM contains the following software and printer driver.
P-touch Editor 3.2It is possible to create various labels such as address label and CD/DVD label.
FontsThese are English fonts such as Atlanta.
Auto Format TemplatesThese are template layouts for label.These are contents used for P-touch Editor 3.2
Clip ArtIllustrations which can be allocated to the label.These are contents used for P-touch Editor 3.2
Printer DriverWhen using the printer connecting to Macintosh®, it is necessary to install this printer driver.
• Until the installation of printer driver is completed, do not connect the printer to Macintosh®. If it has been connected to it, pull out the USB cable from Macintosh®.
• When installing it, log in as the administrator.
For Macintosh
1. Software description
2. Notes on installation

STEP2 Connecting the printer to your PC32
This section explains how to install the P-touch Editor 3.2, Fonts, Auto Format Templates, and Clip Art as a whole, and to install the printer driver and set it for the printer.The procedure for installing it varies depending on the OS version of your Macintosh®.
Here explains the example of Mac OS® X 10.3.9.
1 Start up Macintosh®, and insert the CD-ROM into CD-ROM drive.QL-Series screen is displayed.
When it does not start up automatically, double click QL-Series (CD-ROM) icon.
2 Click [Mac OS X] folder.
3 Double click [P-touch Editor 3.2 Installer].P-touch Editor 3.2 Installer starts up and Introduction screen is displayed.
4 Check the content and click [Next].Important Information screen is displayed.
5 Check the content and click [Next].
3. Software installation

33
TEP1
TEP2
TEP3
For W
indo
wsFo
r Mac
into
sh
TEP4
Bef
ore
usin
g th
e pr
inte
rM
aint
enan
ce a
nd
Trou
bles
hoot
ing
Con
nect
ing
to y
our P
CC
reat
ing
and
prin
ting
a la
bel (
For W
indo
ws)
Intro
duct
ion
S
S
S
S
6 Click [Next].It is possible to select the program you want to install. Clear the check of program that is not installed.
Choose Alias Folder screen is displayed.
7 Select the location where you create the alias, and click [Next].Pre-Installation Summary screen is displayed.
8 Click [Install].The installation starts.
9 After the installation is completed and the screen shown right is displayed, click [Done].The installation of software is completed.Next, install the printer driver.
10 Double click [QL-Series Driver.pkg] in [Mac OS X] folder.Driver Installer starts up and Driver Setup screen is displayed.

STEP2 Connecting the printer to your PC34
11 Click [Continue].Important Information screen is displayed.
12 Click [Continue].Software License Agreement screen is displayed.
13 Check the content and select "English", and then click [Continue].License agreement screen is displayed.
14 When continuing the installation, click [Agree].Select a Destination screen is displayed.
15 Select the drive you want to install, and click [Continue].Easy Install screen is displayed.
Select the drive where the Mac OS® X is installed.
35
TEP1
TEP2
TEP3
For W
indo
wsFo
r Mac
into
sh
TEP4
Bef
ore
usin
g th
e pr
inte
rM
aint
enan
ce a
nd
Trou
bles
hoot
ing
Con
nect
ing
to y
our P
CC
reat
ing
and
prin
ting
a la
bel (
For W
indo
ws)
Intro
duct
ion
S
S
S
S
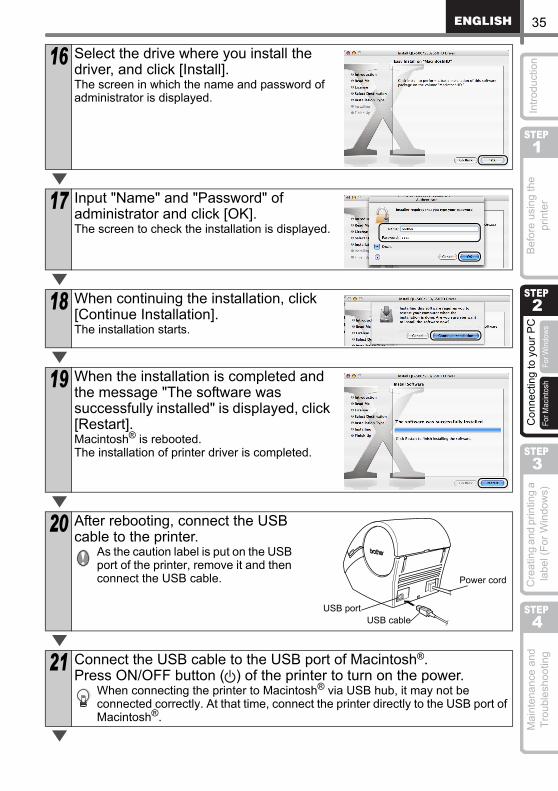
16 Select the drive where you install the driver, and click [Install].The screen in which the name and password of administrator is displayed.
17 Input "Name" and "Password" of administrator and click [OK].The screen to check the installation is displayed.
18 When continuing the installation, click [Continue Installation].The installation starts.
19 When the installation is completed and the message "The software was successfully installed" is displayed, click [Restart].Macintosh® is rebooted.The installation of printer driver is completed.
20 After rebooting, connect the USB cable to the printer.
As the caution label is put on the USB port of the printer, remove it and then connect the USB cable.
21 Connect the USB cable to the USB port of Macintosh®.Press ON/OFF button ( ) of the printer to turn on the power.
When connecting the printer to Macintosh® via USB hub, it may not be connected correctly. At that time, connect the printer directly to the USB port of Macintosh®.
USB cable
Power cord
USB port

STEP2 Connecting the printer to your PC36
For details on software, refer to "Software User's Guide (PDF Manual)". For Software User's Guide (PDF Manual), refer to the PDF file stored in "Manuals" folder of included CD-ROM.
22 Double click the drive where Mac OS® X is installed, and click in order of [Applications]-[Utility]-[Printer Setup Utility (Print Center)].Printer List screen is displayed.
When the screen shown right is displayed, click [Add].
23 Click [Add (Add Printer)].
24 Click [USB].
25 Click "QL-500" or "QL-550" and then click [Add].The screen returns to Printer List screen.
26 Check the "QL-500" or "QL-550" is added, and close Printer List screen.Now you can use the printer.
27Double click of [Applications] folder - [P-touch Editor
3.2] folder in the P-touch Editor is installed.
STEP3STEP337
STEP1
STEP2
STEP3
For W
indo
wsFo
r Mac
into
sh
STEP4
Bef
ore
usin
g th
e pr
inte
rM
aint
enan
ce a
nd
Trou
bles
hoot
ing
Con
nect
ing
to y
our P
CC
reat
ing
and
prin
ting
a la
bel (
For W
indo
ws)
Intro
duct
ion
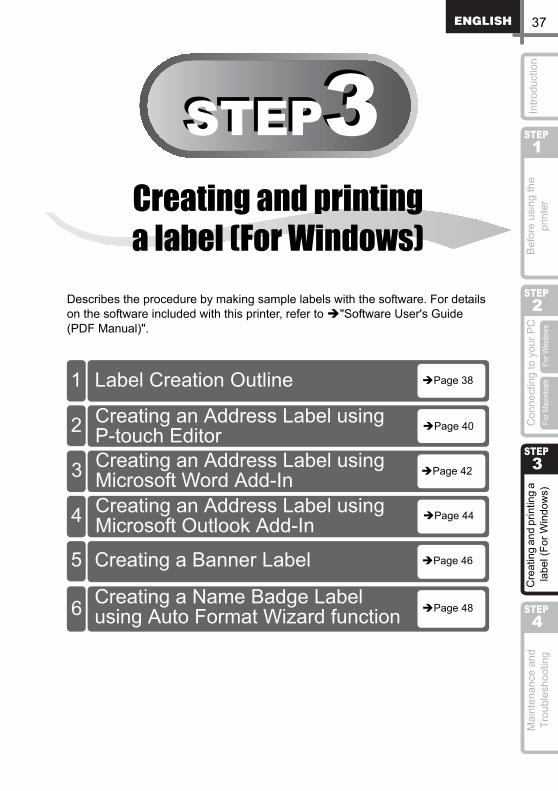
Creating and printing a label (For Windows)
Describes the procedure by making sample labels with the software. For details on the software included with this printer, refer to "Software User's Guide (PDF Manual)".
Label Creation Outline Page 38
Creating an Address Label using P-touch Editor Page 40
Creating an Address Label using Microsoft Word Add-In Page 42
Creating an Address Label using Microsoft Outlook Add-In Page 44
Creating a Banner Label Page 46
Creating a Name Badge Label using Auto Format Wizard function Page 48
1
2
3
4
5
6
STEP3 Creating and printing a label (For Windows)38
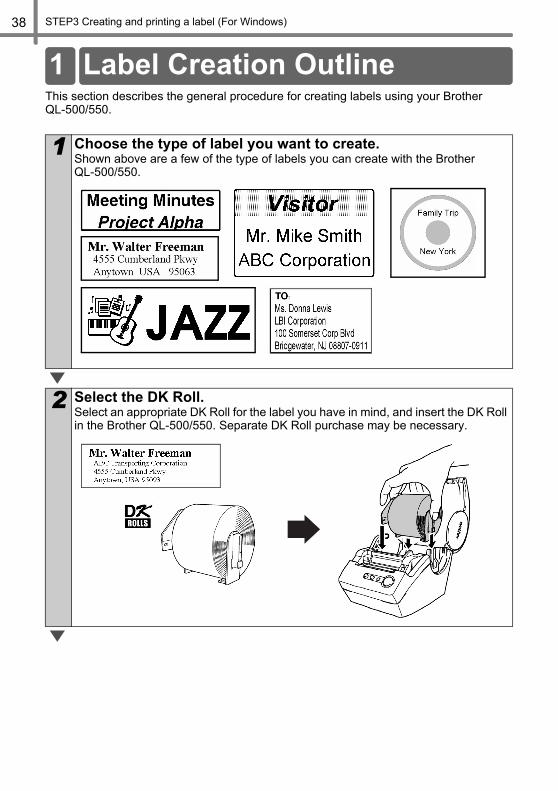
This section describes the general procedure for creating labels using your Brother QL-500/550.
1 Choose the type of label you want to create.Shown above are a few of the type of labels you can create with the Brother QL-500/550.
2 Select the DK Roll.Select an appropriate DK Roll for the label you have in mind, and insert the DK Roll in the Brother QL-500/550. Separate DK Roll purchase may be necessary.
1 Label Creation Outline

39
TEP1
TEP2
TEP3
For W
indo
wsFo
r Mac
into
sh
TEP4
Bef
ore
usin
g th
e pr
inte
rM
aint
enan
ce a
nd
Trou
bles
hoot
ing
Con
nect
ing
to y
our P
CC
reat
ing
and
prin
ting
a la
bel (
For W
indo
ws)
Intro
duct
ion
S
S
S
S
Use CUT lever when cutting a printed label with QL-500.
3 Edit the label data.Enter text directly using P-touch Editor, or copy text from a Microsoft Office application.Use P-touch Editor's variety of editing functions to format and decorate your label.• Enter text in P-touch Editor. • Copy text from Microsoft Office.
4 Print the label.Print the label from the Brother QL-500/550.
QL-500 QL-550CUT Lever CUT Button

STEP3 Creating and printing a label (For Windows)40
Learn the basic workflow of P-touch Editor while creating a general label.
1 Start P-touch Editor and create a new label layout.Click [Start] - [All Programs (or Programs)] - [P-touch Editor 4.1] - [P-touch Editor]. Select "New Layout" in the dialog box displayed, and then click .
2 Select the label size.Click on the Page Property box.
If the required Property box is not displayed in the Property dock, click the corresponding button at the left of the dock to open it.
3 Enter the text.Click in the Object dock to create a text box, and then enter the text.
You can use the Text Property box to select options for formatting the text.
2 Creating an Address Label using P-touch Editor2

41
TEP1
TEP2
TEP3
For W
indo
wsFo
r Mac
into
sh
TEP4
Bef
ore
usin
g th
e pr
inte
rM
aint
enan
ce a
nd
Trou
bles
hoot
ing
Con
nect
ing
to y
our P
CC
reat
ing
and
prin
ting
a la
bel (
For W
indo
ws)
Intro
duct
ion
S
S
S
S
4 Add a frame to the label.Click in the Object dock to create a text box, and then enter the text.The Frame Properties dialog box appears. Select a frame and then click .
5 Print the label.Click in the Print Property box.
If the required Property box is not displayed in the Property dock, click the corresponding button at the left of the dock to open it.
Completed label.Peel the printed label from backing and apply the label.

STEP3 Creating and printing a label (For Windows)42
Copy text from Microsoft Word and create an address label.
1 Copy text.In MS Word, select the text to be imported, and then click in the toolbar.
Text can also be copied from MS Excel and MS Outlook.
2 Verify the copied data.The Add-in Preview Window appears. Verify the contents. To make formatting changes click .
• Changes to the layout of a label can also be made using the Layout Style Function. For details refer to 4 step 2 below.
• If you want to print immediately, click on to print your label.
3 Format the text.Click the text box of the text you wish to format to select it.Use the Text Property box to change the text formatting.
3 Creating an Address Label using Microsoft Word Add-In3

43
TEP1
TEP2
TEP3
For W
indo
wsFo
r Mac
into
sh
TEP4
Bef
ore
usin
g th
e pr
inte
rM
aint
enan
ce a
nd
Trou
bles
hoot
ing
Con
nect
ing
to y
our P
CC
reat
ing
and
prin
ting
a la
bel (
For W
indo
ws)
Intro
duct
ion
S
S
S
S
4 Position the text box.Select the text box you wish to move, then drag and drop to move it to the desired position.
5 Print the label.Click in the Print Property box.
If the required Property box is not displayed in the Property dock, click the corresponding button at the left of the dock to open it.
Completed label.Peel the printed label from backing and apply the label.
STEP3 Creating and printing a label (For Windows)44
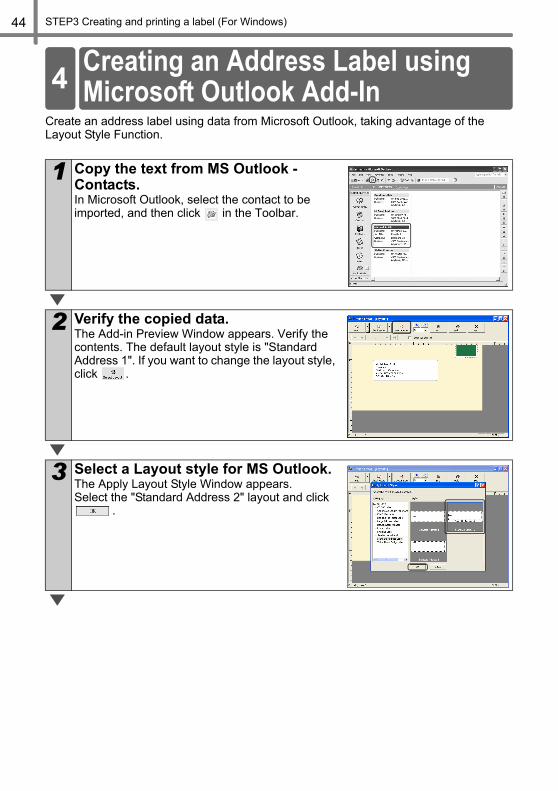
Create an address label using data from Microsoft Outlook, taking advantage of the Layout Style Function.
1 Copy the text from MS Outlook - Contacts.In Microsoft Outlook, select the contact to be imported, and then click in the Toolbar.
2 Verify the copied data.The Add-in Preview Window appears. Verify the contents. The default layout style is "Standard Address 1". If you want to change the layout style, click .
3 Select a Layout style for MS Outlook.The Apply Layout Style Window appears.Select the "Standard Address 2" layout and click
.
4 Creating an Address Label using Microsoft Outlook Add-In4

45
TEP1
TEP2
TEP3
For W
indo
wsFo
r Mac
into
sh
TEP4
Bef
ore
usin
g th
e pr
inte
rM
aint
enan
ce a
nd
Trou
bles
hoot
ing
Con
nect
ing
to y
our P
CC
reat
ing
and
prin
ting
a la
bel (
For W
indo
ws)
Intro
duct
ion
S
S
S
S
4 Verify the Layout.The Add-In Preview Window appears. Verify the Layout.
If further editing is required, enter the P-touch Editor by clicking . Refer to step 2 of 3.
5 Print the label.Click in the Print Property box.
If the contact does not have a Job Title, there may be a blank space before the address. Use P-touch Editor to change any formatting.
Completed label.Peel the printed label from backing and apply the label.
STEP3 Creating and printing a label (For Windows)46
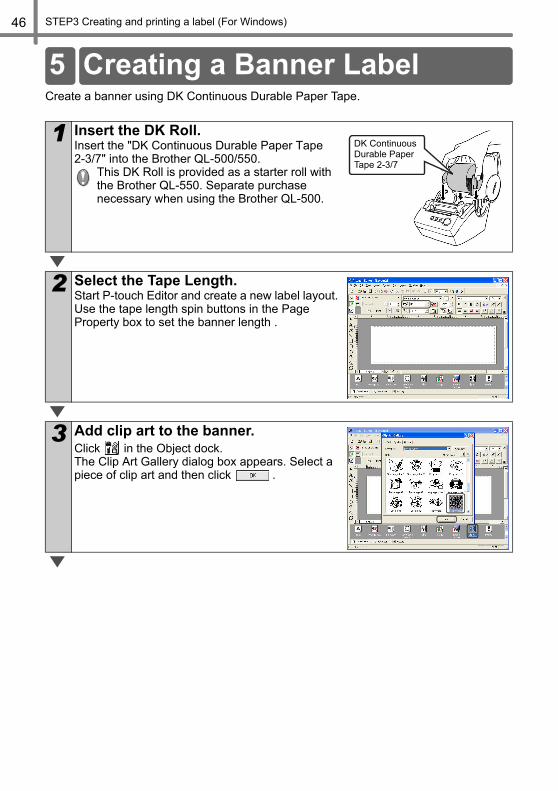
Create a banner using DK Continuous Durable Paper Tape.
1 Insert the DK Roll.Insert the "DK Continuous Durable Paper Tape 2-3/7" into the Brother QL-500/550.
This DK Roll is provided as a starter roll with the Brother QL-550. Separate purchase necessary when using the Brother QL-500.
2 Select the Tape Length.Start P-touch Editor and create a new label layout.Use the tape length spin buttons in the Page Property box to set the banner length .
3 Add clip art to the banner.Click in the Object dock.The Clip Art Gallery dialog box appears. Select a piece of clip art and then click .
5 Creating a Banner Label
DK Continuous Durable Paper Tape 2-3/7

47
TEP1
TEP2
TEP3
For W
indo
wsFo
r Mac
into
sh
TEP4
Bef
ore
usin
g th
e pr
inte
rM
aint
enan
ce a
nd
Trou
bles
hoot
ing
Con
nect
ing
to y
our P
CC
reat
ing
and
prin
ting
a la
bel (
For W
indo
ws)
Intro
duct
ion
S
S
S
S
4 Enter the text.Click in the Object dock to create a text box, and then enter the text.
5 Print the label.Click in the Print Property box.
If the required Property box is not displayed in the Property dock, click the corresponding button at the left of the dock to open it.
Completed label.Peel the printed label from backing and apply the label.

STEP3 Creating and printing a label (For Windows)48
Create a name badge label quickly and easily using the Auto Format Wizard.
1 Start the Auto Format Wizard.Start P-touch Editor, select "Use the Auto Format Wizard" in the dialog box displayed, and then click
. This label cannot be created using the Starter Roll(s) provided with the Brother QL-500/550. Separate purchase of suggested supply DK-1202 necessary.
2 Select a category.The Auto Format Wizard dialog box appears. Select a category "For Visitor Name Badges" and then click .
3 Select a template.A list of templates for the selected category appears. Select a template and then click .
6 Creating a Name Badge Label using Auto Format Wizard function6
49
TEP1
TEP2
TEP3
For W
indo
wsFo
r Mac
into
sh
TEP4
Bef
ore
usin
g th
e pr
inte
rM
aint
enan
ce a
nd
Trou
bles
hoot
ing
Con
nect
ing
to y
our P
CC
reat
ing
and
prin
ting
a la
bel (
For W
indo
ws)
Intro
duct
ion
S
S
S
S
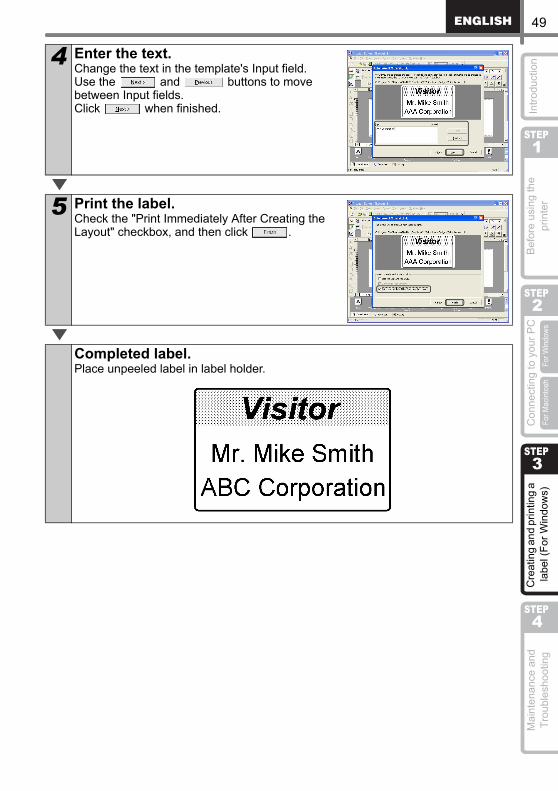
4 Enter the text.Change the text in the template's Input field.Use the and buttons to move between Input fields.Click when finished.
5 Print the label.Check the "Print Immediately After Creating the Layout" checkbox, and then click .
Completed label.Place unpeeled label in label holder.

STEP3 Creating and printing a label (For Windows)50
51
STEP1
TEP2
TEP3
For W
indo
wsFo
r Mac
into
sh
TEP4
STEP4STEP4
Bef
ore
usin
g th
e pr
inte
rM
aint
enan
ce a
nd
Trou
bles
hoot
ing
Cre
atin
g an
d pr
intin
g a
labe
l (Fo
r Win
dow
s)In
trodu
ctio
nC
onne
ctin
g to
you
r PC
S
S
S
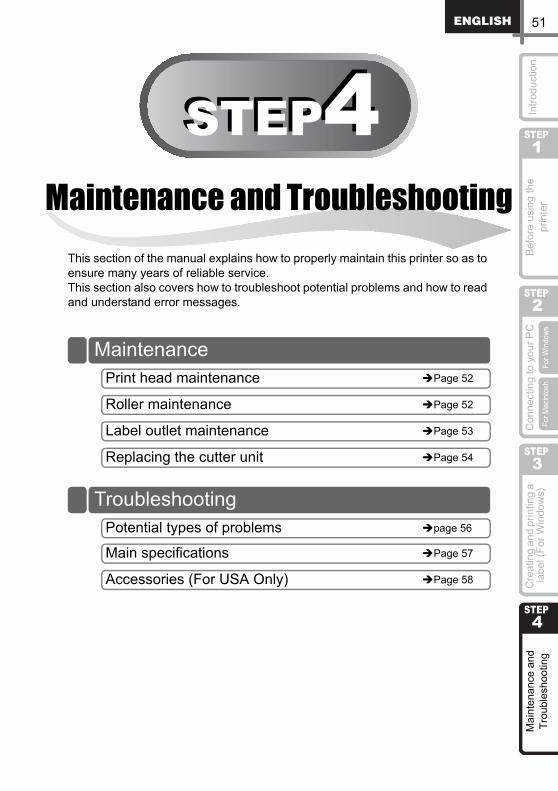
Maintenance and Troubleshooting
This section of the manual explains how to properly maintain this printer so as to ensure many years of reliable service.This section also covers how to troubleshoot potential problems and how to read and understand error messages.
Maintenance
Troubleshooting
Print head maintenance Page 52
Roller maintenance Page 52
Label outlet maintenance Page 53
Replacing the cutter unit Page 54
Potential types of problems page 56
Main specifications Page 57
Accessories (For USA Only) Page 58

STEP4 Maintenance and Troubleshooting52
Maintenance of the printer must be done as needed. However, some environments require that maintenance must be done more frequently (e.g. in dusty conditions).
The DK Roll (thermal recording paper type) used with the printer is designed to clean the print head automatically. When the DK Roll passes the print head during printing and label feeding, the print head is cleaned.
Clean the roller using the cleaning sheet (separately available).the printer contains only one cleaning sheet. To purchase additional cleaning sheets, refer to "Accessories (For USA Only)" in page 58 as needed.
When doing maintenance on the roller, be sure to use the cleaning sheet exclusive for this printer only.If using other cleaning sheet, the surface of roller may be scratched or it may cause a malfunction.
1 Turn OFF the power of the printer.
2 Lift the both sides of lower part of DK Roll cover on the front side of the printer to open the cover.
3 Pull up the roll release lever and remove the DK Roll.
Before cleaning the roller, it is necessary to remove the DK Roll. Otherwise, the roller cleaning function does not function normally.
Maintenance
Print head maintenance
Roller maintenance

53
TEP1
TEP2
TEP3
For W
indo
wsFo
r Mac
into
sh
TEP4
Bef
ore
usin
g th
e pr
inte
rM
aint
enan
ce a
nd
Trou
bles
hoot
ing
Cre
atin
g an
d pr
intin
g a
labe
l (Fo
r Win
dow
s)In
trodu
ctio
nC
onne
ctin
g to
you
r PC
S
S
S
SWhen the glue is attached on the label outlet (metallic plate part and resin guide part) and the printer chews up a label, pull out the power plug from the outlet and clean it up with cloth dipped into ethanol or isopropyl alcohol.It is recommended to clean the label outlet when replacing the cutter unit.
4 Insert the edge (A) of cleaning sheet into the printing unit and pull it out to just in front of the cutter.
• Insert the sheet without removing the A part of sheet.• Check that the printing surface of cleaning sheet is upward.
5 After inserting the cleaning sheet into the printing unit, push down the roll release lever and remove the B part of cleaning sheet.
6 Close the DK Roll cover and turn ON the power of the printer.
7 Press the Feed button for more than one second.The roller spins by 4" (10 cm).The adhesive face of cleaning sheet removes the stain or dust on the roller.
• If not pressing the Feed button for more than one second, the roller spins only 1/3" (8 mm).
• Dispose the cleaning sheet after use. Feed button
Label outlet maintenanceLabel outlet
STEP4 Maintenance and Troubleshooting54
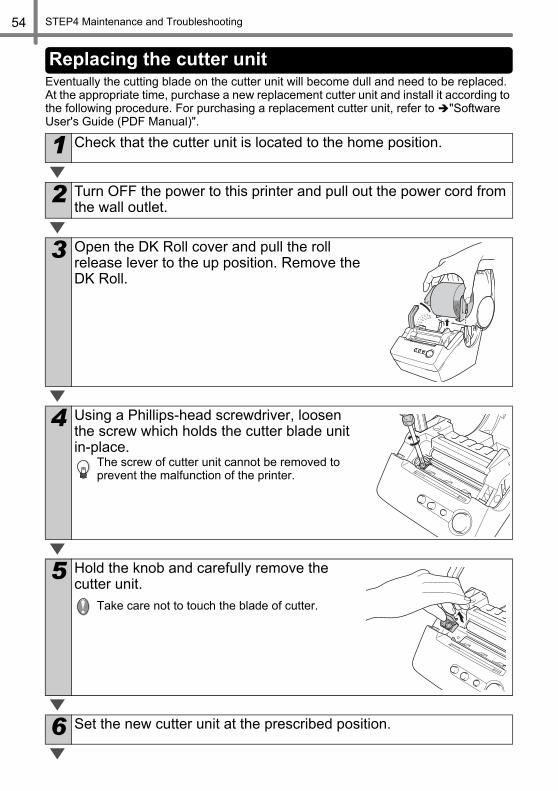
Eventually the cutting blade on the cutter unit will become dull and need to be replaced. At the appropriate time, purchase a new replacement cutter unit and install it according to the following procedure. For purchasing a replacement cutter unit, refer to "Software User's Guide (PDF Manual)".
1 Check that the cutter unit is located to the home position.
2 Turn OFF the power to this printer and pull out the power cord from the wall outlet.
3 Open the DK Roll cover and pull the roll release lever to the up position. Remove the DK Roll.
4 Using a Phillips-head screwdriver, loosen the screw which holds the cutter blade unit in-place.
The screw of cutter unit cannot be removed to prevent the malfunction of the printer.
5 Hold the knob and carefully remove the cutter unit.
Take care not to touch the blade of cutter.
6 Set the new cutter unit at the prescribed position.
Replacing the cutter unit

55
TEP1
TEP2
TEP3
For W
indo
wsFo
r Mac
into
sh
TEP4
Bef
ore
usin
g th
e pr
inte
rM
aint
enan
ce a
nd
Trou
bles
hoot
ing
Cre
atin
g an
d pr
intin
g a
labe
l (Fo
r Win
dow
s)In
trodu
ctio
nC
onne
ctin
g to
you
r PC
S
S
S
S
7 Once set in the correct position, tighten the screw which holds the cutting blade unit in place.
8 Set the DK Roll and close the DK Roll cover.For details, refer to "Setting the DK Roll" in page 21.
STEP4 Maintenance and Troubleshooting56
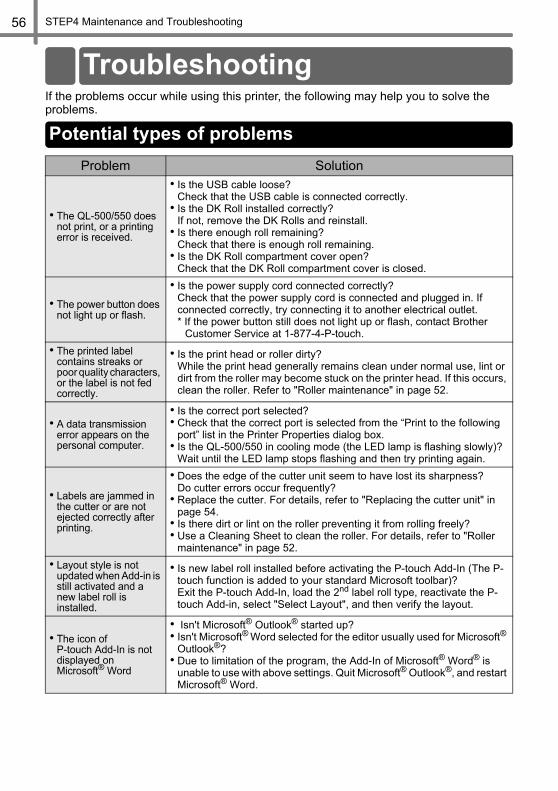
If the problems occur while using this printer, the following may help you to solve the problems.
Problem Solution
• The QL-500/550 does not print, or a printing error is received.
• Is the USB cable loose?Check that the USB cable is connected correctly.
• Is the DK Roll installed correctly?If not, remove the DK Rolls and reinstall.
• Is there enough roll remaining?Check that there is enough roll remaining.
• Is the DK Roll compartment cover open?Check that the DK Roll compartment cover is closed.
• The power button does not light up or flash.
• Is the power supply cord connected correctly?Check that the power supply cord is connected and plugged in. If connected correctly, try connecting it to another electrical outlet.* If the power button still does not light up or flash, contact Brother
Customer Service at 1-877-4-P-touch.• The printed label
contains streaks or poor quality characters, or the label is not fed correctly.
• Is the print head or roller dirty? While the print head generally remains clean under normal use, lint or dirt from the roller may become stuck on the printer head. If this occurs, clean the roller. Refer to "Roller maintenance" in page 52.
• A data transmission error appears on the personal computer.
• Is the correct port selected?• Check that the correct port is selected from the “Print to the following
port” list in the Printer Properties dialog box.• Is the QL-500/550 in cooling mode (the LED lamp is flashing slowly)?
Wait until the LED lamp stops flashing and then try printing again.
• Labels are jammed in the cutter or are not ejected correctly after printing.
• Does the edge of the cutter unit seem to have lost its sharpness?Do cutter errors occur frequently?
• Replace the cutter. For details, refer to "Replacing the cutter unit" in page 54.
• Is there dirt or lint on the roller preventing it from rolling freely?• Use a Cleaning Sheet to clean the roller. For details, refer to "Roller
maintenance" in page 52.• Layout style is not
updated when Add-in is still activated and a new label roll is installed.
• Is new label roll installed before activating the P-touch Add-In (The P-touch function is added to your standard Microsoft toolbar)?Exit the P-touch Add-In, load the 2nd label roll type, reactivate the P-touch Add-in, select "Select Layout", and then verify the layout.
• The icon of P-touch Add-In is not displayed on Microsoft® Word
• Isn't Microsoft® Outlook® started up?• Isn't Microsoft® Word selected for the editor usually used for Microsoft®
Outlook®?• Due to limitation of the program, the Add-In of Microsoft® Word® is
unable to use with above settings. Quit Microsoft® Outlook®, and restart Microsoft® Word.
Troubleshooting
Potential types of problems
57
TEP1
TEP2
TEP3
For W
indo
wsFo
r Mac
into
sh
TEP4
Bef
ore
usin
g th
e pr
inte
rM
aint
enan
ce a
nd
Trou
bles
hoot
ing
Cre
atin
g an
d pr
intin
g a
labe
l (Fo
r Win
dow
s)In
trodu
ctio
nC
onne
ctin
g to
you
r PC
S
S
S
S
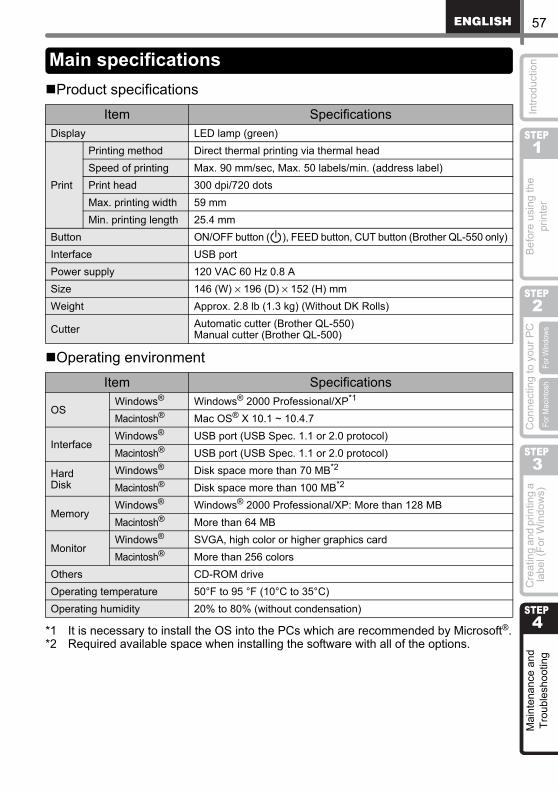
Product specifications
Operating environment
*1 It is necessary to install the OS into the PCs which are recommended by Microsoft®.*2 Required available space when installing the software with all of the options.
Item SpecificationsDisplay LED lamp (green)
Printing method Direct thermal printing via thermal headSpeed of printing Max. 90 mm/sec, Max. 50 labels/min. (address label)Print head 300 dpi/720 dotsMax. printing width 59 mmMin. printing length 25.4 mm
Button ON/OFF button ( ), FEED button, CUT button (Brother QL-550 only)Interface USB portPower supply 120 VAC 60 Hz 0.8 ASize 146 (W) × 196 (D) × 152 (H) mmWeight Approx. 2.8 lb (1.3 kg) (Without DK Rolls)
Cutter Automatic cutter (Brother QL-550)Manual cutter (Brother QL-500)
Item Specifications
OSWindows® Windows® 2000 Professional/XP*1
Macintosh® Mac OS® X 10.1 ~ 10.4.7
InterfaceWindows® USB port (USB Spec. 1.1 or 2.0 protocol)Macintosh® USB port (USB Spec. 1.1 or 2.0 protocol)
HardDisk
Windows® Disk space more than 70 MB*2
Macintosh® Disk space more than 100 MB*2
MemoryWindows® Windows® 2000 Professional/XP: More than 128 MBMacintosh® More than 64 MB
MonitorWindows® SVGA, high color or higher graphics cardMacintosh® More than 256 colors
Others CD-ROM driveOperating temperature 50°F to 95 °F (10°C to 35°C)Operating humidity 20% to 80% (without condensation)
Main specifications

STEP4 Maintenance and Troubleshooting58
Brother recommends the use of genuine Brother accessories with your Brother QL-500/550. The use of other products may effect the print quality or may damage your Brother QL-500/550. The following supplies and accessories are available for your Brother QL-500/550 and can be ordered directly from Brother should your retailer not stock them.
DK Rolls
DK Die-cut Label
DK Continuous Length Tape
Replacement Cutter
Cleaning Sheet
Stock No. Description PriceDK-1201 Standard Address Labels, 1-1/7" × 3-1/2" (29 mm × 90 mm), 400 labels $14.99
DK-1208 Large Address Labels, 1-1/2" × 3-1/2" (38 mm × 90 mm), 400 labels $19.99
DK-1209 Small Address Labels, 2-3/7" × 1-1/7" (62 mm × 29 mm), 800 labels $26.49
DK-1202 Shipping Labels, 2-3/7" × 4" (62 mm × 100 mm), 300 labels $26.49
DK-1203 File Folder Labels, 2/3" × 3-7/16" (17 mm × 87 mm), 300 labels $12.99
DK-1204 Multi Purpose/Return Address Labels, 2/3" × 2-1/8" (17 mm × 54 mm),400 labels $14.99
DK-1207 CD / DVD Film Labels, 2-1/3" × 2-1/3" (58 mm × 58 mm), 100 labels $28.49
DK-1219 Round Paper Labels, 1/2" (12 mm × 12 mm), 1200 labels $19.99
DK-1218 Round Paper Labels, 1" (24 mm × 24 mm), 1000 labels $19.99
Stock No. Description PriceDK-2214 Continuous Length Paper Tape 1/2" (12mm), 100 ft (30.48 M) $13.99
DK-2210 Continuous Length Paper Tape 1-1/7" (29mm), 100 ft (30.48 M) $17.99
DK-2205 Continuous Length Paper Tape 2-3/7" (62mm), 100 ft (30.48 M) $27.49
DK-2211 Continuous Length Film Tape White 1-1/7" (29mm), 50 ft (15.24 M) $30.99
DK-2212 Continuous Length Film Tape White 2-3/7" (62mm), 50 ft (15.24 M) $61.99
DK-2606 Continuous Length Film Tape Yellow 2-3/7" (62mm), 50 ft (15.24 M) $94.99
DK-2113 Continuous Length Film Tape Clear 2-3/7" (62mm), 50 ft (15.24 M) $94.99
DK-4205 Removable Continuous Length Paper Tape White 2-3/7" (62mm), 100ft(30.48M) $36.99
DK-4605 Removable Continuous Length Paper Tape Yellow 2-3/7" (62mm), 100ft(30.48M) $41.99
Stock No. Description PriceDK-BU99 Cutter unit (2 units) $12.99
Stock No. Description PriceDK-CL99 Cleaning Sheet (10 sheets) $12.99
Accessories (For USA Only)
Crea
ción
e im
pres
ión
de
etiq
ueta
s (P
ara
Win
dows
)
PASO1
PASO2
PASO3
PASO4
Ant
es d
e us
ar e
sta
impr
esor
aM
ante
nim
ient
o y
corr
ecci
ón d
e av
ería
sC
onex
ión
a su
PC
Intro
ducc
ión
Para
Win
dows
Para
Mac
into
sh
BROTHER QL-500/550
Guía de configuración y uso(Brother QL-500/550)
Asegúrese de leer este manual antes de usar la impresora. Le recomendamos conservar este manual a mano para poder consultarlo como referencia en el futuro.

Introducción2
Le felicitamos por su compra de la impresora QL-500/550.La nueva QL-500/550 es una impresora de etiquetas que se conecta a su PC y le permite imprimir fácil y rápidamente etiquetas profesionales personalizadas creadas en el equipo con el software de edición de etiquetas proporcionado.
Proporcionaremos servicio y soporte técnico a los usuarios que registren sus productos en nuestra página de Internet. Le recomendamos aprovechar esta oportunidad para registrar su producto visitando nuestra página en:
Registro de usuario en líneahttp://www.registermybrother.com/Página de soporte técnico en línea
http://solutions.brother.com/NOTA: También es posible tener acceso a las páginas de Internet mencionadas arriba a partir
de la ventana de registro del usuario en línea usando el disco CD-ROM de instalación que viene con la impresora. Esperamos con interés el registro de su producto.
Declaración de conformidad de la Comisión Federal de Comunicaciones (sólo para Estados Unidos)La parte responsable: Brother International Corporation
100 Somerset Corporate BoulevardBridgewater, NJ 08807-0911 USATEL: (908) 704-1700
declara que el productoNombre del producto: Impresora de etiquetas QL-500/550Número de modelo: QL-500/550
cumple con la Parte 15 de la normativa de la FCC. El funcionamiento está sujeto a las dos condiciones siguientes: (1) este dispositivo no puede causar interferencias nocivas y (2) este dispositivo debe aceptar cualquier interferencia que reciba, incluidas las interferencias que puedan provocar un funcionamiento no deseado.
Este equipo ha sido sometido a diversas pruebas y se ha comprobado que cumple con los límites establecidos para los dispositivos digitales de Clase B, de acuerdo con la Parte 15 de la normativa de la FCC. Dichos límites están diseñados para proporcionar una protección razonable contra las interferencias nocivas en las instalaciones residenciales. Este equipo genera, utiliza y puede irradiar energía de radiofrecuencias y, si no se instala y utiliza siguiendo las instrucciones suministradas, podría provocar interferencias nocivas en las comunicaciones de radio. No obstante, no existe garantía alguna de que no se produzcan dichas interferencias en una instalación determinada. Si este equipo causara interferencias nocivas en la recepción de radio o televisión, lo cual se puede determinar apagando y encendiendo el equipo, se anima al usuario a intentar corregir la interferencia mediante una o más de las siguientes medidas:
• Cambie la orientación o la ubicación de la antena de recepción.• Aumente la separación entre el equipo y el receptor.• Conecte el equipo a una toma de corriente en un circuito distinto al que está conectado el
receptor.• Consulte a su distribuidor o a un técnico experto en radio/TV para obtener ayuda.• El cable de conexión incluido se debe utilizar para garantizar el cumplimiento con los límites
establecidos para los dispositivos digitales de Clase B.• El cable de conexión incluido se debe utilizar para garantizar el cumplimiento con los límites
establecidos para los dispositivos digitales de Clase B.• Si se realizan cambios o modificaciones no aprobadas expresamente por Brother Industries, Ltd.
se podría anular la autoridad del usuario para utilizar el equipo.
Introducción
3
ASO1
ASO2
ASO3
Para
Win
dows
Para
Mac
into
sh
ASO4
Intro
ducc
ión
Ant
es d
e us
ar e
sta
impr
esor
aM
ante
nim
ient
o y
corr
ecci
ón d
e av
ería
sC
onex
ión
a su
PC
Crea
ción
e im
pres
ión
de
etiq
ueta
s (P
ara
Win
dows
)
P
P
P
P
• El contenido de este manual está sujeto a cambios sin aviso previo. • Se prohíbe la reproducción de cualquier parte de este manual de cualquier modo,
incluyendo fotocopias o reimpresiones, sin el previo consentimiento de nuestra empresa.
• Este manual ha sido redactado cuidadosamente. Sin embargo, si usted nota algún error o tiene alguna observación que hacernos, por favor no dude en comunicarse con nosotros.
• No asumiremos responsabilidad ante usted u otras personas por daños, pérdidas de ganancias o reclamaciones de terceros que surjan en relación con el uso de esta impresora o las etiquetas impresas o la pérdida o alteración de datos causados por fallos de la impresora, reparaciones o fallos de las pilas.
• Microsoft® y Windows® son marcas registradas de Microsoft Corporation en los Estados Unidos y otros países.
• La impresora incluye el módulo de software “USBPRINT.SYS” y “USBMON.DLL” sobre el cual Microsoft Corporation conserva todos los derechos de propiedad.
• Apple®, el logotipo de Apple®, Macintosh® y Mac® OS son marcas registradas de Apple Computer, Inc.
• Adobe®, el logotipo de Adobe®, Acrobat® y Adobe® Reader® son marcas registradas de Adobe Systems Incorporated.
• QR code es una marca registrada de DENSO WAVE Incorporated. • Todos los demás nombres de productos y software mencionados son marcas
registradas o marcas comerciales de sus respectivos propietarios. • Los derechos generales y los derechos intelectuales de todo el software que viene con
la impresora (incluyendo, pero sin limitación, el programa, las imágenes, la galería de imágenes, plantillas y textos incorporados en el software) y los manuales y otros documentos adjuntos y todas las copias del software son propiedad de Brother Industries, Ltd. y sus proveedores.
• Se le prohíbe al usuario revender, reproducir, cambiar, aplicar técnicas de ingeniería inversa, desmantelar o descompilar cualquier parte del software mencionado sin nuestro previo permiso por escrito.
Introducción4
Garantía limitada de un año y Servicio de sustitución de Brother® (sólo en Estados Unidos)
Cobertura: • Esta garantía limitada (“garantía”) sólo se concede al comprador original final (en
adelante el “Comprador original”) del producto al que acompaña, consumibles y accesorios (denominados colectivamente en esta garantía “la máquina”).
• Si ha adquirido este producto a alguien que no es un distribuidor autorizado de Brother en los Estados Unidos, o si el producto ha sido utilizado (incluyendo, pero sin limitarse a modelos de exposición o productos reacondicionados) antes de que el usuario lo comprara, entonces dicho usuario no es el Comprador original y el producto adquirido no estará cubierto por esta garantía.
Alcance de la cobertura: • Este producto incluye una máquina y artículos consumibles y accesorios. Los artículos
consumibles y accesorios incluyen, pero no se limitan a casetes de etiquetas, cortadores, estampas, adaptadores eléctricos, cajas y pilas.
• A excepción de lo dispuesto en este documento, Brother garantiza que la máquina y los artículos consumibles y accesorios que la acompañan no presentarán ningún defecto en sus materiales ni de mano de obra, si se utilizan en condiciones normales.
• Esta garantía se aplica exclusivamente a los productos adquiridos y utilizados en los Estados Unidos. En el caso de aquellos productos que se hayan comprado dentro de los Estados Unidos, pero se han utilizado fuera de sus fronteras, esta garantía sólo cubre el servicio de garantía dentro de los Estados Unidos (es decir, no incluye los gastos de transporte fuera de los Estados Unidos).
Duración del periodo de garantía:• Máquinas: un año a partir de la fecha de compra original.• Consumibles y accesorios incluidos: 90 días a partir de la fecha de compra original o la
duración prevista del consumible, lo que suceda antes.Aspectos NO CUBIERTOS:Esta garantía no cubre:(1) Daños físicos a la máquina;(2) Daños provocados por una instalación incorrecta, uso anormal o incorrecto, abuso,
negligencia o accidente (incluyendo pero sin limitarse al transporte de esta máquina sin la preparación o embalaje adecuados);
(3) Daños provocados por otro dispositivo o software utilizado con esta máquina (incluyendo pero sin limitarse a daños como consecuencia del uso de piezas, artículos consumibles y accesorios que no sean de la marca Brother®);
(4) Los artículos consumibles y accesorios que caducaron de acuerdo con la duración establecida para los mismos, y,
(5) Problemas resultantes de otras causas que no son defectos en los materiales o mano de obra.Esta garantía limitada quedará ANULADA si esta máquina se altera o modifica de alguna forma (incluyendo pero sin limitarse al intento de una reparación en garantía sin la autorización de Brother o la alteración/eliminación del número de serie).Procedimiento que debe seguir si su Producto cumple con los requisitos del servicio en garantía:Informe del problema a nuestra Línea directa de atención al cliente de P-touch llamando al número 1-877-478-6824 o a un Centro de servicio autorizado de Brother dentro del periodo de garantía aplicable. Presente a Brother, o al centro de servicio autorizado de Brother, una copia de la factura de venta fechada donde se pueda comprobar que la máquina se adquirió en los Estados Unidos. Si desea conocer el nombre de un Centro de servicio autorizado Brother en su localidad, llame al 1-800-521-2846.Brother le pedirá que realice lo siguiente:Tras ponerse en contacto con Brother o con un Centro de servicio autorizado de Brother, es posible que tenga que entregar (personalmente si lo prefiere) o enviar el producto debidamente empaquetado, con el transporte ya abonado, al Centro de servicio autorizado junto con una fotocopia de la factura de compra.El usuario será el responsable de sufragar los gastos de transporte, empaquetado del producto y seguro (si lo desea). El usuario también será responsable de la pérdida o los daños que pueda sufrir el producto durante su transporte.
5
ASO1
ASO2
ASO3
Para
Win
dows
Para
Mac
into
sh
ASO4
Intro
ducc
ión
Ant
es d
e us
ar e
sta
impr
esor
aM
ante
nim
ient
o y
corr
ecci
ón d
e av
ería
sC
onex
ión
a su
PC
Crea
ción
e im
pres
ión
de
etiq
ueta
s (P
ara
Win
dows
)
P
P
P
P
Brother, por su parte, actuará de la siguiente forma:Si el problema del que se informa con relación a la máquina o artículos consumibles y accesorios está cubierto por esta garantía y si usted ya informó del mismo problema a Brother o a un Centro de servicio autorizado dentro del plazo de garantía aplicable, Brother o su Centro de servicio autorizado reparará o sustituirá la máquina o los artículos consumibles y accesorios sin cobrarle las piezas ni la mano de obra. Brother, bajo su propio criterio, decidirá si va a reparar o a sustituir la máquina o los artículos consumibles y accesorios. Brother se reserva el derecho a proporcionar una máquina reacondicionada o los artículos consumibles y los accesorios que la acompañan, y utilizar piezas reacondicionadas siempre y cuando los productos reacondicionados cumplan con las especificaciones del fabricante respecto a productos o piezas nuevas. La máquina reparada o sustituida, o los artículos consumibles y accesorios que la acompañan se devolverán al usuario por transporte pagado o se pondrán a su disposición para que los recoja personalmente en un Centro de servicio autorizado situado en un lugar conveniente.Si la máquina o los artículos consumibles y accesorios no están cubiertos por esta garantía (ninguna de sus dos fases), se cobrarán al usuario los gastos de transporte en los que se incurra para devolverle el equipo y los artículos consumibles y accesorios, así como por cualquier servicio o pieza/producto de repuesto, a las tarifas publicadas actuales de Brother.
Lo anteriormente descrito constituye los únicos recursos que tiene el usuario bajo esta garantía.
Qué sucede cuando Brother decide sustituir la máquina:Si Brother ha autorizado una Máquina de sustitución y usted lleva la máquina a un Centro de servicio autorizado, éste le proporcionará una máquina de sustitución tras recibirla de Brother. Si está tratando directamente con Brother, Brother le enviará un equipo de sustitución con el entendimiento de que el usuario, tras recibir el mencionado equipo de sustitución, proporcionará la prueba requerida de la compra, junto con el equipo que Brother se comprometió a sustituir. Se espera entonces que el usuario empaquete la máquina que Brother se ha comprometido a sustituir en el paquete donde se ha entregado la máquina de sustitución y que lo devuelva a Brother utilizando el documento de envío prepagado suministrado por Brother de acuerdo con las instrucciones indicadas por Brother. El usuario dispondrá de dos equipos, por ello, Brother exigirá que le proporcione el número de una tarjeta de crédito válida. Brother emitirá un cargo contra ese número de cuenta de la tarjeta de crédito hasta que reciba el producto original y determine que dicho producto original cumple con los requisitos de la cobertura de la garantía. Sólo se cargará en su tarjeta de crédito el importe de un producto nuevo si: (i) no devuelve el producto original a Brother en un plazo de cinco (5) días hábiles; (ii) los problemas del producto original no están cubiertos por la garantía limitada; (iii) no se siguen las instrucciones correctas para empaquetar el producto y éste ha sufrido algún daño como consecuencia de ello; o (iv) el periodo de garantía del producto original ha vencido o usted no ha presentado una copia de la prueba de compra válida (factura de compra). La máquina de sustitución que recibe el usuario (incluso si se trata de un equipo reacondicionado) quedará cubierta durante el resto del periodo de garantía limitada que le quedaba al producto original, más treinta (30) días adicionales. El usuario conservará la máquina de sustitución que se le envía y el equipo original pasará a ser propiedad de Brother. Conserve los artículos de accesorio originales y una copia del documento de envío de devolución, firmada por el servicio de transporte.
Introducción6
Limitaciones:Brother no se responsabiliza de los daños o pérdida de un equipo, soporte, programas o datos relacionados con el uso de esta máquina. Excepto en el caso de las reparaciones o sustituciones descritas anteriormente, Brother no será responsable de ningún daño directo, indirecto, accidental o consecuente, ni de desagravio específico. Algunos estados no autorizan esta exclusión o limitación de los daños consecuentes o accidentales, por tanto, es posible que la limitación anterior no se aplique en su caso.ESTA GARANTÍA INVALIDA CUALQUIER OTRA GARANTÍA, ESCRITA U ORAL, YA SEA EXPRESADA MEDIANTE UNA AFIRMACIÓN, PROMESA, DESCRIPCIÓN, DIBUJO, MODELO O PRUEBA. TODAS Y CADA UNA DE LAS GARANTÍAS DISTINTAS DE ESTA, SEAN EXPLÍCITAS O IMPLÍCITAS, INCLUIDAS LAS GARANTÍAS DE COMERCIABILIDAD Y ADECUACIÓN A UN PROPÓSITO DETERMINADO, QUEDAN POR EL PRESENTE RECHAZADAS.• Esta garantía limitada es la única garantía que Brother ofrece para esta máquina. Se
trata de la expresión última y la declaración única y exclusiva de las obligaciones de Brother para con el usuario. Sustituye todos los acuerdos o negociaciones que se puedan haber establecido con Brother o sus representantes.
• Esta garantía le otorga ciertos derechos y usted también puede gozar de derechos adicionales en función del estado donde se encuentre.
• Esta garantía limitada (y la obligación de Brother para con el usuario) no puede modificarse de ninguna forma a menos que el usuario y Brother firmen el mismo documento en el que (1) se haga referencia a esta máquina y la factura con la fecha de compra, (2) se describa la modificación de esta garantía y (3) se esté de acuerdo en la aplicación de esa modificación.
Importante:Le recomendamos que conserve todo el material de empaque original por si tuviera que transportar la máquina.

7
ASO1
ASO2
ASO3
Para
Win
dows
Para
Mac
into
sh
ASO4
Intro
ducc
ión
Ant
es d
e us
ar e
sta
impr
esor
aM
ante
nim
ient
o y
corr
ecci
ón d
e av
ería
sC
onex
ión
a su
PC
Crea
ción
e im
pres
ión
de
etiq
ueta
s (P
ara
Win
dows
)
P
P
P
P
Si tiene alguna pregunta o necesita información acerca de su producto Brother, puede elegir entre las siguientes opciones de asistencia:
Registre a continuación la información de su modelo y número de serie, junto con la fecha y lugar de compra, para tenerla como referencia. Conserve esta información con la prueba de compra (factura) por si su máquina necesitara algún tipo de servicio.
Nº de modelo _____________________________________
Nº de serie _______________________________________
Fecha de compra: __________________________________
Establecimiento donde se realizó la compra: _____________
Dirección del establecimiento: ________________________
Importante: Le recomendamos que conserve todo el material de empaque original por si tuviera que transportar la máquina.
(En EE.UU.)
Servicio de atención al clienteServicio de atención al cliente877-478-6824 (voz)
Servico de atención a cliente901-379-1210 (fax)
Respuesta por fax automatizada800-521-2846
World Wide Webwww.brother.com
Consumibles / Accesorioswww.brothermall.como 888-879-3232
BROTHER INTERNATIONAL CORPORATION100 SOMERSET CORPORATE BLVD.BRIDGEWATER, NEW JERSEY 08807-0911
(En México)
Centro Nacional de Atención a Clientes
8503-8701 (voz) - Ciudad de México
01-800-759-8000 (voz) - lada sin costo
8503-8766 (fax) - Ciudad de México
01-800-759-9000 (fax) - lada sin costo
World Wide Webwww.brother.com.mx
Consumibles / Accesorioswww.brother.com.mxo Centro Nacional de Atención a Clientes
BROTHER INTERNATIONAL DE MEXICO, S.A. DE C.V.Circuito Nemesio Diez Riega No. 8 Mz. 2 Lt. 4Parque Industrial Cerrillo II, C.P. 52000Lerma, Estado de México / R.F.C. : BIM-920922-A53
(Sólo en Estados Unidos)No pierda su tiempo, ¡regístrese en línea!
No haga cola en una oficina de correos ni se preocupe por si se pierde su carta. Visite nuestro sitio Web en
www.registermybrother.comSu producto quedará registrado inmediatamente en nuestra base de datos y usted
podrá continuar ocupándose de sus asuntos.Además, mientras nos visita, puede comprobar qué concursos o información
interesante hay disponibles.
Información importante

Introducción8
Le proporcionamos los siguientes manuales para ayudarle a usar la impresora correctamente y utilizar sus funciones. Asegúrese de leer este manual antes de usar la impresora.
Guía de configuración y uso (este manual)Lea este manual primero. En él obtendrá información que debe leer antes de usar la impresora como, por ejemplo, advertencias, consejos de instalación y configuración, y los procedimientos para imprimir etiquetas sin usar su PC. También se describe la instalación del software que viene con la impresora para su uso en un PC.
Guía del software para el usuario (manual en formato PDF)En este manual se explica cómo crear etiquetas usando el software que viene con la impresora, instalándolo en un PC después de conectar la impresora al PC. También explica cómo limpiar la impresora y cómo realizar las tareas de corrección de averías.
•Para revisar la Guía del software para el usuario (manual en formato PDF), usted deberá tener instalado o instalar el programa Adobe® Reader® o Adobe® Acrobat® Reader®. (Para Macintosh®, el programa estándar “Preview” que viene con el sistema operativo también puede usarse para leer el manual.)
• Si su sistema operativo es Windows®, este manual puede leerse desde la aplicación de configuración P-touch usando el disco CD-ROM. Además, este manual puede leerse a partir del menú Inicio si está instalado en el PC.
• Si utiliza un PC Macintosh, vea los archivos PDF en la carpeta [Manuals] del disco CD-ROM que viene con la impresora.
Los símbolos que se utilizan a lo largo de este manual son los siguientes:
Este símbolo indica información o instrucciones a las que debe prestar atención. Si las ignora, pueden ocurrir lesiones, daños o fallas operativas.
Este símbolo indica información o instrucciones que pueden ayudarle a comprender mejor o a utilizar la impresora con mayor eficiencia.
Manuales
Símbolos utilizados en este Manual

9
ASO1
ASO2
ASO3
Para
Win
dows
Para
Mac
into
sh
ASO4
Intro
ducc
ión
Ant
es d
e us
ar e
sta
impr
esor
aM
ante
nim
ient
o y
corr
ecci
ón d
e av
ería
sC
onex
ión
a su
PC
Crea
ción
e im
pres
ión
de
etiq
ueta
s (P
ara
Win
dows
)
P
P
P
P
Para prevenir lesiones y daños, se presentan notas importantes usando diversos símbolos. Los símbolos y sus significados son los siguientes:
Los símbolos que se utilizan en este manual son los siguientes:
Advertencia Esto indica la posibilidad de muerte o graves lesiones si se ignoran las instrucciones.
Cuidado Esto indica la posibilidad de lesiones corporales o daños materiales si se ignoran las instrucciones.
Este símbolo indica prohibición. Los detalles de los aspectos prohibidos se muestran en la figura (por ejemplo, en la figura a la izquierda se muestra la prohibición contra el desmantelamiento de la impresora).
Este símbolo indica instrucciones especiales. Los detalles de las instrucciones se muestran en la figura (por ejemplo, en la figura a la izquierda se muestra el método para desconectar el enchufe de la toma de corriente).
Advertencia La impresora
Siga estas advertencias para evitar riesgos de incendios, daños, descargas eléctricas y asfixia.
No desarme la impresora.Para la inspección, el ajuste y la reparación de la impresora, comuníquese con el distribuidor en la tienda donde adquirió la impresora o con el centro de servicio autorizado en su localidad. (Si los daños fueron causados por el propio cliente al desarmar o modificar la impresora, Brother prestará servicios de reparación a cambio del pago de una tarifa, independientemente de si la garantía sigue vigente o no.) No deje que la impresora se caiga, reciba golpes u algún otro tipo de impacto.No agarre ni levante la impresora por la tapa del compartimento del rollo DK. La tapa se podría desprender y la impresora podría caer y dañarse.No toque ninguna pieza metálica cerca del cabezal de impresión. El cabezal de impresión se calienta mucho durante su uso y permanece muy caliente inmediatamente después de usarlo. No lo toque directamente con las manos.
No moje la impresora con bebidas como café y jugos. Tenga cuidado para evitar mojar la impresora al regar plantas o flores.No use la impresora si hay un objeto extraño en ella. Si hay agua o un objeto extraño en la impresora, desconecte el enchufe de la toma de corriente y comuníquese con la tienda donde adquirió la impresora o con el centro de servicio autorizado de su localidad. Evite el uso de bolsas de plástico cerca de la impresora. Deseche o mantenga la bolsa de plástico fuera del alcance de los niños. Jugar con bolsas de plástico puede provocar asfixia. Desenchufe inmediatamente el cable de alimentación eléctrica y deje de usar la impresora si observa algún olor anormal, calor, decoloración, deformación o cualquier cosa fuera de lo común al usarla o guardarla.
Precauciones de seguridad
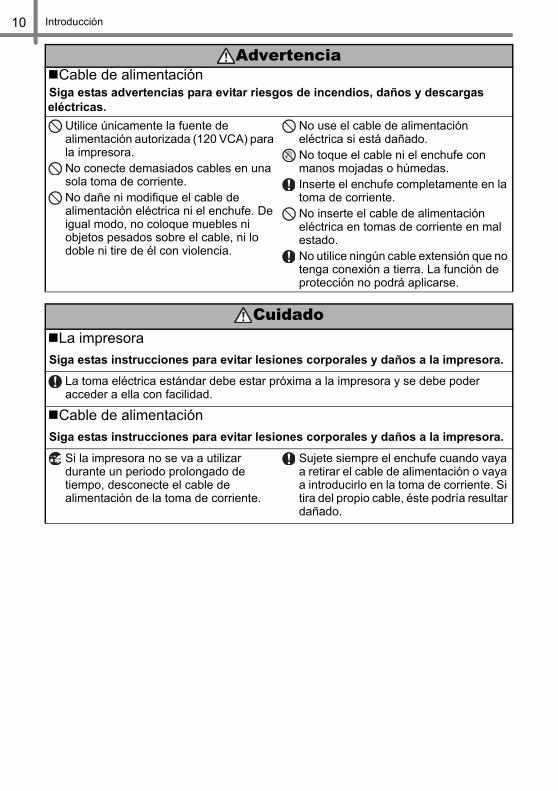
Introducción10
Cable de alimentaciónSiga estas advertencias para evitar riesgos de incendios, daños y descargas eléctricas.
Utilice únicamente la fuente de alimentación autorizada (120 VCA) para la impresora.No conecte demasiados cables en una sola toma de corriente.No dañe ni modifique el cable de alimentación eléctrica ni el enchufe. De igual modo, no coloque muebles ni objetos pesados sobre el cable, ni lo doble ni tire de él con violencia.
No use el cable de alimentación eléctrica si está dañado. No toque el cable ni el enchufe con manos mojadas o húmedas.Inserte el enchufe completamente en la toma de corriente. No inserte el cable de alimentación eléctrica en tomas de corriente en mal estado.No utilice ningún cable extensión que no tenga conexión a tierra. La función de protección no podrá aplicarse.
CuidadoLa impresora
Siga estas instrucciones para evitar lesiones corporales y daños a la impresora.
La toma eléctrica estándar debe estar próxima a la impresora y se debe poder acceder a ella con facilidad.
Cable de alimentaciónSiga estas instrucciones para evitar lesiones corporales y daños a la impresora.
Si la impresora no se va a utilizar durante un periodo prolongado de tiempo, desconecte el cable de alimentación de la toma de corriente.
Sujete siempre el enchufe cuando vaya a retirar el cable de alimentación o vaya a introducirlo en la toma de corriente. Si tira del propio cable, éste podría resultar dañado.
Advertencia

11
ASO1
ASO2
ASO3
Para
Win
dows
Para
Mac
into
sh
ASO4
Intro
ducc
ión
Ant
es d
e us
ar e
sta
impr
esor
aM
ante
nim
ient
o y
corr
ecci
ón d
e av
ería
sC
onex
ión
a su
PC
Crea
ción
e im
pres
ión
de
etiq
ueta
s (P
ara
Win
dows
)
P
P
P
P
CortadorSiga estas instrucciones para evitar lesiones corporales y daños a la impresora.
No toque la hoja de la unidad del cortador. No abra la cubierta superior cuando la unidad del cortador esté en funcionamiento.
No ejerza demasiada presión sobre la unidad del cortador.
Instalación/AlmacenamientoSiga estas instrucciones para evitar lesiones corporales y daños a la impresora.
Al usar esta impresora, no la coloque sobre una plataforma inestable como, por ejemplo, una mesa en mal estado o sobre un estante.
No coloque objetos pesados sobre la impresora.
Rollo DK (etiqueta DK y cinta DK)Siga estas instrucciones para evitar daños a la impresora.
Tenga cuidado para evitar la caída del rollo DK. El rollo DK usa papel térmico y película térmica, de tal forma que el color de la etiqueta se desvanecerá con la luz solar o el efecto del calor. No use el rollo DK al aire libre ni en otras circunstancias que afecten su durabilidad.
Dependiendo de la ubicación, el material y las condiciones ambientales, puede ser difícil despegar la etiqueta o pueden ocurrir cambios en el color de la etiqueta o ese color puede teñir otros objetos. Antes de pegar la etiqueta, compruebe las condiciones ambientales y el material y seguidamente ponga a prueba la etiqueta pegando una parte de ella en un área poco visible de la superficie donde desee aplicarla.
Cuidado

Introducción12
La impresora • Puede que la impresora funcione incorrectamente si se encuentra cerca de un televisor,
radio, etc. No utilice la impresora cerca de algún dispositivo que cause interferencias electromagnéticas.
• No coloque ni almacene la impresora de forma que quede expuesta a aparatos de calefacción u otras fuentes de calor, ni en ningún lugar donde quede expuesta a temperaturas extremadamente altas o bajas, a una humedad elevada o a una gran cantidad de polvo. Los límites recomendados de temperatura están entre 10°C a 35°C (50°F y 95 °F).
• No use disolventes de pintura, gasolina, alcohol ni otros disolventes orgánicos para limpiar la impresora. Si usa esas sustancias puede dañar el acabado de la superficie de la impresora. Use un paño suave y seco para limpiar la impresora.
• No introduzca ningún objeto ni bloquee la ranura de salida de etiquetas, ni el puerto USB ni el puerto serie.
• Utilice únicamente el cable de conexión (cable USB) que viene con la impresora.• Cuando no lo vaya a utilizar durante un periodo prolongado de tiempo, extraiga el rollo
DK de la impresora.• No intente imprimir etiquetas si la tapa del compartimento del rollo DK está abierta.• La impresora hace ruido al imprimir debido a su
velocidad (no se trata de una falla de la impresora).Ajuste la “calidad de impresión” en el controlador de la impresora para reducir el ruido.
• Si se atascara el papel debido a una acumulación de adhesivo en la superficie de guía del papel, desenchufe el cable de alimentación de la toma eléctrica y limpie la acumulación de adhesivo con un paño humedecido en etanol o alcohol isopropílico (alcohol para fricciones). Es recomendable limpiar la guía del papel cuando se sustituye la unidad del cortador.
Rollo DK (etiqueta DK y cinta DK)• Utilice únicamente los accesorios y consumibles Brother originales (con las marcas ,
). No utilice accesorios ni consumibles no autorizados.• Si la etiqueta está pegada a una superficie húmeda, sucia o grasienta, podría despegarse
fácilmente. Antes de pegar la etiqueta, limpie la superficie donde vaya a colocarla.• El rollo DK usa papel térmico y una película térmica, de tal forma que los rayos
ultravioleta, el viento y la lluvia pueden causar el desvanecimiento del color de la etiqueta y el desprendimiento de los extremos de la etiqueta.
• No exponga los rollos DK a la luz solar directa, a temperaturas altas, a humedad elevada ni al polvo. Guárdelos en un lugar fresco y oscuro. Utilice los rollos DK lo antes posible tras abrir el paquete.
• Si rasca la superficie impresa de la etiqueta con la uña o con un objeto metálico, o si toca la superficie impresa con las manos húmedas con agua, sudor, crema tratante, etc., puede decolorar la etiqueta o hacer que su color cambie.
• No aplique etiquetas a personas, animales, plantas o lugares públicos.• Dado que el extremo del rollo DK está diseñado para no adherirse al carrete de etiqueta,
es posible que la última etiqueta no pueda cortarse correctamente.Si esto llegase a ocurrir, retire las etiquetas restantes, inserte un nuevo rollo DK y vuelva a imprimir la última etiqueta.Nota: para tener esto en cuenta, es posible que el número de etiquetas DK que viene en cada rollo DK pueda ser mayor que el número indicado en el paquete.
• Cuando despegue una etiqueta DK, es posible que quede algún resto de la etiqueta sobre la superficie. Retírelo antes de pegar una etiqueta nueva.
• Algunos rollos DK utilizan adhesivo permanente en sus etiquetas. Estas etiquetas no se pueden retirar limpiamente después de pegarlas.
Precauciones generales
Superficie de la guía del papel

13
ASO1
ASO2
ASO3
Para
Win
dows
Para
Mac
into
sh
ASO4
Intro
ducc
ión
Ant
es d
e us
ar e
sta
impr
esor
aM
ante
nim
ient
o y
corr
ecci
ón d
e av
ería
sC
onex
ión
a su
PC
Crea
ción
e im
pres
ión
de
etiq
ueta
s (P
ara
Win
dows
)
P
P
P
P
Etiquetas de película para CD/DVD• Antes de usarlas, asegúrese de seguir las instrucciones indicadas en el manual de
instrucciones del reproductor de CD/DVD en relación con las etiquetas para CD/DVD.• No utilice etiquetas para CD/DVD cuando se trate de un reproductor de CD/DVD con
ranura de carga, por ejemplo en el reproductor de CD de un vehículo donde el CD se introduce en la ranura del reproductor de CD.
• No despegue la etiqueta del CD/DVD una vez que se haya pegado sobre él.• Se podría desprender también una delgada capa de la superficie del disco con el
consiguiente daño para el disco.• No coloque etiquetas para CD/DVD en discos CD/DVD diseñados para ser utilizados
con impresoras de inyección de tinta. Las etiquetas se despegan con facilidad de estos discos y la utilización de discos con etiquetas despegadas puede provocar que se pierdan o se dañen los datos.
• Cuando pegue una etiqueta en un CD/DVD, utilice el aplicador que acompaña a los rollos de etiquetas para CD/DVD. Si no lo hace así, se podría dañar el reproductor de CD/DVD.
• La responsabilidad respecto a la aplicación de etiquetas para CD/DVD recae totalmente sobre el usuario. Brother no acepta responsabilidad alguna por la pérdida o daño de los datos debido al uso inapropiado de las etiquetas para CD/DVD.
CD-ROM y software• No raye los discos CD-ROM ni los coloque en lugares a temperaturas extremadamente
altas o bajas.De igual modo, no coloque objetos pesados encima del CD-ROM ni aplique fuerza sobre él.
• El software incluido en el CD-ROM es para usarlo exclusivamente con la impresora. Si desea información más detallada, consulte la Licencia incluida en el CD. Dicho software se puede instalar en varios equipos PC para utilizarlo en una oficina, etc.
Cortador• El número de cortes promedio es de 5.000 o más, según las condiciones ambientales.
Un corte irregular, la incapacidad de cortar recto o los frecuentes atascos de papel pueden indicar que la vida del cortador se acerca a su fin. Si se dan estas situaciones, sustituya el cortador.
Tenga en cuenta que Brother no asume ninguna responsabilidad por cualquier daño, etc. que se produzca por no seguir las precauciones indicadas.

Introducción14
Introducción •••••••••••••••••••••••••••••••••••••••••••••••••••••••••••••••••••• 2Información importante •••••••••••••••••••••••••••••••••••••••••••••••••••••••••••••••• 7Manuales ••••••••••••••••••••••••••••••••••••••••••••••••••••••••••••••••••••••••••••••••• 8Símbolos utilizados en este Manual •••••••••••••••••••••••••••••••••••••••••••••••• 8Precauciones de seguridad ••••••••••••••••••••••••••••••••••••••••••••••••••••••••••• 9Precauciones generales ••••••••••••••••••••••••••••••••••••••••••••••••••••••••••••••• 12Índices •••••••••••••••••••••••••••••••••••••••••••••••••••••••••••••••••••••••••••••••••••• 14
Antes de usar esta impresora •••••••••••••••••••••••••••••••• 171 Lista de comprobación de accesorios •••••••••••••••••••••••••••••••••••• 182 Descripción de piezas •••••••••••••••••••••••••••••••••••••••••••••••••••••••• 19
Unidad impresora principal ••••••••••••••••••••••••••••••••••••••••••••••••••••••••••• 19Descripción de los botones ••••••••••••••••••••••••••••••••••••••••••••••••••••••••••• 20Indicador luminoso ••••••••••••••••••••••••••••••••••••••••••••••••••••••••••••••••••••• 20
3 Instalación del rollo DK •••••••••••••••••••••••••••••••••••••••••••••••••••••• 21Rollos DK aplicables ••••••••••••••••••••••••••••••••••••••••••••••••••••••••••••••••••• 21Instalación del rollo DK •••••••••••••••••••••••••••••••••••••••••••••••••••••••••••••••• 21
4 Instalación de la guía de papel ••••••••••••••••••••••••••••••••••••••••••••• 225 Conexión de la alimentación eléctrica •••••••••••••••••••••••••••••••••••• 23
Conexión de la impresora a su PC ••••••••••••••••••••••••••• 25Para Windows ••••••••••••••••••••••••••••••••••••••••••••••••••••••••••••••••• 26
1. Descripción del software ••••••••••••••••••••••••••••••••••••••••••••••••••••••••••• 262. Notas sobre la instalación ••••••••••••••••••••••••••••••••••••••••••••••••••••••••• 273. Instalación del software •••••••••••••••••••••••••••••••••••••••••••••••••••••••••••• 27
Para Macintosh •••••••••••••••••••••••••••••••••••••••••••••••••••••••••••••••• 311. Descripción del software ••••••••••••••••••••••••••••••••••••••••••••••••••••••••••• 312. Notas sobre la instalación ••••••••••••••••••••••••••••••••••••••••••••••••••••••••• 313. Instalación del software •••••••••••••••••••••••••••••••••••••••••••••••••••••••••••• 32
Creación e impresión de etiquetas (Para Windows) ••••••• 371 Diseño de la etiqueta que se va a crear •••••••••••••••••••••••••••••••••• 382 Creación de una etiqueta de dirección con P-touch Editor ••••••••••• 403 Creación de una Etiqueta de dirección utilizando
Microsoft Word Add-In ••••••••••••••••••••••••••••••••••••••••••••••••••••••• 424 Creación de una Etiqueta de dirección utilizando
Microsoft Outlook Add-In •••••••••••••••••••••••••••••••••••••••••••••••••••• 445 Creación de etiquetas para titulares •••••••••••••••••••••••••••••••••••••• 466 Creación de una etiqueta de placa de identificación con
el Asistente de formato automático •••••••••••••••••••••••••••••••••••••••• 48
Índices
STEP1STEP1
STEP2STEP2
STEP3STEP3

15
TEP1
TEP2
TEP3
Para
Win
dows
Para
Mac
into
sh
TEP4
Intro
ducc
ión
Ant
es d
e us
ar e
sta
impr
esor
aM
ante
nim
ient
o y
corr
ecci
ón d
e av
ería
sC
onex
ión
a su
PC
Cre
ació
n e
impr
esió
n de
etiq
ueta
s (P
ara
S
S
S
S
Mantenimiento y corrección de averías •••••••••••••••••••• 51Mantenimiento ••••••••••••••••••••••••••••••••••••••••••••••••••••••••••••••••• 52
Mantenimiento del cabezal de impresión •••••••••••••••••••••••••••••••••••••••••• 52Mantenimiento del rodillo •••••••••••••••••••••••••••••••••••••••••••••••••••••••••••••• 52Mantenimiento del punto de salida de las etiquetas ••••••••••••••••••••••••••••• 53Reemplazo de la unidad del cortador ••••••••••••••••••••••••••••••••••••••••••••••• 54
Localización y resolución de problemas •••••••••••••••••••••••••••••••••• 56Posibles tipos de problemas •••••••••••••••••••••••••••••••••••••••••••••••••••••••••• 56Especificaciones principales •••••••••••••••••••••••••••••••••••••••••••••••••••••••••• 57Accesorios (sólo en Estados Unidos) ••••••••••••••••••••••••••••••••••••••••••••••• 58
STEP4STEP4

Introducción16
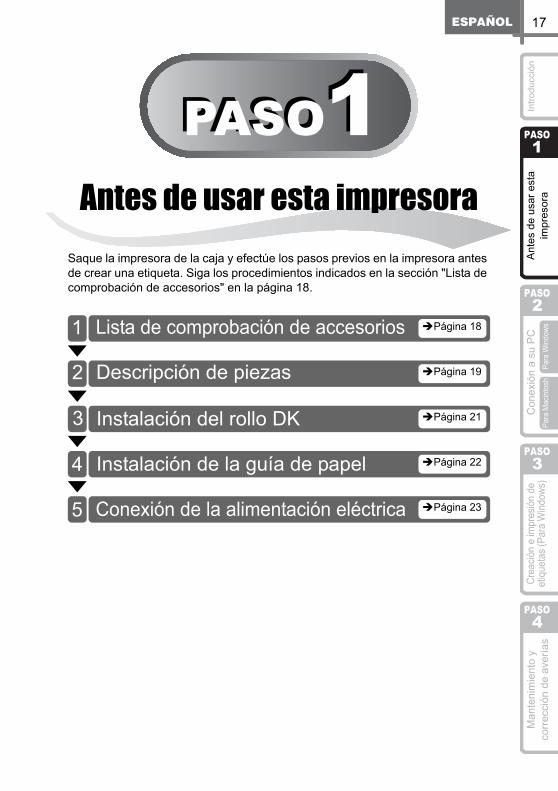
17
PASO1PASO1 PASO1
ASO2
ASO3
Para
Win
dows
Para
Mac
into
sh
ASO4
Ant
es d
e us
ar e
sta
impr
esor
aM
ante
nim
ient
o y
corr
ecci
ón d
e av
ería
sC
onex
ión
a su
PC
Crea
ción
e im
pres
ión
de
etiq
ueta
s (P
ara
Win
dows
)In
trodu
cció
n
P
P
P
Antes de usar esta impresora
Saque la impresora de la caja y efectúe los pasos previos en la impresora antes de crear una etiqueta. Siga los procedimientos indicados en la sección "Lista de comprobación de accesorios" en la página 18.
Lista de comprobación de accesorios Página 18
Descripción de piezas Página 19
Instalación del rollo DK Página 21
Instalación de la guía de papel Página 22
Conexión de la alimentación eléctrica Página 23
1
2
3
4
5
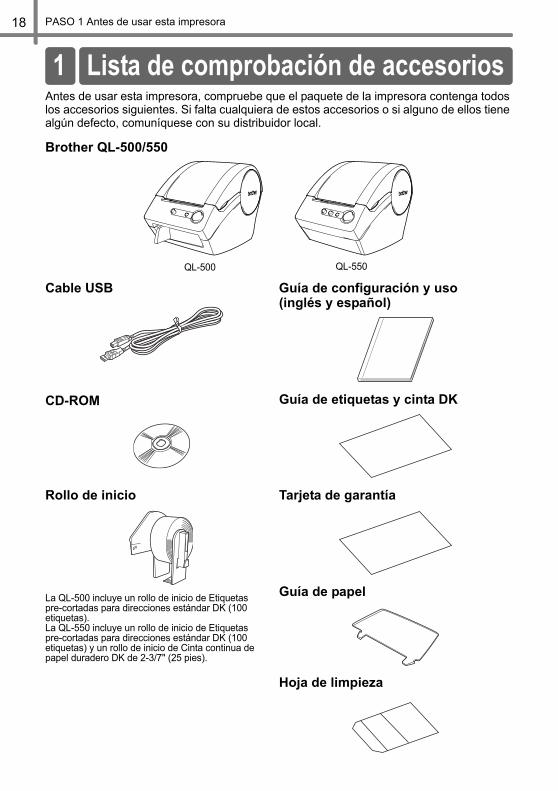
PASO 1 Antes de usar esta impresora18
Antes de usar esta impresora, compruebe que el paquete de la impresora contenga todos los accesorios siguientes. Si falta cualquiera de estos accesorios o si alguno de ellos tiene algún defecto, comuníquese con su distribuidor local.
Brother QL-500/550
Cable USB Guía de configuración y uso(inglés y español)
CD-ROM Guía de etiquetas y cinta DK
Rollo de inicio
La QL-500 incluye un rollo de inicio de Etiquetas pre-cortadas para direcciones estándar DK (100 etiquetas).La QL-550 incluye un rollo de inicio de Etiquetas pre-cortadas para direcciones estándar DK (100 etiquetas) y un rollo de inicio de Cinta continua de papel duradero DK de 2-3/7" (25 pies).
Tarjeta de garantía
Guía de papel
Hoja de limpieza
1 Lista de comprobación de accesorios
QL-500 QL-550

19
ASO1
ASO2
ASO3
ASO4
Ant
es d
e us
ar e
sta
impr
esor
aIn
trodu
cció
nPa
ra W
indo
wsPa
ra M
acin
tosh
Man
teni
mie
nto
y co
rrec
ción
de
aver
ías
Con
exió
n a
su P
CCr
eació
n e
impr
esió
n de
et
ique
tas
(Par
a W
indo
ws)
P
P
P
P
Cara frontal
Si se deja abierta la tapa del compartimento del rollo DK, el polvo se acumulará en la cabeza de impresión. Cierre siempre la tapa.
Vista desde atrás
QL-500 QL-550
QL-500/QL-550
2 Descripción de piezasUnidad impresora principal
FEED, botón de avanceIndicador luminosoON/OFF, botón de encendido y apagadoCUT, palanca de corte
Tapa del compartimiento del rollo DK
Indicador luminosoON/OFF, botón de encendido y apagado
Tapa del compartimiento del rollo DKFEED, botón de avanceCUT, botón de corte
Cable de alimentación
Puerto USB

PASO 1 Antes de usar esta impresora20
A continuación se describe la función de los botones de la QL-500/550.
Use la palanca de corte cuando tenga que cortar una etiqueta impresa con QL-500.
El indicador luminoso de la QL-500/550 indica el estado de funcionamiento actual.
Botón EstadoON/OFF, botón de encendido y apagado Enciende y apaga la QL-500/550.
CUT, botón de corte(sólo en la QL-550)
Corta la etiqueta del rollo DK. Utilice este botón para cortar las etiquetas cuando no se haya seleccionado la opción "Auto Cut" (Corte automático) en el cuadro de diálogo Print (Imprimir).
FEED, botón de avance
• Cuando se utilizan Etiquetas troqueladas DK, hace avanzar el rollo de etiquetas DK hasta el principio de la siguiente etiqueta del rollo. Si se presiona este botón durante más de un segundo, el rollo de etiquetas DK avanza hasta el principio de la siguiente etiqueta del rollo.
• En el caso de cintas continuas DK, hace avanzar 25,4 mm (1 pulgada) el rollo de etiquetas DK.
• Si no hay ningún rollo de etiquetas DK instalado, el modo cambia al modo de limpieza y el rodillo gira 8 mm (un tercio de pulgada). Si se mantiene presionado este botón durante más de un segundo, el rodillo girará 100 mm (4 pulgadas).
Indicador luminoso EstadoApagado
La impresora está apagada.
EncendidoLa impresora está encendida.(Aunque normalmente está iluminado cuando la impresora está encendido, el indicador luminoso parpadea durante la operación de limpieza o si se produce algún error.)
Parpadeo rápido
Indica uno de los siguientes errores.• Error del cortador• Error del sensor de la etiqueta• (El rollo DK no está instalado correctamente, se ha llegado al fin del rollo
DK o se ha atascado una etiqueta)• La tapa del compartimiento del rollo DK está abierta cuando el equipo
está funcionando• El rollo DK instalado no es el correcto• No hay ningún rollo DK instalado
Parpadeo lento La impresora se está enfriando(Está esperando que la cabeza de impresión se emfríe.)
Se apaga tras parpadear
rápidamente diez veces
Error del sistema
Apague la QL-500/550 y vuelva a encenderla.Si se repite el error, póngase en contacto con el distribuidor donde adquirió la QL-500/550 o con su Centro de servicio local autorizado.
Descripción de los botones
QL-500 QL-550
CUT, palanca de corte
CUT, botón de corte
Indicador luminoso

21
ASO1
ASO2
ASO3
ASO4
Ant
es d
e us
ar e
sta
impr
esor
aIn
trodu
cció
nPa
ra W
indo
wsPa
ra M
acin
tosh
Man
teni
mie
nto
y co
rrec
ción
de
aver
ías
Con
exió
n a
su P
CCr
eació
n e
impr
esió
n de
et
ique
tas
(Par
a W
indo
ws)
P
P
P
P
Abajo se muestran los tipos de rollo DK que pueden utilizarse en esta impresora.
• Es posible adquirir rollos DK, cintas DK y etiquetas DK. Si desea obtener una lista de los rollos DK que pueden utilizarse, consulte la “Lista de artículos consumibles” indicada en la "Guía del software para el usuario (manual en formato PDF) ".
• Asegúrese de utilizar únicamente el rollo DK original para esta impresora.
Rollo DKNombre general para la etiqueta DK y la cinta DK.
Etiqueta DKSe trata de un rollo de etiquetas precortadas.Es posible adquirir un papel térmico y una película térmica.
Cinta DKSe trata de una cinta adhesiva de página completa que se puede cortar libremente.Es posible adquirir un papel térmico y una película térmica.
1 Compruebe que la impresora esté apagada (revise el indicador luminoso).Levante ambos lados de la parte inferior de la tapa del rollo DK en la parte delantera de la impresora para abrir la tapa.
2 Tire hacia arriba de la palanca de desbloqueo del rollo y retire la hoja de protección de la unidad impresora.
3 Inserte el carrete del rollo DK a lo largo de la guía del carrete de la impresora.
Revise ambos lados del carrete del rollo DK para comprobar que esté correctamente insertado en la guía de carrete de la impresora.
3 Instalación del rollo DKRollos DK aplicables
Instalación del rollo DK
Palanca de desbloqueo del rolloHoja de protección de la unidad impresora
Carrete
Guía del carrete

PASO 1 Antes de usar esta impresora22
La impresora viene con una guía de papel que puede cargar hasta 10 hojas de etiquetas individuales.
4 Compruebe que la palanca de desbloqueo del rollo esté en posición levantada.Inserte el borde del rollo DK en la unidad impresora y tire de él hasta ponerlo justo delante del cortador.
5 Baje la palanca de desbloqueo del rollo y cierre la tapa del rollo DK.
Si no pudo sacar el rollo DK para ponerlo justo delante del cortador en el paso 4, inserte el borde del rollo DK como pueda y baje la palanca de desbloqueo del rollo y seguidamente cierre esta palanca.Al pulsar el botón Feed de avance se lleva el rollo DK a la posición correcta (si usa una cinta DK, corte la cinta alimentada según sea necesario).
1 Como se muestra a la derecha, monte la guía de papel en la cara frontal de la impresora.
Si va a imprimir más de 10 etiquetas continuamente usando la función de corte automático, retire la guía de papel para prevenir el atasco del papel.
Palanca de desbloqueo del rollo
Unidad impresoraCortador
4 Instalación de la guía de papel
Guía de papel
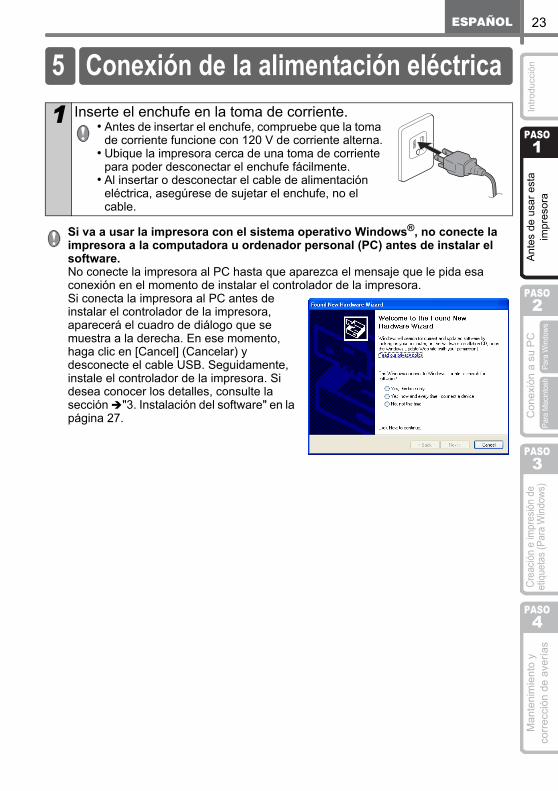
23
ASO1
ASO2
ASO3
ASO4
Ant
es d
e us
ar e
sta
impr
esor
aIn
trodu
cció
nPa
ra W
indo
wsPa
ra M
acin
tosh
Man
teni
mie
nto
y co
rrec
ción
de
aver
ías
Con
exió
n a
su P
CCr
eació
n e
impr
esió
n de
et
ique
tas
(Par
a W
indo
ws)
P
P
P
P
Si va a usar la impresora con el sistema operativo Windows®, no conecte la impresora a la computadora u ordenador personal (PC) antes de instalar el software.No conecte la impresora al PC hasta que aparezca el mensaje que le pida esa conexión en el momento de instalar el controlador de la impresora.Si conecta la impresora al PC antes de instalar el controlador de la impresora, aparecerá el cuadro de diálogo que se muestra a la derecha. En ese momento, haga clic en [Cancel] (Cancelar) y desconecte el cable USB. Seguidamente, instale el controlador de la impresora. Si desea conocer los detalles, consulte la sección "3. Instalación del software" en la página 27.
1 Inserte el enchufe en la toma de corriente.• Antes de insertar el enchufe, compruebe que la toma
de corriente funcione con 120 V de corriente alterna.• Ubique la impresora cerca de una toma de corriente
para poder desconectar el enchufe fácilmente.• Al insertar o desconectar el cable de alimentación
eléctrica, asegúrese de sujetar el enchufe, no el cable.
5 Conexión de la alimentación eléctrica

PASO 1 Antes de usar esta impresora24

PASO2PASO225
PASO1
ASO2
ASO3
Para
Win
dows
Para
Mac
into
sh
ASO4
Ant
es d
e us
ar e
sta
impr
esor
aM
ante
nim
ient
o y
corr
ecci
ón d
e av
ería
sC
onex
ión
a su
PC
Crea
ción
e im
pres
ión
de
etiq
ueta
s (P
ara
Win
dows
)In
trodu
cció
n
P
P
P
Conexión de la impresora a su PC
Gracias al software que viene con esta impresora, usted podrá crear una variedad de etiquetas con rapidez y facilidad usando su PC.
Para Windows
Para Macintosh
1. Descripción del software Página 26
2. Notas sobre la instalación Página 27
3. Instalación del software Página 27
1. Descripción del software Página 31
2. Notas sobre la instalación Página 31
3. Instalación del software Página 32

PASO 2 Conexión de la impresora a su PC26
El software que viene con esta impresora es compatible con los siguientes sistemas operativos:El software puede utilizarse con los siguientes sistemas operativos.Microsoft® Windows® 2000 Professional/XP
Si desea conocer más detalles sobre el software, consulte la "Guía del software para el usuario (manual en formato PDF)".
El disco CD-ROM que viene con esta impresora contiene el siguiente software y controlador de impresora.
P-touch Editor 4.2Es posible crear varios tipos de etiquetas como, por ejemplo, etiquetas de dirección y etiquetas para discos CD/DVD. También es posible establecer enlaces con bases de datos creadas previamente (función de base de datos) y administrar la información como nombres y direcciones (función de listas de etiquetas).Se instalarán también las siguientes herramientas.• Programa P-touch Library 2.0
La etiqueta creada mediante P-touch Editor puede imprimirse nuevamente con rapidez y facilidad.
• Utilidad P-touch 4.2 Add-InsUtilizando el conjunto de iconos Add-In para Microsoft® Word 97/2000/2002/2003, Microsoft® Outlook® 2000/2002/2003, Microsoft® Excel 97/2000/2002/2003, es posible crear un etiqueta a partir de cada conjunto de datos.
Programa P-touch Address Book 1.0Es posible organizar las direcciones para imprimir las etiquetas con direcciones más fácilmente.También es posible importar los datos de contacto a partir de la información contenida en el programa Microsoft® Outlook®.
Controlador de impresoraPara usar la impresora en combinación con un PC, es necesario instalar este controlador de impresora.
Guía del software para el usuario (manual en formato PDF)En esa guía se describe cómo usar cada software. Esa guía puede consultarse utilizando el programa Adobe® Acrobat® Reader® o Adobe® Reader®.También es posible consultarla directamente desde el disco CD-ROM.
Puede que la información de software arriba indicada sea modificada en el futuro; le rogamos que consulte el último software en la página de soluciones de Brother. http://solutions.brother.com/
Para Windows
1. Descripción del software
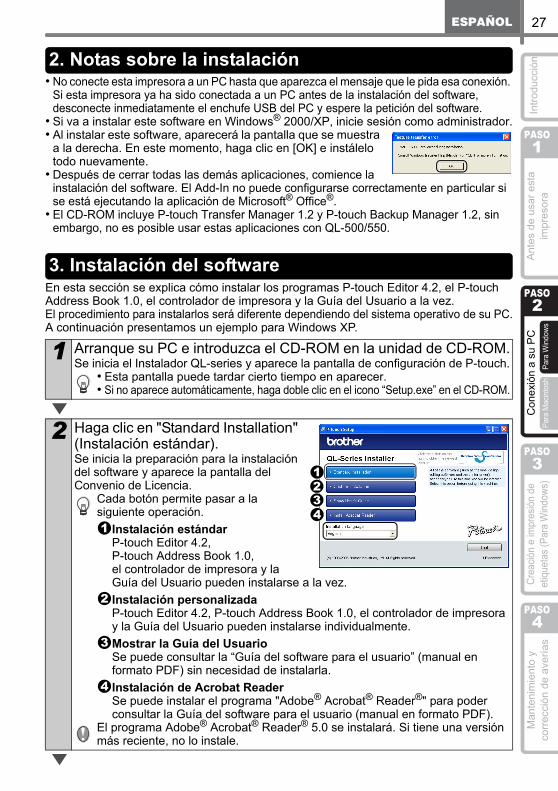
27
ASO1
ASO2
ASO3
Para
Win
dows
Para
Mac
into
sh
ASO4
Ant
es d
e us
ar e
sta
impr
esor
aM
ante
nim
ient
o y
corr
ecci
ón d
e av
ería
sC
onex
ión
a su
PC
Crea
ción
e im
pres
ión
de
etiq
ueta
s (P
ara
Win
dows
)In
trodu
cció
n
P
P
P
P
• No conecte esta impresora a un PC hasta que aparezca el mensaje que le pida esa conexión. Si esta impresora ya ha sido conectada a un PC antes de la instalación del software, desconecte inmediatamente el enchufe USB del PC y espere la petición del software.
• Si va a instalar este software en Windows® 2000/XP, inicie sesión como administrador.• Al instalar este software, aparecerá la pantalla que se muestra
a la derecha. En este momento, haga clic en [OK] e instálelo todo nuevamente.
• Después de cerrar todas las demás aplicaciones, comience la instalación del software. El Add-In no puede configurarse correctamente en particular si se está ejecutando la aplicación de Microsoft® Office®.
• El CD-ROM incluye P-touch Transfer Manager 1.2 y P-touch Backup Manager 1.2, sin embargo, no es posible usar estas aplicaciones con QL-500/550.
En esta sección se explica cómo instalar los programas P-touch Editor 4.2, el P-touch Address Book 1.0, el controlador de impresora y la Guía del Usuario a la vez.El procedimiento para instalarlos será diferente dependiendo del sistema operativo de su PC.A continuación presentamos un ejemplo para Windows XP.
1 Arranque su PC e introduzca el CD-ROM en la unidad de CD-ROM.Se inicia el Instalador QL-series y aparece la pantalla de configuración de P-touch.
• Esta pantalla puede tardar cierto tiempo en aparecer.• Si no aparece automáticamente, haga doble clic en el icono “Setup.exe” en el CD-ROM.
2 Haga clic en "Standard Installation" (Instalación estándar).Se inicia la preparación para la instalación del software y aparece la pantalla del Convenio de Licencia.
Cada botón permite pasar a la siguiente operación.
Instalación estándarP-touch Editor 4.2, P-touch Address Book 1.0, el controlador de impresora y la Guía del Usuario pueden instalarse a la vez.Instalación personalizadaP-touch Editor 4.2, P-touch Address Book 1.0, el controlador de impresora y la Guía del Usuario pueden instalarse individualmente.Mostrar la Guía del UsuarioSe puede consultar la “Guía del software para el usuario” (manual en formato PDF) sin necesidad de instalarla.Instalación de Acrobat ReaderSe puede instalar el programa "Adobe® Acrobat® Reader®" para poder consultar la Guía del software para el usuario (manual en formato PDF).
El programa Adobe® Acrobat® Reader® 5.0 se instalará. Si tiene una versión más reciente, no lo instale.
2. Notas sobre la instalación
3. Instalación del software
1234
1
2
3
4

PASO 2 Conexión de la impresora a su PC28
3 Lea muy atentamente el Convenio de Licencia. Si está de acuerdo con los términos y condiciones del Convenio de Licencia, haga clic en [Yes] (Sí) para continuar con el proceso de instalación.Aparecerá la pantalla de información del cliente.
4 Introduzca el "User Name" (Nombre de Usuario) y el "Company Name" (Nombre de la Empresa), y haga clic en [Next] (Siguiente).Aparecerá la pantalla de selección del lugar donde se guardarán los datos.
5 Haga clic en [Next] (Siguiente).Aparecerá la pantalla de adición de acceso directo.
Si desea cambiar el nombre de la carpeta donde se va a instalar el software, haga clic en [Browse] (Examinar).
6 Compruebe el lugar donde desea añadir el acceso directo (de ese modo podrá tener acceso inmediato al programa haciendo clic fácilmente en ese acceso) del software y haga clic en [Next] (Siguiente).Aparecerá la pantalla de Inicio de copia de archivos.
Si no se requiere un acceso directo, cierre ese cuadro de diálogo.

29
ASO1
ASO2
ASO3
Para
Win
dows
Para
Mac
into
sh
ASO4
Ant
es d
e us
ar e
sta
impr
esor
aM
ante
nim
ient
o y
corr
ecci
ón d
e av
ería
sC
onex
ión
a su
PC
Crea
ción
e im
pres
ión
de
etiq
ueta
s (P
ara
Win
dows
)In
trodu
cció
n
P
P
P
P
7 Compruebe la configuración y, si es correcta, haga clic en [Next] (Siguiente).Aparecerá la pantalla de configuración de Add-In.
• Esta pantalla puede tardar cierto tiempo en aparecer.
• Si la configuración no es correcta, haga clic en [Back] (Atrás).
8 Marque el software con el cual usted desea ajustar el Add-In y haga clic en [Next] (Siguiente).Aparecerá la pantalla de configuración del controlador (Brother P-touch).
Compruebe que haya salido de todas las aplicaciones de Microsoft® Office®, y prosiga con el siguiente paso.Si desea conocer más detalles sobre la configuración del Add-In, consulte la "Guía del software para el usuario (manual en formato PDF)".
9 Haga clic en [OK] (Aceptar) en la pantalla Instalación delcontrolador (Brother P-touch) para iniciar la instalación.
10 Haga clic en [Next] (Siguiente).La instalación del controlador ha finalizado y aparece la pantalla Registro del usuario.
11 Seleccione si desea efectuar el registro de usuario en ese momento y haga clic en [Next] (Siguiente).• Si se selecciona "Yes, display the page." (Sí,
acceder a la página), la pantalla para el registro de usuario en línea se mostrará a través de Internet. Después del registro del usuario, continúe la instalación (le recomendamos registrarse).
• Si se selecciona “No, do not display the page.” (No, no acceder a la página.), el proceso de instalación sigue adelante.

PASO 2 Conexión de la impresora a su PC30
Si desea conocer más detalles sobre el software, consulte la "Guía del software para el usuario (manual en formato PDF)".La Guía del software para el usuario (manual en formato PDF) puede mostrarse haciendo clic en [Inicio]-[Todos los programas (Programas)]-[Brother P-Touch]-[Manuals]-[QL-Series User's Guide (English)].
12 Haga clic en [Finish] (Finalizar).En ese momento habrá completado la instalación del software. Conecte la impresora para finalizar la instalación del controlador.
Una vez que haya completado la instalación, aparecerá un mensaje que le pide reiniciar el PC. En este caso, seleccione "Restart" (Reiniciar) y haga clic en [Finish] (Finalizar).
13 Inicie cada software instalado.• Para iniciar P-touch Editor, haga clic en [Inicio]-[Todos los programas
(Programas)]-[Brother P-touch]-[P-touch Editor 4.2].• Para iniciar P-touch Address Book, haga clic en [Inicio]-[Todos los programas
(Programas)] - [Brother P-touch] - [P-touch Address Book 1.0].
Cable USB
Cable de alimentación
Puerto USB
31
ASO1
ASO2
ASO3
Para
Win
dows
Para
Mac
into
sh
ASO4
Ant
es d
e us
ar e
sta
impr
esor
aM
ante
nim
ient
o y
corr
ecci
ón d
e av
ería
sC
onex
ión
a su
PC
Crea
ción
e im
pres
ión
de
etiq
ueta
s (P
ara
Win
dows
)In
trodu
cció
n
P
P
P
P
Si se usa la impresora conectada a un Macintosh®, es necesario instalar el software que viene en el disco CD-ROM con la impresora.Este software puede utilizarse con los siguientes sistemas operativos.Mac OS® X 10.1 ~ 10.4.7
Si desea conocer más detalles sobre el software, consulte la "Guía del software para el usuario (manual en formato PDF)".
El disco CD-ROM que viene con esta impresora contiene el siguiente software y controlador de impresora.
P-touch Editor 3.2Es posible crear diversas etiquetas como, por ejemplo, etiquetas de dirección y etiquetas para discos CD/DVD.
FuentesSe trata de fuentes para el idioma inglés como la fuente Atlanta.
Plantillas de formato automáticoSon diseños de plantillas para etiquetas.Trae el contenido que se usa para P-touch Editor 3.2.
Galería de imágenesIlustraciones que pueden insertarse en la etiqueta.Trae el contenido que se usa para P-touch Editor 3.2.
Controlador de impresoraPara usar la impresora en combinación con un Macintosh®, es necesario instalar este controlador de impresora.
• Debe esperar hasta completar la instalación del controlador de impresora para conectar la impresora al Macintosh®. Si ya tiene conectada la impresora al Macintosh®, desconecte el cable USB.
• Para instalar el controlador, inicie sesión como administrador.
Para Macintosh
1. Descripción del software
2. Notas sobre la instalación
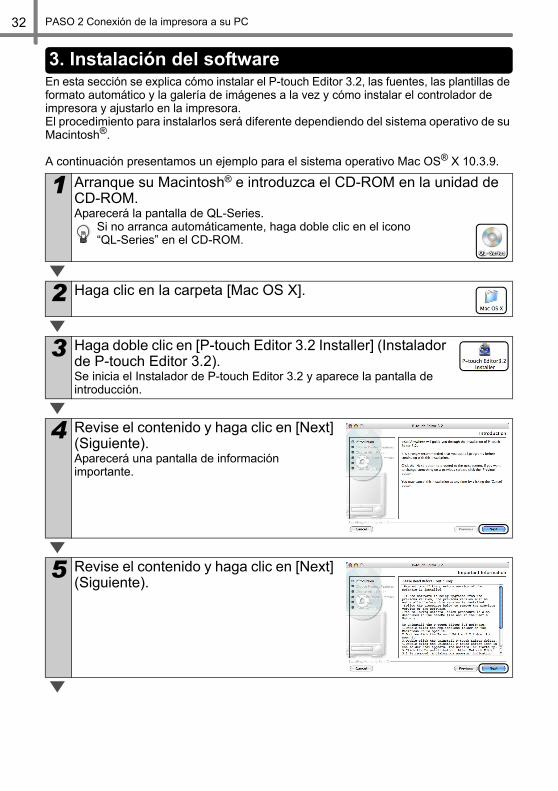
PASO 2 Conexión de la impresora a su PC32
En esta sección se explica cómo instalar el P-touch Editor 3.2, las fuentes, las plantillas de formato automático y la galería de imágenes a la vez y cómo instalar el controlador de impresora y ajustarlo en la impresora.El procedimiento para instalarlos será diferente dependiendo del sistema operativo de su Macintosh®.
A continuación presentamos un ejemplo para el sistema operativo Mac OS® X 10.3.9.
1 Arranque su Macintosh® e introduzca el CD-ROM en la unidad de CD-ROM.Aparecerá la pantalla de QL-Series.
Si no arranca automáticamente, haga doble clic en el icono “QL-Series” en el CD-ROM.
2 Haga clic en la carpeta [Mac OS X].
3 Haga doble clic en [P-touch Editor 3.2 Installer] (Instalador de P-touch Editor 3.2).Se inicia el Instalador de P-touch Editor 3.2 y aparece la pantalla de introducción.
4 Revise el contenido y haga clic en [Next] (Siguiente).Aparecerá una pantalla de información importante.
5 Revise el contenido y haga clic en [Next] (Siguiente).
3. Instalación del software

33
ASO1
ASO2
ASO3
Para
Win
dows
Para
Mac
into
sh
ASO4
Ant
es d
e us
ar e
sta
impr
esor
aM
ante
nim
ient
o y
corr
ecci
ón d
e av
ería
sC
onex
ión
a su
PC
Crea
ción
e im
pres
ión
de
etiq
ueta
s (P
ara
Win
dows
)In
trodu
cció
n
P
P
P
P
6 Haga clic en [Next] (Siguiente).Es posible seleccionar el programa que desea instalar. Quite la marca del programa que no vaya a instalar.
Aparecerá la pantalla para seleccionar la carpeta alias.
7 Seleccione la ubicación donde desee crear la carpeta alias y haga clic en [Next] (Siguiente).Aparece la pantalla de resumen de preinstalación.
8 Haga clic en [Install] (Instalar).Se inicia la instalación.
9 Una vez que se complete la instalación y aparezca la pantalla que se muestra a la derecha, haga clic en [Done] (Terminar).En ese momento habrá completado la instalación del software.Seguidamente, instale el controlador de la impresora.
10 Haga doble clic en [QL-Series Driver.pkg] en la carpeta [Mac OS X].Se inicia el instalador del controlador y aparece la pantalla de configuración del controlador.

PASO 2 Conexión de la impresora a su PC34
11 Haga clic en [Continue] (Continuar).Aparecerá una pantalla de información importante.
12 Haga clic en [Continue] (Continuar).Aparece la pantalla del Convenio de Licencia del software.
13 Revise el contenido y seleccione "English" (Inglés) y haga clic en [Continue] (Continuar).Aparece la pantalla del Convenio de Licencia.
14 Si desea continuar con la instalación, haga clic en [Agree] (De acuerdo).Aparecerá la pantalla de selección de la ubicación donde desee guardar el controlador.
15 Seleccione la unidad de disco que usted desee instalar y haga clic en [Continue] (Continuar).Aparecerá una pantalla de Instalación fácil.
Seleccione la unidad de disco donde esté instalado el Mac OS® X.
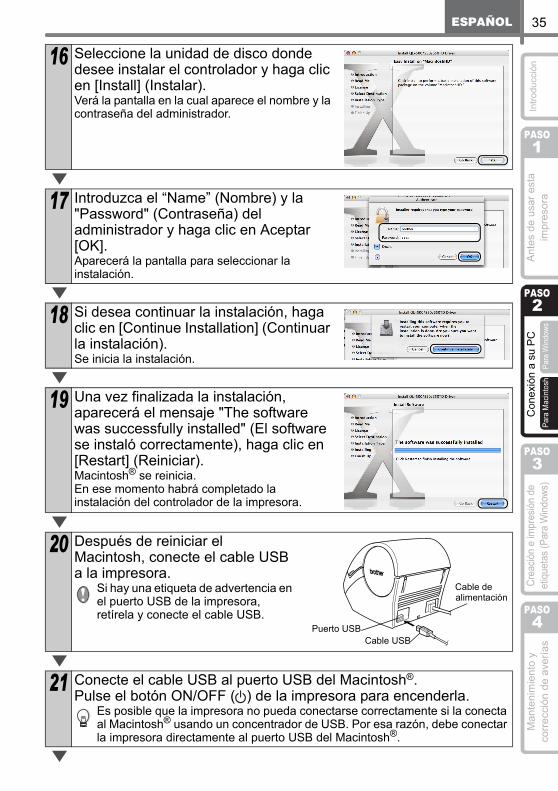
35
ASO1
ASO2
ASO3
Para
Win
dows
Para
Mac
into
sh
ASO4
Ant
es d
e us
ar e
sta
impr
esor
aM
ante
nim
ient
o y
corr
ecci
ón d
e av
ería
sC
onex
ión
a su
PC
Crea
ción
e im
pres
ión
de
etiq
ueta
s (P
ara
Win
dows
)In
trodu
cció
n
P
P
P
P
16 Seleccione la unidad de disco donde desee instalar el controlador y haga clic en [Install] (Instalar).Verá la pantalla en la cual aparece el nombre y la contraseña del administrador.
17 Introduzca el “Name” (Nombre) y la "Password" (Contraseña) del administrador y haga clic en Aceptar [OK].Aparecerá la pantalla para seleccionar la instalación.
18 Si desea continuar la instalación, haga clic en [Continue Installation] (Continuar la instalación).Se inicia la instalación.
19 Una vez finalizada la instalación, aparecerá el mensaje "The software was successfully installed" (El software se instaló correctamente), haga clic en [Restart] (Reiniciar).Macintosh® se reinicia.En ese momento habrá completado la instalación del controlador de la impresora.
20 Después de reiniciar el Macintosh, conecte el cable USB a la impresora.
Si hay una etiqueta de advertencia en el puerto USB de la impresora, retírela y conecte el cable USB.
21 Conecte el cable USB al puerto USB del Macintosh®.Pulse el botón ON/OFF ( ) de la impresora para encenderla.
Es posible que la impresora no pueda conectarse correctamente si la conecta al Macintosh® usando un concentrador de USB. Por esa razón, debe conectar la impresora directamente al puerto USB del Macintosh®.
Cable USBPuerto USB
Cable de alimentación

PASO 2 Conexión de la impresora a su PC36
Si desea conocer más detalles sobre el software, consulte la "Guía del software para el usuario (manual en formato PDF)". Para leer la “Guía del software para el usuario (manual en formato PDF)”, abra el archivo PDF guardado en la carpeta "Manuals" en el disco CD-ROM que viene con la impresora.
22 Haga doble clic en la unidad de disco donde está instalado el sistema operativo Mac OS® X y haga clic en [Applications]-[Utility]-[Printer Setup Utility (Print Center)].Aparecerá la pantalla de Lista de impresoras.
Cuando aparezca la pantalla que se muestra a la derecha, haga clic en [Add] (Agregar).
23 Haga clic en [Add (Add Printer)].
24 Haga clic en [USB].
25 Haga clic en "QL-500" or "QL-550" y seguidamente haga clic en [Add] (Agregar).La pantalla regresa a la presentación de la Lista de impresoras.
26 Compruebe que se haya añadido "QL-500" or "QL-550" y cierre la pantalla de Lista de impresoras.En ese momento podrá usar la impresora.
27Haga doble clic en de la carpeta [Applications]-carpeta
[P-touch Editor 3.2] donde está instalado el P-touch Editor.

PASO1
ASO2
ASO3
Para
Win
dows
Para
Mac
into
sh
ASO4
Ant
es d
e us
ar e
sta
impr
esor
aM
ante
nim
ient
o y
corr
ecci
ón d
e av
ería
sC
onex
ión
a su
PC
Crea
ción
e im
pres
ión
de
etiq
ueta
s (P
ara
Win
dows
)In
trodu
cció
n
PASO3PASO337
P
P
P
Creación e impresión de etiquetas (Para Windows)
Explica el procedimiento mediante la realización de etiquetas de prueba con el software.Para obtener más información sobre el software incluido con esta impresora, consulte "Guía de software del usuario (manual en formato PDF)".
Diseño de la etiqueta que se va a crear Page 38
Creación de una etiqueta de dirección con P-touch Editor Page 40
Creación de una Etiqueta de dirección utilizando Microsoft Word Add-In Page 42
Creación de una Etiqueta de dirección utilizando Microsoft Outlook Add-In
Page 44
Creación de etiquetas para titulares Page 46
Creación de una etiqueta de placa de identificación con el Asistente de formato automático Page 48
1
2
3
4
6
5

PASO 3 Creación e impresión de etiquetas (Para Windows)38
En esta sección se describe el procedimiento general para crear etiquetas con la QL-500/550.
1 Seleccione el tipo de etiqueta que desea crear. Más arriba se muestran algunos de los tipos de etiquetas que se pueden crear con la QL-500/550.
2 Seleccione el rollo DK.Seleccione un rollo DK adecuado para la etiqueta que tiene en mente e inserte el rollo DK en la QL-500/550. Es posible que tenga que comprar rollos DK adicionales.
1 Diseño de la etiqueta que se va a crear

39
ASO1
ASO2
ASO3
Para
Win
dows
Para
Mac
into
sh
ASO4
Ant
es d
e us
ar e
sta
impr
esor
aM
ante
nim
ient
o y
corr
ecci
ón d
e av
ería
sC
onex
ión
a su
PC
Crea
ción
e im
pres
ión
de
etiq
ueta
s (P
ara
Win
dows
)In
trodu
cció
n
P
P
P
P
Use la palanca de corte cuando tenga que cortar una etiqueta impresa con QL-500.
3 Edite los datos de la etiqueta.Introduzca el texto directamente con P-touch Editor, o copie el texto de una aplicación de Microsoft Office.Utilice las diversas funciones de edición de P-touch Editor para dar formato y decorar la etiqueta.• Escriba el texto en P-touch Editor. • Copie el texto de una aplicación de Microsoft Office.
4 Imprima la etiqueta.Imprima la etiqueta con la QL-500/550.
QL-500 QL-550
CUT, palanca de corte
CUT, botón de corte

PASO 3 Creación e impresión de etiquetas (Para Windows)40
Aprenda cuál es el flujo de trabajo básico de P-touch Editor creando una etiqueta general.
1 Inicie P-touch Editor y cree un diseño de etiqueta nuevo.Haga clic en [Start] - [All Programs (or Programs)] - [P-touch Editor 4.1] - [P-touch Editor]. Seleccione "New Layout" (Diseño nuevo) en el cuadro de diálogo que aparece y, a continuación, haga clic en .
2 Seleccione el tamaño de la etiqueta.Haga clic en del cuadro de propiedades de página.
Si el cuadro de propiedades correspondiente no aparece en la Zona de propiedades, haga clic en el botón situado a la izquierda de la zona para abrirlo.
3 Introduzca el texto.Haga clic en de la Zona de objetos para crear un cuadro de texto y, a continuación, introduzca el texto.
El cuadro de propiedades de texto se puede utilizar para seleccionar las opciones de formato para el texto.
2 Creación de una etiqueta de dirección con P-touch Editor2

41
ASO1
ASO2
ASO3
Para
Win
dows
Para
Mac
into
sh
ASO4
Ant
es d
e us
ar e
sta
impr
esor
aM
ante
nim
ient
o y
corr
ecci
ón d
e av
ería
sC
onex
ión
a su
PC
Crea
ción
e im
pres
ión
de
etiq
ueta
s (P
ara
Win
dows
)In
trodu
cció
n
P
P
P
P
4 Agregue un marco a la etiqueta.Haga clic en de la Zona de objetos.Aparecerá el cuadro de diálogo "Frame Properties" (Propiedades de marco). Seleccione un marco y haga clic en .
5 Imprima la etiqueta.Haga clic en del cuadro de propiedades de página.
Si el cuadro de propiedades correspondiente no aparece en la Zona de propiedades, haga clic en el botón situado a la izquierda de la zona para abrirlo.
Etiqueta finalDespegue la hoja protectora del dorso de la etiqueta impresa y pegue la etiqueta.

PASO 3 Creación e impresión de etiquetas (Para Windows)42
Copie el texto de Microsoft Word y cree una etiqueta de dirección.
1 Copie el texto.En Microsoft Word, seleccione el texto que se va a importar y, a continuación, haga clic en el botón
de la barra de herramientas.También se puede copiar el texto de Microsoft Excel y Microsoft Outlook.
2 Compruebe los datos que se han copiado.Aparecerá la ventana de Vista previa de módulo adicional. Verifique el contenido. Para realizar cambios de formato, haga clic en .
• Los cambios en el diseño de una etiqueta también se pueden realizar con la función de Estilo de diseño. Si desea más información, consulte el paso 2 de la sección 4 siguiente.
• Si desea imprimir inmediatamente, haga clic en para imprimir la etiqueta.
3 Dé formato al texto.Haga clic en el cuadro de texto del texto al que desea dar formato para seleccionarlo.Utilice el cuadro de propiedades de texto para cambiar el formato del texto.
3 Creación de una Etiqueta de dirección utilizando Microsoft Word Add-In3

43
ASO1
ASO2
ASO3
Para
Win
dows
Para
Mac
into
sh
ASO4
Ant
es d
e us
ar e
sta
impr
esor
aM
ante
nim
ient
o y
corr
ecci
ón d
e av
ería
sC
onex
ión
a su
PC
Crea
ción
e im
pres
ión
de
etiq
ueta
s (P
ara
Win
dows
)In
trodu
cció
n
P
P
P
P
4 Coloque el cuadro de texto.Seleccione el cuadro de texto que desea desplazar y arrástrelo para colocarlo en la posición deseada.
5 Imprima la etiqueta.Haga clic en el botón del cuadro de propiedades de impresión.
Si el cuadro de propiedades correspondiente no aparece en la Zona de propiedades, haga clic en el botón situado a la izquierda de la zona para abrirlo.
Etiqueta finalDespegue la hoja protectora del dorso de la etiqueta impresa y pegue la etiqueta.
Etiqueta finalDespegue la hoja protectora del dorso de la etiqueta impresa y pegue la etiqueta.

PASO 3 Creación e impresión de etiquetas (Para Windows)44
Cree una etiqueta de dirección con los datos introducidos en Microsoft Outlook, sacándole partido a la función de Estilo de diseño.
1 Copie el texto de la carpeta Contactos de MS Outlook.En Microsoft Outlook, seleccione el contacto que se va a importar y, a continuación, haga clic en el botón de la Barra de herramientas.
2 Verifique los datos que se han copiado.Aparecerá la ventana de Vista previa de módulo adicional. Verifique el contenido. El estilo de diseño predeterminado es "Dirección estándar 1". Si desea cambiar el estilo de diseño, haga clic en
.
3 Seleccione un estilo de diseño para MS Outlook.Aparecerá la ventana Aplicar estilo de diseño.Seleccione el diseño "Dirección estándar 2" y haga clic en .
4 Creación de una Etiqueta de dirección utilizando Microsoft Outlook Add-In4

45
ASO1
ASO2
ASO3
Para
Win
dows
Para
Mac
into
sh
ASO4
Ant
es d
e us
ar e
sta
impr
esor
aM
ante
nim
ient
o y
corr
ecci
ón d
e av
ería
sC
onex
ión
a su
PC
Crea
ción
e im
pres
ión
de
etiq
ueta
s (P
ara
Win
dows
)In
trodu
cció
n
P
P
P
P
4 Verifique el diseño.Aparecerá la ventana de Vista previa de módulo adicional. Verifique el diseño.
Si es preciso editarlo, acceda a la aplicación de edición P-touch Editor haciendo clic en
. Consulte el paso 2 de la sección 3.
5 Imprima la etiqueta.Haga clic en para imprimir la etiqueta.
Si el contacto no tiene Job Title (cargo), puede haber un espacio en blanco tras la dirección. Utilice P-touch Editor para cambiar el formato.
Etiqueta finalDespegue la hoja protectora del dorso de la etiqueta impresa y pegue la etiqueta.

PASO 3 Creación e impresión de etiquetas (Para Windows)46
Cree un titular con la Cinta continua de papel duradero DK.
1 Inserte el rollo DK.Instale la "Cinta continua de papel duradero DK 2-3/7" en la QL-500/550.
Este rollo DK se entrega como rollo de inicio con la QL-550. Tendrá que comprar este rollo por separado cuando trabaje con la QL-500.
2 Seleccione la longitud de la cinta.Inicie P-touch Editor y cree un diseño de etiqueta nuevo. Utilice los botones de selección de longitud de cinta del cuadro de propiedades de página para establecer la longitud del titular.
3 Agregue imágenes de la galería al titular.Haga clic en de la Zona de objetos.Aparecerá el cuadro de diálogo "Clip Art Gallery" (Galería de imágenes). Seleccione una imagen y haga clic en .
5 Creación de etiquetas para titulares
Cinta continua de papel duradero DK 2-3/7
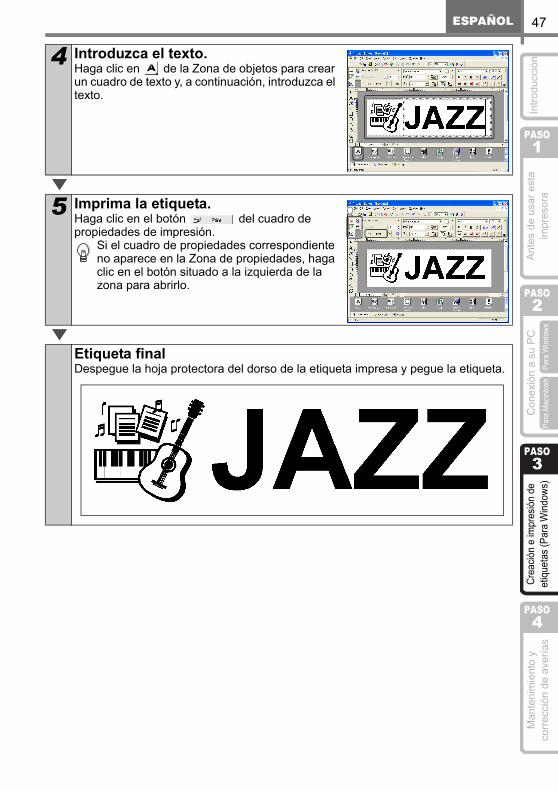
47
ASO1
ASO2
ASO3
Para
Win
dows
Para
Mac
into
sh
ASO4
Ant
es d
e us
ar e
sta
impr
esor
aM
ante
nim
ient
o y
corr
ecci
ón d
e av
ería
sC
onex
ión
a su
PC
Crea
ción
e im
pres
ión
de
etiq
ueta
s (P
ara
Win
dows
)In
trodu
cció
n
P
P
P
P
4 Introduzca el texto.Haga clic en de la Zona de objetos para crear un cuadro de texto y, a continuación, introduzca el texto.
5 Imprima la etiqueta.Haga clic en el botón del cuadro de propiedades de impresión.
Si el cuadro de propiedades correspondiente no aparece en la Zona de propiedades, haga clic en el botón situado a la izquierda de la zona para abrirlo.
Etiqueta finalDespegue la hoja protectora del dorso de la etiqueta impresa y pegue la etiqueta.

PASO 3 Creación e impresión de etiquetas (Para Windows)48
Cree una etiqueta de placa de identificación con rapidez y facilidad con el Asistente de formato automático.
1 Inicie el Asistente de formato automático.Inicie P-touch Editor, seleccione la opción "Use the Auto Format Wizard" (Utilizar el Asistente de formato automático) y, a continuación, haga clic en
. Esta etiqueta no se puede crear con el rollo de inicio suministrado con la QL-500/550. Necesitará comprar el propuesto DK-1202 por separado.
2 Seleccione una categoría.Aparecerá el cuadro de diálogo "Auto Format Wizard" (Asistente de formato automático). Seleccione una categoría "For Visitor Name Badges" (Placas de identificación para invitados) y haga clic en .
3 Seleccione una plantilla.Aparecerá una lista de plantillas para la categoría seleccionada. Seleccione una plantilla y haga clic en .
6 Creación de una etiqueta de placa de identificación con el Asistente de formato automático6

49
ASO1
ASO2
ASO3
Para
Win
dows
Para
Mac
into
sh
ASO4
Ant
es d
e us
ar e
sta
impr
esor
aM
ante
nim
ient
o y
corr
ecci
ón d
e av
ería
sC
onex
ión
a su
PC
Crea
ción
e im
pres
ión
de
etiq
ueta
s (P
ara
Win
dows
)In
trodu
cció
n
P
P
P
P
4 Introduzca el texto.Cambie el texto en el campo "Input" (Entrada) de la plantilla. Utilice los botones y para desplazarse entre los campos "Input" (Entrada).Haga clic en cuando haya terminado.
5 Imprima la etiqueta.Seleccione la casilla de verificación "Print Immediately After Creating the Layout" (Imprimir inmediatamente después de crear el diseño) y, a continuación, haga clic en .
Etiqueta finalDespegue la hoja protectora del dorso de la etiqueta impresa y pegue la etiqueta.

PASO 3 Creación e impresión de etiquetas (Para Windows)50

51
PASO4PASO4 PASO1
ASO2
ASO3
Para
Win
dows
Para
Mac
into
sh
ASO4
Ant
es d
e us
ar e
sta
impr
esor
aIn
trodu
cció
nM
ante
nim
ient
o y
corre
cció
n de
ave
rías
Con
exió
n a
su P
CCr
eació
n e
impr
esió
n de
et
ique
tas
(Par
a W
indo
ws)
P
P
P
Mantenimiento y corrección de averías
En esta sección del manual se explica cómo dar mantenimiento adecuado a esta impresora para garantizar muchos años de servicio fiable.En esta sección también se describen cómo corregir los posibles problemas y cómo leer y comprender los mensajes de error.
Mantenimiento
Localización y resolución de problemas
Mantenimiento del cabezal de impresión Página 52
Mantenimiento del rodillo Página 52
Mantenimiento del punto de salida de las etiquetas Página 53
Reemplazo de la unidad del cortador Página 54
Posibles tipos de problemas Página 56
Especificaciones principales Página 57
Accesorios (sólo en Estados Unidos) Página 58

PASO 4 Mantenimiento y corrección de averías52
Las tareas de mantenimiento deben realizarse según sean necesarias. Sin embargo, algunos ambientes exigen que el mantenimiento se lleve a cabo con mayor frecuencia (por ejemplo, en ambientes con excesiva cantidad de polvo).
El rollo DK (tipo de papel térmico) que se usa en esta impresora está diseñado para limpiar el cabezal de impresión en forma automática. El cabezal de impresión se limpia cuando el rollo DK pasa por el cabezal durante la impresión y la alimentación de etiquetas.
Limpie el rodillo usando la hoja de limpieza (que puede adquirirse por separado).La impresora viene con una sola hoja de limpieza. Para adquirir hojas adicionales, refiérese a "Accesorios (sólo en Estados Unidos)" en la página 58 según sea necesario.
Al efectuar tareas de mantenimiento en el rodillo, asegúrese de usar sólo la hoja de limpieza diseñada exclusivamente para esta impresora.Si usa otra hoja de limpieza, es posible que la superficie del rodillo sufra arañazos o funcione inadecuadamente.
1 Apague la impresora.
2 Levante ambos lados de la parte inferior de la tapa del rollo DK en la parte delantera de la impresora para abrir la tapa.
3 Suba la palanca de desbloqueo del rollo y extraiga el rollo DK.
Para limpiar el rodillo, es necesario retirar el rollo DK. En caso contrario, la función de limpieza del rodillo no se ejecutará normalmente.
Mantenimiento
Mantenimiento del cabezal de impresión
Mantenimiento del rodillo
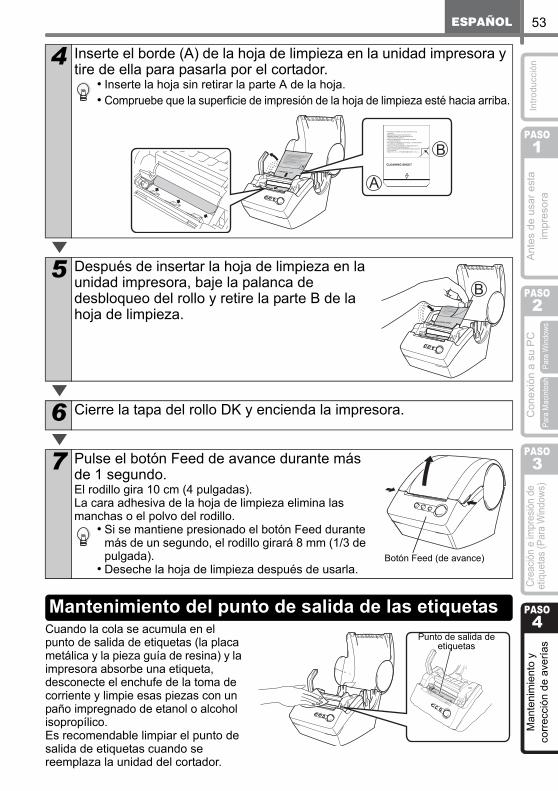
53
ASO1
ASO2
ASO3
Para
Win
dows
Para
Mac
into
sh
ASO4
Ant
es d
e us
ar e
sta
impr
esor
aIn
trodu
cció
nM
ante
nim
ient
o y
corre
cció
n de
ave
rías
Con
exió
n a
su P
CCr
eació
n e
impr
esió
n de
et
ique
tas
(Par
a W
indo
ws)
P
P
P
P
Cuando la cola se acumula en el punto de salida de etiquetas (la placa metálica y la pieza guía de resina) y la impresora absorbe una etiqueta, desconecte el enchufe de la toma de corriente y limpie esas piezas con un paño impregnado de etanol o alcohol isopropílico.Es recomendable limpiar el punto de salida de etiquetas cuando se reemplaza la unidad del cortador.
4 Inserte el borde (A) de la hoja de limpieza en la unidad impresora y tire de ella para pasarla por el cortador.
• Inserte la hoja sin retirar la parte A de la hoja.• Compruebe que la superficie de impresión de la hoja de limpieza esté hacia arriba.
5 Después de insertar la hoja de limpieza en la unidad impresora, baje la palanca de desbloqueo del rollo y retire la parte B de la hoja de limpieza.
6 Cierre la tapa del rollo DK y encienda la impresora.
7 Pulse el botón Feed de avance durante más de 1 segundo.El rodillo gira 10 cm (4 pulgadas).La cara adhesiva de la hoja de limpieza elimina las manchas o el polvo del rodillo.
• Si se mantiene presionado el botón Feed durante más de un segundo, el rodillo girará 8 mm (1/3 de pulgada).
• Deseche la hoja de limpieza después de usarla.Botón Feed (de avance)
Mantenimiento del punto de salida de las etiquetasPunto de salida de
etiquetas
PASO 4 Mantenimiento y corrección de averías54
Eventualmente la hoja de corte del cortador perderá su filo y deberá reemplazarse. En el momento apropiado, compre una nueva unidad de cortador de repuesto e instálela conforme al siguiente procedimiento. Para adquirir una unidad del cortador de reemplazo, consulte la "Guía del software para el usuario (manual en formato PDF)".
1 Compruebe que la unidad del cortador esté situada en la posición inicial.
2 Apague la impresora y desconecte el cable de alimentación eléctrica de la toma de pared.
3 Abra la tapa del rollo DK y levante la palanca de bloqueo del rollo. Extraiga el rollo DK.
4 Use un destornillador de estrella para aflojar el tornillo que sujeta la hoja de corte en su sitio.
Para prevenir desperfectos en la impresora, no es posible extraer el tornillo de la unidad del cortador.
5 Sostenga la perilla y retire cuidadosamente la unidad del cortador.
Tenga cuidado para evitar tocar la hoja del cortador.
6 Instale la nueva unidad del cortador en la posición indicada.
Reemplazo de la unidad del cortador
55
ASO1
ASO2
ASO3
Para
Win
dows
Para
Mac
into
sh
ASO4
Ant
es d
e us
ar e
sta
impr
esor
aIn
trodu
cció
nM
ante
nim
ient
o y
corre
cció
n de
ave
rías
Con
exió
n a
su P
CCr
eació
n e
impr
esió
n de
et
ique
tas
(Par
a W
indo
ws)
P
P
P
P
7 Una vez que la haya colocado en la posición correcta, apriete el tornillo que mantiene la unidad de la hoja de corte en su sitio.
8 Instale el rollo DK y cierre la tapa del compartimento del rollo DK.Si desea conocer más detalles, consulte la sección "Instalación del rollo DK" en la página 21.
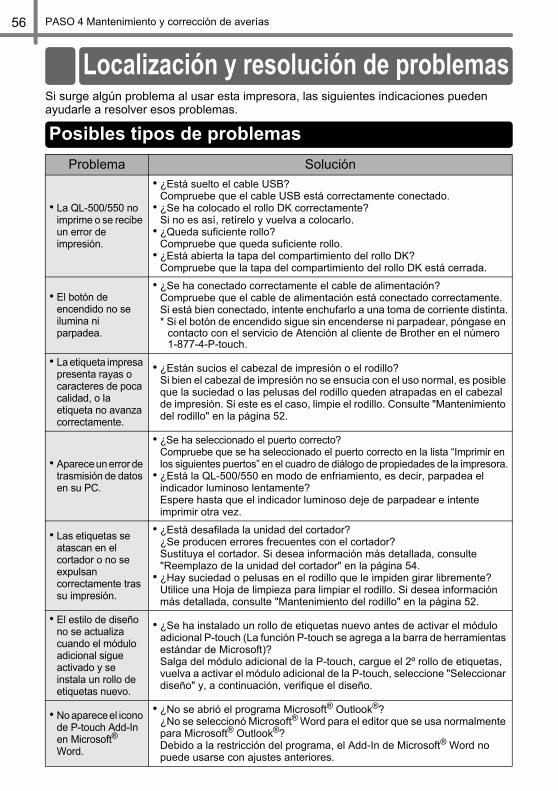
PASO 4 Mantenimiento y corrección de averías56
Si surge algún problema al usar esta impresora, las siguientes indicaciones pueden ayudarle a resolver esos problemas.
Problema Solución
• La QL-500/550 no imprime o se recibe un error de impresión.
• ¿Está suelto el cable USB?Compruebe que el cable USB está correctamente conectado.
• ¿Se ha colocado el rollo DK correctamente?Si no es así, retírelo y vuelva a colocarlo.
• ¿Queda suficiente rollo?Compruebe que queda suficiente rollo.
• ¿Está abierta la tapa del compartimiento del rollo DK?Compruebe que la tapa del compartimiento del rollo DK está cerrada.
• El botón de encendido no se ilumina ni parpadea.
• ¿Se ha conectado correctamente el cable de alimentación?Compruebe que el cable de alimentación está conectado correctamente. Si está bien conectado, intente enchufarlo a una toma de corriente distinta.* Si el botón de encendido sigue sin encenderse ni parpadear, póngase en
contacto con el servicio de Atención al cliente de Brother en el número 1-877-4-P-touch.
• La etiqueta impresa presenta rayas o caracteres de poca calidad, o la etiqueta no avanza correctamente.
• ¿Están sucios el cabezal de impresión o el rodillo? Si bien el cabezal de impresión no se ensucia con el uso normal, es posible que la suciedad o las pelusas del rodillo queden atrapadas en el cabezal de impresión. Si este es el caso, limpie el rodillo. Consulte "Mantenimiento del rodillo" en la página 52.
• Aparece un error de trasmisión de datos en su PC.
• ¿Se ha seleccionado el puerto correcto?Compruebe que se ha seleccionado el puerto correcto en la lista “Imprimir en los siguientes puertos” en el cuadro de diálogo de propiedades de la impresora.
• ¿Está la QL-500/550 en modo de enfriamiento, es decir, parpadea el indicador luminoso lentamente?Espere hasta que el indicador luminoso deje de parpadear e intente imprimir otra vez.
• Las etiquetas se atascan en el cortador o no se expulsan correctamente tras su impresión.
• ¿Está desafilada la unidad del cortador?¿Se producen errores frecuentes con el cortador?Sustituya el cortador. Si desea información más detallada, consulte "Reemplazo de la unidad del cortador" en la página 54.
• ¿Hay suciedad o pelusas en el rodillo que le impiden girar libremente?Utilice una Hoja de limpieza para limpiar el rodillo. Si desea información más detallada, consulte "Mantenimiento del rodillo" en la página 52.
• El estilo de diseño no se actualiza cuando el módulo adicional sigue activado y se instala un rollo de etiquetas nuevo.
• ¿Se ha instalado un rollo de etiquetas nuevo antes de activar el módulo adicional P-touch (La función P-touch se agrega a la barra de herramientas estándar de Microsoft)?Salga del módulo adicional de la P-touch, cargue el 2º rollo de etiquetas, vuelva a activar el módulo adicional de la P-touch, seleccione "Seleccionar diseño" y, a continuación, verifique el diseño.
• No aparece el icono de P-touch Add-In en Microsoft® Word.
• ¿No se abrió el programa Microsoft® Outlook®?¿No se seleccionó Microsoft® Word para el editor que se usa normalmente para Microsoft® Outlook®?Debido a la restricción del programa, el Add-In de Microsoft® Word no puede usarse con ajustes anteriores.
Localización y resolución de problemas
Posibles tipos de problemas
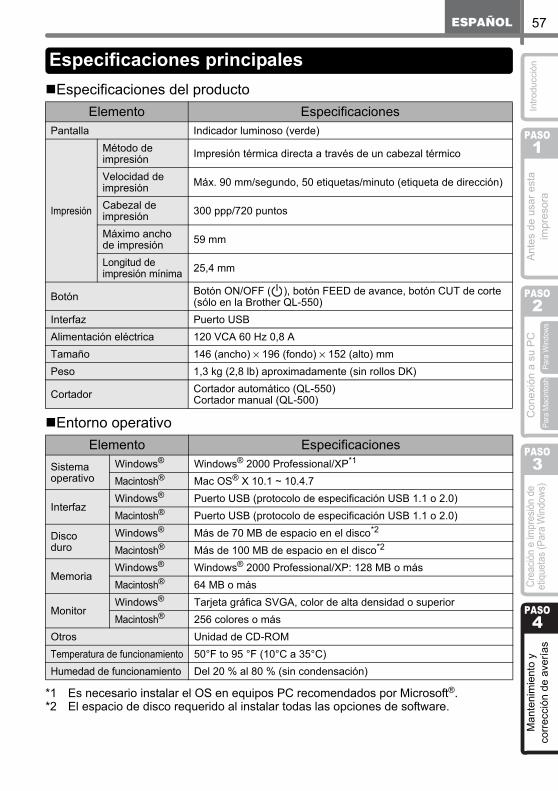
57
ASO1
ASO2
ASO3
Para
Win
dows
Para
Mac
into
sh
ASO4
Ant
es d
e us
ar e
sta
impr
esor
aIn
trodu
cció
nM
ante
nim
ient
o y
corr
ecci
ón d
e av
ería
sC
onex
ión
a su
PC
Crea
ción
e im
pres
ión
de
etiq
ueta
s (P
ara
Win
dows
)
P
P
P
P
Especificaciones del producto
Entorno operativo
*1 Es necesario instalar el OS en equipos PC recomendados por Microsoft®.*2 El espacio de disco requerido al instalar todas las opciones de software.
Elemento EspecificacionesPantalla Indicador luminoso (verde)
Impresión
Método de impresión Impresión térmica directa a través de un cabezal térmico
Velocidad de impresión Máx. 90 mm/segundo, 50 etiquetas/minuto (etiqueta de dirección)
Cabezal de impresión 300 ppp/720 puntos
Máximo ancho de impresión 59 mm
Longitud de impresión mínima 25,4 mm
Botón Botón ON/OFF ( ), botón FEED de avance, botón CUT de corte (sólo en la Brother QL-550)
Interfaz Puerto USBAlimentación eléctrica 120 VCA 60 Hz 0,8 ATamaño 146 (ancho) × 196 (fondo) × 152 (alto) mmPeso 1,3 kg (2,8 lb) aproximadamente (sin rollos DK)
Cortador Cortador automático (QL-550)Cortador manual (QL-500)
Elemento EspecificacionesSistema operativo
Windows® Windows® 2000 Professional/XP*1
Macintosh® Mac OS® X 10.1 ~ 10.4.7
InterfazWindows® Puerto USB (protocolo de especificación USB 1.1 o 2.0)Macintosh® Puerto USB (protocolo de especificación USB 1.1 o 2.0)
Discoduro
Windows® Más de 70 MB de espacio en el disco*2
Macintosh® Más de 100 MB de espacio en el disco*2
MemoriaWindows® Windows® 2000 Professional/XP: 128 MB o másMacintosh® 64 MB o más
MonitorWindows® Tarjeta gráfica SVGA, color de alta densidad o superiorMacintosh® 256 colores o más
Otros Unidad de CD-ROMTemperatura de funcionamiento 50°F to 95 °F (10°C a 35°C)Humedad de funcionamiento Del 20 % al 80 % (sin condensación)
Especificaciones principales

PASO 4 Mantenimiento y corrección de averías58
Brother recomienda el uso de accesorios originales Brother con su Brother QL-500/550. Si usa otros productos, puede afectar negativamente la calidad de impresión o puede dañar su Brother QL-500/550.Los siguientes consumibles y accesorios están disponibles para su Brother QL-500/550 y pueden solicitarse directamente a Brother si su proveedor no los suministra.
Rollos DK
Etiqueta troquelada DK
Cinta DK de longitud continua
Cortador de reemplazo
Hoja de limpieza
Nº de producto Descripción PrecioDK-1201 Etiquetas para direcciones estándar de 29 mm × 90 mm (1-1/7" × 3-1/2"), 400 etiquetas $14.99DK-1208 Etiquetas para direcciones grandes de 38 mm × 90 mm (1-1/7" × 3-1/2"), 400 etiquetas $19.99DK-1209 Etiquetas pequeñas para direcciones, 62 mm × 29 mm (2-3/7" × 1-1/7"), 800 etiquetas $26.49DK-1202 Etiquetas para transporte, 62 mm × 100 mm (2-3/7" × 4"), 300 etiquetas $26.49DK-1203 Etiquetas para carpetas de archivos, 17 mm × 87 mm (2/3" × 3-7/16"), 300 etiquetas $12.99
DK-1204 Etiquetas de papel para diversos usos/dirección de devolución, 17 mm × 54 mm (2/3" × 2-1/8"), 400 etiquetas $14.99
DK-1207 Etiquetas de película para discos CD/DVD, 58 mm × 58 mm (2-1/3" × 2-1/3"), 100 etiquetas $28.49
DK-1219 Etiquetas de papel redondas 12 mm × 12 mm (1/2”), 1200 etiquetas $19.99DK-1218 Etiquetas de papel redondas 24 mm × 24 mm (1”), 1000 etiquetas $19.99
Nº de producto Descripción PrecioDK-2214 Cinta de papel continua, 12 mm × 30,48 m (1/2” × 100 pies) $13.99DK-2210 Cinta de papel continua, 29 mm × 30,48 m (1-1/7” × 100 pies) $17.99DK-2205 Cinta de papel continua, 62 mm × 30,48 m (2-3/7” × 100 pies) $27.49DK-2211 Cinta de película continua, color blanco, 29 mm × 15,24 m (1-1/7” × 50 pies) $30.99DK-2212 Cinta de película continua, color blanco, 62 mm × 15,24 m (2-3/7” × 50 pies) $61.99DK-2606 Cinta de película continua, color amarillo, 62 mm x 15,24 m (2-3/7“ x 50 pies) $94.99DK-2113 Cinta de película continua transparente, 62 mm x 15,24 m (2-3/7” x 50 pies) $94.99
DK-4205 Cinta de papel continua y extraíble, color blanco, 62 mm × 30,48 m (2-3/7” x 100 pies) $36.99
DK-4605 Cinta de papel continua y extraíble, color amarillo, 62 mm × 30,48 m (2-3/7” x 100 pies) $41.99
Nº de producto Descripción PrecioDK-BU99 Unidad del cortador (2 unidades) $12.99
Nº de producto Descripción PrecioDK-CL99 Hoja de limpieza (10 hojas) $12.99
Accesorios (sólo en Estados Unidos)


Printed in ChinaLB7063001