graphical analysis 3
TRANSCRIPT

Low Tech Solar Collector for Garages/Barns/WorkshopsHere are some thoughts on an experimental inexpensive, low maintenance, long life, very simple solar collector.
The collector is probably best suited for a barns, garages, workshops, hangers and similar buildings.
The new collector concept is integrated into a South facing wall. It uses the siding material of the building as the absorber. The siding is painted a dark color, and is applied directly over conventional studs. The interior wall (e.g. Gypsum board) is omitted as is the insulation in the wall cavity. So if you look at the collector wall from the inside, you see the wall studs and the back surface of the siding. The outer surface of the siding is covered with a layer of corrugated polycarbonate or Fiberglass glazing panels (e.g. SunTuf polycarbonate panels). The glazing panels are spaced off the siding and supported by a simple set of thin vertical and horizontal spacers. The glazing panel corrugation valleys are only about a quarter inch off the siding. The openings on the top and bottom of the corrugated panels are closed off to prevent air circulation. The glazing provides a static airspace next to the siding that reduces heat loss to the outside. Heat is transferred through the siding by conduction only, there are no penetrations of the wall and no ducts or fans. See the test panel picture below.
In operation, the sun heats the siding (absorber), and the heat is transferred by conduction
www.BuildItSolar.com
Illustration 1Low Tech Collector -- Test Panel

to the inside surface of the siding, which, in turn, transfers heat to the garage via convection and radiation. The external glazing reduces heat loss from the siding and allows the siding to attain a higher temperature. The inside surface of the siding acts like a large (full wall) radiant heater, warming the air in contact with it, as well as providing direct radiant heating.
The picture above shows a small test panel – in actual practice a large fraction of the south wall would be covered by the collector.
The things that I like about the collector concept are:
• Its about as simple a collector as I can imagine -- most of the usual components of a collector are eliminated: 1) there is no separate absorber, the siding serves as both siding and absorber, 2) there is no collector box, just some small spacers, 3) there is no insulation, since you want to encourage heat transfer out the back of collector, not discourage it, 4) there are no ducts or fans to deliver air to/from the collector. That is, this design eliminates all the components of a conventional collector except the cover plate.
• It uses a very simple glazing system that requires essentially no framing, and minimal labor to install.
• It transfers heat to the inside of the building directly through the wall by conduction. No wall penetrations, ducts, vents, or blowers are used. You don't have to cut holes in your wall, which can be a bit daunting.
• It is less expensive, since the only added component is the glazing (approximately $1/ft^2) and some small spacers. These cost and labor for these added components is partially offset by omitting the insulation on the inside of the collector wall at (~$0.30/ft^2).
• The net extra labor to install the collector is small. This collector is so cheap and easy to install, you can just do it without a long battle with yourself about whether its worth the investment in materials and labor. A collector large enough to heat a 25 ft by 25 ft barn/garage will cost about $150 in materials, and take (perhaps) half a day to install.
• Some of the heat transfer into the garage/barn is by direct radiation from the heated South wall. This should allow for a lower room air temperature for the same comfort level (see “Radiation Benefits” below).
• It can cover as much or as little of the wall as desired, and can be installed along with and around windows.
• It should have a long life with little maintenance.
www.BuildItSolar.com

• Its not too ugly, or strange looking. With spacer strips painted to match the siding and clear glazing, it should be almost invisible.
On the negative side:
• The night time losses will be high, since there is no insulation to prevent heat loss out the wall. In this regard it behaves similarly to using a window as a solar collector. How important this is depends in large part on how you use the space that is being heated.
• The thermal efficiency of the panel is not as high as a conventional solar collector. The efficiency depends primarily on the thermal conductivity of the siding material – highly conductive siding (like metal or Hardi Board) will give the highest efficiency. In general, the panel will not be as efficient as a more conventional solar panel. That said, the economic efficiency (dollars spent per BTU produced) is dandy.
• An alternative to this type of collector would be to have a large fraction of the South wall in windows, or to use transparent siding panels on the South wall (e.g. Corrugated Polycarbonate panels). This approach would: 1) have a higher collection efficiency, 2) have worse night time losses, 3) would let in more day lighting (nice, but glare can be a problem), 4) make it more difficult to use the wall for storage etc., 5) might be deemed to be more of a security problem, and 4) in the case of windows, would be much more expensive. The best answer depends on your situation.
• The design may be difficult to retrofit to an existing building if the siding material on the building has a high R value. South walls with low thermal resistance will work better – see below
www.BuildItSolar.com
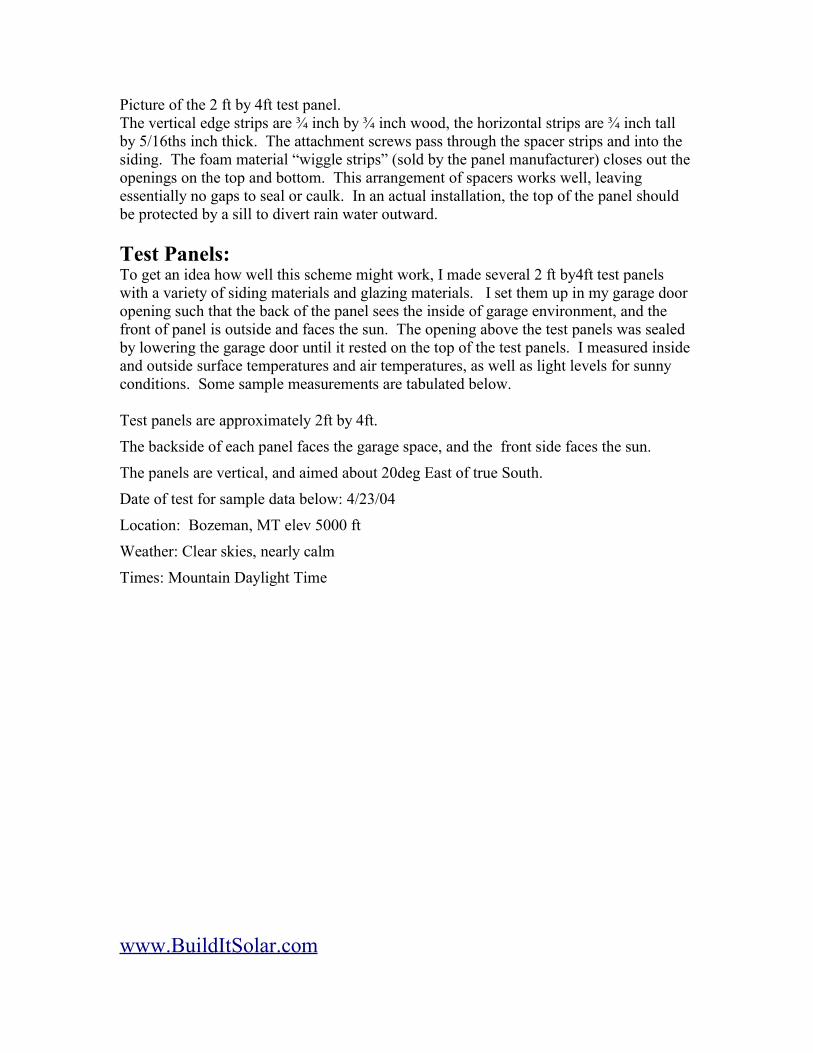
Picture of the 2 ft by 4ft test panel.The vertical edge strips are ¾ inch by ¾ inch wood, the horizontal strips are ¾ inch tall by 5/16ths inch thick. The attachment screws pass through the spacer strips and into the siding. The foam material “wiggle strips” (sold by the panel manufacturer) closes out the openings on the top and bottom. This arrangement of spacers works well, leaving essentially no gaps to seal or caulk. In an actual installation, the top of the panel should be protected by a sill to divert rain water outward.
Test Panels:To get an idea how well this scheme might work, I made several 2 ft by4ft test panels with a variety of siding materials and glazing materials. I set them up in my garage door opening such that the back of the panel sees the inside of garage environment, and the front of panel is outside and faces the sun. The opening above the test panels was sealed by lowering the garage door until it rested on the top of the test panels. I measured inside and outside surface temperatures and air temperatures, as well as light levels for sunny conditions. Some sample measurements are tabulated below.
Test panels are approximately 2ft by 4ft.
The backside of each panel faces the garage space, and the front side faces the sun.
The panels are vertical, and aimed about 20deg East of true South.
Date of test for sample data below: 4/23/04
Location: Bozeman, MT elev 5000 ft
Weather: Clear skies, nearly calm
Times: Mountain Daylight Time
www.BuildItSolar.com

Sample Test Panel Results:
10:00 AM 11:00 AM 12:05 pm(6)Tamb (F) 45 52 56Tgarage (F) 61 63 64Wind (mph) (aprox) 1.5 1.5 1.5Illumination(rough) (lux)(2) 61k 74.2k 79.6kTest Panel 1:0.5 inch Plywood – white, no glazing(3)Tcollector(4) 66 83 90Tinside (5) 58 71 76Test Panel 2:0.5 inch Plywood – dark, PC glazing (7)Tcollector 122 141 142Tinside 88 105 110Test Panel 3: “Hardi Panel” siding, dark, PC glazing(8)Tcollector 108 131 134Tinside 99 120 124Test Panel 4:Alum siding, dark, PC glazgin (9)Tcollector 106 126 132Tinside 103 123 127Test Panel 5:Asphalt Shingle, plywood, PC Glaz (10)Tcollector 129 163 175Tinside 72 94 100
(2) Illumination (flux) – very rough illumination level in plane of siding(3) This non-glazed panel is a base to compare the others to.(4) Tcollector – surface temperature of outer surface of siding (ire. Absorber temp)(5) Tinside – surface temperature of inner surface of siding (ire. The side that heats the garage). All surface
temperature measurements taken with a RayTek MT4 IR surface temperature meter – taken on the dark grey paint (6) At this time, the sun azimuth is 13 deg East of perpendicular to the panels.(7) This panel is ½ inch plywood (simulating T11 style siding), covered with one layer of polycarbonate glazing.(8) This panel is 3/8 inch “Hardi Panel” (cement) siding, covered with one layer of polycarbonate glazing(9) This panel is aluminum soffit material to simulate metal siding, covered with one layer of fiberglass glazing.
www.BuildItSolar.com
(10)This panel is ½ inch plywood sheathing+felt paper+asphalt shingles, covered with one layer of PVC glazing
The “figure of merit” is Tinside – this is the temperature of the siding surface facing the inside of the garage space. The higher this temperature, the more heat that is being transferred to the garage. As expected, the siding material with the least thermal resistance (metal siding) has the highest Tinside (127F max). The corresponding Tcollector is the lowest, since a lower collector temperature is required to drive the heat through the lower thermal resistance of the metal siding. But, even the relatively high thermal resistance plywood siding (R = 0.62) reaches 110F inside. The various siding types with glazing produced an inside surface temperature increase over the unglazed siding of 30F to 50F-- this might have been greater if the wind speed had been more normal.
The last case (asphalt shingles over plywood sheathing) is a somewhat unrelated experiment. The idea was to see if a layer of glazing over a shingle roof could result in increased transfer of heat to an attic space. The hot attic air could then be ducted to the house for heating. The temperatures turn out to be higher than one might want to subject the asphalt shingles to?? But, this scheme might work well with metal roofing – very simple, no roof penetrations?? But, how do you attach the glazing to the roof??
The test panel results were also used to validate the thermal model described below. This was done by looking up the solar radiation for the time of the test, figuring out the component of radiation on the panel, and then using the model to estimate collector temperatures (Tcollector). The measured vs modeled collector temperatures were quite close – about +-2 deg F for several cases. I'm sure there is some element of luck here, but it does seem to indicate the model is not too far off, and that performance estimates (below) based on the model might be in the ballpark.
Construction Issues:I pass on these construction hints for what they are worth – you should take them with a healthy grain of salt, since I have never built one of these collectors.
The siding should be dark in color. Black is thermally the best with an absorbency of 0.95, but dark blue and dark green are only about 5% less, and may be more aesthetically pleasing. The siding should preferably have high thermal conductance (low R). Installation of the glazing panels will be easier if the siding is smooth on the outside.Siding that comes in large panels (say 4X8ft) will make life easier.
For windy areas, a fairly tight pattern of horizontal support strips and screws should be used to attach the glazing panels. Horizontal support strips at (say) 2ft intervals with screws every (say) 3rd corrugation should cover just about any wind condition. Even for non-windy areas, I would not cut this back a lot.
www.BuildItSolar.com
If a somewhat finished look is desired on the inside, be sure to consider the length of the screws used to secure the glazing to the siding/studs. Long screws will protrude through the siding and be visible on the inside unless they are over stud locations.The glazing panel manufacturers would like the screws to be placed in oversize pilot holes, and would like screws with EDPM washers that are just snug (not over tight) – this is supposed to allow the panels to expand and contract thermally.
I think that the foam type “wiggle strips” (that close off the corrugation openings at the end of the panels) fit and seal better than the wood ones. I'm not sure which will hold up the best over time.
A sill should be used on the top of the collector to prevent rain from entering the top of the collector.
Some form of summer overheat protection for the collector (and the garage) may be needed (or not). The usual approaches of deciduous trees, overhangs, awnings, a roll up covering, or shade cloth would all be applicable as overheat protection.
There may be some concern about exposing wood siding to temperatures that may go as high as 200F (this is an estimate for mid summer, 94F ambient, no summer overheat protection, and insulation over inside wall of collector). There is one source ( http://www.doctorfire.com/low_temp_wood1.pdf ) that recommends not exceeding 170F, in order to prevent any chance of ignition. On careful reading of this paper, it appears to me that the exothermic chemical reaction within the wood that is required to produce ignition at these low temperatures requires thick sections of wood , and therefore may not be a problem for typical siding. Other sources seem to be content with temperatures less than 100C (212F) or 120C. The one wood based siding manufacturer that I was able to find data on simply says to avoid temperatures over 400F. I did some simple short term tests with a propane pad heater and some composition siding -- It took surface temperatures above 400F for the siding to show any signs of distress (visible out gassing). When removed from proximity to the heating pad, the siding and paint appeared unaffected. I plan to leave the test panel with the glazed half inch plywood out for the summer, with the back side insulated, a 2nd layer of glazing added, and the tilt angle optimized for maximum gain. This should produce much higher temperatures than any actual application, and may give some indication if there is a problem.
The spacer arrangement used in the test panel in picture seems to work out well. The vertical spacer strips are ¾ inch thick, and the horizontal spacers are 5/16ths thick. This allows the foam “wiggle strips” that block off the ends of the corrugations to fit perfectly. This all goes together with no gaps that need to be sealed up with caulking. A sill above the collector panel to divert rain out from the panel should also be used. Spacing the horizontal spacers at 2 to 2.5 ft seems about right to me. If the spacers are painted the same color as the siding, they will be almost invisible.
www.BuildItSolar.com

Refinements:Some form of movable insulation could be added on the inside to reduce the heat loss when the sun is not shinning on the panel to improve the overall performance, especially if night time temperatures need to be kept from dropping too low. Without the insulation the R value for the siding + glazing is about 2.5, as compared to R13 or more for an insulated wall. A single layer of reflectorized mylar that rolls down over the inside of the studs would cut the night time heat loss of the collector wall about in half. This would help keep the garage temperature from dropping so much after a sunny day – it will not help a much with multiple days of heavy cloudy weather.
Some form of simple forced circulation could be used to improve heat transfer from the collector wall to the garage during the day. This could be as simple as a box fan or two set up to blow garage air toward the back of the collector (ire. The back surface of the siding). Most of the thermal resistance to heat transfer is the air film next to the wall (R= 0.68), if the air velocity were increased to 3 or 4 mph, the air film R is cut about in half.
The panel could be made even simpler by eliminating the strips that space the glazing panels off the siding, and attaching the glazing directly to the siding. This decreases the efficiency of the glazing, because the corrugation valleys are in direct contact with the siding, but it still works pretty well. In this case, it would be better to use glazing panels with the sine wave looking cross section rather than the panels that have a more square wave type of pattern (to reduce the contact area). The open areas at the top and bottom of the glazing panels still need to sealed off to prevent wholesale circulation of ambient air behind the panels.
An enterprising siding manufacturer could offer siding panels (say 4 ft by 8ft) with the glazing layer already built into the panel. Ideally these would have built in webs to prevent air circulation if the siding panel is cut. This would reduce the added labor for this collector to zero (or less than zero if you take credit for not installing insulation inside)!
Comments:If you have any thoughts on this concept, or you give it a try, I would be interested in any comments or suggestions you have.
Gary 5/20/[email protected]
Some Extra Data on a Thermal Model and Performance Simulation is Included Below:
Thermal Model
www.BuildItSolar.com

Here is one way to think of how this collector works thermally:
About 95% of incident solar energy will pass through the glazing and reach the siding/absorber, and about 95% of this energy will be absorbed by the absorber. -- so about 90% of the incident energy gets to, and heats the absorber. From here it will either end up going South (out the glazing) and be lost, or, it will end up going North, and heat the room.
Isun (Trans)(Absorb) = Qnorth + Qsouth
Qsouth = (Acoll) (Tcollector – Tambient) * Usouth
Qnorth = (Acol) (Tcollector – Tgarage * Unorth
Isun = Idn cos(IncidAng) + Idif/2Where:
Qsouth = the heat flow out the glazing (BTU/hr)Qnorth = the heat flow into the garage (BTU/hr)Acol = the area of collector (ft^2)Tcollector = the surface temperature of the outside surface of siding (absorber)Tambient = the ambient outdoor temperature (deg F)Tgarage = temperature in the garage (F)Usouth = the thermal conductivity out the glazing (BTU/ft^2 F hr)Unorth = the thermal conductivity for heat flow into the garage Isun = solar energy incident on collector (BTU/ft^2)Idn = direct normal solar radiation (BTU/ft^2)Idif = diffuse solar radiation (BTU/ft^2)Trans = fraction of light transmitted by glazingAbsorb = fraction of light absorbed by siding IncidAng = is the incidence angle of the sun on the collector (deg)
The above equation can be rearranged into:
Tcollector = ((Isun)(Trans)(Absorb) + (Tgarage)(Unorth) + (Tamb)(Usouth))/(Usouth+Unorth)
This can be measured on the test panels to see how well the model predicts actual conditions.
Usouth:Is around 1.2 for single glazed collectors – this includes all losses out the cover plate including radiation. U varies with ambient and collector temperatures and sky temperatures, but 1.2 appears to be a pretty good average.
Unorth:
www.BuildItSolar.com

Depends on the R value of the siding + the air film on the inside of the siding.Siding R values:
½ inch plywood style siding R = 0.62“Hardi Panel” style siding R = 0.25(?)Metal siding R = 0 (or nearly so)
The R value of the air film on the inside of the siding, is about 0.68 for free convection, or about half this if mild (e.g. box fan) forced convection is used.
So, Unorth = 1/Rnorth can vary fromUnorth
metal siding, box fan convection 4.0 (BTU/hr-ft^2)metal siding, free convection 1.5“Hardi Panel”(1) siding, box fan convec 2.0“Hardi Panel”(1) siding, free convection 1.1Plywood siding, box fan convection 1.1Plywood siding, free convection 0.8Sheathing + siding + box fan 0.7Sheathing + siding + free convec 0.5
Note (1): “Hardi Panel” is a brand of siding that is made from “90% cement and sand + 10% cellulose”. It is non-combustible, relatively dense, is patterned to look like wood, and has a higher thermal conductivity than wood siding – I believe that the R value for the Hardi Panel siding is about 0.25. So, it might make a good alternative to wood siding for this type of collector.
Best results are achieved when Usouth is made as small as possible (less loss), and Unorth is made as large as possible (more gain).
An Example using the thermal model:Dec 21, solar noon, Latitude = 45, altitude = 4000 ft MSLAcol = 200 ft^2Trans = 0.95, Absorb = 0.95 (single glaze polycarbonate)Tambient = 35F Tgarage = 60FUnorth = 1.5 (metal siding, free convection) Usouth = 1.2 (single glazed)Ground Reflectance: 0
Isun = Idn cos(IncidAng) + 0.5 Idif= (279)(cos(21.6)) + 0.5*16 = 267.5 BTU/hr – ft^2
Tcollector = ((Isun)(Trans)(Absorb) + (Tgarage)(Unorth) + (Tamb)(Usouth))/(Usouth+Unorth)
= (267.5*0.95*0.95 + 60*1.5 + 35*1.2) / (1.5 + 1.2)
www.BuildItSolar.com

= 138.3F
Qsouth = (Acoll) (Tcollector – Tambient) * Usouth= 200*(138.3 – 35)*1.2 = 24720 BTU/hr
Qnorth = (Acol) (Tcollector – Tgarage * Unorth= 200*(138.3 – 60)* 1.5 = 23400 BTU/hr
efficiency = Qnorth/Isun*Acol = 23400/267.5*200 = 44%
This thermal efficiency may seem a bit low, but when you work out the dollar efficiency as: (Installed cost $)/ (BTUs produced), its dazzling :-)
Benefit of Radiant Heating(?)Some of the heat transfer into the garage/barn is via direct radiation of the heated south wall. My HVAC book defines a Mean Effective Radiant Temperature (MERT) as the effective radiant temperature a room occupant sees – it is calculated as the temperature of each wall weighted by the angle that the wall subtends on the occupant. The claim is that if the MERT is increased by one degree, then the air temperature can be decreased by 1.5 degrees, and the same comfort level is maintained. So, for a person sitting in the middle of a 25 ft square building with 70F walls, the MERT is 70 F. If the collector heats the inside surface of the South wall to 90, the MERT would go up to:
MERT = (3*(90deg)*70 + (90 deg)*90F))/360 deg = 75F.
This should allow an air temperature that is 7.5F lower to provide the same comfort level.
No Sun Heat Losses:During the times when the sun is not shining on the collector, it will lose heat much faster than a well insulated wall. The R value for the collector wall is about 2.5, which is poor compared to the R 13 or more of an insulated wall. If the garage is fairly well insulated, the collector wall might typically account for about half of the total heat loss from the garage. This may not matter if the building is only used during the day, and is allowed to cool down to near ambient at night anyway. In cases where night time heat loss is important, some form of movable insulation on the inside of the collector wall would help carry over some of the previous days gain and make the morning warmer.
www.BuildItSolar.com


The plots above show the ESTIMATED performance of a 25 ft by 25 ft garage/barn. The south wall is all collector (200ft^2), the E and W walls and ceiling are insulated to R19, and the North wall is assumed to be R4 (as in a big garage door).
The first plot shows the temperatures inside and outside of the garage for a sunny day in Billings, MT in December. Performance for two different types of siding (metal and plywood) are shown. The “Hardi Panel” style siding would fall between the metal and plywood siding.
Tambient -- outside ambient temperature (F)
TbarnMS – inside temperature with a collector that uses metal siding, and free convection
TbarnPS -- same for single layer plywood siding (no separate sheathing layer)
TcolMS -- collector/absorber temperature of metal siding version
TcolPS -- same for plywood siding version
The metal siding version has a temperature increase rate of about 6 F/hr once the sun starts shining, and achieves just over 70F in the afternoon. Once the sun stops shinning on the collector, the garage loses heat at about 2.5F per hour. The plywood siding version has a slower temperature rise, but still achieves the mid 60's – the temperature drop in the plywood sided version is less than the metal sided one, due to the greater R value of the plywood.
The 2nd plot shows the heat flow into and out of the garage for the same day.
QcolMS -- heat flow rate for the collector wall with metal siding (BTU/hr)
www.BuildItSolar.com
QcolPS -- same for plywood sided collector wall
Qgarloss – heat loss out all of garage except collector wall (BTU/hr)
During the night, the garage losses heat at about 5000 to 10000BTU/hr (the sum of Qgarloss + QcolMS) – the collector wall losses about as much heat as all of the rest of the garage. Once the sun starts shining on the collector, the heat gain rate quickly gets up to 3 to 5 times the loss rate, so the garage heats up fairly quickly. The inside of the siding will also be acting as a radiant heater, which would make the air in the garage feel somewhat warmer even when Tgar is a bit chilly.
It should be noted that if the weather is cloudy enough to cut out most of the sunshine, the garage does not have any thermal storage, and will drift down to near ambient temperature in not too long a time. In other words, if the garage/barn needs to be warm on cloudy days, some form of supplementary heat will be needed – or you could just wait for a sunny day :-)
It should be noted that insulating the garage is very important. Without insulation, the winter time heat losses in colder climates will exceed the collector gain, even when the sun is shinning.
In the above estimates, the thermal mass of the garage is modeled as equivalent to 3000lb of water which is thermally well coupled to the collector. This is a very approximate way to do it – I should be able to refine this after Nick's workshop :-) That said, the technique seems to match the performance of my current garage collector fairly well.
Monthly Performance Plots:
The following plots show monthly performance in Billings, MT for December and February.
www.BuildItSolar.com

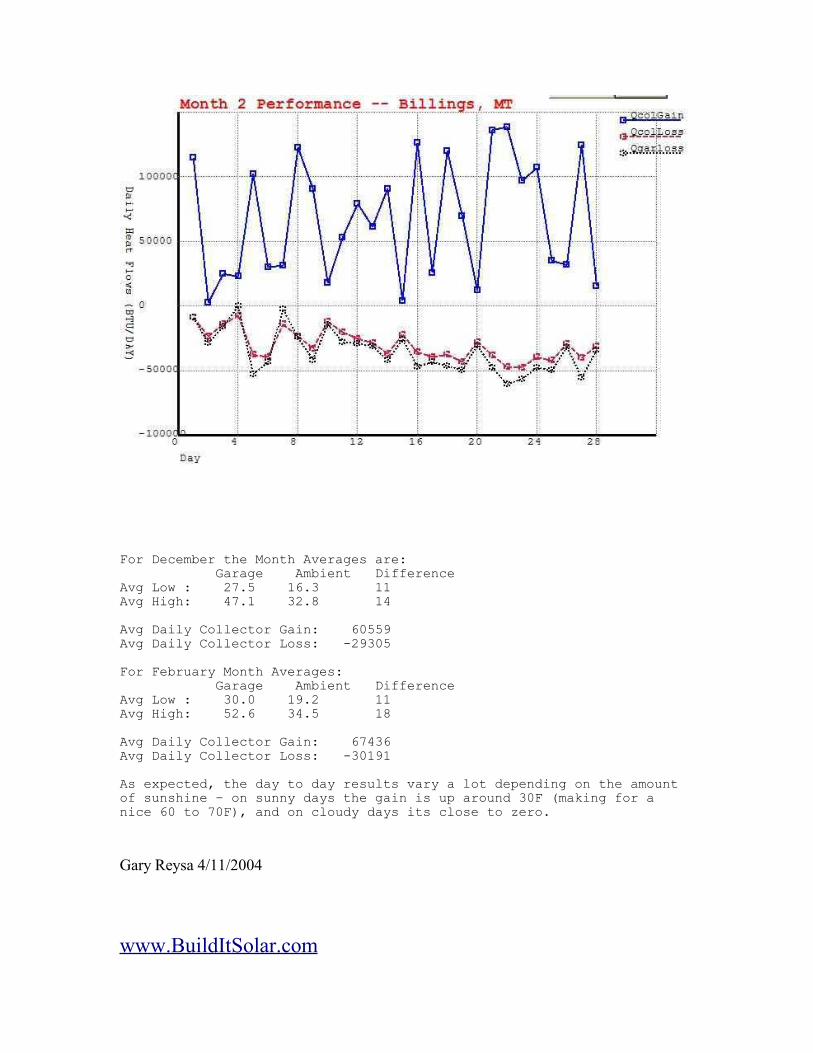
For December the Month Averages are: Garage Ambient Difference Avg Low : 27.5 16.3 11 Avg High: 47.1 32.8 14 Avg Daily Collector Gain: 60559Avg Daily Collector Loss: -29305For February Month Averages: Garage Ambient Difference Avg Low : 30.0 19.2 11 Avg High: 52.6 34.5 18 Avg Daily Collector Gain: 67436Avg Daily Collector Loss: -30191As expected, the day to day results vary a lot depending on the amount of sunshine – on sunny days the gain is up around 30F (making for a nice 60 to 70F), and on cloudy days its close to zero.
Gary Reysa 4/11/2004
www.BuildItSolar.com