graphic pen display en.pdf · graphic pen display. page1 page2 ... notes: (1) barrel button ......
TRANSCRIPT

Artist 13.3 ManualWindows 10,8,7 and Vista Mac 10.8 or above
www.xp-pen.com
Please contact us with any questions
Graphic Pen Display

PAGE1 PAGE2
Artist 13.3 User Manual
Thank you for purchasing the XP-Pen tablet. Our product quick guide currently supports English, Russian, Japanese, German, Korean, Chinese, Italian, Spanish, and French. We apologize if your preferred language is not supported.
Contents
I. Artist 13.3................................................................ a. System requirements.............................................b. Product overview...................................................c. Active area............................................................
II. Stylus..................................................................... a. Stylus and accessories......................................... b. Pen tip replacement..............................................c. Pen stand............................................................
III. Connecting the Artist 13.3.....................................
IV. Driver Installation.................................................a. Windows.............................................................b. Mac....................................................................
V. Driver Settings UI...................................................a. Windows..............................................................b. Mac.....................................................................
VI. Driver Uninstallation.............................................a. Windows.............................................................b. Mac....................................................................
VII. FAQ......................................................................
{ I.Product Overview }
a.System Requirements
● Windows 10/8/7and Vista ● Mac OSX 10.8 or later● USB and HDMI ports
b.Product Overview
Image 1-1: Product Overview
1.Working area2.Shortcut keys3.Type-C USB port4.Brightness up5.Brightness down6.Power indicator LED
a.On, blue: The Artist 13.3 is connected to your computer and powered on.b.Off: The Artist 13.3 is powered off.
c.Active area
Image 1-2: Active area
2222
3334
4
567
101015
181818
19
1
2

PAGE3 PAGE4
{ II.Stylus }
a.Stylus and accessories
Image 2-1: Stylus and Accessories
1.Barrel button 22.Barrel button 13.Pen tip4.Pen stand (Top)5.Replacement pen tips6.Pen stand bottom7.Pen clip hole
Notes:(1) Barrel button functions can be customized in the tablet’s driver settings. (2) Stylus does not use a battery or require charging.
b.Pen tip replacement
Image 2-2: Pen Tip Replacement
1.Turn the pen stand upside-down and insert the stylus tip into the hole in its center. Tilt the stylus slightly so that the tip catches on the edge of the hole, then pull the stylus and pen stand apart to remove the pen tip.
2.Twist the pen stand’s top half counter-clockwise to separate it from the bottom.3.Take a new pen tip from the inside of the pen stand.4.Push the new pen tip straight into the stylus.
c.Pen Stand
Image 2-3: Pen Stand
{ III.Setting up the Artist 13.3 }
Notes:(1) Two USB cords are included with the Artist 13.3. The RED USB code of the two
comes in two separate sections which must be connected before use.(2) The RED USB cord can be plugged int to your computer or into a wall outlet. The
other USB cord must be plugged into your computer.
1.The RED USB cord plugs into extra USB cable.
Image 3-1: Connecting the extra USB cable
1
2
3
4
5
6
7
2.Plug the Type-C USB cord into the Artist 13.3.3.Plug the Artist 13.3 HDMI and USB cords into your computer.
1
2
3
4

PAGE5 PAGE6
Image 3-2: Connection
4.Plug the long, 2-part USB power cord into your computer or into a wall outlet. If your tablet does not work correctly with its power cord connected to your computer, please plug the cord into a wall outlet instead.
Image 3-3: Connection-1
Notes: If your tablet displays a “No Signal” error message:(1) Unplug the Artist 13.3's Type-C USB cord then plug it back in. Ensure that cord is
connected well. Reboot your computer, then turn the Artist 13.3 off and back on. (2) Test the Artist 13.3 on a different computer to check for hardware issues. (3) If the error persists on different computers and (a) does not solve it, please contact
XP-Pen support.
(3) You may install the Artist 13.3 driver with the included ash drive or download the latest driver version from the XP-Pen website (www.xp-pen.com). If you choose to download the driver from the website, be sure to extract the .zip le contents before running “install.exe” or “PenTablet10.0.0.8_20170606.pkg.”
(4) The Artist 13.3’s maximum resolution is 1920x1080.
{ IV.Driver Installation }
Notes:(1) Disable any antivirus or rewall software and close any non-essential background
software before beginning the installation. Some software, such as OneDrive and Dropbox, may monopolize important les and prevent a successful installation. On Windows computers, check the system tray on the bottom-right of the screen and close any software unrelated to your computer hardware. On Windows 8 computers, syncing must be disabled in OneDrive while installing and uninstalling tablet drivers.
(2) Uninstall any existing tablet software before attempting to install the Artist 13.3 driver. Other tablet drivers will conict with the Artist 13.3 driver or prevent installation entirely.
a.Windows
1.Connect the Artist 13.3 to your computer using the included HDMI & USB cords. Turn on the tablet.
2.Insert the included ash drive into a working USB port on your computer, then open it and run its install.exe le.
3.If you get a “Windows Security” warning message, please click “Install this driver software anyway.”
Image 4-1: Windows Security
4.After a successful installation, the driver’s icon ( ) will appear in your system tray and on your desktop. If the icon is not present, uninstall the driver, reboot, and repeat step 2.
5.(Recommended) Open [Control Panel] > [Display], then set Change the size of text, apps, and other items to 100%.
Image 4-2: Display setting
6.In [Control Panel] > [Display], change your dual monitor settings to Extend mode/Extend these displays.
7.In Extend mode, set your Artist 13.3 to monitor 2 and choose a resolution of 1920x1080.
8.In Duplicate these displays mode, set both of your monitors’ resolutions to 1920x1080.

PAGE7 PAGE8
Image 4-3: Extend mode
9.Apply and exit. 10.Double-click the driver’s system tray icon to open your tablet settings, then set your
Artist 13.3 to Monitor 2 under “Current screen.” Apply and exit.
b.Mac
1.Connect the Artist 13.3 to your computer using the included HDMI & USB cords. Turn on the tablet.
2.Insert the included ash drive into a working USB port on your computer.3.Open Finder, then open the ash drive’s folder. Open the “Mac Driver” folder, then run
its .pkg le.
Image 4-4: Mac driver
4.If you run into the error message below, please complete the following steps.
Image 4-5: Unidentified developer
(1)Open “System Preferences,” then “Security & Privacy.”
Image 4-6: Security & Privacy
(2)Click the lock icon on the bottom left of the window.
Image 4-7: Lock
(3)Input your username and password, then click “Unlock.”
Image 4-8: Password

PAGE9 PAGE10
(4) Click “Open Anyway.”
Image 4-9: Open Anyway
(5)Click “Open” to run the tablet setup.
Image 4-10: Open
5.Open [System Preferences] > [Display]. In the Display tab, set your resolution to Default for display.
Image 4-11: Display
Image 4-12: Arrangement
6.In the Arrangement tab, you may choose to Mirror Displays. With Mirror Displays enabled, both monitors’ resolutions should be set to 1920x1080.(1) Open [Finder] > [Applications] > [Touch Tablet] > [Pen Tablet Setting]. (2) In the Calibration tab, set Monitor Mapping to Monitor 1.
7.With Mirror Displays disabled, set your Artist 13.3’s resolution to 1920x1080.(1) Open [Finder] > [Applications] > [Touch Tablet] > [Pen Tablet Setting]. (2) In the Calibration tab, set Monitor Mapping to Monitor 2.
Image 4-13: Calibration
{ V.Driver Settings UI }
a.Windows
The Artist 13.3’s driver settings can be opened in two ways:●Double-click the driver’s system tray icon ( ).
OR●Double-click the “Pentablet” icon on your desktop.

PAGE11 PAGE12
Image5-1: UI
You may customize the functions of your tablet pen’s barrel buttons here. Use the “Function Key” option to program custom keystrokes.
Driver UI
1. Barrel Button SettingsYou may customize the functions of your tablet pen’s barrel buttons here. Use the “Function Key” option to program custom keystrokes.
Image5-2: Barrel Button Settings
Note:Pen/Eraser ToggleWith the stylus in range of the Artist 13.3’s working area, press the assigned barrel button to toggle between pen and eraser modes in compatible drawing software. The current mode will briey be displayed on your monitor.
Image5-3: Click Sensitivity & Current Pen
3.Mouse ModeAbsolute (Pen) Mode: Standard tablet mode; Each point of the tablet’s work area corresponds to an absolute point on your computer display.Relative (Mouse) Mode: Mouse mode; The tablet’s work area does not correspond to absolute points on your computer display and your pen works as a standard mouse.
Image5-4: Absolute & Relative modes
4.Current ScreenThe Artist 13.3 may be congured for use on different monitors. Generally, this should be set to “Monitor 2.”
Image5-5: Current Screen
2. Click Sensitivity & Current Pen Pressure
Lighter sensitivity means that digital pressure level will rise with less applied physical
pressure. Current Pen Pressure shows the current pressure level being exerted on
your tablet and can be used to test pen pressure.
5. Windows InkWindows Ink capability can be toggled on and off here. Enabling this will allow support for Windows Ink and applications that run using Windows Ink.

PAGE13 PAGE14
Image5-7: Calibration
7.Display Setting (1)Color Temperature: Use to adjust the Artist 13.3’s color balance. (2)User: Use to adjust red, green and blue color levels on the Artist 13.3’s display.
Brightness and contrast can also be adjusted here.(3)Rotate: You may rotate the Artist 13.3’s display in this tab.
Image5-8: Display Setting
8. Express Keys Settings
Image5-9: Express Key Setting
Use Function Key to set custom keystrokes for your shortcut keys.
Image5-10: Function Key
Note:(1)Fine Detail Mode allows you to restrict your tablet’s active area to a small portion of
the screen for ne detailing.
9. Default Click “Default” to revert to manufacturer settings.
Image5-6: Windows Ink
6.Calibration The Calibration tab allows you to set up calibration for your tablet.
PAGE15 PAGE16
10.XP-Pen LogoIf a driver update is available, you will see a blue arrow here ( ). Click the arrow to update your driver.Click our logo to visit our website.
Image5-11: XP-Pen logo
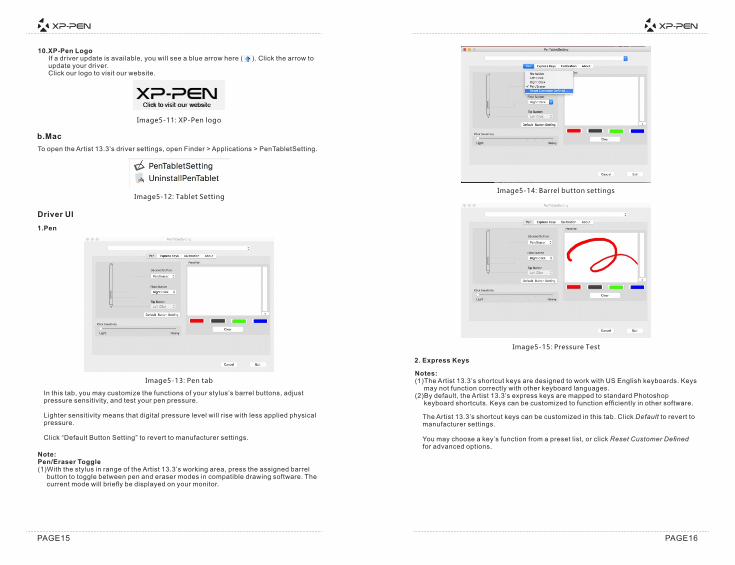
b.Mac
To open the Artist 13.3’s driver settings, open Finder > Applications > PenTabletSetting.
Image5-12: Tablet Setting
Driver UI
1.Pen
Image5-13: Pen tab
In this tab, you may customize the functions of your stylus’s barrel buttons, adjust pressure sensitivity, and test your pen pressure.
Lighter sensitivity means that digital pressure level will rise with less applied physical pressure.
Click “Default Button Setting” to revert to manufacturer settings.
Note:Pen/Eraser Toggle(1)With the stylus in range of the Artist 13.3’s working area, press the assigned barrel
button to toggle between pen and eraser modes in compatible drawing software. The current mode will briey be displayed on your monitor.
Image5-14: Barrel button settings
Image5-15: Pressure Test
2. Express Keys
Notes:(1)The Artist 13.3’s shortcut keys are designed to work with US English keyboards. Keys
may not function correctly with other keyboard languages.(2)By default, the Artist 13.3’s express keys are mapped to standard Photoshop
keyboard shortcuts. Keys can be customized to function efciently in other software.
The Artist 13.3’s shortcut keys can be customized in this tab. Click Default to revert to manufacturer settings.
You may choose a key’s function from a preset list, or click Reset Customer Dened for advanced options.

PAGE17 PAGE18
Image5-16: Express Keys
3.Calibration The Calibration tab allows you to calibrate your tablet, map your monitor, or rotate your display.
To calibrate, click Calibration … and follow the on-screen instructions.
Image5-17: Calibration
4. About The About tab displays the current downloaded driver version.
Image5-18: About
{ VI. Driver Uninstallation }
a.Windows
The are 3 ways to uninstall your Artist 13.3 driver. (1)In the Start menu, open [Settings] → [Apps & features]. Find “Pentablet” and click
“Uninstall.” Follow the on-screen instructions.
Image6-1: Windows uninstall
(2)Click ”Start,” then scroll down to the “XPPEN Technology” folder. Click “Uninstall.”
Image6-2: Uninstall Pentablet
(3)Run the driver’s installer again, then select “Remove” when prompted.
Image6-3: Remove
b.Mac
Open [Finder]→ [Application]→ [Pen Tablet], then click “Uninstall Pen Tablet” and follow the on-screen instructions.

PAGE19 PAGE20
Image 6-2: Mac uninstall
Note:When attempting to reinstall the Artist 13.3 driver, be sure to reboot your computer after the uninstallation is complete.
{ VII.FAQ }
Q: Where can I download the latest Artist 13.3 driver?a.Latest driver releases can be downloaded from our website (www.xp-pen.com).
Q: I can’t use the stylus to control the cursor. a. Uninstall the Artist 13.3 driver. If its uninstaller will not run, run the driver’s installer
again, then uninstall. Reboot, then connect your Artist 13.3 to your computer and test your stylus. If the cursor responds to your pen input, the tablet’s hardware is functional. Reinstall the Artist 13.3 driver according to these steps (Windows):
Download the tablet’s latest driver from www.xp-pen.com, then extract the .zip contents to the desktop.
Close all non-essential software and processes (Some software may use the wintab process and interfere with the driver installation. OneDrive in particular often causes issues; its system tray icon looks like two grey clouds. OneDrive’s syncing must be disabled during installation and uninstallation on Windows 8 computers).
Open C:\Windows. Using the “search” box near the top-right of the window, search for “WinTab32.dll” and delete any instances.
Connect the tablet and power it on, then run the driver installation. Complete the installation, then reboot.
If the tablet’s system tray icon is not visible after rebooting:Open C:\Windows. Open File >> Folder and Search options >> View. Enable “Show hidden les and folders,” then exit options. Search for “wtclient.” Right-click both instances and “Run” each as Administrator. The driver icon should appear.
Q: How do I know that the Artist 13.3 driver installed successfully?a. After installing the driver, the Artist 13.3’s driver icon should be visible in your
system tray on the bottom-right of your screen (Windows OS). Pen input will control the cursor and pressure sensitivity will be functional in the driver UI’s “Pressure Test”.
Q: How do I determine if a problem is software or hardware related?a. Connect and install the Artist 13.3 on a different computer. If the tablet functions
properly on the new computer, you are experiencing a software issue—conrm that ALL tablet drivers (including the Artist 13.3) are uninstalled and removed from your computer, then reinstall the Artist 13.3.
If you have any questions, please contact us at:Skype: XP-PenWeb: www.xp-pen.comEmail: [email protected]