grading and reward - hr systems · grading and reward 4 creating a post all new posts within the...
TRANSCRIPT

Grading and Reward
Copyright © 2009 University of Cambridge Last Modified: January 2009 Contents page
1 Introduction to structure...............................................................................................1
2 Explorers .....................................................................................................................3 2.1 Organisation Explorer ....................................................................................................... 3
2.2 Mini Explorer..................................................................................................................... 5 2.2.1 To maintain existing data......................................................................................................... 6 2.2.2 Amending or entering new details ........................................................................................... 6
3 Post and Position Menus.............................................................................................7
4 Creating a Post............................................................................................................8 4.1 Post Reference Number ................................................................................................. 13
5 Process Chaining Principles......................................................................................14 5.1 Starting a Process .......................................................................................................... 14
5.2 The Process Chain Bar................................................................................................... 14
5.3 Stopping and Restarting the Process ............................................................................. 16
6 Post Details Process Chains .....................................................................................17 6.1 Process Chain overview ................................................................................................. 18
6.2 Starting the Process ....................................................................................................... 19
6.3 Creating a New Post - Graded........................................................................................ 22 6.3.1 Payscale Values .................................................................................................................... 24 6.3.2 Structure Costing................................................................................................................... 26 6.3.3 HESA Details ......................................................................................................................... 27 6.3.4 Hours and Basis Details ........................................................................................................ 29 6.3.5 Check Details......................................................................................................................... 31 6.3.6 Address Details...................................................................................................................... 34 6.3.7 Terms and Conditions Details ............................................................................................... 35
Changing a post to non-pensionable ............................................................................................... 37 7 Creating a Position ....................................................................................................38
7.1 Position reference number.............................................................................................. 41
7.2 Position Status................................................................................................................ 42
7.3 Creating a Position on a temporary basis....................................................................... 44
7.4 User Defined Fields ........................................................................................................ 45 7.4.1 Role Code Number................................................................................................................ 45 7.4.2 Adding Role Code Number.................................................................................................... 47
Grading and Reward
1 Introduction to structure
Trent’s organisation structure is made up of Units, Posts, Positions and Contracts.
Organisation Structure
The organisation structure is the set of interconnected parts that represent the University of Cambridge as a whole. Most users will only see the University of Cambridge Organisation. There is also a Pensioners organisation which will be accessible to some users.
Unit
A unit is an organisation structure component that is made up of subordinate components including other units and posts. For example Colleges are a unit and each individual college – Christ’s, Churchill, - a unit within this main unit.
Post
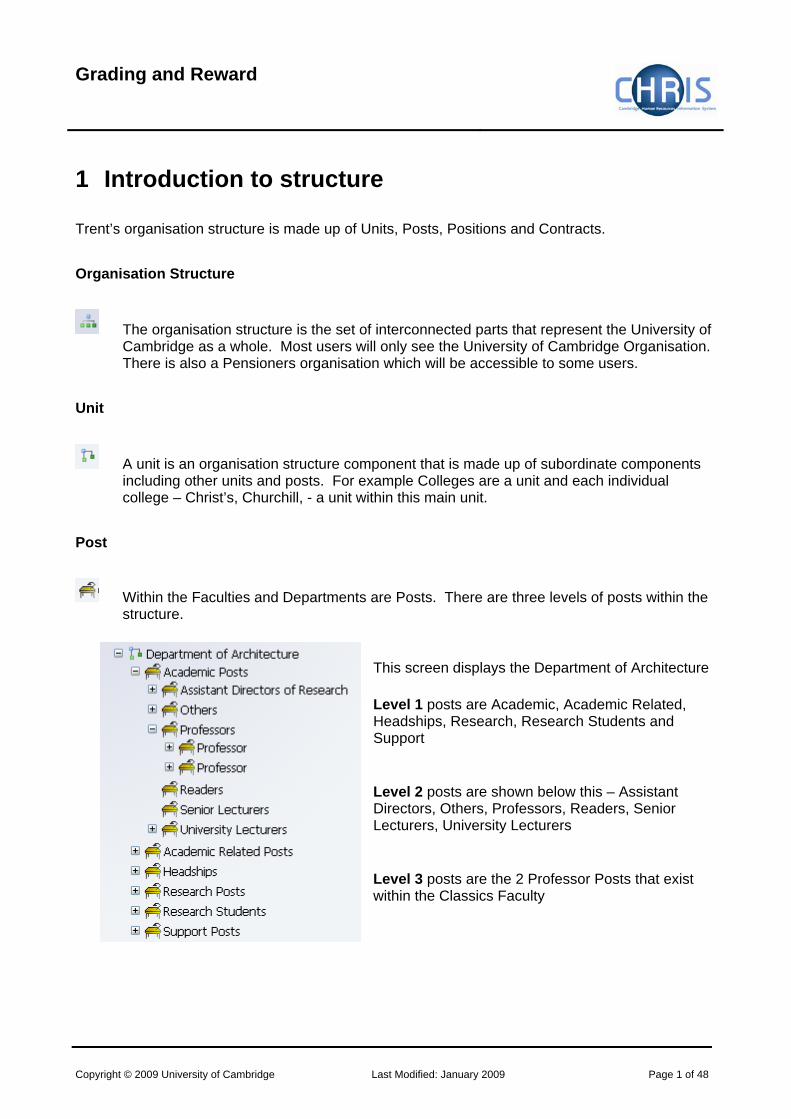
Within the Faculties and Departments are Posts. There are three levels of posts within the structure.
This screen displays the Department of Architecture
Level 1 posts are Academic, Academic Related, Headships, Research, Research Students and Support
Level 2 posts are shown below this – Assistant Directors, Others, Professors, Readers, Senior Lecturers, University Lecturers
Level 3 posts are the 2 Professor Posts that exist within the Classics Faculty
Copyright © 2009 University of Cambridge Last Modified: January 2009 Page 1 of 48

Grading and Reward
Position
A position is a location in the Organisation in which a person can be placed. If the chair icon is blue the position is occupied.
If the chair icon is green it indicates that the position is vacant and as yet unoccupied
If the chair icon is red it indicates that the position is vacant and has a recruitment requisition attached to it (no red chairs are visible at present)
Employee
Each employee within the University that is attached to the structure will be shown with this icon.
People are attached to the structure via a position and a contract is created.
A contract within Trent is not a contract of employment, but a piece of data which binds an employee to a payroll
Copyright © 2009 University of Cambridge Last Modified: January 2009 Page 2 of 48

Grading and Reward
2 Explorers
There are two explorers that you can use. The Organisation Explorer and the Mini Explorer.
The whole area of the Organisation Structure is controlled using effective dates. Information that is added, amended, or deleted is recorded as a change on that specific date. It is important that the date selected when using the organisation explorer is the correct one, as the organisation will differ from day to day.
2.1 Organisation Explorer
You can use the Organisation explorer to display the units, posts and positions within the University and how they have been organised within Trent.
1. Select University of Cambridge 2. Select Organisation Explorer 3. Enter the correct effective date. 4. The top level of the organisation is displayed first with a plus icon next to it
. The plus sign indicates that there are further items to be displayed under this node.
5. Click on the search button to enter the faculty or department you wish to locate.
Copyright © 2009 University of Cambridge Last Modified: January 2009 Page 3 of 48

Grading and Reward
For example entering “Geography” will return search results as displayed below
6. Select the required Faculty or Department.
When viewing the structure in the organisation explorer, the appearance of a plus icon next to any element indicates hidden items below the level displayed.
Clicking the plus icon will expand the diagram to display the subordinate components. When the selected node is fully expanded, the plus icon changes to a minus icon
Clicking the minus icon condenses the node again.
When you reach the node that you are interested in, click on it.
It is suggested that you use the Organisation explorer only to identify an area of the University structure to initialise a search procedure. To add or maintain items search for the unit, post or position and click the Mini explorer link in the action pane.
Copyright © 2009 University of Cambridge Last Modified: January 2009 Page 4 of 48

Grading and Reward
2.2 Mini Explorer
The Mini Explorer allows you to add new items to the Organisation structure as required and to view and maintain Unit, Post and Position details of the organisation structure for a specific area in the object pane.
As the whole structure of the University is so large it is easier to create, amend or view the specific area of the organisation structure you require using the Mini Explorer.
The mini explorer options are available for each of the different components that make up the structure (Units, Posts and Positions), and can be accessed in the relevant folder.
Use the search facility to locate the item you require. (See the introduction manual for more information about performing searches). Select from the object pane the item you wish to enquire on and click the link. The structure icon of the selected item will appear in the object pane.
Like the organisation explorer, the mini explorer structure diagram can be expanded by clicking the plus icon next to items that contain lower levels.
Copyright © 2009 University of Cambridge Last Modified: January 2009 Page 5 of 48

Grading and Reward
The explorer view will appear within the Object pane. If you need to add, amend or view details within the mini explorer you can click on the relevant item and the appropriate folder items will be displayed in the Action Pane as usual.
2.2.1 To maintain existing data
If you need to modify existing structure components select the required item in the object pane and the related function will become available in the action pane.
Selecting a person in the object pane will make person related options available in the action pane. Selecting unit, post or position in the object pane will update the action pane to display the available options for the unit, post or position respectively.
2.2.2 Amending or entering new details
Select the item to be modified in the object pane and then click the required item details in the action pane. Existing information will be shown on the function details page in the display pane, where it can be amended as necessary.
When you have completed an entry or amendment, click in the display pane to save the changes.
Copyright © 2009 University of Cambridge Last Modified: January 2009 Page 6 of 48

Grading and Reward
3 Post and Position Menus
The position details menu displays information specific to the individual employee who occupies a position.
The Payscale values form shows the grade and scalepoint for the employee.
Occupancy details shows expected occupancy end date, for example where an employee is limited by their work permit expiry date.
Hours and basis shows the number of hours that the employee is contracted to work.
Addresses shows the UMS address at which the employee works.
Each position is attached to a post and the post details menu displays information specific to the post and the conditions that a position should go back to when an occupant leaves.
The Payscale values form shows the grade of the post, but no scalepoint as this is individual to the occupant.
Hours and basis shows whether it is a full time or part time post. A post may show as full time, but position details could show that the employee occupying the position is working less hours.
Addresses shows the UMS address for the faculty or department. The position details address may be different where the occupant is located in a different place of work.
Copyright © 2009 University of Cambridge Last Modified: January 2009 Page 7 of 48

Grading and Reward
4 Creating a Post
All new Posts within the University, which are permanent or temporary, will be entered on to the CHRIS system by staff within Central Personnel based upon the details provided on the ‘Grading and New Post Request Form’ - CHRIS/1, ‘New Academic Post Request Form - CHRIS/2, New Appointment Request Form– CHRIS/10 or New Short-Term (ungraded) Appointment – CHRIS/11
Posts are an intermediate part of the organisation structure.
A post always belongs to an organisation unit. Within Cambridge we have allocated different staff groups to posts and this is displayed as a three level structure of posts within Trent.
If a person is to occupy a post it is always by means of an intermediate position.
1. Within the University structure there will always be one post visible for each position (with the exception of certain academic promotions.)
2. With the University of Cambridge selected, click on Organisation explorer. 3. Enter the correct effective date for the start date of the post. This should be the
date of the PD33. 4. Click on the search button.
5. Enter the Faculty or Department you wish to search for
6. Select the Faculty or Department and let the system drill down to find it and select. 7. Click on the expand icon.
Copyright © 2009 University of Cambridge Last Modified: January 2009 Page 8 of 48

Grading and Reward
8. Continue to expand to find the post within which you are creating the new post.
9. Select the level 1 post.
In this example a new Senior Clerk Post is being created. The level 1 post is Support Posts, the level 2 post is Clerical Assistants. Support Posts is selected.
Copyright © 2009 University of Cambridge Last Modified: January 2009 Page 9 of 48

Grading and Reward
10. The post will appear in the object pane
11. Open the Mini Explorer
Copyright © 2009 University of Cambridge Last Modified: January 2009 Page 10 of 48

Grading and Reward
12. Select the Post within which you wish to create the new post. The Post details menu will be displayed.
13. Ensure that the correct level post is highlighted – this should be the post above which you are creating the new post. Click the Create Post option in the Action Pane. Enter the correct effective date for the new post. Trent opens the New - Post page in the display pane
Copyright © 2009 University of Cambridge Last Modified: January 2009 Page 11 of 48

Grading and Reward
14. Enter the name for the new Post
15. The Quantity of 1 will automatically be entered
16. Click the button on the Create linked item page to save your changes. A changes have been saved message will appear briefly and iTrent adds the new Post to the Organisation structure and the explorer diagram is updated accordingly. The new Post can easily be identified as it will not have an expand icon to the left of it.
Copyright © 2009 University of Cambridge Last Modified: January 2009 Page 12 of 48

Grading and Reward
4.1 Post Reference Number
A post reference number is automatically generated when a post is created. To enable you to easily identify this post it is advised that you make a note of the post number once you have created it.
1. Select the new post in the Object pane (this will be the one without an expand button to the left of it)
2. Choose Post details and record the post reference number.
Copyright © 2009 University of Cambridge Last Modified: January 2009 Page 13 of 48

Grading and Reward
5 Process Chaining Principles
Process chaining is a facility in Trent that allows you to link forms and processes together into a logical sequence. There are several benefits for using these, however the main ones are:
• Users do not have to remember the form sequence that is used for the required process, such as New Starters.
• Process chains can be stopped and restarted as required, therefore long processes can be completed in stages.
5.1 Starting a Process
Each process chain is linked to a type of record and is therefore accessed from the appropriate module/menu options. Details of each process, including where to find them will be explained later.
5.2 The Process Chain Bar
Completing forms within a process chain is the same as if you completed them independently, however when in a process chain you are given information about what you are currently doing along with the ability to navigate from step to step.
Current Step Navigation Buttons
Name of Active Process Chain
Copyright © 2009 University of Cambridge Last Modified: January 2009 Page 14 of 48
Grading and Reward
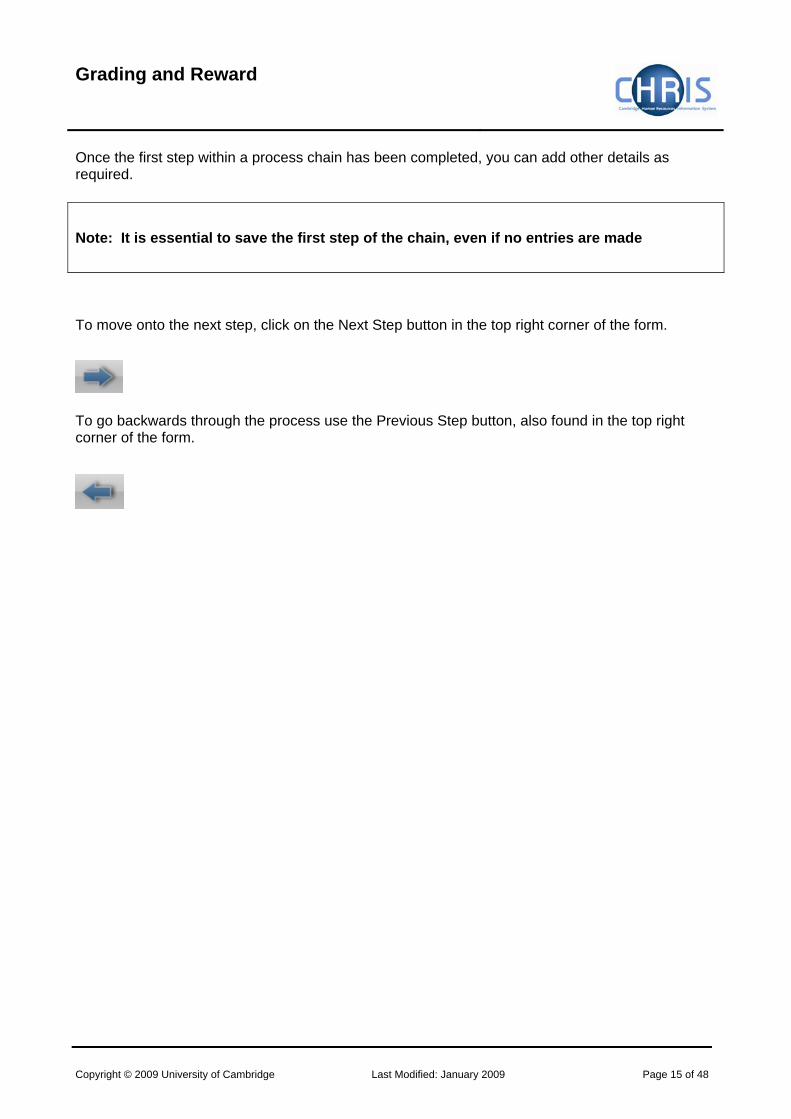
Once the first step within a process chain has been completed, you can add other details as required.
Note: It is essential to save the first step of the chain, even if no entries are made
To move onto the next step, click on the Next Step button in the top right corner of the form.
To go backwards through the process use the Previous Step button, also found in the top right corner of the form.
Copyright © 2009 University of Cambridge Last Modified: January 2009 Page 15 of 48

Grading and Reward
5.3 Stopping and Restarting the Process
Trent keeps a track on where you are in the process, therefore it is possible to stop the process at any point with a view to returning where you left off and continuing.
To stop the process, simply navigate away from the process chain. To restart the process from the place you left it follow the steps below.
1. Click on the To Do List option on the Home page
2. This will open the To Do List Pane.
3. Click on the process you would like to continue. Trent will open the Process Chain at the place indicated at the top of the task details.
Copyright © 2009 University of Cambridge Last Modified: January 2009 Page 16 of 48

Grading and Reward
6 Post Details Process Chains
Once the new post has been created you will need to add further details. There are five Process Chains that are available for this.
• New Post (graded)
• New Post (ungraded)
• New Post (student)
• New Post (graded) with split costing
• New Post (ungraded) with split costing
Which is used depends on the post being defined. Look at the funding section of the CHRIS/1 or CHRIS/2 form to establish if you require the New Post (graded) or New Post (graded) with split costing screen chain. Appointments that are created using the New Short-Term (ungraded) Appointment – CHRIS/11 form will require one of the ungraded screen chains. Look at the pay details and funding sections of the New Appointment Request Form – CHRIS/10 to establish which chain to use.
Copyright © 2009 University of Cambridge Last Modified: January 2009 Page 17 of 48
Grading and Reward
6.1 Process Chain overview
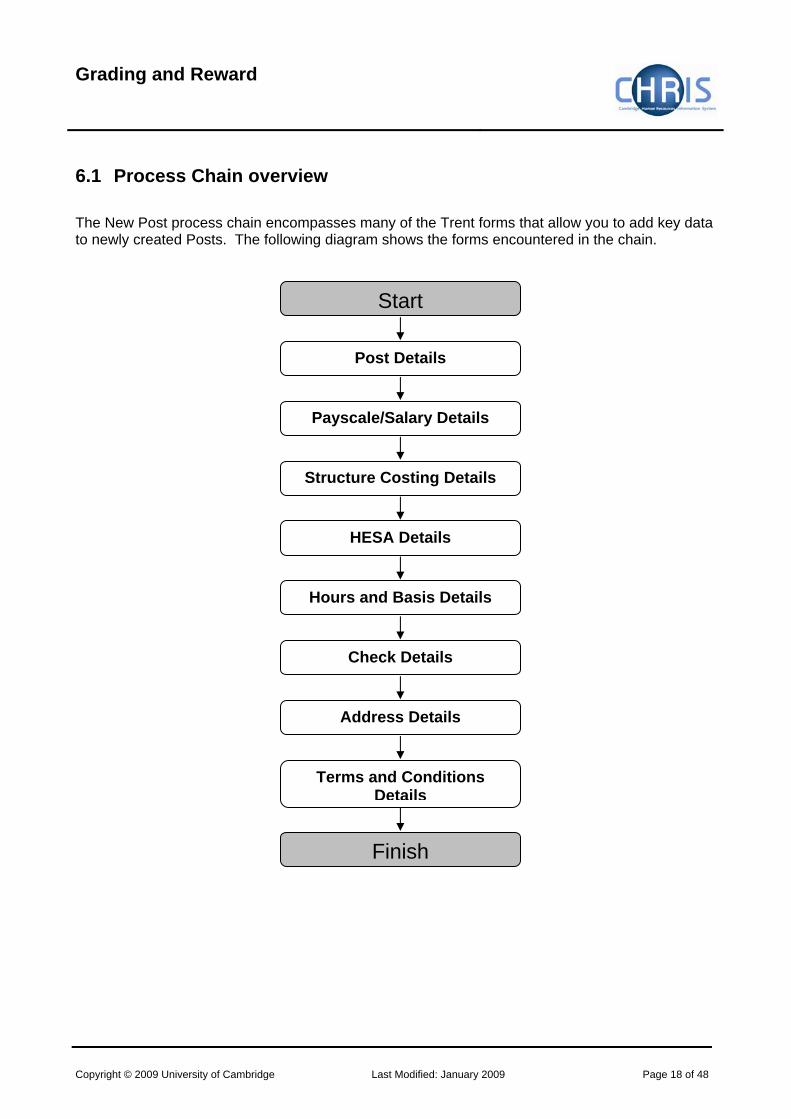
The New Post process chain encompasses many of the Trent forms that allow you to add key data to newly created Posts. The following diagram shows the forms encountered in the chain.
Start
Post Details
HESA Details
Structure Costing Details
Payscale/Salary Details
Terms and Conditions Details
Address Details
Check Details
Finish
Hours and Basis Details
Copyright © 2009 University of Cambridge Last Modified: January 2009 Page 18 of 48

Grading and Reward
6.2 Starting the Process Navigate: Organisation > Posts > Search for New Post > Process Chaining > Process Chaining If you have just created the new Post ensure this is selected and select the process chaining option.
If not: 1. Select the University of Cambridge organisation 2. Select the Posts menu item from the Action Pane
Copyright © 2009 University of Cambridge Last Modified: January 2009 Page 19 of 48

Grading and Reward
3. Search for the Post to be maintained using the post reference number.
4. Select the post
Copyright © 2009 University of Cambridge Last Modified: January 2009 Page 20 of 48

Grading and Reward
5. Select the Process Chaining menu from the Action pane
6. Select the Process Chaining option and type in the required date in the effective date field.
Copyright © 2009 University of Cambridge Last Modified: January 2009 Page 21 of 48
Grading and Reward
6.3 Creating a New Post - Graded
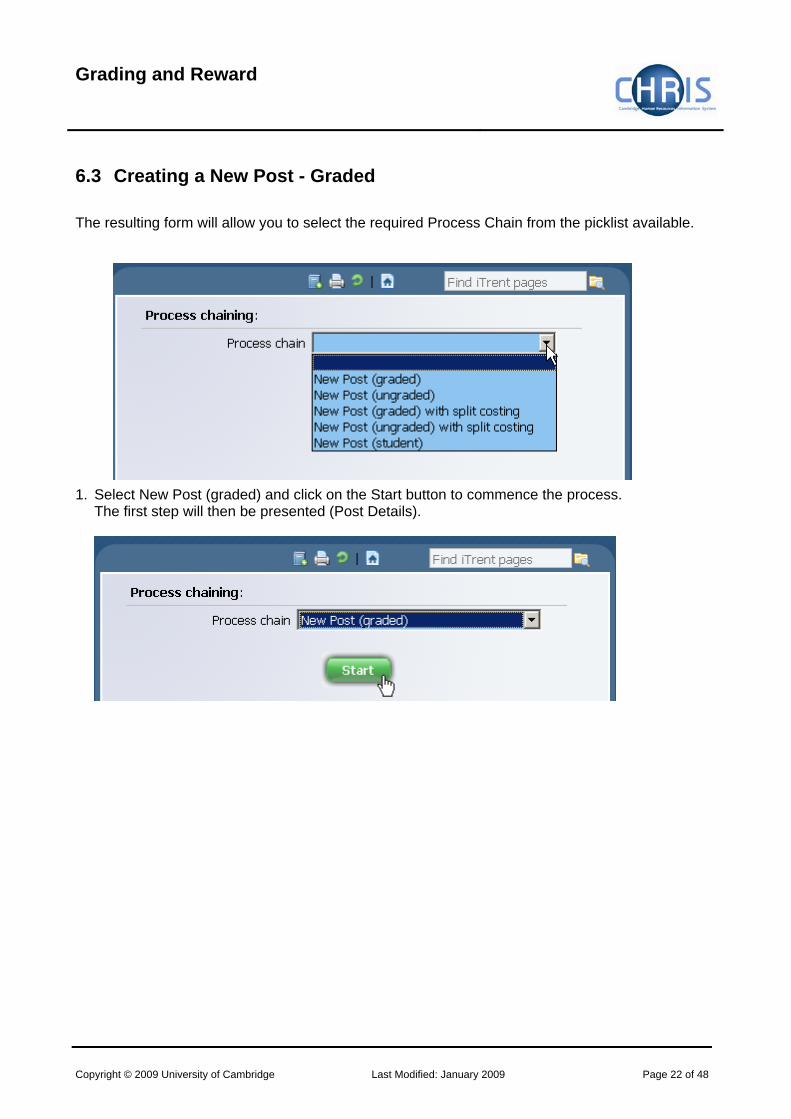
The resulting form will allow you to select the required Process Chain from the picklist available.
1. Select New Post (graded) and click on the Start button to commence the process.
The first step will then be presented (Post Details).
Copyright © 2009 University of Cambridge Last Modified: January 2009 Page 22 of 48

Grading and Reward
2. Click the button. The following message will appear at the top of the screen.
It is essential to save this first screen before you proceed to the next steps
Copyright © 2009 University of Cambridge Last Modified: January 2009 Page 23 of 48
Grading and Reward
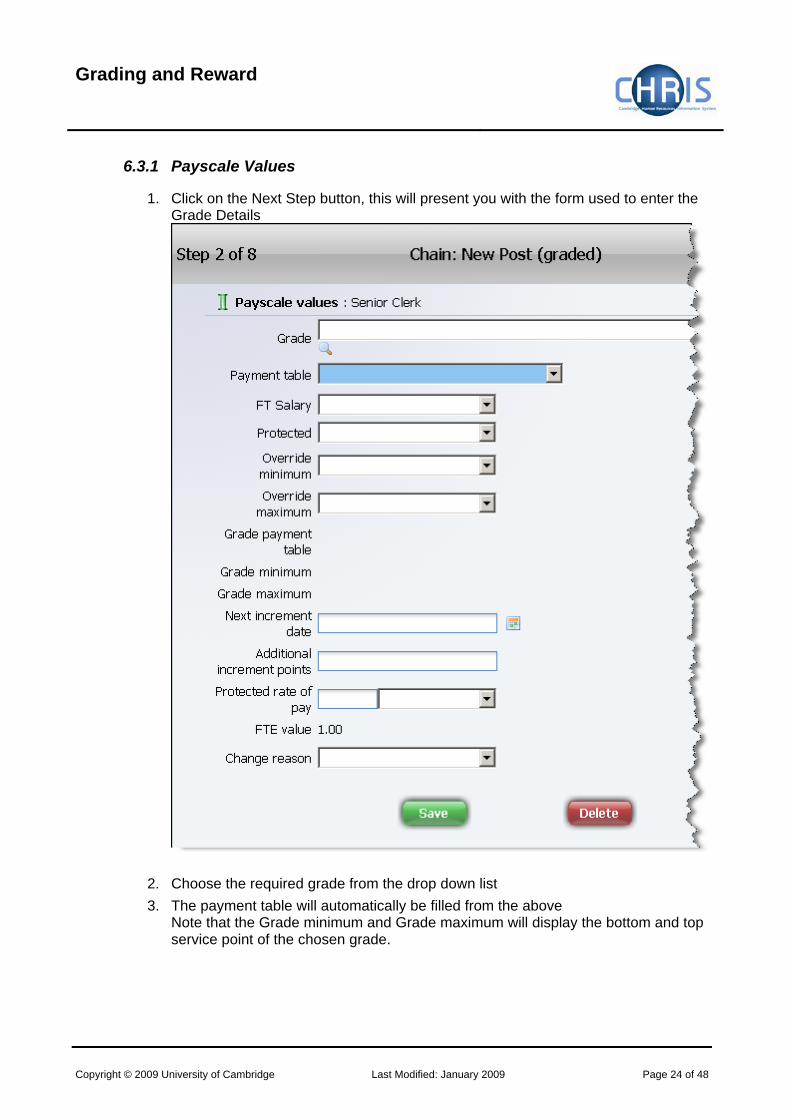
6.3.1 Payscale Values
1. Click on the Next Step button, this will present you with the form used to enter the Grade Details
2. Choose the required grade from the drop down list 3. The payment table will automatically be filled from the above
Note that the Grade minimum and Grade maximum will display the bottom and top service point of the chosen grade.
Copyright © 2009 University of Cambridge Last Modified: January 2009 Page 24 of 48

Grading and Reward
4. Click the button
Copyright © 2009 University of Cambridge Last Modified: January 2009 Page 25 of 48

Grading and Reward
6.3.2 Structure Costing
1. Click on the Next Step button, this will present you with the form to enter the Structure Costing information.
2. No structure costing information will be available at this stage. Click the forward button to go to step 4.
Copyright © 2009 University of Cambridge Last Modified: January 2009 Page 26 of 48

Grading and Reward
6.3.3 HESA Details
1. Click the Next Step button This will take you to the HESA details screen. This is a large screen. Use the full
screen button to view the information more easily.
2. The Campus Identifier will be automatically inherited 3. Leave Senior Management Post blank. It will be maintained by the HESA
correspondent. 4. The Atypical checkbox will be set by inheritance and any further maintenance will be
done by the HESA correspondent 5. Exclude from HESA return will be set by inheritance if the Employment Basis is in
Chairmanship/Headship, College Officer, Roll of Regent House records, Excluded Classes, Research Student, Associate and Affiliated Lecturers.
6. NHS contracts and grade is applicable only for Clinical appointments. 7. Healthcare professional speciality is applicable only for Clinical appointments. 8. Academic employment function will be set by inheritance and should not need to be
maintained. 9. HEI is always left blank as the University does not issue joint contracts with other
HEI’s.
Copyright © 2009 University of Cambridge Last Modified: January 2009 Page 27 of 48

Grading and Reward
10. Activity Code 1 will be set for all Academic and Research appointments. This field must be set for all non Academic and non Research posts at post creation time. The source for this information is the CHRIS/1 OR CHRIS/2 HESA Classification.
11. Activity codes 2 and 3 are not used. 12. Cost Centre can be left at the inherited value. Any overrides will be provided by the
HESA correspondent. 13. Percentage can be left at the inherited value of 100%
14. Click the button
Copyright © 2009 University of Cambridge Last Modified: January 2009 Page 28 of 48

Grading and Reward
6.3.4 Hours and Basis Details
1. Click on the Next Step button
2. Check the inherited details on this form.
Copyright © 2009 University of Cambridge Last Modified: January 2009 Page 29 of 48

Grading and Reward
Add details for category, basis and type according to the details provided on the New Post Request Form
3. Click the button
Copyright © 2009 University of Cambridge Last Modified: January 2009 Page 30 of 48

Grading and Reward
6.3.5 Check Details
1. Click on the Next Step button
2. Checks will be displayed in the object pane. Select one of the listed checks to view step 6 of the screen chain.
3. The Right to Work check details will be displayed. This check is a requirement for
every Post. It is an inheritable item set at the top of the organisation and does not require setting as part of the screen chain. If no additional checks are required, use the next step arrow to advance to step 7.
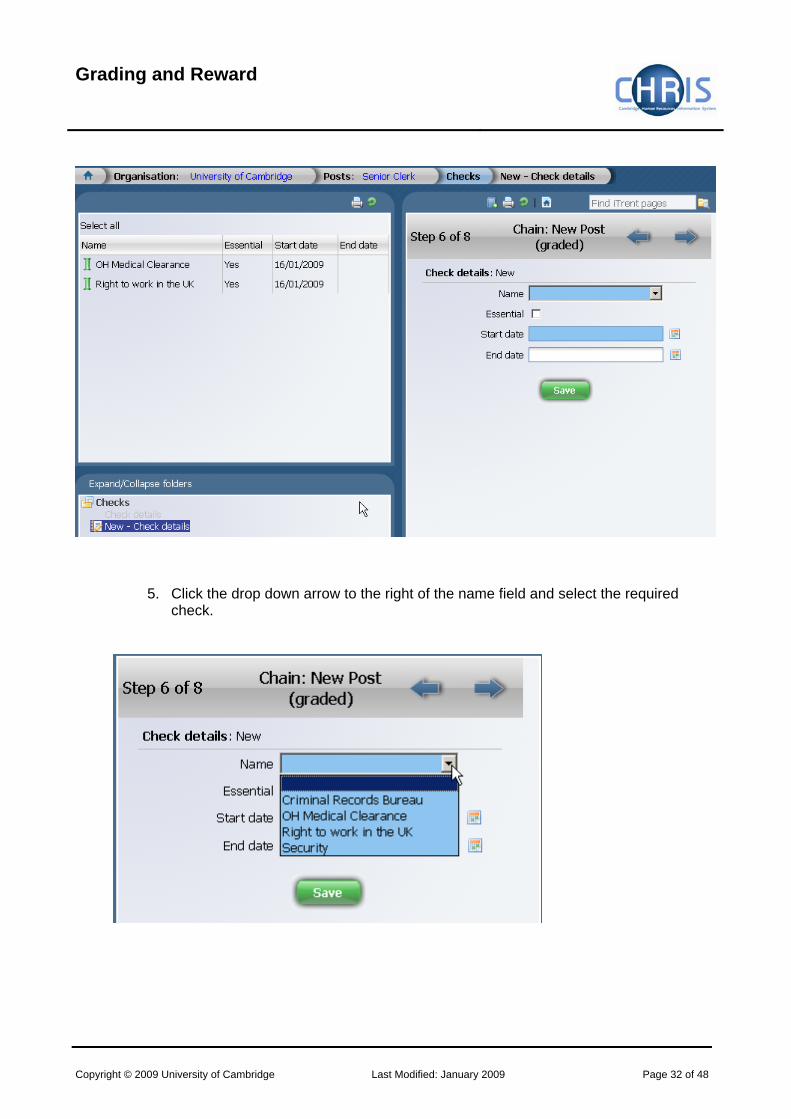
4. If a Criminal Records, OH Medical or Security check is required for the Post, select New – Check details.
Copyright © 2009 University of Cambridge Last Modified: January 2009 Page 31 of 48
Grading and Reward
5. Click the drop down arrow to the right of the name field and select the required check.
Copyright © 2009 University of Cambridge Last Modified: January 2009 Page 32 of 48

Grading and Reward
6. Tick the essential box and complete the start date.
7. Click the button 8. Where additional checks are required, select New Check details again and follow
steps 4 to 5.
Copyright © 2009 University of Cambridge Last Modified: January 2009 Page 33 of 48

Grading and Reward
6.3.6 Address Details
1. Click on the Next Step button 2. The current UMS address for the Post will be displayed
There should be no need to amend this data.
Copyright © 2009 University of Cambridge Last Modified: January 2009 Page 34 of 48

Grading and Reward
6.3.7 Terms and Conditions Details
1. Click on the Next Step button.
2. The inherited Terms and Conditions for the Post will be displayed.
Check these details (e.g. Final Salary Scheme is ‘CPS’ or ‘USS’ as appropriate). Click on one of the T & Cs listed to view the last step of the screen chain.
Copyright © 2009 University of Cambridge Last Modified: January 2009 Page 35 of 48

Grading and Reward
3. Click on the new Post in the navigation trail to leave the screen chain and view the
mini explorer
Copyright © 2009 University of Cambridge Last Modified: January 2009 Page 36 of 48

Grading and Reward
Changing a post to non-pensionable
A change to the inherited Terms and Conditions may be required where a post is non-pensionable. For example, for a Marie Curie Fellow, or where the post hours are zero the post is non-pensionable. The Final Salary Scheme should be changed to non-pensionable.
1. Select the term and condition to be changed – Final Salary Scheme
2. Click the drop down arrow to the right of choice and select Non Pensionable.
3. Click the button
Copyright © 2009 University of Cambridge Last Modified: January 2009 Page 37 of 48

Grading and Reward
7 Creating a Position
Once a post has been created it is then necessary to create a position. If a person is to occupy a post it is always by means of an intermediate position. Positions are a location in the Organisation structure in which a person can be placed.
A blue position icon indicates it is occupied by a person
A green position icon indicates a vacant position
A position always belongs to a Post.
Navigate: Organisation > Posts > Create Position 1. If you are completing this step straight after completing the new post screen chain
use the navigation trail to navigate back to the mini explorer and ensure that the post under which you wish to create the new position is selected.
Copyright © 2009 University of Cambridge Last Modified: January 2009 Page 38 of 48

Grading and Reward
2. Click the New - Position option in the Action Pane
Trent opens the New - Position page in the display pane
3. Enter a name for the new position.
The Post name is the ‘official’ title and the position name is the ‘in-house’ title.
4. The quantity will automatically be set to 1.
5. Click the button on the new - position page to save your changes.
Copyright © 2009 University of Cambridge Last Modified: January 2009 Page 39 of 48

Grading and Reward
Trent adds the new Position to the Organisation structure and the explorer diagram is updated accordingly, showing a vacant (green) chair for the position.
Copyright © 2009 University of Cambridge Last Modified: January 2009 Page 40 of 48

Grading and Reward
7.1 Position reference number
A position reference number is automatically generated by Trent when a position is created. To enable the contract team to easily identify this position when attaching a person record the new position number in the box at the bottom of the CHRIS form
1. Select the position created from the mini explorer. 2. Select position details from the action pane 3. View and record the position reference number
Copyright © 2009 University of Cambridge Last Modified: January 2009 Page 41 of 48
Grading and Reward
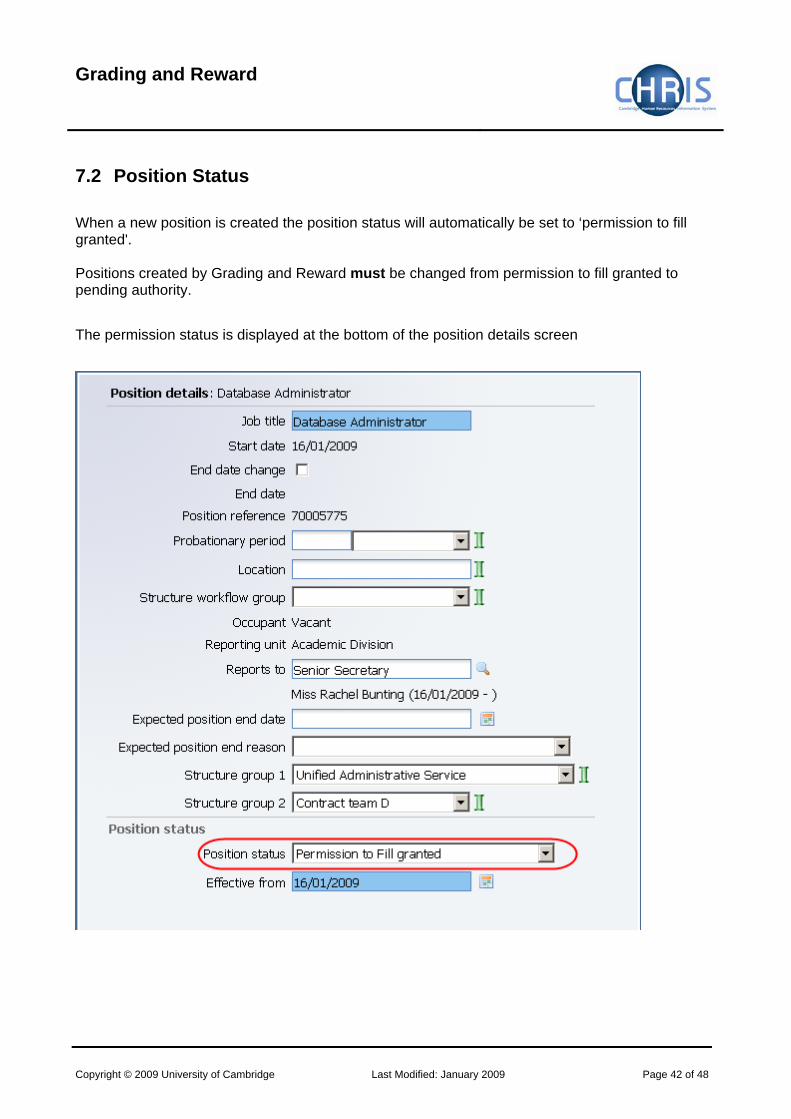
7.2 Position Status
When a new position is created the position status will automatically be set to ‘permission to fill granted'. Positions created by Grading and Reward must be changed from permission to fill granted to pending authority.
The permission status is displayed at the bottom of the position details screen
Copyright © 2009 University of Cambridge Last Modified: January 2009 Page 42 of 48

Grading and Reward
1. Select the newly created position and choose the position details menu.
2. Enter the effective date
3. Click the drop down arrow to the right of position status.
4. Select ‘Pending Authority’
5. Click on the button.
Copyright © 2009 University of Cambridge Last Modified: January 2009 Page 43 of 48

Grading and Reward
7.3 Creating a Position on a temporary basis
To create a temporary position it is necessary to make use of Expected position end date and Expected position end reason fields within position details.
1. Select the position created
2. Select position details from the action pane
3. Enter the date when the position is expected to end. The date is for information purposes and will not end the position at that date.
4. Enter the reason for the position ending by selecting from the drop down box
5. Click the button
Copyright © 2009 University of Cambridge Last Modified: January 2009 Page 44 of 48

Grading and Reward
7.4 User Defined Fields
Some of the data required for Cambridge University is held on fields in forms that are not standard with the Trent application, these are referred to as User Defined Fields (UDFs).
7.4.1 Role Code Number
Where a position has been assigned a Role Code Number this can be viewed in the User defined fields.
1. Select the position 2. Select the User defined forms menu and choose UDF Categories (Position)
3. Select Role Code Number from the list of UDF Categories and click on UDF Details (Position).
Copyright © 2009 University of Cambridge Last Modified: January 2009 Page 45 of 48

Grading and Reward
4. The Role Code reference will be displayed
Copyright © 2009 University of Cambridge Last Modified: January 2009 Page 46 of 48

Grading and Reward
7.4.2 Adding Role Code Number
The Grading and New Post Request Form CHRIS/1 will be used to record the Role Code Number where applicable in Section A, question number 6. This number should then be recorded in Trent in the UDF Details for the position.
1. Select the newly created position 2. Select User defined forms and then UDF Categories (Position)
3. Select Role Code Number from the list of User Defined Fields and click on UDF Categories (Position)
Copyright © 2009 University of Cambridge Last Modified: January 2009 Page 47 of 48

Grading and Reward
4. Select New – UDF Details (Position)
5. Key in the Role Code Number
6. Click the button The No. of rows column will be displayed with a ‘1’ against Role Code Number to indicate that an entry has been made.
Copyright © 2009 University of Cambridge Last Modified: January 2009 Page 48 of 48