gps watch with heart rate measurement - runtastic - makes sports
TRANSCRIPT
GPS Watch with Heart Rate Measurement
Operating instructions
Edition 04/2012

2
Table of Contents
1 Application range................................................................................ 4 2 Safety and maintenance ..................................................................... 5
2.1 Safety instructions ........................................................................... 5 2.2 Repairing .......................................................................................... 6 2.3 Water impermeability ...................................................................... 6 2.4 Percussion and vibrations ................................................................ 7 2.5 Electromagnetic compatibility ......................................................... 7 2.6 Environmental temperature ............................................................ 8 2.7 Functioning of the battery ............................................................... 8 2.8 Disposal ......................................................................................... 10 2.9 Maintenance .................................................................................. 10 2.10 Cleaning and keeping ..................................................................... 10 2.11 Indications regarding application instructions ............................... 11
3 Outlet volume and functional press keys ........................................... 11 3.1 Outlet volume ................................................................................ 11 3.2 Functional press keys ..................................................................... 12
4 Start-up ............................................................................................ 13 4.1 Charging the accumulator of the GPS watch ................................. 14 4.2 Chest strap ..................................................................................... 15
5 General information regarding the GPS reception ............................. 16 6 Modes of the GPS watch ................................................................... 17
6.1 Adjustment mode .......................................................................... 18 6.1.1 User’s settings ....................................................................... 20 6.1.2 System settings ..................................................................... 21 6.1.3 Memory status programming ............................................... 23
6.2 Time-mode .................................................................................... 24 6.2.1 Time and date ....................................................................... 24 6.2.2 Accumulator level display ..................................................... 26 6.2.3 Timer ..................................................................................... 26 6.2.4 Alarm .................................................................................... 27 6.2.5 Dual Time .............................................................................. 28
6.3 GPS-Workout mode ....................................................................... 29 6.3.1 Cardiac frequency measurement .......................................... 29 6.3.2 Profiles and training data ...................................................... 32 6.3.3 Training ................................................................................. 35
3
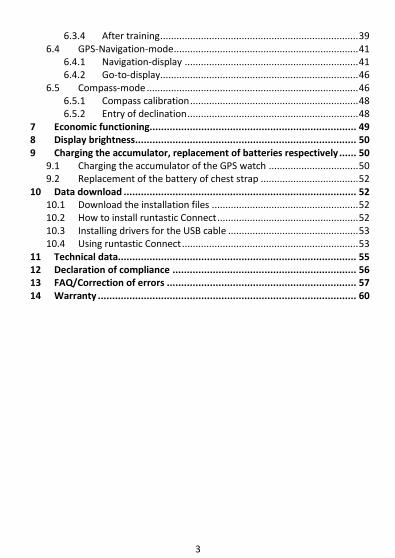
6.3.4 After training ......................................................................... 39 6.4 GPS-Navigation-mode .................................................................... 41
6.4.1 Navigation-display ................................................................ 41 6.4.2 Go-to-display......................................................................... 46
6.5 Compass-mode .............................................................................. 46 6.5.1 Compass calibration .............................................................. 48 6.5.2 Entry of declination ............................................................... 48
7 Economic functioning........................................................................ 49 8 Display brightness ............................................................................. 50 9 Charging the accumulator, replacement of batteries respectively ...... 50
9.1 Charging the accumulator of the GPS watch ................................. 50 9.2 Replacement of the battery of chest strap .................................... 52
10 Data download ................................................................................. 52 10.1 Download the installation files ...................................................... 52 10.2 How to install runtastic Connect .................................................... 52 10.3 Installing drivers for the USB cable ................................................ 53 10.4 Using runtastic Connect ................................................................. 53
11 Technical data................................................................................... 55 12 Declaration of compliance ................................................................ 56 13 FAQ/Correction of errors .................................................................. 57 14 Warranty .......................................................................................... 60
4
1 Application range
The GPS-watch RUNGPS1 is equipped with a navigation system. The User’s
location can be determined by using the satellite network that surrounds the
earth. This is possible at any moment and everywhere in the world.
The GPS-watch is destined for the use as a global system for
determining the location.
Made for measuring the distance, speed, height and navigation by using
the American satellite network, being fit especially for sports types like
jogging, cycling, camping, sailing, skiing etc.
The GPS-watch is not fit for an exigent use as sky diving, gliding.
The RUNGPS1 is designed for private purposes and it is not made for
commercial use.
The GPS-watch can also be used as an auxiliary training gadget for measuring
and displaying cardiac frequency, not as a medical device.
Any other use than the ones described in the operating instructions is not
allowed, and it may lead to deterioration, and also injuries. No responsibility
is taken for the damages which result from the improper use. Further
instructions and clarifications can be found in the operating instructions.
All the indicated data are only nominal data. The right to technical
modifications is preserved.
5
2 Safety and maintenance
2.1 Safety instructions
Please read this chapter carefully and follow all the specified indications. This
way you ensure the adequate functioning and a long period of operation for
your GPS-watch.
Keep the wrapping and operating instructions well, so that, in case of
alienation, you can hand them on to the new owner.
For safety reasons, do not operate the GPS-watch while driving a car.
Stop or let a co-passenger carry on the settings. It is dangerous not to
watch the street and it may lead to an accident, in which you or
someone else could get hurt.
Do not open the case of the GPS-watch or the chest strap, it does not
include parts that must be maintained (excepting the opening of the
strap part with the battery, for replacing the battery, see point 9.2
“Replacement of the battery of chest strap”).
Do not place any object on the GPS-watch and do not put any pressure
on the display or the display may break.
Do not touch the screen with sharp objects, in order to avoid damaging.
The use of this product depends on satellites, as many of the GPS
products, satellites that are operated by the American government. If
modifications at the level of the satellite network take place, this may
influence the execution and accuracy of this GPS-watch.
Risks for children and individuals requiring assistance
This device is not intended for use by individuals (including children) with limited physical, sensorial or emotional capacities or limited experience and / or knowledge unless they are supervised by an individual responsible for their safety or receive instructions from the

6
latter as to how the device should be used. Children should be supervised in order to ensure that they do not play with the device.
Important: Always consult your doctor, before starting a regular training
program. The RUNGPS1 watch is not a medical device; it is a helping training
gadget for the measurement and display of your cardiac frequency.
Wearers of cardiac pacemakers may use devices for cardiac frequency
measurement only after consulting with their doctor.
Indication: The chest strap may contain latex elements. Allergic reactions
under the form of some skin irritations and redness – in relatively powerful
conditions – may rarely appear to this material. Even if only slight redness
appears, stop using the chest strap. In this case, we recommend you to
contact a skin specialist (dermatologist).
2.2 Repairing
In case of a necessary reparation or when a technical problem occurs, resort exclusively to our service center. You can find its address on the warranty card.
2.3 Water impermeability
The RUNGPS1 watch is 3 bar water resistant. In the table below you will see
which activities and conditions the GPS-watch is adequate. Data are based
on a verification of aquatic impermeability according to DIN 8310.
Rain, Splash
Car wash Shower Bath, pool Nautical sports
Yes, Yes, do not flood the
watch in water No No No

7
Be careful not to touch the buttons, when the watch is still moist. The water
only can enter in the case through these buttons and this can affect the
watch. Please note that salty and thermal water can lead to the corrosion of
the metallic elements.
Note that, in case of extreme temperature differences (e.g. from sauna to
the swimming-pool, from the beach to cold sea) water resistance can not be
guaranteed. Because of temperature differences condensation water can be
formed and thus the mechanism of the watch can be influenced.
The chest strap is protected against water splatter, here the following
applies:
Rain, Splatter
Car wash Shower Bath, pool Nautical sports
Yes, No No No No
2.4 Percussion and vibrations
The GPS-watch is protected against the bumps that may appear during its
normal wrist wearing.
2.5 Electromagnetic compatibility
Very powerful magnetic fields (e.g. transformers) must absolutely be
avoided, or differences in measuring time and determining location may
occur. The inobservance of these indications may lead to deteriorations or
the mismatch of your GPS-watch.
8
2.6 Environmental temperature
The GPS-watch can be operated durably at an environmental temperature
from 0 °C up to 50 °C, and stored at an environmental temperature of -10 °C
up to 60 °C. Avoid high temperatures (e.g. in stopped vehicles or under direct
sun influence) and permanent environmental humidity.
Indication:
Display problems at temperatures of -10° C up to 0° C will not be attributed
to the GPS-watch, but on the impairment of accumulators due to coldness.
The electro-chemical processes of the batteries and accumulators are
strongly influenced by the environmental temperature. The lower the
temperature, the more powerfully the processes are influenced during
discharge. That is why you should note that at temperatures below freezing
point, the battery, respectively the accumulators may "freeze", a fact that
will lead to the damage of the economic life of the battery, respectively of
the accumulators.
2.7 Functioning of the battery
Your GPS-watch operates on the basis of a lithium-polymer accumulator,
which can not be changed. The chest strap operates with a lithium battery 3V
CR2032.
Further you will find some indications regarding the manipulation of
accumulators:
The accumulator of the GPS watch can not be changed and must not be
taken out.
Keep the GPS watch far from heat sources of high temperature
environments, e.g. direct exposure to sunlight in a vehicle.
Do not perforate or burn the GPS-watch.
9
Charge the accumulator of the GPS watch only with a USB cable
delivered together with it. If the accumulator is charged otherwise, this
can lead to overheating, explosion or fire.
Do not charge the accumulator of the GPS watch near heat sources or
in a car, under the powerful action of sunbeams. Powerful temperature
leads to the destruction of the accumulator and may lead to
overheating, explosion or fire.
The inobservance of these indications may lead to the shortage of the service
life of the inserted accumulator or to the damaging of the GPS watch.
Further you will find some indications regarding the manipulation of
batteries:
Replace a battery only with the similar type of battery.
Batteries must not be charged or re-activated by other means; they will
not be disassembled, thrown in fire or short-circuited.
Keep batteries out of reach of children. In case of swallowing, batteries
can jeopardize life. Consequently, keep the batteries and chest strap
out of reach of small children. If a battery is swallowed, medical help
must be required immediately.
Never expose batteries to high heat such as direct sun action, fire or
other similar source. There is a leakage danger. The inobservance of
these indications may lead to the deterioration and, under certain
circumstances, to the explosion of the battery.
Immediately take out a used battery from the chest strap, otherwise it
can leak. In this case, avoid contact with skin, eyes and mucosa. Wash
immediately the parts affected by the acid of the battery with a lot of
water and require immediately medical help. If need be, clean the
contacts of the battery and the contacts from the device. Keep
operating instructions for consulting the information on batteries.
The inobservance of these indications may lead to the deterioration and,
under certain circumstances, to the explosion of the battery.

10
Information regarding the replacement of the battery of chest strap can also
be found at point 9.2 "Replacement of the battery of chest strap ".
2.8 Disposal
Batteries are special waste. For the adequate disposal of the
batteries, there are special containers in the shops where
batteries are commercialized, as well as in the communal
collection places.If you want to throw the GPS watch and its
accessories away, eliminate them in conformity with current
dispositions.
Information will be received in communal places.
KRIPPL-WATCHES
Warenhandels GmbH
Maria-Theresia-Straße 41
4600 Wels, Austria
Eliminate the wrapping of the GPS watch in conformity with current
dispositions. Information will be received in communal places.
2.9 Maintenance
Caution! In the case of the GPS watch and chest strap there are no parts that
require maintenance. Still, we recommend you to clean the sensor surfaces
of the chest strap before or after each use.
2.10 Cleaning and keeping
If problems occur when charging the GPS watch, check the contact pins
on the back of the watch. If these were soiled with sweat deposits and
skin scales, clean them with a sharp metallic object (e.g. tweezers).

11
Clean the GPS watch and chest strap only with a soft, moist towel
without naps.
Do not use diluent, corrosive cleaning agent or under the form of gas.
Be careful not to leave water drops on the display of the GPS watch.
Water may cause permanent stains.
Do not expose the display to sunlight, or to direct action of ultraviolet
beams.
2.11 Indications regarding application instructions
We structured the application instructions for the GPS watch so that you can
choose from the contents the necessary information depending on the
theme. For further questions you can resort to [email protected].
3 Outlet volume and functional press keys
3.1 Outlet volume
1 GPS watch (Art.-Nr. RUNGPS1, Type: D02I280)
including integrated lithium-polymer accumulator
1 chest strap
(formed by sensors and elastic strap )
(Art.-Nr. RUNGPS1, Type: T00018D)
incl. lithium battery (3V, CR2032)
Sensor:
1313
1313

12
Elastic strap:
1 USB cable
1 bike support
incl. 2 cable clamps and 1 installing plate
3.2 Functional press keys
„ST./STP.” button
„VIEW“ button
„MODE“-button
„LIGHT“ button
Position of GPS antenna: For the best GPS reception, the GPS antenna will always be directed
towards the sky
„LAP/RESET“ button
Contact points for USB cable
13
4 Start-up
We recommend you to read the operating instructions carefully before
starting-up the GPS watch.
On the screen of the GPS watch there is a protection film. Eliminate it before
the first use.
Caution! This protection film for the screen must be kept out of reach of
babies and young children! It presents asphyxiation danger!
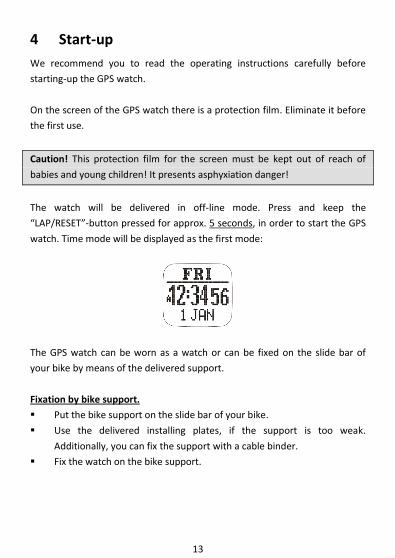
The watch will be delivered in off-line mode. Press and keep the
“LAP/RESET”-button pressed for approx. 5 seconds, in order to start the GPS
watch. Time mode will be displayed as the first mode:
The GPS watch can be worn as a watch or can be fixed on the slide bar of
your bike by means of the delivered support.
Fixation by bike support.
Put the bike support on the slide bar of your bike.
Use the delivered installing plates, if the support is too weak.
Additionally, you can fix the support with a cable binder.
Fix the watch on the bike support.
14
4.1 Charging the accumulator of the GPS watch
The GPS watch has a lithium-polymer accumulator. Charge it for minimum 3
hours before the first use of the GPS watch.
To avoid corrosion, we recommend you to dry the contact points of the GPS
watch well before starting a charging process.
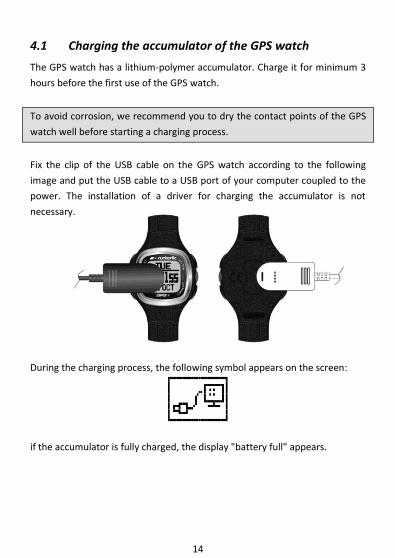
Fix the clip of the USB cable on the GPS watch according to the following
image and put the USB cable to a USB port of your computer coupled to the
power. The installation of a driver for charging the accumulator is not
necessary.
During the charging process, the following symbol appears on the screen:
if the accumulator is fully charged, the display "battery full" appears.
15
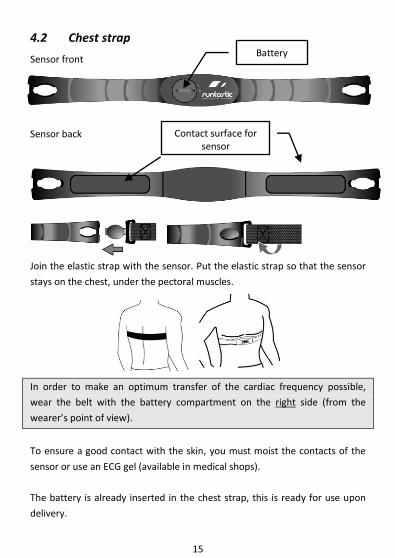
4.2 Chest strap
Sensor front
Sensor back
Join the elastic strap with the sensor. Put the elastic strap so that the sensor
stays on the chest, under the pectoral muscles.
In order to make an optimum transfer of the cardiac frequency possible,
wear the belt with the battery compartment on the right side (from the
wearer’s point of view).
To ensure a good contact with the skin, you must moist the contacts of the
sensor or use an ECG gel (available in medical shops).
The battery is already inserted in the chest strap, this is ready for use upon
delivery.
Battery
Contact surface for sensor

16
5 General information regarding the GPS
reception
In order to be able to use the function of your GPS optimally, the below
mentioned instructions must certainly be followed.
The GPS watch is a global positioning system (=GPS), which serves especially
for measuring the distance, speed, height and navigation by means of USA
satellite network. The USA operates this satellite system and also responds
for their exactness and maintenance.
The reception of the signal, without problems, from a satellite can only be
guaranteed under calm weather conditions (clear sky) and an adequate
reception area – open area with clear view to the sky.
Because satellite signals react very sensitively to external influences, bad
weather (e.g. heavy snowfalls), as well as a perturbed reception area (the
GPS watch is covered by clothes or other objects, high buildings or narrow
valleys and defiles impede the reception) can affect significantly the
efficiency and exactness of the GPS watch.
Inside the buildings, GPS reception is strongly restricted or impossible. Near
the windows, and also in spaces with large windows and clear view to the sky
a determination of the location can be possible, under certain circumstances,
depending on the momentary position of the satellites. In interior spaces and
in basements the GPS reception is practically impossible.
17
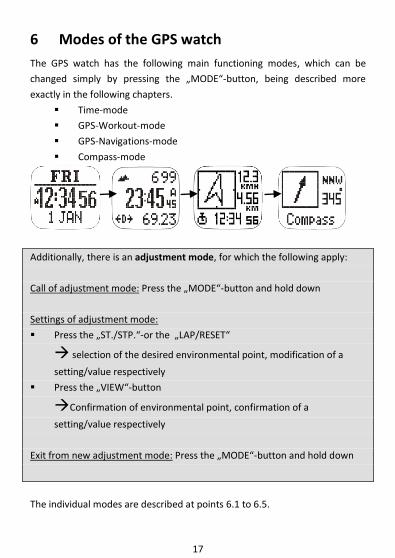
6 Modes of the GPS watch
The GPS watch has the following main functioning modes, which can be
changed simply by pressing the „MODE“-button, being described more
exactly in the following chapters.
Time-mode
GPS-Workout-mode
GPS-Navigations-mode
Compass-mode
Additionally, there is an adjustment mode, for which the following apply:
Call of adjustment mode: Press the „MODE“-button and hold down
Settings of adjustment mode:
Press the „ST./STP.“-or the „LAP/RESET“ selection of the desired environmental point, modification of a
setting/value respectively
Press the „VIEW“-button Confirmation of environmental point, confirmation of a
setting/value respectively
Exit from new adjustment mode: Press the „MODE“-button and hold down
The individual modes are described at points 6.1 to 6.5.

18
6.1 Adjustment mode
Press and hold down the „MODE“-button in order to get to the adjustment
mode. The following pages offer an image about the structure of the menu
from the adjustment mode:
Menu structure
Workout (Point 6.3)
o Profiles
Select Selection of training profile
Customize Selection of training data for the display
1-3 of each training profile
Reset Setting of training data basis
o History Call of training history
o Smart Lap
By Dist Automatic taking-up of lap times
„Lap-By-Distance“
LapWP Automatic generation of reference points
From laps „Lap-To-Waypoint“
Alert Alarm activation for „Lap-By-Distance“
o View Scan Automatic switching among the 3
displays
o Track Log Setting of the interval for measurements
o Delete
Del Last Deletion of data from last training
Del All Deletion of data from all trainings so far
Navigation (Point 6.4)
o Sel Path Path selection
o Del Path Path deletion
o Nav Mode Selection of navigation type
o WP Radius Adjustment of path-beam point

19
GPS (Points 6.3 and 6.4)
o On/Off Activation/deactivation of GPS reception
o Timeout Setting of GPS Timeout
o A-GPS A-GPS Expiry (Maturity date)
HRM (Point 6.3)
o On/Off Activation of cardiac frequency
measurement
o Zone HR
Select Selection of training area
Customize Modification of upper and lower limits
Alert Alarm activation for training area
Reset Reset of upper and lower limits to
basic settings
o Max.HR Setting of maximum cardiac frequency
o Pairing Junction of the chest belt with the GPS
watch
Settings
o Timer (Point 6.2) Timer adjustment
o Alarm (Point 6.2) Alarm adjustment
o Time Date (Point 6.2)
Home Time
GPS Upd Setting of GPS updating time
Time Zone Time zone adjustment
Manual Manual adjustment of time
Dual Time Dual time adjustment
Format Adjustment of 12/24 hour format
o User (Point 6.1.1)
Gender Selection of gender
Birth Date Date of birth setting
20
Weight Weight setting
o System (Point 6.1.2 – excepting Compass point 6.5)
Sound
Key Tones Activation/deactivation of key tone
Chimes Activation/deactivation of fixed time alarm
Contrast LCD contrast adjustment
Units
Dst/Spd Adjustment speed and distance unit of
measure
Position Adjustment of unit of measure for latitude
and longitude degree
Weight Adjustment of weight unit of body
weight
Compass (Point 6.5)
Declinate Entry of declinations
Calibrate Compass calibration
Language Language adjustment
Sys Reset Operation of system reset
Memory (Point 6.1.3) Call of memory status
Some general settings (user’s settings, system setting operation and call of
memory status), which are not presented directly in the chapters Time mode,
GPS-Workout-mode, GPS-Navigations-mode and Compass-mode, are
described here:
6.1.1 User’s settings
These data are necessary for calculating the calorie consumption, the
maximum cardiac frequency respectively.

21
Selection of gender
In the setting mode select the „Settings“ point from the menu
„User“ „Gender“.
Then select "Male" for masculine or "Female" for feminine.
Date of birth adjustment
In the setting mode select „Settings“ point from the menu „User“
„Birth date“.
Then set the year of birth, month and day.
Weight setting
In the setting mode select „Settings“ point from the menu „User“
select „Weight“.
Then adjust weight
6.1.2 System settings
Activation/deactivation of key tones
In the setting mode select „Settings“ point from the menu „System“
„Sound“ „Key Tones“.
Then select "On" in order to activate key tones or "Off" to deactivate
them.
Activation/deactivation of fixed time alarm
In the setting mode select „Settings“ point from the menu „System“
„Sound“ „Chime“.
Then select "On" in order to activate fixed time alarm or "Off" to
deactivate it.

22
LCD contrast adjustment
In the setting mode select „Settings“ point from the menu „User“
„Contrast“.
Then set the desired LCD contrast from 3 (light) up to 16 (dark).
Adjustment of the unit of measure for speed and distance
In the setting mode select „Settings“ point from the menu „System“
„Units“ „Dst/Spd“.
Then select „Metric” for Kilometer/km/h, „Statute” for miles/mph or
„Nautical” for miles/ knots.
Adjustment of the unit of measure for longitude and latitude degree
In the setting mode select „Settings“ point from the menu „System“
„Units“ „Position“.
Then select „0’00’00.00 N” for the indication in Degrees-Minutes-
Seconds or „0.000000 N” for the indication in decimal degrees
Adjustment of the unit of measure for body weight
In the setting mode select „Settings“ point from the menu
„System“ „Units“ „Weight“.
Then select „kg” for the indication in kg or „lb” for the indication in
Pfund
Language adjustment
In the setting mode select „Settings” point from the menu
„System“ „Language“.
Then select the desired language (English, French, Spanish, German,
and Italian).

23
System reset operation
In the setting mode select „Settings” point from the menu
„System“ „Sys Reset“.
Then select "On" to perform a system reset. By this, all the values, all
the basic settings will be reset and all the data (paths, reference points,
training histories, etc.) deleted.
Select "Off" in order not to reset the system.
6.1.3 Memory status programming
In the adjustment mode select the menu point "Memory" until the following
display appears:
The memory use level of the GPS watch will be indicated in %. 1% of the
memory corresponds to approximately 480 in memorized reference points
for the GPS watch.
CAUTION:
Keep in mind that the watch does not delete automatically the memory with
your data.
To this effect, when transferring the data from the watch in your computer,
you must activate automatic memory deletion at a data transfer from
runtastic Connect, in settings/options. If the memory of the watch is full, no
timing will be performed, a training timing in workout mode can not be
started any more. This means that the ST./STP. cannot be pushed anymore.
Still, before the memory is full, the notification “Memory full!” appears on
the display of the GPS watch
Memory usage level

24
6.2 Time-mode
Press the „MODE“-button until you reach time mode. This appears by the
following screen display:
In time mode there are the following sub-functions, with the „VIEW“-button
you can choose among them:
Time and date
Display of accumulator level
Timer
Alarm
Dual Time
6.2.1 Time and date
In Time-mode press the „VIEW” button until the following display appears on
the display:
Day of the week
Time
Date Month
Day of the week
Time
Date Month

25
Update GPS for time:
In the setting mode select „Settings” point from the menu „Time
Date“ „Home Time“ „GPS-Upd“.
Then select "ON" or "OFF". "ON" is pre-set, this means that when the
satellite signal is received, time and date will be automatically set.
Indication: Keep in mind that the GPS signal transmits Greenwich Mean Time
(GMT), therefore, it may be necessary to set a different time zone
In winter, for Austria and Switzerland GMT + 1:00 is applied.
In summer, for Austria and Switzerland GMT + 02:00 is applied.
Time zone adjustment
In the setting mode select „Settings” point from the menu „Time
Date“ „Home Time“ select „Time Zone“.
Then you will be able to set a time zone of -12:00 up to +12:00 or "By
Longitude". When selecting "By longitude", the GPS watch will try to
calculate the time zone based on the established longitudinal degree. If
this does not work properly, set the time one in hours (e.g.: + 1:00).
Adjustment of 12/24 hour format
In the setting mode select „Settings” point from the menu „Time
Date“ select „Format“.
Then select between the format of 12 or 24 hours.
Manual time adjustment
If no GPS reception is possible, time format can also be manually adjusted:
In the setting mode select „Settings” point from the menu „Time
Date“ „Home Time“ „Manual“.
26
Then adjust the seconds, minutes, hours, year, month and day.
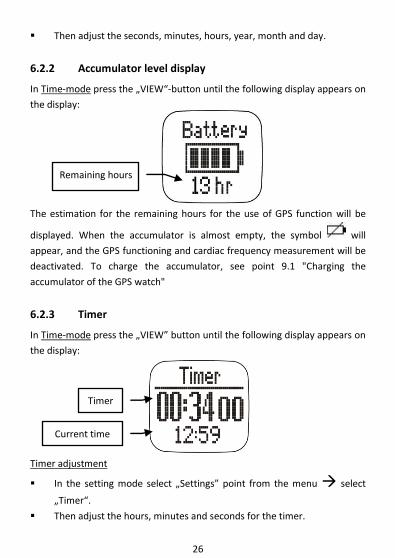
6.2.2 Accumulator level display
In Time-mode press the „VIEW“-button until the following display appears on
the display:
The estimation for the remaining hours for the use of GPS function will be
displayed. When the accumulator is almost empty, the symbol will
appear, and the GPS functioning and cardiac frequency measurement will be
deactivated. To charge the accumulator, see point 9.1 "Charging the
accumulator of the GPS watch"
6.2.3 Timer
In Time-mode press the „VIEW” button until the following display appears on
the display:
Timer adjustment
In the setting mode select „Settings” point from the menu select
„Timer“.
Then adjust the hours, minutes and seconds for the timer.
Timer
Current time
Remaining hours

27
Timer use:
In the display mode Timer press the „ST./STP" button to start or stop
the timer.
If the timer is stopped, press the "LAP/RESET" button, to reset the timer
at the time set previously.
When timing is finished, during the last 10 seconds a Beep will be given
for each second. When it reaches to 0, a longer Beep will be heard.
Press any key to stop this Beep tone.
6.2.4 Alarm
In Time-mode press the „VIEW” button until the following display appears on
the display:
Press the „ST./STP.” button, to select the alarm 1-5.
Press the „LAP/RESET” button to set the alarm "ON" (enabled) or "OFF"
(disabled).
Setting of alarm time and alarm format:
In the setting mode select „Settings” point from the menu select
„Alarms“.
Then select from alarms 1-5 and adjust alarm hours and minutes,
"ON/OFF" will blink.
Then adjust the alarm "ON" (activated) or "OFF" (deactivated), the
alarm format will blink:
Alarm time
Alarm format
Alarm 1-5
Alarm „ON” „OFF”

28
Daily Daily
Sun Sunday
Mon Monday
Tue Tuesday
Wed Wednesday
Thu Thursday
Fri Friday
Sat Saturday
Mon-Fri Monday-Friday
Then select the desired alarm format.
Alarm stop:
When the alarm rings, you can stop it by pressing any key.
6.2.5 Dual Time By this function you can choose a dual time. In Time-mode press the „VIEW“-
button until the following display appears on the display:
Dual time adjustment:
In the setting mode select „Settings” point from the menu „Time
Date” „Dual Time”.
Then adjust the desired difference (from the current time to dual time)
in 30-minute steps.
Dual time
Current time

29
6.3 GPS-Workout mode
Press the „MODE“-button until you get to GPS-Workout-mode. This will be
seen by the following display on the screen (example of a display):
Within the GPS-Workout-mode the speed, distance, training time, cardiac
frequency and other interesting data are indicated; these can be
subsequently seen on the computer by Runtastic Connect.
GPS-Workout-mode works in tight connection with GPS-Navigation-mode.
The functions start and stop training and lap time taking can be achieved in
both modes.
6.3.1 Cardiac frequency measurement
Activation of cardiac frequency measurement
Wear the strap according to the description from point 4.2 "Chest strap."
In the setting mode select „HRM” point from the menu „On/Off“,
set „On!“
Thus, cardiac frequency measurement is activated.
Training zone
There are three indicated training zones (Health, Fat Burn, Aerobics) and also
one defined by the user (User). Based on your age, the GPS watch calculates
Training data row 1
Training data row 2
Training data row 3

30
automatically your maximum cardiac frequency, as well as your upper and
lower limits to the 3 indicated training zones. Select the training zone
depending on the purpose you follow by your training.
Selection of training zone
In the setting mode select „HRM” point from the menu „HR Zone“
„Select“.
Then select one of the three preset training zones of the training zone
defined by the user (User).
Modification of upper and lower limits
In the setting mode select „HRM” point from the menu „HR Zone“
„Customize“.
Then select one of the three preset training zones of the training zone
defined by the user (User) for which you want to modify the upper or
lower limits.
Then indicate the desired upper and lower limits for cardiac frequency.
Upper limit
% of the maximum cardiac frequency
Lower limit
Within the training zone
Above the training zone
Under the training zone

31
Reset of upper and lower limits to basic setting
In the setting mode select „HRM” point from the menu „HR Zone“
„Reset“.
Setting of maximum cardiac frequency
In the setting mode select „HRM” point from the menu „Max.HR” and adjust the specific maximum frequency.
Alarm activation for training zone
In the setting mode select „HRM” point from the menu „HR Zone“
„Alert“ „On“.
When the cardiac frequency from the training is outside the maximum and
minimum limits set, a signal tone will be heard. The alarm for the training
zone only works in training mode.
Joint of chest strap with the GPS watch
Each chest strap has its own ID and it was paired from the factory with the
GPS watch, in order to avoid faults. If you replace the GPS watch or the belt,
these must be paired again.
In the setting mode select „HRM” point from the menu select
„Pairing“.
Then touch, for a few seconds, the contact surfaces of the sensors.
If pairing was successfully performed, the notification "DONE!" appears.
If the notification "FAIL" appears, then the pairing did not work. Try
again, according to the description above.
32
6.3.2 Profiles and training data
The GPS watch has 5 different training profiles:
Running, Cycling, Hiking, Sailing and „User“
The names of these profiles can only be modified via runtastic Connect
Selection of training profile
In the setting mode select „Workout“ point from the menu
„Profiles“ „Select“.
Then select one of the five training profiles.
For each training profile there are three displays, each display being formed
by 3 digits for training data.
These training data can be freely chosen from a list. Thus, each user can
select those training data that are especially interesting to him. The selection
of training data can be made by the adjustment mode of the GPS watch, and
also via runtastic Connect. The selection by runtastic Connect is faster and
easier.
Selection of training data
In the setting mode select „Workout“ point from the menu
„Profiles“ „Customize“.
Then select one of the 5 profiles, for which you wish to adjust the
training data.
Then select for the displays 1-3 (View 1- 3) the training data for each 3
rows.

33
Possible training data rows 1 and 3
Altitude
Calories
Distance
Heading
HR-Avg
HR-Max
HR-Min
HR
HRZ-Abv
HRZ-Blw
HRZ-In
LapDist
LapNo
LapTime
Pace Avg
Pace Max
Pace
Speed Avg
Speed Max
Speed
TimeOfDay
Wkout Time
Altitude
Calories
Distance
Heading (degree indication)
Average cardiac frequency
Maximum cardiac frequency
Minimum cardiac frequency
Current cardiac frequency
Time above training area
Time below training area
Time in training area
Lap distance
Number of laps
Time of laps
Medium Pace (time/km)
Maximum Pace (the fastest time/km)
Current Pace (time/km)
Average speed
Maximum speed
Current speed
Time
Training time

34
Possible training data row 2
Distance
HR
LapDist
LatLong
PaceAvg
SpeedAvg
Speed
TimeOfDay
Wkout Time
Distance
Current cardiac frequency
Lap distance
Longitudinal and latitude degree
Average pace (time/ km)
Average speed
Current speed
Time
Training time
Training data Basic data setting
In the setting mode select „Workout“ point from the menu
„Profiles“ „Reset“.
The basic setting for training data is:
Display 1: Distance, medium pace (time per km), training time
Display 2: Number of laps, current cardiac frequency, lap time
Display 3: Height, time, calories
Manual switch among the 3 displays
In GPS-Workout-mode press the „VIEW” key, in order to manually switch
among the 3 displays.
Automatic switch among the 3 displays
When “Scanning” function is activated, the GPS watch automatically switches
among the 3 displays.
In the setting mode select „Workout” point from the menu
„Viewscan“ „On“.

35
6.3.3 Training
A-GPS
The watch has a function called “A-GPS” (Assisted global Positioning System).
A-GPS is a method, which fastens the search for a good GPS-reception under
bad weather conditions. The A-GPS data will be saved on a server and
transferred to the watch via the runtastic Connect. The validity period of this
data is 7 days.
In order to use this function you require
internet access.
Download the A-GPS data
Connect the watch with the USB cable and
then plug in the cable to your computer.
As soon as the watch is linked to the
computer, the A-GPS data will be
transferred to the watch.
GPS starting
Here, follow especially the indications from point 5 "General information
regarding GPS reception".
In optimal conditions, in cold start, the search of the satellites takes approx. 1
minute, and in warm start, approximately 10 seconds.
We talk about cold start when the GPS watch is used for the first time, it has
not been used for a long time, or it has been moved for a quite long distance
from the last determination of the position (e.g. 300 km).

36
Then the GPS watch does not know what satellite constellation it should wait
and has to gather the data again.
Then there is warm start, in the best case it takes approximately 10 seconds.
A warm start can function only when the GPS watch did not go a long
distance away from the last determination of the position and there was not
too much time since then. The more satellites changed their position since
the last determination of the position, from the GPS watch point of view, the
longer the search for satellites will be.
For the fast GPS reception it is important for the watch to be at rest and not
to be on the move.
Advice: Before starting running, before starting the path respectively, start
your GPS watch, in open space, with clear view to the sky (e.g. to window
ledge or on the bonnet of the car) and start searching for the satellites.
In order to search for the satellites, there are the following options:
1) In the setting mode select „GPS” point from the menu „On/Off“, set
„GPS On!“
2) Press and hold down the „VIEW“-button from GPS-Workout-mode.
As soon as the signal is received, the following symbol will appear:
Search for satellites GPS signal received
Display of GPS status:
Antenna symbol lights – search for satellites
If "GPS fixed" appears on the screen, this means that the watch has
found a 2D position (the altitude is still missing, respectively).
37
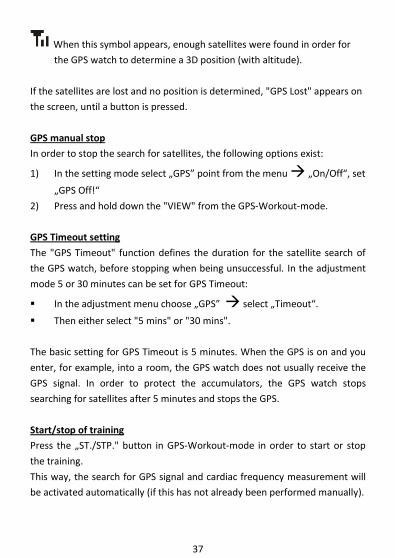
When this symbol appears, enough satellites were found in order for
the GPS watch to determine a 3D position (with altitude).
If the satellites are lost and no position is determined, "GPS Lost" appears on
the screen, until a button is pressed.
GPS manual stop
In order to stop the search for satellites, the following options exist:
1) In the setting mode select „GPS” point from the menu „On/Off“, set
„GPS Off!“
2) Press and hold down the "VIEW" from the GPS-Workout-mode.
GPS Timeout setting
The "GPS Timeout" function defines the duration for the satellite search of
the GPS watch, before stopping when being unsuccessful. In the adjustment
mode 5 or 30 minutes can be set for GPS Timeout:
In the adjustment menu choose „GPS” select „Timeout“.
Then either select "5 mins" or "30 mins".
The basic setting for GPS Timeout is 5 minutes. When the GPS is on and you
enter, for example, into a room, the GPS watch does not usually receive the
GPS signal. In order to protect the accumulators, the GPS watch stops
searching for satellites after 5 minutes and stops the GPS.
Start/stop of training
Press the „ST./STP." button in GPS-Workout-mode in order to start or stop
the training.
This way, the search for GPS signal and cardiac frequency measurement will
be activated automatically (if this has not already been performed manually).
38
Recording of lap times
During the training, press the "LAP/RESET” button to record the time of a lap.
For each workout, the maximum number of lap times is 99.
Automatic recording of lap times „Lap-By-Distance”
By this function, laps can be automatically generated. Then the "LAP/RESET”
button no longer needs to be pressed to record the time of a lap.
In the setting mode select „Workout” point from the menu
„SmartLap“ „By Dist“.
Set the desired distance, after which a lap will always be marked (e.g. 1
km).
Then press "On", in order to activate „SmartLap” function.
Still, there is the possibility to record manually the lap times between the
laps stopped automatically.
Alarm activation for „Lap-By-Distance“
In case of an activated alarm, when the GPS watch generates a new lap by
means of „Lap-By-Distance” function, a signaling sound will be heard.
In the setting mode select „Workout” point from the menu
„SmartLap“ „Alert“.
Then select "On" to activate the alarm for "Lap-By-Distance" function or
"Off" to deactivate it.
Automatic generation of reference points from laps „Lap-To-Waypoint”
By this function, reference points can be automatically generated. Whenever
a new lap time is recorded (regardless if manually or automatically), a
waypoint is generated.
In the setting mode select „Workout” point from the menu
„SmartLap” „LapWP“.

39
Then press "On", to activate „Lap-To-Waypoint” function.
Then select one of the paths. This path will be erased and replaced with
a new reference point
Setting of measurement interval
The GPS watch records the path continuously. You can set manually how
often the measurements are performed, from 1 second up to 10 minutes.
The basic setting is 4 seconds:
In the setting mode select „Workout” point „Tracklog“.
Then adjust the interval desired for measurements
6.3.4 After training
Setting of training data to zero
If training stops, hold down the "LAP/RESET" button, until "Hold to Save"
appears; all training data are set to 0 and you can start with a new training.
Still, the data of this training will be kept in the memory of the watch and will
be able to be viewed later.
Deletion of training data
If you wish to delete the data of the last training:
In the setting mode select „Workout” point „Delete” „Del Last”.
If you want to delete the data of all trainings so far:
In the setting mode select „Workout” point „Delete” „Del All”.
Training history:
In the setting mode select „Workout” point from the menu
„History” to view a training history.
The history consists of 3 parts, if each part is displayed for each 5 seconds
(automatic switch between the parts).

40
(Part 1)
First row: Number of recording (Training) Press the „ST./STP.“- or the „LAP/RESET” buttons, to switch between
recordings (trainings)
Second row: Date
Third row: Time
Fourth row: Integral number of the laps from this recording
(2nd Part)
Training time
Distance
Average pace (time per km)
(3rd Part)
Calories
Average cardiac frequency
Average speed
Press the „VIEW“-button, to view the History of laps. On the left upper side
the number of the recording (training) is shown, on the right upper side the
number of laps. Press the „ST. / STP.” or the „LAP/RESET” buttons, to switch
between the individual laps.
The history of the laps consists of 2 parts, which are always displayed
alternatively:
Part 1. Average lap time, lap distance and Tempo (Pace) of this lap
2nd Part Medium, average frequency of this lap and the speed of this lap.
Press the „VIEW“-button, to get again to the Histories of trainings.
41
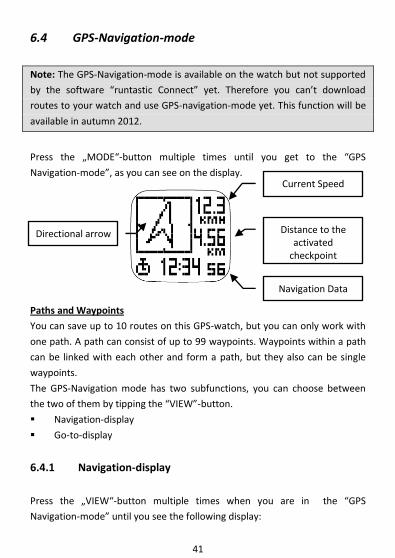
6.4 GPS-Navigation-mode
Note: The GPS-Navigation-mode is available on the watch but not supported
by the software “runtastic Connect” yet. Therefore you can’t download
routes to your watch and use GPS-navigation-mode yet. This function will be
available in autumn 2012.
Press the „MODE“-button multiple times until you get to the “GPS
Navigation-mode”, as you can see on the display.
Paths and Waypoints
You can save up to 10 routes on this GPS-watch, but you can only work with
one path. A path can consist of up to 99 waypoints. Waypoints within a path
can be linked with each other and form a path, but they also can be single
waypoints.
The GPS-Navigation mode has two subfunctions, you can choose between
the two of them by tipping the “VIEW”-button.
Navigation-display
Go-to-display
6.4.1 Navigation-display
Press the „VIEW“-button multiple times when you are in the “GPS
Navigation-mode” until you see the following display:
Distance to the activated
checkpoint
Current Speed
Navigation Data
Directional arrow

42
First choose the path, the navigation-mode and the waypoint-radius, like described as follows: Choose path Choose “Settings” “Navigation” “SelPath” Now you can choose from path 1 to path 10 Delete path Choose “Settings” “Navigation” “DelPath” Now you can choose from path 1 to path 10 Navigation types
There are three different types of navigation:
Waypoint-navigation: The activated waypoint is the goal. Choose this
navigation type, to go to an individual waypoint on the activated path.
Select the activated waypoint in the “go-to-display”.
Forward-navigation: The last waypoint is the finish. Choose this kind of
navigation to run from the first to the last waypoint on the activated
path. Activate the nearest waypoint in your area in the “go-to-display”
to start with. When you reach the activated waypoint, automatically
the next waypoint is displayed until you finish the path.
Backward-navigation: The first waypoint is the finish. Choose this kind
of navigation to run from the last to the first waypoint on the activated
path. Activate the nearest waypoint in your area in the “go-to-display”
Distance to the activated
checkpoint
Current Speed
Navigation Data
Directional arrow

43
to start with. When you reach the activated waypoint, automatically
the previous waypoint is displayed until you rech the first waypoint.
Choose navigation-modes
Choose “Settings” “Navigation” “NavMode”
Now choose “waypoint”, “forward” or “backward”
Waypoint-radius
Here you can adjust when exactly a waypoint is reached. Basic setting is 30
meters (98,43 feet). So when you enter this radius, the waypoint is reached.
You can also adjust the radius manually (from 10 to 200 meters/ 32,81 to
656,17 feet).
To adjust the waypoint-radius manually, hold the “MODE”-button to
get to the menu, choose “Navigation” “WP Radius”.
Now you can adjust the waypoint radius
Start GPS
Please carefully read the hints mentionend in chapter 5 “General information
regarding the GPS reception”.
The search for satellites under best conditions normally lasts app. 1 min. when started cold, about 10 seconds when started warm. Cold start is the first start ever or the first start after being inactive for a long time. We also talk about a cold start, when the watch was moved more than 300 km (186,41 miles), from the last point of calibration. The GPS-watch does not know the exact constellation of the satellites and has to regain the data. Once this step is finished, there is only the warm start, which lasts app. 10
seconds. A warm start can only work, if the GPS-watch was not carried over
far distances since its last location calibration. The more satellites move since
its last location calibration, the longer the search for satellites will last.
44
For a good GPS-reception it is important to know that the watch should lie
even and shall not be moved.
Indication: Before you start your workout, lay your GPS-watch in open area
with view to the sky (e.g. window board, car roof) and start the search for
satellites.
To start the search for satellites, there are following options:
1) Hold the “MODE”-button to get to the menu, choose GPS “On/Off”, and
activate “on”.
2) Press and hold the “VIEW”-button in the GPS-navigation-mode.
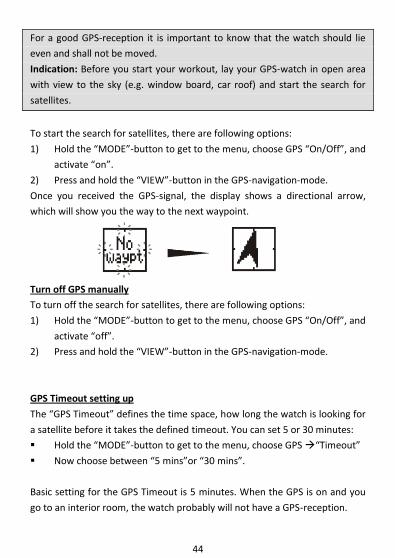
Once you received the GPS-signal, the display shows a directional arrow,
which will show you the way to the next waypoint.
Turn off GPS manually
To turn off the search for satellites, there are following options:
1) Hold the “MODE”-button to get to the menu, choose GPS “On/Off”, and
activate “off”.
2) Press and hold the “VIEW”-button in the GPS-navigation-mode.
GPS Timeout setting up
The “GPS Timeout” defines the time space, how long the watch is looking for
a satellite before it takes the defined timeout. You can set 5 or 30 minutes:
Hold the “MODE”-button to get to the menu, choose GPS “Timeout”
Now choose between “5 mins”or “30 mins”.
Basic setting for the GPS Timeout is 5 minutes. When the GPS is on and you
go to an interior room, the watch probably will not have a GPS-reception.

45
To save the batteries, the GPS-watch will stop searching after 5 minutes and will turn off the GPS. Start/Stop Workout
Press the “ST./STP.”-button when you are in the GPS-navigation mode to start or to stop the workout. Thus the search for the GPS-reception and the heart rate measurement are activated automatically (if this has not been done yet manually). Recording Lap Times During the workout press the “LAP/RESET”-button to record a lap time. The maximum number of lap times for each workout is 99. The current speed and the distance to the activated waypoint are displayed. Alternating following navigation data is shown in the bottom of the line: Time of day Workout time Distance to finish Estimated time to finish Current heart rate (if available) Once you reach the radius of a waypoint, you can hear 3 short “beep”-sounds, except you deactivated them earlier in the menu (6.1.2 System settings).
Current Speed
Distance to the activated waypoint
Directional arrow
Navigation Data

46
6.4.2 Go-to-display
Enter the GPS-Navigation mode and press the “VIEW”-button several times, until you see the following display: You can choose a waypoint from the previous path by either pressing the “ST./STP.” or the “LAP/RESET”-button. Alternating following navigation data is shown in the bottom of the line: Time and date, the time when the waypoint was created and the
direction (degree display) to this waypoint (assumption: GPS-reception) Longitude and altitude of the waypoint After activating a waypoint, press the “VIEW”-button to return to the navigation menu.
6.5 Compass-mode
Press the „MODE“-button until you get to Compass-mode. This appears on
the screen by the following display:
Waypoint number
Path name Navigation data
North Pole indication
Direction
Indication of degrees

47
Direction Indication of degrees
Direction Indication of degrees
N North 349° - 11°
NNE North-Northeast 12° - 33°
NE Northeast 34° - 56°
ENE East-North East 57° - 78°
E East 79° - 101°
ESE East-South East 102° - 123°
SE South East 124° - 146°
SSE South-South East 147° - 168°
S South 169° - 191°
SSV South-South West 192° - 213°
SV South West 214° - 236°
VSV West-South west 237° - 258°
V West 259° - 281°
VNV West-North west 282° - 303°
NV North west 304° - 326°
NNV North-North west 327° - 348°

48
6.5.1 Compass calibration
The compass of the GPS watch must be calibrated:
if the watch is used for the first time.
if the compass will be used in a place, which is not identical to the place
in which the compass was calibrated.
To calibrate the compass, go in the adjustment mode and select
„Settings“ „System“ „Compass“ „Calibrate”. Keep the GPS
watch parallel to the floor and rotate clockwise, until "Done" appears
on the screen.
6.5.2 Entry of declination
The GPS watch, as most of the magnetic compasses, shows toward the
magnetic North Pole. Any departure on a map however refers to the
geographical North Pole. An angle arises from here. This is called deviation or
declination.
To correct this declination, the deviation degree can be introduced. This
deviation degree is indicated on maps as plus Eastern deviation (E), Western
deviation minus respectively (V).
Geographical North Pole
Magnetic
North Pole
Magnetic declination
Magnetic declination
49
Example 1:
Western deviation 23° and the compass shows 323° 323° - 23° = 300°
Example 2:
Eastern deviation 22° and the compass shows 278° 278° + 22° = 300°
Most of the maps have a small arrow, which indicates where the magnetic
North Pole is, how big the deviation is, respectively (it is indicated in
degrees). Also, the internet page www.magnetic-declination.com is useful, to
find the declination of a place.
To enter the declination, in the adjustment mode select “Settings”
“System” “Compass” “Declinate”
Then adjust the declination.
7 Economic functioning
The GPS watch has an economic functioning mode. Thus, the light turns off,
in order to extend the economic life of the accumulators.
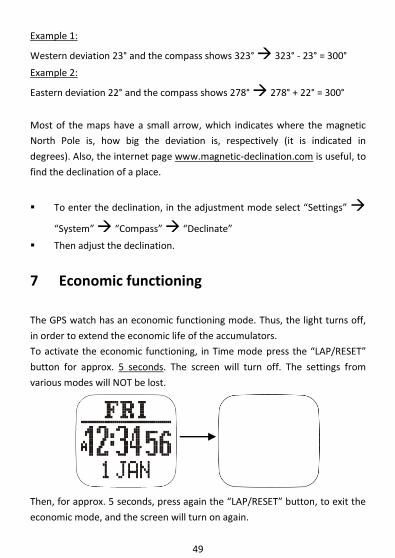
To activate the economic functioning, in Time mode press the “LAP/RESET”
button for approx. 5 seconds. The screen will turn off. The settings from
various modes will NOT be lost.
Then, for approx. 5 seconds, press again the “LAP/RESET” button, to exit the
economic mode, and the screen will turn on again.
50
8 Display brightness
By pressing the "LIGHT" button, the display will be lit for approximately 5
seconds.
Also, a permanent brightness of the display is possible. To activate the so-
called "Night mode", press and hold down the "LIGHT" button for
approximately 5 seconds. Press the "LIGHT" button shortly to exit the night
mode. Display brightness disappears after approximately 5 seconds.
However, note that more power is consumed for display brightness;
therefore the accumulator will be discharged faster.
9 Charging the accumulator, replacement of
batteries respectively
9.1 Charging the accumulator of the GPS watch
The GPS watch has a lithium-polymer accumulator.
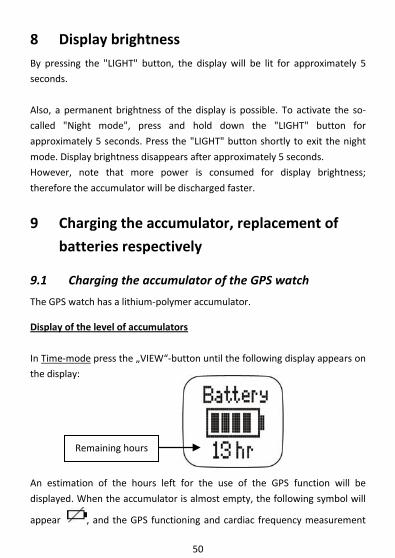
Display of the level of accumulators
In Time-mode press the „VIEW“-button until the following display appears on
the display:
An estimation of the hours left for the use of the GPS function will be
displayed. When the accumulator is almost empty, the following symbol will
appear , and the GPS functioning and cardiac frequency measurement
Remaining hours

51
will be deactivated. The operation duration of the accumulator is of 8 hours
when using the GPS, and in time mode of approx. 1 year.
To avoid corrosion, we recommend you to dry well the contact points of the
GPS watch, before starting a charging process.
To charge the accumulator, proceed as follows:
Fix the clip of USB cable on the GPS watch according to the following image
and insert the USB cable in a USB connected to power from your computer.
The installation of a driver for charging the accumulator is not necessary.
During the charging process the following symbol appears on the screen:
The charging of an empty accumulator takes approximately 2 hours.
When the accumulator is fully charged, the display "battery full" appears.
52
9.2 Replacement of the battery of chest strap
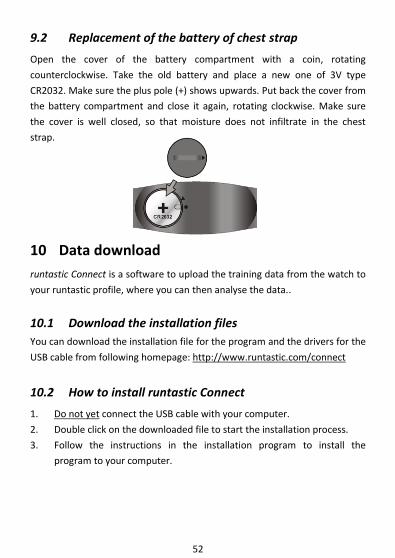
Open the cover of the battery compartment with a coin, rotating
counterclockwise. Take the old battery and place a new one of 3V type
CR2032. Make sure the plus pole (+) shows upwards. Put back the cover from
the battery compartment and close it again, rotating clockwise. Make sure
the cover is well closed, so that moisture does not infiltrate in the chest
strap.
10 Data download runtastic Connect is a software to upload the training data from the watch to
your runtastic profile, where you can then analyse the data..
10.1 Download the installation files You can download the installation file for the program and the drivers for the
USB cable from following homepage: http://www.runtastic.com/connect
10.2 How to install runtastic Connect
1. Do not yet connect the USB cable with your computer.
2. Double click on the downloaded file to start the installation process.
3. Follow the instructions in the installation program to install the
program to your computer.

53
10.3 Installing drivers for the USB cable
During the installation process of the runtastic Connect progam you will also
install the necessary drivers for the USB-port to your computer.
Indication: We are not assuming any liability for damages on your computer.
10.4 Using runtastic Connect
See below the most important facts how you can use runtastic Connect:
1. Connect the watch with the USB cable and then plug in the cable to
your computer. runtastic Connect will open automatically once linked
to the watch with following window:
Click to this arrow to open up the window completely:
To sign up with your runtastic account, click on “Connect account”.
Automatically you will be linked to the homepage of runtastic were you can
log in with your Username. For creating an account please follow the
instructions on the site.
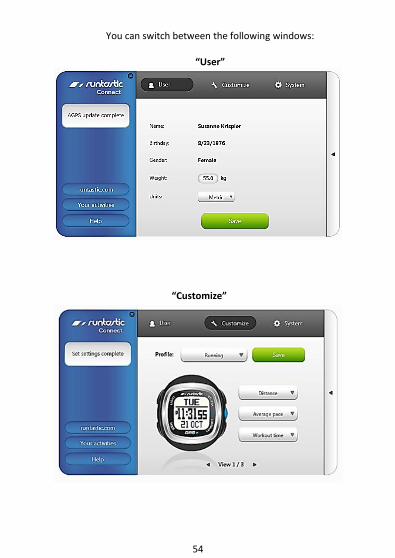
54
You can switch between the following windows:
“User”
“Customize”

55
“System”
In each window you can make adjustments in the settings which will be transferred to the watch once you press the “Save” button.
11 Technical data
GPS watch
Power supply: Lithium-polymer accumulator, 380 mAH, 3,7V
GPS accuracy: 3 meters CEP (50%) under clear sky conditions
The indication of the accuracy is based on the so-called CEP 50% (Circular
Error Probability). This means that in case of very good GPS reception from
the satellites 50% of all measuring points will be located in a circle with the
indicated half-line of 3 m. It also means that half of the measuring points are
outside this half-line.
Further, however, 95% of all measuring points are in a circle with double half-
line. Nearly all points are inside a circle with a half-line of 6 m, in case of good
reception of the satellite.

56
Accuracy of position determination
Chest strap
Power supply: 1 Lithium battery (3V, CR2032)
Transmission frequency from the chest strap to the GPS watch: 2,4 GHz
12 Declaration of compliance
R&TTE Directive 1999/5/EG:
Shortened text of the declaration of compliance: By this, Krippl-Watches,
declares that the GPS watch (Art.-No. RUNGPS1, Type: D02I280), as well as
the chest strap (Art.-No. RUNGPS1, Type: T00018D) comply with the
applicable basic conditions and dispositions of 1999/5/EG directive.
The complete text of the declaration of compliance can be taken from our
website www.runtastic.com

57
13 FAQ/Correction of errors
Before claiming the GPS watch, verify if the accumulators are charged and
charge them if need be. Also, check the batteries from the chest strap and
replace them if need be.
I’d like to start training, why doesn’t the GPS watch show speed?
It is important for GPS fast reception that the watch be at rest and not to be
on the move. Before starting running, before starting the path respectively,
start your GPS watch, in open space, with clear view to the sky (e.g. at the
window ledge or under the bonnet of the car) and start the search for
satellites. Further, comply with point 5 "General information regarding GPS
reception" from the operating instructions.
What does "GPS lost" display mean?
"GPS lost" display on the screen of the GPS watch means that it does not
receive GPS signal or all the signals from the satellites were lost. For this, see
point 6.3.3. "Training" of the operating instructions.
Why can’t I see on the display?
Why doesn’t the display light work?
Check if the accumulators are charged and charge them if needed. However,
if no display appears on the screen, please contact the service.
Why is the screen black and why aren’t the displays readable?
This is caused by long exposure to sunbeams or too high environmental
temperature. Let the GPS-watch cool down, then the display will become
readable again.
The display on the screen reacts slowly, why?
Is the temperature below 0°C? When the temperature rises again over 0°C,
the display will become normal. The saved data will not be lost.

58
How long does the accumulator of the GPS watch last?
The service life of the accumulator is of 14 hours, when using the GPS, and of
approx. 1 year in time mode.
It doesn’t show my current speed, why?
Check if you receive enough GPS signal.
Why does the GPS watch show a certain speed, if I do not walk/I am not on
the move?
This depends on the exactness of position determination, measurement
intervals of the GPS respectively. See next paragraph, the exactness of the
GPS watch respectively.
How exact does the GPS watch show?
The exactness depends on the reception of the satellites. The indication of
exactness is based on the so-called CEP 50% (Circular Error Probability). This
means that, in case of a very good reception from the satellites 50% of all
measurements will be in a circle with the indicated half-line of 3 m. It also
means that half of the measurement points are outside this half-line. Further,
however, 95% of all the measurement points are in a circle with double half-
line. Almost all the points are inside a circle with a half-line of 6 m, in case of
a good reception of the satellite.
Charge of the accumulator of the GPS watch does not work, why?
Make sure the USB port in which the GPS watch is inserted is power carrier.
The installation of a driver for charging the accumulator is not necessary.
If problems appear when charging the GPS watch, check the contact pins on
the back of the watch. If these were soiled with sweat deposits and skin
scales, clean them with a sharp metallic object (e.g. tweezers).

59
Why when riding the bike, a different speed in comparison to the computer
without bike cable is shown?
Do not use the computer without bike cable and the GPS watch
simultaneously. The signals of the sensor from the bike computer may
disturb the GPS watch. Thus, false displays can be shown.
Can the cell phone and the GPS watch be mounted together on the handle
bar of the bike?
It is not recommended because disturbances (radio) may appear.
For which types of sports is the GPS watch adequate?
For outdoor sports like jogging, cycling, hikes, sailing, skiing etc.
Can I use the GPS watch also for measuring properties, houses etc?
The sports computer of the GPS is used only for free time activities/hobbies.
Do not use the GPS watch when measurements demand professional
accuracy.
For climbing, trekking laps, cycling laps etc will I have to use only the GPS
watch instead of maps and compass?
The GPS watch was designed to complete other forms of navigation, e.g.
maps, compasses. It does not replace them directly. Do not use the GPS
watch as a sole navigation support.

60
14 Warranty
We provide a 24 months warranty for this product. The warranty period
begins on the date of purchase (till receipt, purchase voucher). During this
period you will receive free of charge a new or repaired product. The
warranty does not include batteries, improper handling, dropping, shock or
the like.
If you have a claim please contact:
For Germany and Austria: [email protected]
For all other countries:
Please contact the distribution partner in charge resp. to the point of sale
where you have purchased the product.
www.runtastic.com