google classroom help sheet 9/3/2014 google classroom help sheet table of contents introduction...
TRANSCRIPT

1
9/3/2014
Google Classroom Help Sheet Table of Contents Introduction
Signing into Google Classroom
Creating a Class
Changing a Class Theme
Adding a Teacher Photo to the Class
Renaming or Deleting a Class
Adding a Class Resource Page
Adding Student by Class Code
Removing Students from a Class
Resetting the Class Code
Creating an Assignment
Viewing an Assignment
Grading and Returning an Assignment
Changing a Grade
Posting Announcements
Adding and Deleting Comments
Introduction Google Classroom integrates Google Docs, Drive, and Gmail in order to create and collect assignments in a paperless environment. By utilizing Classroom, you can create assignments for one or multiple classes, and assign the assignment to each student or a group of students. As a teacher, you can view who has or has not completed assignments, provide feedback during and after assignments, and assign grades. Google Classroom Workflow
1. Teacher creates assignment and attaches one or all of the following: File(s) Google Drive Item(s)

2
9/3/2014
Video(s) Link(s)
2. Teacher chooses to send the assignment to each individual student, a group of students, or to the whole class along with privileges: Edit or View .
3. Student receives a notification that an assignment is due. 4. Student turns in the assignment and loses editing privileges once assignment is turned
in. 5. The teacher edits the document to grade the assignment, returns it to the student with
feedback when necessary. 6. Student receives document with grade and has gained editing access again to write
comments. Note:
Both the teacher and students can see the list of pending and completed assignments.
The teacher can see all grades for an assignment
Students can see their own grades for completed assignments.
Signing into Google Classroom
1. Type the following web address: http://classroom.google.com
2. Enter your email and password.
Note: Classroom is only available for Google Apps for Educations users, so you cannot sign
into Classroom with your personal Google Account.
3. Click TEACHER. The Welcome to Classroom page opens.
4. Click SEE HOW CLASSROOM WORKS for a guided tour of Classroom. To take the guided
tour at a later time, Click the three horizontal lines in the upper-left corner, and
select Help.
Creating a Class
1. Click the + icon in the upper-right corner.
2. Click Create Class

3
9/3/2014
3. Type a Class Name and Section descriptions such as Section, Grade Level, or Class Time.
4. The Created Class will now appear.
5. As classes are created, you can navigate and view any class by clicking the three
horizontal lines in the upper-left corner.

4
9/3/2014
Changing the Class Theme
You can choose a theme (image) that will be displayed for the class in the stream. To change
the image:
1. Open the class and click Change Class Theme in the lower-right corner of the image.
2. Select an image from the gallery and click the Pick Course Image button.
Adding a Teacher Photo to the Class
You can also display a profile photo next to your name in both the class stream and on the class
card on the home screen.
1. From Google Drive, Click on your Account Name.

5
9/3/2014
2. Click on Change photo.
3. Drag or Upload a photo.
4. Click Set as Profile photo.
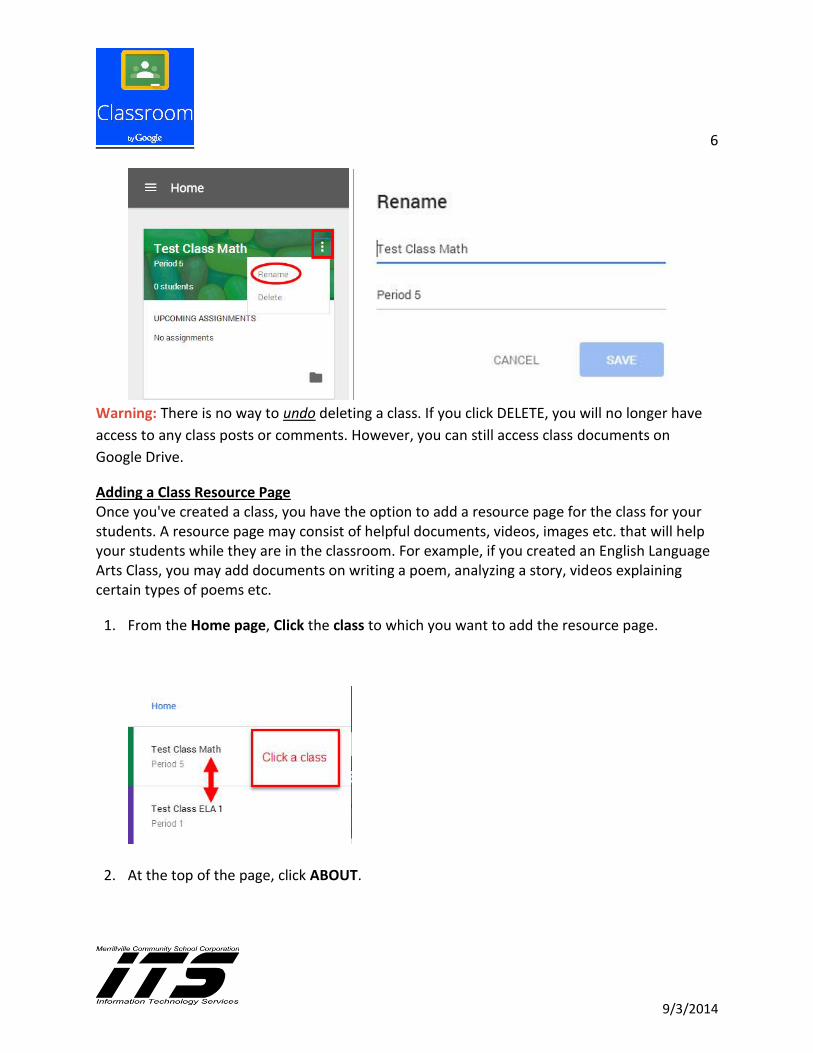
Renaming or Deleting a Class
From the home screen, you can rename or delete a class using the menu icon (three vertical
dots) in the upper-right corner of the class card:
To rename a class, Click the menu icon and select Rename. Enter a new name and
click SAVE.
To delete a class, Click the menu icon, select Delete, and click DELETE.
6
9/3/2014
Warning: There is no way to undo deleting a class. If you click DELETE, you will no longer have
access to any class posts or comments. However, you can still access class documents on
Google Drive.
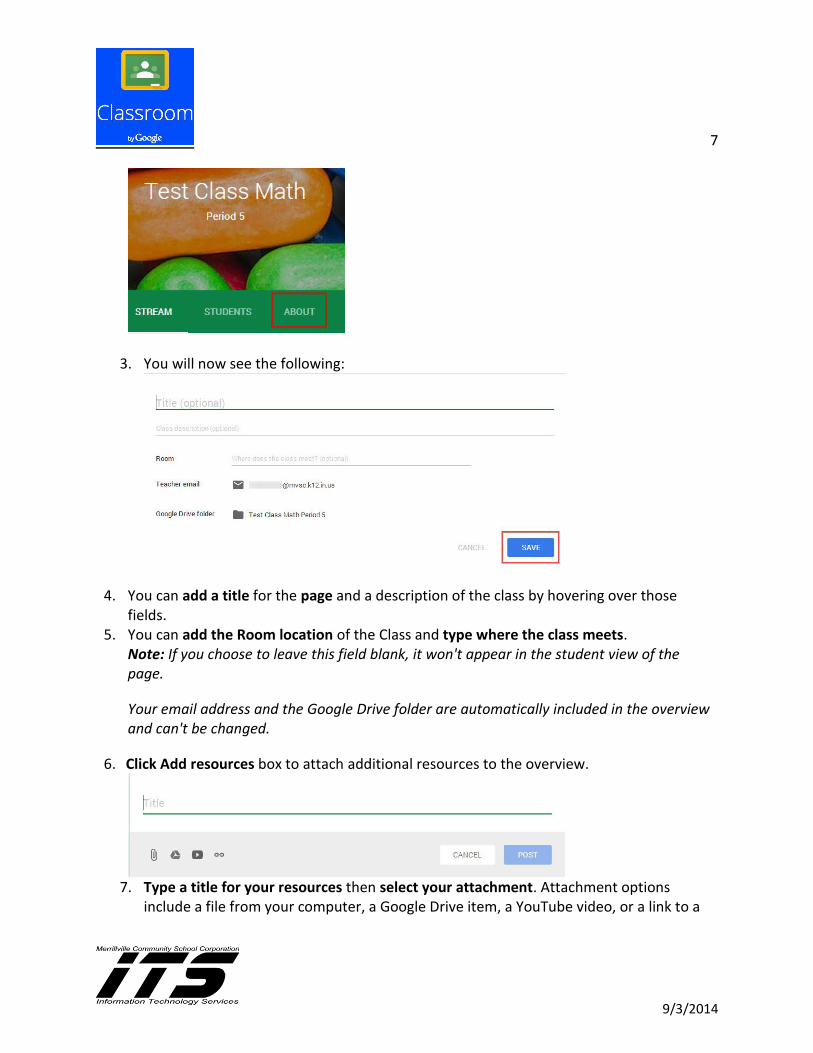
Adding a Class Resource Page Once you've created a class, you have the option to add a resource page for the class for your students. A resource page may consist of helpful documents, videos, images etc. that will help your students while they are in the classroom. For example, if you created an English Language Arts Class, you may add documents on writing a poem, analyzing a story, videos explaining certain types of poems etc.
1. From the Home page, Click the class to which you want to add the resource page.
2. At the top of the page, click ABOUT.
7
9/3/2014
3. You will now see the following:
4. You can add a title for the page and a description of the class by hovering over those fields.
5. You can add the Room location of the Class and type where the class meets. Note: If you choose to leave this field blank, it won't appear in the student view of the page.
Your email address and the Google Drive folder are automatically included in the overview and can't be changed.
6. Click Add resources box to attach additional resources to the overview.
7. Type a title for your resources then select your attachment. Attachment options
include a file from your computer, a Google Drive item, a YouTube video, or a link to a

8
9/3/2014
webpage. You can add multiple resources under a single title or add them separately under their own titles.
8. Click Post, when you're done. Click stream to go back to the main classroom page. Note: You can always edit the resource page by following the same steps. If you choose not to add a resource page, the ABOUT link at the top of the class stream will not appear for students.
Adding Students by Class Code
1. Sign in to Classroom at https://classroom.google.com
2. Click on the Class.
3. The class code is on the left of the stream.
4. Share the Class Code with students by:
Send an email to students with the class code.
Post the class code as an announcement on the class stream.
Write it on the board in your classroom.
5. The Class Code can also be obtained by clicking on the Students tab. It will be below the
Invite button.

9
9/3/2014
6. Give the students these instructions:
1. Sign in to Classroom at https://classroom.google.com.
2. On the Home page, click the + icon.
3. Enter the code that I gave you in the box and click JOIN.
Removing Students from a Class
At any time, a teacher can remove a student or several students from a class.
To remove a student: 1. Sign in to Classroom at http://classroom.google.com. 2. Click the class from which the student should be removed.
3. Click on Students.
4. Check the box or boxes next to the student(s) you want to remove.

10
9/3/2014
5. At the top of the page, Click REMOVE.
6. The dialog box appears with the question: "Are you sure you want to remove or uninvite the following student?" and shows the student's name.
7. Click REMOVE to remove the student from the class.
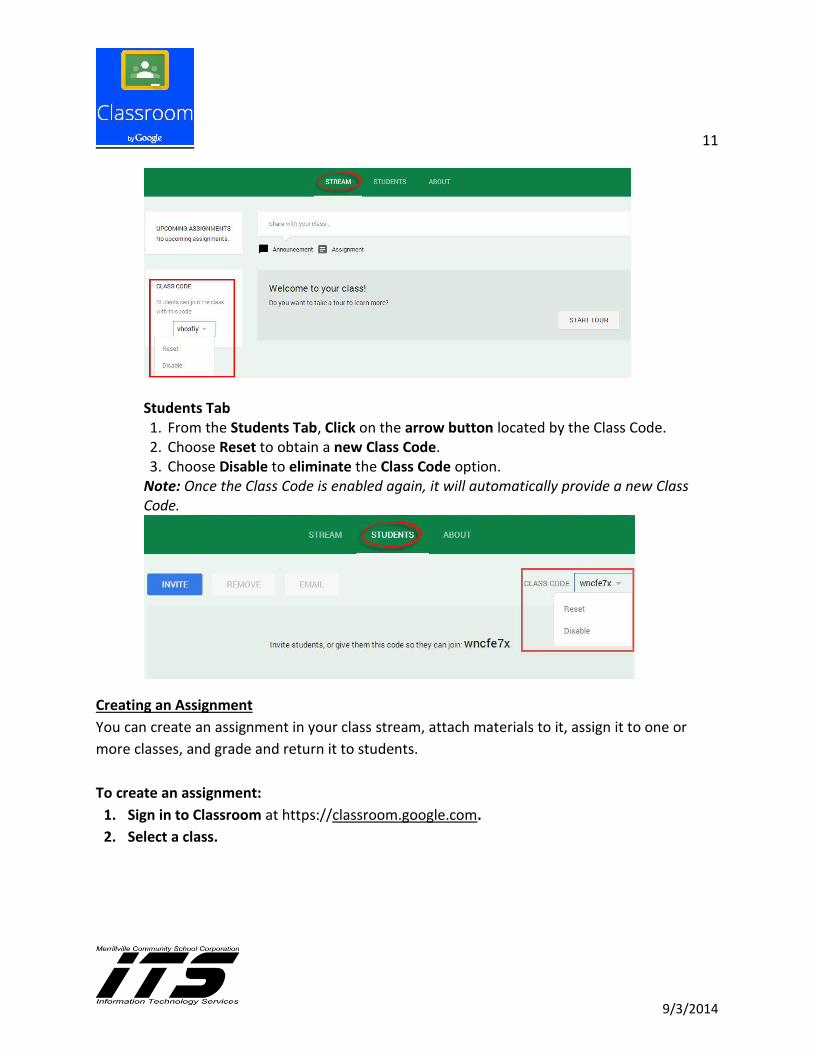
Resetting the Class Code
You have the option to reset or disable the class code by clicking the code itself to access the
drop-down menu. This can be accessed from either the Stream or the Students Tab.
Stream Tab 1. From the Stream Tab, click the arrow down button located by the code. 2. Choose Reset to obtain a new Class Code. 3. Choose Disable to eliminate the Class Code option. Note: Once the Class Code is enabled again, it will automatically provide a new Class Code.
11
9/3/2014
Students Tab 1. From the Students Tab, Click on the arrow button located by the Class Code. 2. Choose Reset to obtain a new Class Code. 3. Choose Disable to eliminate the Class Code option.
Note: Once the Class Code is enabled again, it will automatically provide a new Class Code.
Creating an Assignment
You can create an assignment in your class stream, attach materials to it, assign it to one or
more classes, and grade and return it to students.
To create an assignment:
1. Sign in to Classroom at https://classroom.google.com.
2. Select a class.

12
9/3/2014
3. Click Assignment at the top of the stream.
4. Enter the title of the assignment, and instructions in the Description area.
5. The assignment is due the next day by default. Click on the date to select a different date
from the calendar.
6. If you want the assignment turned in before midnight on the due date, click Add time to
set the time at 11.59 pm. Or, Click again to select a time from the drop-down list.

13
9/3/2014
7. Add other attachments to the file as needed to help students understand or add
motivation to the assignment:
File(s)
Google Drive item(s)
YouTube Video(s)
Link(s)
8. To attach a File, a Google Drive item, a YouTube video, or a link, Click the appropriate
icon.
9. To attach a File, Click the paperclip icon. This will enable you to:
Upload files from your computer that exist on your desktop, documents, etc.
Upload files from your Google Drive.
Upload files from your Google Drive that are starred.

14
9/3/2014
Or, Click the Google Drive icon to upload files from Google Drive.
Click Add.
If you attach a Drive item, and after you Click Add, you have a few options on how the student
can interact with the item. You set the appropriate option by clicking the Students can view
file drop-down menu next to the attached item.
1. Select Students can view file if you want all students to read, but not change, the
same file.
2. Select Students can edit file if you want all students to make changes in the same file.
3. Select Make a copy for each student to provide an individual copy of the file for each
student.
15
9/3/2014
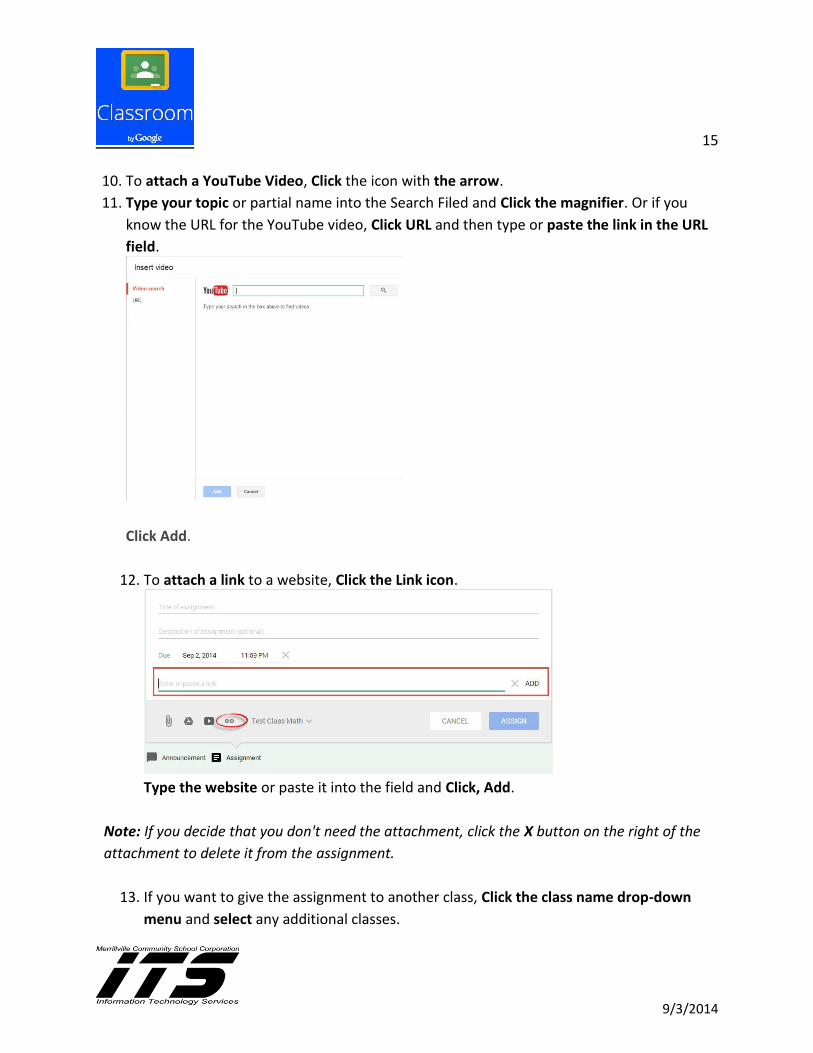
10. To attach a YouTube Video, Click the icon with the arrow.
11. Type your topic or partial name into the Search Filed and Click the magnifier. Or if you
know the URL for the YouTube video, Click URL and then type or paste the link in the URL
field.
Click Add.
12. To attach a link to a website, Click the Link icon.
Type the website or paste it into the field and Click, Add.
Note: If you decide that you don't need the attachment, click the X button on the right of the
attachment to delete it from the assignment.
13. If you want to give the assignment to another class, Click the class name drop-down
menu and select any additional classes.

16
9/3/2014
After you specify the assignment details, click ASSIGN to send it to students.
Viewing an Assignment
To access students’ assignments:
1. Sign in to Classroom at classroom.google.com.
2. Open the class and click the assignment in the class stream.
3. The Student Submissions page shows the current status of the students’ work on this
assignment. You can see if a student has started the assignment and review any work in

17
9/3/2014
progress (any files the student added to the assignment). You can also see which
students have completed the assignment (marked as DONE).
Note: If you chose to create a copy of a Google Drive item for each student in the
assignment, the copy is created and appears on the Student Submissions page when the
student opens it. You can review the work in progress, comment on it, and give feedback to
the student before the work is submitted. The file submitted back to you will also
automatically be name with the same Title but will also include the student’s name on the
file.
If you don’t see an attachment on the Student Submissions page under a student’s name, it
means the student has not opened the Google Drive item or attached a file, and there is
nothing for you to review.
4. To open all of the students’ assignments at once, click the FOLDER button to open the
Google Drive folder where all of the work is stored. Click any item in the folder and begin
reviewing the student’s work.

18
9/3/2014
5. You can view an individual student’s work by clicking the student’s name and then the
item. You will be taken to your Google Drive and be able to view all the students’
documents within the already created assignment folder.
6. You can edit or comment right in any document on Google Drive. Simply Click on
Comments make any comments and close the document.
7. It's automatically saved and ready for the student to review when they open the
document again.
19
9/3/2014
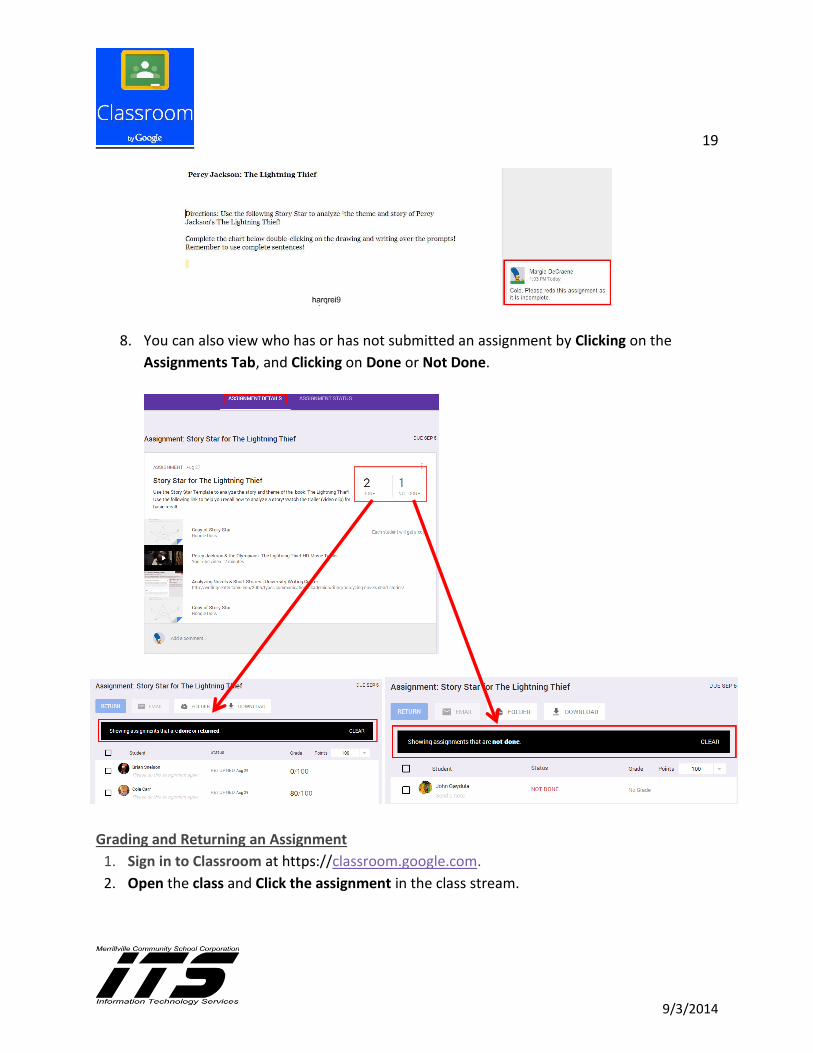
8. You can also view who has or has not submitted an assignment by Clicking on the
Assignments Tab, and Clicking on Done or Not Done.
Grading and Returning an Assignment
1. Sign in to Classroom at https://classroom.google.com.
2. Open the class and Click the assignment in the class stream.

20
9/3/2014
3. The Student Submissions page lists the students who have completed this assignment.
4. To grade an assignment, Click No Grade which is on the same line as the student’s name.
The default point value for an assignment is 100. To change this, Click the Points drop-
down menu on the right and select the point value for the assignment, or Click the
number and enter a new number.
Note: Only whole number grades are supported at this time. You cannot enter a letter
grade or a decimal point.

21
9/3/2014
5. Enter the grade in the box.
6. Enter grades for any additional students.
Warning: The grades that you enter on this page will not be saved unless you return the
assignments to the students.
7. Check the box next to the student or students whose grades you want to return.
If you want to return an assignment without assigning a grade, simply skip the grading
steps above and just check the box next to the student or students.
8. Click the RETURN button.
22
9/3/2014
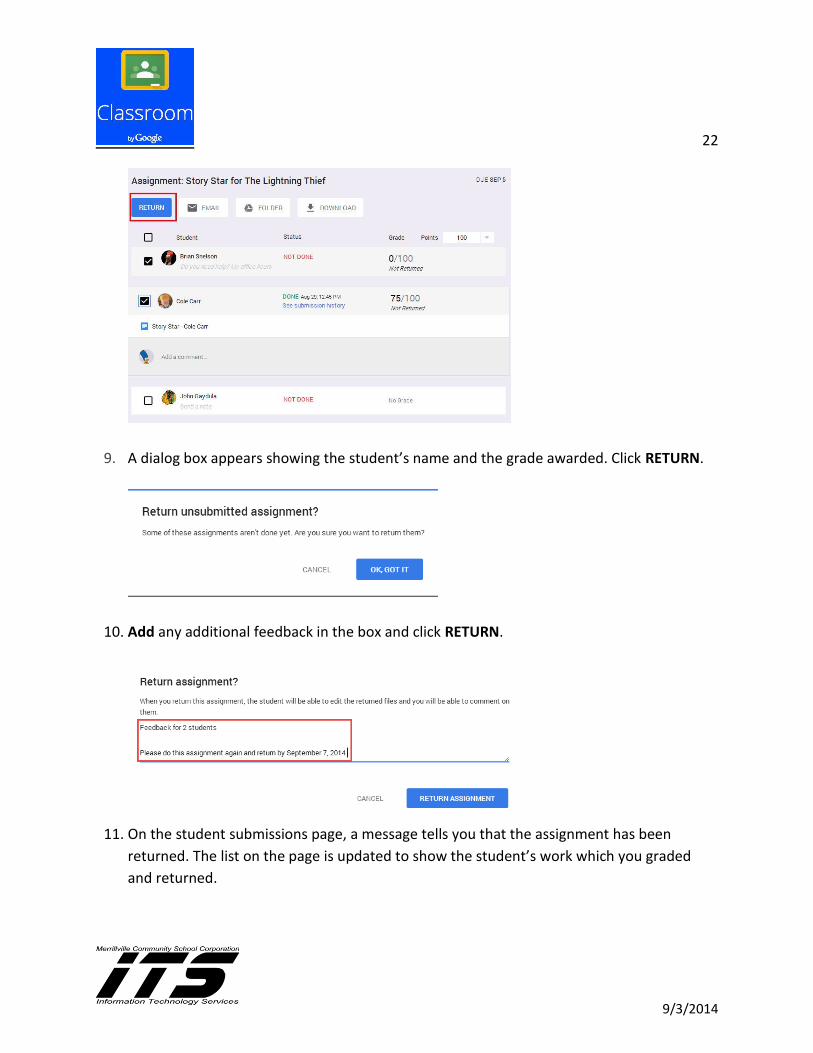
9. A dialog box appears showing the student’s name and the grade awarded. Click RETURN.
10. Add any additional feedback in the box and click RETURN.
11. On the student submissions page, a message tells you that the assignment has been
returned. The list on the page is updated to show the student’s work which you graded
and returned.

23
9/3/2014
12. After you click RETURN, the student receives an email telling them that you've returned
their grade. Also, the student regains edit access to any Drive items that were part of the
assignment.
Changing a Grade
1. Sign in to Classroom at classroom.google.com.
2. Open the class and click the assignment in the class stream.

24
9/3/2014
3. The Student Submissions page lists the students who have completed this assignment.
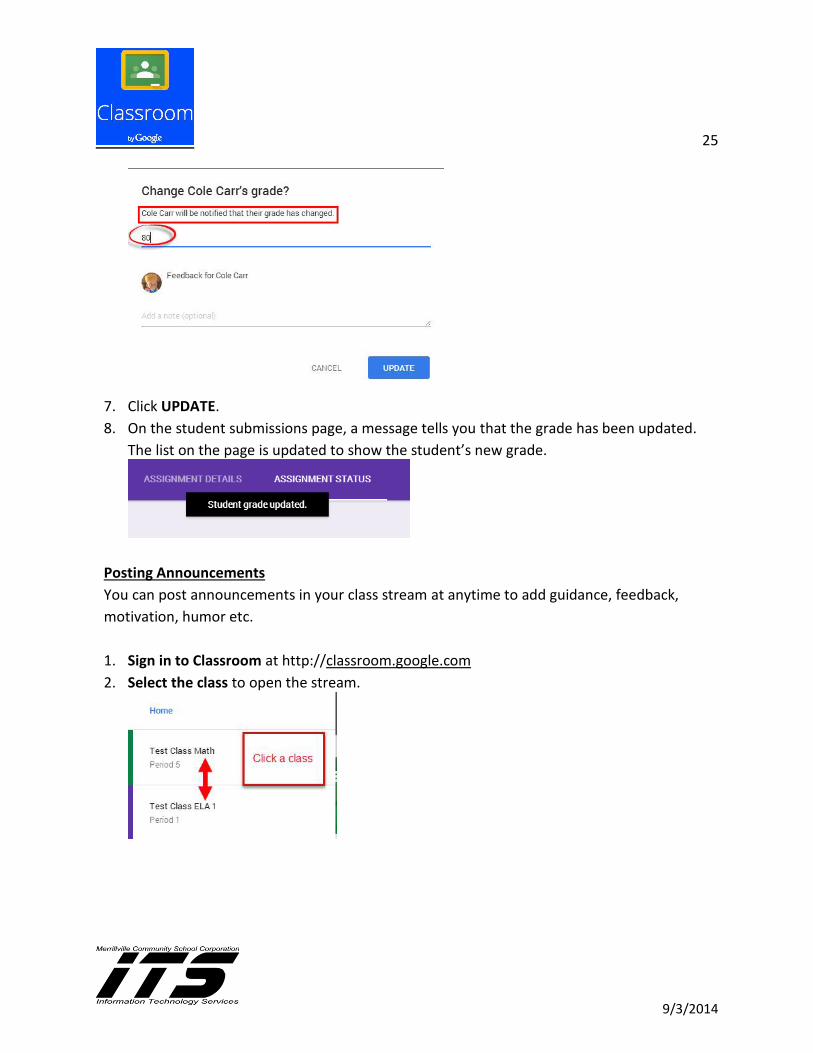
4. Click on the grade of the student whose grade you want to change.
5. Click the Points drop-down menu on the right and select the point value for the
assignment. Or, Click the number and enter a new number.
6. A dialog box appears showing the student’s name and the grade awarded, and states that
the student will be notified that their grade has changed.
25
9/3/2014
7. Click UPDATE.
8. On the student submissions page, a message tells you that the grade has been updated.
The list on the page is updated to show the student’s new grade.
Posting Announcements
You can post announcements in your class stream at anytime to add guidance, feedback,
motivation, humor etc.
1. Sign in to Classroom at http://classroom.google.com
2. Select the class to open the stream.
26
9/3/2014
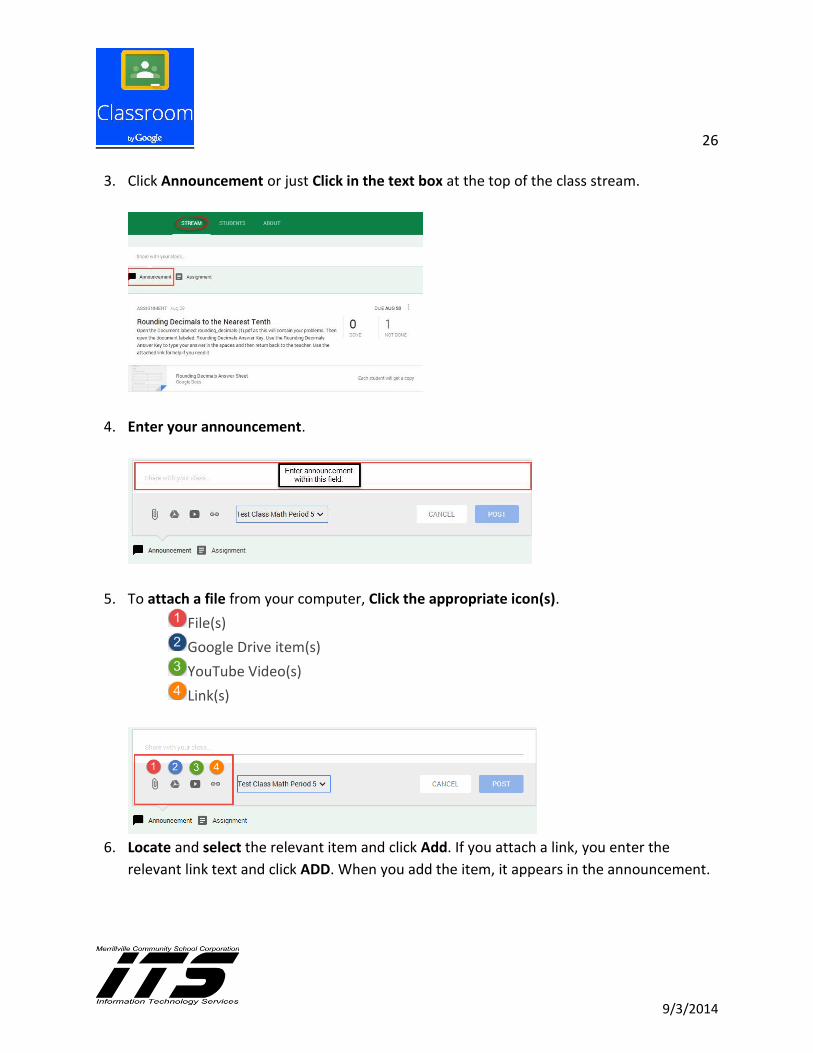
3. Click Announcement or just Click in the text box at the top of the class stream.
4. Enter your announcement.
5. To attach a file from your computer, Click the appropriate icon(s).
File(s)
Google Drive item(s)
YouTube Video(s)
Link(s)
6. Locate and select the relevant item and click Add. If you attach a link, you enter the
relevant link text and click ADD. When you add the item, it appears in the announcement.

27
9/3/2014
Note: If you decide that you don't need the attachment, click the X button on the right of
the attachment to delete it.
7. If you want to share the announcement with another class, Click the class name drop-
down menu in the lower-right corner and select any additional classes.
8. Click POST when you're done.
9. If you decide that you don't need to post the announcement or you want to edit the
announcement, Click the three dots to the right of the announcement. Choose from the
following: Edit or Delete.

28
9/3/2014
Adding and Deleting Comments
Anyone in the class can add a comment.
1. Click the Add a comment box, enter text, and Click POST.
2. All comments are visible under the announcement in the stream.
Note: As the teacher of the class, you can delete any inappropriate comments.
3. Click the menu icon (three vertical dots) in the upper-right corner of the comment and
Click Delete.
29
9/3/2014
Reference The previous was adapted from:
Google(2014). Welcome to the Classroom Help Center. Retrieved from
https://support.google.com/edu/classroom/?hl=en#topic=6020278