glooko kiosk app for android user guide...freestyle freedom lite ... manual at support.glooko.com....
TRANSCRIPT

GLOOKO KIOSK APP FOR ANDROID USER GUIDE June 2019 IFU-0035-00-EN 01

GENERAL INFORMATION ............................................................................................. 1 PRODUCT DESCRIPTION .................................................................................................................................1 INTENDED USE ...............................................................................................................................................1 WARNINGS ....................................................................................................................................................1 CONTRAINDICATIONS ....................................................................................................................................1 SUPPORTED DEVICES......................................................................................................................................2 Blood Glucose Meters ................................................................................................................................................ 2 Insulin Pumps ............................................................................................................................................................. 5 Continuous Glucose Monitors (CGMs) ....................................................................................................................... 5 Supported Android Devices and Operating Systems ................................................................................................. 6
INSTRUCTIONS FOR USE - GLOOKO KIOSK ANDROID APP ............................................ 7 DOWNLOADING GLOOKO KIOSK.....................................................................................................................7 LOG IN AS A PROVIDER ..................................................................................................................................7 CHOOSING PATIENT IDENTITY SETTINGS .........................................................................................................8 Requiring Patient Identity Fields ................................................................................................................................ 8 PAIRING A GLOOKO METERSYNC BLUE ...........................................................................................................9 DOWNLOADING A NEW GLOOKO USER’S DEVICE .......................................................................................... 10 Downloading a Device .............................................................................................................................................. 10 Using a MeterSync Blue with Compatible Devices .................................................................................................. 12 Using a USB OTG Cable............................................................................................................................................. 13 Entering Patient Identity for New Patients .............................................................................................................. 14 Ending the Session.................................................................................................................................................... 18 Sync a Medtronic Device (CareLink USB) ................................................................................................................. 20 Sync a Medtronic Device (MiniMed Connect with Existing CareLink Personal Account) ........................................ 28 Printing a Report ...................................................................................................................................................... 33 DOWNLOADING A PREVIOUS GLOOKO USER’S DEVICE .................................................................................. 36 Downloading a Device .............................................................................................................................................. 36 Ending the Session.................................................................................................................................................... 38 Sync a Medtronic Device (CareLink USB) ................................................................................................................. 39 Downloading a Device .............................................................................................................................................. 40 Sync a Medtronic Device (MiniMed Connect with Existing CareLink Personal Account) ........................................ 44 Printing a Report ...................................................................................................................................................... 48 DEVICE TIME OFFSET .................................................................................................................................... 50 UPDATING SETTINGS .................................................................................................................................... 51 Identity Settings ....................................................................................................................................................... 52 Email Settings ........................................................................................................................................................... 52 MeterSync Blue Settings .......................................................................................................................................... 53 Sending Diagnostics .................................................................................................................................................. 53 View Tutorial Settings .............................................................................................................................................. 54 LOG OUT OF THE GLOOKO KIOSK APP ........................................................................................................... 55 Log Out ..................................................................................................................................................................... 55
INSTRUCTIONS FOR USE – THE GLOOKO WEB APP ..................................................... 56 Access Your Glooko Account Online ........................................................................................................................ 56
DOCUMENT REVISION HISTORY ................................................................................ 57
1
GENERAL INFORMATION
PRODUCT DESCRIPTION The Glooko Kiosk App for Android was designed for in-clinic use with the benefit of improving workflow efficiency and onboarding patients to the Glooko diabetes management platform. This app allows popular blood glucose meters, insulin pumps and CGMs to be downloaded via a single Android tablet from which patient data is sent through the cloud to their healthcare provider’s Glooko Population Tracker, thus creating a standardized diabetes report in real-time. INTENDED USE Glooko is a data management software intended for use in home and professional settings to aid individuals with diabetes and their healthcare professionals in review, analysis and evaluation of device data to support an effective diabetes management program. Glooko connects to compatible diabetes medical devices and trackers to allow users to transfer their data to the Glooko system. Glooko is not intended to provide treatment decisions or to be used as a substitute for professional healthcare advice.
SUPPORTED DEVICES To get started, individuals will need:
• The Glooko Kiosk app for Android, available via the Google Play Store or via Glooko’s remote management system. You will need a provider Glooko account to login into the application – please contact Glooko for assistance and to set up a provider account.
• The Glooko web app, known as the Glooko Population Tracker, accessible on web browsers at my.glooko.com (to view data after syncing).
• The required syncing hardware: Glooko MeterSync Blue, micro-to-micro USB OTG Cable, micro-to-female USB OTG Cable, and/or micro-to-mini USB OTG Cable. See below to determine what hardware is needed to sync a compatible diabetes device.
• A supported blood glucose meter, insulin pump, or Continuous Glucose Monitors (CGMs).
• A supported Android device and Operating System. WARNINGS The Glooko device system for Glooko Application does not measure, interpret, or make decisions on the data it conveys nor is it intended to provide automated treatment decisions or be used as a substitute for professional judgment. All medical diagnosis and treatment are to be performed under the supervision and oversight of an appropriate healthcare provider.
CONTRAINDICATIONS None.
2
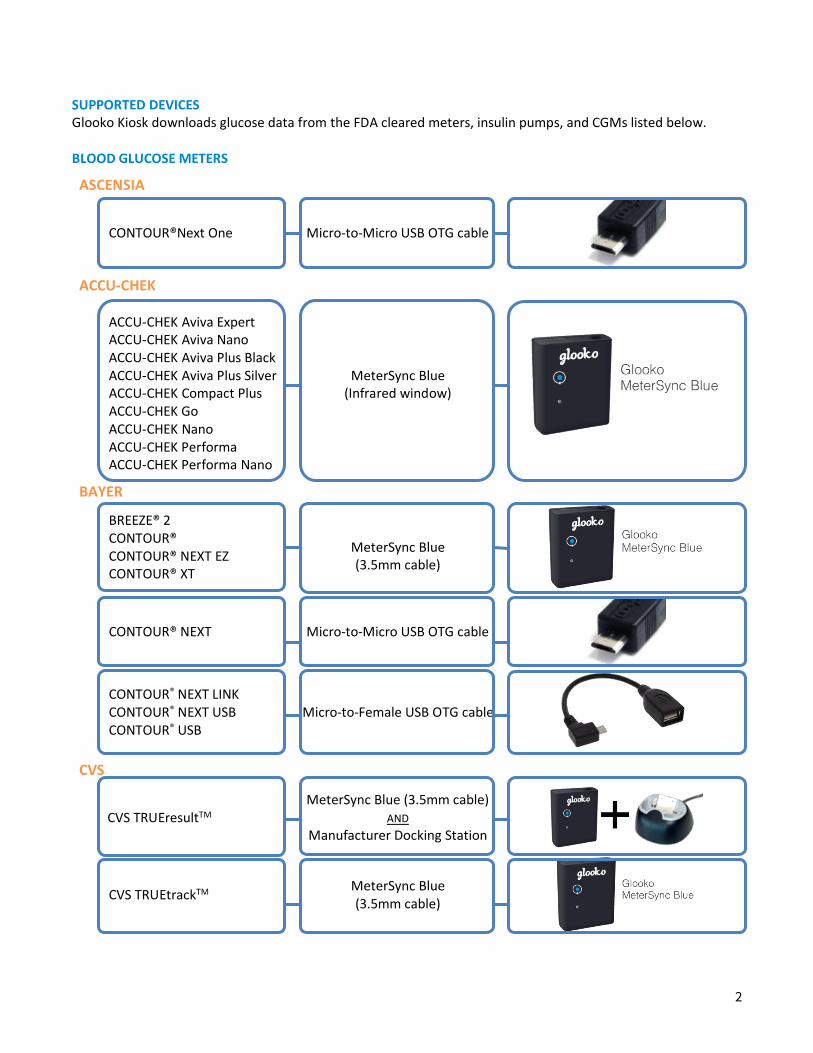
SUPPORTED DEVICES Glooko Kiosk downloads glucose data from the FDA cleared meters, insulin pumps, and CGMs listed below. BLOOD GLUCOSE METERS
ASCENSIA
CONTOUR®Next One Micro-to-Micro USB OTG cable
ACCU-CHEK
ACCU-CHEK Aviva Expert ACCU-CHEK Aviva Nano ACCU-CHEK Aviva Plus Black ACCU-CHEK Aviva Plus Silver ACCU-CHEK Compact Plus ACCU-CHEK Go ACCU-CHEK Nano ACCU-CHEK Performa ACCU-CHEK Performa Nano
MeterSync Blue (Infrared window)
BAYER
BREEZE® 2 CONTOUR® CONTOUR® NEXT EZ CONTOUR® XT
MeterSync Blue (3.5mm cable)
CONTOUR® NEXT Micro-to-Micro USB OTG cable
CONTOUR® NEXT LINK CONTOUR® NEXT USB CONTOUR® USB
Micro-to-Female USB OTG cable
CVS
CVS TRUEresultTM MeterSync Blue (3.5mm cable)
AND Manufacturer Docking Station
CVS TRUEtrackTM MeterSync Blue (3.5mm cable)

3
FREESTYLE
Freedom Lite Lite®
MeterSync Blue (3.5mm cable + 2.5mm adapter)
Insulinx Precision Neo
Micro-to-Micro USB OTG cable
GLUCOCARD
01 Vital
MeterSync Blue (3.5mm cable + 2.5mm adapter)
NIPRO
TRUEbalanceTM TRUEreadTM TRUEtrackTM
MeterSync Blue (3.5mm cable)
True Metrix True Metrix Air
Micro-to-female USB OTG cable AND
Manufacturer Docking Station with included USB cable
TRUEresultTM MeterSync Blue (3.5mm cable)
AND Manufacturer Docking Station
ONETOUCH
Ultra®2 UltraLink® UltraMini®
MeterSync Blue (3.5mm cable)
Verio Verio Flex
Micro-to-Mini USB OTG cable

4
RELION
Confirm Prime
MeterSync Blue (3.5mm cable + 2.5mm adapter)
RITE AID
CVS TRUEresultTM** MeterSync Blue (3. 5mm cable)
AND Manufacturer Docking Station
CVS TRUEtrackTM MeterSync Blue (3.5mm cable)
WALGREENS
CVS TRUEresultTM** MeterSync Blue (3.5mm cable)
AND Manufacturer Docking Station
CVS TRUEtrackTM MeterSync Blue (3.5mm cable)

5
INSULIN PUMPS
INSULET
Omnipod System Micro-to-Mini USB OTG cable
MEDTRONIC MiniMed® 530G System
(MMT-551, MMT-751)
MiniMed Paradigm REAL-
Time Revel™
(MMT-523, MMT-723,
MMT-523K, MMT-723K)
MiniMed Paradigm
(MMT-515, MMT-715,
MMT-522, MMT-722, MMT-
522K, MMT-722K)
Guardian REAL-Time Continuous Glucose Monitoring System
(CSS7100, CSS7100K)
Micro-to-Female USB OTG cable AND
CareLink Personal account
CONTINUOUS GLUCOSE MONITORS (CGMS)
DEXCOM
Dexcom G4 Platinum Dexcom G4 Platinum with Share Dexcom G5 Dexcom G5 Touchscreen
Micro-to-Micro USB OTG cable
Micro-to-Micro USB OTG
cable
Micro-to-Micro USB OTG
cable Omnipod Dash System

6
SUPPORTED ANDROID DEVICES AND OPERATING SYSTEMS
• The specific Android device models are: o LG V400 Tablet
• An Android Device with the following operating system:
GLOOKO DEVICE REQUIRED ANDROID OS VERSION
Glooko MeterSync Blue • 5.0.1 (Lollipop) and newer
Micro-to-Female USB OTG Cable • 5.0.1 (Lollipop) and newer
Micro-to-Micro USB OTG Cable • 5.0.1 (Lollipop) and newer
Micro-to-Mini USB OTG Cable • 5.0.1 (Lollipop) and newer

7
INSTRUCTIONS FOR USE - GLOOKO KIOSK ANDROID APP
DOWNLOADING GLOOKO KIOSK If you ordered an Android Glooko Kiosk tablet directly from Glooko, the Glooko Kiosk App will be pre-installed on the tablet. You can download Glooko Kiosk from the Google Play Store. To login, you will need a Glooko provider account – contact Glooko if you do not already have an account and would like to learn more. On a supported Android device:
• Find the Google Play icon and open the app.
• In the Google Play Store app, click on the Search icon (top right).
• In the text field, type ‘glooko kiosk’ – click Search again or select ‘glooko kiosk’ from the options presented.
• Click INSTALL.
• Click ACCEPT – this signifies that you agree with the stated policy and will begin the app download.
• Once the Glooko Kiosk app is downloaded, click OPEN to begin using the app. LOG IN AS A PROVIDER When you first open Glooko Kiosk, you will immediately be asked to fill in your provider login information. By logging in, Glooko Kiosk will recognize that every patient who syncs their diabetes device(s) using Glooko Kiosk on this Android device will have their glucose data automatically shared to your Population Tracker.
LOG IN
From the Login screen:
• Enter your Glooko provider Email.
• Enter the Password associated with that account.
• Click Log In.
If you don’t remember your Glooko login credentials, contact your
Glooko Customer Success Manager for assistance.

8
CHOOSING PATIENT IDENTITY SETTINGS Once you are logged into Glooko Kiosk, you will be able to configure the app’s settings and define specific identity fields that should be inputted by your patients when they sync their device(s) using Glooko Kiosk. This includes making it a requirement for patients who are new to Glooko to accept the Glooko Terms of Use or having them add their MRN number, phone number, or type of diabetes to their Glooko profile. You will only have to fill out the Identity Settings once. However, you can still go to Settings to make edits later.
REQUIRING PATIENT IDENTITY FIELDS From the Identity Settings screen:
• Select which additional identity fields you would like patients who are new to Glooko to fill out when syncing their device for the first time:
• Turn the toggle for the specific field from the left to right - toggle turns blue.
• Check the Required Box to prevent the patient from skipping this question – check box will turn blue.
After filling out the Identity Settings, click Save (top right).

9
PAIRING A GLOOKO METERSYNC BLUE To sync a patient’s glucose device to your Glooko Population Tracker, you will need to use either a Glooko MeterSync Blue or a variation of a USB OTG Cable. In order to sync data using a Glooko MeterSync Blue, the Glooko MeterSync Blue should first be paired to your Android device. After you have set the Identity Settings, you will be prompted to pair a MeterSync Blue. This is a one-time process. However, you can still go to Settings to un-pair an existing MeterSync Blue and pair a new one.
PAIRING A GLOOKO METERSYNC BLUE You will be prompted to follow a series of steps that will help you pair the Glooko MeterSync Blue to your Android device.
To pair the Glooko MeterSync Blue:
• Press and hold the blue button on the Glooko MeterSync Blue for at least one second to turn it ON – the light on the device will start flashing green.
• In the app, click Next (bottom).
For additional help, click on What now (bottom right) to see animations on advice for pairing your MeterSync Blue, or refer to the instruction manual at support.glooko.com.
If you haven’t enabled Bluetooth on the Android device, Glooko Kiosk will prompt you to do so.
• From the pop-up, click Yes.

10
If the Glooko MeterSync Blue has turned OFF, turn it back ON and start from where you left off in Glooko Kiosk. Wait for Glooko Kiosk to find your Glooko MeterSync Blue.
• Click Done.
DOWNLOADING A NEW GLOOKO USER’S DEVICE The goal of Glooko Kiosk is to save your clinic time and improve workplace efficiency. With Glooko Kiosk, patients are walked through a series of steps to help them download their diabetes device data, enter information into the identity fields, and sync their data to your Glooko Population Tracker.
DOWNLOADING A DEVICE Your patients will be prompted to follow a series of steps that will help them download their diabetes device data using the Android device.
• Click Start Here.
11
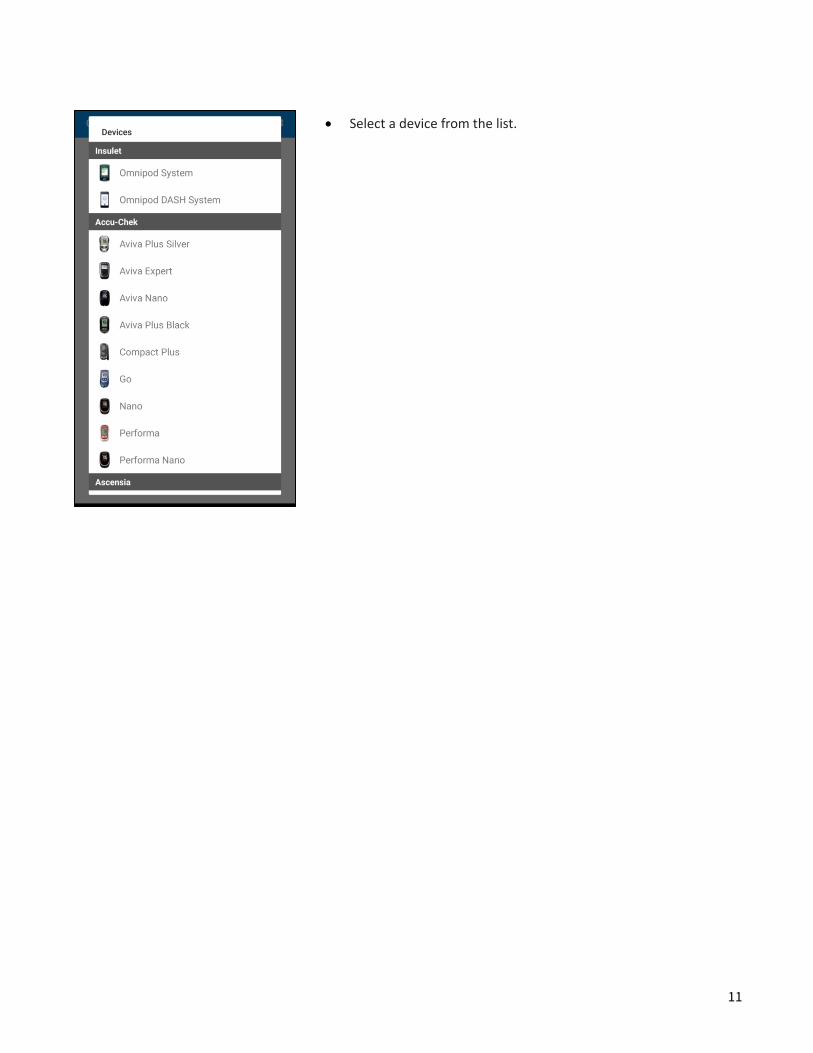
• Select a device from the list.

12
USING A METERSYNC BLUE WITH COMPATIBLE DEVICES After selecting a device, your patient will have the option to watch a sync tutorial. They will need an Internet connection to watch the tutorial.
• Press the play button. If they have watched the sync tutorial or if they’re already familiar with how to sync their device, they click on I know how to sync.
Based on the tutorial instructions on the previous screen, they will need to put their device into data transfer mode and then click Sync. The patient’s device will now sync glucose readings to Glooko Kiosk. Note: If the Glooko MeterSync Blue is ON and connected to the Android device, the sync button will be green. If the Glooko MeterSync Blue is not ON or not connected to the Android device, the sync button will be gray.

13
USING A USB OTG CABLE The following applies to when your patient has a micro-USB, mini-USB or USB device. To sync, instead of the Glooko MeterSync Blue, they will use one of the following USB OTG Cable depending on the make of their diabetes device or the Android mobile device.
• Micro-to-Micro USB OTG Cable
• Micro-to-Female USB OTG Cable After selecting their device, your patient will have the option to begin a sync tutorial.
• Click Begin Tutorial.
The tutorial will prompt them to connect their diabetes device to the Android device.
14
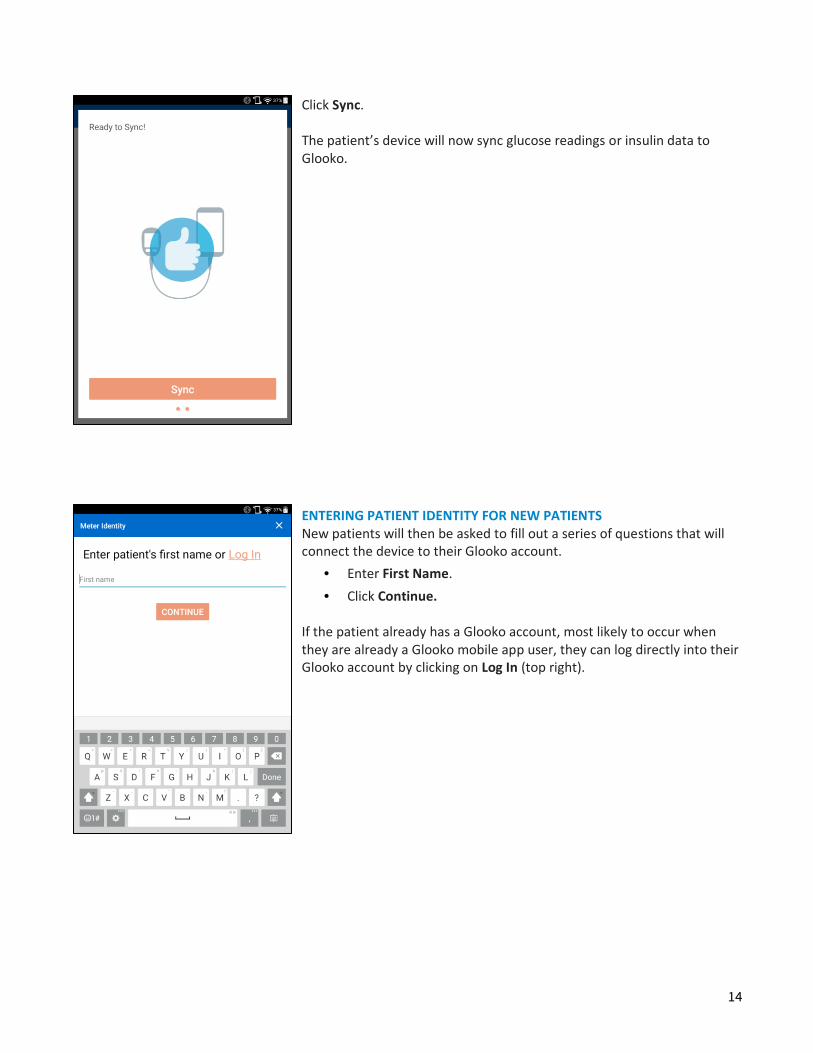
Click Sync. The patient’s device will now sync glucose readings or insulin data to Glooko.
ENTERING PATIENT IDENTITY FOR NEW PATIENTS New patients will then be asked to fill out a series of questions that will connect the device to their Glooko account.
• Enter First Name.
• Click Continue. If the patient already has a Glooko account, most likely to occur when they are already a Glooko mobile app user, they can log directly into their Glooko account by clicking on Log In (top right).

15
• Enter Last Name.
• Click Continue.
• Click Select DOB
• Scroll to select Date of Birth
• Click Continue. At this point, the Glooko app will search through the user base to see if there is a patient who has the same name and date of birth already on your Glooko Population Tracker. If not, the patient will be asked to fill out the Identity Fields that you had selected in Identity Settings.
16
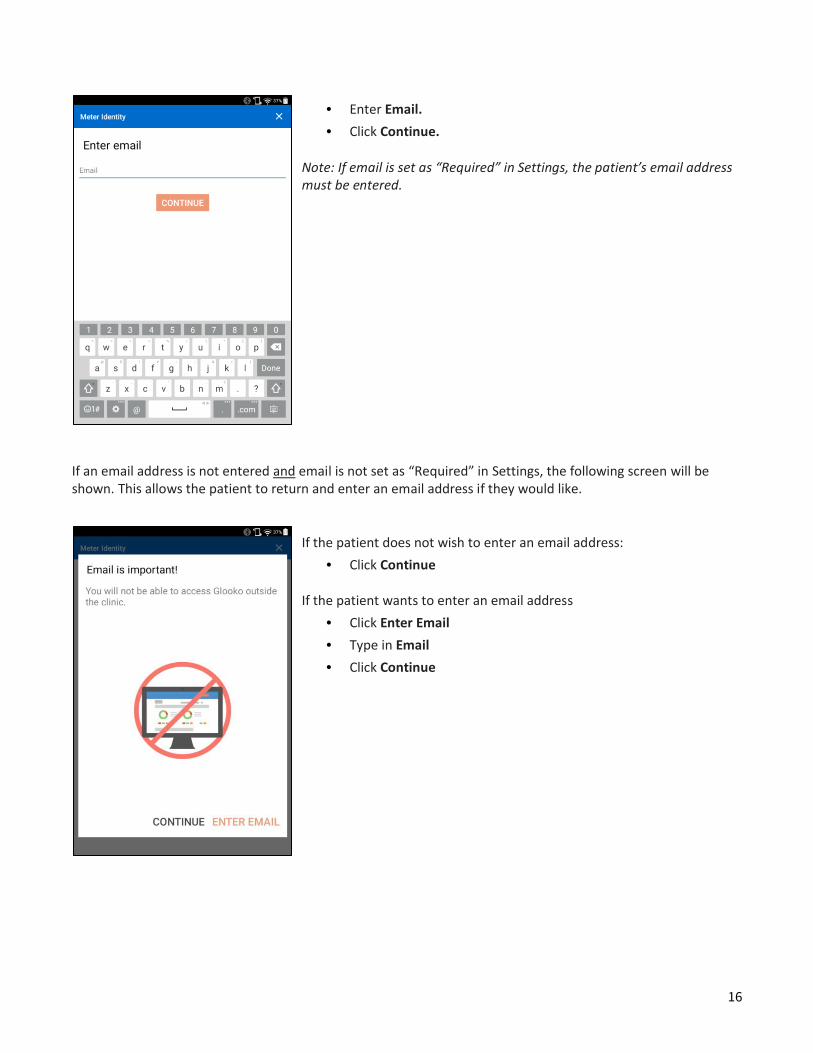
• Enter Email.
• Click Continue.
Note: If email is set as “Required” in Settings, the patient’s email address must be entered.
If an email address is not entered and email is not set as “Required” in Settings, the following screen will be shown. This allows the patient to return and enter an email address if they would like.
If the patient does not wish to enter an email address:
• Click Continue If the patient wants to enter an email address
• Click Enter Email
• Type in Email
• Click Continue

17
The following screens are only shown to patients if you had selected them in Identity Settings:
• Enter Phone Number.
• Click Continue.
• Enter Medical Record Number (MRN).
• Click Continue.

18
• Click in the box to select Type of Diabetes.
• Click Continue.
After the new user has filled in all of the identity fields, their data will now be shared to your Glooko Population Tracker. The user can elect to print a report of their glucose data or end the session. ENDING THE SESSION
• Click Finished.
The next time this patient uses Glooko Kiosk, the app will recognize their device – all the patient will need to do is to confirm their name and date of birth.
Note: if the patient uses multiple devices, they can click I HAVE ANOTHER DEVICE on this screen to sync their other device(s). Once the readings are downloaded, they will be returned to this screen where they can sync yet another device or click Finished.

19
If the patient entered an email address or already had a Glooko account, the “Use Glooko at home!” screen will be displayed. The patient can check his/her email to access their Glooko data.
• Click OK to return to the Start Here screen.

20
SYNC A MEDTRONIC DEVICE (CARELINK USB)
If you would like to sync using a CareLink USB device, Click CareLink USB. If the patient has a MiniMed Connect with an existing CareLink Personal Account, view these instructions: Sync a Medtronic Pump Using MiniMed Connect with a Patient’s Existing CareLink Personal Account.
Connect the CareLink USB to the Glooko Kiosk using a Micro-to-Female USB cable.
• Connect the female end of the USB cable with the male end of the CareLink USB.
• Connect the micro end of the USB cable to the Glooko Kiosk tabket.
Click Next.

21
Enter the 6-digit Medtronic Device Serial number from the label on the back of the Medtronic Pump and click Next.
New patients will then be asked to fill out a series of questions that will connect the device to their Glooko account.
• Enter First Name.
• Click Continue. If the patient already has a Glooko account, most likely to occur when they are already a Glooko mobile app user, they can log directly into their Glooko account by clicking on Log In (top right).

22
• Enter Last Name.
• Click Continue.
• Click Select DOB
• Scroll to select Date of Birth
• Click Continue. At this point, the Glooko app will search through the user base to see if there is a patient who has the same name and date of birth already on your Glooko Population Tracker. If not, the patient will be asked to fill out the Identity Fields that you had selected in Identity Settings.
23
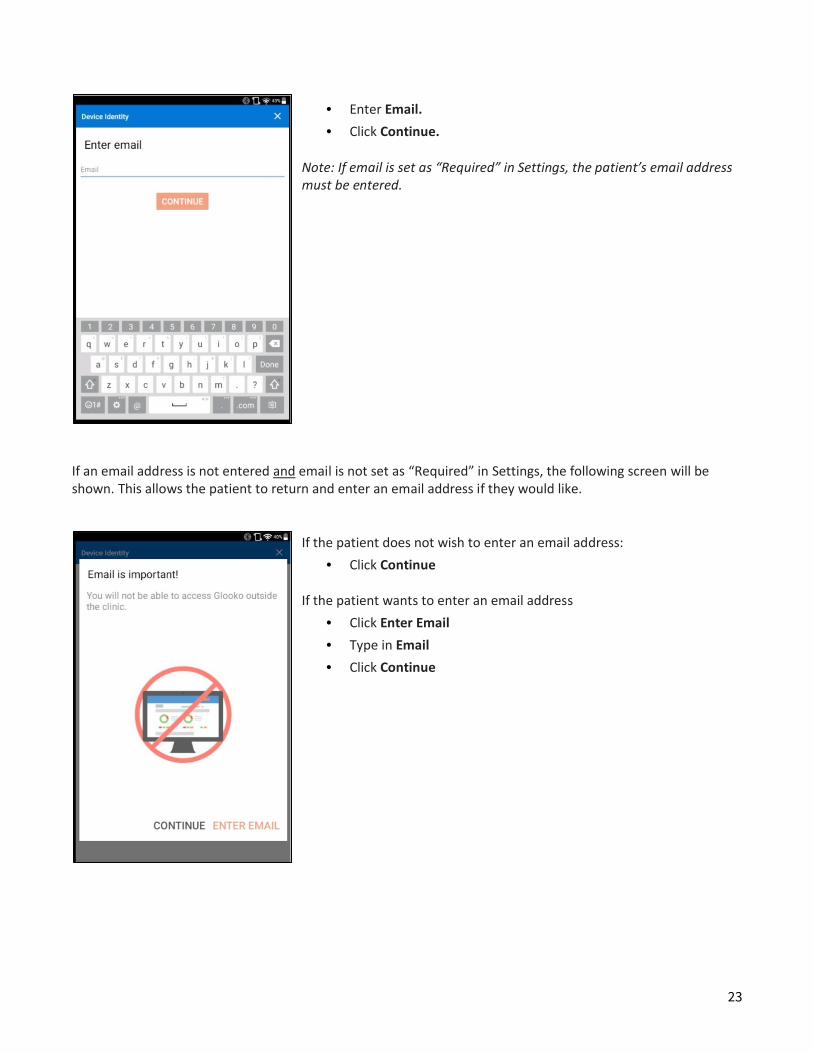
• Enter Email.
• Click Continue.
Note: If email is set as “Required” in Settings, the patient’s email address must be entered.
If an email address is not entered and email is not set as “Required” in Settings, the following screen will be shown. This allows the patient to return and enter an email address if they would like.
If the patient does not wish to enter an email address:
• Click Continue If the patient wants to enter an email address
• Click Enter Email
• Type in Email
• Click Continue

24
If prompted to allow the application Glooko Kiosk to access the USB device, select OK. The Glooko Kiosk app will now download the data from the Medtronic device. Note: The download may take several minutes, depending on how much data is stores on the Medtronic device.
In order to receive data from the Medtronic device, Medtronic requires that the patient create a CareLink account (or connect an existing CareLink account). Select an option to connect Glooko to CareLink:
• If the patient has an existing CareLink account, click Log in to CareLink. The patient will be prompted to Log in using his/her CareLink Personal Account User Name and Password.
• If the patient does not have an existing CareLink account, click Create CareLink Account.

25
CREATE A CARELINK ACCOUNT: After clicking on Create a CareLink Account, the patient will be directed to accept the CareLink Terms of Use.
• Review the Terms of Use and check each of the three boxes to indicate acceptance.
o Note: the individual who Accepts the Terms of Use must be over thirteen (13) years of age.
• Click Accept.
Complete all required fields, including Login Information, Contact Information, and Personal Information.

26
Check the box next to I’m not a robot at the bottom of the screen. A window will pop up with a Captcha Image.
• Complete the task and click Verify.
• Click Submit to continue.
Once the CareLink account has been created, you will see a screen that says CareLink is Connected to Glooko. Your patient’s Medtronic data is being downloaded. This data will be available in Glooko within the next few minutes.
• Click Continue.

27
After the new user has filled in all of the identity fields, their data will now be shared to your Glooko Population Tracker. The user can elect to print a report of their glucose data or end the session. ENDING THE SESSION
• Click Finished.
The next time this patient uses Glooko Kiosk, the app will recognize their device – all the patient will need to do is to confirm their name and date of birth.
Note: if the patient uses multiple devices, they can click I HAVE ANOTHER DEVICE on this screen to sync their other device(s). Once the readings are downloaded, they will be returned to this screen where they can sync yet another device or click Finished.

28
SYNC A MEDTRONIC DEVICE (MINIMED CONNECT WITH EXISTING CARELINK PERSONAL ACCOUNT) If the patient has a MiniMed Connect with an Existing CareLink Personal Account, select Minimed Connect.
New patients will then be asked to fill out a series of questions that will connect the device to their Glooko account.
• Enter First Name.
• Click Continue. If the patient already has a Glooko account, most likely to occur when they are already a Glooko mobile app user, they can log directly into their Glooko account by clicking on Log In (top right).

29
• Enter Last Name.
• Click Continue.
• Click Select DOB
• Scroll to select Date of Birth
• Click Continue. At this point, the Glooko app will search through the user base to see if there is a patient who has the same name and date of birth already on your Glooko Population Tracker. If not, the patient will be asked to fill out the Identity Fields that you had selected in Identity Settings.

30
• Enter Email.
• Click Continue.
Note: If email is set as “Required” in Settings, the patient’s email address must be entered.
If an email address is not entered and email is not set as “Required” in Settings, the following screen will be shown. This allows the patient to return and enter an email address if they would like.
If the patient does not wish to enter an email address:
• Click Continue If the patient wants to enter an email address
• Click Enter Email
• Type in Email
• Click Continue

31
Click Log in to CareLink.
Enter the User Name and Password associated with the patient’s CareLink account. Click Log In.

32
Once the CareLink account has been Connected to Glooko, you will see a screen that says CareLink is Connected to Glooko. Your patient’s Medtronic data is being downloaded. This data will be available in Glooko within the next few minutes.
• Click Continue. After the new user has filled in all of the identity fields, their data will now be shared to your Glooko Population Tracker. The user can elect to print a report of their glucose data or end the session. ENDING THE SESSION
• Click Finished.
The next time this patient uses Glooko Kiosk, the app will recognize their device – all the patient will need to do is to confirm their name and date of birth.
Note: if the patient uses multiple devices, they can click I HAVE ANOTHER DEVICE on this screen to sync their other device(s). Once the readings are downloaded, they will be returned to this screen where they can sync yet another device or click Finished.
33
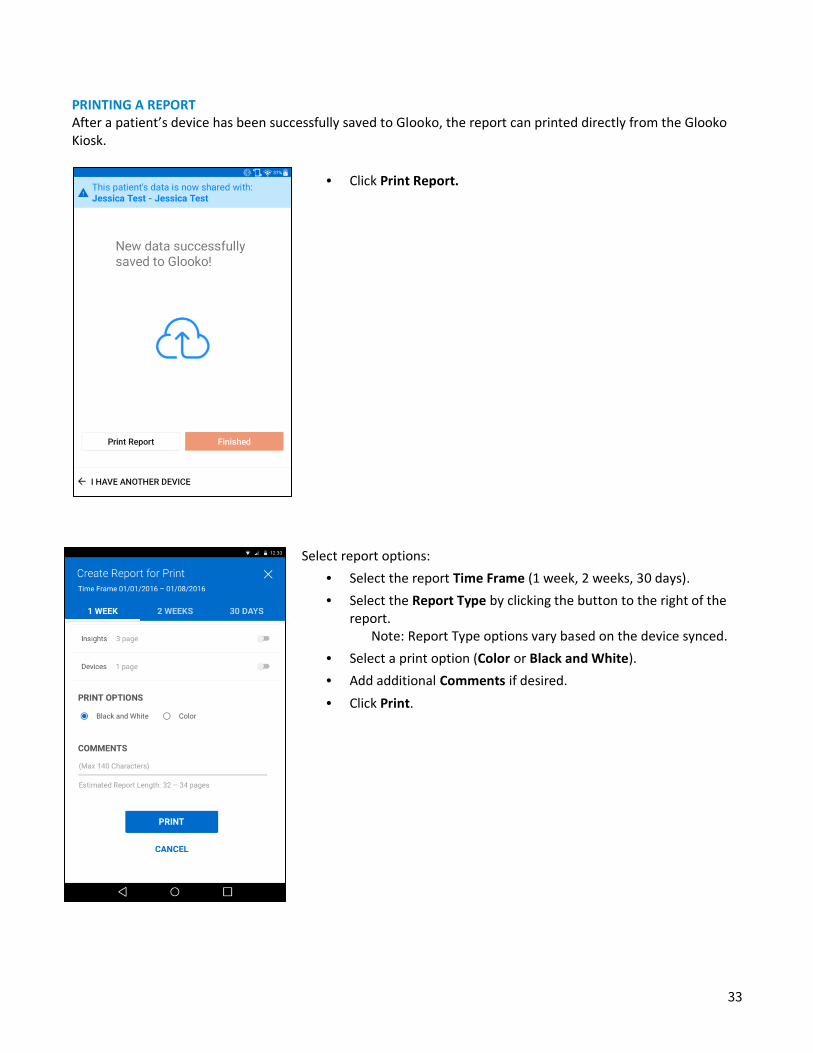
PRINTING A REPORT After a patient’s device has been successfully saved to Glooko, the report can printed directly from the Glooko Kiosk.
• Click Print Report.
Select report options:
• Select the report Time Frame (1 week, 2 weeks, 30 days).
• Select the Report Type by clicking the button to the right of the report.
Note: Report Type options vary based on the device synced.
• Select a print option (Color or Black and White).
• Add additional Comments if desired.
• Click Print.

34
A print preview screen will appear.
• Click Save as PDF (top left) to open the printer drop-down menu.
• Select your printer from the drop-down menu.
• If you are prompted to download a driver pack, click Install
• Click the printer button in the top right corner.
• Print preview is available above the Print button.
• Select from Printer Options, Document Options, and Advanced Options.
• Click Print.

35
• Select Print Options.
• Click OK.
The selected pages will print in the format selected. A Hammermill progress window will update you on the printing progress.

36
DOWNLOADING A PREVIOUS GLOOKO USER’S DEVICE Once a patient syncs their device to Glooko Kiosk and fills out the Identity Fields, during subsequent syncs using Glooko Kiosk, the app will recognize their device and connect it to their existing Glooko account.
DOWNLOADING A DEVICE After the first time a user syncs their device using the Glooko MeterSync Blue or USB OTG Cable, Glooko Kiosk will recognize their device and ask them a series of questions to confirm their identity. If this is the correct user:
• Click This is Me. If is not the correct user:
• Click Not Me – the user will be asked to fill out the Identity Fields. Note: if the existing user is syncing with a new device, Glooko Kiosk will ask them to fill out their first name, last name, and date of birth. At this point, the Glooko app will search through the user base to see if there is a patient who has the same name and date of birth already on your Glooko Population Tracker. The user will need to indicate This is Me or Not Me.
• Confirm Date of Birth.
• Click Continue.

37
If the user entered an email address during previous Kiosk syncs , he/she will be asked to confirm the email or change it to a new email.
• Confirm Email.
• Click This is Me. If the user did not enter an email address during previous Kiosk syncs, he/she will be offered to enter an email address again.

38
After the new user has filled in all of the identity fields, their data will now be shared to your Glooko Population Tracker. The user can elect to print a report of their glucose data or end the session. ENDING THE SESSION
• Click Finished. The next time this patient uses Glooko Kiosk, the app will recognize their device – all the patient will need to do is to confirm their name and date of birth.
Note: if the patient uses multiple devices, they can click I HAVE ANOTHER DEVICE on this screen to sync their other device(s). Once the readings are downloaded, they will be returned to this screen where they can sync yet another device or click Finished.
If the patient entered an email address or already had a Glooko account, the “Use Glooko at home!” screen will be displayed. The patient can check his/her email to access their Glooko data.
• Click OK to return to the Start Here screen.

39
SYNC A MEDTRONIC DEVICE (CARELINK USB)
If you would like to sync using a CareLink USB device, Click CareLink USB. If the patient has a MiniMed Connect with an existing CareLink Personal Account, view these instructions: Sync a Medtronic Pump Using MiniMed Connect with a Patient’s Existing CareLink Personal Account.
Connect the CareLink USB to the Glooko Kiosk using a Micro-to-Female USB cable.
• Connect the female end of the USB cable with the male end of the CareLink USB.
• Connect the micro end of the USB cable to the Glooko Kiosk tabket.
Click Next.

40
Enter the 6-digit Medtronic Device Serial number from the label on the back of the Medtronic Pump and click Next.
Once a patient syncs their device to Glooko Kiosk and fills out the Identity Fields, during subsequent syncs using Glooko Kiosk, the app will recognize their device and connect it to their existing Glooko account.
DOWNLOADING A DEVICE After the first time a user syncs their Medtronic Device, Glooko Kiosk will recognize their device and ask them a series of questions to confirm their identity. If this is the correct user:
• Click This is Me. If is not the correct user:
• Click Not Me – the user will be asked to fill out the Identity Fields. Note: if the existing user is syncing with a new device, Glooko Kiosk will ask them to fill out their first name, last name, and date of birth. At this point, the Glooko app will search through the user base to see if there is a patient who has the same name and date of birth already on your Glooko Population Tracker. The user will need to indicate This is Me or Not Me.

41
• Confirm Date of Birth.
• Click Continue.
If the user entered an email address during previous Kiosk syncs , he/she will be asked to confirm the email or change it to a new email.
• Confirm Email.
• Click This is Me.

42
If the user did not enter an email address during previous Kiosk syncs, he/she will be offered to enter an email address again. Click Continue.
If prompted to allow the application Glooko Kiosk to access the USB device, select OK. The Glooko Kiosk app will now download the data from the Medtronic device.
Note: The download may take several minutes, depending on how much data is stores on the Medtronic device.
Since the CareLink Personal Account is already connected to the patient’s Glooko account, you do not need to enter any additional information.

43
After the new user has filled in all of the identity fields, their data will now be shared to your Glooko Population Tracker. The user can elect to print a report of their glucose data or end the session. ENDING THE SESSION
• Click Finished.
The next time this patient uses Glooko Kiosk, the app will recognize their device – all the patient will need to do is to confirm their name and date of birth.
Note: if the patient uses multiple devices, they can click I HAVE ANOTHER DEVICE on this screen to sync their other device(s). Once the readings are downloaded, they will be returned to this screen where they can sync yet another device or click Finished.

44
SYNC A MEDTRONIC DEVICE (MINIMED CONNECT WITH EXISTING CARELINK PERSONAL ACCOUNT) If the patient has a MiniMed Connect with an Existing CareLink Personal Account, select Minimed Connect.
New patients will then be asked to fill out a series of questions that will connect the device to their Glooko account.
• Enter First Name.
• Click Continue. If the patient already has a Glooko account, most likely to occur when they are already a Glooko mobile app user, they can log directly into their Glooko account by clicking on Log In (top right).

45
• Enter Last Name.
• Click Continue.
• Click Select DOB
• Scroll to select Date of Birth
• Click Continue. At this point, the Glooko app will search through the user base to see if there is a patient who has the same name and date of birth already on your Glooko Population Tracker.

46
• Enter Email.
• Click Continue.
Note: If email is set as “Required” in Settings, the patient’s email address must be entered.
If an email address is not entered and email is not set as “Required” in Settings, the following screen will be shown. This allows the patient to return and enter an email address if they would like.
If the patient does not wish to enter an email address:
• Click Continue If the patient wants to enter an email address
• Click Enter Email
• Type in Email
• Click Continue

47
Because the patient previously linked his/her CareLink Personal Account to Glooko, no additional information is needed. After the new user has filled in all of the identity fields, their data will now be shared to your Glooko Population Tracker. The user can elect to print a report of their glucose data or end the session. ENDING THE SESSION
• Click Finished.
Note: if the patient uses multiple devices, they can click I HAVE ANOTHER DEVICE on this screen to sync their other device(s). Once the readings are downloaded, they will be returned to this screen where they can sync yet another device or click Finished.

48
PRINTING A REPORT After a patient’s device has been successfully saved to Glooko, the report can printed directly from the Glooko Kiosk.
• Click Print Report.
Select report options:
• Select the report Time Frame (1 week, 2 weeks, 30 days).
• Select the Report Type by clicking the button to the right of the report.
• Select Print Options (Color or Black and White).
• Add additional Comments if desired.
• Click Print.

49
A print preview screen will appear.
• Click Save as PDF (top left) to open the printer drop-down menu.
• Select your printer from the drop-down menu.
• If you are prompted to download a driver pack, click Install
• Click the printer button in the top right corner.
• Print preview is available above the Print button.
• Select from Printer Options, Document Options, and Advanced Options.
• Click Print.

50
• Select Print Options.
• Click OK.
The selected pages will print in the format selected. A Hammermill progress window will update you on the printing progress.
DEVICE TIME OFFSET If the device synced to Glooko Kiosk has an incorrect date/time, there will be a notification visible upon sync completion.
This alerts you of an incorrect device time on the patient’s device.

51
UPDATING SETTINGS In Settings, you can change the identity fields, print settings, MeterSync Blue settings, and send diagnostics if you experience an error using Glooko Kiosk.
• Click the Settings icon (gear icon in the top right).
• Select from the options listed. To prevent patients from changing the Settings in Glooko Kiosk, you will be asked to provide your Provider Password to update any of the Settings options.

52
IDENTITY SETTINGS From the Identity Settings screen:
• Select which additional identity fields you would like patients who are new to Glooko to fill out when syncing their device for the first time:
• Turn the toggle for the specific field from the left to right - toggle turns blue.
• Check the Required Box to prevent the patient from skipping this question – check box will turn blue.
After filling out the Identity Settings, click Save (top right).
EMAIL SETTINGS From the Email Settings screen:
• Select if you would like for patient email to be required:
• Turn the toggle for the specific field from the left to right - toggle turns blue.
After filling out the Email Settings, click Save (top right).

53
METERSYNC BLUE SETTINGS To un-pair a MeterSync Blue:
• Click Unpair. To set up a new MeterSync Blue:
• Click Setup New Device – you will be taken through the Pairing Tutorial.
SENDING DIAGNOSTICS If you experience an error using Glooko Kiosk, please send us diagnostics so we can help troubleshoot the issue.
• Click Send Diagnostics.
• Select your email client from the pop-up.

54
• Type information in the body of the email so we can learn about the error you are experiencing.
• Ensure “[email protected]” is listed in the To: field.
• Click Send (top right).
VIEW TUTORIAL SETTINGS Tutorials can be enabled and disabled by checking/unchecking the box next to the device type.
• A green checked box indicates that the tutorial is enabled.

55
LOG OUT OF THE GLOOKO KIOSK APP The data that was sync to Glooko using the Glooko Kiosk is safe and secure. However, if you wish to log out of the Glooko Kiosk app, you can do so in Settings.
LOG OUT
• Click the Settings icon (gear icon in the top right).
• Click Log Out.
• Click Yes.

56
INSTRUCTIONS FOR USE – THE GLOOKO WEB APP ACCESS YOUR GLOOKO ACCOUNT ONLINE The data synced with the Glooko Kiosk App is visible on the web-based Population Tracker (for professionals). In order to access this data on Population Tracker, you simply need to log into your Glooko professional account. A network connection, Internet or 4G, is mandatory for data to be synced across devices and on the web. To log into the Population Tracker, go to my.glooko.com, click Sign In, and enter your Email or Password, which was set up when you first created an account. Please refer to support.glooko.com for more information about how to use the Glooko web app.

57
DOCUMENT REVISION HISTORY
Revision DCO # Description of Changes Initiator Effective Date
A 0559 Initial Release S. Tep 02/19/15
B 0699 Updated screenshots; removed obsolete features (Terms of Use acceptance for patient, printer setup option in Settings); added new features (meter time notification, printing from Kiosk during sync process, additional settings options); updated compatible devices for Glooko Kiosk version 2.3.
J. Baldridge 05/23/16
C 0726 Added Medtronic and Verio compatibility. J. Baldridge 09/07/16
D 17-088 Added Ascensia Contour Next One, True Metrix, True Metrix Air, and Dexcom G5 compatibility.
J. Baldridge 06/15/17
E 0015 01
Added Insulet Dash System and Dexcom G5 Touchscreen compatibility. Updated MSB tutorial screens and Create Report screens.
C. Sutton 09/18/18