gfdgafsphotoshop & quark
TRANSCRIPT

Photoshop & QuarkCONSTRUCTION

COVER

DOUBLE PAGE SPREAD

Photoshop and Quark Before & After

COVERBEFORE
AFTER

Double Page Spread
BEFORE
AFTER

… Removing the background (cover and double page spread) To contract my final cover outcome I have of course used Photoshop Adobe CS6 as well as Quark express. I believe I have progressed profoundly through my primary task towards my outcome including in how to use these programmes as I had never come across them before. For my cover:Step 1: I have uploaded the image onto Photoshop and duplicated the layer to make sure any mistakes I may make, I can go back to and correct them.Step 2: I have used the Quick Selection Tool as well as the Magic Wand which were particularly helpful in order to remove the background. I found this fairly easy to do however I did have to perfect the edges/outline with the eraser tool to achieve a somewhat professional outcome. For further corrections, I have used the Polygonal Lasso tool. Step 3: Moreover, to smooth the edges, especially of the hair of my model which I found extremely hard to Photoshop in order to remove the background, I selected the inside of the object(model). After I have added a layer mask then I went to Filter>Blur>Guaussian blur and by adjusting the radios of the pixels It allowed me to smooth out the edges. I found this way of perfecting the edges much easier then using the Eraser Tool by experimenting and searching ways in which I can smooth out the edges through the internet.Here is the website I have used to help me with the last step: http://pscs5.tumblr.com/post/60284570543

Quick selection tool, the Magic Wand Tool and Polygonal tool to remove the background.
Cover Filter>Blur>Gaussian Blur to smooth edges (e.g.. Hair)
Right click on the image and duplicate layer to avoid mistakes.

Black and White Effect• I have created a black and white effect on my cover page and the reasoning is further explained in
my evaluation, however here are the steps in which I proceeded:
Step 1: Open photograph in Photoshop and duplicate the layer by ctrl+j or cmd+j and then I pressed F7 to open the new layer.
Step 2: I have changed the Blending mode of my background copy to ‘’soft light’’ and the increased the contrast of my imagine which emphasised my models facial features.
Step 3: In order to ad my black and white adjustment to the image, I clicked on add adjustments at the bottom of my layer panel which then allowed me to click on the black and white effect .
Step 4: I have experimented with adjustments on the settings panel . Including colours, vibrancy, brightness and contrast to create more drama on the photograph.
Step 5: Furthermore my pressing ctrl+alt+shift+E I have merged all of these layers together to create one layer.
Step 6: Finally I was done! I have saved the image as a PNG on Photoshop in order to be able to upload it on QuarkXPress and move on to the construction and layout of my magazine page.

Double Page Spread Step 1: The polygonal Lasso Tool to remove the background was used and although through my photography I did create a gradient background I chose to create one on Photoshop instead which I believe it created a move of a professional look..
Step 2: This page was very simple to construct due to the quality of the photograph and lighting. After removing the background from the duplicated layer, I used the Spot Healing Brush/Tool to remove any blemishes.
Step 3 : Using the Eye Dropper Tool I and The Brush Tool I selected the darkest shade of black within the image and using the brush while adjusted to a low level of hardness I went over some parts of the image such as the models jacket and hair to intensify them.

Contents PageBEFORE
AFTER
Picture 1 Picture 2

Contents• Firstly I have duplicated the layer of my image however for my contents page, I have
chosen a photograph where the hair of my model has been cut off. Due to this I had to used to images which I then emerged together. I have used Picture 1 (as labelled in the previous slide) as my main image. Firstly I used the Quick Selection Tool, The Magic Wand Tool etc. at the same processes of my double page and cover images which I have briefly analysed in the previous slides. Moreover, I have photo shopped this mostly by experimenting and adjusting the brightness and contrast of it in order to achieve an edger appearance also created by using the sharpening tool. Furthermore with Picture 2, I have cropped the photo to get a close up of my models face; this allowed me to remove his face and also the background using the Polygonal Lasso tool which then enabled me to be left only with this hair. Once I have done this ,I copied the image and emerged the two layers of the two of my pictures into one therefore it created a full image of my model for my contents page therefore it no longer appeared odd.
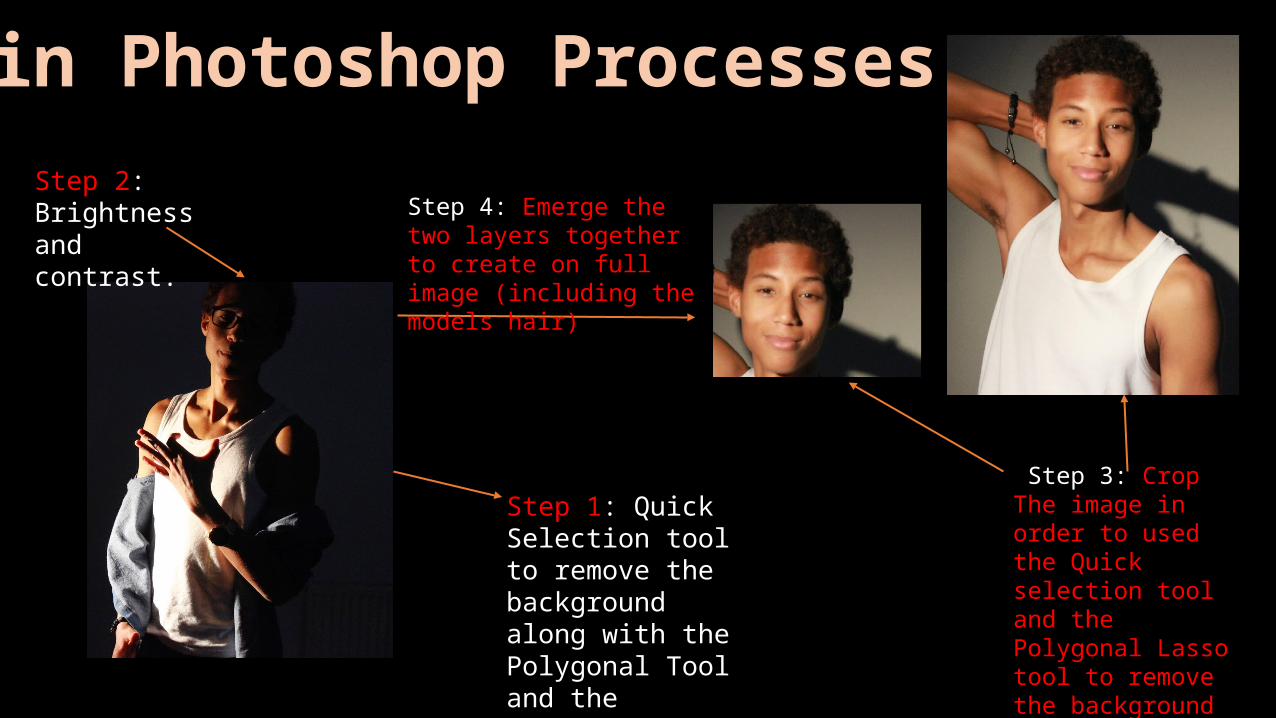
Step 1: Quick Selection tool to remove the background along with the Polygonal Tool and the Eraser..
Step 3: Crop The image in order to used the Quick selection tool and the Polygonal Lasso tool to remove the background and the face therefore I'm left only with his hair.
Step 2: Brightness and contrast.
Step 4: Emerge the two layers together to create on full image (including the models hair)
Main Photoshop Processes

CONTENTS PAGE FINAL OUTCOME

… ( all pages ) • To perfect the complexation of my models I used the Spot Healing
Tool. This helped me to remove any blemishes or any skin imperfections. This tool was very easy to use however I found that it did require a lot of patience. • I have adjusted the brightness, vibrancy, contrast, curves and etc. and
have experimented in all of my pictures with these Photoshop tools in order to find the right fit for my magazine. This helped me to get a more of a professional photograph. • The Eye Dropper Tool was also very helpful for evening out the skin
tone of my models.

Gradient Background• Creating a gradient background was very simple. I can across gradient
backgrounds on YouTube and unfortunately I do not have the link of the video as I am unable to find it due to the video possibly being deleted, however here is how I did it in 3 very simple steps:• Step 1: Right click on your image on your layer panel.• Step 2: Choose blending options.• Step 3: Click on Gradient Overlay.• Step 4: And finally… I adjusted the gradient overlay’s Blending mode,
Opacity, Gradient, Style and Scale to the choice of my desire.

• Once I have Photo shopped the images of my models for my pages, I have opened Quark and firstly I uploaded the gradient background which was created on Photoshop (Blending Options>Gradient). This created the first layer of my page. The canvas and size in width and length of the page was dependant on weather I was constructing my cover and contents or the double page spread.
• Quark allowed me to chose the font of my choice. In my magazine I have used two fonts: The Sans Ultra Bold and the normal Gills Sans font throughout my magazine. To add this text I used the ‘’Text Content Tool.’’
• The Line Tool was used in order to make sure for e.g. on my contents page, that the text was written in straight line as well as having the same gap in-between each line.
• The Item Tool was very useful for moving images and text around until placed according to my desire. It allowed me to experiment and place the text in images I different places therefore I could construct my magazine freely as well as recognising the effect that each placement can have on the overall page.
QUARKXPRESS (All Pages)

•Please note ,all of the Photoshop tool are analysed in more depth in my evaluation!