get started - sprintshop.sprint.com/global/pdf/user_guides/htc/evo_3d/... · sprint is committed to...
TRANSCRIPT
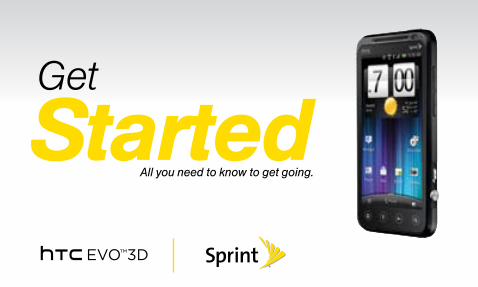
Get
StartedAll you need to know to get going.
Welcome!Sprint is committed to developing technologies that give you the ability to get what you want when you want it, faster than ever before. This booklet introduces you to the basics of getting started with Sprint and your HTC EVO 3D.
Visit sprint.com/support for the complete User Guide, along with videos, tutorials, and community forums for your phone.
Only on the Now Network.

Usi
ng T
his
Gui
de
Get Ready − page 1 − Find out what you need to do before you use your device the first time, including inserting a battery and activating Sprint service on your device.
Android Basics − page 4 − Learn some basics about how to move around on your device, use the home screen, and enter text. If you’re familiar with Android devices, you can probably skip these pages (although a refresher course never hurt anyone).
Use Your Device − page 12 − Take advantage of your device’s features and Sprint services, from the basics (Making Calls) to the more advanced (using Facebook, Qik, and more).
Tools & Resources − page 33 − Find useful tips for your device and discover resources and other helpful Sprint information. For additional information including the full User Guide, videos, tutorials, and community forums, visit sprint.com/support.
Using This GuideThis Get Started guide is designed to help you set up and use your new HTC EVO 3D. It’s divided into four sections to help you find the information you need quickly and easily.

visit sprint.com/support for complete user guide 1
Your HTC EVO 3DHeadset JackCharger/Accessory
Jack
Camera lenses
Dual flash
Volume Buttons
Camera button
2D/3D switch
Power Button
Display Screen
EarpieceFront camera
Back Key
Search Key
Home Key
Menu Key
Get
Rea
dy
visit sprint.com/support for complete user guide 1
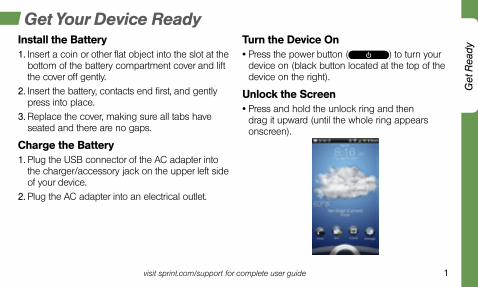
Install the Battery1. Insert a coin or other flat object into the slot at the
bottom of the battery compartment cover and lift the cover off gently.
2. Insert the battery, contacts end first, and gently press into place.
3. Replace the cover, making sure all tabs have seated and there are no gaps.
Charge the Battery1. Plug the USB connector of the AC adapter into
the charger/accessory jack on the upper left side of your device.
2. Plug the AC adapter into an electrical outlet.
Turn the Device On•Press the power button ( ) to turn your
device on (black button located at the top of the device on the right).
Unlock the Screen•Press and hold the unlock ring and then
drag it upward (until the whole ring appears onscreen).
Get Your Device Ready

2 visit sprint.com/support for complete user guide 3
Activate Your Device•If you purchased your device at a Sprint Store, it
is probably activated and ready to use.•If you received your device in the mail, and it is a
new Sprint account or a new phone number, your device is designed to activate automatically when you first turn it on. You will see a Hands Free Activation screen at startup. When it’s finished, tap OK to continue. To confirm your activation, make a phone call.
•If you received your device in the mail and it is going to be activated on an existing number (you’re swapping phones), go to sprint.com/activate and follow the instructions.
When you have finished, make a phone call to confirm your activation. If your device is still not activated or you do not have access to the Internet, contact Sprint Customer Service at 1-888-211-4727 for assistance.
Turn the Screen On and Off•To quickly turn the display screen off, press the
power button on top of the device ( ).•To turn the screen on and display the unlock
screen, press .
Turn the Device Off•Press and hold and then tap
Power off > OK to turn the device off.
Activate Your Device
2
Get
Rea
dy
visit sprint.com/support for complete user guide 3
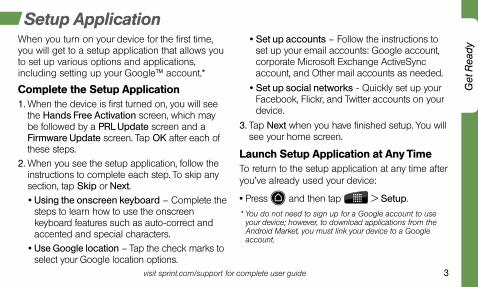
When you turn on your device for the first time, you will get to a setup application that allows you to set up various options and applications, including setting up your Google™ account.*
Complete the Setup Application1. When the device is first turned on, you will see
the Hands Free Activation screen, which may be followed by a PRL Update screen and a Firmware Update screen. Tap OK after each of these steps.
2. When you see the setup application, follow the instructions to complete each step. To skip any section, tap Skip or Next.•Using the onscreen keyboard – Complete the
steps to learn how to use the onscreen keyboard features such as auto-correct and accented and special characters.
•Use Google location – Tap the check marks to select your Google location options.
•Set up accounts – Follow the instructions to set up your email accounts: Google account, corporate Microsoft Exchange ActiveSync account, and Other mail accounts as needed.
•Set up social networks - Quickly set up your Facebook, Flickr, and Twitter accounts on your device.
3. Tap Next when you have finished setup. You will see your home screen.
Launch Setup Application at Any TimeTo return to the setup application at any time after you’ve already used your device:
•Press and then tap > Setup.
* You do not need to sign up for a Google account to use your device; however, to download applications from the Android Market, you must link your device to a Google account.
Setup Application

4 visit sprint.com/support for complete user guide 5
Move Around Your Device’s Menus and Screens Using GesturesYour device’s touchscreen lets you control everything through various types of touches, or gestures.
Tap: When you want to type using the onscreen keyboard, select items such as application and settings icons, or press onscreen buttons, simply tap them with your finger. A light touch works best.
Press and hold: To open the available options for an item (for example, a link in a Web page), simply press and hold the item.
Flick: Move your finger in lighter, quicker strokes than swiping. This finger gesture is always used in a vertical motion, such as when flicking through contacts or a message list.
Tap
Flick
Press and hold
Android Basics: Getting Around Your Device

4
And
roid
Bas
ics
visit sprint.com/support for complete user guide 5
Swipe or slide: Quickly drag your finger vertically or horizontally across the screen.
Drag: Press and hold your finger with some pressure before you start to move it. Do not release your finger until you have reached the target position.
Pinch: “Pinch” the screen using your thumb and forefinger to zoom out or zoom in when viewing a picture or a Web page. (Move fingers inward to zoom out and outward to zoom in.)
Rotate: Automatically change the screen orientation from portrait to landscape by turning the device sideways. (To disable auto-rotation, press > Settings > Display and clear the Auto-rotate screen check box.)
Swipe, Slide or Drag
Rotate
Pinch
6 visit sprint.com/support for complete user guide 7
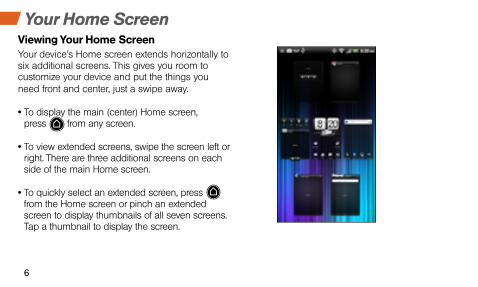
Viewing Your Home ScreenYour device’s Home screen extends horizontally to six additional screens. This gives you room to customize your device and put the things you need front and center, just a swipe away.
•To display the main (center) Home screen, press from any screen.
•To view extended screens, swipe the screen left or right. There are three additional screens on each side of the main Home screen.
•To quickly select an extended screen, press from the Home screen or pinch an extended screen to display thumbnails of all seven screens. Tap a thumbnail to display the screen.
Your Home Screen
6
And
roid
Bas
ics
visit sprint.com/support for complete user guide 7
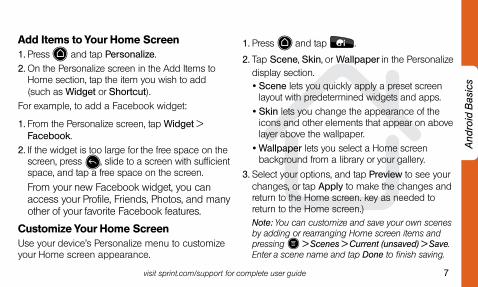
Add Items to Your Home Screen1. Press and tap Personalize.2. On the Personalize screen in the Add Items to
Home section, tap the item you wish to add (such as Widget or Shortcut).
For example, to add a Facebook widget:
1. From the Personalize screen, tap Widget > Facebook.
2. If the widget is too large for the free space on the screen, press , slide to a screen with sufficient space, and tap a free space on the screen.
From your new Facebook widget, you can access your Profile, Friends, Photos, and many other of your favorite Facebook features.
Customize Your Home ScreenUse your device’s Personalize menu to customize your Home screen appearance.
1. Press and tap .
2. Tap Scene, Skin, or Wallpaper in the Personalize display section.•Scene lets you quickly apply a preset screen
layout with predetermined widgets and apps.•Skin lets you change the appearance of the
icons and other elements that appear on above layer above the wallpaper.
•Wallpaper lets you select a Home screen background from a library or your gallery.
3. Select your options, and tap Preview to see your changes, or tap Apply to make the changes and return to the Home screen. key as needed to return to the Home screen.)Note: You can customize and save your own scenes by adding or rearranging Home screen items and pressing > Scenes > Current (unsaved) > Save. Enter a scene name and tap Done to finish saving.

8 visit sprint.com/support for complete user guide 9
Status BarThe status bar at the top of the Home screen lets you quickly see both your device status (connections, signal strength, battery, GPS) and any current notifications.
Notifications PanelWhen you see a notification icon on the left side of the status bar, drag down on the status bar and make sure the Notifications tab is selected. Tap a notification to open the related application, such as alerts, messages, or events.
To close the panel, drag the bottom bar up or press .
Your Home Screen
Tip: To quickly access many of your device’s settings, select the Quick settings tab instead after dragging down on the status bar.
Status Bar
8
And
roid
Bas
ics
visit sprint.com/support for complete user guide 9
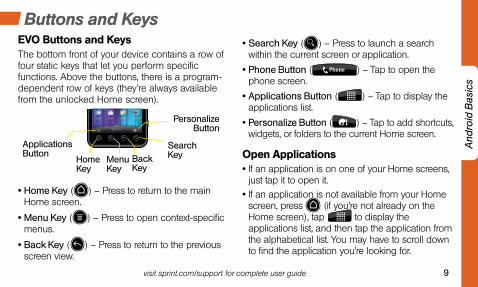
EVO Buttons and KeysThe bottom front of your device contains a row of four static keys that let you perform specific functions. Above the buttons, there is a program-dependent row of keys (they’re always available from the unlocked Home screen).
•Home Key ( ) – Press to return to the main Home screen.
•Menu Key ( ) – Press to open context-specific menus.
•Back Key ( ) – Press to return to the previous screen view.
•Search Key ( ) – Press to launch a search within the current screen or application.
•Phone Button ( ) – Tap to open the phone screen.
•Applications Button ( ) – Tap to display the applications list.
•Personalize Button ( ) – Tap to add shortcuts, widgets, or folders to the current Home screen.
Open Applications•If an application is on one of your Home screens,
just tap it to open it.•If an application is not available from your Home
screen, press (if you’re not already on the Home screen), tap to display the applications list, and then tap the application from the alphabetical list. You may have to scroll down to find the application you’re looking for.
Buttons and Keys
Home Key
Applications Button
Personalize Button
Menu Key
Back Key
Search Key

10 visit sprint.com/support for complete user guide 11
The Touch Input KeyboardWhen you select a field that requires text or numbers, the Touch Input keyboard appears so you can enter the information, type your message, update your Facebook status, or send out a Tweet. (If you don’t see the keyboard when, for instance, you’re entering contact information, just touch the field you’re working on to bring it up.) The Touch Input keyboard can be used in either portrait or landscape mode.
Text EntryEntering text with the Touch Input keyboard is easy: just tap the letters to type the words. Here are a few tips to help you:
•To enter the alternate (gray) character on a key (such as numbers or punctuation), press and hold the key.
•Tap to enter all numbers or symbols.
•Tap (shift) to enter uppercase letters. (Tap twice for caps lock.)
•Tap (enter) to create a new line or paragraph.•Tap (backspace) to delete the previous character.•Tap (space) to enter a space. When using
predictive text, tapping accepts the suggested word and adds a space.
•Tap to hide the keyboard.
Using Trace to Enter TextInstead of tapping the keys on the Touch Input keyboard, you can “trace” through a word’s letters to enter that word. For example, if you want to type “the,” tap the “t” key, and without lifitng your finger, slide to the “h” key and then the “e” key. When you lift your finger, you'll see “the” in the text entry window.
Note: Sometimes if mutiple words are possible or if your keystrokes are off-center, a choice list will appear. Simply tap the correct word in the list, or tap X to cancel.
Entering Text With the Onscreen Keyboard

10
And
roid
Bas
ics
visit sprint.com/support for complete user guide 11
Using Swype to Enter TextSimilar to trace, Swype® lets you slide your finger to enter words.
Switching Keyboards1. Tap and hold any text entry area.2. Tap Input method, and then tap the keyboard
type you wish to use (Swype or Touch Input).
Changing Touch Input Keyboard SettingsYou can customize your onscreen keyboard settings to suit your needs:
•Press > Settings > Language & keyboard > Touch Input to access your options.
•International keyboard lets you select a language for the keyboard.
•Bilingual prediction shows word predictions for a second language (other than the default language you have chosen).
•Text input provides options for prediction, spell correction, sound and vibration, and calibration.
•Tutorial runs you through the basics of using the keyboard.
•Trace keyboard lets you change the setting for the trace line that appears when you slide on the keyboard.
•Personal dictionary lets you add, edit, and delete words in your custom dictionary.
Changing Swype Settings•Press > , and then tap Settings >
Language & Keyboard > Swype.
12 visit sprint.com/support for complete user guide 13
Set Up Your VoicemailAll unanswered calls are automatically transferred to your voicemail, even if your phone is in use or turned off. You should set up your voicemail and personal greeting as soon as your phone is activated:
1. Press and then tap > Voicemail.
2. In the Personalize your voicemail window, tap Personalize now.
3. Follow the voice prompts to create your passcode and record your name and greeting.
Sprint strongly recommends setting a voicemail passcode. Without a passcode, anyone who has access to your phone can access your messages.
Retrieve Your Voicemail1. From the Home screen, tap > Voicemail.2. Tap a message to listen to it.
From any other phone:1. Dial your wireless phone number.2. When your voicemail answers, press *.3. Enter a passcode if needed.
Use Your Device: Voicemail
Voicemail Passcode(do not share): __________________
12
Use
You
r Dev
ice
visit sprint.com/support for complete user guide 13
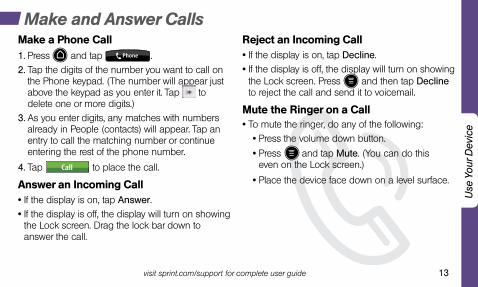
Make a Phone Call1. Press and tap .2. Tap the digits of the number you want to call on
the Phone keypad. (The number will appear just above the keypad as you enter it. Tap to delete one or more digits.)
3. As you enter digits, any matches with numbers already in People (contacts) will appear. Tap an entry to call the matching number or continue entering the rest of the phone number.
4. Tap to place the call.
Answer an Incoming Call•If the display is on, tap Answer.•If the display is off, the display will turn on showing
the Lock screen. Drag the lock bar down to answer the call.
Reject an Incoming Call•If the display is on, tap Decline.•If the display is off, the display will turn on showing
the Lock screen. Press and then tap Decline to reject the call and send it to voicemail.
Mute the Ringer on a Call•To mute the ringer, do any of the following:
•Press the volume down button.
•Press and tap Mute. (You can do this even on the Lock screen.)
•Place the device face down on a level surface.
Make and Answer Calls

14 visit sprint.com/support for complete user guide 15
Your device’s People function lets you access and manage contacts from a variety of sources, including Gmail, Exchange, Facebook, Twitter, Flickr, contacts synced from your computer, and old-fashioned contacts entered by hand.
Viewing People (Contacts)•To view People, press and then tap
> People. The menu bar at the bottom of the screen lets you select which category you want to view.
•All to view all your contacts.•Groups to view and manage groups (useful for
texting and emailing multiple contacts).•Online directories to access online contacts
from your company directory, Facebook, Twitter, or Flickr.
•Call history to view all your incoming and outgoing calls.
Save a Phone Number1. Press and tap . Enter a phone
number using the onscreen keypad.2. Tap Save to People at the top of the screen.
(This appears after at least six digits have been entered.)
3. Tap Create new contact or Save to existing contact.
4. If prompted, select an account under which to save the contact, for example, Exchange ActiveSync, Google, or Phone.
5. Use the keyboard to enter the new contact name and tap Save.— or —Tap an existing contact name and tap Save to save the new number.
People

14
Use
You
r Dev
ice
visit sprint.com/support for complete user guide 15
Retrieve a Phone Number1. Press , tap > People, and
then press .2. Enter the first letter or letters of an entry.3. Tap the contact to display the contact’s phone
number(s).
Add a New Entry to People1. Press and then tap > People.
2. On the All tab, tap Add contact at the top of the screen.
3. Tap the Name box, enter the first and last name of the contact, choose the order in which to display the names, and tap OK.
4. Enter the contact information in the boxes provided, and then scroll to the bottom of the screen and tap Save.
Linking People With Social Networking ProfilesSince many of your contacts may have profiles or accounts on Facebook, Twitter, or Flickr, your device lets you link your contacts entries with their social networking profiles.
Note: Before using this feature, you must have your social networking accounts set up on the device. See "Facebook, Flickr, and Twitter" on page 26.
1. Press and then tap > People.2. Tap a contact and tap in the upper right
corner.•If your device has found a link on its own, click
Link in the upper right corner to see the suggestion.
3. Select an account type (such as Facebook), select an account, and tap Done. The contact’s Facebook picture and updates will appear in the contact listing in People.

16 visit sprint.com/support for complete user guide 17
Send a Text Message1. Press and tap > Messages.
2. On the All messages screen, tap ortap > Compose.
3. Enter a phone number or email address in the To text box, or tap to search for and select a contact.
4. Type your message in the Add text panel.
5. When you are finished, tap Send.
Send a Picture or Video Message (Multimedia Messaging)1. Follow steps 1 – 4 for sending a text message.
2. Tap .
3. Tap a media type (such as Picture or Video) and then tap an available album.
4. Tap a picture or clip to select it and tap Done.
5. Add additional pictures or clips, if desired, and tap Done.
6. If you are satisfied with your message, tap Send.Note: For information on taking pictures and videos with your device, see “Camera & Camcorder” on page 18.
Messaging
16
Use
You
r Dev
ice
visit sprint.com/support for complete user guide 17
Access Messages1. Press and tap > Messages.2. From the All messages screen, tap the message
you want to view.All your text and MMS messages for a contact are collected in an ongoing “conversation,” so when you view a message, you can scroll through the entire history of your messages with that person.
18 visit sprint.com/support for complete user guide 19
You can link as many as 10 email accounts to your HTC EVO 3D, including one Exchange ActiveSync account. You can set up email accounts through the setup application or directly through the email application.
Set Up a Gmail Account1. Press and tap > Gmail.
2. Tap Add account > Google.3. Follow the instructions to set up or sign in to a
Gmail account.4. Once you have entered all the information, tap
Finish setup.Note: Although you need a Gmail account to use certain features such as Android Market, you do not have to use Gmail as the default account for your device.
When setting up a new Google account, you will be prompted to add a secondary email address. Enter a second Gmail address or any other email address from which you currently send and receive email. This address is used to
authenticate your account should you ever encounter problems or forget your password. It is strongly encouraged for Android users so you can regain access to Google services and purchases on your device.
Set Up a POP3/IMAP Email Account1. Press and tap > Mail.2. On the Choose a mail provider screen, tap Other
(POP3/IMAP).3. Enter the Email address and Password for the
email account and then tap Next.4. Enter an Account name and Your name and tap
Finish setup.
Set Up a Microsoft Exchange ActiveSync Account
1. Press and tap > Mail.
2. On the Choose a mail provider screen, tap Microsoft Exchange ActiveSync.

18
Use
You
r Dev
ice
visit sprint.com/support for complete user guide 19
3. Enter the Exchange ActiveSync account details and then tap Next.•Contact your Exchange Server administrator for
required sign-in information.4. Select the type of information you want to
synchronize and tap Finish setup.
Access Email Messages1. Press and tap > Mail or Gmail.
•If necessary, tap the selection arrow ( ) and tap the email account you want to use.
2. From the inbox, tap the message you want to view.For additional message viewing options, use the inbox filter tabs at the bottom of the screen. Tabs include Received, Conversations, VIP group, Unread, Marked, Meeting invitations (Exchange ActiveSync only), and Attachments.
To view other folders (instead of inbox), press > Folders and tap a folder (Trash, Sent, Drafts,
or Outbox).
Send an Email Message1. Press and tap > Mail or >
Gmail.2. If necessary, tap the selection arrow ( )
and tap the email account you want to use.
3. Press and tap Compose.4. Enter an email address or contact name, or tap
to search for and select a contact. (If entering from the contact list, tap the check mark on the right to select contacts, and then tap OK to return to the Compose screen.)
5. Enter a subject and a message.
•To add attachments, press , tap Add Attachments, and select an attachment.
6. Tap Send or press and tap Send.
20 visit sprint.com/support for complete user guide 21
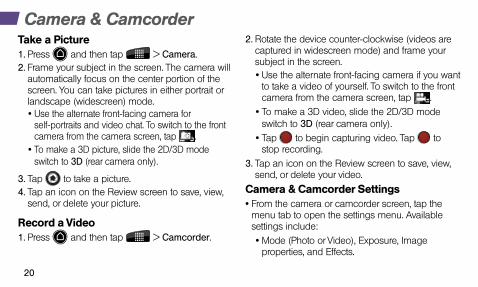
Take a Picture1. Press and then tap > Camera.2. Frame your subject in the screen. The camera will
automatically focus on the center portion of the screen. You can take pictures in either portrait or landscape (widescreen) mode. •Use the alternate front-facing camera for
self-portraits and video chat. To switch to the front camera from the camera screen, tap .
•To make a 3D picture, slide the 2D/3D mode switch to 3D (rear camera only).
3. Tap to take a picture. 4. Tap an icon on the Review screen to save, view,
send, or delete your picture.
Record a Video1. Press and then tap > Camcorder.
2. Rotate the device counter-clockwise (videos are captured in widescreen mode) and frame your subject in the screen. •Use the alternate front-facing camera if you want
to take a video of yourself. To switch to the front camera from the camera screen, tap .
•To make a 3D video, slide the 2D/3D mode switch to 3D (rear camera only).
•Tap to begin capturing video. Tap to stop recording.
3. Tap an icon on the Review screen to save, view, send, or delete your video.
Camera & Camcorder Settings•From the camera or camcorder screen, tap the
menu tab to open the settings menu. Available settings include:•Mode (Photo or Video), Exposure, Image
properties, and Effects.
Camera & Camcorder
20
Use
You
r Dev
ice
visit sprint.com/support for complete user guide 21
•Tap for advanced settings such as White Balance, ISO, Resolution, Storage, Encoding (videos), Metering Mode, Auto Focus, and more. The advanced settings menu includes the Switch camera option to switch between the main (back) camera and the front-facing camera.
View Pictures and VideosThe Gallery application lets you review all the pictures and videos on your device’s storage card. You can also review your and your friends’ pictures on Facebook and Flickr.
1. Press and tap > Gallery.2. At the bottom of the screen, tap the icon for the
gallery you want to view (Albums, Facebook, or Flickr ).
•For Albums, tap an album and scroll through the available pictures and videos. Press for more options.
•For Facebook and Flickr, tap a friend (or yourself) from the list to view posted pictures. You must be signed on to Facebook or Flickr to access those galleries. (See “Facebook, Flickr, and Twitter” on page 26.)
Share1. Press and tap > Gallery.2. Tap the album for the photos or videos
you want to share.3. Tap , and then on the Share via menu, tap a
sharing option (Bluetooth, Facebook, Facebook for HTC Sense, Flickr, Gmail, or Mail).
4. Select the photos or videos you want to share and then tap Next.
5. Compose your message and then tap Send.

22 visit sprint.com/support for complete user guide 23
Find sports scores, news, and weather. Shop online. On-the-go access lets you browse full-color versions of your favorite websites.Go Online1. Press and tap > Internet.2. From the Sprint home page, select categories,
navigate to websites, read blogs, download content, and more.•Tap a category to open it.•For more options, press from any page.
Options may include Back, Forward, Add bookmark, Bookmarks, and Windows (to open additional windows). Tap More for additional options including setting a Home page, History, and Settings (including an option to view full versions of pages instead of mobile versions).
•To scroll, slide your finger up or down the page.•To zoom in or out, pinch the screen.
Downloading Applications From the WebYou can download applications while browsing the Web, but you must first set permissions in settings to allow applications from unknown sources. Applications downloaded from Android Market (see page 24) do not require additional permissions.
1. Press > > and tap Settings > Applications.
2. Select the Unknown sources check box.3. When the Attention dialog box opens, read the
disclaimer and tap OK. Note: All downloaded applications are saved to your device’s microSD storage card. Your device came with a pre-installed microSD card. For information on installing a new card, please see the User Guide at sprint.com/support.
Web

22
Use
You
r Dev
ice
visit sprint.com/support for complete user guide 23
Take Advantage of 4G SpeedSprint 4G data services give you the speed you need to watch and upload high-res streaming videos, browse the Web, and have real-time video chats with your friends.
For information about the availability of Sprint 4G in your location, visit sprint.com/coverage.
1. To activate Sprint 4G, press > > and tap Settings > Wireless & networks.
2. Tap the 4G check box to turn Sprint 4G on.•When you’re connected to the 4G network,
you’ll see the 4G icon ( ) in the status bar.
Note: When you’re not in a Sprint 4G services area, clear the 4G check box in the Wireless & networks settings page to extend battery life.
Connect to a Wi-Fi NetworkWhen you’re in range of an available Wi-Fi network you can use your device’s Wi-Fi feature to access the Internet and other data services.
1. Press > > and tap Settings > Wireless & networks.
2. Tap the Wi-Fi check box to turn Wi-Fi on.
3. Tap Wi-Fi settings to display a list of available networks.
4. Tap a Wi-Fi network to connect. If necessary, enter the security key and tap Connect.•When you’re connected to a Wi-Fi network, you’ll
see the Wi-Fi icon ( ) in the status bar.
Note: When you’re not using Wi-Fi, clear the Wi-Fi check box in the Wireless & networks settings page to extend battery life.
Sprint 4G Wi-Fi

24 visit sprint.com/support for complete user guide 25
Android Market™ gives you access to thousands of applications to boost your productivity and increase your fun.
Download Applications and Games1. Press and tap > Market.
2. The first time you visit Android Market, tap Accept to accept the Terms of Service.
3. To find what you want quickly:•Browse through featured apps and games.
Scroll through the options or browse by categories within Apps or Games.
•Search for an app or game. Tap Search on the Android Market home screen, enter the name or key word, and then tap to the right of the search box.
4. Tap an app or game to read a description and user reviews.
5. Tap Install (for free applications) or Buy (for paid applications).
Note: You must have a Google (Gmail) account set up on your device to purchase and download applications from Android Market.
Opening Installed Applications and Games•Press and tap . Locate the downloaded
item and tap it to launch. You can also launch from the Market > Downloads screen.
Android Market
24
Use
You
r Dev
ice
visit sprint.com/support for complete user guide 25
Your HTC EVO 4G with Google provides easy access to a variety of Google services including Gmail™, Google Talk™, Google Voice™, Google Maps™, Google Navigation, and YouTube™.
•Gmail – The Google mail service. Your Gmail account lets you access many Google-related services as well as the Android Market. (See “Set Up a Gmail Account” on page 18.)
•Google Talk – Google’s instant messaging service. Press and tap > Talk to begin using the service. (If you’re signed in to your Gmail account, you are already signed in to Google Talk.)
•Google Voice – A service that lets you consolidate all your phone numbers and voicemail into one source that you can access anywhere, even online. Visit google.com/googlevoice for information.
•Google Maps and Google Navigation – The Google location programs let you track your current location, view real-time traffic situations, and receive detailed directions to your destination. They also provide search tools where you can locate places of interest or an address on a vector or aerial map, or view locations in street level. Press and tap > Maps or Navigation to begin using the services.
•YouTube – View and share videos on one of the Web’s most popular video sites. Press and tap > YouTube to browse through and view available videos. Sign in with your Gmail account to upload your own videos.
Google™ Mobile Services

26 visit sprint.com/support for complete user guide 27
If you didn’t set up your favorite social media applications using the setup application (see "Setup Application" on page 3), you can do it from the Accounts & sync menu.
Set Up Social Media Accounts1. Press and tap > Settings >
Accounts & sync.
2. Tap Add account, select a type (Facebook, Flickr, Twitter), and then follow the instructions to complete setup.Tip: To remove an account, from the Accounts & sync page, tap the account and then tap Remove account.
Access Your Accounts1. Press and tap > Facebook, Flickr,
or Twitter.2. Enter your required sign-in information.
3. Send status updates, share pictures, read updates, and more.
Use Friend StreamFriend Stream lets you update and access your Facebook, Twitter, and other social media accounts simultaneously.
1. Press and tap > Friend Stream.2. Sign in to at least one social media account (such
as Facebook).3. Update your status simultaneously for all accounts
you’re signed in to and view consolidated status updates, pictures, and links.
Tip: To make the most of Friend Stream, you can add the Friend Stream widget to your extended Home screen. Press and hold an available location, tap Widget > Friend Stream, and select a widget style.
Facebook, Flickr, and Twitter

26
Use
You
r Dev
ice
visit sprint.com/support for complete user guide 27
Your HTC EVO 3D lets you use the preloaded Qik application to share live videos and have live mobile video chats with compatible mobile devices.
Set Up a Qik AccountBefore using Qik on your device, you must create a Qik account and sign in on your device.
•Visit http://qik.com, click Sign Up, and follow the instructions to set up an account.
Qik Overview1. Press and tap > Qik Video.2. If prompted, sign in to your Qik account.
3. Press > Settings to set your preferences, including sharing preferences, location settings, video quality, and front or back camera.Tip: The front-facing camera is best for video chat. Also, always use the device in widescreen mode for videos.
4. Select from the main Qik options: Video Chat, Record to record videos to store directly in your Qik account, Messages to quickly send and view video messages, and My Videos to manage and share your videos.
Live Mobile Video Chat With Qik1. Press and tap > Qik Video.
2. Tap Video Chat.3. Select a contact.
•To complete a video chat, the contact must have a compatible wireless device and a Qik account.
4. Speak directly to your chat partner. Using the front-facing camera, you will see your image in one corner and the other party’s image will cover the rest of the screen.
Qik
28 visit sprint.com/support for complete user guide 29
Pair and Connect With a Bluetooth®-Capable Device1. Press > > and tap Settings > Wireless
& networks > Bluetooth settings > Scan for devices.
•If Bluetooth is not turned on, tap the Bluetooth check box to turn it on.
2. Select an available device and follow the prompts to pair the devices. You may be required to enter a passcode (often 0000) to complete pairing.
3. Once you’re paired with a device, your connection should launch. The shows your current connection status.
Share Contacts, Files, or Pictures Using Bluetooth1. Open the application containing the file you want
to share (for example, press and tap > Gallery).
2. Locate the file you want to share.•You can send pictures and videos directly from
the camera or from Gallery, Calendar events, Contacts (as vCards), music tracks, and voice recordings. Not all devices will be able to receive all file types.
3. Depending on the application, tap > Bluetooth or press and hold the file and select Share (or Send) > Bluetooth.
4. Tap the name of the device to which you’re sending the file. (If prompted, tap Yes to turn Bluetooth on.)
Bluetooth

28
Use
You
r Dev
ice
visit sprint.com/support for complete user guide 29
Connect up to eight Wi-Fi capable devices to the Internet using your EVO as a mobile hotspot.
Set Up Your Sprint Mobile Hotspot1. Press and tap > Sprint Hotspot.
2. Tap OK on the introduction screen.3. Tap the Router name (SSID) text box to enter a
new router name, or use the default router name.4. Select a Wi-Fi network security method in the
Security box. Depending on the security method selected, you may need to add a network key (password) in the Password box.
5. Tap the Sprint Mobile Hotspot check box at the top of the screen to turn on the wireless router.
Connect to the Sprint Mobile Hotspot1. Enable Wi-Fi on your device.2. Select “Wi-Fi Router” (or the new router name,
if you didn’t use the default) from the list of available networks.
3. When “Connected” appears on your device, launch your Web browser to confirm you have an Internet connection.
Sprint Mobile Hotspot

30 visit sprint.com/support for complete user guide 31
Sync Windows contacts and calendar events with those on your EVO, back up data from your device to your computer, install third-party apps, and more.
Install HTC Sync on Your Computer1. Connect the device to your computer using the
USB cable provided.2. On the Connect to PC screen on your device, tap
Disk drive, and then tap Done.3. On your computer, download HTCSync.exe from
htc.com/us/support to your computer’s desktop.4. Double-click HTCSync.exe on the desktop and
then follow the onscreen instructions.
Set Up HTC Sync1. With your device connected to your computer, tap
HTC Sync, and then tap Done.
2. Once your device finds HTC Sync, your computer will display the Connection Wizard. Click Next.
3. Enter the name you want for your device, and then click Finish.
Sync Your Device With Your Computer1. Run HTC Sync from your computer.2. The first time you synchronize the device, the
Synchronization Settings Wizard will launch and help you set up HTC Sync.•If the Synchronization Settings Wizard doesn’t
start, click Synchronize Now.3. Follow the prompts to select the computer
applications and categories to sync and when to sync data between your device and your computer.
4. Confirm the settings you have chosen and click Finish.
HTC Sync

30
Use
You
r Dev
ice
visit sprint.com/support for complete user guide 31
Live TV and video on demand. Complete episodes and clips of your favorite primetime shows and movies. Over 50 channels of news, entertainment, weather, sports, and streaming music.
Watch1. Press and tap > Sprint TV.
2. Tap a channel or category. If prompted, select Preview or select Subscribe to purchase access.
3. Tap an item to play it.
TeleNav GPS Navigator lets you see and hear turn-by-turn directions to a known address, or find nearby restaurants, stores, banks, or gas stations. Get information about traffic and alternate routes
Navigate1. Press and tap > TeleNav GPS
Navigator.
2. Follow the onscreen instructions to access, launch, and use.
Note: Before using any navigation programs, make sure your device is set to allow location detection, and then select which sources you want to use.
Press > Settings > Location > Location setting > On to allow location detection. Select Use wireless networks and/or Use GPS satellites for location sources.
Sprint TV GPS Navigation
32 visit sprint.com/support for complete user guide 33
Adding Music to Your Music FolderBefore you can listen to music with the Music application on your device, you will need to load songs into your Music folder.
1. Use the supplied USB cable to connect your device to an available USB port on your computer.
2. When you see the Connect to PC screen, tap Disk Drive and then tap Done.
3. On your computer, locate the your device’s internal storage, and open or create the Music folder.
4. Copy music files from your computer to the music folder.
5. When you are done, follow your computer’s procedures to safely remove the drive, and then disconnect the device from the USB cable.
Listening to Music1. Press and tap > Music.
2. Tap a song to begin playing.
•Use the controls at the bottom to play, pause, or skip songs.
•Tap to display the music library.
Music
32
Tool
s &
Res
ourc
es
visit sprint.com/support for complete user guide 33
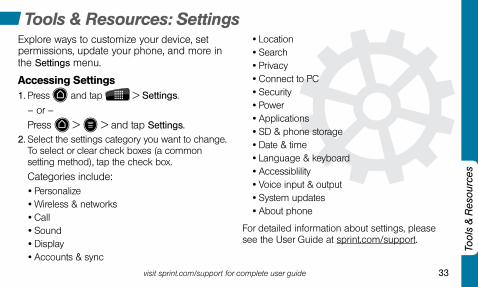
Explore ways to customize your device, set permissions, update your phone, and more in the Settings menu.
Accessing Settings1. Press and tap > Settings.
– or –Press > > and tap Settings.
2. Select the settings category you want to change. To select or clear check boxes (a common setting method), tap the check box.
Categories include:•Personalize•Wireless & networks•Call•Sound•Display•Accounts & sync
•Location•Search•Privacy•Connect to PC•Security•Power•Applications•SD & phone storage•Date & time•Language & keyboard•Accessiblility•Voice input & output•System updates•About phone
For detailed information about settings, please see the User Guide at sprint.com/support.
Tools & Resources: Settings
34 visit sprint.com/support for complete user guide 35
Manage the Display Brightness and Screen On-Time1. Press > > Settings > Display>
Brightness to modify the backlight setting as desired.
2. To turn off the screen, press the power button on top of the device ( ). The device will continue to function.— or —Add a Power Control widget to your Home screen. (See “Customize Your Home Screen” in this guide for more information about adding widgets.)
Use the Back Key to Exit Applications •When you exit applications, press the Back key
( ) instead of pressing . This ends the application instead of leaving it running in the background.
Manage Your Device’s Wireless Functions Disable the 4G, Sprint Mobile Hotspot, Wi-Fi, Bluetooth, and GPS functions of the device when you’re not using them.
•Press > > Settings > Wireless & networks and clear the 4G, Sprint Hotspot, Wi-Fi, or Bluetooth check boxes to disable any of these functions that are not in use.— or —
•Press > > Settings > Location and clear the Use GPS satellites check box to disable the GPS function.
For more useful tips about battery care and safety, see the User Guide at sprint.com/support.
Battery-Saving Tips

34
Tool
s &
Res
ourc
es
visit sprint.com/support for complete user guide 35
Online: www.sprint.com•make a payment, see your bills, enroll in
online billing•check minute usage and account balance•see or modify the details of your Sprint
service plan•get detailed instructions and download content
From Your Sprint Phone•Press to check
minute usage and account balance.
•Press to make a payment.
•Press to access a summary of your Sprint service plan or get answers to other questions.
•Press to add a new line of service, upgrade your device, purchase accessories, or access other account services.
•Press and tap > Sprint Zone to access account services, Sprint news, phone information, suggested applications, and more.
From Any Other Phone•Sprint Customer Service:
Dial 1-888-211-4727•Business Customer Service:
Dial 1-888-788-4727
Manage Your Account

36 visit sprint.com/support for complete user guide 37
Total Equipment ProtectionThe protection you need so you can be worry free
Should anything happen to your phone, you’ll have a worry-free way to ensure that you get connected again soon.
•Coverage includes:Loss, theft, routine maintenance, physical or liquid damage, mechanical or electrical problems, failure from normal wear and tear.
•For more information:See the Total Equipment Protection brochure available at any participating retail location or go to sprint.com/tep for more details. To enroll within 30 days of activation, call 1-800-584-3666.
Total Equipment Protection is a service provided by Asurion Protection Services, LLC, Continental Casualty Company’s (a CNA company) licensed agent for the customers of Sprint.
Sprint 411Dial 411 for nationwide listings, movie show times, restaurant reservations, driving directions and more. Spanish-speaking operators are available. See sprint.com for pricing and details.
Helpful Sprint Information
36
Tool
s &
Res
ourc
es
visit sprint.com/support for complete user guide 37
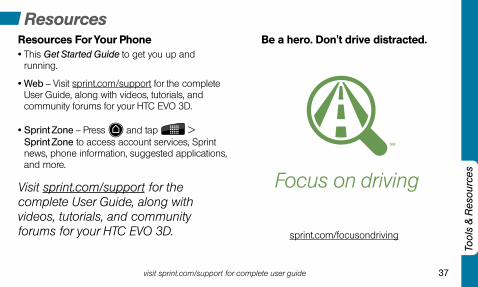
Resources For Your Phone•This Get Started Guide to get you up and
running.
•Web – Visit sprint.com/support for the complete User Guide, along with videos, tutorials, and community forums for your HTC EVO 3D.
•Sprint Zone – Press and tap > Sprint Zone to access account services, Sprint news, phone information, suggested applications, and more.
Visit sprint.com/support for the complete User Guide, along with videos, tutorials, and community forums for your HTC EVO 3D.
Be a hero. Don't drive distracted.
sprint.com/focusondriving
Resources

38 visit sprint.com/support for complete user guide 39
Symbols4G 23
AAndroid Market 24Answering a Phone Call 13Apps 24
BBattery
Charge 1Install 1
Bluetooth 28Buttons 9
CCamera
Front-facing 20Settings 20
DDrag 5
EEmail
Gmail 18Microsoft Exchange
ActiveSync 18POP3/IMAP 18
FFacebook 26Flick 4Flickr 26Friend Stream 26Front-facing Camera 20
GGames 24Gestures 4–5Gmail 18Google Maps 25Google Navigation 25
Google Talk 25Google Voice 25GPS Navigation 31
HHome Screen 6
Add Items 7Customize 7Extended 6
HTC Mobile Guide 37HTC Sync 30
IInternet 22
KKeyboard 10
Settings 11Keys 9
Index
38
Inde
x
visit sprint.com/support for complete user guide 39
MMaking a Phone Call 13Maps 25microSD Card 32Microsoft Exchange ActiveSync
18Mobile Guide 37Multimedia Messages 16
NNavigation 25, 31
PPhone Call
Answering 13Making 13
Picture Messages 16Pictures
Take 20Pinch 5Predictive Text 11Press and hold 4
QQik 27
Video Chat 27QWERTY Keyboard 10
RRotate Screen 5
SScenes 7Screen
Turn On and Off 2Unlock 1
Setup Application 3Shortcuts 7Slide 5Sprint 4G 23Sprint Customer Service 35Sprint Zone 35, 37Status Bar 8
TTap 4Text Messages 16Total Equipment Protection 36Twitter 26
UUnlock Screen 1
VVideo Chat 27Videos
Record 20Share 21
Voicemail 12
WWallpaper 7Widgets 7Wi-Fi 23
YYouTube 25
The services described in this guide may require a subscription to a service plan and/or may incur additional charges. Not all services will work on all devices. Sprint 4G coverage is not available in all markets. See www.sprint.com/coverage for more details.
Portions of this guide are reproductions of work created and shared by Google and used according to terms described in the Creative Commons 3.0 Attribution License.
Important Privacy Message. Sprint’s policies often do not apply to third-party applications. Third-party applications may access your personal information or require Sprint to disclose your customer information to the third-party application provider. To find out how a third-party application will collect, access, use, or disclose your personal information, check the application provider’s policies, which can usually be found on their website. If you aren’t comfortable with the third-party application’s policies, don’t use the application.
©2011 Sprint. SPRINT and the logo are trademarks of Sprint. Other marks are property of their respective owners.