geo 302d: age of dinosaurs dino pit.pdf · 2017-09-18 · geo 302d: age of dinosaurs lab 9: dino...
TRANSCRIPT

Geo 302D: Age of Dinosaurs LAB 9: Dino Pit
Now that you are able to identify dinosaurs in both lab and lecture, let’s go dig
some up. The major goals of this lab are to simulate the field work that paleontologists participate in and to use fossils to answer questions that paleontologists want to help answer. The Dino Pit exhibit in the Austin Science and Nature Center is an excellent facility for you to achieve these goals. At the Dino Pit, you will “discover” and uncover fossils, identify the taxa that you have found, make a brief interpretation of the environment in which each taxon lived, place the fossils in proper temporal (stratigraphic) order, and answer some general questions about a few of the fossils. Information on how to complete these tasks is given below. Read through the entire lab before you begin to maximize your time at the Dino Pit; you have a lot of work ahead of you! Below are driving directions to the Austin Science and Nature Center, as well as Capital Metro Bus Routes 30 and 470 (Note: 470 only runs on Saturday). These buses will drop off at Zilker Park, so you will have to walk to the Dino Pit from the bus stop. Directions to the Austin Nature and Science Center (see map of Zilker Park below): From MOPAC (Loop 1), take the 2244/Rollingwood exit and go east on Barton Springs Road. Take a left on Stratford Drive (immediately east of the Zilker Botanical Gardens). Follow Stratford to the parking area under the MOPAC bridge, just by the Hike and Bike Trail. The entrance is just across the road from the parking lot.
From IH-35, head west on Riverside Drive. Turn left at the intersection of Riverside Drive and Barton Springs Road. Continue on Barton Springs Road about 1.5 miles past Lamar Blvd, then turn right on Stratford Drive (immediately east of the Zilker Botanical Gardens). Follow Stratford to the parking area under the MOPAC bridge, just by the Hike and Bike Trail. The entrance is just across the road from the parking lot.
1

Dino Pit Rules: Before you can enter the Dino Pit to complete the lab, there are several of rules that you must follow: 1) No metal digging tools. These will damage the fossil casts. 2) No climbing on the surrounding hillsides and cliffs. 3) No digging in the surrounding hillsides and cliffs. 4) Leave no trash behind. Let’s keep the exhibit clean for everybody else. 5) Play nice. There are bound to be crowds of little children around, so be mindful of
what you do and what you say. 6) No food or drink allowed in the Dino Pit exhibit. 7) Once you have discovered and studied a fossil, cover it back up again. This will
not only allow your classmates and the public to experience the joy of finding the fossil themselves, but it will help to protect the fossils from the elements.
Other information:
• Be on time. Check in with one of the GEO 302D TAs in the amphitheater to the left of the Dino Pit entrance (see Dino Pit map).
• Bring money. Please bring a small donation to place in the donation box on the left when you enter the Science and Nature Center. You are welcome to donate as much as you wish.
• Dress appropriately. The Dino Pit is an outdoor exhibit, so you may get very hot or very wet. The fossil pits are well drained, and the lab will proceed at the designated times even if it is raining.
• Optional items. If you like, you can bring a small plastic shovel and whisk broom to help you work. Some tools are available at the Dino Pit, but access to them may be limited depending on the number of people at the exhibit at any particular time.
• For more information about the Dino Pit, visit their website at http://www.tmm.utexas.edu:8007/
FIELD WORK
The science of paleontology does not advance without active field work by
paleontologists. While field work is often focused on collecting specimens that represent new taxa, or taxa which are not completely known, vertebrate paleontologists also go into the field to survey the diversity and spatial distribution of fossils, as well as their stratigraphic distribution. Other goals of field work can include collecting information towards an interpretation of the surrounding rocks, and therefore the original depositional environment, in which a fossil was found, or taking samples for radiometric dating. Vertebrate paleontological fieldwork is challenging. Paleontologists must deal with permitting issues on federal land, or with the requirements of private landowners. They must lead, guide, and often train a group of field assistants, negotiate with colleagues regarding the best plan of action, mediate quarrels among their coworkers, enforce the requirements of landowners or federal agencies, cope with time constraints, supply shortages, medical emergencies, and physical exhaustion... all in scorching heat
2

miles from the nearest air conditioning, home-cooked meal, shower, hospital, or bed. Months of such work may return only a few badly weathered pieces of bone, but the paleontologist’s troubles have just started. Often there is time pressure, including deadlines for returning the hard-won specimens to the country or repository to which they rightly belong. In many cases, specimens recovered are fragmentary or are so different from anything previously found that it isn’t possible to identify them as a currently known taxon with certainty. However, all of these hardships are worth it in the end if a paleontologist is able to add even one new idea to our understanding of evolutionary relationships and changes in life through geologic time. Although we cannot expose you to the full experience of field work, we can simulate some of the conditions under which paleontologists regularly work, using Austin’s own Dino Pit. The Dino Pit is an outdoor educational exhibit at the Austin Science and Nature Center. Concrete casts of vertebrate fossils from Texas have been buried in large sand-filled pits, allowing visitors to experience the thrill of discovering and uncovering a fossil for themselves. Although this attraction is primarily intended for children, the casts are well-made and a lot of careful science went into producing the exhibit in anticipation of its use for educational purposes in a substantially higher age bracket. STRATIGRAPHIC COLUMNS
In class you have learned that fossils are crucial to our understanding of the history of life because they constitute the physical evidence for that history. However, the rock in which we find fossils contains just as much evidence, and proper field techniques can mean the difference between collecting all of the information about a specimen and collecting no information at all. A fossil recovered without any information about the rocks from which it was collected is less valuable to future studies.
Stratigraphy is the study of the relationships among layered rocks. Using the basic principles and laws you learned in class (e.g., the principle of original horizontality), geologists determine the relationships among rock units in relative time. Stratigraphers also formally name rock units, such as the Hell Creek Formation and the Lance Formation. A Formation is the basic level in a hierarchy of named rock units, much as the species is the basic unit of biological systematics.
One of the basic tools of stratigraphy is the stratigraphic column (see figure below), a stylized pictoral representation of the sequence of layered rocks in a region. A stratigraphic column is divided into rock units of convenient size (from Formations to individual beds) that are filled with a pattern to indicate the predominant type of rock (the rock type may be described in a separate column). The column is usually scaled such that the thickness of units on the column is proportional to their true thickness. Geologic time is often noted along one side of the column, and the divisions between named rock units are often included as well.
3
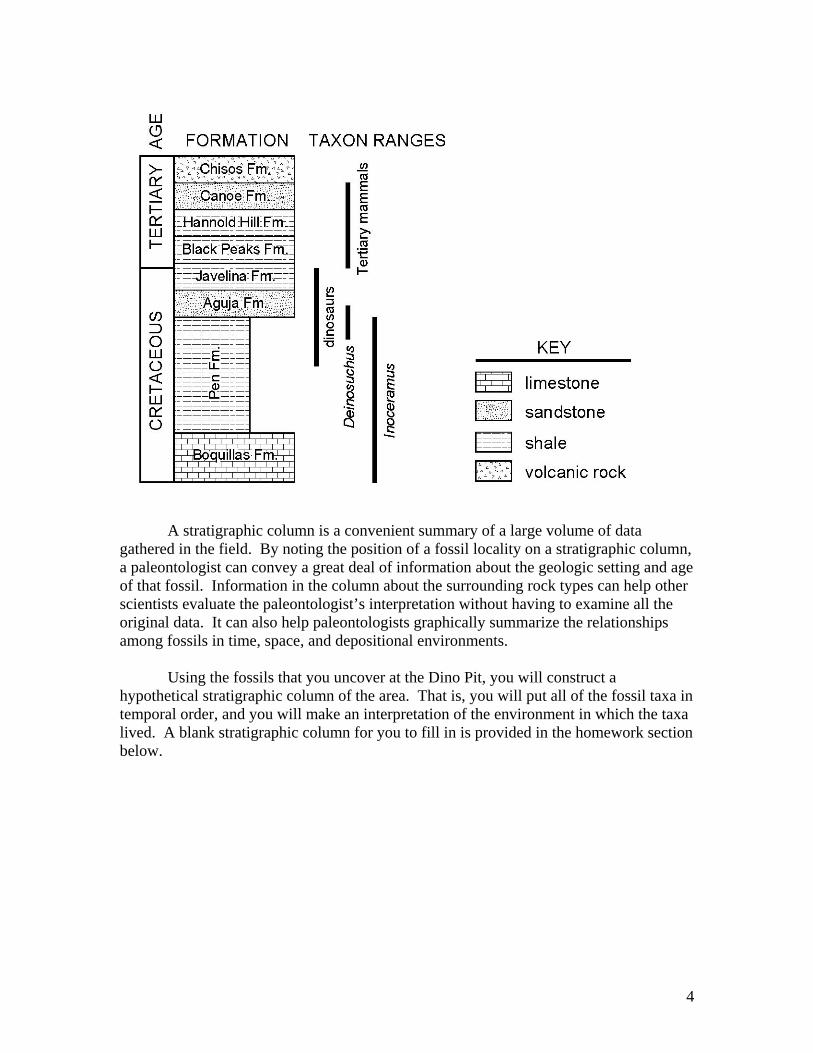
A stratigraphic column is a convenient summary of a large volume of data
gathered in the field. By noting the position of a fossil locality on a stratigraphic column, a paleontologist can convey a great deal of information about the geologic setting and age of that fossil. Information in the column about the surrounding rock types can help other scientists evaluate the paleontologist’s interpretation without having to examine all the original data. It can also help paleontologists graphically summarize the relationships among fossils in time, space, and depositional environments.
Using the fossils that you uncover at the Dino Pit, you will construct a
hypothetical stratigraphic column of the area. That is, you will put all of the fossil taxa in temporal order, and you will make an interpretation of the environment in which the taxa lived. A blank stratigraphic column for you to fill in is provided in the homework section below.
4

Homework: Due the week of 11/16/09
15 points
The Dino Pit exhibit consists of six pits filled with cement casts of fossils covered by sand as detailed on the map accompanying this lab. Each pit contains fossil taxa from specific geologic time periods. You must uncover all of the fossils, draw the exact position of the fossils on the blank maps of the pits provided below, and construct a stratigraphic column including the six pits. You may work in groups if you wish, but everybody must turn in their own assignment. The fossils you must find are: Alamosaurus sanjuanensis (in 2 separate pieces) Crateraster mccarteri Edaphosaurus pogonias Geochelone sp. Homotherium serum Mammut americanum Mammuthus sp. Mosasaurus maximus Osteopygis sp. Polyptychodon sp. Quetzalcoatlus northropi Rooneyia viejaensis Seymouria baylorensis (Note: this specimen may be absent for repair) Stantoceras solisense Tyrannosaurus rex 2 blocks of small disarticulated vertebrate bones (you do not have to identify individual
taxa in these blocks, but make sure that you locate both of them) Steps to complete:
• Locate the fossils. There will be a lot of sand for you to move to find all of the specimens listed above. What are the best ways to maximize your chances in finding all of the fossils in a short period of time?
• Uncover the fossils. Make sure that you dig out to all borders of the fossil. Some of the specimens are very large, and two people may discover different parts of the fossil and not realize that they are parts of the same individual.
• Identify the fossils. When you discover an actual fossil in the field there is no label identifying the taxon that you have found. Likewise, the fossils in the Dino Pit are not labeled, and you must identify them for yourself. There are encyclopedic plaques at the Dino Pit to help you, or you can visit the Dino Pit website (http://www.tmm.utexas.edu:8007/) which has pictures of all of the taxa listed above. Note that some of the fossils will not be complete (i.e., will be missing some parts).
• Sketch the fossil in its location on the blank figures of the pits provided. Be sure to label your sketches. The sketch does not have to be perfect, but it is important to know exactly where you found the specimen. This information will allow you to
5

make interpretations based on the fossil at home, or even relocate the fossil in case you choose to come back to the Dino Pit later.
• Rebury the fossil. Once you have identified the taxon, be sure to cover the specimen up for the next group.
• Fill in the blank stratigraphic column provided. Be sure to include the time span that each pit represents (a pit may span across the boundary between two geologic periods), and provide a general indication of the environment (e.g., Pit Z = Terrestrial).
• Answer the questions on the last page.
6

Please sketch and identify all of the fossils located in Pits O and U in the diagram below.
7

Please sketch and identify all of the fossils located in Pit E in the diagram below.
8

Please sketch and identify all of the fossils located in Pits A and Y in the diagram below.
9

Please sketch and identify all of the fossils located in Pit I in the diagram below.
10

Please complete the stratigraphic column below by indicating the temporal ranges of pits A, E, I, O, U, and Y (refer to the figure of the stratigraphic column above for help). Be sure to indicate the type of environment that each pit represents (i.e. terrestrial, marine, lacustrine, etc.).
11

Questions: 1. Identify and list the bones that are present in the specimen of Quetzalcoatlus northropi. 2. Is Edaphosaurus pogonias a dinosaur? Why or why not? 3. Examine at the skulls of Mammut and Mammuthus. How are they different? What can these differences tell us about the ecology and diet of these animals? 4. Why might there be an abundance of Cretaceous marine specimens at the Dino Pit? 5. Identify the two dinosaurs found at the Dino Pit. List one synapomorphy observable in each and which group that synapomorphy diagnoses.
12